
One hour. Two hours. Five hours. Phew, time flies when you’re looking for the ideal WordPress theme.
Once you’ve found it, it’s a relief. You can breathe a sigh of relief, but not for too long.
Because then you have to move on to the next stage: installing the theme that has won your heart.

For the most seasoned WordPress users, this is a simple formality. But when you’re doing it for the first time, it can get a bit confusing.
The purpose of this article is to show you how to install a WordPress theme step by step (whether you’re setting it up for the first time or changing your theme).
At the end of the day, this little technical trick will hold no secrets for you. Let’s get moving!
This tutorial is not intended for WordPress.com users, but only for users of the self-hosted version (WordPress.org).
Overview

What makes a good WordPress theme?
To begin with, let’s briefly review what a WordPress theme is. It governs the design of your site, as well as its layout.
As the WordPress documentation indicates, “Changing your theme changes how your site looks on the front-end” (the interface of your site visible to your visitors).
Basically, if you put a site online, you want it to be visited by as many people as possible (readers, prospective clients, fans, etc.), whatever its purpose.
The aim of your theme is to appeal to your visitors, to encourage them to browse your pages… and to make them want to come back to you. 😉
That’s why it’s crucial to choose your WordPress theme carefully. To help you, here are a few key points to consider before choosing your next theme.
As far as possible, it should be:
- Easy to use, so you don’t have to waste a lot of time tearing your hair out over it.
- Flexible, with basic options and opportunities for customization.
- Frequently updated, in order to take advantage of new features as they become available and ensure that any security flaws are quickly corrected as soon as they are detected.
- Responsive, to adapt to all screens (desktop, smartphone, or tablet). To find out if your theme is responsive, you can run it through Google’s Mobile Optimization Test, for example.
- Well-coded, respecting WordPress standards and the SEO guidelines set by search engines like Google.
- Highly rated, with positive user reviews, which is often a good indicator of the quality of a theme.
- Lightweight, so that your pages load as quickly as possible to optimize your visitors’ user experience.
- Compatible with the most popular plugins, especially WooCommerce if you plan to set up an online shop later on.
Obviously, the list is far from exhaustive, but it gives you an initial idea of the points to watch out for.
The official WordPress plugin directory has 59,524 options, so you’ve got plenty to browse through.
If I had to pull out a few themes that meet the characteristics listed above, I’d mention the following:
These are a good starting point, but be thoughtful in your choice. Just because they’re solid and well designed doesn’t mean they’ll work for you! In the end, the important thing is to choose a theme that suits your needs.
To find out more about this, head to our page dedicated to WordPress themes. There you’ll find the best free WordPress themes, some must-have premium themes, and also a guide to choosing the best WordPress theme for your project.
5 things to do before changing your WordPress theme
If you’re installing WordPress for the first time, you can skip ahead to the next point. This only applies to people who want to change their WordPress theme.
There are a few precautions to take if your site already has a certain reputation. The consequences of a theme change should be minimal for visitors. The impact is not the same when you install your first theme, as your site is unlikely to receive significant traffic.
Make a backup
We can’t stress this enough: having a backup system is IMPERATIVE for any site. A problem can happen at any time, and backing up your site is worth its weight in gold.
Whether you change your theme or not, install a backup system for your WordPress files and database. This is vital.
There are various options for doing this:
- Use a backup plugin like UpdraftPlus. Its free version is very efficient and allows you to schedule your backups and send them to a remote storage space such as Dropbox or Google Drive. To enlighten you a little more, we present 7 backup plugins (including UpdraftPlus) in this post.
- Opt for an all-in-one tool like WP Umbrella (affiliate link). Ideal if you need to maintain several sites, WP Umbrella makes it very easy to create automated backups. What’s more, from the same dashboard you can also make all your updates at the same time (with just one click), check the availability of your site, check for PHP errors, etc.
Create a maintenance page
Even if the procedure for changing your theme isn’t very long, you’ll still need to set up the new theme.
If you haven’t tested the beast on another WordPress installation (a test server or locally with the Local tool, for example), it will take a little time to familiarize yourself with this new theme. And no matter how good you are, complications can happen.
That’s why a maintenance page won’t go amiss.
To help you set up a maintenance page, we’ve tested 10 dedicated plugins in this article.
Take note of the features of the old theme
Some themes offer features that may be lost when the new WordPress theme is activated.
For example, if your old theme takes care of everything SEO-related and the new one doesn’t offer this, you’ll have a problem. In this case, I’d recommend that you install the Yoast SEO plugin.
Even though they are used much less frequently since the advent of the WordPress content editor (Gutenberg), you should also think about shortcodes.
If you use shortcodes to enhance the content of your site, copy them into the new theme so that they still work.
Continue to inspect your old theme so that the transition is as pleasant as possible for your visitors.
Copy all the additions made to functions.php
If you’re a bit of a do-it-yourselfer, you’ve probably added a few lines of code to your functions.php file, picked up for example from TheWPClub.
I won’t go into what you can do with this file, which lets you add functions to your theme, but remember to duplicate the additions you want to keep in the functions.php file of your new theme.
Don’t forget the tracking code!
You’ve probably inserted a tracking code to collect your site’s visitor statistics (Google Analytics, Matomo, Plausible, or other). Make sure that tracking is not interrupted by changes to your theme.
If you manage this with a plugin such as MonsterInsights, you shouldn’t have any problems.
On the other hand, if you’ve integrated the tracking code manually into your theme, put a reminder on your screen to restore it as soon as possible.
It would be a shame to find out 15 days later, wouldn’t it?
Bonus: Translating your theme
If you find you need to translate your theme before using it, there are several ways to go about it:
- Using Poedit, which requires you to handle translation files.
- Using Loco Translate, where the translation process is done directly in WordPress, which is more comfortable.
At last, I think you’re ready to proceed with the installation.

How to install a WordPress theme
Foreword: The case of a theme from Themeforest
If you have a premium theme purchased from a specialist theme shop or a platform such as Themeforest, you must have your WordPress theme in .zip format in order to install or change it for the first time.
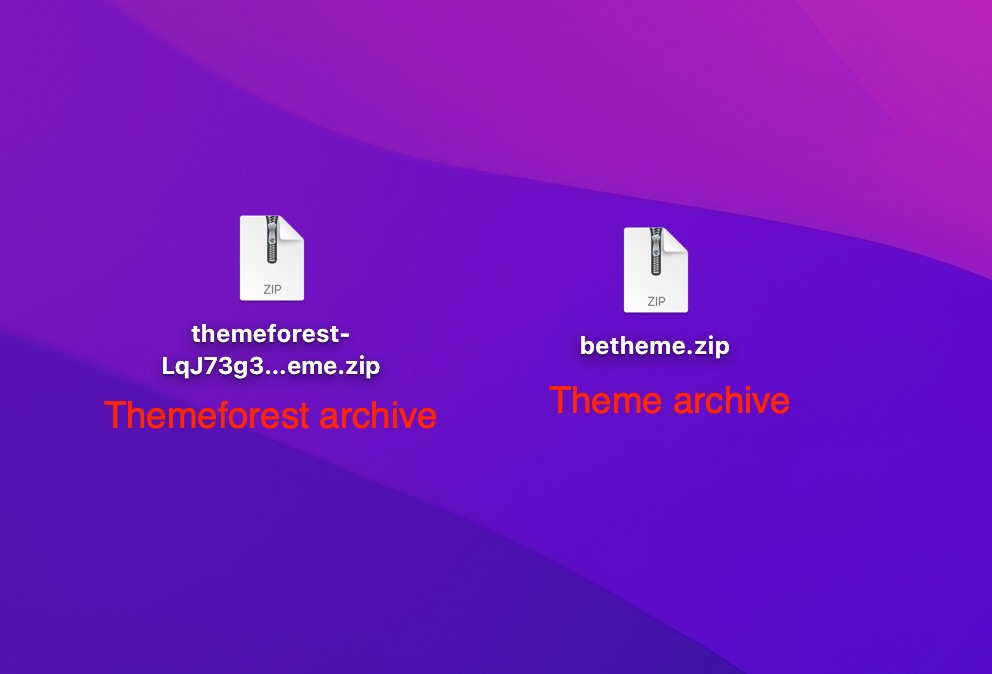
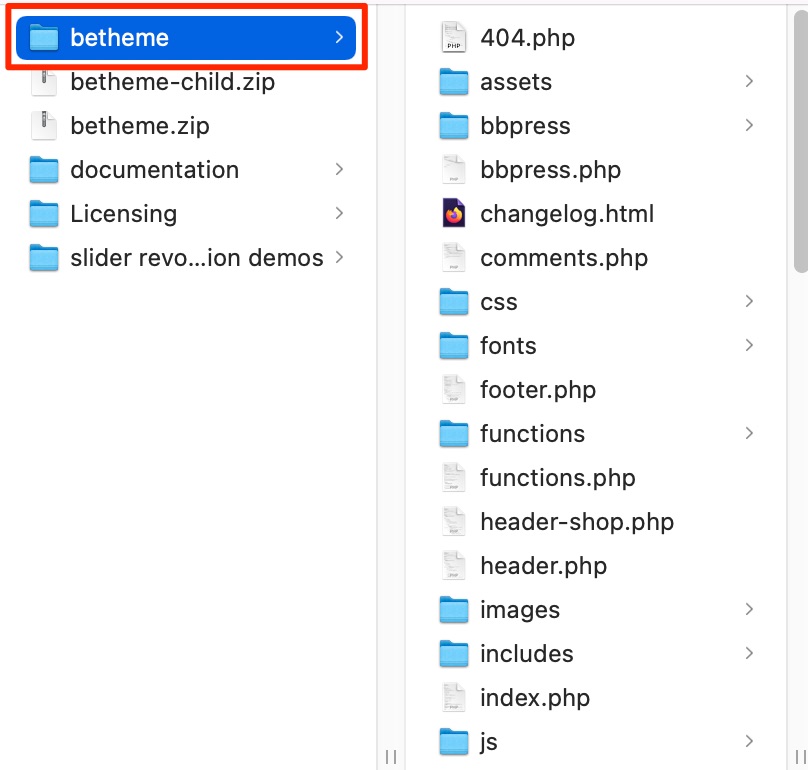
Warning: In the case of Themeforest, the .zip file you downloaded may not be the file containing your theme. In fact, the archive (I’m talking about the .zip file) generally contains the documentation, the PSD files, the licence terms, AND the archive containing the theme.
So if your WordPress theme comes from Themeforest, you need to unzip the downloaded archive to keep only the theme archive.
Rather than give you a convoluted explanation, here’s an image to illustrate my point:
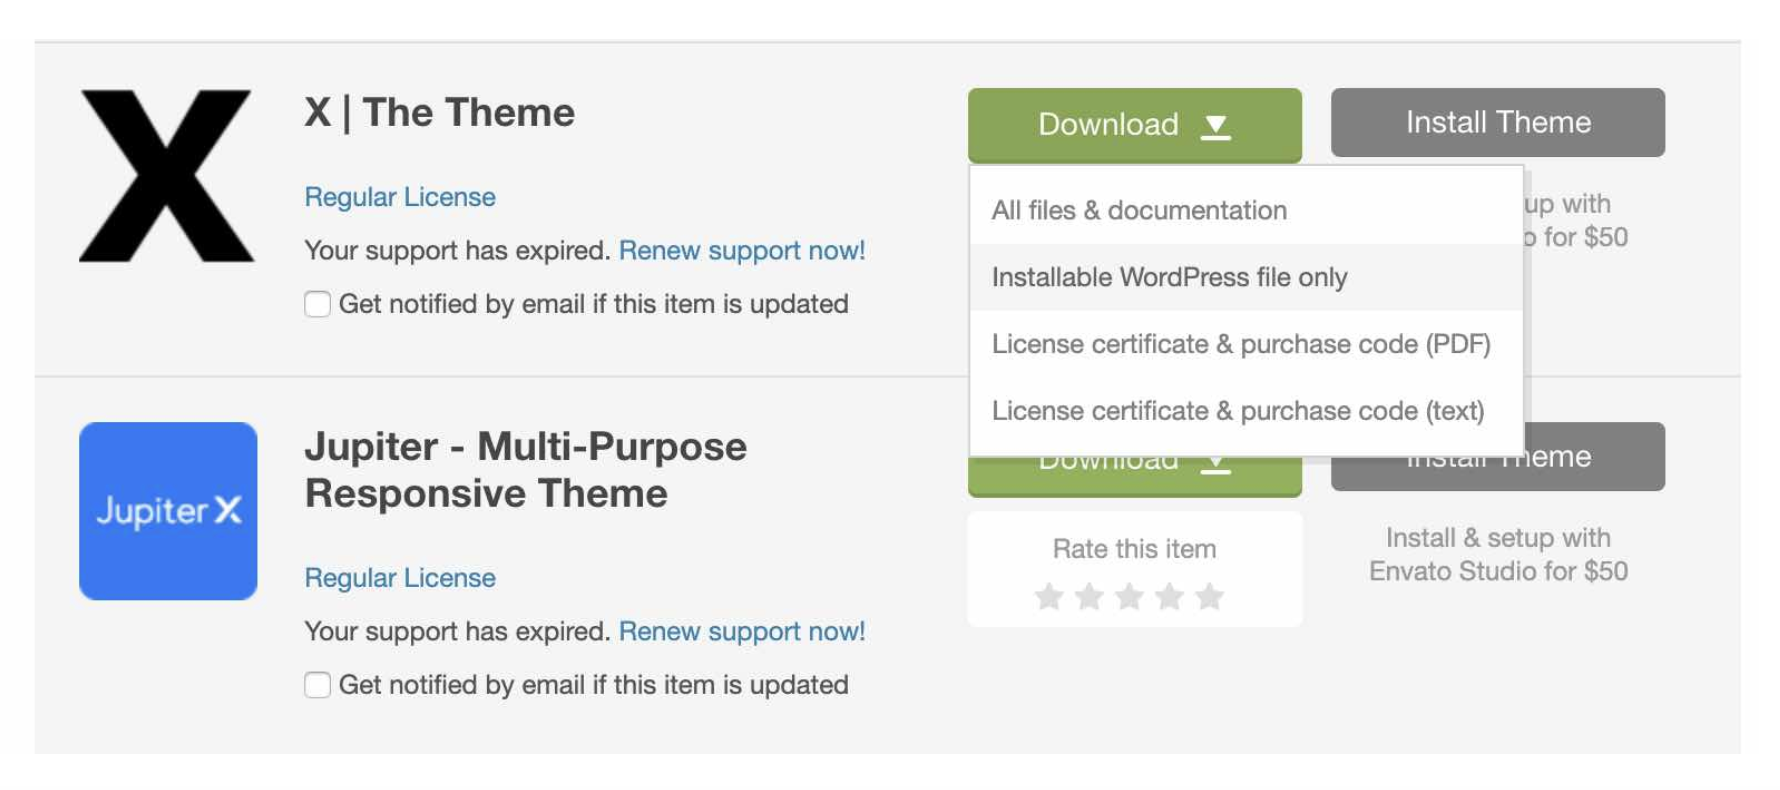
You can now download the theme archive directly from Themeforest by clicking on “Download” and then “Installable WordPress file only” on the download page.
Now that you have your theme archive, you have two options:
- Upload your theme via WordPress.
- Using FTP software: This is software that allows you to communicate with your server (e.g. FileZilla, Cyberduck, or Transmit).
Let’s explore these two methods individually.
How to install a theme via the WordPress administration
This is the easiest way to install your WordPress theme. I’ll illustrate all the steps with pictures, so follow the guide below.
Method 1: Installing a WordPress theme via a zip file
If you want to install a premium theme, you’ll need to upload its zip file to your WordPress installation.
In the example below, I’ll show you how to install a Themeforest theme on WordPress (the theme I’m using here is called BeTheme, for the record).
To do this, follow these 5 steps:
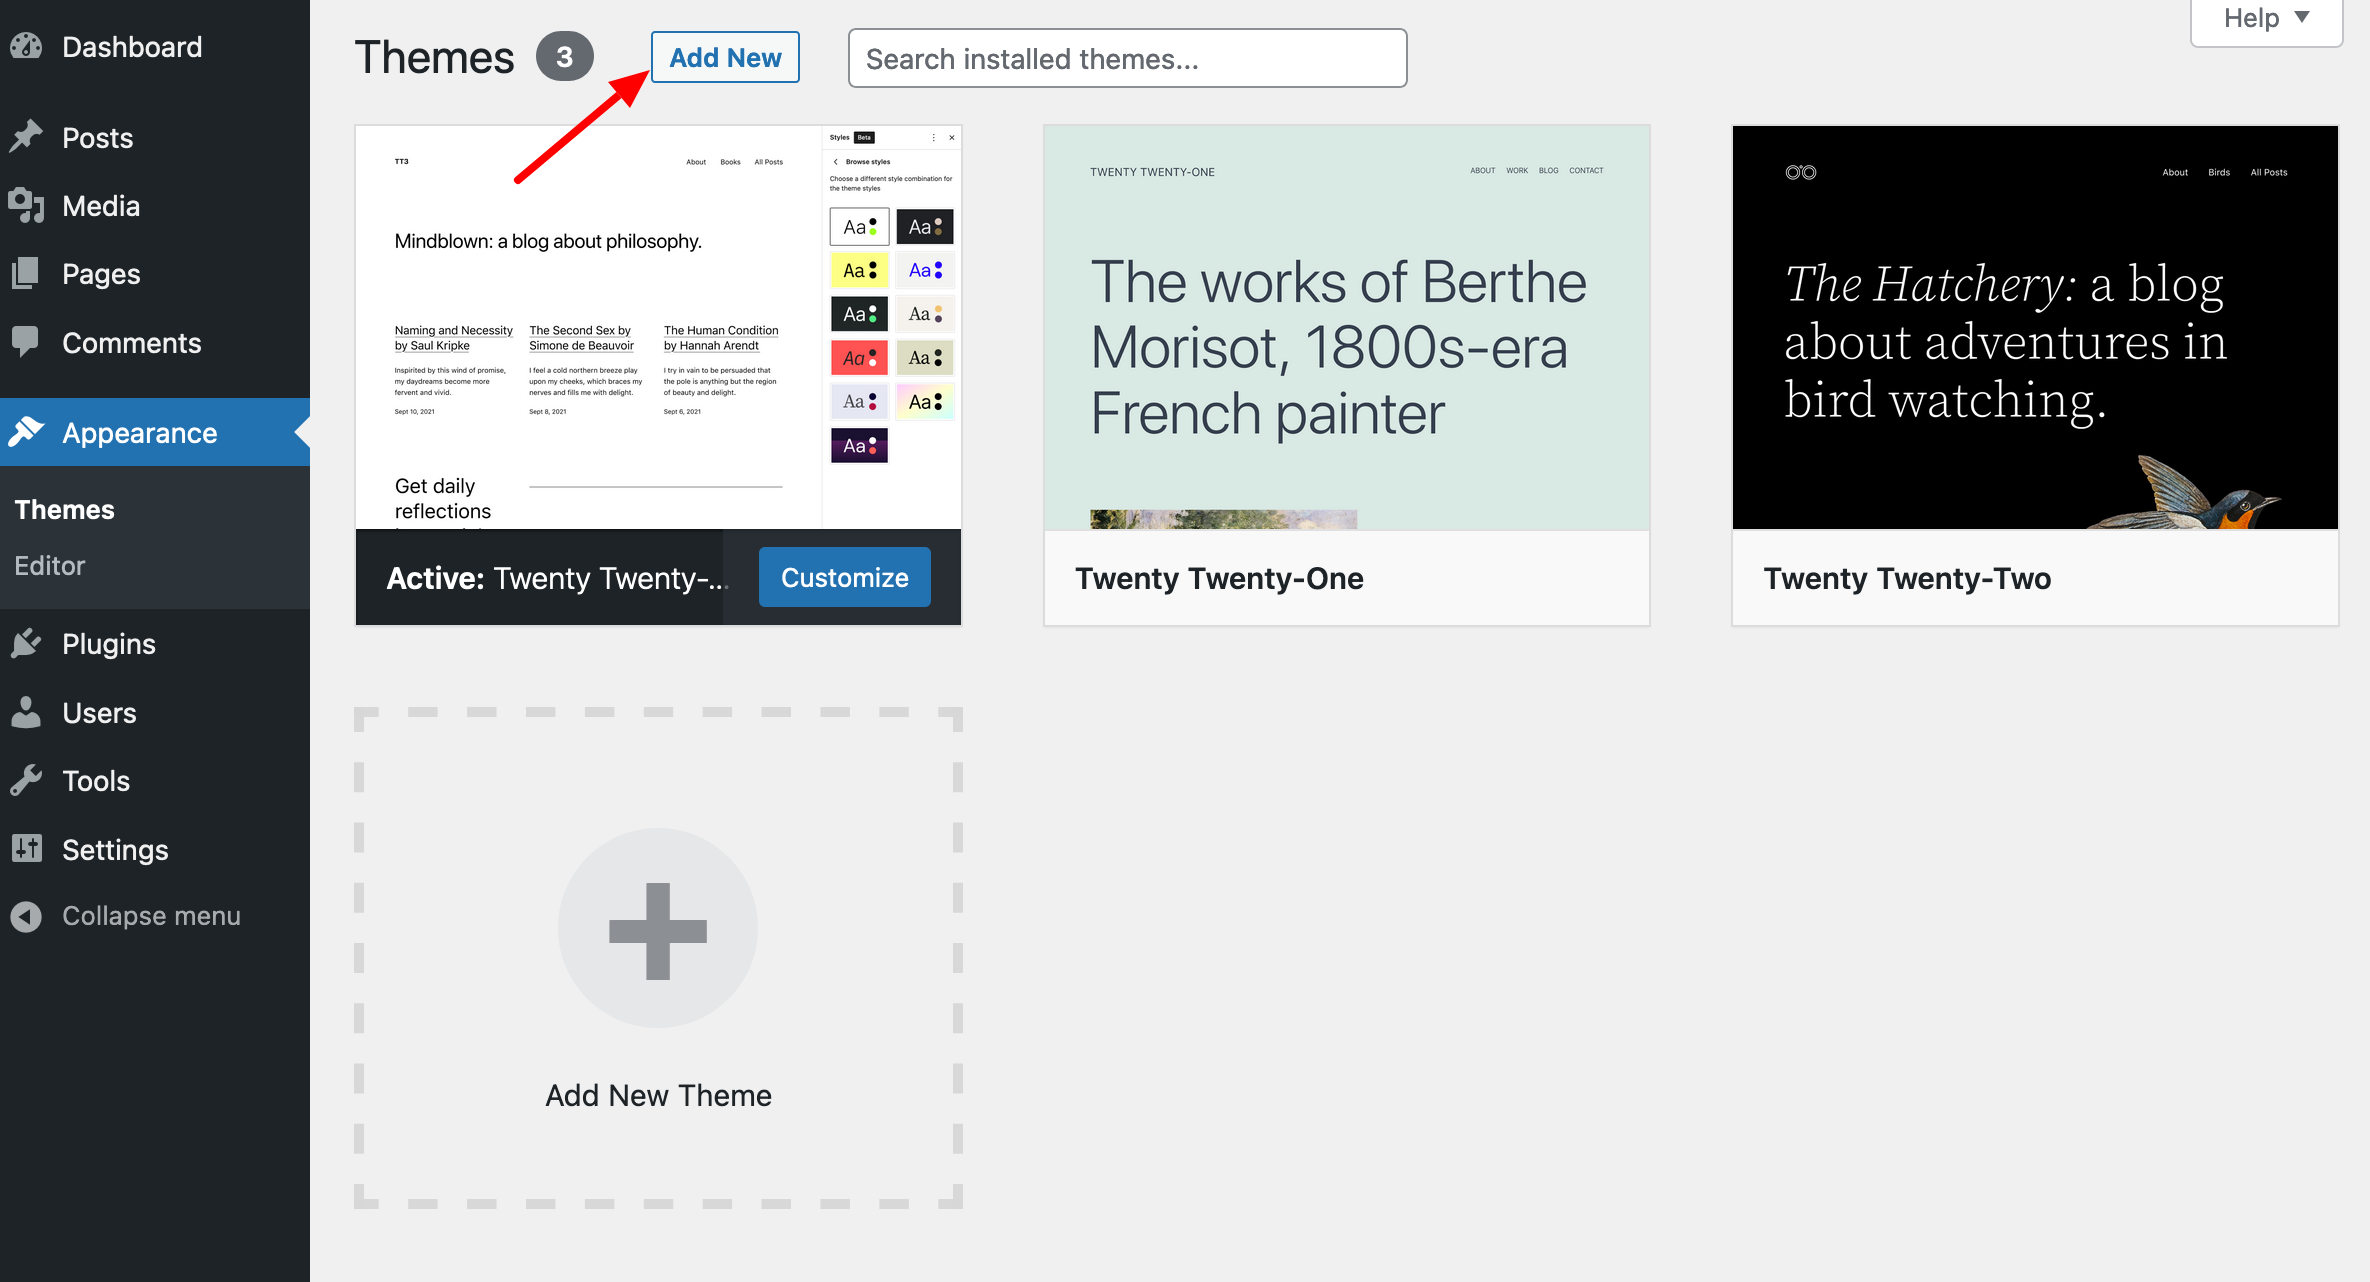
1. On your WordPress admin interface, go to Appearance > Themes.

2. Click on the “Add New” button.
3. Click on the “Upload Theme” button.
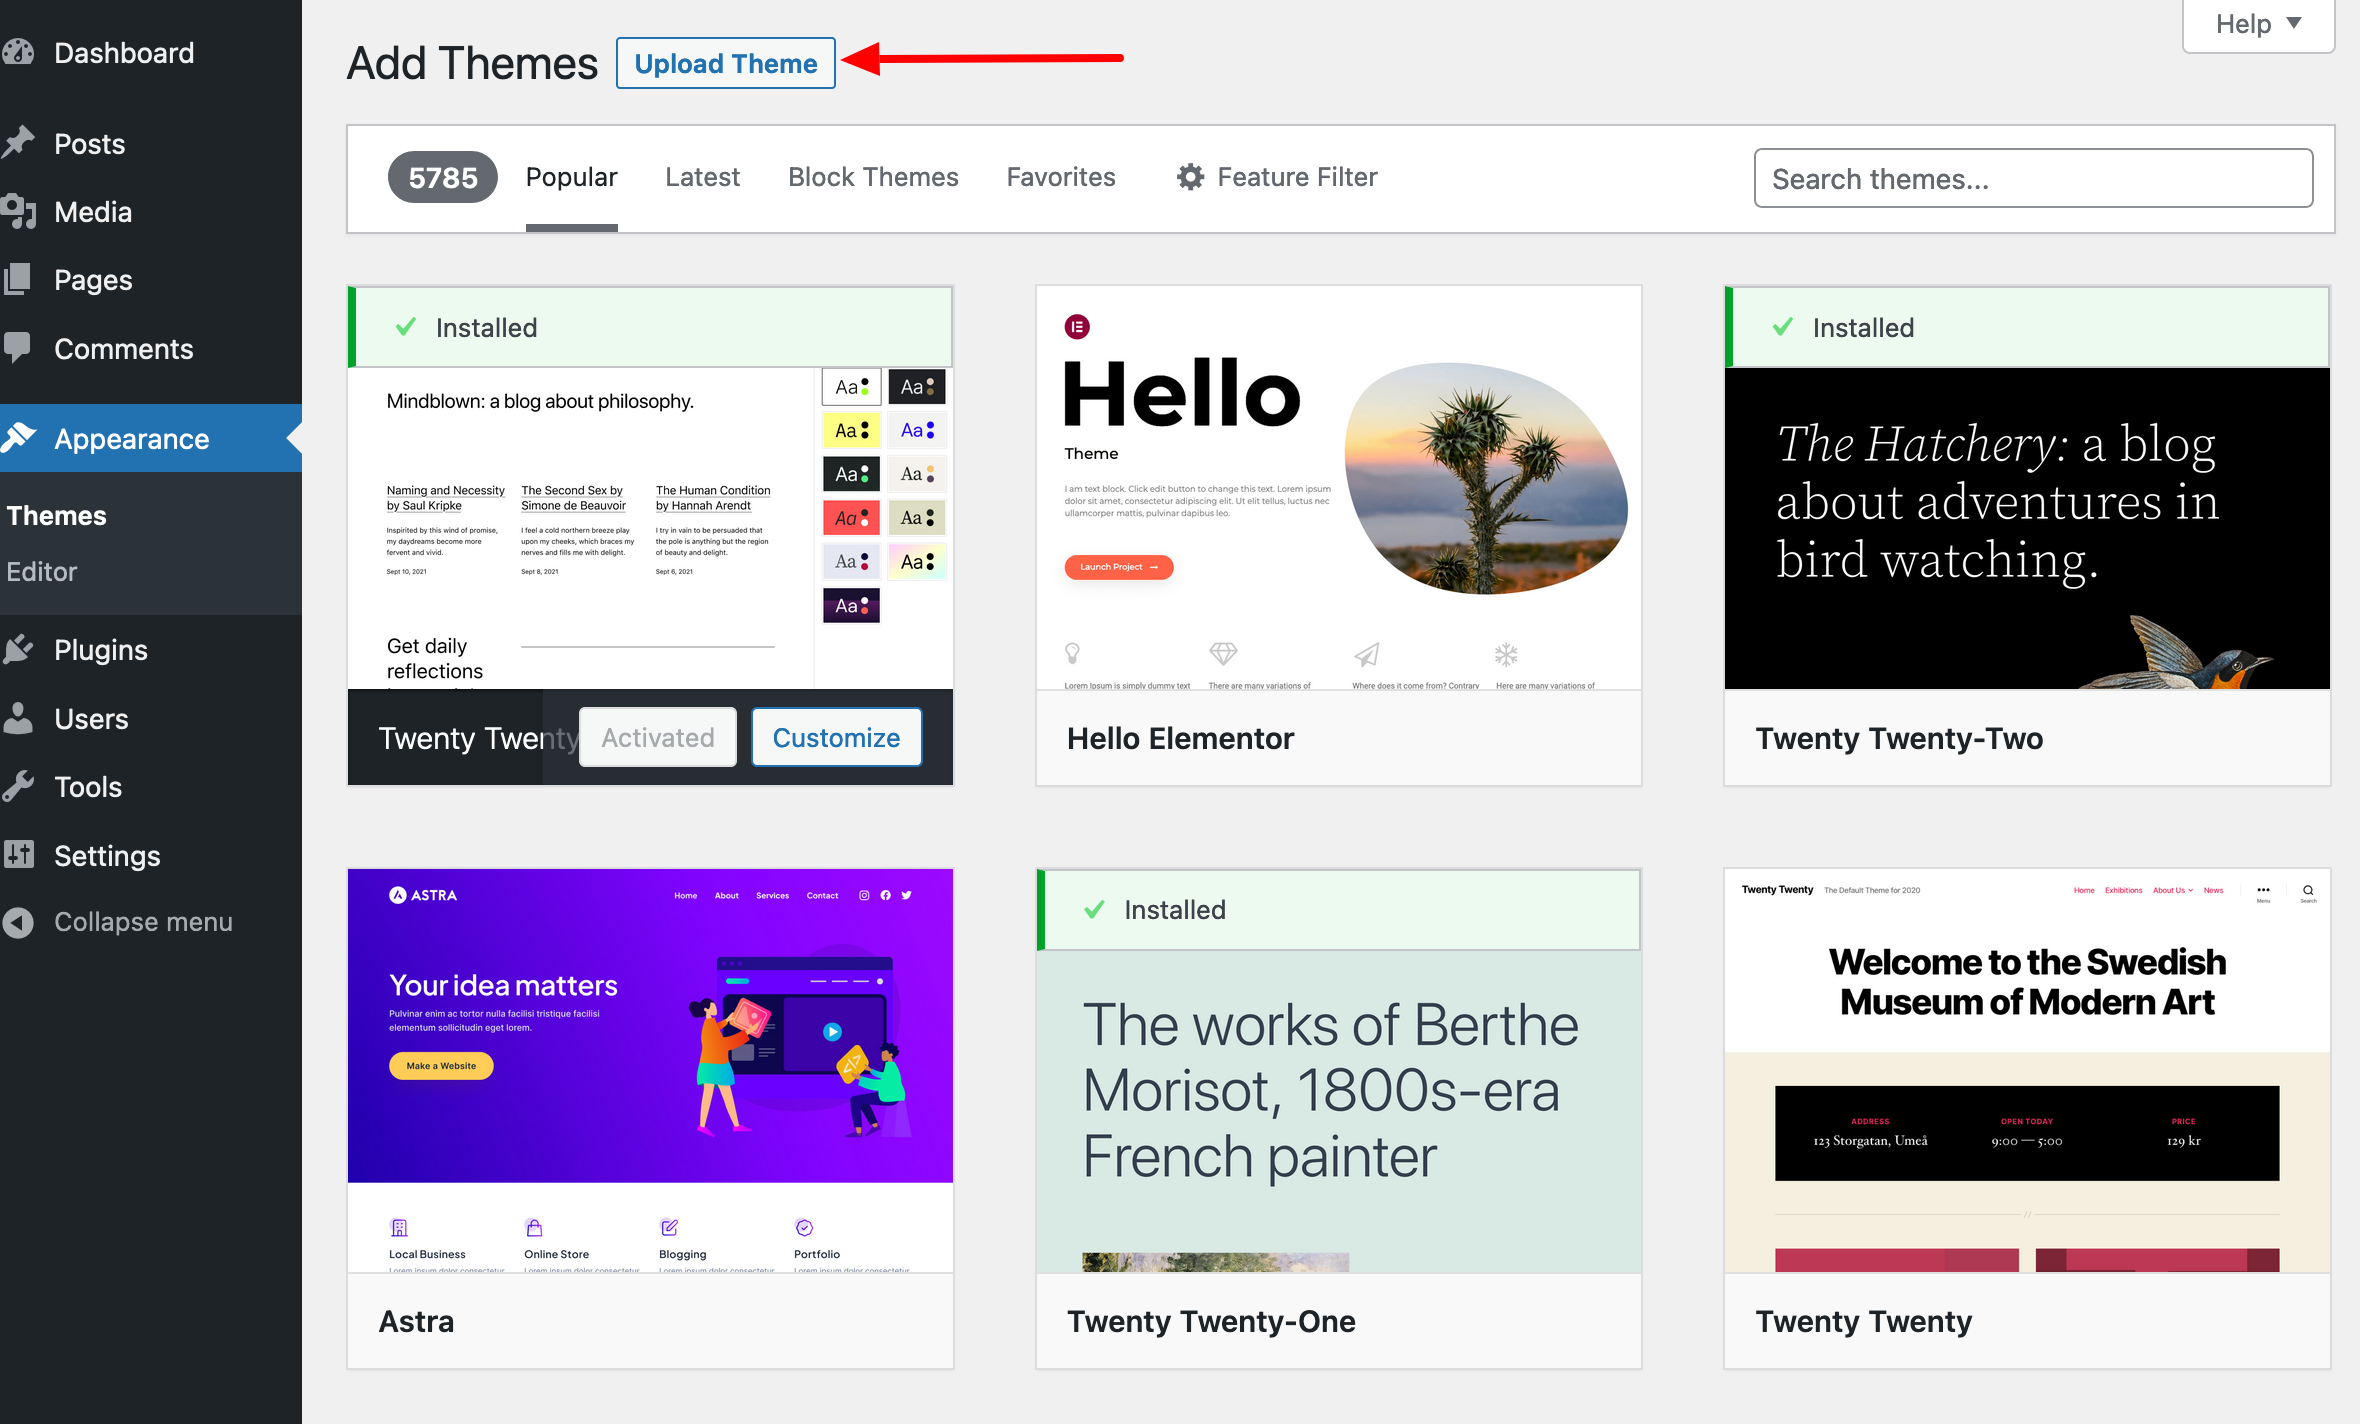
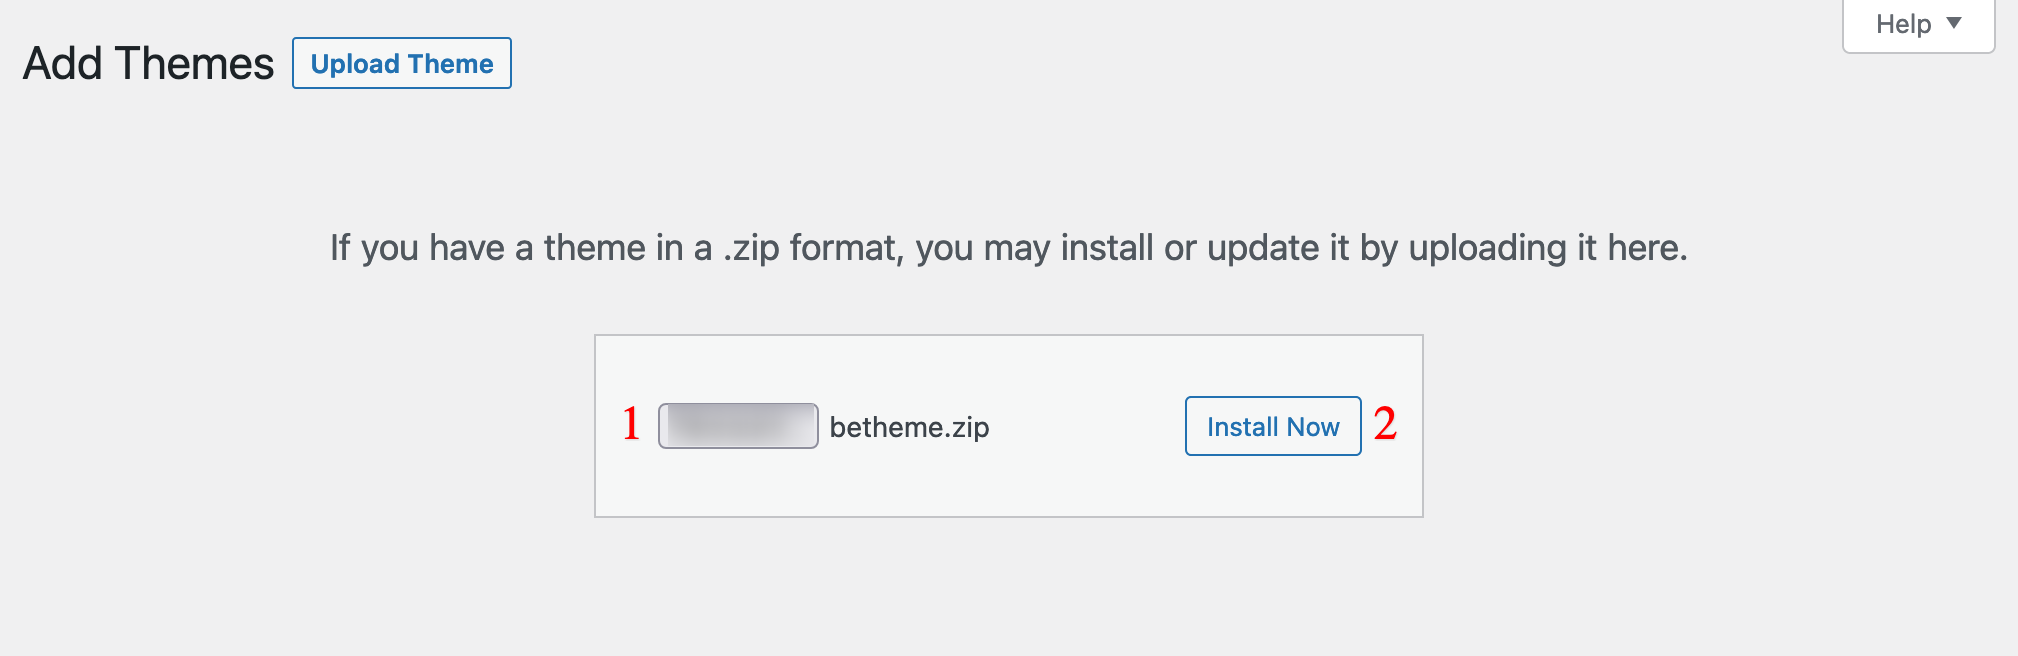
4. Click on the “Browse” button to download the zip file for your theme.
Remember to click on the “Install now” button once you have selected your theme:
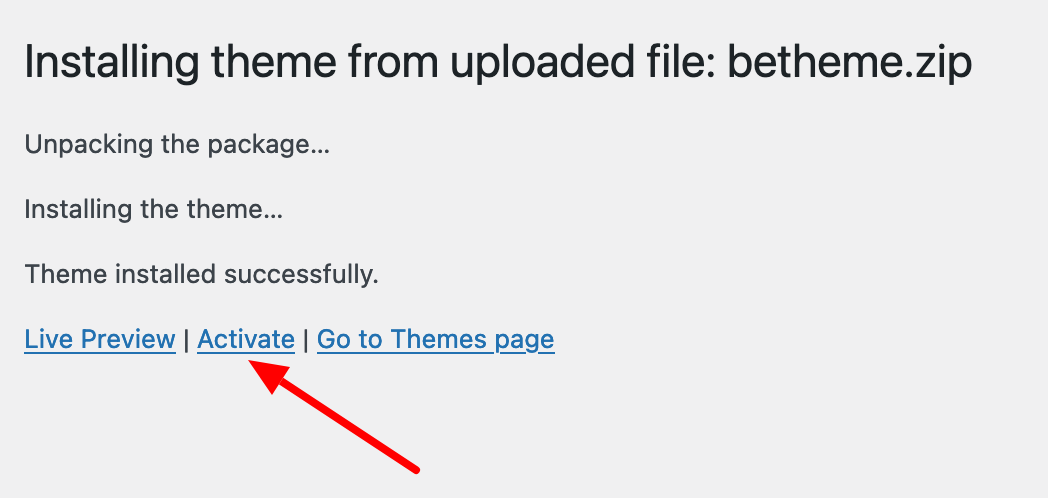
5. Activate the theme (or not).
Finally, should you activate your theme at this stage? It all depends. If your site is new and you don’t mind it being visited, go ahead. To do this, click on the “Activate” link provided by WordPress:
On the other hand, if you have a site that is visited regularly or you want to keep it private, don’t activate your theme yet!
Seriously, don’t do it just yet.
I know you’re impatient, but remember that among the 5 things to do before changing your theme, I recommended creating a maintenance page. Well, you can set that up now.
That way, people visiting your site will see a clean page telling them what’s going on, instead of coming across an unconfigured theme.
The aim is to keep disruption to a minimum.
Once maintenance mode is activated, you can activate your theme. This time, activate it in Appearance > Themes.
Take a look at your site in private browsing mode to check that everything is working as expected.
If there’s a problem, what can you do?
Congratulations, your theme is installed. However, in some cases you may encounter a problem.
First of all, some of you may see a message like: “The archive could not be installed. This theme is missing the style.css file.”
If this is the case, please reread what I wrote above about Themeforest. Other shops may have the same issue.
Secondly, sometimes the theme archive is too large to be uploaded directly in WordPress.
You have two solutions:
- Either you increase the size of the files that WordPress can accept by following this tutorial.
- Or, you can upload your theme via FTP by following the rest of this tutorial.
If you haven’t had any problems, you can proceed.
Method 2: Install a WordPress theme from the official directory
From the WordPress administration interface, it’s also possible to add a theme from the official WordPress directory, of course, without leaving your dashboard.
The procedure is quite similar to the one you have just learned. There are, however, a few minor differences, so I’ll explain those to you now with a few screenshots.
On your side, follow the four steps below. As you’ll see, I’m going to show you how to install the Astra theme on WordPress.
1. Connect to WordPress and go to the Appearance > Themes menu.
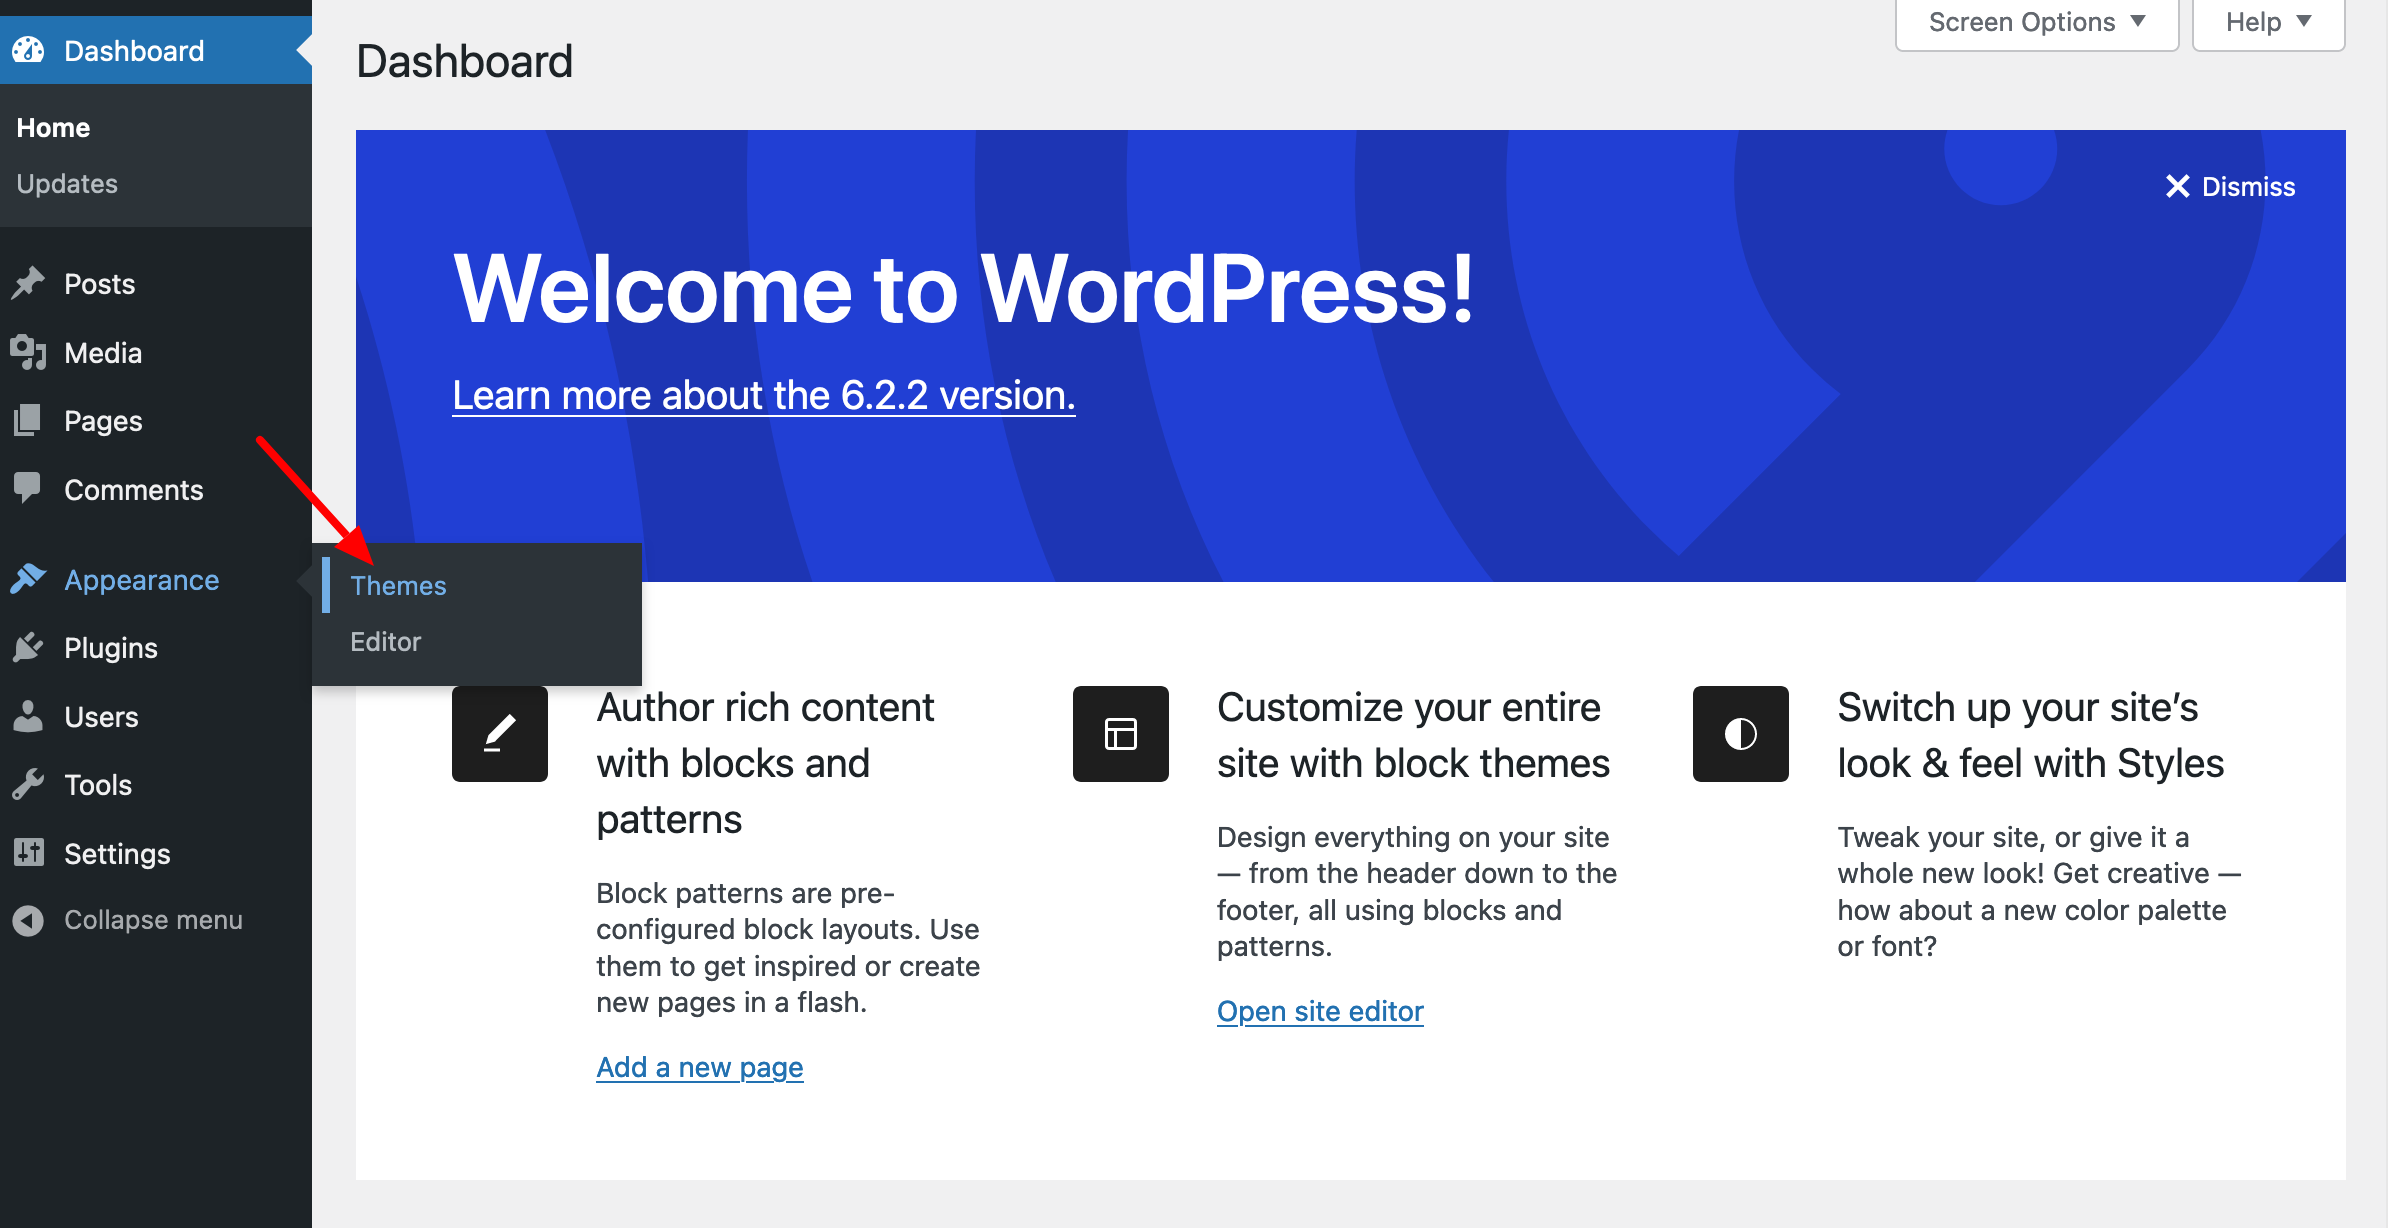
2. Click on the “Add New” button.

3. Choose the theme of your choice.
By default, WordPress displays a list of the most popular themes. To help you in your search, you have various options:
- Either use the themes listed in the tabs: “Popular,” “Latest,” “Block-based themes,” and “Favorites”.
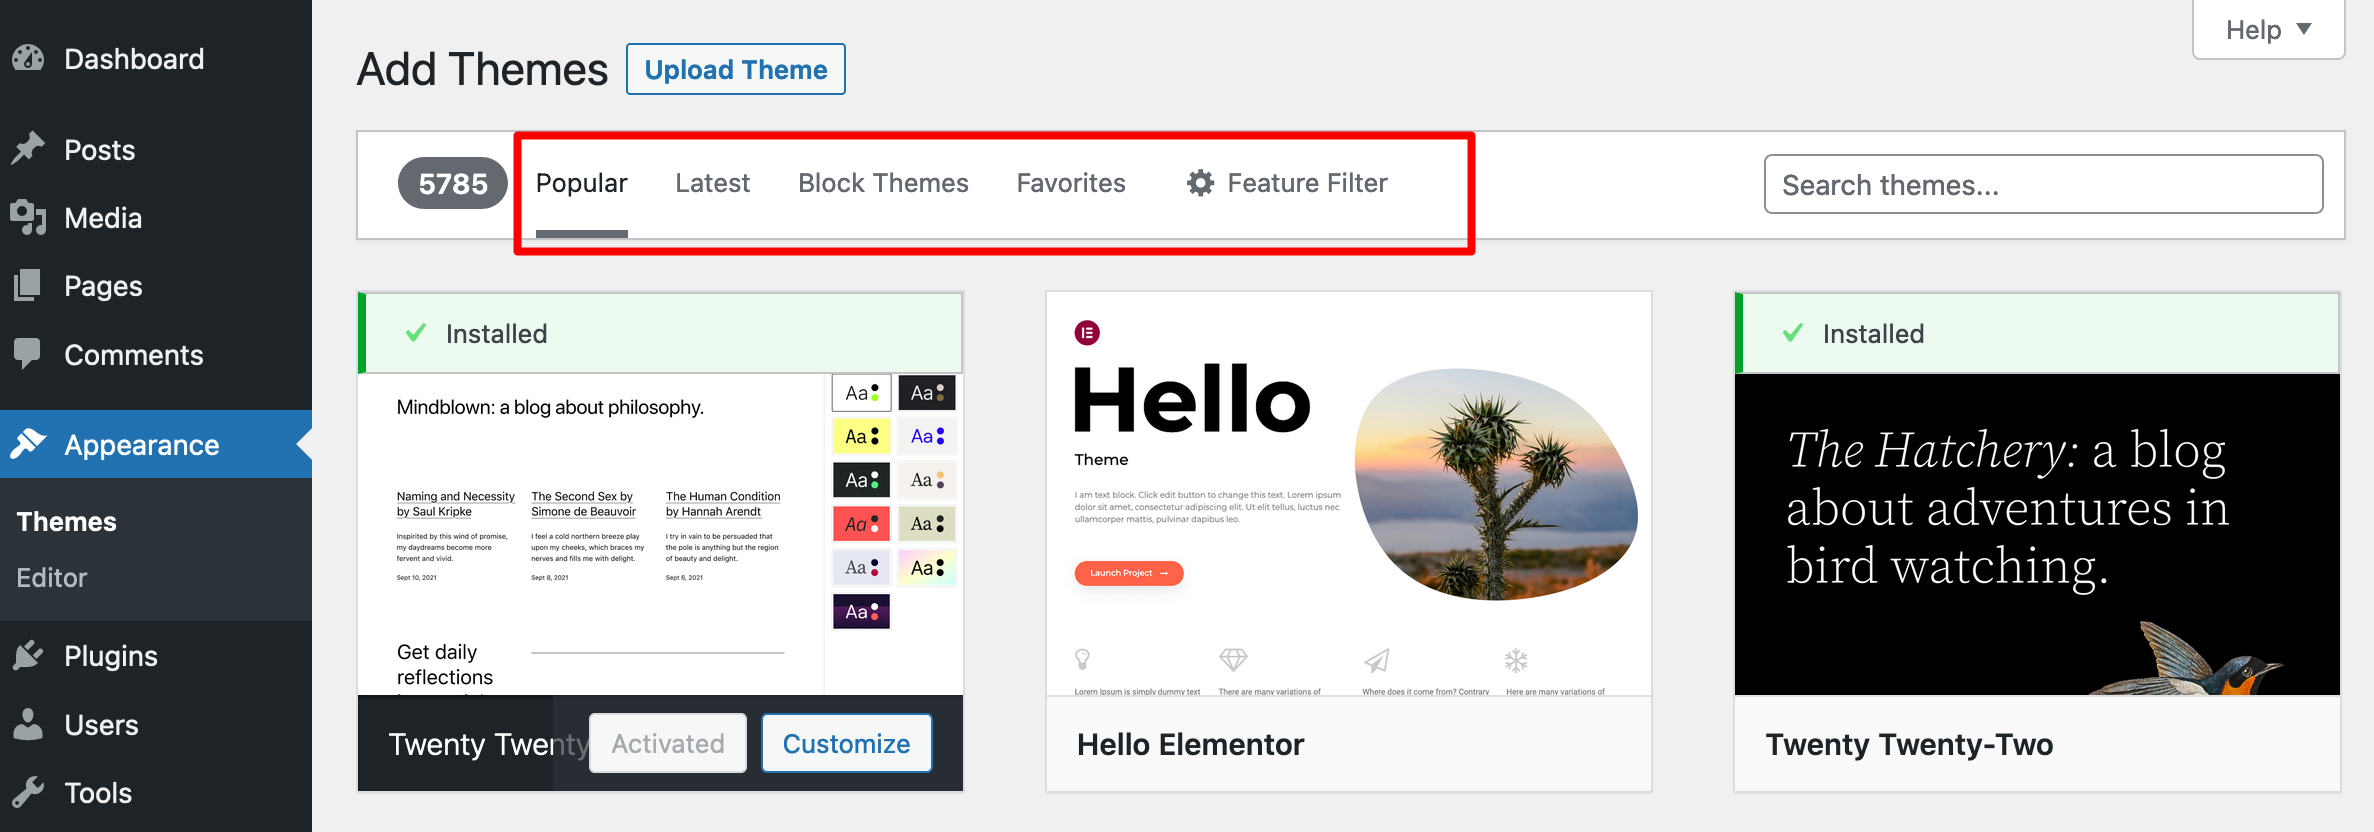
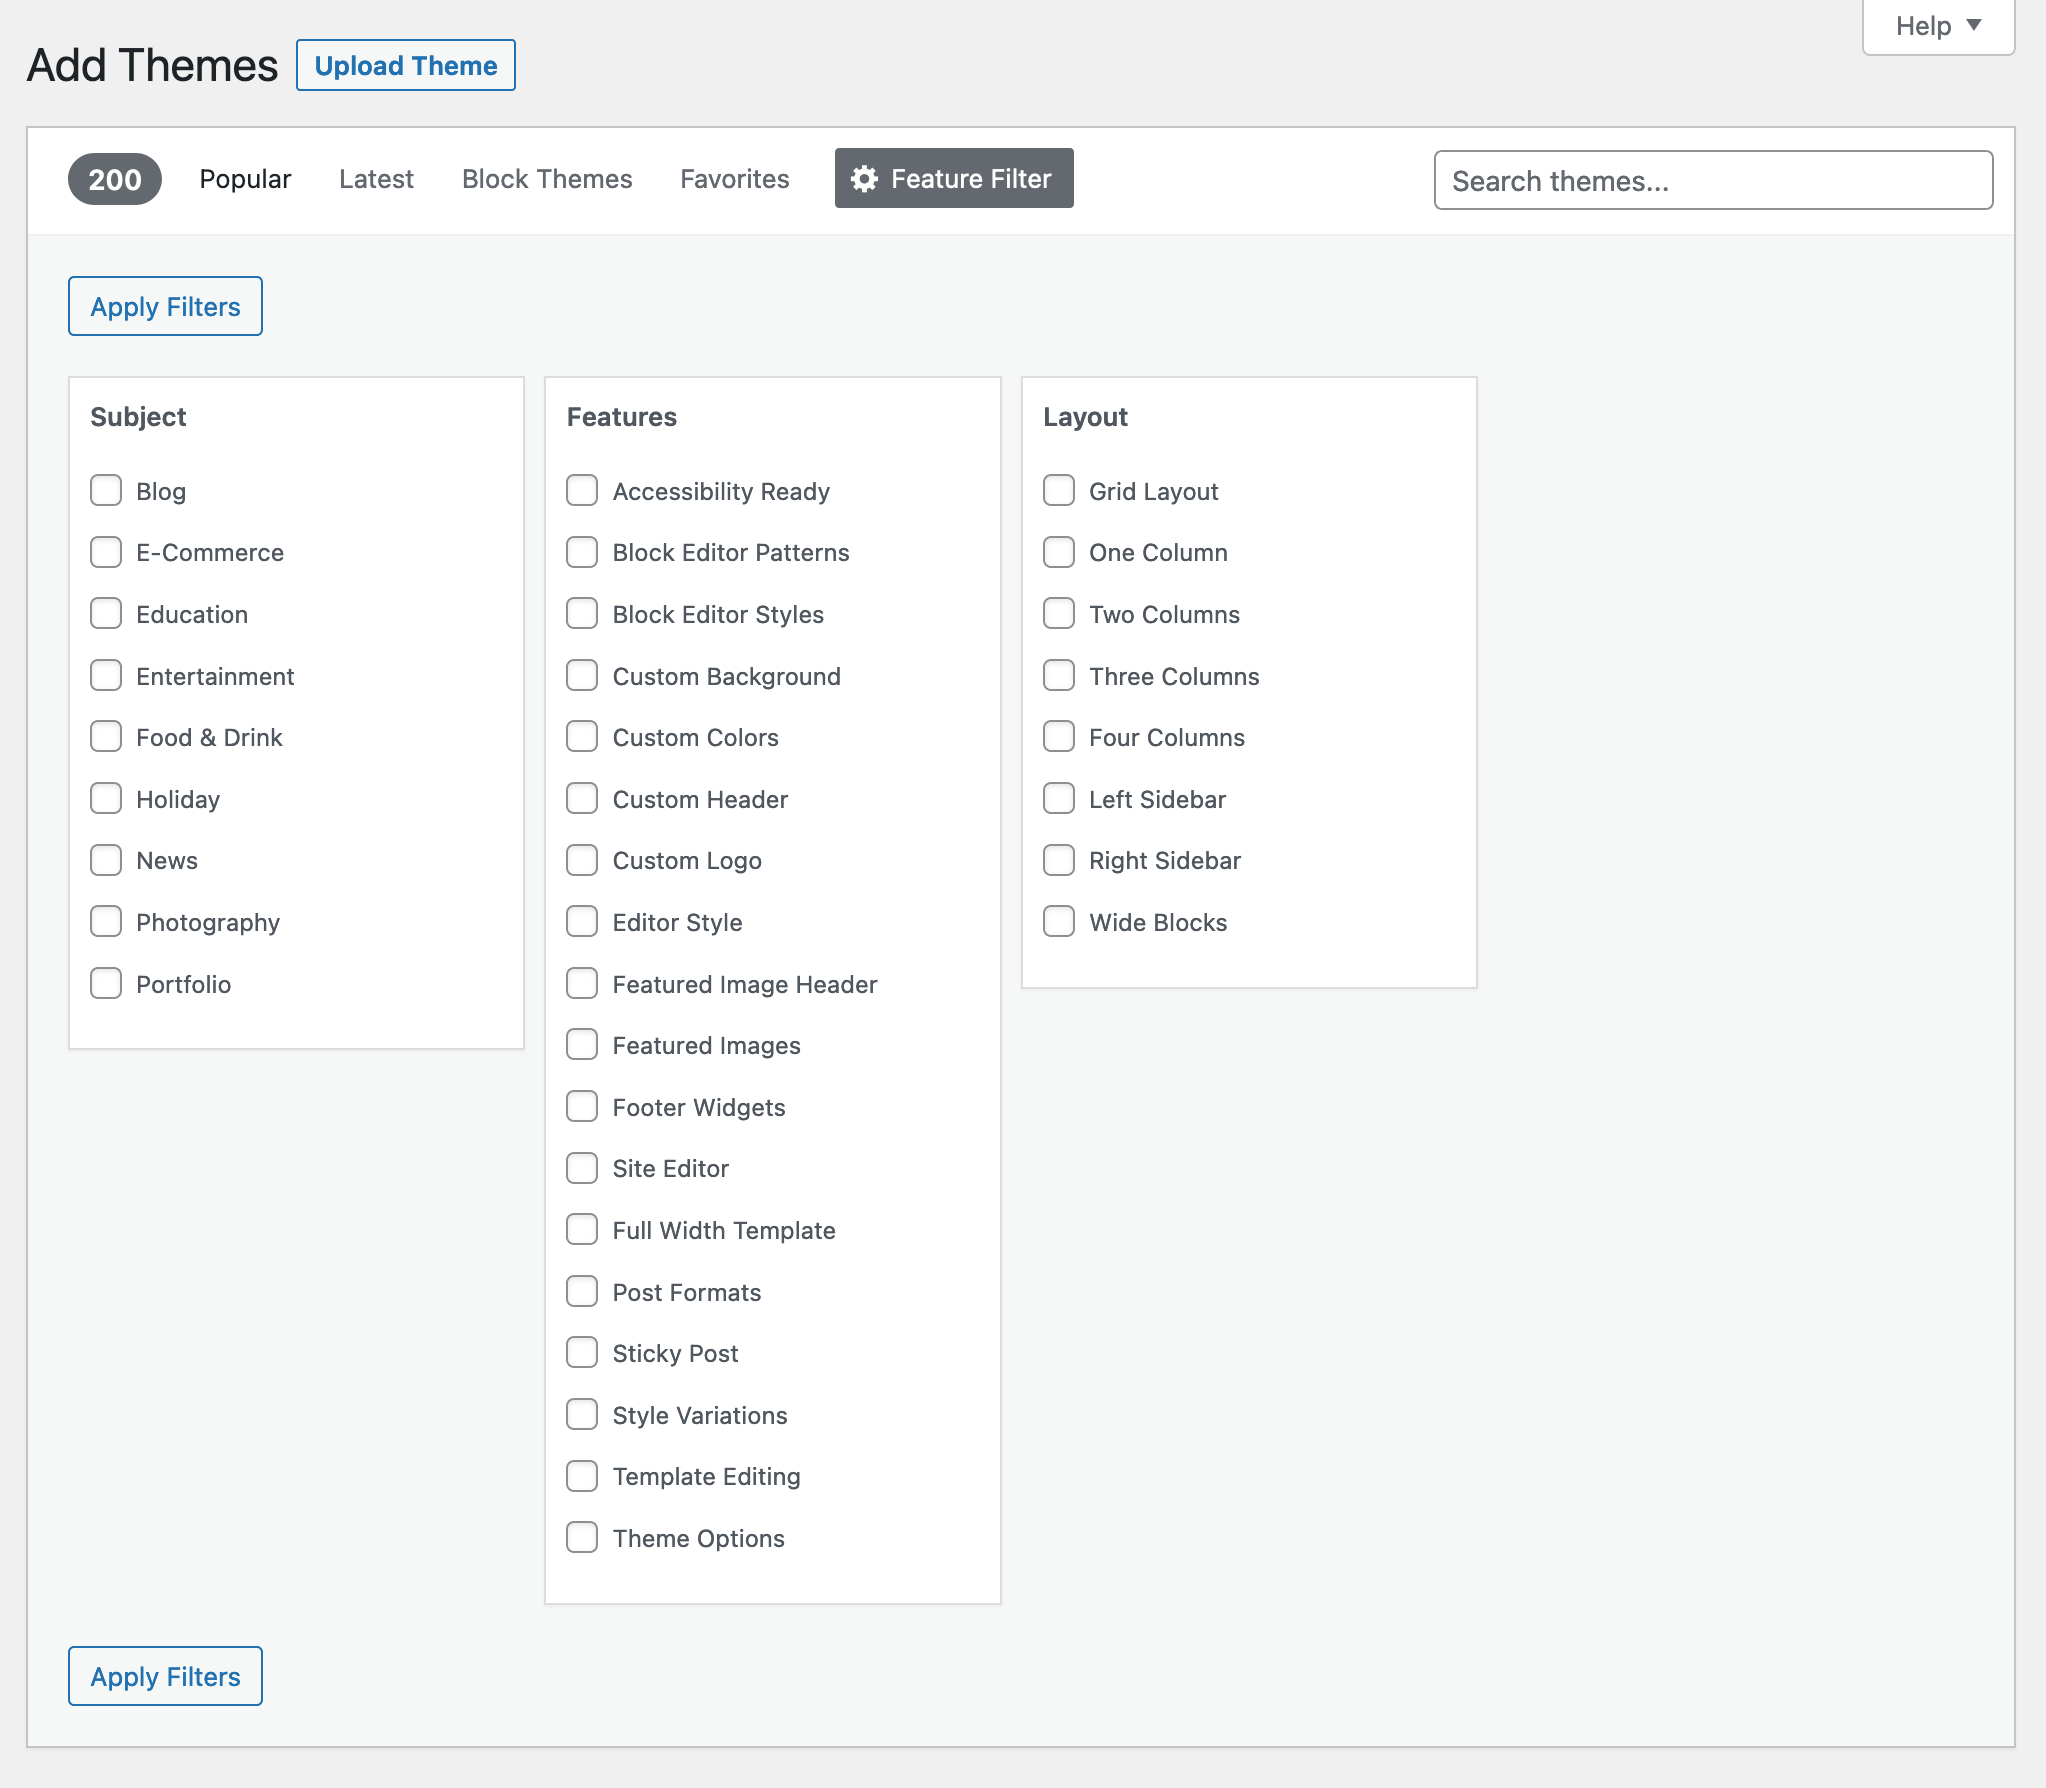
- Or search by category using the features filter provided by WordPress:
- Or use the search bar to find the theme of your choice, if you’ve already chosen it.

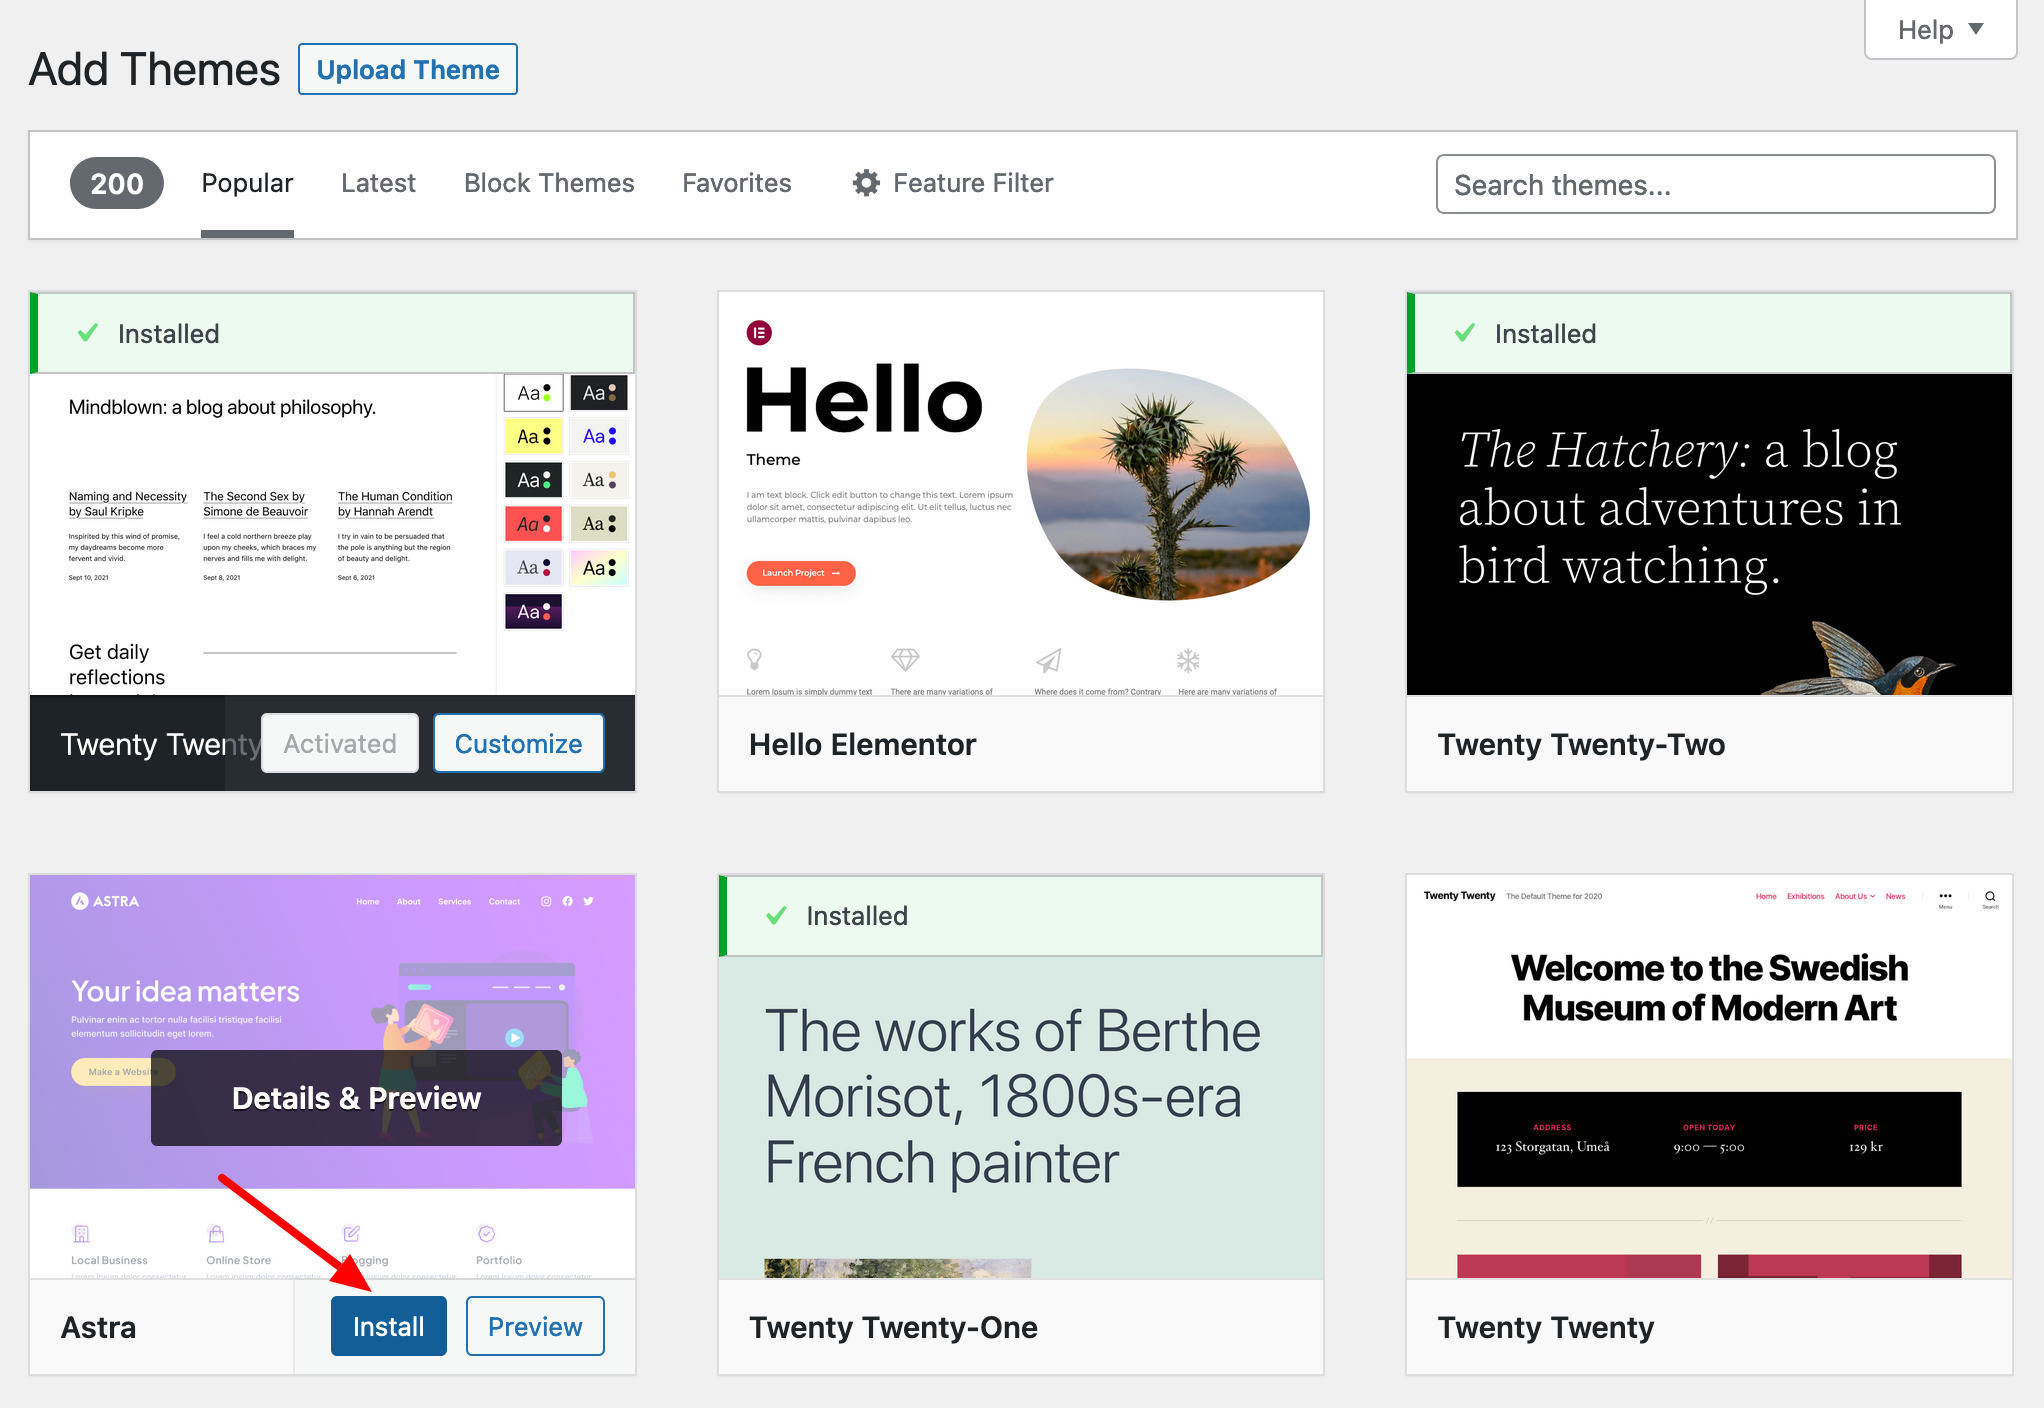
4. Install the theme.
Once you’ve made your selection, click on the “Install” button:
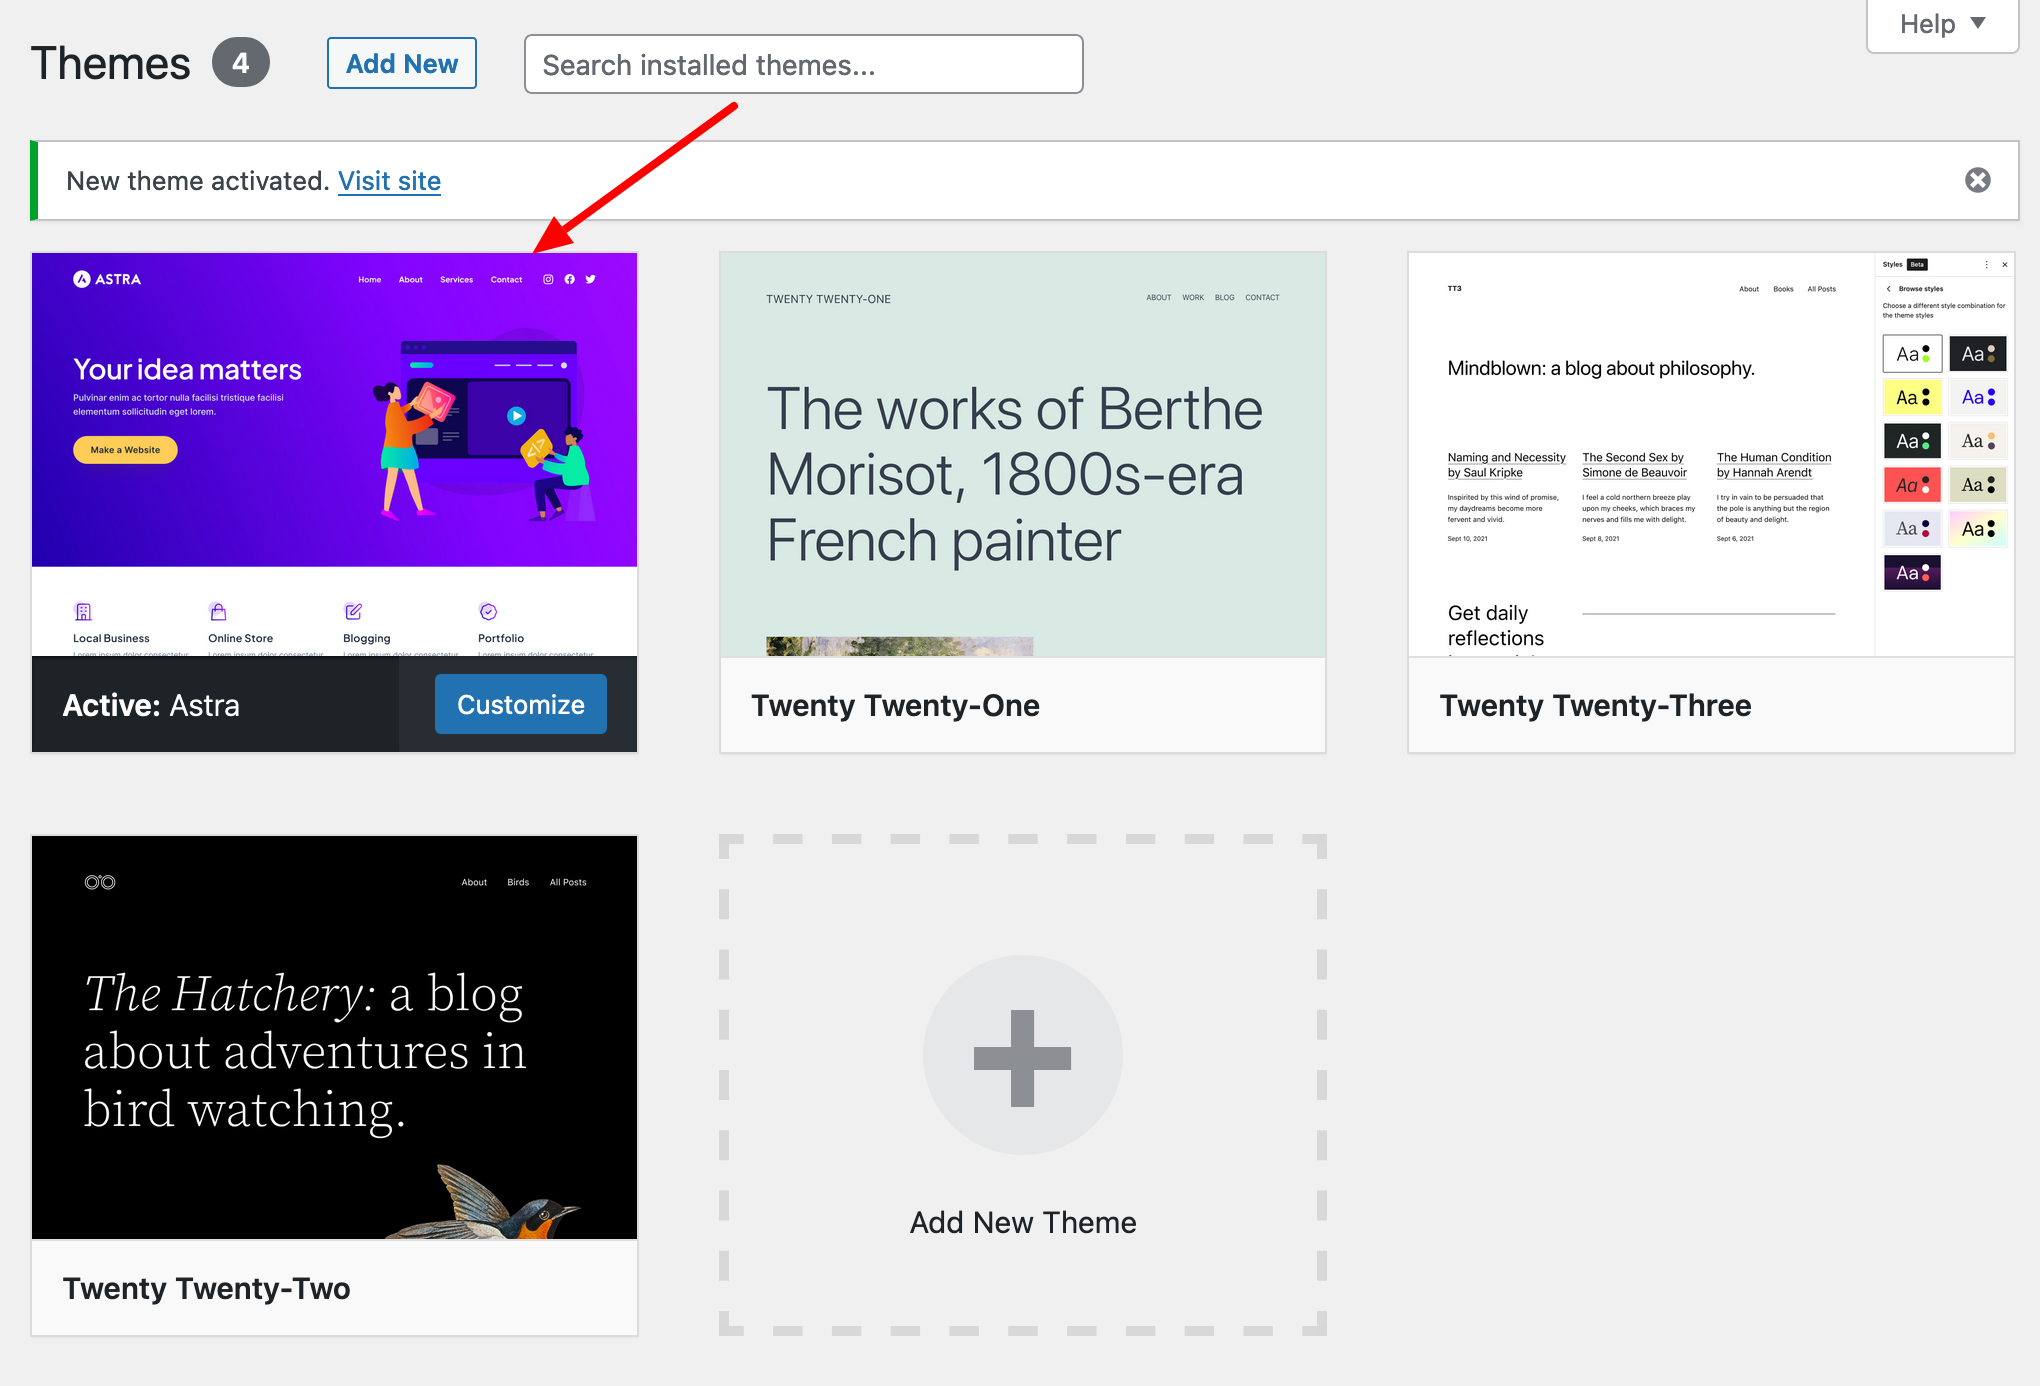
If you feel that your theme should be activated right away, go ahead. You will be presented with an “Activate” button just after installation.
Once the theme has been activated, it will appear in your list of themes:
How to install a theme via FTP
Uploading your theme directly to your host is the second option for installing a WordPress theme.
To do this, you need to use FTP software (remember, you had to use it to install WordPress).
1. Unzip your theme archive.
2. Connect to your server.
To do this, you need to fill in four details:
- The host (URL of your server)
- Your login
- Your password
- The port

In principle, your web host will have sent you these details by email when you reserved a hosting space with them.
If you can’t find them, you can also access this information by accessing the control panel for your hosting account (usually cPanel or Plesk).
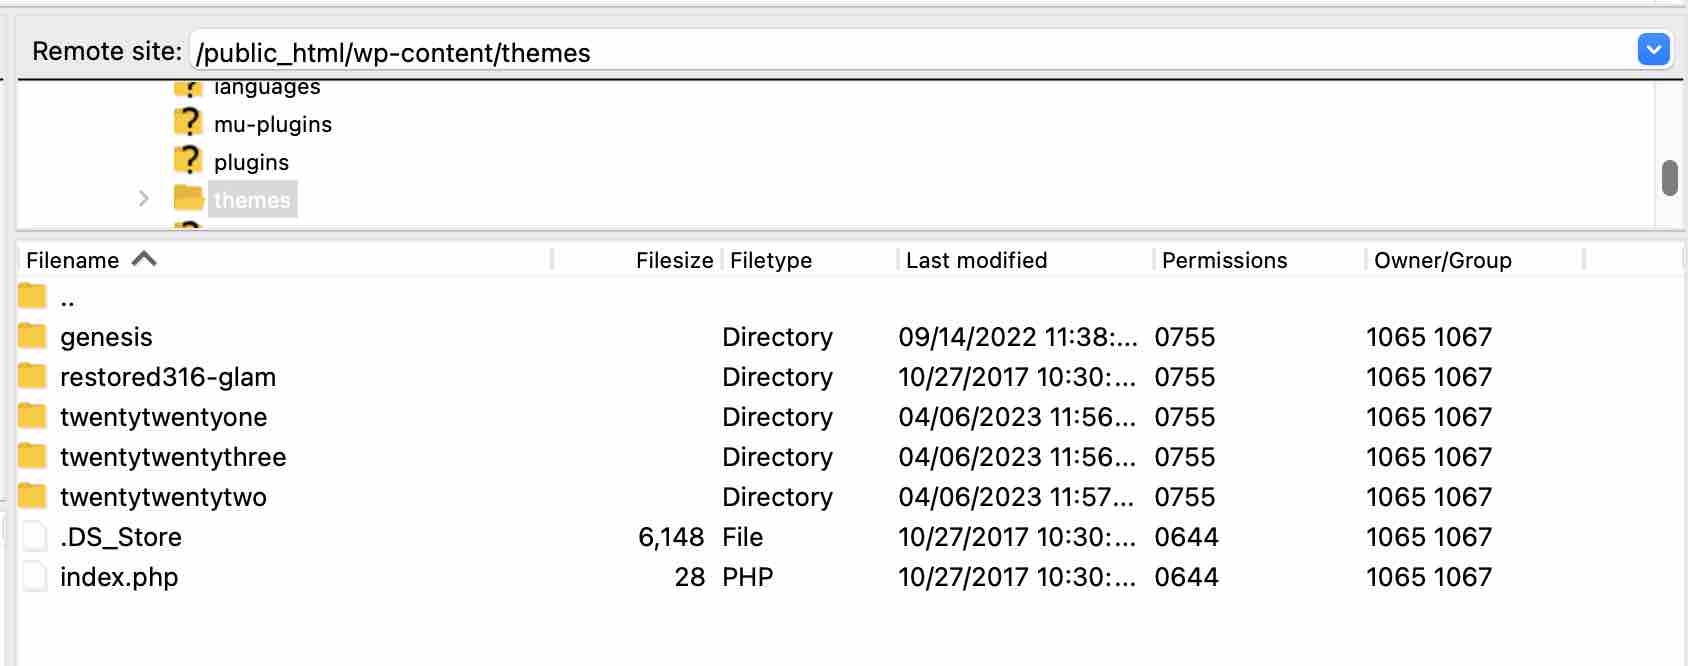
3. Go to the “wp-content/themes” folder in your WordPress installation.
Once logged in, locate your site’s root directory. Depending on the hosting provider, it will have a different name, such as public_html or www, for example.
To access the ‘themes’ folder, follow this path by double-clicking on each directory: public_html > wp-content > themes.
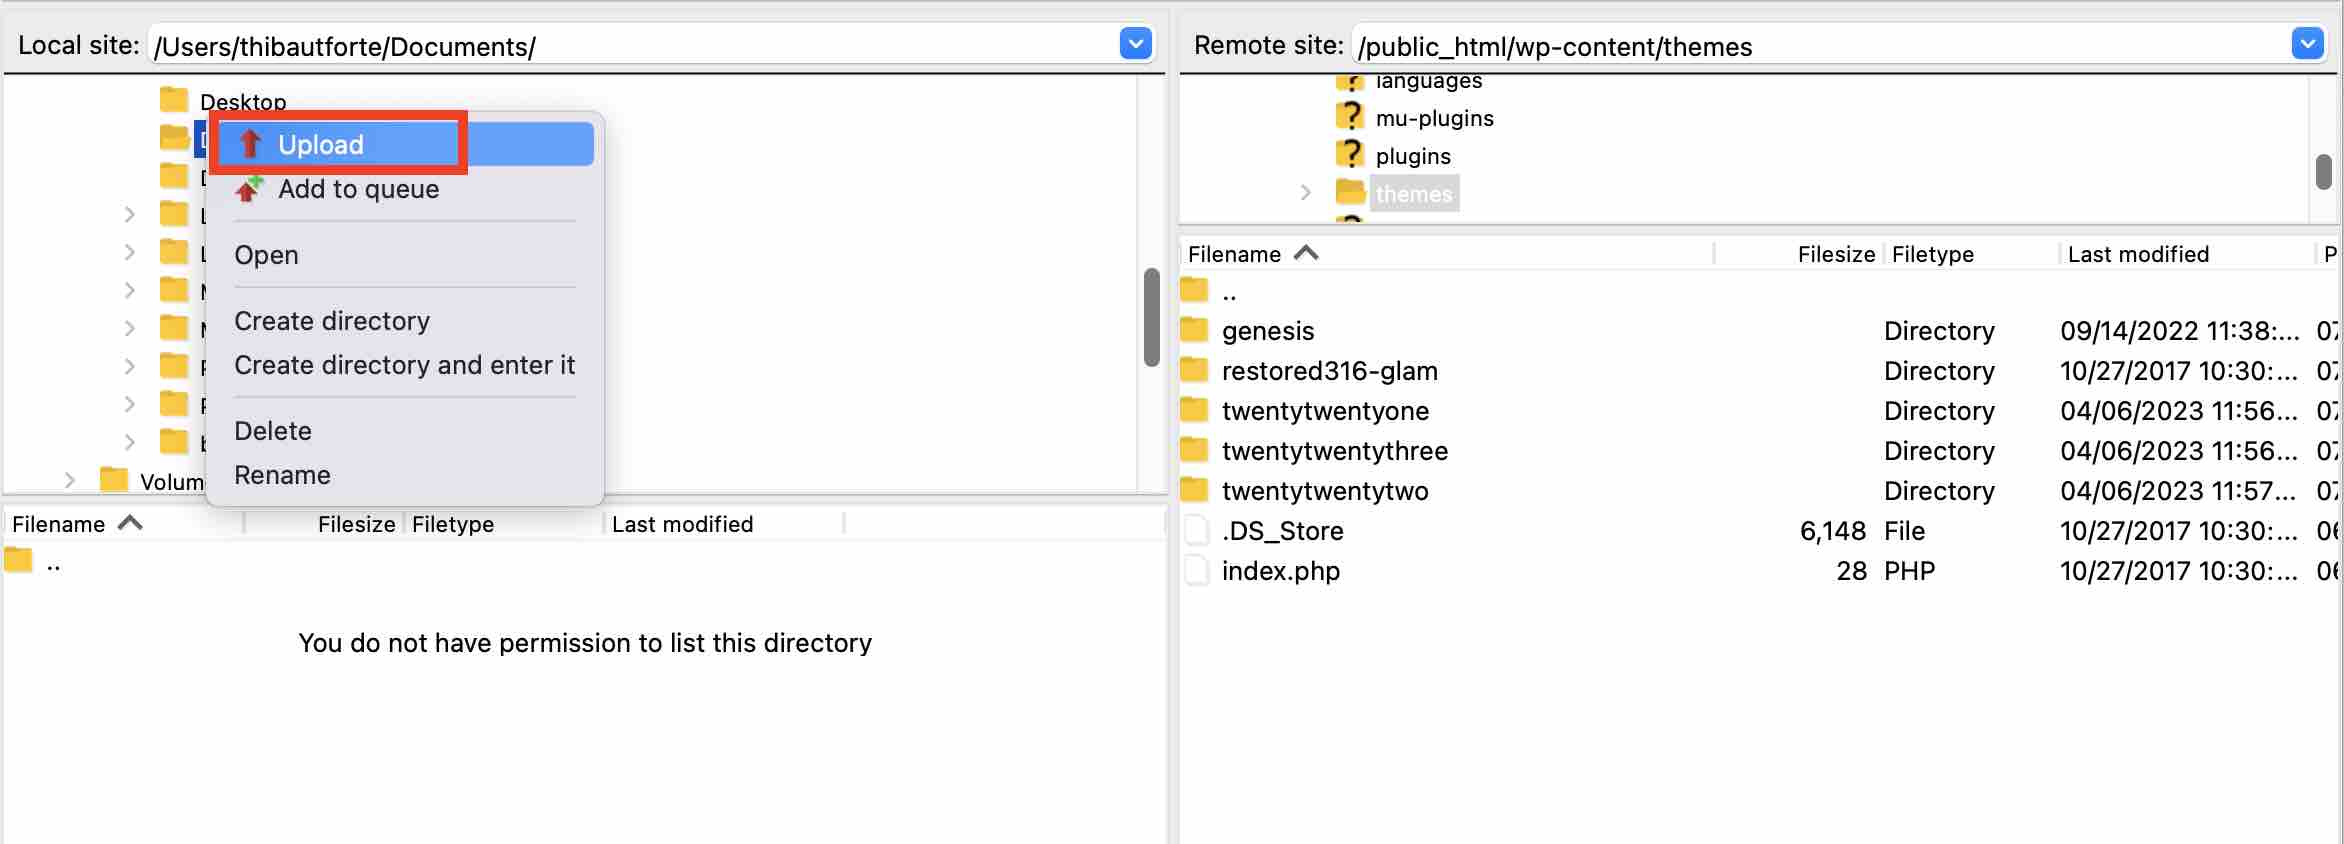
4. Add your theme folder to the “themes” folder.
Continue by adding your theme folder to the “themes” directory of your FTP client.
To do this, you can:
- Either drag and drop it from the left-hand side of your FileZilla interface (“Local site” section)
- Select it by clicking on it, then right-click. Then click on “Upload”:
5. Activate the theme on your administration interface.
Finally, if you’re ready, activate your theme on your WordPress dashboard, in Appearance > Themes. You already know how to do that. 😉
Do you need to create a child theme?
A child theme is a “sub-theme” of your WordPress theme on which you can make all your modifications. Thanks to this, if your “parent” theme is updated, you won’t lose anything.
At the time of writing this post, a child theme is unlikely to be relevant if you’re new to WordPress.
This practice is mainly aimed at developers and/or people who want to get their hands dirty in the code.
To find out all you need to know on the subject, read our dedicated article on child themes.
3 things to do after activating your WordPress theme
Here we are, your theme is installed!
But don’t stop there. This theme needs to shine for the first people who see it.
To do this, focus on the three aspects below.
Configure your WordPress theme
If you’re changing your theme, you need to do it quickly, because your site needs to be in maintenance mode for as little time as possible. Otherwise, you can take your time.
Go to your theme’s admin panel (if you have one) to set it up. Unfortunately I can’t help you with this, as it all depends on your project and the options offered by your theme.
However, you should be aware that in most cases you can configure settings in two different ways.
Your theme is based on blocks
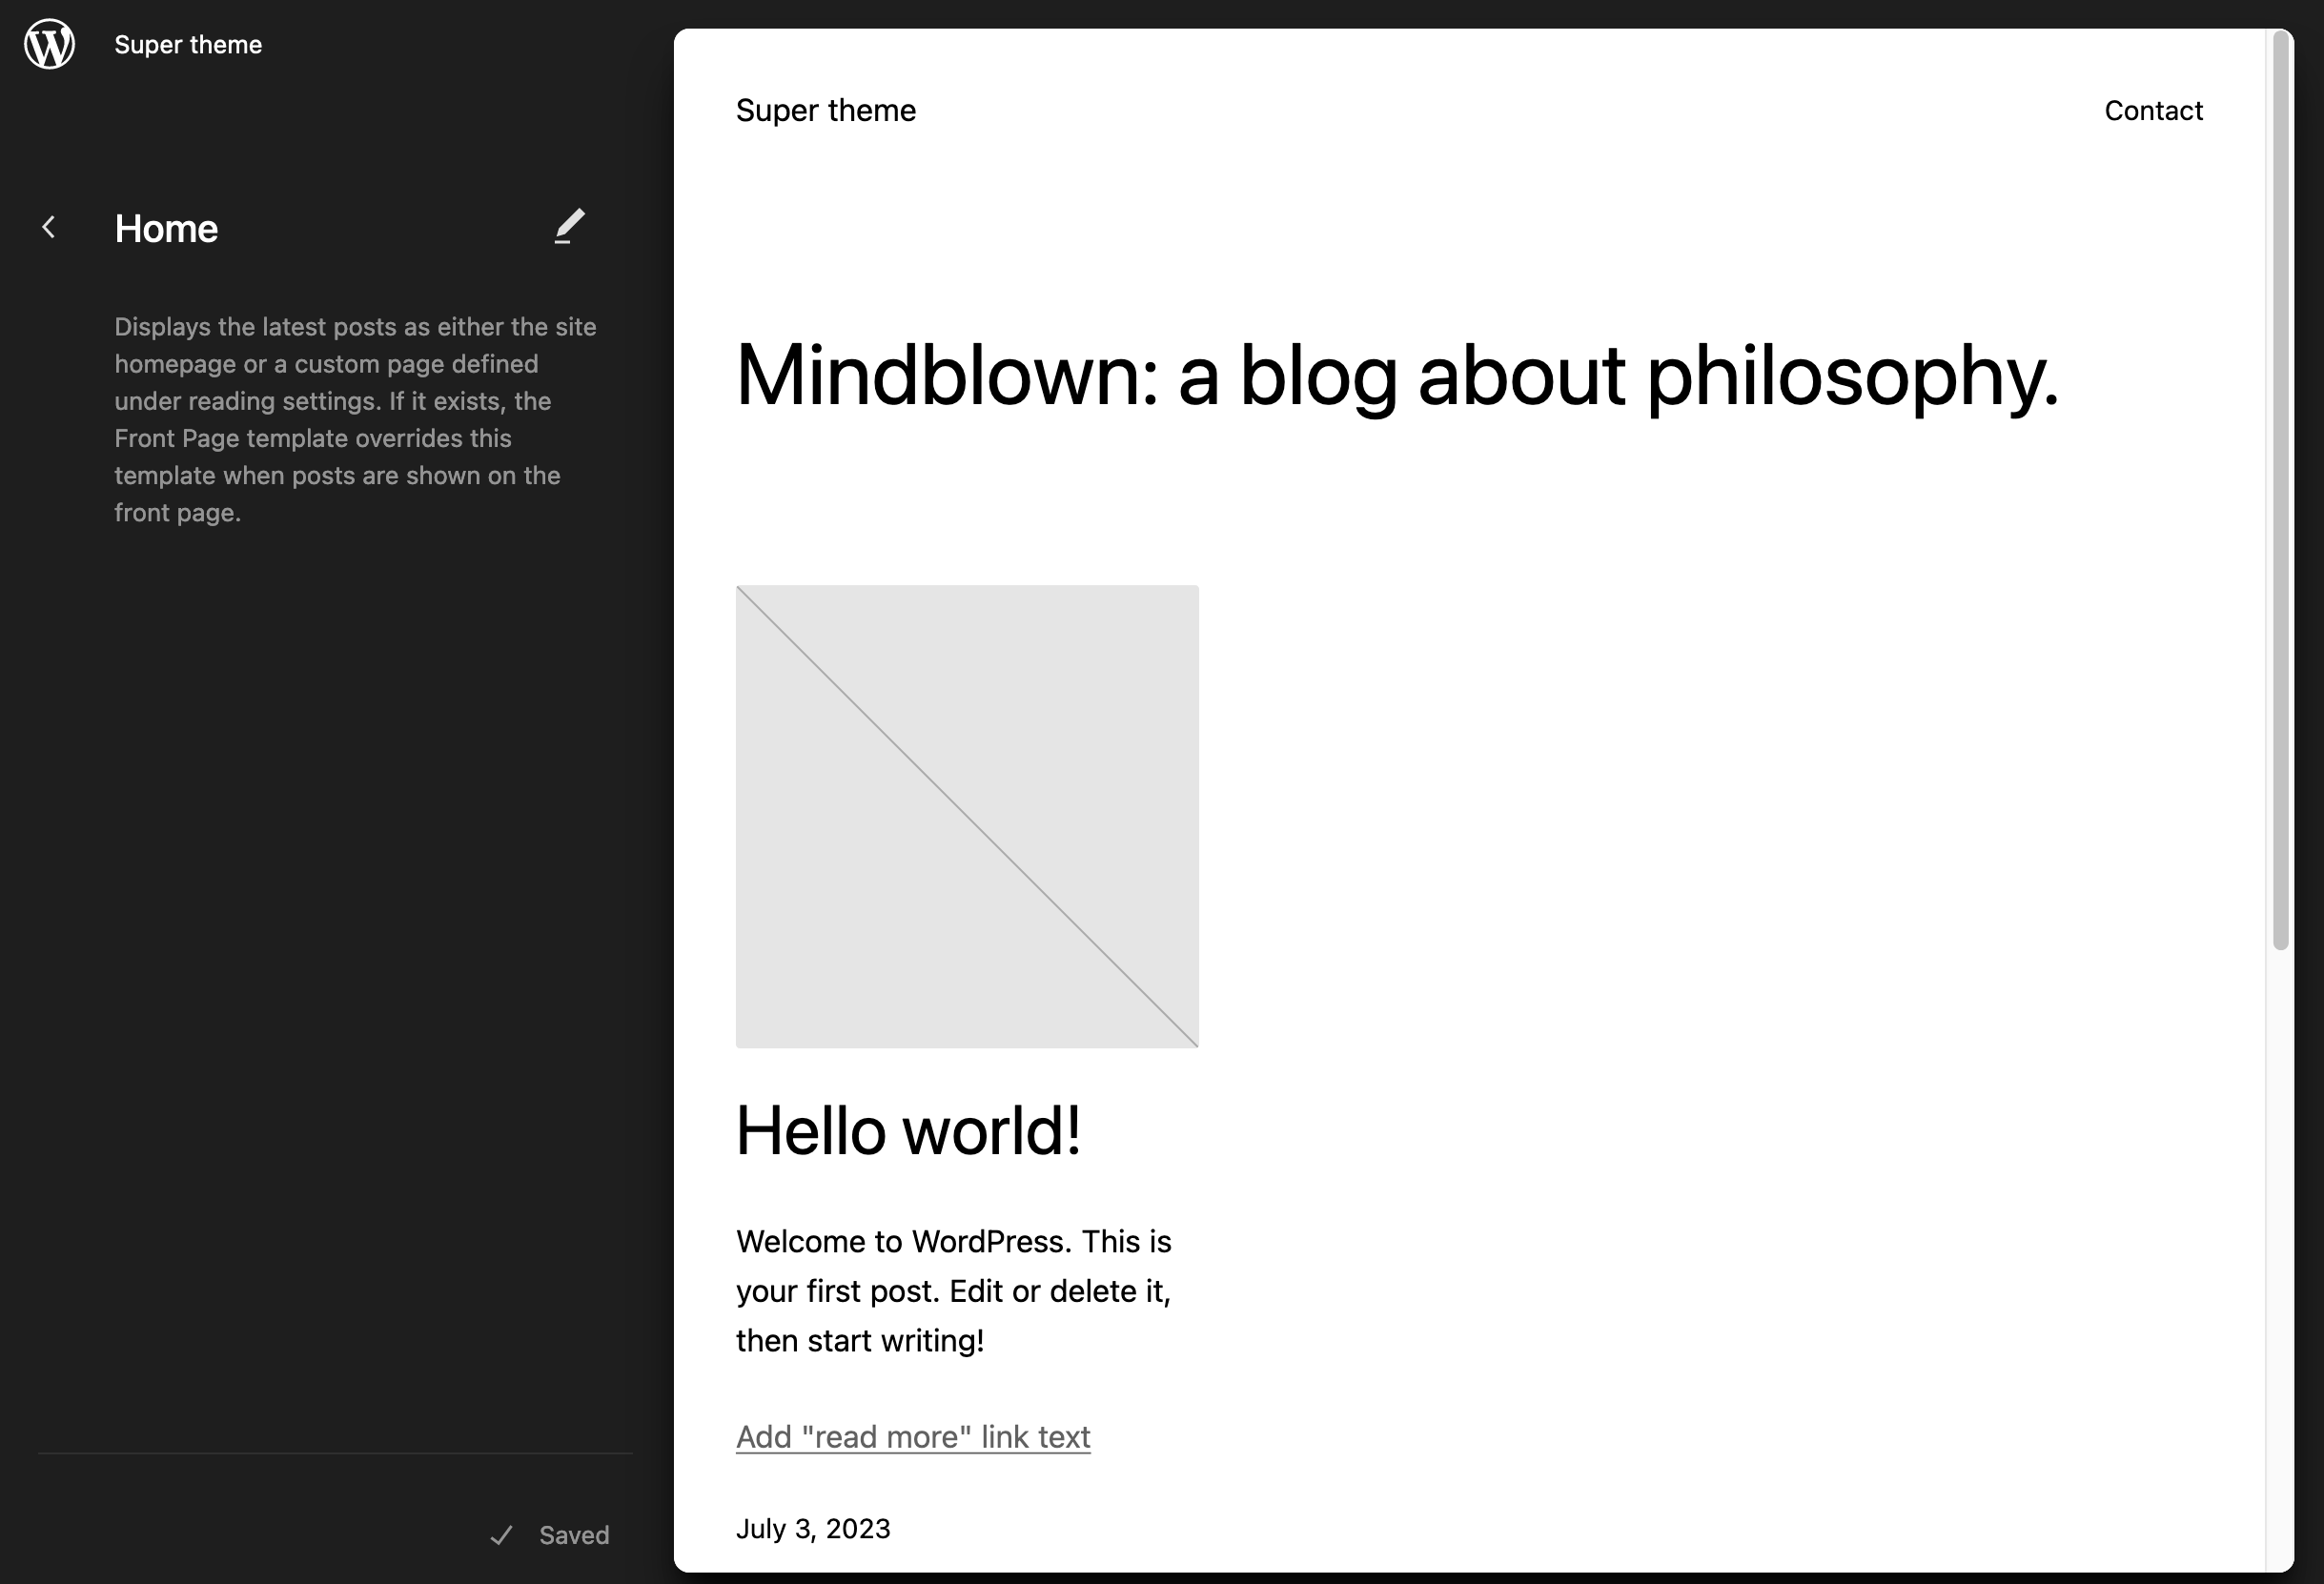
If your theme is based on blocks, it will be compatible with the WordPress Site Editor (this will be accessible if your site runs on a version of WordPress greater than or equal to 5.9).
This is the case, for example, with the latest native WordPress themes, such as Twenty Twenty-Three.
In this case, you can customise it by going to the Appearance > Editor menu.
The WordPress Site Editor lets you edit all areas of your site, from the header to the footer, using content blocks (the kind you use, for example, when you create a post or a page):
The Site Editor is a tool that is still being fully developed at the time of writing this post. If you want to achieve professional layouts, it requires solid technical knowledge, both in terms of templating and web design. That’s why we don’t recommend it for WordPress beginners.
Your theme uses the Customizer
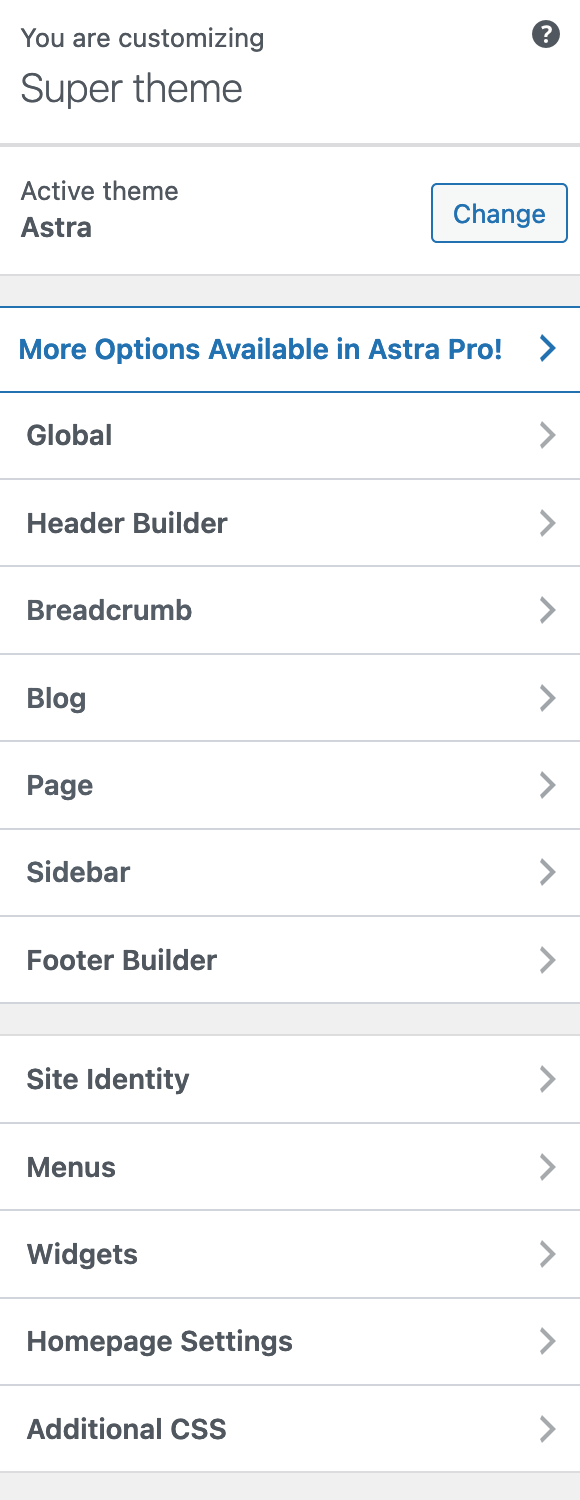
If you’re not using a block-based theme, chances are you can make adjustments using the Customizer.
This can be accessed via the Appearance > Customize menu in your admin interface.
This is the case, for example, with the Astra theme. You can then customize various elements such as the typography, colors, buttons, header, footer, and so on:
Browse your site for display errors
Once your theme has been installed and configured, there may still be a few display errors. You’ll need to track them down one by one to correct them.
These errors may come from incorrectly configured plugins, widgets, page templates, or other things.
Thumbnail images sometimes need to be regenerated because the new theme uses thumbnails of different sizes. To do this, you can use the Regenerate Thumbnails plugin.

Don’t forget to visit your site on several different browsers. To find out which ones to fix first, take a look at your traffic statistics (don’t forget to rely on your Analytics tracking code).
Once again, this may require some knowledge of web development for everything to be perfect.

Update your theme
Once you think you’ve got it right, deactivate maintenance mode, take a final look around, and let people know that your new site is up and running, for example by sending a newsletter to your email list.
After that, remember to update your theme as soon as possible. This will enable you to take advantage of its latest features and receive patches for any bugs.
Last but not least, you’ll be strengthening the security of your site, since any vulnerabilities detected will be corrected.
To find out if an update is available for your theme, go to Dashboard > Updates.
If your theme needs a little refreshing, it will appear in the list. 😉 By the way, do the same for your plugins and the WordPress core.
Conclusion
Throughout these lines, you’ve learned how to install a WordPress theme. As a reminder, you can do this:
- From the WordPress administration interface
- Using an FTP client
Installing a new theme or changing one is no trivial matter. Remember to take certain precautions before taking action (e.g. backing up your site) and after the operation.
What do you think of all this? Give me your feedback in the comments below.

Receive the next posts for free and access exclusive resources. More than 20,000 people have done it, why not you?


Continue reading
Articles posted in WordPress TutorialscPanel: Features and how to use this interface for your WordPress site
Need to modify the PHP version of your website? That’s where it happens. Need to create an email address? That’s where it happens too. Need to install an SSL certificate on short notice? Here again. Where? On your WordPress site’s…
How to redesign a WordPress website: the ultimate checklist
Aaah, the redesign of a WordPress website… When you think about the different issues that this mission involves, you usually tend to stress a bit. Who doesn’t dream, in this key moment, of doing a simple Command + Option +…
How to enable two-factor authentication on your WordPress site
A login + a password. Connecting to the WordPress administration interface is very simple, as long as you remember these two elements. From the point of view of the malicious person or robot that wants to access your site, it’s…