
A long time ago, in a galaxy far, far away, everyone recommended using a child theme to customize the code of a WordPress theme. Well, okay, maybe it wasn’t that long ago.
Today, using a WordPress child theme doesn’t have to be systematic.
It’s true that without a child theme, we risk losing all our modifications the next time we update our theme. And if you follow us, you know it: updating your theme is crucial to avoid security problems and to continue to benefit from new features.

But that was before. Today, there are alternatives to avoid having to get your hands dirty. Because manipulating CSS and PHP files is not for everyone.
Who wants to spend hours tinkering and risk crashing everything because of a small error in the code? That’s really not what you want, is it?
In this article, we’ll take a look at this good practice that, in the end, doesn’t concern everyone. May the force be with you.
Overview
To learn how to create a WordPress site from A to Z, check out our comprehensive guide. Also, you might find this other one helpful to choose your domain name.

What is a child theme?
A WordPress child theme is a theme that will inherit the functionality, design, and layout of a theme installed on a site (which becomes the parent theme) and allow for extensive customization.
The parent theme remains intact, all modifications are made to the child theme.
On its side, WordPress will first take into account the files of the child theme. And if it needs other files to work, it will look for them in the parent theme.
In short, a child theme allows you to radically customize your theme without touching the parent’s code. The latter can then be updated without fear.
So much for the theory. Now, let’s go to the practice.
Why and when should I use a child theme?
Sometimes, our WordPress theme doesn’t offer us the desired customization options.
The typical example is the modification of that damn copyright notice in the footer.
If the author of the theme hasn’t added a setting in the Customization Tool, we’re left with nothing but tears in our eyes (even though, between us, this is becoming increasingly rare in the main free WordPress themes).
Of course, it is out of the question to directly modify the code of our theme. If the latter were to be updated, the modifications would be lost!
The only solution is to create a child theme. Thanks to it, we will customize the footer.php file and that’s it.
In the same way, the latter will be useful to customize the structure of the archive pages, taxonomy or any other file of the template hierarchy.
Another valid reason would be to intervene on the templates proposed by some plugins. For example, you could customize the WooCommerce My Account page (or the cart page, order page, product pages and even the default email content).
In these 3 cases, using a child theme is essential. However, not everyone can do this. You need a minimum of code knowledge before you start.
And we haven’t even mentioned page builders! With a tool like Elementor Pro’s Theme Builder (affiliate link), you can design your own header, footer and make all the page templates in the template hierarchy!
With a page builder, there are even fewer reasons to use a child theme.
Two other types of customizations are often cited as reasons to create a child theme:
- Modifying your theme’s CSS to change its style.
- Adding PHP snippets to add functionality.
However, don’t create one just for these reasons! Indeed, you can:
- Use the Additional CSS field in the customization tool (located in Appearance > Customize > Additional CSS).
- Install the Code Snippets plugin or create a functionality plugin if you’re a developer, which is the equivalent of a
functions.phpfile contained in a plugin (which, by the way, allows you to separate the functionality from the visual).
In the end, there is little chance that a child theme will be relevant if you are new to WordPress.
Moreover, the use of an FSE (Full Site Editing) compatible theme limits even more the use cases. Indeed, it is possible to modify your entire site directly in the WordPress interface, without having to go into the code.

How to create a WordPress child theme?
Are you one of the people concerned by the creation of a child theme? Well, that’s fine! Let’s see how to create it.
To create one in two clicks, you can use our child theme generator.
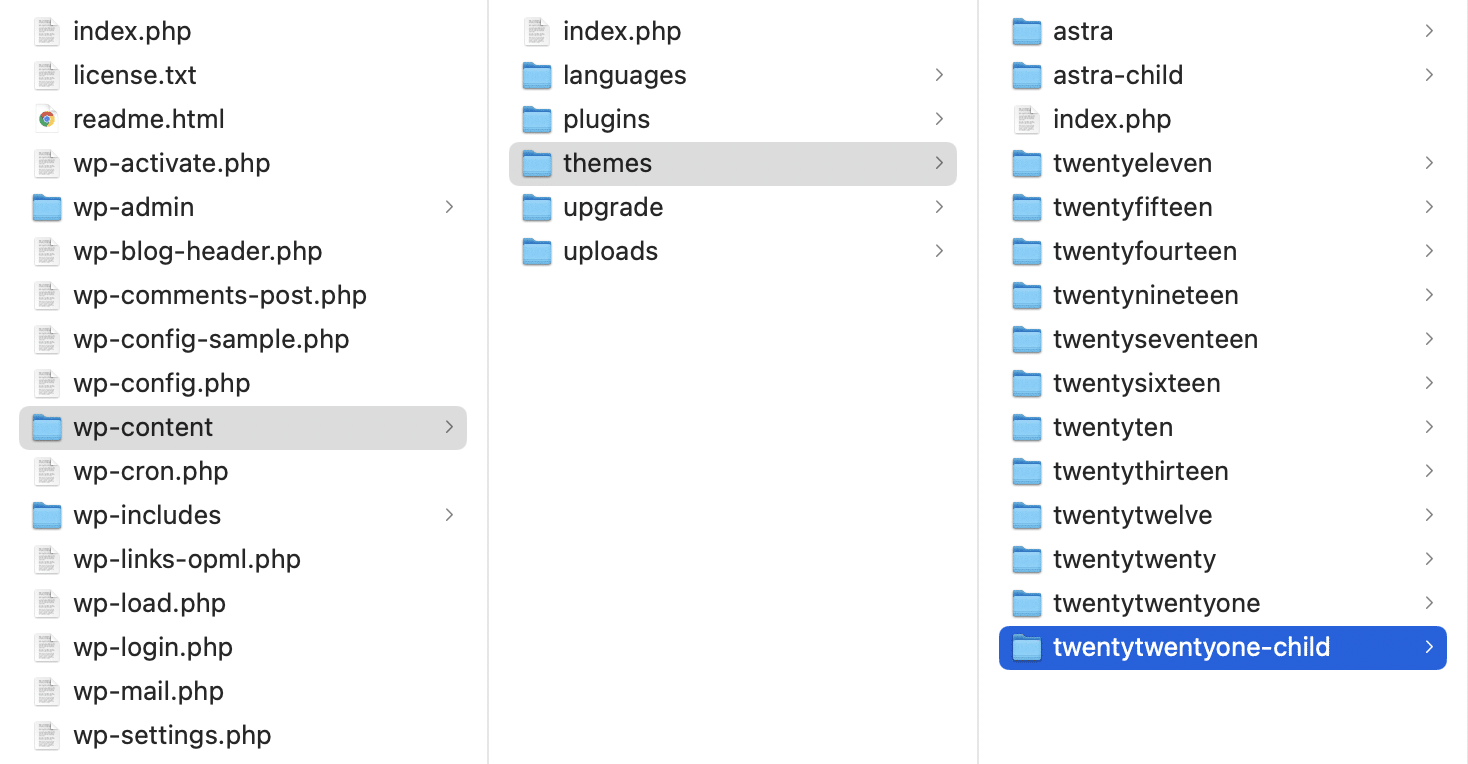
Before we start, let’s clarify the structure of your WordPress site. The themes installed on your site are located in the following directory: /wp-content/themes/.
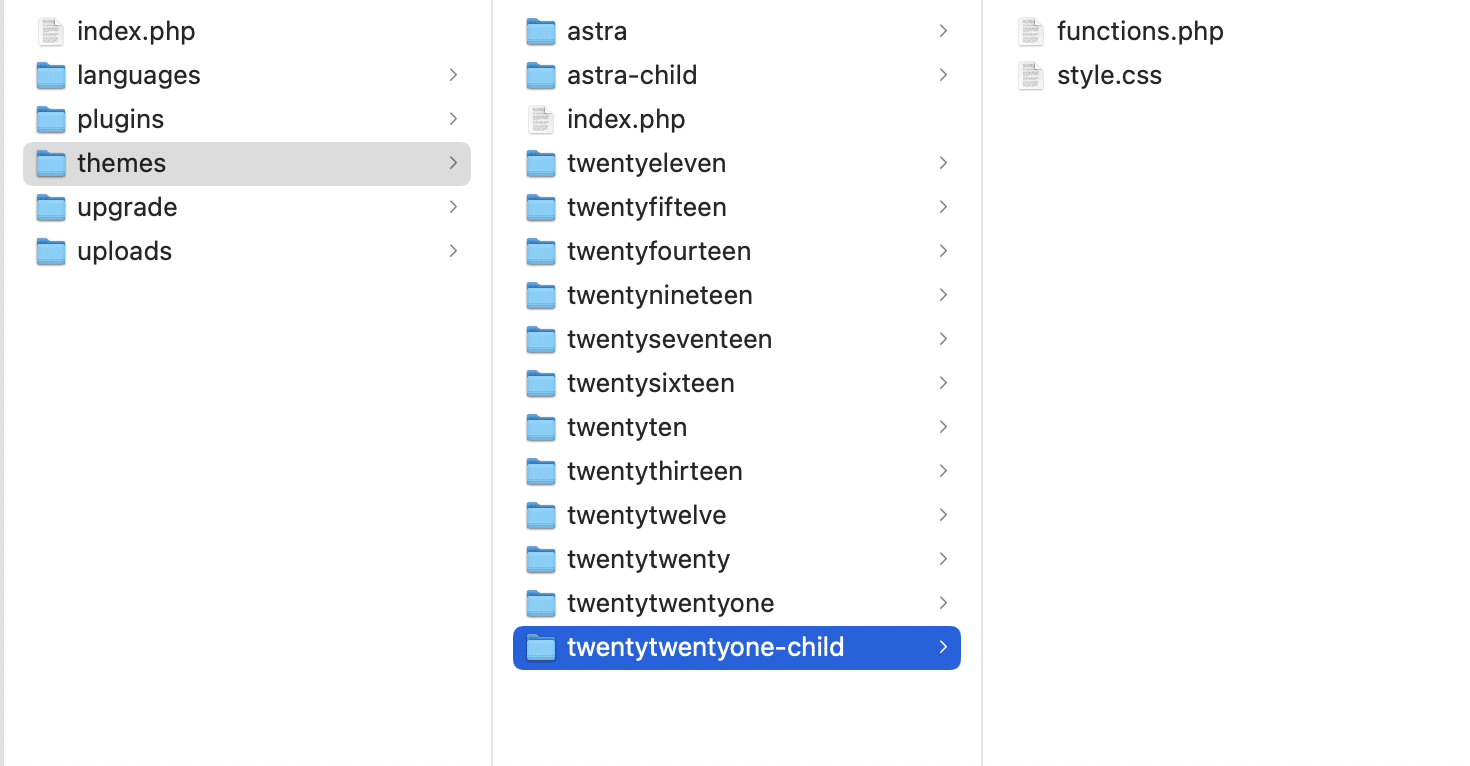
Let’s say I want to customize the Twenty Twenty-One theme. Its files are located in the following folder: /wp-content/themes/twentytwentyone/.
This theme contains all the files of a “normal” theme, namely a style sheet (style.css), the template files (index.php, page.php, etc.), the functions file (functions.php) and possibly other files like resources (images, libraries, etc.).
This being said, we can start.
Step 1 – Create the child theme directory
The first step to create your child theme is to create a directory for it
With the help of an FTP client, directly on your server, or directly on your computer if you work locally, you will have to create a new directory which, in our example, will have the name: twentytwentyone-child.
This directory should be created here: /wp-content/themes/twentytwentyone-child/.
The best practice is to take the name of the parent theme and add the suffix -child, as in the image below with Astra.
Once the directory is created, we go to the next step.
Step 2 – Create a stylesheet
The second step to create your child theme is to create in the child theme directory a stylesheet, named style.css, which will indicate that this new theme is… a child theme of your parent theme.
Here is the code to use for this stylesheet :
And that’s it! You have just created with love the style.css file of your child theme. But uh… What did we do exactly?
- Theme Name: the name of the theme you are going to create.
- Theme URI : the address where it can be downloaded, if applicable.
- Description: the description of the theme.
- Author : the author of the theme… put your name there.
- Author URI: the address where we can find information about the author.
- Template : the parent theme that will be used. You have to put the name of the directory of this one, respecting the case.
- Version: if you have version numbers, this is the place to put them.
Do not add a space before the colon.
Two fields are mandatory for your child theme to work:
- Theme Name is necessary for WordPress to recognize the files in this folder as a theme.
- Template tells WordPress the name of the parent theme.
The other fields are used to add additional information, like the ones you can see on the other themes.
To create files on your server, you can either create theme:
- On your computer and send them to your server using your FTP client.
- Directly on your server using your FTP client and then modify them with a code editor.
Step 3 – Import the style of the parent theme
To import the style of the parent theme in your child theme, you will have to create a functions.php file, recognized and loaded automatically.
Inside, enter the following code:
Let’s study these lines of code.
At first sight, we can see that we associate the hook wp_enqueue_scripts to the function wpm_enqueue_styles().
A hook is a hook in the execution of WordPress, on which we can graft functions in order to modify its behavior.
To tell you a little more, this hook is triggered when WordPress is ready to load the scripts, and we graft our code onto it to tell it to load the styles of the parent theme.
In our case, it is to load the style.css file of the parent theme so that the child theme inherits the CSS styles of the parent.
You can, if you feel like it, change the name of the wpm_enqueue_styles() function by changing for example the prefix, wpm corresponding to WPMarmite.
However, this method may not work if your parent theme loads its own styles while ignoring those of the child. In this case, this is the code to use:
<?php add_action( 'wp_enqueue_scripts', 'twentynineteen_child_scripts' ); /** * Loads child styles */ function twentynineteen_child_scripts(){ wp_enqueue_style( 'child-styles', get_stylesheet_uri(), array( 'twentynineteen-style' ) ); }Save everything to finalize the creation of your child theme.
Step 4 – Activate the WordPress child theme
Once you have created your child theme, it’s time to activate it!
Go to the WordPress admin, Appearance > Themes to find your freshly hatched child theme.

You’ll recognize it easily: it has the name you gave it at birth and displays a transparent background instead of a screenshot of the home page.
If you find that your child theme doesn’t look good without a screenshot, you can add one in its folder. To be recognized by the theme, the screenshot must be named screenshot.png and measure 1200×900px.
You can also copy the screenshot.png file from the parent theme and paste it into the child theme to have the same screenshot.
If you activate this child theme on a brand new site, you can see that… nothing changes. Amazing, isn’t it? 🙃
This is quite normal, as we haven’t modified our child theme yet. For now, we can just see that the parent theme call is functional.
If you activate a child theme on an existing site, the configuration of menus, widgets and the Customization Tool will have to be done again.
How to use a WordPress child theme?
Good! Now is when all your development and web design skills will be put to the test… Because now you can make any changes you want.
What are the actions you can take?
Adapt the code of a page template to your needs
The principle of a child theme is the following: if it has a page template, it has priority over the parent theme.
Let me explain with an example: let’s imagine you want to modify the footer of your site to remove the copyright reference and add other information.
To do this, you will have to copy the footer.php file from your parent theme and paste it in your child theme.
Now that this file exists in your child theme, it is the one that is used : it overwrites the footer.php of the parent theme (the child file has priority over the parent).
As for the other templates (header.php, page.php, etc.), your theme will continue to use the elements present in the parent, because they are not present in the child directory.
The next step is to identify the line in the code that corresponds to the copyright and add your different mentions by modifying the HTML code.
Beware, you might be tempted to copy all the files from your parent theme to be able to modify them at leisure in your child theme. It is tempting… but it is also a very bad practice.
Indeed, if you do this, your new files will always have control over the parent’s files, and therefore… the updates of the page templates will not be effective on your site.
Copy the files and modify ONLY the elements that you really need and that you can’t impact in the stylesheets.
Customize the style sheet
By adding your modifications in the style.css file of the child theme, you will be able to modify the layout of all the graphic elements of the site.
Whether it is colors, positioning, text sizes, fonts… in short, you have the control.
To test your modifications live, you can use the inspector of your favorite browser, accessible by right-clicking on the element that interests you, then on “Inspect” (the title may differ slightly depending on the browser you use).
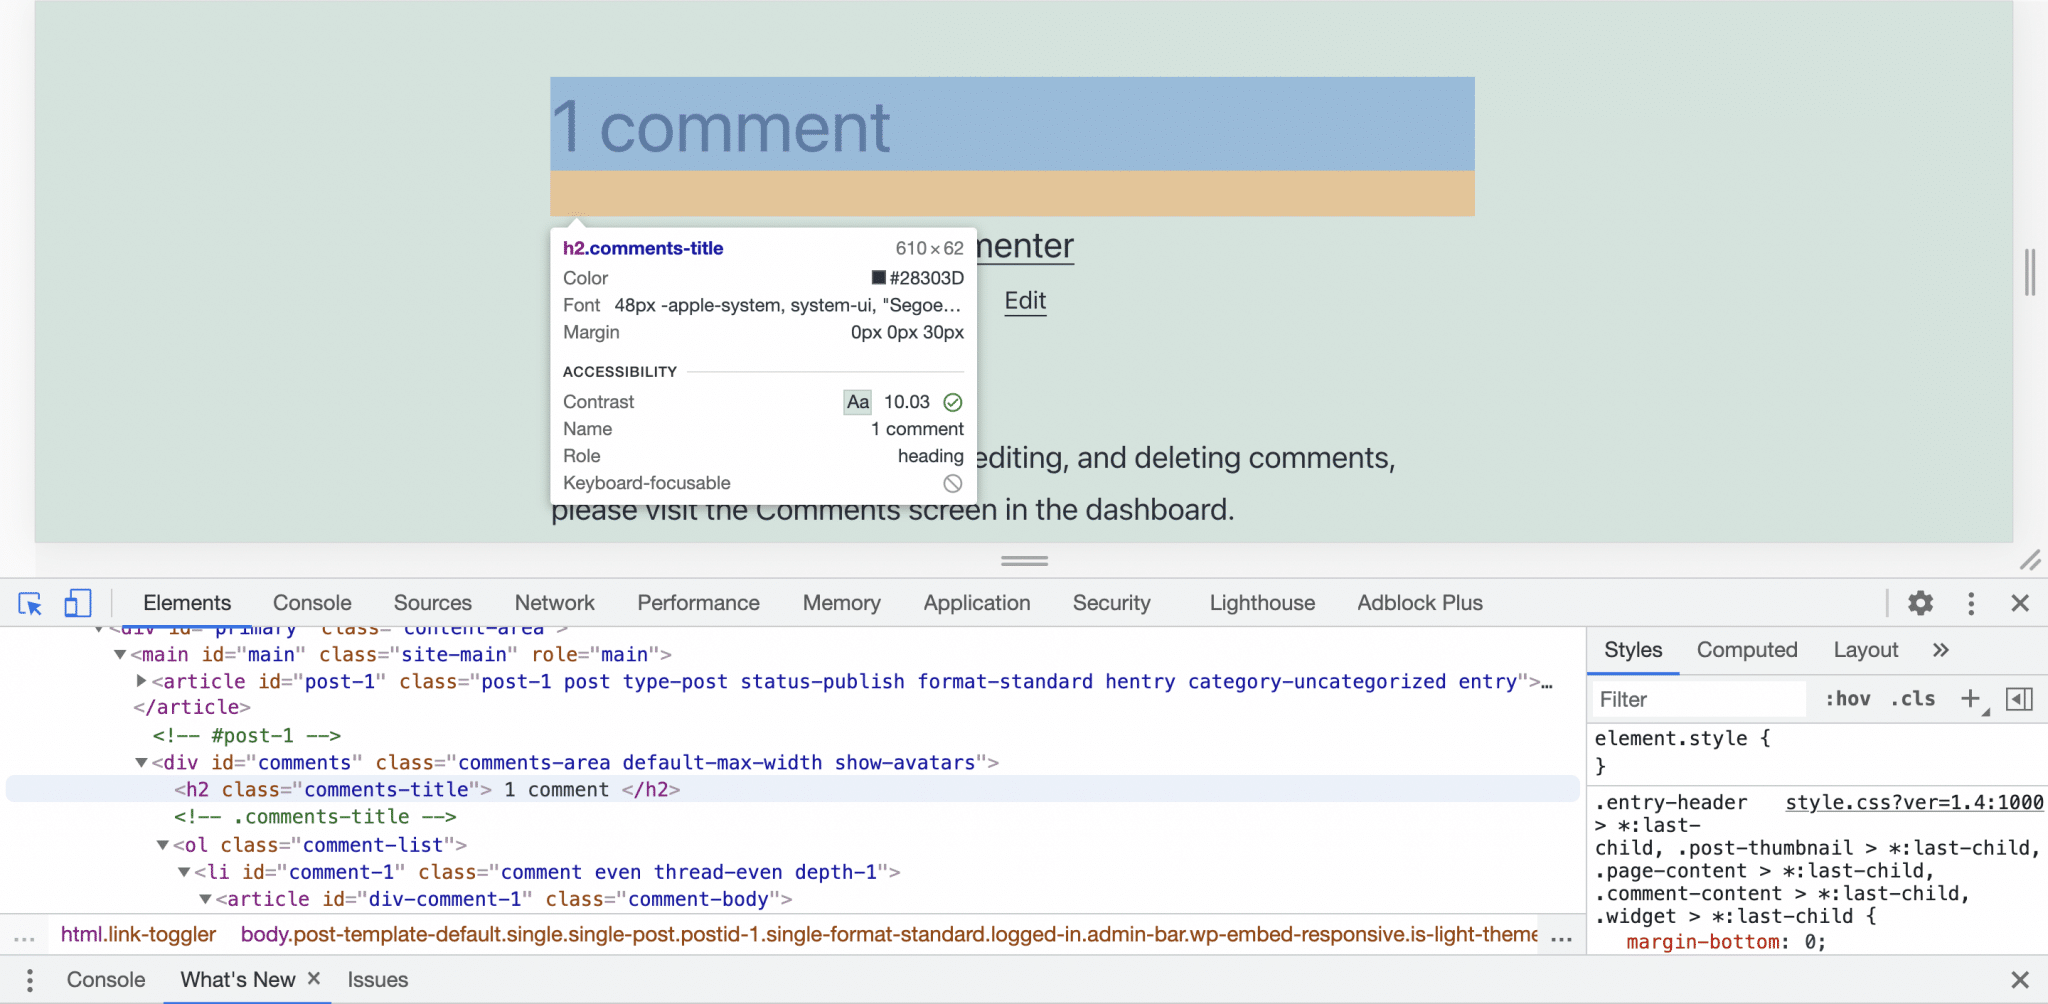
A new space allows you to identify the style elements (in the box on the right) linked to this or that part of the site.
To select another element, simply click on the arrow at the top left of the inspector to hover over and click on the element you want to modify.
Then you can make your changes to the CSS to test new layouts live.
When you are happy with the changes, you just need to add the corresponding code elements to the child theme.
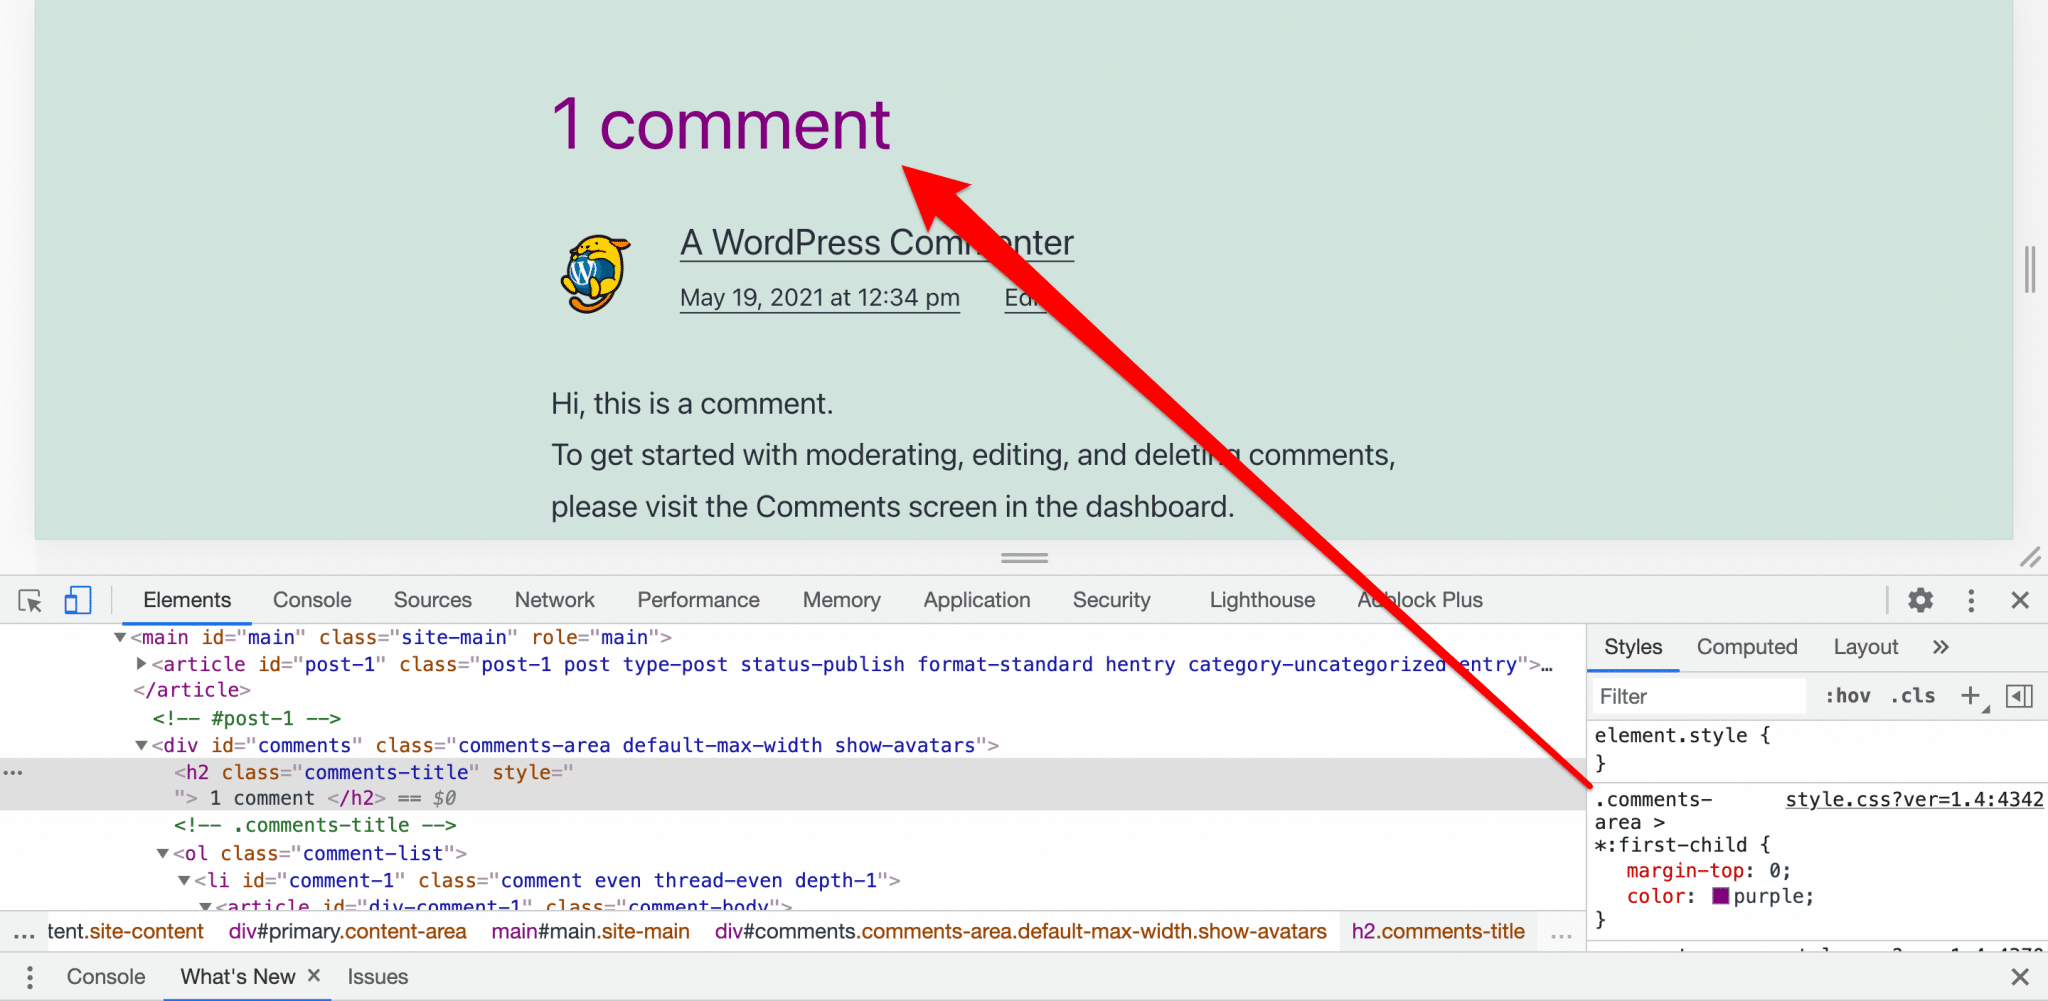
For example, here, to change the color of the number of comments in the article, you just need to add this content to the style sheet you created in step 2, under the previously added code:
And that’s it!
Adding new functions to your theme
Regarding the theme functions (those in the functions.php file), if you create a functions.php file in the child theme, it will be loaded first, then the functions.php file of the parent theme.
The functions.php file of the child theme will be loaded just before the functions.php file of the parent theme. The advantage is that you can bring all the new functions you want and be sure that at least the original file will not be broken.
For example, if you want to add custom image dimensions for your image imports, you will just need to add the following lines in the functions.php file of the child theme.
If you want to know more about this add_image_size function, check out the dedicated page of the WordPress DevHub.
So, should I use a WordPress child theme?
Creating a child theme allows you to fine-tune a theme without touching the original files. We have seen that you can adapt the code of a page template, override the styles of the theme and add functions to the functions.php file. The modifications made are resistant to different updates of the parent theme.
However, using a child theme can be technical if you don’t master the code. Only start this adventure if you know what you are doing. If not, there are solutions:
- Modifying the CSS is possible from the WordPress Customization Tool.
- Adding PHP functions can be done with a plugin.
- And you can modify page layouts with a page builder.
What about you, what do you think about child themes? Do you use them on your sites?
Tell us all about it in the comments. 🙂

Receive the next posts for free and access exclusive resources. More than 20,000 people have done it, why not you?


Continue reading
Articles posted in WordPress TutorialscPanel: Features and how to use this interface for your WordPress site
Need to modify the PHP version of your website? That’s where it happens. Need to create an email address? That’s where it happens too. Need to install an SSL certificate on short notice? Here again. Where? On your WordPress site’s…
How to redesign a WordPress website: the ultimate checklist
Aaah, the redesign of a WordPress website… When you think about the different issues that this mission involves, you usually tend to stress a bit. Who doesn’t dream, in this key moment, of doing a simple Command + Option +…
How to enable two-factor authentication on your WordPress site
A login + a password. Connecting to the WordPress administration interface is very simple, as long as you remember these two elements. From the point of view of the malicious person or robot that wants to access your site, it’s…