


Managing a WordPress site means going through different emotions. Sometimes, there is joy, like when you see your content slowly ranking on Google.
Sometimes there is anger, when your site crashes after an update. And sometimes, you even feel fear. That’s when your site has been hacked, an inconvenience that doesn’t just happen to other people.


To avoid cold sweats in the future, and to protect your site, use a security plugin.
The most famous one in the official directory is called Wordfence Security. Since it’s hard to ignore, we tested it for you to find out what it has up its sleeve.
By the end of this article, you will know how to set it up and use it.
Overview


What is Wordfence Security?

Wordfence Security is a plugin to strengthen the security of your WordPress site. It offers several features to protect your installation, including an application firewall, a malware scanner, two-factor authentication, and protection against brute force attacks.
With 5M+ active installations, it is the most popular security plugin in the official plugin directory, ahead of iThemes Security (900K active installations), All in One Security (1M+ active installations), and Sucuri 800K+ active installations).
The Wordfence Security plugin, also called “Wordfence Free,” is free of charge. However, Wordfence also offers several paid options:
- Wordfence Premium: an even more complete version than the free plugin, with support included.
- Wordfence Care: the security tool team installs Wordfence, configures it, optimizes it, and monitors your site for you. In case of security-related problems, a dedicated team intervenes.
- Wordfence Response, a service dedicated to WordPress sites where downtime has a financial impact. This service is mainly intended for large sites with a lot of traffic and for e-commerce stores.
- Wordfence Intelligence: mainly dedicated to web hosts who want to collect data on security in general.
Note that the WordFence team also offers two other free plugins on the official directory. Wordfence Assistant is a plugin that will be useful if Wordfence is active on your site but you can no longer access your dashboard. Wordfence Login Security contains some features already included in the free plugin: two-factor authentication, XML-RPC protection, and CAPTCHA on the login page. There is no need to activate it if you are already using Wordfence Security.
What are the main features of Wordfence Security?
Wordfence Security is a comprehensive security solution that works on several levels. To take advantage of it, the user benefits from several key options:
- A web application firewall (WAF) that identifies and blocks malicious traffic from your web server (and not in the cloud, as offered by its competitor Sucuri, for example)
- A malware scanner that blocks requests that include malicious code or content
- Protection against brute force attacks by limiting the number of connection attempts to your administration login page
- Two-factor authentication, to add an extra layer of security for logging into your WordPress site
- reCAPTCHA on your login pages to prevent bots from logging in and to limit spam
- Email alerts when a security issue is detected
- A platform called Wordfence Central to manage the security of multiple sites in one place. It works on the same principle as ManageWP, which allows you to maintain your WordPress sites.
Why should you use a security plugin like WordFence?
As you may already know, WordPress is the most widely used CMS (Content Management System) on the planet, with 62.8% of market share.
Beyond that, it powers nearly one out of every two sites worldwide (among the million sites receiving the most traffic).
This dominant position whets the appetite of human hackers, and especially of malicious bots that work automatically, such as:
- Spam bots
- Robots that scrape (extract) your content
- Bots that launch denial of service (DoS) or distributed denial of service (DDoS) attacks.
In total, 90% of attacks perpetrated against a CMS affect WordPress. And 2,800 attacks per second target WordPress installations specifically, worldwide!
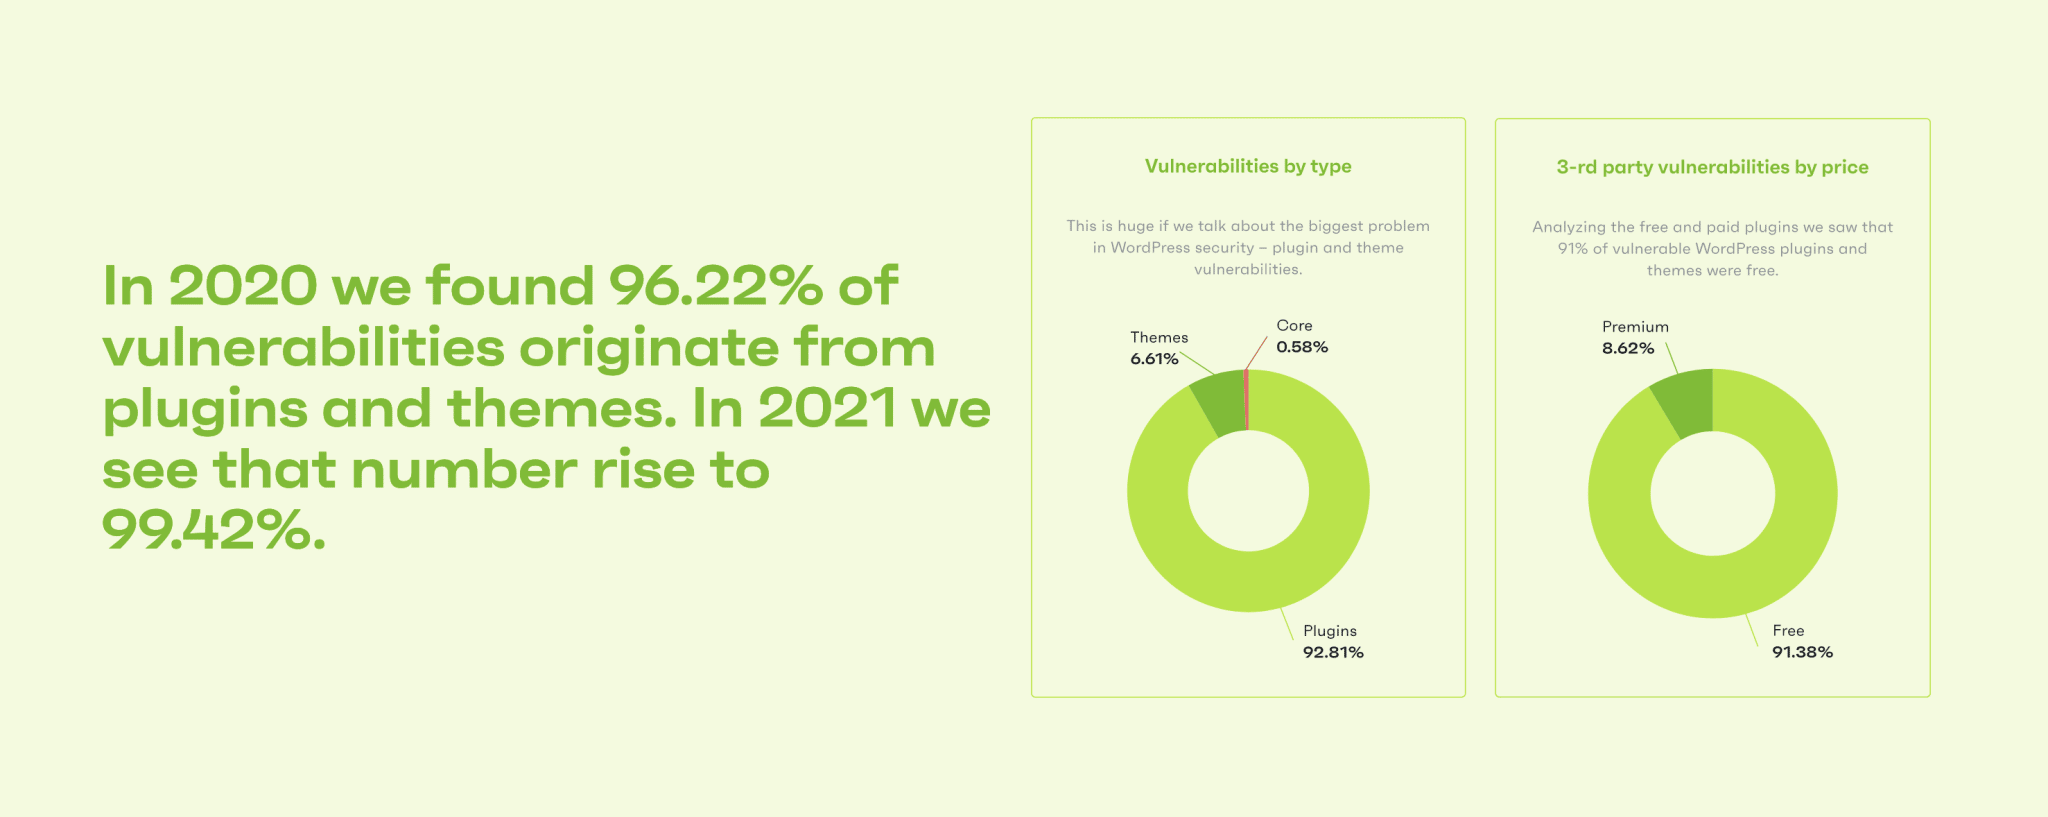
Rest assured: fortunately, WordPress is not a sieve. According to a report published in 2021 by security expert Patchstack, only 0.58% of security flaws come from the WordPress Core.
The main culprit is your plugins, which alone account for 92.81% of vulnerabilities (compared to 6.61% for themes).
Some of the findings of Patchstack’s study speak volumes and call for taking the security issue very seriously:
- On average, 42% of WordPress sites have at least one vulnerable component (plugin or theme) installed
- Vulnerabilities have increased by 150% between 2020 and 2021
- 29% of WordPress plugins containing critical vulnerabilities have not been patched
So, you see what I mean: it is imperative that your WordPress site be protected in order to strengthen its security.
For this, a plugin like Wordfence can do the job. I’ll show you how to install it below.
How to install Wordfence in three steps
Step 1: Activate the plugin on your WordPress dashboard
The first step is to install the plugin from your WordPress admin interface.
Go to the Plugins > Add New menu and type “Wordfence” in the search bar:

Click the “Install Now” button next to “Wordfence Security – Firewall & Malware Scan,” then activate the plugin.
Step 2: Get a Wordfence license key
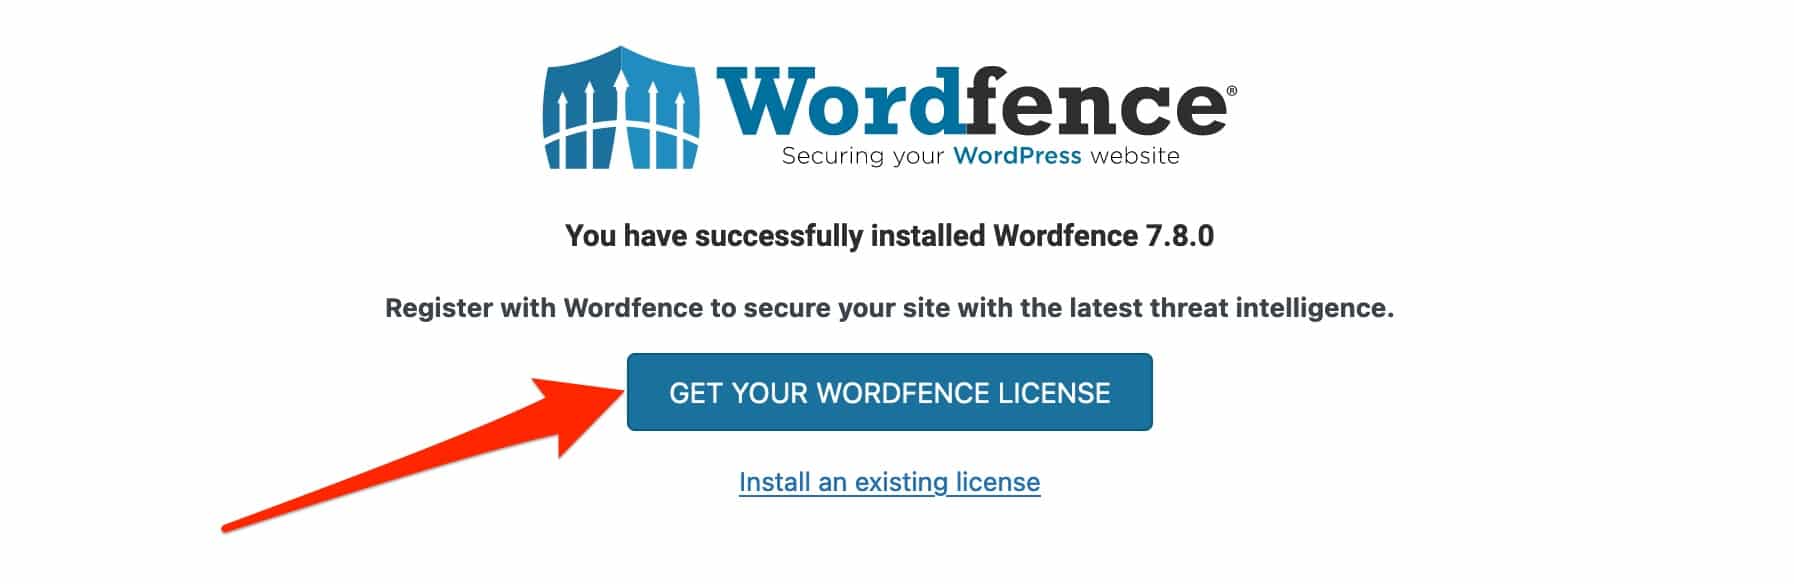
Once the plugin is activated, a window will pop up asking you to get a Wordfence license. This is a necessary prerequisite to take advantage of all the options of the free plugin.
Click on the “Get your Wordfence license” button:

You will be redirected to the Wordfence pricing page on the official website. Click on the “Get a free license” button to get a key for the free version of the plugin:

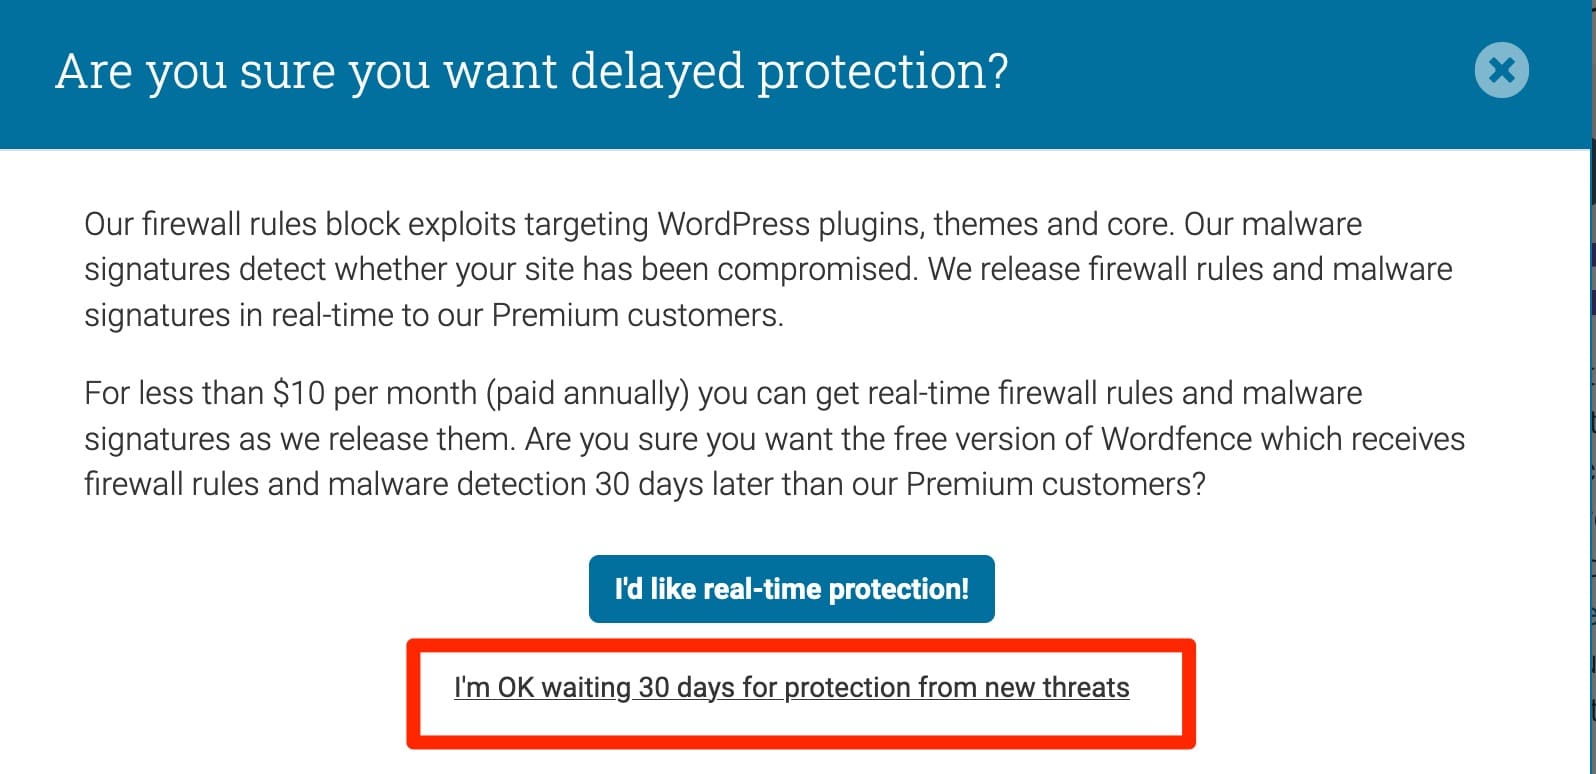
A new window opens on your screen. Wordfence asks you if you are sure you want to use its free version, and explains the main advantage of its premium version: as soon as the plugin’s team deploys a protection measure on its firewall or malware scanner, it is updated in real time on the premium version (compared to 30 days later on the free version).
As I just want to use the free plugin, I clicked on “I’m OK waiting 30 days for protection from new threats”:

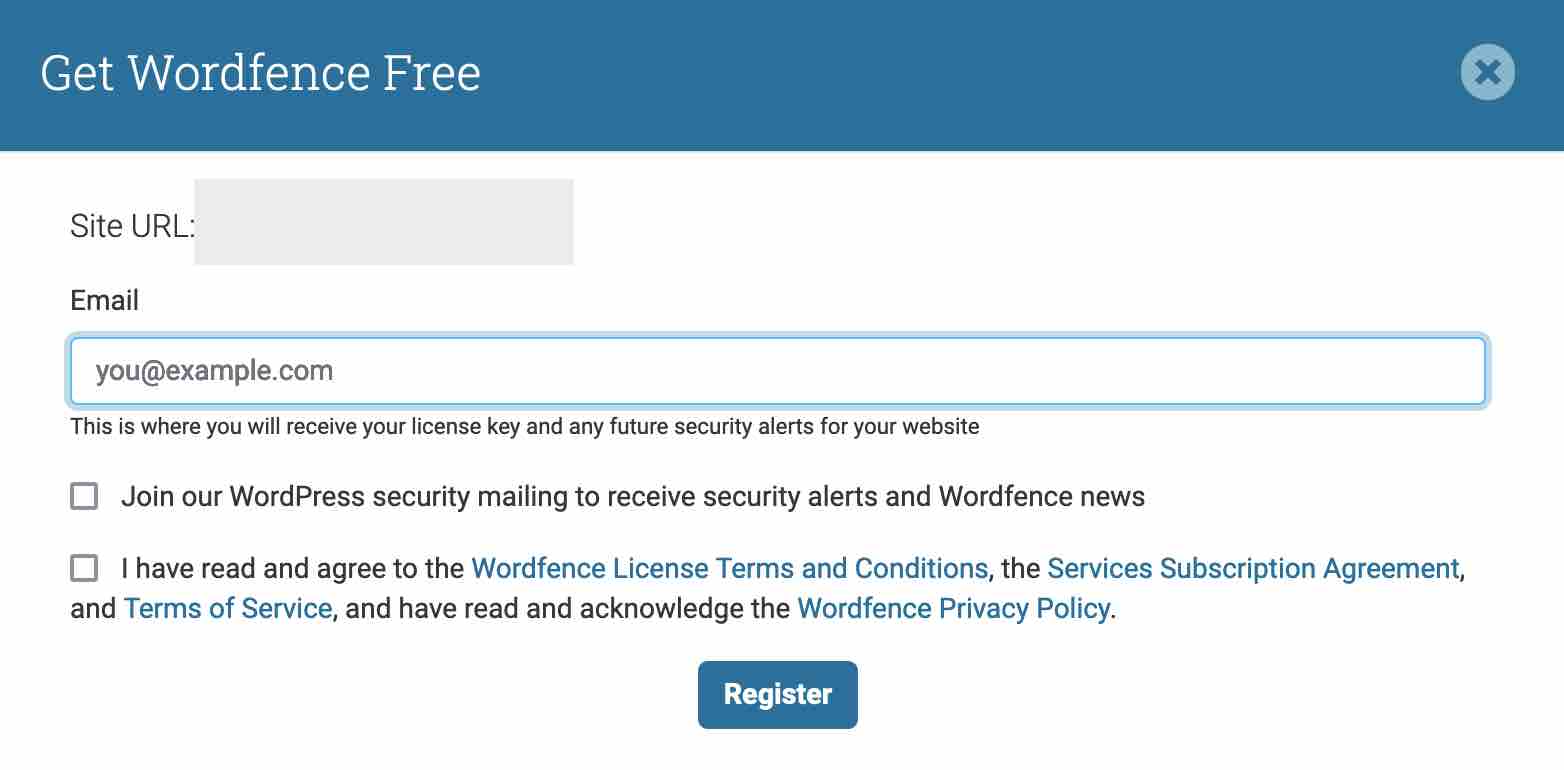
In the next window, enter your email address, check the boxes, and click on “Register”:

Step 3: Install your license on WordPress
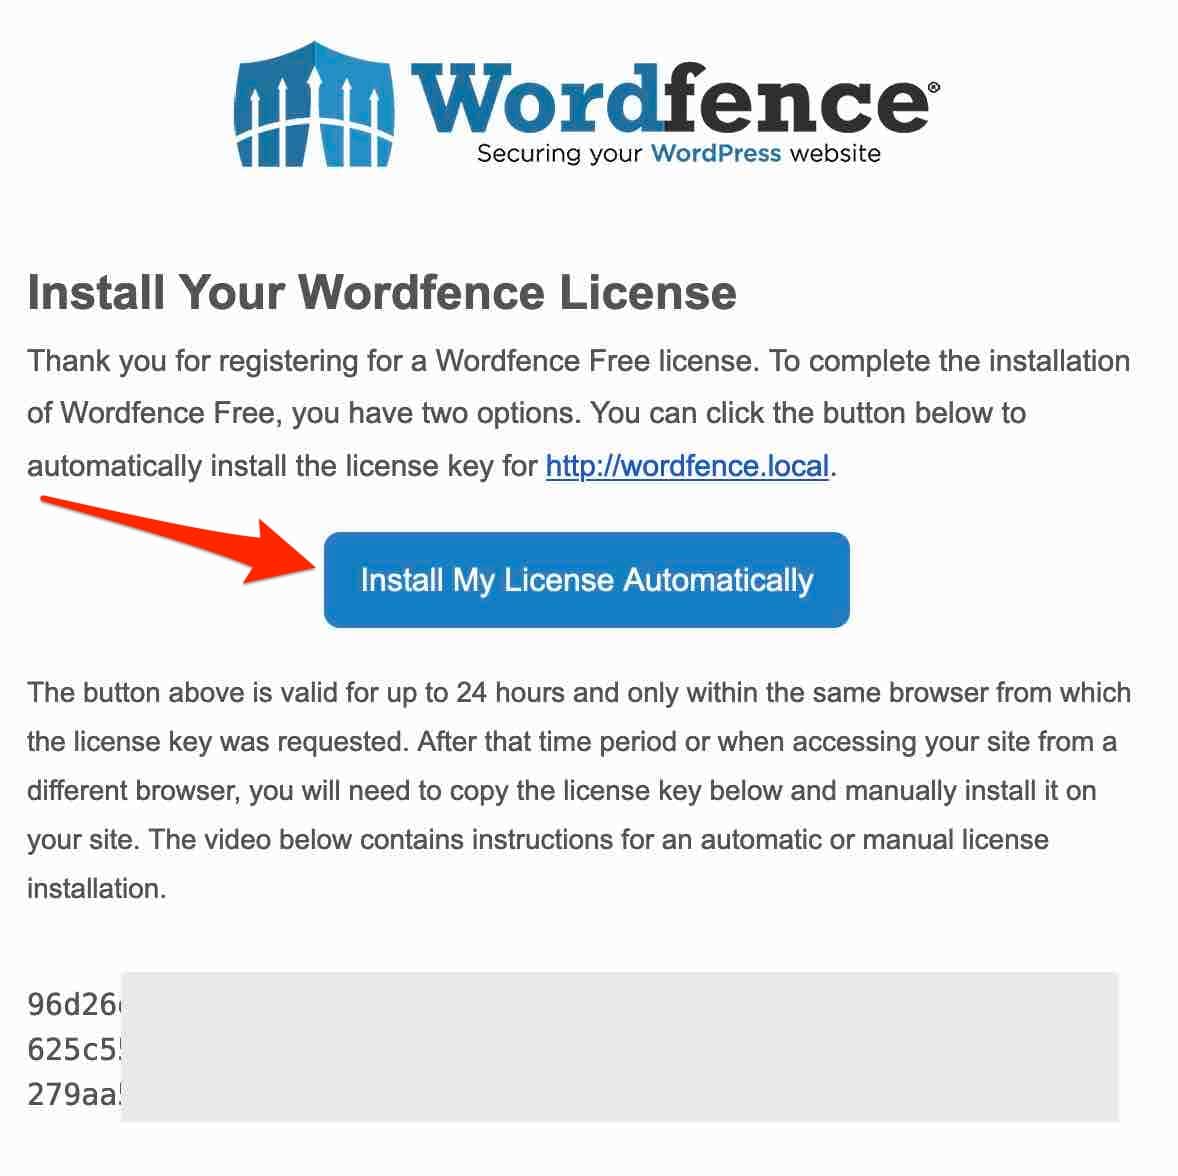
Now go to your email inbox. You should have received an email from Wordfence.
Inside, you will find your license key so you can activate it manually. To move even quicker, Wordfence also offers to activate it automatically for you. To do this, click on the “Install My License Automatically” button:

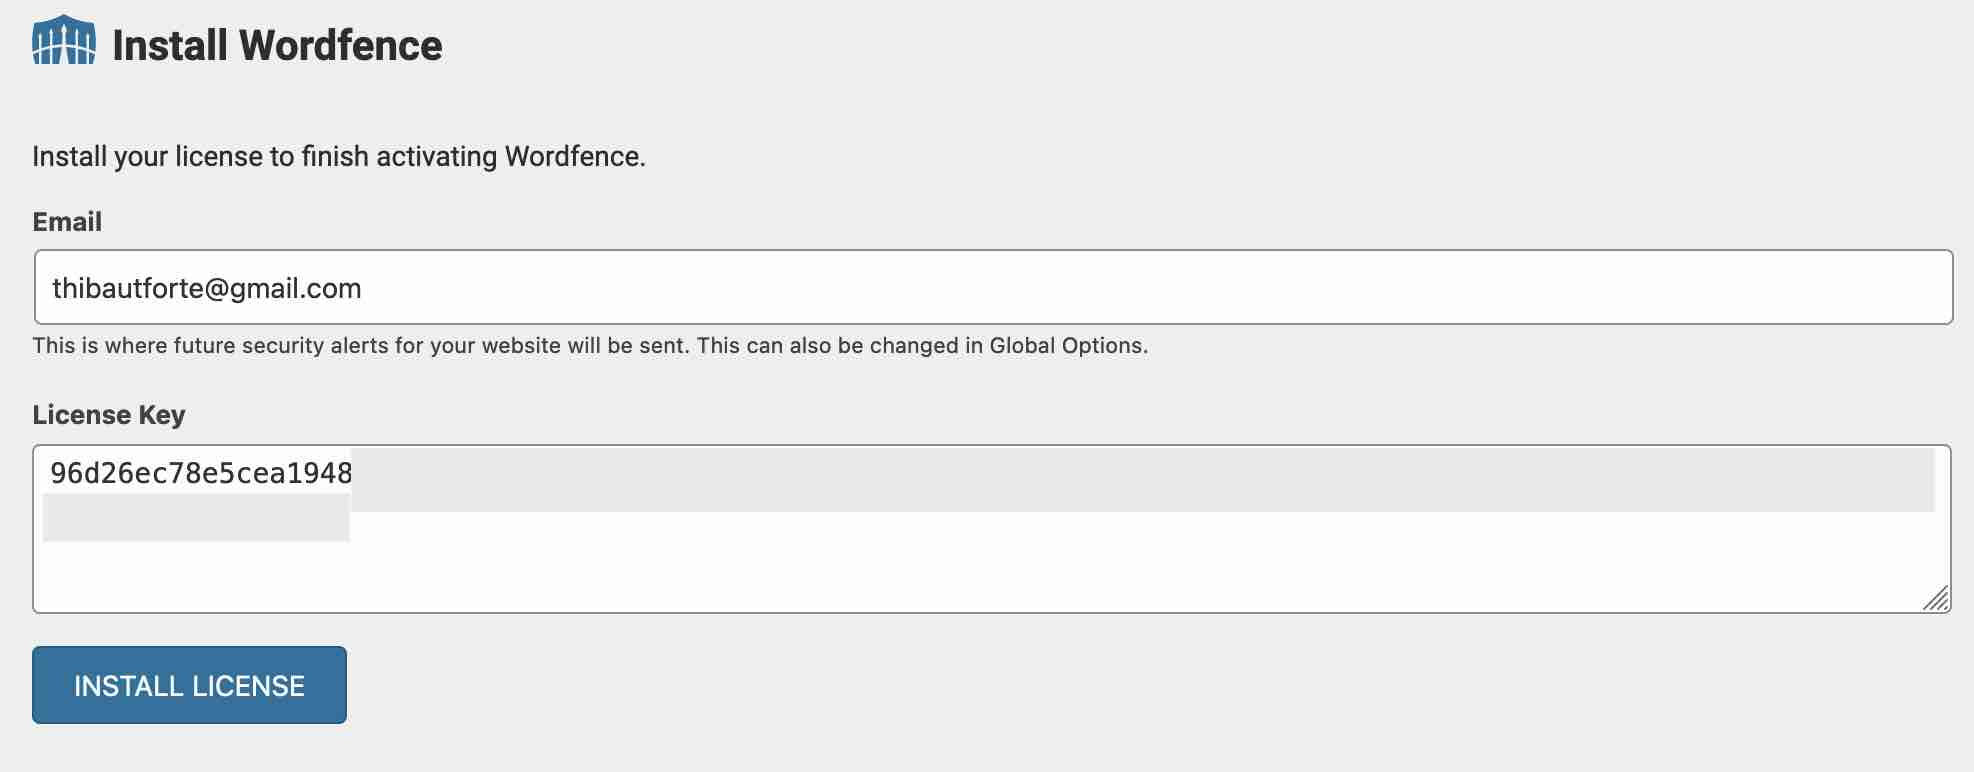
You will be redirected to your WordPress dashboard, with the “Email” and “License key” fields already filled in. Finish by clicking on “Install License”:
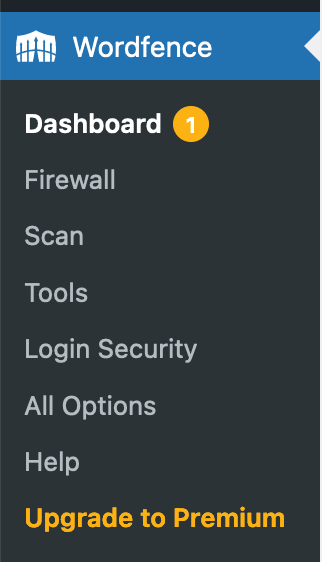
Well done: the plugin is now up and running. In the left sidebar, on your administration interface, you now have a new menu called “Wordfence,” containing all the settings offered by the plugin:

Let’s have a look at them right now, just to see what’s under the hood of the plugin.
How to set up the Wordfence Security plugin
How does the Wordfence Security dashboard work?
The core of the plugin is its dashboard.
It offers quick shortcuts to access the different options offered by the plugin, which you can also find in the menu located in your left sidebar.
With one click, you can take advantage of:
- The application firewall
- The malware scanner
- Wordfence Central. To take advantage of this service, which allows you to update the security of your sites from the same dashboard, you must create a free account. This can be handy if you need to manage the security of several sites at the same time. For individual use, skip it.
- General options to set up your email alerts, firewall, and scanner settings
- Access to the plugin’s documentation
- A notification log
- A summary of blocked attacks on your WordPress site
- A graph showing the total number of attacks blocked on the entire Wordfence network
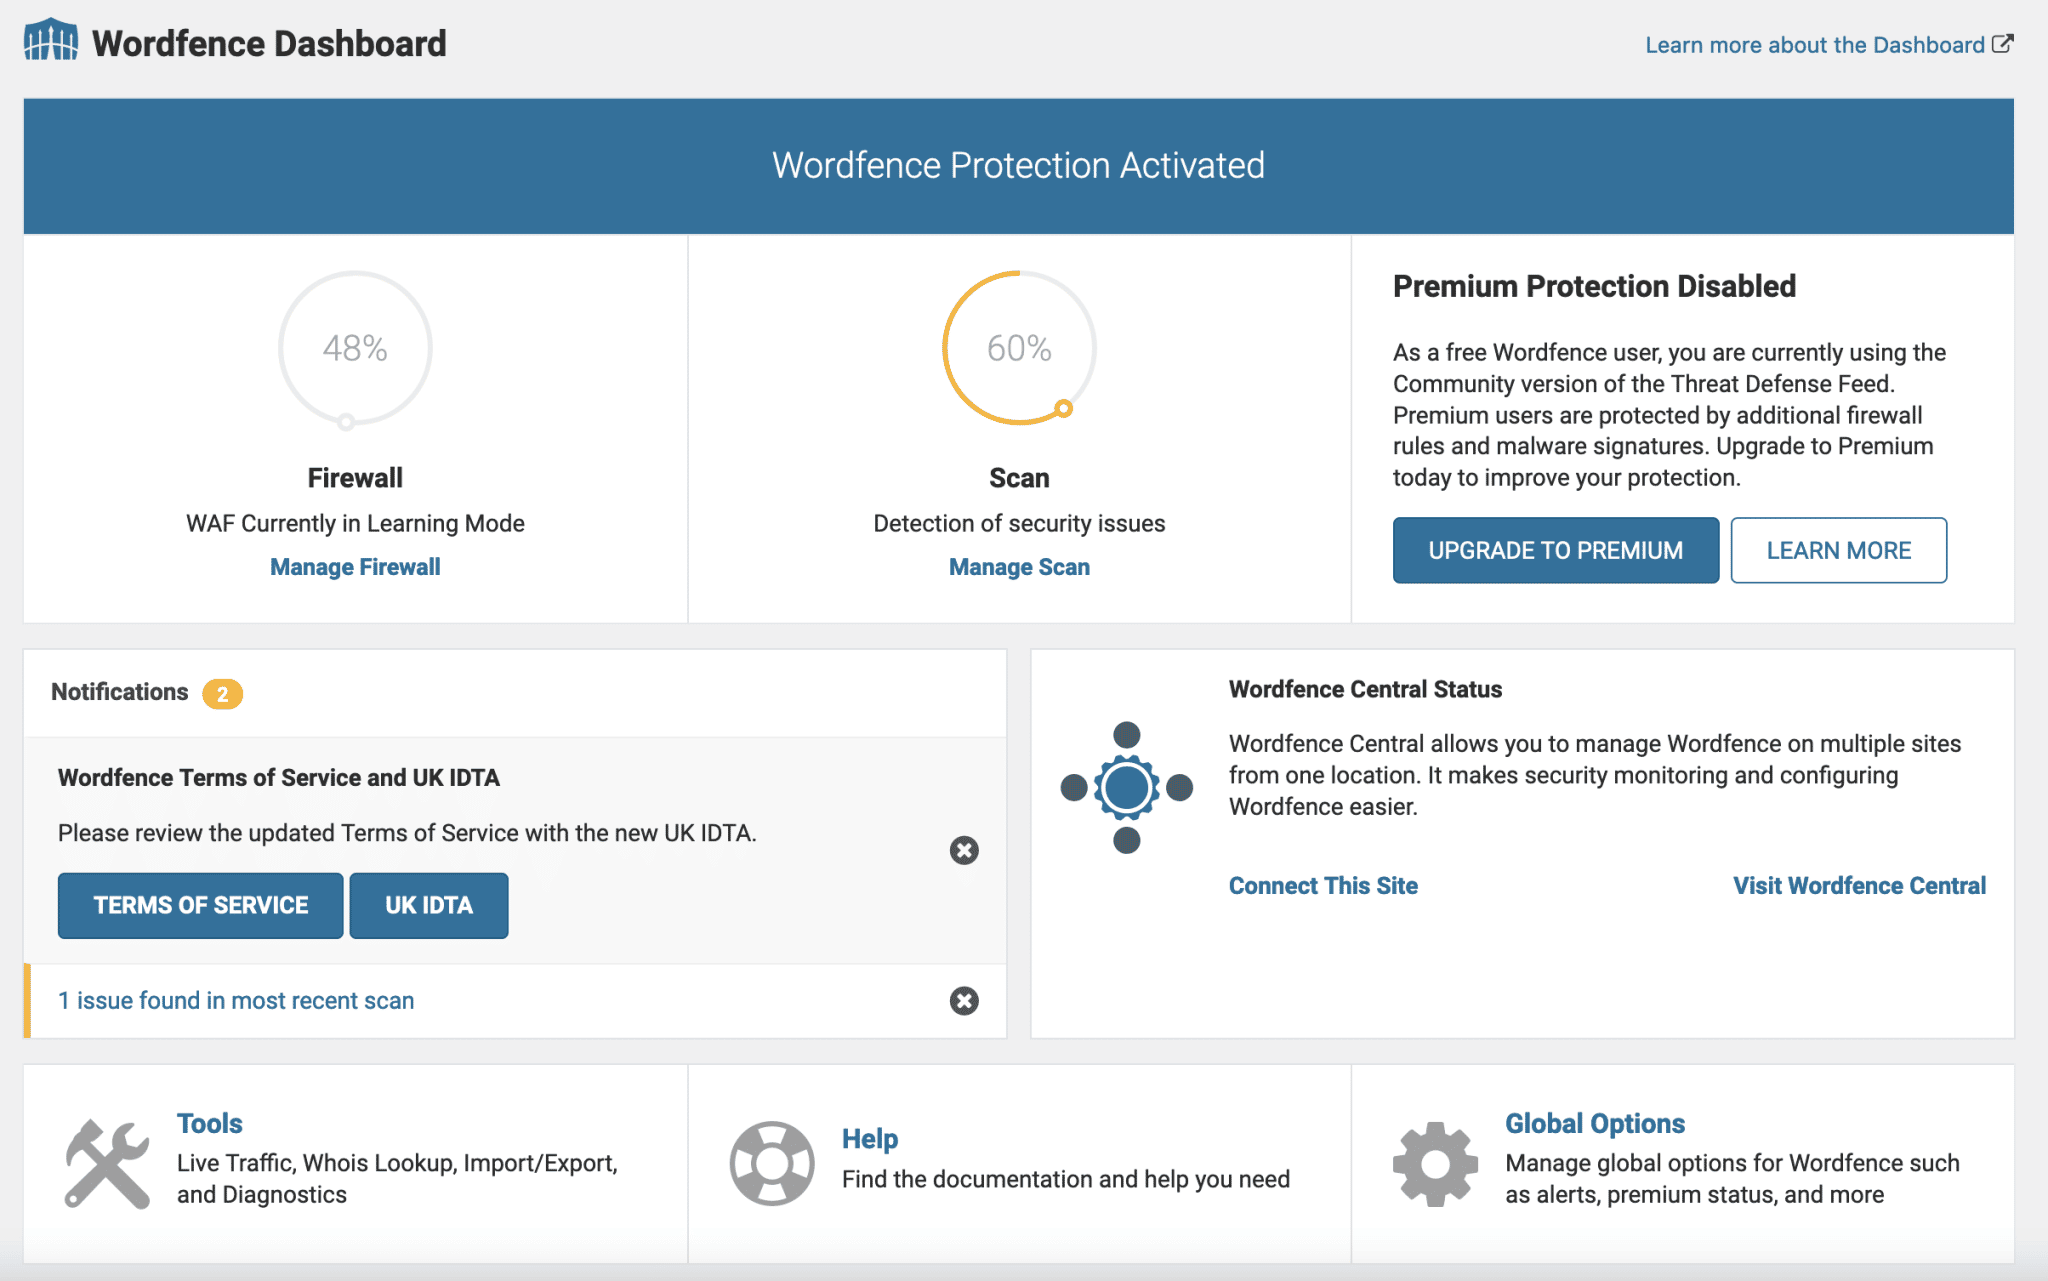
The dashboard is clear and understandable; it’s easy to find your way through the different options.
How to use the application firewall
Protection against multiple attacks
One of the main features of Wordfence is its application firewall.
It can identify malicious traffic and block hackers and other malicious bots before they can access your site.
The firewall is accessible through Wordfence > Firewall. It protects your site against the following attacks:
- SQL injections, i.e. attacks on your database
- Cross-site scripting (XSS): malicious code is injected into the content of your pages
- Malicious file downloads
- Directory traversal attacks
- Local File Inclusion vulnerabilities (LFI), in which remote files are added to your web server
By default, the firewall is in Learning Mode for one week, starting from the moment you install the plugin.
“This allows Wordfence to get to know your site in order to understand how to protect it and how to allow normal visitors through the firewall,” says Wordfence. “We recommend that you leave Wordfence in learning mode for a week before activating the firewall.”
If you want to override these recommendations, click “Enabled and Protecting” in the drop-down menu below:
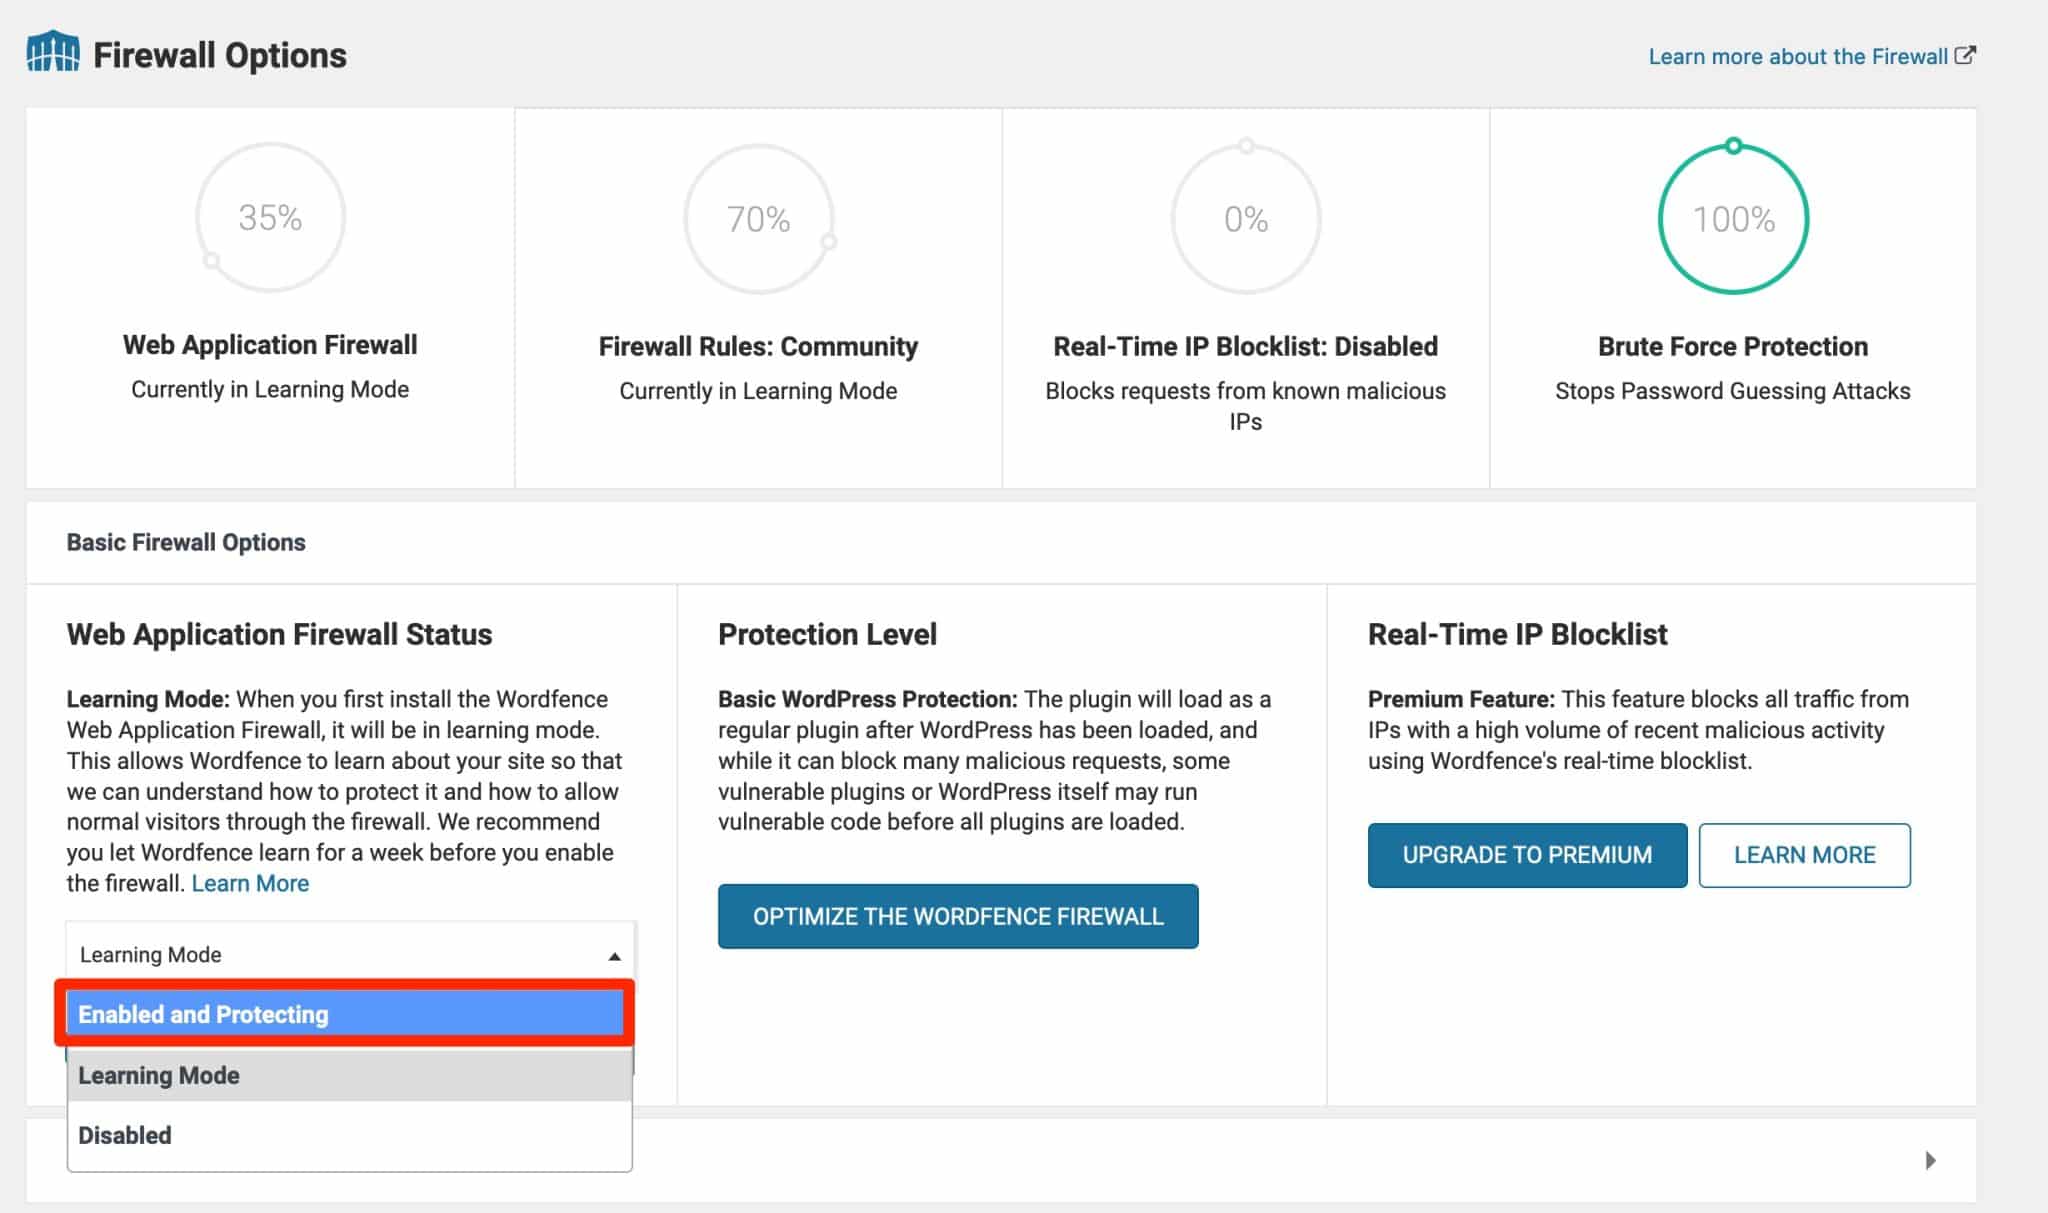
As mentioned earlier, only the premium version of the plugin gets a real-time firewall update whenever a new threat is detected by the Wordfence team (globally, not necessarily an attack intended to target your site). The free version of the firewall is updated 30 days after the threat is detected.


How the Wordfence Security firewall works
By default, the plugin has configured basic settings to strengthen the security of your site. But you can still customize slightly more technical settings by taking advantage of additional options:
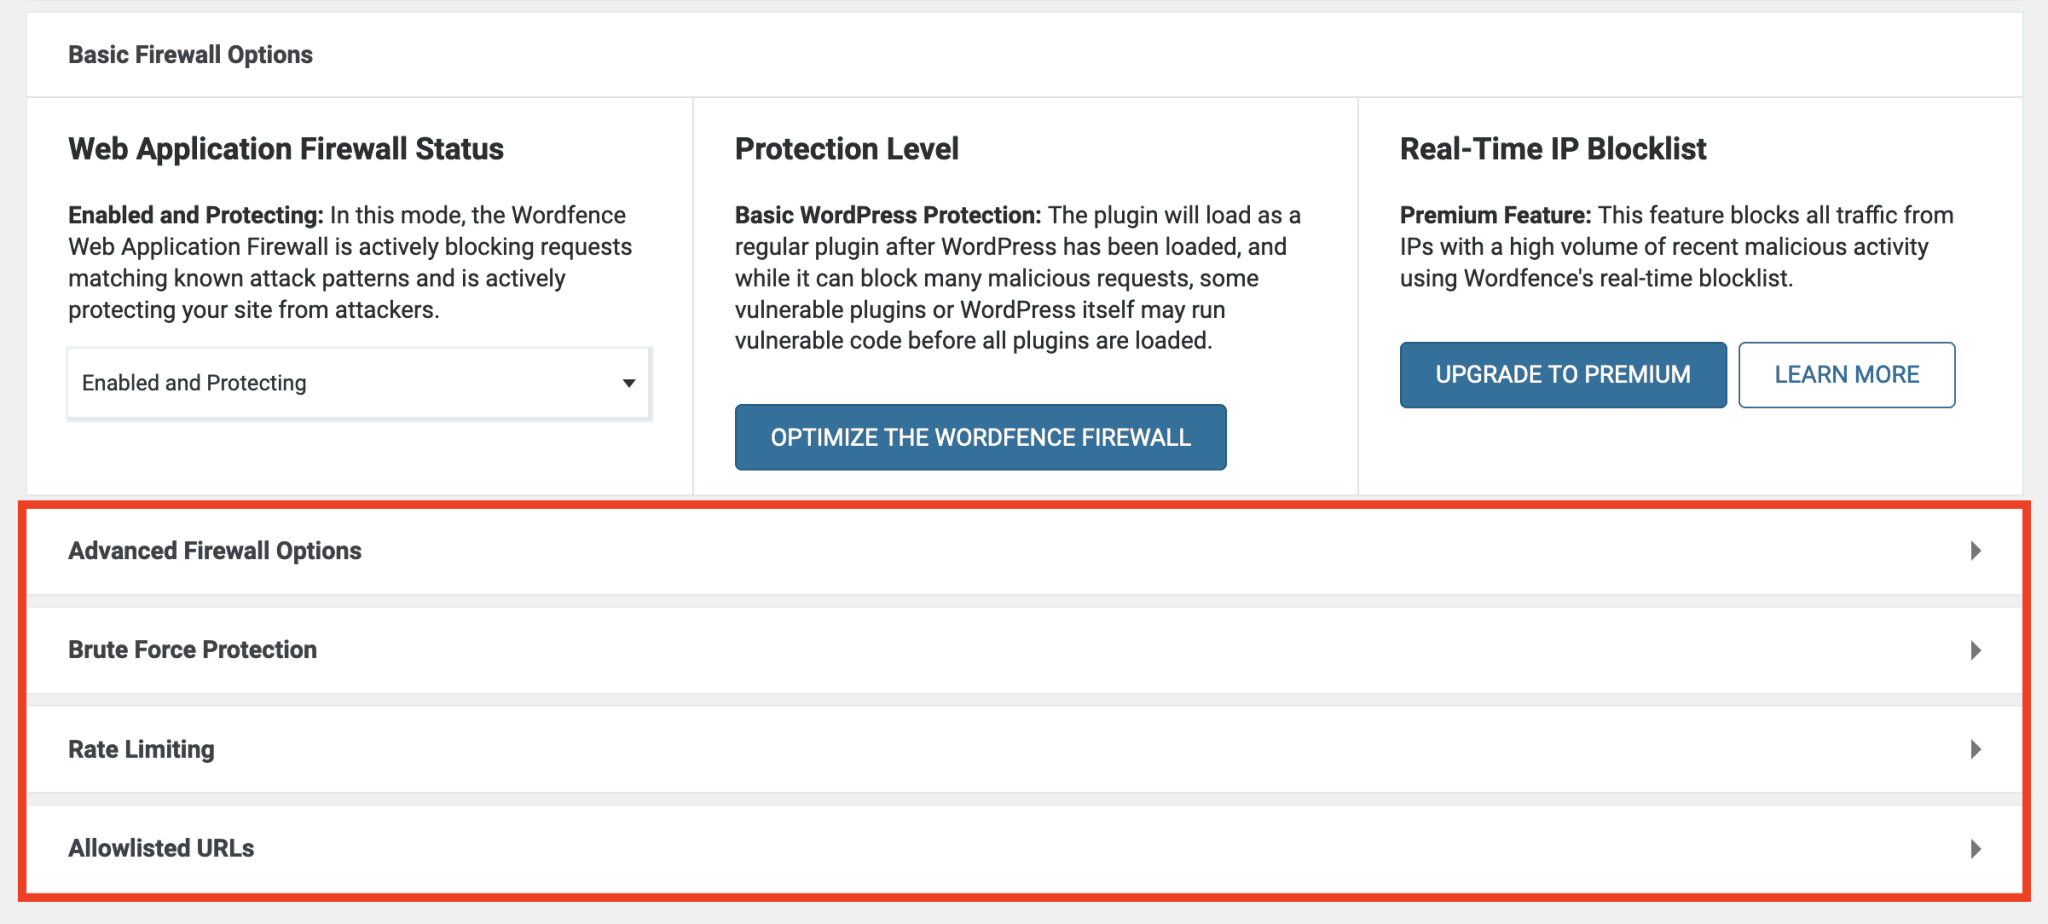
Among them are:
- Whitelisting certain IP addresses
- Entering IP addresses to be ignored by the firewall
- Configuring protection from brute force attacks. For example, you can specify how many failed login attempts are required to prevent access to your login page (and for how long).
This saves you the use of an additional plugin like Limit Login Attempts Reloaded.
When the firewall is in working order, circles show you your level of protection (in percentage). When the circle is grey, the firewall is in learning mode.
The goal is to reach a score of 100% (green color). You can achieve this by following the recommendations provided, by hovering your mouse over each circle:
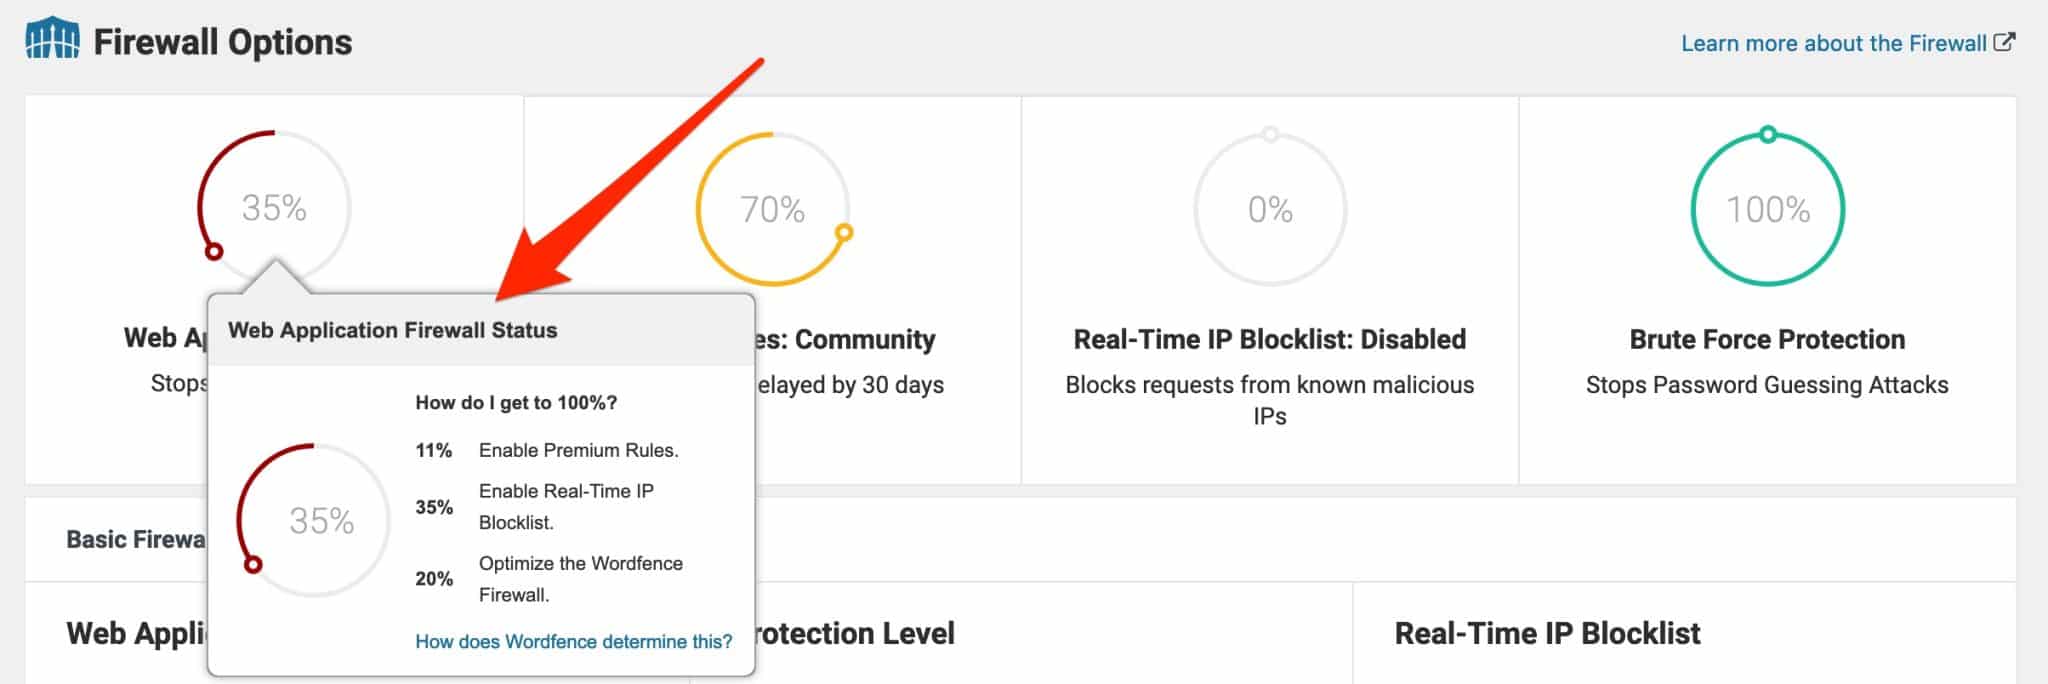
However, a score of 100% will not always be achievable with the free version of the plugin.
To achieve this, you will have to use premium options, such as real-time blocking of IP addresses.
The Application Firewall Blocking tab
In addition to firewall rules that protect against various attacks, Wordfence also has custom features for additional blocking. These can be accessed via the “Blocking” tab:
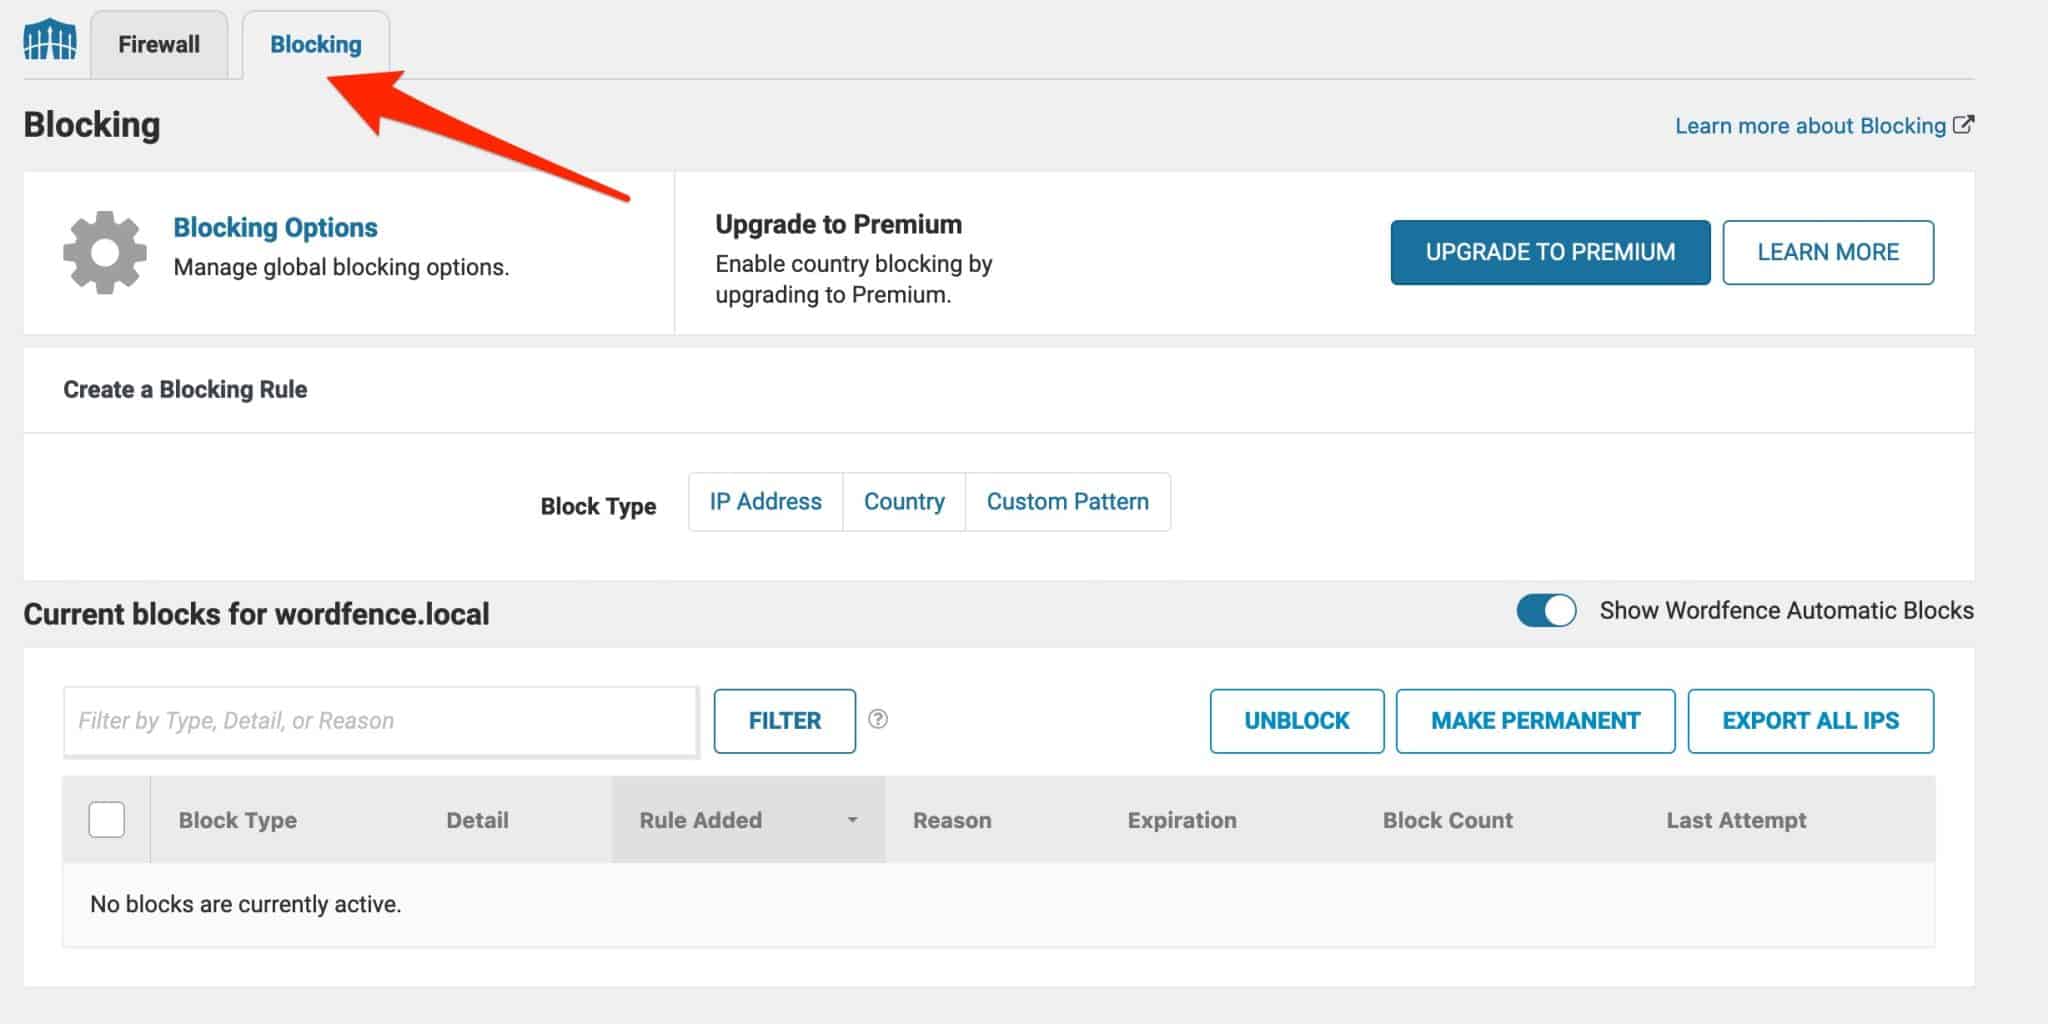
You can create blocking rules based on:
- IP address
- A geographical area
- A set of criteria (Custom Pattern) such as a network of IP addresses or web browsers
For more info on this, watch this video:

How to use the malware scanner
Let’s move on to the scanner offered by the plugin, accessible via Wordfence > Scan.
The scan tool scans your site (core files, themes, and plugins) for the following: malware, bad URLs, backdoors, remote access to your site, SEO spam, malicious redirects, and other code injections.
During its scan, the plugin “compares your core files, themes and plugins with what’s on the WordPress.org directory,” Wordfence Security details. “It checks their integrity and notifies you of any changes.”
Initially, the scan focuses on checks for spam and blacklisted IP addresses (for the premium version only). It then moves on to scanning your site’s files and providing results.
In my case, the plugin warns me that I am using a too insecure administrator login (“admin”). I can then solve this problem by clicking on “Edit,” or simply ignore it:
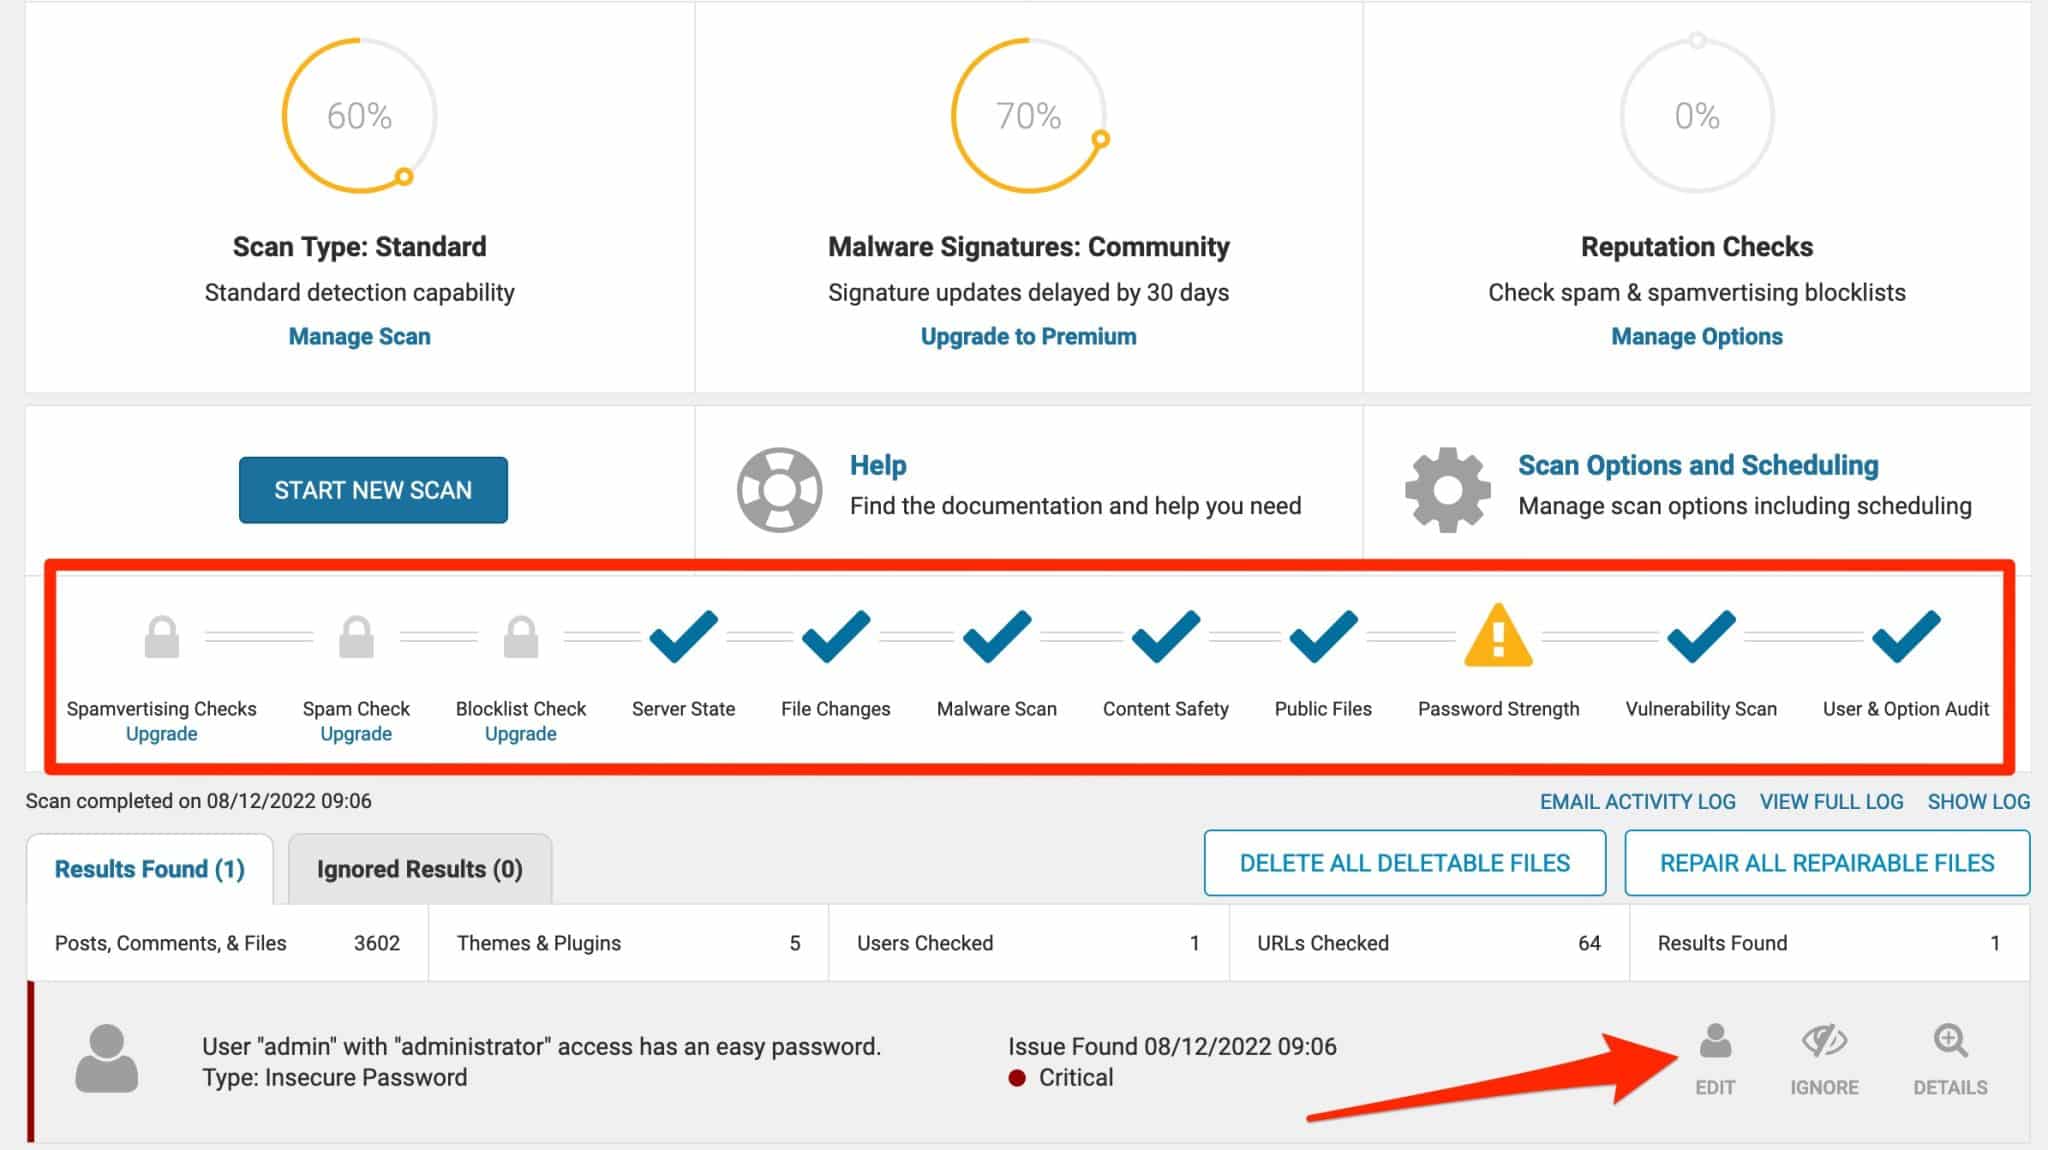
As for the firewall, circles show me the elements to optimize to reach a score of 100%.
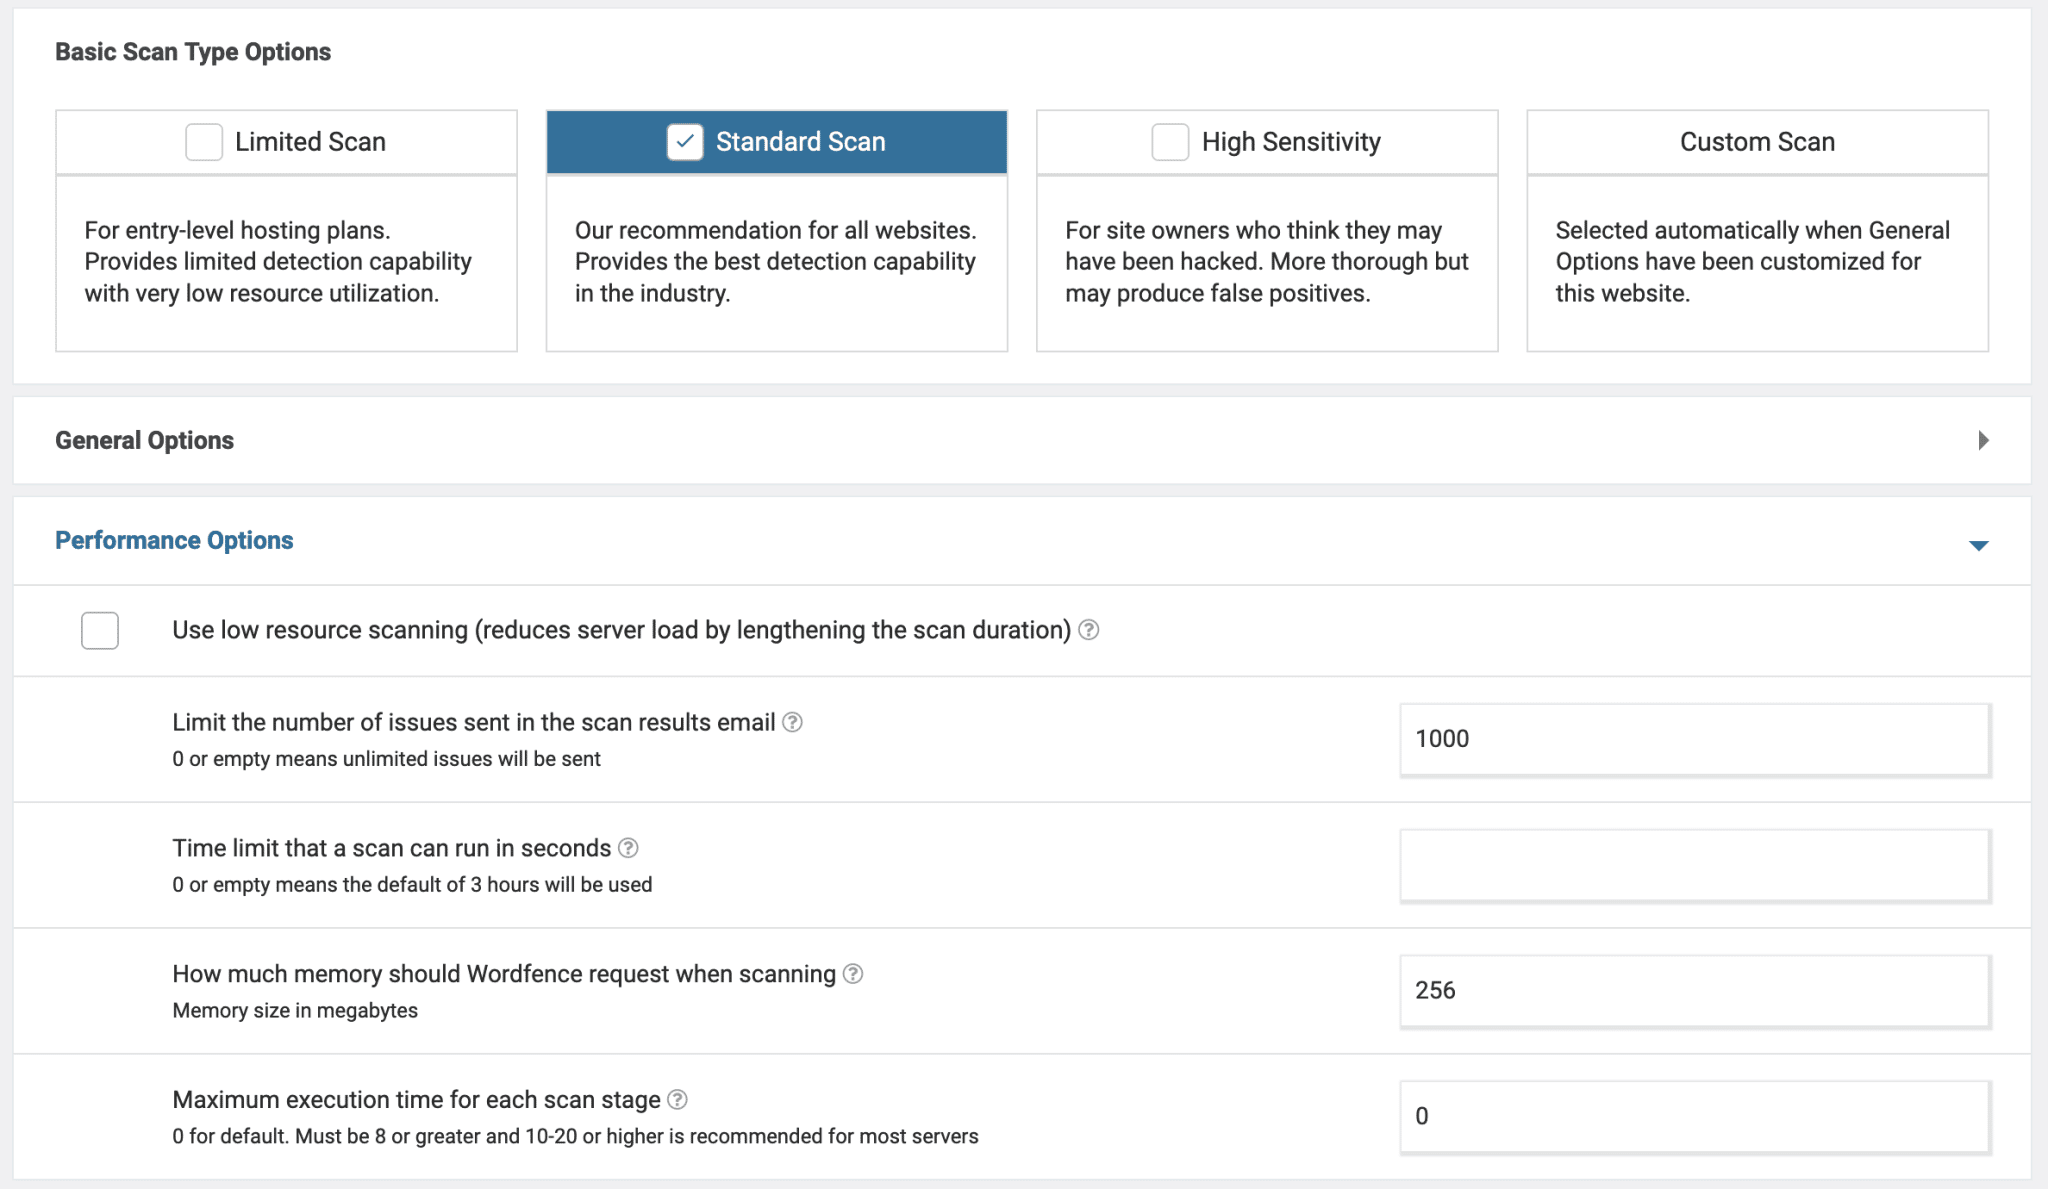
By clicking on “Scan Options and Scheduling,” it is also possible to edit more specific settings.
To optimize performance, you can, for example:
- Choose to run the scanner on a limited basis, to save bandwidth (remember that Wordfence runs on your web server, so it uses resources)
- Manually limit the number of items to scan
How to enable two-factor authentication
After the firewall and the site scanner, WordFence Security suggests its users enable two-factor authentication (Wordfence 2FA).
Two-factor authentication adds an additional security measure for logging into your WordPress site.
After entering your username and password, you will be asked to use a device, often your smartphone or tablet, to validate the login process.
This is a method already used by banking institutions when you make online payments. It is very effective in protecting you against brute force attacks.
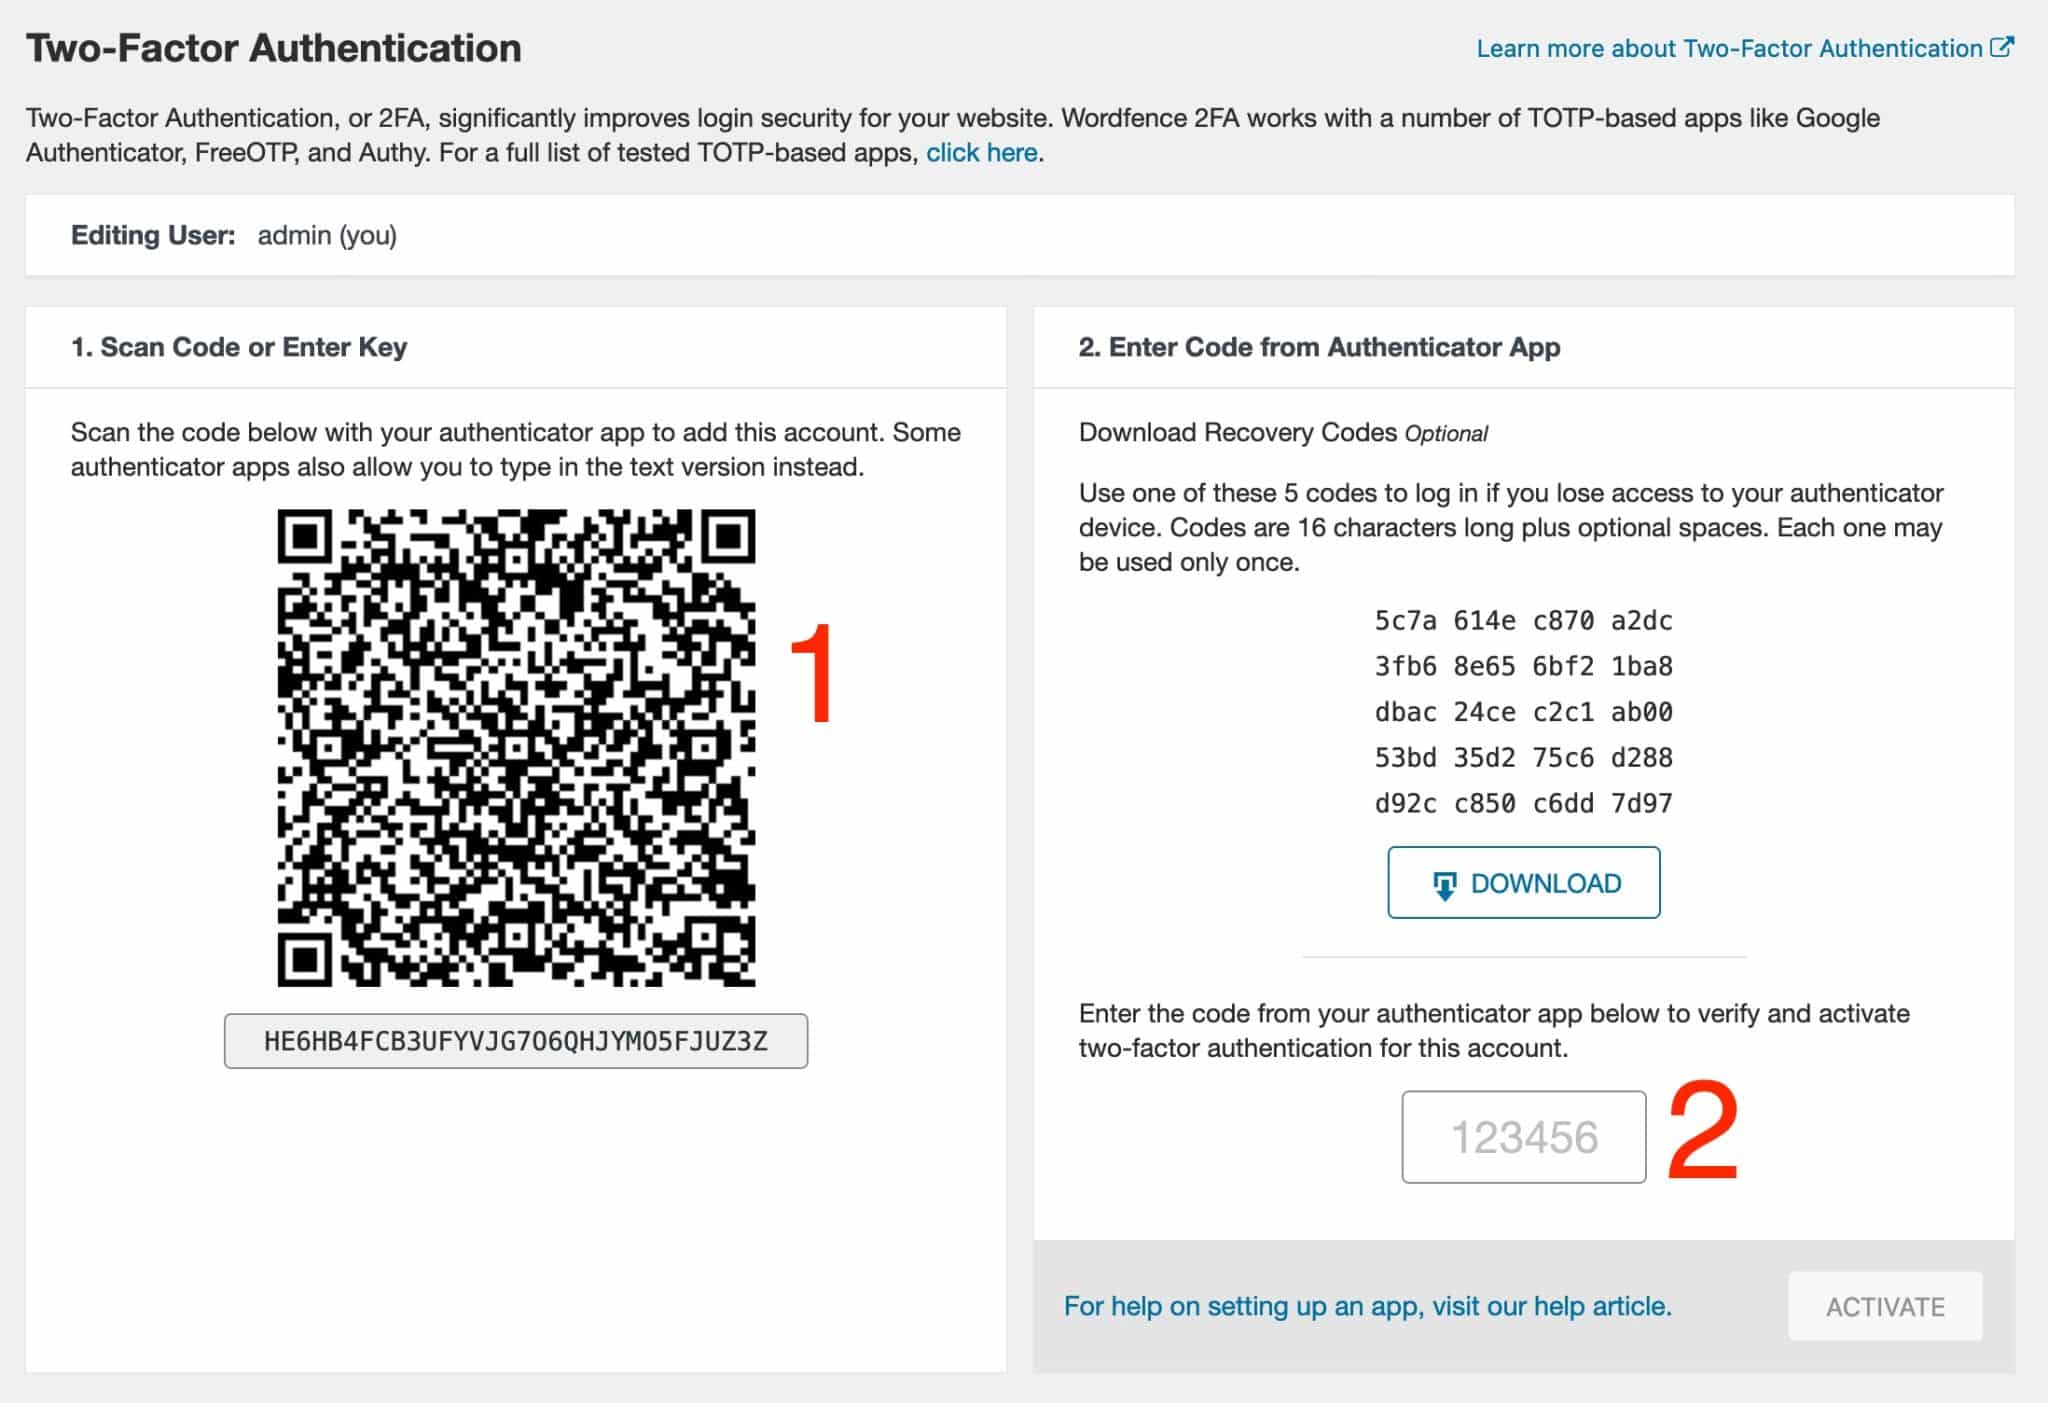
To use it, go to the Wordfence > Login Security menu. In summary, you need to:
- Install an application on your smartphone to authenticate yourself, such as Google Authenticator, Sophos Mobile Security, or FreeOTP Authenticator.
- Scan the QR code offered by Wordfence in the chosen authentication application (1).
- Enter the 6-digit code displayed after the QR code scan to authorize the connection between your WordPress site and the application (2).
If you want to see this activation process visually, check out this resource:

Two-factor authentication can be set up for all user roles, from administrator to subscriber, through the Settings tab:
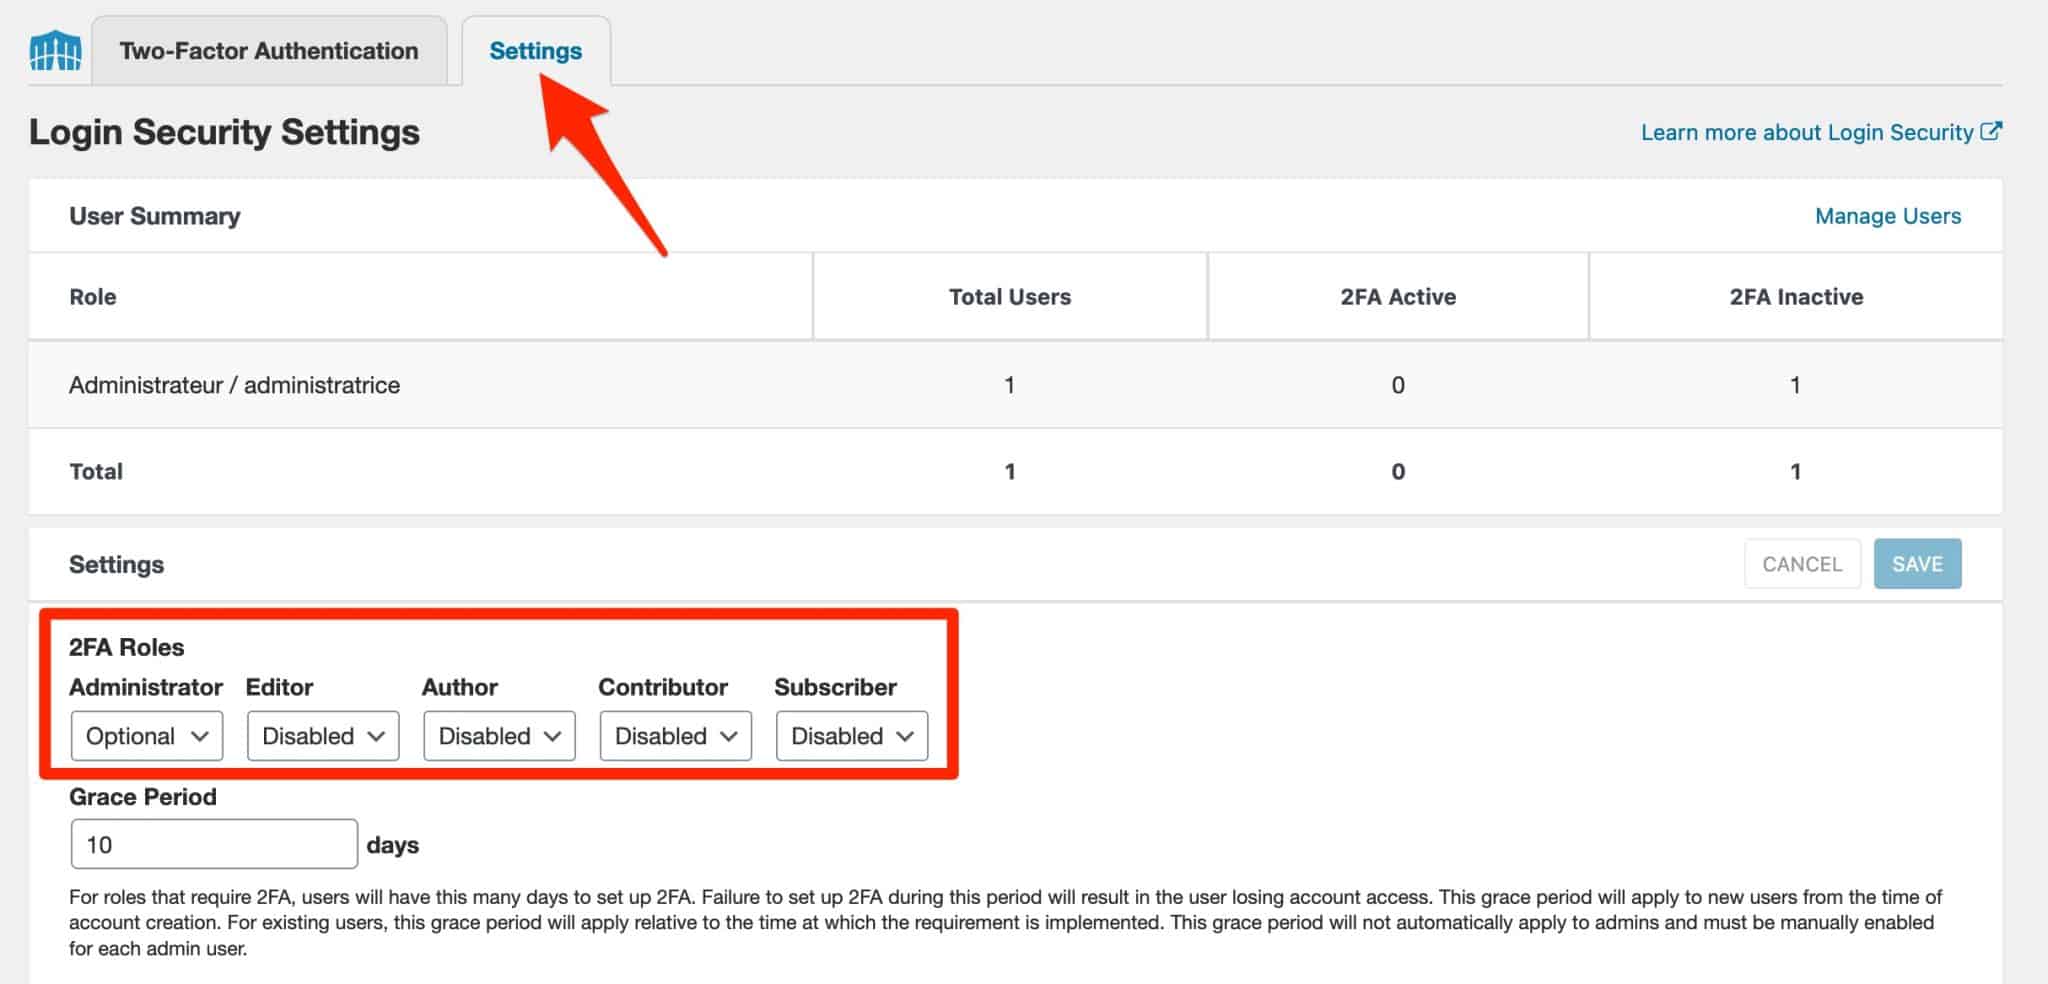
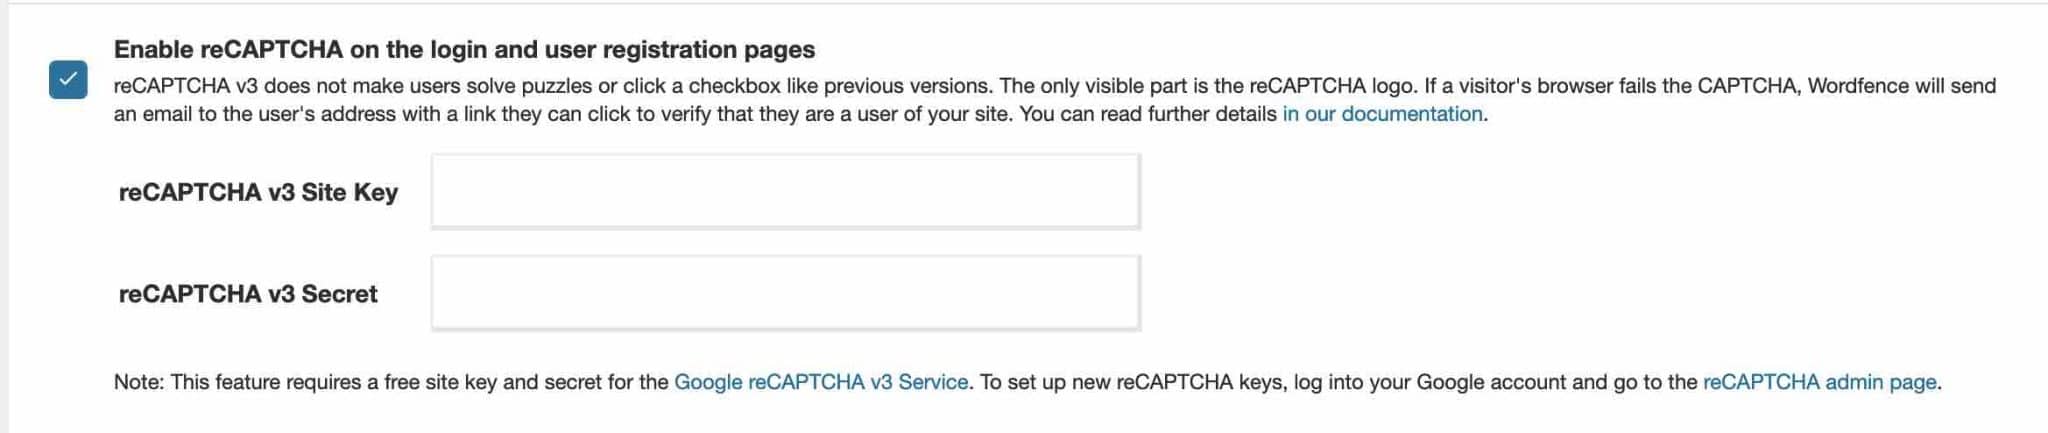
Still in the “Settings” tab of the “Login Security” menu, you can also enable Google reCAPTCHA version 3, to protect against spam on the admin login page. To work, this service requires a free license key from Google.
Other tools offered by Wordfence Security
The WordFence Security owner’s tour is well advanced. To finish, let’s dive into the last two menus offered by the WordPress security plugin.
The Tools menu
The Tools menu consists of four tabs:
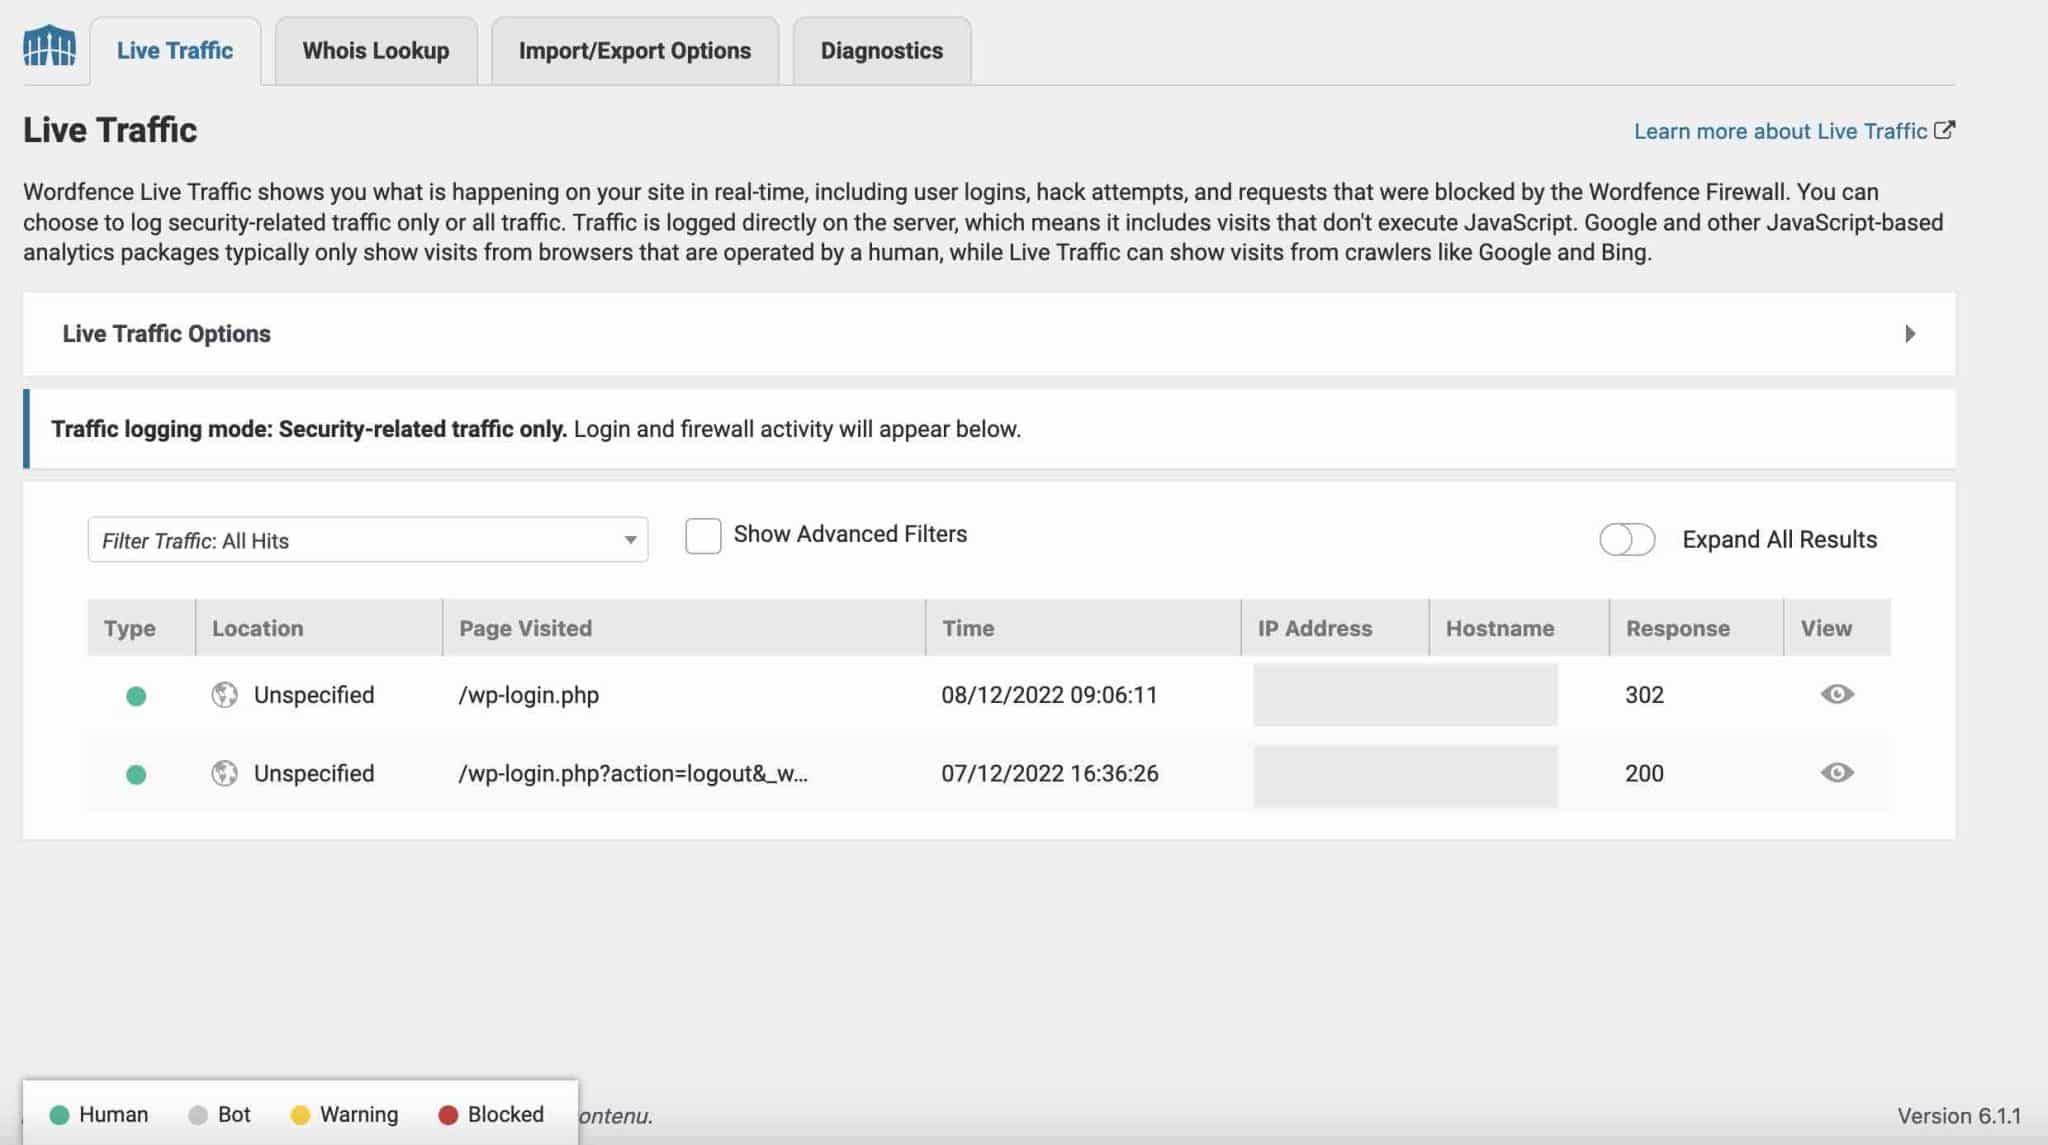
- “Live Traffic” shows you what is happening on your site in real time, including user logins, hacking attempts, and requests that have been blocked by the Wordfence firewall. A color code (green, gray, yellow, and red) tells you who is trying to access your site (humans or bots) and the status (warning or blocking):
- “Whois Lookup” to know who owns an IP address or domain name that visits your site or engages in malicious activity on your pages
- “Import/Export Options” to export or import your Wordfence options to another WordPress site
- “Diagnostics” delivers information that can be used to resolve conflicts, configuration or compatibility issues with other plugins, themes, or the server environment.
The All Options menu
The “All Options” menu contains all the options that are scattered in other menus (such as firewall, scanner, or connection options) on the same page.
The advantage is that you can find everything in the same place. I won’t go into all the options, since you have already seen the main ones.
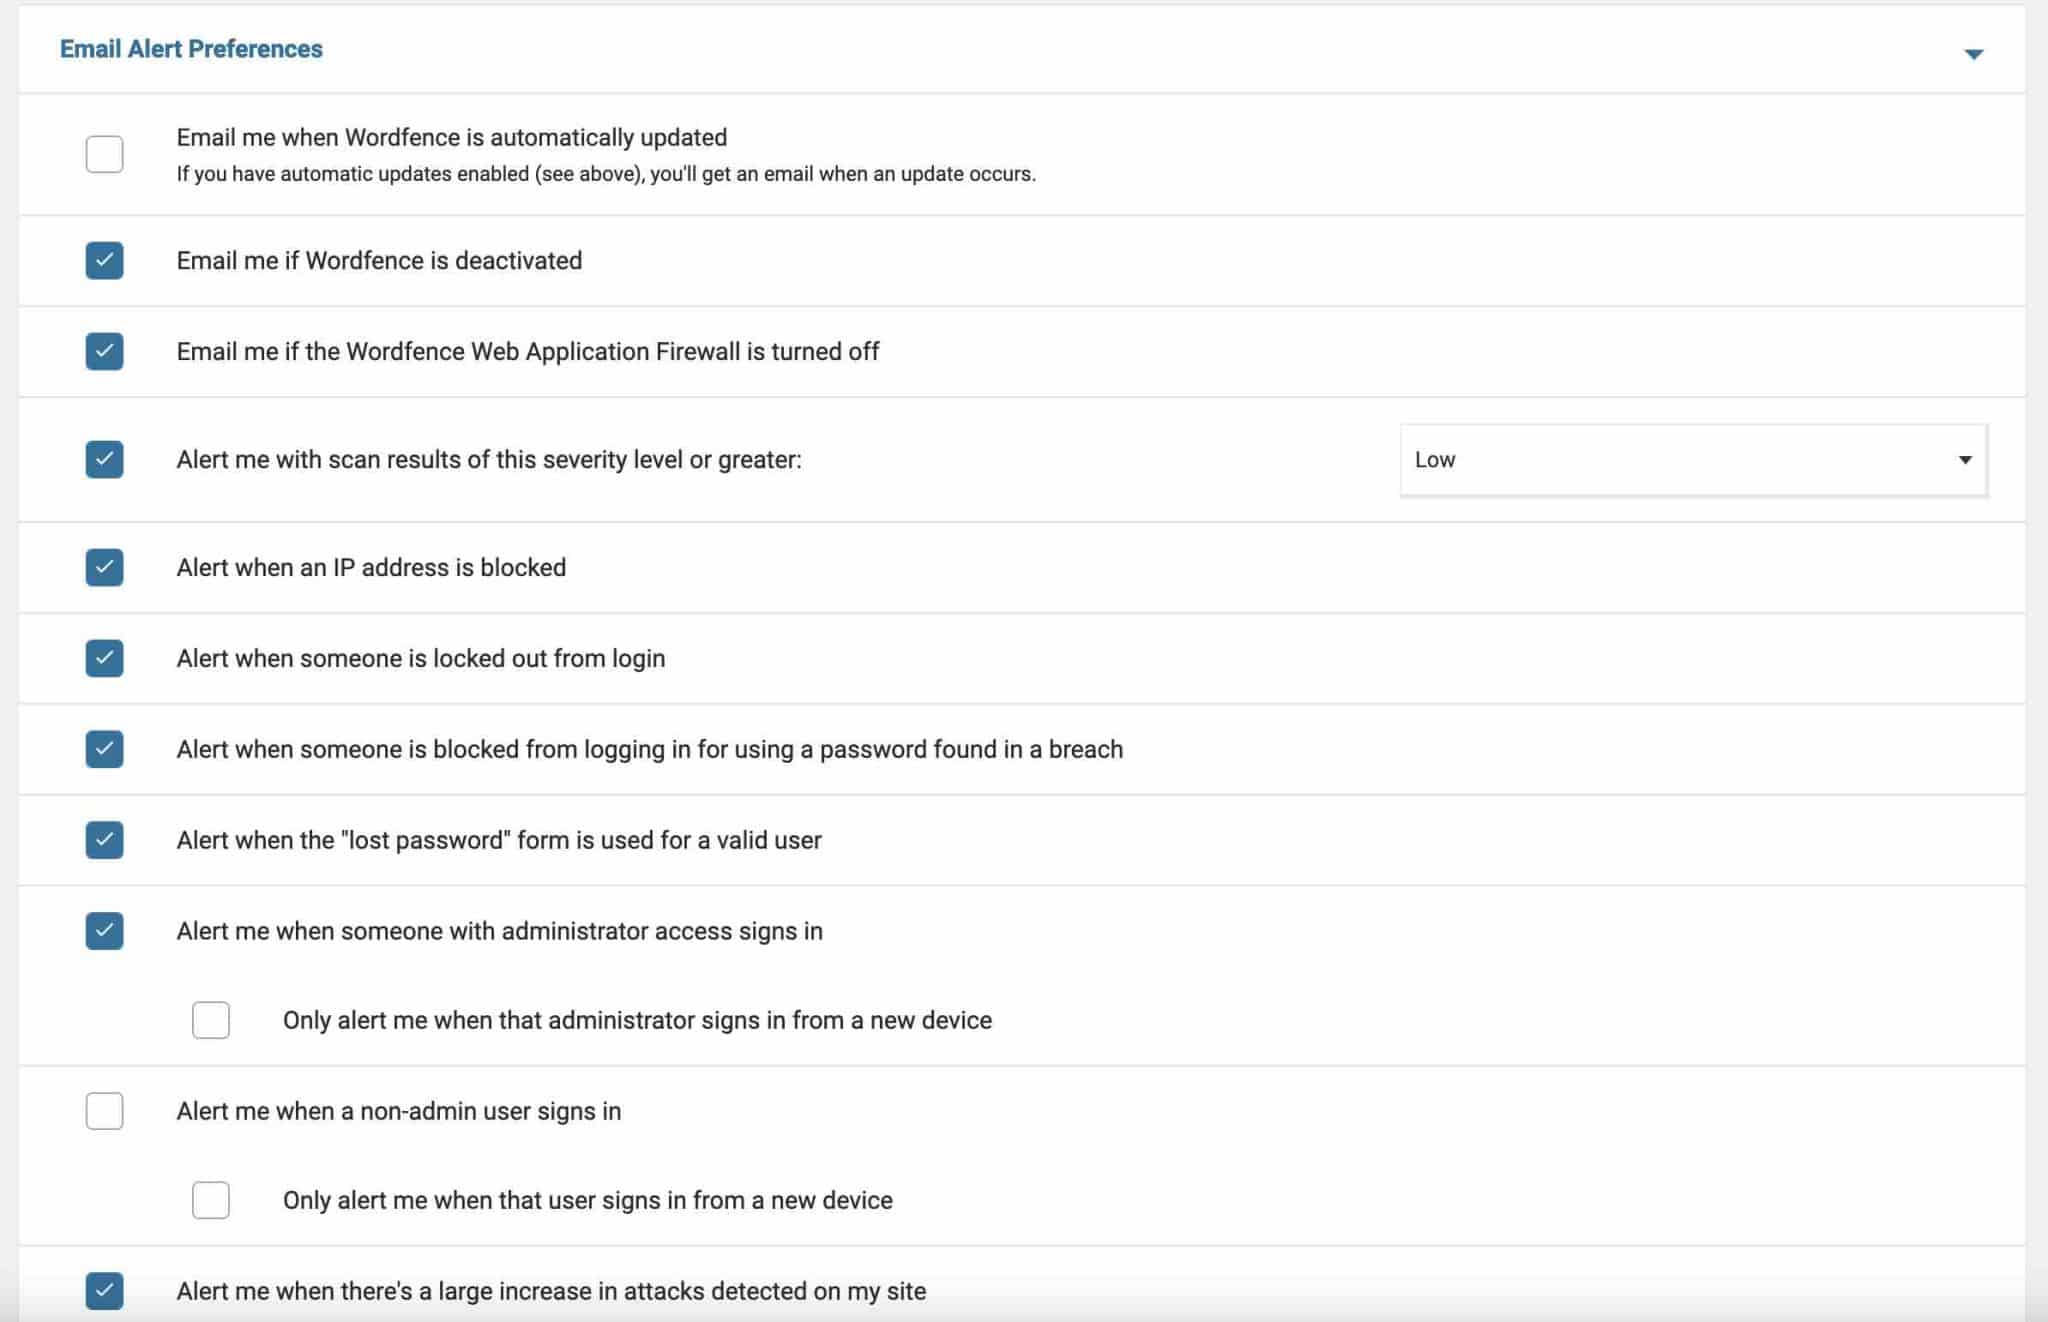
However, it is interesting to note that it is here that you can set your email alert preferences. You have a dozen checkboxes that allow you, for example, to be alerted (or not):
- When an IP address is blocked
- When a person is banned from your login page
- When a significant number of attacks is detected on your WordPress site
That’s it for this complete tour of Wordfence Security features. Now let’s take a closer look at the pricing of this tool.
How much does Wordfence cost?
Wordfence Security is initially available for free on the official WordPress directory. Of course, like any free version, it does not include all the options offered in the paid version of the plugin.
Wordfence Premium is priced at $119/year. Apart from the priority support, the main difference with the free offer is the frequency of updates of the tools offered by Wordfence.
With premium, as soon as Wordfence’s servers detect threats in real time, they will update your firewall rules, malware detection, and IP blocking list in a flash.
With the free plugin, you have to wait 30 days after going live to benefit from the updates.
Beyond that, Wordfence also offers two licenses where a dedicated team will install, configure, and manage Wordfence for you:
- Wordfence Care: $490/year
- Wordfence Response: $950/year. This license gives you access to the same options as Wordfence Care, but you also have a guaranteed response time of one hour maximum and responses are available seven days a week.
These last two offers are mainly for large sites and people who don’t have the time to take care of the security of their site (and who have the budget to delegate this task).
For your personal website or blog, the free or premium Wordfence plugin will be sufficient.
Our final opinion on the Wordfence plugin
To conclude, let’s recap what we’ve seen since the beginning of this article, with a summary of the strengths and weaknesses of this security plugin.
Advantages of the Wordfence Security plugin
- The pleasant and clear interface, which makes it easy to learn
- It automatically applies basic security settings for you
- The many features offered in the free version, including an application firewall
- Two-factor authentication
- The security scanner
- Email alerts to let you know when there is a problem
Disadvantages of the plugin
- Some settings are too complex for a beginner, but this is also the case with other security plugins
- The fact that the latest updates of detected threats are only applied 30 days after they are released
- Using Wordfence can cause slowdowns on your pages because it consumes a lot of server resources. If your web host doesn’t catch up the performance of your site could be impacted.
Should you use it?
Overall, Wordfence is a very good security plugin. As most of its options work automatically, it’s suitable for beginners.
More advanced users will appreciate being able to edit more technical and advanced settings.
Thanks to the free plugin, you will have a valuable shield to block most malicious attacks, especially through its application firewall. The latter will already be effective in providing a first level of security for your site.
This is worth noting because other competing plugins (e.g. Sucuri) do not offer a firewall in their free version. It is however a basic protection to have for any site.
And if you also want to protect yourself from the latest threats detected by the Wordfence team (it’s always better), switch to the premium package if your budget allows it.
Finally, don’t forget that using a security plugin is not everything. Firstly, because no site is infallible. Secondly, because you need to apply good practices on a daily basis. For example, remember to update and backup your site regularly.
So, what do you think of Wordfence? Give me your opinion in the comments.