12 + 23 + 6 + 9 + 16. That is a total of 66. Addition done by head, without the help of a calculator.
Easy? Yes, it’s true. I didn’t include divisions or fractions that would have made my life difficult.
Now let’s try something more complicated. Imagine that this number 66 represents the total number of updates to be done on several sites you manage.
Each time, you will have to connect to each site, and then make the updates by hand.

Unless? Unless you use a guardian angel. A tool called ManageWP, designed to perform all your updates from a single dashboard.
And that’s just the tip of the iceberg. ManageWP allows you to automate many other tasks (e.g. backup), to make your daily life as a webmaster more peaceful.
Don’t you know the beast yet? At the end of this tutorial, you’ll know everything about how it works and you’ll finally say goodbye to the chore of time-consuming updates.
Overview
- What is ManageWP?
- How to add your WordPress site to ManageWP?
- How is the dashboard of the tool organized?
- How to update your site?
- How do you create a backup of your site with ManageWP?
- Other free options
- What are the premium features of ManageWP?
- Support and assistance
- How much does ManageWP cost?
- Who are ManageWP’s competitors?
- Our final opinion on ManageWP
What is ManageWP?

ManageWP is a freemium tool that allows you to control and manage all your WordPress sites from a single dashboard. With one click, you can perform bulk updates (plugins, themes, translations & WordPress core), cloud backups, or clean up spam and validate your comments.
Premium add-ons allow you to go further by offering more advanced features in SEO, security, performance, backup, monitoring etc.
Created by Serbian developer Vladimir Prelovac in 2010, ManageWP was officially launched on the market in January 2012. It is a solid tool, which “plays nice with all major hosts, and 99% of the small ones” says the team in charge of its development.
Very well established in the WordPress ecosystem, ManageWP is maintained by a team of nearly 50 people based in Belgrade (Serbia).
After the launch of its new version called “Orion” in July 2016, which featured, among other things, a redesigned dashboard, ManageWP was then acquired by the American hosting giant GoDaddy in September of the same year.
However, the tool continues to “operate indefinitely as a standalone service,” says the service’s About page.
In terms of numbers, ManageWP claims the following:
- Its tool manages 1 million 100,000 sites worldwide.
- 60,000 customers trust it at the time of writing.
- ManageWP saves 128,000 hours of work for all its customers by automating the maintenance tasks of their WordPress sites.
Saving time to focus on more value-added tasks for your business, I bet you’re at least a little interested, right? To take advantage of this, let’s see how to start taking advantage of this service right below.
How to add your WordPress site to ManageWP?
As you’ll see throughout these lines, ManageWP is a very easy service to use. It starts right from the moment you set it up.
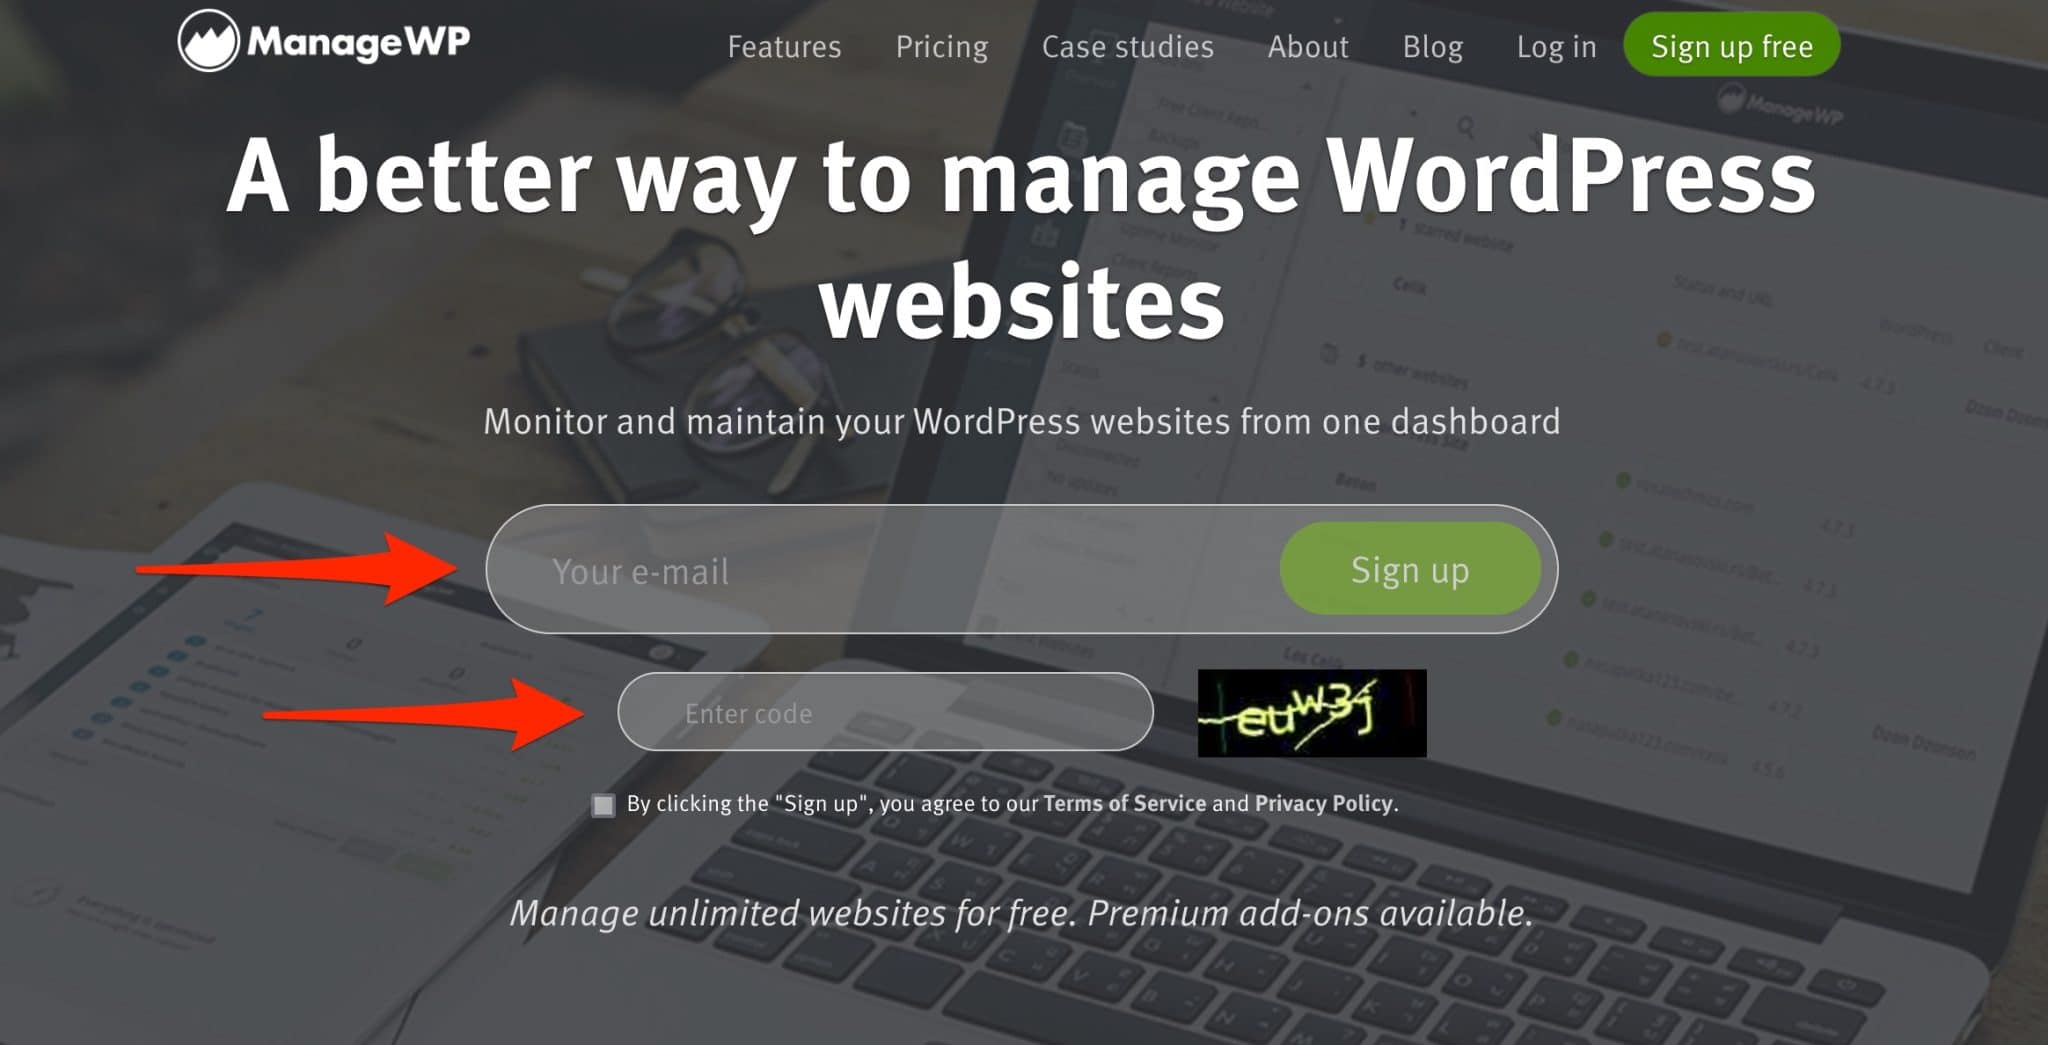
To activate it, all you have to do is enter your email address and a verification code on the home page of the dedicated site.
Then, a configuration wizard will ask you to add your first and last name, and then connect to your site.
You can do this right now, or you can do it right after from your dashboard, by clicking on the “Skip to Dashboard” link:

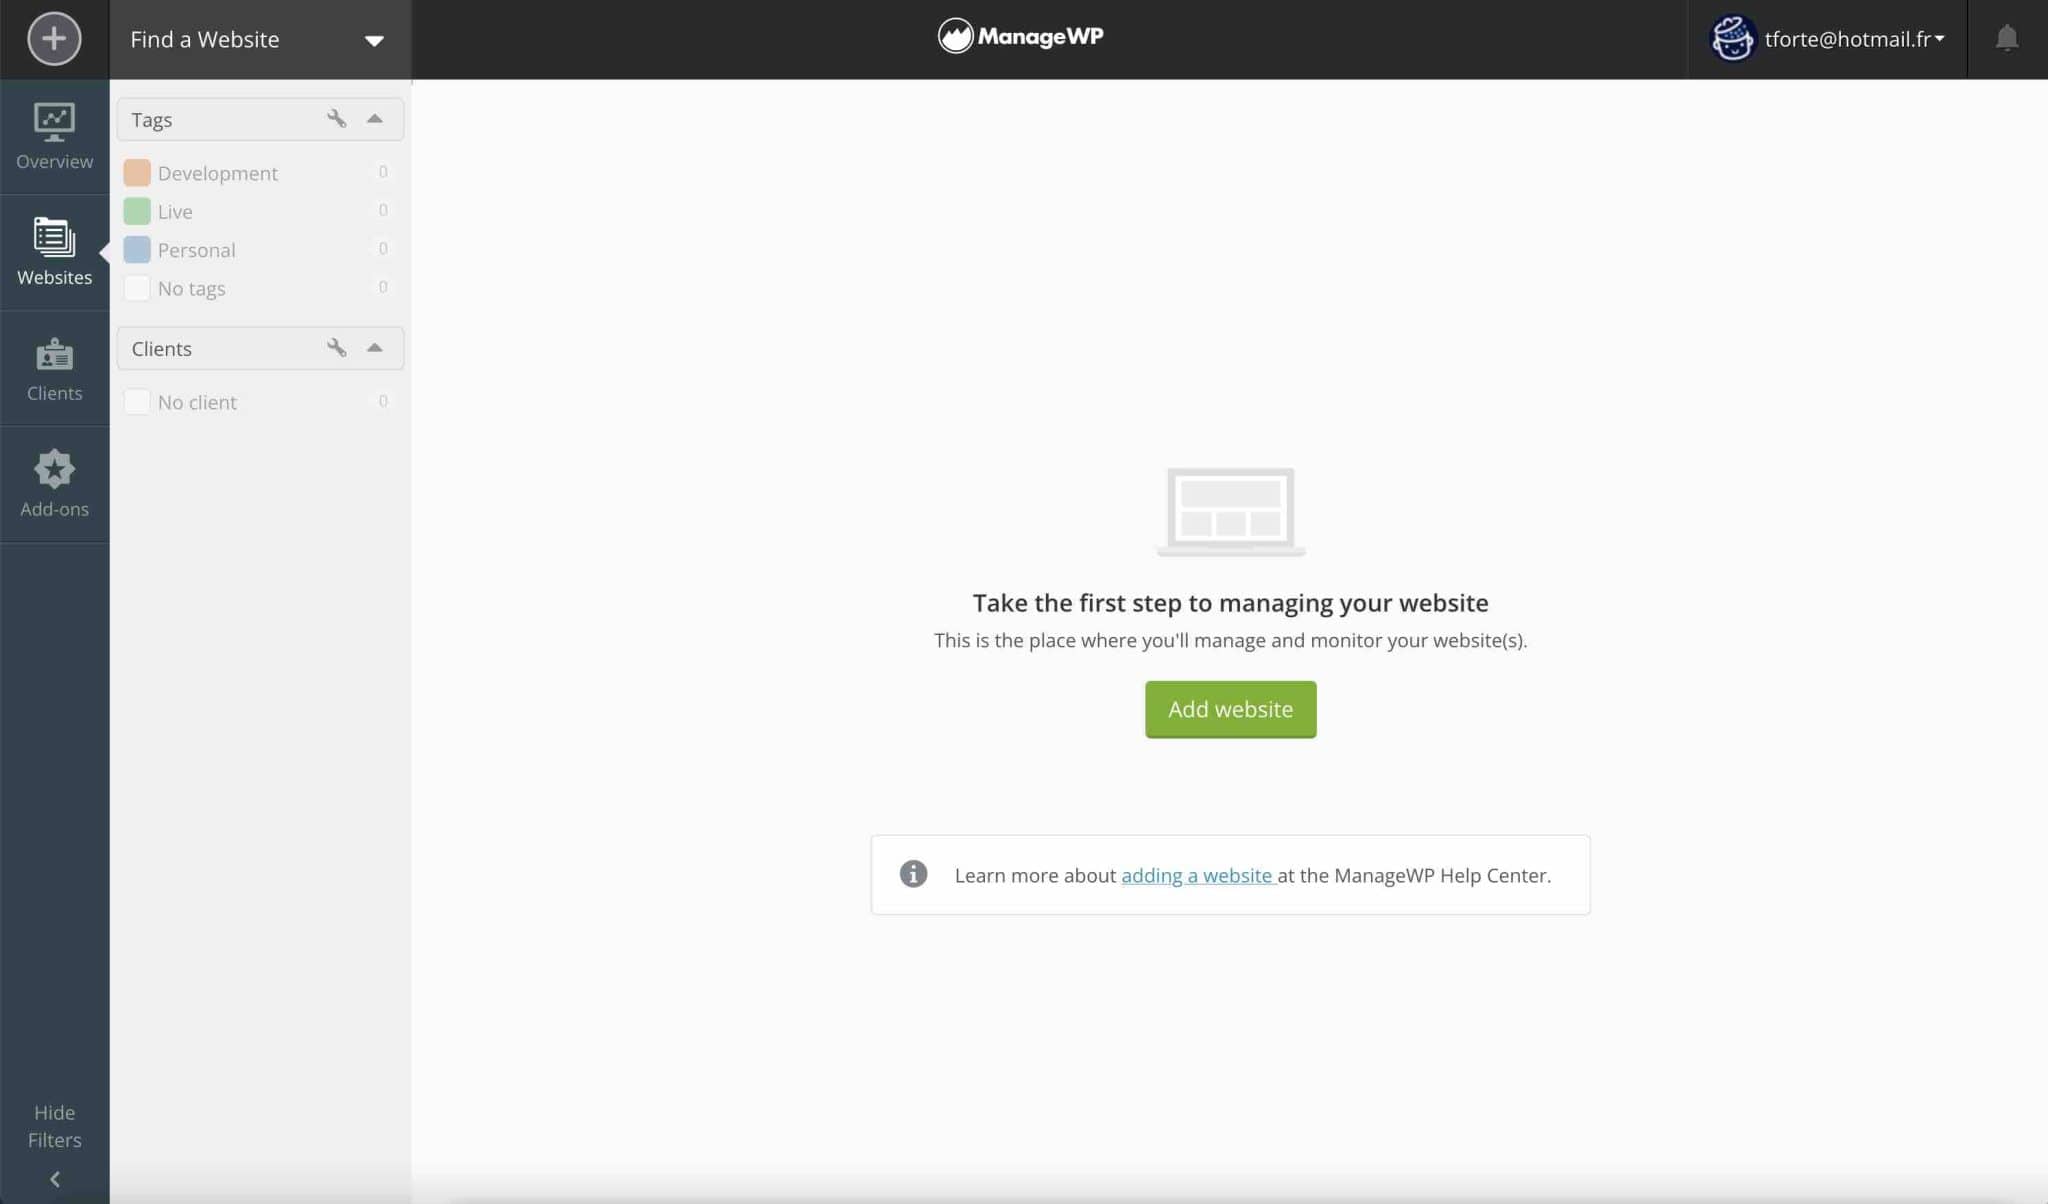
This is the option I’m going to use for this test, so that you have an overall view of the interface. After that, it’s up to you to decide how you want to proceed. ManageWP will then redirect you to its interface:
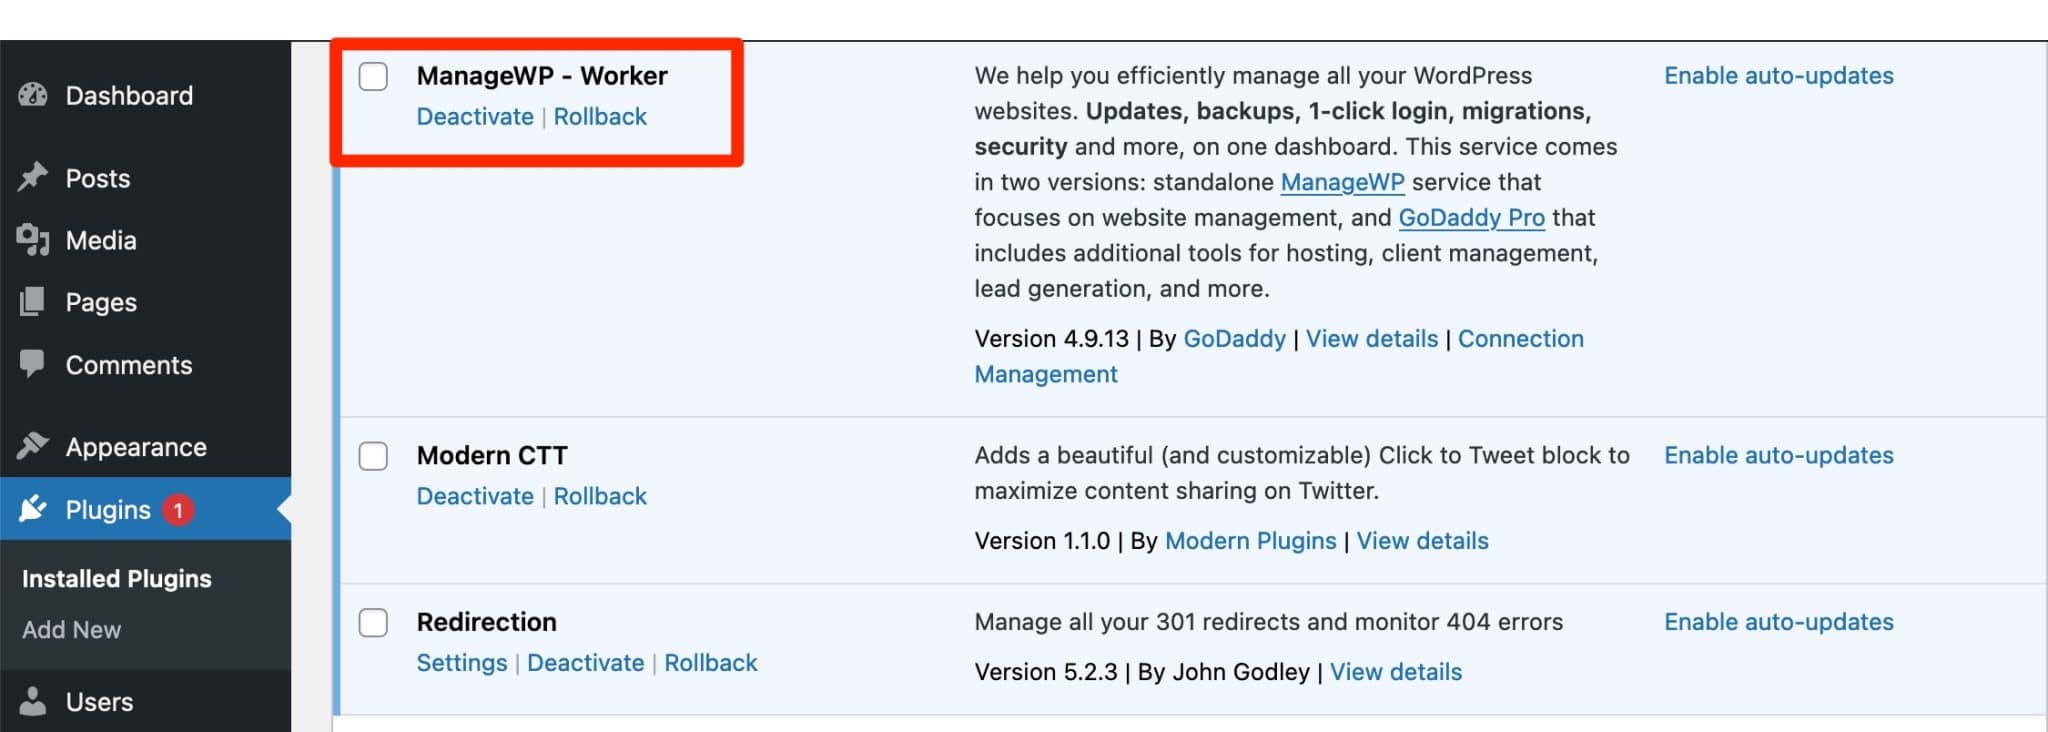
Step 1: Activate the ManageWP Worker plugin on your WordPress site
To link your WordPress site to ManageWP, activate the ManageWP Worker plugin on your WordPress dashboard (Plugins > Add New menu). For your information, this plugin acts as a bridge between the two services (ManageWP & WordPress).
Step 2: Add your WordPress credentials to the ManageWP dashboard
Once this is done, go back to your ManageWP dashboard. You have two options to start adding your site:
- Click on the green “Add website” button located in the center of the screen.
- Go to the “+” button at the top left hand corner of your dashboard.

For example, click on “Add website”, then enter the URL of your homepage, as well as your WordPress credentials (username + password):

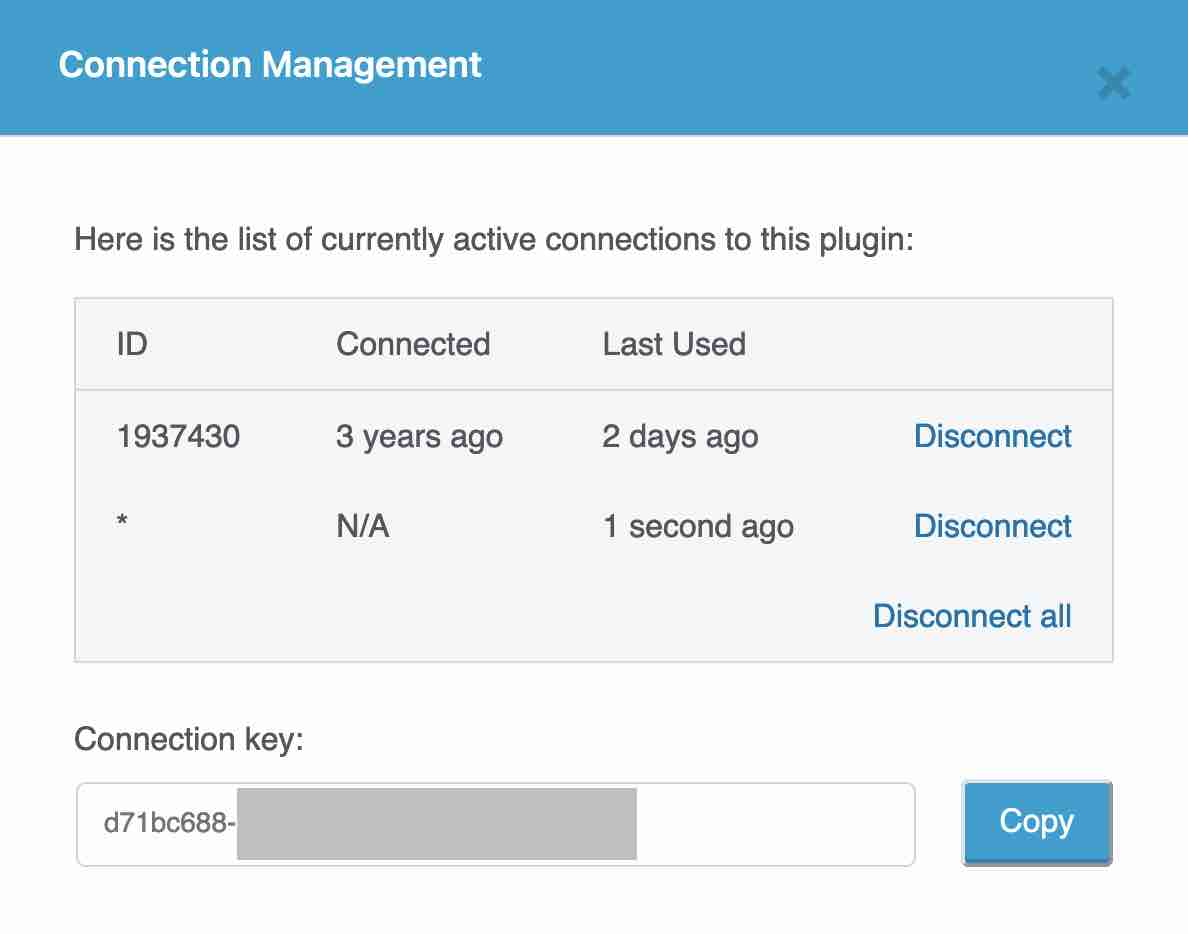
Note that you can also enter a connection key, instead of your WP credentials, by clicking on “Use connection key instead”.
You can find this key by clicking on the “Connection Management” link in the ManageWP Worker description, in the WordPress “Plugins” menu.
The highlighted window below will open when you click on it:
Finish by clicking on the green “Add website” button. Now all I have to do is congratulate you! Your site is added to your dashboard, which you will now discover in detail.
How is the dashboard of the tool organized?
The ManageWP dashboard is divided into 3 parts, which we will explain in detail.
The navigation bar at the top of the page
To begin with, you can access several options from the navigation bar with a black background, located at the top of the page.
From left to right, you can:
- Add a site (“+” button).
- Access direct links to the site(s) already added by clicking on “Find a Website”.
- Get tips on maintaining your sites by clicking on “Latest news!”, which links to the ManageWP blog.
- Manually synchronize your sites to get an up-to-date overview of the latest updates (this is done automatically as soon as you log in to the tool).
- Access settings for billing and support, for example, by clicking on the downward icon next to your email address.
- Check the latest information on updates by clicking on the bell icon.

The central part of the ManageWP dashboard
Under this navigation bar at the top of your page, you will see the central part of the ManageWP dashboard.

The display will be different depending on the menu you are in. For example, as you can see in the screenshot above, I have access to the following things:
- Updates to my site, to plugins, themes and WordPress core. You can see that there are 29 updates to be done in total, for all my active sites on ManageWP. Note that ManageWP also works on a multisite network.
- Services offered by ManageWP: Backups, Security, Performance, etc. I’ll come back to this in detail later.
- An insert on possible optimizations. For example, you can delete spam comments if there are any.
- Comments to approve on all your sites.
The sidebar
Most of your maintenance actions will be done through the sidebar located on the left side of your dashboard. It is divided into four menus.
Overview
The Overview displays all the updates currently available for all your sites. This is what I explained above.
The filters are quite interesting. You can change the display of the updates to be performed according to several criteria:
- The activation of a premium add-on.
- The presence of an SSL certificate on your sites.
- The language, the version of WordPress or PHP used.
- Tags: a very practical option that allows you to assign categories to your sites to better recognize them, using colored labels.
By default, ManageWP offers “Development”, “Live” and “Personal” tags, but you can design your own by clicking on the small wrench. - Clients: a filter that allows you to group sites by client. It is useful if you manage the maintenance of several sites of the same client.

Websites
The “Websites” menu displays all the websites you add to your ManageWP area.
For each website, you can perform 4 major actions, accessible by hovering over the associated image:
- Open the dashboard dedicated to this site (“Open website dashboard”), which summarizes the updates available and to be done.
- Access your WordPress dashboard (“Open WP dashboard”). ManageWP will automatically connect you to your back-office since it already has your login information from when you added a site.
- Check the last backups (“View Backups”).
- Access the site options (“Site Options”). For example, you can reconnect/remove your site from the ManageWP dashboard, or add tags and a client, among other things.

At the top of the page, 7 tabs allow you to make the following settings:
- Activate a client report for the site(s) of your choice.
- Manage plugins and themes directly on the ManageWP interface. You can activate, deactivate or delete them without going to your WordPress dashboard.
- Add/modify a user with the role of your choice (administrator, editor, author, contributor and subscriber).
- Add the pieces of code of your choice (Code Snippets).
- Assign tags or a customer record.

Note that you can also change the display of your sites on the dashboard (List or Thumbnail):
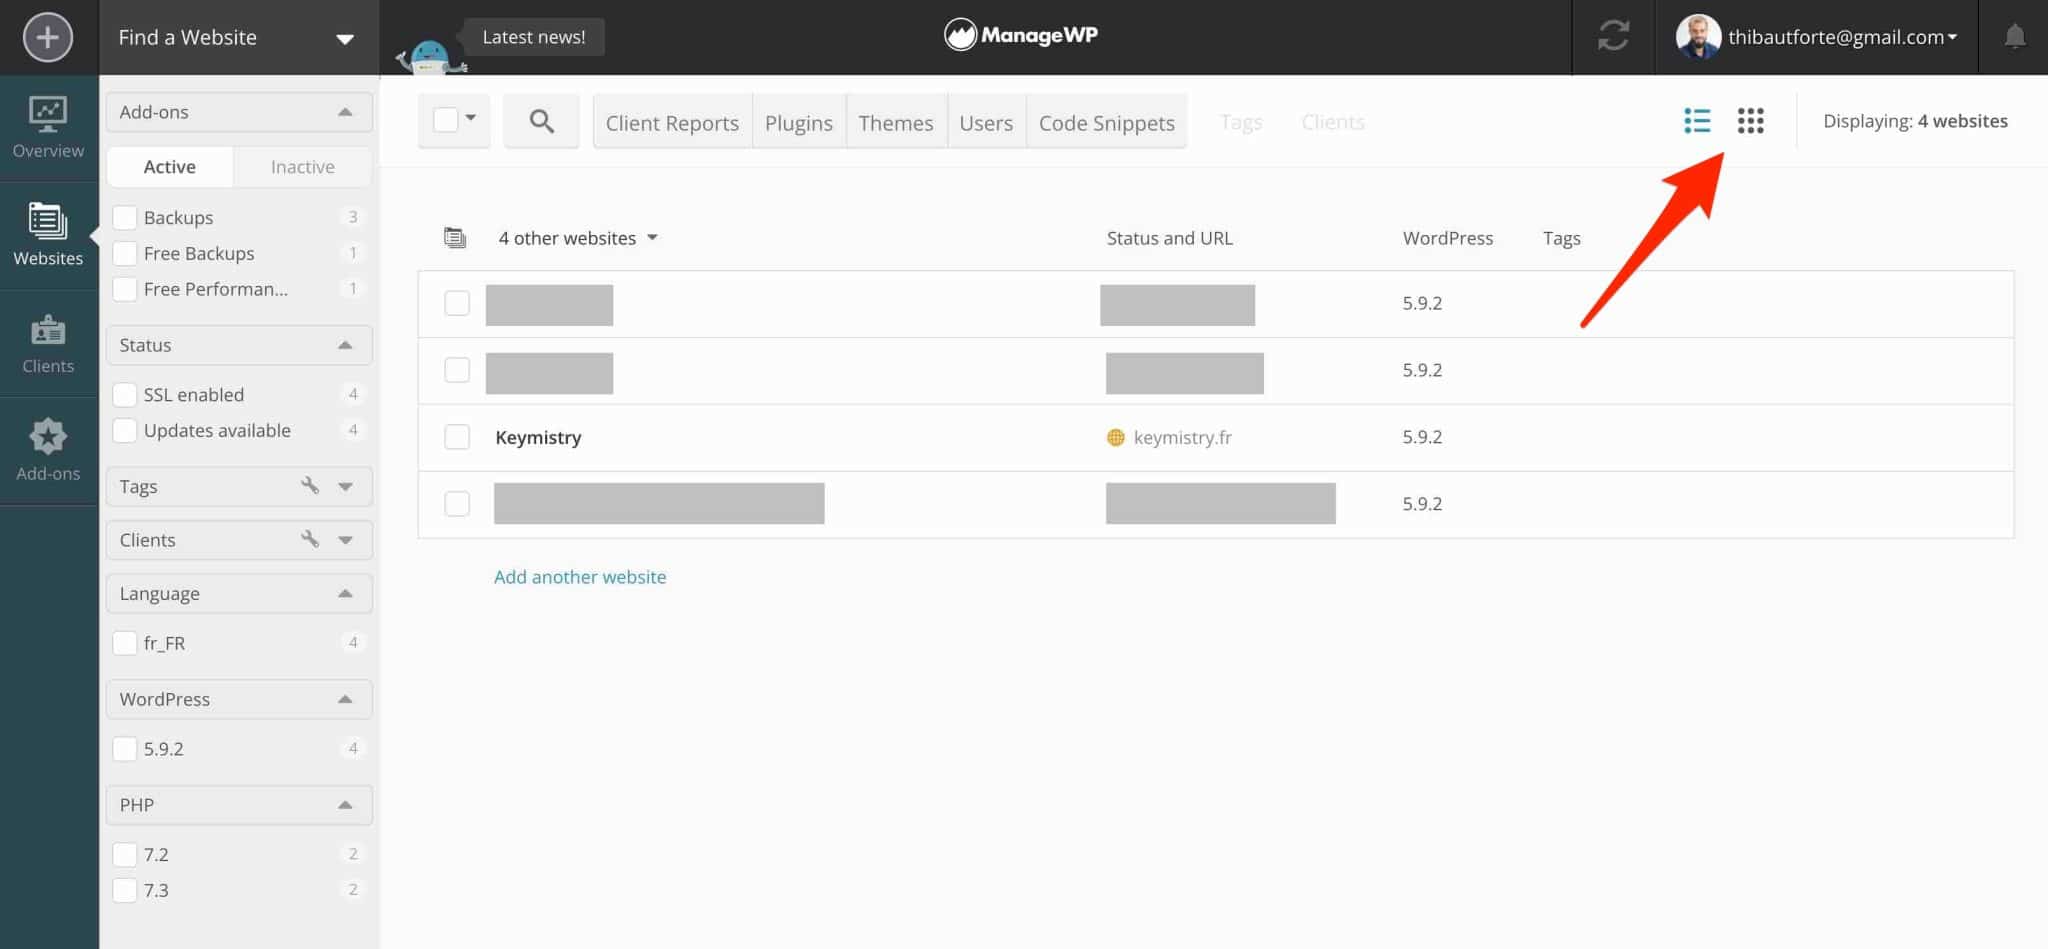
Finally, be aware that ManageWP uses a color code to inform you about the status of a site:
- Green: no update is required.
- Orange: updates are available.
- Red: the site has been disconnected from the ManageWP service.
- Gray: the site is paused or not synchronized.
Clients and Add-ons
The 3rd and 4th menus allow you to add customer records to each site (as we have seen) and to activate paid add-ons on the site(s) of your choice.


How to update your site?
Now you know how to find your way around the ManageWP dashboard. So let’s get down to business: making updates to your sites.
You have two options for this.
Option 1: Use the ManageWP Overview menu
The “Overview” menu shows the available updates on ALL your sites at once.
For example, I can see that:
- The Beaver Builder plugin has an update available on a site. If I click on the name of the plugin, ManageWP shows me the name of the site concerned. The tool also shows me the version of the plugin used, and the version obtained after the update (e.g. 2.5.1.3 > 2.5.2.1).
- The Really Simple SSL plugin has updates available on 3 sites in total.

To proceed to an update, I simply check the box of the plugin I want to update, and then click on the blue “Update” button.
ManageWP also offers what it calls secure updates (on the green “Safe Update” button). How does it work? The tool first creates an automatic backup before each update. Then, “after the update, the system checks the website and automatically goes back if something goes wrong,” ManageWP says.
In a way, you are covering yourself in case of a bug. However, this option is only available with the ManageWP premium backup add-on.
I’ve talked about plugins so far, but the way it works is the same for themes, translations and the WordPress Core.
You can access their updates by clicking on the dedicated tab:
And, of course, like any maintenance tool, you can perform all your updates in bulk. To do this, click on “Select all”, then on “Update”:

Option 2: Proceed on a case-by-case basis via the Websites menu
The “Overview” menu offers the fastest access to updates. This works very well, but I personally prefer to update my sites on a site-by-site basis.
To do so, I go to the “Websites” menu , then I click on “Open website dashboard”.
I find exactly the same menu as in the “Overview”, and I only have to launch my updates when I’m ready. You already know how it works, so we’re good on that. 😉

You can also update your plugins and themes automatically by going to the “Scheduling” tab in the “Plugins” menu of each site. You can choose the date and time of the update, as well as the plugins and themes concerned.
Personally, I don’t use this option because I prefer to keep control of the deployment of my updates, but it’s good to know that it exists.
Let’s continue with a must-have option, starting with the free version of ManageWP: the backup of your sites.
How do you create a backup of your site with ManageWP?
Although ManageWP allows you to manage all the updates to your sites, it is not its only function.
It allows you to go much further in their maintenance by also allowing you to back them up (among other things). This is very important to reinforce the security of your site, so don’t hesitate!
To take advantage of ManageWP’s backup feature, go to the “Websites” menu and select “View Backups” on the site of your choice.
A button will allow you to activate it, at the top right hand corner of your window. This option is not available on the screenshot below, simply because the option is already active on my site. Instead, ManageWP offers me to disable it.

With the free version of ManageWP, you can only backup your site once a month.
If your site’s content is frequently updated, this won’t be enough unless you subscribe to a ManageWP’s paid backup add-on, which starts at $2/month for daily backups.
It allows you to back up your site automatically (up to hourly if you wish), to select which files/folders to exclude from the backup and gives access to a tool to clone and migrate your sites.
If you don’t want to pay for your backups, don’t skip these operations. Use a free plugin dedicated to this, like the ones we present in this article.
For your backup operations, ManageWP uses the principle of incremental backup. This means that the tool will only back up files that have been modified since the last backup, in order to “consume” as few server resources as possible.
In addition, all backups are sent to a secure cloud space using Amazon S3 technology.
Have you enabled the backup option? Sit back, pour yourself a drink and hydrate yourself.
ManageWP will take care of everything for you. If you wish, you can schedule some settings in the “Settings” tab:
- The time you want the backup to be triggered.
- The possibility to exclude certain files and tables of your database from the backup.
- The storage region for your backups: this is the location of the cloud server.
- The reception of an email notification in case of backup failure.

Backing up is great and recommended. But you may need to go further at some point.
How to restore a site from a backup?
In case of a bug during an update, it can happen that your site becomes inaccessible. To get it back on its feet very quickly, and to find the cause of the problem quietly, you can restore its previous version in a few clicks.
To do this, select the date of the last backup on the calendar provided, then click on “Restore backup”.
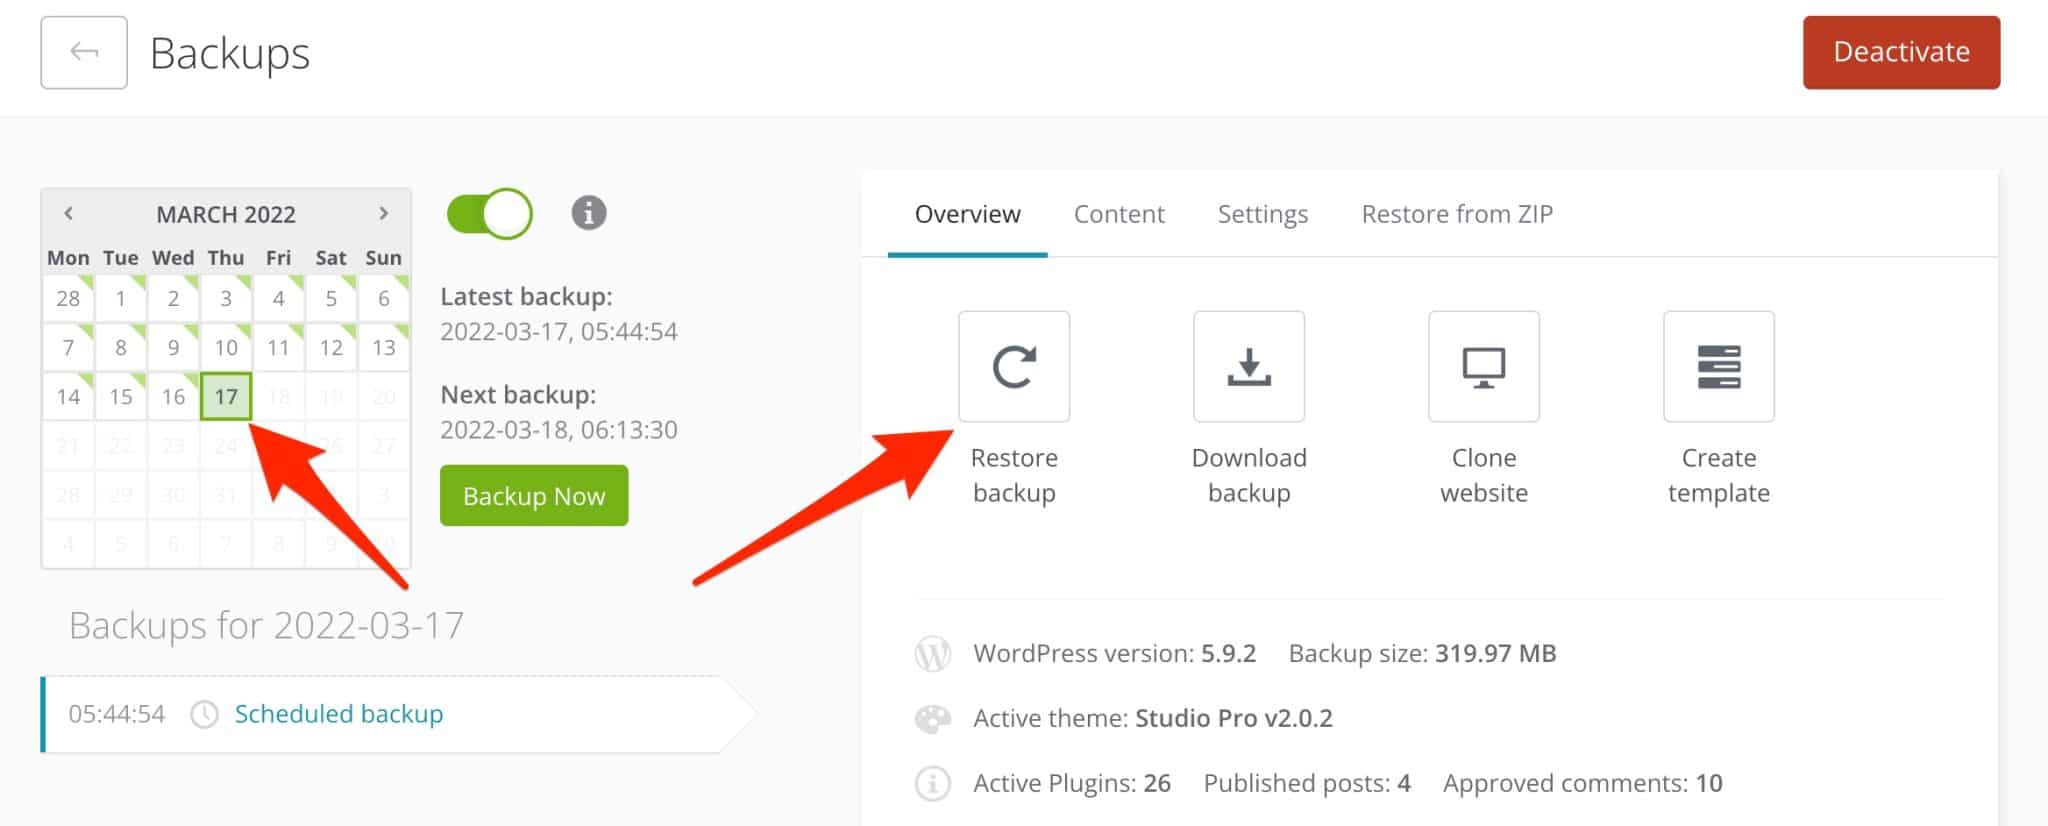
Your site will return to its previous state, before the bug. You can also restore it from a zip file, using the “Restore from ZIP” tab.
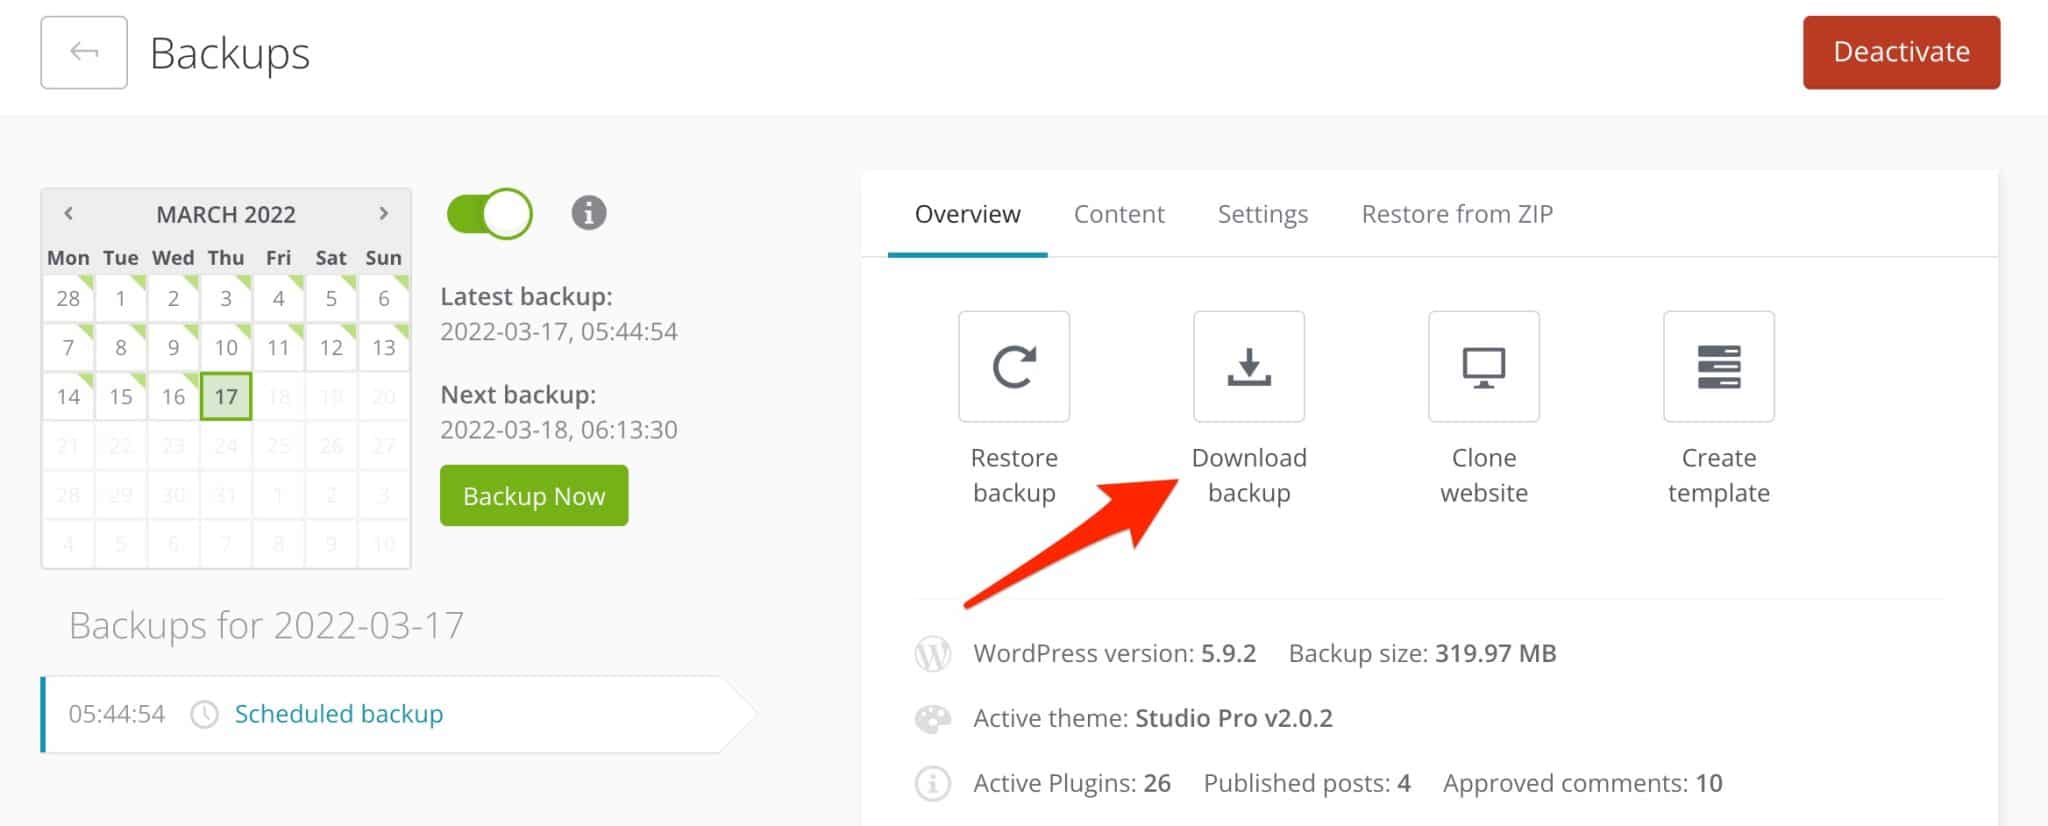
How to download a backup ?
For some reason, you may need to download a backup. For example, to store it on your computer.
To do this, simply click on “Download backup”. However, this option is not available with the free version of ManageWP.
How to clone and migrate a site?
Finally, the daily life of a webmaster is sometimes marked by migration and cloning operations.
For example, you may need to migrate your site to a new host, or to send it from a pre-production server to an online server.
ManageWP has an option to do this for you (premium only). It is called “Clone Website” and there are 3 ways to do it:
- Migrate a site already on your ManageWP interface. This is the fastest method: you just have to enter the URL of the destination site.
- Migrate your site to a new server. However, this option only works if you keep the same domain name.
- Clone your site to a new URL. You will need to fill in at least your FTP and database credentials.

See our detailed test of the best migration plugins on the blog.
Other free options
If one-click updates and backup remain the two main features of the free version of ManageWP, you can also:
- Activate a maintenance page (Maintenance Mode). The option is accessible in the “More tools” menu of the site. Two templates are available, but the text can only be customized through the HTML code.
For more options, choose a dedicated plugin like the one presented in this resource.

- Create a “client report”.
- Launch a performance test to get an idea of the loading speed of your pages, with recommendations to improve it.
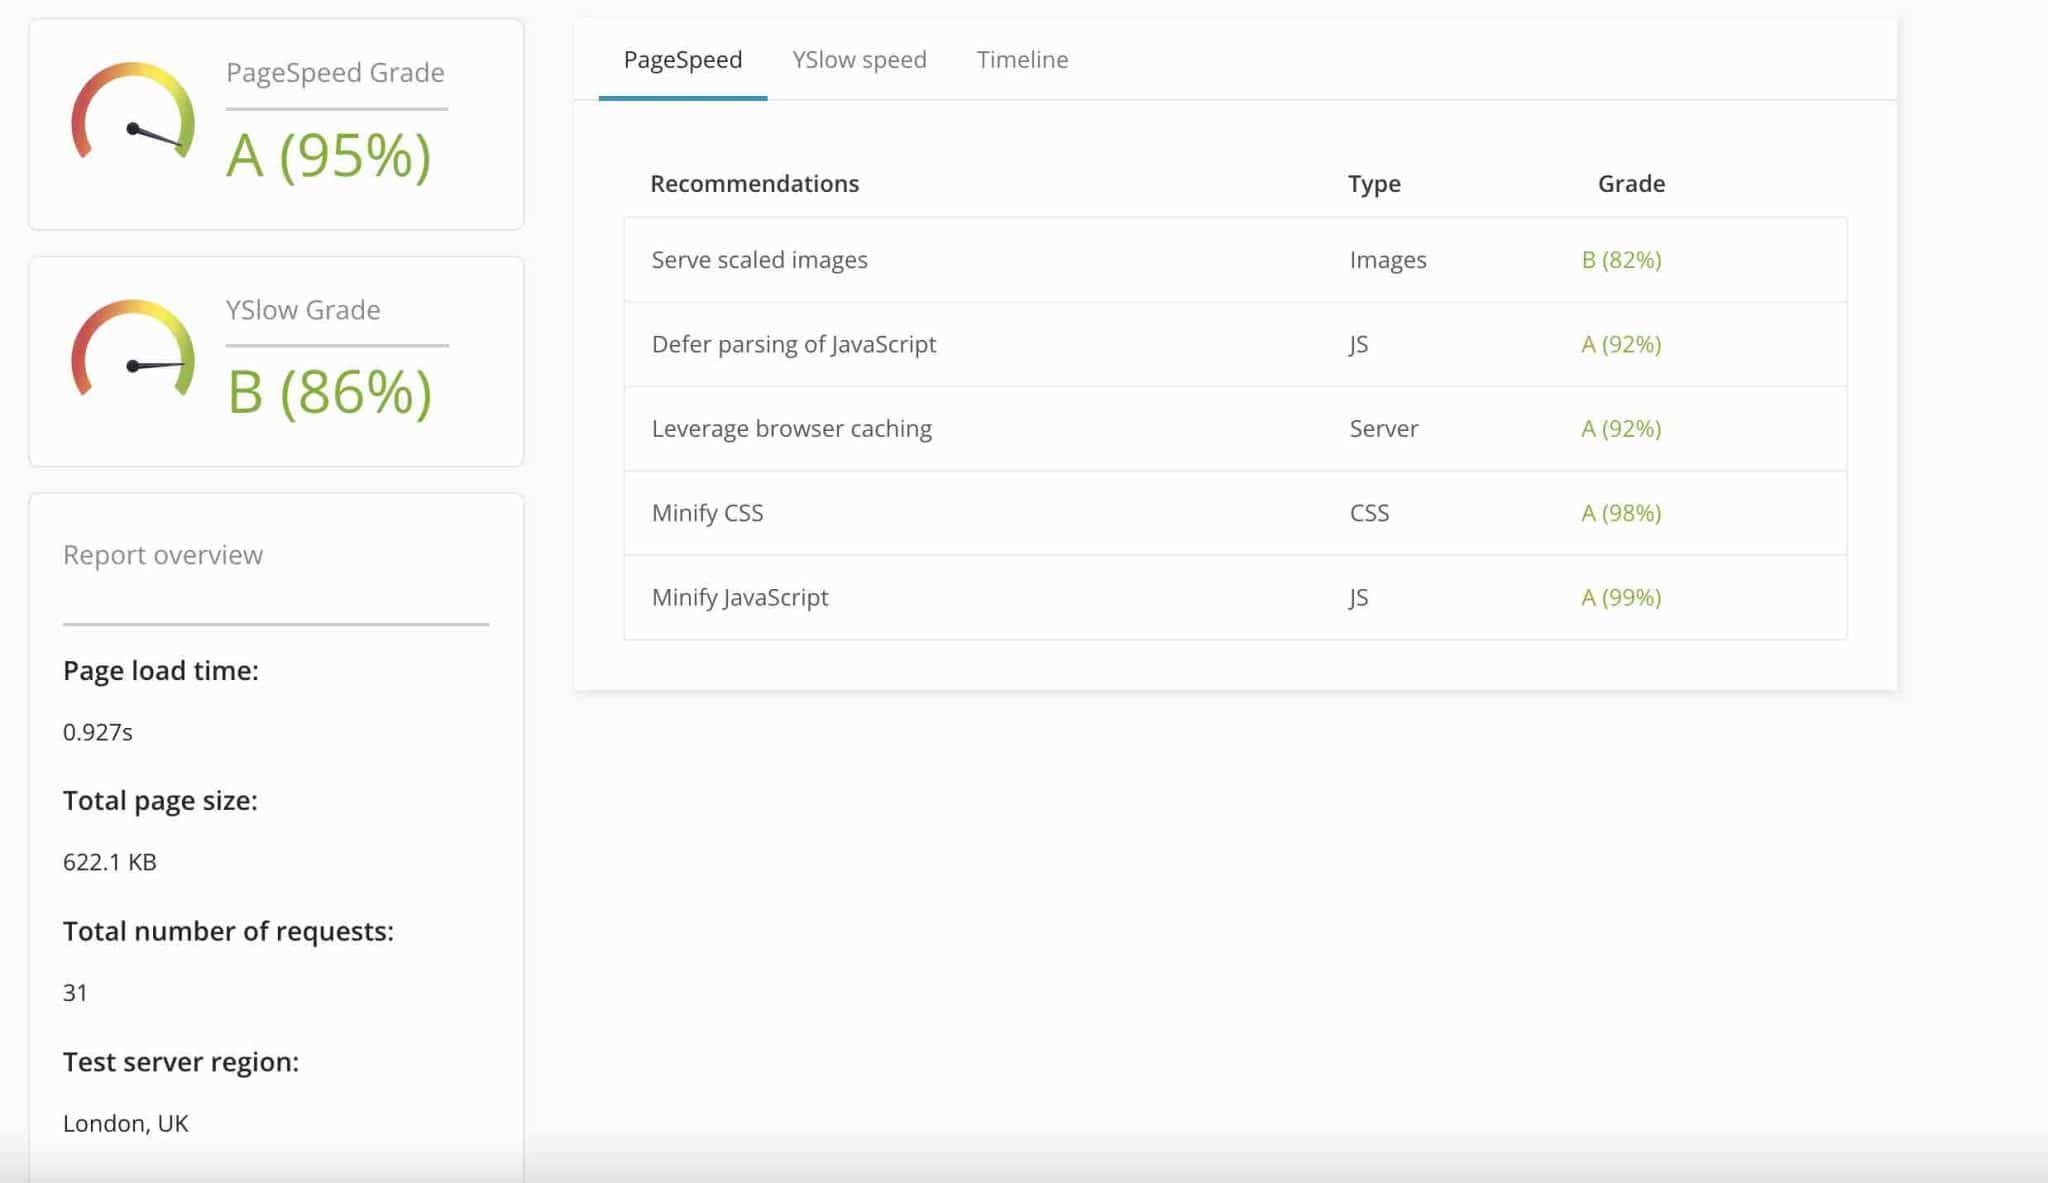
- Check for vulnerabilities in the “Security” menu, in order to find out about the presence of malware and other blockages.
- Provide access to maintenance operations enabled by ManageWP with the “Collaborate” tool, accessible via the menu containing your photo and email address, in the upper right-hand corner of the screen. Your team members and customers can then take advantage of ManageWP’s services, if you wish. Simply enter their email address.

What are the premium features of ManageWP?
The free version of ManageWP is a great way to get started. Do you want to go further with additional options? You’ll need to go through one or more of the 7 premium add-ons presented below.
They are all accessible via the sidebar proposed for each site:

Now it’s time for the introductions.
Hunt for broken links with Link Monitor
Link Monitor ($1/month) is a tool that scans your site’s articles and pages, searching for broken links causing 404 errors that are bad for your search engine optimization (SEO).
The tool runs daily and is limited to 10,000 links per site. It works on the same principle as the Broken Link Checker plugin, for example
Monitor malware with Security Check
In case of a problem, you are notified by email or Slack. A comprehensive security plugin like iThemes Security is also able to scan your site, while protecting you against different types of attacks (e.g. brute force), which ManageWP does not offer (well, it can’t do everything).
Compared to the free version of ManageWP, the premium option of Security Check ($1/month) allows you to perform security checks automatically, at the time of your choice.
Check the loading speed of your site with Performance Check
Same remark for the Performance Check option as for the Security Check option: the premium add-on ($1/month) automates the process, compared to the free version, and notifies you by email or Slack in case of problem.
You’ll get at least similar, if not more advanced, recommendations with free online tools like Pingdom Tools or GTMetrix. However, you’ll have to do it manually.
Check the availability of your sites with Uptime Monitor
Uptime Monitor ($1/month) is a very useful add-on that monitors the availability of your sites every 60 seconds, and warns you (by text, email or Slack) as soon as one of them stops working.
So if there is a problem, you can react very quickly to solve it. This is essential if you have a very high traffic and/or sell products online.
There are quite a few tools on the market that allow you to do this. Some even offer free versions, like the excellent UptimeRobot, but this service is more limited (50 checks every 5 minutes with the free plan).
Track your keywords with SEO Ranking
The SEO Ranking add-on ($1/month) summarizes the evolution of the ranking of your keywords (and those of your competitors).
It’s a very basic tool, far from what is offered by much more advanced solutions (and also more expensive, of course) like Semrush, Ahrefs or Ubersuggest.
Summarize your maintenance operations with Client Report
You already know Client Report: it exists with the free ManageWP offer. With the premium add-on ($1/month), you can also delete the mentions to ManageWP in the document you are going to generate, which is impossible with the free version.
You can also send this report to your customer from the email address of your choice and automate the creation of your reports.
Work in white label with White Label
White Label ($1/month) allows you to hide or rename the tools offered by ManageWP, including their ManageWP Worker plugin, which you activate on each of your sites.
This can be very useful if you install it on your customers’ sites, in order to work in white label, without reference to any third party tool such as ManageWP.
That’s it for this overview of ManageWP’s free and paid features. After all that, you should be able to use it like a boss.
Although ManageWP is easy to learn and its various menus are easy to understand, you may encounter some difficulties as you use it.
Can you count on ManageWP’s assistance in this case? The answer is in the next section.
Support and assistance
It is rare enough to be highlighted: ManageWP offers 24/7 support, whether you are a free or premium user.
In its Frequently Asked Questions from its description on the official directory, ManageWP even claims “a 1h average response time and a 65% answer resolution in the first reply”.
Having requested it several times, I can confirm that the support is very responsive. On the other hand, they do not always respond within the hour. 😉 Sometimes, the volume of requests received and the time of sending your message does not allow them to answer your request in 60 minutes.
You can contact the support team directly from your dashboard, by choosing “Contact Support” in the drop-down menu at the top of the dashboard, by clicking on your email address.
In addition, a practical and well illustrated documentation (screenshots, videos) is also offered to users.

How much does ManageWP cost?
As you know, ManageWP works on a freemium model. You can use it for free, on an unlimited number of sites, to update and backup your sites.
However, remember that for the backup feature in particular, the free version limits you to one automatic backup per month.
To have more settings and options, you can activate one or more of the 7 premium add-ons, on a case by case basis.
Depending on the add-on you choose, prices start at $1/month per site. This means that if you want to activate the SEO Ranking add-on on 5 sites, for example, it will cost you $5/month.
Basically, you only pay for the add-ons you want to use, with no commitment period: each add-on can be deactivated at any time.
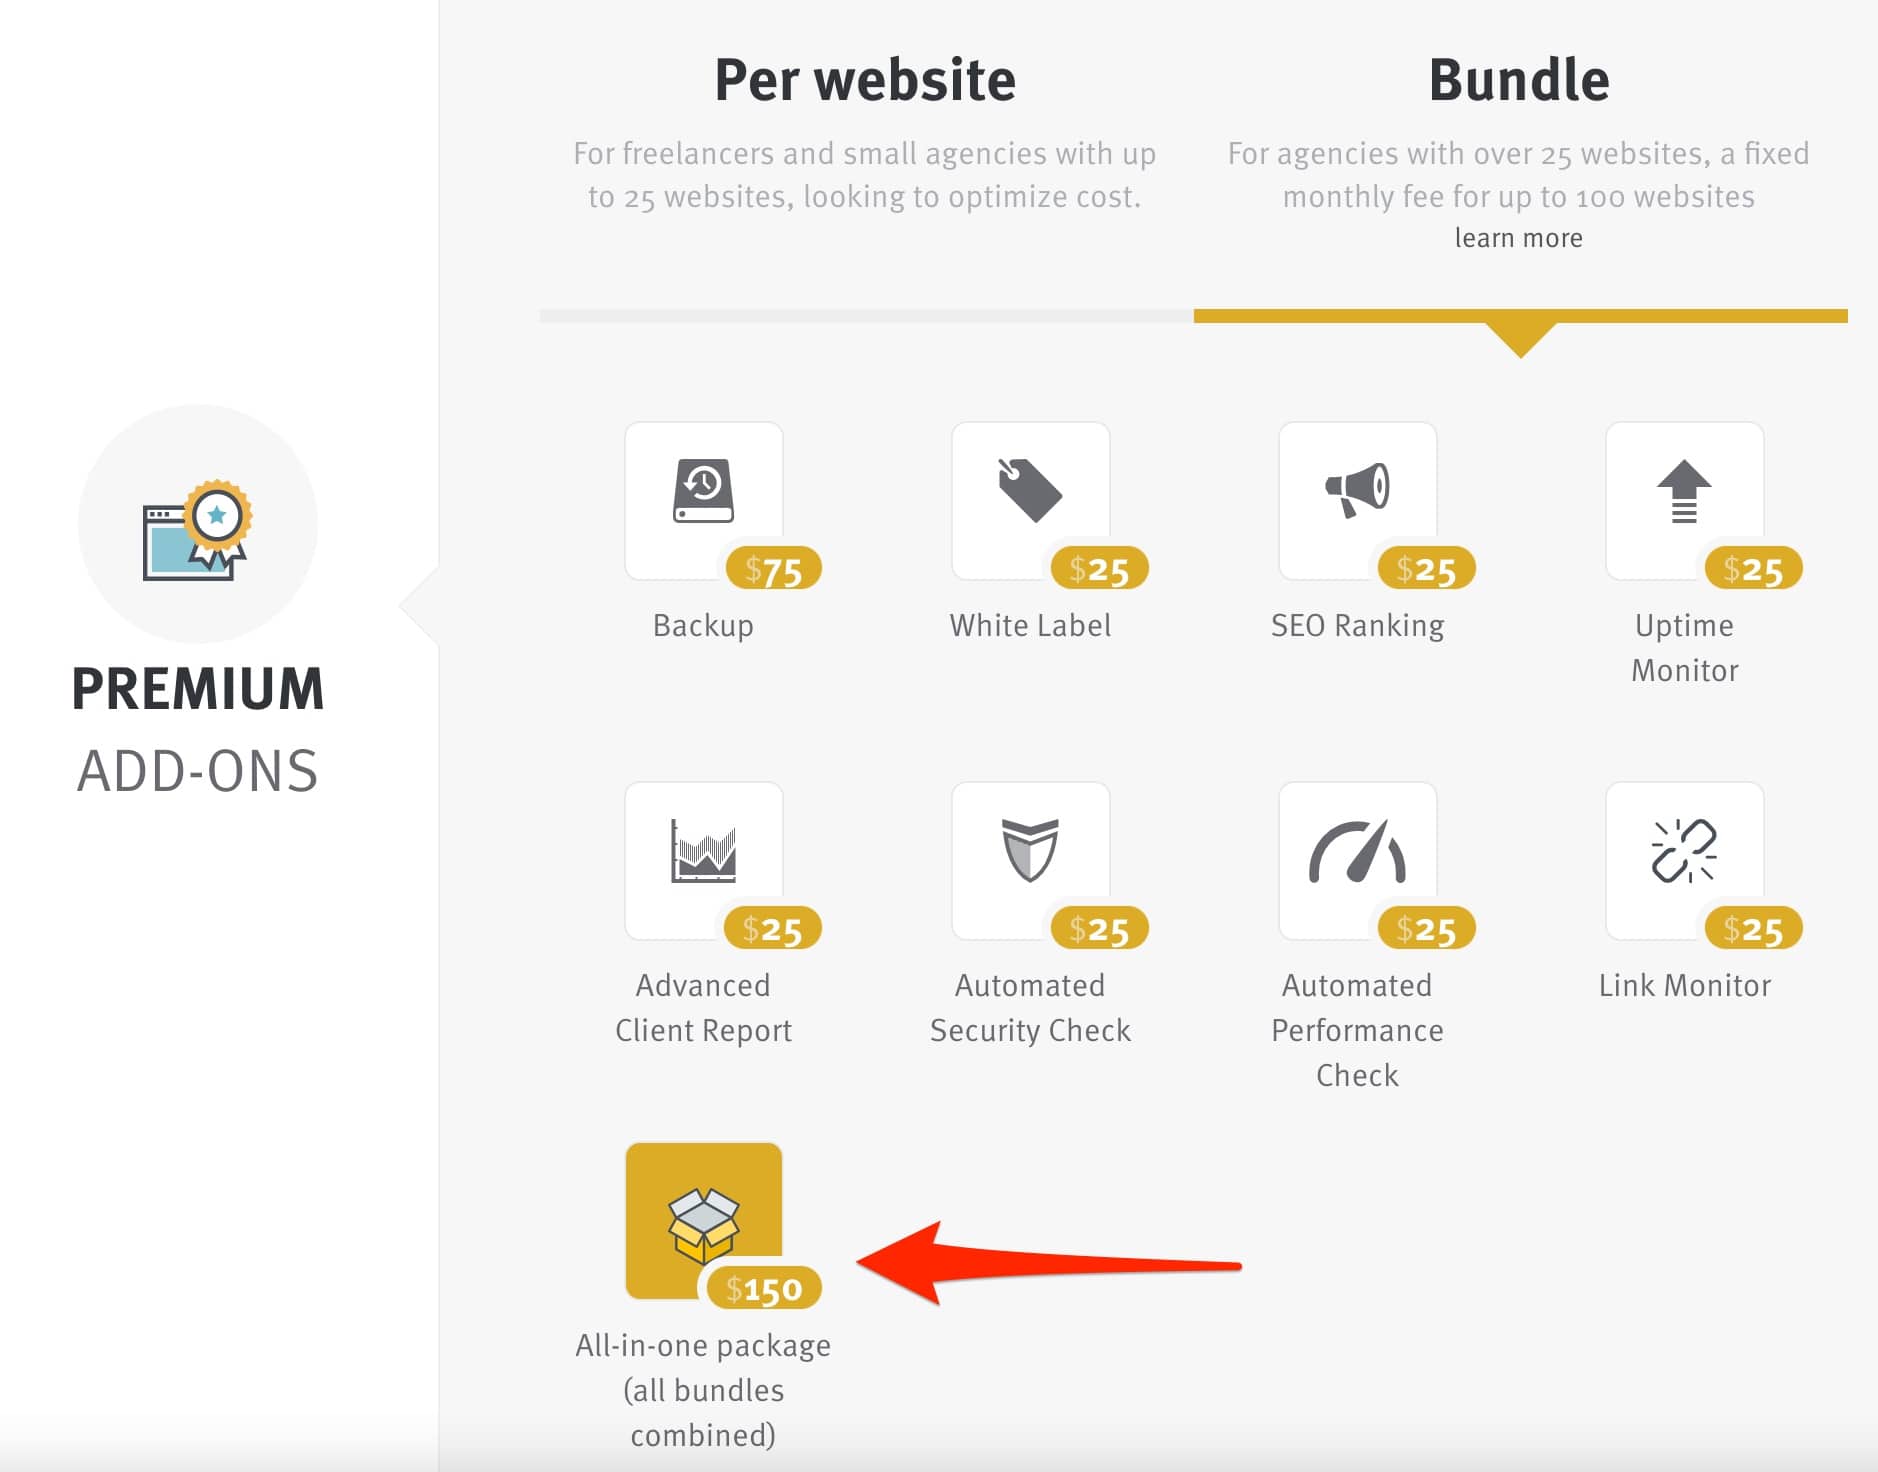
Note that if you manage 25 to 100 sites, ManageWP offers a fixed price for each add-on (from $25/month to $75/month), as well as a bundle containing all add-ons for $150/month:
Who are ManageWP’s competitors?
ManageWP is one of the leading tools for maintaining and updating your sites… but it is not alone on the market.
Several of them are stepping on its toes, such as:
- MainWP: You can find our test here. Like ManageWP, MainWP has adopted the freemium model. On the other hand, I find that its handling and its use is more laborious than with ManageWP.
- InfiniteWP, the service Alex used before switching to ManageWP. A service he didn’t like very much, because some updates didn’t work. That said, InfiniteWP must have evolved since then and remains a strong competitor.
- CMS Commander.
- iThemes Sync.
Our final opinion on ManageWP
ManageWP is an excellent plugin to keep your site automatically updated for free.
Throughout these lines, you have discovered:
- The interface of the tool, with a detailed presentation of its different menus.
- How to activate a site on the ManageWP dashboard.
- How to backup and migrate a site.
- The premium features of ManageWP.
- The price of the tool and the competition.
Personally, I have been using ManageWP for several years and I am very satisfied with it. This is also the case for Alex, who uses it on a dozen sites, including WPMarmite.
ManageWP is very reliable but also easy to use. It is intended for all types of users, from beginners to advanced users. Do you want to save time on time-consuming maintenance tasks? Adopt it, you’ll tell me about it.
But maybe you are already using this service. If so, what do you think? Give me your opinion by leaving a comment.

Receive the next posts for free and access exclusive resources. More than 20,000 people have done it, why not you?

Continue reading
Articles posted in WordPress PluginsOur review of B2BKing: A WooCommerce plugin built for B2B commerce
“Hi, I need 200 units of this product with fast shipping please”. As an online store owner, receiving this kind of message puts a smile on your face. Answering it, on the other hand, becomes a lot less fun… Basically,…
GTranslate on WordPress: our full review of this tool for creating a multilingual site
“Hello, how are you?” “What do you think of this computer mouse?” For you, everything is easy to understand in these two sentences. For someone living deep in the Shetland Islands or Yucatán, it’s probably a bit more complicated… If…
Air WP Sync: Test and review of this plugin for integrating Airtable into WordPress
Do you use Airtable and WordPress? Then some of your days probably look something like this. In the morning, you update your Airtable database as soon as something changes. In the afternoon, you copy and paste the same data into…