

What comes to mind when you think of WordPress speed and security? Your favorite plugins, perhaps? You should also think about… PHP! If you’re looking for a site that loads fast, while offering a solid shield against hacker attacks, there’s a…
Imagine you found the exact plugin you needed for your site. You install it, activate it and boom. The WordPress 5 fatal error handler tells you there’s a problem on your site. You can’t access your admin nor your front end.

That’s just one example of many problems that sometimes happen when working on a WordPress site. You might get locked out of your admin area for some reason, or you might accidentally crash your site because you edited a file via the WordPress admin, you might lose admin privileges due to a colleague’s mistake or you might simply get hacked !
Whatever the cause, when you or your users can’t access your site, that’s problematic, and you still need to access it somehow to fix the problem.
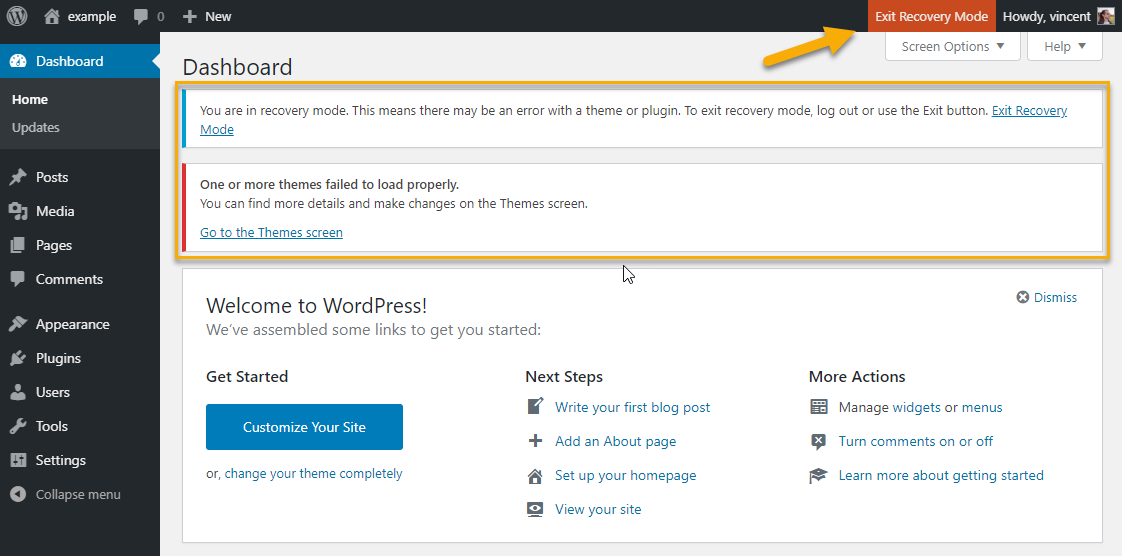
WordPress 5.2’s Fatal Error Recovery Mode can help you a little, but still, the problem being probably caused by a corrupt file, you have to have a look at the files in your installation.
To access your WordPress files, you need to use FTP.
Overview
To learn how to create a WordPress website, read our detailed guide.
What is FTP?
FTP simply means File Transfer Protocol. A FTP Client is a piece of software that allows you to connect to a remote server to transfer files.
You can upload files from your computer to your host or download files from your remote WordPress installation to your computer.
You can even directly open them in your text editor for a quick edit ! Open your file, make your changes, click “save” and it’s directly uploaded to your server. Magic!
Why would I need FTP when I can upload media, themes and plugins via the WordPress admin?
The WordPress administration is a fantastic tool for sure, and there are a lot of things you can do just by clicking a few links or buttons. Installing a plugin, a theme, or updating them only takes a few clicks. Easy.
But for some tasks you have to have access to your files.
For instance, installing a mu-plugin can only be done by transferring the file directly into your wp-content/mu-plugins folder. You can easily force the deactivation of a plugin by renaming its folder (prefixing it with an underscore for example).
Maybe a premium plugin you use requires you to upload a new version manually via FTP. Or maybe you need to overwrite your installation with a fresh version of WordPress, or place a Google verification file to the root of your installation.
Also, modifying your wp-config.php file simply cannot be done via your standard admin interface, should you need to update your database credentials or temporarily activate debug mode.
These are just a few examples of situations in which you absolutely need to access your files. And for all those cases, you need to use a FTP client.
Or maybe you’re a power user/developer, you already know how to access your server via command line SSH, and do all these things via CLI, so you can skip the rest of this article and go back to your day 😉
When NOT to use FTP for your WordPress site
Uploading media should always be done via the admin interface, because WordPress is doing a lot of things under the hood.
Basically, when you upload an image, WordPress checks for the registered image sizes and creates copies of all thoses images, among other things. That process won’t happen if you manually transfer the image via FTP.
The same is true for uninstalling plugins. Temporarily deactivating via FTP is ok, but a lot of plugins have a cleanup procedure that executes when it is uninstalled via the plugins page.
If you delete the plugin folder manually via FTP, the cleanup will never trigger and you’ll end up with options and tables cluttering your database. Not cool.
The basic rule is to do as much as possible from your WordPress admin, to get the most of all the things WordPress does automatically for us.
Installing a FTP Client
As mentioned before, a FTP client is a piece of software that allows you to connect securely to your server, and upload or download files.
There are many different options to choose from with varying features and price tags, but I’ll only mention three among the most popular ones.
Transmit is not free, and is only available for Mac Os, but it is a very popular option among Mac users. Both Cyberduck and Filezilla are free and are available on Mac & Windows, which make them great options.
For this example, we’ll go with Cyberduck. But the installation process and usage with Filezilla (and a lot of other options, for that matter) will be very similar, so feel free to pick whatever piece of software you like best.
Downloading and installing Cyberduck
Installing CyberDuck is a straightforward process.
- Just go over to https://cyberduck.io/, visit the download page, and click to download the installer corresponding to your operating system.

- Then double-click the installer you just downloaded to start the process.

- If you need to choose which folder you want to install the program in, click “Options” and pick your destination folder. If you’re happy with the default, just click “Install”.
- The installation should only take a few minutes or less. Once finished, launch the application by finding it in your application shortcut or folder.
You’ll be greeted with the following screen :

Finding or creating credentials
To open a connexion to your server, you first need to get your credentials. Usually you can find them in the welcome email sent by your web host when you first signup for your hosting account. The email should provide you with a url to your server (with a port number), a username and a password.
If you need to you can create additional FTP accounts pointing to different folders on your server. To do this you need to access your hosting account control panel. Usually, this is cPanel or Plesk, depending on your host. Again, credentials needed to access your control panel can be found in your welcome email.
Here’s an example if what my cPanel looks like. Yours might be different, but the options and settings are generally the same.

Under the Files section, click the FTP Accounts link.

- Type in a username,
- Choose the domain you’d like to give access to.
- Enter a strong password.
- Enter the path in the filesystem you’d like to give access to. This path is the entry point for the user, and he will not be able to get higher up in the directory tree. For example, if you set this path to the
wp-content/folder, then the user will be allowed to view files in this folder and its sub-folders, but won’t be able to go up a level and access files at the root of your WordPress installation (provided your WordPress files are at your web root and thewp-content/folder is not placed elsewhere). Use your cPanel’s File Manager to navigate your hosting space and find the right folder. - You can set a quota to limit the amount of transferable data.
Once the account is created, it will appear just below in the FTP Accounts section, and you’ll be able to click the Configure FTP Client link to get a nice summary of all your credentials.

You’ll get your username, the address of your FTP server and your server port. You even have the option to download a config file for Cyberduck to log in automatically, which is very cool, but we’ll go over manually connecting to your server first, okay 😉 ?
Connecting to your server
Now you have your credentials handy, let’s actually connect to your server.
In the Cyberduck main browser window, click on Open Connection. A dialog box opens, prompting you to enter your credentials, but first, you get a select dropdown allowing to choose among different protocols.

There are a lot of options there, and we won’t cover them all in details. However, here is an overview :
- WEBDAV is an extension of the HTTP and HTTPS protocol allowing to manipulate files. It allows for copying, editing, moving files and creating directories.
- FTP (File Transfer Protocol) is the usual protocol for transferring files.
- FTP-SSL, or FTPS (File Transfer Protocol Secure) is an extension of FTP, adding support for TLS (Transport Layer Security) encryption.
- SFTP or SSH FTP is an extension of SSH (Secure Shell), providing a way of transferring files through a SSH secure connection.
- All the other available options listed are used for connecting to specific cloud storage providers to transfer files.
We won’t be covering WEBDAV, or SFTP, because they deserve their own article ! However, we’re going to focus on FTP and FTPS.
Simply put, FTPS is to FTP what HTTPS is to HTTP.
It’s the same thing, but with TLS encryption, so it’s more secure. That’s it. All you need to know is that if you have a TLS/SSL certificate installed on your site, and your site is available via HTTPS, there’s a good chance your certificate is also configured to cover your FTP server connection. If not, just check with your hosting and/or certificate provider to make sure it is.
Cyberduck is smart enough to detect if your host supports FTP-SSL. If you choose regular, unsecured FTP protocol, and try to connect, it will trigger a useful warning telling you you should switch to FTP-SSL. Very nice !
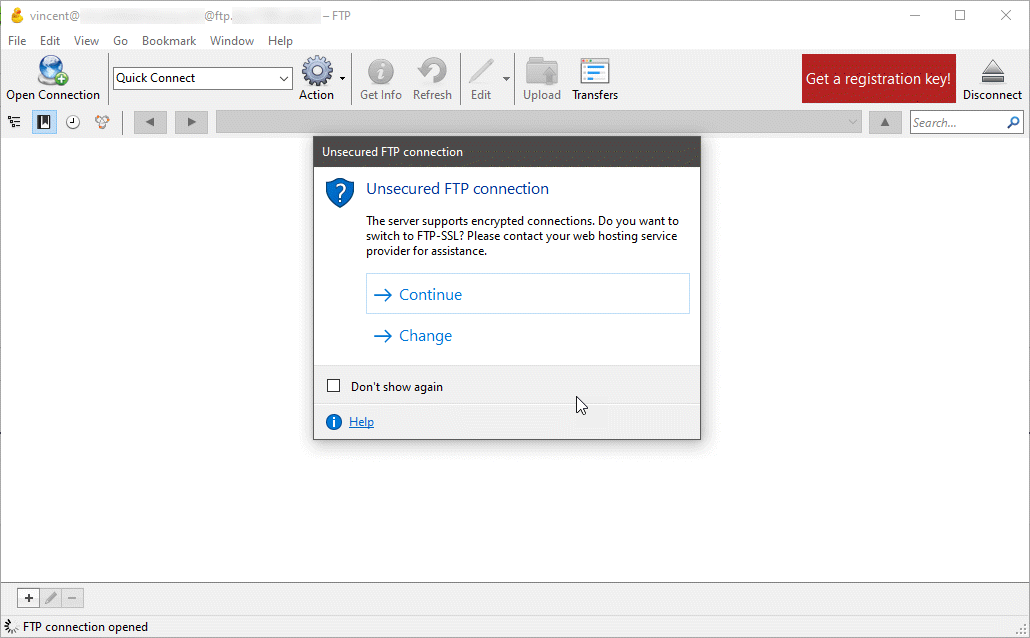
So, let’s make the switch and choose FTP-SSL for this first connection. Depending on how your certificate is setup, you may get a warning telling you the certificate is not valid. Click the Always Trust checkbox and ignore it for now, or it will interrupt you every time you connect to the server to download or upload a file.

Basic usage
Once logged in, you’ll get access to your files at the document root you specified for the account.
To download a file, simply double-click on it. By default, the file will be downloaded in your Downloads folder. You can set the default location in the Edit > Preferences menu, under the Transfers tab.
Another way to download a file is to select it, right-click on it, and choose Download to, to place it directly where you need it. You can also simply drag files out of the Cyberduck window directly into your desktop or other open folder. That’s very convenient.
When downloading files, a Transfer window opens, and you can check the status of the transfer, the files queued for transfer, and can directly open or locate files by clicking the appropriate buttons in the upper right corner. You can also get the remote and local address of any selected file at the bottom of this window.

You can transfer multiple files or folders by selecting them with CTRL-click, or with your mouse, exactly as you would in a typical finder or explorer window.
You can create folders, and rename files, copy, cut, etc… Just right click on a file to see the possible options. Basically, a lot of what’s possible in a standard file browser is available within Cyberduck.
To upload files, the process is the same. You can even drag files and folders directly from Finder or Explorer and drop them in your Cyberduck browser window to upload all of them at the location currently displayed.
You can also directly edit a file on the remote server. To do this, just select the file, and click the Edit button at the top. Or right-click on it to list all options.

As you can see, Cyberduck detected I’m using VS Code, and set it up as my default editor. You can choose your editor by clicking the little arrow just on the right of the button, or setup your own editor in the Edit > Preferences menu.
When you click this button, Cyberduck will temporarily download the file and open it in your text editor. When you make your edits and save the file, it is directly uploaded to the remote server. Nice !
This feature is super useful for quick edits of settings in the wp-config.php file, for example.
Like FTP Clients there are tons of options for text editors, free and paid. I’ll only mention two here :
Both are free, and have a huge ecosystem of plugins to meet all of your code editing needs.
Conclusion
As you saw, using FTP is very easy and it’s a basic skill you’ll eventually need if you’re managing any WordPress website, whether to recover from a broken site, or tweak some configuration. We only scratched the surface of what a solid FTP client has to offer, but what we learned covers 90% of use-cases for FTP.
So, to sum up briefly what we covered :
- FTP is the protocol used to transfer files
- You need an FTP client to connect to your site and access your files. Filezilla and Cyberduck are two solid free options.
- Your web hosting provider will provide you with FTP access. If you need to, you can create other FTP accounts.
- If you have a TLS/SSL certificate installed, strongly consider using FTPS over regular unencrypted FTP.
- Cyberduck allows you to download, move, rename, upload and directly edit files.
Did it help you get a clear idea of what FTP is, when to use it or not and how to connect to your WordPress site ? Did you ever face a situation where your site was inaccessible and needed to access files ? Please tell us in the comments below !

Receive the next posts for free and access exclusive resources. More than 20,000 people have done it, why not you?
Register

I am working with Google Ads…and have an appointment to work on my word press files, how do I accomplish the following?
“To ensure a successful implementation session, please ensure the following:
1)Administrative Access to Website- Please ensure someone with administrative access to the source code of your website (FTP/Admin panel access) joins the call.
Thanks,
Hello, you need to have an access to your host or your FTP 😉