In October 2012, Felix Baumgartner undertook a completely crazy project.
Sponsored by a famous energy drink, the Austrian jumped from 127,852.4 feet (39,969.4 meters) to become the first man to break the sound barrier in freefall.

A real leap into the unknown. Proportionally, that’s what you’ll face when you create your first WordPress website.
Alright, alright, it’s much, much less risky. But like our brave Felix, there are a lot of parameters you don’t know about and you’ll have to take care of your landing.
One question in particular should be on your mind: where do you start, before you launch yourself into the void?
This guide is here to help you. Starting from scratch, you’ll manage to set up your first WordPress website like an experienced webmaster. 👍
Ready to take the bull by the horns and embark on this journey of initiation?


There are affiliate links in this guide. This means that WPMarmite will earn a commission if you purchase one of these tools using our link (it doesn’t cost you anything extra on your end). We make it a point to recommend only trusted resources.
Why create your website on WordPress?
This is it, you’ve made up your mind. You are going to create your own website with WordPress.
By opting for WP, as it is usually abbreviated, you are choosing a solution that is on the rise.
According to the latest figures at the time of writing (summer 2024), WordPress powers more than 41.2% of websites worldwide.
If WordPress enjoys great popularity, it’s because it allows you to set up and administer websites more easily than others and for free, while offering more possibilities.
And for good reason: with WordPress, it’s possible to create websites without touching a single line of code.
Whether you’re a beginner blogger, an ambitious entrepreneur, an artist looking for recognition, a small business launching itself on the Internet, or a student wishing to showcase your skills, you’re sure to like what you find.
Learn more about WordPress in our dedicated page.
Part 1: Domain name and WordPress hosting
Well, I hope you’ve put on your warm-up gear and adjusted your safety helmet.
Let’s start our operation to create your WordPress website by talking about two essential elements: the domain name and the hosting.
Without them, you simply won’t be able to bring your dream site to life. They are the foundations of your future building.
The two often go hand in hand, so find out how not to make a mistake when choosing them.

Find a domain name
A domain name is the equivalent of your postal address on the Internet, as explained by Afnic (“Association française pour le nommage Internet en coopération” i.e. the French network information centre).
For example, wpmarmite.com is the domain name (DN) associated with the WPMarmite blog.
A DN is composed of two elements:
- A name, consisting of a set of characters.
- An extension, often associated with a country (e.g.
.fr,.be,.es,.ch, etc.)
For example, in the domain name wpmarmite.com, wpmarmite is the name and .com is the extension.
Choosing a good domain name is not easy. It must combine several criteria:
- Short
- Easy to remember
- Simple to pronounce
- Without hyphens if possible
From a more pragmatic point of view, the domain name of your choice must also be available. Make sure someone else hasn’t beaten you to it with a Namechk search.
You know, the name of a website is a bit like the name you give to a child. You have to choose it well, because it will stay with it all its life (except in exceptional cases)!
To help you in this difficult task, WPMarmite has prepared a complete guide to domain names.
Choose a host for your WordPress website
If the domain name is considered your mailing address on the web, then we might say the web host is your home, so to speak.
A web host is a company that stores the files that make up your site (in our case WordPress), as well as its database, so that it is accessible 24/7.
There are several types of hosting, but if you are just starting out, shared hosting is the best solution.
If you want to understand in detail what a web host provides, read this guide to WordPress web hosting. I cover everything you need to know before you start.
Please note that WordPress.com is not a web host, but a platform for creating a WordPress website online.
The free package does not offer the same possibilities as installing WordPress at a hosting company and displays ads on your site (ugh! 😱).
The WordPress we are interested in is a software that we will install at our host (we talk about a self-hosted solution). It is the one used by WPMarmite and that you will learn how to handle in this guide.
In short, there are two versions of WordPress!
To avoid getting confused between these two “false friends,” check out this post listing their differences.
To find the right fit for you, I recommend that you pay particular attention to the following details:
- The cost: on average, count around $4-5 per month to host your site.
- The performance of the servers.
- The quality and availability of the customer service. In case of a problem, it is always appreciated to get answers quickly.
- The availability of the servers.
- The ease of use.
- The presence or not of a cPanel. This administration interface is not present with all hosting companies, but it is a little plus, because it is easy to use to perform common operations (e.g. creation of email addresses, redirects, change of PHP version, etc.).
WPMarmite has been hosted at o2switch since December 2015, but there are other trusted hosts like SiteGround that we definitely recommend to you.
Choosing a web host is a crucial step in the creation of your website. Your adventure on the web finally enters the real world!
Part 2: Install and set up WordPress
Generate an SSL certificate
Before proceeding with the installation of WordPress, you will need to secure the connection to your site by generating an SSL certificate. It is thanks to this certificate that your website will switch to HTTPS and that you will get the little padlock in the browser, to the left of your domain name.
This step is essential, even if you do not do ecommerce. A secure site allows you to protect the data you send to your site (starting with your login credentials) and to give trust to your users.
Today, all hosting companies offer a free SSL certificate via the Let’s Encrypt certification authority.
To install an SSL certificate on your site with SiteGround, you can go to your Site Tools control panel, then to the Security > SSL Manager menu.
In the “Install New SSL” section, select your domain, choose “Let’s Encrypt,” and click the “Get” button.

You will see a confirmation message that the certificate is in place on your site. To see it in action, go to your site and notice the famous padlock to the left of the URL.
SiteGround provides a free “Let’s Encrypt SSL” certificate with each of its hosting plans.
Now the serious stuff can finally begin! 💪
Install WordPress
To install WordPress online, you can proceed automatically or manually.
The automatic installation corresponds to what the hosting companies call the 1-click installation: a software will do all the work for you. This is mainly for beginners.
With the host SiteGround, you’ll be able to launch a site in a few clicks. To put all this into practice, you can follow our dedicated guide, which details step by step the whole installation process, both automatic and manual.
Once you’ve set up your login details, write them down and keep them in a safe place.
Congratulations, you now have a WordPress site! 🎉
However, it’s somewhat empty and impersonal at the moment.

Just be patient: there are several things you need to do before you can get started customizing the design of your website.
It only takes a few minutes and will save you a lot of trouble later on.
Set up WordPress
First, go to the administration of your site at the following address: yoursite.com/wp-admin, then to the “Settings” section.
The General tab
In the “General” tab, we advise you to modify the following values:
- Site Title and Tagline: these are the elements that are displayed at the top of your site.
- Site icon: choose an icon.
To quickly create a site icon, you can use a tool like LogoFast.
- Timezone: select your capital city from the list.
- Date Format: choose the one that suits you.
Do not change the website address (URL).
The Reading tab
If you are creating a blog, you can leave the first setting of the “Reading” tab as it is.
If not, it is better to select “A static page” in order to define a specific page, which you will have created beforehand (we will see how in the next part), as the homepage.
Set the permalinks
Well, the name may sound scary, but it’s actually not that big of a deal. Permalinks (slugs) are the format of the addresses of the pages on your site.
Go to Settings > Permalinks and choose “Post name” as in the image below:

Remember to save your changes to finish.
It is important not to touch this setting afterwards, otherwise your visitors will not be able to find your pages.
Part 3: Add and edit content on your WordPress website
Exploring Gutenberg
Now we’re going to explore the WordPress content editor (the famous Gutenberg), which will be used to create your website with quality posts.
To write posts on your blog, in case you want to blog, go to Posts > Add New.
To create pages, go to Pages > Add New (yes, that was easy to guess).
At a minimum, create the following pages:
- About: where you introduce yourself.
- Contact: where you will give your contact information.
- Terms and Conditions: they are mandatory, whether your site is published professionally or not.
- Privacy Policy: this is mandatory since the advent of the General Data Protection Regulation (GDPR), launched in May 2018. A “Privacy Policy” page is automatically generated when WP is installed.
However, this page will not be enough; you will have to adapt it to your website.
To have a privacy policy tailored for your website, I recommend you ask an expert in this field.

By going to Posts > Add New or Pages > Add New, the WordPress content editor, also known as Gutenberg, is displayed. You can start writing your content there.
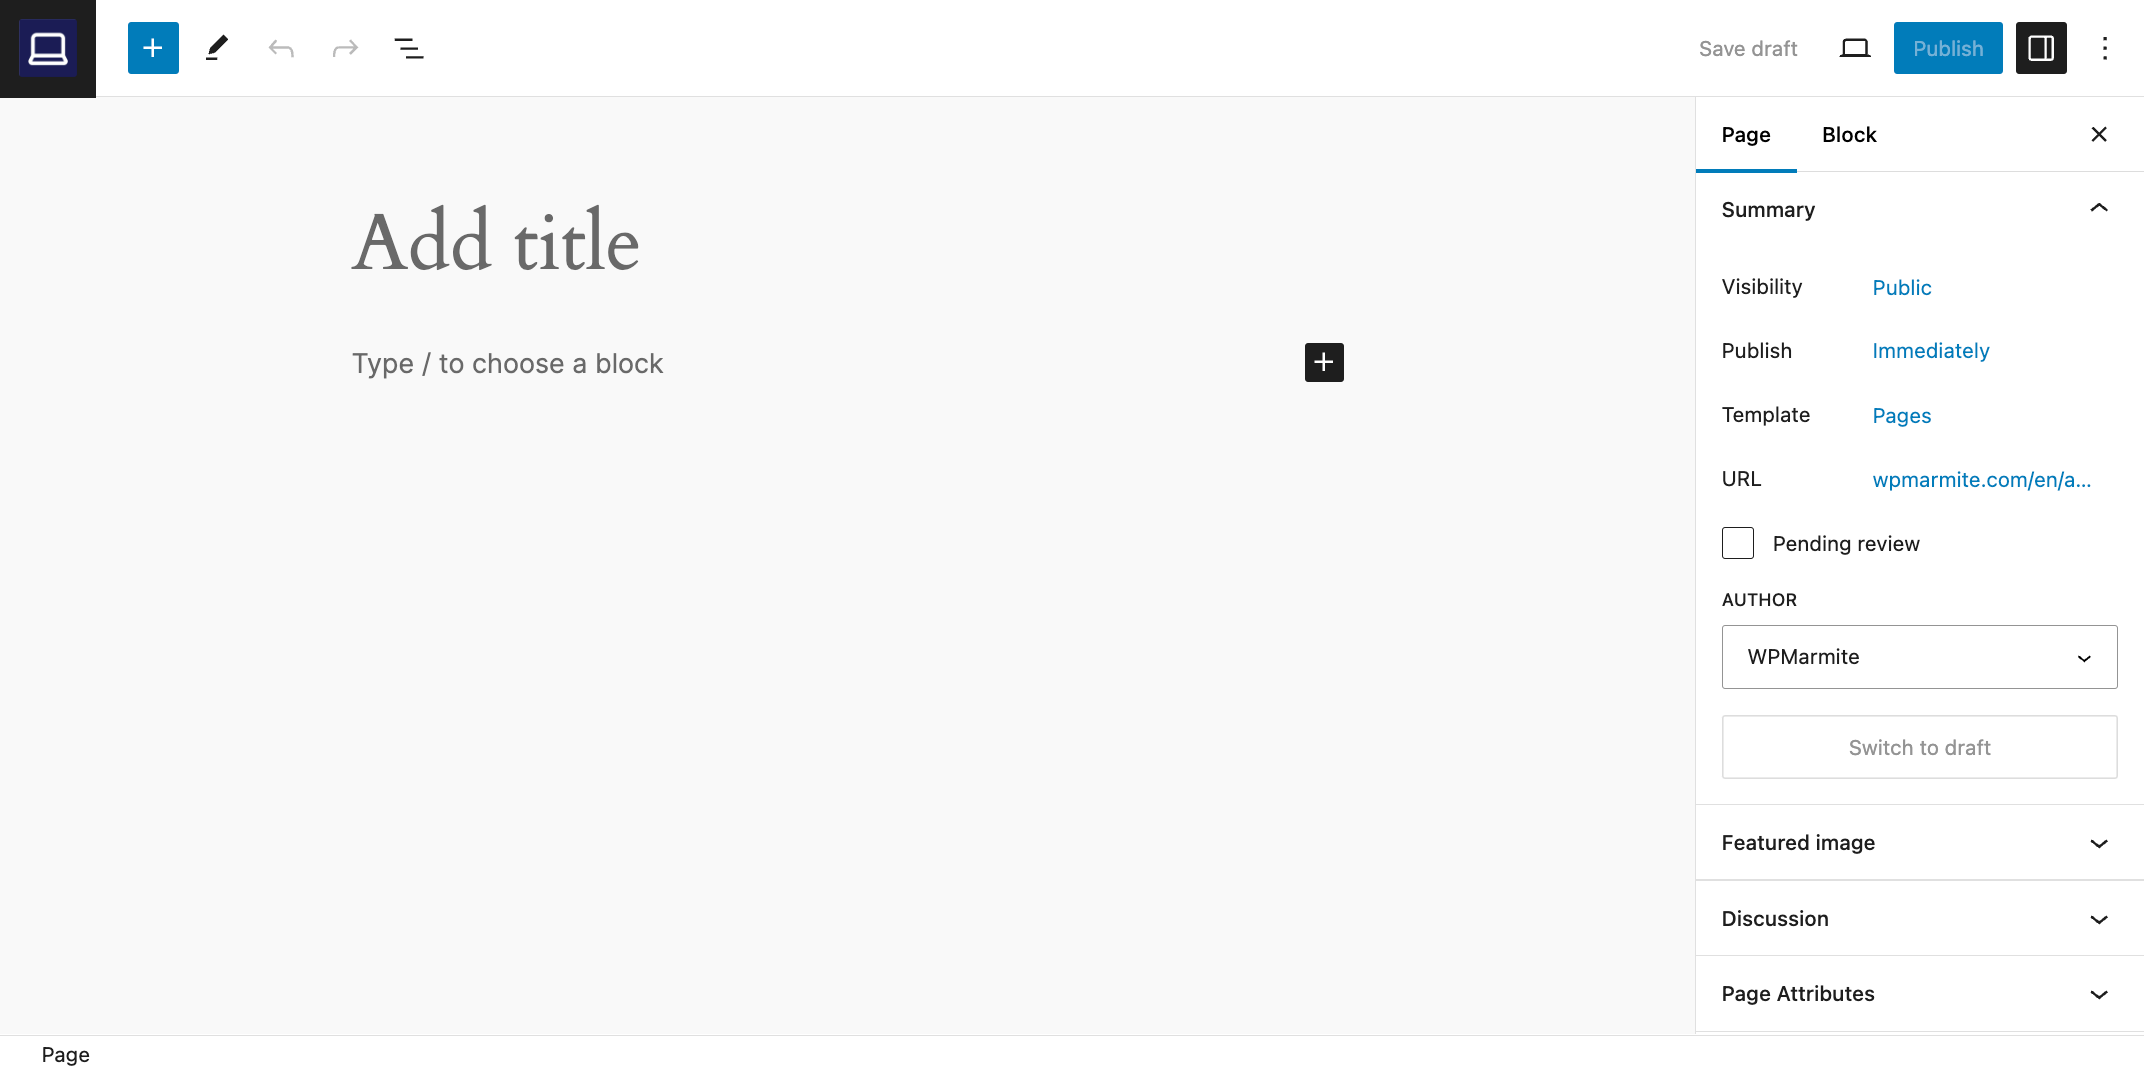
The current content editor, which appeared in late 2018, works with content blocks that you add within your text with a few clicks.
In the middle part of the editor, you can edit their content and click on “Save draft” to save your changes before publishing, and on the blue “Publish” or “Update” button after publishing.
On the right-hand side, you will find the settings column for the publication being edited, and for the active block. Here you can configure the typography and color of your blocks, but use them sparingly, as the default settings will often do.
The goal is to create a professional WordPress website that moves your users to action.
However, you’ll need to check the permalinks of each of your posts to make sure they contain the minimum amount of words.
Above the editor, a toolbar allows you to select elements, add them and view those contained in your publication. If you select the list view, you can also rearrange them by drag and drop.
Blocks, how to unlock?
In WordPress, all the content of your publications is presented in the form of blocks. There are a myriad of them, from the simplest content elements (Title, Paragraph, Image, Bullet List, etc.) to the most sophisticated (Media & Text, Tag Cloud, Custom HTML, etc.).
To get an overview of all available blocks, click on the “+” at the end of the line or in the editor toolbar. These vary depending on the theme and plugins active on your WordPress website.

You can also quickly add a block by typing “/” and then the name of the block (e.g. “/title” to add the Title block).
The available blocks are arranged in different categories:
- Text: contains the most common blocks.
- Media: to make the content more visual.
- Design: to shape your layouts.
- Widgets: not very useful at first.
- Theme: completely useless if you are just starting out.
- Embedded content: to integrate content from other websites (Twitter, YouTube, etc.).
Think about groups and columns
To build custom layouts, the Group and Columns blocks can be very useful.
The Group block allows you to gather several blocks and apply common settings or style to them, and move them at the same time for example.
This is the block that WPMarmite uses to make its CTAs. 😉
They are composed of a Title block, a paragraph and a button.
The Columns block allows you to put blocks side by side. It can be used to display services, portfolio elements and testimonials.

On the other hand, to place an image next to a text, the Media & Text block should do the trick.
Block patterns
Block patterns are assemblies of pre-designed blocks to be integrated into your pages or posts.
They are intended to save you time in the creation of your content, but don’t forget to go through the “customization” so that it fits with the spirit of your site.
You will find all the available patterns in the “Patterns” tab of the blocks list, accessible by clicking on the “+” in the toolbar above the content editor.
They are grouped by type: Text, Gallery, Call To Action, Headers, etc., as well as in a category dedicated to the patterns embedded by your theme, if it offers any.

Now that you know how to structure your content, all you have to do is create it! If you’re not sure, you can always take a look at what the competition is doing (without copying, of course), or ask ChatGPT for help.
And if you don’t like the default WordPress theme, you can always install another one.
Part 4: Customize your WordPress website design
Find the theme of your dreams
Since the release of WordPress 5.9, the WordPress theme installed by default is block-based and compatible with the Site Editor (formerly known as Full Site Editing or FSE).
FSE is a project that allows you to edit the entire structure of your WordPress site with blocks. It’s a new, much easier way of creating WordPress sites.
So we’re going to keep the default theme installed, which will enable you to create a professional site without spending hours on it, by customizing it.
If you’d still like to change it, you can rely on those in the official WordPress directory. At the last count at the time of writing, there were over 12,000 free or freemium themes available.
To install one, the easiest way is to go to the Appearance > Themes menu in WordPress, then click on “Add New” at the top of the screen.
A list of free themes will appear. Browse through them and click on their image to get a full screen preview.
To help you make your choice, WPMarmite has compiled a list of the best free WordPress themes and offers various selections and tests on the blog.
If you like the preview of a theme, click “Install” at the top of the screen. Wait, then click “Activate” to get it up and running on your WordPress site.
One last tip for the road: since this is your first WordPress site, keep it simple with your theme.
Remember, you’re not making a website for yourself, you’re making it for your visitors.
They need to feel good about browsing its pages and understand what it’s all about. Otherwise, they will leave as quickly as they came.
Customize a WordPress Theme
For the purposes of this guide, we will use the Twenty Twenty-Four theme to customize the look of our WordPress website.
It offers many customization options, and will allow us to modify the header, body (style and content area), and footer of our website, all by taking advantage of blocks and the WordPress Site Editor.
To get started, go to Appearance > Editor. The left-hand side of the screen displays a menu allowing you to modify the appearance of your theme and make other adjustments.
On the right side, you’ll have a preview of your site, allowing you to see your changes live.

Set up the main menu of your WordPress website
Click on “Navigation” on the right-hand side of the screen (on your site).
Then click on the “Settings” icon in the top right-hand corner of the screen, then on your menu.
Use the options provided to add, move, and remove pages from your menu.

If needed, it is possible to add new pages directly from this menu.
You can remove the link to your homepage. It is already on your logo.
Finally, click on the “Save” button to save your freshly baked menu.
Some good practices to remember for menus:
- Keep the number of items to a minimum (to keep it simple).
- The label of each item must be explicit (we know what to expect when we click on it).
- In most cases, avoid using submenus.
You can read more about managing menus in this article.
Customize the site style
Back in the Site Editor (accessible from the Appearance > Editor menu), click on “Styles.”
You can choose the style that best suits your industry from the list, and use the color palettes and typography sets offered by your theme.
Then, click on the pencil icon to customize your site’s style.

In the right-hand panel, you can modify several settings.
Typography
Click on the “Manage fonts” icon to:
- Manage existing fonts (you can deactivate those you don’t want)
- Upload new fonts
- Install fonts from Google Fonts. You can select the variants you wish to use (bold, italic, etc.)
Once you’ve saved, you can define the font settings you want for body text, links, titles, captions, and buttons.

Colors
In the “Colors” menu, you can customize your site’s color palette. If you have a style guide, this is where you can integrate it.
Customize templates
The “Templates” menu in the Site Editor lets you modify the structure of your site (header and footer, for example).
For each type of page, you can modify the associated template without coding.
For example, this is where you can customize your 404 page and create personalized templates.
Click on the “+” button to create a new template.

Patterns and template parts
In the “Patterns” menu of the Site Editor, you can find all available block patterns and create your own.
At the very bottom, by clicking on the “Manage all template parts” button, you can find and create new template parts; these are sections that will be reused on your site.
This is where you can customize your site’s header, for example.
Part 5: Add features to WordPress
Install plugins
After themes, I’d like to talk about another essential element of WordPress: plugins.
These plugins allow you to add new features to your website, without coding.
The possibilities are almost limitless. This is what makes WordPress so strong.
There are more than 63,708 free plugins to date, on the official directory.
In addition, specialized marketplaces like CodeCanyon also offer paid plugins.
So, there is plenty to choose from.
Here are 6 “generalist” plugins that I recommend you to start with. They can be used on any type of website (blog, store, portfolio, etc.):
- Yoast SEO: to optimize your search engine optimization (SEO).
- SecuPress: to secure your website and turn it into a fortress.
- WP Super Cache: to speed up your website (or WP Rocket if you want to upgrade to premium).
- NinjaForms: to integrate forms to your web pages.
- UpdraftPlus: to backup your website regularly.
- Matomo: to track the number of visits to your site while remaining in compliance with the General Data Protection Regulation (GDPR) (or MonsterInsights if you wish to use Google Analytics).
You will also find other nuggets in the following resource: The 25 Best WordPress Plugins.
To install a plugin on your website, go to Plugins > Add New.

Once you’ve found the ones you want, click the “Install Now” button, then “Activate” to turn them on.
How to rank your WordPress website
Once you have written the content of your posts, you can focus on making them visible on search engines.
To do this, you need to apply some good practices. In the Settings > Reading menu, start by checking that the “Search Engine Visibility” box is unchecked.

Otherwise, your website will not be indexed by Google and its friends, which means that no one will find it (which would be a shame, after all that work!).
Then, I advise you to use a SEO plugin. It won’t get you on the first page for the keyword of your choice, but it will help you optimize your content so that it will appeal to search engines.
Earlier, I told you about Yoast SEO, which I use on WPMarmite. It’s the most famous one in the official directory.
And then, what should you do next? To try to win over Google, your website will have to perform well. Understand that it will have to load quickly.
For this, I recommend you to read the following post: How to optimize a WordPress site without breaking the bank.
How to secure your WordPress website
To finish polishing your website, I recommend that you pay special attention to its security.
You should know that WordPress is the target of many hacker attacks, especially because it is the most used CMS in the world. It therefore attracts attention, but remains intrinsically secure.
In fact, the main causes of hacking are due to faulty plugins, or bad practices of webmasters, who do not update their website, for example.
On these two points, you are normally quite well covered having read until here. 😉

For the rest, you should know that it is impossible to be 100% protected against hackers.
However, you can protect yourself from a lot of complications by applying some basic advice:
- Back up your site regularly.
- Update it as soon as possible.
- Only activate reliable themes and plugins: choose those from the official repository or from well known shops.
For more security tips, check out our dedicated blog posts.
It’s all good. What’s next?
Well, congratulations! You must have spent a few hours behind your screen creating your WordPress website.
As a reminder, you have discovered how to:
- Choose a good domain name and host.
- Install WordPress and configure it.
- Add content and start linking to it.
- Customize the design of your website.
- Find and activate the plugins you need.
It may have been a daunting task – especially if it was your first time – but I hope it all works out.
This will allow you to go through everything step by step and benefit from exclusive resources.
So now what? Know that the adventure of your website does not stop here. Think about maintaining it, making it evolve and pampering it so that it helps you reach your goals.