It is crucial for many websites. It is in four letters. And we often see it very quickly at the top of the page, when we land on a new site.
This essential element is the menu.
A website menu is a bit like a restaurant menu. It must help you to quickly see the options available and make you want to stay.
That’s why your navigation menu must be uncluttered, clear and well organized to make your visitors’ mouths water.

So, how do you create a WordPress menu and how do you configure it? That’s what we’ll see right now.
Originally written in November 2021, this article was updated in June 2024.
What are your options for setting up a WordPress menu?
There are two main types of WordPress theme:
- classic” themes, which integrate a Customizer that lets you make a whole range of modifications to your site (including the creation of menus 😉 )
- the block-based themes, which are more recent, and with which you can customize your site using the Site Editor.
Depending on the theme you use, the way you create a menu will differ. The steps to follow and the interface are specific to the type of WordPress theme installed on your site.
To help you get the most out of whatever theme you’re using, we’ll show you the two ways to create a WordPress menu in this tutorial.
Option 1: the “classic” method
If you’ve ever browsed the WordPress admin, your first instinct for creating a navigation menu is probably to go to Appearance > Menus (number 1 on the following screenshot).
If so, you’re not wrong, as you could easily get away with it.
However, if you go to Appearance > Customize (number 2), you will come across the Customize Tool for your site, which contains a “Menus” item:

Click on it to get to another, more intuitive menu creation module, which gives you access to a live preview of your site actions.
The Customization Tool is available with so-called “classic” WordPress themes, such as the famous Astra (which we’ll be using in this tutorial). But what about other themes?
Option 2: the Navigation block
Since the release of WordPress version 5.9 in January 2022, another type of theme has appeared: block-based themes. They are the fruit of a project called Full Site Editing (since renamed Site Editor).
The latter, based on the Gutenberg content editor, lets you create and edit an entire site using blocks.
Thanks to it, you now have control over every part of your theme (header, footer, custom pages), not just the content.
With the arrival of the Site Editor, new blocks have also appeared, including the “Navigation” block.
This allows you to create and manage your navigation menus within the Site Editor.
The latest native WordPress themes (Twenty Twenty-Four, Twenty Twenty-Three etc.) are for example block-based.
When using this type of theme, you can access the Site Editor via Appearance > Editor (the Customization Tool options are then hidden).
In this tutorial, we’ll look at these two methods of creating a menu on WordPress, so that you can create an efficient one, whatever theme you’re using.
But first, let’s take a look at best practices when it comes to menu creation.
What are the characteristics of a good menu?
The menu of your site is the entry point of your users’ navigation, so you must take care of it.
To do this, a menu must have 3 characteristics:
- A limited number of items.
- Concise and clear headings.
- Few, if any, submenus.
We agree, there may be exceptions depending on the site (especially for submenus). However, if your site is a blog or a small showcase site, don’t go overboard.
In all cases, keep it simple. The more choices you give to your visitors, the more they will have to think about which item to click on, the more time it will take, and in the end, they may go elsewhere.
It’s a bit like a restaurant menu, the more there is, the harder it is to choose.
So remember to get to the point.
Also note that there is no need to add a link to the home page of the site in the menu, as the home page is usually already accessible from the logo.
As for your legal notices and privacy policy, it’s best to insert a link to them in your footer.
Which items can you add to your menu?
While pages are the main elements you’ll be adding to your menus, they’re not the only ones offered by WordPress.
How to add links to your menu?
For the sake of your navigation, you may need to use custom links in your menus to take your visitors to another site (a partner’s site, for example – don’t send your visitors to just any site!).
You can also use custom links to add a non-clickable menu item (one containing sub-menus, for example).
To do this, add a custom link and insert the # character in the URL field. Once the element has been added, remove the # to avoid damaging your SEO.
How to add posts to your menu?
WordPress also lets you add items to your menu, but I don’t recommend it.
If you’re tempted to add one, you probably should have created a page instead.
To learn about the differences between articles and pages, read out this article.
Add categories or tags
You can also add categories into your menu. This is very useful on blogs.
In fact, this is what WPMarmite uses in its footer to make it easier for you to find the articles that interest you. 😉

Unlike pages, you’ll need to have created your categories before you can add them to your menu. You won’t be able to create them from the WordPress menu management interface.
Finally, adding tags to a WordPress menu can also be interesting on a blog, in a sidebar or footer for example.
Now let’s get down to business and see how to create your own WordPress menu.
How to create a WordPress menu with a block-based theme?
Go to the WordPress Site Editor, in the Appearance > Editor menu, then click on “Navigation” in the menu on the left of the screen.

Click on the right-hand side of the screen (on your site). A banner will inform you that you need to edit your template to change this block, so click on “Edit template”.

Next, click on the “Settings” icon in the top right-hand corner of the screen, then on your menu.

From this interface, you can either:
- edit the existing menu, by clicking on it
- create a new menu, by clicking on the 3 vertical dots in the right-hand side menu, then on “Create a new menu”

How to structure a menu on WordPress?
Your menu is presented in a “Navigation” block. You can add, delete and customize your menus as you would any other WordPress block (“Title”, “Paragraph”, “Image”, etc.).
Directly from your menu or from the list of menu items in the right-hand pane, you can:
- change the order of items
- add sub-menu links
- remove or add items using the “+” icon

Note that you can add a whole range of blocks to your menu:
- page link: to add pages to your menu, simply ;
- custom link
- search bar
- social network icons
- a category or tag link: useful if you have a blog
- a login/logout link
- etc.
If required, new pages can be added directly from this menu.
How to customize a menu?
Use the “Settings” and “Styles” tabs on the right-hand panel to customize the layout and style of your new menu.
In the “Settings” tab, you can:
- modify the justification and orientation of your menu
- act on your menu’s responsiveness, by defining an icon for mobile display, and enabling or disabling your menu’s mobile overlay, for example
When this option is activated, your menu will be displayed as a “burger menu”, i.e. the user will have to click on an icon to see it displayed vertically.

At the very bottom, in the “Advanced” menu, you can also set a menu name to help you find your way around if you create several menus.
The “Styles” tab lets you edit:
- your menu colors (text, background, sub-menu, etc.)
- the typography (font size and family, text decoration, etc.)
- the spacing between menu items, and content width

Finally, click on the “Save” button to save your work.
How to add menus to other locations of your WordPress site?
So far, we’ve edited the main menu already present in the header of our site.
What if you want to create a new menu, somewhere else on your site
Thanks to the WordPress Site Editor, it’s very simple. Go to Appearance > Editor, and select the template or template element in which you’d like to display your menu.
Wherever you want your menu to appear, add a “Navigation” block.

In the right-hand side menu, click on the 3 vertical dots to create a new menu or select an existing one.
How to create a WordPress menu with a classic theme?
Once in Appearance > Customize, click on the “Menus” item, then on the “Create New Menu” button. Give it a name and assign it a location on your site (otherwise, your menu will not be displayed).

The available menu areas differ depending on the WordPress theme active on your site. On the above screenshot, you can see the 5 areas offered by the Astra WordPress theme.
How to add items to a menu?
Next, it’s time to add items to your menu using the dedicated button. To do this, click on the “Add Items” button and then enjoy the different types of items ready to integrate your menu:
- Custom Links
- Pages
- Posts
- Categories
- Tags
If you are looking for a particular item, you can use the search bar at the top of this list.
Once you have created your menu, let’s see how to add pages to it.
How to add pages to your WordPress menu?
When you click on the “Add Items” button, you will immediately see the pages you have previously created.
It is also possible to quickly create new pages using the field and button below the list of your pages.
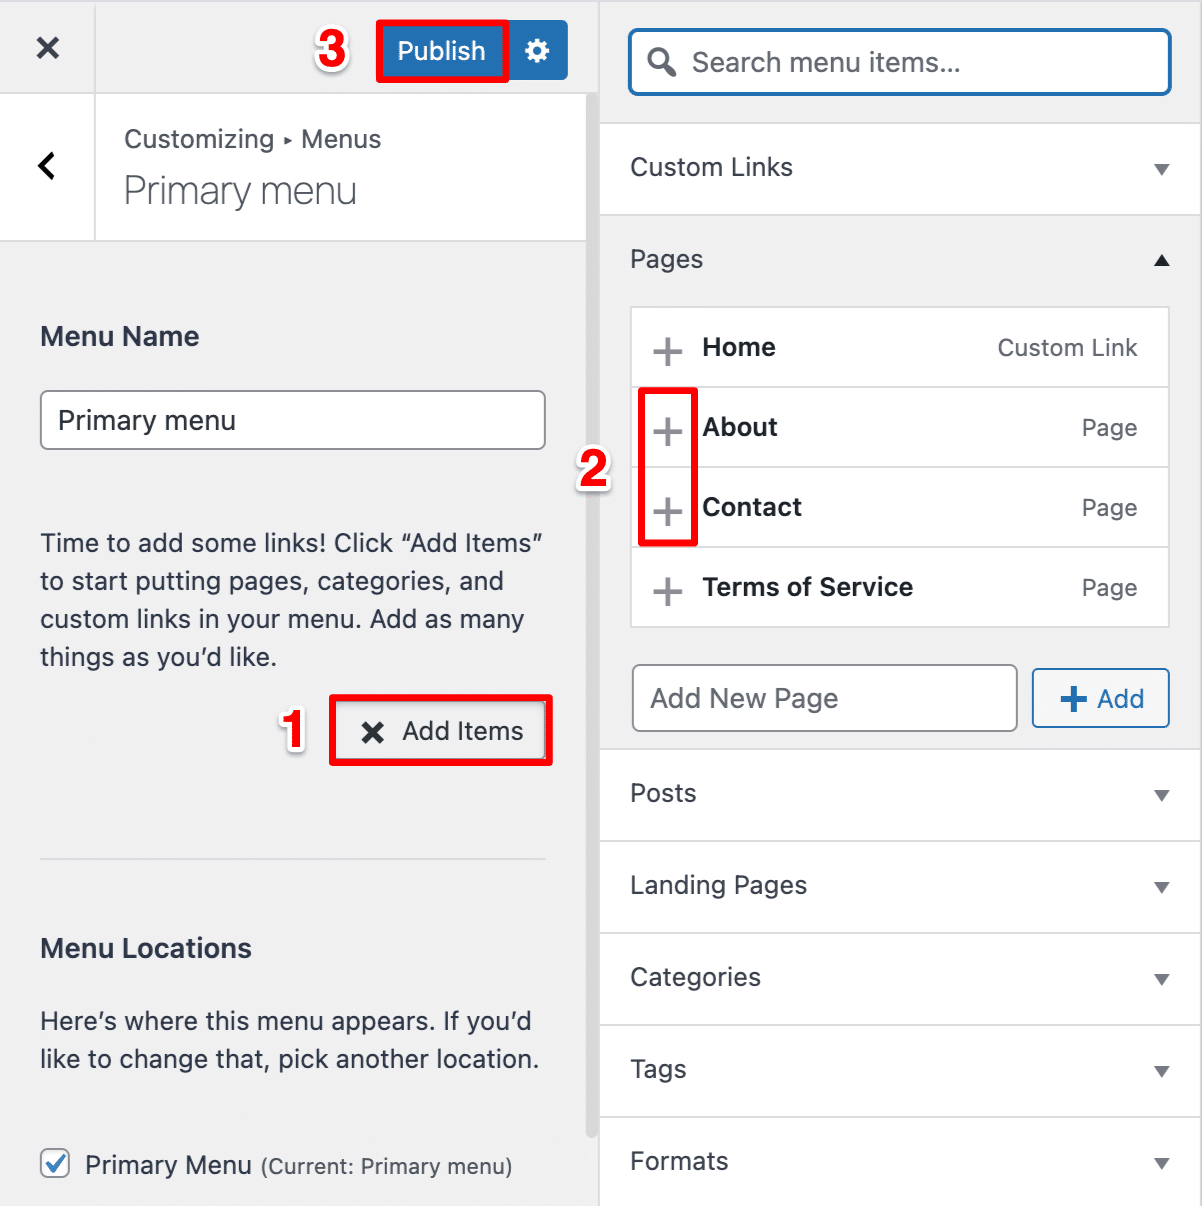
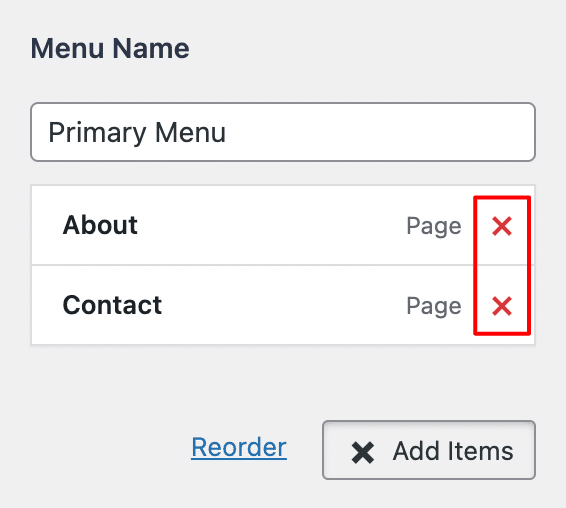
To add one to your menu, click on the “+” before the page title.

To remove it, click on the red cross that follows the title of the added page.
How to add links to your menu?
To add a custom link to your menu, enter the desired link in the “URL” field, then the link text (anchor) in the “Link Text” field.
Then click on “Add to Menu” to include your link.
How to add categories to your menu?
Unlike pages, you’ll need to have created your categories before you can add them to your menu.
So click on “Categories” to see the list of categories created on your WordPress site. However, you will notice that an additional category has been inserted without your request, in the first position.

This “Uncategorized” category is the default category in WordPress and contains “unclassified” posts. Its presence is good neither for the user experience nor for the SEO of your site.
We’ll show you how to set another default category and remove this unwanted one in this article.
To add or remove categories from/to your menu, proceed in the same way as for pages.
Finally, don’t forget to save your menu so that WordPress remembers what you’ve done.

How to organize menu items in WordPress?
How to change the order of the elements
At this point, your menu is not yet well structured. It has several items, but they are not necessarily arranged the way you want them to be.
To reorganize your menu, nothing could be simpler: you can change the order of the elements containing it with a simple drag and drop.
Do this until your menu looks like you imagine it will.
Note that the menu item in the first position will be displayed first on your site, i.e. on the left.
How to create a submenu (drop-down menu)?
If you have a lot of items to add (beware of overloading), you can create submenus by moving an item slightly to the right under another item, again by drag and drop.

In the example above, the categories “Starters”, “Main Dishes” and “Desserts” are submenus of the “Recipes” page.
As I said earlier, although you can create many levels of menus, stick to the basics. Imagine a submenu of submenu of submenu! Your visitors might not see the end of the tunnel.
As a general rule, if you have too many submenu levels, your menu is poorly structured.
For everything you need to know about creating a drop-down menu on WordPress, check out our detailed tutorial.
Without transition, let’s move on to the next part!
How to modify menu items?
At this point, your menu is almost ready, but you realize that you made a mistake. How to remove an item from a WordPress menu?
As you’ve probably noticed, each of your menu items has a little arrow on the right. Clicking on it will unfold that item to display additional information.

The “Navigation Label” field that appears before your eyes allows you to change the title of the item in your menu.
A “Remove” link is present to remove an item from your menu.
What are the hidden options in WordPress menus?
You should know that by default, WordPress hides some menu options. This is to gain clarity and above all to prevent beginners from doing the wrong thing.
To display these famous options, click on the gear in Appearance > Customize > Menus:

By checking these boxes, new fields will appear within your menu items:

Let’s see what these options correspond to:
- Link Target: allows you to display a box to open the destination page in a new tab. In the case of an external link, checking this box will keep users on your site longer.
- Title Attribute: this option is used to display a description of the menu item when hovering over it. Its usefulness is therefore reduced and it is very little used now.
- CSS Classes: if you want to customize the appearance of a menu item with CSS, place the classes you need in this field.
- Link Relationship (XFN): if you are linking to a site and want to specify the relationship between you, you can use the XFN properties. In practice, I have never used this. Chances are you won’t need it.
- Description: some themes allow you to display a description under the menu title, but they are quite rare.
So now you know how to edit a menu with WordPress. Now let’s work out the final details.
How to set up your menu?
Once you’ve added all the items you need to make up your menu, go to Appearance > Menus, and then go to the “Menu Settings” section, located below your menu items.

There are several checkboxes to choose from:
- Auto add pages: Checking this box will automatically add the pages you create to your menu. This is of little interest because your menu will not be customized. So be sure not to check this box.
- Display location: The checkboxes listed here allow you to determine where to display the menu you just created.
It is necessary to check one of these boxes for your menu to be displayed on your site.
The available menu locations will have different headings depending on your theme. You will normally find a box for the main menu (primary menu).
Once the settings are configured, click on the blue “Save Menu” button to put your new menu into use. A link to delete your menu is also present at the bottom left to delete a menu you no longer need.

How to manage your menu locations?
We’ll now take a look at what’s on the second tab of the WordPress menu management page, called “Manage Locations”.

As the name suggests, this tab will give you the possibility to assign the menus you create to the locations provided by your theme.
In fact, this tab allows you to see where your menus are displayed at a glance. And for a live view, click the “Manage with Live Preview” button at the top of the tab.
To assign or edit the menu for a location, use the drop-down menu. If you need to create a new menu, click the “Use new menu” button.
The list of menus in this tab will be different depending on your theme.
A click on “Edit” will take you to the associated menu editing page.
Once all the menus are in their place, don’t forget to click on “Save Changes”.
How to add menus to other locations of your WordPress site?
In addition to the locations provided by your theme, you can insert menus in the sidebar of your site (if your theme provides one) and in the footer via the “Navigation Menu” widget.
To do this, create a new menu and do not assign a location to it.
Then go to Appearance > Widgets and add a “Navigation Menu” widget to the widget area of your choice.

Write a title if you wish and then select the menu to be displayed in the widget. Then click on “Save” to activate this new menu.
Of course, this is optional. Chances are that the default locations of your theme are more than enough.
To create advanced menus, check out our article 7 plugins to boost your WordPress menu.
Conclusion
Whatever site you design with WordPress, you will inevitably need one or more menus to make your content accessible to your visitors.
WordPress has a relatively simple interface for creating menus, but you mustn’t fall into certain traps (menu that is too long, useless elements, etc.).
To go further in the creation and design of your site, take a look at our guide to create a professional WordPress website, step by step.
Also, take a look at our guide on choosing a domain name. And to pamper your website, pick a free WordPress theme from our selection.
How many WordPress menus do you have on your site? Where on your site do you place them?
Tell us all about it in the comments below this post.

Receive the next posts for free and access exclusive resources. More than 20,000 people have done it, why not you?
Continue reading
Articles posted in WordPress TutorialsHow to update the PHP version of your WordPress site
What comes to mind when you think of WordPress speed and security? Your favorite plugins, perhaps? You should also think about… PHP! If you’re looking for a site that loads fast, while offering a solid shield against hacker attacks, there’s a…
How to create an effective HubSpot conversion funnel on WordPress (complete guide)
In the drawers of a kitchen, there are often two very useful utensils lying around. The first is the colander. And to illustrate, some WordPress sites unfortunately resemble it. Why? Well, because visitors arrive on the site in question… then…
How to fix the ERR_CONNECTION_REFUSED error: A complete guide
Does your browser display the ERR_CONNECTION_REFUSED message when you try to access a website? This error means that the target server – or your own configuration – is actively rejecting the connection request, leaving you at a dead end. But…