Aaah, the redesign of a WordPress website…
When you think about the different issues that this mission involves, you usually tend to stress a bit.

Who doesn’t dream, in this key moment, of doing a simple Command + Option + Escape or Ctlr + Alt + Del on their server, and start over easily?
Unfortunately, redesigning your website is always a bit more complex than that. And an oversight, a mistake, a blunder, happens so quickly…
WPMarmite wanted to share with you its best practices to approach this big project with peace of mind.
Are you ready? In this post, I detail all the elements you need to think about to redesign your WordPress website, from the upstream strategy to the online launch.
Originally written in October 2018, this article was last updated in March 2024.
To learn how to create a WordPress website from scratch, check out our complete guide.
The 4 steps before the redesign of your WordPress website
Before you even get your hands on WordPress to redesign your website, you’ll need to work on various structural elements.
That’s right: you didn’t think you’d get started without knowing what you were getting into?
1. Set the goals of your redesign
Like any project, to redesign a WordPress website, you need to have goals, which you need to define precisely (whether you are a freelancer, a web agency, or a non-professional webmaster).
It’s these clear and concise goals that will guide your next steps.
It comes down to asking yourself the following question: why do you want to redesign your website? There can be many reasons for this:
- Changing the design of your site, by selecting a new theme, or by opting for a page builder.
- Updating the administration of your site. This can be the case if your plugins or your version of the WordPress CMS have never been updated, if there are conflicts between different plugins, or if your theme has been modified erratically. These are all concerns that can affect the performance of your website, and its daily management.
- Optimizing your SEO. A goal worth considering, especially if your traffic has dropped or is not taking off, if your user experience is currently flaky, or if your HTML code isn’t optimized for Google’s robots.
- Adding new features to your site that your current design can’t accommodate. You may also want to make it more intuitive and easier to use for your visitors.
- Improving the technical structure of your showcase website (or e-commerce site) to reinforce its security, improve its loading speed, and modify its tree structure.
- Migrating your site to another web hosting server.
- Generating more sales, especially if you have a WooCommerce store.
- Bringing your site up to date with the competition that offers more up-to-date websites. You’ll benefit by improving your brand image and your reputation.
Write down, in a well-structured document, these different goals. You will see that they will constitute structuring elements, to organize your website redesign.
2. Structure your redesign project
Now that you have a clear idea of the purpose of your redesign, let’s talk about the different steps that determine the main lines of your project.
Think about your new tree structure
Yes, I reassure you, we are still talking about website redesign, not horticulture!
Designing your tree structure means imagining the links that will exist between the different pages, and thinking about all the ways in which a visitor can find his way around the site.
In short, by creating your tree structure, you think about the different navigation paths of your users.
So how to do it?
Design a tree structure and remember to include:
- Your main navigation menu, as well as your potential secondary menus
- Your footer, and the links it may contain
- Your possible sidebars, especially on your blog
- The different categories of your blog
- Etc.

With a diagram like this, there’s no way you can forget to create a well-crafted mesh between your different pages, which will ensure a smooth user experience.
You can create this diagram on a sheet of paper, or use an online tool like GlooMaps or Octopus.
Create your wireframes
Does the term wireframes ring a bell?

A quick review of the subject is necessary, as this step is crucial.
Wireframes are structural mock-ups that help you arrange the different elements of your web pages on a single document.
The idea is to create a straightforward framework of the different pages of your site, to have a clear idea of the user experience you are going to create.
Here’s an example to illustrate my point:
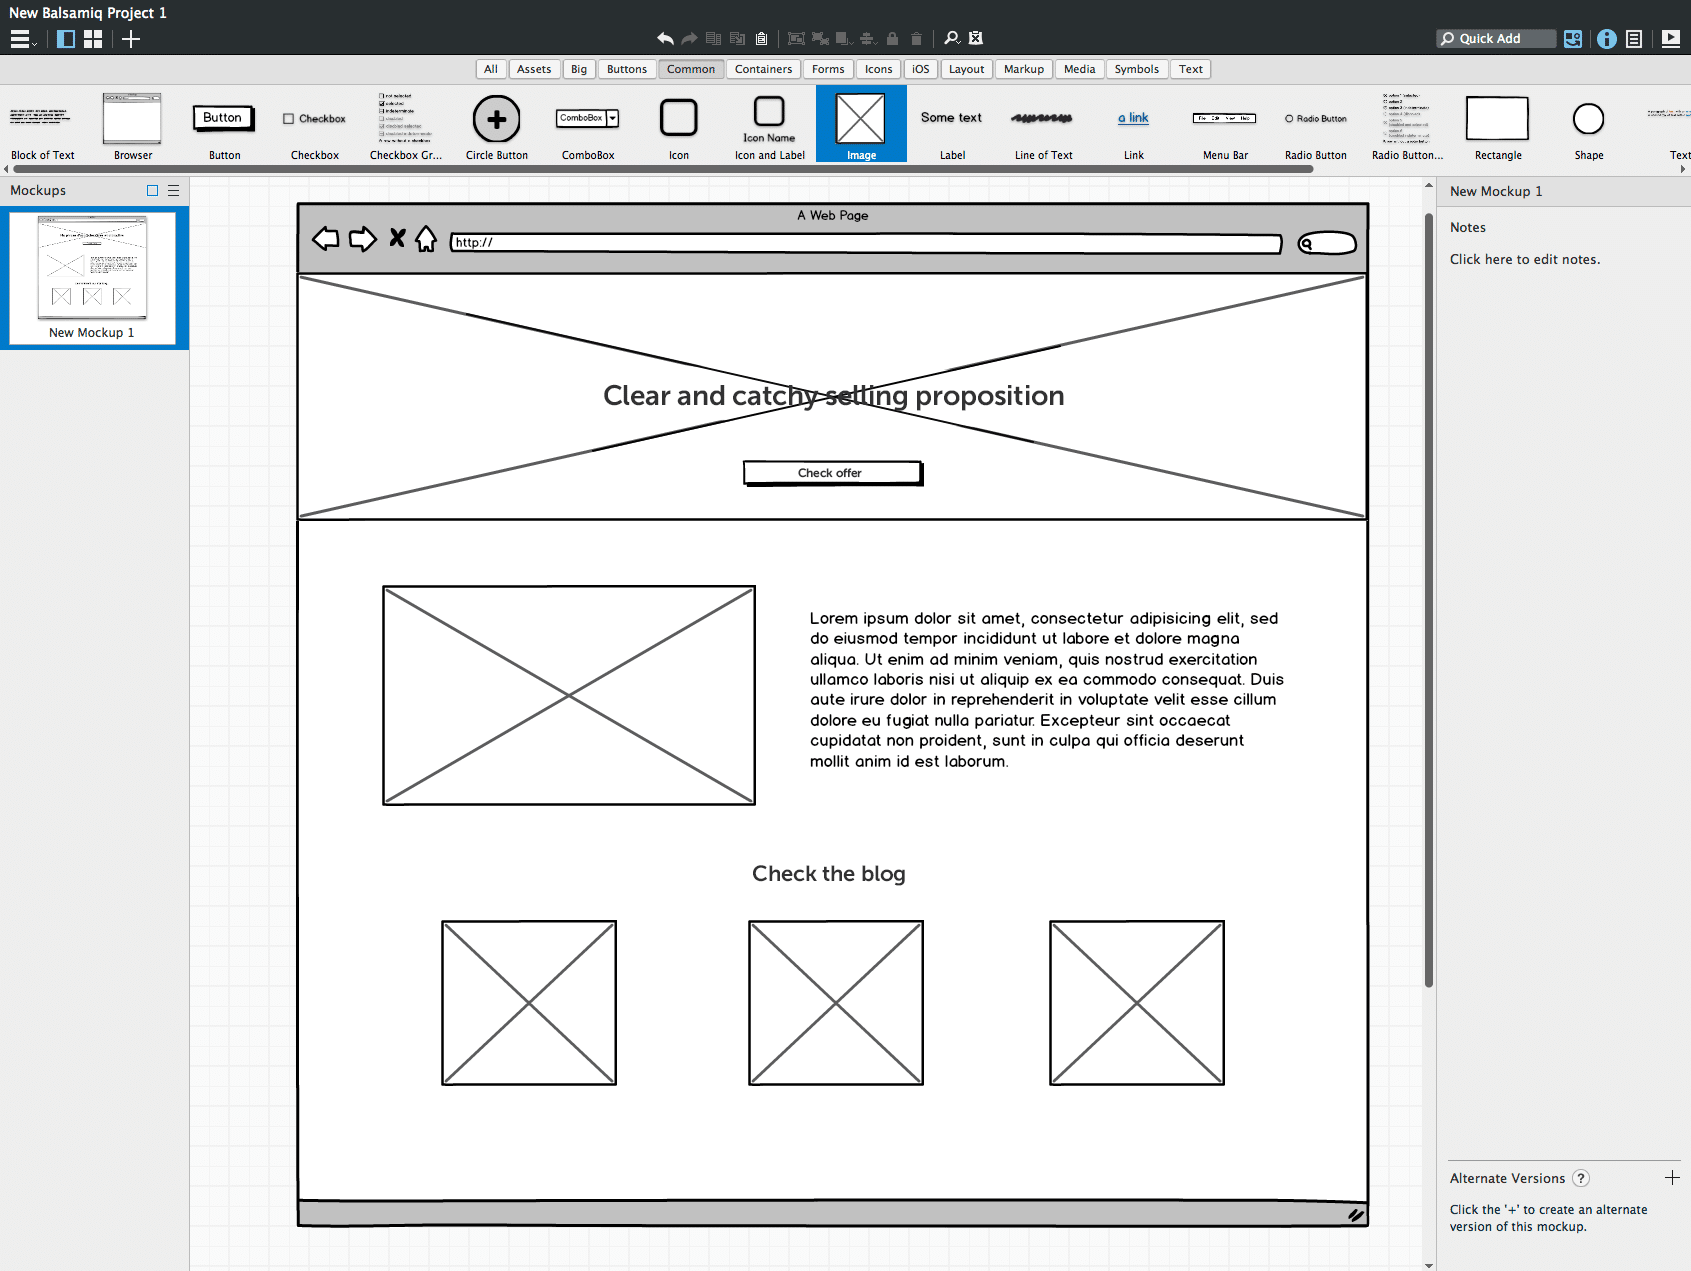
If the ancient paper + pencil method can be enough for a light redesign, I still recommend using a digital tool to design your wireframes.
This will not only allow you to easily modify them if needed, but also provides an easy way to share these wireframes with your team (or with your cousin who works in web marketing).
I can recommend several tools to do this:
- Balsamiq Wireframes: It’s a paid software, but the free 30-day trial version gives you plenty of time to design well-crafted wireframes.
- MockFlow: This is a handy freemium online tool. Its free version allows you to create up to 3 pages, to start.
- Sketch: A very powerful collaborative web design platform, provided you know how to use it properly. It offers a free 30-day trial version, then a paid offer starting at $10/month.
- Figma: This tool allows you to edit three files in the free version, and offers a Pro version from from $12/month per editor.
Designing your mockups
While wireframes will give you a vision of the structure of your redesigned pages, mockups will integrate the design itself.
Created via a page layout software (such as Adobe InDesign), the layout of your web pages can be technical, and is a rather time-consuming step.
So the question is: do you really need to create graphic mockups for your redesign? The answer is simple:
- Yes, if you want to create your own theme. In this case, you will have to design your redesigned website from scratch, and thus be able to visualize all the graphic elements easily.
- No, if you just want to use an existing theme and redesign it. A simpler solution. But in this case, be sure to choose your new theme according to your goals.
To help you, WPMarmite has the resource you need: a list of the best free themes. Enjoy!
At this point, you have a better idea of what to expect for the redesign of your site.
WPMarmite’s tip:
“Among the elements to watch out for when choosing a theme, don’t forget to check:
- That your theme is optimized for SEO.
- That it’s optimized for all browsers used by Internet users (at least Chrome, Safari, Firefox, and Edge).
- That it’s designed in responsive design, that is to say optimized for all devices (desktop, smartphone, and tablet).
This will save you a lot of trouble when redesigning your site!”

Designing your specification
Well, at this stage, you are well supplied with structuring elements. It is now time to gather all this in a key document: a specification.
The specification of your website redesign is a very extensive document, which allows you to target the different expectations you have in redesigning your website.
If you’re working on a project for a client, the client may have given you a specification, or at least have described his or her needs.
You’ll find many templates for specifications on the web. However, yours absolutely must contain:
- A description of your web project and your company, as well as the role that your website plays in this project.
- The target audience of your new website, described with precision if possible.
- The goals of your redesign, illustrated as much as possible with figures. If one of your goals is, for example, to increase your traffic, remember to specify the traffic of your current website.
- The elements to be recovered from your current website: the content of your pages, the possible images, etc.
- The graphic paths you wish to follow. To do this, integrate your wireframes and mock-ups into your specifications, as well as your style guide (which defines your visual identity).
- The new functional elements of your redesigned website, such as the addition of an ecommerce store, a blog, an opt-in module, a new administration (back-office), etc.
- The major milestones of your redesign project: When do you want to have a preview of your website? When do you want it to go live?
It’s a lot clearer now, isn’t it?

3. Think about the resources at your disposal
Now it’s time to get down to business.
Your challenge, if you accept it, is now to list the resources you have at your disposal in terms of:
- Budget: How much do you want to invest in this redesign?
- Time: How much time do you have available to redesign this WordPress website?
- Skills: Do you have the ability to achieve all the goals of the redesign by yourself?
- Tools: Plugins, themes, page builders… Can these types of tools help you achieve your goals?
This list will allow you to know if you will have to call upon an external provider, or if you feel you can work independently, with your team members or by your own means.
4. Create a redirection plan
“Okay, here we go, this is it!”
Easy! There is one last step that is too often neglected during the redesign of your website: the creation of your redirection plan.
Let me explain.
Often, in the redesign of a website, there will be URL changes. This is particularly true if you create new pages.
But what happens if you put your new website online without thinking about setting up your redirections? 404 errors galore, which will impact your SEO and your visitors’ navigation.
To avoid this problem, you’ll need to create a redirection plan, which lists the old site URLS alongside the new ones:

The stakes of this operation are high: transferring the traffic and the popularity of the old site URL to the new site URL, without breaking anything.
Once your website is online, you can set up the Redirection plugin, and import this table directly.
Clever, isn’t it?
Alright: take a deep breath, and let’s talk about the redesign itself.

The 3 steps to launch your redesign
So how do you go about it, now that your project is well structured and organized? These 3 essential steps will guide you.
1. Choose to work locally or directly on your current site
Before getting into the technical aspect, start by choosing to work:
- Either directly on your current site, and integrate the changes “live.”
- Or on development and pre-production servers, to test your new site before giving it to your audience.
What do these two options entail?
Working online directly on your site is barbaric.
In this case, all your visitors see the changes live, and act as “guinea pigs” of your new features… with all the bugs that this can induce.
Also note that if an error occurs during the modifications, it will impact the website until you have detected and resolved the problem. Site unavailable, functionality not working…

To avoid all these problems, you can redesign your website locally.
The advantages of working locally are numerous:
- Make your modifications safely
- Test your plugins without risk
- Have a preview of the final rendering before going online
It’s also the ideal solution if you want to keep the administration of WP as you have currently configured it. In other words, you will be able to modify a WordPress website without deleting the existing one.
However, if you want to start from scratch, in a completely new administration, take a look at how you should proceed to install WordPress locally.
WPMarmite’s tip: “Of course, you can retrieve elements from your old website, thanks to a plugin like UpdraftPlus or Duplicator. These plugins allow you to import back on your admin what you want: your content, your themes, your plugins, your media, etc.”
2. Acquire the tools you need for the redesign
Now it’s time for you to list and get everything you’ll need to take over the redesign of your WordPress website.
Remember: you listed them in your specifications.
This may include:
- A new theme, if one of the many options on the official directory caught your eye (like the very popular Astra).
- A page builder, like Elementor or Beaver Builder, if you want to avoid getting your hands in the code.
- New plugins, to integrate amazing features.
Not sure which plugins to use? Maybe you’ll find what you’re looking for in our must-have list.
Is your toolbox ready? Let’s get it all set up and move on to the last crucial step of your redesign: the content.
3. Prepare the content of your new website
First of all, a crucial point not to forget.
During a website redesign, there are inevitably contents of the previous website that can be preserved.
Images, texts, plugin configurations: think about it!
So make a backup of your current WordPress website, and hold on to what you want to include in your redesign.
However, I imagine that, if you’re doing a redesign, it’s also to modify the content of your website, to make it more relevant and more attractive for your targets… and for search engines, of course!
So think about your SEO strategy, which is so important to rank your (awesome) new website well.
Though it’s complicated to summarize the steps you should follow, I can give you the main lines here:
- First, define the keywords on which you want to rank. These are the expressions that your targets enter spontaneously on Google, to find the information they are looking for.
- Next, determine where you need to integrate these keywords on each page. Your title tags (hn)
, or the alternative text of the images, must be optimized for SEO, for example: Google is fond of these, and that’s where it will try to understand your site first! - Once these new contents are integrated into the redesigned website, you can check that everything is well in place. Think in particular about the names of images and the titles and meta descriptions of pages, which are too often neglected.
To help you with the on-page SEO of your website (content optimization), rely on a dedicated SEO plugin.
WPMarmite uses the most famous of them, Yoast SEO, but it’s not the only effective option on the market. Check out our detailed comparison of its competitors in this article.
Ranking a website is a job in itself. However, with some good practices, it’s possible to do well, and to move up in the queries of your targets with success.
Step by step, on your development server, locally, and with all the necessary WordPress tools, you can see your project progressing… and your online launch is approaching.

The 3 steps to a successful launch of your website
I can feel you getting excited about unveiling your new WordPress website to the world.
Take the time to look at these 3 steps, and follow them carefully: you’ll be glad you did, I promise.
1. Choose a direct production or pre-production server
Does the term “pre-production server” mean nothing to you? Don’t worry, let’s take a quick break for a definition.
A pre-production server shares the same server as the one your website will be on once it goes live. If WPMarmite were to redesign it, Alex could for example choose to put his pre-production at preprod.wpmarmite.com: this would be the same environment as wpmarmite.com.
So why would you use this preprod server?
- To confirm your redesign with your client, if you’re a WordPress developer
- To test for bugs before the site goes live
- To adjust your SEO strategy, making sure all your keywords are included on each page
Once everything is confirmed, then can you go live, and deploy your new website. If you’re confident, you can of course choose to go directly to production.
WPMarmite’s tip: “While your site is being deployed, keep in mind that you’ll have to activate the maintenance mode until your visitors can access your website again.
To do this, don’t hesitate to check out the selection of Coming Soon plugins that we’ve made. This will allow you to display maintenance pages and even continue to convert visitors during your ongoing redesign.”
2. Test your new website for potential problems
From your pre-production server (or live, if you’re a WordPress adventurer), you’ll need to test your new website.
The key to successfully testing for problems is to put yourself in the shoes of an average visitor, click around, and note any problems you encounter…
You will probably see design and structure problems. But don’t forget to check also:
- Redirections that have not been done, which generate dead links or white pages
- The performance of the website, by testing it on GTMetrix, Pingdom, or the PageSpeed Insights test of Google
- The opt-in points, by checking if they work well
- Contact forms, quote forms, etc.
- Payment, if you have an ecommerce site (including confirmation emails, access to the member site, etc.)
Everything is beautiful, functional, properly connected, and nicely put together? Congratulations! The last step will enhance the big smile that I can see on your faces from here.

3. Reactivate and reconnect all third-party services
Come on, you’re almost there!
You can now reactivate all the services and plugins linked to your WordPress website. Think in particular about:
- Your cache plugin
- Plugins that measure your audience, particularly those that use Google Analytics, like MonsterInsights
- Plugins that use social networks, such as Facebook or Instagram
- The various license keys for your plugins and theme
And because security is everyone’s business (and especially yours), remember to re-enable all the elements that secure your website.
Ready to go? Then start indexing your new website in Google Search Console. This manipulation forces Google’s robots to visit your new baby, and thus to index it more quickly in its new version.
Ta-da! Redesigned, better performing, more striking, and better structured, your new website is ready to receive the traffic it deserves. It was hard work, but it was worth it, wasn’t it?
Check out our detailed guide to choosing a domain name for your WordPress website.
What about you, have you conducted a redesign of a WordPress website recently?
What are the problems you encountered, or the moments of pride you had in doing it?
Tell us all about it in the comments: the WPMarmite team reads them all carefully.

Receive the next posts for free and access exclusive resources. More than 20,000 people have done it, why not you?
Continue reading
Articles posted in WordPress TutorialsHow to update the PHP version of your WordPress site
What comes to mind when you think of WordPress speed and security? Your favorite plugins, perhaps? You should also think about… PHP! If you’re looking for a site that loads fast, while offering a solid shield against hacker attacks, there’s a…
How to create an effective HubSpot conversion funnel on WordPress (complete guide)
In the drawers of a kitchen, there are often two very useful utensils lying around. The first is the colander. And to illustrate, some WordPress sites unfortunately resemble it. Why? Well, because visitors arrive on the site in question… then…
How to fix the ERR_CONNECTION_REFUSED error: A complete guide
Does your browser display the ERR_CONNECTION_REFUSED message when you try to access a website? This error means that the target server – or your own configuration – is actively rejecting the connection request, leaving you at a dead end. But…