

“Hi, I need 200 units of this product with fast shipping please”. As an online store owner, receiving this kind of message puts a smile on your face. Answering it, on the other hand, becomes a lot less fun… Basically,…
Redirects: believe me, I would have been delighted to know what that word meant when I discovered WordPress a few years ago.
Except that, when I opened my first blog, I didn’t know anything about it.
I installed and launched a blank WordPress site — a blank page that I quickly filled, filled, filled. I published article after article, while discovering the richness of the web.
After a year of blogging, noticing few results in terms of traffic, I started to get interested in SEO and… boom!
I realized that I had made a lot of mistakes. Mistakes, or even disasters, I might say.
The worst of them all (I’ll spare you the others, they’re irrelevant)?
I hadn’t changed my blog’s permalinks: and at the time, the default permalinks looked like this: yoursite.com/?p=1234 – but yes, I’m sure you’ve seen them before (maybe on my blog, who knows!).
And what did I do? One year and a few hundred articles later? I changed my permalinks.
But above all, I had to set up hundreds of redirects.
By hand.

But after that, my blog started to appear in Google search results, and even to rank quite well.
This unpleasant experience helped me understand the importance of redirects. If this word doesn’t mean much to you, don’t worry, I’ll explain everything in this article. And in the end, you’ll be a pro!
This article was updated in March 2025. It is based on the version 5.5.1 of the plugin.
What is a redirect?
A redirect automatically redirects a visitor who wants to access URL A (e.g. https://mysuperwebsite.com) to URL B (e.g. https://myawesomewebsite.com).
You could say you we will force the visitor to take an alternate route, without any impact on the travel time. The visitor won’t notice the change. Let’s say that the original route he or she wanted to take has turned into a dead end.
The most common redirect is the 301 redirect. This article will focus on it, because you will use it in most cases.
What is a 301 redirect?
The 301 redirect, also known as a permanent redirect, indicates to Internet users and search engines that content has been moved or permanently deleted to another web address. This is the most common redirection and it allows your new URL to keep the reputation of the old one.
So, if you redirect a popular and well-ranked page to another page, the latter will (in theory) keep the same ranking and traffic.
So this is the type of redirect I used for my blog. I redirected all my URLs:

To my new URL format:

So that Google will forget about these mistakes once and for all!
Some redirects are less frequently required, but you can also meet them on your WordPress journey:
- 302 Redirect: Redirects a primary URL to a secondary URL temporarily. Search engines continue to index the main URL. This type of redirect can be used for sites in maintenance.
- Redirects 307 and 308: Reserved for technical cases. We won’t bother to detail what they are, because you won’t have to use them.
When are redirects required?
Here is what Daniel Roch, WordPress SEO expert at the French SEOMix agency, recommends:
“Whenever you are going to delete or change the URL of a post, you’ll need to create a redirect. This will avoid displaying a useless error page by displaying the most relevant content, while keeping the links that pointed to it. In other words, it improves the navigation on your website while allowing you to keep your ranking.”
To make it clearer, you will need to redirect if you:
- Decide to update your posts’ or articles’ slugs.
- Modify or delete any type of content on your site (media, pages, posts, products, portfolios, etc.).
- Edit or delete categories, tags, authors.
- Change your domain name.
- Change your permalinks’ structure on your website.
Setting up redirects may seem quite complex. Wondering if you really have to do it?
Spoiler alert: the answer is YES!
Otherwise, you risk facing the ultimate punishment: the 404 error. This refers to a page that does not exist or no longer exists. And Google doesn’t like 404 errors. Nor do your visitors. Nor you. In fact, nobody likes them.

Redirects also help improve User Experience on your website, providing smooth navigation for your visitors, and preventing them from landing on error pages.
Even if you create nice and funny 404 pages, it’s still frustrating to find them and they can drive your visitors away!

Are you still there? Are you ready to pamper Google and your visitors? Then let’s find out how!
Redirects on WordPress with the Redirection plugin

With 2M+ active installations, Redirection is the most popular plugin in the official directory for dealing with… redirects. 🙂
Easy to use, intuitive, free, and quick to set up, it allows you to create redirections without touching any line of code.
If you are a WordPress beginner and want to redirect a page to another, you’ll love it. Thanks to this plugin, you will be able to (among other things):
- Create different types of WordPress redirects
- Manage the 404 errors on your website
- Import or export redirects
- Create groups to organize them
Sounds intriguing, right?
How to set up a simple redirect
Install and activate the Redirection plugin on your WordPress site.
Are you unsure of what steps to follow? Check out our guide to correctly installing WordPress plugins.
In the Tools tab of your dashboard, a Redirection subtab has appeared.
It takes you to the page where you can manage your redirects.
From there, an assistant helps you to set up the plugin in no time at all.
To get started, we recommend you check the two first options:
- “Monitor permalink changes in WordPress posts and pages.”
- “Keep a log of all redirects and 404 errors.”

This will allow Redirection to automatically create a redirect when you modify the permalink of a publication on your WordPress site, and to discover the redirects followed by your visitors.
We’ll come back to these options in more detail later in this article. Bear in mind that you can change these settings at any time.
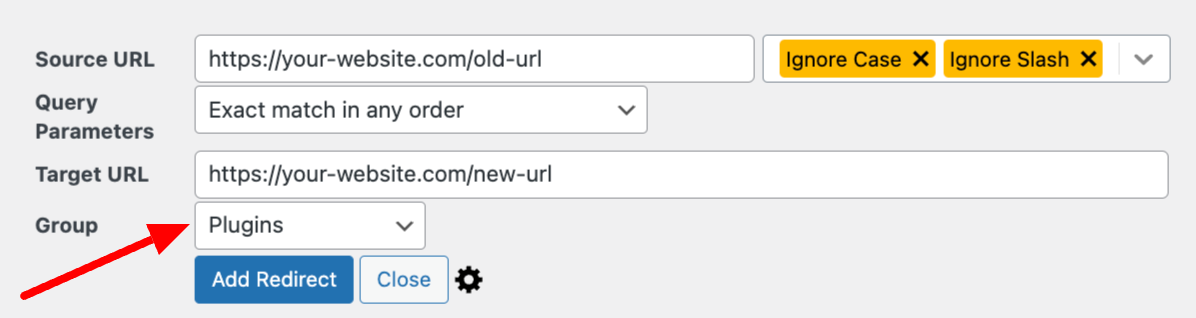
To set up a redirect, just fill in the Source URL (the one you want to replace), and the Target URL (the one you want it to lead the visitor to).
Click the Add Redirect button and you’ve have created your first WordPress redirect.

However, you can go even further.
By clicking on the wheel icon, you’ll see additional options:

You can choose where you want to redirect your URL to (another specific URL, a random post, your 404 page), as well as the type of redirect you want (permanent, not modified, temporary, etc.).
Remember that in 99% of the cases, you will have to do permanent redirections (the so-called 301 redirect).
You can choose the group in which to classify the redirect. By default, the plugin creates a Redirections group and a Modified Posts group.
But you can create others in the “Groups” tab, for example if you want to classify your redirections according to the sections of your site.
Finally, the “Position” field allows you to specify a priority for when the redirect is executed. The smaller the number, the higher the priority. I advise you not to touch this field: the plugin handles it very well by itself.
Once your WordPress redirect is created, remember to empty your cache if you use a cache plugin, so that the change is effective. Most of the time, it won’t be necessary — but it’s better to plan ahead!
In the “Redirects tab,” you can access your redirects list, and find some interesting information:

- URL indicates the source URL (the old URL) and the new one below it (the target).
- Code is the type of redirect you have set up.
- Hits details the number of times the redirection has been triggered.
- Last Access reveals the last time it was followed by a visitor.
From this list, you can modify, deactivate, or delete a redirection (one by one or in bulk): just like for WordPress posts or pages, the links to perform these actions appear on the hover of the concerned line.
Easy, isn’t it? Alright, let’s continue!
How to set up an advanced redirect using regular expressions
Now that we’ve warmed up, let’s go a little further.
The Redirection plugin also allows you to set up more advanced redirects, thanks to regular expressions (Regex).
While these allow you to create simple redirects, as explained just before, they will mostly help you change several URLs from a single redirect.
Let’s find out how with the help of a case study.
Let’s say you have a recipe blog.
You have created a “Desserts” category, but for a reason of your own, you decide to rename it “Sweet.”
If you have chosen a permalink structure like https://your-website.com/category/postname , all your posts’ URLs will be modified and will therefore send your visitors to 404 pages.
If you are motivated and have time to waste, you can create all the redirections for your articles by hand, but there is a much faster solution: you guessed it, regular expressions.
You can create a regular expression that transforms all URLs /desserts/postname into URLs /sweet/postname.
So how does this work?
In the “Source URL” field, specify: https://your-website.com/desserts/(.*), and don’t forget to check the Regex box – otherwise your regular expression won’t work.
Because the plugin is friendly, it will remind you to do this.
In “Target URL” specify: https://your-website/sweet/$1.
Like this:

You could also write it like this:
- Source URL:
^/desserts/(.*) - Target URL:
/sweet/$1
These two lines actually correspond to a Find/Replace command.
The first line allows you to search for all expressions that begin with https://your-website.com/desserts/, regardless of the characters behind this. The second line indicates that they should be replaced by this expression https://your-website.com/sweet/.
Go ahead and click “Add Redirect.” All your posts’ URLs are automatically modified. Quick and easy, right?
Regular expressions are a tricky little exercise to pick up. But, once you master them, they allow you to create complex and powerful redirects!
Here are some resources if you want to learn more about this topic.
For your information, the release of version 5.0 of the plugin also offers to add some shortcodes in the target URLs to redirect.
How to organize your redirects using groups
Groups allow you to organize your WordPress redirects into categories. When you have hundreds of them to create, it becomes really important to know where everything is located.
Click on the “Groups” tab. You’ll notice that the Redirection plugin has created two of those, by default:
- Modified Posts
- Redirections
You can add your own group below. For example, “Plugins.”

Via a small drop-down menu, you can either select:
- WordPress: This creates redirects from your WordPress. By default, I advise you to stay on this setting.
- Apache: This sends the redirects to your server, adding them to your .htaccess file.
- Nginx: This is meant to create Nginx (a web server software) redirects. In this case, the server must be running with it for it to work. Most of the time, the servers work with Apache, so you won’t need to use it.
When you set up a redirect from the “Redirections” tab, you can assign your new group name to it, if you wish.
How to set up global redirections
The “Site” tab offers options to set up global redirections for your entire site.
Warning: Do not use the features offered in this tab unless you are sure of yourself. The author of the plugin warns you that “the options on this page can cause problems if they are not used properly.”
Among the available settings, you can for example:
- Redirect your entire site to another domain (Relocate Site)
- Redirect all URLs from an old domain to your current site (Site Aliases)
- Set up canonical settings, for example by choosing your preferred domain (with or without www), or by forcing a redirection from HTTP to HTTPS
It is also possible to migrate old permalink structures to your new structure (Permalink migration).
It is much easier to do this, rather than creating regular expressions.
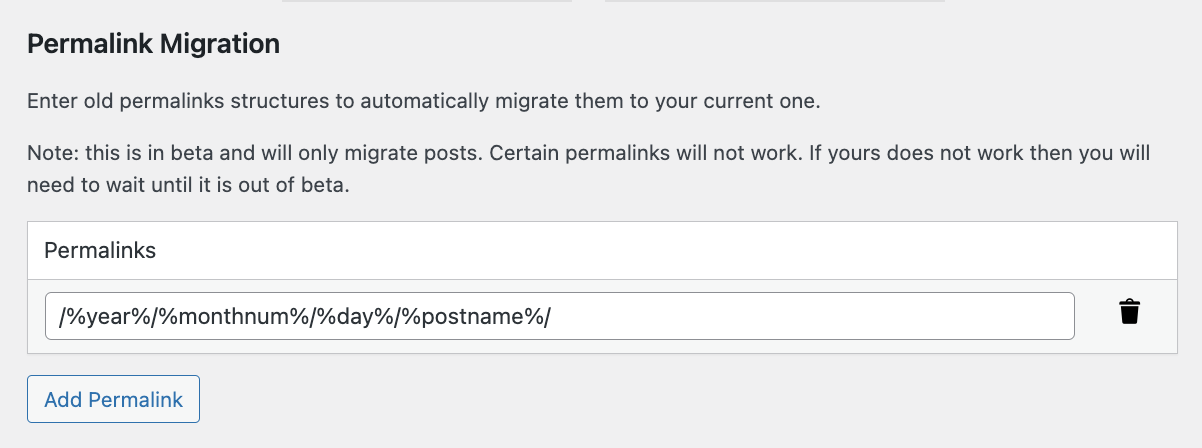
Again, be careful. At the time of writing, it was clearly stated that this last feature was in beta, so handle it with care.

How to “follow” your redirects
If you are the kind of person who likes to know everything, it might be interesting to go to the “Log” tab. There, you’ll discover all the redirects followed by your visitors.

There is a lot of information that you might want to look at, from time to time. To do this, click on the “Logs” tab of the plugin.
You’ll have access to the following data:
- The URL visited
- The target URL to which the visitor was redirected
- The redirect’s date and time
- Your visitor’s browser
- The IP address (if you enable logging in the plugin options)
Note that by clicking on certain options (e.g. IP address or browser), you have access to more detailed information, such as the IP address’ geolocation when that’s possible.
How to track your 404 pages
Changing URLs, updating your permalinks, or triggering errors when creating your links: all of this can lead to terrible 404 errors.
These are THE reason why we create redirects. The Redirection plugin allows us to track and remove them.
To do this, go to 404s tab. You’ll find the list of 404 errors triggered on your website, and will be able to correct them directly by clicking on Add a redirect, under the relevant error.

Remember to visit this tab regularly, to correct your errors and delete lines to lighten your database.
However, stay cautious: not all errors need to be corrected. You will sometimes encounter unknown and mysterious URLs. Most of the time, these are robots trying to access unavailable resources.
It’s perfectly normal and there’s not much you can do about it. It is up to you to determine which errors are true 404s and need to be corrected.
Here’s a hint: this must concern posts, pages, or other content on your site. 🙂
And since it’s better to be safe than sorry, I also advise you to track the presence of 404 pages using the Google Search Console.
How to import/export your redirects
Thanks to the “Import/Export” tab, the Redirection plugin also allows the import and export of redirects. This can be useful if you have a lot of redirections to set up at once.
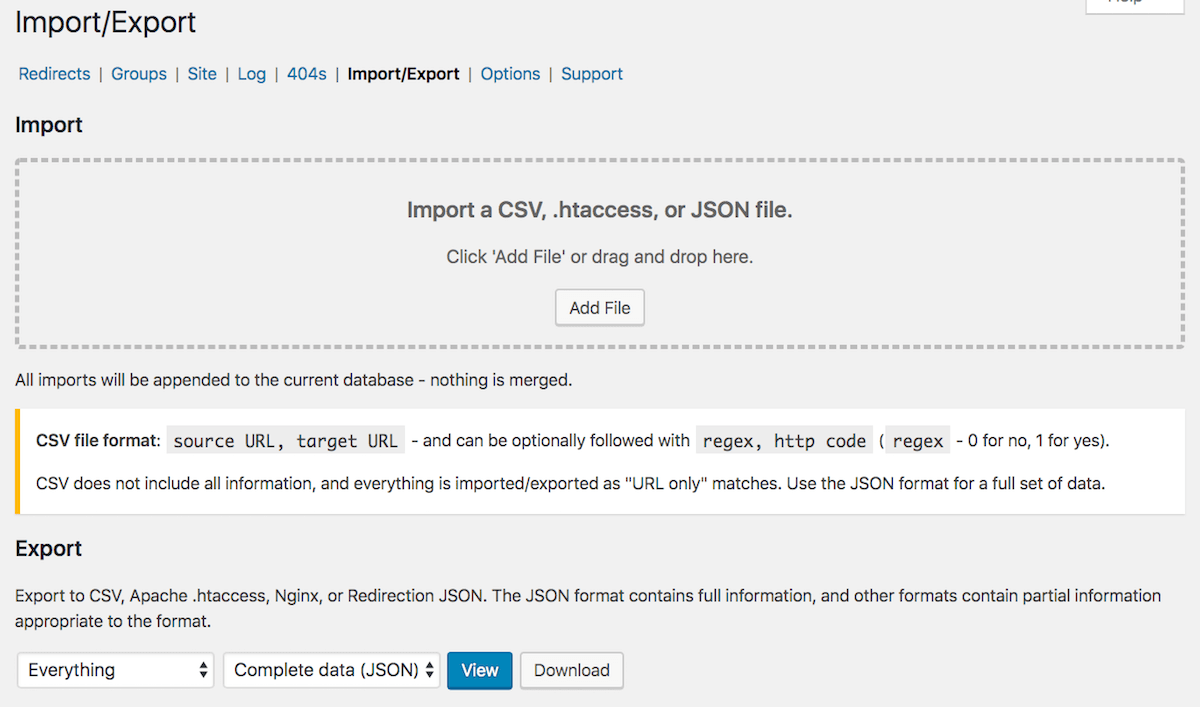
For your information, you can import and export CSV (e.g. Excel), Nginx, JSON, Apache .htaccess files.
CSV stands for comma-separated values. It’s a spreadsheet file where values are separated by commas. For JSON it’s a file type that allows it to store text data.
The little secrets of the Options tab
As its name implies, the “Options” tab provides access to additional settings.
If you’re feeling generous, you can make a donation to contribute to the plugin’s development: it’s a good way to support a tool when it’s useful.
You can also define a storage period for the logs of redirects and 404 errors.
As soon as a user (or robot) triggers a redirect or lands on a 404 page, the plugin stores it in its logs (“Logs” tab for redirects and “404s” tab for 404 errors).
These logs can be useful, and it is important to check them. But you’ll have to purge them regularly to de-clutter your database and prevent it from growing unnecessarily large.
You can, for example, set the deletion of logs every month: this gives you time to analyze them and correct errors, without making your database heavy.
The most useful part remains the possibility to automatically create redirects as soon as you change a content’s slug. This option is absolutely essential to activate.
To do this, select the appropriate content type. Let’s take pages and posts, for example. Check the corresponding box as shown in the screenshot below.

Finish by associating a group with your future redirects and that’s it.

The “Options” tab also allows you to set a cache time for redirects.
This means that, when a visitor encounters a redirect, his browser remembers it. It does not have to perform the query every time the user tries to access the source URL.
The user’s navigation is therefore faster and smoother.
But if the browser caches a redirect, and you change it in the meantime, this change will not be taken into account by your user’s browser.
It will still display the old redirect, which can be problematic for you and the user.
The change will only be taken into account once the caching has expired.
So if you change your redirects often, you can set a low caching time (e.g. one day).
If, on the other hand, you only make changes in your redirects very rarely, you can set a higher caching duration (for example, one week).
Finally, note that since the release of version 5.0 of Redirection, you can also cache the destination URL of your redirection, so that the plugin does not have to reread the information of the redirect you have configured.
However, this option is only available in beta for the moment, so be sure to back up your site beforehand (files + database) if you are interested in this option.

Support tab
The “Support” tab allows you to check that everything is working properly. If all lights are green, it means that the Redirection plugin is correctly setup and operational.

This tab also gives you access to the documentation, FAQ, and source code of the the plugin.
Is everything making sense? Let’s switch to a different method for creating redirects. A method that is a little more frightening, especially for beginners.
But don’t worry, I’m going to give you all the keys to handle this explosive safely.
The classic WordPress redirect: .htaccess
Although efficient and useful, WordPress Redirection via .htaccess doesn’t come without risks.
With this method, you’re going to have to get your hands dirty by manipulating the famous .htaccess file, which is located at the root of your WordPress site.
This is a configuration file for Apache, one of the software used by your web host to run its servers.
The contents of the .htaccess file will send instructions to the server to:
- Improve the speed of a website
- Secure it
- Limit spam
- And also… set up redirects
This file is very sensitive and requires a lot of caution, otherwise…

The slightest small error can make your site inaccessible. If you are not confident, I advise you to use the Redirection plugin.
If you still want to go on an adventure, remember to save your original .htaccess file before doing anything.
Then connect to your website using your favorite FTP client (Filezilla, Cyberduck, or Transmit, for example).
Locate your .htaccess file and open it with your text editor. Finish by adding the line of code of your choice, preferably at the bottom of your file.
Let’s go through some of them together.
The classic method for creating redirects in WordPress is especially useful for a complete change of the site URLs (for example when changing the domain name or moving from an HTTP address to an HTTPS address).
Of course, both the old and the new domain name must point to your website at the hosting provider.
To verify this, go to your old website. If it automatically redirects to the new one, it’s all good. Otherwise, go to your host’s interface and modify the pointing.
If you want to go further with .htaccess, I recommend this article by Alex, entitled “The ultimate guide to the WordPress .htaccess file.”
For developers only: WordPress redirects in PHP
Redirects with wp_redirect()
There is yet another way to redirect URLs with WordPress: by using the wp_redirect()template_redirect hook. Here is the function’s syntax:
$url is the new address to which to redirect a URL and $status is the type of redirection performed.
However, this function should not be used lightly! In the case of our example above, all pages of the site would be redirected to the new URL.
It’s best to use this function to create…
Conditional redirects
They allow you to create a redirect if the Internet user is in a specific situation (whether he is connected to the website or not, if he arrives on a 404 page, another page of the website, etc.).
For example, let’s look at 404 pages. We were saying earlier that your users don’t like to land on it. We could create a redirect so that they are automatically redirected to another page, the homepage for example.
We would then write, in the functions.php file:
Another case, which creates more complex conditions: let’s say you have a Resources page on your website that is only accessible to your subscribers.
When your unregistered visitors arrive on this page, they may be redirected to a page that invites them to register. And, after validating their registration, they could be redirected to the Resources page.
Then we’d have:
This function, translated into everyday language, means:
If the Internet user is on the Resources page and is not connected to the site, then he is redirected to the page
https://mysite.com/registration/.
Then, we would use the registration redirect hook to bring him back to the Resources page after his registration.
That’s it! You can see that you can go far with redirections and do powerful and precise things.
To learn more about the features to use, take a look at the WordPress developer documentation.
And you, which (re)direction did you take?
You have just finished reading this article detailing our methods to set up redirects in WordPress.
As you have understood, there are many ways to achieve this. The easiest and quickest way to do this is to download and install the Redirection plugin, which is essential for any type of WordPress site:
Whether you are blogging, publishing your work on a portfolio, selling products, or whatever, there is always a time when you will redesign the architecture and content of your website.
Whether these changes are big or small, it’s important to make sure that Google falls on 404 pages as little as possible, and that they don’t impact your visitors’ navigation.
But maybe you already manage your redirects? If so, which method do you prefer? Tell us all about it.
And please share this article on social networks, if you think it would be useful to others! Together, we’ll get rid of 404s. 😉

Receive the next posts for free and access exclusive resources. More than 20,000 people have done it, why not you?
Register


My hosting provider that is redhostserver.com said that I can use directory or page which is existed in the website root. But I want to redirect the urls those where previously existed, but now urls struscture have been changed because of redesigning I want to know can I use this plugin at free of cost and will it work for me.
Hello Marco, yes it’ll work for you and for free 😉
Thank you very much for your answer alex. I will try using it because this is my first website on wordpress and I am not a developer, so it will help me a lot.
WUHUUU ! Super post thank you very much !
Thanks for this amazing life-saving guide. 🙂
The Redirections plugin is amazing. I’m surprised that Yoast doesn’t include redirect management in the free version, especially when there’s a plugin that can do it better, and for free.