What comes to mind when you think of WordPress speed and security? Your favorite plugins, perhaps? You should also think about… PHP! If you’re looking for a site that loads fast, while offering a solid shield against hacker attacks, there’s a…
I’m really not easy to understand: my default code looks like Chinese.
I stand out because of my singular appearance, as my name has no extension.
I also have magical powers. If yotu set me up correctly, I am capable of the following:
- Improving the security of your website.
- Increasing the loading speed of your pages.
- Setting up redirects.
- Limiting spam.
- And even making a few jokes: that’s my cheeky side. 😉

You still don’t know who I am? I am the .htaccess file of your WordPress website. Let’s get to know me better in this guide about how I work.
Throughout these lines, you will discover more than thirty guidelines for configuring me. They are materialized in the form of ready-to-use pieces of code, which you will just have to copy and paste at home.
Keep reading, you won’t be disappointed!
Overview
- What is a .htaccess file?
- How do .htaccess files work?
- How to create a .htaccess file
- Precautionary measures before customizing a .htaccess file
- How to modify your .htaccess file properly.
- How to customize the .htaccess file at a website’s root?
- How to customize the .htaccess file in wp-admin
- How to customize the .htaccess file in wp-includes?
- How to customize the .htaccess file in wp-content?
- How to customize the .htaccess file in wp-content/uploads?
- Final recap on the .htacess file in WordPress
Originally written in October 2015, this article was last updated in July 2022.
What is a .htaccess file?
A .htaccess file is a configuration file for Apache, the software that most web servers use to run. The content of this file will give directives to Apache so that the server behaves in a certain way.
Beware, some web hosts only run on the NGINX server. This is the case of Flywheel, for example. They do not have a .htaccess file.
Almost all websites using WordPress have a
.htaccessfile. In fact, WordPress creates it automatically during installation, to include the permalinks settings for the website.
When you go to Settings > Permalinks to choose a URL format (normally “Post name”), the .htaccess file is modified.
How do .htaccess files work?
You should know that a website can have several .htaccess files.
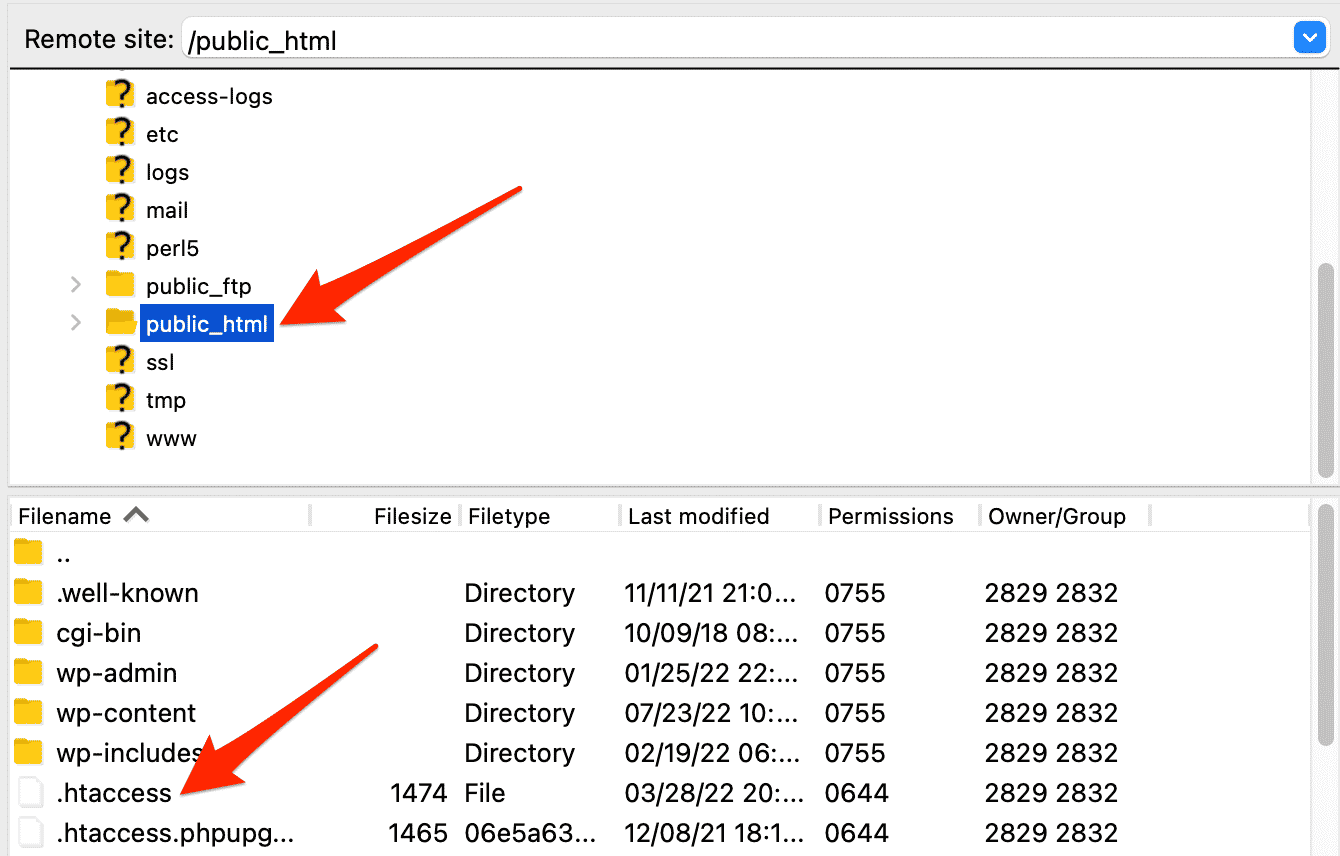
First, there is the main .htaccess file, located at the root of the website.
The root of a website is where the WordPress files (wp-admin, wp-includes and wp-content folders plus some other files) are located on your server. You can access them by connecting to your FTP client, for example. The name of this root folder may vary depending on your hosting provider. For example, it is called public_html with Bluehost (affiliate link) and www with OVH.
The contents of the main
.htaccessfile will influence the entire website.
Other .htaccess files can be created in subdirectories. In the case of WordPress, one can be placed in the wp-admin or wp-content/uploads directory, for example.
Secondary .htaccess files will influence the directories in which they are located, as well as their subdirectories.
If we imagine that a .htaccess file is present in wp-content/uploads, the uploads directory and all of its subdirectories will be impacted by what is defined in the .htaccess file.
How to create a .htaccess file
Logically, your website should have at least one .htaccess file, the one located at the root of your website. You can edit it using your favorite code editor (Sublime Text, Brackets, Notepad++, Coda, etc.).
There are other solutions, such as the Htaccess File Editor plugin, to edit it directly from your WordPress dashboard.
But, if there are any problems, you’ll have to go through your FTP client and code editor, so you might as well do it directly by hand.
If you need to add a .htaccess file to a subdirectory, follow these instructions.
Create a .htaccess file from your computer
- Create a new text file and name it
htaccess.txt. - Edit it as you wish.
- Send it to the root of your server.
- Rename it
.htaccess.
Create a .htaccess file from your server
- Right click in the directory where it should be.
- Add a new file and name it
.htaccess. - Edit it with your code editor (Notepad++, Coda, Sublime Text or other).
Congratulations, you now know what a .htaccess file is for and how to create it. Before you find out what guidelines you can add to it, remember to be cautious!

Precautionary measures before customizing a .htaccess file
Customizing the code of a .htaccess file is fairly straightforward (especially with the code snippets offered in the rest of this article), but you still shouldn’t go into it with guns blazing.
Before making any changes, I recommend that you first make a backup of your WordPress website. For this, you can use a dedicated plugin like UpdraftPlus.
Next, save the initial contents of your .htaccess file. To do this, you can:
- Duplicate the
.htaccessfile on your server into a.htaccess-initialfile. - Copy the contents of the file into a text file, on your computer.
If you have a problem, you can easily restore the original content.
How to modify your .htaccess file properly.
To make any changes, follow the procedure below:
- Open the file in your code editor.
- Place your additions in the file.
- Save it.
- Update your website to see if everything is fine.
Refreshing your website is very important: it will help to see if there are any problems with the added code.
In general, a 500 error “Internal Server Error” will appear on the screen, if there is a problem:

In this case, undo your changes and save again. Everything should go back to normal.
Sometimes, some hosts do not accept specific code in the .htaccess file…
You’ll have to deal with it.
Contact your host’s customer service to find out more. Hopefully, it will only need a slight modification to make it work.
Are you experiencing a WordPress error, such as the typical and widespread 500 error? WPMarmite offers a comprehensive guide to resolving the major ones.
This time, it’s all good. You know how a .htaccess file works, how to create and edit it properly.
Now find out how to customize it in 5 different places:
- At the root of the website
- In
wp-admin - In
wp-includes - In
wp-content - In
wp-content/uploads
Let’s start right away with the root of the website. You’ll see, this will be the most consistent piece.
Like in every computer language, the .htaccess file allows you to include comments. To do this, simply place the # symbol at the beginning of a line so that the line is ignored. This is very handy for remembering what lines of code perform. You’ll get to see comments in the examples in this article.
How to customize the .htaccess file at a website’s root?
If your installation went well, you will find a .htaccess file at the root of your website. It will contain the following code:
If you are using WordPress in multisite mode, the default code of the .htaccess file will be different. This will not affect you in most cases.
Now that you’ve located this file, you’ll be able to enhance its contents with the code snippets below to get some specific things done. This can be about security, but also other things.
Be sure not to include any code between the comments # BEGIN WordPress and # END WordPress as it is possible that this code will be modified in some cases.
Another reminder: save your original .htaccess file before making any changes. You need to be able to go back if you have any problems.
Disable display-directories
By default, if you try to access a website’s directories, the server will display them. The formatting will look like this:

You can imagine that this is bread and butter for hackers. The fact that they can see the files on your website is going to help them better be able to attack it. Insert the following code into your .htaccess file to protect your website:
It is also possible to use this code to prevent directory listing:
Hide server information
With some hosting providers, the pages displayed may contain server information. This information can give details to potential attackers.
It is therefore best to hide them with the following code:
Enable following symbolic links
I must be talking complete gibberish to you, but it’s important to insert this line of code into your main .htaccess file:
This will allow your server to follow what are called symbolic links, i.e. shortcodes.
Set your server to the correct time
This isn’t really important, but if your server is abroad, you can tell it to set to your time zone with this line of code:
Set default character encoding
The following code allows you to set the character encoding for text and HTML files as UTF-8 (a computer character encoding). Without this, there is a risk that accents will be misunderstood.
Protect wp-config.php
The configuration file for your website (wp-config.php) contains the credentials to connect to the database.
This is the most sensitive file on your website. It can be the target of potential hackers. It can be protected by adding this code to the main .htaccess file:
Protect the .htaccess file itself
Like the wp-config.php file, the .htaccess file must be protected to the fullest extent. To do so, insert this code:
Limit comment spam
You know it as well as I do if you have a blog, comment spam is a real pain.
Thankfully, there is a trick to prevent this directly in the .htaccess file. This is not a quick fix but, combined with the Akismet plugin, the majority of spam should be filtered.
Don’t forget to replace mywebsite.com with your domain name.

Avoid detection of an author’s ID
Even if you use a complex user login, it can still be detected.
Of course, I’m assuming you’re not already displaying it publicly with your theme (it can happen).
Try typing mywebsite.com/?author=x replacing x with 1 for the administrator or the ID of one of your authors. If you are not protected, you will be redirected to a page like mywebsite.com/author/author_id.
That’s how you find a user ID in two seconds. From there, all that’s left is to try to guess your password.
To protect yourself from this technique, use the following code:
Disable hotlinking of your images
What on earth is hotlinking? Don’t worry, I’ll explain everything.
Basically, once you add images to your website (for example in an article), anyone can copy the URL of one of your images, and display it on their website.
You might think that this is not so bad, but if for some reason a very followed website picks up your image and displays it on one of its pages, requests will be made to your server.
Hotlinking is actually stealing bandwidth. If your website is installed on a small shared server, your host may not appreciate it because resources are limited.
To avoid the problem, insert and customize this code in your .htaccess file:
To allow certain websites to display your images, use the following code:
You can also customize the image that will be displayed in place of the requested image. I added something simple, but you can be more creative.
Ban IP addresses
If you’ve noticed that some IP addresses are trying to log into your website’s administration a little too often (for example with the Login Lockdown plugin), you can get rid of them by banning their IP address.
You also have the possibility to retrieve the IP addresses of comment spammers to ban them from your website.
This solution is not permanent as your attacker may change IP address, but it may work against less skilled individuals.
Block visitors from certain websites
If you realize that a non-compliant website has linked to yours, and you don’t want visitors from that website to have access to your website, use this code:
Redirect visitors from one website to another
To take the previous tip a step further, you can redirect visitors from certain websites to another website.
Here’s the code to use:
Create redirections
The .htaccess file allows you to do redirects (redirect URL A to URL B).
This is handy for redirecting a few pages, but if you want to create a lot of redirects, I recommend the WordPress Redirection plugin, which I introduced in this article.
How to create redirects in the .htaccess file:
Redirect address without www to one with www
When setting up a website, one of the actions to accomplish first is to redirect the website without the www to the version with the www (or vice versa).
If you do the test the next time you create a website, you’ll find that the two addresses don’t necessarily link to your website.
In some cases, the hosting company will take care of this automatically, or it must be activated via the admin page on the hosting website (this is the case with Gandi, for example).
If you need to do this redirection manually, use the following code by replacing mywebsite.com with your website:
Redirect address with www to one without www
On the other hand, if you don’t want the www in front of your website name (as with WPMarmite), it is possible to redirect to the version without the www.
Insert the following code into the .htaccess file:
Warning: Do not use this code with the previous one or your website will suffer from a redirect loop (as the version without www will redirect to the version with www which will redirect to the version without www, etc.).
Redirect to HTTPS
If you have set up an SSL certificate on your website to switch it to HTTPS, you need to be sure that all your visitors are browsing the secure version of your website.
If not, sensitive information could be recovered by hackers (personal or banking data, for example).
Use the following code to switch your entire website to HTTPS:
Force download of specific files
When you want to download a file from a website, your browser sometimes tries to open it to display it.
Personally, I find this convenient for PDF files. On the other hand, it is very unpleasant for other types of files.
Insert the following code to make your visitors download files with these extensions directly (modify them as you like):
Create a custom maintenance page
In a previous article, you discovered a selection of maintenance plugins. Yet, there are cases where the maintenance page will not be able to display.
That’s annoying, isn’t it?
To get a maintenance page, you can use the following code:
For this to work, you need to:
- Create a
maintenance.htmlfile with content indicating that the website is under maintenance. - Add your IP address in line 4 (making sure to keep the “
\“) to allow you to access the website (find out your IP address on this website).
When maintenance is complete, put “#” in front of each line to pass them as a comment.
Enable caching
The .htaccess file allows you to cache certain files on your website in your visitor’s browser so that they load faster.
Indeed, the browser will not need to re-download files in its cache.
To do this, insert the following code:
File caching will be effective for the duration specified for each file type or until the visitor clears his cache.
To speed up your website with caching, I recommend using the premium WP Rocket plugin (affiliate link). As it’s simple and quick to set up, it’s perfect for beginners on WordPress. With its help, you won’t need to use the snippet (piece of code) offered above.

Enable compression
In addition to everything we’ve seen so far, it’s possible to compress some resources before they are transferred from the server to the browser.
And file compression means a faster page loading speed. So I recommend you implement this code to give your website a speed boost:
Disable access to certain scripts
To function, WordPress uses scripts located in the wp-includes directory. However, there is no reason to access them directly. Use this code to limit access:
Protection against file injections
Hackers may try to send files to your server to take control of your website. To throw a wrench in their path, you can include this code in your .htaccess file:
Protection against other threats
On Facebook, Richard told me that it was possible to protect against clickjacking and other threats by adding a few lines in the .htaccess file.
For your information, clickjacking is a technique that helps make a visitor believe that he is on your website, when they are not, using frame or iframe tags.
So the following code helps protect you from clickjacking, fights other threats like MIME Sniffing, and blocks content in case of XSS attack (which will inject HTML or JavaScript into poorly-protected variables).
And that’s it, you’ve just gone through a whole bunch of optimizations to incorporate into the .htaccess file located at the root of the website.
Let’s move on: new pieces of code for the wp-admin, wp-icludes, wp-content and wp-content/uploads folders.
How to customize the .htaccess file in wp-admin
wp-admin is the lair of your website. The place where you go to write articles, configure your menus, set up your theme and much more.
It goes without saying that no unauthorized people should enter this haven. Otherwise, beware of the consequences.
Here’s what you can do to harden security with a .htaccess file that you place in the wp-admin folder of your website.
Limit access to website administration
Only people with the listed IPs will be able to access the wp-admin folder. Pretty handy to prevent strangers from logging into your website (even if they have the right password).
Add a second authentication
When you log in to the admin of a WordPress website, you use a login and password. Well, it’s possible to add a second one through the .htaccess file, and another file.
First, create a file named .htpasswd in the wp-admin directory, and insert a username and password pair into it. Use this website to guide you:

Enter the username you want to use in the first field, and your password in the second, then click “Generate .htpasswd file”.
Then copy the line that will appear in the .htpasswd file. If you need to create multiple users, repeat the process and add the new username/password pair within a new line.
For example, you can get this kind of file:
Next, insert the following code into the .htaccess file:
The tricky part of this operation is getting the full path to the .htpasswd file right. To find it for sure, create a info.php file and insert the following code:
Go to yourwebsite.com/wp-admin/info.php and you will get the actual path of the .htpasswd file to be placed in the .htaccess file. Delete the info.php file once you get the right path.
If you insert this code as is, AJAX requests will no longer work. Use the below snippet to fix the problem:
If you understood everything I just mentioned, you should have dual authentication in place to access the WordPress administration.
Let’s move on to the next part.
How to customize the .htaccess file in wp-includes?
Block direct access to PHP files
Create a .htaccess file in wp-includes, and paste the following code into it to prevent PHP files from being loaded directly.
The above code is provided by the Sucuri plugin.
How to customize the .htaccess file in wp-content?
Block direct access to PHP files
For the wp-content folder, the code is similar, it just has the exceptions removed:
How to customize the .htaccess file in wp-content/uploads?
Block direct access to PHP files
With this same code, protect the folder where the media is stored to prevent PHP files from being executed by someone from the outside (a nasty hacker for example).
Final recap on the .htacess file in WordPress
As you have discovered throughout this guide, the .htaccess file is a very powerful tool for configuring your website’s server.
When handled with care and caution, it can improve your website’s security, performance, SEO or even user experience.
Once again, I recommend that you always keep a backup of your original .htaccess file to perform a reset in case there are any problems.
Proceed with your changes with extreme care (I will have warned you!). Errors or incompatibilities may occur depending on your website’s host.
While quite a bit has been covered in this article, it is possible to go further in setting up your .htaccess, using various resources:
- The WordPress documentation and the Apache documentation (the software that runs your server).
- The Perishable Press blog, which even has a paid book on the subject.
Before I say goodbye, I’d like to get your input in the comments. Did you customize your .htaccess file?
And most importantly, feel free to share any code snippets you are used to using with other readers.

Receive the next posts for free and access exclusive resources. More than 20,000 people have done it, why not you?
Register

Very useful data, I was also looking for something that would speed up the website for me a bit. So how do we use it will also reduce the consumption of our pages because this part will already be in the browser’s memory?
Hi, you can try a caching plugin such as w3 total cache. Have a nice day 😉
I am having some caching issues and doing some research and came across your post. My .htaccess is quite a mess and I think much of the file was created/edited with various caching plugins I’ve used over the years (ie: rewrites are handled by my Yoast plugin, some caching handled by cache etc..) and I’m pretty sure i have duplicate content in there that can’t be helping.
I think I may just back it up and try your recommendations here to see how it works out.
Thanks for taking the time to post this.
Hi, and thanks a lot for this tutorial.
However, are all those codes adapted for Apache 2.4? I struggle with it, although it works fine on Apache 2.2.
All my best