Need to modify the PHP version of your website? That’s where it happens. Need to create an email address? That’s where it happens too.
Need to install an SSL certificate on short notice? Here again.
Where? On your WordPress site’s cPanel interface, of course!

From this nerve center, you have access to a host of useful and necessary features in your daily webmastering routine. There’s just one condition: use a web host that offers this interface.
Many of them do, which makes cPanel a popular and widespread tool. And quite frankly, it would be foolish to miss out on its many advantages.
If you’d like to find out more, stick around. In this article, we’ll give you an in-depth look at this administration interface. In the end, you’ll be able to use it like a pro, even if you’re just starting out, and even if you don’t have any technical knowledge.
Let’s get started!
This site contains affiliate links to various tools and services. If you purchase one of these by clicking on an affiliate link, WPMarmite will earn a commission (at no extra cost to you). In particular, this enables us to cover and pay for the research and editorial work carried out on the blog.
We make a point of highlighting only tools that we use and/or that are of high quality. If they’re not worth it, we don’t mention them, or we tell you so. 😉
What is cPanel?
An interface for managing, monitoring, configuring, and securing your WordPress site

cPanel is a Linux-based administration interface. Accessible from your hosting account, it lets you manage, configure, monitor, and reinforce the security of your WordPress site and server in just a few clicks, with no technical skills required.
This platform is used by many hosting providers, mostly on shared servers (on which several sites are installed).
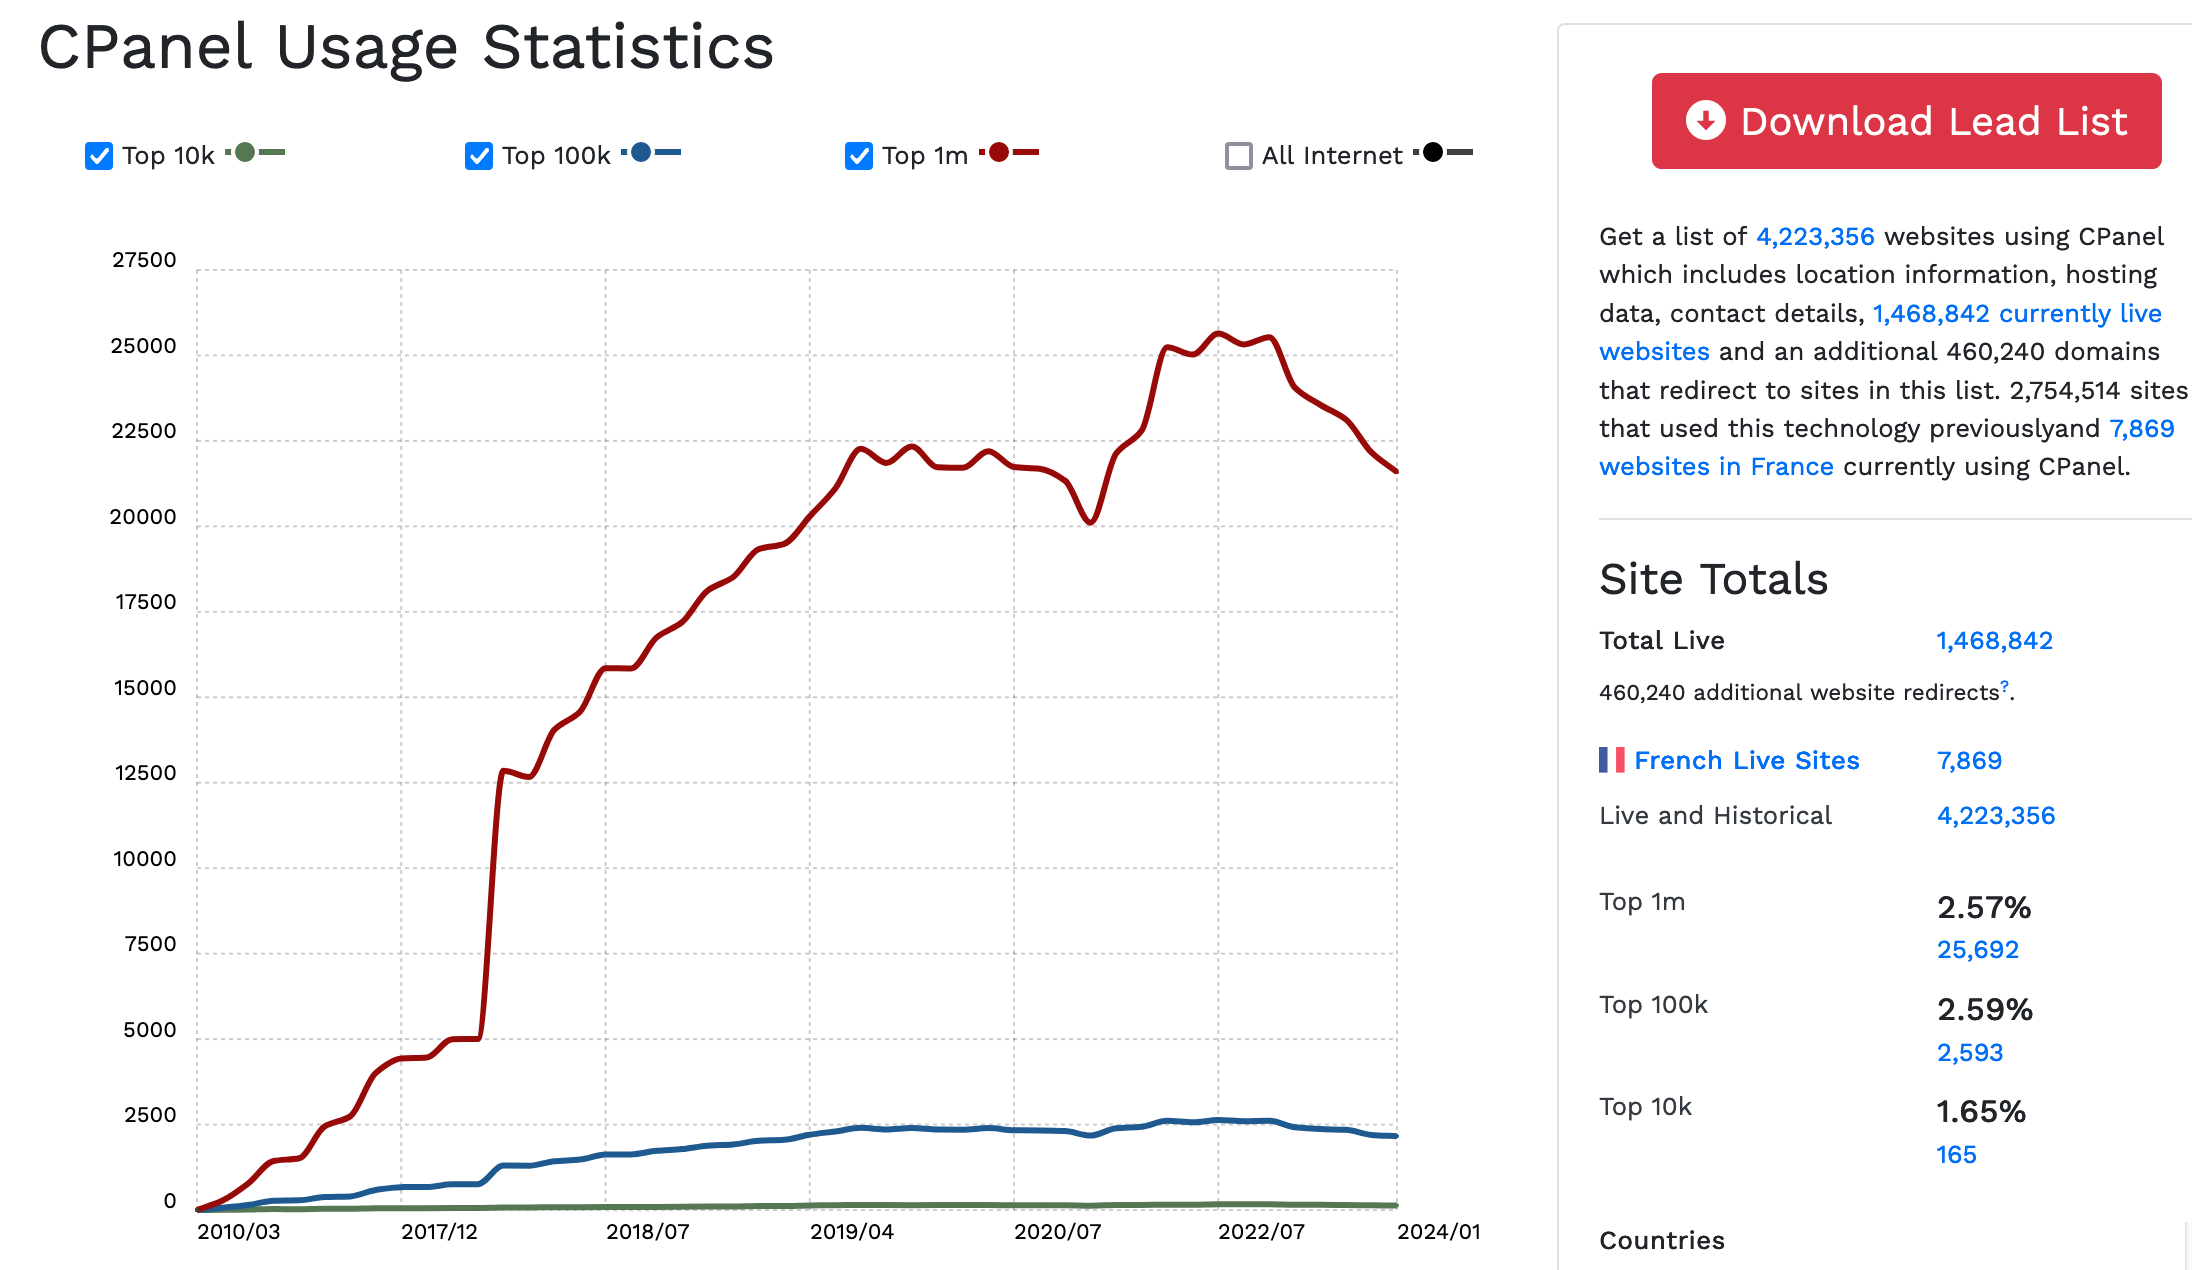
Alongside Plesk, cPanel is one of the most widely used control panels in the world, with nearly 1.5 million site owners using it, according to data collected by Built With:
Note: Other hosting management interfaces include Plesk, ZPanel, Webmin, RunCloud, DirectAdmin, and Virtualmin.
How cPanel works: What can you do with it?
Your cPanel home page is organized into different categories. In each one, there are several sub-menus enabling you to perform operations that you encounter on a daily basis as a WordPress webmaster.
Here are just a few examples of what you can do with your WordPress site’s cPanel:
- Access your WP site files
- Create and manage your databases
- Manage your domain names
- Configure email boxes
- Track statistics and monitor your hosting
- Install CMS in one click
- Manage your account (contact details, login, or password)
- Etc.

In the rest of this article, we’ll take a look at some of the basic features we feel are essential.
But first, let’s find out why it’s worth choosing a web hosting provider that comes with cPanel.
What are the advantages of choosing a web hosting provider that offers cPanel?
If cPanel has been adopted by hosters around the world, it must have a number of advantages.
If your current host, or the one you’d like to join, offers cPanel, you’ll benefit from the following advantages (non-exhaustive list):
- Ease of use. The cPanel administration interface is ergonomic, intuitive, and clear. It’s easy to navigate and understand the menu headings and actions you want to perform. This makes cPanel a tool for everyone, from WordPress beginners to seasoned developers.
What’s more, you don’t need to code or edit complex files to take advantage of it. It’s all done in a few clicks, with no technical skills required. - Free service. cPanel is not free, but the cost is borne by your hosting provider. Though this cost will probably be passed on to you in your hosting package, you don’t have to pay anything extra to use it.
- Flexibility. You can carry out a wide range of operations, from performance enhancement to database creation to security.
- Options to enhance your site’s security. Your WordPress cPanel will certainly offer free installation of an SSL certificate (to switch to HTTPS), a backup system, and the addition of a firewall application.
- Automatic WordPress installation, thanks to a script like Softaculous, for example.
- Simple email management, with the ability to create business addresses linked to your domain name in just a few clicks.
- A large community of developers (much like WordPress) who regularly develop new features. If you’re interested, take a look at the cPanel blog or forum.
Every hosting provider’s cPanel is different. Though the control panel includes basic headings, the configuration can vary.
Finally, note that some hosts don’t even use cPanel at all, although this is less widespread. This is the case of Hostinger, which only offers its customers its in-house management platform: hPanel. Other hosts, such as bluehost, offer both cPanel and their own proprietary interface.
How do I install cPanel on my WordPress site?
As you’ve just seen, using cPanel with your WordPress site can be very handy. At this point, you may be wondering, “By the way, how do I install this platform to take advantage of it?”
Sit back. Take a deep breath.You’ll need the following ingredients:
- A server
- An SSH client
- A command line

Jumping out of your chair behind your screen? Don’t panic! We’re talking about the manual installation of cPanel.
Rest assured, you won’t have to go into these details. The hosts who use this management interface had the good sense to install everything for you.
The only thing you have to do to take advantage of it is to connect to the platform. Find out how in the next section.
How to connect to your cPanel dashboard
Where can I find cPanel on WordPress?
You have several options for accessing cPanel on your WordPress site:
- Use the login link in the welcome email sent when you first signed up for your hosting account.
- Type the URL of your site, followed by :2083, in a tab of your web browser. If your site is in HTTPS, for example, type: https://yoursite.com:2083. If it’s still in HTTP, type: http://yoursite.com:2082.
- Use the backup address when port 2083 is blocked.
Enter the URL of your site, and add cpanel in front of your domain. Example: https://cpanel.your-domain.tld.
In principle, you’ll land on a page that looks like this:

You’ll be asked to enter a username and password. At bluehost, these are included in the welcome email sent to you.
Finally, click on the “Login” button and… magic! You’re on your cPanel interface:

The cPanel on my WordPress site looks like this. Yours may be different, bearing in mind that some hosts offer several themes (backgrounds) to their users.
For the rest, options and settings are generally the same. Now you just need to know how to use them. That’s the subject of the next section of this article.
How to use cPanel and its features: 6 examples
cPanel offers two categories of features:
- Category 1: Includes basic features common to all hosting providers.
- Category 2: Features created or installed by the host itself (like a WordPress plugin).
These additional features can help you in your choice of host, depending on the needs of your WordPress site.
To help you get the most out of cPanel, we’ll take a look at some of the basic features that are most useful in the day-to-day management of WP sites.
How do I install WordPress on cPanel hosting?
At bluehost, cPanel hosting for your WordPress site includes an automatic installation script called Softaculous.
To take advantage of it, go to the bottom of the settings page, to the “Softaculous Apps Installer” menu. Then click on the WordPress logo:

On the page that just opened, click on the “Install now” button. If you wish, you can enter certain parameters to customize the installation process:
- WordPress version
- Protocol: HTTP or HTTPS
- Site name and language
- Database prefix
- Administrator username and password
- The domain on which WordPress will be installed
- WordPress theme to be installed
- Etc.
For detailed instructions, see our dedicated tutorial: How to install WordPress: a step-by-step guide.
How do I create a professional email address?
The “Email” menu in the cPanel of your WordPress site lets you create and manage the entire email section of your website.
If you use your site for business purposes, chances are you’ll want an email address like contact@mysite.com rather than mysite@gmail.com.
Sounds more serious, doesn’t it?
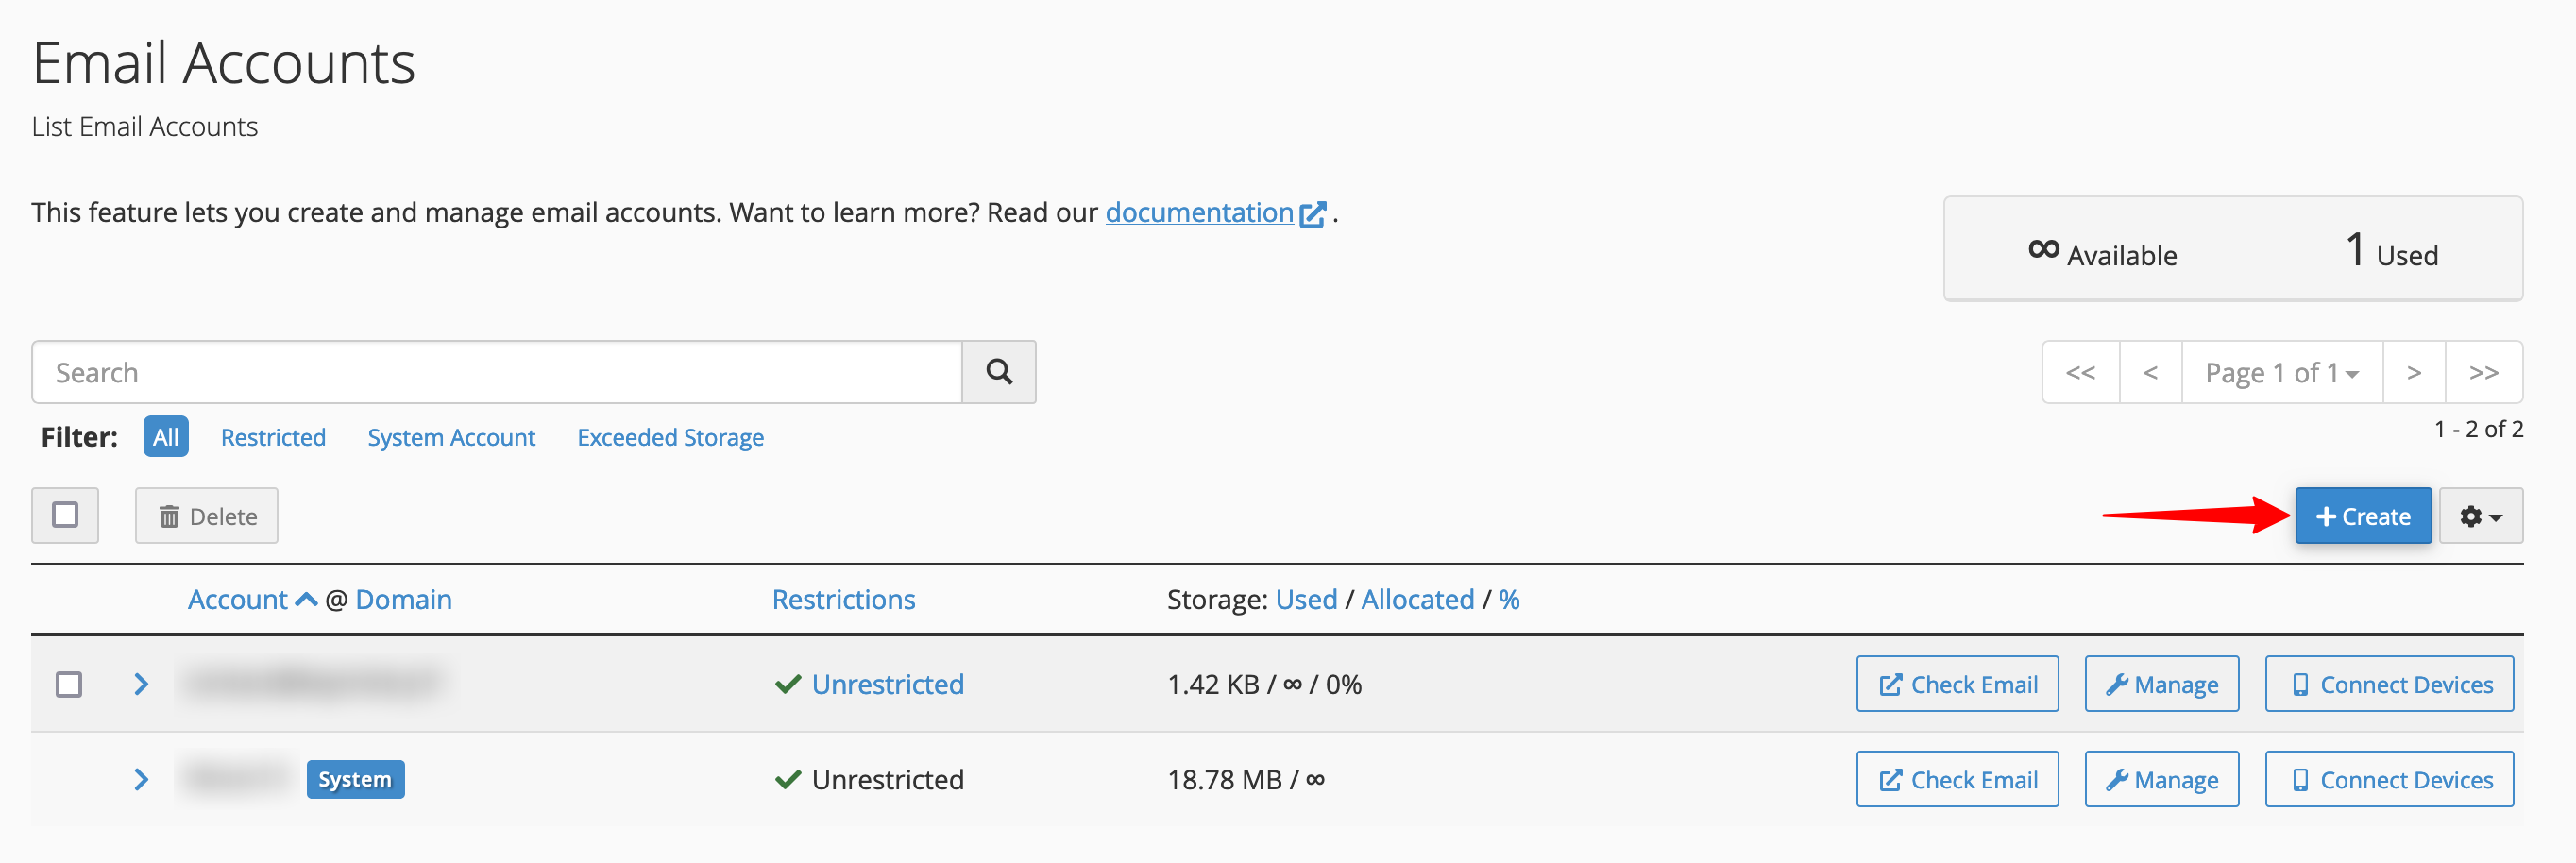
To create one, first click on the “Email Accounts” submenu, in the “Email” section. Then click on the blue “Create” button:
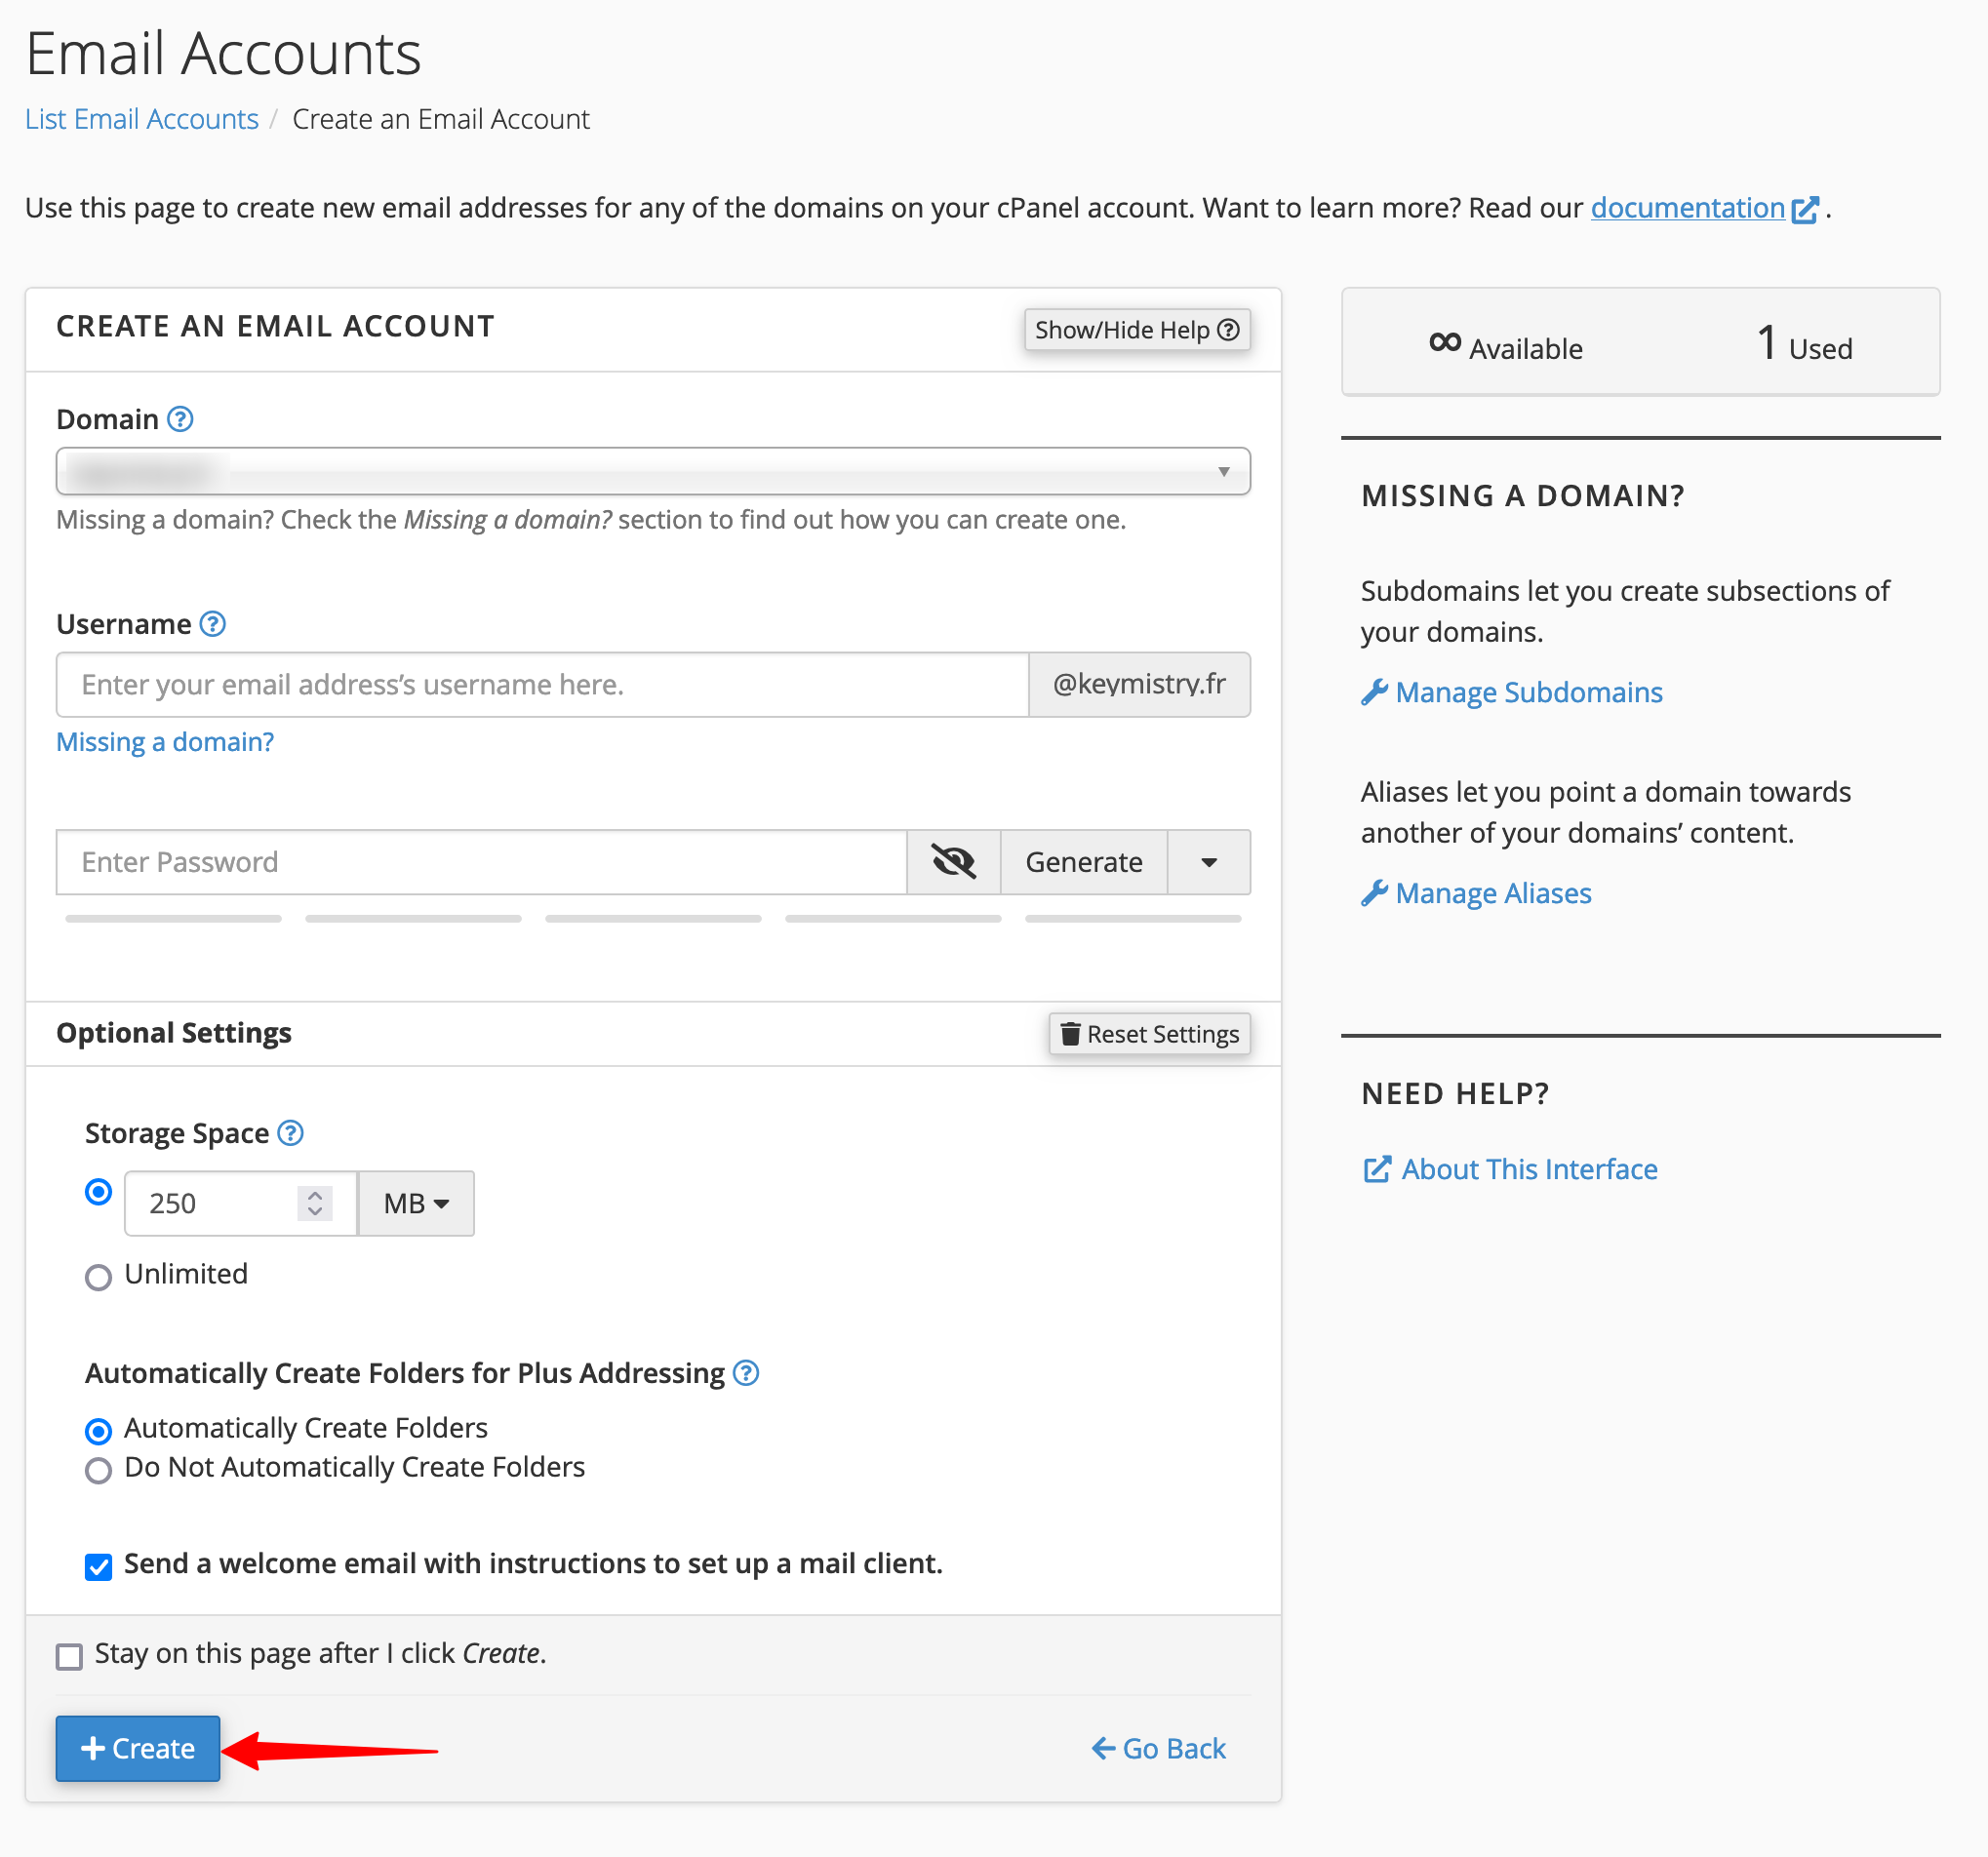
Then define 4 fields:
- “Domain”: If you have several domain names on your hosting, you can choose the extension of the email to be created. For example
@mysite.comor@mysite.net. - “Username”: The name of your mailbox. For example,
contact@mysite.comorhello@mysite.com. - “Password”: Choose one for your mailbox. Use the “Generate” button to make sure you create a strong, secure password.
- “Storage Space” in the “Optional Settings” section: This corresponds to the size allocated to your mailbox on the server. Always choose the unlimited option — it’s the easiest way.
Confirm by clicking on the “Create” button:
Your new professional mailbox is now available!
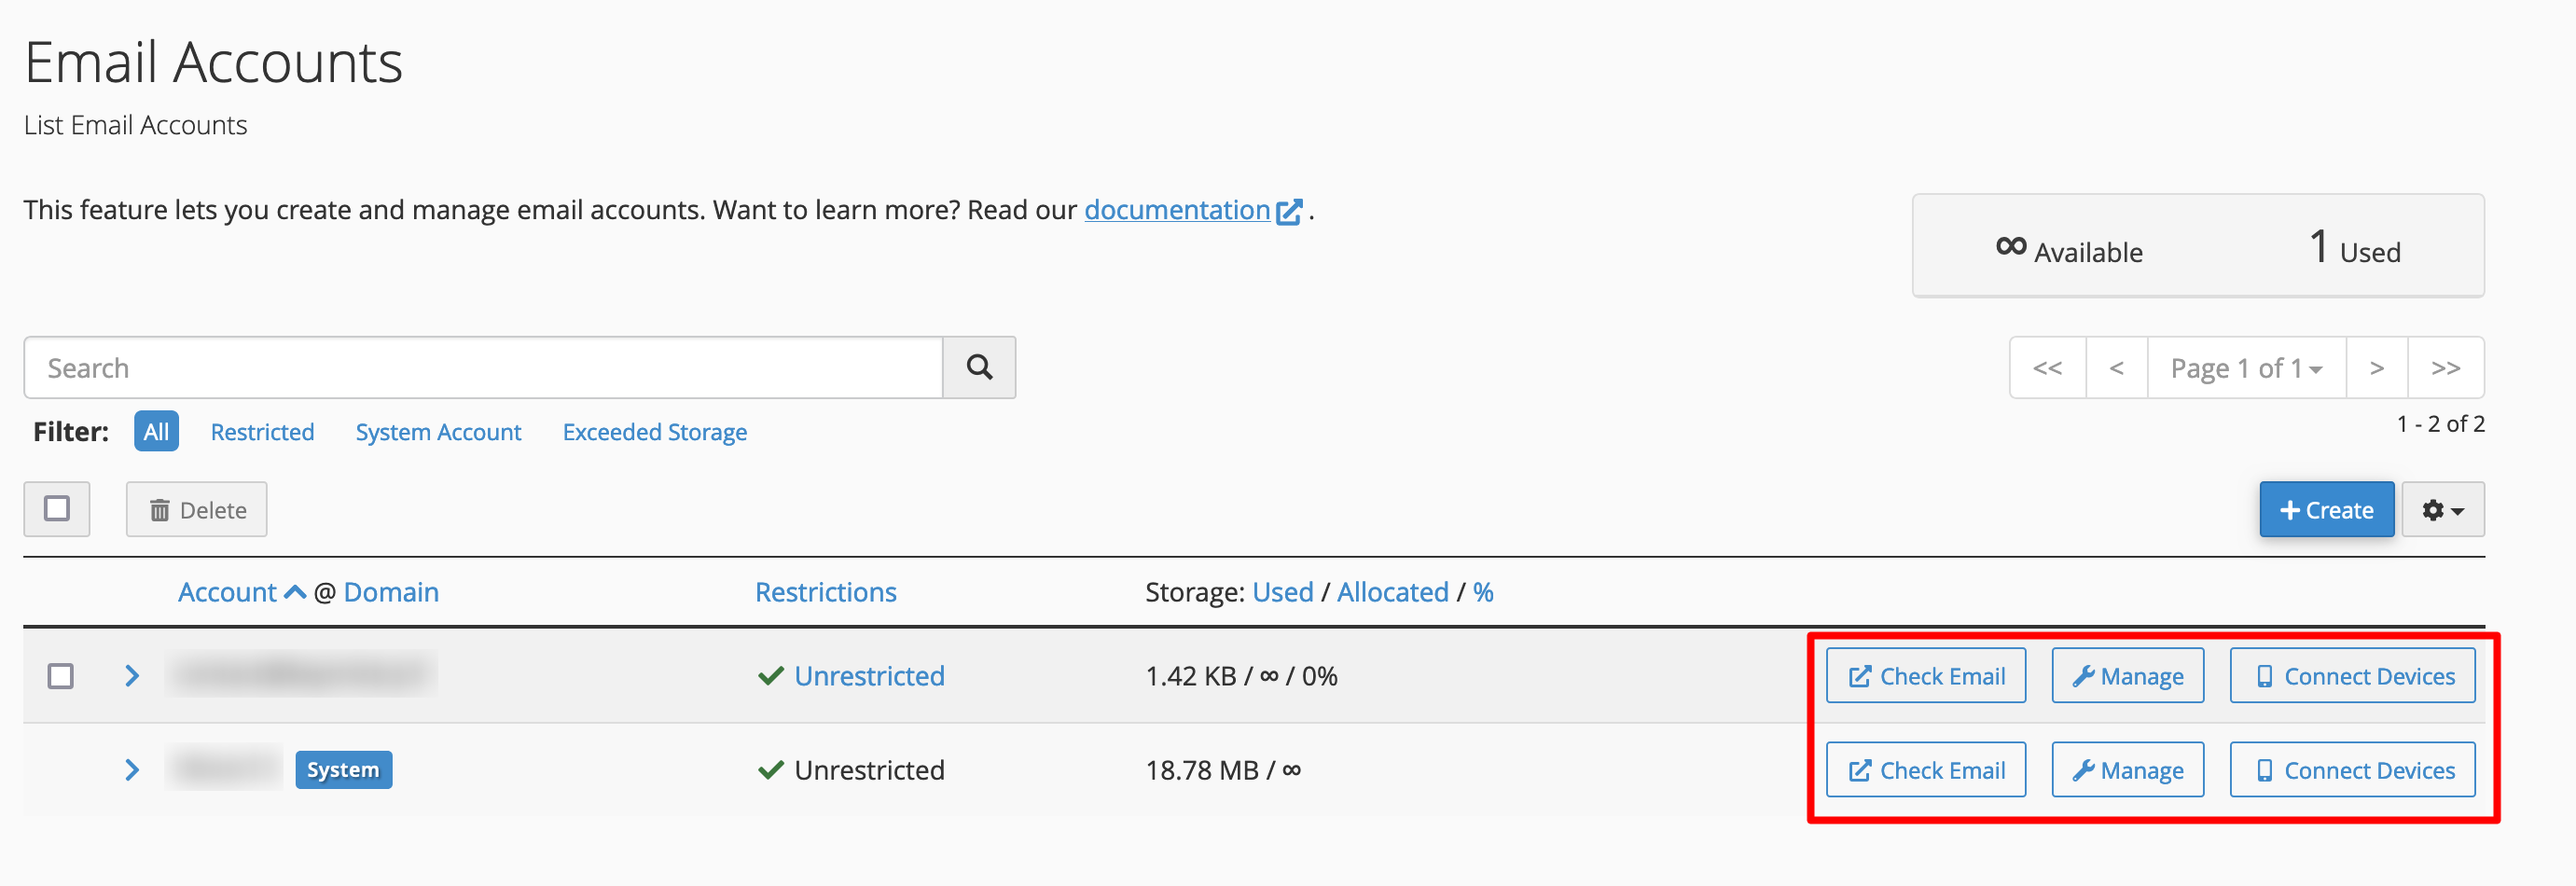
Back on the list of your email addresses, you can:
- View and edit your emails by clicking on “Check Email”
- Change your password or storage space by choosing “Manage”
- Set up your mailbox on your favorite email client (e.g. Outlook or Gmail) by clicking on “Connect Devices”
How do I create a subdomain?
Without further ado, let’s move on to the creation of a subdomain (in the “Domains” menu). This can be useful, for example, if you want to create development spaces so that you don’t have to modify your online site… and can work in complete peace of mind.
Another advantage of a subdomain: segment the different parts of your site to improve performance.
You could create a subdomain for each of your site’s functions. For example: forum.my-site.com for a discussion forum, etc.
To create a subdomain (on a URL such as subdomain.my-site.com), all you need to do is:
- Give your subdomain a name
- Choose the domain to which it belongs
- Define the root folder on your hosting it will route to
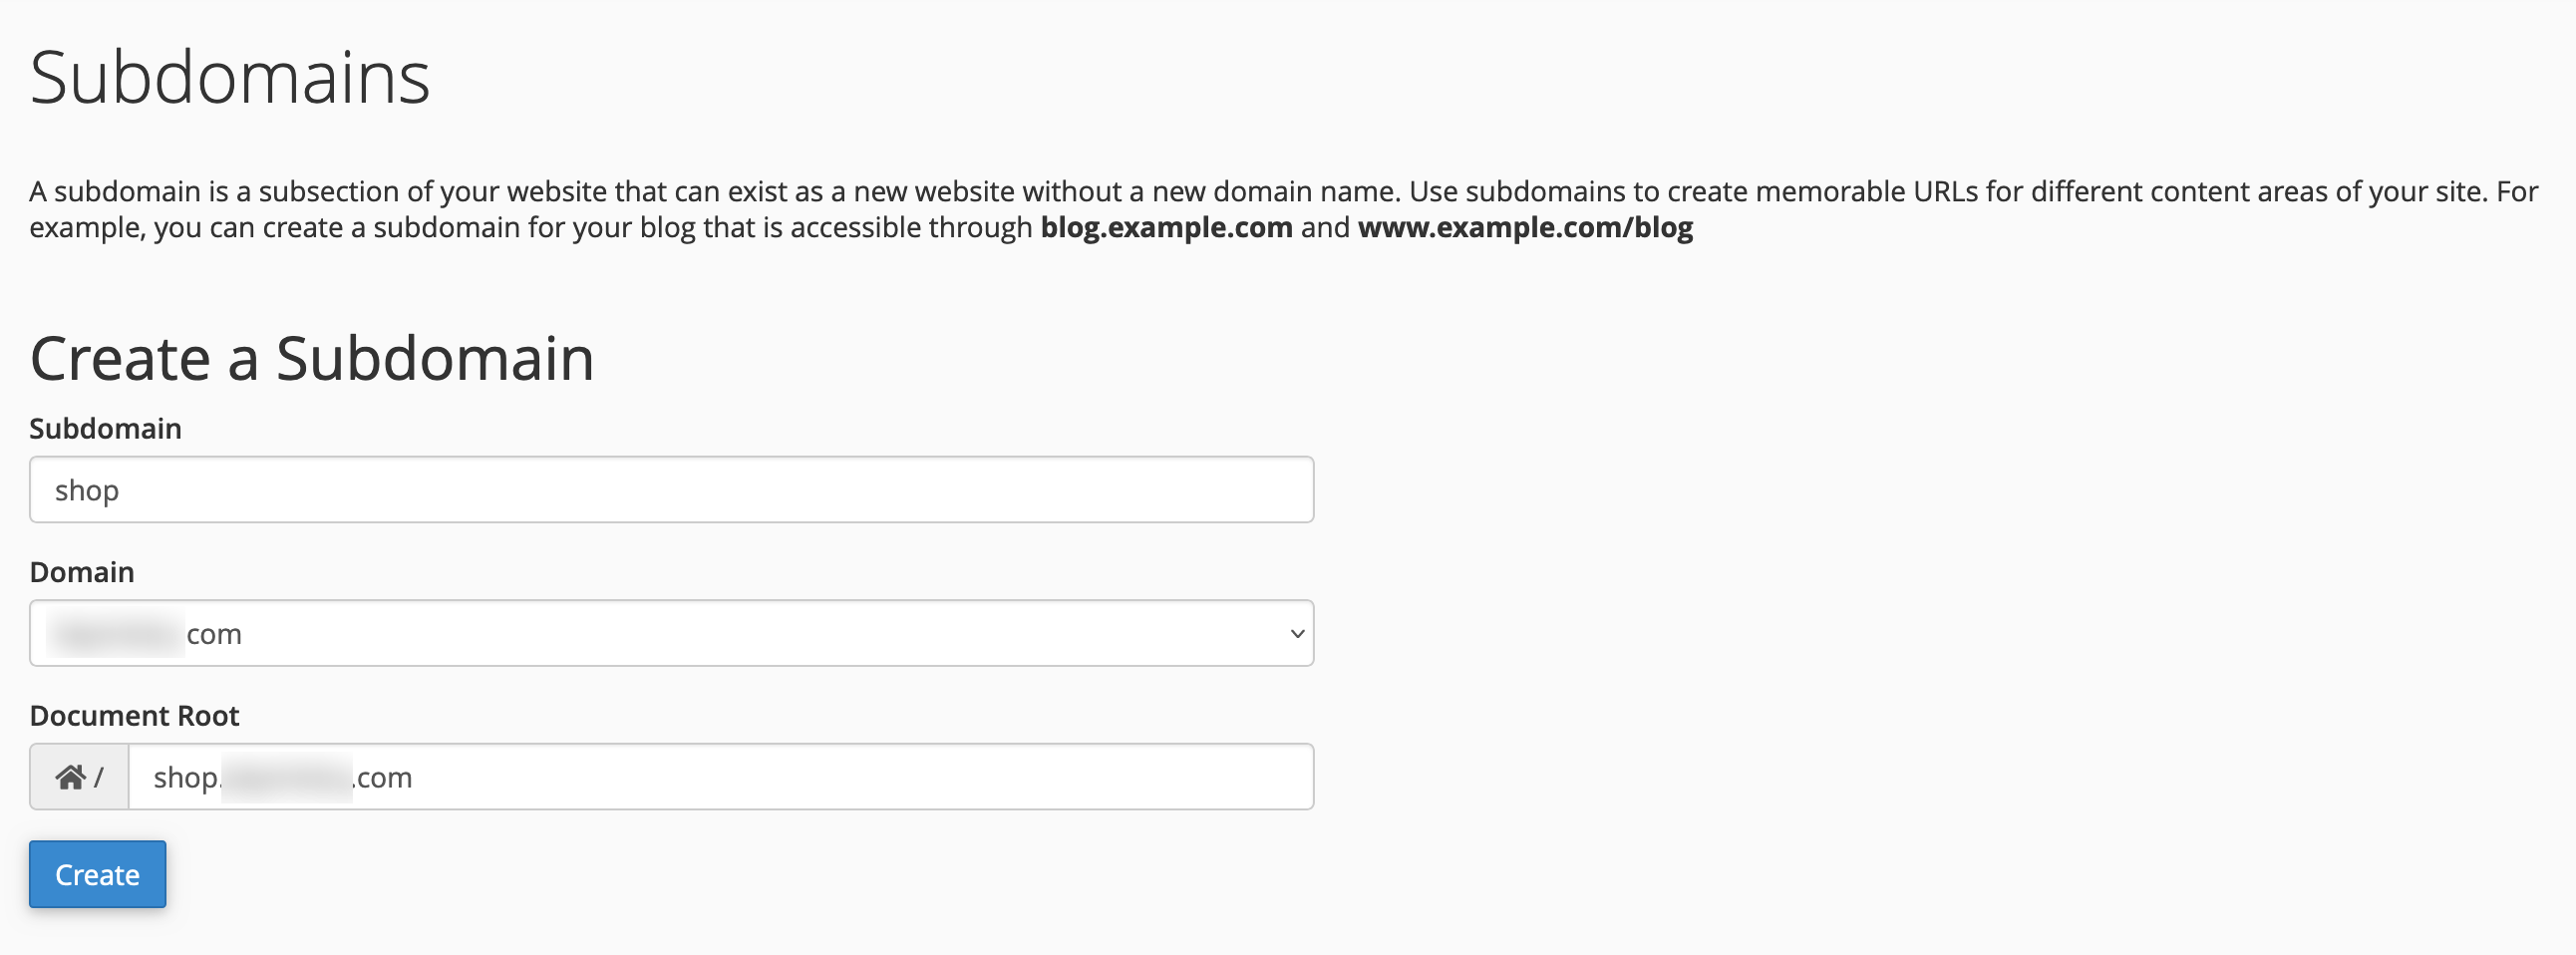
In the example above, I’ve created a “shop” sub-domain for my domain name.
The full address will therefore be shop.mydomain.com and will host a WordPress installation completely independent of the first, in another folder, which here bears the name of the subdomain (replace “mydomaine.com” with your domain name and its extension).

How do I create a WordPress redirect with cPanel?
Since we’re in the “Domains” menu, let’s stay there. Let’s take a look at the functionality for designing redirects.
Redirects allow you to redirect one link to another, for example if you delete a page or article from your site, or even redirect an entire site to a new URL if you change your domain name.
For the latter possibility, a wild card redirect from your old URL to the new one will enable you to do this in one click, as in the image below:

In the redirection type, two choices are available:
- Permanent (301).
- Temporary (302).
To find out more about the different types of redirection, I recommend our article on the subject.
Here I’m redirecting a domain name I don’t use but keep, to my main site (WPMarmite in the example here).
The options to be defined are as follows, in the fields:
- “Type“: I want my redirection to be permanent, so I select the 301 redirection.
- “https?://(www.)?“: All the domains you own are listed here, so all you have to do is select the one you want to redirect.
- “Redirects to“: Enter the domain name to which you wish to redirect.
The buttons then let you choose whether to redirect the domain without www, with www, or both. The choice is yours.
Finally, the “Wild Card Redirect” box is useful if you change your domain name. By checking this box, all your pages will be automatically redirected from one domain to another.
How do I install an SSL certificate?
I’m not telling you anything new when I say that securing your WordPress site is of the utmost importance. One of the best ways to do this is to install an SSL certificate to switch your site to HTTPS protocol.
On your WordPress cPanel, this can be done in a few clicks via the “Let’s Encrypt SSL” submenu of the “Security” menu.
Domain names that don’t yet have an SSL certificate are listed in the section called “Issue a new certificate.”
Click on the “Issue” button next to the domain you wish to secure.
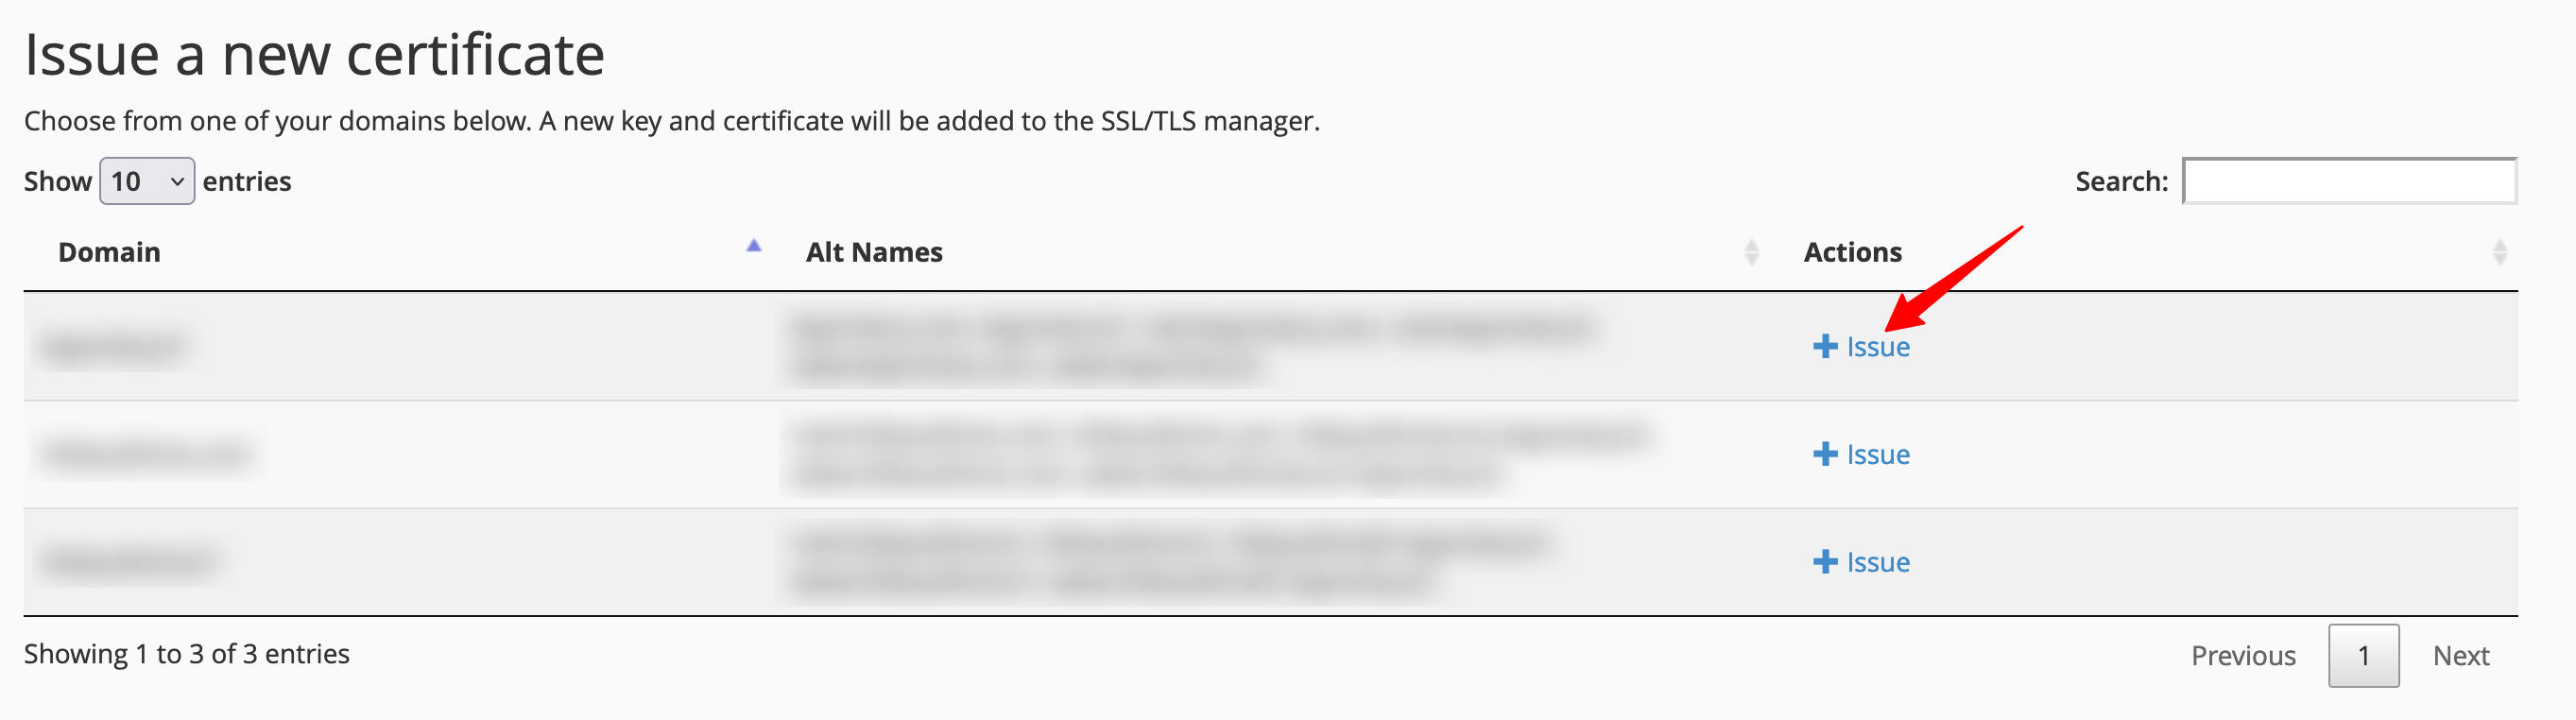
Leave all the options as they are, and click on the “Issue” button. That’s all there is to it! Your site now has an SSL certificate and is accessible via HTTPS.
Just remember to redirect HTTP to HTTPS.
Conclusion
By now, you’ve learned all about cPanel and its major features. With this tool, you’ll be able to perform a wide range of everyday operations on your WordPress site, simply and autonomously.
But don’t forget: not all hosting providers offer cPanel! If you absolutely must use it, especially as it meets your needs, make sure that your future host offers it.
And don’t forget to check the options offered, because every host has its own way of doing things, and can add its own. This is the case with bluehost, which offers a range of additional applications.
What are you using? Are you satisfied with your current interface, and what would you like to see improved?

Receive the next posts for free and access exclusive resources. More than 20,000 people have done it, why not you?
Continue reading
Articles posted in WordPress TutorialsHow to update the PHP version of your WordPress site
What comes to mind when you think of WordPress speed and security? Your favorite plugins, perhaps? You should also think about… PHP! If you’re looking for a site that loads fast, while offering a solid shield against hacker attacks, there’s a…
How to create an effective HubSpot conversion funnel on WordPress (complete guide)
In the drawers of a kitchen, there are often two very useful utensils lying around. The first is the colander. And to illustrate, some WordPress sites unfortunately resemble it. Why? Well, because visitors arrive on the site in question… then…
How to fix the ERR_CONNECTION_REFUSED error: A complete guide
Does your browser display the ERR_CONNECTION_REFUSED message when you try to access a website? This error means that the target server – or your own configuration – is actively rejecting the connection request, leaving you at a dead end. But…