A hundred times. Two thousand times. Ten thousand times. It doesn’t really matter how many times. You’re going to repeat this operation many, many times throughout the life of your site.
The operation is: installing a WordPress plugin. A basic process. Routine. An experienced user would almost be able to do it with his eyes closed.

Yes, but here’s the thing. If you’re just starting out, there are a few details you need to know. But don’t worry, it’s nothing too complicated.
To do things the right way, you just need to follow a few best practices. That’s what this detailed tutorial will show you.
By the time you’ve finished reading this post, you’ll have mastered 3 plugin installation methods.
As a bonus, you’ll also know where to find your next plugins to activate, as well as tips on how to put them to good use.
Overview
This article contains affiliate links. This means that WPMarmite will earn a commission if you decide to purchase some of the solutions presented via these links. This won’t cost you anything extra, and in particular allows us to pay our team, finance the creation and updating of our content, and test new themes and plugins. To find out more, see our publishing policy.
What is a WordPress plugin?
A plugin allows you to add new options and extend existing functionalities in the WordPress core.
They exist in a wide range of fields (SEO, eCommerce, security, webmarketing, etc.). You’ll find tens of thousands of them free of charge on the official WordPress directory, and for a fee on specialized platforms.
The WordPress Core corresponds to all the basic files the CMS (Content management system) needs to function. They are contained in the archive (zip file) you get when you download WordPress.
As the WordPress documentation points out, “Plugins offer custom functions and features so that each user can tailor their site to their specific needs.”
More technically, “a plugin is a PHP file that can be uploaded to the wp-content/plugins directory on your web server, where you have installed WordPress,” reports the WordPress Glossary.
For your information, here are some of the plugins featured on the official WordPress.org directory:

What should you consider when choosing a WordPress plugin?
Before rushing headlong into installing plugins, ask yourself the following questions:
- What functionality do you need?
- Can a plugin meet this need?
- Can you understand what the plugin does?
- Can you configure it without risking damage to your site?
Keep these questions in mind, because some plugins can have a negative impact if you don’t use them correctly.
At the same time, pay attention to the following aspects:
- The plugin’s star rating. Choose a plugin with a good rating, if possible at least 4 out of 5 stars.
- User reviews. If many users criticize the plugin you’re eyeing, there’s probably something fishy going on.
- Number of active installations. It’s not always a guarantee of quality, but it’s a fairly reliable indicator. The more active installations a plugin has, the higher its quality. Please note: don’t take this statement as gospel. There are also some excellent plugins that don’t have 100,000 active installations.
- The date of the last update and compatibility with your version of WordPress (preferably the latest).

Looking for must-have plugins that can be used on any type of site (blog, store, portfolio, etc.)? Check out our list of the 25 best “generalist” WordPress plugins. You’ll come across the likes of Elementor, WP Rocket, TablePress, Spectra, and Imagify.
Do you have an idea of the type of WordPress plugins you need? Before we move on to installing plugins, I’ll show you where to get them.
Where do you find WordPress plugins?
The official plugin directory on WordPress.org
Welcome to Ali Baba’s Cave! With 63,708 plugins available, the Official Plugin Directory is the #1 place to find your next nugget.
Firstly, because the choice is immense. And secondly, because every plugin that wants to have a chance of appearing in this gigantic directory undergoes an upstream check. The Plugin Review Team, for example, checks that the plugin complies with WordPress (WP) code standards.
To find a plugin, you have several options:
- Find one via the categories offered by WordPress: “Plugins with blocks,” “Featured plugins,” “Beta plugins,” “Popular plugins,” etc.
- Use the search bar at the top of the page, if you already know the plugin you want to install. You can also type in a keyword (e.g. SEO, form, security, etc.) to find suggested plugins for that function.
- Filter by tab. WordPress classifies plugins in two ways: a “community” plugin is developed and maintained by a community. It’s free of charge.
- On the other hand, a “commercial” plugin is free but “offers commercial upgrades or additional support for a fee,” says WordPress.

Specialized marketplaces
If that’s not enough, other plugins are available on specialized marketplaces.
One of the most famous is CodeCanyon. Created by the Envato company (which also publishes Themeforest), CodeCanyon offers various scripts for all types of websites, including plugins for WordPress.

The WordPress plugins you’ll find here are all premium, i.e. paid for.
It would be a shame to spend money for nothing. Don’t hesitate to contact the authors to ask questions via the Comments tab on each plugin page.
Plugin stores
Although I can’t draw up an exhaustive list, it’s possible to find plugins elsewhere than on the two sites I’ve just mentioned. In particular, you can find them on:
- Specialized WordPress theme/plugin stores such as ThemeTrust, CSSIgniter, WPZoom, or Barn2Plugins & Yith (WooCommerce specialists)
- Sites offering several plugins, such as WPMUDev and SolidWP (e.g. iThemes)
- Sites dedicated to a specific plugin, such as Easy Digital Downloads, Gravity Forms, and WP Rocket

A search engine can also help you find a plugin. On Google, for example, type “XXX wordpress plugin,” where XXX is the description of the function you need.
But be careful with this procedure. Don’t download just anything from shady sites.
Wherever possible, for security reasons, choose plugins from the official directory, which have all been verified.
Right. I hope everything’s clearer for you now. Now let’s get down to the practical side of this tutorial.
You’ll learn three ways to install a WordPress plugin on your website.
We’re going to start with the most common case and work our way through to the special cases, so as to cover every situation.
Let’s get started!
How to install plugins on WordPress: 3 detailed methods
First of all, I recommend that you back up your WordPress site before proceeding. In the event of a problem, such as a WordPress error or incompatibility, you’ll be able to restore your site in just a few clicks. To cover yourself, you can use a backup plugin like UpdraftPlus, or an all-in-one tool for managing your WordPress sites like WP Umbrella.

How to install a free WordPress plugin from the official directory
Let’s start with method #1: installing a plugin from the official WordPress directory.
What you need to know about this directory (also known as the repo or repository) is that you can access it directly from the WordPress administration.
To do so, go to Plugins > Add New from your side menu, on the WordPress administration interface (back office).
If you can’t find this menu and can’t add a WordPress plugin, it may be because you’re using the WordPress.com service and not the open-source WordPress.org software, which is a self-hosted solution (which is what we’re talking about in this article and what WPMarmite uses). Learn the differences between the two WordPresses here.
Then type the name of the plugin you’ve found or keywords related to what you’re looking for in the search bar:

Let’s say we need a plugin to optimize our SEO, and you’ve discovered the handy Yoast SEO.
Type “Yoast SEO” in the search field and check out the results. Then click on the “Install Now” button to … install the plugin 😉:

Once installed, after a few seconds, remember to activate the plugin to put it into service:

Congratulations, your WP plugin is installed. All that’s left is to configure it.
In addition to your plugins, do you want to know how to install a WordPress theme like a pro? Check out our tutorial on the subject.

How to install a purchased or downloaded WordPress plugin
Without further ado, let’s move on to method #2, which involves installing a WordPress plugin manually.
This is what you’ll need to do if you’ve purchased or downloaded the plugin. In the case of a premium plugin, for example, you will probably have downloaded the .zip file for your plugin.
Note that if you’ve downloaded a plugin for free from the official WordPress directory, or from another site, the instructions that follow are also valid.
In fact, everything that follows works as long as you have a WordPress plugin in .zip format. Go again to Plugins > Add New. This time, click on the “Upload Plugin” button:

Then select your plugin’s .zip file on your computer, and click on the “Install Now” button:
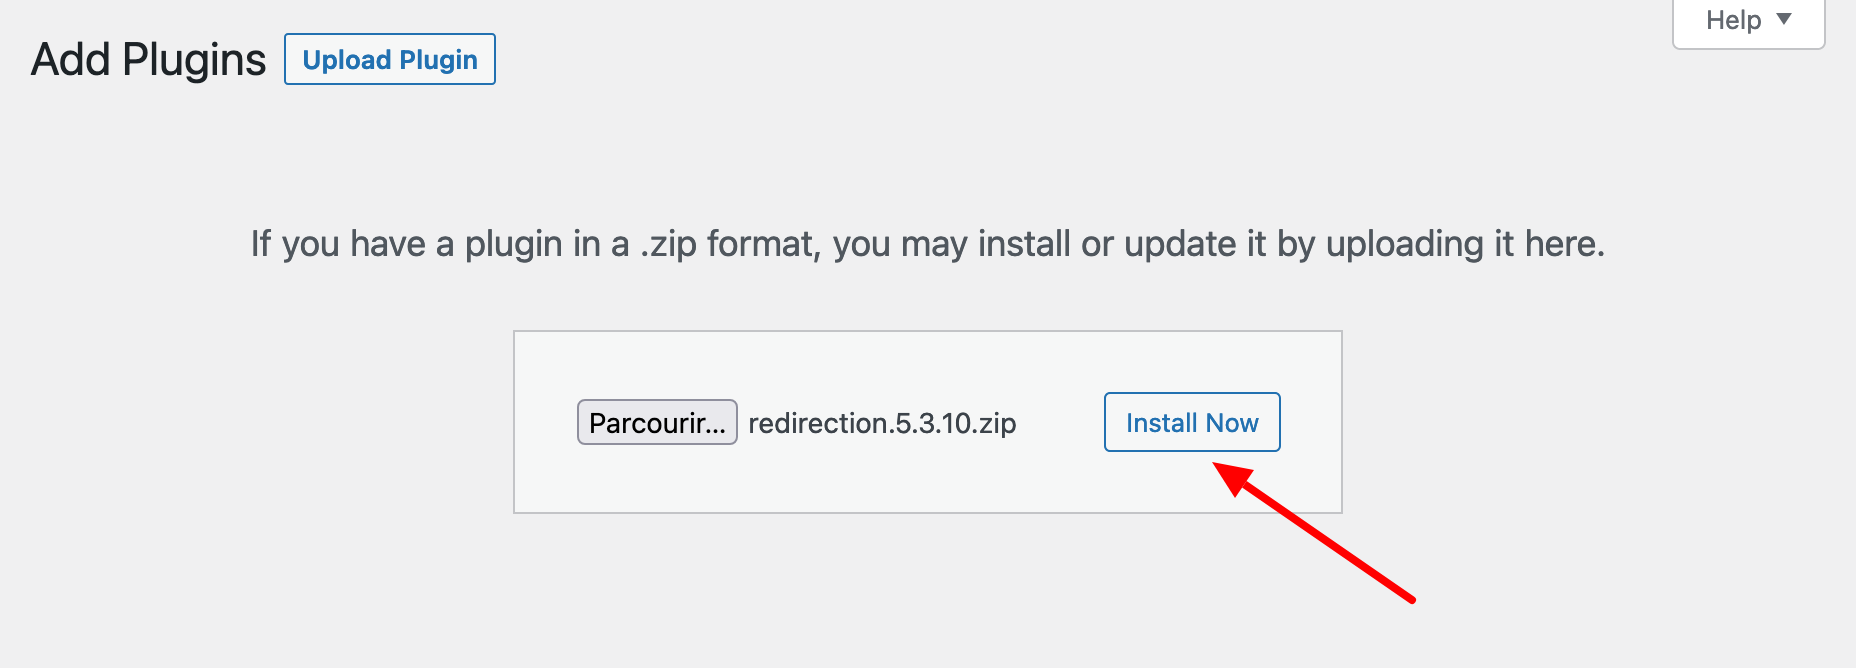
As an example, I’ve installed the free plugin Redirection, which automatically redirects a visitor wishing to access URL A, to URL B.
Once the plugin is installed, click on “Activate Plugin” to activate it:

Next, the same procedure as before. You’ll need to configure your plugin if it has an options page.
For example, the Redirection plugin offers its settings options in the “Tools” menu of your WordPress administration interface:

How to install a WordPress plugin via FTP
Let’s finish with the last way to install a plugin, which is to use an FTP client.
To begin with, note that this method should NOT be useful to you, as it’s possible to manage your plugins directly from your WordPress admin.
But as this article is intended to be comprehensive, I’d like to show you how it’s done in detail, below.
FTP stands for File Transfer Protocol. An FTP client is a software that lets you connect to a remote server to transfer files.
Step 1: Open your favorite FTP software
Let’s assume that you have a WordPress plugin contained in a .zip file. Unzip it and open your favorite FTP software (e.g. FileZilla, Cyberduck, or Transmit).
Log in using the credentials provided by your hosting provider. You’ll usually find them in the welcome email sent by your host when you first sign up for your hosting account.
This email should provide you with a URL to your server (with a port number), a username, and a password.
On FileZilla, for example, enter these in the appropriate fields and click on the “Quickconnect” button:

Step 2: Copy the plugin to your hosting server to install a WordPress plugin
Locate your site’s root folder. Depending on your hosting provider, this folder will have a different name. At SiteGround, for example, it’s called public_html. At OVH, it’s called www.
Once in this root directory, navigate to your site’s /wp-content/plugins/ folder.
Copy your plugin’s folder (obtained by unzipping the .zip file) by dragging and dropping it into the “plugins” folder:

Step 3: Activate the plugin on your WordPress dashboard
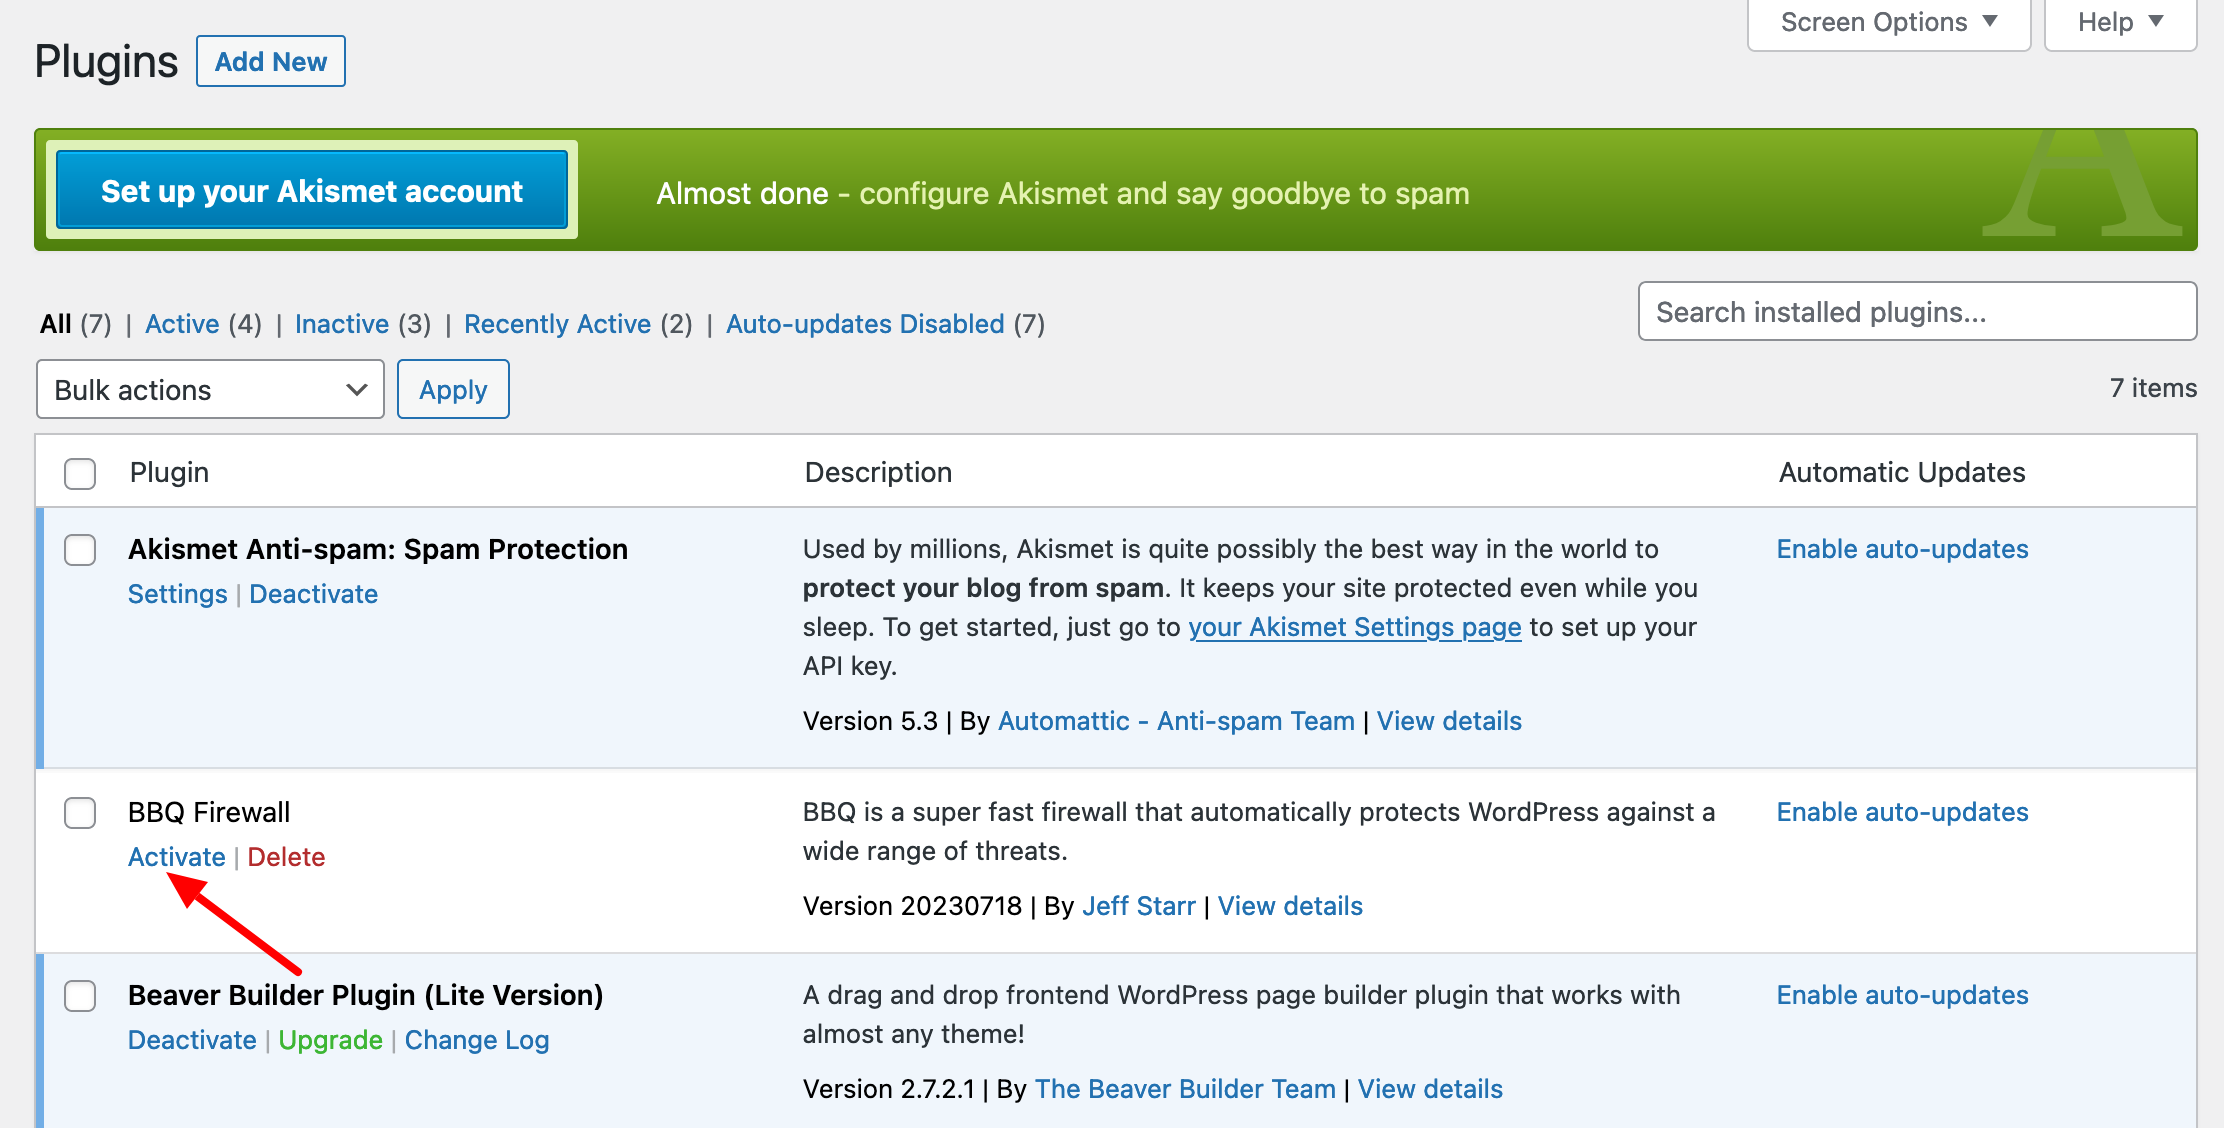
Once your plugin is in the WordPress plugins folder, go to the “Plugins” menu on your admin interface.
Then click on the “Activate” button to start using the plugin:
To say the least, you’re spoilt for choice when it comes to installing a WordPress plugin!
Personally, I’d recommend keeping things simple and uncomplicated.
In other words, use the admin installation, whether for plugins in the official directory or those you’ve downloaded elsewhere.
6 tips to apply after installing a WordPress plugin
You now know how to install WordPress plugins in 3 different ways. To conclude, apply the following tips when installing one or more plugins at a time:
- Configure the plugin’s settings from the menu(s) it offers.
- Check that your WordPress site is working properly (preferably in private browsing mode) after activating a plugin. In the event of a problem, clear your cache first.
- Update your plugins as soon as an opportunity arises. This is a good practice to reinforce your site’s security. When an update is available, WordPress will notify you in Dashboard > Updates.
- Uninstall any plugins you no longer use. To do this, deactivate them and then delete them from the Plugins > Installed Plugins menu.
- Don’t install two plugins that do exactly the same thing. For example, don’t activate two SEO plugins like Yoast and Rank Math at the same time. One is enough.
- Don’t overdo it on the number of plugins you install, even if the most important thing is the quality of the plugins you use. In other words, it’s better to have 40 well-coded plugins than 10 that cause incompatibilities and bugs, but it’s still best to avoid overloading your site!
What did you think of this tutorial? Do you have any additional tips to share with WPMarmite readers who want to install a WordPress plugin like a pro?
Tell us all about it in the comments.

Receive the next posts for free and access exclusive resources. More than 20,000 people have done it, why not you?

Continue reading
Articles posted in WordPress TutorialsHow to update the PHP version of your WordPress site
What comes to mind when you think of WordPress speed and security? Your favorite plugins, perhaps? You should also think about… PHP! If you’re looking for a site that loads fast, while offering a solid shield against hacker attacks, there’s a…
How to create an effective HubSpot conversion funnel on WordPress (complete guide)
In the drawers of a kitchen, there are often two very useful utensils lying around. The first is the colander. And to illustrate, some WordPress sites unfortunately resemble it. Why? Well, because visitors arrive on the site in question… then…
How to fix the ERR_CONNECTION_REFUSED error: A complete guide
Does your browser display the ERR_CONNECTION_REFUSED message when you try to access a website? This error means that the target server – or your own configuration – is actively rejecting the connection request, leaving you at a dead end. But…