If I tell you: a page builder that has more than 10 million active users, and promises to be “limitless in design”, you tell me?
Elementor, my dear Watson!

Launched in 2016, this plugin – for it is one – is growing like crazy and is selling like hotcakes. Its users are crazy about it and you’d almost look like a has-been if you didn’t use it
But does it deserve so much praise? Is it really a must-have tool, or is it just smoke and mirrors?
To find out, my little budding Sherlocks, I’m inviting you to discover it in this (almost) 10,000-word guide that will tell you all about it (design, customization, page templates, value for money, performance, comparison with the competition, etc.).
And when we tell you everything, that’s really everything (or almost). We tried to be as exhaustive as possible by offering you one of the most complete resources on the subject.
By the end of this guide, you’ll know exactly how to configure Elementor on WordPress, and be able to create your first pages with it from scratch, without coding.
Let’s go! Get out your grey raincoat and your magnifying glass: we’re off to investigate a page builder that has become THE reference on the market.
This guide is nearly 10,000 words long. If you want to read it at your own pace, you can download its PDF version by following this link.
Overview
- What is Elementor?
- How to install Elementor on WordPress?
- How to configure the Elementor settings?
- How to create and customize a page with Elementor on WordPress?
- What widgets and templates does Elementor offer?
- Performance and responsive on Elementor
- Which theme to choose with Elementor?
- Which version of Elementor to choose: the free extension or Elementor Pro?
- Elementor documentation, support and ecosystem
- Elementor and the competition
- How much does Elementor cost?
- Elementor: WPMarmite’s review
Originally written in May 2018, this guide was last updated in April 2022, to best reflect the latest developments in Elementor.
Affiliate links are present in this guide. That is, if you purchase one of these plugins, WPMarmite will earn a commission. This allows us to pay for the research and writing work of the blog editors and to build a fund to buy and test other WordPress plugins. To learn more about our publishing policy, check out this resource.
What is Elementor?

An open-source freemium model
Elementor is a page builder for WordPress that comes as a plugin. It allows you to design complex pages on WordPress with drag and drop, and without coding. You can either start from scratch, or use ready-made page templates to go faster. All changes are visible in real time.
A page builder allows you to design the visual appearance of your site with modules (image, text, button, video, etc.) and ready-to-use templates, without putting your hands in the code (or very little). It is very often used in drag and drop. In this article, we present nine of the most important ones.
To be precise, Elementor is now more than a page builder. It is presented as a “website builder”, literally a site builder.
We’ll come back to this later in this guide, its Pro version offers a Theme Builder, which allows you to customize all areas of your site (header, footer and body content in particular).
Based on the open-source model, like WordPress, Elementor is a freemium page builder (by extension, we will also use the term “site builder” to designate it in this guide).
That is, it has a free version, the one on the official directory.
Next to that, you will also find a premium version, called Elementor Pro (paid). Of course, the latter version is much more extensive than the free version.
Technically, it is an additional extension of Elementor: you must have installed the free version before, to use it.
A website builder that has already attracted over 10 million active users
Elementor was launched in 2016 by the Pojo Themes team with a mission: to “radically simplify website building” with “minimal hassle and maximum fun”.
Since then, the page builder has swallowed everything in its path: the market share of page builders, and many of its competitors, to whom it casts quite a shadow (Beaver Builder, Divi Builder, Spectra or WPBakery Page Builder for example).
It is part of a very closed circle: that of the plugins with more than 5 million active installations on the official WordPress directory.
There are only nine of them, like Yoast SEO, Jetpack, or WooCommerce.
Here are some figures showing the impact and power of this creation tool on the WordPress ecosystem and the web in general:
- 10 million, as the number of sites on which Elementor would be active, according to the figures provided by the page builder. For the record, the official directory stops counting active installations when they reach 5 million, which is why the numbers are different.
- 7%, the share of sites worldwide on which Elementor runs. By comparison, WordPress powers over 43% of the world’s web at the time of writing.
- 140,000, the number of members in the global Elementor community.
- 3 seconds: an Elementor site would be created every time this time period elapses.

Why use Elementor?
To say that the tool has won over its users is an understatement. On its dedicated page in the official directory, Elementor has an excellent 5 out of 5 star rating.
There are several reasons for this. Whether you use one version or the other, Elementor offers the same overall features:
- It can be used without coding and with drag and drop.
- Templates allow you not to start from scratch.
- The process of creating your pages is live. This means that you will have a real-time overview of all changes made to your content. You won’t need to refresh your page, or open it in a new tab.
- Elementor works with almost any theme.
- It helps you customize any type of site: showcase or ecommerce.
- The site builder offers many options to make your site responsive (adaptable on computers, smartphones and tablets).
- A large ecosystem revolves around it, with dozens and dozens of addons that allow you to push its customization even further.
- It is translated into about fifty languages.
That’s it for this general presentation. Now, let’s discover the process of installing Elementor on your WordPress site.
How to install Elementor on WordPress?
The easiest way to install Elementor on your WordPress site is through your dashboard.
Go to the Plugins > Add New menu. Type “Elementor” in the search bar, then install and activate the plugin.

You will then be redirected to an installation wizard to guide you through the configuration of Elementor. The wizard will first ask you to create an account, then to install Hello, the in-house theme by Elementor.
I’ll tell you more about it in the rest of this guide: Hello is a theme with a minimalist design and features, that I don’t advise you to install if you don’t already master Elementor and CSS, and if you want to be satisfied with the free version of the page builder.
You will also be able to give a name and add a logo to your site, and choose to start your site from a blank sheet or to import a template.
You can leave this configuration wizard and make the settings it offers in your WordPress administration or in Elementor’s menus, which we’ll break down in the next section.
Wondering how to install Elementor Pro? After you get it, simply upload the premium page builder plugin to Plugins > Add New.
After installing Elementor, you will discover two main menus in the left sidebar of your admin interface:
- Elementor
- Templates
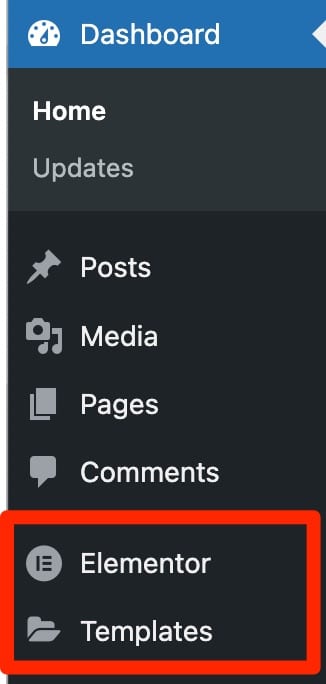
The menu named Elementor allows you to make all the basic settings of the site builder, to begin to take it in hand. Discover them in detail, sub-menu by sub-menu, in the following section.
How to configure the Elementor settings?
Settings
The “Settings” sub-menu is the first in the order. It consists of 5 tabs.
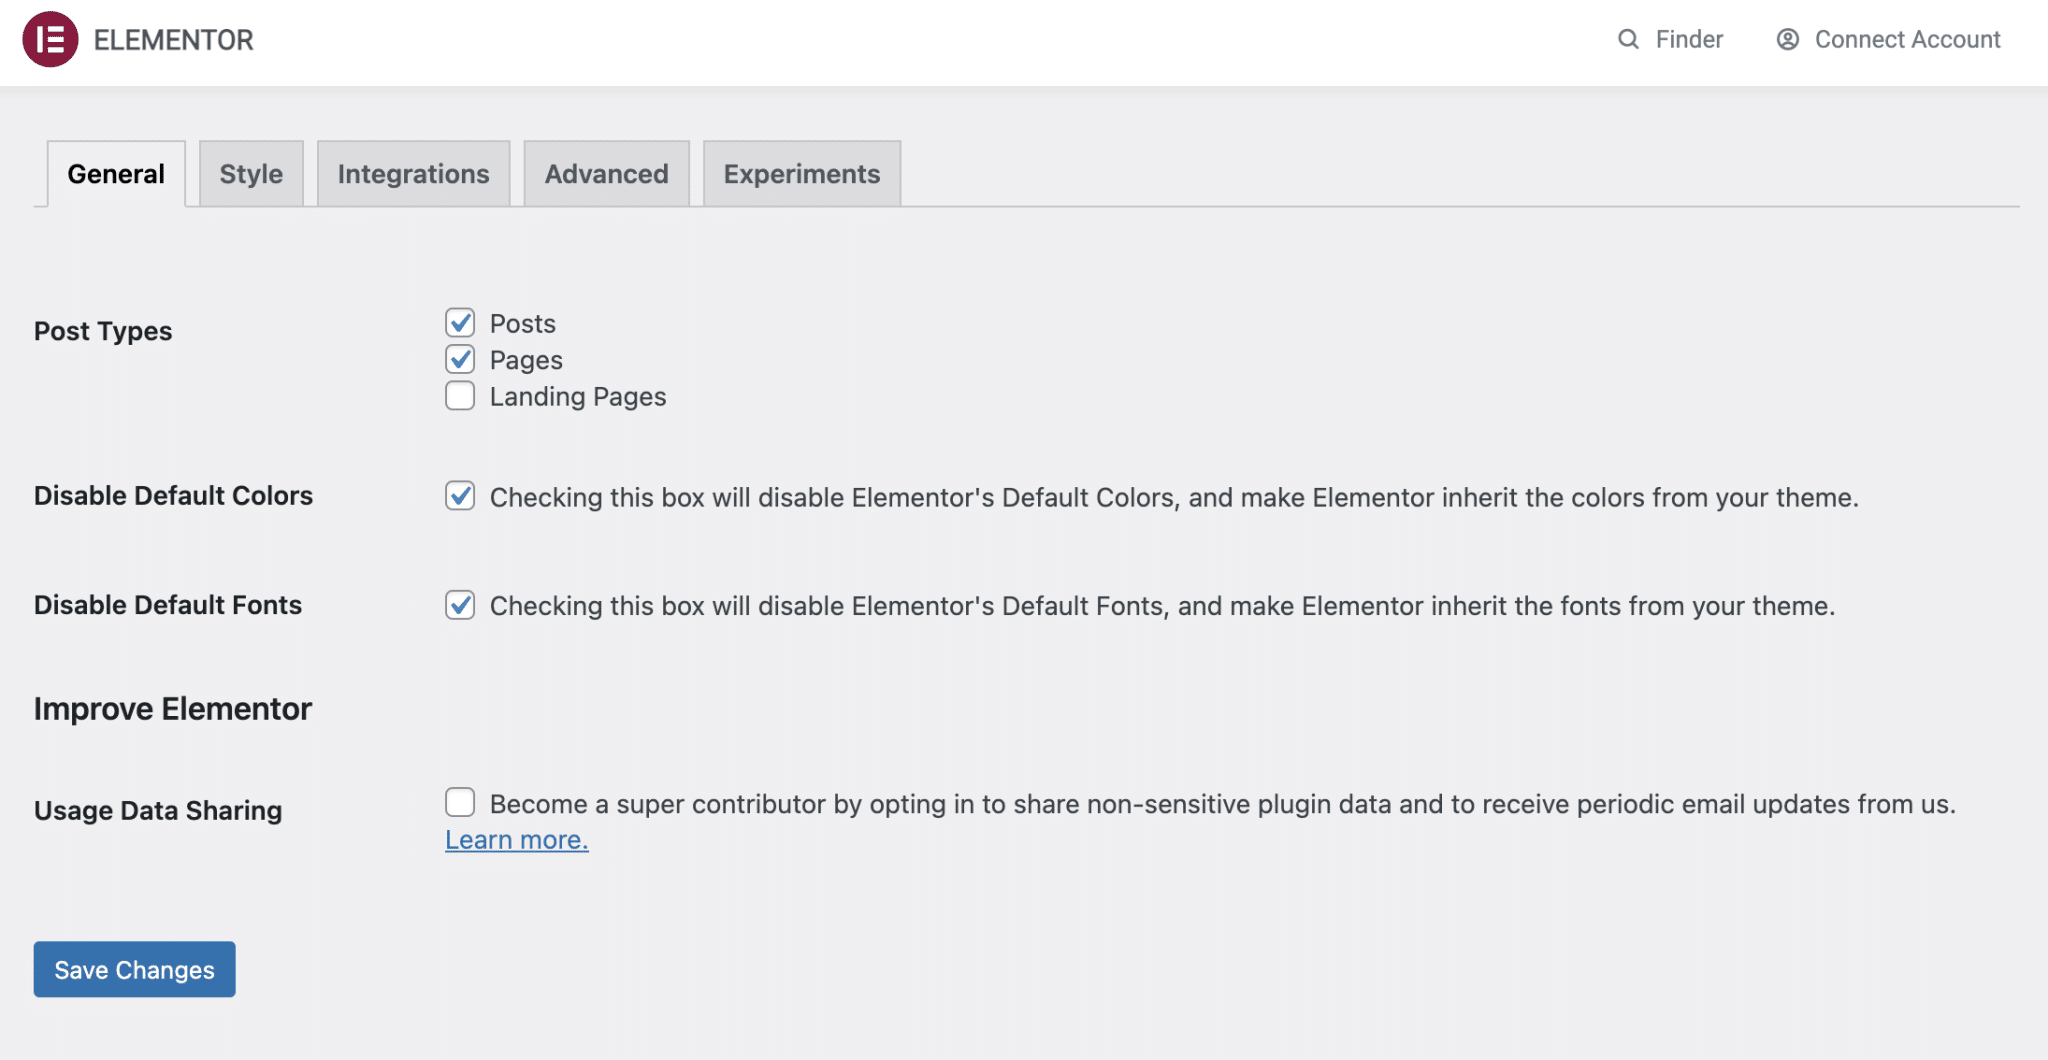
General
This tab allows you to act on the following elements:
- Post Types to define which content Elementor can be activated on. By default, pages and articles are checked. At WPMarmite, we use the WordPress content editor (Gutenberg) to write and edit our articles. It’s up to you to decide what you prefer. Personally, we prefer to use Elementor only on pages. Note that you can also activate it on landing pages.
- Disable Default Colors. I recommend you to check this box if you want Elementor to inherit the colors of your theme.
- Disable Default Fonts. Same reasoning for fonts. Check the box if you want Elementor to inherit fonts from your theme.
- Usage Data Sharing. Check this box if you want to share some information with the Elementor team (e.g. version of WordPress, PHP, MySQL and your server), in order to improve their plugin.
The other tabs
Now, let’s quickly go over the other tabs, which you won’t need to touch most of the time:
- Styles no longer offers settings: they have been transferred to the Elementor interface.
- Integrations allow you to integrate the Google Maps API into your site with the free version of Elementor. With Elementor Pro, integrations are for example possible with reCAPTCHA, Facebook SDK, Mailchimp, Drip, Active Campaign, etc.
- Advanced highlights settings with CSS files or the performance of your site. You can be satisfied with the default ones.
- Experiments lets you access new experimental features of Elementor before they are officially released.
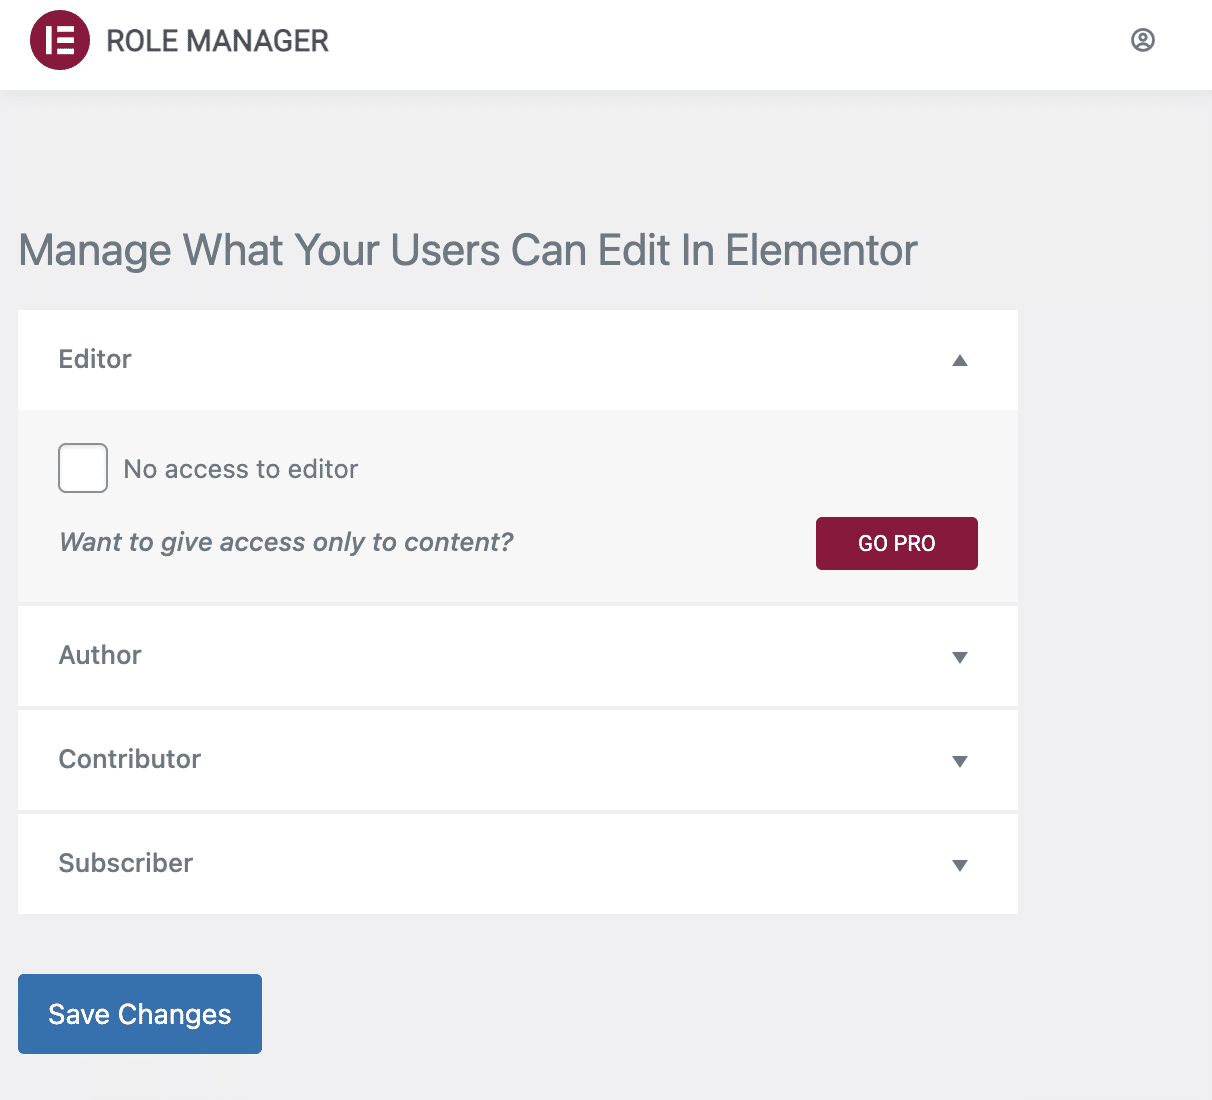
Role manager
The following submenu allows you to manage who has access to use Elementor among your users.
Five roles exist by default on WordPress:
- Administrator (the role that has all permissions)
- Editor
- Author
- Contributor
- Subscriber (the role with the least permissions)
Once you enable it, the Elementor page builder can be used by all roles, unless you decide otherwise.
You can prevent editors, authors, contributors and subscribers from using the page builder by checking the corresponding box… provided you have Elementor Pro.
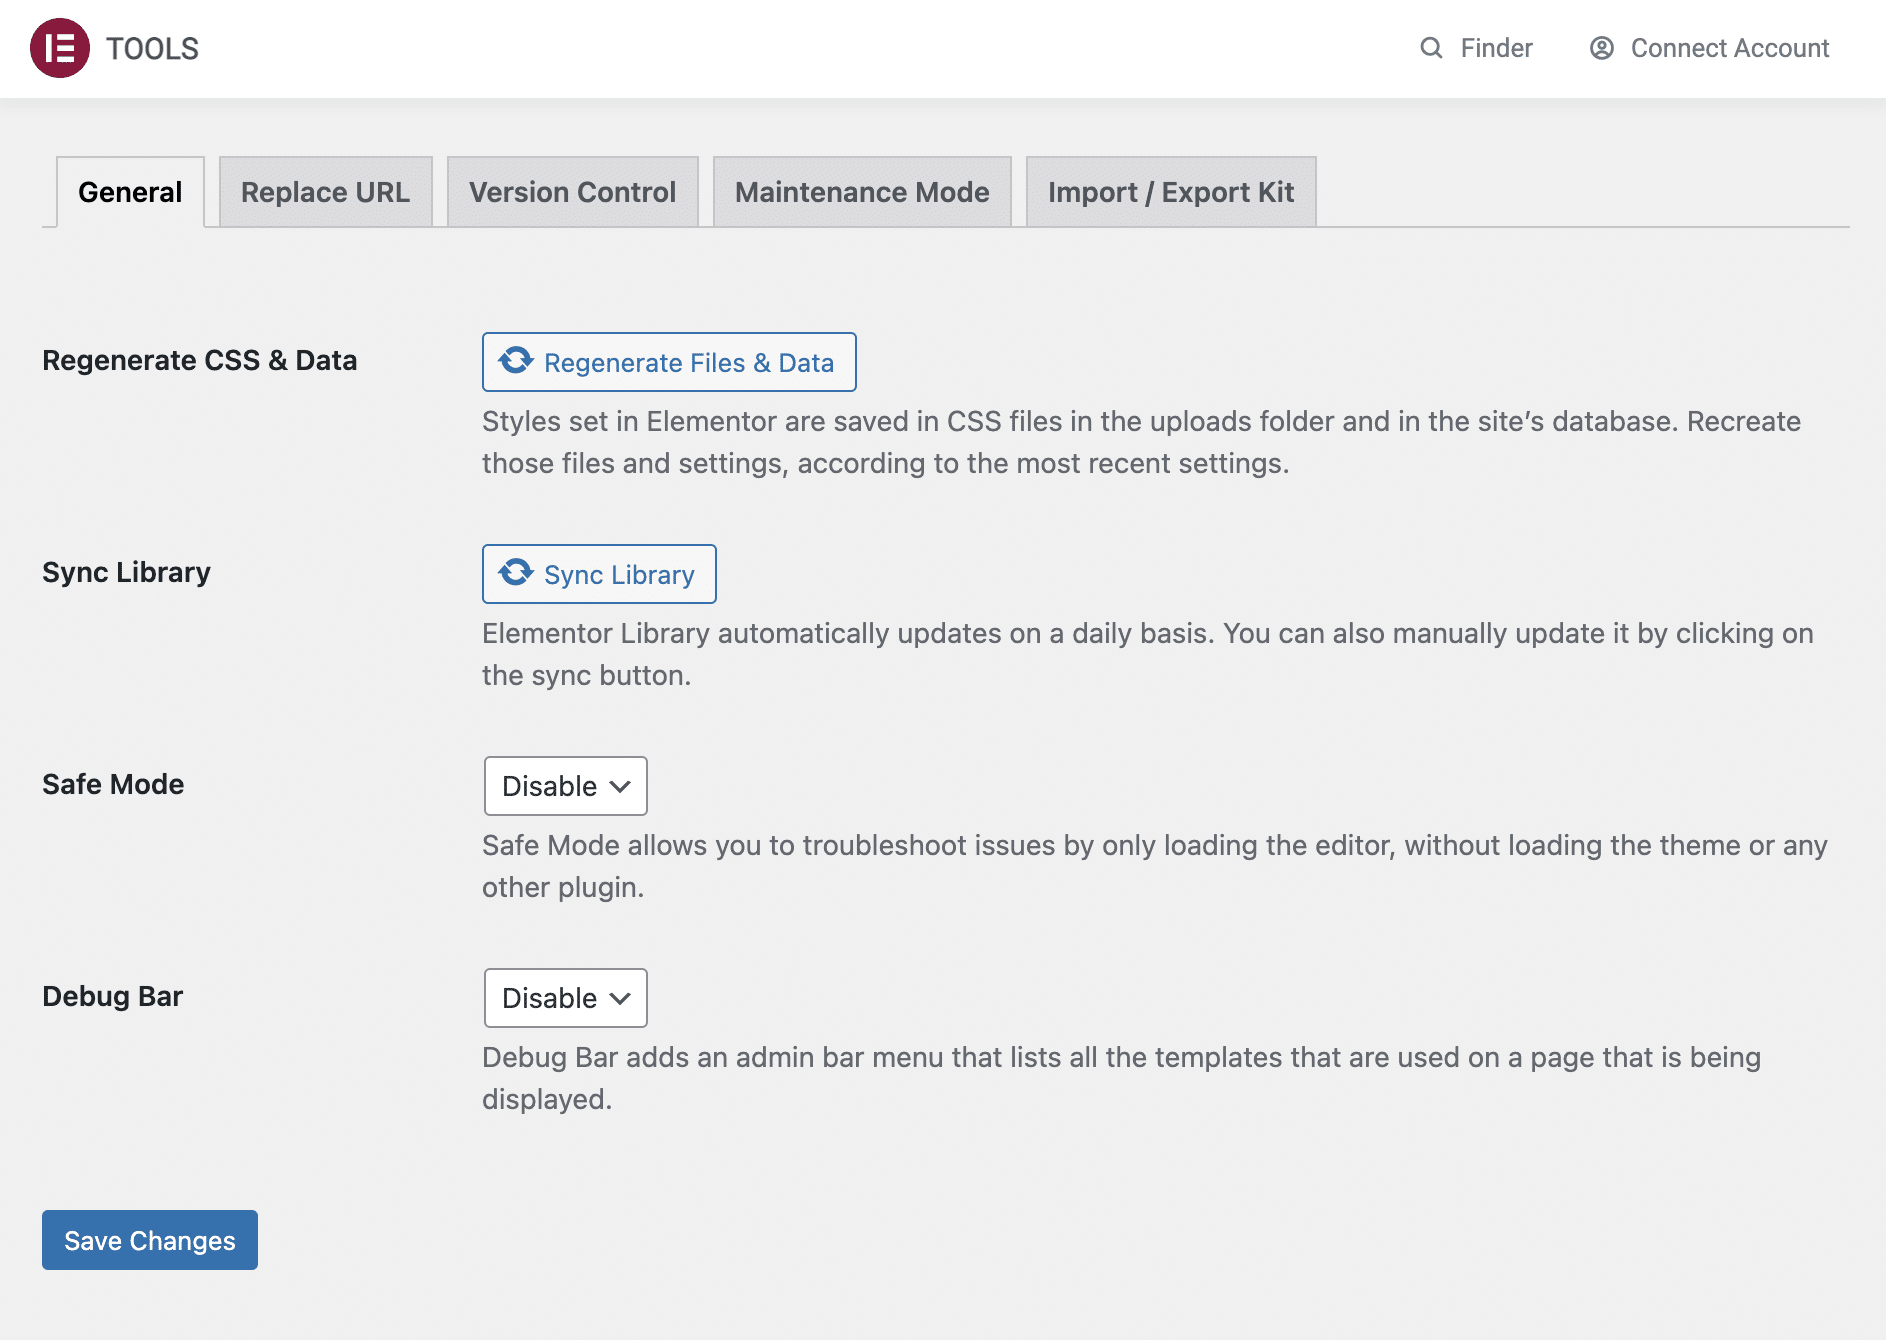
Tools
As in the “Settings” submenu, you will find five tabs in “Tools”. The options offered may be necessary in certain very specific cases, but you will almost never have to use them.
General
The General tab offers 4 settings:
- Regenerate CSS & Data, if you ever have a display problem.
- Sync Library, in case you need to manually update the Elementor template library. The library automatically synchronizes every day.
- Safe Mode, to “troubleshoot issues by only loading the editor, without loading the theme or any other plugin“.
- Debug Bar, to add “an admin bar menu that lists all the templates that are used on a page that is being displayed”.
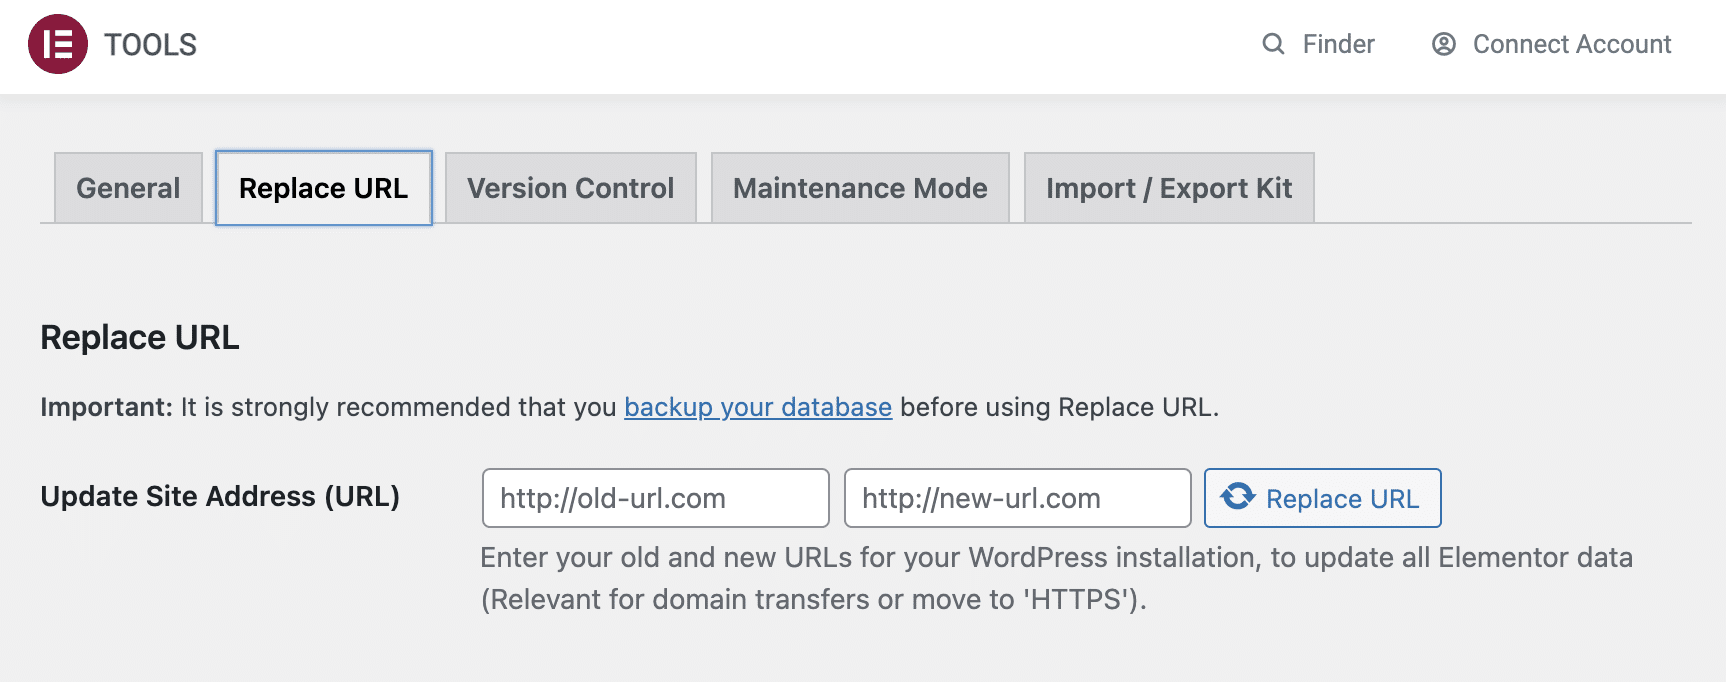
Replace URL
This tab allows you to update the URL (web address) of your site. In principle, you will never have to touch this setting.
And if you ever do, be careful what you do. A change of URL can have negative consequences on your SEO if it is badly done.
Remember to backup your site (files + database) if you ever need to touch this setting.
Version Control
Here you can revert to a previous version of Elementor, for example if you experienced a problem when updating the page builder.
You can be notified by email when a new version of Elementor or Elementor Pro is available, by becoming a beta tester.
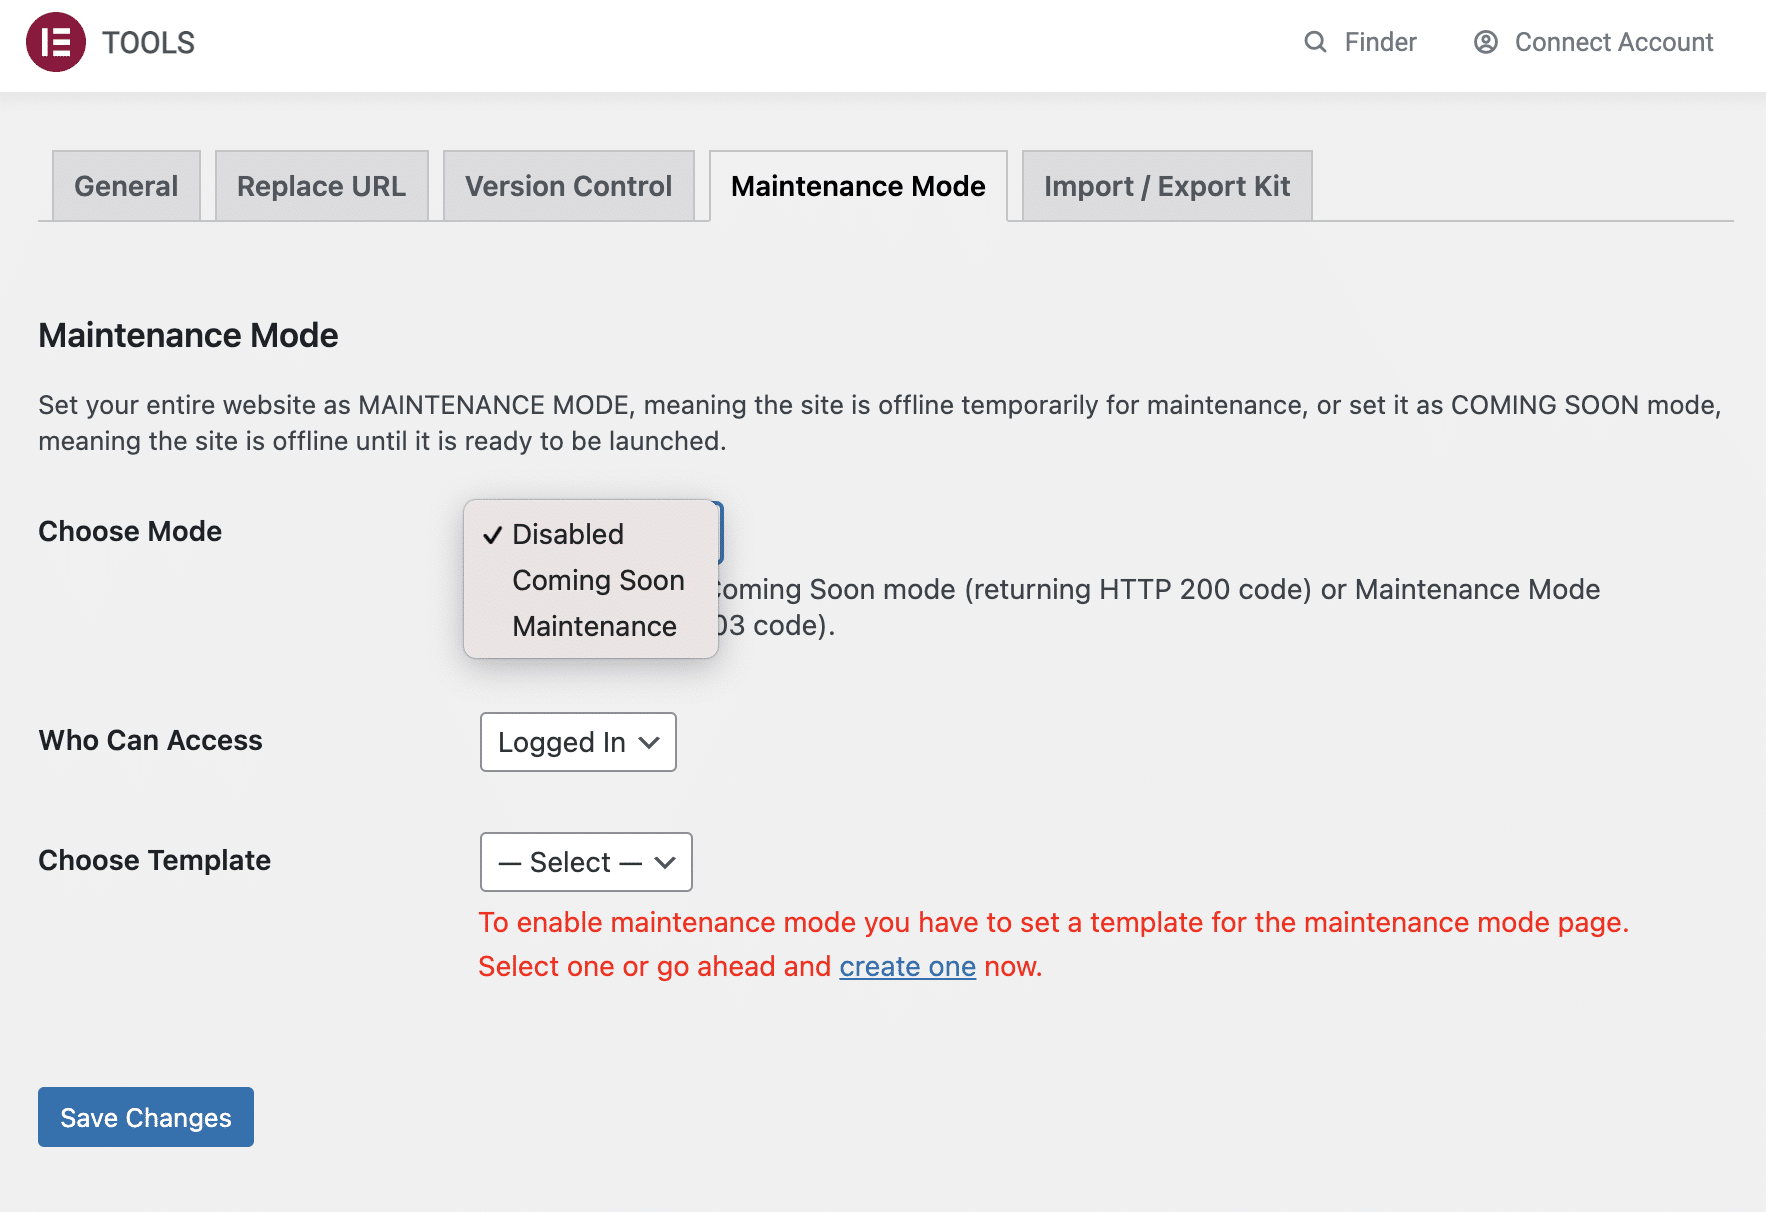
Maintenance Mode
Thanks to the Maintenance Mode tab, you can put your site in maintenance without using a plugin dedicated to this. It is possible to:
- Select either the “Coming Soon” mode (which returns an HTTP code 200), or the “Maintenance” mode (which returns an HTTP code 503).
- Define which user role can access the Maintenance page.
- Choose a template for your Maintenance page.
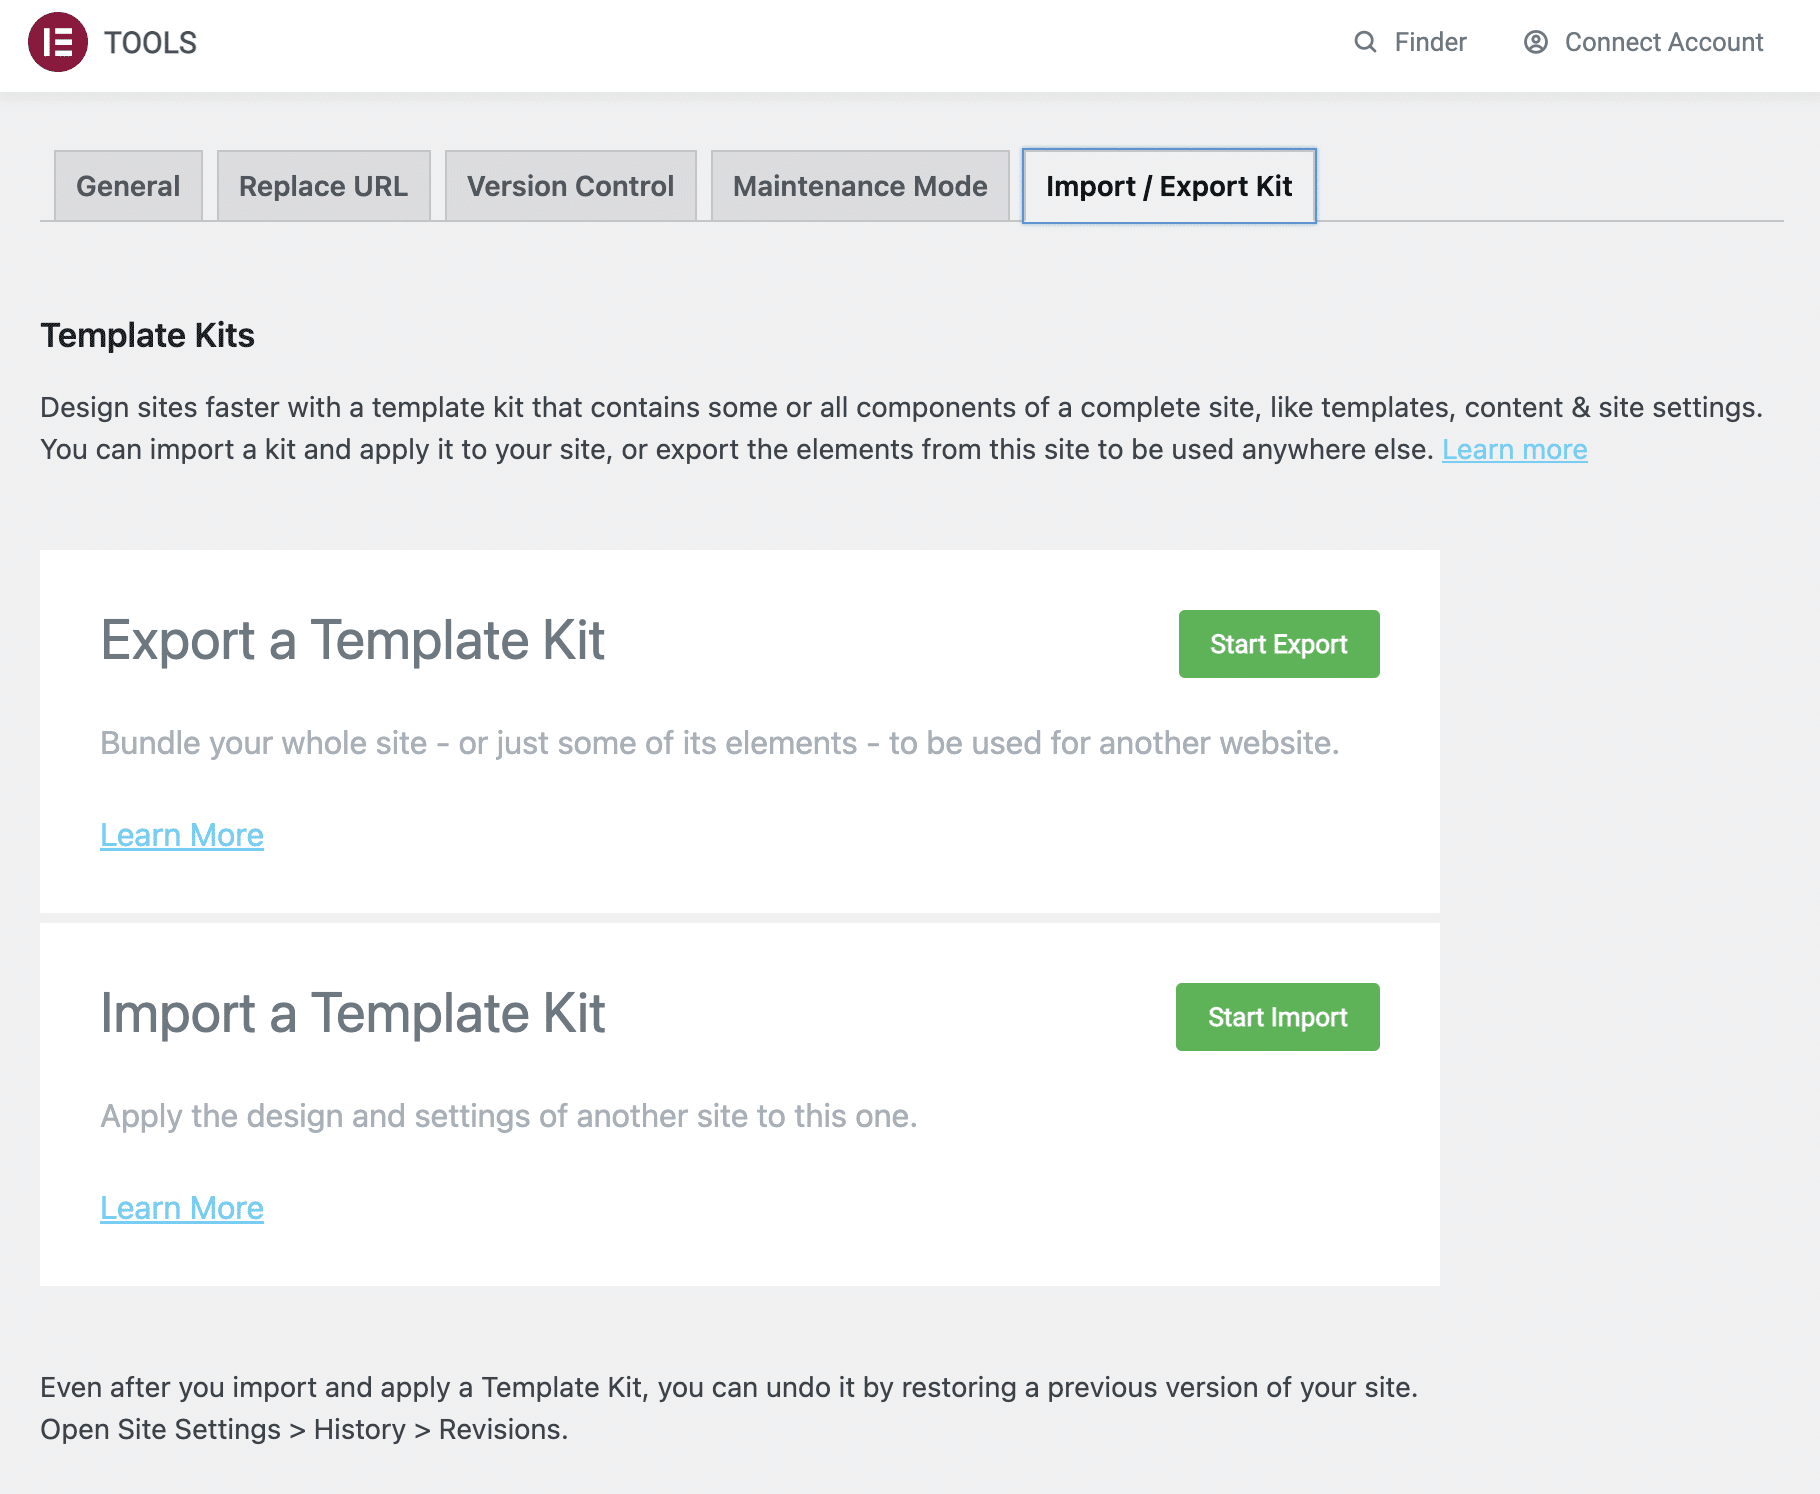
Import/Export a kit
Finally, what does the last tab of the “Tools” sub-menu offer us? The possibility to import or export a kit containing “some or all components of a complete site, like templates, content & site settings”.
This is very useful if you need to create similar sites.
System Info
The fourth sub-menu in the hierarchy is called “System Info”. Here you will find information about:
- Your server environment.
- Your WordPress environment.
- Your theme.
- Active plugins.
- Some Elementor features.
Nothing here will allow you to customize your site. These elements may be useful in case of problems. Elementor support may ask you for them, if you contact them.
Getting Started and Getting Help
I’ve grouped these two sections together for Elementor support. They do not allow you to make any settings:
- Getting Started displays a video presentation showing the steps to create a website easily. You are then encouraged to create your first page with the page builder.
- Get Help links to the Elementor documentation. You will find information about settings, widgets and other features of the builder.
Submissions
The submenu “Submissions” is only available in Elementor Pro. It is a dashboard that lists the contact information of people who have filled out a contact form created with the page builder.
Custom Fonts, Icons and Code
The same applies to the following 3 sub-menus: they are only accessible with the premium version of Elementor:
- Custom Fonts allows you to“add your self-hosted fonts and use them on your Elementor projects”.
- Custom Icons is useful if you want to upload your own icons, not necessarily from a Font Awesome library.
- Custom Code is a tool to add your own scripts, without using one or several plugins.
Finally, note that there is a last sub-menu called “Upgrade to Pro”. Its name is quite evocative, I think. 😉
You have set Elementor to your liking. The next logical step is to start creating content with it. See this just below.
How to create and customize a page with Elementor on WordPress?
How do you enable Elementor on a page?
I’ll start by refreshing your memory. In the “Settings” menu, you normally have Elementor enabled on your pages, by checking the dedicated box. Do you remember this?
This action means that you give permission to Elementor to be used on your pages. But in order for it to take over, you need to activate it. By default, the WordPress content editor (Gutenberg) has priority.
To do this, follow these steps:
- Go to the Pages > Add New menu.
- Give your page a name and save it as a draft (you will publish it when it is ready).
- Click on the “Edit with Elementor” button at the top of the page.

The page builder sends you to its interface, which you will discover in the following lines.
How does the Elementor page builder interface work?
Depending on the theme you are going to use, the display may differ. You will normally have a header at the top of the page, with your navigation menu and your logo.
Then you may have a sidebar on the right, which is not the case with the theme used in this test (Twenty Twenty-Two), as you can see on the screenshot below:
The header and the sidebar are elements proposed by your theme, not by Elementor. As my theme doesn’t offer a sidebar, you don’t see it. 😉 Logical.
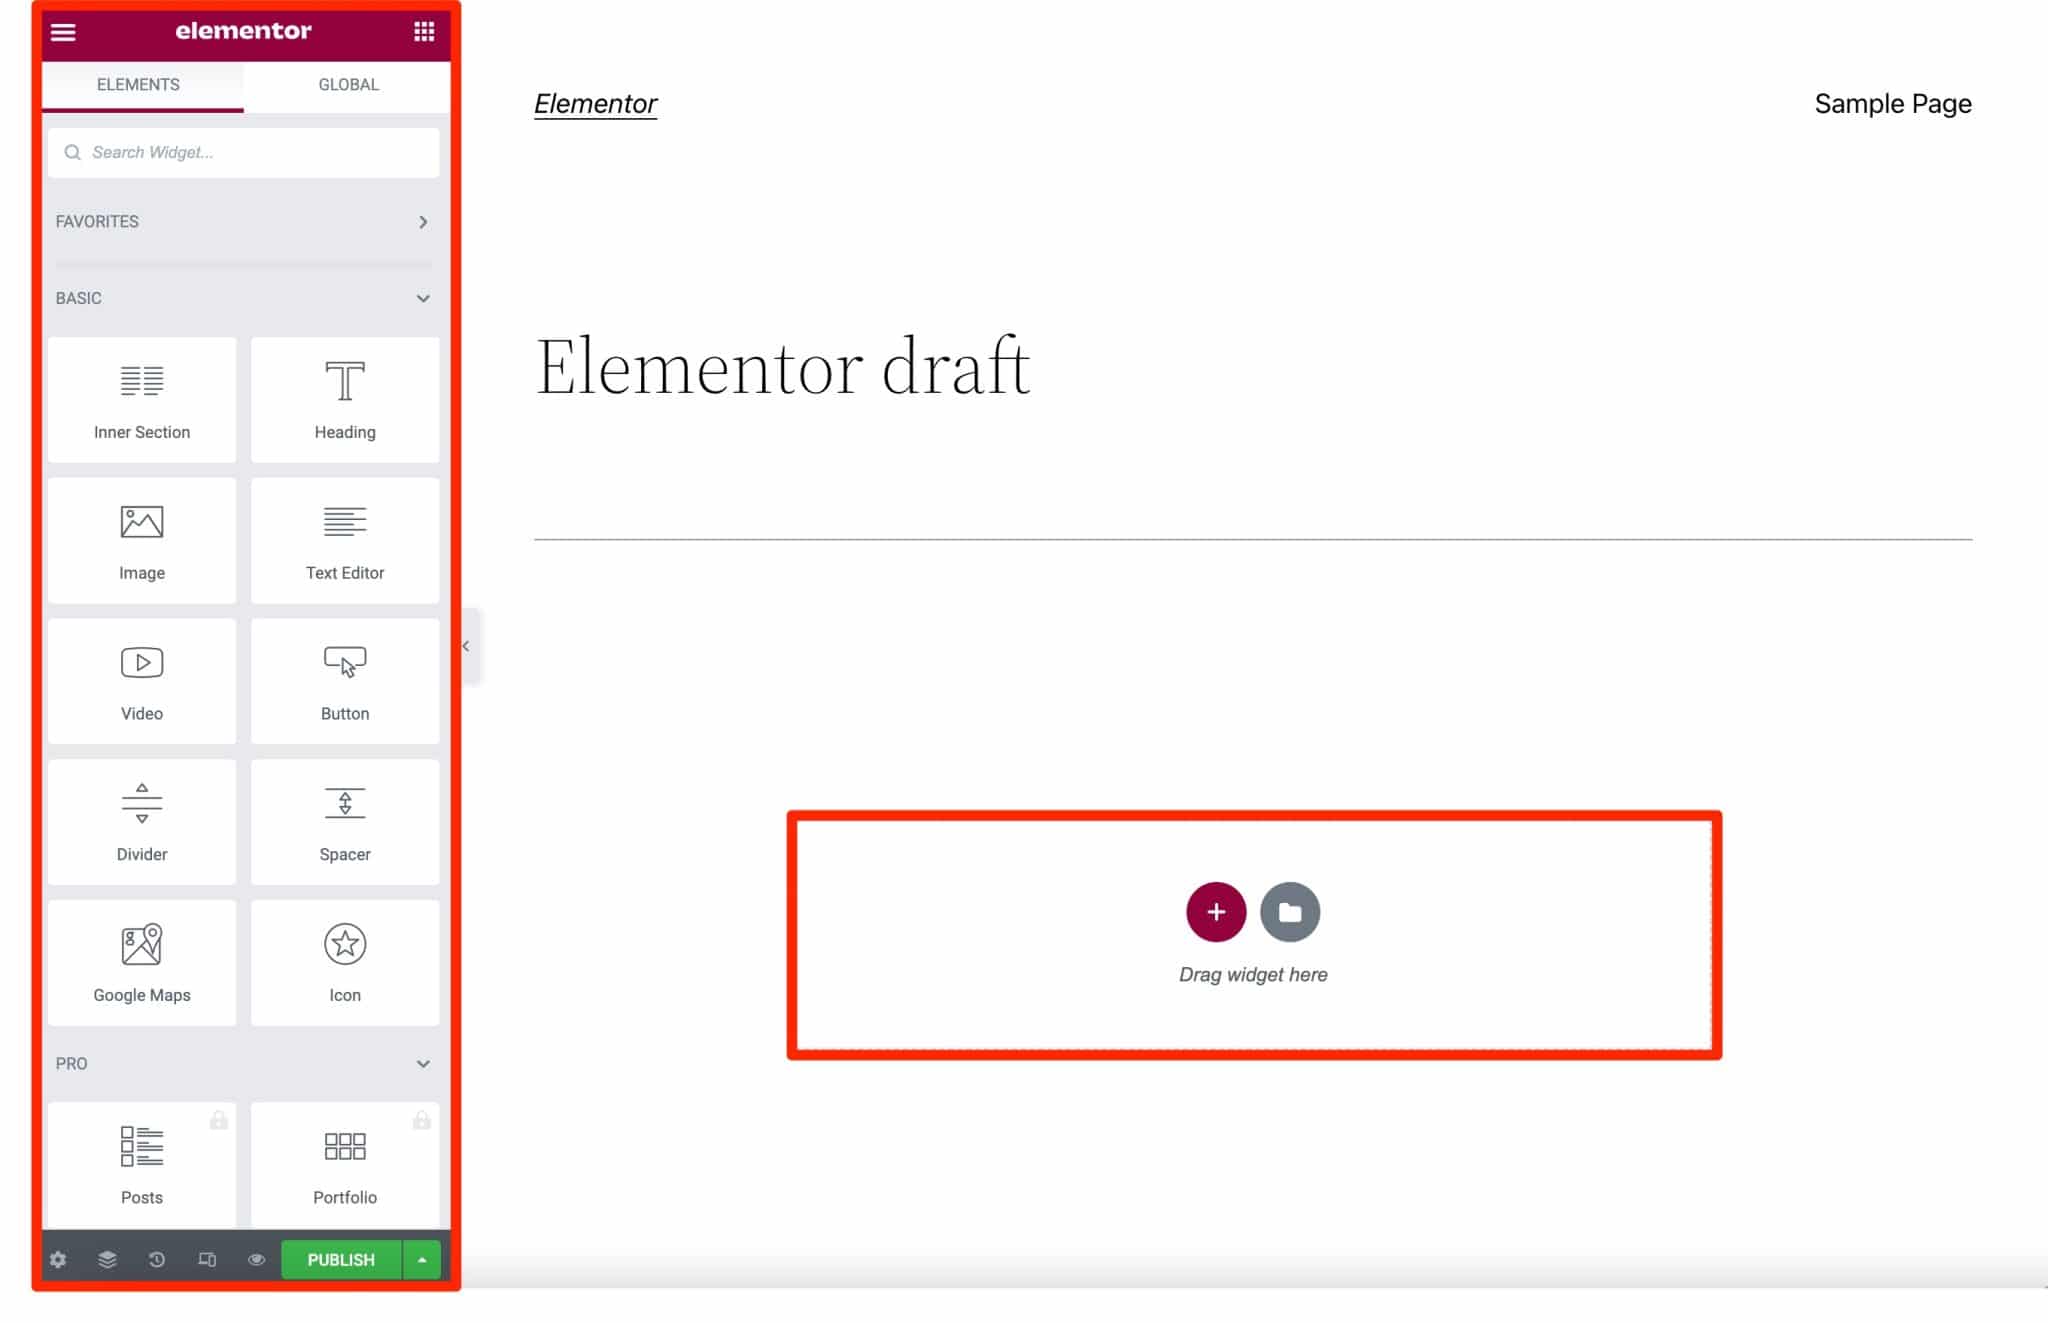
Elementor adds two main elements on your edit page.
The area to add a section or a template
Designing a page from scratch starts in the center of the screen. You have two options:
- Add a new section by clicking on the “+” icon.
- Insert a ready-made page template to go faster, by clicking on the folder icon.
With the release of Elementor 3.6, flexbox containers have arrived. For now, it’s only an “experiment” (you’ll find it in the Elementor > Settings > Experiments menu) to replace sections and columns. To design your pages in sections and columns, as explained in this guide, make sure this experiment is turned off.
To understand how Elementor works, let’s add a new section.
You should know that Elementor, like most page builders, works according to the following logic, with a hierarchical structure:
- You first define a section, which Elementor calls a “structure”.
- You select the number of columns in your structure. You can start with up to 6 columns, then go up to 10.
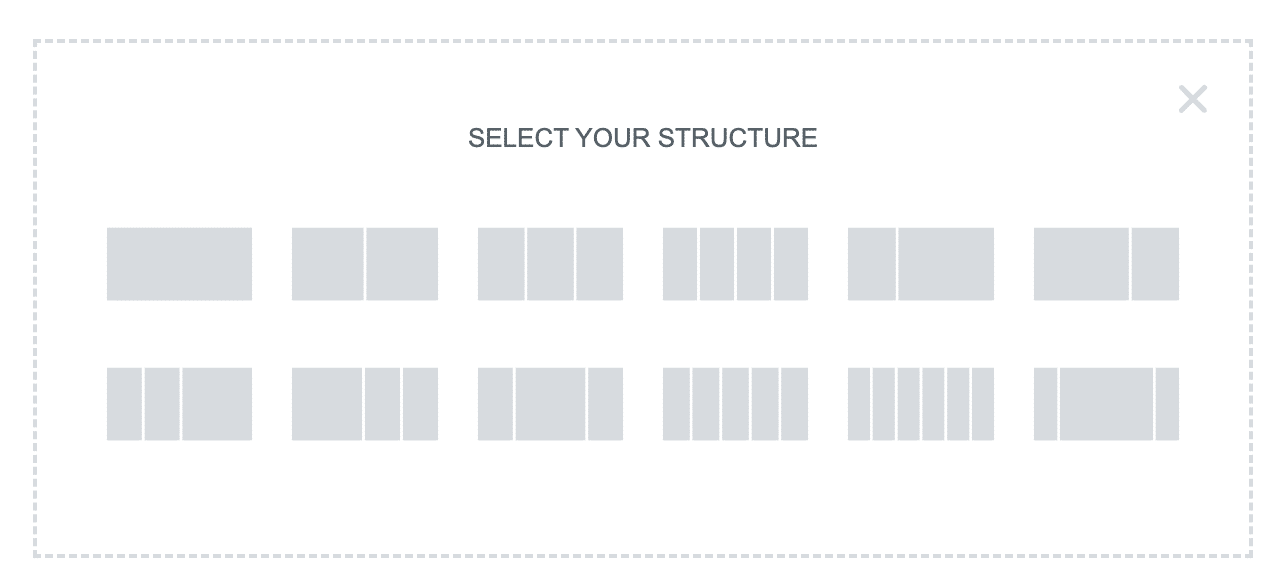
3. Then inside each column, you add content elements that act as a container.
Elementor calls these widgets. You find them in the side panel on the left side of the screen. You can embed them with a simple drag and drop.
Each widget can then be customized directly on the screen. For example, if you have chosen to add a title, you can modify its text by writing directly inside, without going through a pop-up window. A real child’s play.
The side panel
The nerve center of Elementor, so to speak, is the side panel on the left side of the screen.
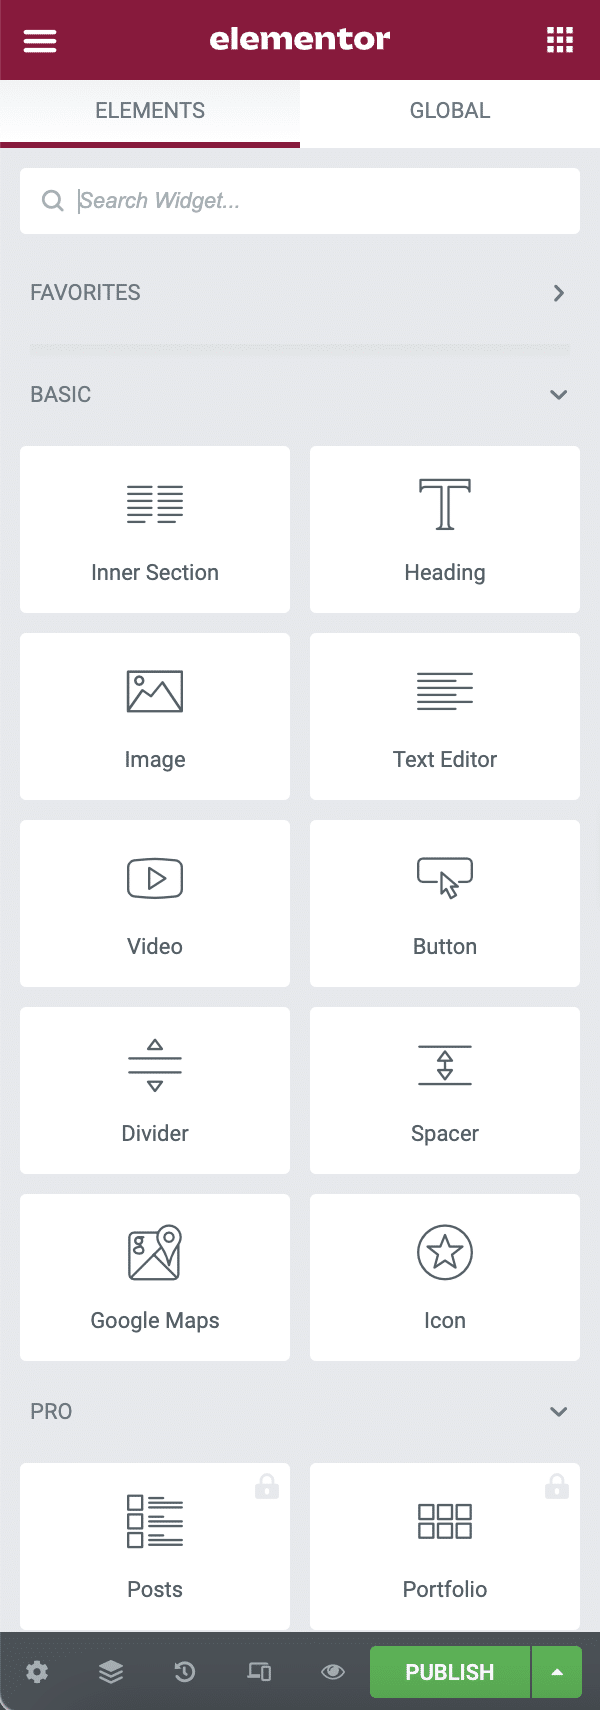
It is divided into 3 parts:
- In the upper part, the “Elements” tab gives access to the available widgets. You can search for them using the bar provided for this purpose. The “Global” tab is a feature of Elementor Pro that allows you to save a widget and then add it to several places on your site. Each change to the widget will be applied to the entire site.
The hamburger menu gives access to the site settings, the Theme Builder and allows you to return to the WordPress Dashboard.
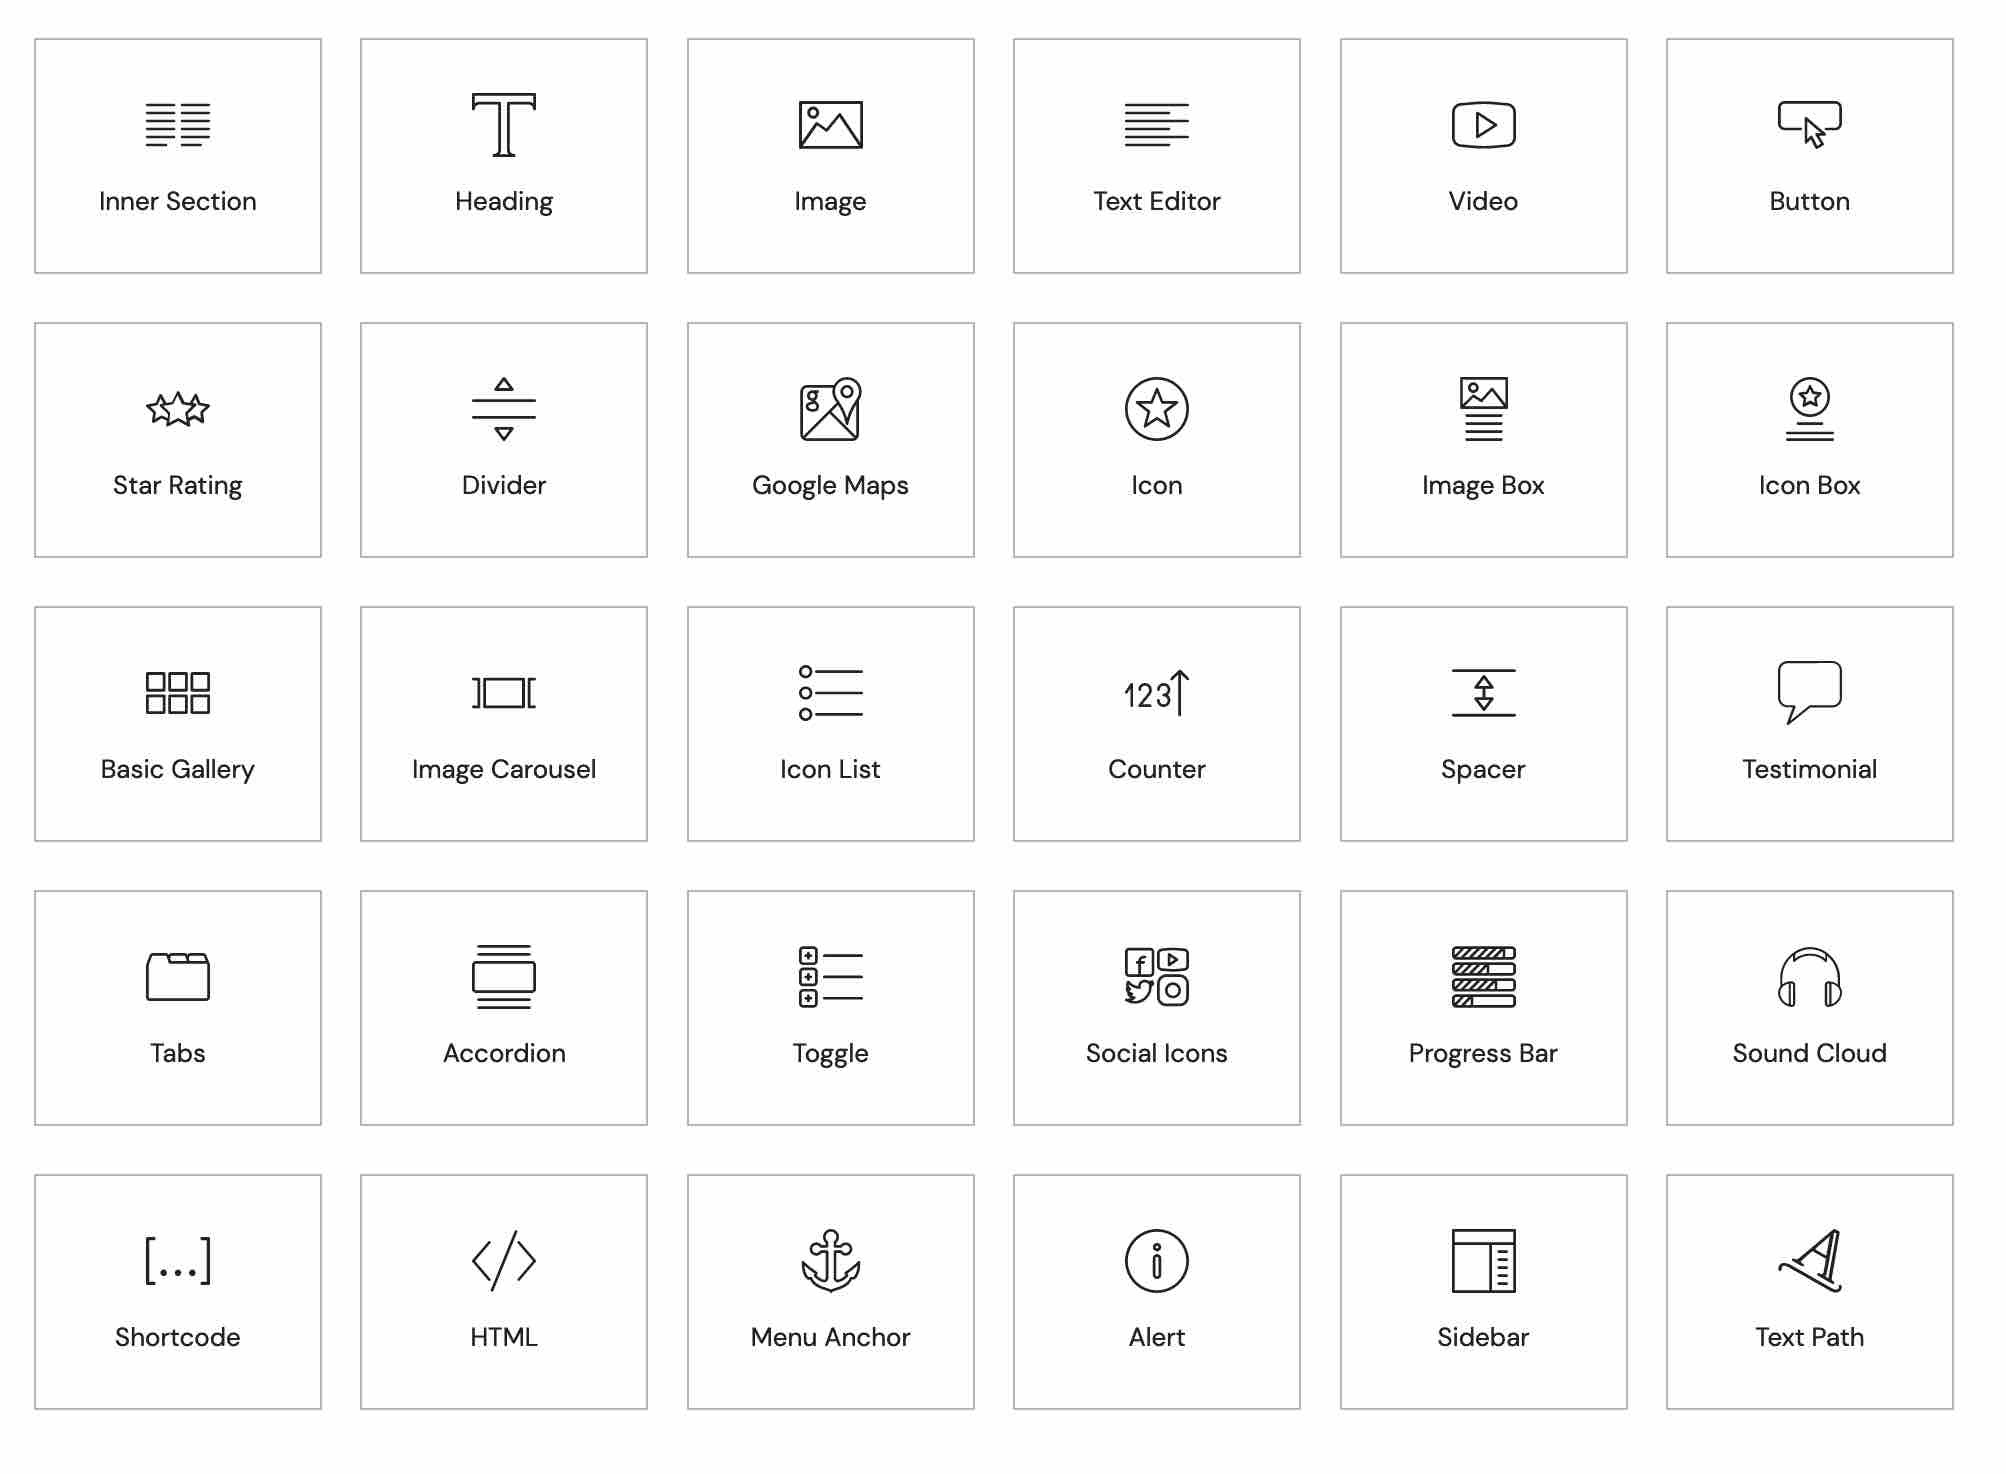
- The central part lists all the widgets. You will find for example widgets specific to WooCommerce. Those with a lock are only usable with Elementor Pro.
- The bottom part (grayed) offers different shortcuts. You can for example display a browser (a section presenting the skeleton of your page), the history of your actions, or a responsive mode, to control the display of your page on different screen sizes.
What about the usability of the Elementor page builder interface?
With an airy interface, Elementor really offers a pleasant workspace.
The plugin’s features, such as the side panel (the column containing the elements), can be easily hidden or minimized, which allows you to really see the rendering without being polluted by the working interface.
Elementor offers a WYSIWYG (What You See Is What You Get) interface that is absolutely flawless.
We particularly appreciate the possibility of making changes online, directly on the texts contained in the page. But also the fact that you can manually resize the columns, for example:

As you can see above, all the elements that you see in the page builder interface give the same rendering on your website, once the page is published.
This WYSIWYG features dynamic animations, which animate the module when a change is applied to it: handy to know that your modification has been applied.
And when I say that this WYSIWYG is perfect, it’s because Elementor goes very far: the plugin allows you to visualize in the creation interface the effects of the mouse over or the scrolling of the page, for example.
This is a big plus compared to other builders, which require you to constantly trigger a preview in the browser to see the final rendering of the page.
Now that you know how Elementor works in general, let’s see how to customize your sections, columns and widgets.
How to customize a section?
Once you have added your 1 to 10 column structure, it will be highlighted in blue:

You can act on its layout, its style and configure advanced settings.
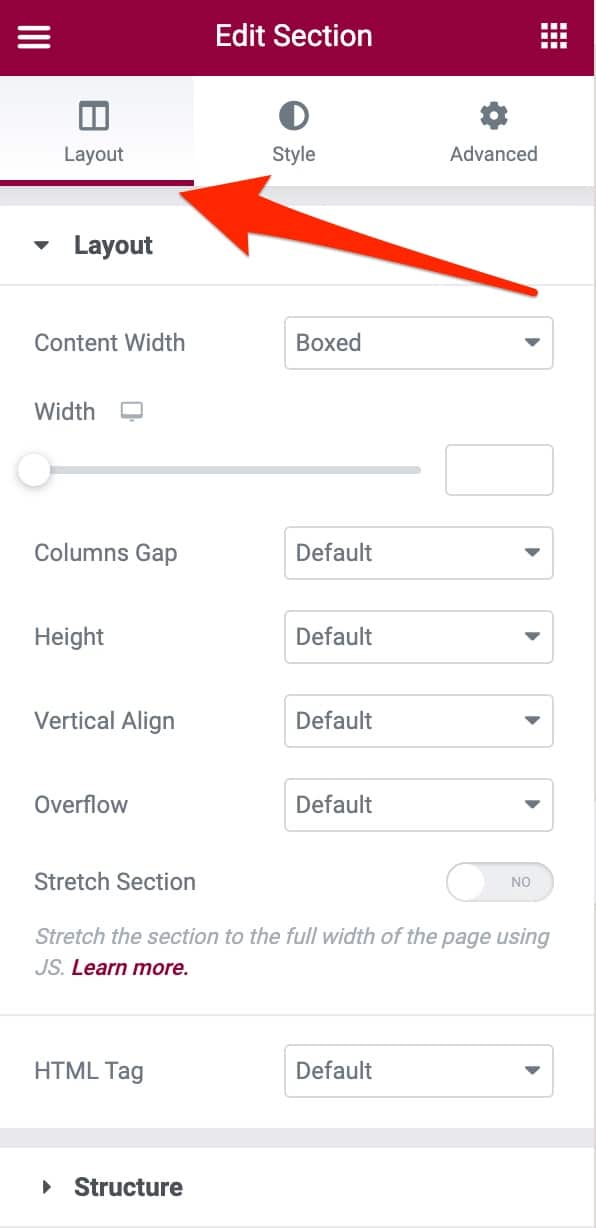
Layout
The “Layout” tab offers a first drop-down menu of the same name. This is where you define the general appearance of the page with options to:
- Adjust the width of the page, with the possibility of managing this to the nearest pixel.
- Define the distance between columns.
- Set the vertical alignment.
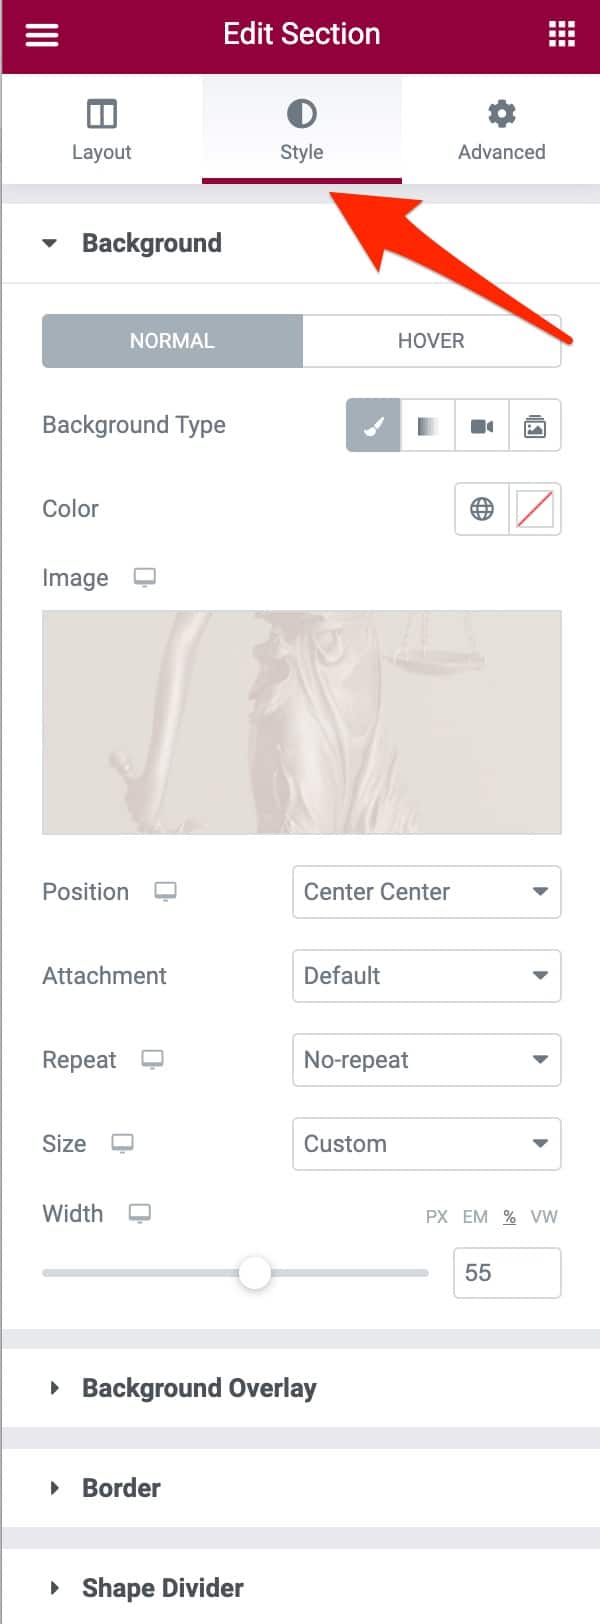
Style
The “Style” tab gives you control over:
- The background of the page. You can for example display a gradient, a video or a slideshow. It is even possible to activate this background only on mouse hover.
- The border. 5 types of borders are proposed and you can set their radius and a shadow.
- Shape divider, with about twenty different options. You can for example add mountains or zigzag to separate your sections.
- Typography. Here you can set the color of headings, text, links and text alignment.
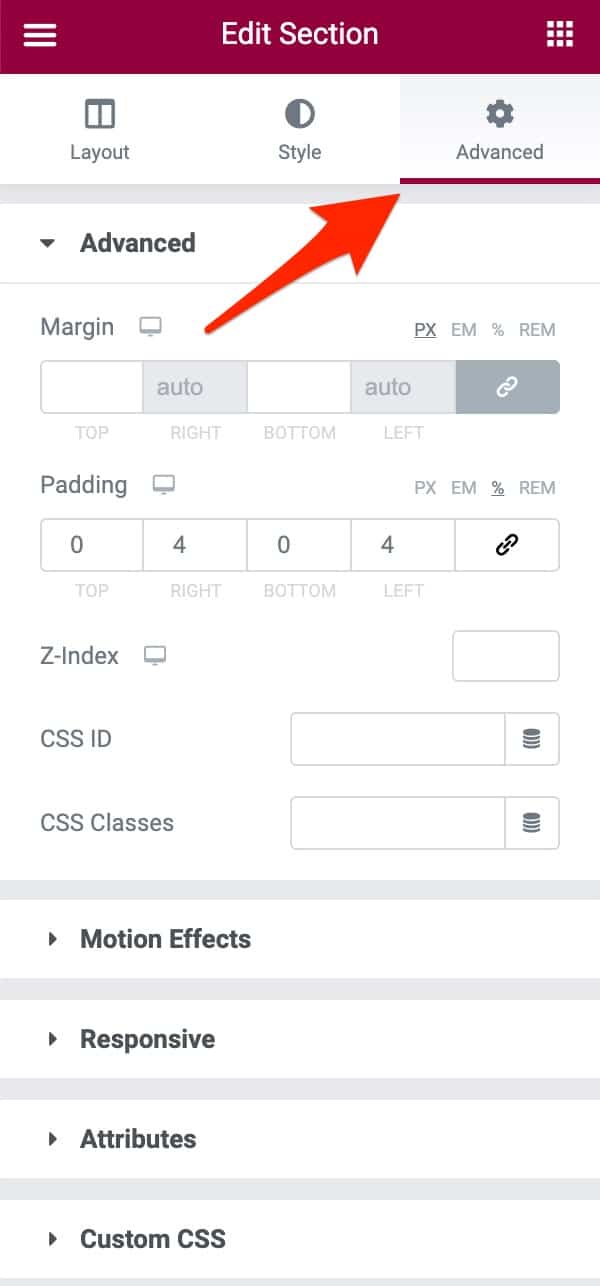
Advanced
Finally, the “Advanced” tab offers the addition of custom CSS code (in the Pro version), responsive settings (e.g. hide a section or widget on a particular type of screen), or the integration of motion effects(fading, zooming, bouncing, etc.) when a visitor lands on your page.
After the section settings, it’s time for the widgets.
How to customize a widget?
The principle is the same as for the sections, only the settings differ. As soon as you add a widget in one of your sections, the Elementor editing bar offers you 3 tabs to use as you wish:
- Content
- Style
- Advanced
Depending on the widget you add, you will have more or less extensive options. For example, the Content tab of the Text Editor widget allows you to act on the HTML tag, the alignment and the size of the text.
The one for the Video widget offers video-specific options (autoplay, loop, mute, etc.).
Global settings on the design of your pages: the Design System
Another major element I wanted to talk about in this section on customization is the Design System, which has been launched with the release of Elementor 3.0 in August 2020.
The Design System is a way to define your style guide, so you can easily use it later.
It can be accessed by clicking on the hamburger icon in the edit bar, then choosing “Site Settings”.
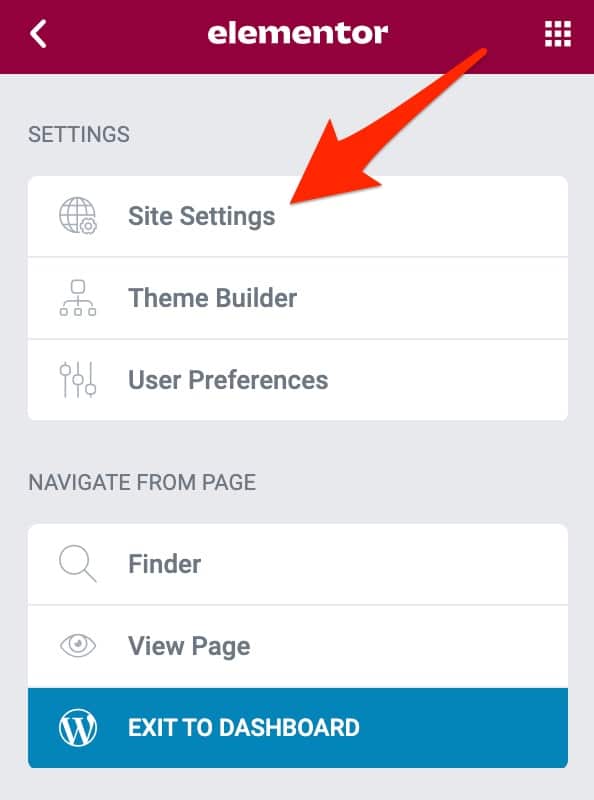
It is from this interface that you can act on the design and visual appearance of your site created with Elementor. It is divided into 3 parts.
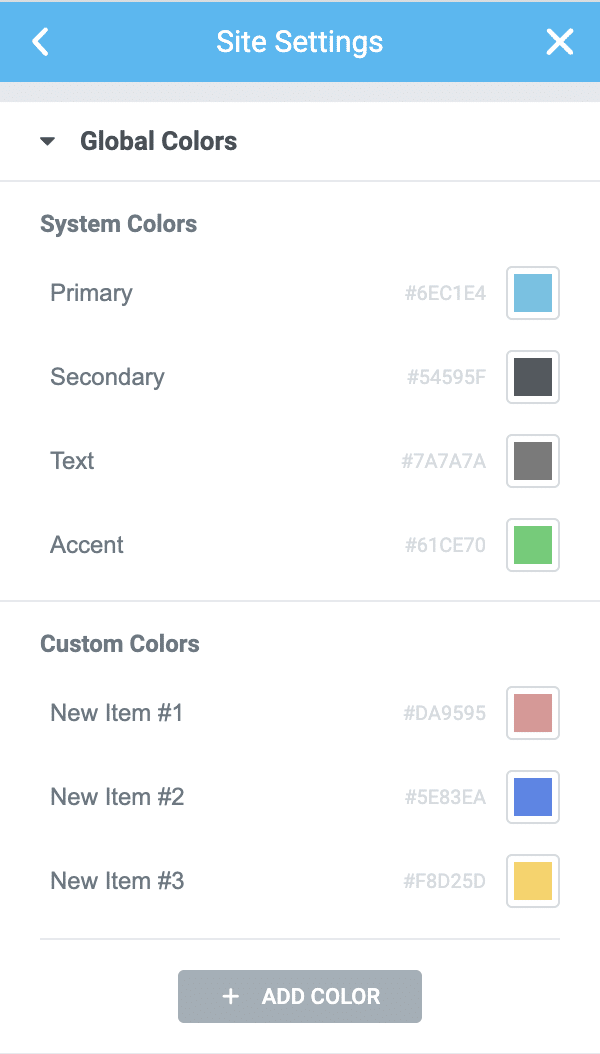
Design system
This first part helps you customize global colors and fonts throughout your site.
How does it work? You define a primary color, then secondary colors (the same principle applies to typography).
They will then be applied to your entire site automatically. This saves a lot of time, since you don’t have to go through the hassle of doing it element by element, for example (except for fine tuning).
Theme style
The second part of the interface concerns the “theme style”, which is only really useful when you use the Theme Builder (more on this later). Here, Elementor lets you control:
- Typography (color, size, style, line height, spacing, font family, etc.).
- Buttons (color, typography, shadow, border, margin).
- Images (border, opacity, shadows, CSS filters).
- Form Fields (color, typography, shadow, border, margin).
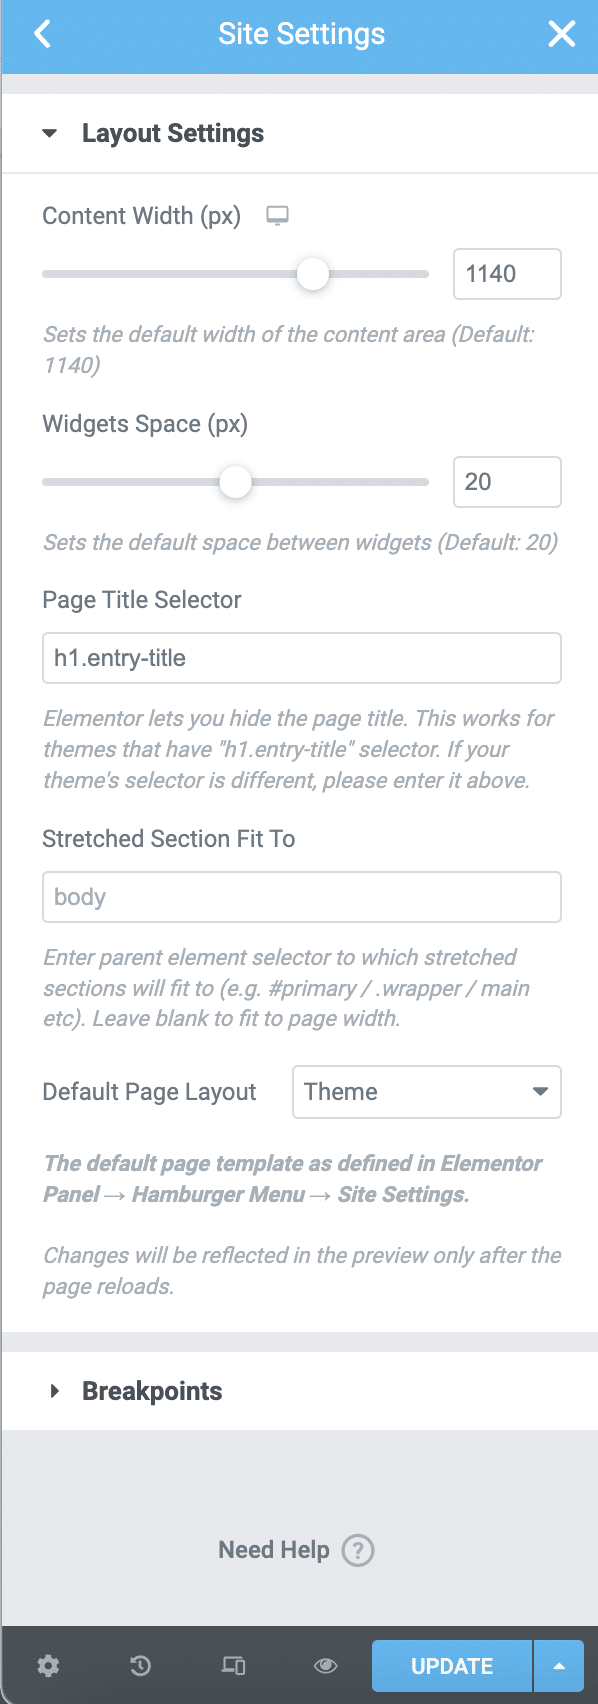
Settings
Thirdly, you can make more traditional adjustments such as adding a logo and favicon (as on the WordPress Customization Tool), or the appearance of the layout (e.g. content width).
All of these elements help provide a smooth and easy experience for the site designer, but that’s not enough. A page builder must also have good tools.
And from this point of view, Elementor is not to be outdone. The proof is in the following section.

What widgets and templates does Elementor offer?
A variety of Elementor widgets for different needs
In the free version of Elementor, you will find a wide range of widgets, namely:
- Basic widgets: Heading, Text Editor, Image, Button, etc.
- General widgets related to content (Gallery, Carousel, Tabs, Accordion, etc.), persuasion (Testimonial, Rating, Progress Bar, etc.) and technique (Shortcode, Custom HTML, etc.).
- WordPress widgets: those you already know in the Customization Tool.
In the Pro version of the plugin, additional widgets appear, some of which have even become essential for many site creators.

For example, you’ll be able to insert price tables to display the prices of your offers, calls to action, countdowns, or even forms.
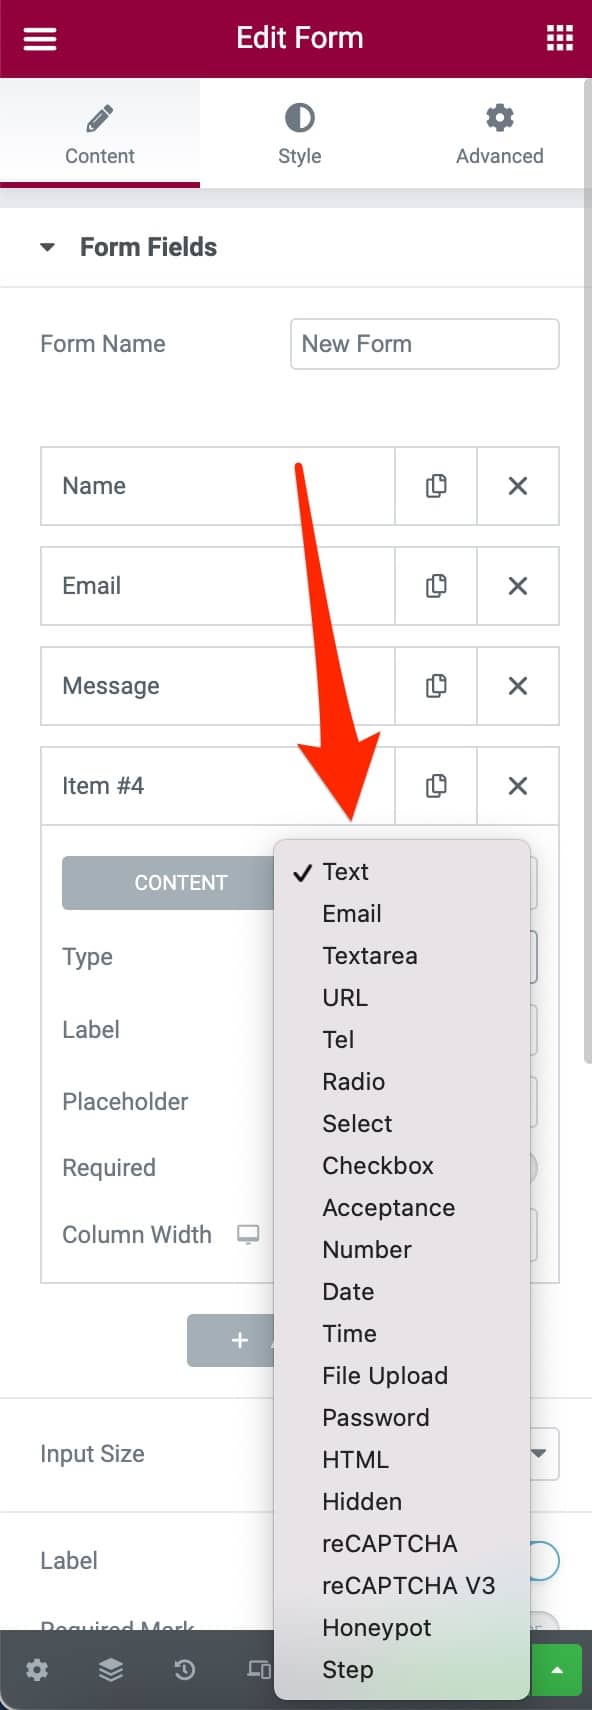
Speaking of forms, the “Form” widget has some pretty advanced features. It offers you a choice of about 20 different field types, including some advanced ones (password, file upload, etc.).
It doesn’t have all the power of a plugin like Gravity Forms, but you can still fine-tune your forms with it.
Of course, you have control over the design and visual appearance: choice of colors, spacing, typography, background, etc.
The icing on the cake: Elementor even allows you to create forms step by step.
A wide variety of page templates for inspiration
Another very useful feature of a page builder is the page templates, which allow you to start with a specific structure and design that you can customize later.
The paid version adds even more, in a rich library with various layouts.
To take advantage of this, click on the “Folder” icon, located next to the one for adding a new section.
Elementor then takes you to its Library, which lists page templates. You can for example filter them by new features, trends or popularity. However, in order to take advantage of this feature, you will need to create a free account with Elementor.
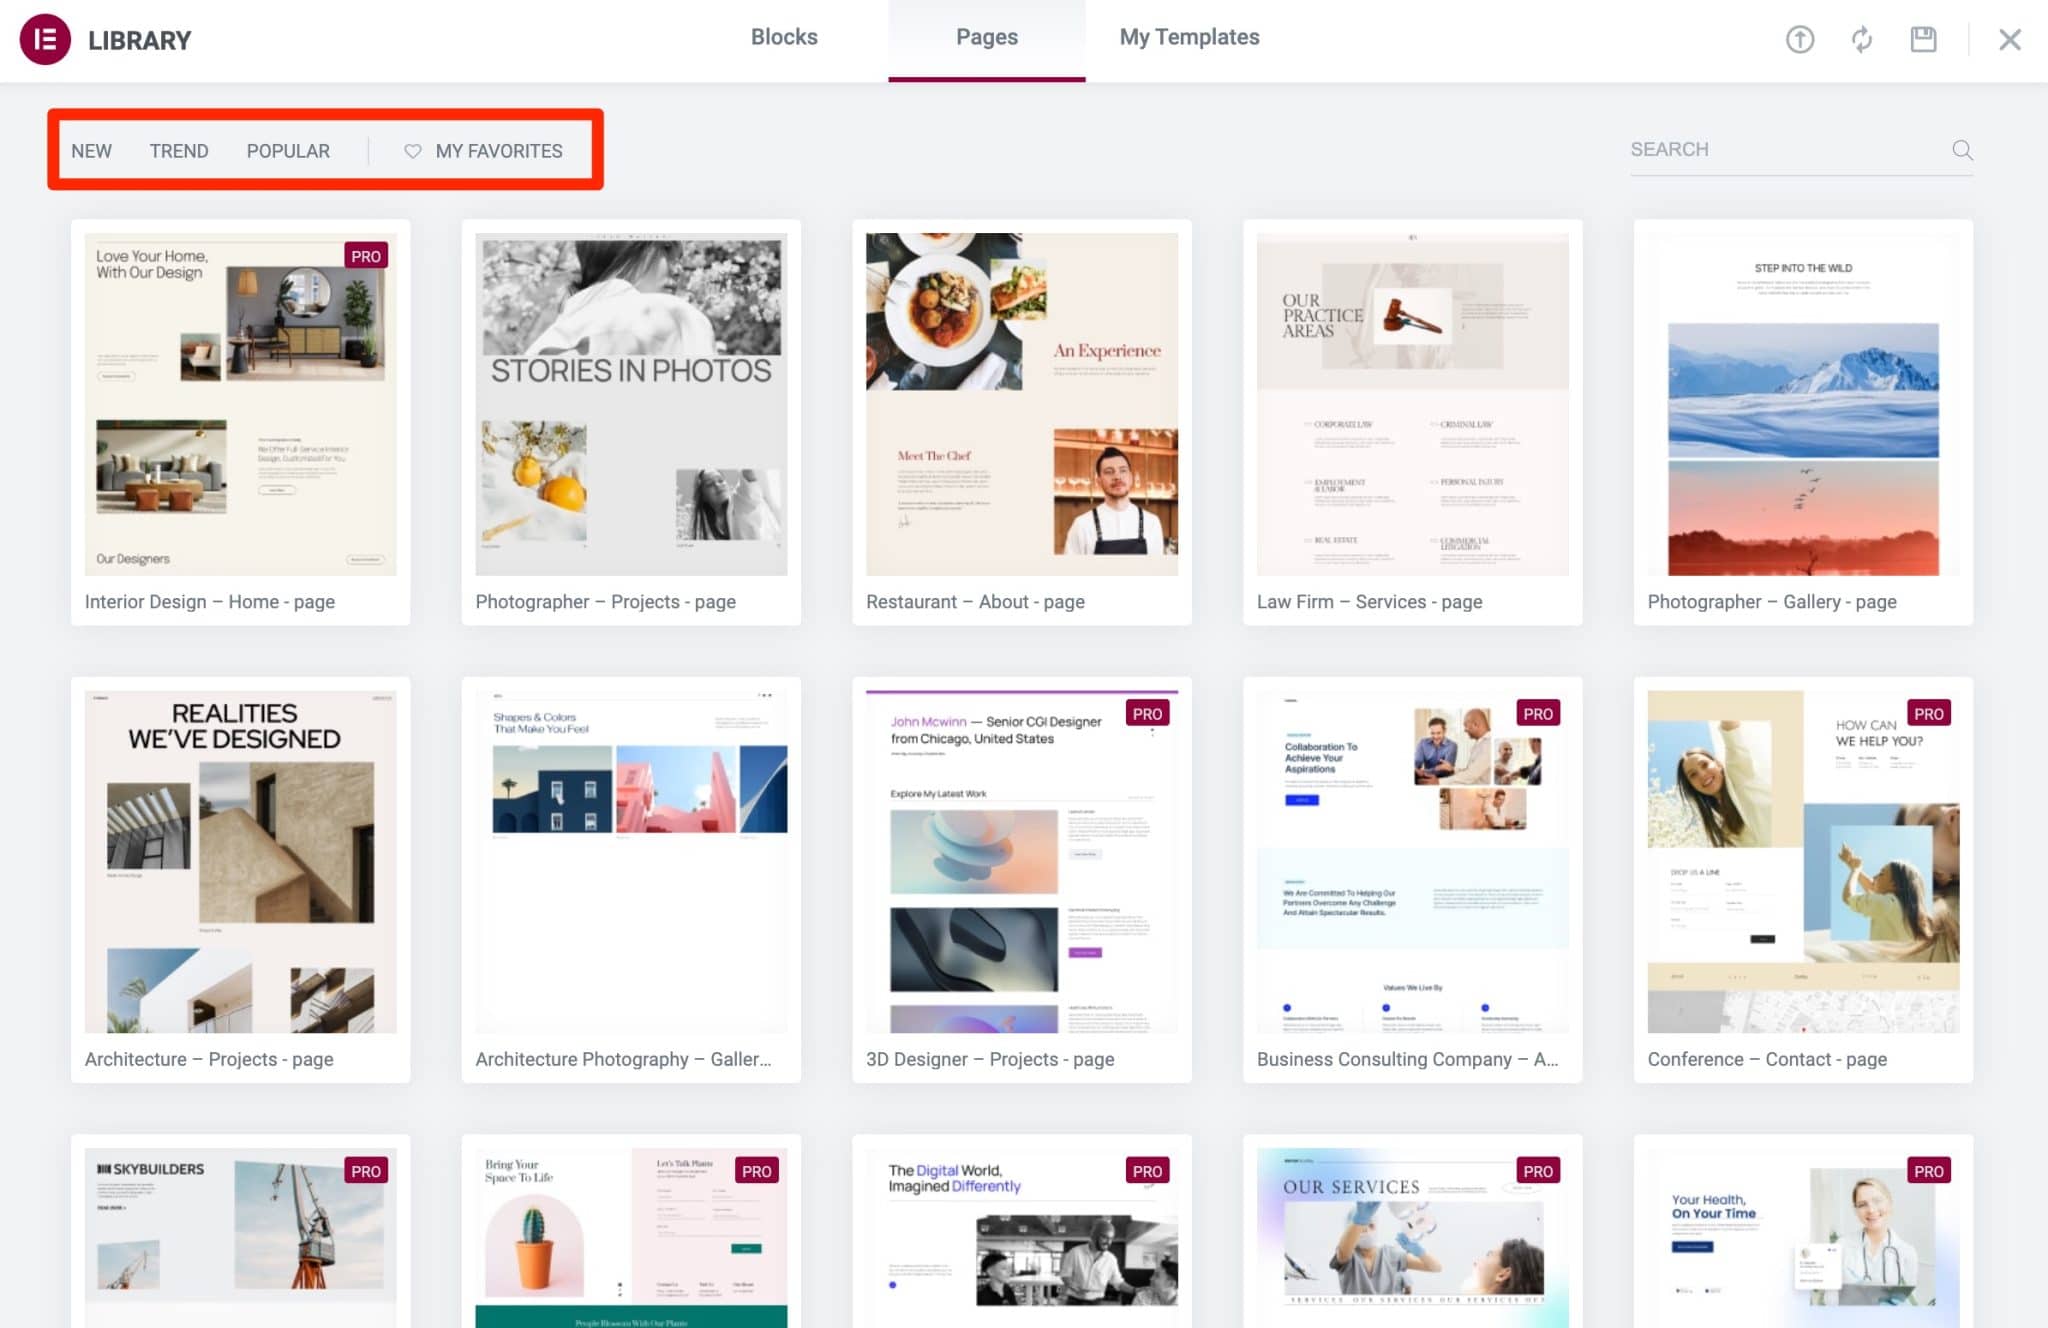
At the time of writing, there are more than 300 templates, including about 40 free ones.
Note that this rich library of templates is regularly updated with the plugin, as the charming Elementor avatar tells us when we scroll to the end of the list.

How to save your Elementor templates on WordPress?
Speaking of page templates, we particularly appreciate the feature that allows you to save a page or a section as a “template”.
This is useful when you’ve worked hard to customize the design of an element, and you want to reuse it on another page.
Right click on the block or page you want to use, and you have your own library of custom templates!
Hundreds of blocks to structure your page
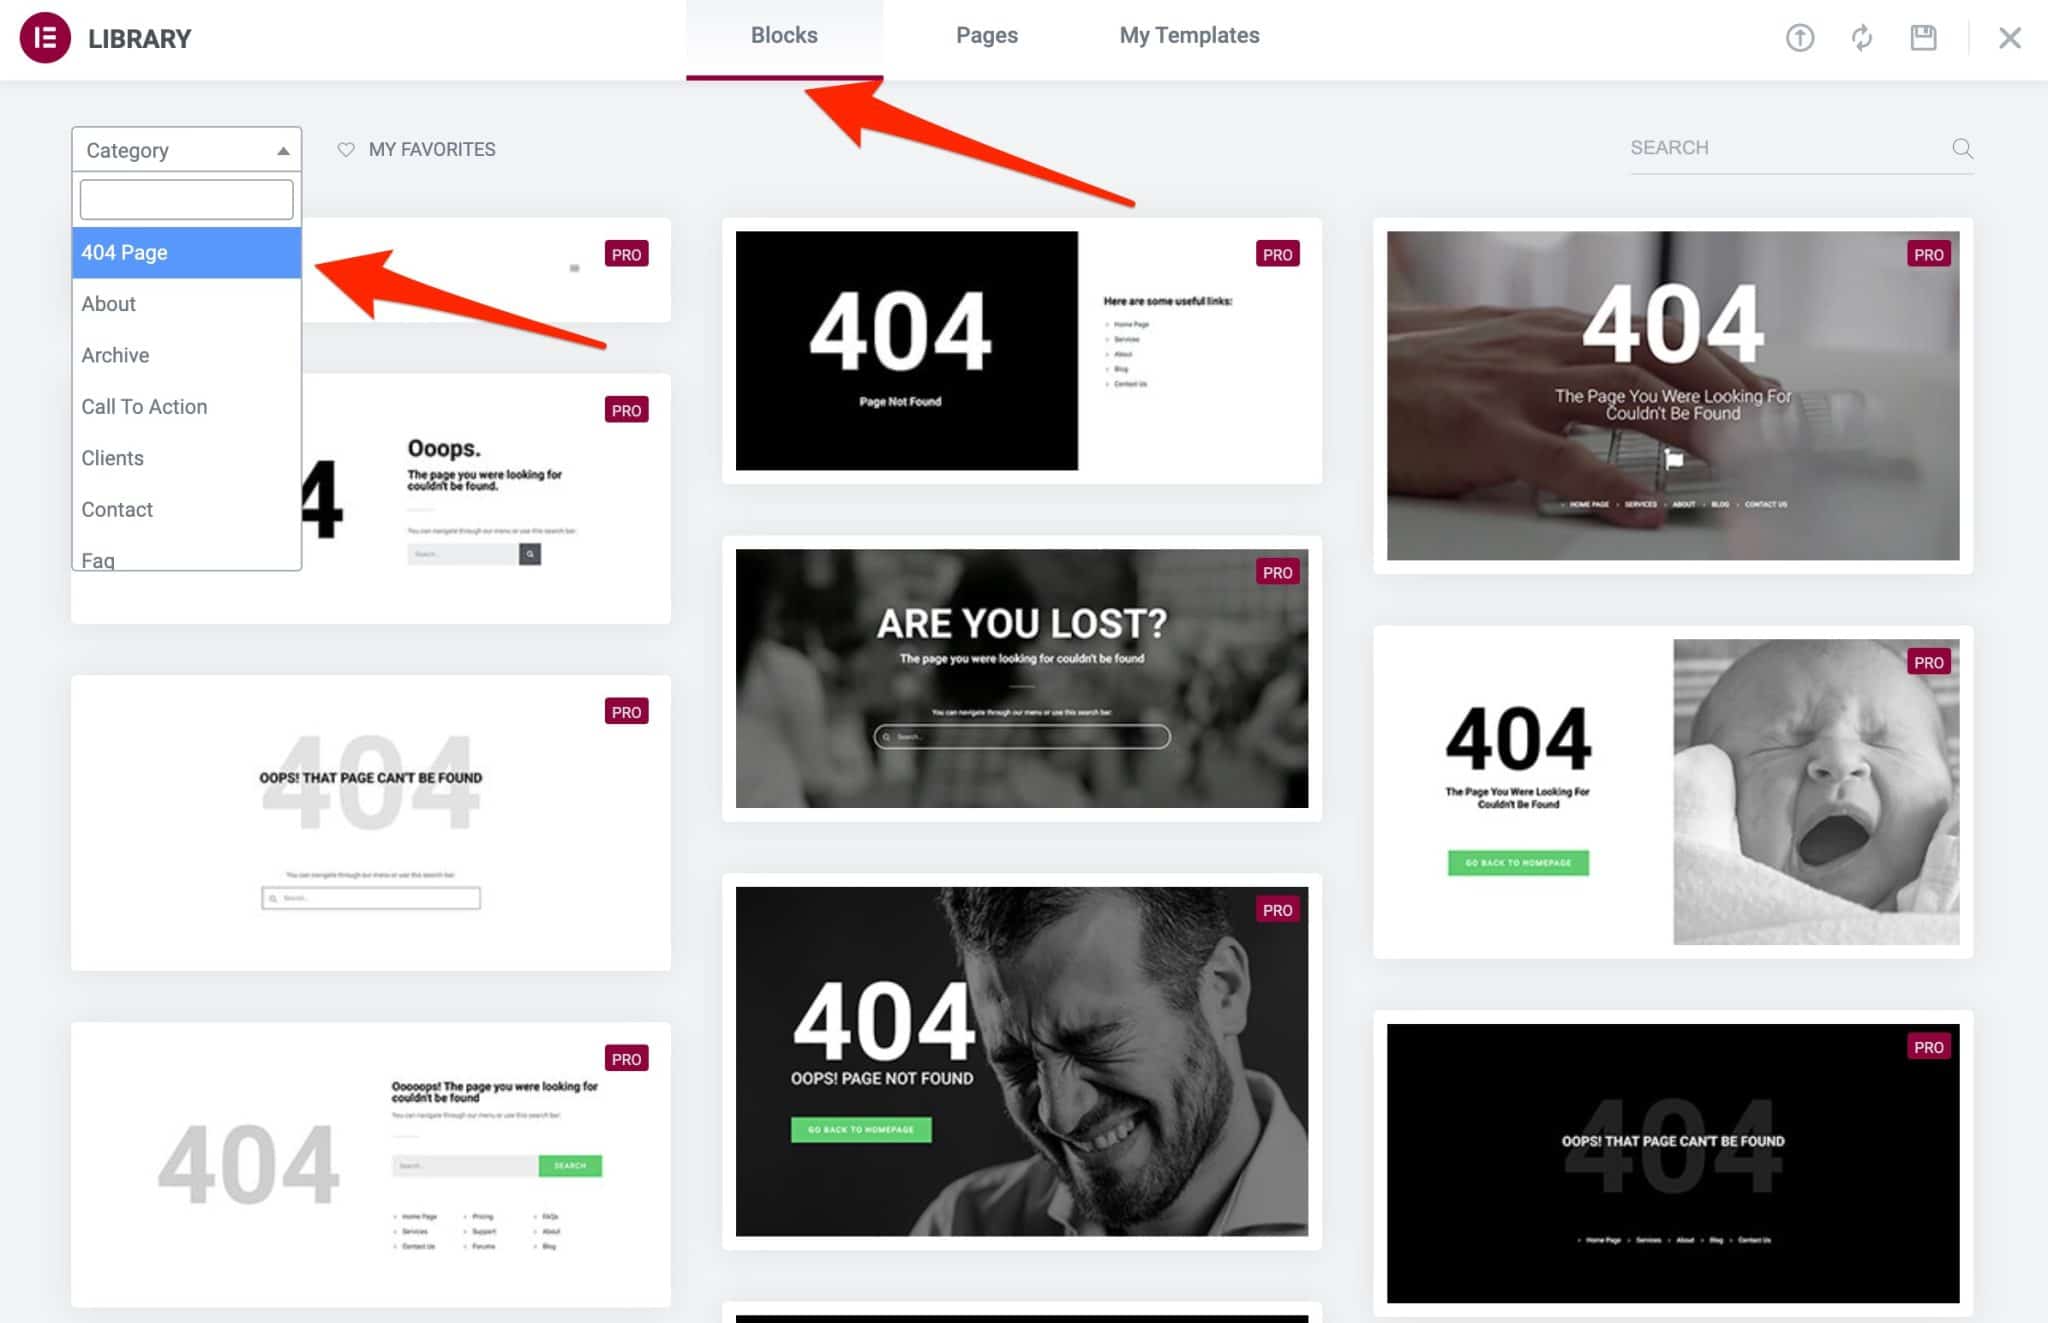
Moreover, you will also find a library of blocks, accessible in the same way as the page templates.
This library allows you to integrate a pre-built structural element to a page (like WordPress patterns).
This large variety of blocks (about 300) makes it easier to structure the page, and allows you to really focus on customizing the appearance.
To make your life easier, Elementor has organized them into 22 categories: About, Frequently Asked Questions, Call to Action, Header, Testimonials, etc.:
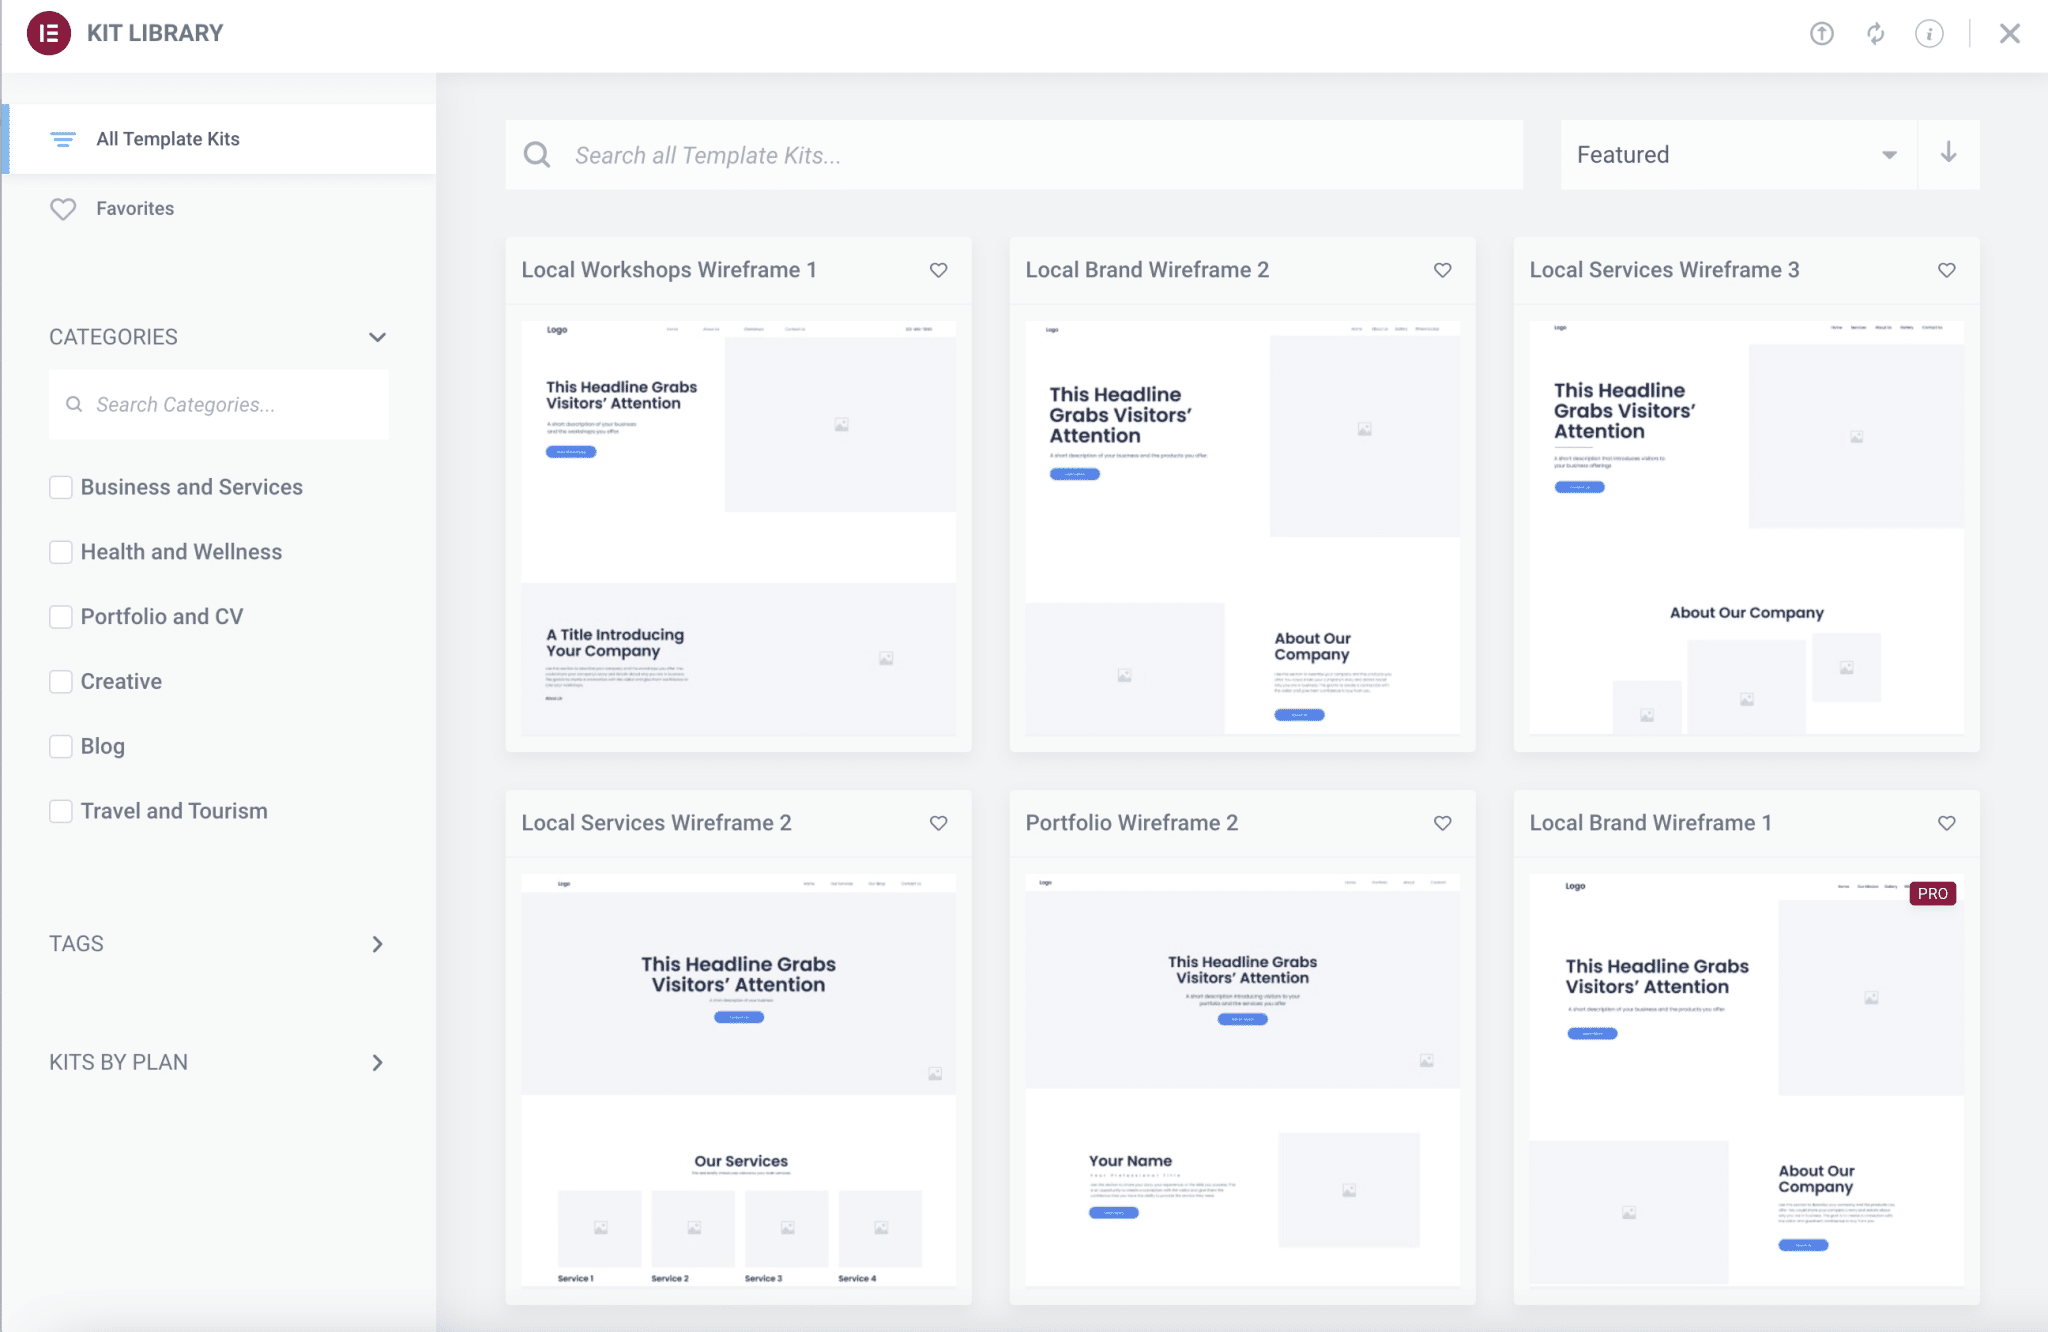
The Kit Library for a functional WordPress site, from A to Z
Finally, Elementor offers a Kit Library, accessible from your WordPress interface (back office) via the Templates > Kit Library menu.
A site kit allows you to create a WordPress site in a few clicks. It includes a set of page templates (homepage, About, Contact, 404, etc.), widgets and other popups necessary to create a complete website.
There are almost a hundred of them, adapted to different niches (Business, Portfolio, Blogging, Tourism, Travel, etc.), useful for designing different types of websites.
On the other hand, it should be noted that there are only 5 kits for the free version of the plugin, at the time of writing.
Note that you can also import kits purchased on the ThemeForest platform in a few clicks.
In the same vein, Elementor also offers a dozen Wireframe Kits since February 2022. These are sort of customizable page templates to fill with the elements of your choice (e.g. widgets).
Widgets, page templates and other Elementor kits will no longer hold any secrets for you. Without any transition, let’s take a look at two very important aspects of a WordPress site: performance and responsive.
Performance and responsive on Elementor
The Elementor page builder and page load speed
Will Elementor slow down my WordPress site? If you use the page builder or are interested in it, you may have come across these kinds of questions on forums and other discussion areas dedicated to Elementor.
It is normal to be concerned about this aspect, knowing the major impact it has on the user experience (UX). The slower your site loads, the more likely you are to increase the bounce rate and drive your visitors away.
The UX of a site is also taken into account in Google’s ranking criteria, through its Core Web Vitals, even if they have very little influence on your ranking.
More info on Core Web Vitals on the WP Rocket blog.
A page builder that does not slow down your pages significantly
That’s it for the overall picture. In fact, it is undeniable: with the many features it offers, Elementor logically embeds more code than a simple theme more “classic”.
However, you don’t have to worry about the performance of a site created with Elementor. That’s what a technical performance test I did with the builder shows.
I first tested the technical performance of Elementor, by putting the page I had created with Elementor to the test bench.
Then I deactivated the plugin and tested again the same page with the same elements, but without formatting.
The result was clear:
- The page with Elementor enabled lost only 0.1s of loading time compared to the one with the plugin enabled.
- The number of requests triggered remained the same, namely 5.
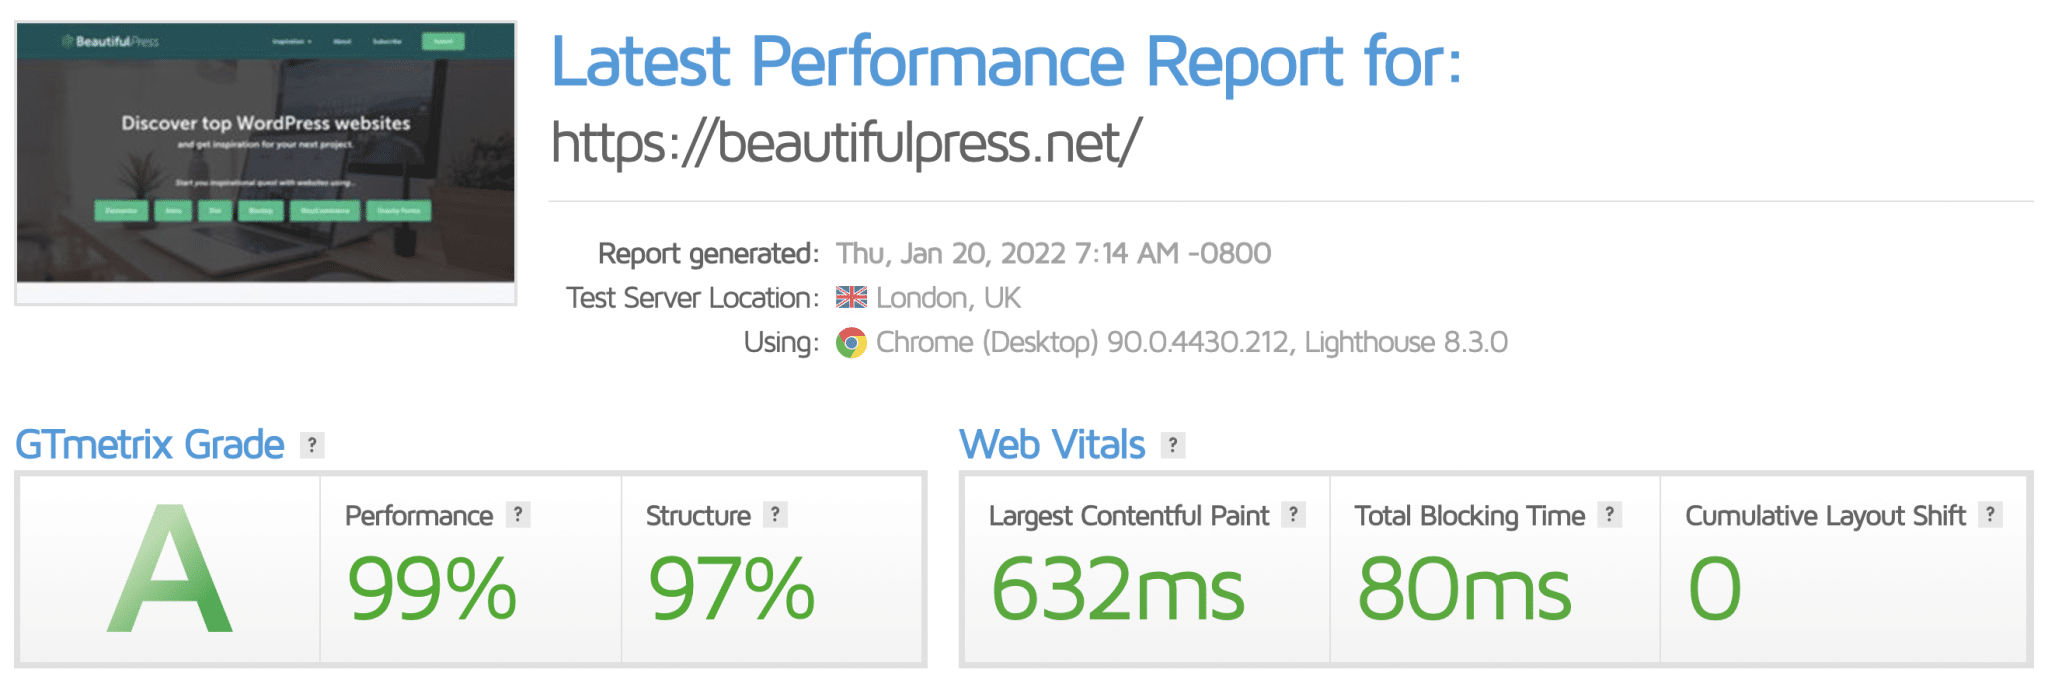
On the other hand, BeautifulPress, the little brother of WPMarmite, is built entirely with Elementor. And as you can see below, it loads quickly and has a good score on GTMetrix :
It must be said that the designers of Elementor take loading speed very seriously. Improvements are made in this area with each update.
For example, the page builder loads only the resources it needs on each page, has reduced the use of external CSS and JavaScript libraries, as well as unnecessary DOM elements (the DOM represents the tree of HTML tags on a web page).
Of course, if you create a page a mile long with huge images and effects all over the place, its performance might take a hit. But that will be your fault, not Elementor’s. 😉
How to improve the speed of a WordPress site designed with Elementor?
Is your Elementor site slow? Apply the following best practices to fix this:
- Use a caching plugin like WP Rocket.
- Optimize the weight of your images with a plugin like Imagify.
- Choose a quality host with fast performance, like Bluehost.
- Run your site on a recent version of PHP.
- Remove the plugins you don’t need.
The management of the responsive
After the performance, let’s focus on the responsive. A website is said to be responsive when it is optimized to display well on any screen (computer, smartphone, tablet).
Theoretically, Elementor allows you to create pages automatically adapted to all types of media. The plugin even allows you to go further, with the possibility to switch to WYSIWYG tablet or mobile viewing, to ensure the rendering on these formats.
A very practical feature to avoid making mistakes and to think of your site in terms of “mobile first”, as Google recommends.
Result: a page that offers a great experience to visitors on all media, and search engines happy to read a truly responsive site.

You can also use the keyboard shortcuts Cmd + Shift + M on Mac and Ctrl + Shift + M on PC to switch from one medium to another.
And because sometimes you don’t want to give your visitors the same look and feel depending on whether they’re on a desktop or a laptop, Elementor offers you several cards in hand:
- You can hide certain modules depending on the medium, from the “Advanced” tab.

- You can adjust the responsive settings of the element of your choice (section, widget) by clicking on its preview window icon.
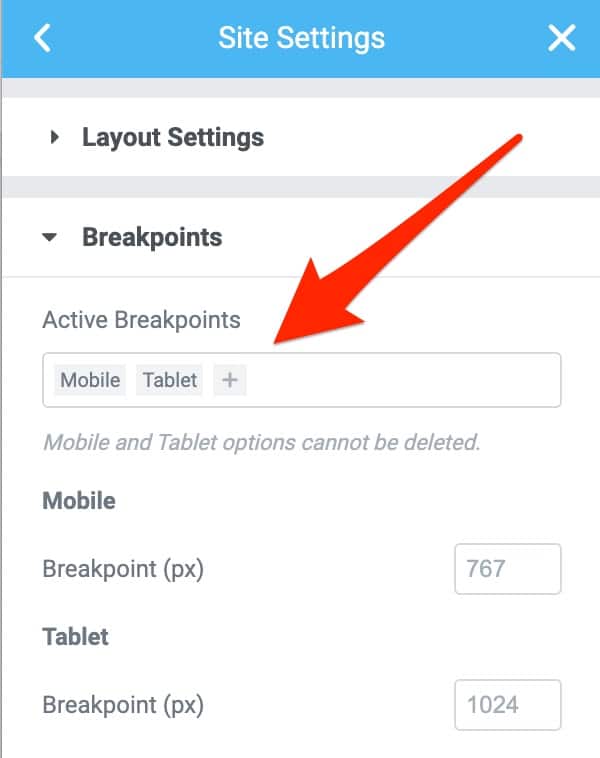
- You can define custom CSS breakpoints for 7 different screen types, with their own style each time, if you want. To do this, go to Site Settings > Layout > Breakpoints:
- You can reverse the display order of your columns by going to Settings > Advanced > Responsive > Reverse Columns.
If I didn’t encounter any problems during my test of Elementor from this point of view, be sure to test the responsive on your site. To do so, use this free tool: Google’s mobile optimization test.
Which theme to choose with Elementor?
Hello, yes but..
You start to realize it since the beginning of this test. Elementor is a plugin that offers almost unlimited possibilities. But to work, this plugin needs a theme. 😉
By the way, which theme to use with Elementor? All themes are supposed to be compatible with this page builder. However, there is a flagship theme created by the designers of Elementor themselves: the Hello theme.
Ultra-popular, it has 1M+ active installations on the official directory.
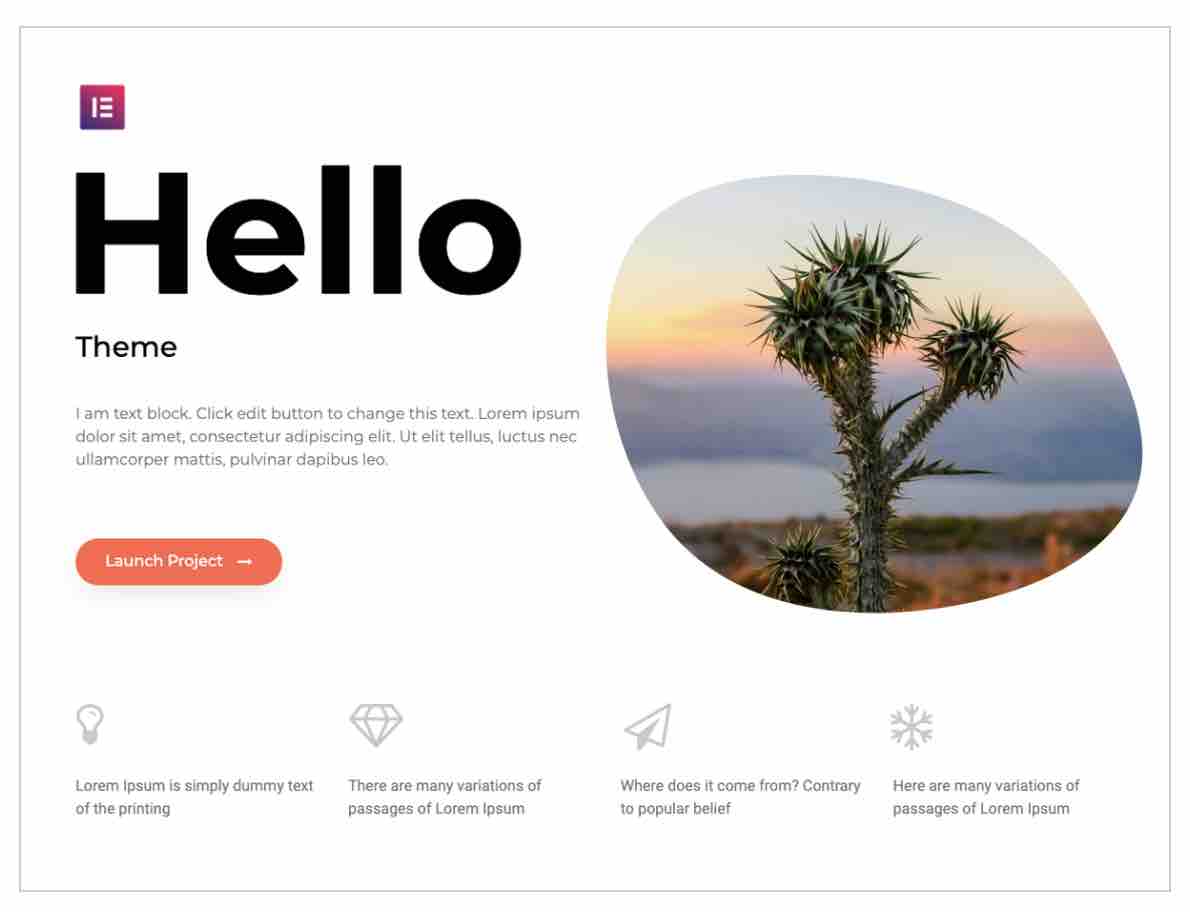
Hello has some notable advantages. It is free, light, minimalist and above all designed to work best with Elementor.
Nevertheless, it is first of all a starter theme, that is to say a theme with an ultra minimalist design and features.
Therefore, it is primarily intended for users with experience with Elementor and CSS, as well as for people who want to use Elementor Pro exclusively.
Other themes suitable for pairing with the Elementor page builder
Hello won’t really help you with a specific design. If this is your case, you should rather use an optimized theme, associated with Elementor site, page or block templates, to be customized afterwards.
I’m thinking for example of the following themes, more adapted for novices:
Need help finding the perfect WordPress theme for your project? Check out our selection (and tests) of the best free WordPress themes, as well as answers related to their use (installation, support, customization, etc.).
Which version of Elementor to choose: the free extension or Elementor Pro?
What can I do with the free version of Elementor?
The free version is recommended for those who want to start getting a feel for the page builder, to see if it can work for them.
It will be sufficient if you want to create custom pages, freeing yourself from the constraints imposed by the theme.
On the other hand, you will be limited in terms of options available. For example, you will only have access to:
- 50 basic widgets (Elementor Pro offers about 50 more).
- 30 page templates and 5 kits (compared to over 300 templates and 60 kits with Elementor Pro).
Your possibilities in terms of editing will also be restricted. An example? You won’t be able to edit all parts of your site (header, footer, custom pages), but only the body of your page (its content).
If you don’t want to be restricted and want to have control over all aspects of your site (from the header to the footer), the Pro version will be indispensable. And of course, you will have a much wider choice of templates and blocks.
What can you do with the Pro version?
If you want to design professional websites from A to Z, for yourself and/or your clients, turn to Elementor Pro. Its added value lies in the availability of three “builders”: the Theme Builder, the WooCommerce Builder and the Popup Builder. Let me introduce them to you in detail.
The Theme Builder
Elementor Pro first integrates what is called a Theme Builder.
Thanks to it, it is possible to design ALL the parts of your theme, to replace the original ones. And not only the content of your pages. You also have control over the:
- Header
- Footer
- Archive pages (blog, category, tag, etc.)
- 404 page
- Search results page
- Publications pages and other types of content
This means that you can start from a very basic theme, like Twenty Twenty-One, and customize it entirely (or only partially).
Warning: Using the Theme Builder requires a minimum of knowledge in webdesign and usability, to keep a consistent layout and avoid going off in all directions.
To make it easier for you, all the options are centralized in a single interface, since the switch to Elementor 3.0. This interface is accessible in two ways:
- From your WordPress admin, go to Templates > Theme Builder.
- On the Elementor online interface, click on the hamburger menu, then on “Theme Builder”.
At a glance, you’ll have access to all parts of your site, making the creation process even more intuitive.
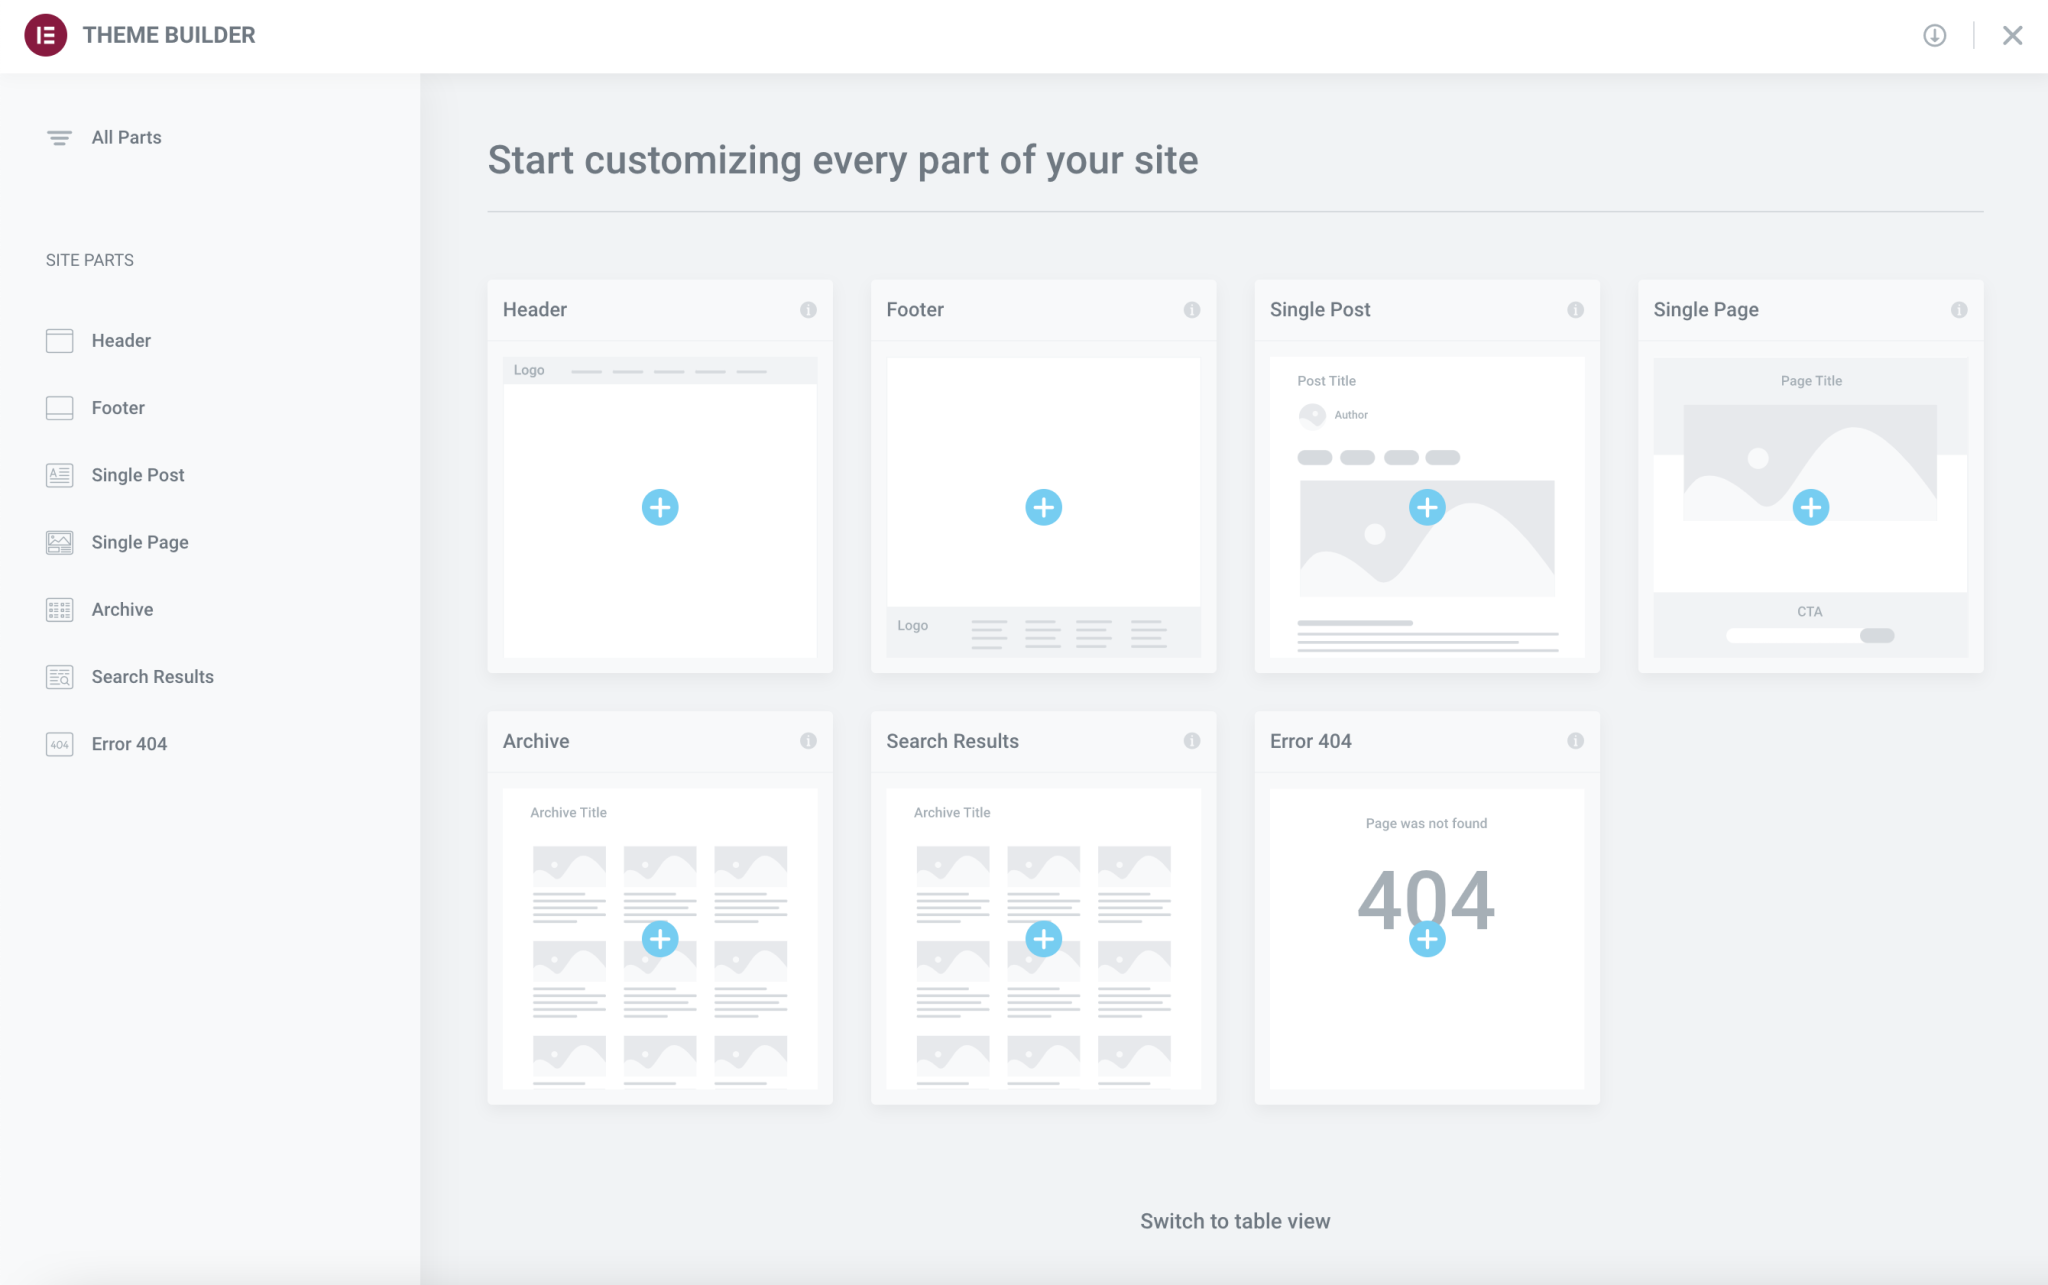
As Elementor explains, each part of the site has an automatic preview, with a screenshot of the actual template. This gives you a visual overview of your entire site, so you can identify the exact template you want to modify.
To fully understand how Theme Builder works, here’s a look at this explanatory video posted on Elementor’s YouTube channel:
This very powerful tool also has features to make the display of different parts of your page dynamic.
For example, it is possible to create several headers depending on your pages, or predefined layouts for a particular page of your site.
The Elementor Pro WooCommerce builder
After the Theme Builder, it’s time for the WooCommerce Builder of Elementor Pro.
To work, this option requires that WooCommerce is activated on your site. In other words, you need to create an online store, or have the idea of creating one to take advantage of it.
The most popular ecommerce plugin on the WordPress CMS, WooCommerce remains difficult to customize visually when you start, unless you have a theme that lends itself to it.
On your product pages, for example, the native options are very limited. To put it simply, and without going through the code, you’ll have a hard time modifying much of anything, except colors, typography and background.
Elementor removes all these barriers by allowing you to create custom product pages and product archives.
For this purpose, you can already use several dedicated widgets like Product Title, Product Price, Add to Cart, etc.
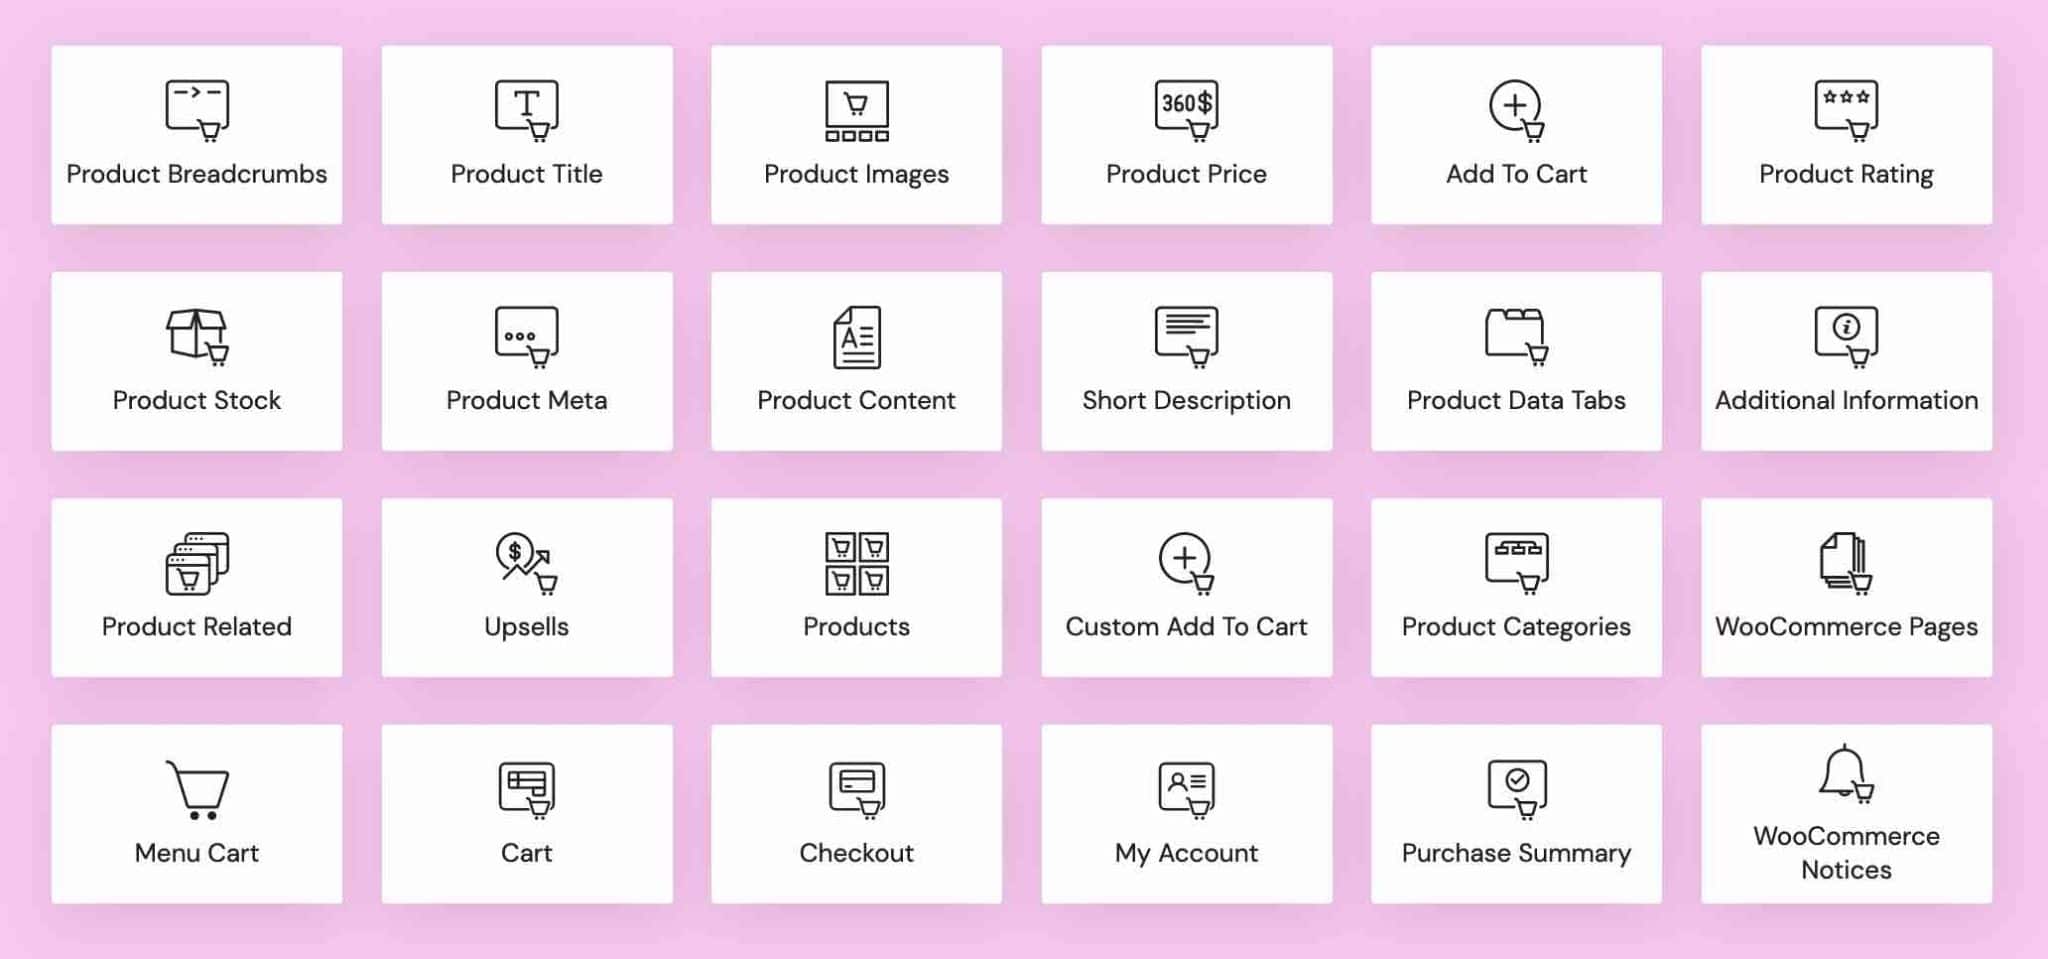
Elementor also allows you to design Shopping Cart, Order and My Account pages when you are going to create a merchant site, with dedicated widgets for each of these pages, in order to customize them finely.
More generally, the Elementor team has been putting a lot of emphasis on ecommerce for several months. This is a strategic development axis for the company, and it is palpable in the latest updates.
For example, the major new features introduced in the latest Elementor Pro updates are related to ecommerce:
- Elementor Pro 3.4 allows you to customize your WooCommerce cart (color, typography, icon), add a floating cart wherever you want on your online store, or decide that the cart opens automatically after adding an item.
- Elementor Pro 3.5 adds new Shopping Cart, Checkout, and My Account widgets (to further customize the look of this page).
- Elementor Pro 3.6 offers a widget to create and customize an order summary page, and another to control the appearance of WooCommerce notices (info, message and error) on your pages.
The Popup builder
While the Theme Builder and WooCommerce Builder are two major marketing elements of Elementor Pro, you won’t be left out if marketing is your core business.
Elementor Pro also features a Popup Builder, to help you increase your conversions.
A conversion is a specific action you want your visitor to perform, such as downloading a white paper, clicking a button, paying for a product, etc.
A popup is a window that appears automatically on a web page, depending on an action taken by the user.
Generally, it allows to achieve 3 goals:
- To capture emails.
- To highlight a promotional offer.
- Or to incite to action.
To benefit from it, you must usually use a plugin or a third-party tool.
With Elementor Pro, this functionality is directly embedded with the page builder (in Templates > Popups), which offers nearly 150 ready-to-use WordPress templates. Ideal, if you lack inspiration.
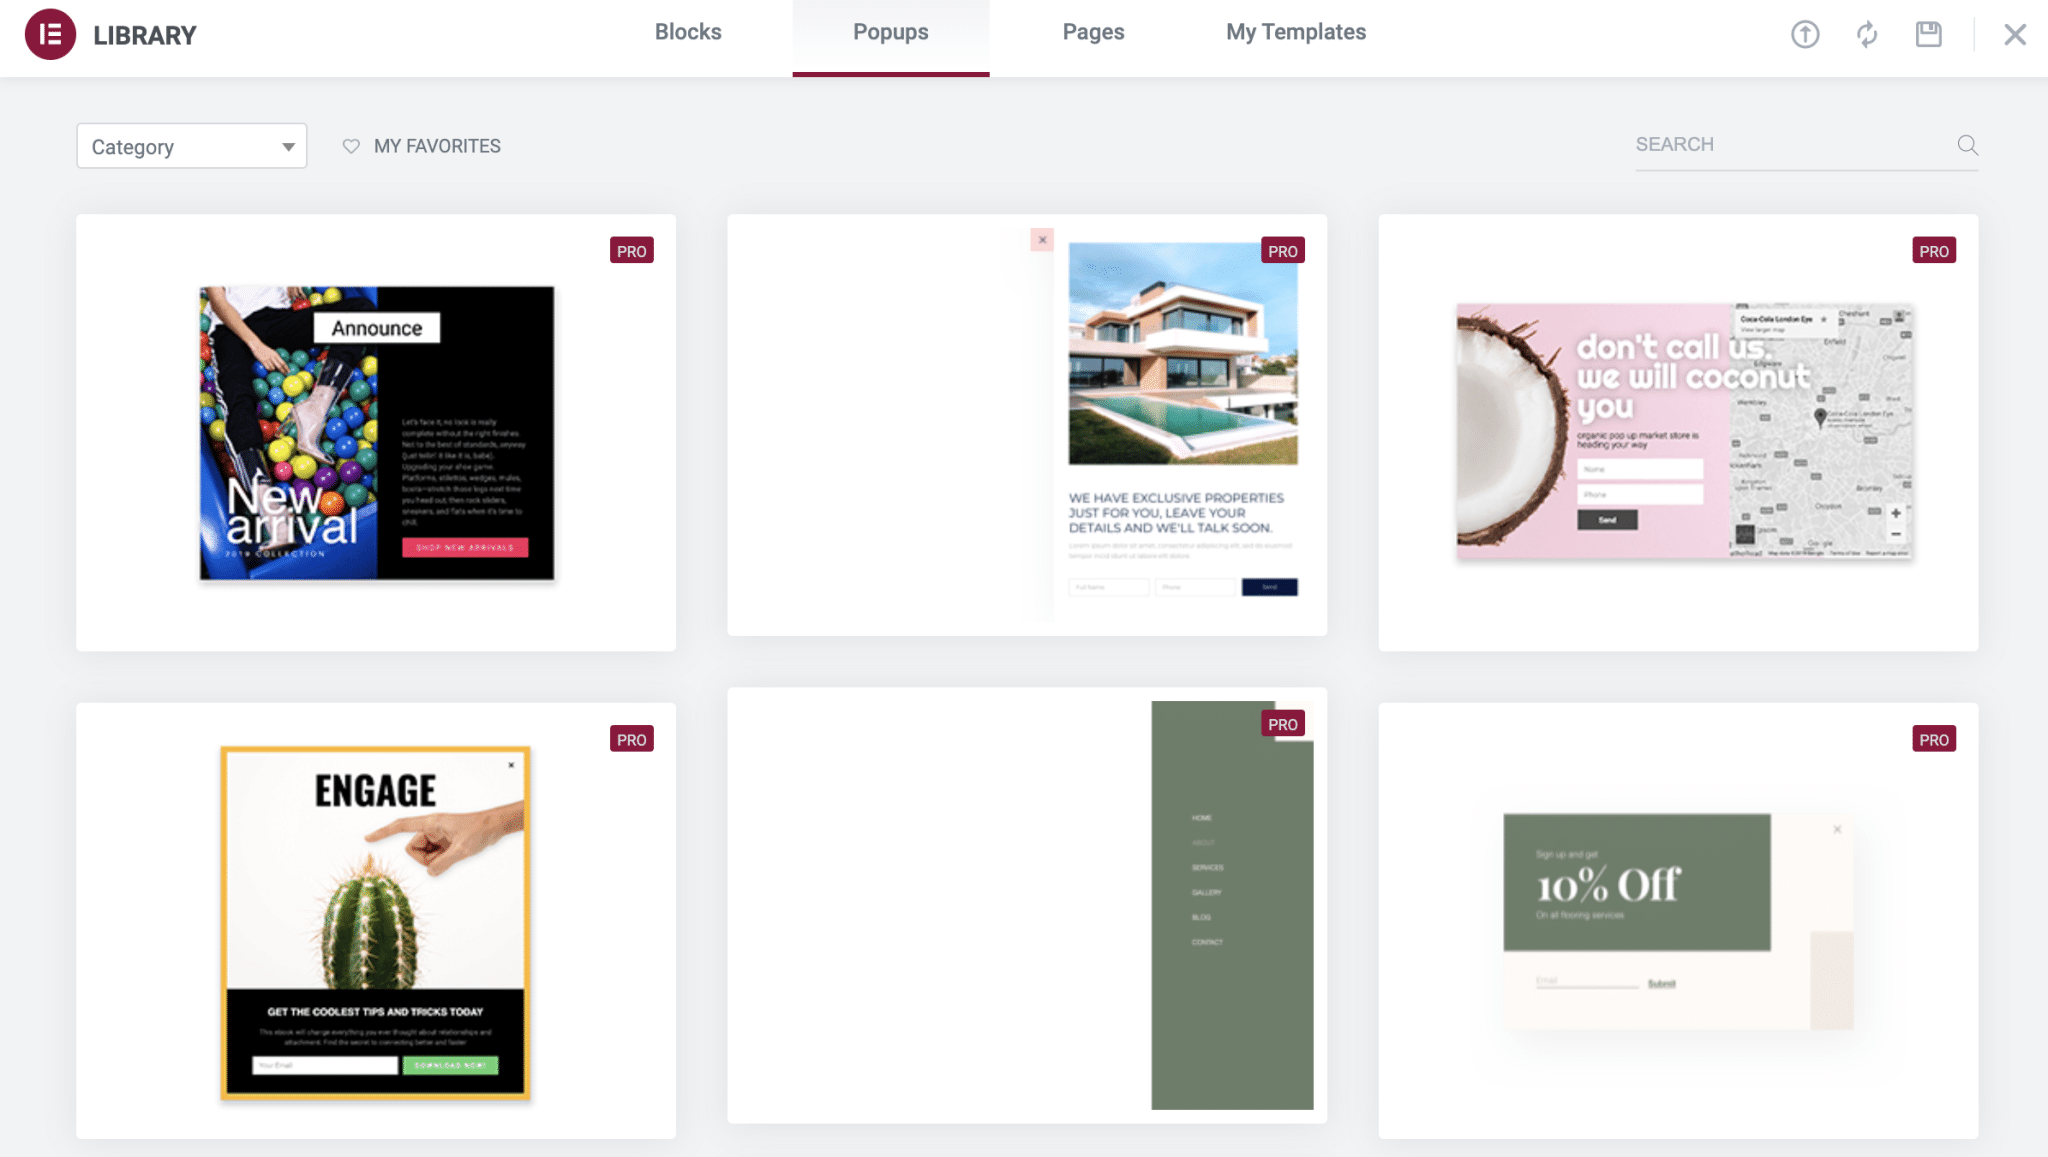
And here again, the Popup builder has nothing to envy to the competition:
- It is possible to create almost any type of popup: full screen, inline, floating bar, slide-in (the window slides on the right or left side of your screen): there is enough to satisfy you.
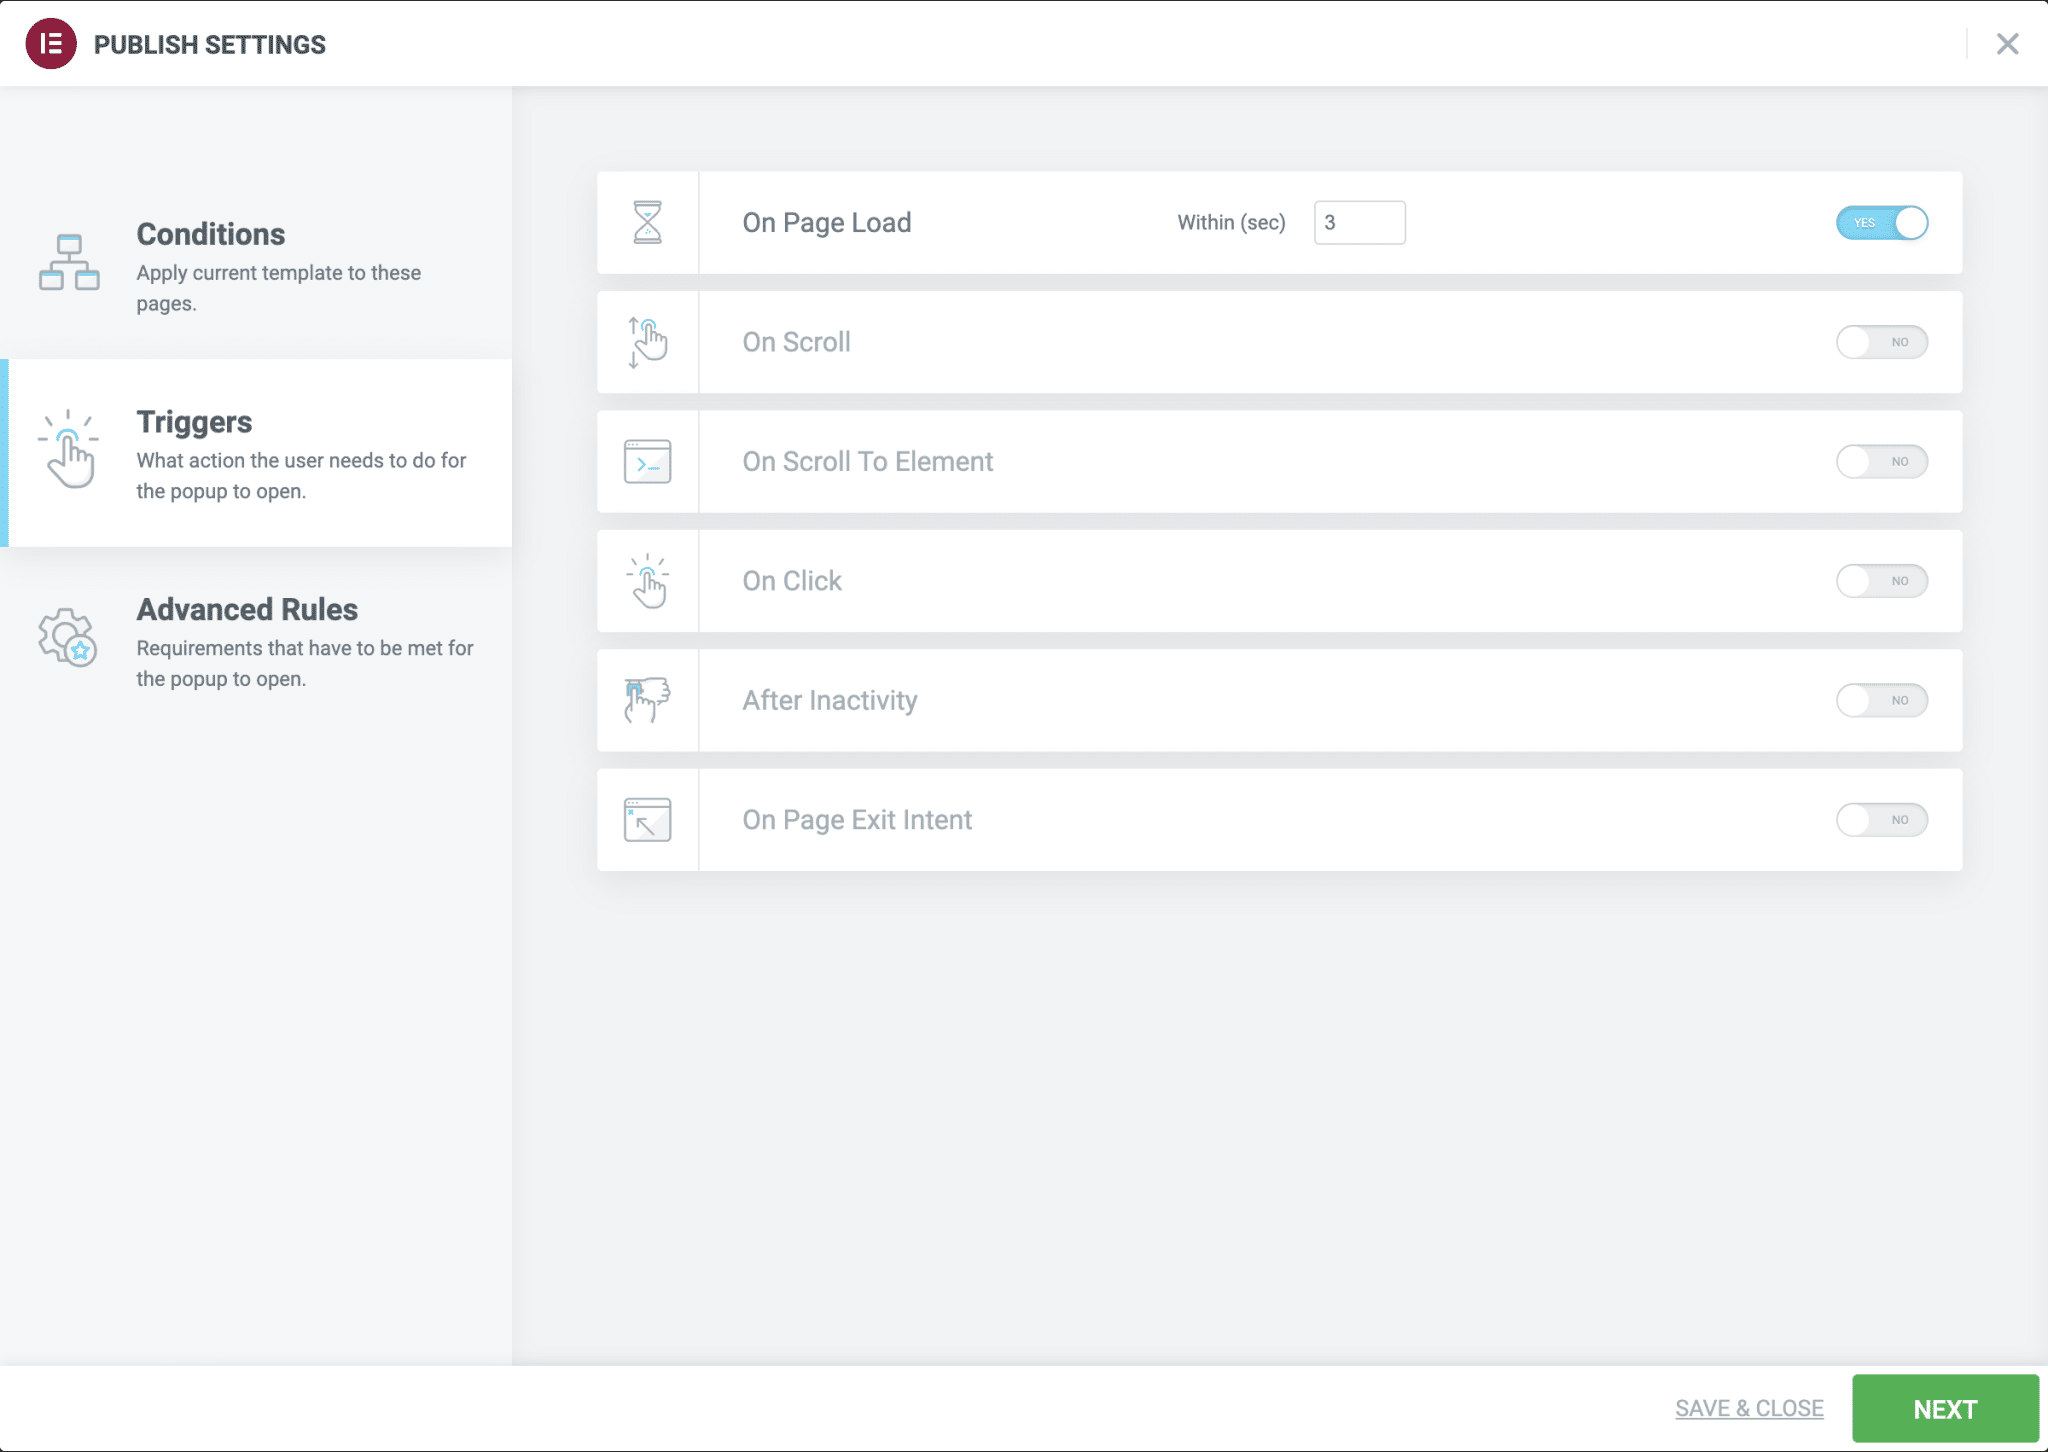
- Like any good popup builder, you can determine when and how your popups will be displayed. For example: on click, on the whole site, when the user leaves your site, on scroll, after a certain amount of page views, etc.
Elementor allows you to do everything (or almost everything) in terms of page creation. But is it also up to par when it comes to user support?
Elementor documentation, support and ecosystem
A wide range of resources
While Elementor remains an intuitive, flexible and beginner-friendly page builder, a learning curve will be necessary to get the most out of it.
At some point, you may find yourself stuck in using it. Yes, you don’t become an Elementor professional in a snap.
To help you in these lonely moments, you can rely on a wide range of resources:
- Extensive documentation (Help Center) covering the main areas and features of Elementor (installation, editor, design, layout, Theme Builder, templates, etc.).
- Hundreds of video tutorials on the Elementor YouTube channel, for those who prefer visual explanations.
- Written tutorials detailing how to create a particular type of site, depending on your niche (e.g. music, coffee, barber, medical, etc.).
- Elementor Academy, which includes video courses, written guides, and even webinars.
- Frequently Asked Questions (FAQ).
- A private Facebook group with over 120,000 members (!), where you can find answers to your questions, and ask them.
- A developer-specific documentation center that explains to technical people how to “leverage the wide-range of tools and options Elementor provides them”.
As you can see, there’s a lot to it already. However, there are a few limitations.
You can contact them by email by submitting what is called a “ticket”. Unlike Elegant Themes’ Divi Builder, for example, Elementor does not offer a live chat system.
Elementor scalability and community
A frequently improved and updated site builder
If you’re just starting out with Elementor, rest assured that with over 10 million active installations and a hard-working team of developers, your plugin will be updated regularly.
The proof is in the analysis of their changelog, which lists all the updates made since the initial launch of the page builder.
If you want to have a look at it, you will notice that the updates are frequent: on average, several times a month.
This shows the Elementor team’s willingness to constantly evolve and improve their plugins (both the free and the Pro versions).
A community of experts and a professional network
Using Elementor also means joining a dynamic and enthusiastic community that is growing every day.
If you ever feel like getting involved, you won’t be left out. Beyond the official Facebook group, you will also find:
- A community on GitHub, where you can make feature suggestions and report bugs.
- Elementor meetups.
- Users willing to translate the plugin. There is even an official Facebook group dedicated to this: Elementor Translators.
Finally, Elementor even offers its own professional network, called Elementor Experts (in Beta version, for the moment).

Here you can find developers, webdesigners and webmarketers using Elementor. Everyone can showcase their work, and offer their services to work on paid missions.
A good way to combine business with pleasure.
Dozens of third-party plugins to go even further with Elementor
With Elementor Pro, you’ve seen that the creative possibilities are almost limitless.
In most cases, this will be enough to design a professional website very nicely.
But maybe, if you’re greedy and want to take the experience even further, you’d like to have even more features in your toolbox.
This is possible thanks to third-party plugins – not developed by the Elementor team – also known as addons.
For your information, Elementor recommends about fifteen of them on its official website. We have selected four that caught our eye:
- Ultimate Addons for Elementor (starting at $69/year, or $249 for life). Behind this plugin, we find the expertise and the seriousness of Brainstorm Force, the company behind the Astra theme (1M+ active installations). For each of the proposed packages, we appreciate being able to use the plugin on an unlimited number of sites.
You will also find options to visually customize your Contact Form 7 or Gravity Forms, a module to create modal popups, a pre-integrated Google Maps widget…
In short: with this plugin, you can save a certain budget that you would have spent in other plugins.
- Crocoblock (from $130/year to $750 lifetime): an all-in-one toolbox containing a suite of plugins (Jet plugins), site templates, and even a free theme (Kava).
Beyond its very large and eclectic offer, Crocoblock (read our test) is interesting because it proposes a set of packs that can be bought individually according to your needs.
- Extras for Elementor (from €26 i.e. ± $29). A plugin that will add some modules to your current panel: a module to easily create tables, original pre-styled titles, or engaging photo galleries. It’s up to you to see if these elements could be useful in the creation of your site.
- Unlimited Elements for Elementor (freemium): This freemium plugin is already very complete in its free version, since it offers a hundred widgets covering a lot of needs.
If you want even more, there’s nothing to stop you from buying the Pro version. The annual fee starts at $39 for one site, and a lifetime fee is available from $199.
And to go even further on the subject, take a look at the official WordPress directory.
Elementor and the competition
Before revealing Elementor’s pricing policy on WordPress, let’s take a look at some of its major competitors.
Elementor and other page builders
After all, even if it dominates the market in terms of users, Elementor is not in a monopoly situation. And if you have your eye on it, you’re probably wondering what it has over the competition.
So, is it better to use Elementor or Divi? Elementor or Visual Composer? What is Elementor vs. Beaver Builder worth?
To form your own opinion, check out our guide to the 10 best page builders. We cover the aforementioned tools and others (Thrive Architect, Brizy, Oxygen Builder, etc.), with links to their detailed tests, when they exist.
Trying to remain objective, Elementor is surely the most complete and advanced website builder at the time of writing (with Divi Builder more or less at the same level).
However, it may not be the one that will suit you best. With a page builder, habits are often paramount. For example, if you started creating sites with Beaver Builder, you might swear by it.

Elementor and Gutenberg
Another natural “competitor” of Elementor is the WordPress content editor (Gutenberg).
Although Gutenberg is not a page builder per se, it has been getting closer and closer since the release of WordPress 5.9 at the end of January 2022.
On this occasion, the Full Site Editing (FSE) project was launched. FSE allows you to create and edit the entire structure of a site (including headers, footers, menus and page templates, not just the content) using the content editor blocks.
This makes it very similar to a website builder like Elementor.
So, what to do? Should you choose Elementor or Gutenberg to create and customize your website pages? There are two things to distinguish:
- Do you want to use a Full Site Editing compatible theme to design your site from scratch? It’s possible, but you’ll need a good technical background to get a professional result.
Besides, FSE compatible themes are currently limited to a few (about 50 in the official directory). - You want to use Gutenberg blocks to create your pages? That’s also possible, but the creative features will be more limited than with Elementor, both in terms of available elements and customization options. Again, if you’re a beginner, you may be short on material if you don’t want to get your hands dirty.
For your information, WPMarmite has adopted the following operating mode:
- We use the content editor to write and edit our blog posts.
- We use Elementor to create some strategic pages.
FYI, there are synergies between Elementor and Gutenberg. For example? The free plugin Elementor Blocks for Gutenberg created by the Elementor team
With this plugin, you can insert Elementor templates as blocks. Moreover, WPMarmite does not hesitate to use it. All the inserts on the blog have been inserted using this plugin.
Now, let’s talk about budget. How much should you expect to pay for Elementor?
How much does Elementor cost?
On the one hand, Elementor is available for free. But for really professional looking sites, with no design limits, the Pro version is the way to go. It is available in two formats.
Elementor’s plans have evolved since this post was written, notably with the launch of an all-in-one plan for creating and managing your WordPress sites. To learn more, check out our comprehensive guide to Elementor One.
Elementor Cloud Website, a WordPress.com-style option
If you go to Elementor’s pricing page, you’ll see that its Cloud offer is highlighted first:
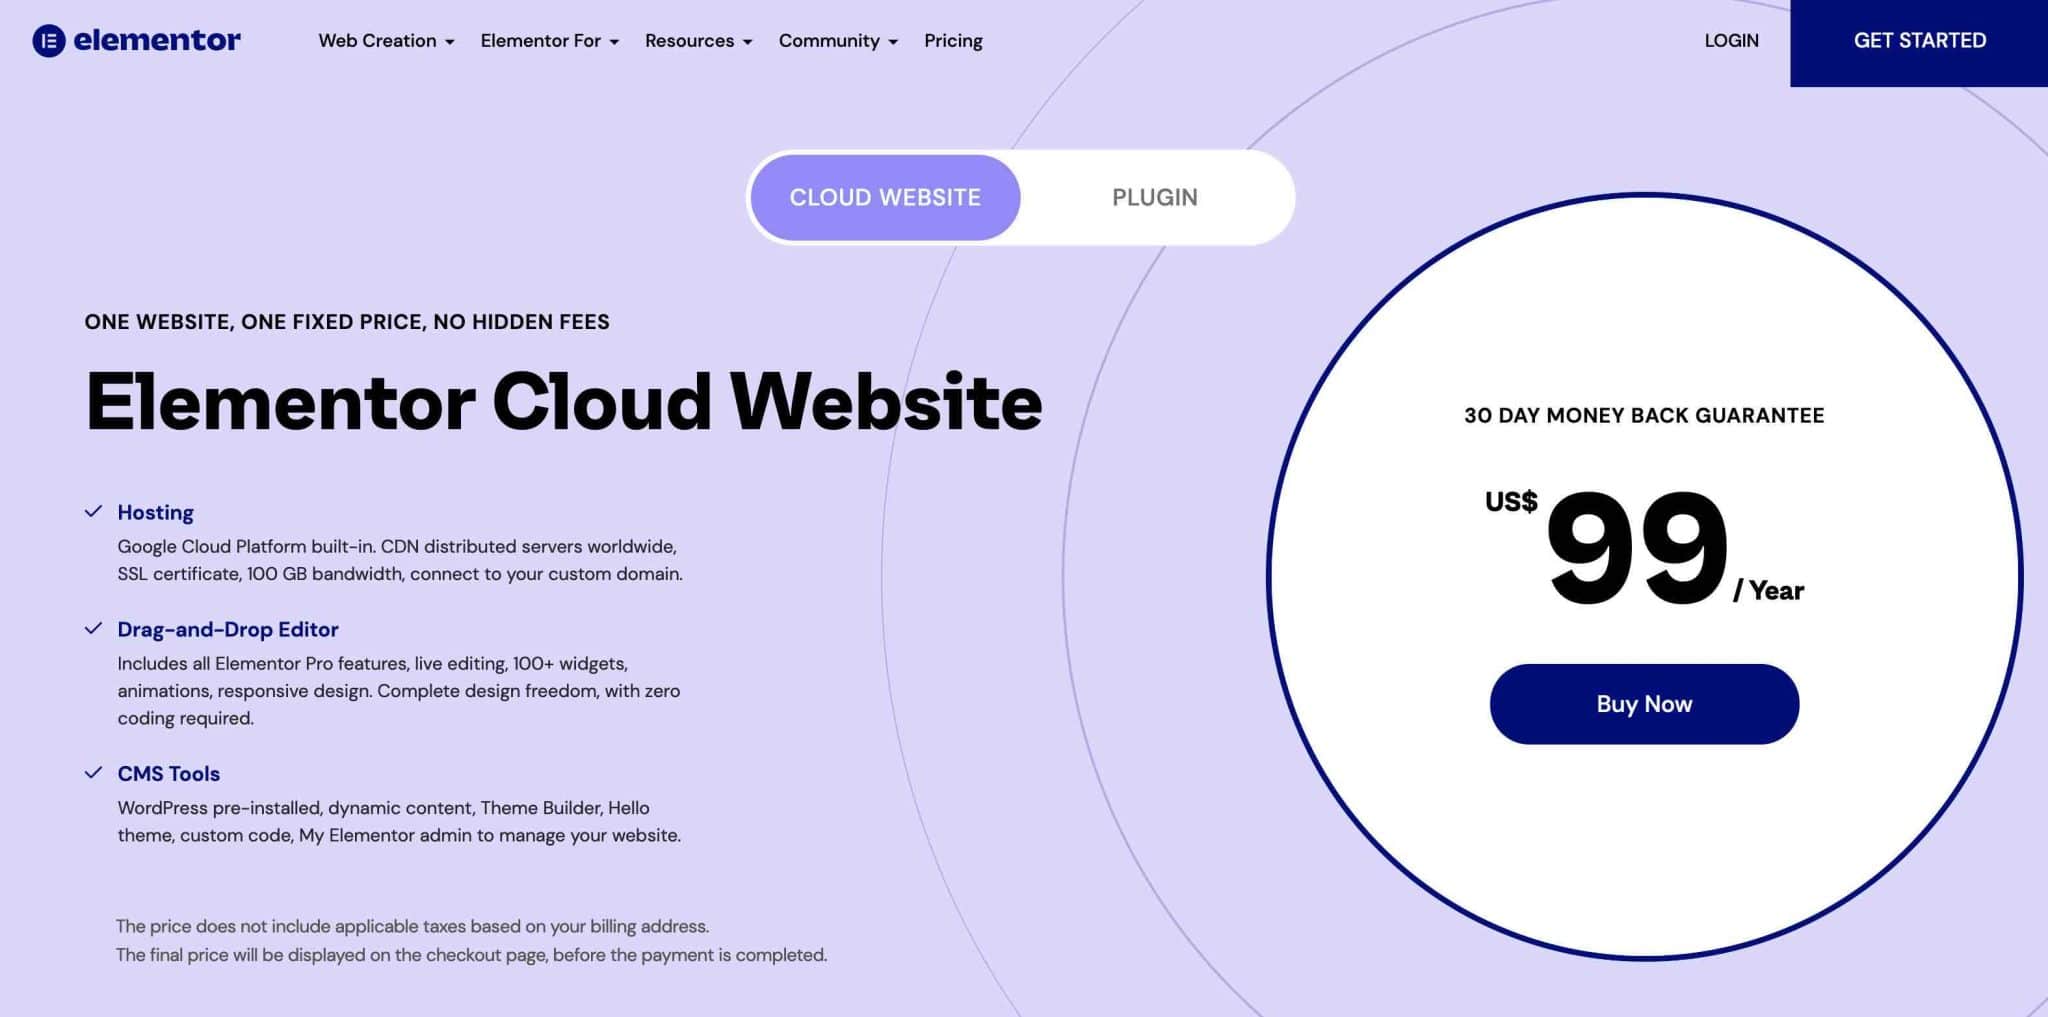
This offer was launched in February 2022. It is offered at a single price of $99/year. It is a global solution including in particular:
- A hosting offer
- Access to Elementor Pro
- A free connection to a personalized domain
- 7-day a week support
This offer includes hosting in the cloud, via the Google Cloud platform, and aims to simplify the life of the site creator who wants to start up.
For example, WordPress is pre-installed and the user has access to a personalized dashboard. In the end, this service is similar to what the WordPress.com hosting solution already offers.
This new offer is particularly aimed at beginners who don’t want to be bothered with finding a hosting solution and installing WordPress.
And if you’re looking at creating a professional WordPress website, take a look at our detailed guide.
Personally, I prefer to keep control over the choice of my host and install WordPress. This allows me to keep a certain independence. In this sense, Elementor’s “classic” offer is more appropriate.
One site builder, 5 price offers
If you only want to get the Elementor plugin for WordPress – that’s how WPMarmite uses it – Elementor offers 5 licenses:
- Essential: $49/year for use on up to one site.
- Expert: $199/year for use on up to 25 sites.
- Studio: $499/year for use on up to 100 sites.
- Agency: $999/year for use on up to 1,000 sites.
And where is the 5th license, you ask? A small hyperlink, under the table of plans, also proposes to buy Elementor Pro for $99/year (use on up to 3 sites).

Which version to choose?
The choice between one or the other version will depend on the use you want to make of it, because the embedded features are exactly the same in each offer.
Elementor does not offer unlimited site creation, as most of its competitors do. But hey, if you reach the 1,000 sites created per year mark, let me know! 😉
You won’t find a Lifetime offer either, like you would with Divi, for example.
With Elementor, you have to pay every year to keep getting support, updates and access to Pro templates. But each yearly renewal results in a 25% discount on the total bill.
Not sure if you want to take the plunge? Elementor offers a 30-day money-back guarantee.
Elementor: WPMarmite’s review
So what do we think of this page builder, my dear Watson? Conclusion of the survey in a few key points.
Elementor’s strengths
- The impeccable WYSIWYG interface, especially in terms of animations, which allows you to really know what the final result will be.
The dynamic visualization gives a pleasant workspace, where it becomes almost relaxing to build your page. - The possibilities in terms of customization. Effects, styling, advanced settings… With Elementor, the webmaster really has the feeling of having control over almost everything, and of being able to have fun with the design of his WordPress site.
- A free version that already offers many widgets, and an affordable paid version that adds more, to go even further.
- No code knowledge required to use the page builder.
- A large catalog of templates to avoid always starting from a blank sheet.
- Its theme builder (Pro version) to create sites entirely with Elementor.
- Regular updates to ensure that your product is always up to date and durable.
- A hyper-active community to help you find answers to your questions.
Areas for improvement in Elementor
- With the countless options offered by Elementor, its exploitation potential is huge and almost inexhaustible. Therefore, to take full advantage of it, you will have to spend some time on it.
Elementor, for whom?
- For novice site designers. Being able to rely on WYSIWYG puts Elementor as a flagship page builder for those without code skills.
- For marketers. They will appreciate the multiple landing page templates, as well as the popup builder.
- For WordPress developers. Yes, a page builder for developers: it’s possible, and it’s the choice of many freelancers and agencies who can’t do without Elementor.
The interface is pleasant to use for them, especially thanks to the functions that allow to save modules, reusable on several pages, to save a lot of time in the design of client sites.
So, did this test make you want to try it? Get the free version of Elementor on WordPress to see for yourself, or jump right in with Elementor Pro:
Did you like this guide and did it help you understand the basics of Elementor? Share it on social networks!