

“Hi, I need 200 units of this product with fast shipping please”. As an online store owner, receiving this kind of message puts a smile on your face. Answering it, on the other hand, becomes a lot less fun… Basically,…
If there’s one thing all sites have in common, it’s the contact form and maybe the Contact Form 7.
Even if there are still some diehards who don’t want to be bothered, we can say that almost all sites have a contact page.paypa
Therefore, to set this up on a WordPress site, there are two possibilities:
- Your theme has a “Contact” page template or another way to include a form, in which case it’s all good.
- Use a plugin to include a form in your Contact page.
In this post, we will see how to use a plugin downloaded more than 1 billion 300 million times (at the time of writing these lines)! I named Contact Form 7 (CF7).
Although it is quite simple to use, I wanted to write a guide to show you how to integrate more or less advanced contact forms on your site.
Let’s see with the chapters of this guide…
Overview
This article was updated in February 2020 with version 5.1.6 of Contact Form 7.
What is Contact Form 7?
Contact Form 7 is a free WordPress plugin to create contact forms simply and quickly.
Flexible thanks to the presence of many customizable fields, it also helps fight against spam.
It is one of the most popular plugins in the official directory.

Set up a basic Contact Form 7
Once you have installed and activated Contact Form 7, you will see that a Contact item has been added to the menu (under Comments). Click on it to get to the main page of the plugin:
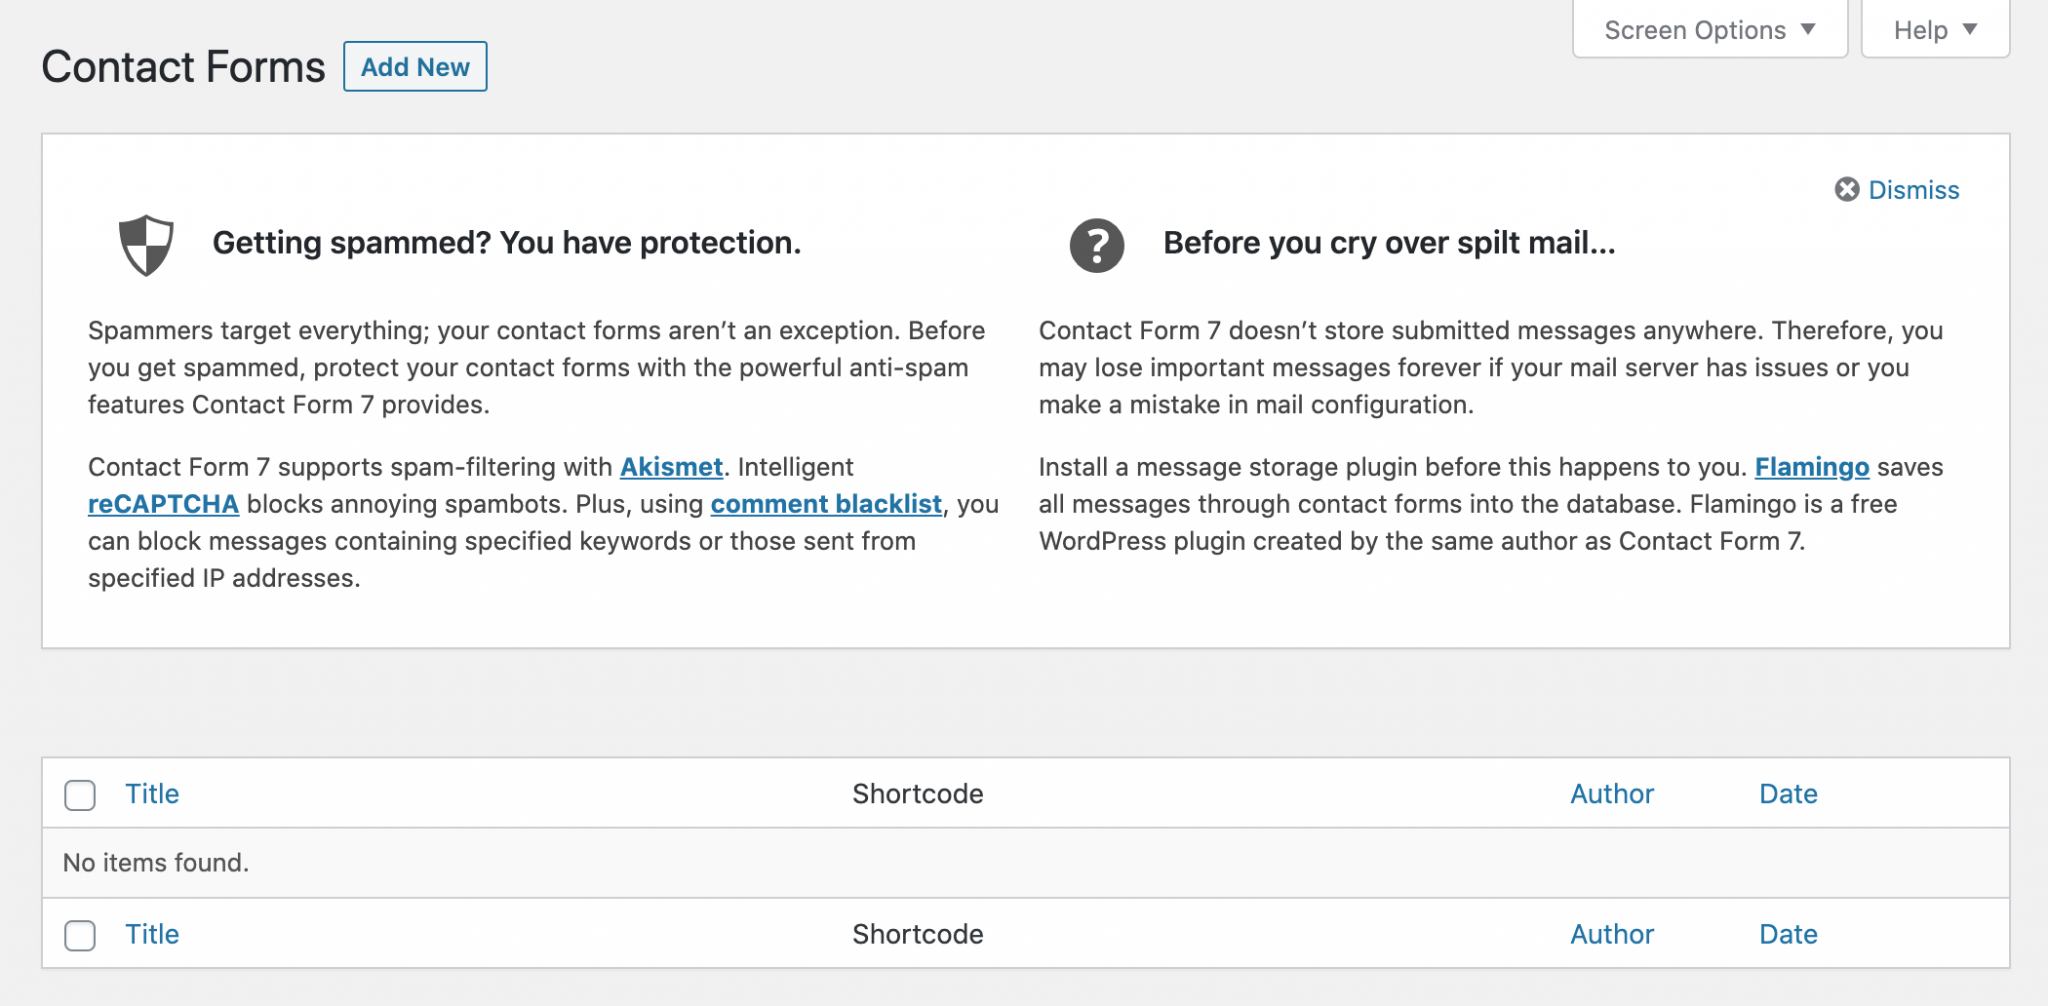
First of all, Contact Form 7 informs you that you are protected from spam via Akismet or reCAPTCHA.
You are also invited to download an additional plugin, Flamingo, also designed by Takayuki Miyoshi, the creator of CF7.

Thanks to it, you can save in a database all the messages submitted in your forms. Without it, you would only have them in your inbox (but that might be enough for you).
Finally, don’t worry, this tutorial will help you create your first form. To do so, simply click on the Add New button at the top of the screen (or in the menu).
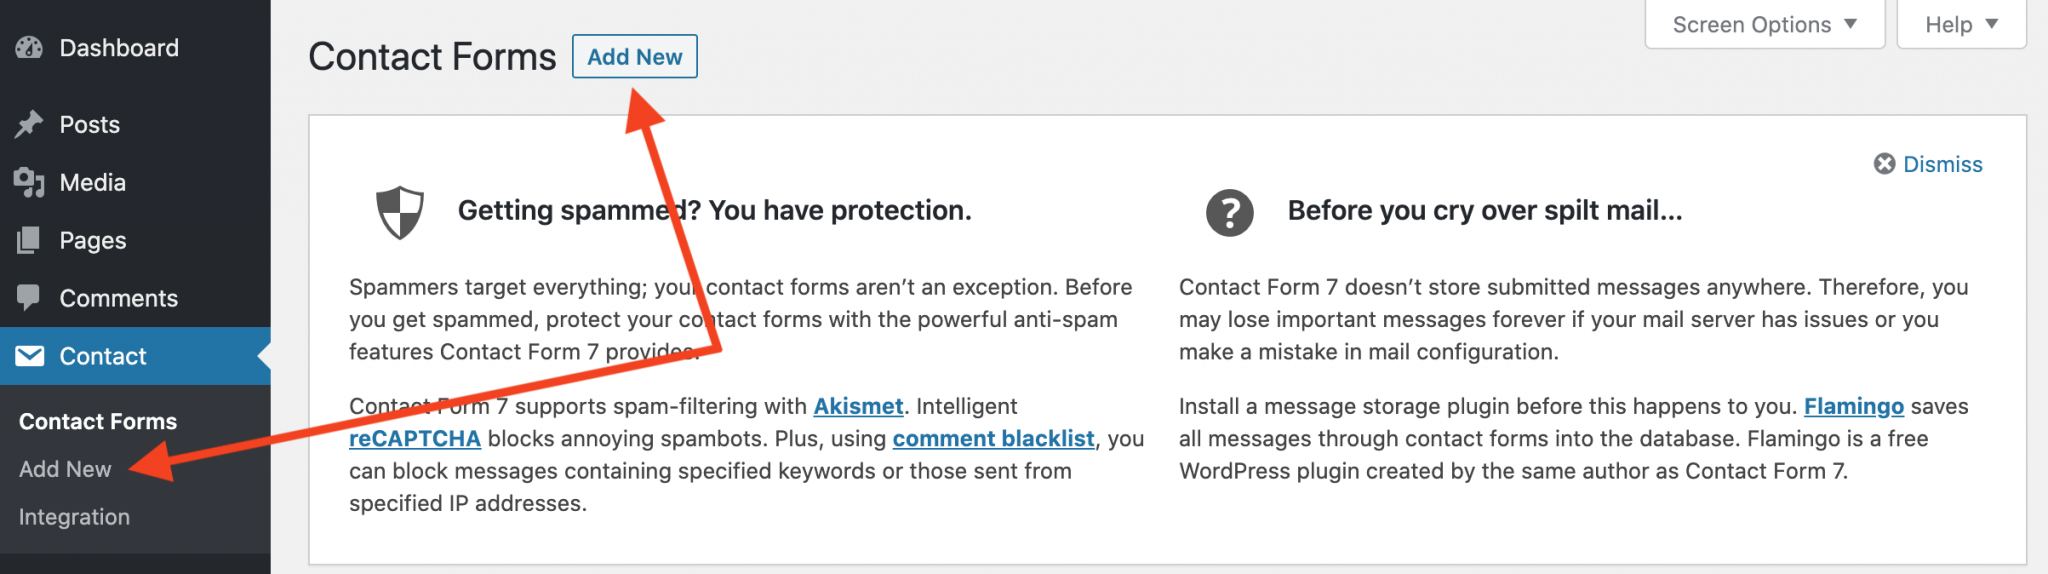
You will arrive on the next page which has 4 different tabs:
- Form
- Messages
- Additional Settings

There is a form by default. Let’s see what the different options correspond to:
Enter title here
This first section is used to give a name to your form. Call it “Contact”, or as you wish.
You can also give it a specific name, if the form you create needs to be placed on a specific page (support form, quote request form, etc).
There is also a Save button. Don’t forget to use it once you have made your changes.
“Form” tab
This section contains the HTML code of your contact form. Several paragraphs are present (tags <p>...</p> ) with tags for the form fields as well as the Send button.
Let’s detail all this for a better understanding.
<label> Your Name (required) [text* your-name] </label>The code above will display the text “Your name (required)” and then the text field associated with the name.
In the second part of this tutorial, we will see how to create tags. You will see that their syntax is not very important.
The email, subject and message fields are structured in the same way. The last element in square brackets – [submit "Send"] – includes the tag for the form validation button.
Uses of tags

The buttons above the form allow you to add all kinds of fields in the forms you create: text, email, date, drop-down menu, radio buttons, quiz and even send files.
We’ll see how to configure them in the “Add additional fields” section of this article.
“Mail” tab
Let’s take a look at the fields in this section and what they contain:

For: The email to which the message should be sent (your email or your client’s).
From: Sender’s email. Here we retrieve the person’s email from the email field of the form (identified by the [your-email] tag in the form code). The name is indicated before the email by the [your-name] tag.
It is important to keep the structure NAME < EMAIL> in this field so that it is displayed properly in your inbox.
Subject: In our case, the form retrieves the subject indicated by the sender thanks to the [your-subject] tag. However, you are not obliged to use it. If I used CF7 for WPMarmite, I could choose the following subject “[WPMarmite] Message from [your-name]”.
Additional headers: This field is useful for specifying people to copy and blind copy. For example, you can send a copy of the email to the person who contacts you (we’ll see that we can do it another way right after).
To copy a person, add Cc: cofounder@site.com. You can also use the NAME <EMAIL> structure seen above: Cc: Mike <cofounder@site.com>
To put a person in blind copy, use Bcc: cofounder@site.com. As with the normal copy, the NAME < EMAIL> structure also works.
Message body: This field will be used to format the message you will receive. In the screenshot, you can see that the tags are reused.
To see more clearly, insert only the tag [your-message] to have only the sender’s message (the email and the name being already in the From field). By doing so, the received message will look more like a message sent directly.
A signature is automatically added by Contact Form 7 to indicate from which form the message was sent. It may not be optimal but I advise you to keep it as a reminder of the origin of the email. You can edit it as you wish to make it more relevant.
Exclude lines with blank mail-tags from output: This option is used to exclude lines for which the tag has not been specified by the sender. For example, if you have a City field and the person does not fill in the field, the line that should display the City tag will not be displayed. Do you see where I’m going with this?
Use HTML content type: Here nothing complicated, check the box to receive contact emails in HTML format. In most cases this is not necessary.
File attachments: In case you give the possibility to send attachments. You will have to indicate the corresponding tag(s) in this field to receive them (don’t be surprised to receive nothing if you have left this field empty).
Mail (2)
Once you have the ability to copy people, you may wonder what the purpose of a second email field is.
This field is useful if you want to send a differently structured message.
For example, if you want to send a copy of the email to the sender, you can add a sentence like this in the introduction: “Thank you for contacting me, I will reply within 24 hours. As a reminder, here is the content of your message:”.
See below:

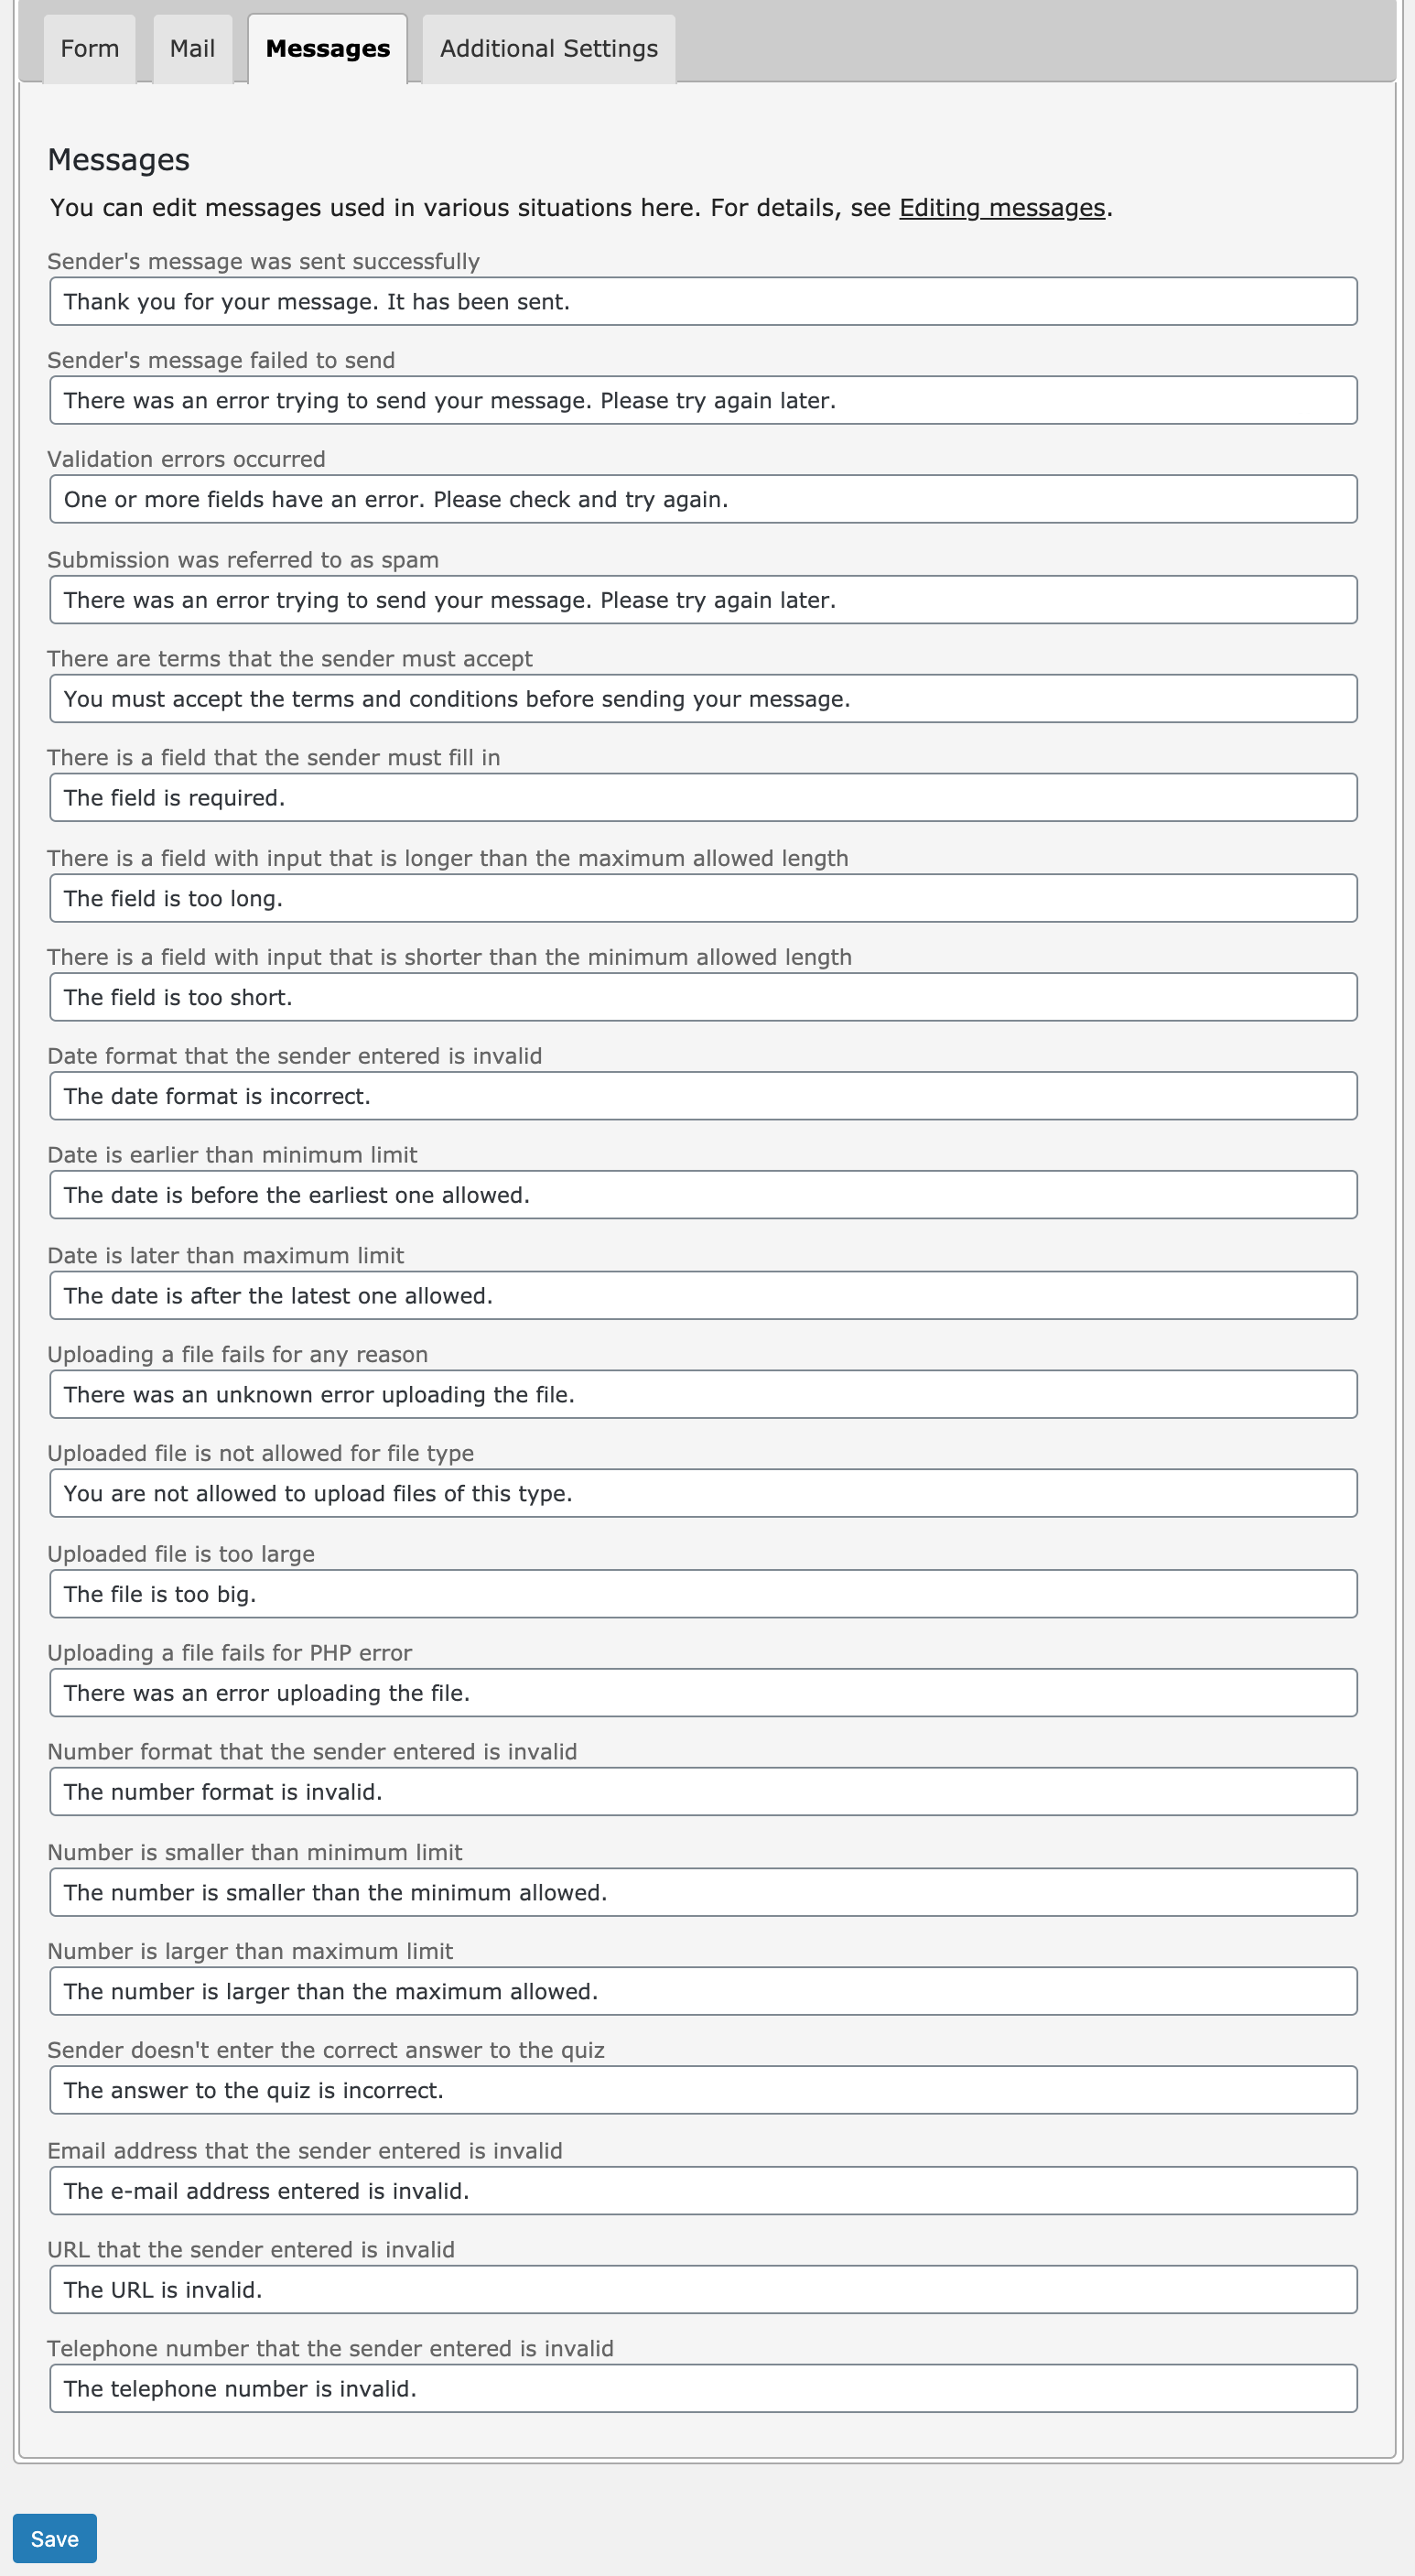
“Messages” tab
Then come the error and success messages that will be displayed in return when the email is sent.
If everything goes well, the success message will be displayed (the first one), otherwise one of the error messages will be displayed depending on the problem.
It’s up to you to see what you want to change. You can customize the success and error message to be less cold.
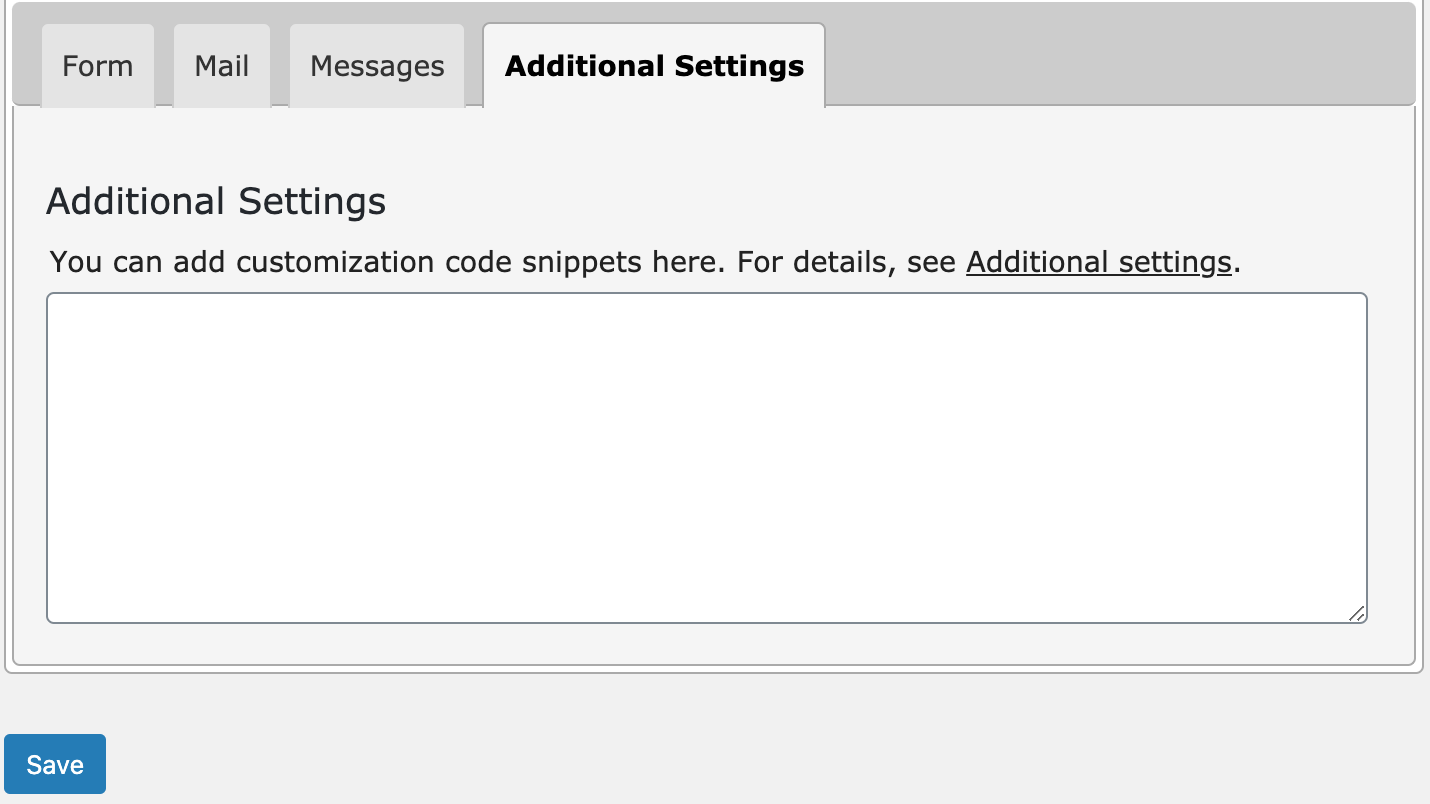
“Additional settings” tab
The last section of this page concerns slightly more advanced uses. We will see some of them in the 5 tips at the end of the article.
You now have a basic contact form (don’t forget to save it thanks to the Save button at the top right of the page). Now let’s see how to customize it…

Add additional fields in Contact Form 7
After discovering the different sections of the edit page of a form, let’s look at the use of tags, which will allow us to insert new fields.
Let’s start by clicking on the first element:
The text field
A text field configuration box will be displayed. You can assign it:
- An obligation to fill it in;
- A name;
- A default value (that you can place as a watermark);
- An anti-spam check via the Akismet plugin (only useful if the text field is a name);
- An identifier (for CSS);
- A class (always for CSS).
In the example below, I made the field mandatory and added watermark text (placeholder).

Once the field is set up, you get a tag that must be placed in the form code.
Now click on “Insert Tag” to do this. To keep a classic display, I have taken the label structure of the other fields.
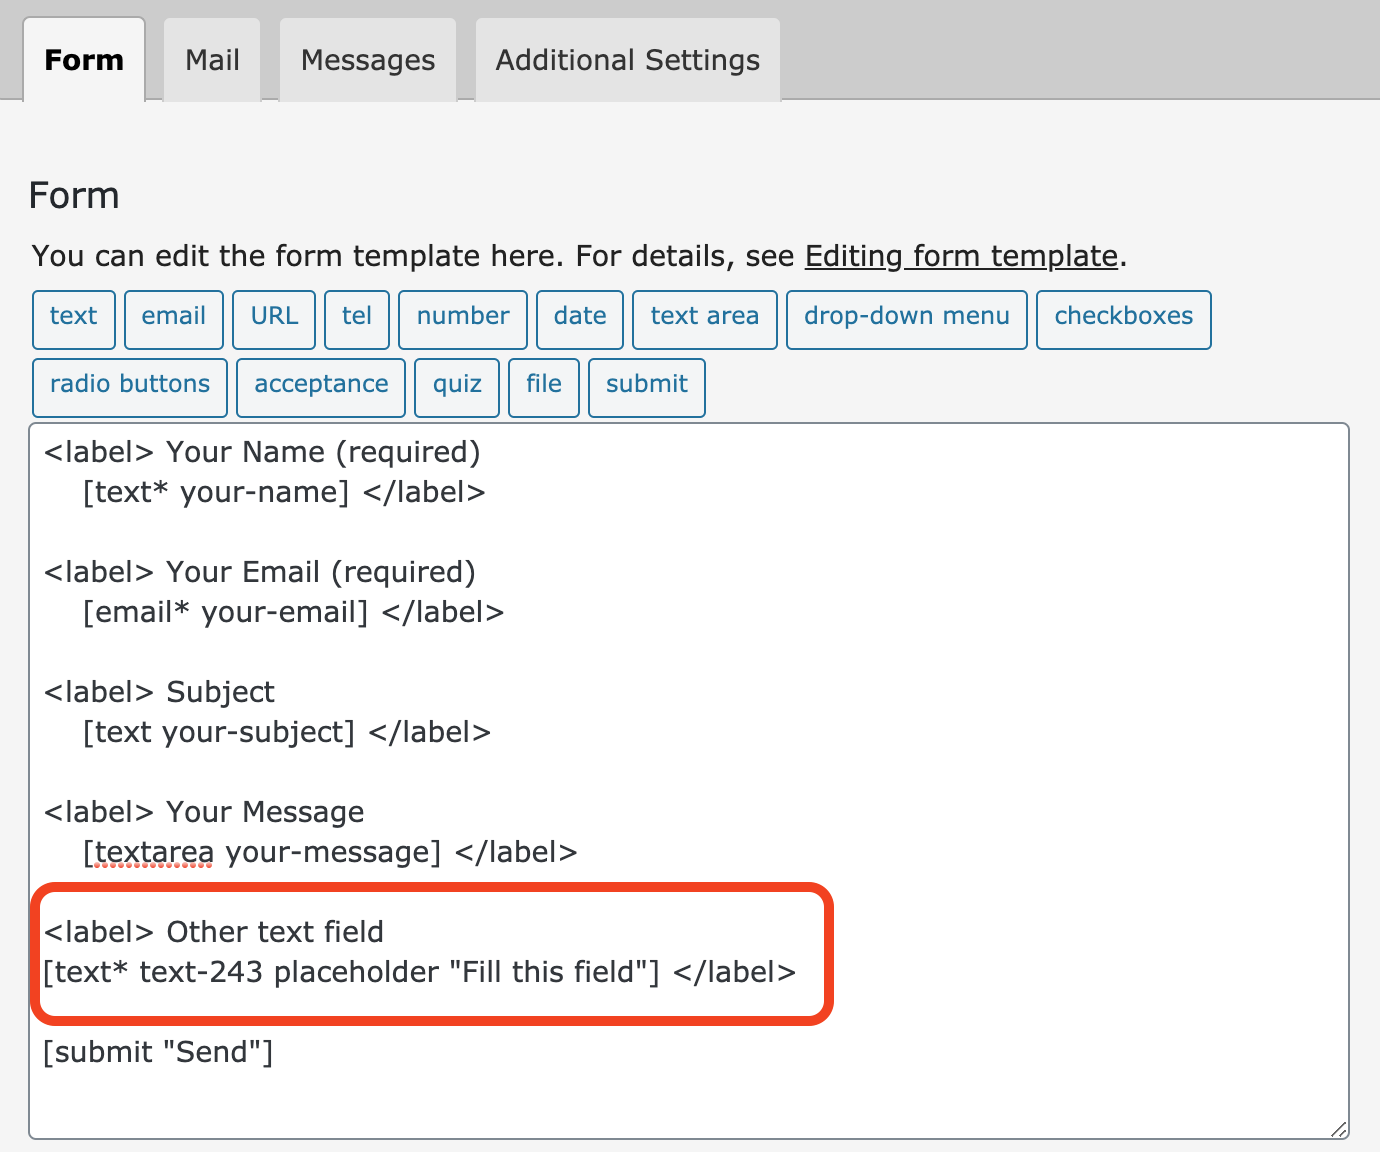
Now that this field is in the form, it must be possible to retrieve it when a person sends a message. Hence the presence of a second tag [text-243].
As the plugin indicates, it must be placed in the body of the message of the email that will be sent to us
Finally, you can also place it in the subject line if it is of interest to you.
The procedure is the same for all other fields. Let’s take a look at some of them.
I’m going to skip over the email, URL and numbers field to tell you about the…
Date field
Let’s say you create a reservation form: having an arrival date and a departure date is mandatory. In the same way as the text field, you can set up a date:

For the arrival date, I defined a minimum and a maximum date to avoid people to include wrong values.
Text area
To write their message, senders will need a text area.
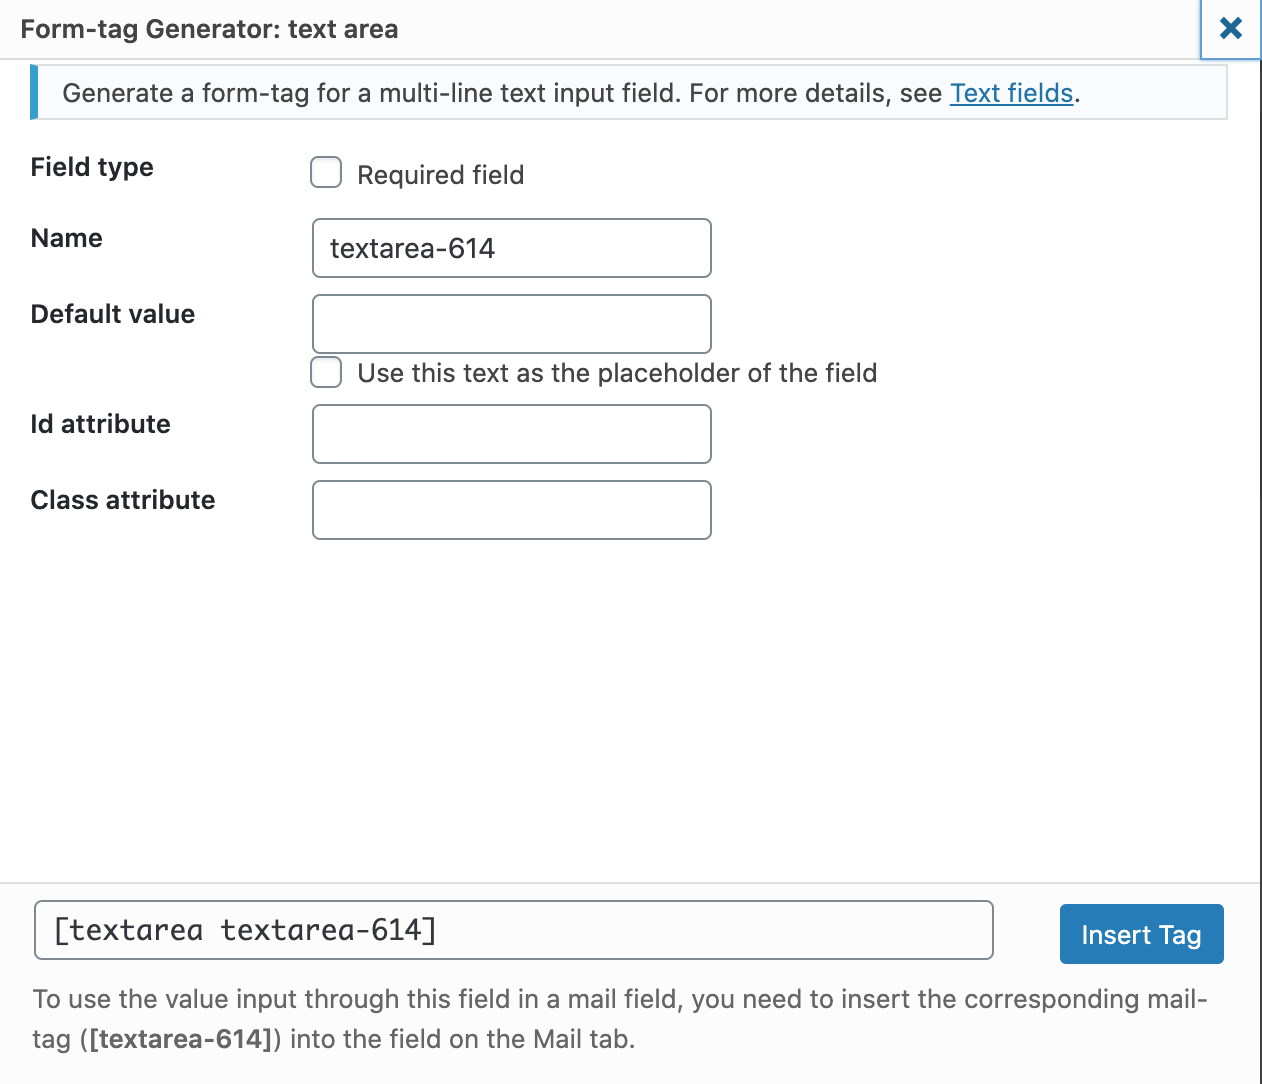
As with the other fields, the first tag must be inserted in the form code, and the second in the body of the message.
Drop-down menu
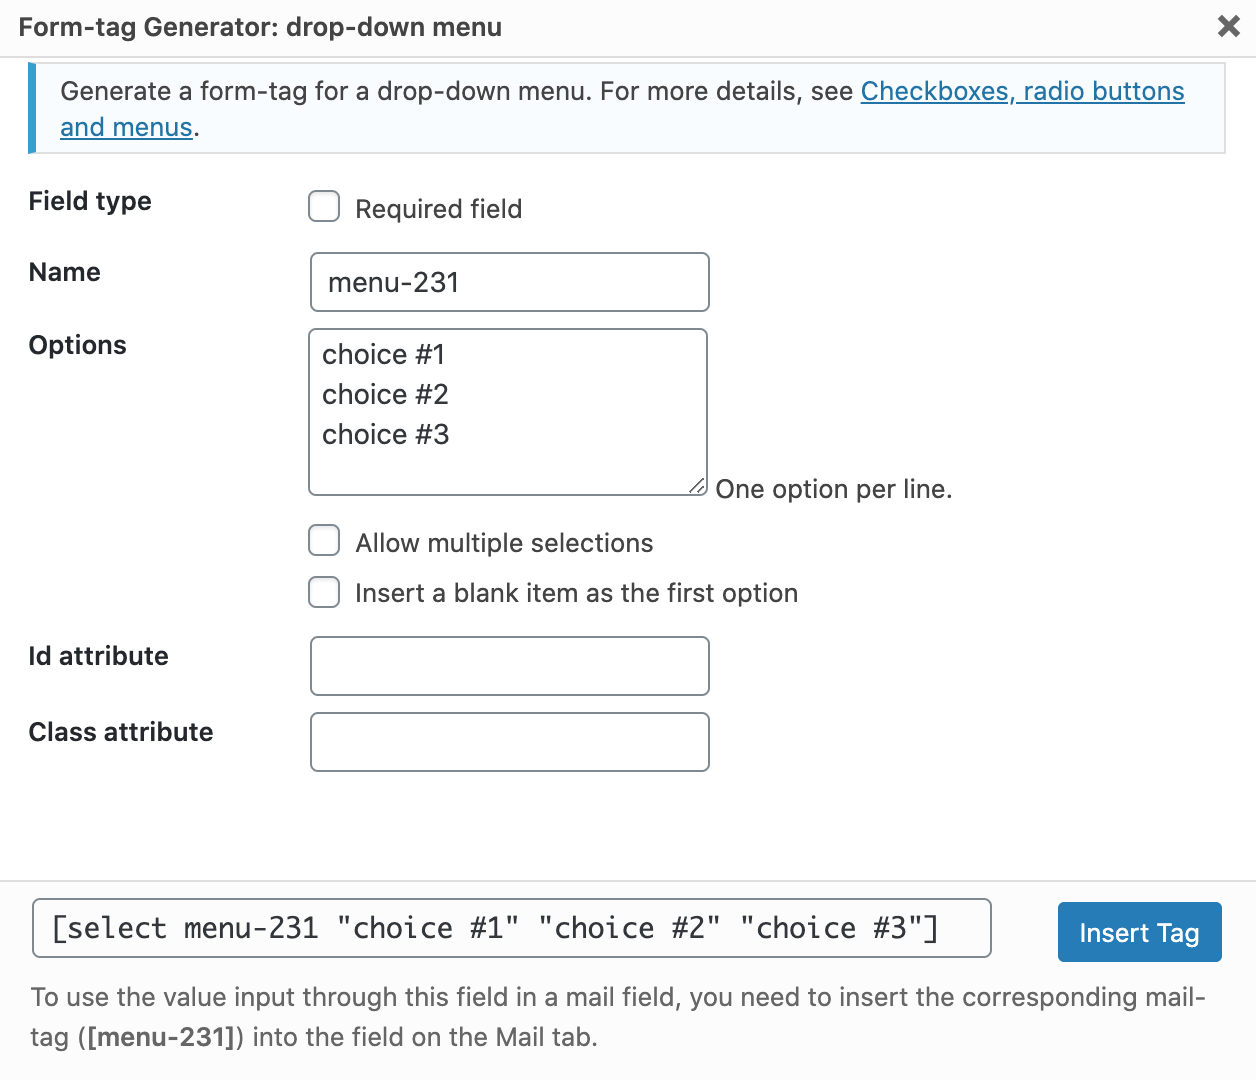
If your form allows your visitors to contact you about one of your offers, a drop-down menu may be useful to find out which offer the visitor wants information about.
Indicate one choice per line and check some options if necessary:
Note: The radio buttons and checkboxes have similar functions.
Acceptance
With this field you can add an accept button. If the button is not checked by your visitor, the email will not be sent.
To comply in part with the GDPR (General Data Protection Regulation), you can use this field to ask your visitors to accept your Privacy Policy.
In this case, remember to add a small text like “By checking this box, I accept the Privacy Policy of this site” in the middle of two <label> tags.
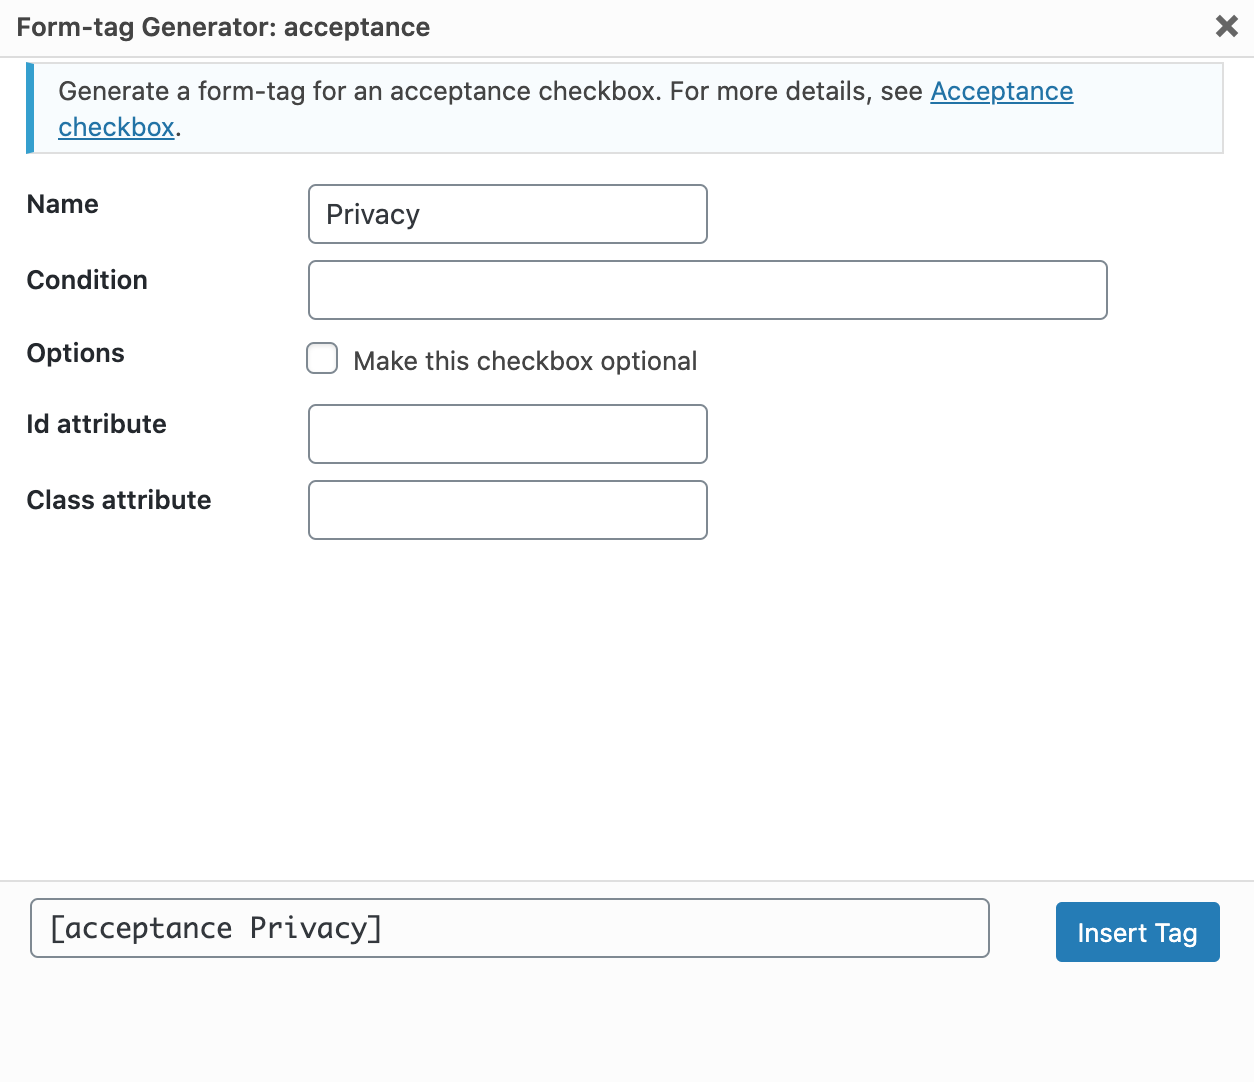
In terms of options, note that it is possible to make this checkbox optional.
Quiz
If you want to filter the emails that are sent to you, you can use a quiz (I’ll tell you about another solution later).
Even if spam is generally well handled by Contact Form 7, adding a subsidiary question allows you to be sure that your interlocutors are indeed humans.
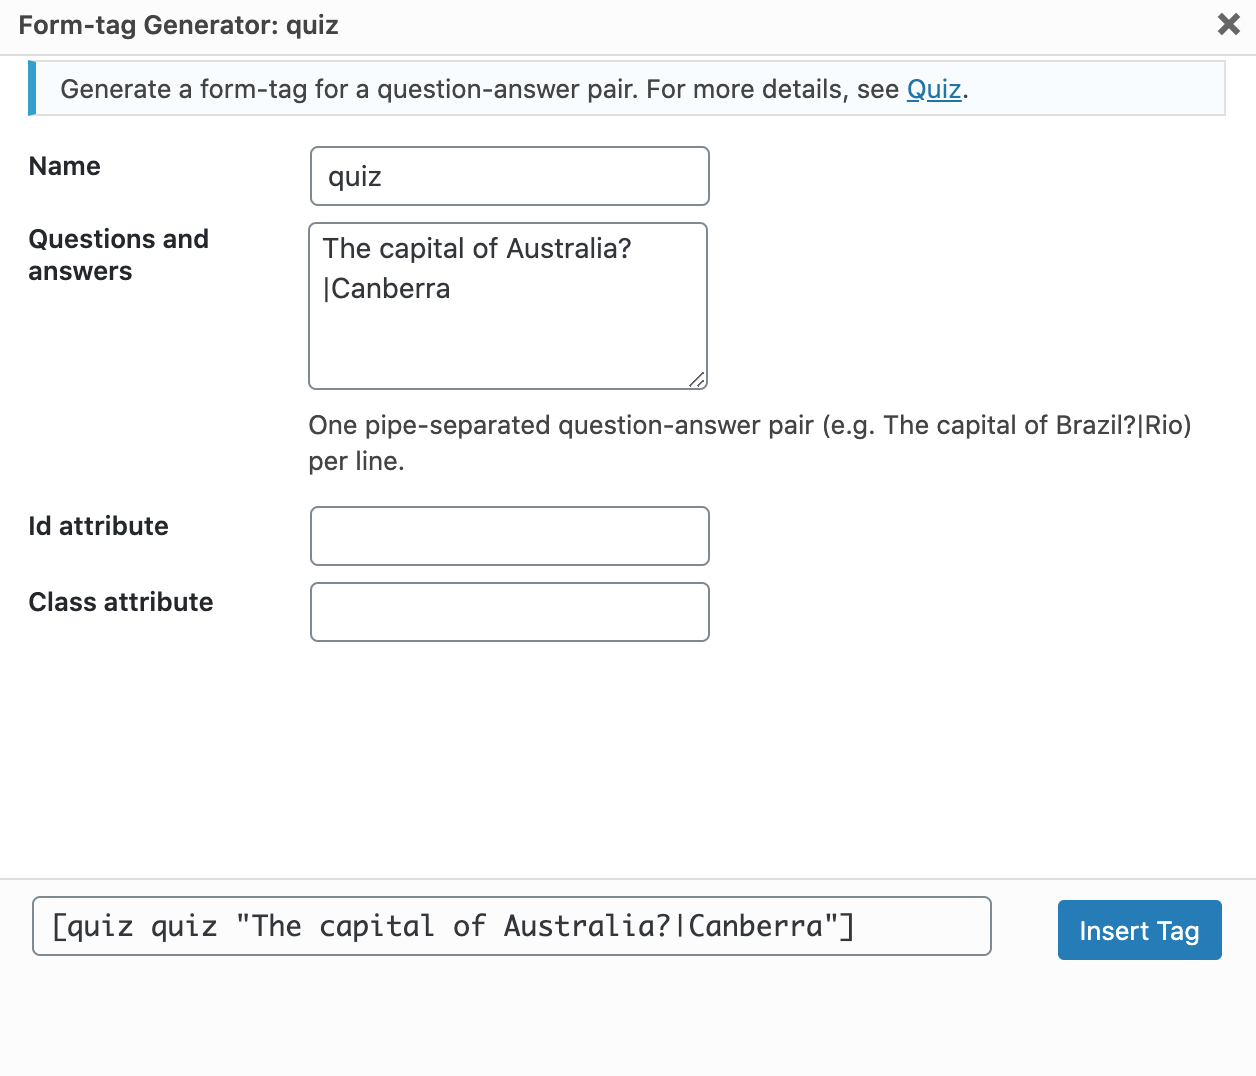
And in the form:

In this case, I asked what was the capital of Australia but you can ask for the solution of a small calculation.
The important thing is to use the structure: Question|Answer
Sending files
Your contacts can also send you files. This can be specifications, images, etc. In short, anything you want:
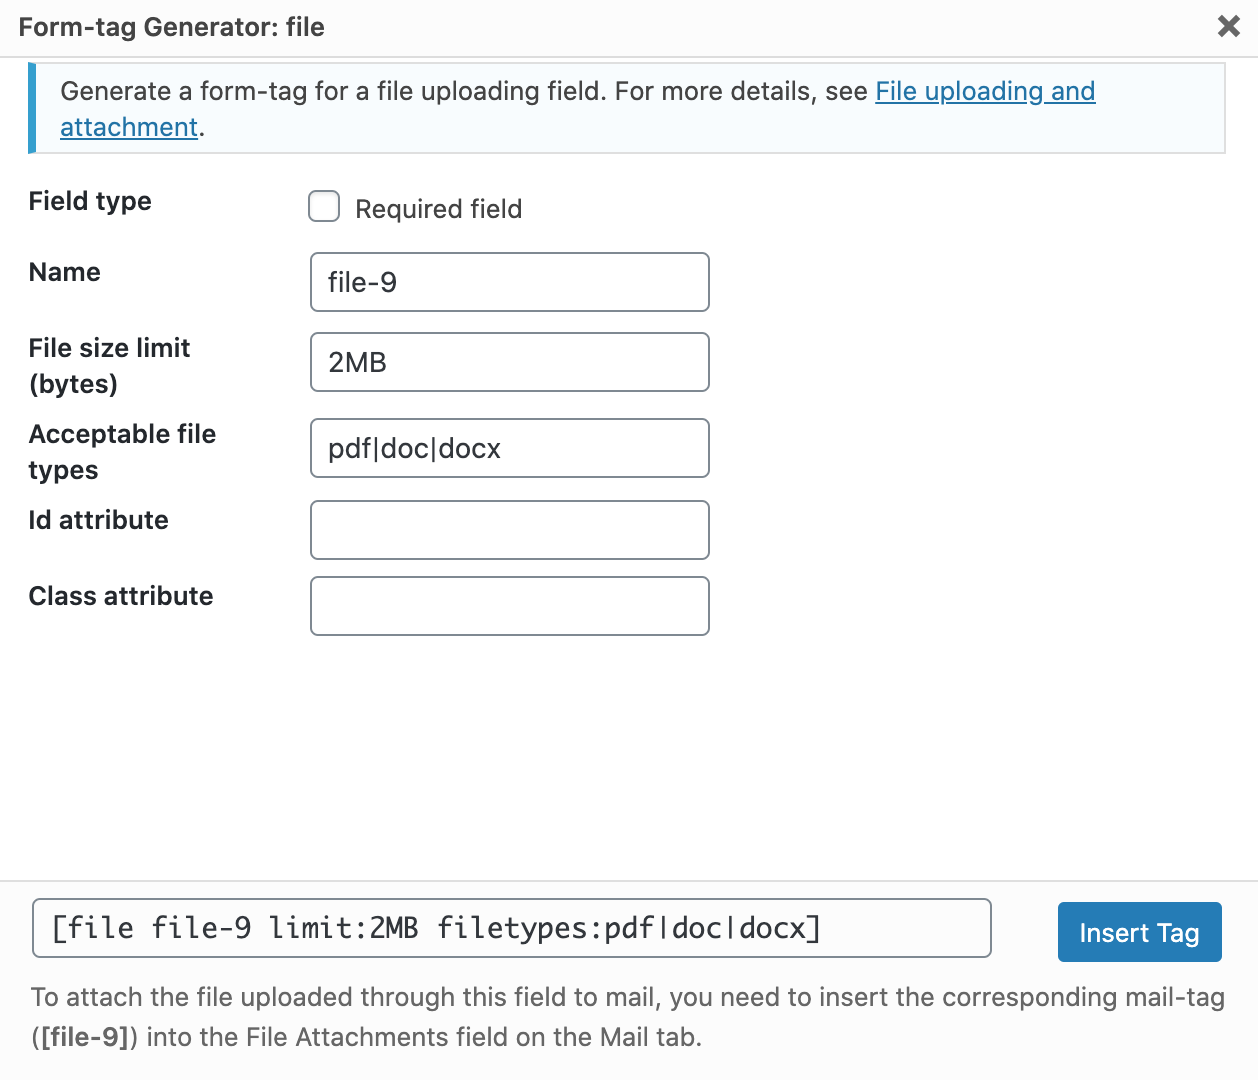
To avoid receiving any type of files, it is recommended to define a maximum size. Indicate 1, 2, 3 or 10mb, or even more depending on the files you expect.
Also indicate the file formats accepted by your form, based on this example: pdf|doc|docx. The important thing is to separate the extensions by vertical bars: |.
Last thing to know, do not put the second tag ([file]) in the body of the message but in the Attachments field of the email.
Submit button
In order to send his/her message, your interlocutor will have to click on a Submit button. As for the fields studied previously, it is possible to add an identifier and a class in order to customize it with CSS.
The label corresponds to the text of the button, so it is important to specify it.
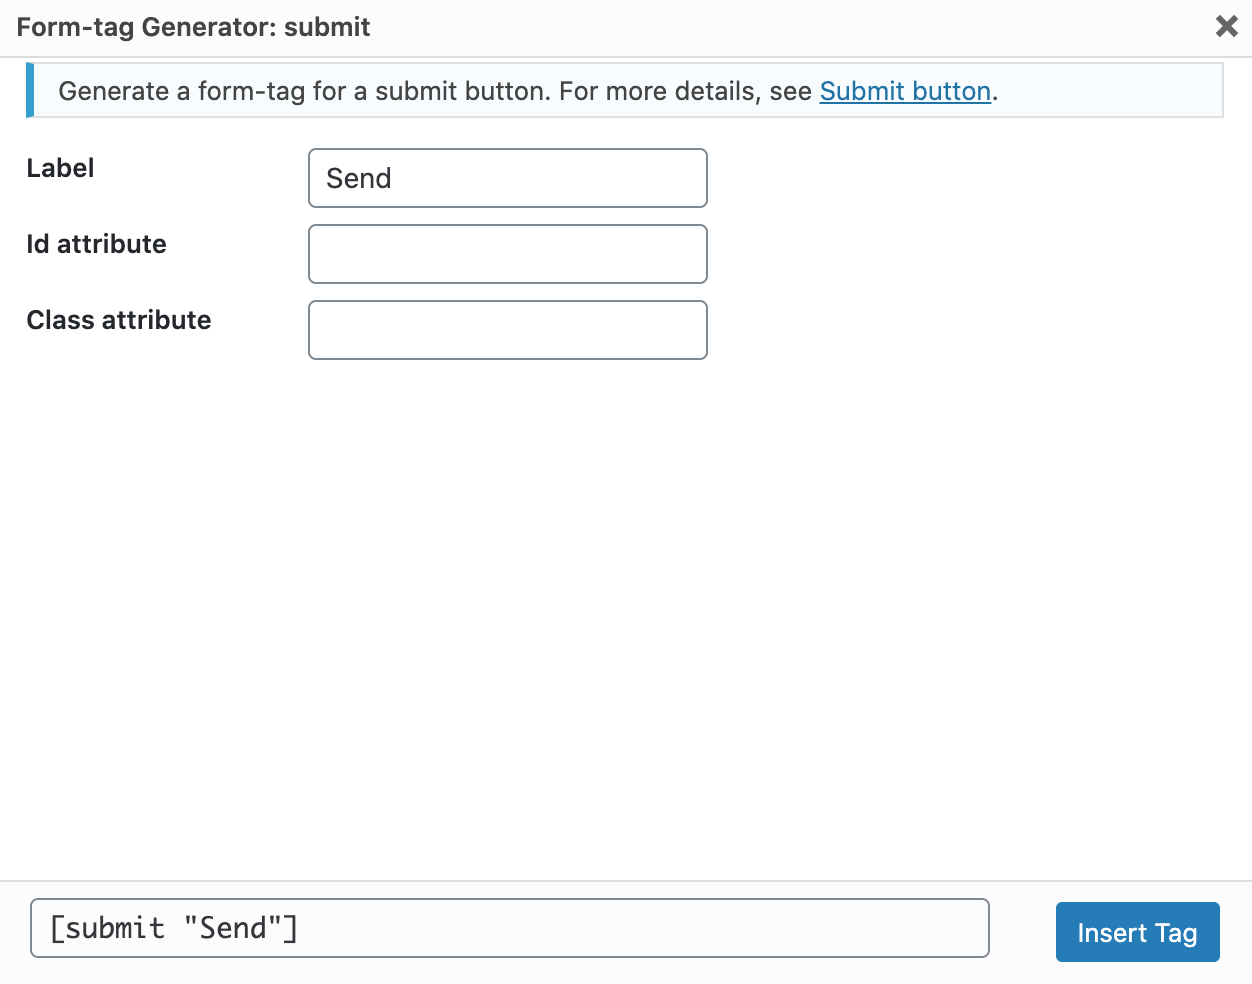
Then paste the tag into the form code on the left.
We have finished our tour of Contact Form 7 tags, but before we move on to integrating your form on your site, I would like to stop for a few moments on captchas.
CAPTCHA in Contact Form 7
Earlier, to be able to filter the emails, I told you that it was possible to use a quiz with Contact Form 7.
But there is also a solution that is not native on CF7, but more recommended: the use of a captcha.
A captcha is a test that helps fight against spam by differentiating humans from robots.
It requires a response from the user (choosing photos, copying words) before performing an action (downloading a file, creating an email account, validating a comment, sending a form, etc.).
To insert a captcha with CF7, how do you do it?
Well, before updating this article, I told you how to do it thanks to another plugin designed by the creator of CF7: Really Simple Captcha.
It allows you to choose the size and theme of the captcha (background color and font color).
In the meantime (for CF7 versions higher than 4.3), Takayuki Miyoshi has changed his cuti and now recommends the use of reCAPTCHA.
This is a service from Google that allows you to prove that you are not a robot by checking one box.
If the computer has any doubt about you being a human, it will give you a little test.
To link reCAPTCHA to CF7, follow the Integration link in the plugin menu. Then click on the button Setup Integration.

On the next page, you are prompted to enter a Site Key and a Secret Key.
To do so, go to this page and click on the Admin Console button in the top right corner of the page.
Fill in the requested information by choosing the captcha of your choice (version 3 or version 2). Google shows you the different types of captchas on this page.
For example, choose a reCAPTCHA version 2 if you want a “I am not a robot” checkbox to be displayed.
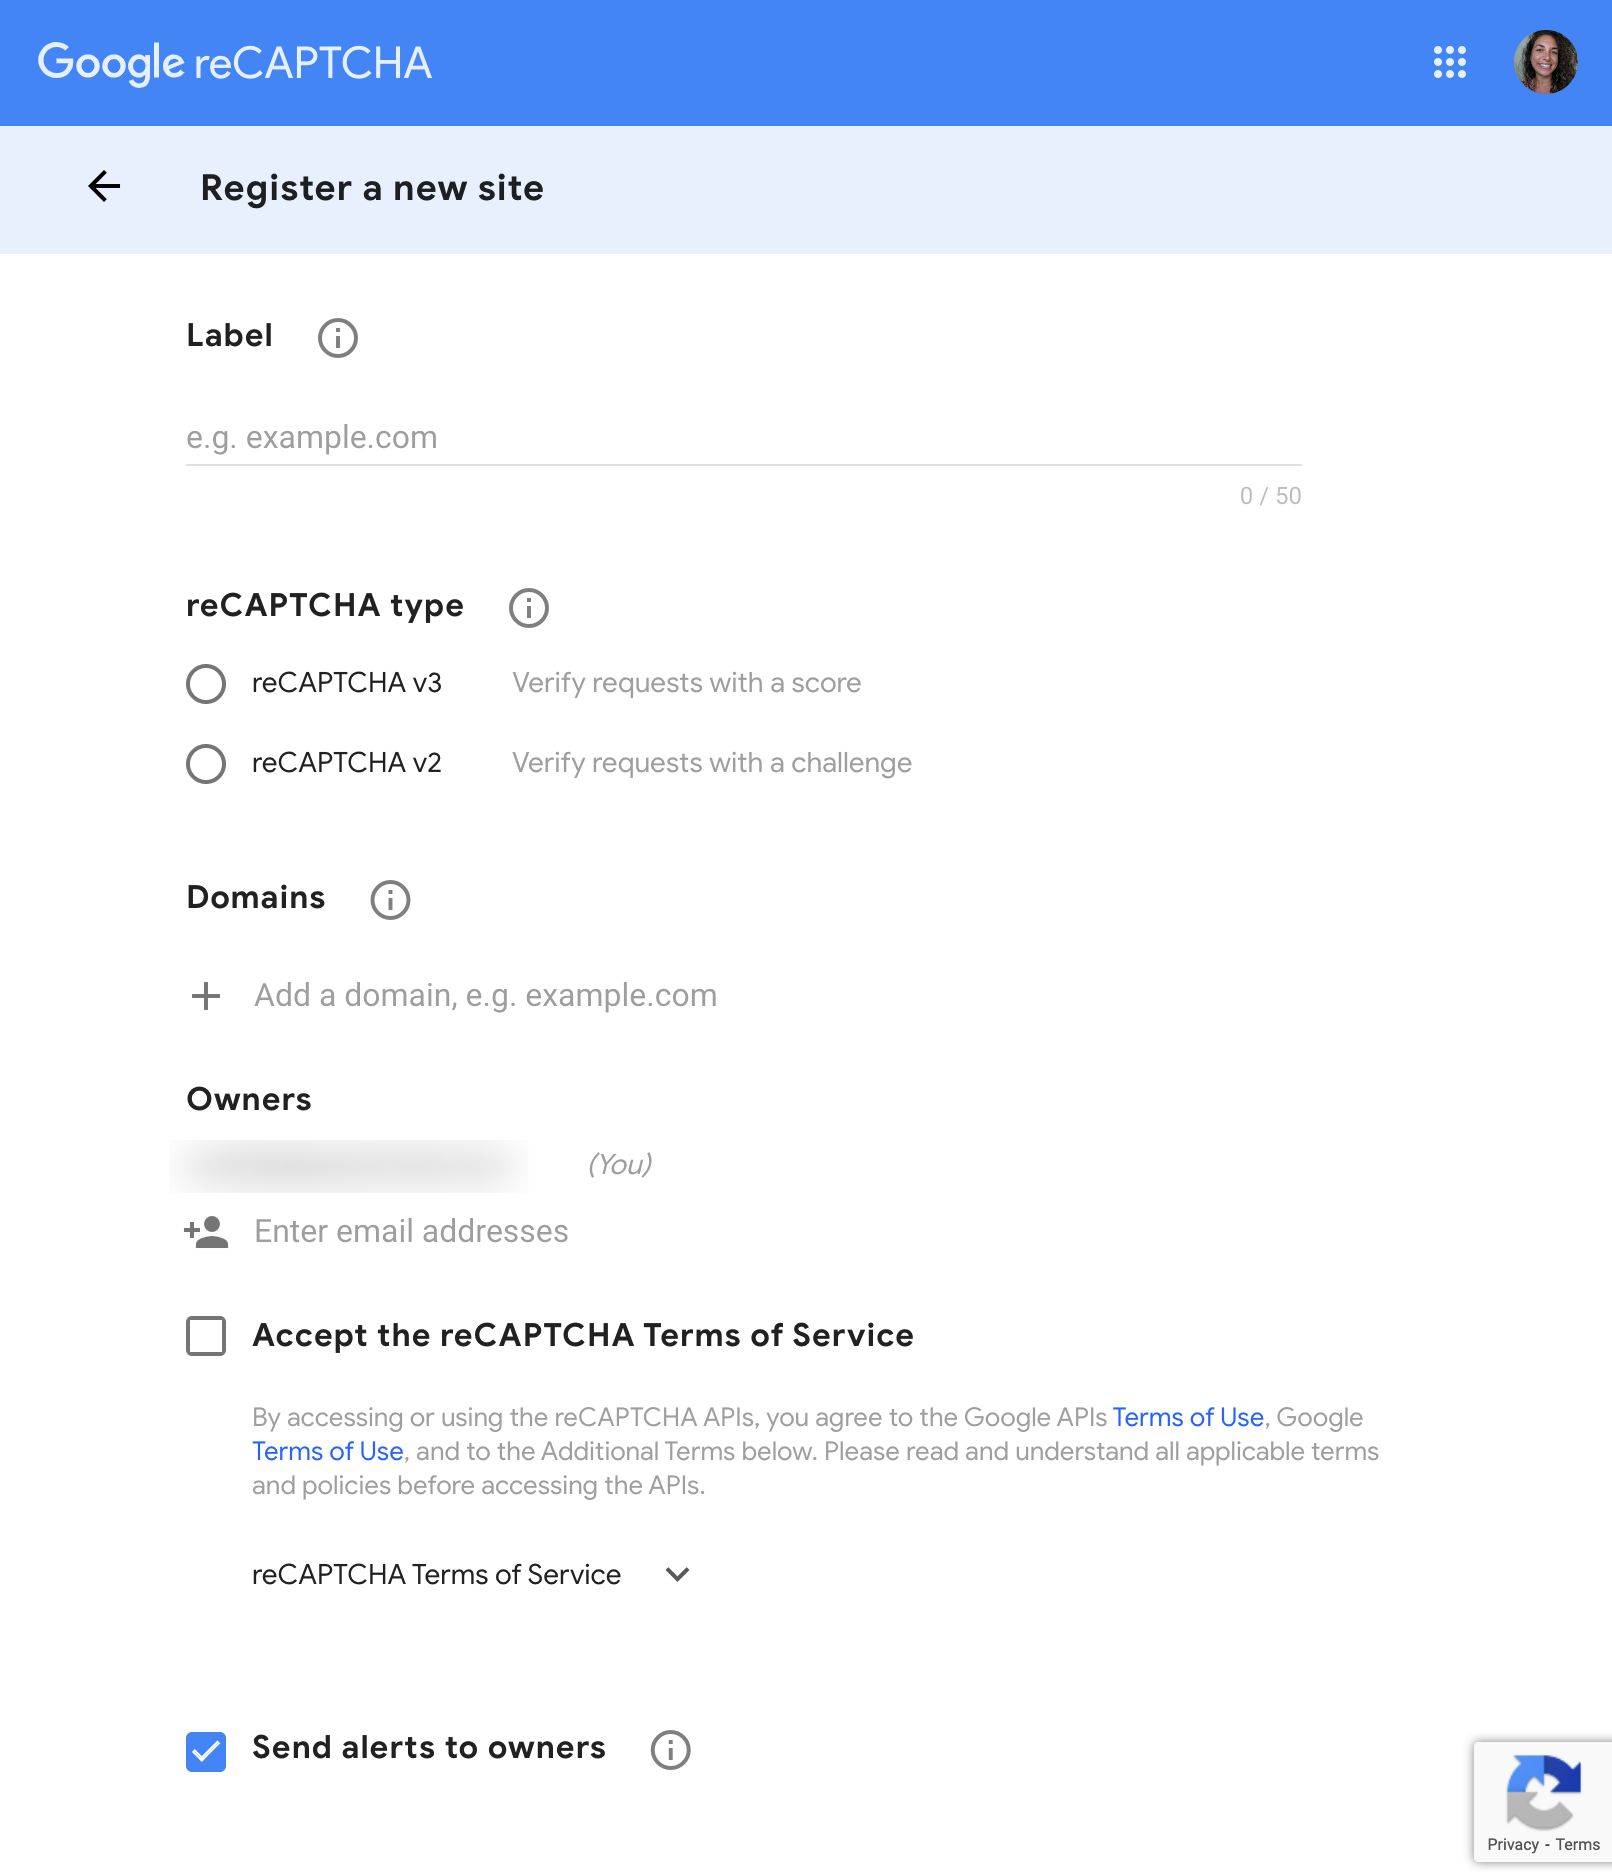
Once the information is filled in, Google will display your Site Key and your Secret Key.
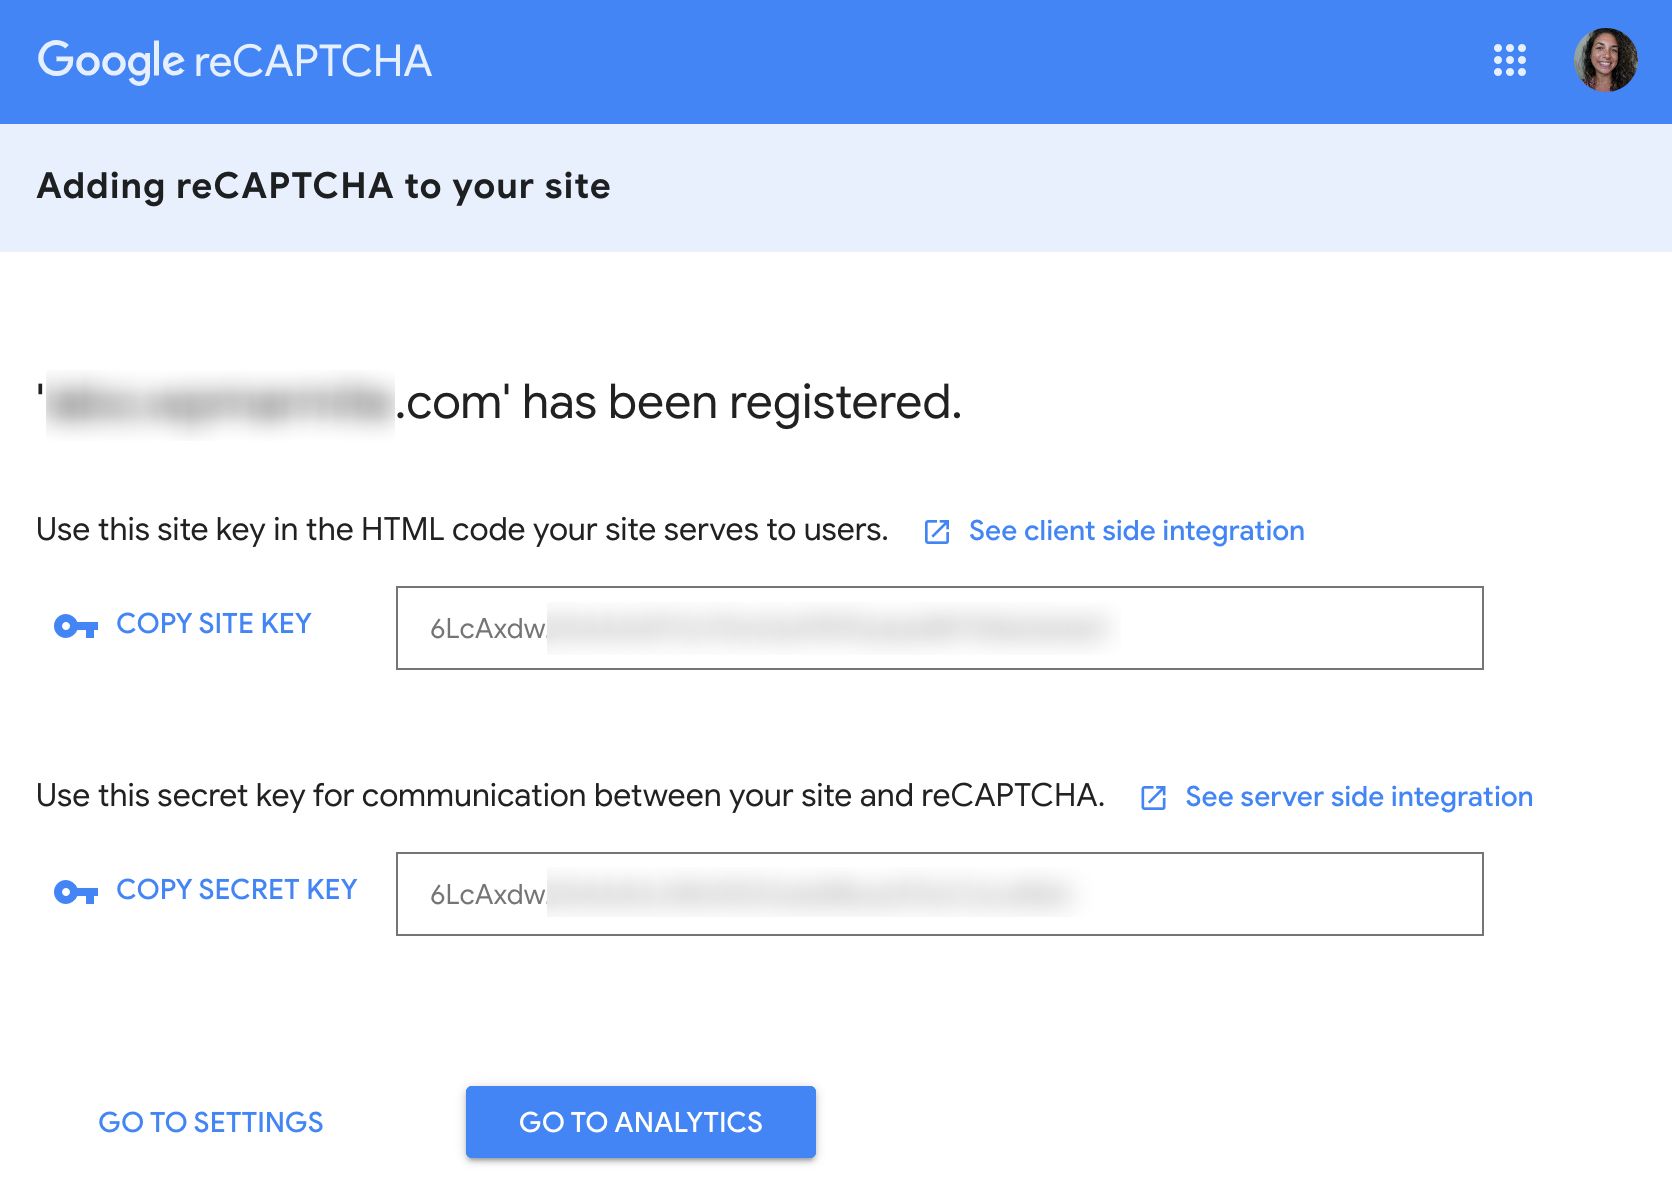
All you have to do is copy and paste them into the boxes provided, click on Save Changes and you’re good to go.

And to know everything about captchas, WPMarmite has the guide you need in which we present 6 dedicated plugins.
So, as promised, it’s time to move on to the integration of your form in your content.
Integrate a Contact Form 7 on your site
Once you have finished setting up the fields in your form, click on the Save button at the top right of the screen.
Under the title, you will see a shortcode:
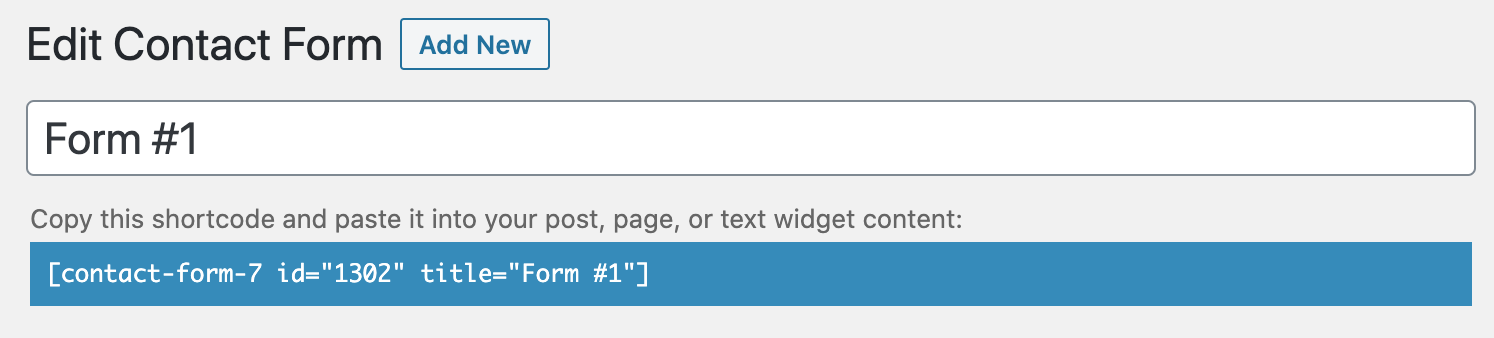
To insert your form, simply paste the shortcode in the article, page or widget of your choice.
And yes, it’s not more complicated 🙂
I suggest you to end this tutorial with…
5 tips to customize your forms
If you want your forms to be a little more advanced, here are some tips that may help.
Of course, these are not the only things you can do with this plugin.
Take a look at the other plugins that couple with Contact Form 7 to see what they can do.
1. Insert a form anywhere
By default, it is only possible to insert forms in publications (posts, pages or other) and widgets.
If you want to include a form in a page template or at a specific place in your theme, use the following PHP code (obviously by putting the right shortcode):
<?php echo do_shortcode( '[contact-form-7 id="1234" title="Contact form 1"]' ); ?>
2. Let the visitor choose the recipient
To give your visitors the opportunity to contact a particular person or department in your company, proceed as follows:
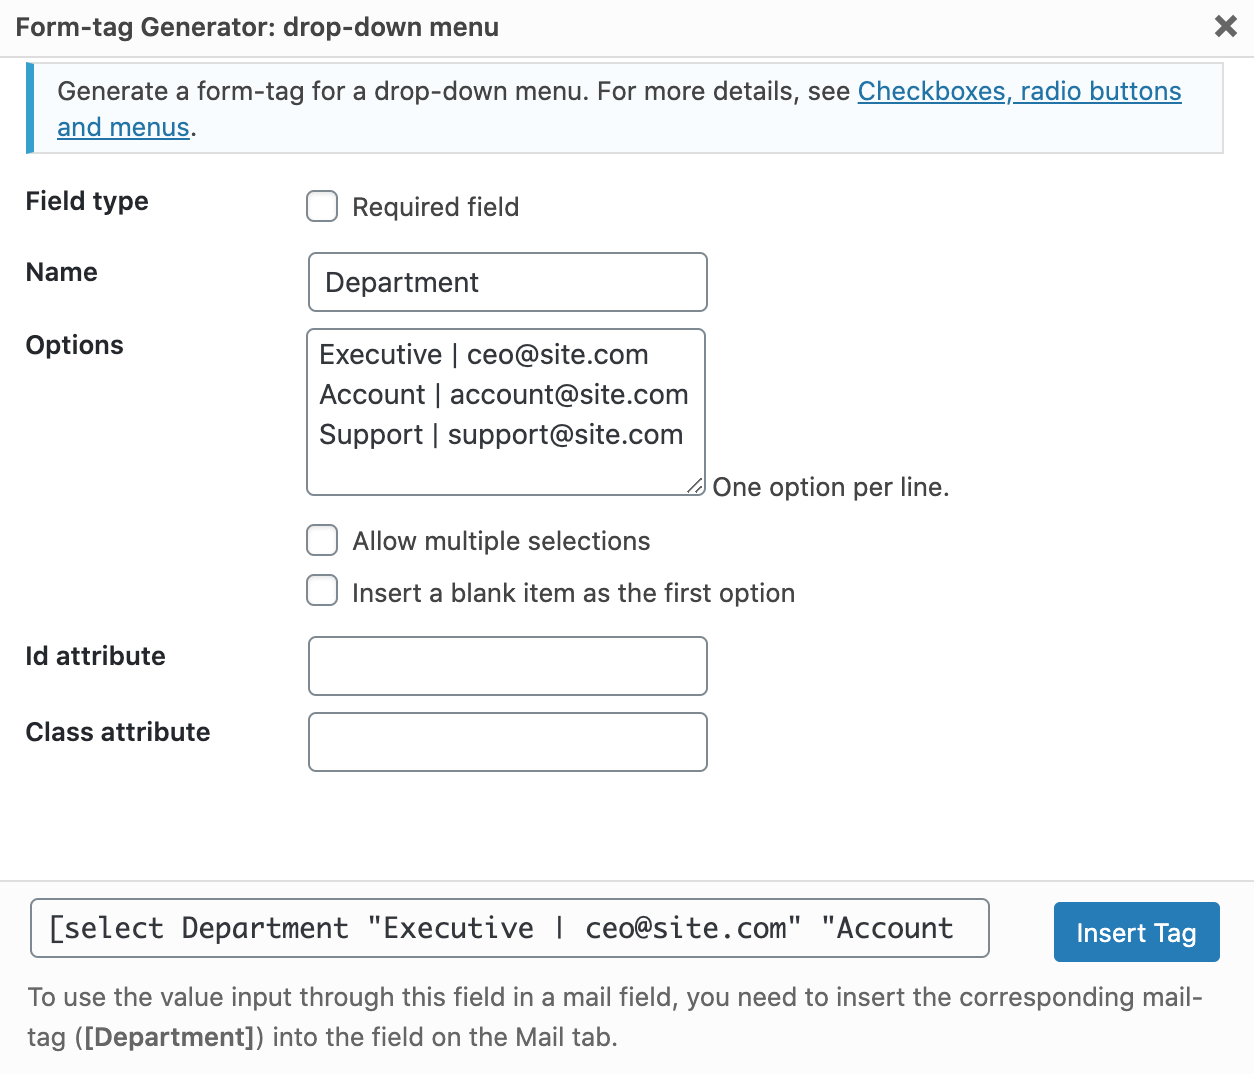
As shown in the image, create a drop-down menu and put the recipients in the choices. Use the structure DEPARTMENT|EMAIL to hide emails to visitors (e.g. Executive|ceo@site.com).
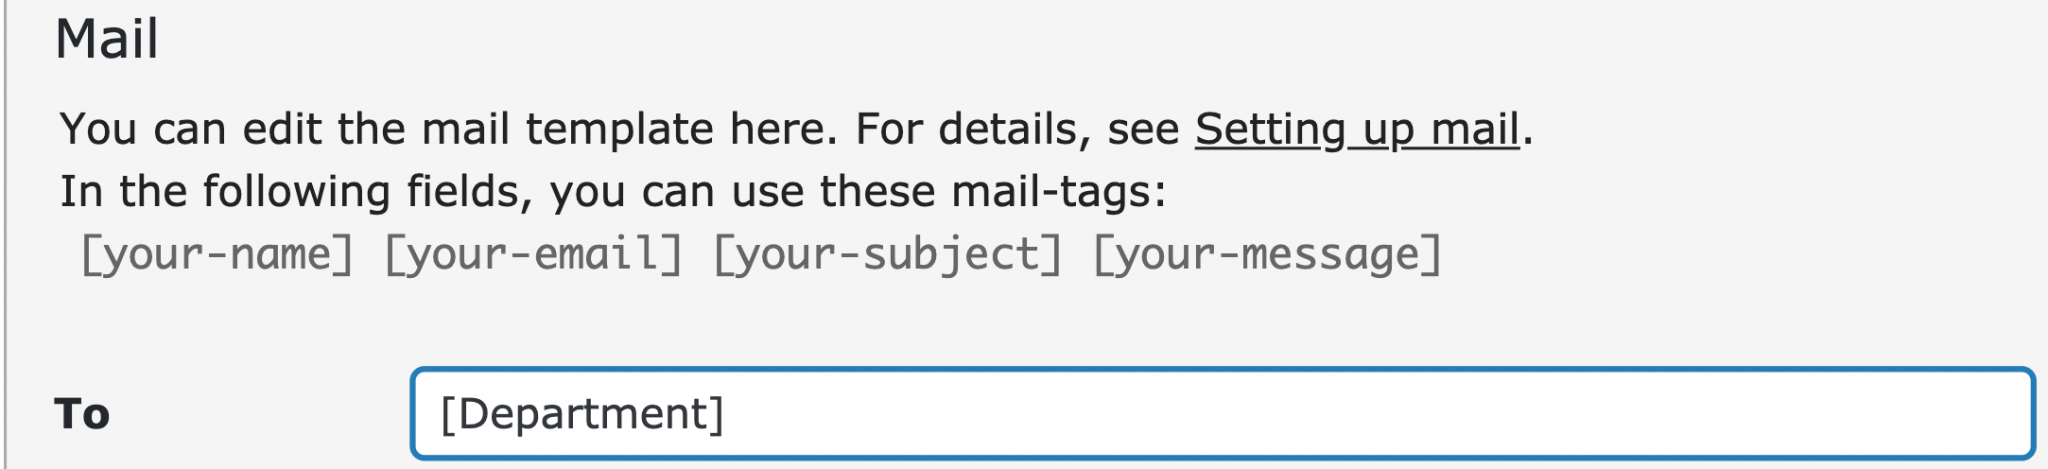
In order for this to work, it is necessary to put the [Department] tag in the To field:
3. Get the visitor’s IP
If, for any reason, you wish to obtain the IP of the person who contacts you, insert the [_remote_ip] tag in the body of the message (for example under the signature).
4. Get the date and time of the submission
Also, it is possible to have the date and time of submission of the email. You will tell me that this corresponds to the date and time of reception of the email and you will be right.
But hey, if you need, you can insert the [_date] and [_time ] tags in the body of the message.
5. Get the address of the submission page
If you have integrated your form in a widget or something in your theme, knowing the exact page from which the form was sent can be interesting.
To do so, insert the [_url] tag in the body of the message ([_post_url] will return the permalink of the post, so it’s up to you).
In addition, there are two other tricks that I will not detail here because their implementation concerns more advanced users. I don’t really understand why the author has integrated these features in this way but well, that’s the way it is. They are:
Learn all about Google Analytics and how to use it to understand your WordPress site’s statistics, read this article.
Contact Form 7: we take stock
Contact Form 7 is one of the 6 plugins of the official WordPress.org directory with more than 5 million active installations.
It allows you to create simple forms but it will not always be easy to create complex things with it.
You’ll need some knowledge of HTML to get a correct rendering. If you have a basic knowledge of CSS, you will be able to push the customization thanks to the classes and identifiers that can be added to each element.
If you’re looking for more simplicity, I recommend Gravity Forms.
In particular, it allows you to create forms with simple drag and drop. Which – it must be said – puts Contact Form 7 far behind.
Multiple complementary plugins are available to benefit from more functionalities (such as Slack, Mailchimp or Paypal). There’s plenty to choose from.
From now on, I’ll leave the floor to you. What do you think of Contact Form 7? Which form plugin do you use for your site?
Express yourself by posting a comment below.

Receive the next posts for free and access exclusive resources. More than 20,000 people have done it, why not you?
Register


Bonjour,
Super tutoriel. Pour ma part sur mon site internet tout fonctionnait très bien et ça fait maintenant quelques mois que l’email 2 ne s’envoit plus. J’ai le pluggin recaptcha (ainsi qu’Akismet) qui a été installé. Selon contact form ça devait régler le problème mais ça n’a rien changé :'(
Si vous avez une idée d’ou le problème peut venir ce serait super !
Merci 🙂
Bonjour Sèverine,
Je n’ai pas compris de quoi s’agissait “l’email 2”. Une deuxième adresse à laquelle est envoyé le message du formulaire ?
Pour la petite précision, Recaptcha et Askimet permettent de bloquer les spams.