Is your site temperamental? Is it slow loading? Or worse, maybe it’s not displaying the latest CSS changes you’ve just applied?
In that case, you have three options:
- Get hydrated
- Call 911
- Throw your screen out of the window

These solutions are a bit extreme, especially the last one. Even though they’ll make you feel instantly better, they won’t solve your problem.
Instead, opt for pragmatism: have you thought about clearing the WordPress cache of your website?
Clear what? Well, I’m going to explain it all to you now.
By the end of this post, you’ll know exactly what the word “cache” means, and you’ll have several solutions for… clearing your pages’ cache, of course.
Believe me, it would be a shame not to do it. Your website and your visitors will love the cache.
Overview
What is caching?
Caching is a technique that consists of storing a copy of a given resource (web page, image, etc.) in order to be able to restore it quickly to the visitor.
“When a web cache has a requested resource in its store, it intercepts the request and returns a copy of the stored resource instead of redownloading the resource from the originating server” says the Mozilla web browser documentation.
In concrete terms, here is how it works in a simplified way. When you want to visit a web page, your browser requests the web server hosting the page.
Then the server resquests the database (DB), and “creates” a page using the content retrieved from the DB.
Finally, it sends the page to your browser, which displays it on your screen (computer, smartphone or tablet). That’s the classic way of working.

Now, when a resource is cached, your browser can retrieve it from this temporary storage space (the cache), which puts less strain on the hosting server to allow a faster display. The cache is clever. 😉
Generally speaking, there are two types of caches:
- The browser cache: this stores locally, on your computer, the static resources of a site (CSS files, images, JavaScript, etc.) to be able to restore them more quickly to the Internet user who has already visited the page.
- The server cache: the way this works is similar, except that this time the resources are stored on a web server, which avoids PHP processing.
Now, let’s talk about the advantages of caching.
Why cache your WordPress site?
Caching a WordPress site has several benefits, both for the visitor and the webmaster:
- The user experience (UX) is improved. Thanks to a caching system, the pages are displayed more quickly on the user’s screen. The latter benefits from a smoother navigation, and you put more chances on your side to limit the bounce rate.
In addition, UX is taken into account by Google’s algorithm in the ranking of pages in its search results (even if it is not the most important factor), especially since the launch of its update “Page Experience” and “Web Vitals“. - The web server load is reduced. Computing power is saved because the server is less solicited. This is especially important if you are using a server with limited resources, for example on a shared hosting service.
- The loading speed of your pages is improved. With a caching system, the static pages of your site are already pre-constructed and stored to be delivered more quickly.
More info on Core Web Vitals on the WP Rocket blog.
While the benefits of caching are undeniable, it is still necessary to clear or purge the cache manually at certain times to be able to view the most up-to-date version of your site.
Let’s take an example to understand this. As a WordPress site creator, you probably perform some common operations on your site:
- At the content level, you create new posts or add updated texts on certain pages.
- From time to time, you refresh the design of your pages, add some CSS code, change your logo, etc.
After each modification, it is possible that your different changes aren’t visible on the front-end interface of your WordPress site (i.e. what your visitors see).
The culprit is the caching system! Instead of loading the new version of your site, the rogue continues to display its cached version, which does not include the latest changes.
To solve this, you need to clear the cache. Don’t worry: you don’t need to be a techie and dive into the code to take care of it.
Using a dedicated cache plugin will do the trick, as you’ll see in the next section.
How to clear the WordPress cache with a plugin?
To find a WordPress plugin, nothing compares to the official directory. It offers 63,708 plugins.
In this ocean, there are dozens of free caching plugins. In this test, I will present the 4 most popular ones in terms of active installations.
- LiteSpeed Cache (7M+ active installations)
- WP Fastest Cache (1M+ active installations)
- W3 Total Cache (900K active installations)
- WP Super Cache (1M+ active installations)
With a dedicated tutorial, let’s see how to clear the cache with each of them.
In the meantime, there are also premium solutions to clear the cache of your WordPress site. One of them is called WP Rocket, so let’s start with this one.
How to clear WordPress cache with WP Rocket?

WP Rocket is a very interesting plugin to improve the loading speed of your pages. Very simple to use, it works immediately, as soon as you enable it.
It automatically caches your pages, but that’s not all:
- It lightens your CSS and JavaScript files.
- It allows you to delay the loading of your images, with a system called lazy load. If it is native on WordPress, WP Rocket allows you to enable the lazy load on iFrames.
- It optimizes your database by making it lighter, etc.
To learn more about WP Rocket, check out our detailed review on the blog.
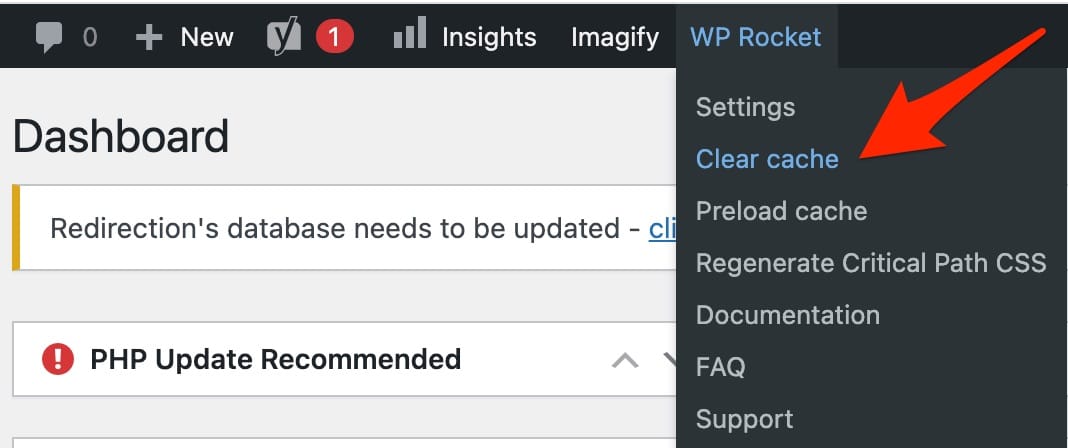
Right now, let’s just see how to clear the cache with WP Rocket. Once the plugin is installed and enabled, hover over the WP Rocket link located in the menu bar at the top of your page. Click on “Clear cache”:
And then… that’s it! Your site’s cache has been purged. A success message will normally be displayed just below, with the date and time of the operation:

If you only want to clear the cache of a page or a post, click on “Clear this cache” from the page where your pages or posts are listed:

After WP Rocket, let’s move on to the plugins proposed on the official directory. These plugins are also of very good quality, but most of the time they have less features than WP Rocket.
Another drawback is that they are often more complex to use for a beginner. So you have to make sure that you set them up correctly to avoid crashing your site.
Apart from that, these plugins have a major competitive advantage over WP Rocket: they are free. If you just want to clear your cache without going much further (e.g. optimizing your site’s performance on other levels), they are an interesting alternative.
Now let’s go into detail for each of them.
How to clear the WordPress cache with LiteSpeed Cache?

With 7M+ active installations, LiteSpeed Cache is the most popular WordPress cache plugin in the official directory.
LiteSpeed Cache is a server-level cache and, like WP Rocket, it offers other more general options to boost the loading speed of your pages:
- CSS, JavaScript and HTML minification
- Lazy load
- Image and database optimization
However, you must use a LiteSpeed web server or a QUIC.cloud CDN to use the caching functions offered by the plugin.
FYI: Bluehost (affiliate link) doesn’t support LiteSpeed on shared hosting. You must be on VPS or Dedicated Hosting to install it. Also, you’ll have to handle the maintenance and updates yourself.
Are you ready? Then go to LiteSpeed Cache > Toolbox.
You will have different choices to clear the cache, either on the whole site or in a more targeted way (e.g. some pages only).
To clear the entire cache, select “Purge All” and you’re done.

Download LiteSpeed Cache:
How to clear your WordPress cache with WP Super Cache?

The second plugin we’ll go through is WP Super Cache. It is a must-have behind which we find the company Automattic, which mostly contributes to WordPress.org.
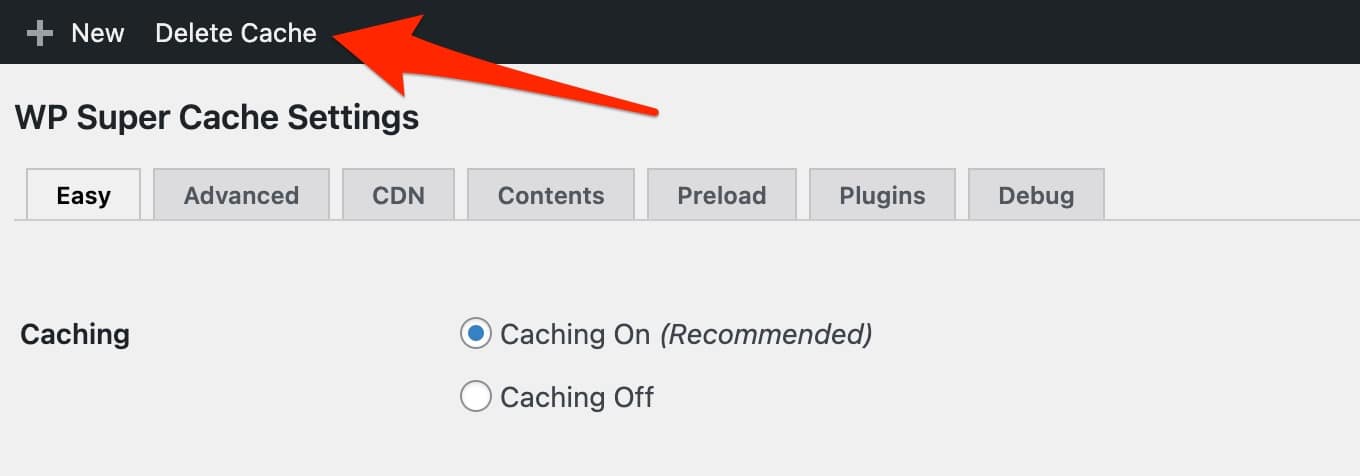
To start, enable caching by going to Settings > WP Super Cache Settings. In the “Easy” tab, click on “Caching On (Recommended)”. Remember to save by clicking on the blue “Update Status” button.

To clear the cache in one click, you have two main options:
- Click on the “Delete Cache” link at the top of your dashboard, in the menu bar.
- In the WP Super Cache settings, in the “Easy” tab, choose the “Delete cache” button.
Download WP Super Cache:
How to clear WordPress cache with WP Fastest Cache?

Developed and maintained by Emre Vona, WP Fastest Cache bills itself as “the easiest and fastest caching system for WordPress”.
It also has excellent user feedback, with an overall rating of 4.9 out of 5 stars.
This plugin is very convenient because its settings are limited, most of them being accessible on its premium version.
That way, there’s no risk of getting lost in endless menus. In addition to the cache, you can also try to improve the loading speed of your pages by minifying/combining HTML and CSS or by disabling emojis.
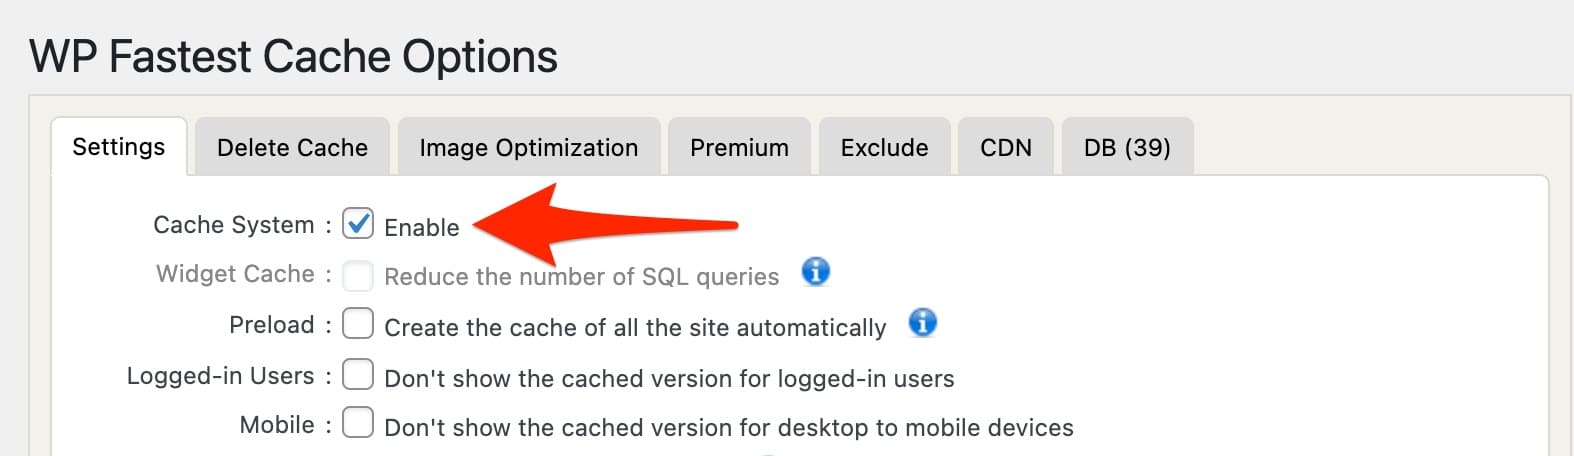
To take advantage of the WP Fastest Cache system, first check the “Enable” box in the “Settings” tab:
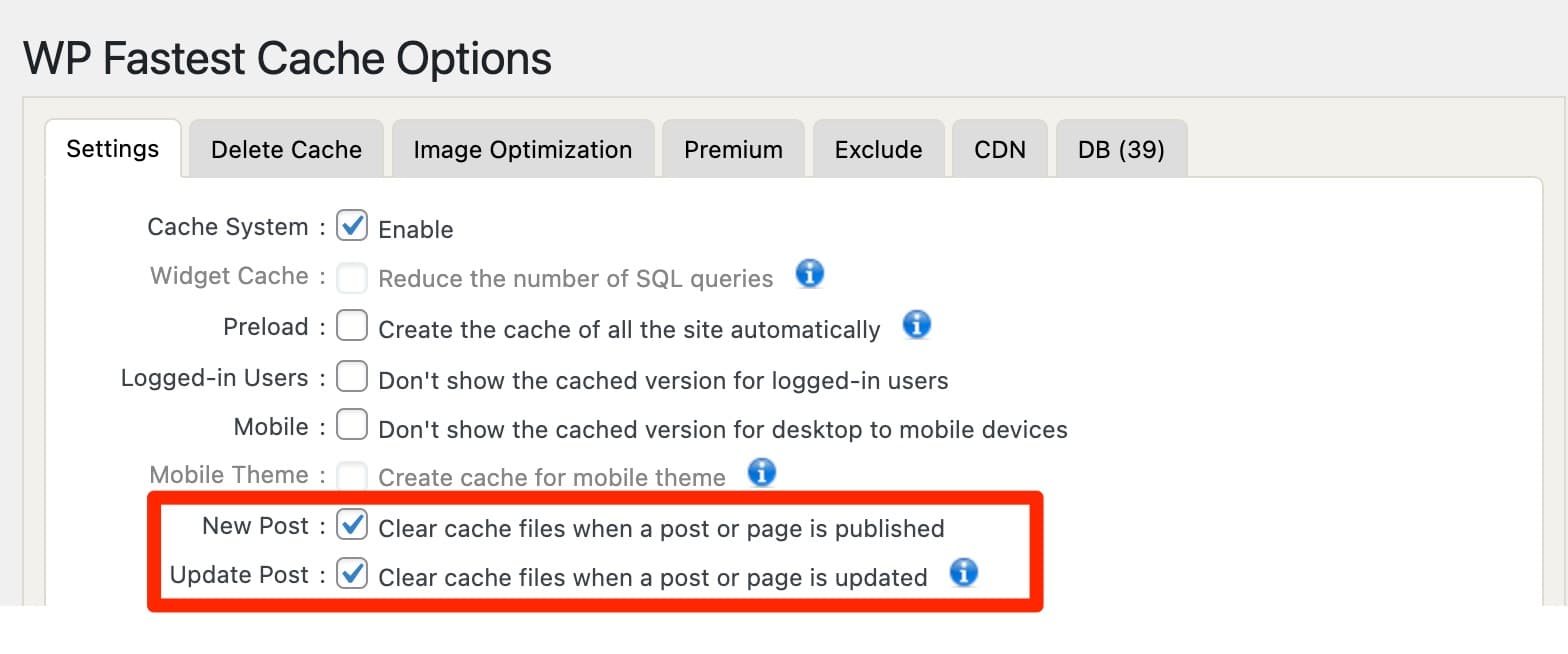
For your information, it is possible to automatically purge the cache when publishing or updating a new post or a page. To do this, check the two boxes below:
Do you need to purge the cache manually? Hover over the link “Delete Cache” located at the top of your dashboard. You won’t miss it, it has a roaring cheetah’s head on it:

From there, you have 3 options:
- Clear All Cache, to clear the cache on your entire site.
- Delete Cache and Minified CSS/JS. Use this option if you have just made adjustments to the CSS and/or JavaScript code.
- Settings, which redirects you to the plugin settings page. You will also find the two options presented in the bullet points above under the “Delete Cache” tab.
Download WP Fastest Cache:

How to clear your WordPress cache with W3 Total Cache?
W3 Total Cache is one of the oldest cache plugins on the market. As stated in its description once you enable it, the plugin features browser caching, page caching, object caching and database caching, as well as minification for WordPress.
Compared to its competitors, W3 Total Cache has one main flaw: it is more complex to use, due to endless setting menus with increasingly complex headings.
To be able to purge the cache, you must first set up the different types of cache offered (page, database, object, browser, etc.) via the menu Performance > Dashboard.
All this is done automatically via a configuration wizard.
When everything is good on your end, you can manually purge the cache via the “Performance” link at the top of your dashboard. On mouseover, click on “Purge All Caches” to achieve your goal.

If you want to go even further and purge specific caches (pages, database, etc.), select the option of your choice under Performance > General Settings:

Download W3 Total Cache:
Well, that’s it for this review of the most popular plugins for cache clearing on WordPress. Thanks to them, you won’t have to perform any technical operation to purge your site’s cache.
They will take care of everything for you. All you have to do is click on the buttons of your choice.
If you’re the daring type, you might want to know how to clear your site’s cache without a plugin.
The answer is in the next part, everything is detailed for you.
How to clear your WordPress cache without a plugin?
Clearing your site’s cache without a plugin involves using an FTP client (File Transfer Protocol).
This is a software that allows you to communicate with your server. With it, you can add/delete files and directories on your site.
Among the most famous FTP clients, there are for example:
- Filezilla (the one I will use here)
- Cyberduck
- Transmit
To clear the WordPress cache via FTP, first connect to your server on Filezilla. The connection information is specified in the email your host sent you when you signed up with them.
You must enter in particular:
- A login name
- A user name
- A password
- The connection port
When you are connected, double-click on the wp-content directory, which is located at the root of your site (the folder is often called public_html, www or htdocs). Inside wp-content, find the folder called “cache”:

Go inside this “cache” folder and delete all of its contents. If there are several folders, right click on each of them and click on Delete.

However, be careful: do not delete the source directory, the one called “cache”. Only delete the folders inside!
How to empty the cache of your web browser?
The changes you’ve just made to your WordPress site are still not visible on front-end, even after clearing the cache with a plugin?
In this case, consider clearing your web browser’s cache. The latter also memorizes resources (e.g. images) to display your pages faster during your next visits.
Except that sometimes, it will continue to display the cached version of your site, rather than its updated version.
For the procedure, let’s focus on the two most used browsers in the USA: Google Chrome and Safari.
How to empty the cache of the Google Chrome browser?
Once you have opened Google Chrome, click on the 3 small dots, on the right end of your navigation bar.
Select More tools > Clear browsing data.

In the highlighted window that opens, select the time range of your choice. Select “All time” if you want to delete the entire cache.
Make sure the “Cached images and files” box is checked, then select “Browsing history” and “Cookies and other site data” if you want to delete them. Finish by clicking on the “Clear data” blue button:

If the operation worked well, your site will display its last version when you reload its page.
Here are 3 other ways to clear the cache of the Google Chrome browser:
1 – In one click using the Clear Cache Chrome extension.
2 – Private browsing (keyboard shortcut Ctrl or Cmd + Shift + N on Chrome) when you browse the site of your choice.
In this mode, there are no cookies, so in general, all your resources (images, CSS, JavaScript etc.) will be downloaded again each time the page is loaded.
3 – By forcing a page refresh via the keyboard shortcut Ctrl or Cmd + Shift + R.
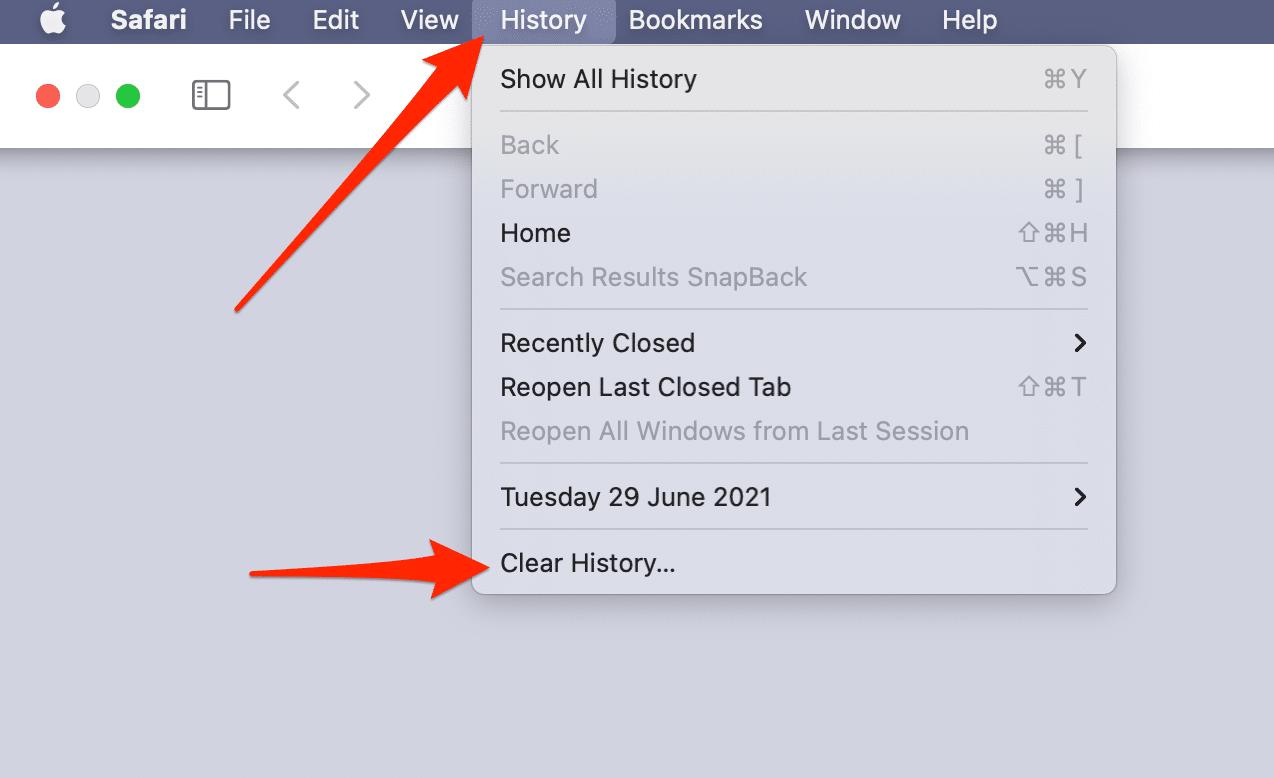
How to clear the Safari browser cache?
After opening the web browser developed by Apple, click on History > Clear History:
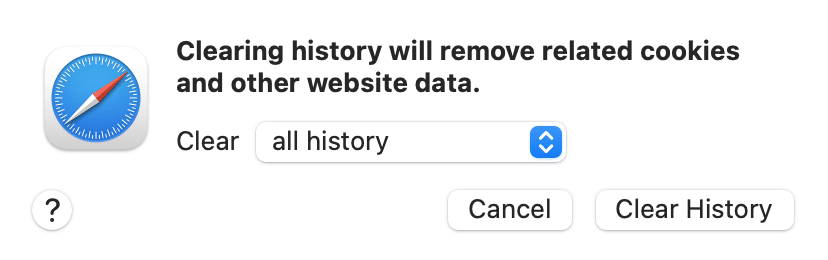
In the highlighted window, choose the time range you want to clear. Choose “All history” if you want to clear the entire cache. Safari says it will also delete cookies and other website data.
Finish by clicking on “Clear History”:
How to clear the cache of your web host?
To conclude on the different ways to clear your WordPress site’s cache, you should know that some web hosts offer their own in-house caching solution.
You can then purge the cache directly from their settings interface, without having to use a plugin.
To find out if your host offers this feature, check their presentation page, or contact their customer service department to ask them about it.
For example, with Bluehost (affiliate link), it is possible to clear your cache directly on your WordPress dashboard. Click on “Caching” in your WordPress admin menu and select “Purge All” to purge all caches.
Bluehost recommends several caching plugins as well, like W3 Total Cache or W3 Super Cache or WP Rocket that we mentioned earlier in this post.
Final recap
Clearing the cache of your WordPress site is a simple but important operation. As you have seen throughout these lines, it allows to:
- Improve the user experience.
- Speed up the loading time of your pages.
- Display the latest version of your site.
There are several ways to do this: manually, via your browser and, of course, with a plugin.
Precisely, all the plugins presented in this post allow you to purge the cache easily and quickly.
The easiest to use, and probably the most complete, is WP Rocket (affiliate link). If you have some budget and want to improve the overall performance of your WP site – well beyond the cache – we highly recommend it.
Among the free plugins, WP Fastest Cache made a very good impression on us. Its reduced options and its clarity make it a great tool if you just want to clear the cache of your pages.
To a lesser degree, LiteSpeed Cache is also very interesting, but it needs to be installed on the LiteSpeed server or QUIC.cloud CDN, which can make it a bit complicated to use.
How do you clear your site’s cache? Do you have a favorite plugin for this?
Share your experience with us by posting a comment.

Receive the next posts for free and access exclusive resources. More than 20,000 people have done it, why not you?

Continue reading
Articles posted in WordPress TutorialsHow to update the PHP version of your WordPress site
What comes to mind when you think of WordPress speed and security? Your favorite plugins, perhaps? You should also think about… PHP! If you’re looking for a site that loads fast, while offering a solid shield against hacker attacks, there’s a…
How to create an effective HubSpot conversion funnel on WordPress (complete guide)
In the drawers of a kitchen, there are often two very useful utensils lying around. The first is the colander. And to illustrate, some WordPress sites unfortunately resemble it. Why? Well, because visitors arrive on the site in question… then…
How to fix the ERR_CONNECTION_REFUSED error: A complete guide
Does your browser display the ERR_CONNECTION_REFUSED message when you try to access a website? This error means that the target server – or your own configuration – is actively rejecting the connection request, leaving you at a dead end. But…