In the drawers of a kitchen, there are often two very useful utensils lying around. The first is the colander. And to illustrate, some WordPress sites unfortunately resemble it.
Why? Well, because visitors arrive on the site in question… then leave without leaving a trace. Often, it’s frustrating because the published content is good.
The problem rather comes from the absence of a clear path to guide visitors toward a specific action to be taken. Result: lost opportunities every day, despite steady traffic.

Now, let’s move on to our second utensil: the funnel. The kind of thing you might use to pour olive oil into a nice container at home.
And you know what? With a well-oiled conversion funnel (it goes without saying), you can turn a colander-like site into a client magnet. Yes, really.
An example? Setting up a HubSpot funnel on WordPress allows you to structure each step, capture leads and transform your visitors into clients, without needing to be a developer or multiply third-party tools.
In this article, we explain exactly how to do it, step by step. So, ready to enjoy some detailed content? Follow along to dig in… and generate more leads!
- What is a conversion funnel and why create one on your WordPress site?
- Why create a HubSpot conversion funnel on WordPress?
- Essential elements of a conversion funnel
- A conversion funnel, for whom?
- How to create a conversion funnel on your WordPress site with HubSpot, step by step
- Best practices to optimize your HubSpot conversion funnel
- How much does it cost?
- Our final opinion
This article is sponsored. Some links to HubSpot are affiliate links. If you purchase a subscription to their services, WPMarmite will receive a commission.
Thanks to affiliate marketing, WPMarmite is able to compensate the research and writing efforts of the blog’s writers. Know that we remain impartial. If a product isn’t worth it, we say so (or we don’t talk about it).
What is a conversion funnel and why create one on your WordPress site?
Definition of a conversion funnel
A conversion funnel, also called a conversion funnel, marketing funnel, or sales pipeline, is the path you make an unknown visitor take on your site to transform them into a prospect (we also use the term lead to refer to a sales contact), then into a client.
Imagine this funnel as a funnel in the literal sense, just like the one you might have in your kitchen or garage (for pouring gasoline into a bike, it’s convenient ^^).
So at the top, you have a broad audience discovering your site. This corresponds to the widest part of your funnel.
As they progress through your journey (reading an article, downloading a resource, getting in touch), this audience becomes smaller and more qualified. Let’s say it slides from top to bottom like on a playground slide.
At the bottom of the funnel, you finally find people truly interested in what you offer.

In short, a funnel “maps the complete pathway from when someone first discovers your brand to when they become a paying customer”, as detailed by HubSpot.
The concept is quite simple, isn’t it? But in reality, we won’t hide that its implementation requires a minimum of organization.
Without a funnel, you let your visitors decide their next actions on their own. And often, you know what happens: if you let them choose, they’ll check if the grass is greener… at your competitors’.
Key stages of a marketing funnel
Before diving into preparing your HubSpot pipeline, let’s review how it works. If I say TOFU, what do you think of?
If you’re into cooking and food, you might visualize that Chinese plant-based food that’s high in protein and low in calories with a… particular taste.
In marketing, nothing to do with that. Our TOFU means a part of a conversion funnel (not edible, just to be clear ^^).
And besides, the TOFU of a pipeline even has two younger siblings, you’ll see. Basically, we can divide an effective conversion tunnel into three phases:
- Top of the funnel (TOFU): this is the phase of attracting visitors through content (blog posts, videos, social media). The goal is to generate visibility and awareness among an audience that doesn’t know you yet.
- Middle of the funnel (MOFU): here, you aim to convert these visitors into prospects by offering them a value-added offer (downloadable guide, webinar, free trial, newsletter) in exchange for their contact details. This is the qualification step.
- Bottom of the funnel (BOFU): the final decision-making phase. You transform these qualified prospects into clients through personalized emails, demos, customer testimonials or targeted commercial offers. Here, the challenge is to overcome remaining objections and trigger the purchase, among other things.
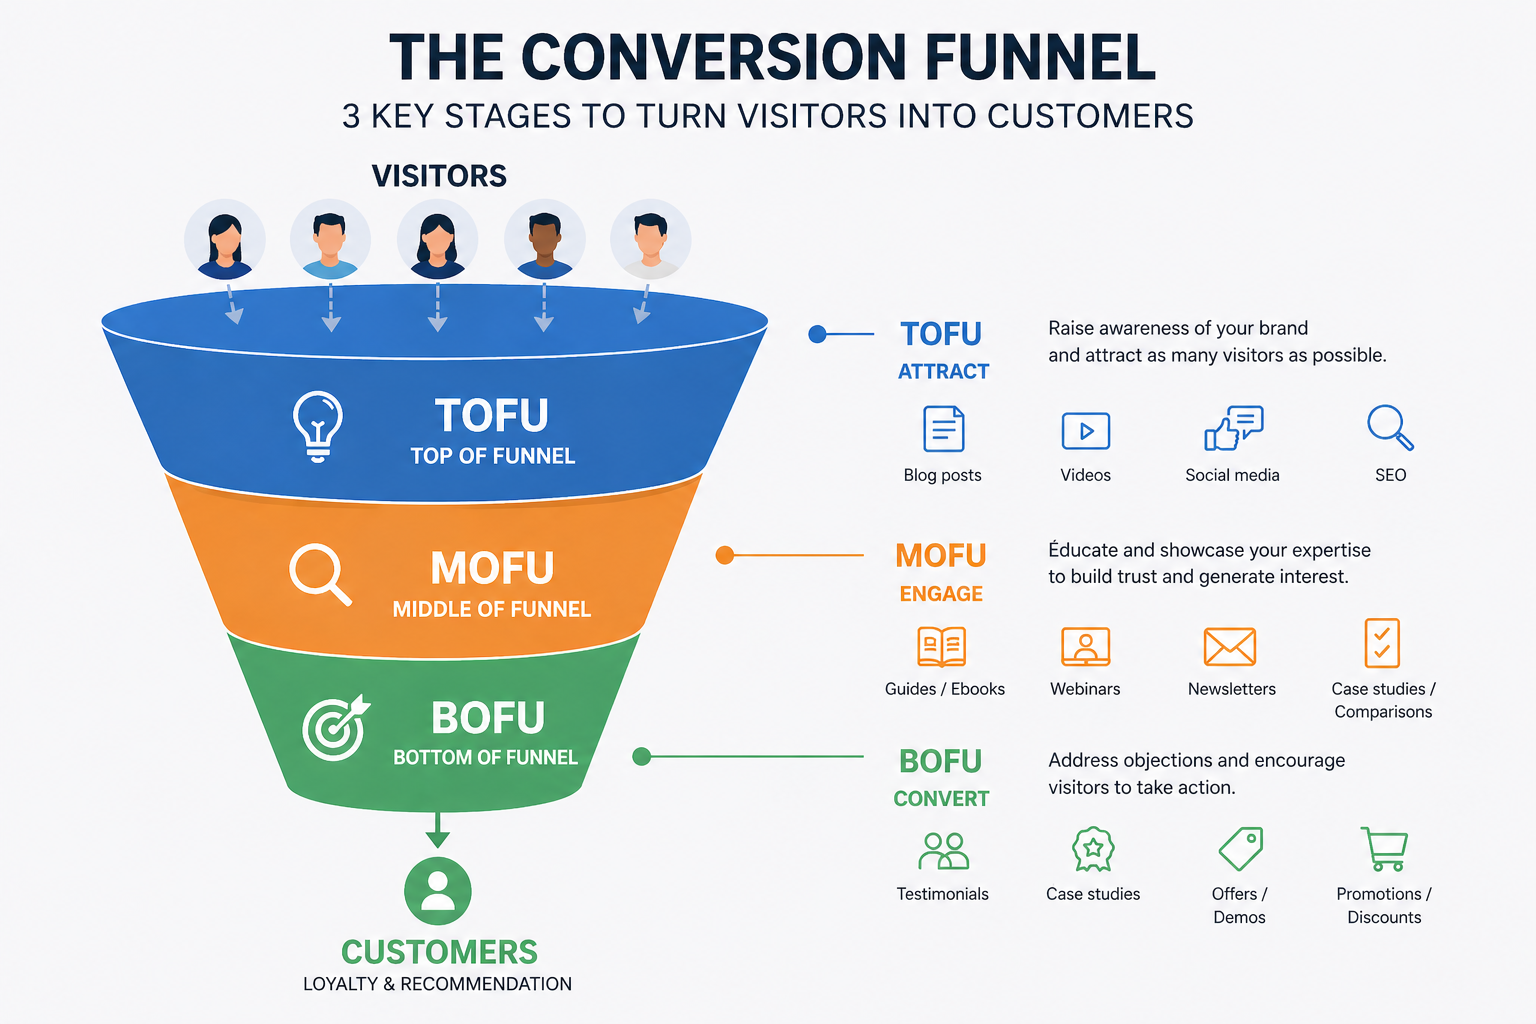
In practice, not all visitors necessarily enter through the top of the funnel. Some may arrive directly on a landing page via an ad or a link shared by a friend.
The key is to ensure that, whichever entry door, your funnel clearly guides the visitor towards a specific action.
To understand the rest of this article, remember that a conversion funnel is not a technology in itself.
It’s a marketing strategy that you will materialize thanks to tools like HubSpot, as we explain right below.
Why create a HubSpot conversion funnel on WordPress?
The limits of a “classic” WordPress site
Nearly one site in two worldwide runs on WordPress, and for good reason.
The CMS (Content Management System) launched in 2003 remains a great tool to create and manage a site.
But as powerful as it is, it doesn’t do everything. By default, it is designed – among other things – to display content, not to automate a conversion journey.
Without a dedicated plugin, your WordPress site can’t:
- identify a visitor who comes back multiple times,
- automatically send a series of emails after downloading a document,
- segment your contacts according to their behavior,
- measure the conversion rate at each stage of your conversion funnel.
To fill these gaps, you can of course assemble several solutions: a form plugin like Contact Form 7 or WPForms, an emailing tool like Mailchimp, an analytics system like Google Analytics.
However, this fragmented approach complicates management and multiplies the risks of malfunctions.
So, you run the risk of spending your time – and wasting it – making tools communicate with each other rather than optimizing your conversions. This is precisely where an integrated solution like HubSpot really comes into its own.
Advantages of integrating HubSpot with WordPress
HubSpot is an all-in-one CRM (Customer Relationship Management) platform that centralizes the entire customer journey, from the first visit to your WordPress site to post-purchase customer retention.
It notably includes marketing automation tools, contact management, form creation, emailing, and performance analysis.

What sets HubSpot apart from the competition is the consistency of its ecosystem. Where other solutions ask you to assemble several plugins or separate subscriptions (one tool for forms, another for emailing, a third for conversion tracking, etc.), HubSpot centralizes everything in a single interface.
The HubSpot marketing platform even has an official plugin for WordPress, which greatly facilitates integration between your site and the CRM.
So by connecting HubSpot to your WordPress site, you benefit from a set of concrete advantages:
- data centralization: all your contacts (prospects, subscribers, clients) are grouped in the HubSpot CRM, accessible from your dashboard,
- smart forms: HubSpot forms automatically feed your contact database without manual handling,
- email automation: you can trigger personalized email sequences based on your visitors’ actions (download, sign-up, visiting a specific page, etc.),
- behavior tracking: thanks to the HubSpot tracking code installed automatically on your site, you can see which pages are viewed by each contact,
- integrated reporting: HubSpot provides dashboards to measure the effectiveness of your HubSpot funnel at each stage.
Is this clearer for you? Perfect! Discover the basic components of any effective conversion funnel in the next section.
Essential elements of a conversion funnel
Note that there isn’t a typical conversion funnel you can duplicate endlessly.
For example, a B2B sales funnel is often longer and more complex than a B2C funnel because the qualification process requires several stages.
Your offer, your target, and your site type (blog, online store) also determine the type of funnel you can design.
For example, if you sell products or services on WooCommerce, you can easily set up a small funnel to help you recover prospects who abandon their cart and send them a personalized follow-up email.
To shed some light on this, let’s take a concrete case to help you visualize it all. Imagine you are a WordPress site creator (freelancer or agency) who wants to offer a free PDF guide on your site.
Ultimately, the goal is to start collecting email addresses and then nurture these contacts with an email sequence to lead them to take advantage of a specific offer (purchasing a product or a service, booking an appointment, etc.).
In this case, a funnel often includes several key elements.
A clear offer
The first point is your offer. Not necessarily a commercial offer: it can be free downloadable content (PDF guide, checklist, template, video), access to a webinar, or even a free trial.
The important thing is that this offer responds to a concrete need of your target and that it is perceived as valuable enough to justify leaving their contact details.
Of course, to fine-tune an offer, you need to know your target inside out.
This includes creating personas (fictional representations of your ideal customers), for example using HubSpot’s free persona creation tool Make My Persona.

Not to mention creating content specific to each stage of your funnel. For example, it’s common to attract your prospects at the top of your funnel (our famous TOFU) through content marketing or advertising.
A call-to-action button
Once your offer is well calibrated, you have a solid foundation to build your HubSpot funnel.
To encourage your visitors to download your PDF guide, you first need a call to action. In jargon, this is also known as CTA (call to action).
To illustrate, this CTA represents the trigger. It’s the button or link inviting your visitor to move to the next step.
It clearly states your offer and includes an action verb. For example:
- “Download the guide”,
- “Access the free training”,
- “Reserve my spot”.
A good CTA is visible and placed strategically on your page.
A landing page at the heart of your HubSpot funnel
The landing page (landing page) is the page where your CTA points. It has a single objective: convince your visitor to fill out the form.
It contains no navigation menu, footer, or external links to avoid distracting attention. It presents the offer, its benefits, and the form.
A form
The form is the data collection point. It also allows your prospects to receive your offer.
It should be as short as possible while capturing the necessary information. For a first contact, first name and email address are often enough.
Additional fields can reduce conversion rates, but are sometimes necessary if you want to better qualify each lead and obtain more detailed information.

A thank-you page
Often overlooked, the thank-you page (thank you page) is actually strategic within your HubSpot funnel. It appears after your prospect submits the form.
For example, it can contain a link (e.g., button) to access your offer (your PDF guide).
It can display a personalized message, for example with the lead’s first name, and may contain a follow-up offer. It represents an opportunity to extend engagement.
A confirmation email
Finally, the confirmation email immediately extends the action performed by your prospect. Its primary goal is to confirm the proper receipt of the request and allow your leads to find your offer in the future.
This email contains, for example, a download link to the promised resource.
But it must not be limited to a simple technical message. It’s also an opportunity to strengthen the relationship by reminding the value of your offer, laying the groundwork for your expertise, and encouraging the next step (reading an article, taking a course, etc.).
Well written, this email improves the user experience and sets the stage for the rest of your marketing strategy.
Alright. We have covered the different “classic” components of a conversion funnel.
Before putting this into practice, let’s clarify one last point.
A conversion funnel, for whom?
You think the conversion funnel is reserved for big companies with structured marketing teams? Not at all!
Today, thanks to tools like HubSpot, any WordPress site creator, regardless of level (from beginner to advanced) can set up an effective funnel.
You are concerned if you recognize yourself in the following situations and want to:
- grow your email list in a qualified and continuous way,
- sell a training course, a service, or a digital product online,
- qualify your leads before contacting them directly,
- precisely measure what works on your site in terms of conversion.
In short: if you have something to offer and an audience to reach, a conversion funnel lets you structure and optimize this connection.
Speaking of that, let’s now dive into the technical setup of your HubSpot pipeline.
How to create a conversion funnel on your WordPress site with HubSpot, step by step
Install the HubSpot plugin on WordPress
First, we recommend you install the HubSpot for WordPress plugin.
This free plugin allows you to easily connect your WP site to HubSpot’s CRM platform, to leverage its marketing features, some of which are essential when setting up a funnel (forms, email, CRM, popups, chat, analytics).
Thanks to this plugin, you have seamless continuity between your WordPress site and the CRM.
Not to mention a very important technical point: the plugin automatically adds the HubSpot tracking code, which lets you collect visitor data and track your traffic.
Without the plugin, you would need to add this code manually to access HubSpot marketing tools on your WordPress account, which is more complex and time-consuming.
To benefit from the HubSpot plugin on your WordPress site, there are two steps to follow:
- Create a HubSpot account (it’s free).
- Install and activate the plugin in your WordPress admin interface.

Before moving on, think about creating a tailor-made offer for your visitors (PDF, video, checklist, etc.). Your offer must solve a precise and immediate problem for your target. The more specific it is, the better it converts. Also, it should be coherent with your main activity and able to qualify leads who are really likely to become your customers.
Create a call to action for your HubSpot pipeline
Once your HubSpot account is created and linked to your WP site, let’s move to the next step of setting up your HubSpot funnel: creating a call to action.
With HubSpot’s Starter offer (starting at $9/month for 1,000 marketing contacts and 500 HubSpot credits), you get a dedicated interface to create advanced and personalized calls to action.
This option is found in the Marketing > CTA menu in your HubSpot account. Let’s say it’s the best way in (everything is explained here).
However, it’s also possible to create a well-optimized CTA even if you use the free version of HubSpot.
Nothing prevents you, on the content of your choice (post or page), from using the “Button” block of WordPress’s native content editor (Gutenberg).
The important thing is to add a link to your destination page (landing page), and you’re done.
Best practices for a converting CTA
- Use short text with an action verb: “Download my guide,” “Access the free training,”
- The CTA should visually stand out from the rest of the page: contrasting color, sufficient size to be easily clickable on mobile,
- Place your CTA in several strategic locations: top of the page (above the fold), within the article body, and at the end of the content,
- Test different wording and colors using A/B testing, available on HubSpot’s paid plans.

Set up a landing page and a form
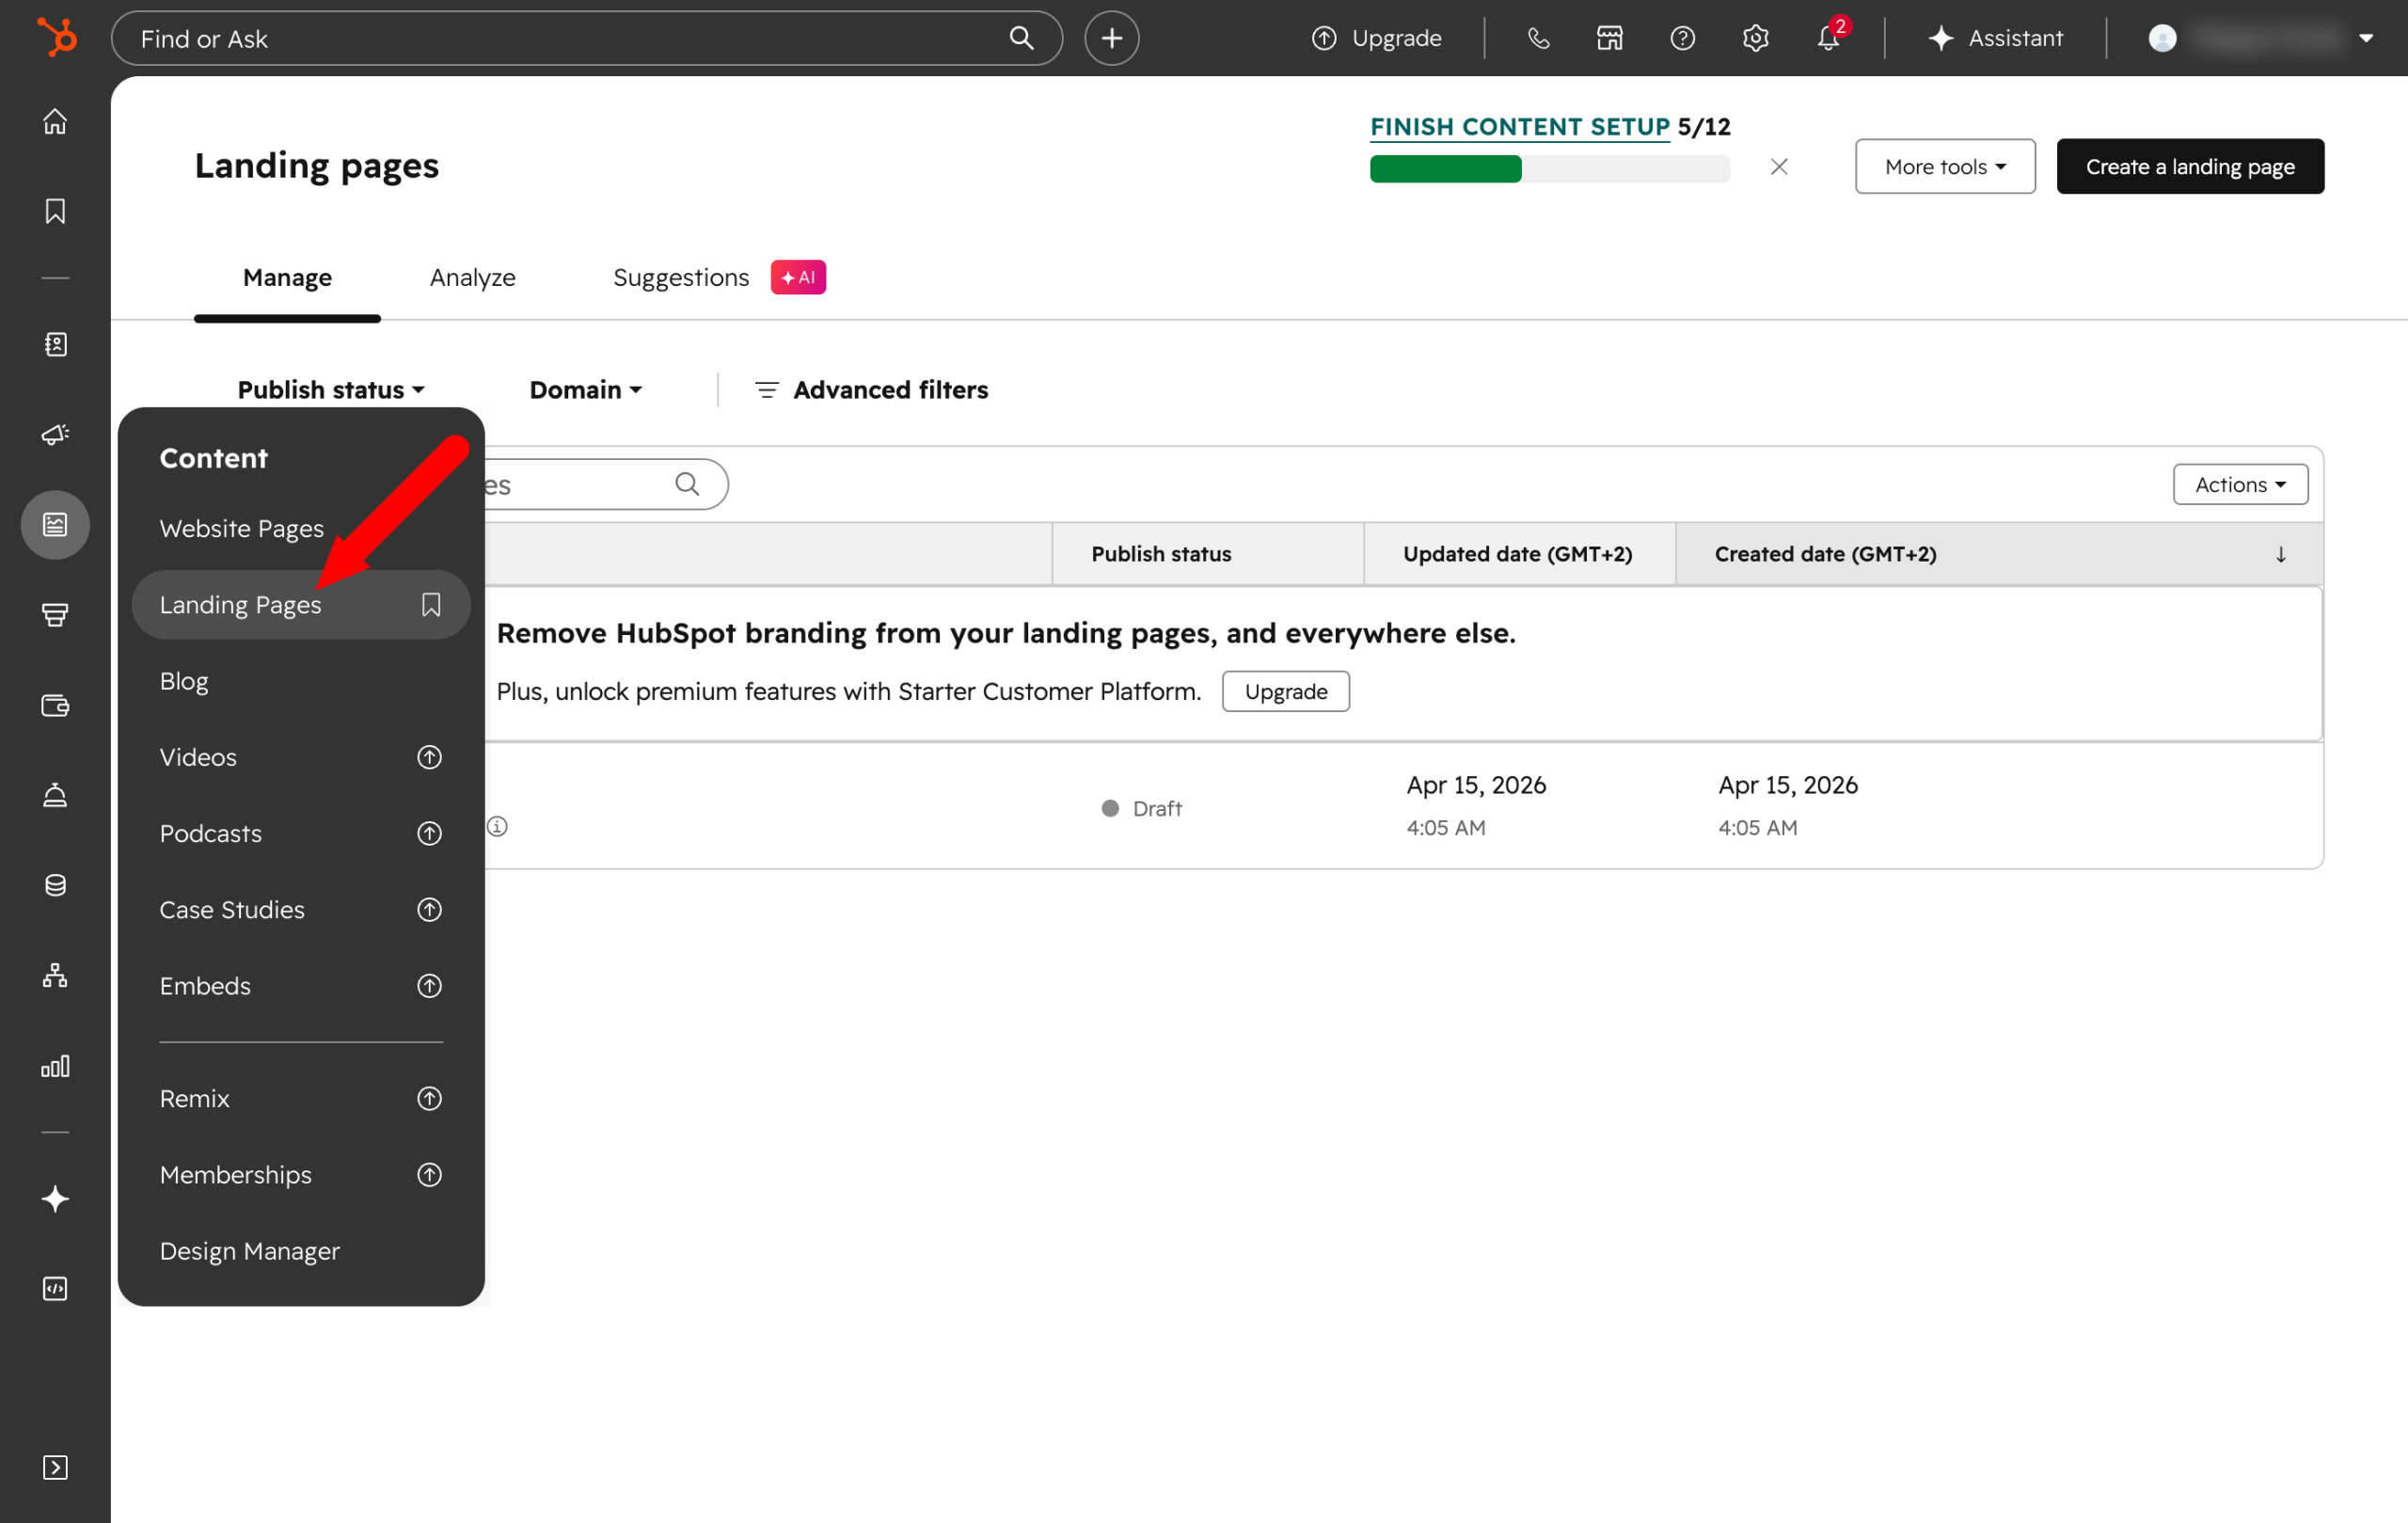
HubSpot lets you create landing pages directly from its platform starting with the free version, under the Content > Landing Pages menu.
If needed, you can also create the page in WordPress with the tool of your choice (e.g., a page builder like Elementor or Divi Builder), then integrate a HubSpot form.
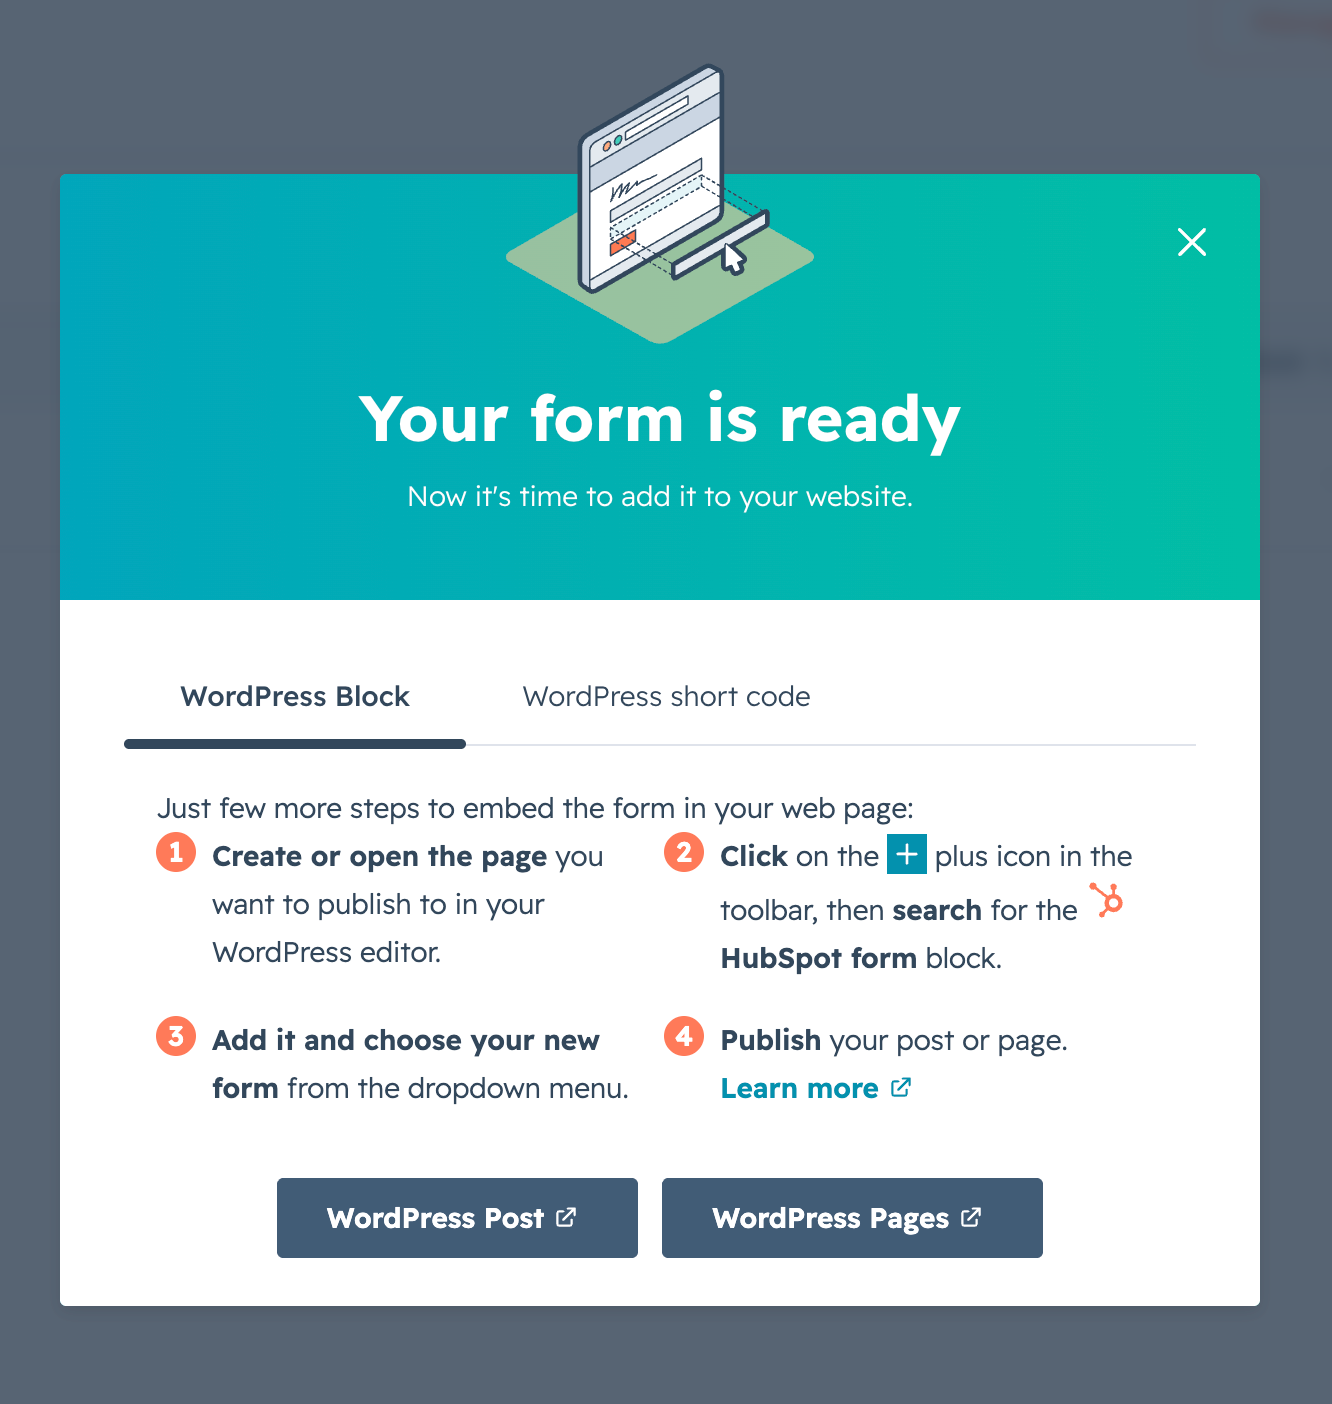
To create a form, go to the HubSpot > Forms menu on your WordPress dashboard.
Choose the type of form you want as a starting point, or start from scratch.

Immediately, customize the fields using the drag-and-drop editor, then integrate the form into the WordPress page of your choice. For this, two options:
- Add an integration code to paste into your WordPress page.
- Use the dedicated block if you installed the HubSpot plugin (normally, you did ^^).
Best practices
- The landing page should have a single objective and no navigation menu,
- Your offer content must be clearly displayed on your landing page, e.g., in a bullet-point list,
- Add a visual element to illustrate your offer and a prominently visible form (or if applicable a simple CTA if that’s sufficient),
- Limit the fields in the form as much as possible to maximize conversion rate,
- Add reassurance elements near the form, such as social proof (customer testimonials, for example).
Design a thank-you page
Now for the next step in building your funnel with HubSpot: setting up a Thank You Page.
From the HubSpot interface, you can create it via the Content > Landing Pages menu.
Feel free to start from a blank page and use the “Generate with AI” option to make your life easier and save time (provided you have a suitable paid plan).
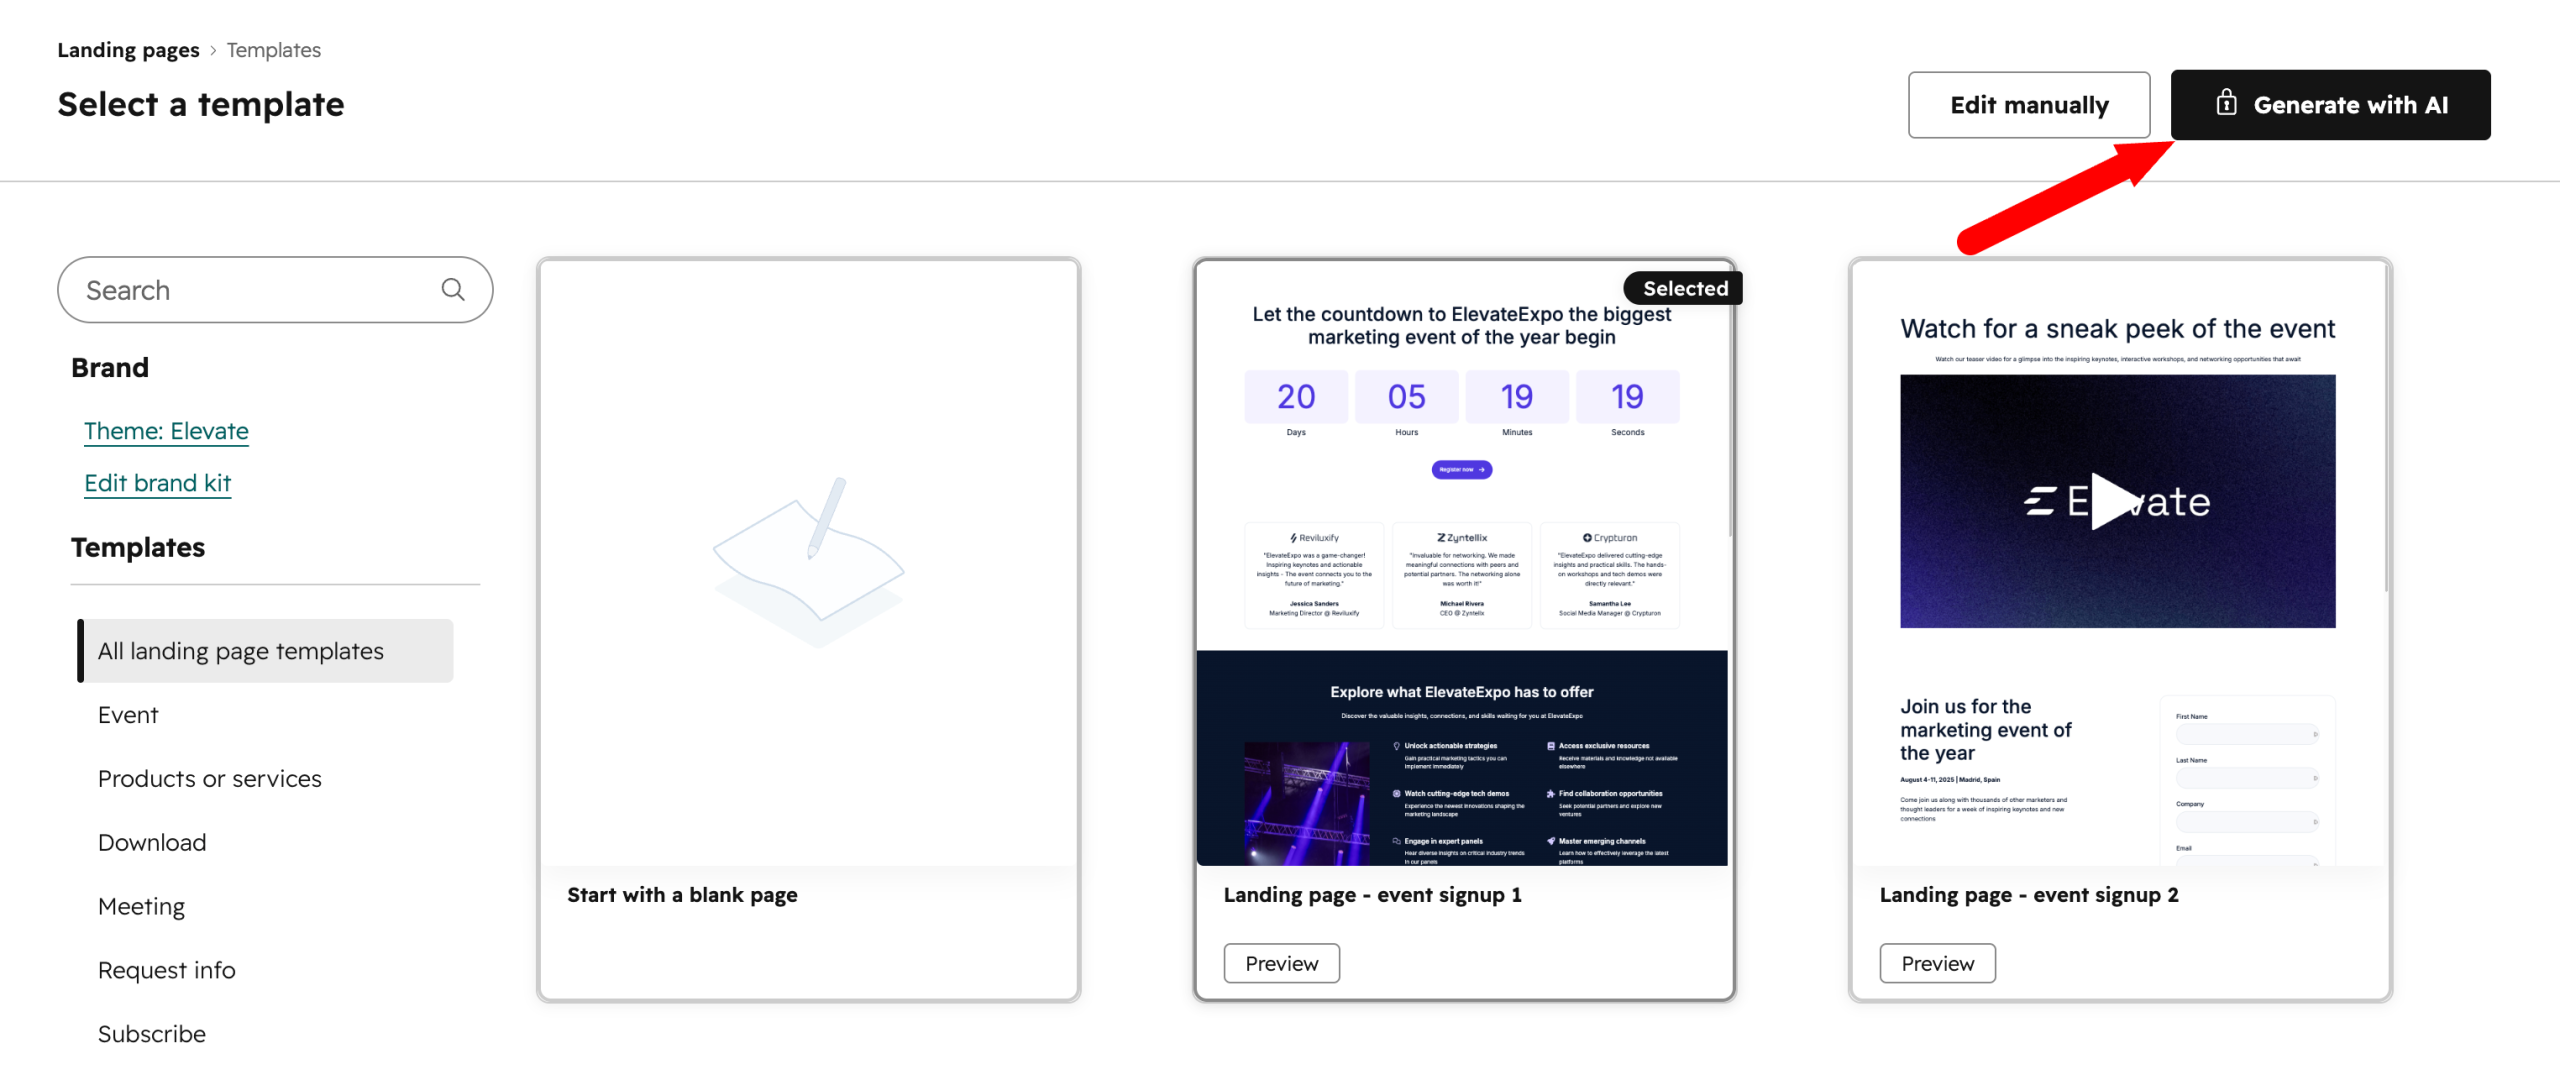
With HubSpot’s free plan, you can use one of the available templates if you don’t want to start from scratch, and adapt it to fit the specifics of a thank-you page.
Another option: create a new page in WordPress and configure your HubSpot form to automatically redirect to this URL after submission.
Best practices for a successful Thank You Page
- Display your thank-you message, such as “Thank you for your download.”
- Include a logical next step: read a related article, watch a video, follow you on social media. Or even offer a sales call if you sell services,
- Use the same visual style as your landing page,
- Exclude this page from your standard traffic analysis to avoid skewing your statistics.
Set up a confirmation email
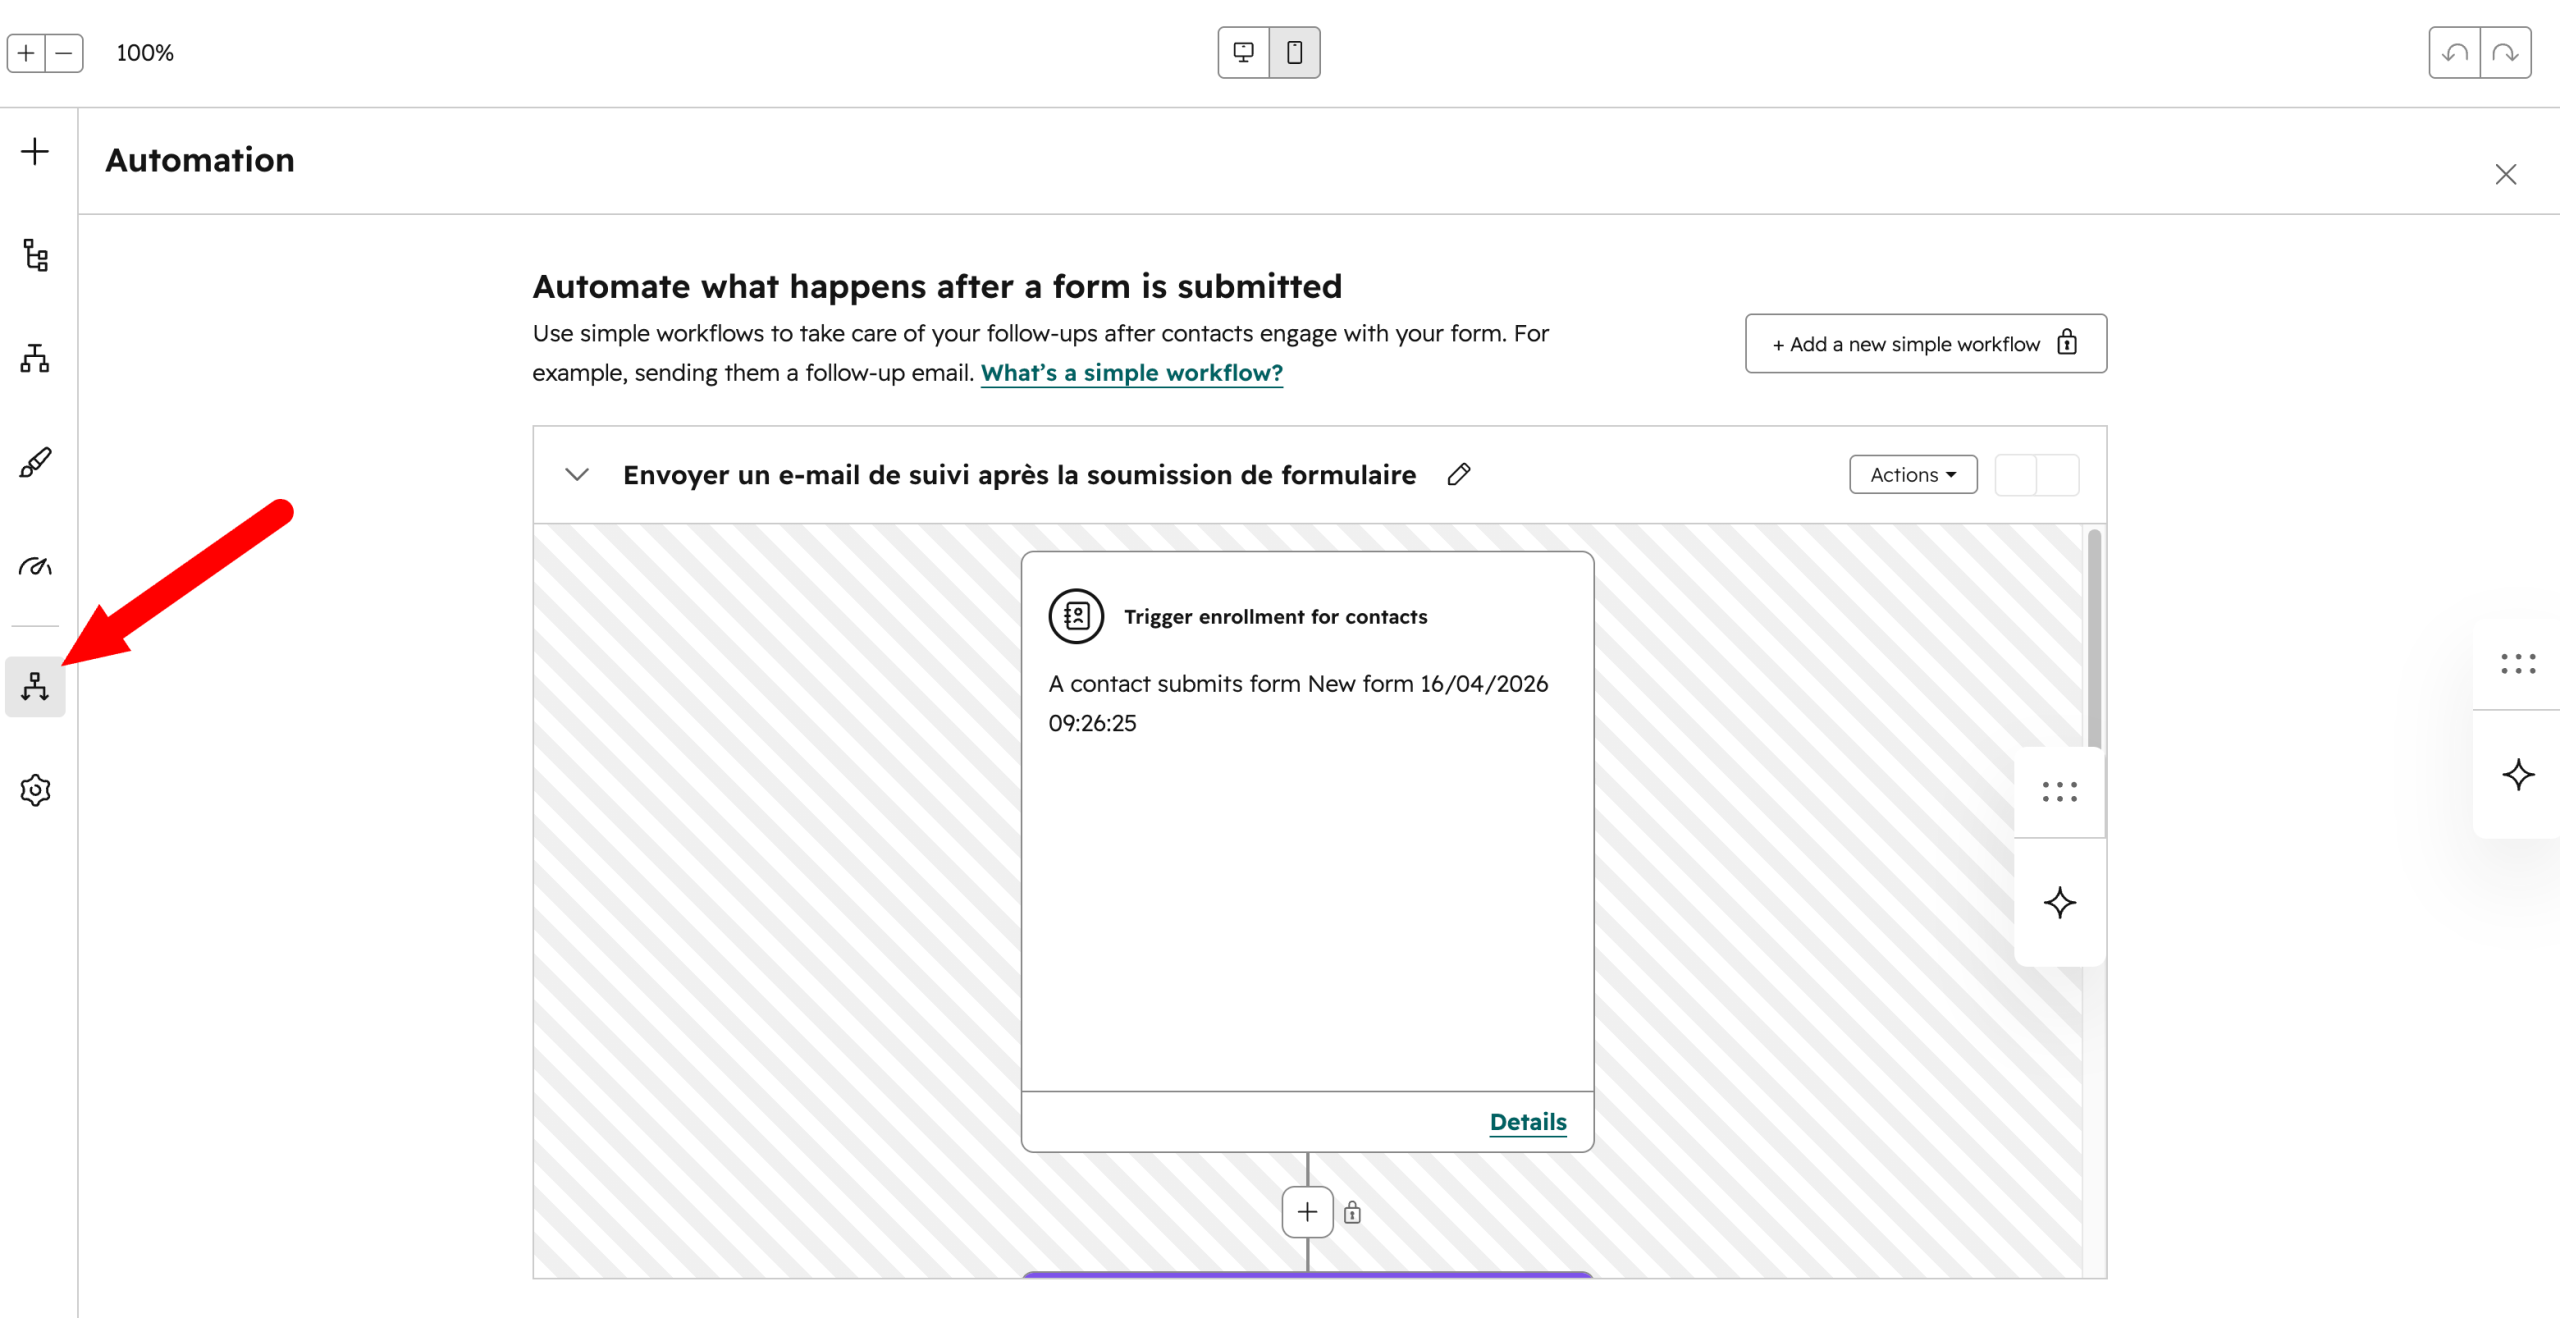
To finish setting up your HubSpot conversion funnel, you just need to set up a confirmation email after a form submission.
With a free HubSpot account, it is possible to create a simple workflow per form, with a single automated action. Technically, it’s doable in our case. HubSpot offers smart forms that adapt to visitors and increase conversion rates.
To do so, go to HubSpot > Forms in your WordPress interface, then click on the dropdown “More”. Then choose “Edit in HubSpot.”
In the “Automation” menu, associate the email of your choice with your form.
To create advanced automated email sequences (workflows), you’ll need to upgrade to at least the Pro version of one of HubSpot’s hubs, especially the Marketing Hub.
Best practices
- Send your confirmation email immediately (really). Your visitor just took action. If they receive nothing within minutes, they might doubt… or forget about you. Responsiveness is essential.
- Provide frictionless access to your resource. Include a visible link to the resource (PDF, video, course). Your goal: have your user access your content with one click, without having to search.
- Keep it simple, human, and reassuring. Confirm receipt, thank, and use a natural tone. You’re talking to a human, not a database.
- Take care of the subject line and sender. Use a clear subject (e.g., “Your guide is ready”) and a recognizable sender name to maximize open rates.
- Include a logical next step (without pushing sales). Suggest a gentle follow-up action: a useful article, a video, or complementary resource. The idea is to maintain a connection with your audience, not to aggressively sell something.
Track conversions
To conclude, remember to closely monitor the results and statistics of your HubSpot funnel.
This is essential to have a comprehensive view of what works, and to adjust what is less effective and can be improved.
By going to the HubSpot > Reports menu in your client interface, you can create dashboards from scratch to track different metrics:
- traffic volume,
- number of form submissions and conversion rate,
- email open rates,
- lead score,
- email engagement rate,
- customer acquisition cost,
- progression of your contacts in the funnel, etc.
Moreover, HubSpot allows you to create custom reports on the entire lifecycle of a contact: from the first visit to the conversion into a client.

Best practices
- Define your key performance indicators (KPIs) before launching your funnel: landing page conversion rate, email open rates, number of leads generated per month.
- Regularly compare the performance of your different offers and landing pages to identify what works.
- Set up A/B tests.
Best practices to optimize your HubSpot conversion funnel
You now know how to create a funnel on HubSpot. But you know what? This is just the beginning.
The rest lies in continuous optimization. That’s what makes the difference between a funnel running quietly in the background and a true lead generator.
To guide you, we share some best practices proven effective:
- Synchronize your funnel with your editorial content. Your blog articles are your best ambassadors at the top of your funnel (TOFU, not the edible kind ^^). Identify articles generating the most traffic and embed CTAs coherent with your offer. For example: an article on “How to create a newsletter” becomes a natural entry point to a PDF guide on managing an email list.
- Test only one variable at a time. Whether it’s your landing page title, CTA button color, or confirmation email subject, change only one element at once to measure its real impact. HubSpot facilitates these A/B tests on emails and pages (depending on your plan).
- Optimize for mobile devices first. More than half of web traffic is now on smartphones, according to data collected by Statista. Always check that your landing page, form, and emails are perfectly readable on all screen sizes.
- Shorten the path to conversion. Every extra click between your CTA and your form mechanically reduces your conversion rate. Minimize friction as much as possible: clear landing page, short form, direct thank-you page.
- Align your content with each stage of the funnel. A blog post targets the top (attract); a case study or customer testimonial targets the bottom (convince). Don’t offer the same offer to a visitor discovering your site and a prospect already warm.
According to HubSpot customer data, HubSpot’s Marketing Hub improves conversion rates by 83% for B2B marketing teams.
How much does it cost?
Before concluding, let’s review pricing. What budget should you expect to set up a HubSpot conversion funnel on your WordPress site?
The answer mainly depends on your level of ambition and the volume of contacts you manage.
Is HubSpot’s free plan really an option?
First, know that HubSpot’s free plan is enough to set up a simple first funnel and start collecting leads.
But free also means limits at different levels (otherwise it would be too good). Some examples:
- 1 automated email per form,
- 2,000 emails sent per calendar month,
- HubSpot branding displayed in your emails,
- 1 automated email action maximum,
- 3 email templates.
If you have a single simple offer to propose, this may be enough to start and see if the platform fits you.
Go further with a paid plan
Otherwise, you’ll have to switch to a paid version. HubSpot offers both specialized product hubs and a customer platform that brings these hubs together.
Taking the example of HubSpot’s Marketing Hub, pricing is as follows (at the time of publishing this article):
- Marketing Hub Starter: starting at $9/month (annual billing),
- Marketing Hub Pro: starting at $792/month,
- Marketing Hub Enterprise: starting at $3,300/month.
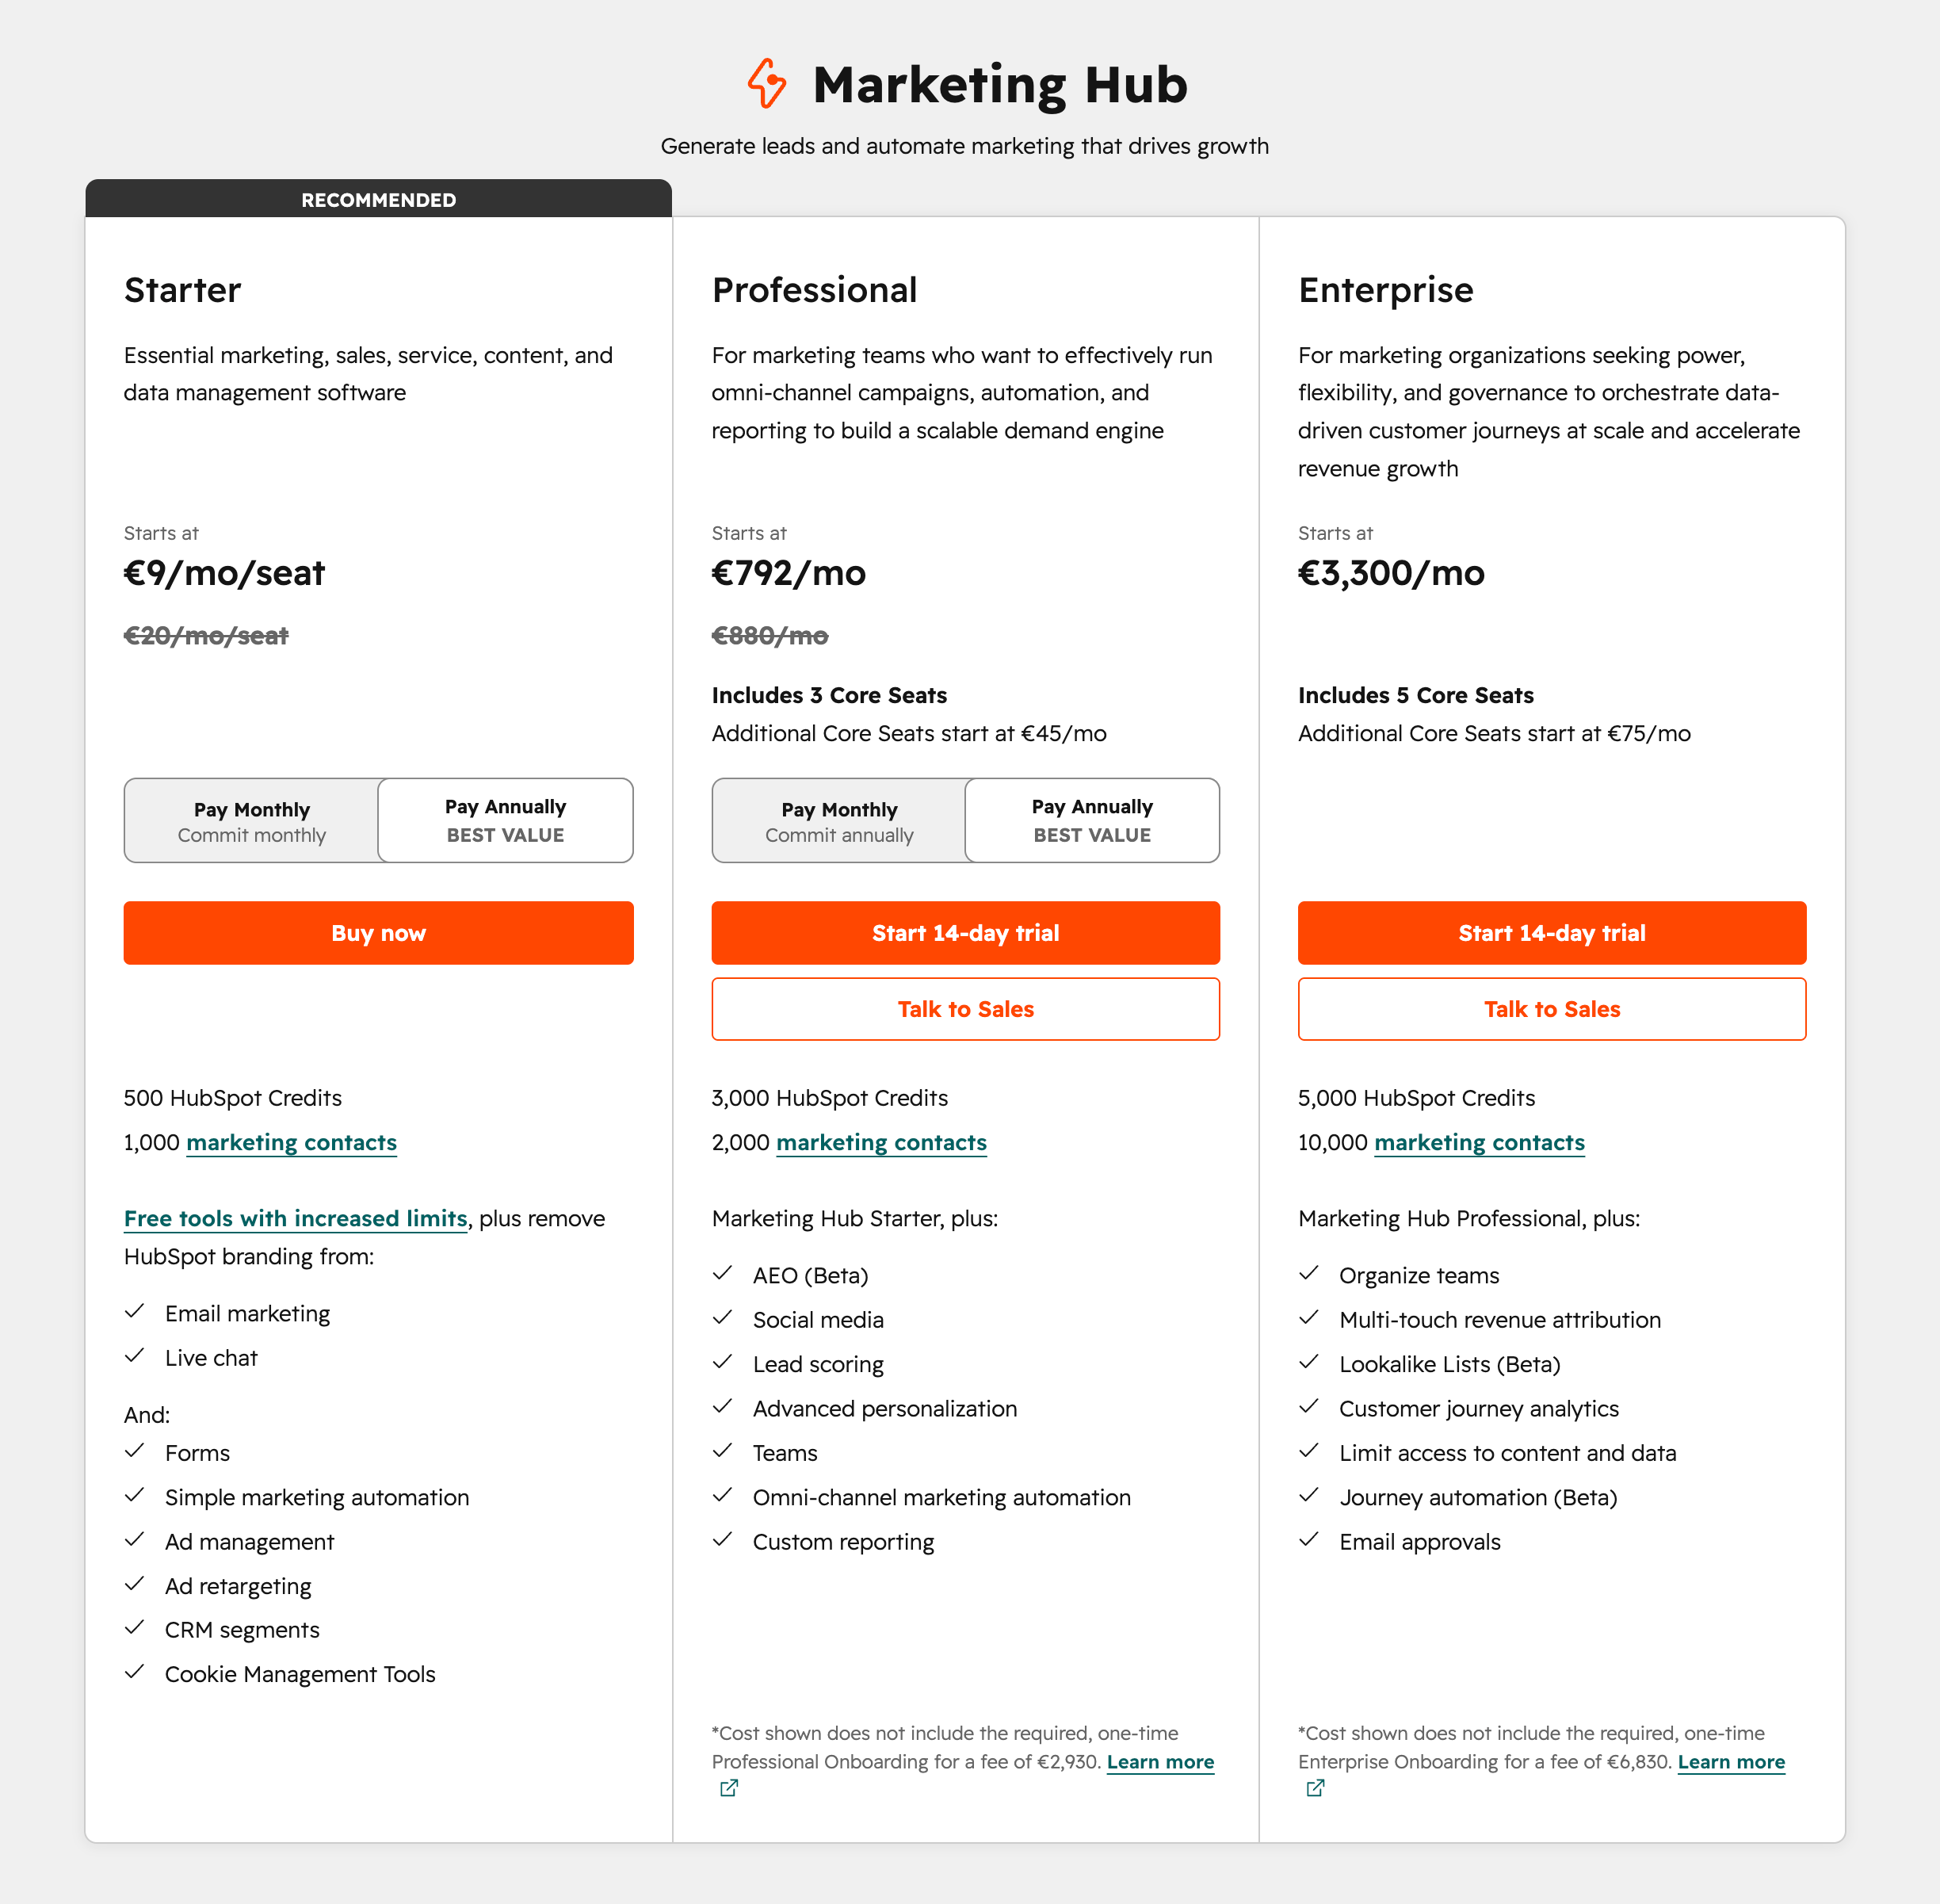
To choose between the “Starter,” “Professional,” and “Enterprise” versions, it all depends on the number of sales contacts you have and the options you need.
We recommend directly consulting HubSpot’s official pricing page for the most up-to-date information before committing.
Our final opinion
Having thoroughly covered the topic, it’s time to share our opinion on creating a marketing funnel with HubSpot.
For us, the combination WordPress + HubSpot currently offers one of the most accessible and complete approaches to set up an effective conversion funnel, without requiring advanced technical skills or a significant starting budget.
As you’ve seen throughout these lines, the key isn’t the complexity of your funnel, but its coherence.
A relevant offer, a well-placed CTA, an optimized landing page, a simple form, and smart email follow-up: these are the foundations of a funnel that converts.
Then, everything hinges on continuous optimization. Test, analyze, adjust: that’s what turns a simple setup into a true lead-generating machine.
In our opinion, that’s exactly where HubSpot shines. By centralizing your data, marketing tools, and performance in a single coherent interface, the platform saves you precious time and lets you focus on what really matters: your conversions.
Want to form your own opinion and launch your first conversion funnel without delay? Click just below to take your first steps with the HubSpot platform:

Receive the next posts for free and access exclusive resources. More than 20,000 people have done it, why not you?

Continue reading
Articles posted in WordPress TutorialsHow to update the PHP version of your WordPress site
What comes to mind when you think of WordPress speed and security? Your favorite plugins, perhaps? You should also think about… PHP! If you’re looking for a site that loads fast, while offering a solid shield against hacker attacks, there’s a…
How to fix the ERR_CONNECTION_REFUSED error: A complete guide
Does your browser display the ERR_CONNECTION_REFUSED message when you try to access a website? This error means that the target server – or your own configuration – is actively rejecting the connection request, leaving you at a dead end. But…
How to create a WordPress site with Elementor’s AI tools: A step-by-step method
I’m sure you experience it every day. Creating a WordPress site often means juggling a thousand tasks: structuring your pages, finding the right words, refining the design, handling technical details, and so on. Result: you move forward… but not always…