


There are some things we really don’t like to hear. A few examples come to mind: “The price of gas is going up 20 cents.” “Your rent has been raised.” “Your vacation request was not accepted.”
Or, “Your WordPress site has been hacked.” Of course, in this case, no one is going to warn you. If it happens, you’ll be left with nothing but tears.


Since I don’t want this to happen to you, I suggest you limit the risks by using a security plugin like SecuPress.
This one is really worth the detour, and not only because it’s made in France. I give it a detailed review in this guide, which also serves as a tutorial.
At the end of your reading, you’ll know what this plugin is worth, and if you should use it on your WordPress site.
Overview


What is SecuPress?

SecuPress is a WordPress security plugin. Among its many features, the plugin is able to protect your site by blocking malicious incoming requests. SecuPress also stands out from the competition thanks to its scanner, which is capable of detecting security issues and fixing them automatically.
Launched in August 2016 on the official directory, SecuPress (40K+ active installations) is among the most popular security plugins, alongside famous competitors like:
- iThemes Security (900K active installations)
- Wordfence Security (5M+ active installations)
- All in One Security (1M+ active installations)
- Sucuri (800K+ active installations)
SecuPress is a freemium plugin, which means that it has both a free version (SecuPress free), and a paid version, called SecuPress Pro (which includes all the options).
SecuPress, a 100% made in France plugin
Behind SecuPress, we find Julio Potier, security expert since 2002. After 18 months of development with his sidekick Grégory Viguier, Julio officially launched SecuPress in August 2016.
At the time, he was still working at WP Media, the French company that publishes the WP Rocket and Imagify plugins, among others.
The SecuPress project had been on Julio’s mind since 2013, as he explains in the press kit dedicated to the plugin.
To make its mark in a very competitive market, SecuPress has focused on three main aspects:
- Ease of use
- Options that can be understood by any type of user, from beginner to advanced
- Offering essential security options that can be applied without any modifications or adjustments on your part
The main idea behind all this: you don’t need to be a security expert to use SecuPress.
What are the features of SecuPress?
SecuPress — not Securpress, as it is sometimes misspelled — ensures the security of your site in four steps, as indicated on its presentation page:
- First, it scans your WordPress installation for vulnerabilities. 32 security points are checked.
- A wizard then presents the detected problems in a simple and understandable way.
- SecuPress goes on to automatically fix the detected vulnerabilities at your request: all you have to do is check the box associated with the identified vulnerability.
- Finally, a final security report allows you to see all the corrections made by the plugin.
Here are some of the major features of this WordPress security plugin:
- Firewall
- Protection against brute force attacks
- Site health scan
- Moving the login page
- Dual-factor authentication (2FA)
- Blocking of bots and malware
- Detection of vulnerable themes and plugins
- Email and Slack alerts
- Backup of WordPress database and site files
- Change database prefix
- Forcing major and minor WordPress updates
- Adding security constants to the wp-config.php file
Moreover, SecuPress is a plugin that has a reputation for taking care of loading time, a significant plus to not impact the user experience too negatively.
Why is securing WordPress important?
Before I move on to the presentation of SecuPress options and settings, I’d like to draw your attention to the importance of security for your WordPress site.
Contrary to popular belief, WordPress is a secure CMS (Content Management System).
As the security expert Patchstack stated in a report published in 2021, almost all detected vulnerabilities come from themes and especially plugins (99.42% of total vulnerabilities).
Since no site is infallible, it is your responsibility as a webmaster to protect your WordPress installation.
Because in case of hacking, the consequences can be very unfortunate and lead to:
- The loss and theft of numerous data, more or less sensitive (text, images, means of payment, etc.), especially those of your customers
- A loss of time, because you will have to clean the hacked site and update everything
- Unplanned financial expenses, especially if you call in a security expert. Following a hack, you may also be asked to pay a ransom
- A degradation of your brand image and a possible loss of trust from your current users and/or future customers
- A drop in your SEO position on Google’s search results pages, which favor secure sites. You may even disappear, which can have a significant impact on your turnover.
The advantage of using an all-in-one plugin like SecuPress is that you have dozens of security-related features in one place — think of the plugin as a toolbox.
As a result, you don’t need to activate several different plugins to perform different actions (e.g., one plugin to protect against brute force attacks, one plugin to enable two-factor authentication, etc.).
Let’s just say that the management is simpler and on top of that, you avoid overloading your site with several plugins.
Now that you understand the importance of security on WordPress, let’s find out how to protect your site with SecuPress. To start, I’ll detail how to install and activate the plugin.
For the purposes of this test, I used SecuPress Pro, which includes all the options offered by the plugin. If you are using the free version of the plugin, you won’t have access to all the features I’ll be presenting here. I will compare the differences between the two versions at the end of the article.
How to install SecuPress Pro in two steps
Step 1: Activate the plugin on your WordPress dashboard
To get started, go to the Plugins > Add New menu on your WordPress admin interface.
Type “SecuPress” in the search bar, then click the “Install Now” button on the “SecuPress Free – WordPress Security” result:
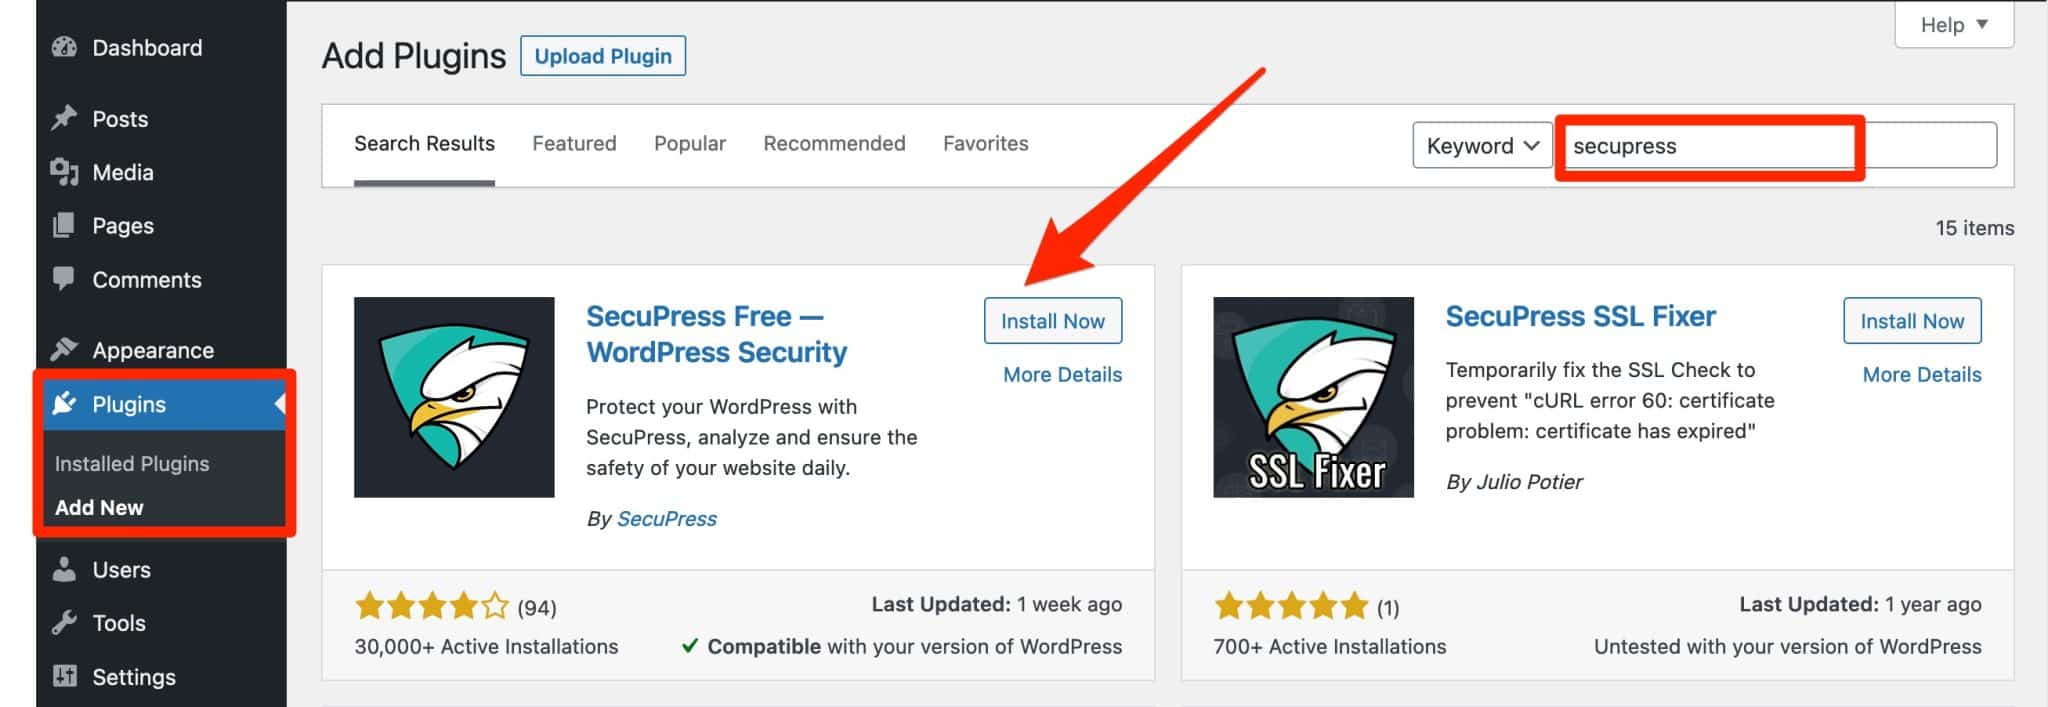
Continue by remembering to activate the plugin. That’s it: the free version is already ready to use.
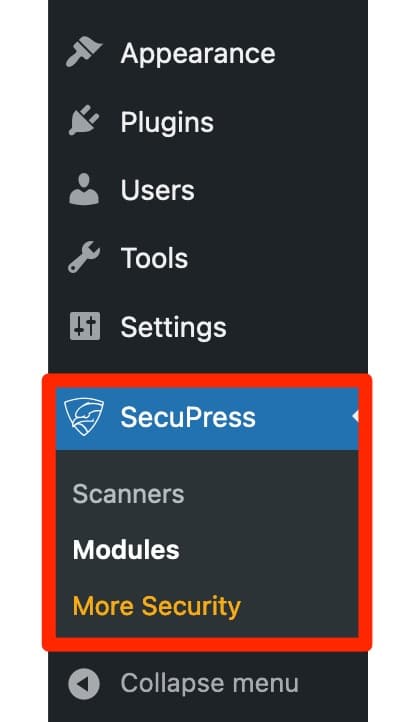
You will notice a new menu at the bottom of the left sidebar of your administration interface. This menu consists of three entries:
- “Scanners,” to run a scan of your site.
- “Modules” lists all the options offered by SecuPress on a dashboard.
- “More Security” links to the SecuPress Pricing page, if you want to take advantage of the paid version.

If you want to activate SecuPress Pro, go to the next step below.
Step 2: Activate your Pro license
To run the premium version of SecuPress on your WordPress site, go to SecuPress > Modules > Dashboard.
Then simply:
- Add the email address you provided when you purchased the Pro version.
- Enter the license key that you found in your customer area.
- Activate the license by clicking on the corresponding button.
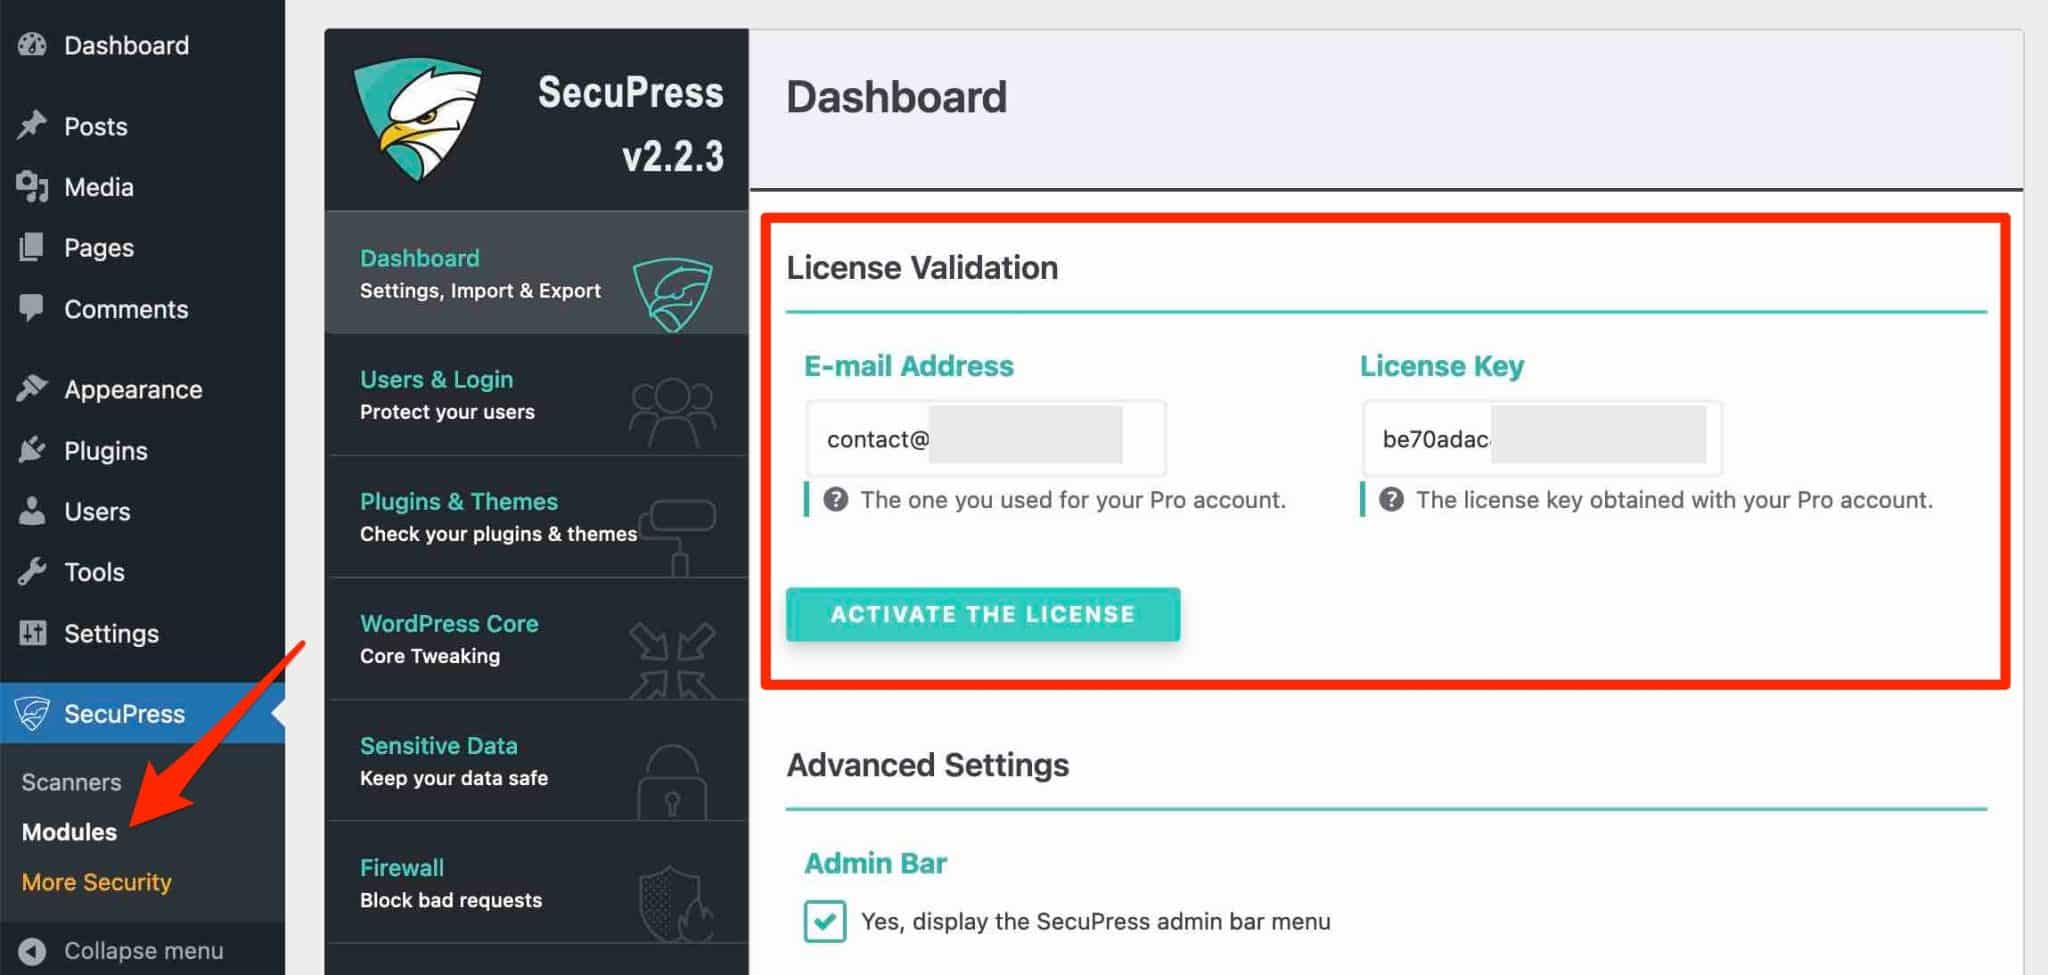
SecuPress is now active: it’s only waiting for your instructions to work. ^^ Find out how to do that in the next part.
Analysis of the interface and handling
SecuPress, a very easy to use plugin
Before going into details, I’ll take a few moments to look at the user interface (UI) of the plugin, because it’s really worth it.
What strikes you when you start using SecuPress is the simplicity of the plugin and its ease of use. The plugin is very easy to use for several reasons:
- The interface is very neat in terms of design. It’s clean, aesthetically pleasing, and you can see at a glance exactly what you need to do, thanks to the clearly visible call-to-action buttons, for example.
Moreover, this interface is reminiscent of plugins like WP Rocket (affiliate link) or Imagify. This makes sense: Julio Potier was part of WP Media when he launched SecuPress, remember.
- You aren’t drowning in the middle of countless menus. In fact, you have “only” two major options to take action with SecuPress: either scan your site or activate various options via modules.
These two major features distinguish SecuPress from its competitors, whose respective interfaces are clearly less polished and more difficult to understand, with more technical jargon.
Look at Wordfence Security’s interface, for example. It suddenly looks much less readable:
A dashboard with a modular approach
Whether you use the free or paid version of SecuPress, the plugin’s dashboard (accessible via SecuPress > Modules) consists of 13 modules.
If you use SecuPress Pro, all options are available. They can be activated or deactivated by checking a box.
If you use the free version of the plugin, the Pro options are blurred and you cannot activate them:
Now let’s get down to business, with the first key feature offered by SecuPress: scanning your site. The plugin suggests that you run a scan as soon as you activate it, so let’s go!
How does the security scanner work?
Run the scan
To take advantage of it, go to SecuPress > Scanners. Then click on the “Scan my site” button:

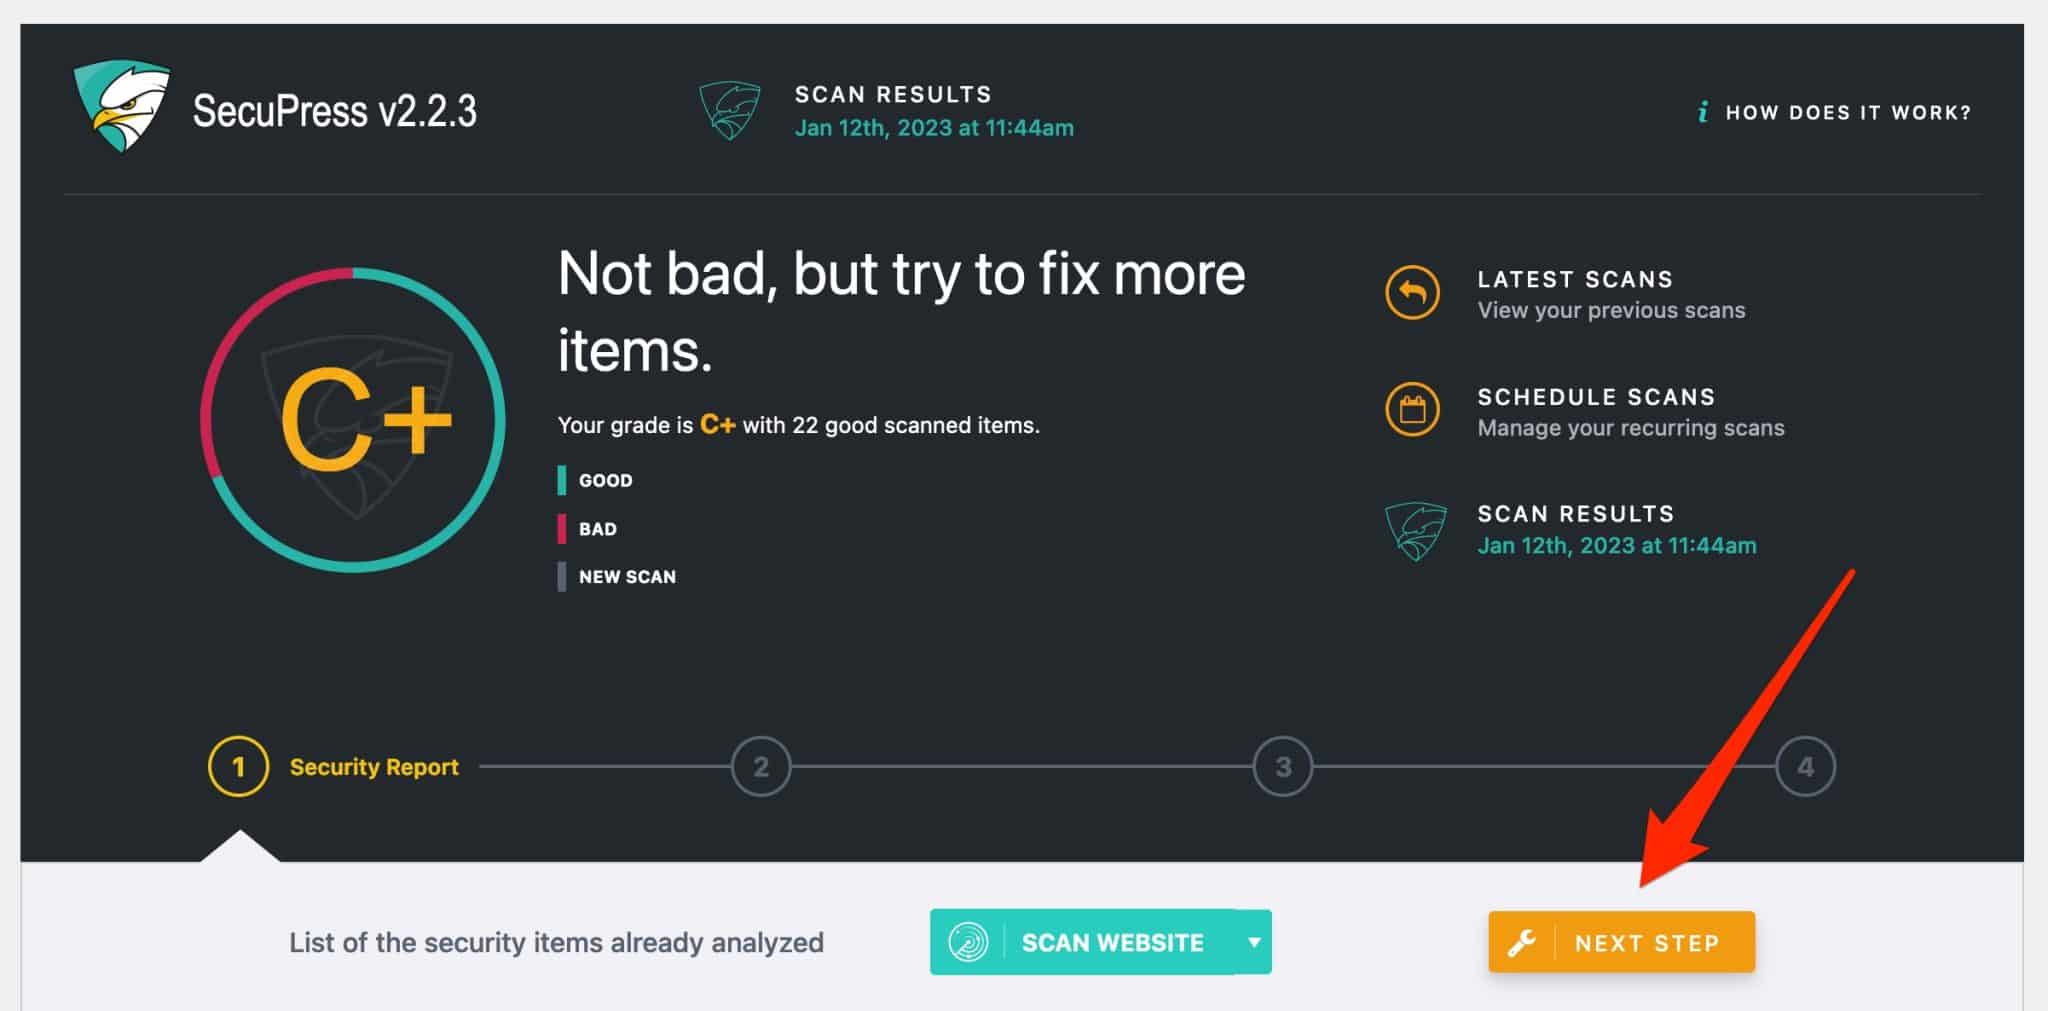
In a few seconds, SecuPress will scan your site and offer you a security report, including an overall score.
In my case, you can see that there is work to do: I got an average grade of C+. Out of the 32 security elements evaluated, SecuPress considers that 10 of them are bad.
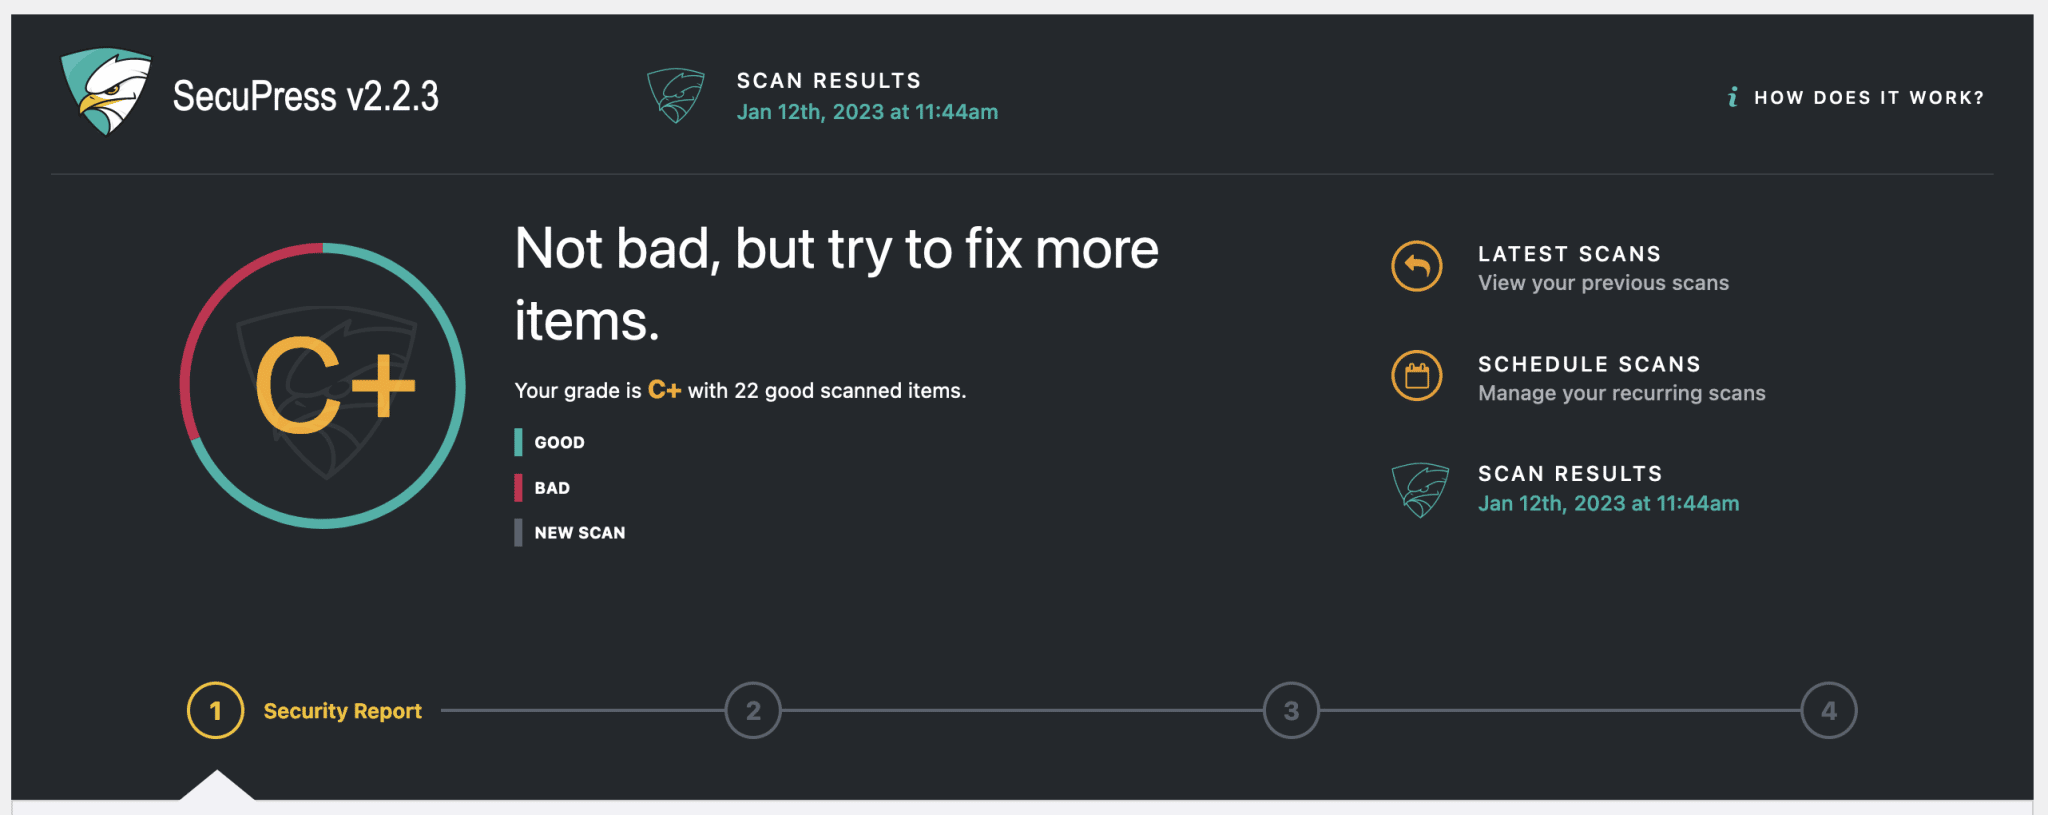
If I scroll down the page, I can access the description of each defective point with a short explanatory sentence. I can also get more details by clicking on “Learn more.”
If I want to correct these problems, I just have to click on the “Next step” button.
Automatically correct the “bad” points
SecuPress then shows me all the points that need to be corrected.
You can control the automatic correction of each item by checking (the item will be corrected) or unchecking the item of your choice (it will not be corrected).
If you’re not sure what you are doing, I recommend that you follow the recommendations of the plugin. In other words, leave the boxes that were automatically checked and click on the “Fix it” button.
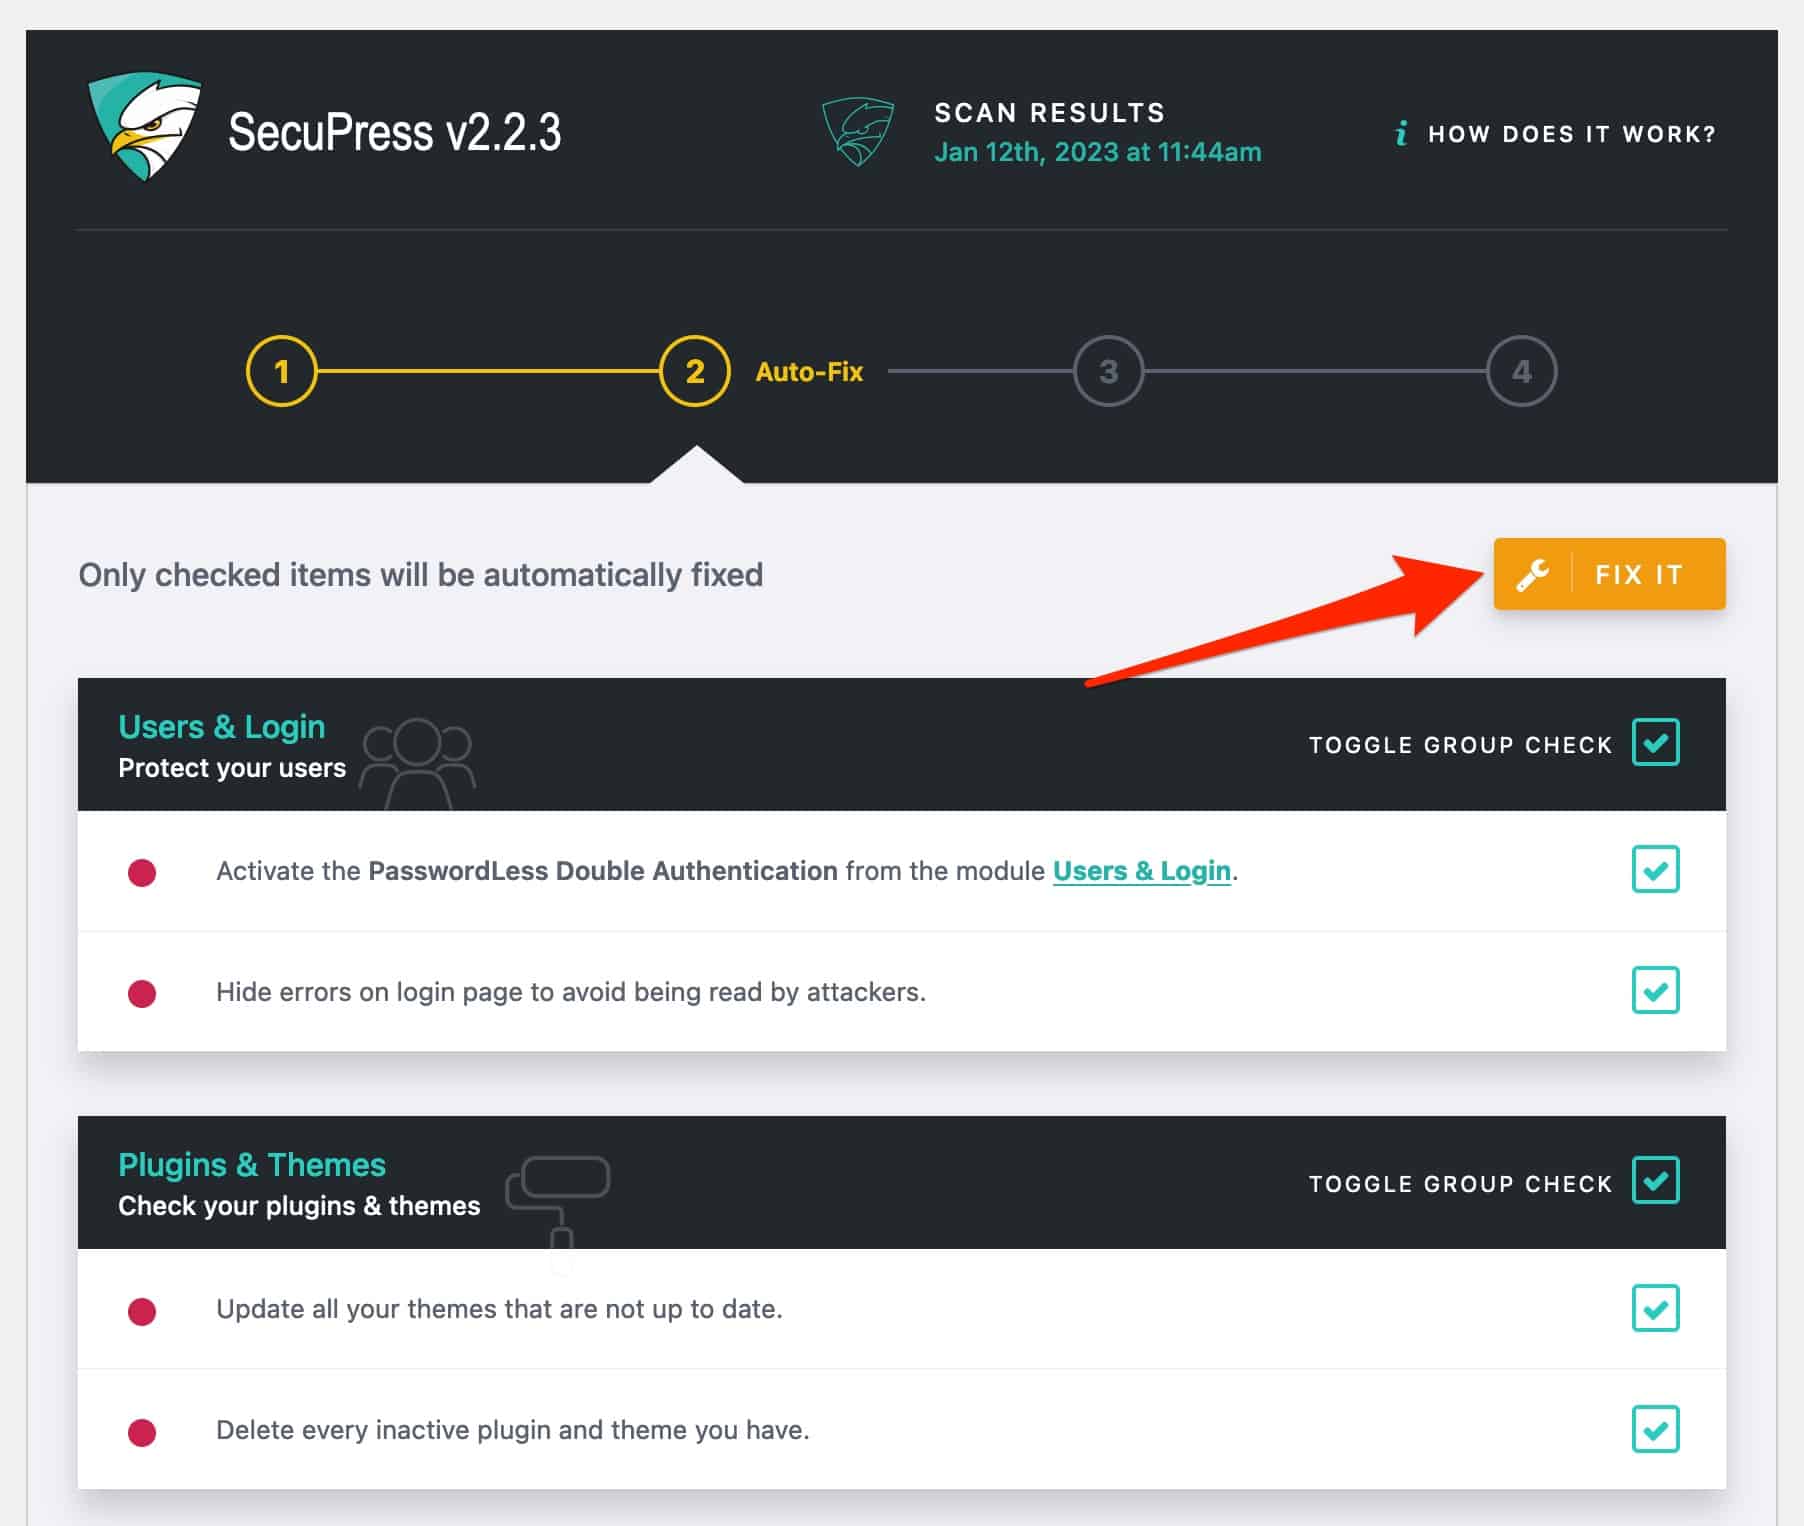
Depending on the number of items to be corrected, the operation should take three minutes at most.
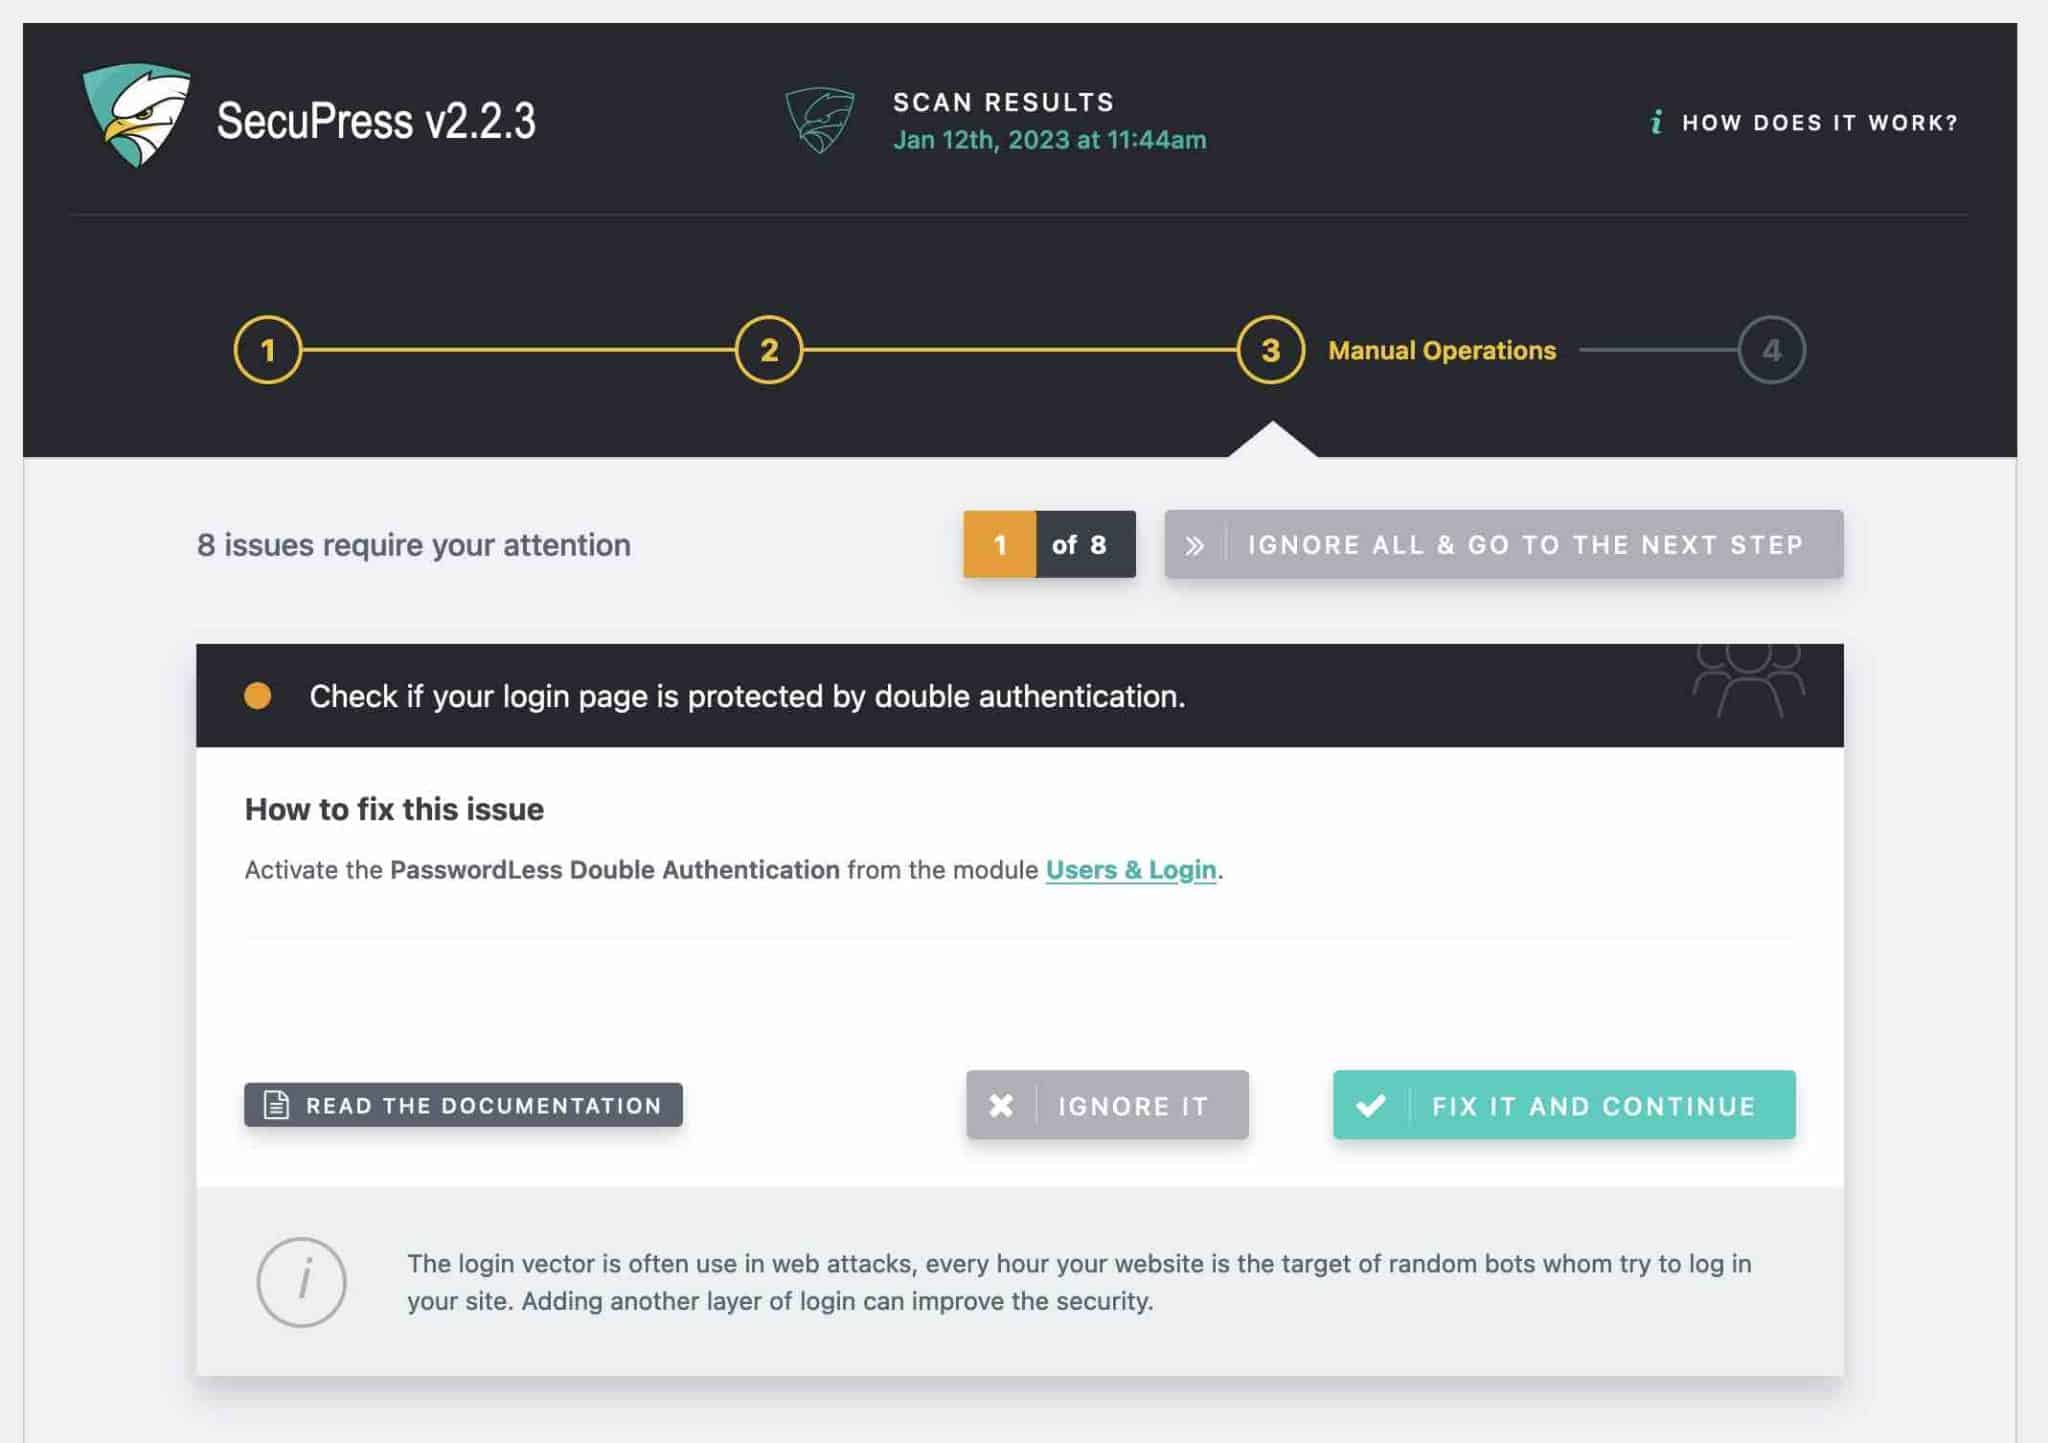
Perform manual operations
When SecuPress has done its job, it will tell you which modules have been activated at the top of the page that appears.
If you didn’t check all the suggested options in the previous step (which I did voluntarily for the purpose of this test), SecuPress recommends that you manually correct (with validation from you) the issues it detected during its scan.
Below, you can see that I am prompted to enable dual authentication on my login page, which is a great security practice. You can either:
- Ignore the recommendation (not recommended)
- Fix it and continue (recommended action)
See a summary of the corrected items
Finally, you will have a resolution report with a summary of the actions taken.
In my case, my grade went from C+ to B+. I still have items to correct, 8 in total. Again, not having everything corrected is not a good practice.
On your site, you should correct all the bad items presented if possible. I didn’t do it here just because I was testing the plugin.
To go further and reinforce the security of your site, you can make additional adjustments module by module, as I detail in the next section.
What modules does SecuPress offer?
You know it now: you can access the modules through SecuPress > Modules. There are 13 of them in total, offering almost one hundred options!
I’ll introduce them to you one by one, with their essential settings.
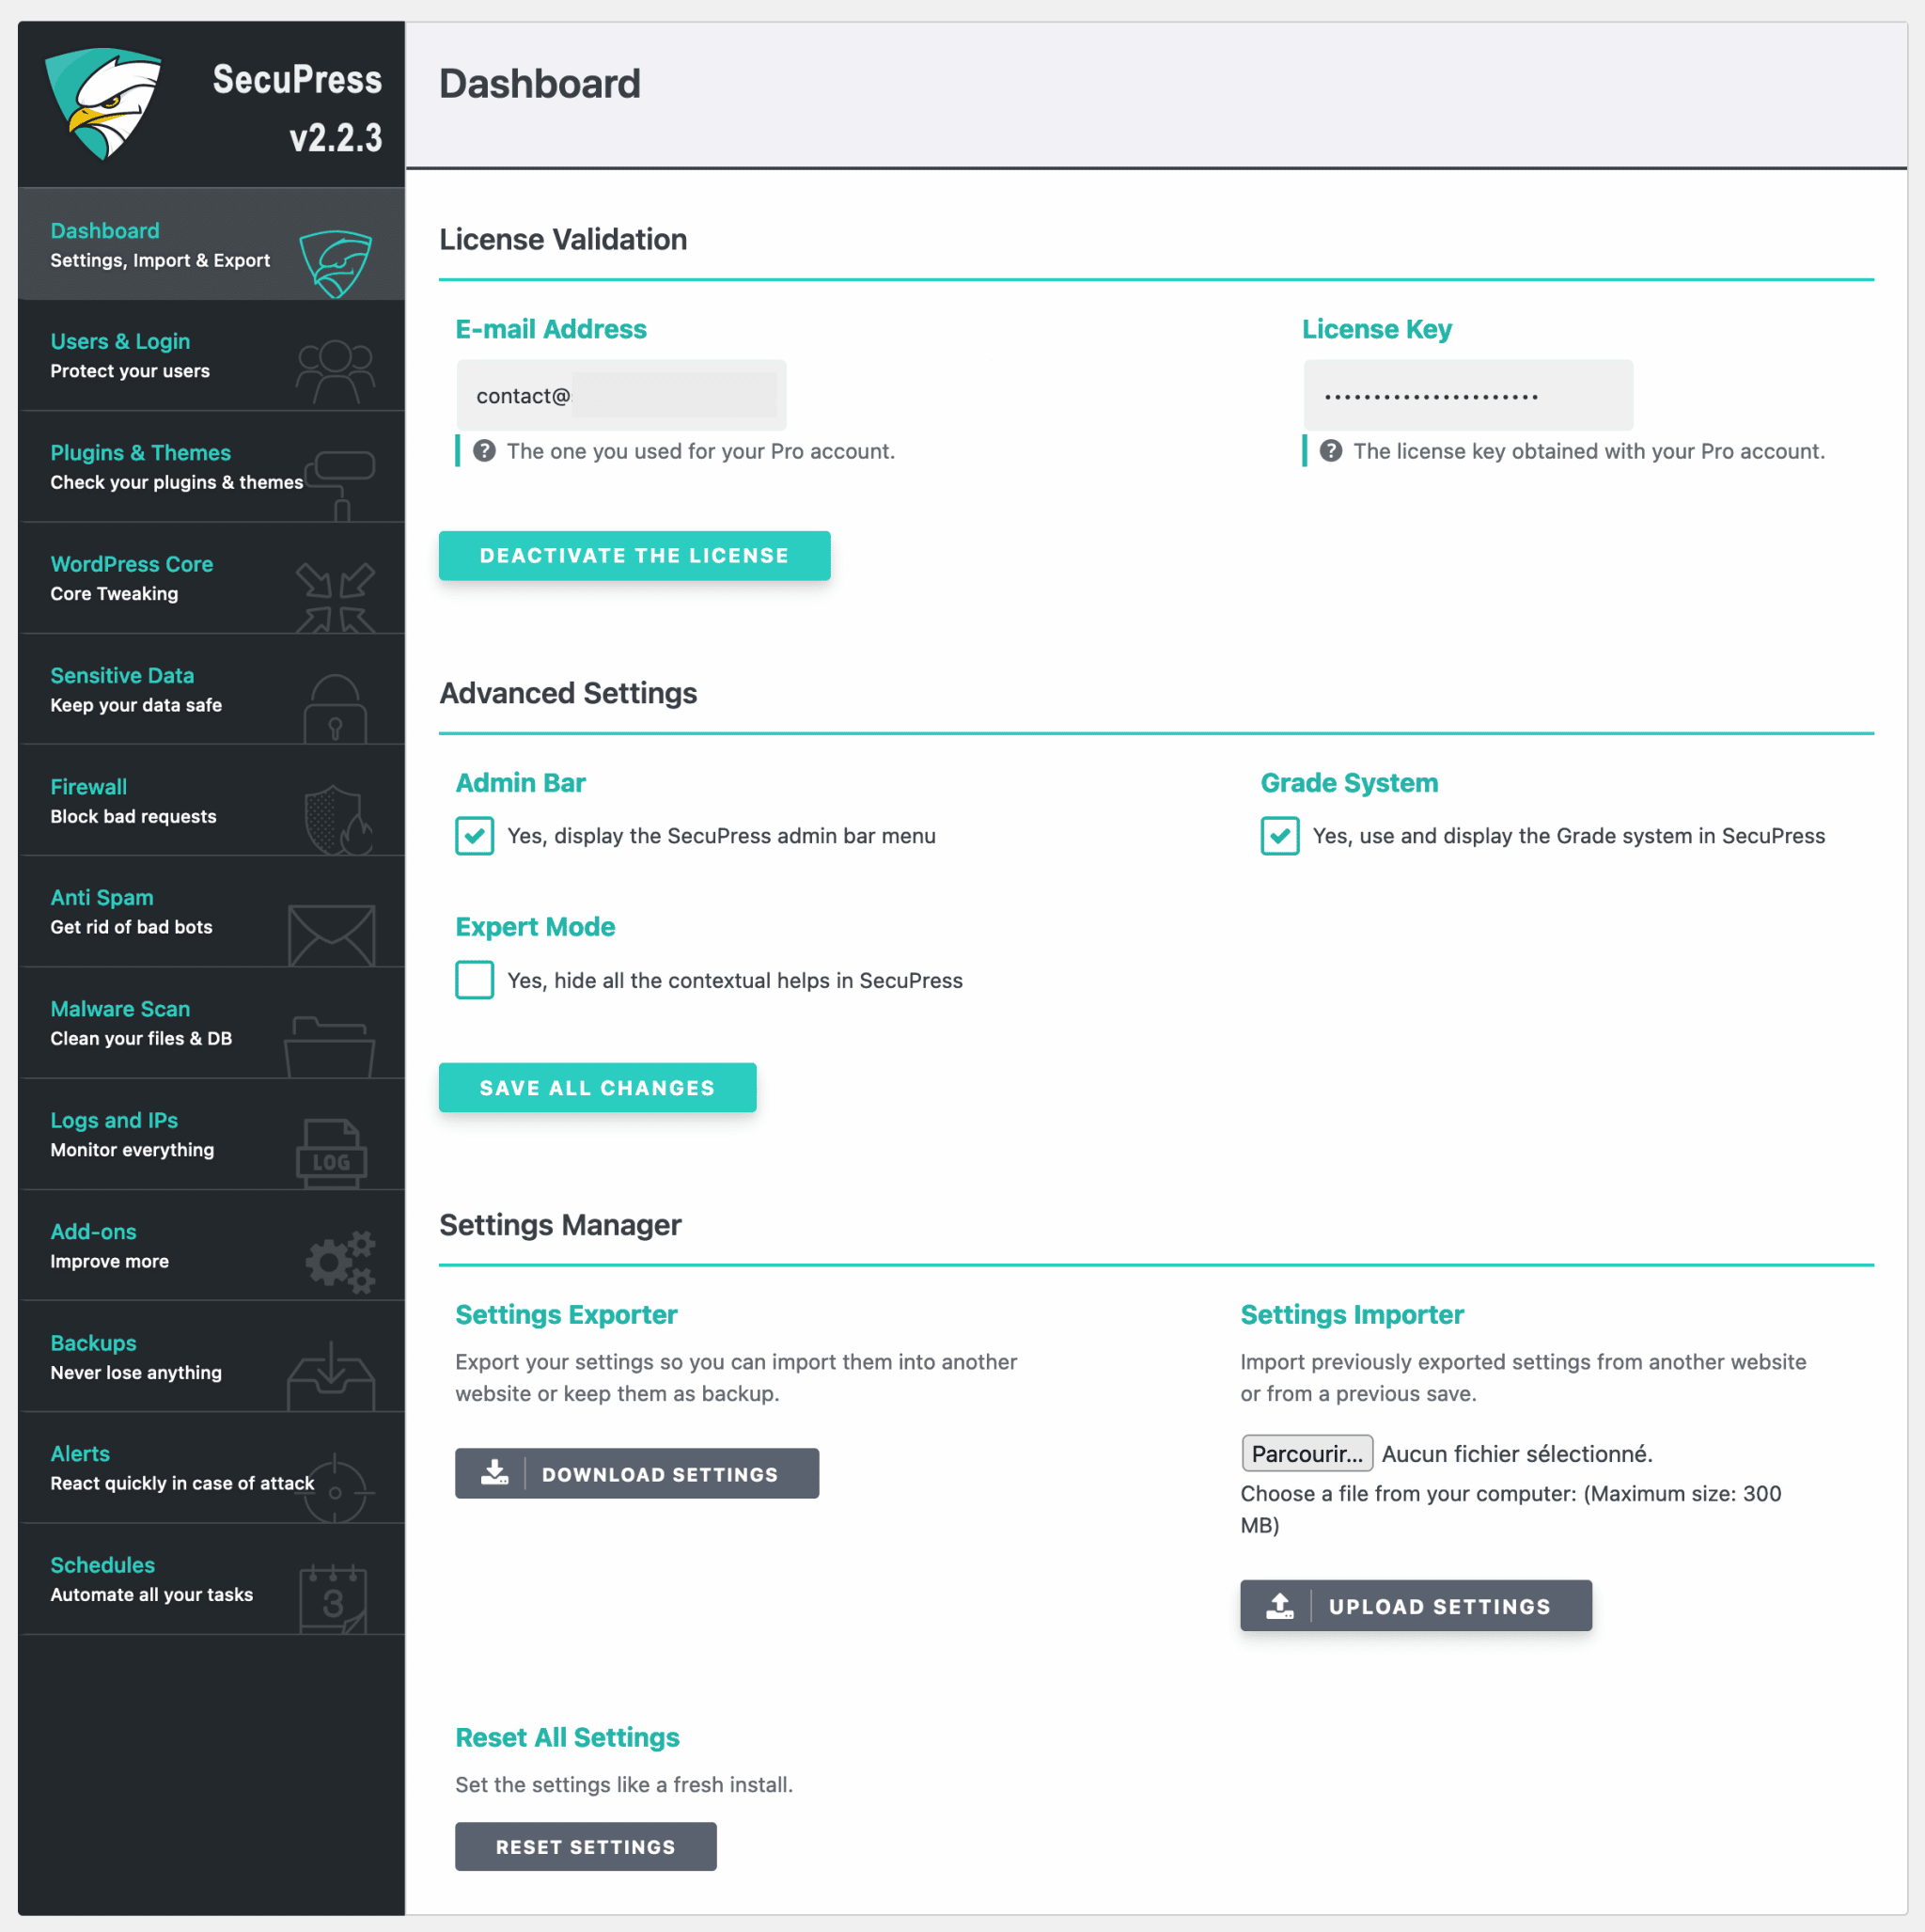
Dashboard
With this first module, you can:
- Enter your Pro license
- Modify advanced settings like displaying or not the SecuPress menu in the administration sidebar
- Export and import your SecuPress settings. This is useful if you want to use the plugin on several sites at once. There’s also a button to reset the plugin settings in one click.
Users & Login
The “Users & Login” module offers several useful features. I advise you to activate the following options:
- Move the administration and login pages. By doing this, your login page will no longer be accessible by everyone on one of the following URLs: your-site.com/wp-admin or your-site.com/wp-login. You will then be able to enter the URL of your choice (e.g. yoursite.com/Ui78vcF45). Choose something complex to decrypt.
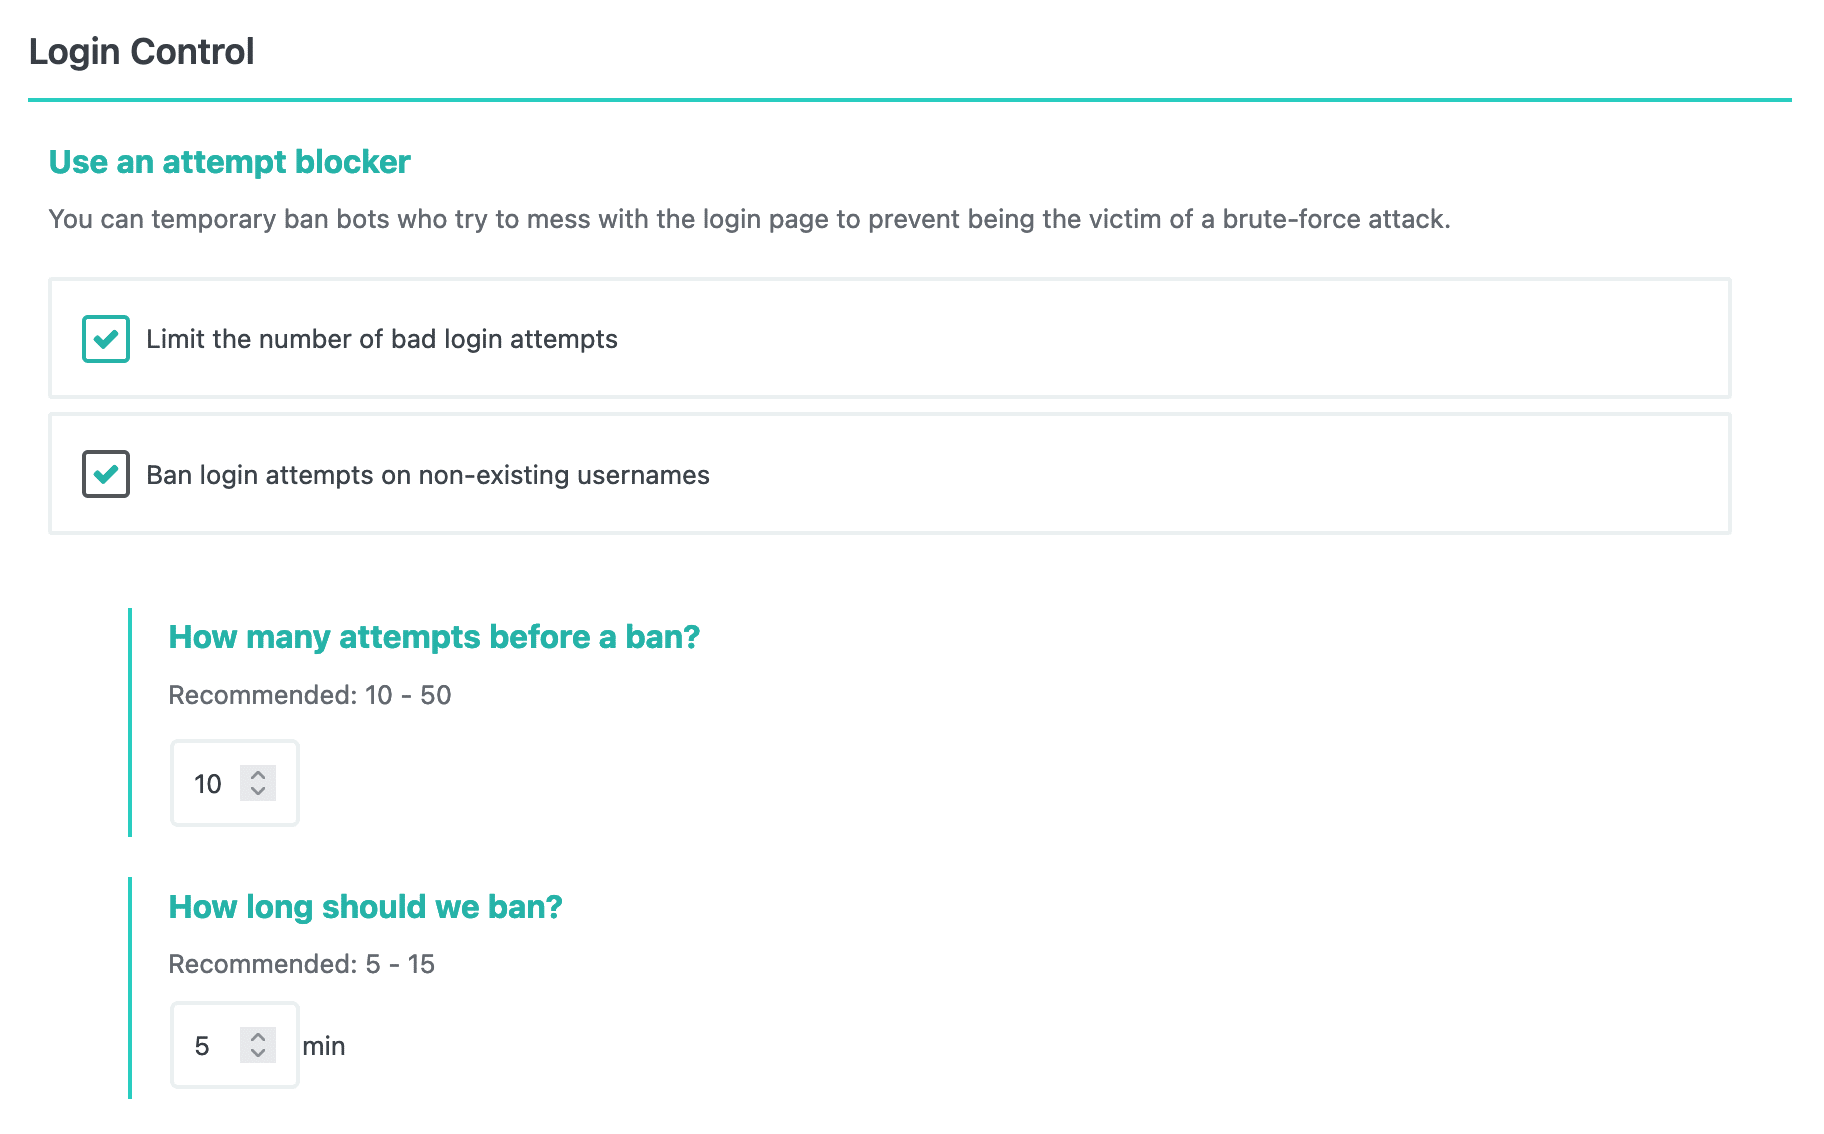
- Limit the number of attempts to connect to the administration, including brute force attacks. You can enter the number of attempts before banning, and set a time period during which the malicious person or bot will not be able to access the login page.
- Use double authentication, especially with the Passwordless method. In this case, the user will have to click on a link received by email to log in, after having entered his address on the login page.
- Use a captcha on the login page, to limit login attempts by robots.
- Force the use of strong passwords.
Plugins and themes
The module for themes and plugins is very useful if you plan to let clients control your site. It contains several options to prohibit the addition, deactivation, or removal of plugins.
Check the boxes that interest you if you want to be sure that your client or the person who manages the site doesn’t do anything wrong.
If you’re the only one managing the site and you know what you are doing, you won’t have to touch much here.
I still recommend that you check the following two boxes no matter what:
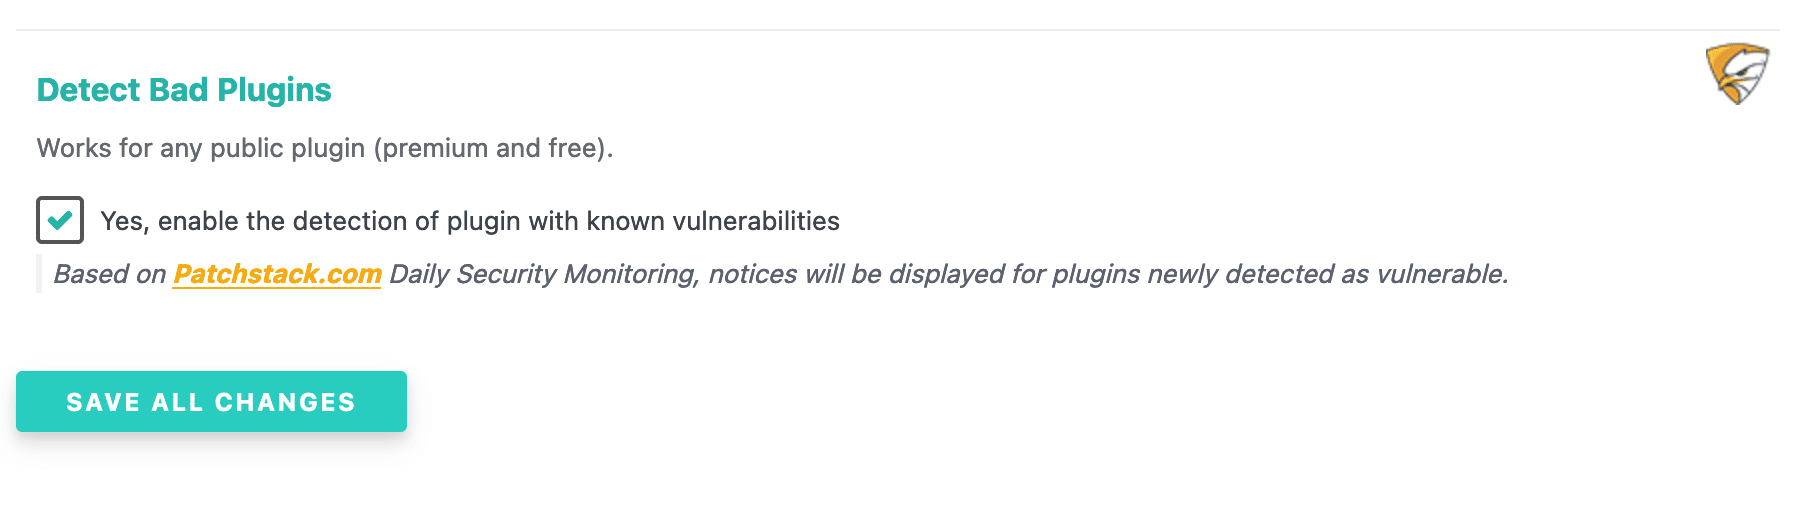
- Detection of bad plugins
- Detection of bad themes
In these cases, you will be notified when plugins or themes known to be vulnerable are enabled (thanks to the Patchstack daily security monitoring service).
WordPress Core
In this module, I advise you to activate the following options first:
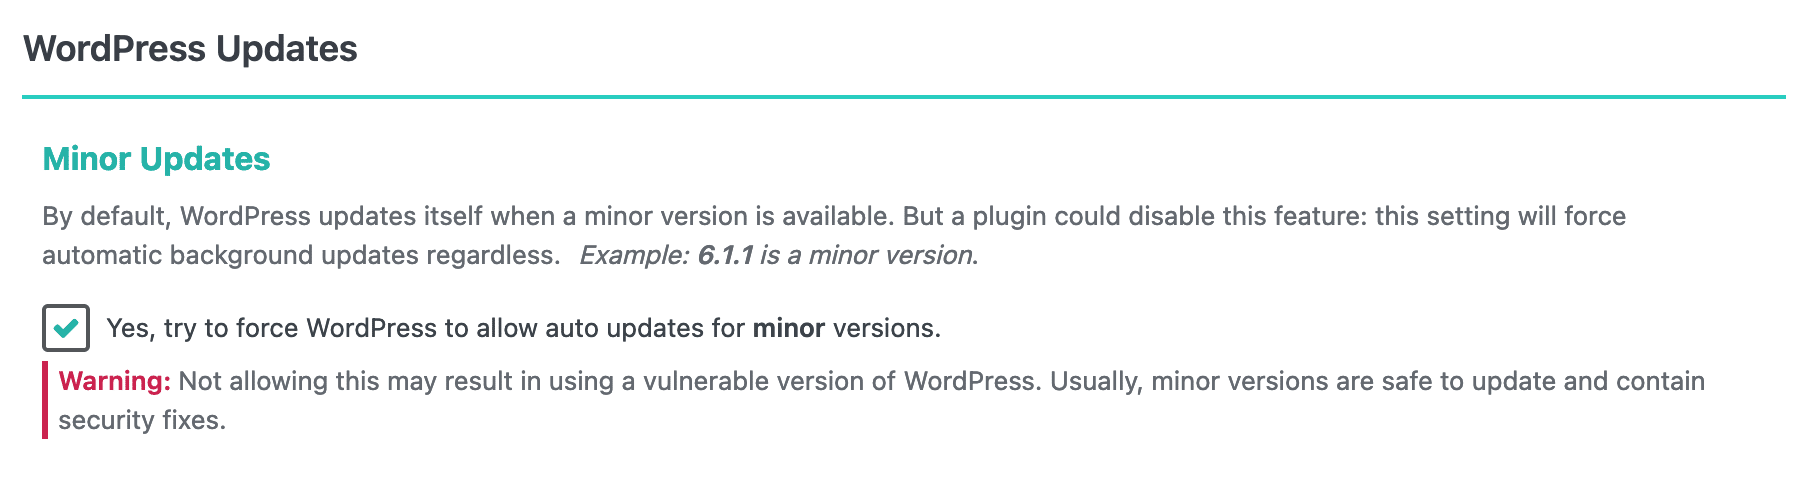
- Minor updates, to force minor updates in the background if they are disabled (for example by a plugin)
- Change the database prefix. By default, the prefix
wp_is assigned to your database tables when WordPress is installed. That means it’s easy to detect in the code that your site is running under WordPress, in order to attack it. Change this prefix to something more complicated (e.g. fgd56mld90_). - Disable the file editor, to prevent editing of plugin and theme files directly from the WordPress interface.
- Create secure keys for your WordPress installation. These keys are located in the
wp-config.phpfile, and allow for better encryption of certain information, such as the cookies of a user who logs into the administration of your site. If a hacker has these cookies, he will be able to log into your site even if you reset your password… Unless you change your security keys.
SecuPress also allows you to enable automatic updates for major WordPress versions. In fact, this is a good practice, but I personally prefer to perform my major updates a few days after their release, manually, partly to avoid possible compatibility problems (though these are quite rare). If you’re the kind of person who forgets to update, though, check the corresponding box.


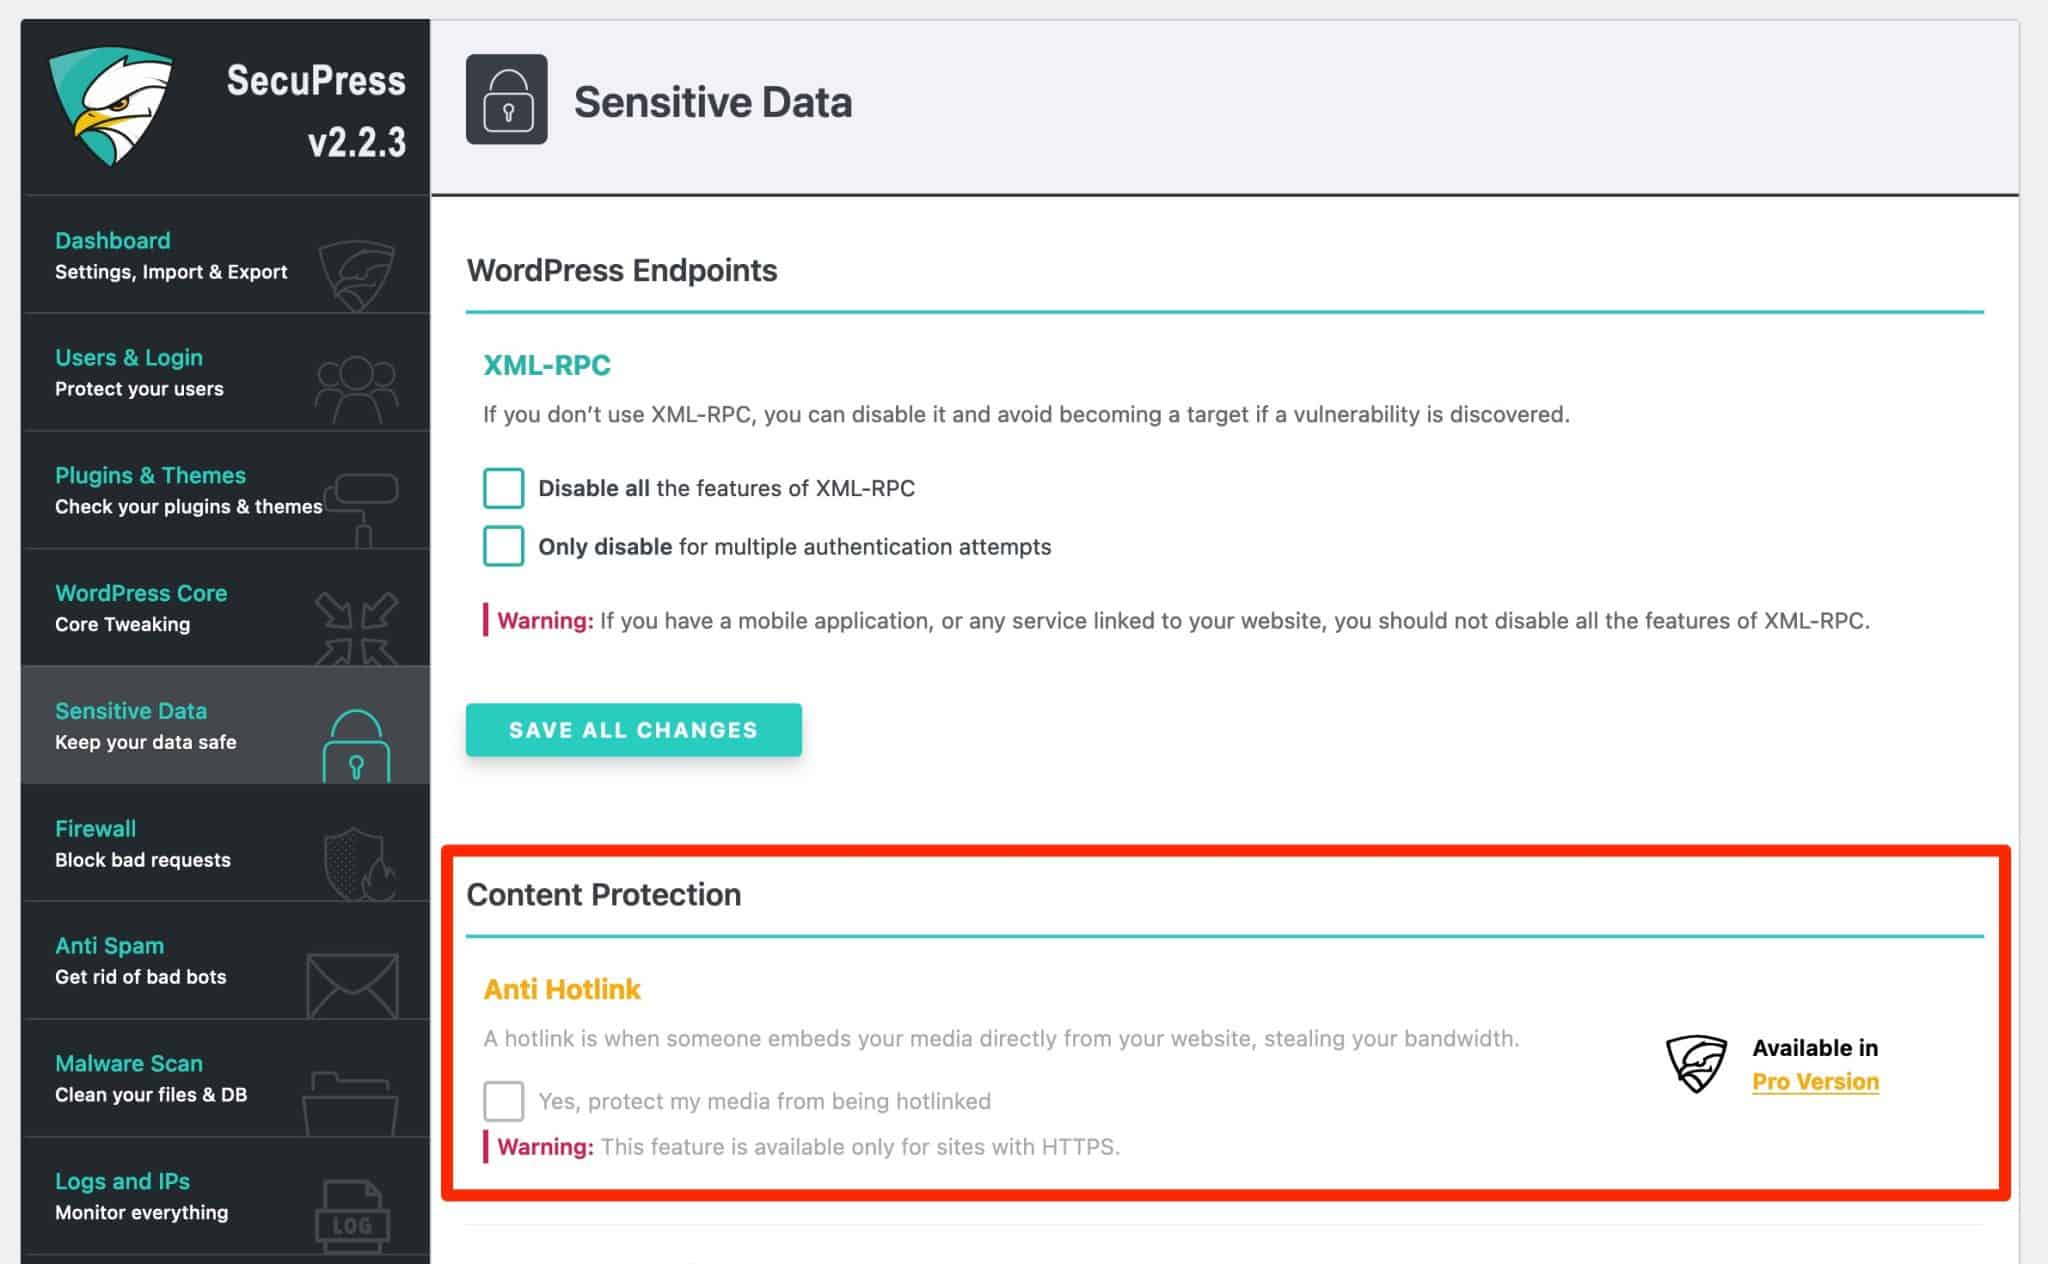
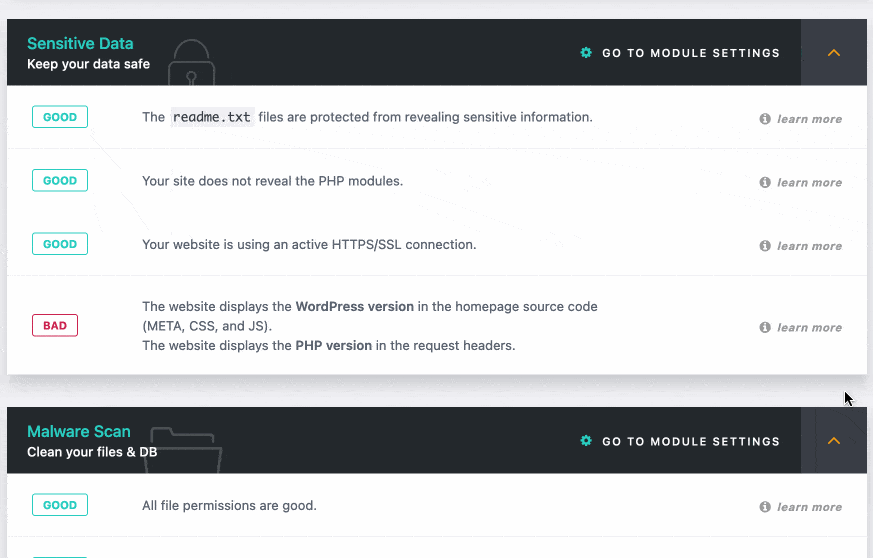
Sensitive data
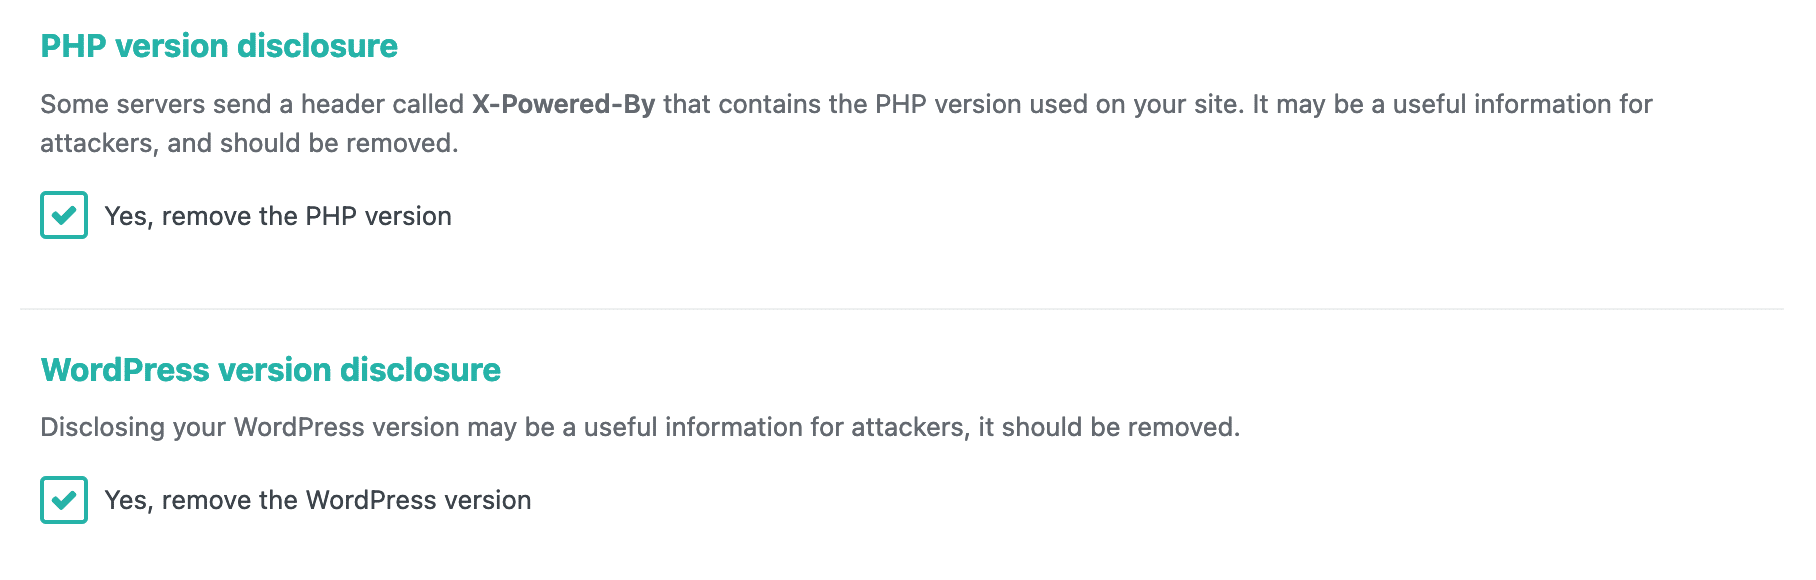
In the “Sensitive data” module, you can first keep the default settings:
- PHP version disclosure
- WordPress version disclosure
Then, I particularly recommend that you:
- Disable the XML-RPC protocol, if you don’t use it
- Protect your media from hotlinking
- Disable the display of files in folders
- Disable access to readme.txt or changelog.md files
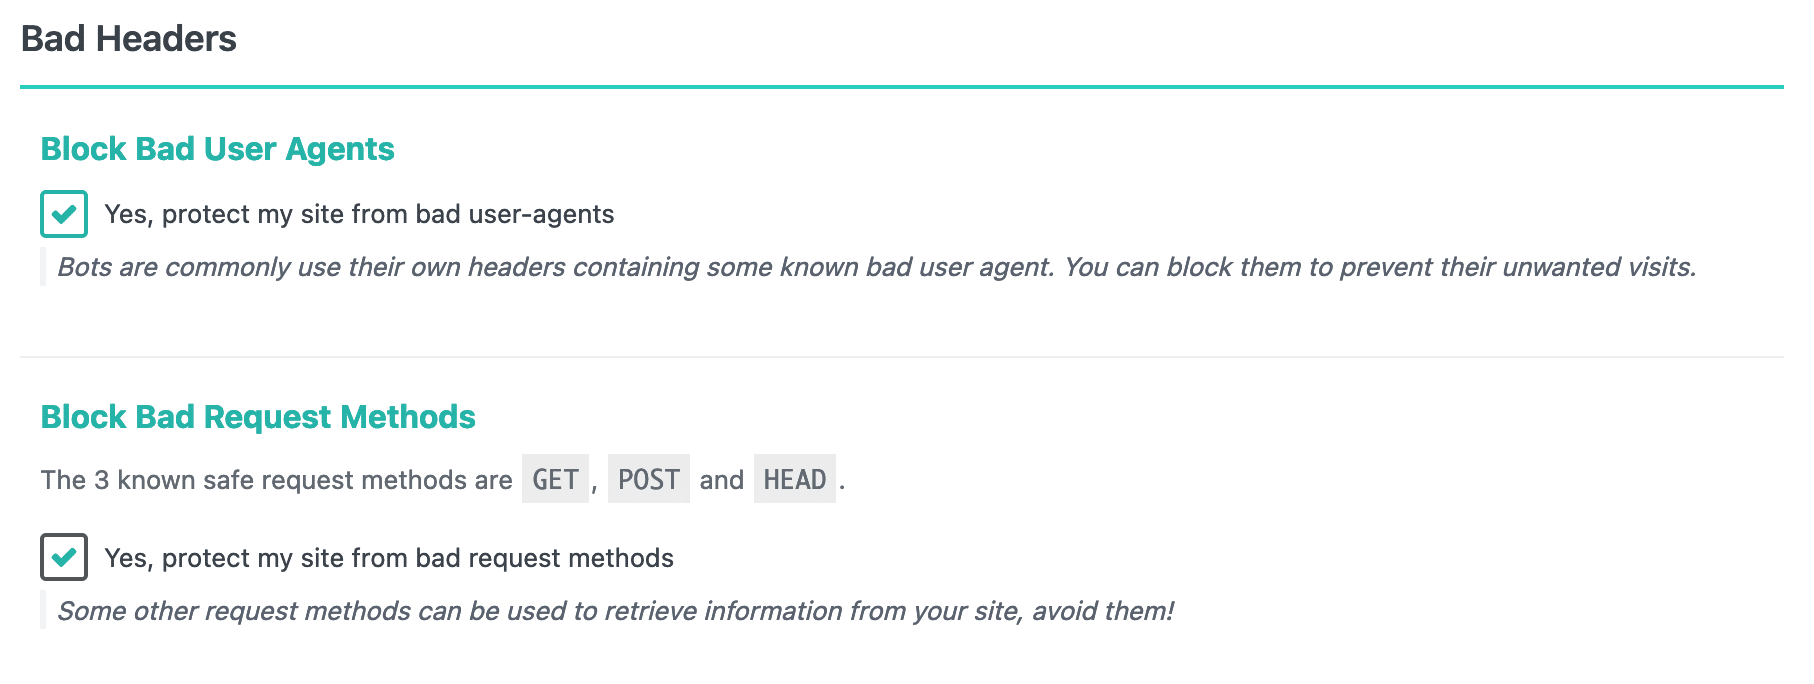
Firewall
With the firewall module, you have seven options to block malicious requests:
- Bad user-agents (e.g. internet browser)
- Bad request methods
- Fake SEO bots
- Bad content in URLs
- Stop malicious activity from one or more countries
Here, I advise you to check all the boxes.
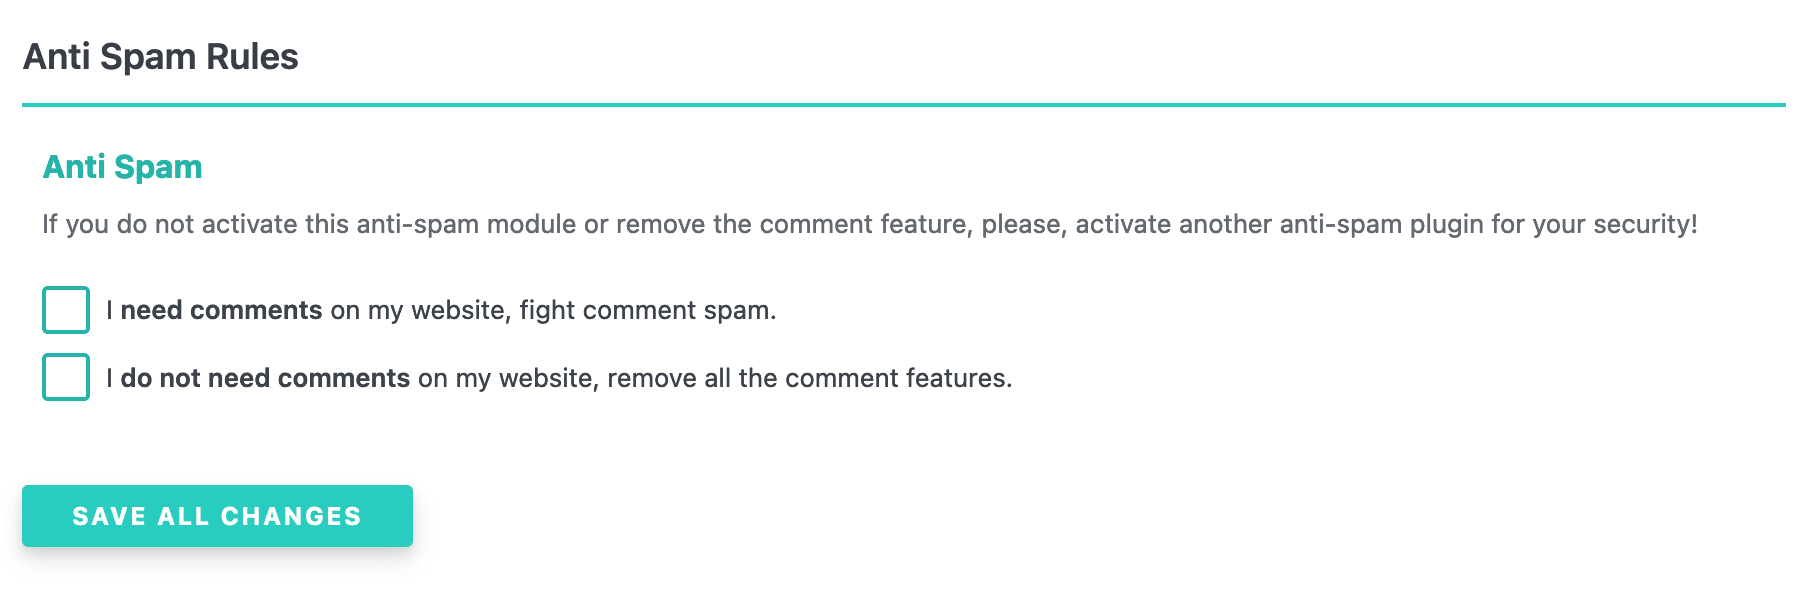
Anti-spam
SecuPress allows you to activate anti-spam to fight against unwanted comments.
Check the box “I need comments on my website, fight comment spam” IF you are not already using an anti-spam plugin like Akismet.
Note that SecuPress also allows you to remove all comment features, if you wish.
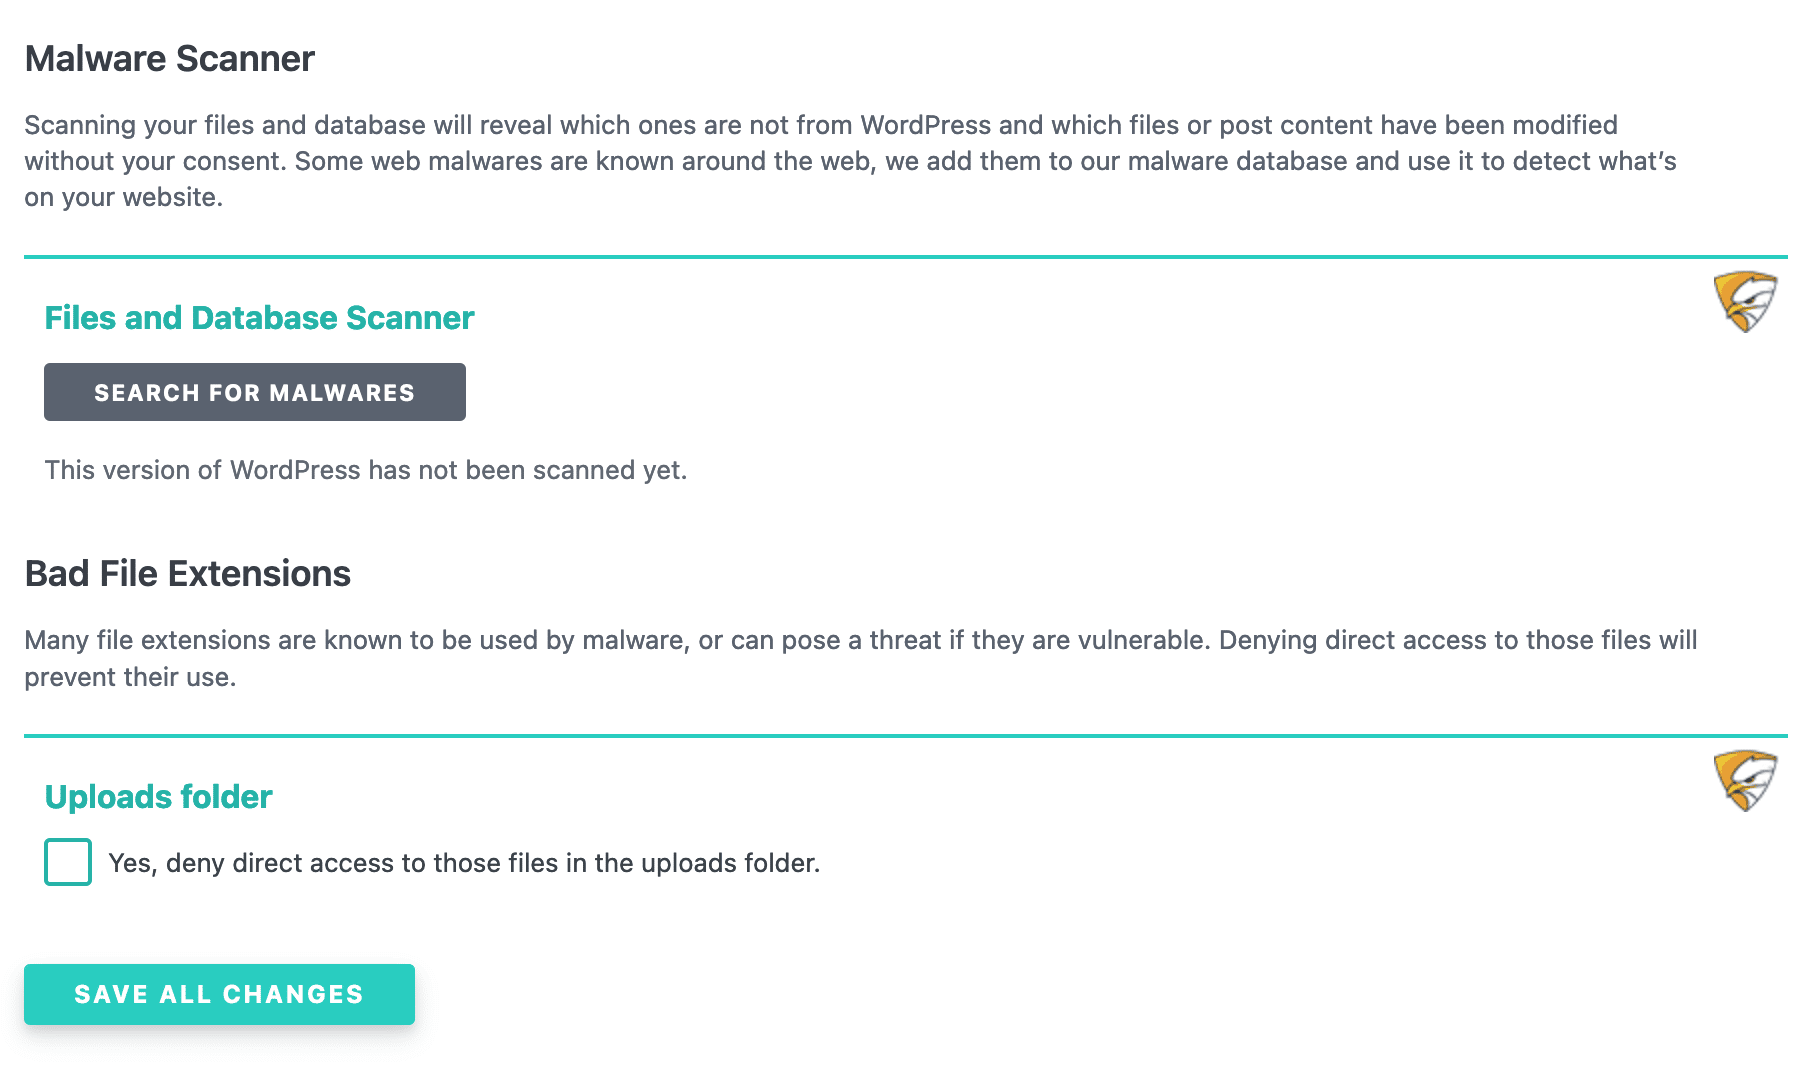
Malware scanner
With the malware scanner, you can:
- Scan your files and database for viruses, i.e. files that are different from the original WordPress Core files (to find out which ones have been modified)
- Block access to files in the uploads folder, to prevent their use if you are affected by a virus (check this box)
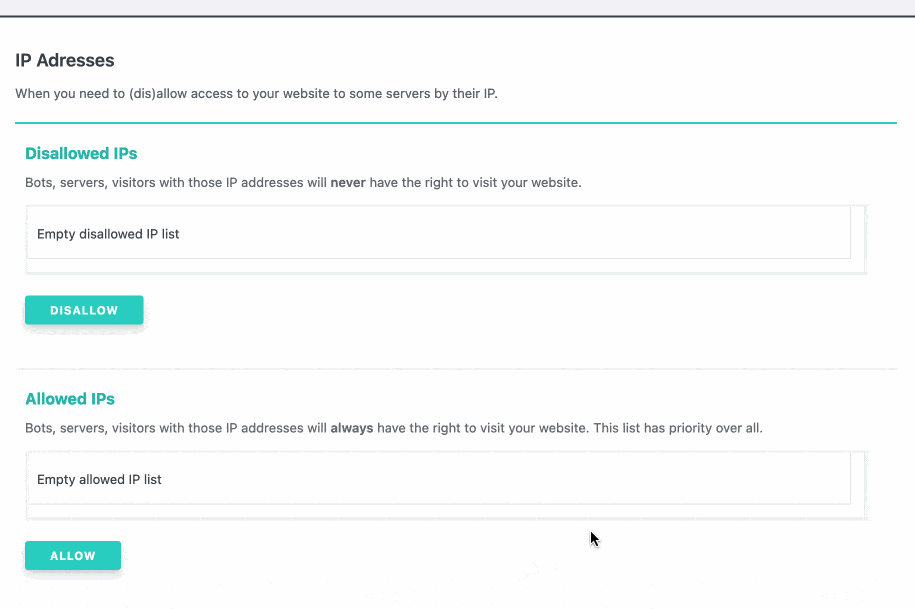
Logs and IP
The “Logs and IP” module allows you to manually enter IP addresses to ban or allow.
Thanks to the Logs, you can also:
- Keep track of actions performed on your site (updating passwords, changing email addresses, an important role logging in, etc.). Check the “Yes, keep a WordPress action log” box if you are interested.
- View your 404 errors. However, SecuPress does not allow you to perform redirects to “remove” your 404s (the plugin can’t do everything). For that, use the Redirection plugin.
Add-ons
This module allows you to install two add-ons:
- WP Activity Log, to have a record of the modifications occurring on your site.
- BackWPup, to backup your site.
It’s up to you to see if you need them.
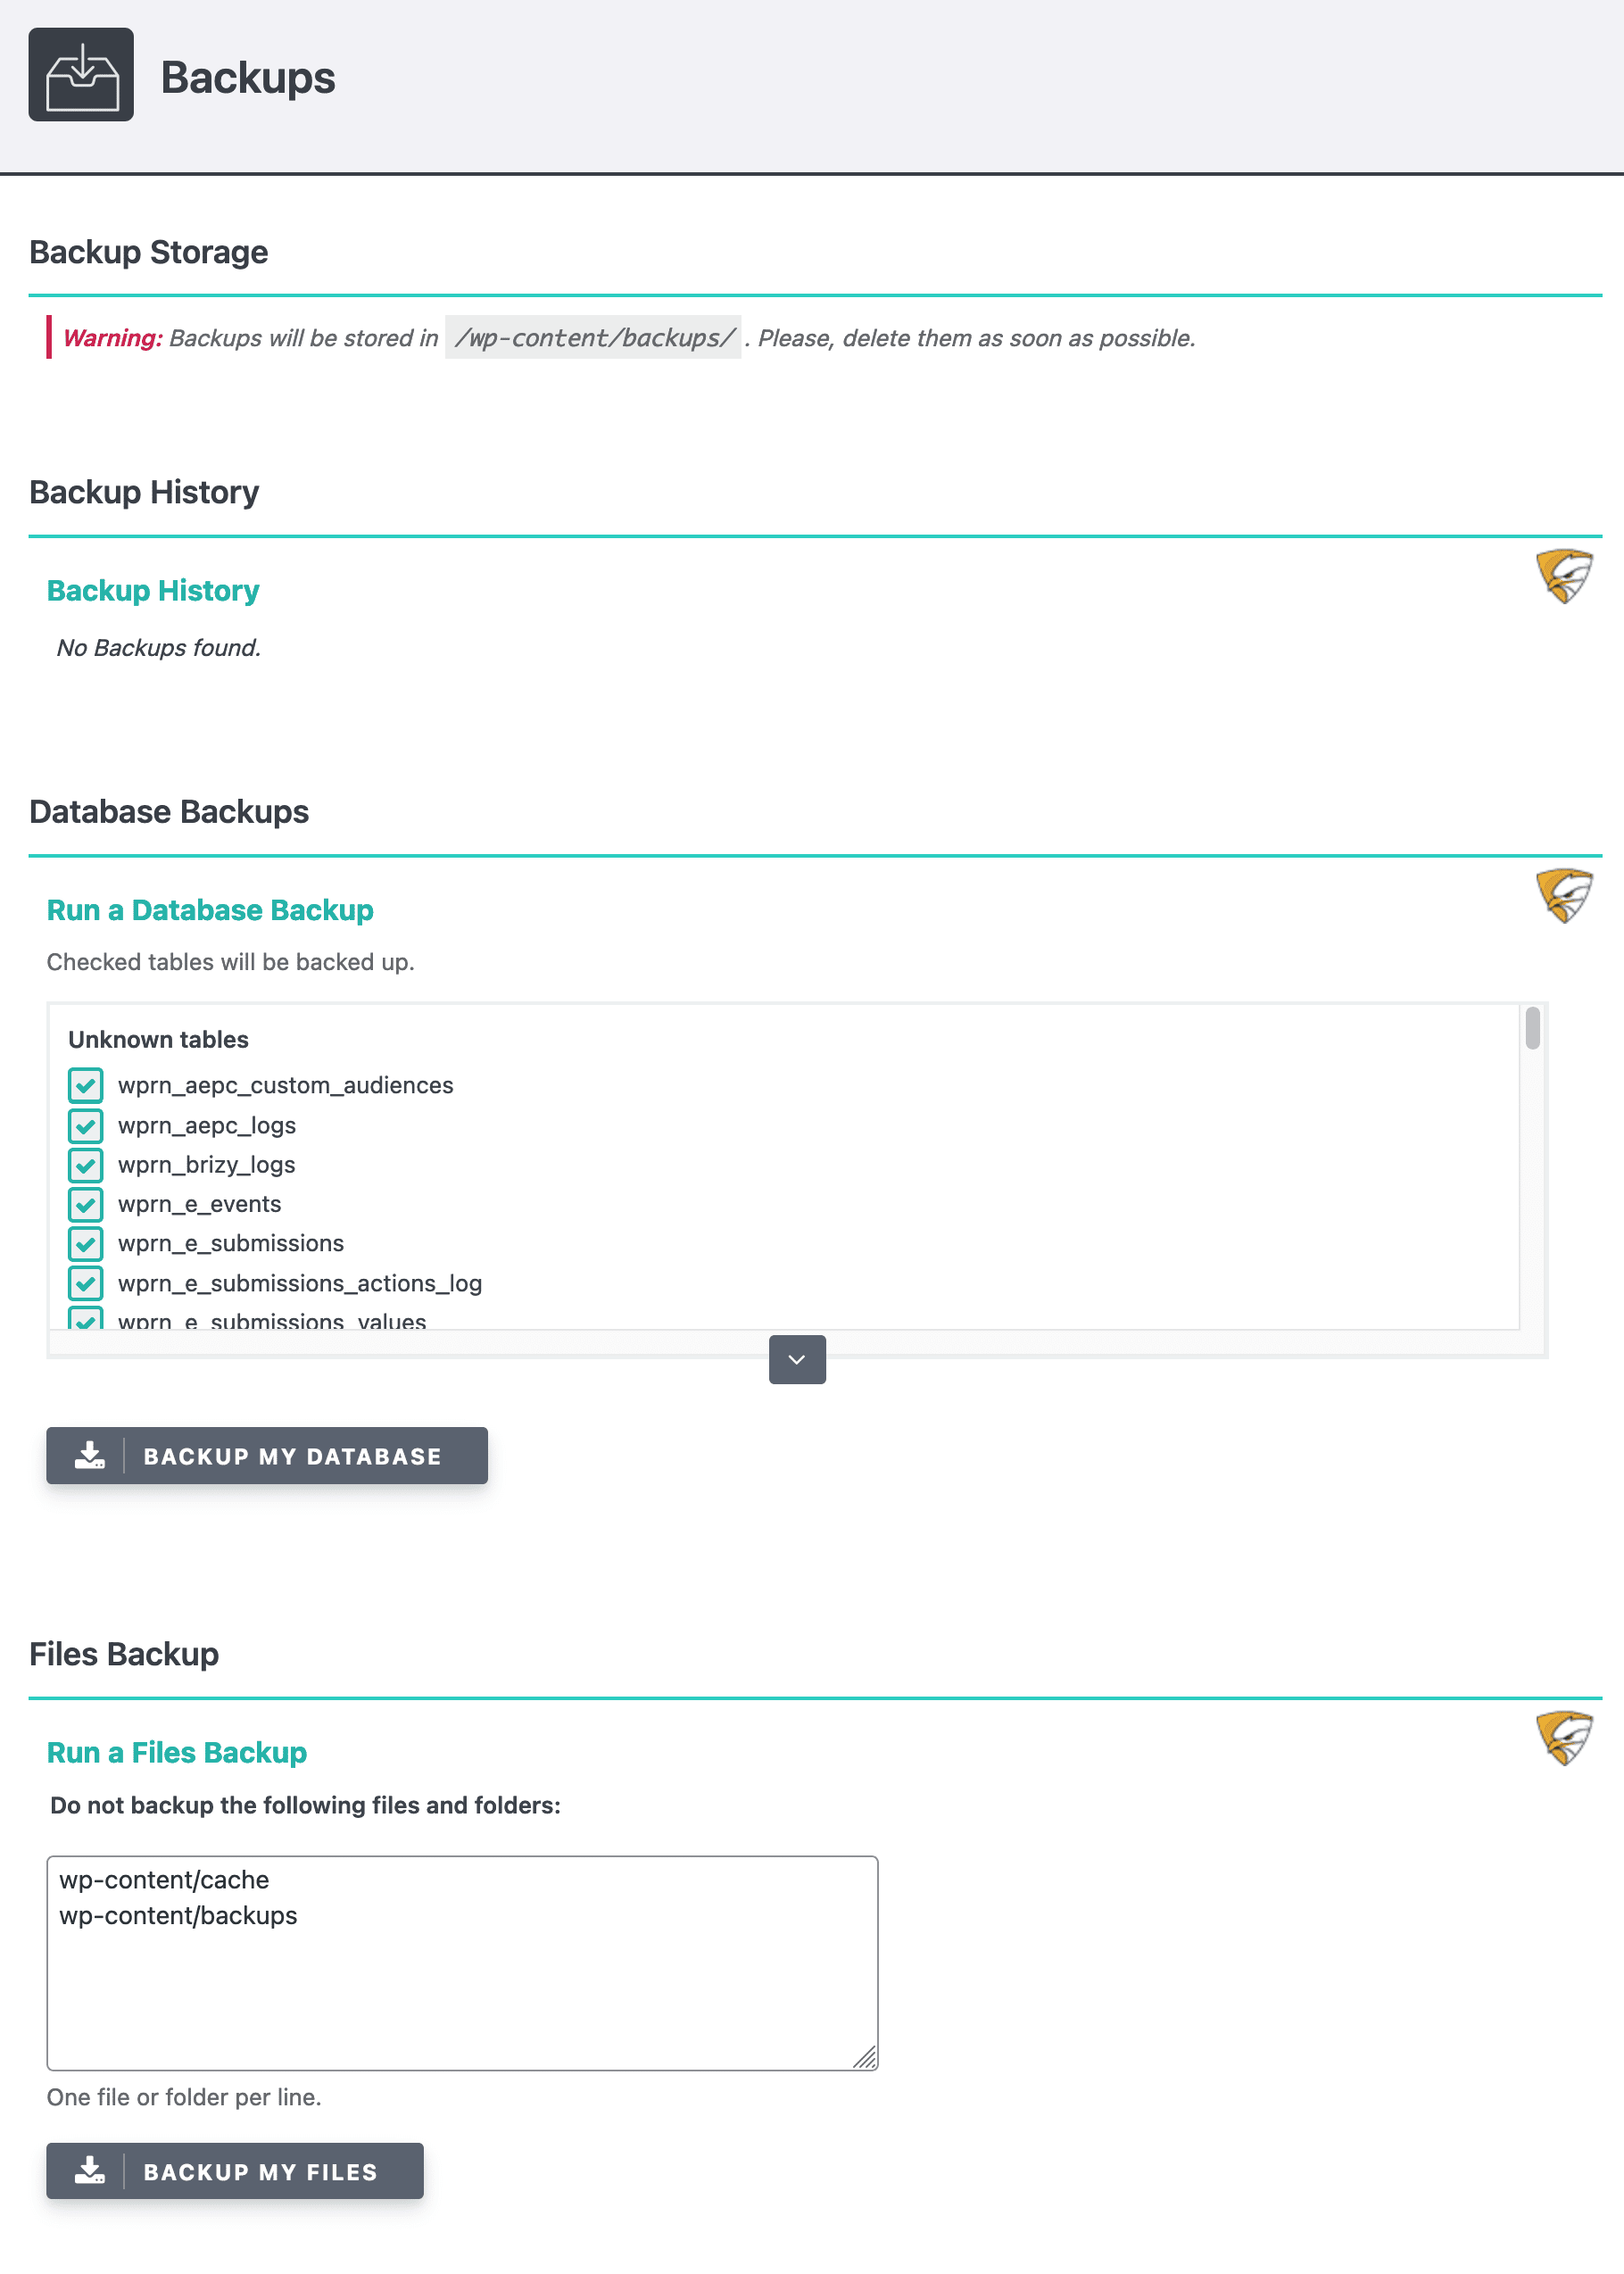
Backups
Having a recent backup of your site is essential in case of security problems. SecuPress has understood this and offers a dedicated module.
Thanks to this module, you can manually backup both your files and your database, with the option of excluding files and tables of your choice.
This is definitely useful but still less extensive than what a dedicated backup plugin is able to offer you.
With SecuPress, you can’t save your backups on a remote storage space (like Google Drive, Dropbox, or Amazon S3), which is still a good practice.
And you’ll need to remember to download and delete each backup as soon as possible, or else you’ll end up using up the storage space allocated by your hosting company.
Alerts
With the “Alerts” module, you can choose to be notified by email or on Slack in case of important events, such as the detection of a vulnerability.
You can also receive a daily report with a summary of important events.
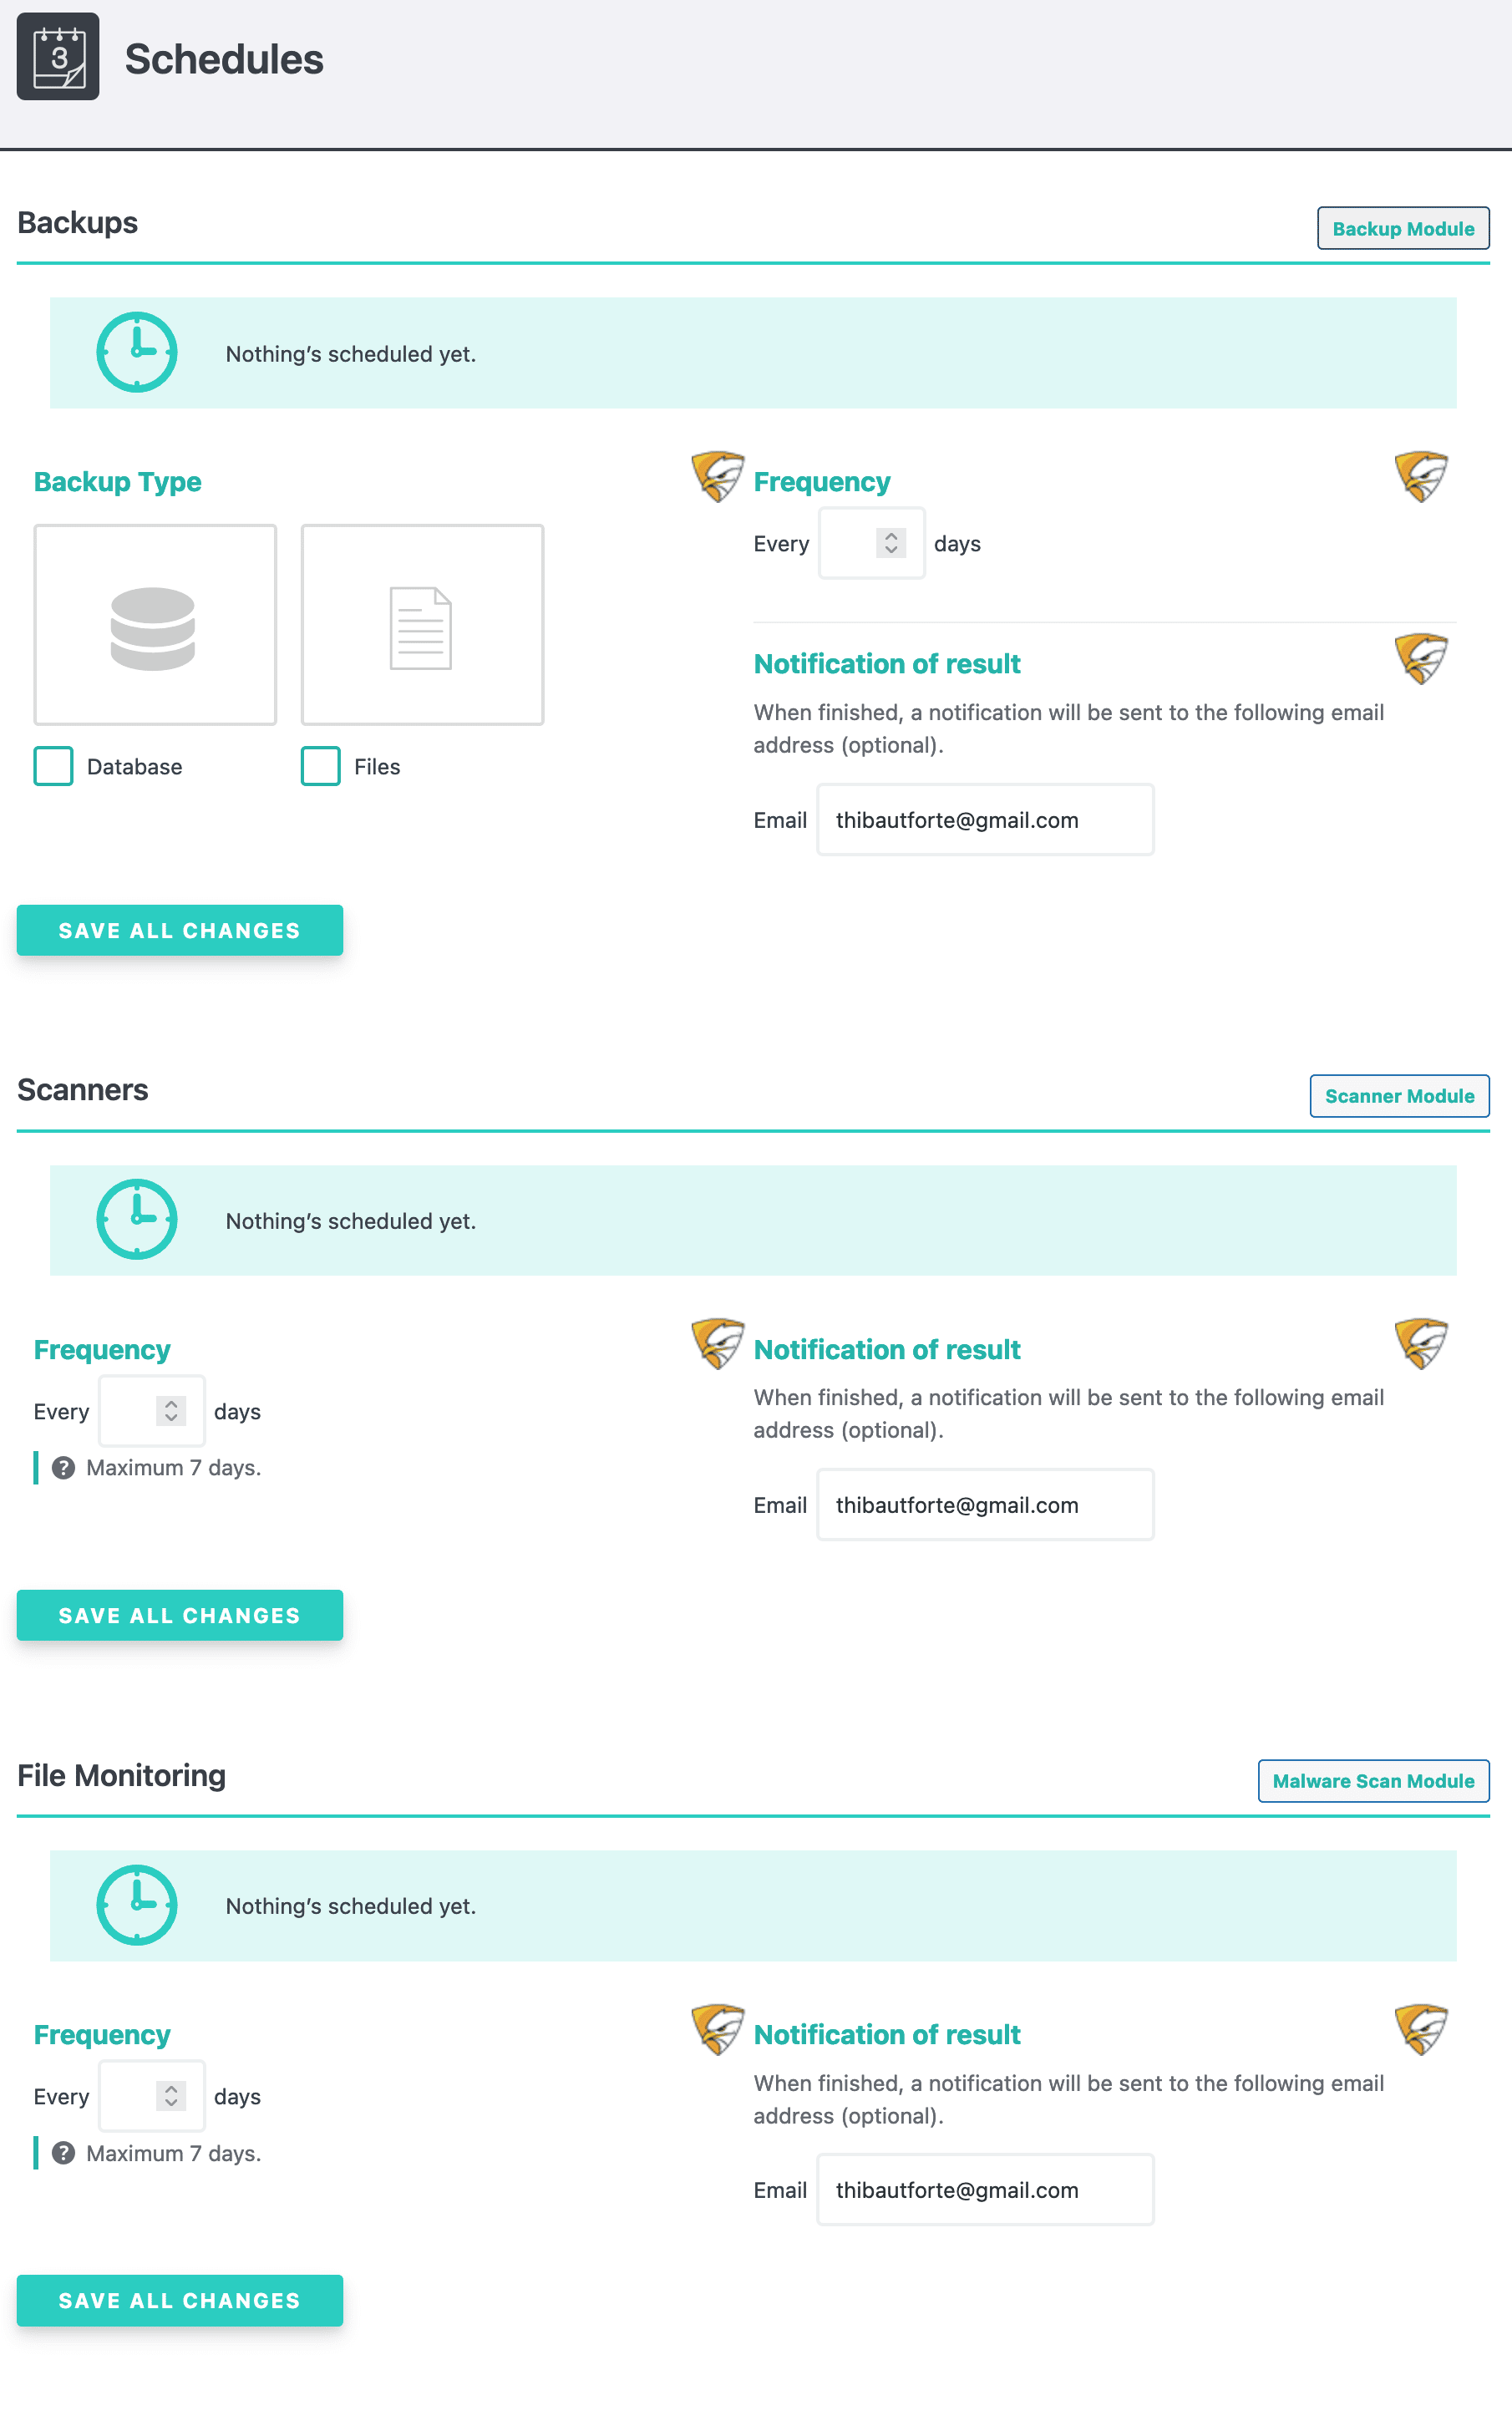
Schedules
Finally, the last module is related to schedules for:
- Backups
- Scans
- File monitoring
You can choose a maximum daily frequency (e.g. everyday). It’s not possible to schedule hourly backups, for example.
Well, that’s it! You now have a pretty complete overview of all the modules of the SecuPress security plugin.
Let’s continue our tour by looking at the prices of the plugin.
How much does SecuPress cost?
SecuPress is first available for free on the official WordPress directory. To take advantage of all these features, however, you’ll need to opt for the paid version, SecuPress Pro.
Prices are on a sliding scale depending on the number of sites on which you want to activate the plugin. Here are some examples to give you an idea:
- €60/year (about $65) for use on one site
- €160/year (about $173) for use on 5 sites
- €260/year (about $280) for use on 10 sites
- €1180/year (about $1280) for use on 100 sites
Free version or Pro version: which one should you choose?
Are you interested in SecuPress but hesitating between the free version and the premium version? To decide, it all depends on the type of site you have and the use you intend to make of the plugin.
As SecuPress says, “the free version can be used for small sites, like blogs with no revenue.”
On the other hand, if you receive regular traffic, have a members’ area, or manage an ecommerce store, opt for the Pro version.
In this case, “you’ll need more security and need to save time. SecuPress Pro can schedule your main tasks and send you alerts when necessary, for example.”
In any case, you can always activate the free version first to see if it’s enough. Also, feel free to check out the comparison between the two versions offered by SecuPress.
Now it’s time to come full circle with a final review and our opinion on the plugin!
Our final opinion on SecuPress
SecuPress is a very comprehensive plugin that combines multiple advantages:
- Ease of use: no technical knowledge is required to use the plugin
- The ergonomics and the user interface, clearly superior to the competition
- The presence of many features that strengthen the security of your site, even in the free version. For example, SecuPress offers a firewall, like Wordfence (iThemes Security and Sucuri do not offer this option for free).
- The modular approach, where you can conveniently activate only the options you need
- The scanner-level configuration wizard, which takes you by the hand from start to finish
- Automatic application of settings and security patches (you don’t have to do anything except check boxes)
- Simple and helpful explanations for each feature
- The frequent updates
- Its price, much cheaper (for the same features) than its major competitors (Wordfence Security, iThemes Security, Sucuri, etc.)
Personally, I liked this plugin very much and I don’t see any major drawbacks.
SecuPress: for whom?
Finally, the question is whether you should use it, especially considering what the competition is offering.
I’m not going to compare SecuPress vs Wordfence, or SecuPress vs iThemes Security.
To form your own opinion, I invite you to read the tutorials we have dedicated to these plugins:
Next to these four, SecuPress has nothing to be ashamed of, far from it. For me, it’s the best designed plugin in terms of interface and user experience.
It’s very easy to use and will be perfect for beginners, of course, but also for more experienced users.
In terms of options, I find it more comprehensive than Sucuri and iThemes Security. On the other hand, the Wordfence firewall seems more powerful to me.
Download the SecuPress plugin:
In the end, SecuPress is a plugin that I would install with my eyes closed to strengthen the security of a WordPress site.
For you, do you use it on your site? Let’s continue the discussion in the comments.