Emporia. Dodge City. Garden City. You’ve probably never heard the names of these three little Kansas towns.
What do they have in common, apart from being located in the Sunflower State? They all have about 30,000 inhabitants. Now, imagine that every inhabitant of one of these cities has a WordPress site … and gets hacked every day.

Sound crazy? It is. 30,000 sites are hacked on a daily basis, according to statistics provided by iThemes Security.
Beyond the statistical analysis it provides from time to time, this WordPress plugin also offers useful options to strengthen the security of your site.
Join me for a complete overview of its features. By the end of this article, you’ll know how to install and configure this plugin, and whether it’s worth activating on your site.
iThemes Security is now called Solid Security.
Overview
- What is iThemes Security?
- What are the main features of this security plugin?
- How important is security for a WordPress site?
- How to install and configure iThemes in six steps
- What are the settings offered by iThemes Security?
- How to monitor the status of your site with iThemes Security
- What are the premium options of the plugin?
- How much does iThemes Security cost?
- Our final opinion on iThemes Security
What is iThemes Security?

iThemes Security is a plugin to protect and secure your WordPress site. It offers various features for this purpose, including two-factor authentication, protection against brute force attacks, password enforcement, IP address blocking, etc.
With 700K active installations, iThemes Security is one of the most popular security plugins on the official WordPress directory. It competes with plugins like:
- Wordfence Security (5M+ active installations)
- All in One Security (1M+ active installations)
- Sucuri (600K+ active installations)
- Jetpack (3M+ active installations)
- SecuPress (40K+ active installations)
iThemes Security, a plugin integrated into a large galaxy of products
Originally launched as Better WP Security by developer Chris Wiegman, the plugin changed its name after being acquired by iThemes in December 2013.
Besides that, the iThemes brand offers two other products:
- BackupBuddy, to backup, move, and restore a WordPress site
- iThemes Sync, to maintain multiple WordPress sites from a single dashboard
Acquired in 2018 by the hosting company Liquid Web, iThemes is part of a galaxy of WordPress products united under the StellarWP brand. It includes, for example:
- Kadence theme
- LearnDash LMS (Learning Management System)
- The Events Calendar, Restrict Content Pro, and GiveWP plugins
That’s it for this first general overview, useful for understanding the ecosystem in which iThemes Security is embedded. Now let’s see how iThemes can help you secure your WordPress website.
What are the main features of this security plugin?
To protect your installation as much as possible, the free version of iThemes is able to:
- Ban IP addresses of hackers or malicious bots that want to access your website
- Save the database of your WordPress installation
- Detect any unauthorized changes to your files
- Block brute force attacks. In this case, robots try to discover the login and password of your site’s administrator account by testing different combinations in order to take control of it.
- Help you set up two-factor authentication to log in to your site
- Require you to set up strong passwords for all accounts
- Make it mandatory to connect to your site via SSL, which is required to implement HTTPS on your site
- Send you email notifications of any suspicious activity on your site
- Change the prefix of your website’s database
- Change the URL of your login page
However, don’t consider iThemes Security as a miracle solution that will protect you 100%. No security plugin can guarantee that, by the way.
As stated on its description page in the official directory, “iThemes Security is designed to help improve the security of your WordPress installation against many common attack methods, but it cannot prevent every possible attack.“
Let’s just say that the plugin will make your life easier when it comes to security, because you have to put some work in on that. To persuade yourself to take the effort, read the following section.
How important is security for a WordPress site?
I’m stating the obvious here, but let’s say it anyway: the security of your site is paramount. In case of hacking, the consequences can be very unfortunate and lead to:
- The loss and theft of a lot of data, more or less sensitive, particularly that of your customers
- Loss of time, because you will have to clean up the hacked site and update everything
- Unplanned financial expenses, especially if you call in a security expert
- Damage to your brand image and possible loss of trust from your current users and/or future customers
Far be it from me to scare you, but keep in mind that this kind of misadventure doesn’t just happen to other people.
A quick look at the iThemes Security Pro presentation page may be enough to convince you (if you’re the type that needs convincing). According to the data that the company shares :
- 50% of cyber-attacks target very small businesses
- 45% of website owners are not sufficiently prepared to be hacked, meaning that they have not put in place sufficient protection measures
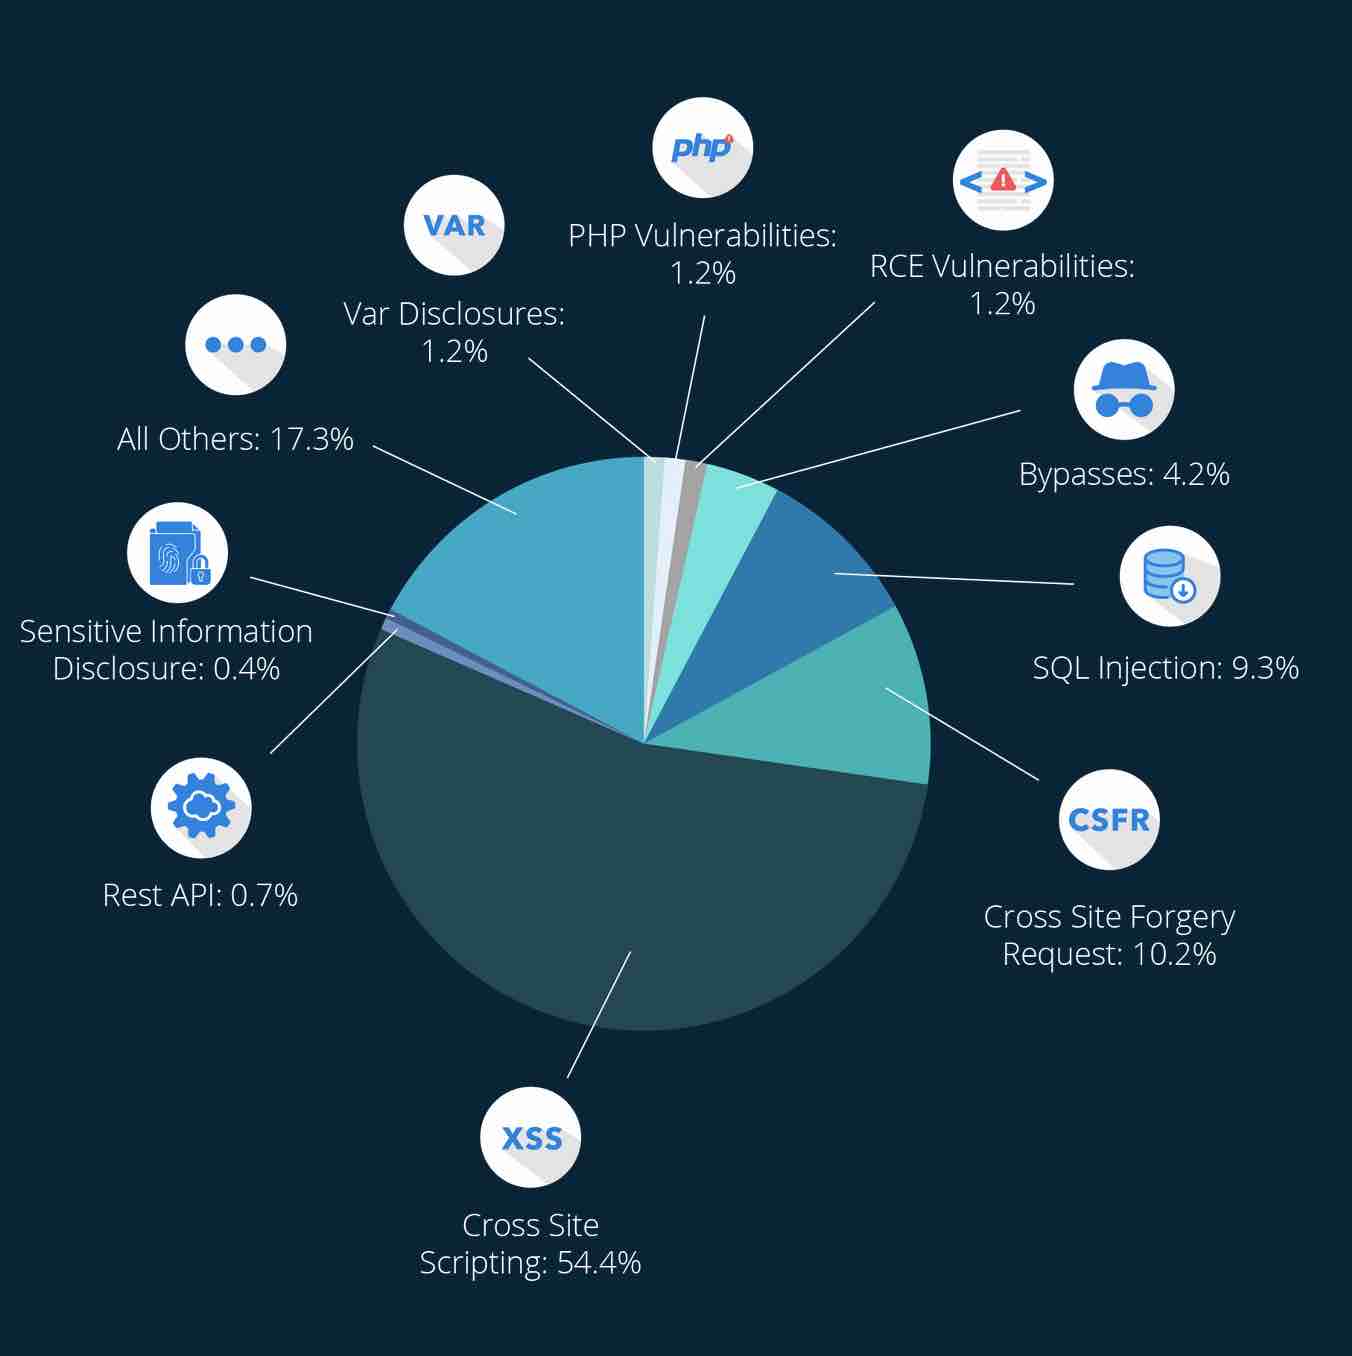
As security expert Patchstack reports in 2021, almost all detected vulnerabilities come from WordPress themes and especially plugins (99.42% of total vulnerabilities). The attacks can be multiple and varied. You can be targeted by:
- Site-to-site scripting (Cross-site scripting, also called XSS)
- Cross site request forgery (CSRF or XSRF)
- SQL injections (attacks on your database)
- PHP vulnerabilities, the language through which WordPress runs
- Malicious file downloads
- Etc.
As a webmaster, you have a role to play in the security of your site. It is necessary that you maintain best practices on a daily basis, such as backing up your files and database, and performing frequent updates.
And don’t forget to use a security plugin like iThemes Security. Find out more in the following section, which shows you how to activate it on your administration interface (the back office).
How to install and configure iThemes in six steps
Step 1: Backup your site
First of all, before activating iThemes Security, back up your site with a dedicated plugin.
We go over some backup plugins in this comparison, including UpdraftPlus. Why take this precaution? First of all, because it’s good practice.
And secondly, because iThemes Security recommends it in its Frequently Asked Questions, on the official directory.
Here’s what it says: “iThemes Security makes significant changes to your database and other site files, which can be problematic for existing WordPress sites. Again, we strongly recommend making a complete backup of your site before using this plugin. While problems are rare, most support requests involve the failure to make a proper backup before installation.”
Duly noted. Let’s move on to step two.
Step 2: Activate the plugin on your dashboard
Now proceed to the installation of iThemes Security. To do so, go to Plugins > Add New and type “iThemes Security” in the search bar:

Click on the “Install Now” button. In the process, activate the plugin. Congratulations! The plugin is running on your site.
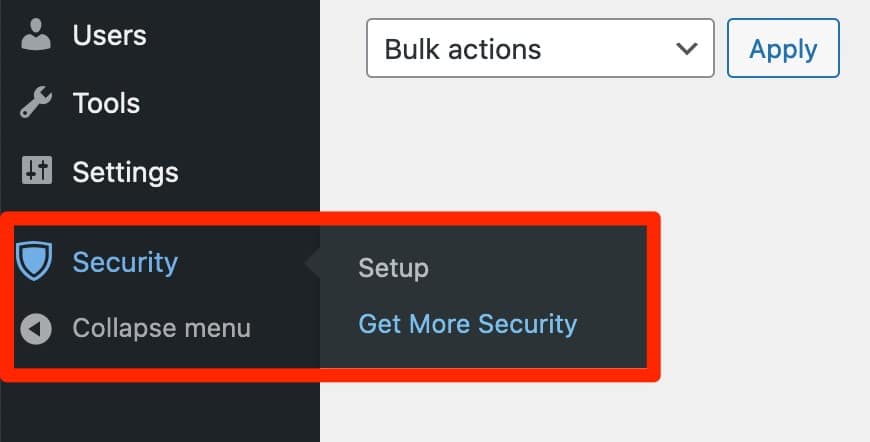
You can see a new custom post type in your left sidebar. It consists of two main menus:
- Setup
- Get More Security
Let’s take a look at the first one right away. Go to the iThemes Security > Setup menu.
Step 3: Choose a site type
To make your life easier at the start, iThemes Security offers to guide you “through the setup process so the most important security features are enabled for your site.”
You can first choose from six site types that best represent yours:
- “Ecommerce”
- “Network” (for forums and membership sites)
- “Non-profit” (for sites supporting a cause and collecting donations)
- “Blog”
- “Portfolio”
- “Brochure” (for showcase sites)
Personally, I chose the “Blog” template, which best fits my test site.

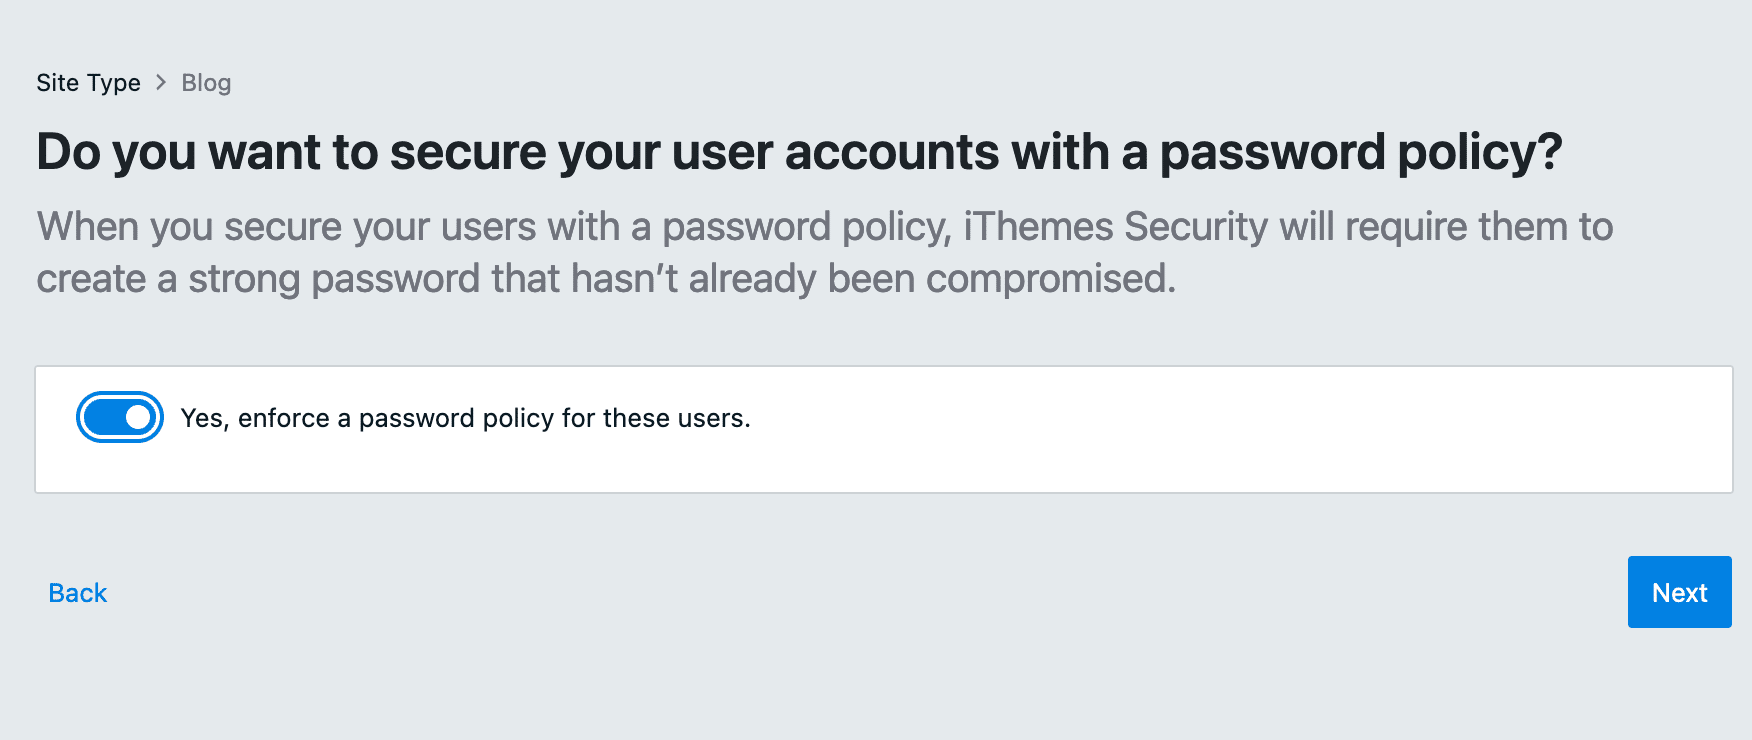
iThemes then asks you to enter the following information:
- For whom are you configuring the plugin, your personal site or a client’s site?
- Do you want to secure your user accounts with a password policy? This requires users of your site to use strong passwords. Checking “Yes” is a good practice.
Step 4: Enable security features
In the next step, iThemes gives you the option to activate/deactivate the features of your choice, divided into four sections:
- “Login Security”
- “Lockouts”
- “Site Check”
- “Utilities”
In the free version of iThemes Security, there are five features:
- Two-factor, to enable two-factor authentication (2FA) when logging in to the administration interface
- Local brute force, to protect your site against brute force attacks (option is active by default)
- Network brute force, to block users who have tried to break into other sites before attacking yours (option is active by default)
- Site Scan Scheduling, to check your site twice a day for malicious files
- Security Check Pro, to identify IP addresses based on your server configuration by making an API request to iThemes.com servers (active by default)
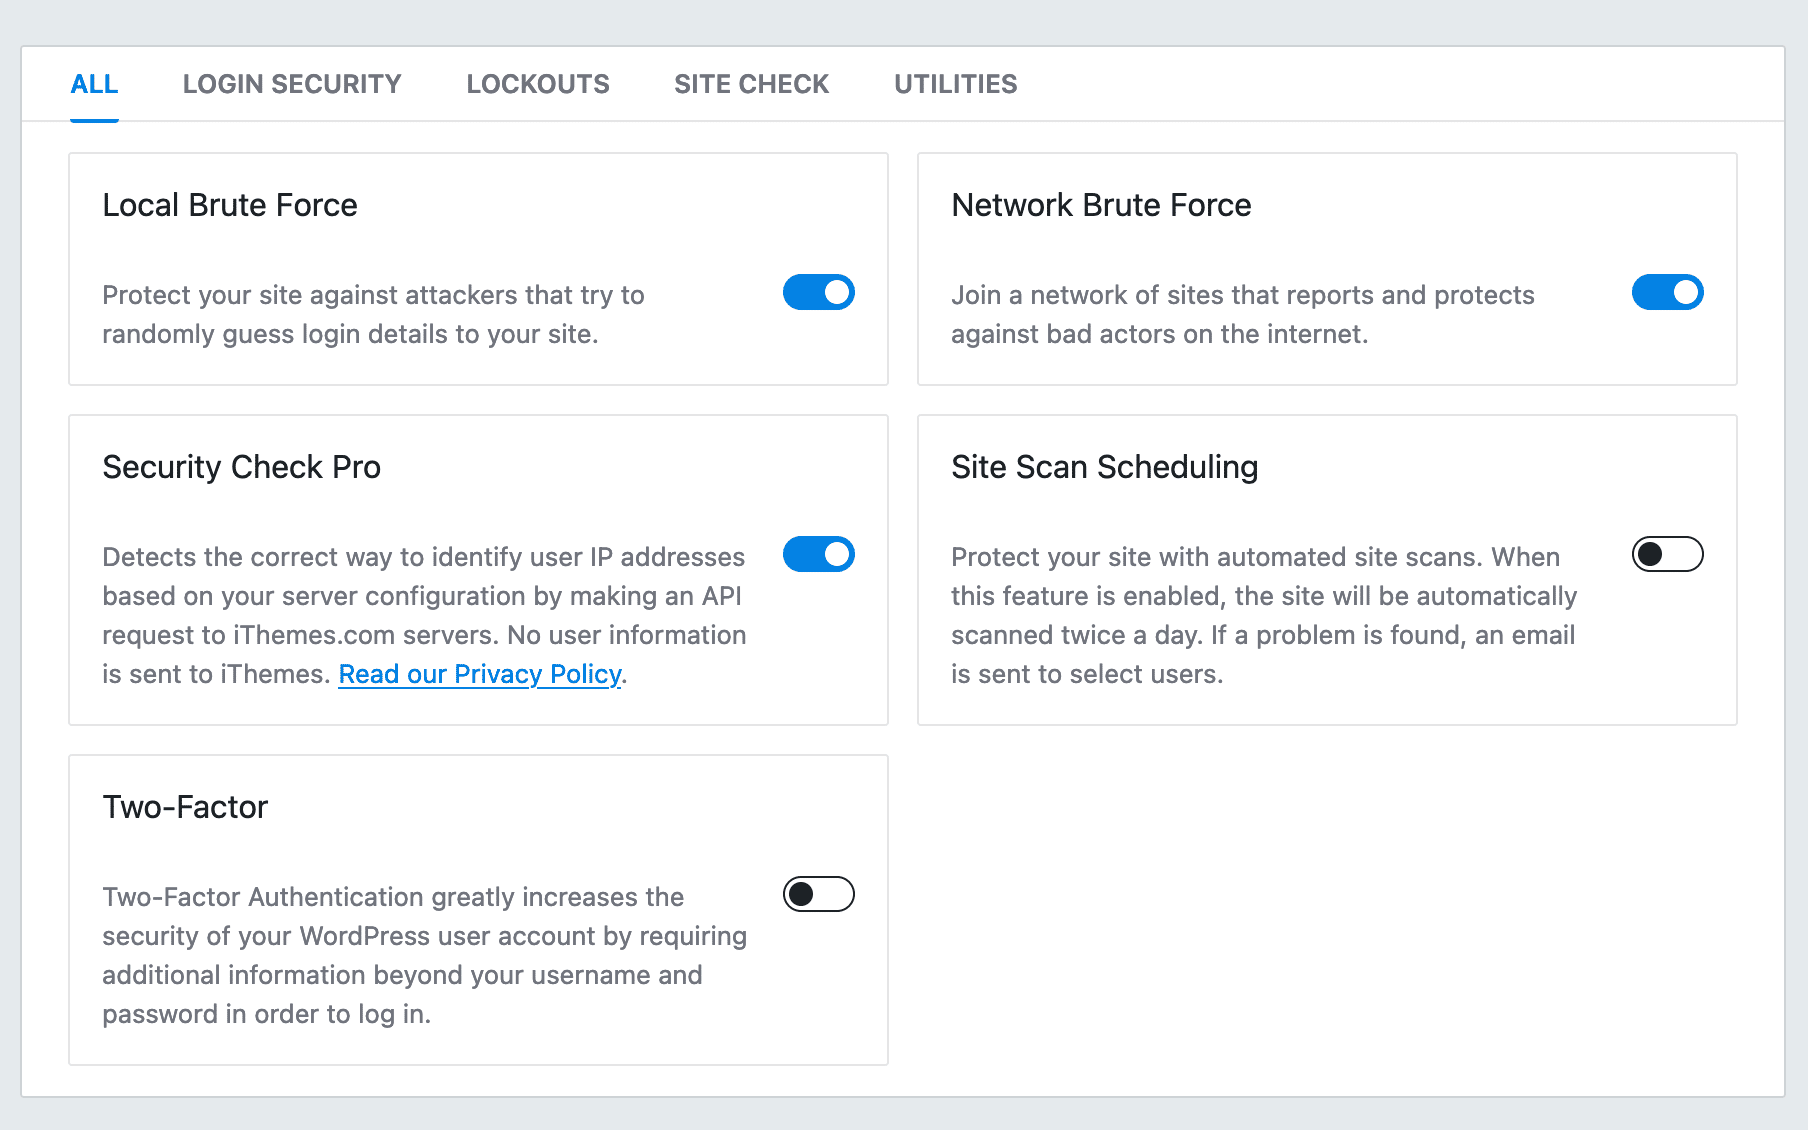
In addition to the features already enabled by default, it may be useful to enable two-factor authentication and site scanning. I’ll come back to the details of the settings later.
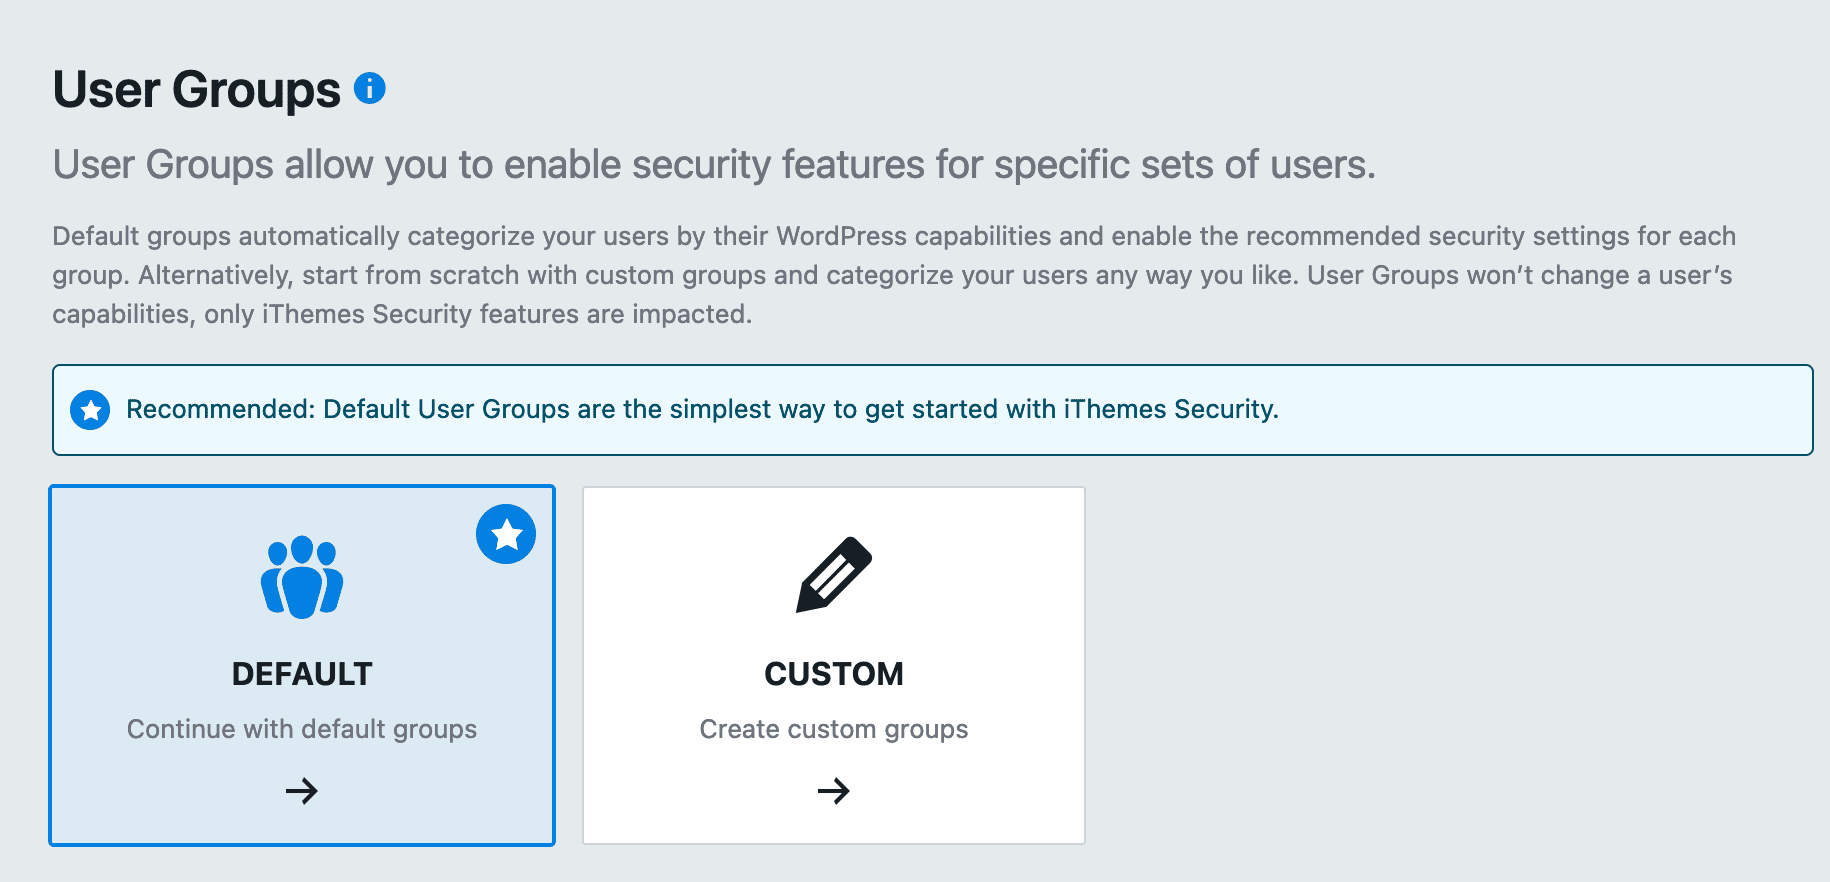
Step 5: Set up account groups
Right after this, iThemes suggests that you set up “Account Groups.”
As stated, “User account groups allow you to enable security features for certain groups of users only.”
You have two options to choose from:
- Default. In this case, your user accounts will be automatically categorized by their permissions in WordPress and the plugin will activate the recommended security settings for each group. I recommend that you go with this option.
- Custom. Here you start from scratch with custom groups and categorize your user accounts as you wish.
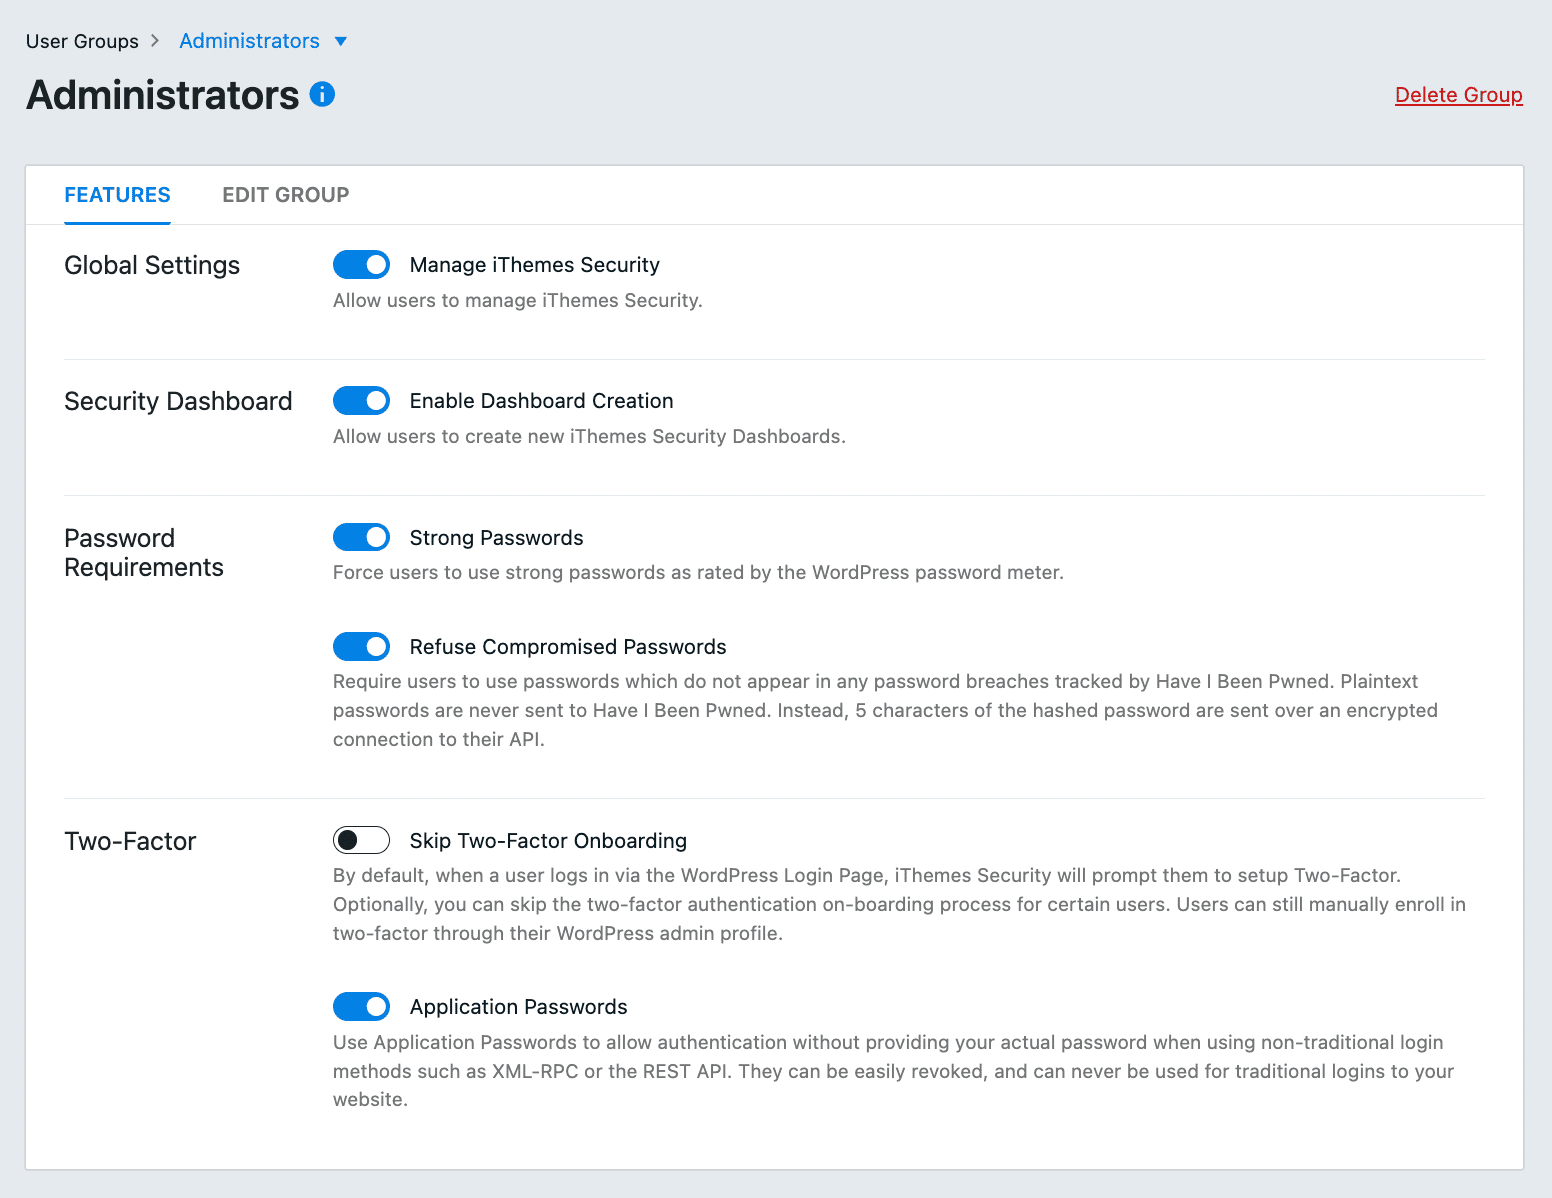
You will then have access to various settings based on the user role (administrator, editor, author, contributor, or subscriber):
Step 6: Set up general settings and notifications
In order to complete the configuration of your site, iThemes Security will request that you, among other things:
- Add your IP address to the list of allowed accounts
- Choose how the plugin will determine the IP addresses of your visitors
- Join or not its brute force network (just enter your email address if you want)
- Enter an email address to receive notifications

That’s it for this first volley of protection measures. iThemes points out that your site has already received some notable improvements:
- The security of your accounts is reinforced
- Brute force attacks are blocked, as are malicious bots and user agents
- Malware detection and detection of vulnerable themes and plugins is active
This is a great first step, but there is room for further customization. In the next part, I’ll show you how to make more in-depth adjustments to the major features of the plugin.

What are the settings offered by iThemes Security?
When you have finished using its configuration wizard, iThemes Security offers you a new menu called “Settings.”
This menu contains the features of the plugin, some of which were mentioned during the configuration phase.
iThemes Security adopts a modular approach: you can activate the features you need and deactivate those that are not useful.
When the button is blue, the feature is active. To disable it, just click it. You can access its settings by clicking on the cog:
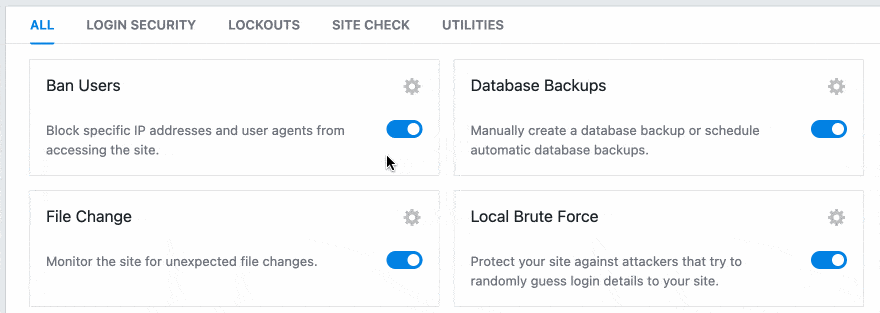
Without further ado, let’s dissect each option offered.
File Change
Thanks to the “File Change” module, iThemes Security is able to inform you as soon as a file has been altered, which may indicate hacking.
By default, all files included in each new fresh installation of WordPress are taken into account.
However, the settings of this module allow you to exclude files and folders of your choice, if you wish.
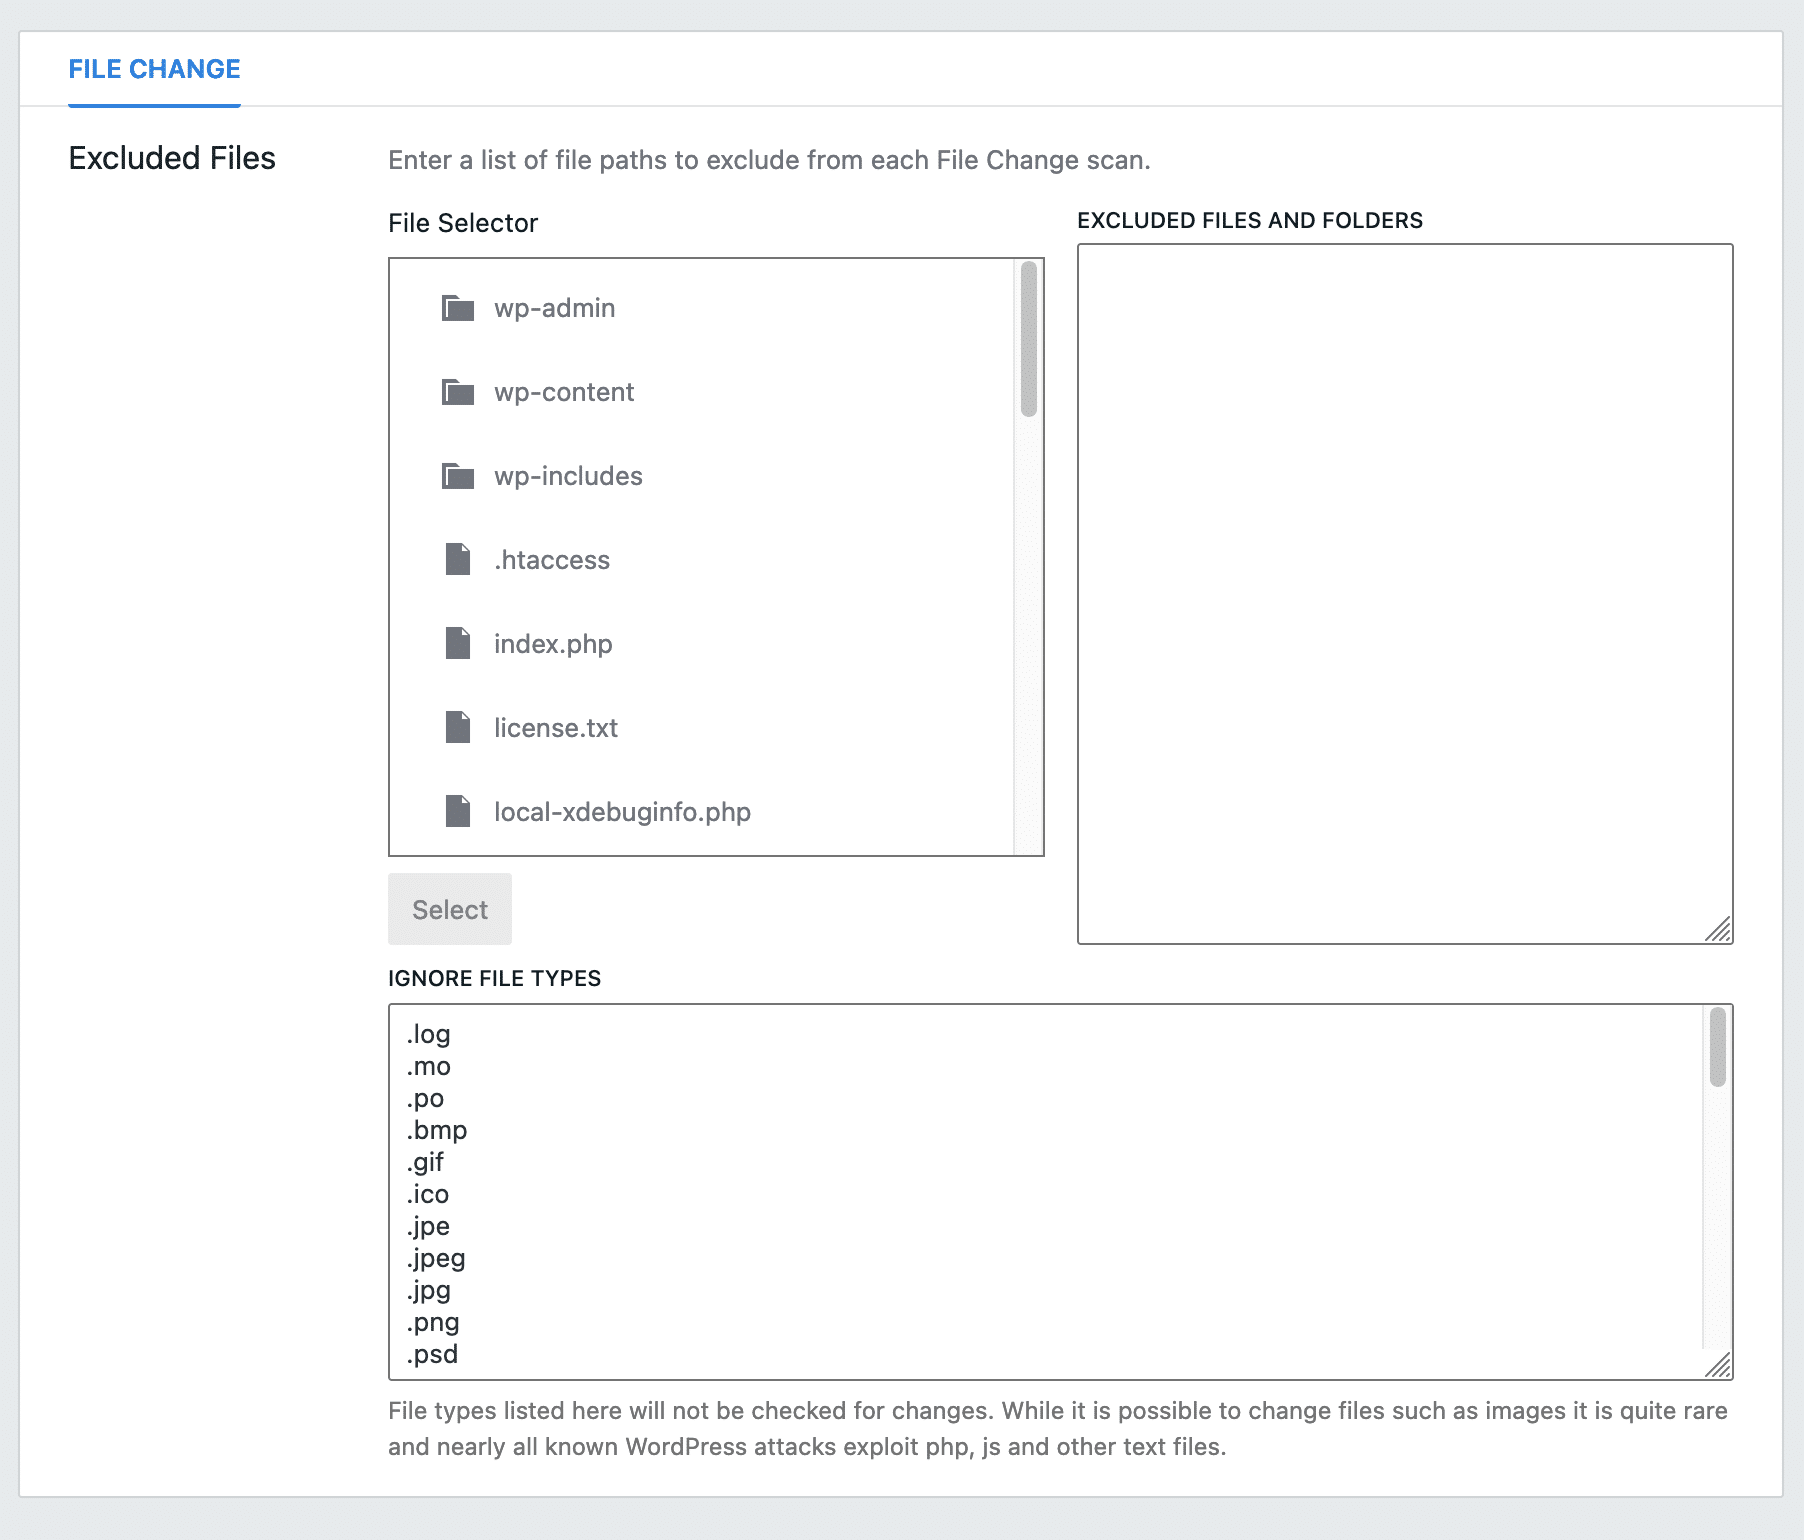
If you’re not sure what you’re doing, leave it alone. The advantage of excluding certain files and folders is that it consumes fewer server resources. The loading time of your pages is therefore less impacted.
If you are using a good host like bluehost (affiliate link), this shouldn’t be a problem anyway.
Account blocking
The “Ban Users” module prevents access to your site by specific IP addresses and user agents (e.g. web browsers or search engine robots).
By default, iThemes suggests activating a list created by the HackRepair.com website. As this list blocks certain bots that are considered malicious, it makes sense to activate it.
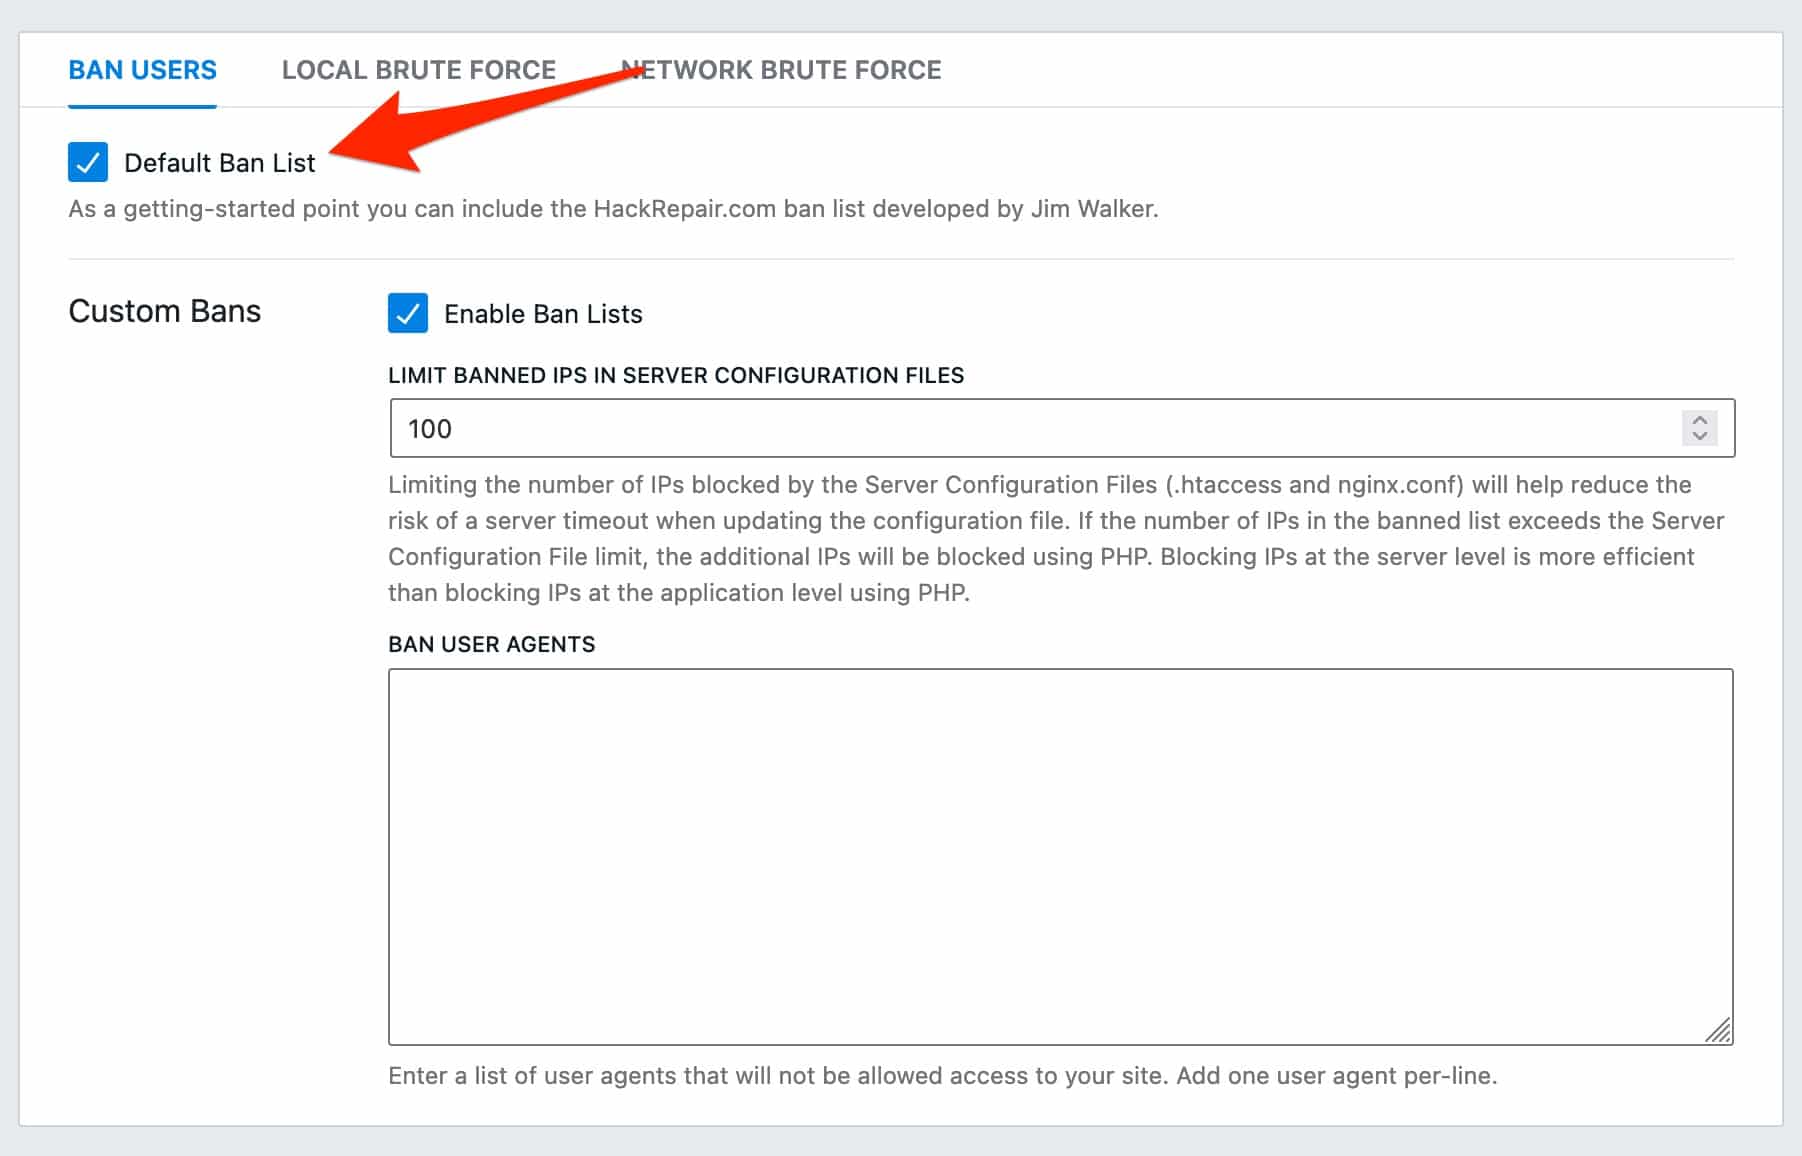
In the part corresponding to the custom bans, you can:
- Limit the number of blocked IPs in the server configuration files. iThemes notes that this reduces the risk of server crashes when updating the file.
- Manually ban user agents
Two-factor authentication
Let’s move on to the module dedicated to two-factor authentication. This adds an additional security measure to logging into your WordPress site.
After entering your login and password, you will be asked to use a device, often your smartphone or tablet, to validate the connection process.
This is a method already used by banks when you make online payments. It is very effective in protecting you against brute force attacks.
In the settings, you must first choose a two-factor authentication method. iThemes Security supports several options:
- Mobile application
- Backup codes
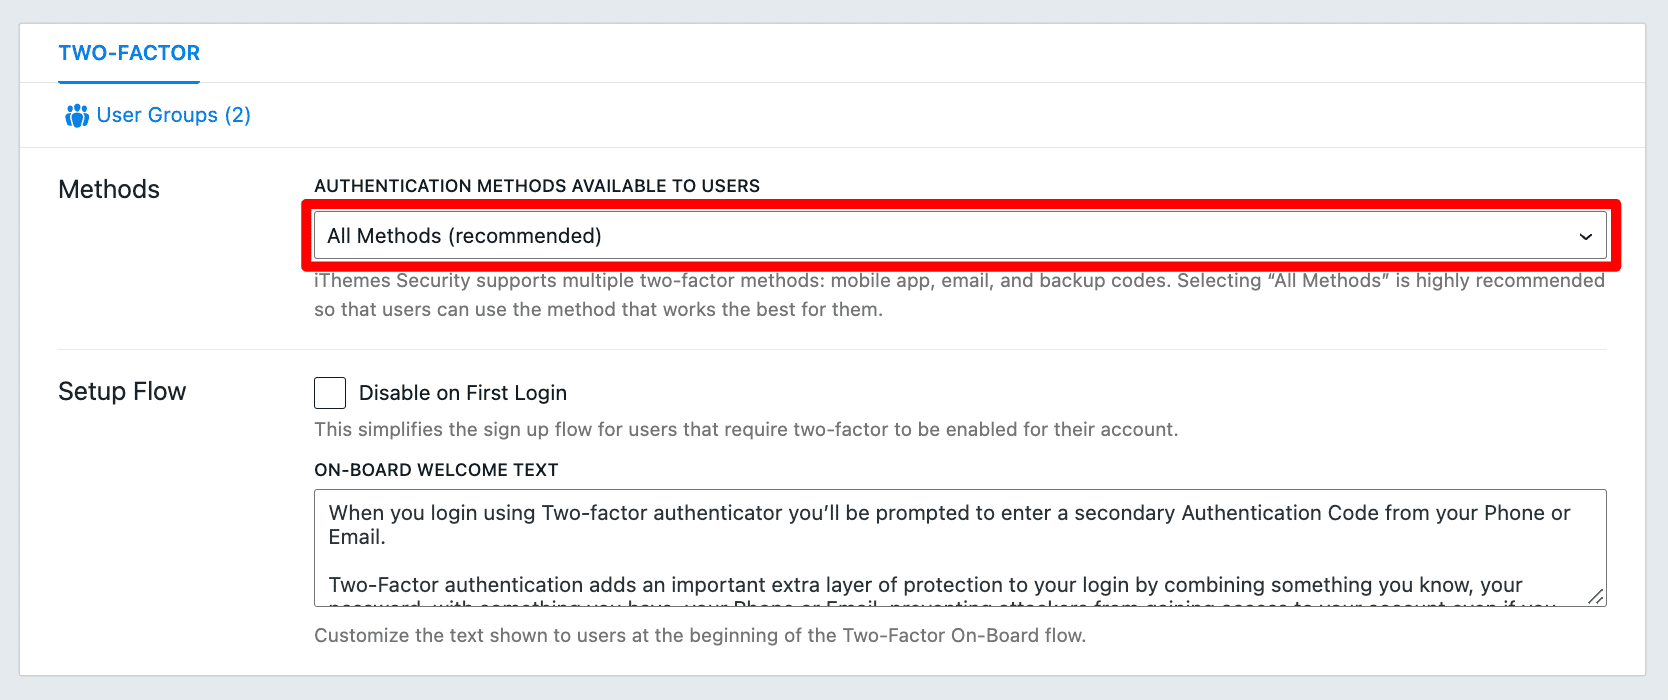
iThemes recommends choosing the “All methods” setting. This allows each account to choose their preferred method.
You can also choose to disable dual authentication on first login, and can edit the text that will be displayed to the user when setting up two-factor authentication.
Once this module is active, you will then be asked to select a method to authenticate yourself after entering your username and password.
For example, you can use a mobile application like Google Authenticator, Authy, FreeOTP, or Toopher.
The next time you log in to the administration interface, you will be asked to use this method to authenticate yourself.
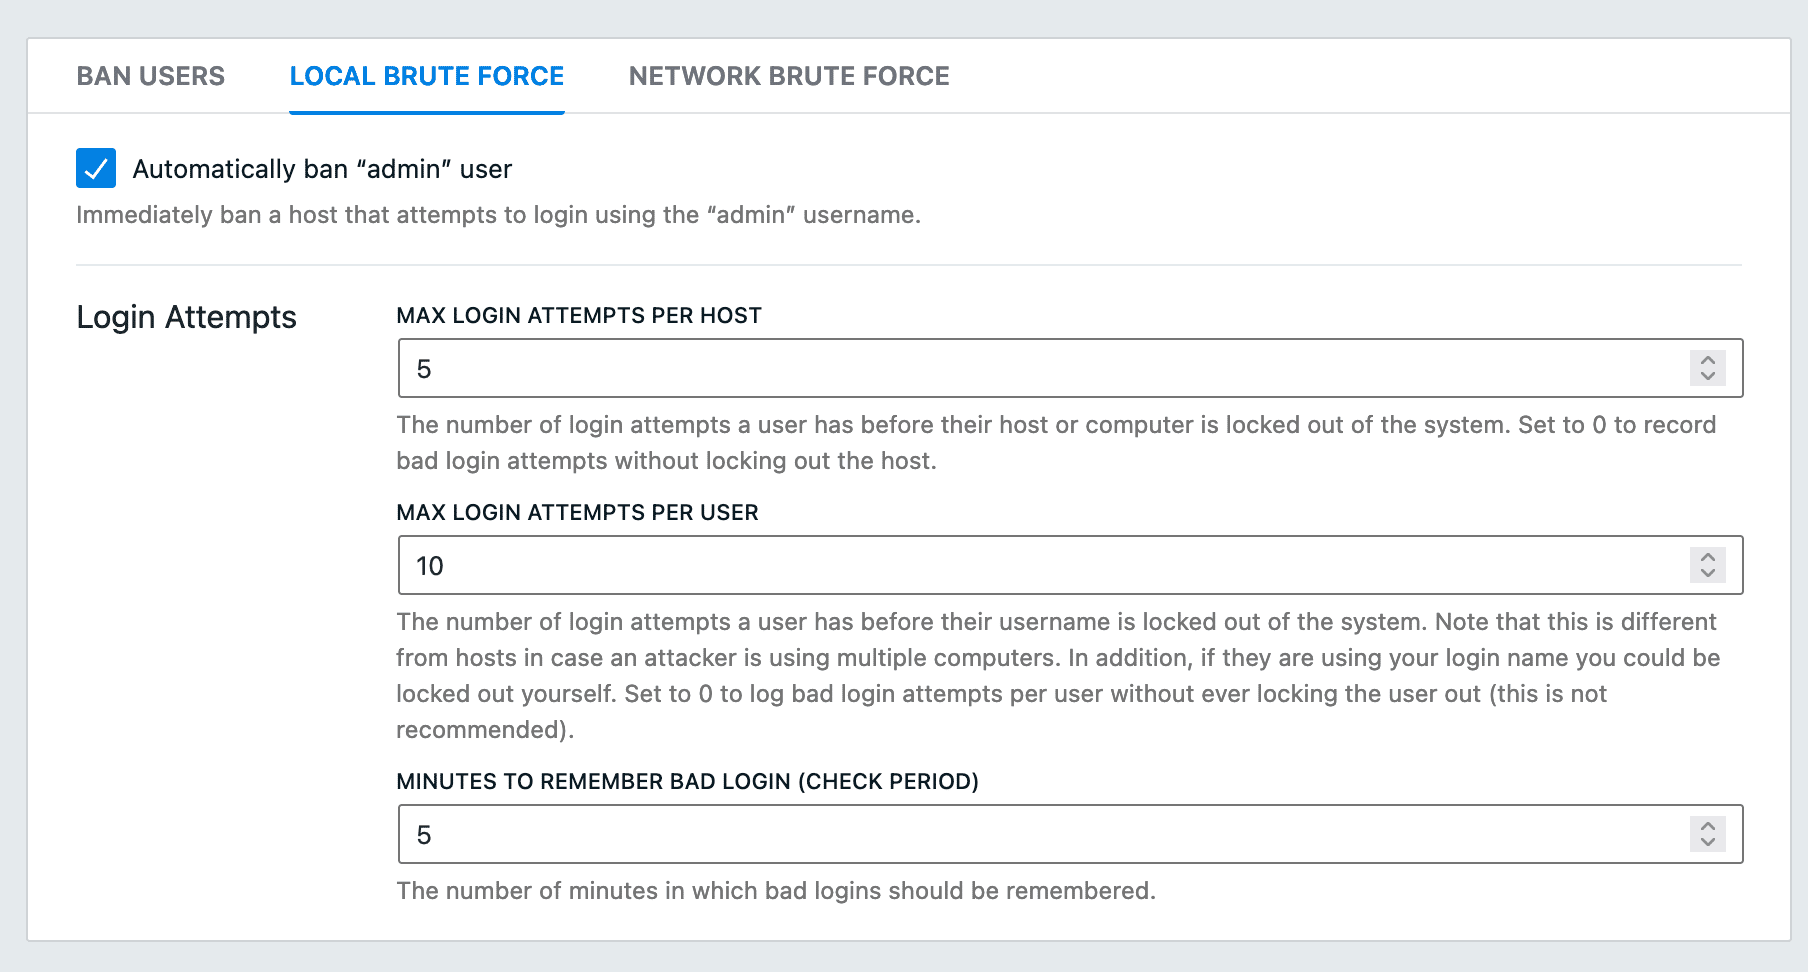
Brute force protection
While two-factor authentication is a good shield to protect you from brute force attacks, it’s not the only one.
iThemes also offers two specific modules for this. With the first one, called “Local brute force,” you can:
- Automatically block an IP address that tries to connect with the “admin” login. I advise you to check this option.
- Limit the maximum number of login attempts per IP address before blocking.
- Limit the maximum number of login attempts per username before blocking.
- Set the number of minutes taken into account to count unsuccessful connections.
The default settings are already effective, but you can modify them as you like.
For example, if you realize that brute force attacks are increasing, reduce the maximum number of login attempts per user from 10 to 5.
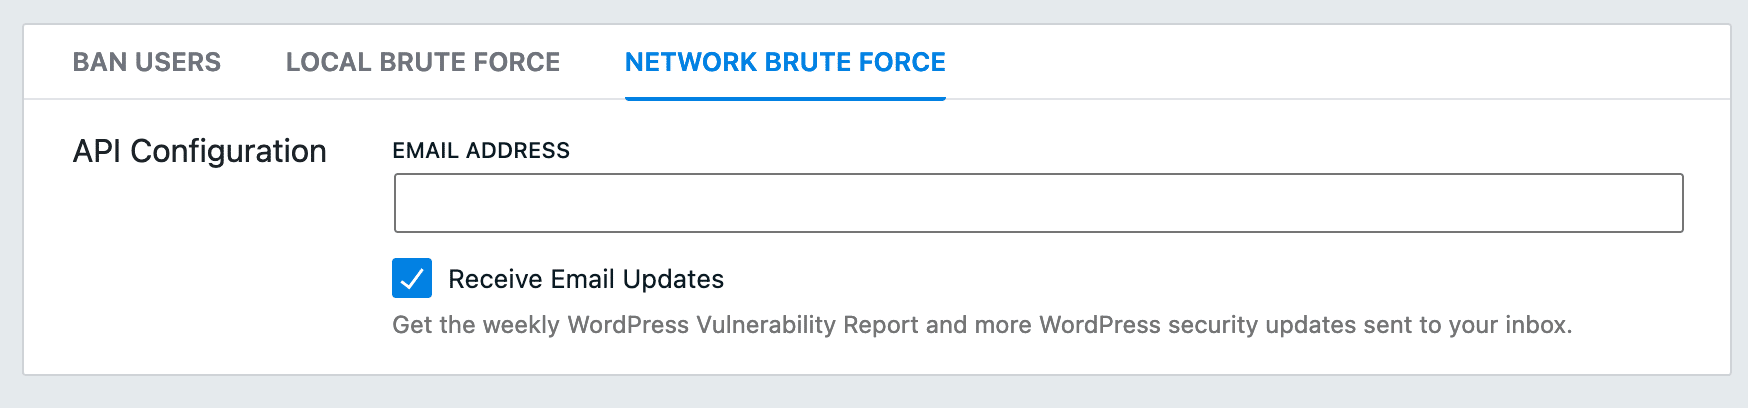
In parallel, you can also take advantage of the “Network Brute Force” module. The description is rather nebulous. iThemes says that this is “a network of sites that protects against bad actors on the Internet.”
While the “Local Brute Force” module only deals with attempts to access your site, “Network Brute Force” blocks users who have tried to break into other sites before attacking yours.
Enable this option by entering your email address, and check the box to receive email updates.
Backing up the database
In case of hacking (hopefully you won’t have to use this information), you will then have to restore your site. To do so, it’s essential to have a recent backup.
Thanks to the “Database Backup” module, you can manually create or schedule automatic backups of your database.
However, be careful: the module only backs up your database, and not the files of your site (those that you find in the “wordpress” folder after having downloaded it).
Here are the settings offered:
- Schedule database backups. Check this box if you want to create automatic backups. If you are not using a parallel backup plugin, enable this option. You can select the number of days between two backups. By default, the setting is three days. If the content of your site doesn’t change, you can decrease this frequency. If you make changes to your site on a daily basis, schedule a daily backup.
- Configuration of your backups. You can choose between three backup methods: by email, local backup, or both. The local backup will take up room in your storage space, so it’s better to send it by email.
You can also compress your backup files to reduce their size (leave this box checked). - Tables to backup. iThemes allows you to exclude certain tables in your database from the backup. By default, all the tables of the WordPress Core are included. For the rest, don’t touch anything, unless you are sure you understand what the table you want to exclude is for.
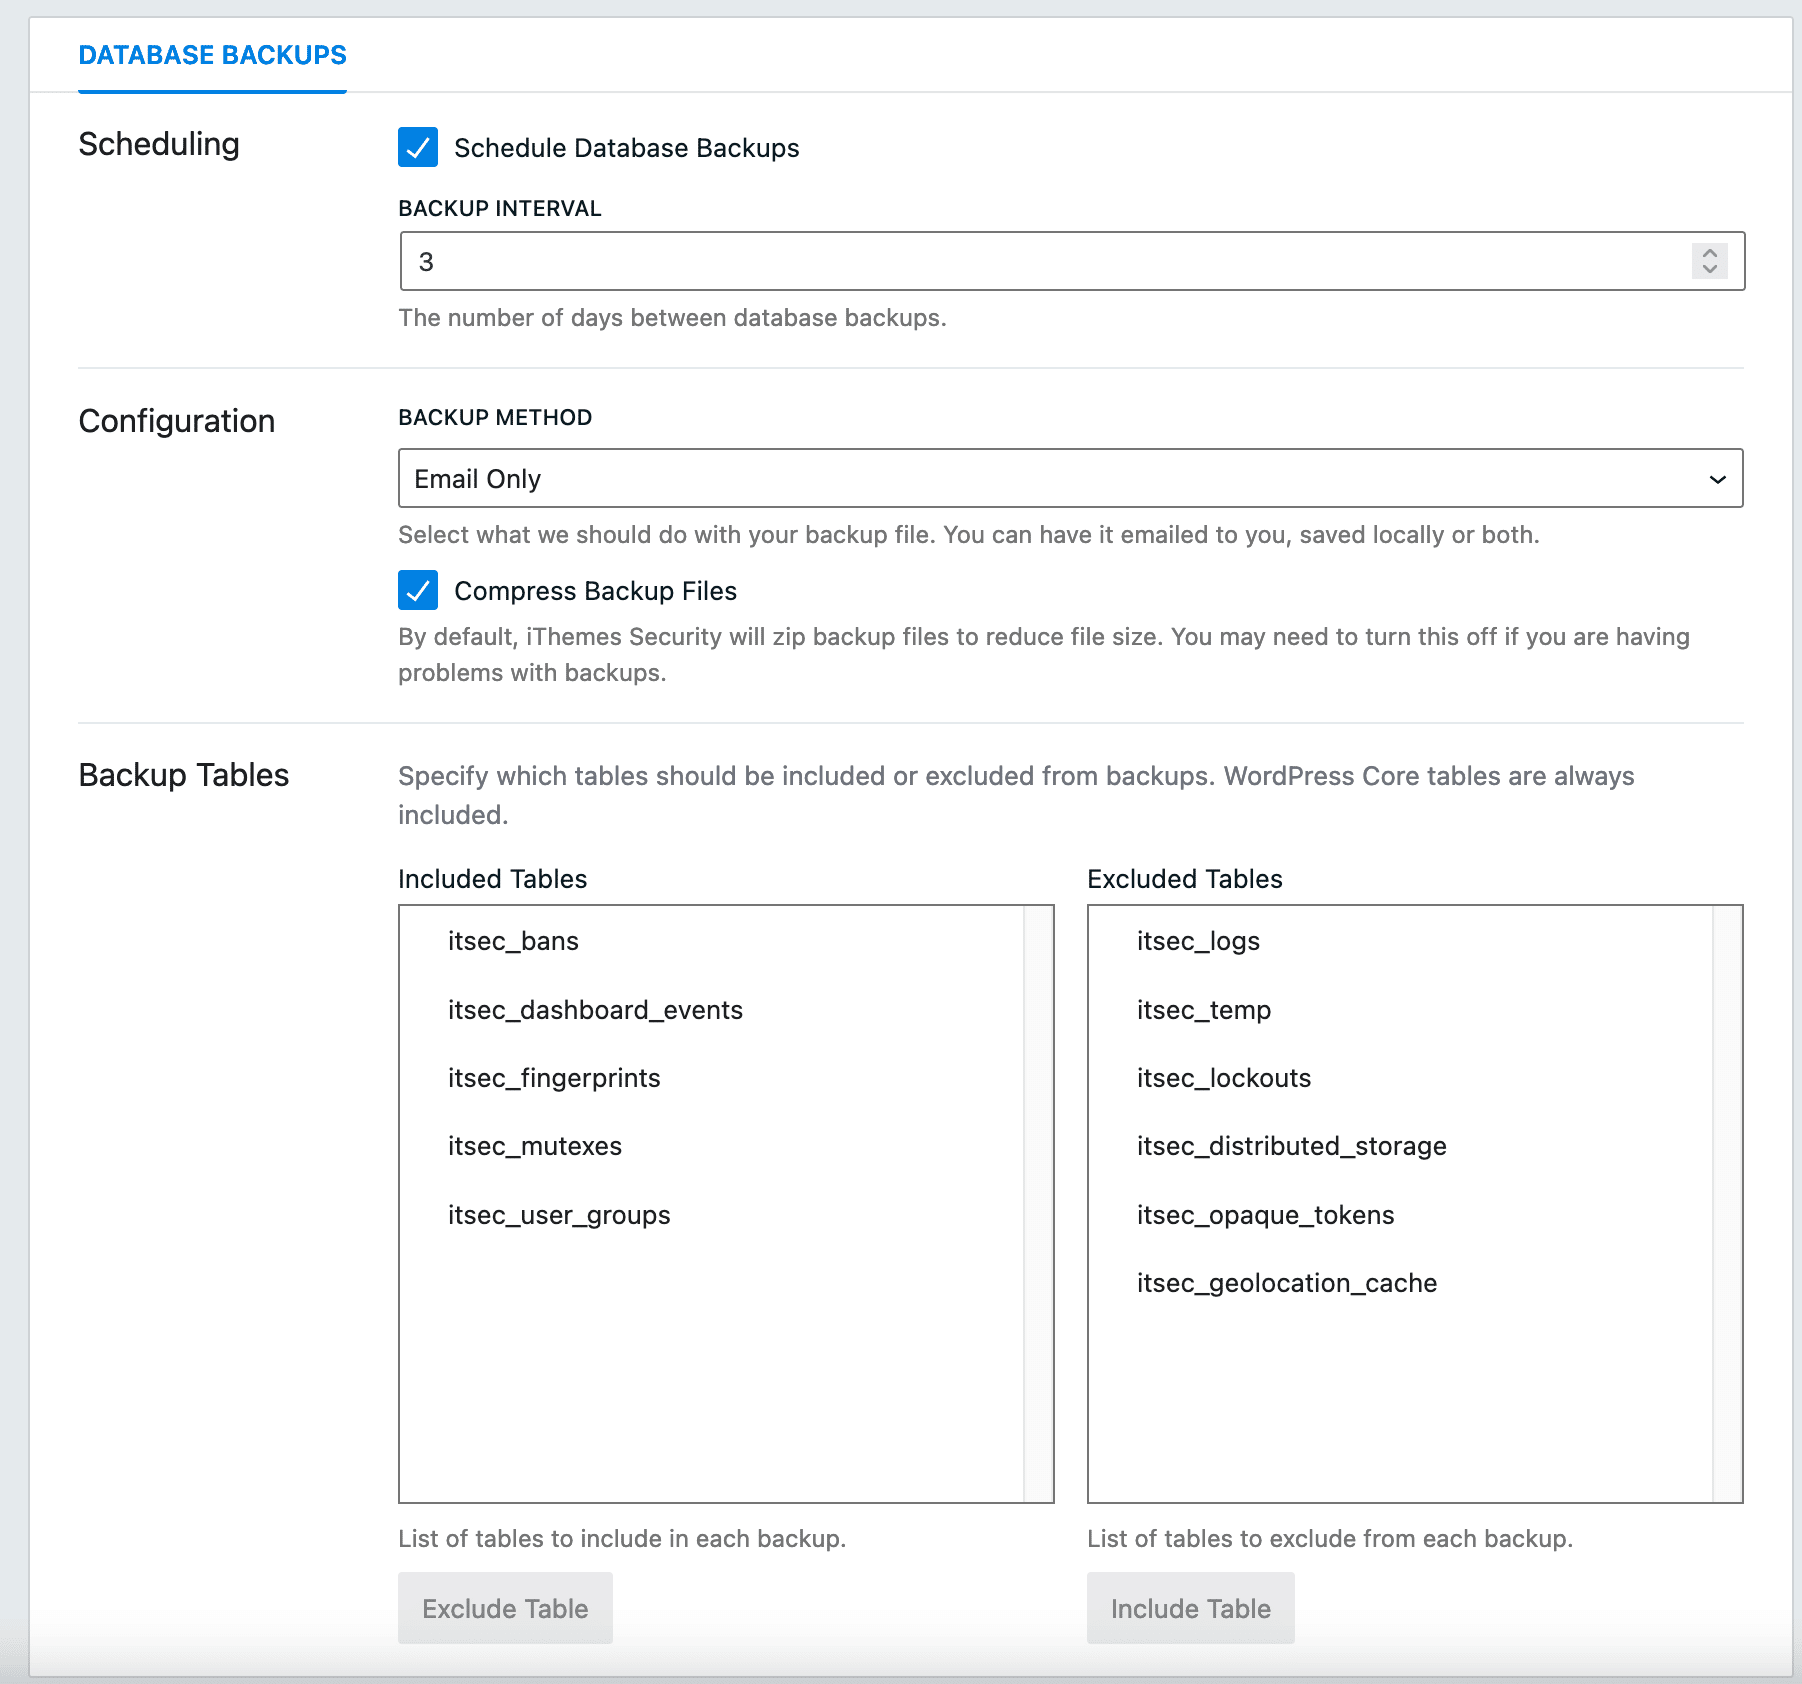
The only thing useful about this module is the backup of your database.
To do better, I advise you to use a dedicated plugin to backup your entire site (files + database).
Choose a plugin (e.g. UpdraftPlus) that allows you to send your backups to a remote storage space (Dropbox, Google Drive, Amazon S3, etc.).
The notification center
After configuring all the options (you will also be asked to force SSL if your site is in HTTPS), iThemes Security provides the user with a menu to manage the notifications it sends:
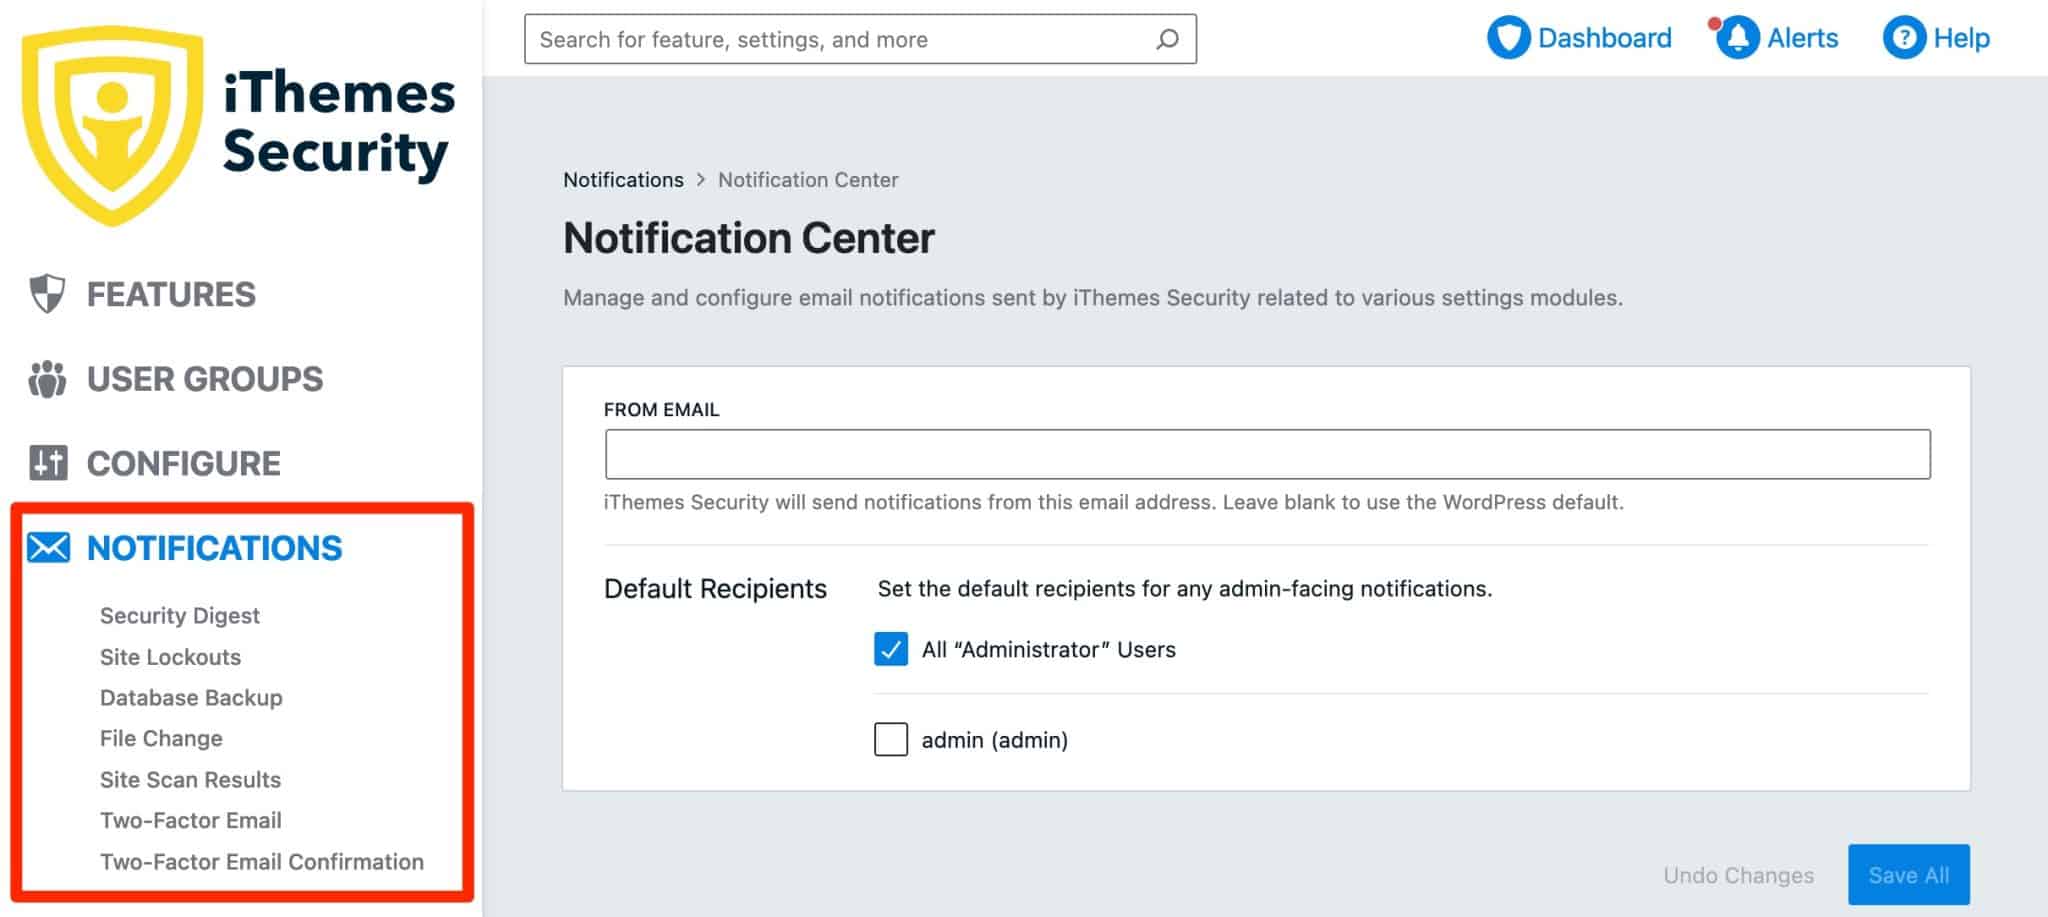
iThemes first allows you to enable/disable notifications by checking/unchecking the associated box in each sub-menu:
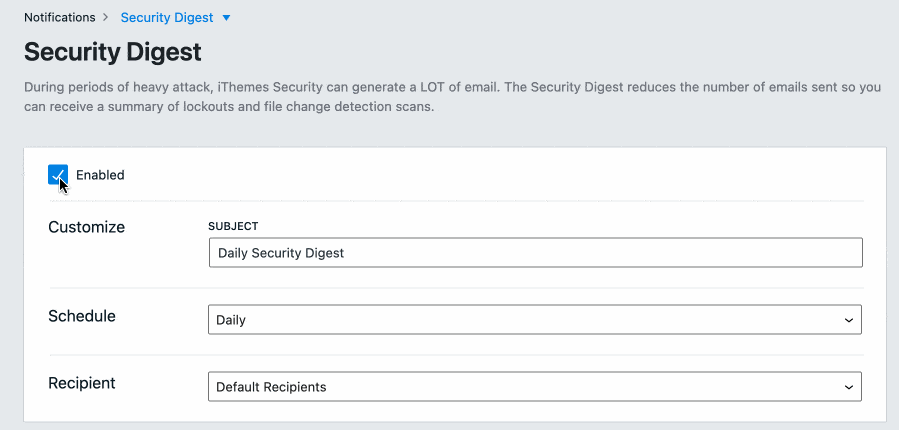
For most of the options, you can then set:
- The subject of the email sent
- The email frequency
- The recipient: the administrator, another user role, or a custom email address
iThemes Security advanced tools and options
Finally, iThemes offers other useful security settings in its “Advanced” and “Tools” menus (you have to keep a sharp eye out for them because they are well hidden ^^).
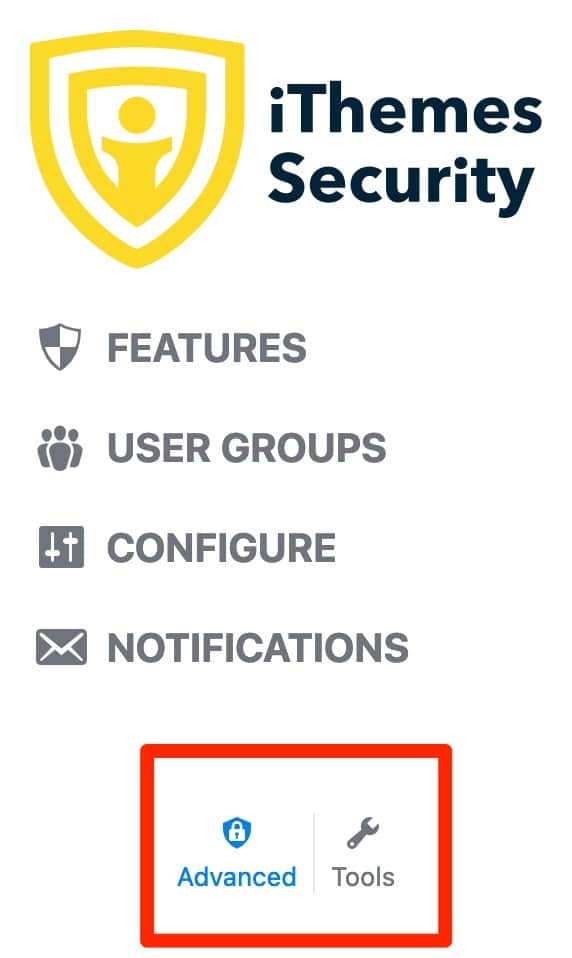
Advanced menu
You will have three tabs in the “Advanced” menu, which allow you to make changes to the server configuration of your site.
Leave the default settings for the first two, “System tweaks” and “WordPress tweaks.”
The third tab, “Hide backend,” allows you to change the login page of the administration of your site. By default, it can be easily accessed by entering one of the two URLs below in a web browser:
- yoursite.com/wp-admin
- yoursite.com/wp-login.php
By modifying it, you make it more difficult for bots to connect to your site. The settings allow you to:
- Change the connection slug, i.e. the last part of your URL. Enter the value of your choice (ex: xc78ygvk).
It’s better to choose a combination that is difficult to guess. Remember to write down your new URL in several places (in your notes application, in your browser’s favorites, etc.). - Specify a redirection URL (e.g. https://yoursite.com/404), which will be sent back to the unconnected bot or hacker who wants to access your login page. Check the associated box if you want this option.
Tools menu
Let’s finish this review of the settings with the “Tools” menu, which lists ten additional configuration options.
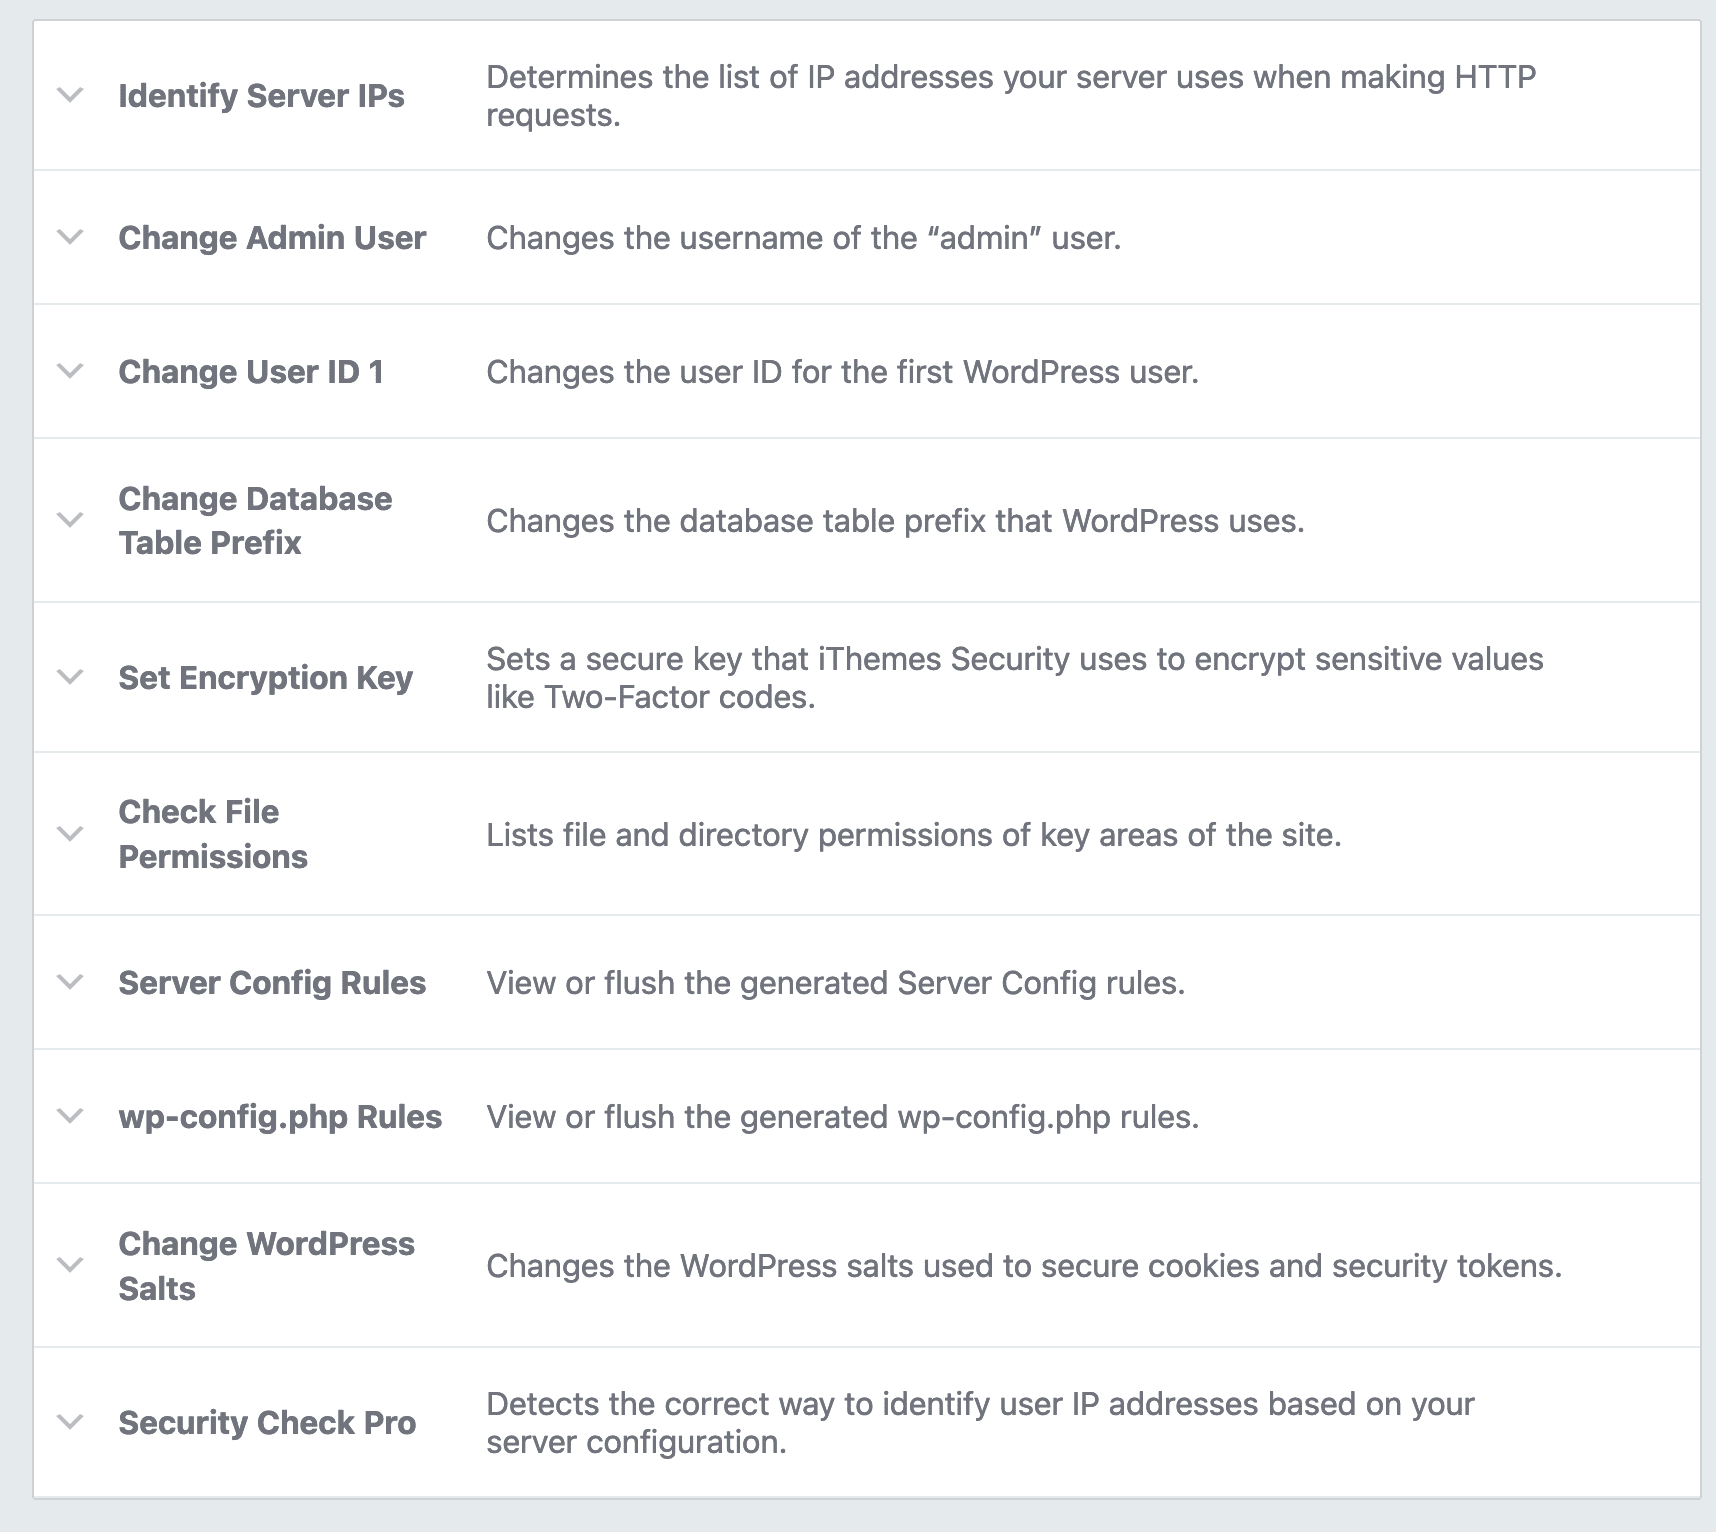
To begin with, I recommend that you use the following tools first:
- “Change admin user,” in order to change the user names starting with “admin.”
- “Change database table prefix.” By changing the wp_ prefix, which is assigned by default to all new WordPress installations, you make it more difficult for tools that try to take advantage of vulnerabilities to access your site’s database.
- “Check file permissions,” to check their permissions. If there is a warning, you can then change them on your FTP client.
Again, remember to backup your site before activating the tools offered by the security plugin.
Well, now you have a detailed overview of the iThemes Security “Settings” menu. It’s time to see what the “Dashboard” menu has in store for you.
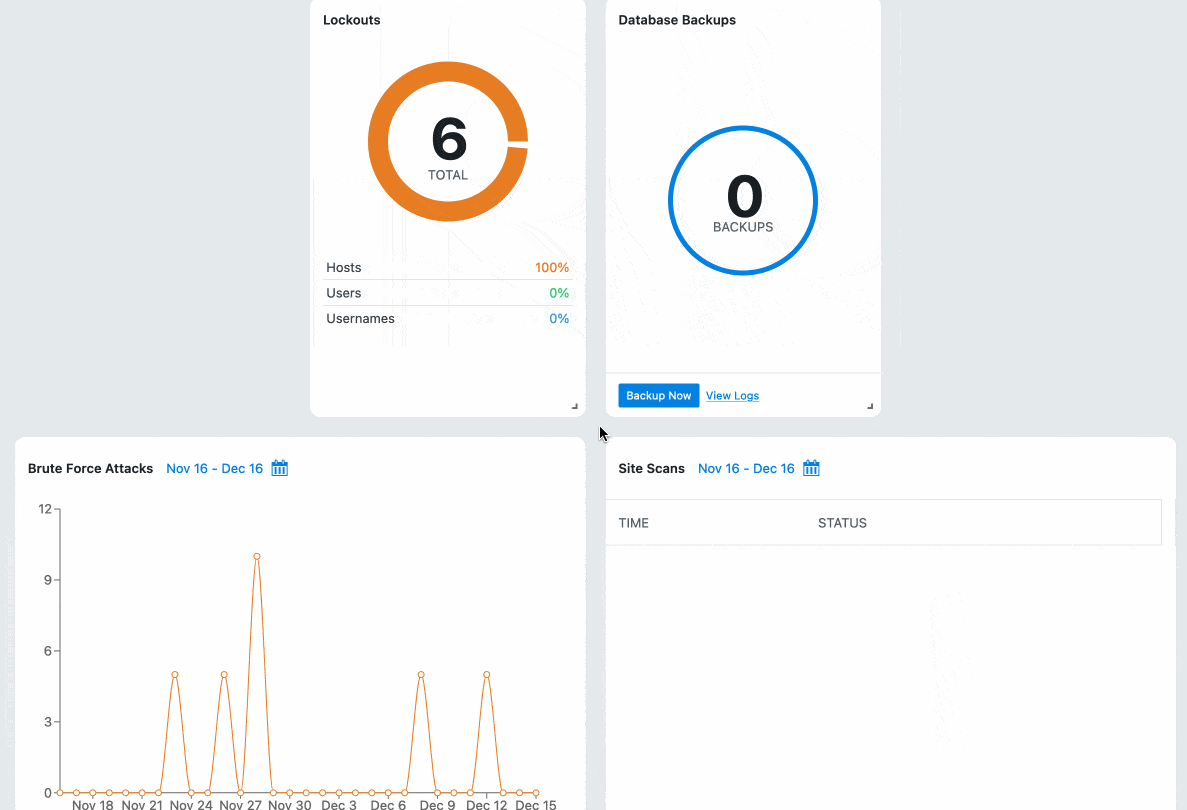
How to monitor the status of your site with iThemes Security
By going to iThemes Security > Dashboard, you will get a visual summary of the status of your site.
The plugin displays the following information:
- Lockouts categorized by IP addresses, users, and identifiers
- The number of backups of your database, with a button to launch an immediate manual backup
- The number of brute force attacks over a given period. By default, the date range is set to 30 days, but you can enter a custom value.
- Scanning errors detected
- Banned accounts
- An overview of bans: login attempts, logins with “admin,” and reCAPTCHA
What are the premium options of the plugin?
With iThemes Security Pro, the premium version of the plugin, you get “additional layers of protection for your WordPress website with performance in mind,” iThemes explains.
Wondering how to activate the Pro version of iThemes Security? It’s very simple. After purchasing one of the paid licenses of the plugin, download the zip file associated with the plugin in your customer area. Then upload it in Plugins > Add New, by clicking on “Upload a plugin.”
Here are most of the major options offered in the plugin’s premium package:
- Automatic update of your plugins, themes, and WordPress core files in case of vulnerability detection.
- An option to activate a reCAPTCHA when registering new users, resetting passwords, logging in, and posting comments. This is an effective option to combat spam. Google reCAPTCHA V3 is supported in particular.
- Ability for your users to log in to your WordPress site using a link sent securely to their email (“Password-less Login” option).
- Ability for users blocked by the brute force network to log in using a magic link (“Magic Links” option).
- Export of the plugin settings. This is a useful option if you want to activate the plugin on several sites without having to set it up each time.
- Quick modification of the five most critical elements for the security of your users: two-factor authentication, age and strength of the password, last activity time, active WordPress sessions, and user role (“User Security Check” option).
- Automatic updates of the Core, plugins, and themes (“Version Management” option).
- Temporary administrator access for temporary users (e.g., maintenance technicians) without having to create a new user (Temporary Privilege Escalation option).
Interested in upgrading to iThemes Security Pro? Let’s talk about pricing now.
How much does iThemes Security cost?
iThemes Security is a freemium plugin. You can first use it for free by activating it from your administration interface, but its creators also offer three premium licenses to take advantage of all the features offered by the plugin.
- Basic: $99/year for use on one site
- Plus: $199/year for use on up to 5 sites
- Agency: $299/year for use on up to 10 sites
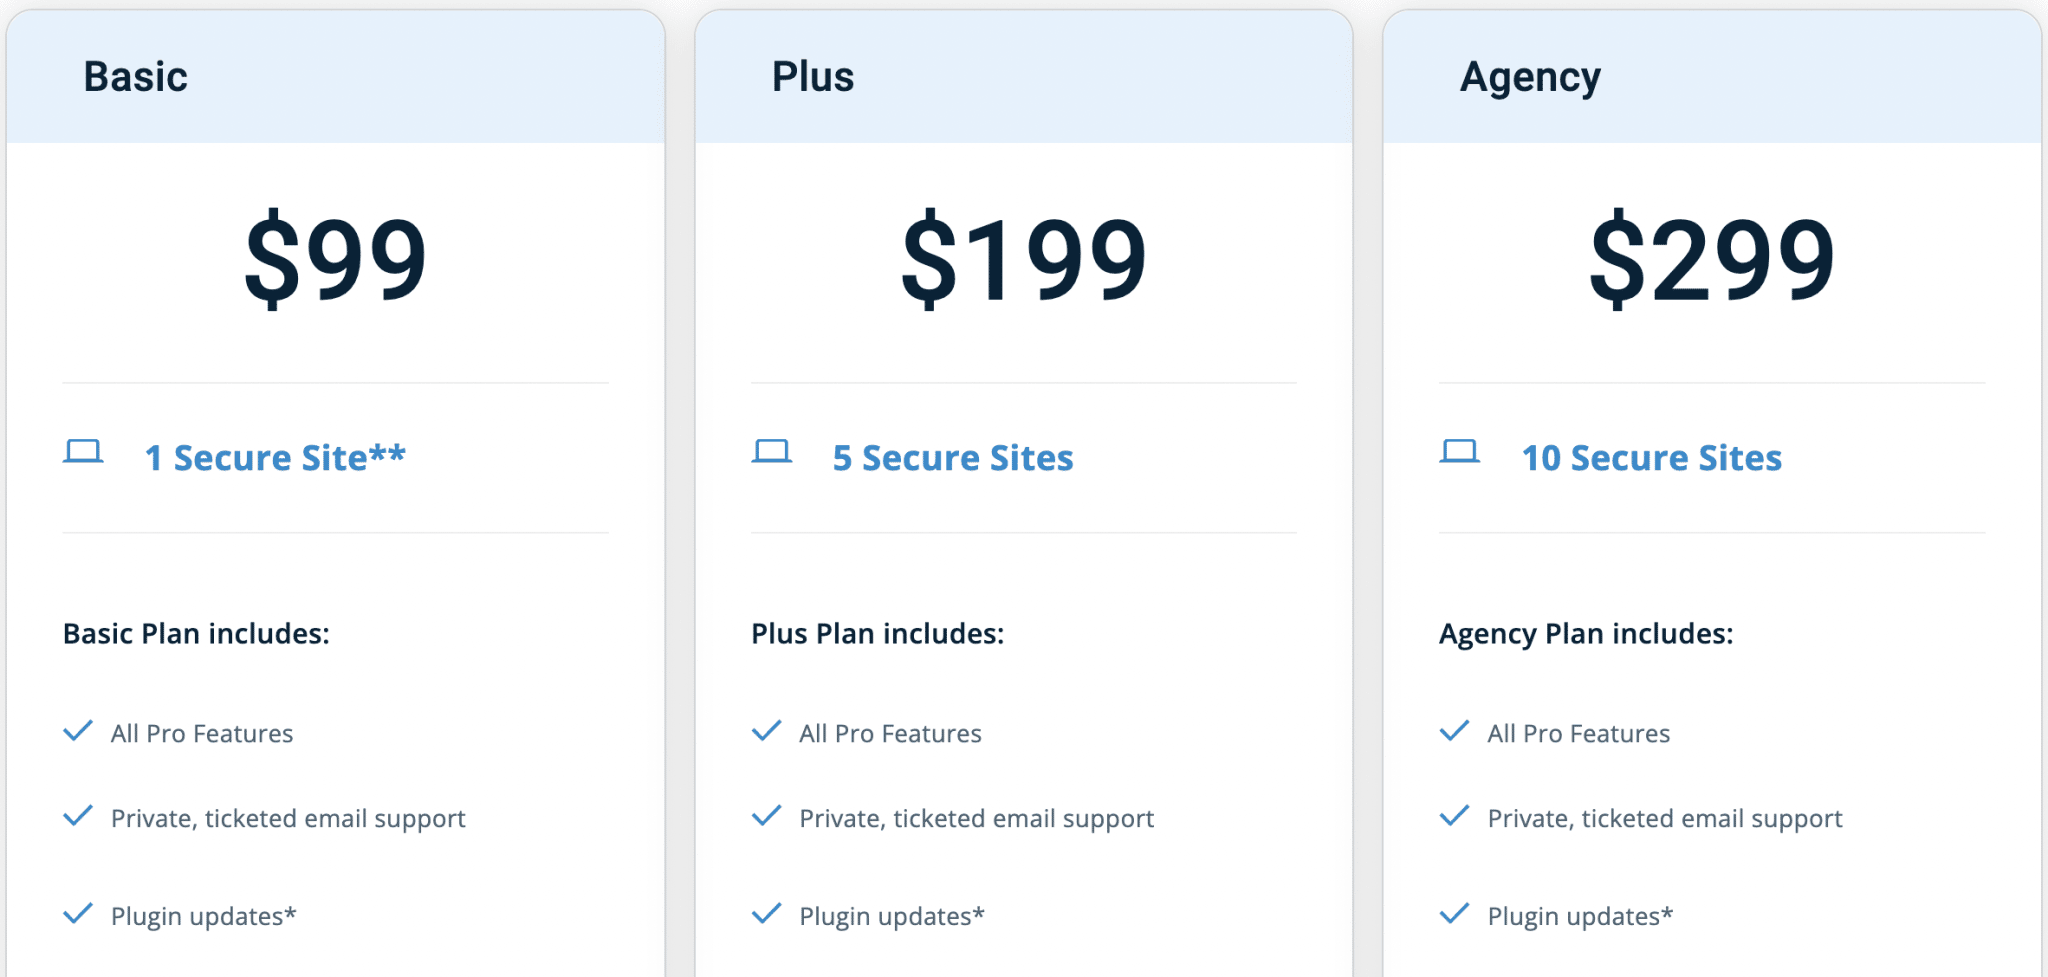
Each license offers exactly the same options, plugin updates, and email support.
Which license you choose depends on how many sites you plan to activate iThemes Security Pro on.
Note: iThemes also offers a $749/year package that includes many tools marketed under the StellarWP brand: iThemes Security, Backup Buddy, Kadence, Restrict Content Pro, etc.
iThemes Security free vs Pro: which version should you choose?
The main added value of iThemes Security Pro in terms of security, compared to its free version, is the automatic application of a patch to vulnerable software detected by the site analysis, when available.
This is obviously useful in protecting your site a little more, but you will still have to pay at least $99/year to take advantage of this.
The rest of the options are mainly intended to facilitate certain actions (connection via a magic link, quick export of options, etc.), not really to strengthen the protection of your site.
To sum up, the free version of the plugin seems to me to be already sufficient to strengthen the security of your site, thanks to the protection against brute force attacks and the double authentication.
But it still has some limitations, as you will see in the summary below.
Our final opinion on iThemes Security
Advantages of iThemes Security
- The security presets automatically added when you activate the plugin.
- The interface, which is fairly intuitive and clear. This makes the plugin easy to learn.
- The modular approach, which allows you to activate only the options you need. This consumes fewer server resources, which is always better for the loading speed of your pages.
- The fact that the plugin uses very little technical jargon. The options are more understandable than those of competitors like Wordfence Security or Sucuri.
- The free version includes a lot of features.
Limitations of the plugin
- The main drawback of the plugin is that it does not offer a firewall, which is still an essential protection measure for a security plugin.
- There is no security scanner as such.
- Real-time traffic is not analyzed in the free version.
- The plugin does not fix detected vulnerabilities in its free version.
- iThemes notes that its plugin can crash your site because it makes significant changes to your files and database.
Should you use it?
Finally, there is one last question: should you activate the plugin on your WordPress site?
To answer this question, there are some important points to keep in mind:
- Yes, iThemes lacks some important options, like a firewall or a scan…
- …but the plugin can do the job IF you implement other security measures in parallel. For example, you may be using another plugin that includes a firewall.
Also remember to backup your site regularly and update it whenever updates become available.
In the end, if you follow these guidelines (joint use of iThemes with other security measures), iThemes seems to me to be suitable for beginner users who want to strengthen the security of their site for free, without straining their minds too much.
Although it has fewer basic security features, iThemes Security is still easier to set up than Wordfence Security, which uses more jargon (and has the reputation of being more greedy in taking server resources).
Download iThemes Security :
What is your opinion of iThemes Security? Tell us all about it in the comments.

Receive the next posts for free and access exclusive resources. More than 20,000 people have done it, why not you?

Continue reading
Articles posted in WordPress PluginsOur review of B2BKing: A WooCommerce plugin built for B2B commerce
“Hi, I need 200 units of this product with fast shipping please”. As an online store owner, receiving this kind of message puts a smile on your face. Answering it, on the other hand, becomes a lot less fun… Basically,…
GTranslate on WordPress: our full review of this tool for creating a multilingual site
“Hello, how are you?” “What do you think of this computer mouse?” For you, everything is easy to understand in these two sentences. For someone living deep in the Shetland Islands or Yucatán, it’s probably a bit more complicated… If…
Air WP Sync: Test and review of this plugin for integrating Airtable into WordPress
Do you use Airtable and WordPress? Then some of your days probably look something like this. In the morning, you update your Airtable database as soon as something changes. In the afternoon, you copy and paste the same data into…