

A login + a password. Connecting to the WordPress administration interface is very simple, as long as you remember these two elements.
From the point of view of the malicious person or robot that wants to access your site, it’s just as simple.
If they find your login and password, they’ll become the captain of the ship, without your permission.


This is a disaster scenario and unfortunately, it doesn’t only happen to others. To protect yourself, it can be a good idea to activate two-factor authentication on WordPress.
If you’re not yet familiar with this protection method, or if you want to set it up, this article will explain everything to you.
After reading it, you’ll know why to use two-factor authentication, and how to enable it on your WordPress installation using two different methods (both using a plugin).


What is two-factor authentication?
How does two-factor authentication work?
Two-factor authentication is a method of securing a user account. On WordPress, it allows you to protect access to the administration interface (back office) by adding an additional layer of protection to password authentication.
Here’s how it works:
- First, you enter your username and password on the administration login page. This is what you normally do whenever you want to access your WordPress site.
- Next, you will have to identify yourself a second time to be able to access the admin, using a device or a service in your possession. This can be a smartphone, for example, on which you validate the connection attempt by entering a code.
That’s why we call it double authentication: to connect to WordPress, you have to identify yourself twice.


The big plus of this method is that if someone hacks your password, it won’t be enough to access your account.
If the malicious person or bot doesn’t have anything else of yours to log in with (e.g. your mobile device), he or she won’t be able to log in.
Moreover, this is a service that you’ve probably already used in your daily life. Many famous sites use it, such as Google, Facebook, and PayPal.
This is also true for your bank. To validate a payment (especially for large amounts), you are often asked to validate it on your banking application, on which you must log in.
Several names are used to refer to two-factor authentication. We can also say two-factor identification, dual authentication, or even 2FA.
What are the options for the second form of authentication?
Before continuing, let’s have a quick look at the identification methods that might be offered to you during the second identification step.
This second factor can take several forms, such as:
- A security code sent by text or email
- An authentication app (e.g. Google Authenticator) that generates a one-time security code, valid only for a certain period of time
- A USB token, which is inserted in the USB port of your computer
- A push notification
- A fingerprint or retina scan
Why should you enable two-factor authentication on WordPress?
While dual authentication adds an extra step to the login process, it still has one big advantage: it makes access to your admin interface much more secure.
By using this method:
- You limit brute force attacks. When brute force attacks occur, bots visit your WordPress login page and try to figure out your site’s admin account username and password by testing different combinations, in order to take control of it. If they ever succeed, dual authentication will prevent them from accessing your WordPress admin.
- You strengthen the security of your admin account. Even if you use a weak password like 123456 or love — don’t do that — you’ll have an extra measure of protection with the second authentication factor.
- You reduce the risk of hacking and better protect some confidential data (personal information, or the banking data of your customers if you sell on a WooCommerce store).
Is the value of two-factor authentication clearer? Now let’s get down to business. Keep reading to find out how to set up dual authentication on WordPress in a few minutes.


How to enable dual authentication on WordPress
First of all, I recommend that you backup your site. In case of a problem, you’ll be able to turn around and restore it easily. To do this, you can activate the plugin UpdraftPlus, for example, or use the backup module of a maintenance tool like WP Umbrella (affiliate link) or ManageWP.
What options do you have?
The easiest and fastest way to enable two-factor authentication on WordPress is to use a plugin. There are two options for this.
First, you can choose a plugin dedicated to dual authentication on WordPress. The official WordPress directory has dozens of them.
Among the most popular (more than 5,000 active installations), you will find:
- Two-Factor (70K+ active installations)
- WP 2FA – Two-factor authentication for WordPress (60K+ active installations)
- Google Authenticator (30K+ active installations)
- Two Factor Authentication (20K+ active installations)
- miniOrange’s Google Authenticator (20K+ active installations)
- Duo Two-Factor Authentication (8K+ active installations)
The other option is to take advantage of a double authentication feature offered by a general purpose security plugin such as SecuPress, iThemes Security, or Wordfence Security.
Let’s find out how to implement them in detail.
How to enable dual authentication on WordPress with the WP 2FA plugin
If you want to use a plugin dedicated to dual authentication on WordPress, the WP 2FA plugin is a reliable and effective option for several reasons:
- It’s the most popular plugin after Two-Factor. And unlike Two-Factor, WP 2FA allows you to set up two-factor authentication for all users (with Two-Factor, each user will have to configure it himself).
- It’s one of the best rated.
- It’s frequently updated.
- It’s easy to use and to learn.
- Several methods of second authentication are offered: email, text, authentication application, recovery code, etc.
- It’s developed and maintained by a company that specializes in WordPress security: WP White Security also offers the excellent WP Activity Log plugin.
- Your users can set up two-factor authentication without logging into the administration. They can do this from the front end, which is very convenient for customers of an online store (WP 2FA integrates with WooCommerce), a members area, etc.
Without transition, let’s learn how to set it up in a few quick steps.


Step 1: Install and activate the WP 2FA plugin
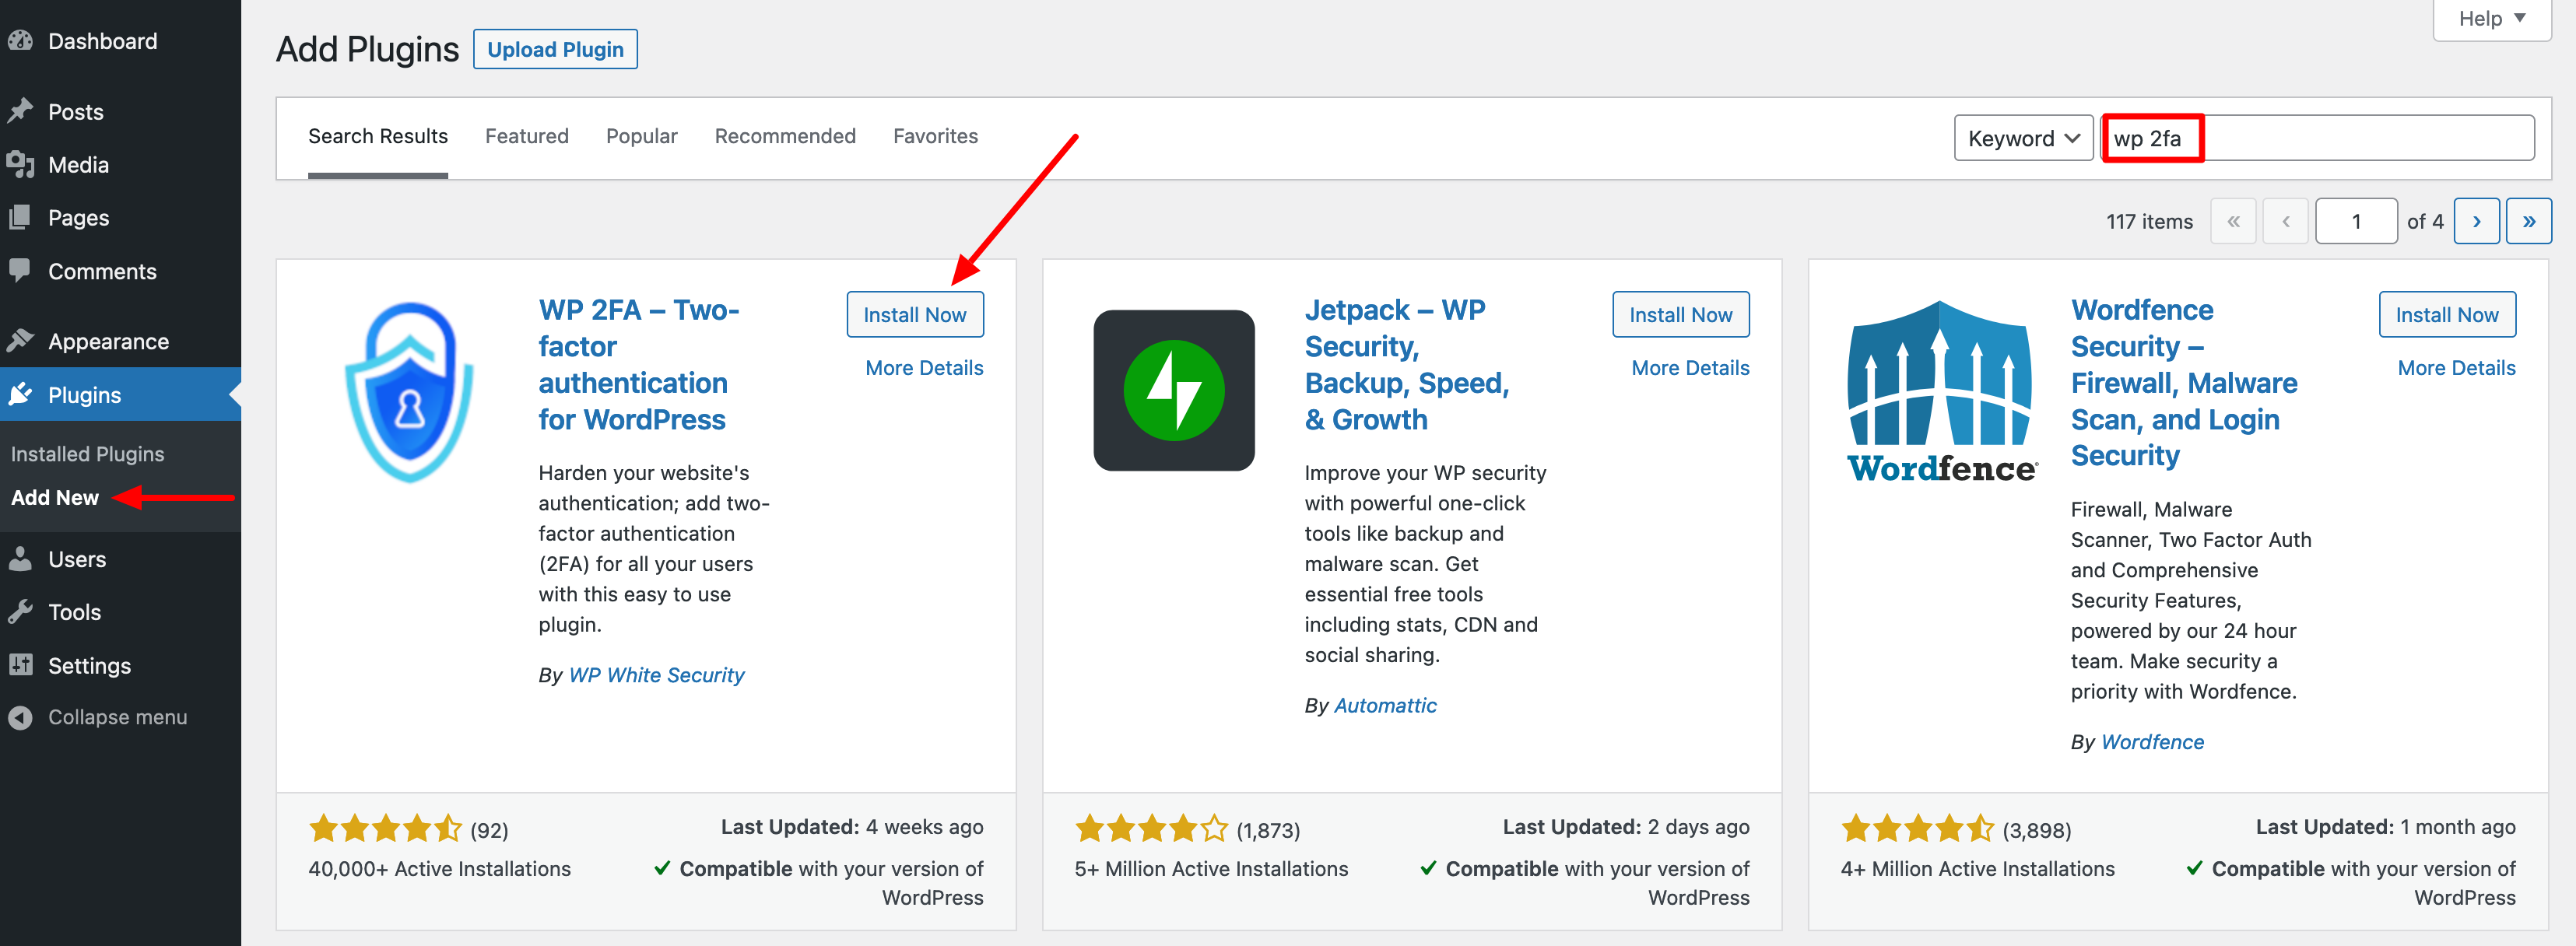
First, install and activate the plugin on your WordPress administration interface. To do this, go to the Plugins > Add New menu.
Step 2: Select an authentication method for your users
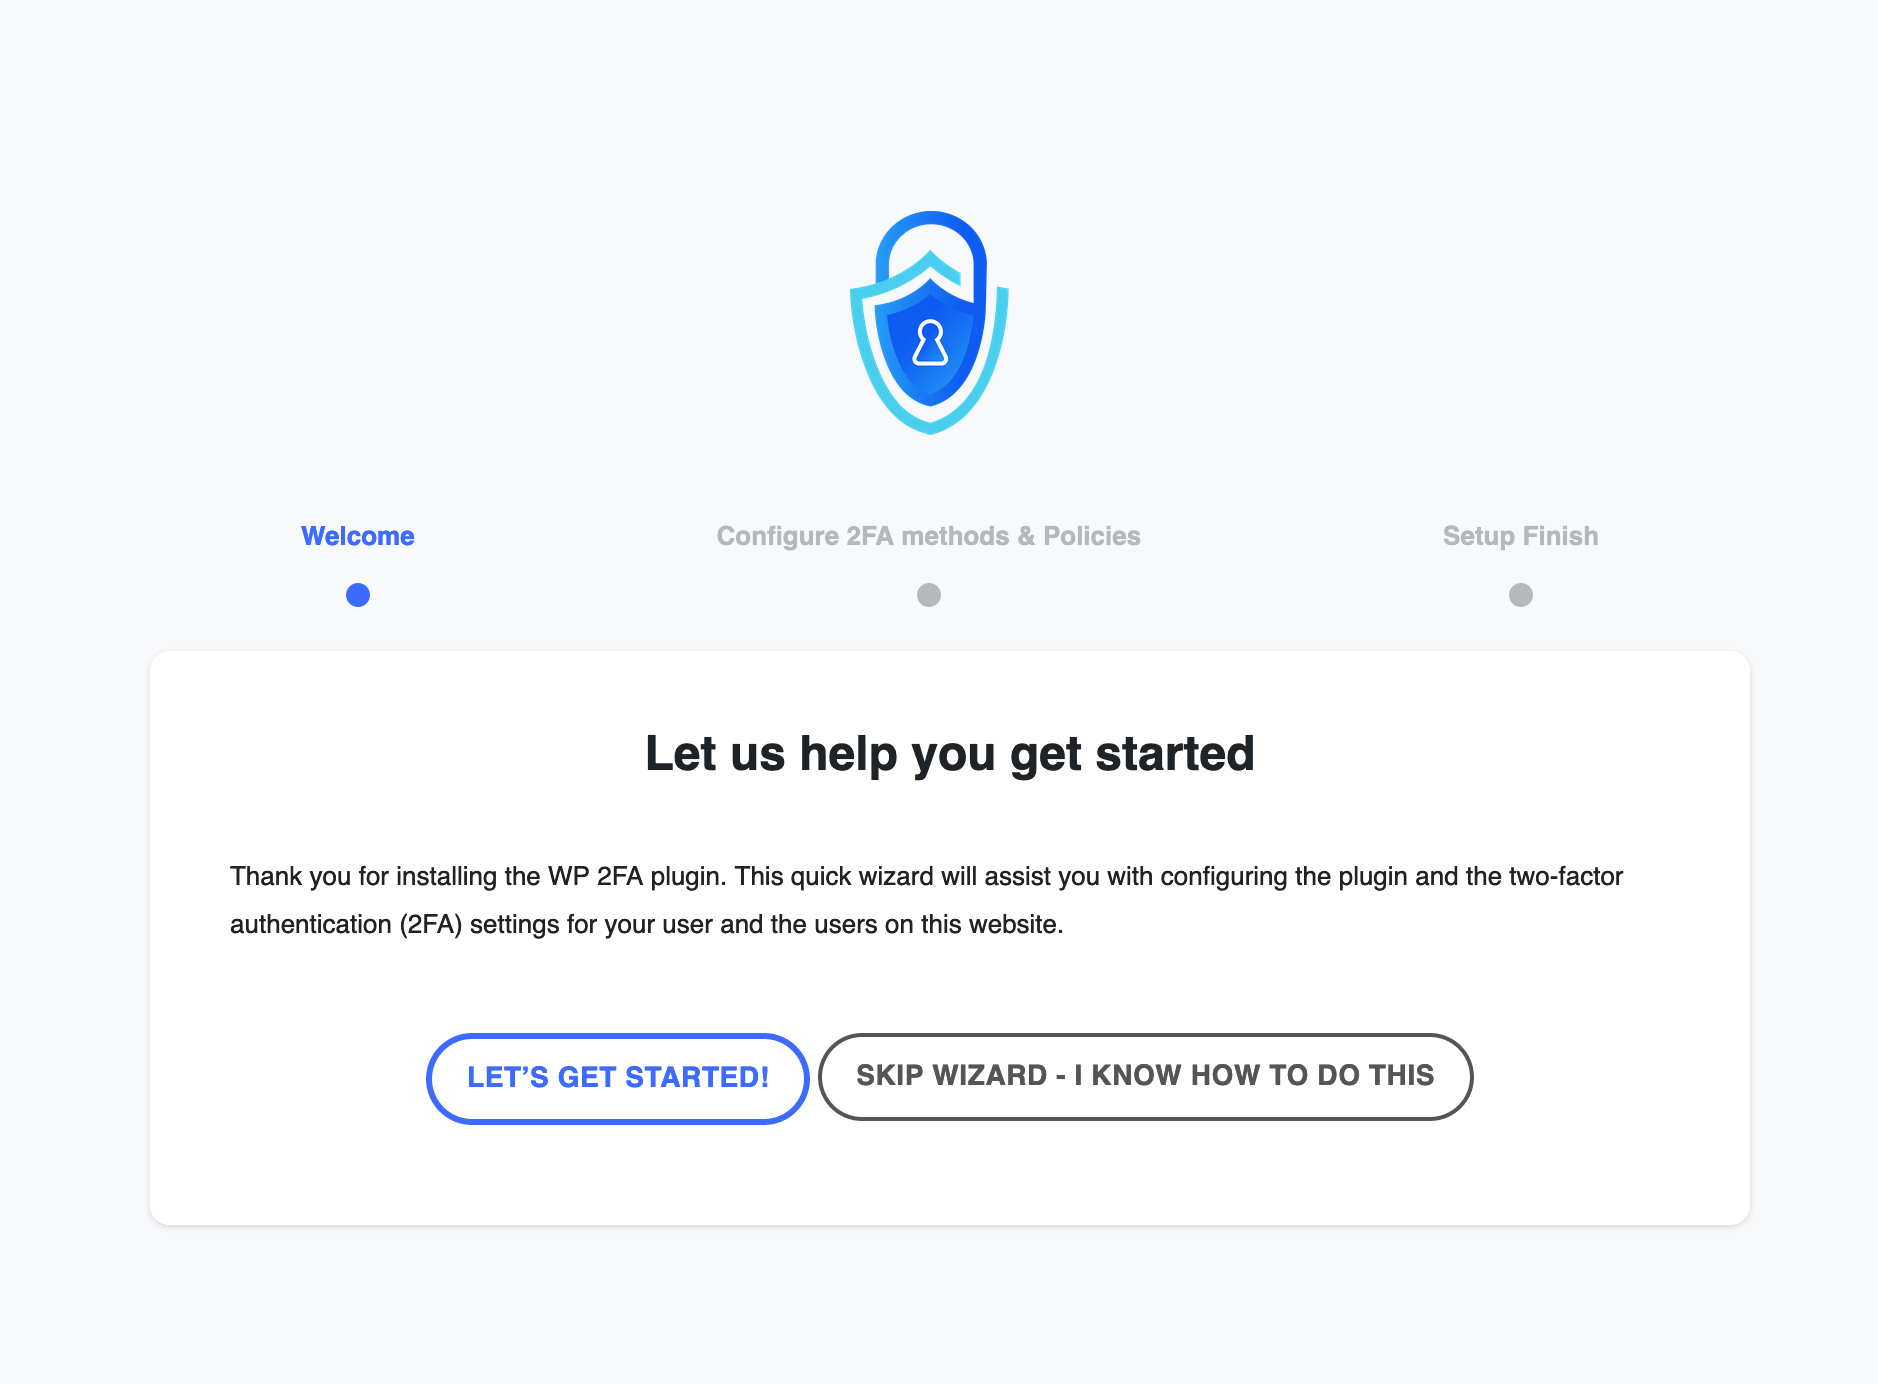
Once the plugin is activated, a configuration wizard will automatically launch on your screen. Click on the blue “Let’s get started” button to get going:

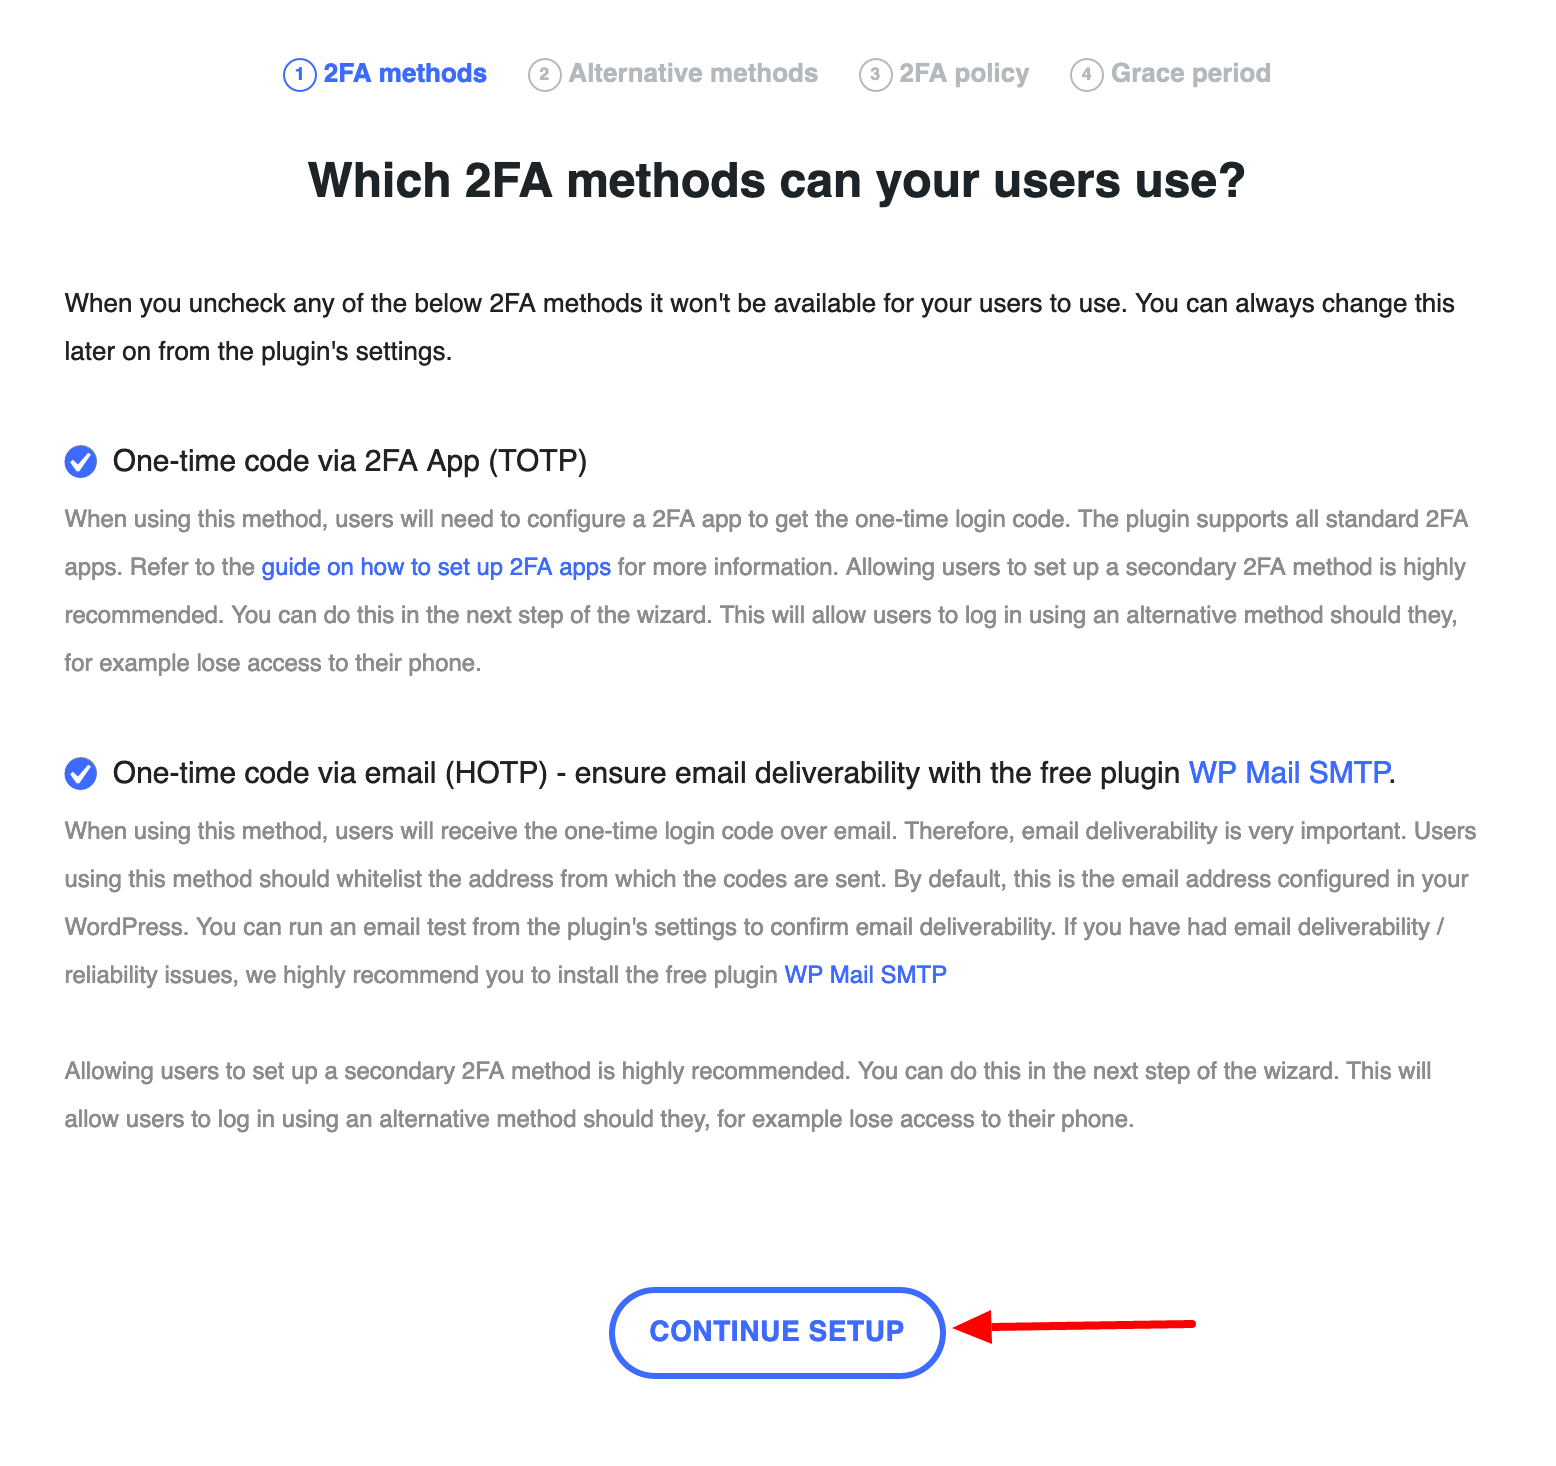
You will then be prompted to choose an authentication method for your users. You have two options for the second authentication factor:
- Using an application like Google Authenticator or Authy
- Sending a code by email. In this case, WP 2FA recommends activating the WP Mail SMTP plugin to improve the deliverability of emails sent by WordPress.
If you want to offer these two options to your users, leave both boxes checked.
Otherwise, uncheck the box of your choice if you don’t want to offer one of the authentication methods. Click on “Continue Setup” to continue the configuration:

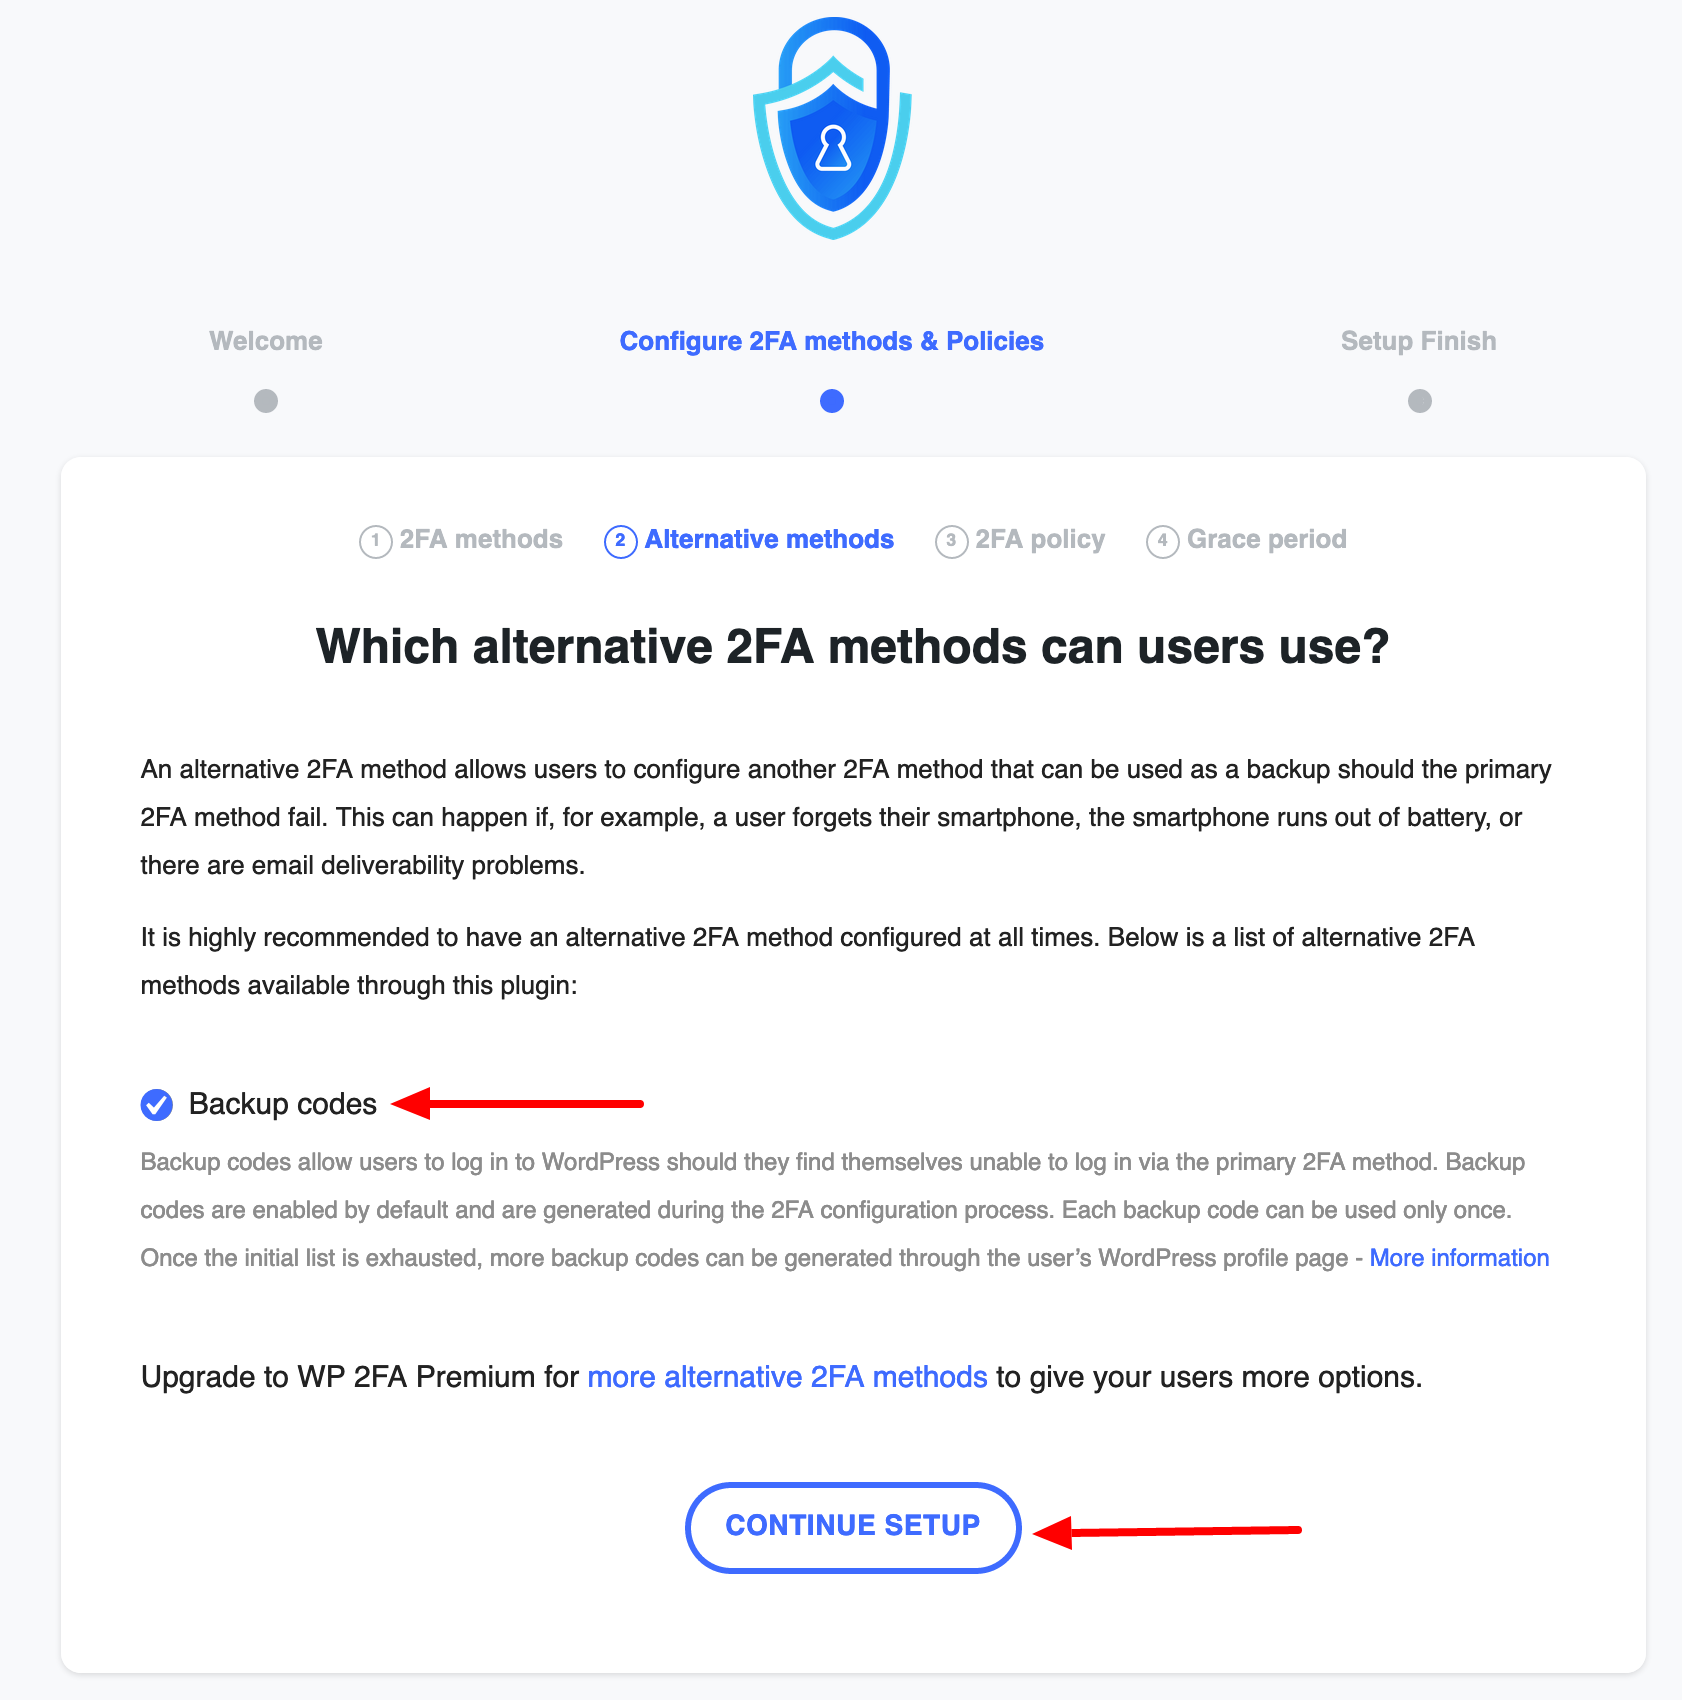
In the next step, you can also choose to send a one-time use backup code, in case the previous authentication method (by an app or by email) doesn’t work.
To choose this option, leave the “Backup codes” box checked, then click on “Continue Setup”:

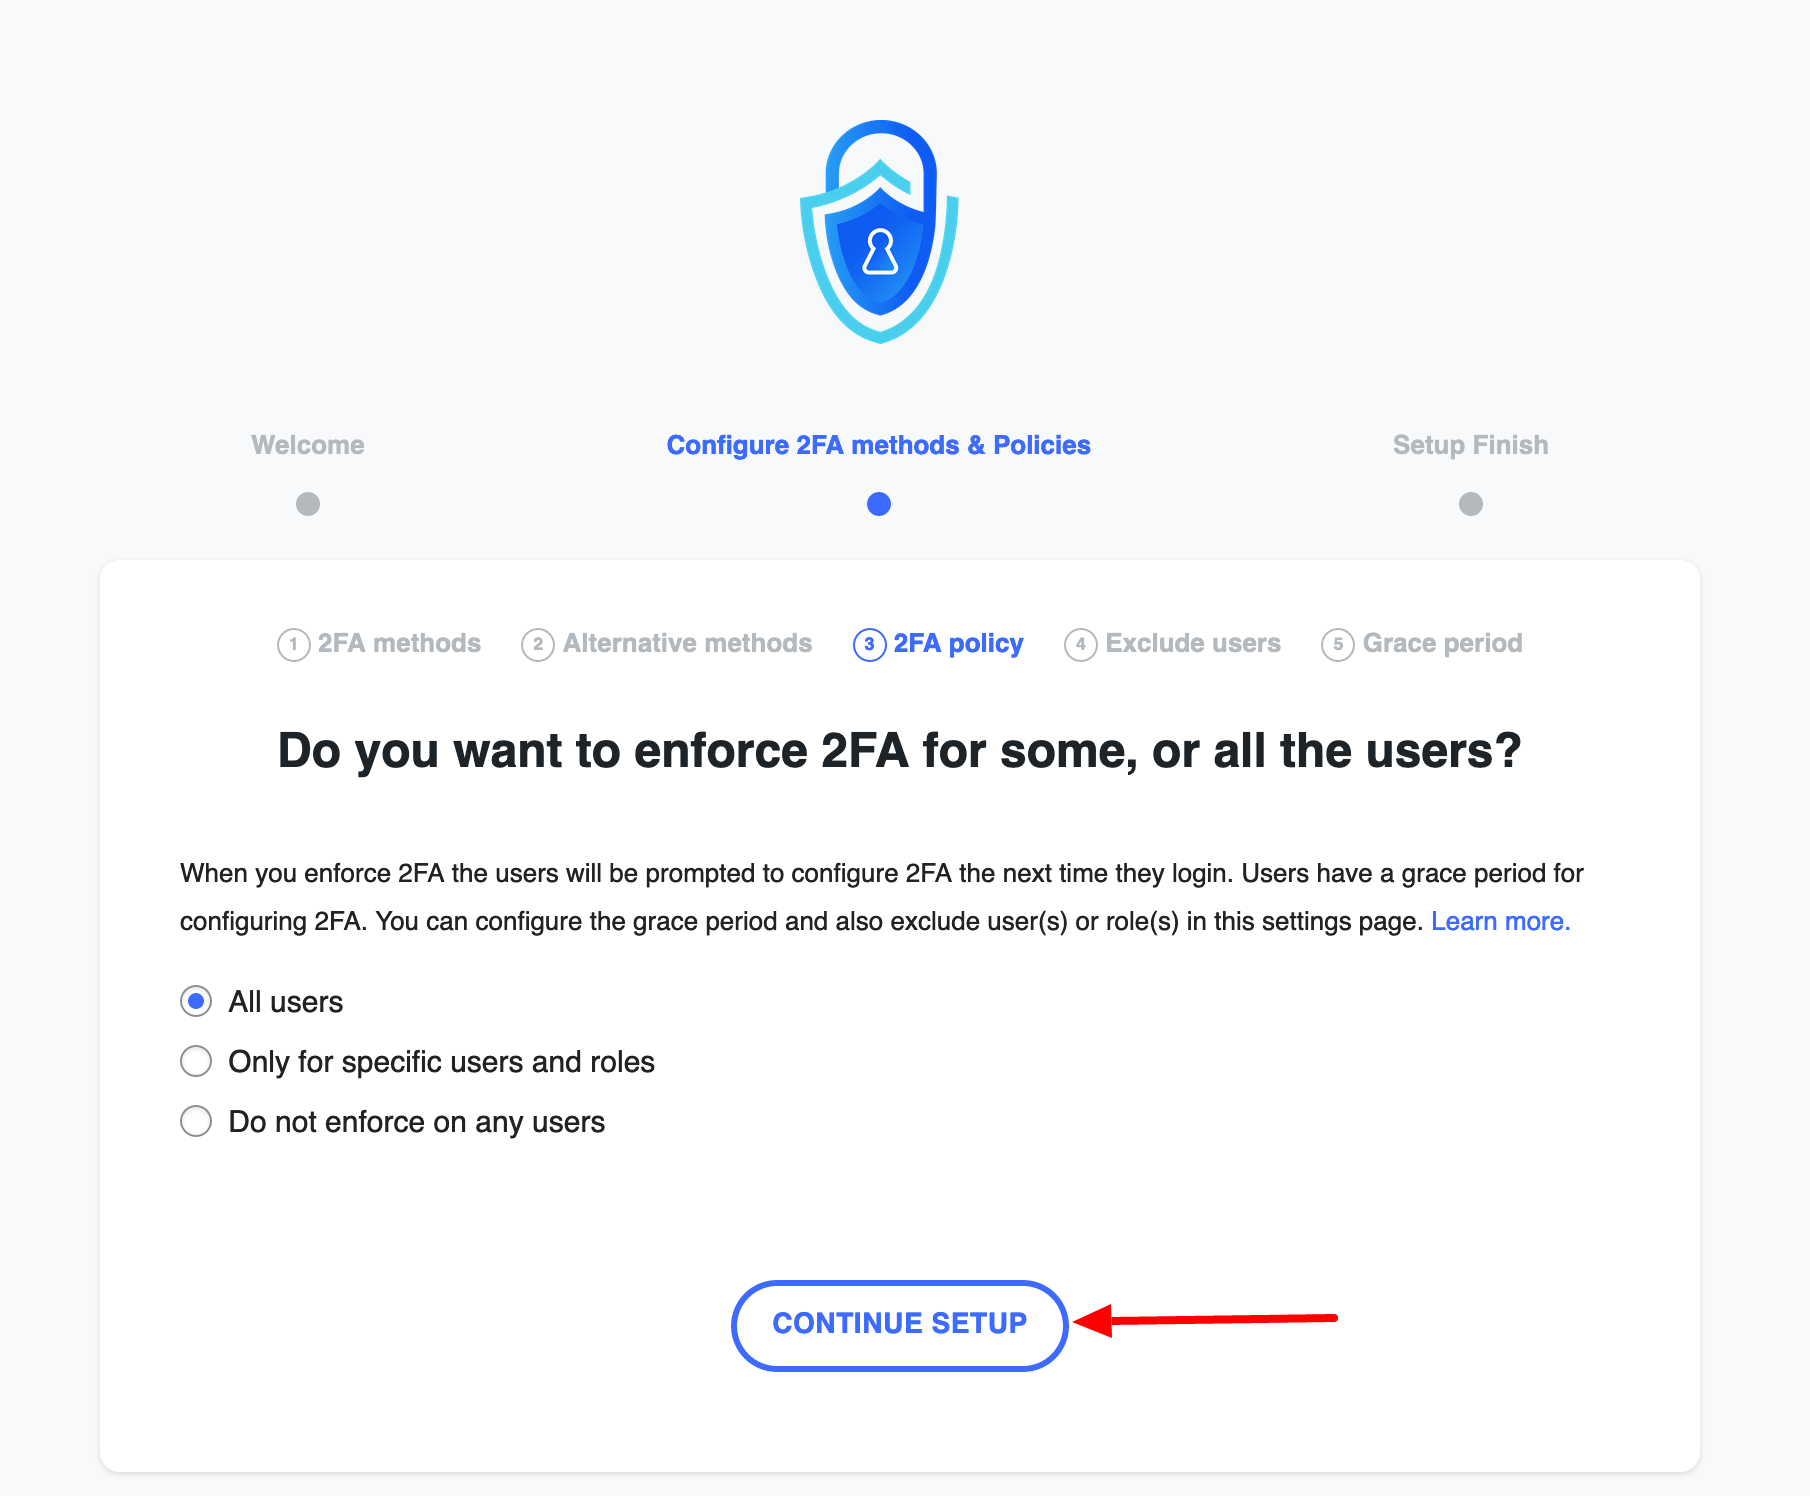
Step 3: Define which user roles will use dual authentication on WordPress
In the third step, WP 2FA prompts you to choose who will use dual authentication on your WordPress site. There are three options:
- All users: In this case, everyone will have to authenticate twice to log in, regardless of their user role (administrator, author, editor, contributor, and subscriber).
- Certain users and/or defined roles (“Only for specific users and roles”). Here you can restrict the use of two-factor authentication to certain users and roles.
- Do not enforce on any users. In this case, each user will be free to activate it or not.
Proceed to the next step by clicking on “Continue Setup”:

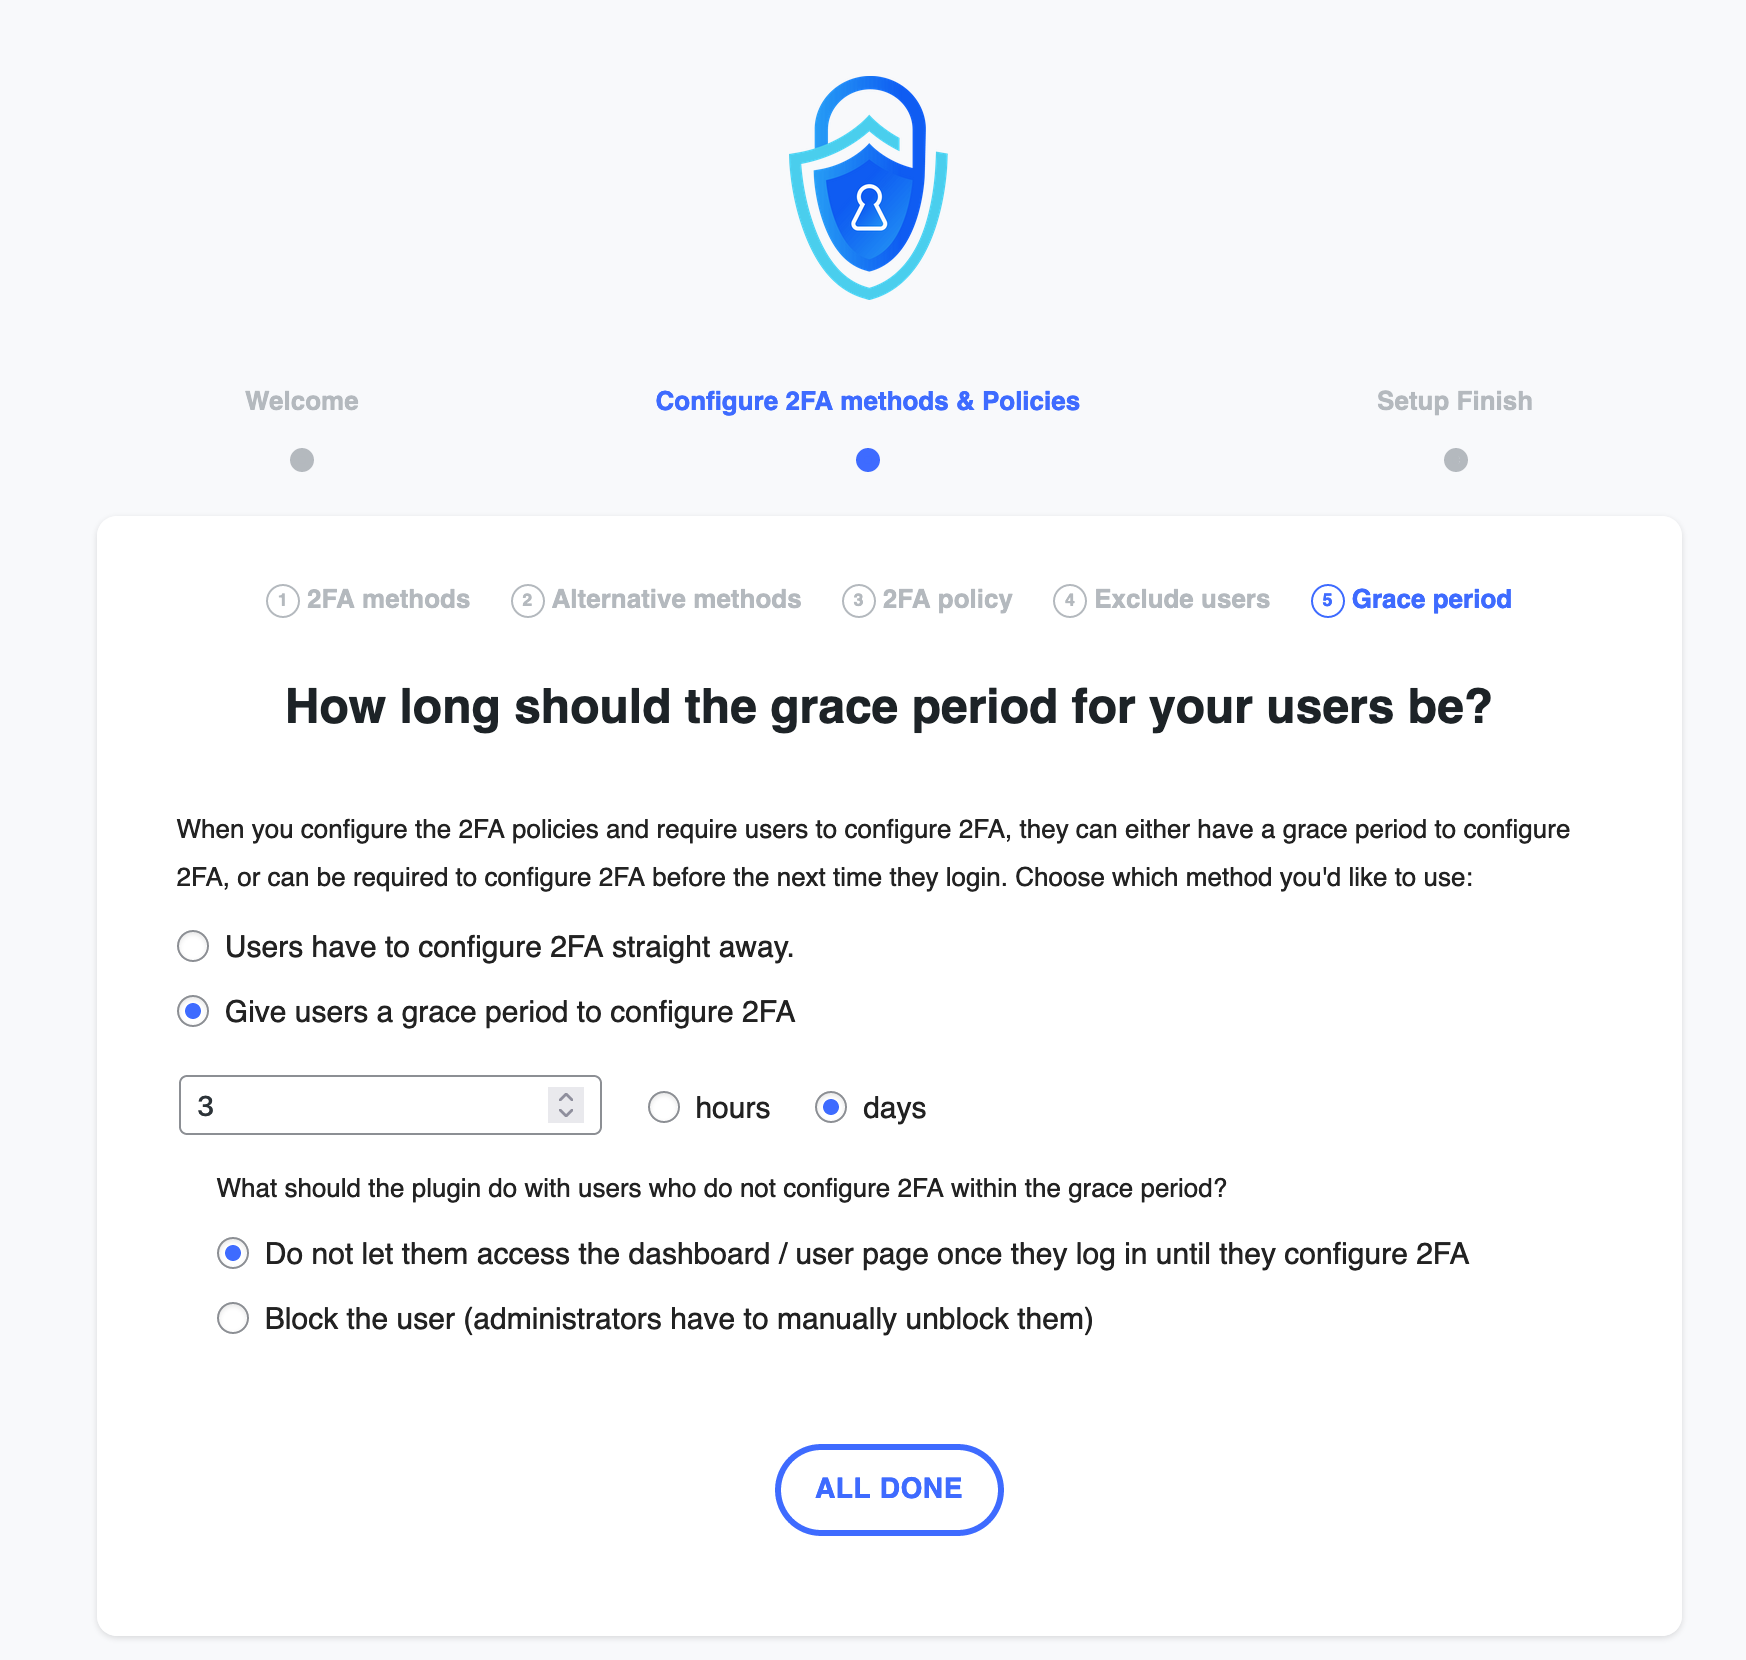
Step 4: Configure a grace period
If you choose to enforce two-factor authentication on all or some of your users, you can give them the option to configure two-factor authentication within a certain grace period.
WP 2FA allows you to either:
- Force your users to configure two-factor authentication immediately (“Users have to configure 2FA straight away”)
- Define a grace period to configure 2FA (“Give users a grace period to configure 2FA”) which can be set in days or hours.
If you decide to set a configuration delay, you will have to choose what will happen if the user doesn’t take action during the delay:
- Either they will not be able to access the dashboard or their user page (“Do not let them access the dashboard/user page”) until they set up dual sign-in on WordPress
- Or the user’s account will be blocked (“Block the user”). Only an admin will be able to unblock it.
Finish by clicking on “All done”:

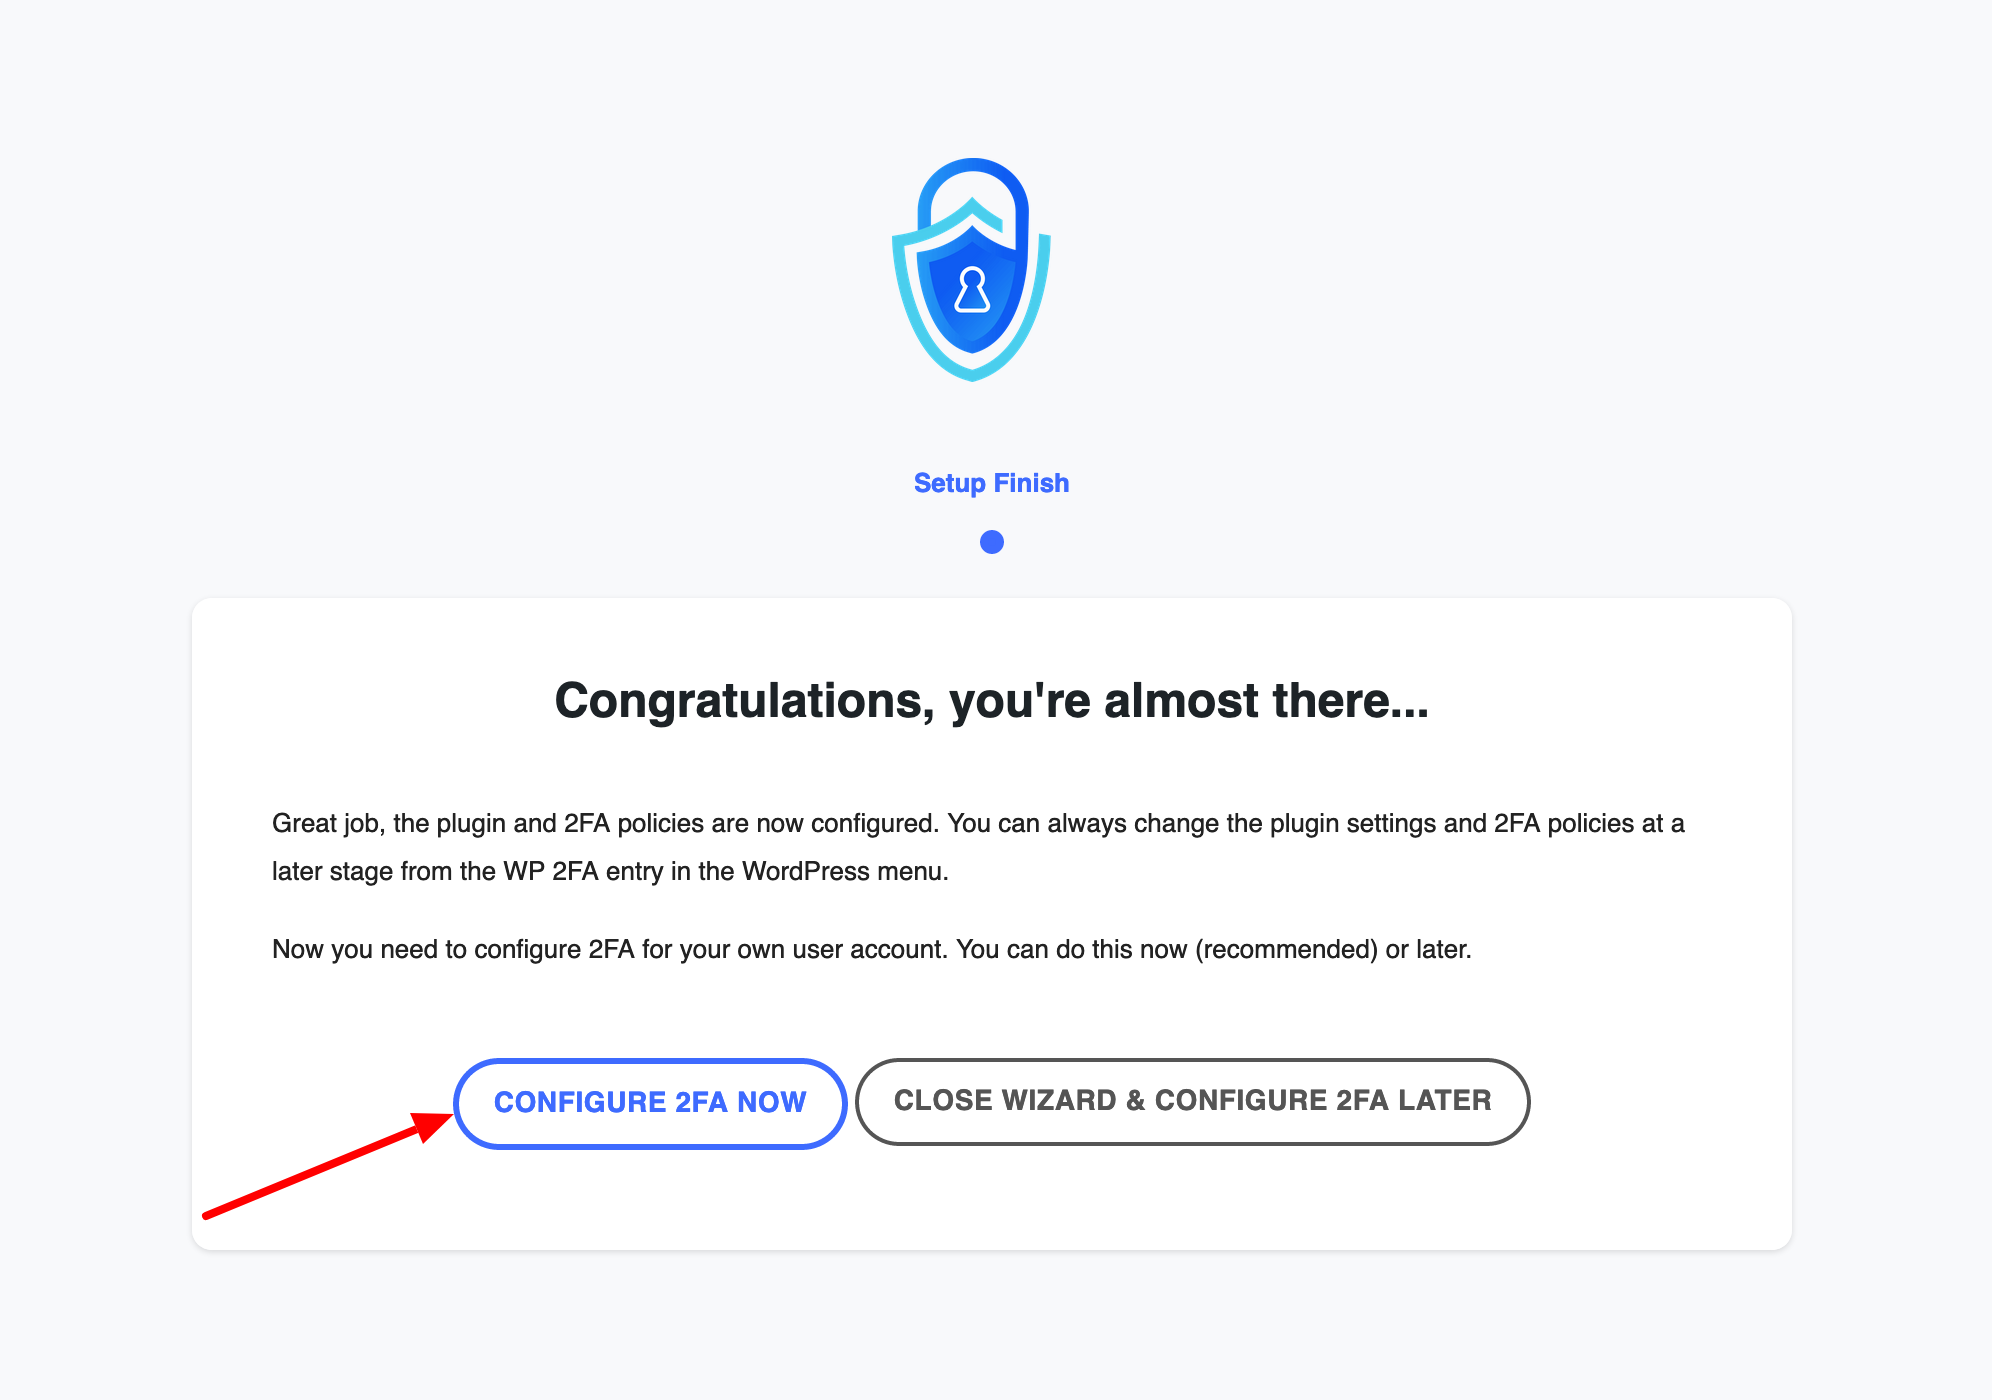
Step 5: Choose the method of dual login on WordPress for your user account
The last step is to set up dual authentication for your user account. To do this, click on the “Configure 2FA Now” button:

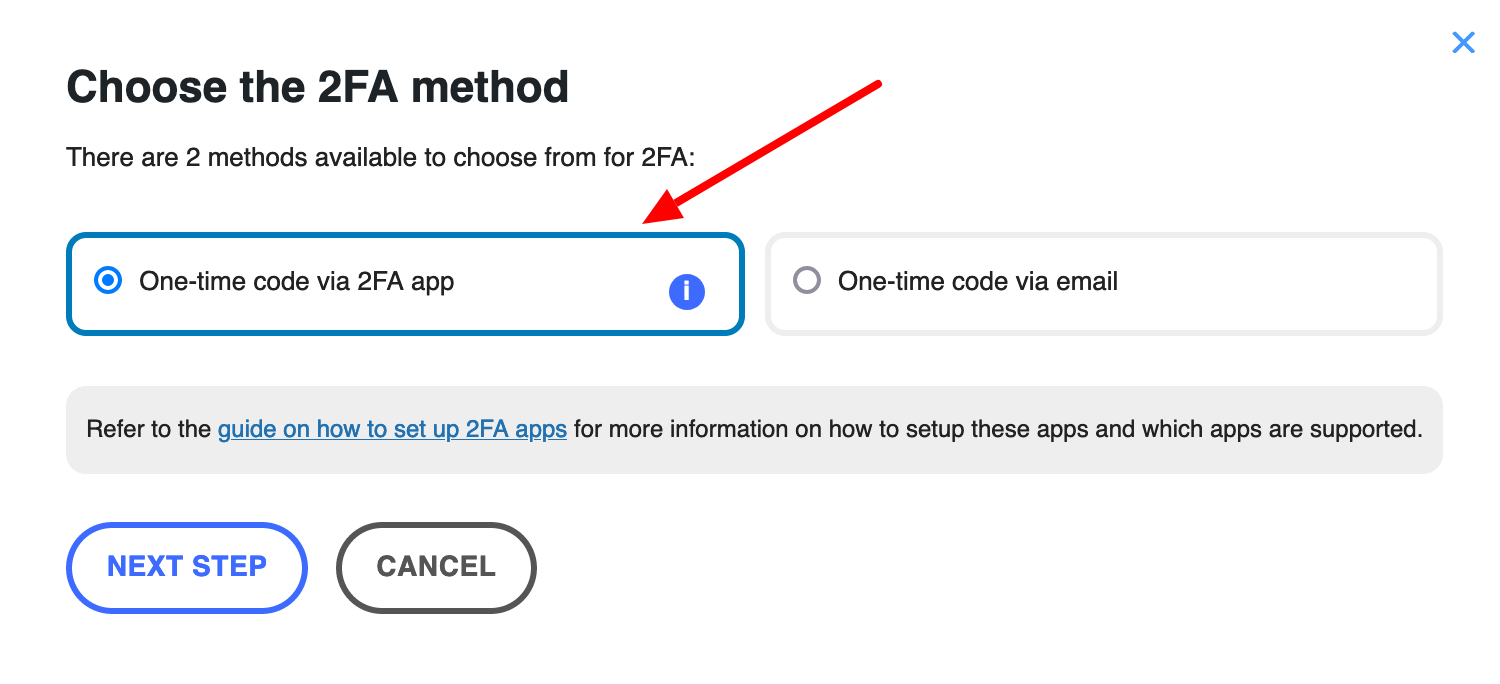
A highlighted window will then open on your screen asking you to choose which authentication method you want to use:
- Authentication via an app (“One-time code via 2FA app”). This is the method I’ll choose here.
- Authentication via email (“One-time code via email”).

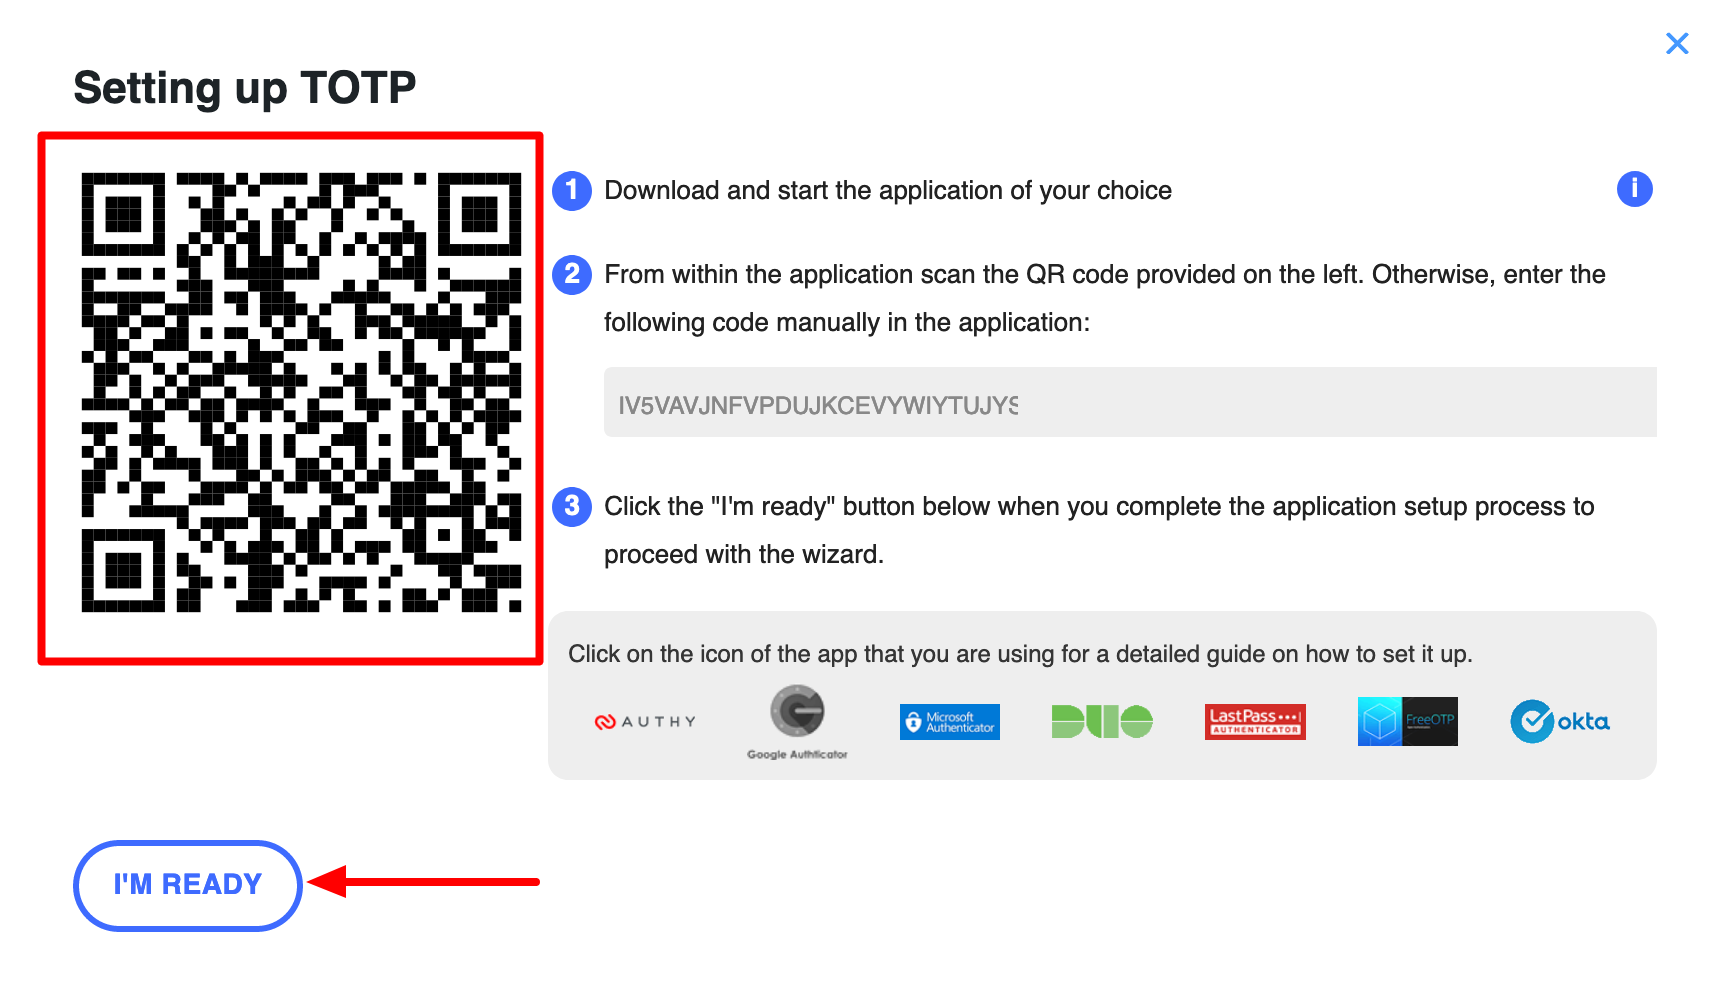
Step 6: Generate an authentication code on a two-factor authentication app
To authenticate via an application, you need to choose one. WP 2FA is compatible with the following applications:
- Google Authenticator
- Authy
- Microsoft Authenticator
- Duo
- LastPass
- FreeOTP
- Okta
For the purpose of this test, I will rely on Google Authenticator, which is probably the most famous.
Download this application on your smartphone. Open it, then scan the QR code offered by the WP 2FA plugin on your administration interface. When it’s done, click on the “I’m ready” button.

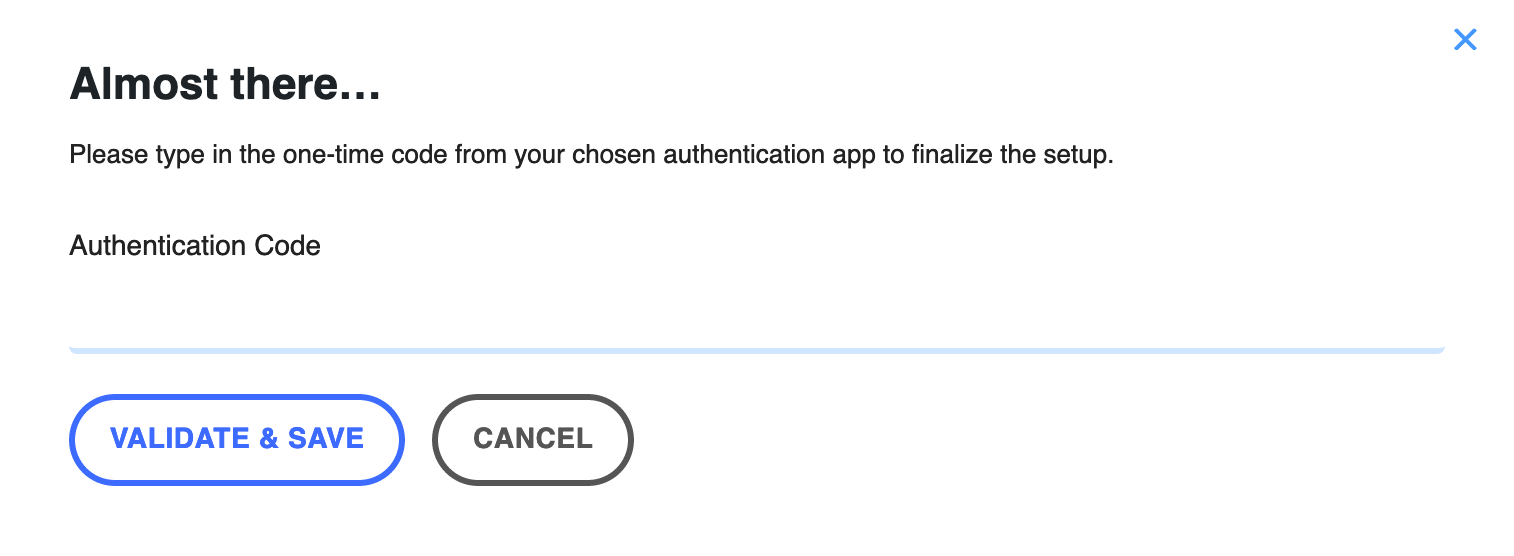
Then enter the code generated by the Google Authenticator application, and remember to validate by clicking on the corresponding button (“Validate & Save”):

Step 7: Connect to WordPress
To verify that everything is working properly, log out of your WordPress administration interface.
On the admin login page, enter your username and password as usual. If all is well, you will then be asked to enter a one-time code generated by the application you will be using.

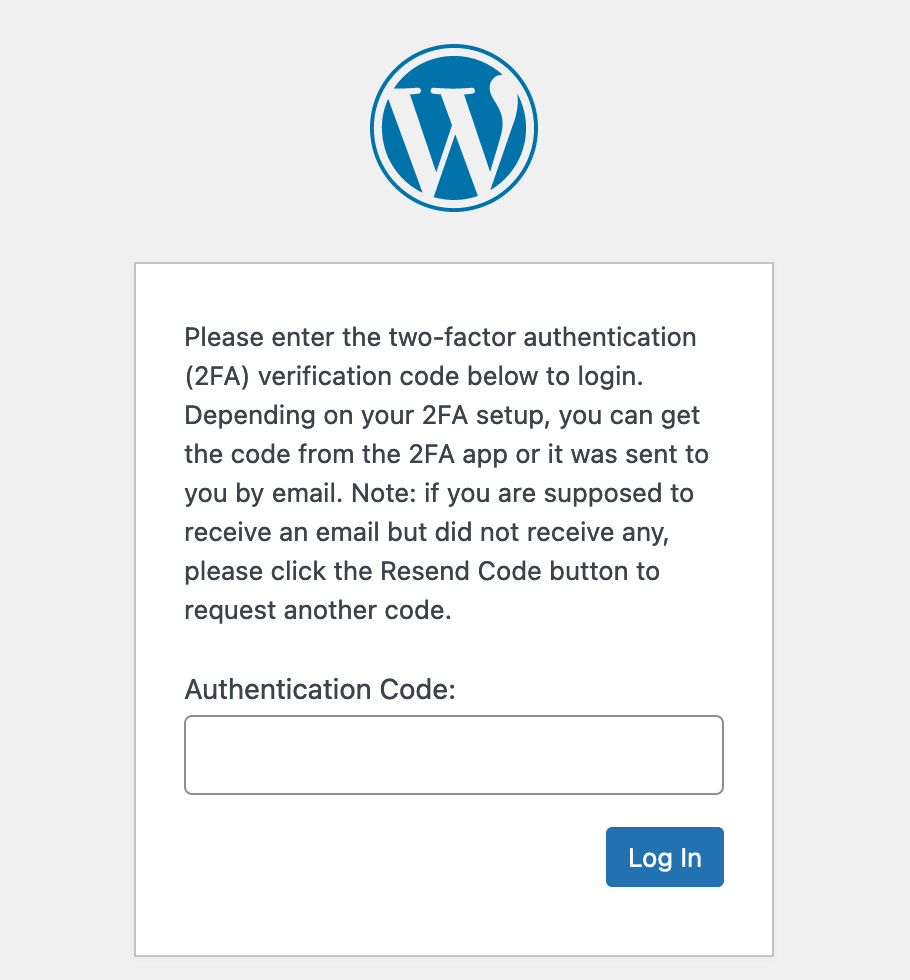
In the case of Google Authenticator, this is a 6-digit code that is regenerated every 30 seconds.
And that’s it, your site is now much more secure. Congratulations!
You can also customize the text of the email that will send you an authentication code (if you choose this method in the plugin settings), via the WP 2FA > Settings > Emails & Templates menu. Finally, it’s also possible to change the text that is displayed on the login page when you have to enter your authentication code.


How to enable two-factor authentication with a general security plugin
If you’ve gone through the process of setting up two-factor authentication on WordPress yourself, you may have found the steps to be relatively simple.
On the other hand, you may have found it a bit time-consuming to implement. The WP 2FA plugin has multiple configuration options, which can make things drag a bit.
If you want to go a bit faster — though with fewer options in the settings — there is another way.
This is the use of a general purpose security plugin. Most of them offer an option to enable dual authentication on your WordPress site.
WPMarmite has dedicated detailed tutorials to three of the most famous security plugins, in which you will find out how to configure dual authentication. These are the following plugins:
- Wordfence Security (included in the free version). If you don’t want to take advantage of all the features offered by Wordfence, note that it also offers a lighter plugin with fewer options (Wordfence Login Security), which include dual authentication.
- Solid Security (formerly known as iThemes Security, included in the free version)
- SecuPress also offers two-factor authentication (2FA), but only in its Pro version. SecuPress offers an interesting method in this respect: Passwordless. To log in, the user doesn’t need to enter a password. They just enter their email address on the WordPress login page, and then they receive an email with a unique link that will allow them to login only once.
If you choose to use a general purpose security plugin, don’t enable a dedicated two-factor authentication plugin like WP 2FA or one of its competitors at the same time. This would be counterproductive and you will expose yourself to incompatibility risks.
Conclusion
Dual authentication on WordPress is an effective way to strengthen the security of your site. For example, it allows you to better protect your site against brute force attacks.
Throughout these lines, you have discovered two main methods to activate it on your WordPress installation:
- With a dedicated plugin like WP 2FA.
- With a general purpose security plugin like Wordfence, iThemes Security, or SecuPress.
However, don’t rely on two-factor authentication alone to protect your site. Consider using strong passwords, for example, as well as an anti-spam plugin like Akismet.
Have you implemented dual sign-in on your site? If so, what feedback can you share with us? Give your opinion to WPMarmite readers by posting a comment.