


I’m French, still small (in terms of active installations), but already pretty strong!
I allow my users to create and send newsletters from the WordPress interface, and to automate the process (among other things).
In short, I am a complete email marketing tool. Do you recognize me? I’m the AcyMailing plugin.


If it doesn’t yet enjoy the same popularity as one of its main competitors, MailPoet (which is also French), AcyMailing has some serious assets to tempt you.
To find out more and discover it in detail, I have prepared a complete assessment that explores it from top to bottom. It shows you exactly how to set it up and use it.
Ready to go? Prepare for take off!
Overview
- What is AcyMailing?
- What are the main features of AcyMailing?
- How to install and configure AcyMailing
- How to create a list with AcyMailing
- How to create a subscription form for your list with AcyMailing
- How to create and send a newsletter with AcyMailing
- What does the Pro version of AcyMailing offer?
- How much does AcyMailing cost?
- Our final assessment of AcyMailing


What is AcyMailing?


AcyMailing is a freemium plugin that allows you to send newsletters from your WordPress administration interface. Multi-purpose, the plugin also allows you to collect email addresses and to set up automated emails, among other things.
Developed and maintained by a French company (Acyba), AcyMailing first became known on the Joomla CMS, to the point of becoming one of the most popular plugins.
Four years ago (at the time of this writing), the Acyba team decided to launch its WordPress version of the plugin in parallel. With more than 7K active installations, the latter is starting to make a name for itself in the WordPress landscape and stands out with a significant number of positive reviews (overall rating of stars).
Convinced users highlight, in no particular order, the following features:
- The intuitive interface
- The responsiveness and efficiency of the support
- The ease of use and speed of configuration
- The numerous possibilities offered by the free version of the plugin
Concerning this last point, you can use AcyMailing in two ways:
- Opt for the free version
- Take advantage of the additional options offered by the premium version of the plugin, starting at $29/year (more information on this in the section dedicated to prices).
For your information, Acyba also offers a handy freemium tool, called AcyChecker. This tool allows you to check that the email addresses you collect are valid.
I can tell you are focused and attentive, so let’s take a closer look at the enticing attractions of this newsletter plugin for WordPress.
What are the main features of AcyMailing?
Like any good newsletter creation plugin, AcyMailing includes several “classic” features that can also be found in most of its competitors (e.g. MailPoet).
- The plugin offers a drag and drop interface.
- Flexible email templates are available to avoid starting from scratch and allow you to begin with a pre-built template.
- No code knowledge (HTML/CSS) is required to use Acyba’s plugin.
- You can both collect email addresses via dedicated forms and send classic newsletters or automated emails (e.g. a welcome email or a more advanced sequence of several emails).
- AcyMailing is GDPR compliant.
Beyond that, AcyMailing stands out with several options that are rare or even non-existent in the competition. For example, I could mention the following very interesting elements:
- AcyMailing does not impose any limit on the number of emails you can send, even on its free version! You are also not limited on the number of users and lists you create.
- Like MailPoet, AcyMailing can be used entirely from your WordPress dashboard. No need to leave your site and go back and forth between different interfaces to send your emails.
- AcyMailing uses a queuing system to facilitate the delivery of your emails and “overcome server limitations.” Thanks to this, you limit the risk of your emails being considered as spam.
- You can customize the emails sent by default by WordPress, but also those sent by WooCommerce. Speaking of the famous ecommerce plugin, AcyMailing also allows you to send emails to bring back a visitor after a cart abandonment.
- An option allows you to test the content of your newsletter (links, keywords, images).


Intriguing, isn’t it? Now, let’s go into the technical details by diving into the heart of the AcyMailing machine.
You’ll now discover the plugin in depth. To do so, I’m going to put myself in the shoes of the user who starts from scratch and begins without having any subscribers to his list.
You will see how to:
- Configure the initial settings on AcyMailing
- Create a list using the plugin, which will allow you to centralize all the email addresses you collect
- Design a subscription form to allow your visitors to subscribe to your list
- Send your first newsletter
To do all this, I will rely on the free version of AcyMailing. Already well equipped with options, it is more than enough to get you started.
The pro version, whose major options I’ll detail later, is primarily intended for users who are a little more experienced in the world of email marketing, as it allows you to create automations.
In principle, you won’t need to go that far at the beginning. 😉 Are you ready? Let’s go!
How to install and configure AcyMailing
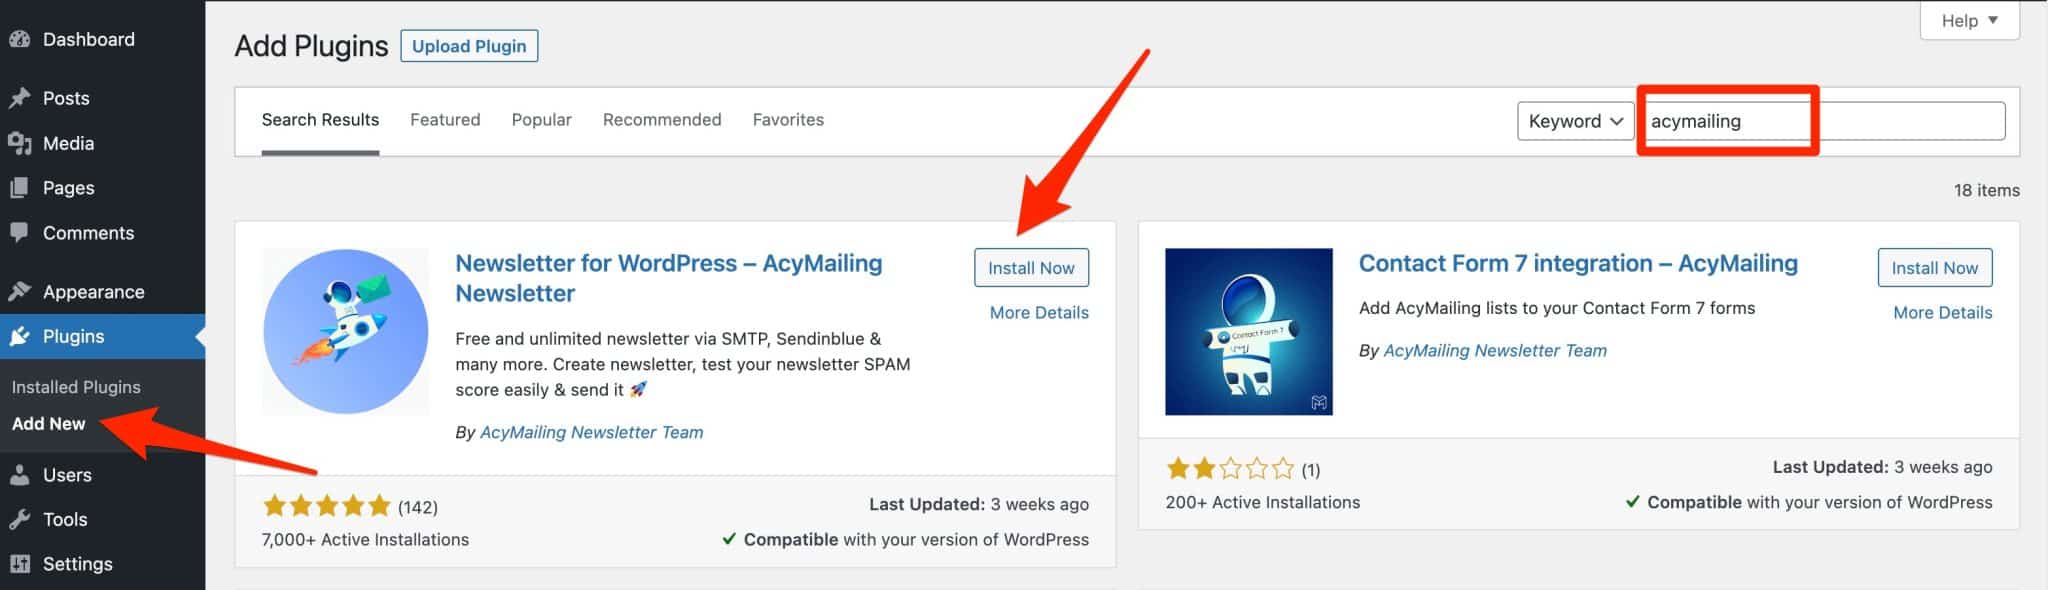
To start enjoying the features of AcyMailing, install the plugin from your WordPress dashboard in Plugins > Add New:

Remember to activate it to complete the operation. You will then see a new settings menu in the left sidebar of your WordPress back office:

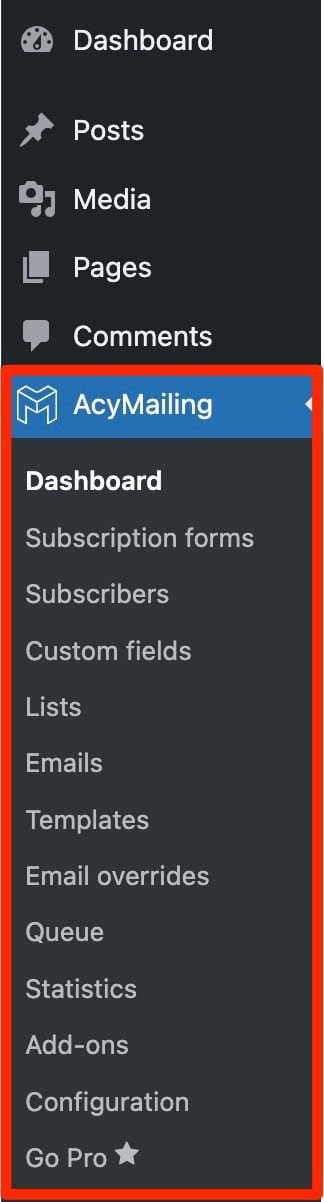
This is where you can configure all the settings provided by the plugin, and of course, send your first newsletters.
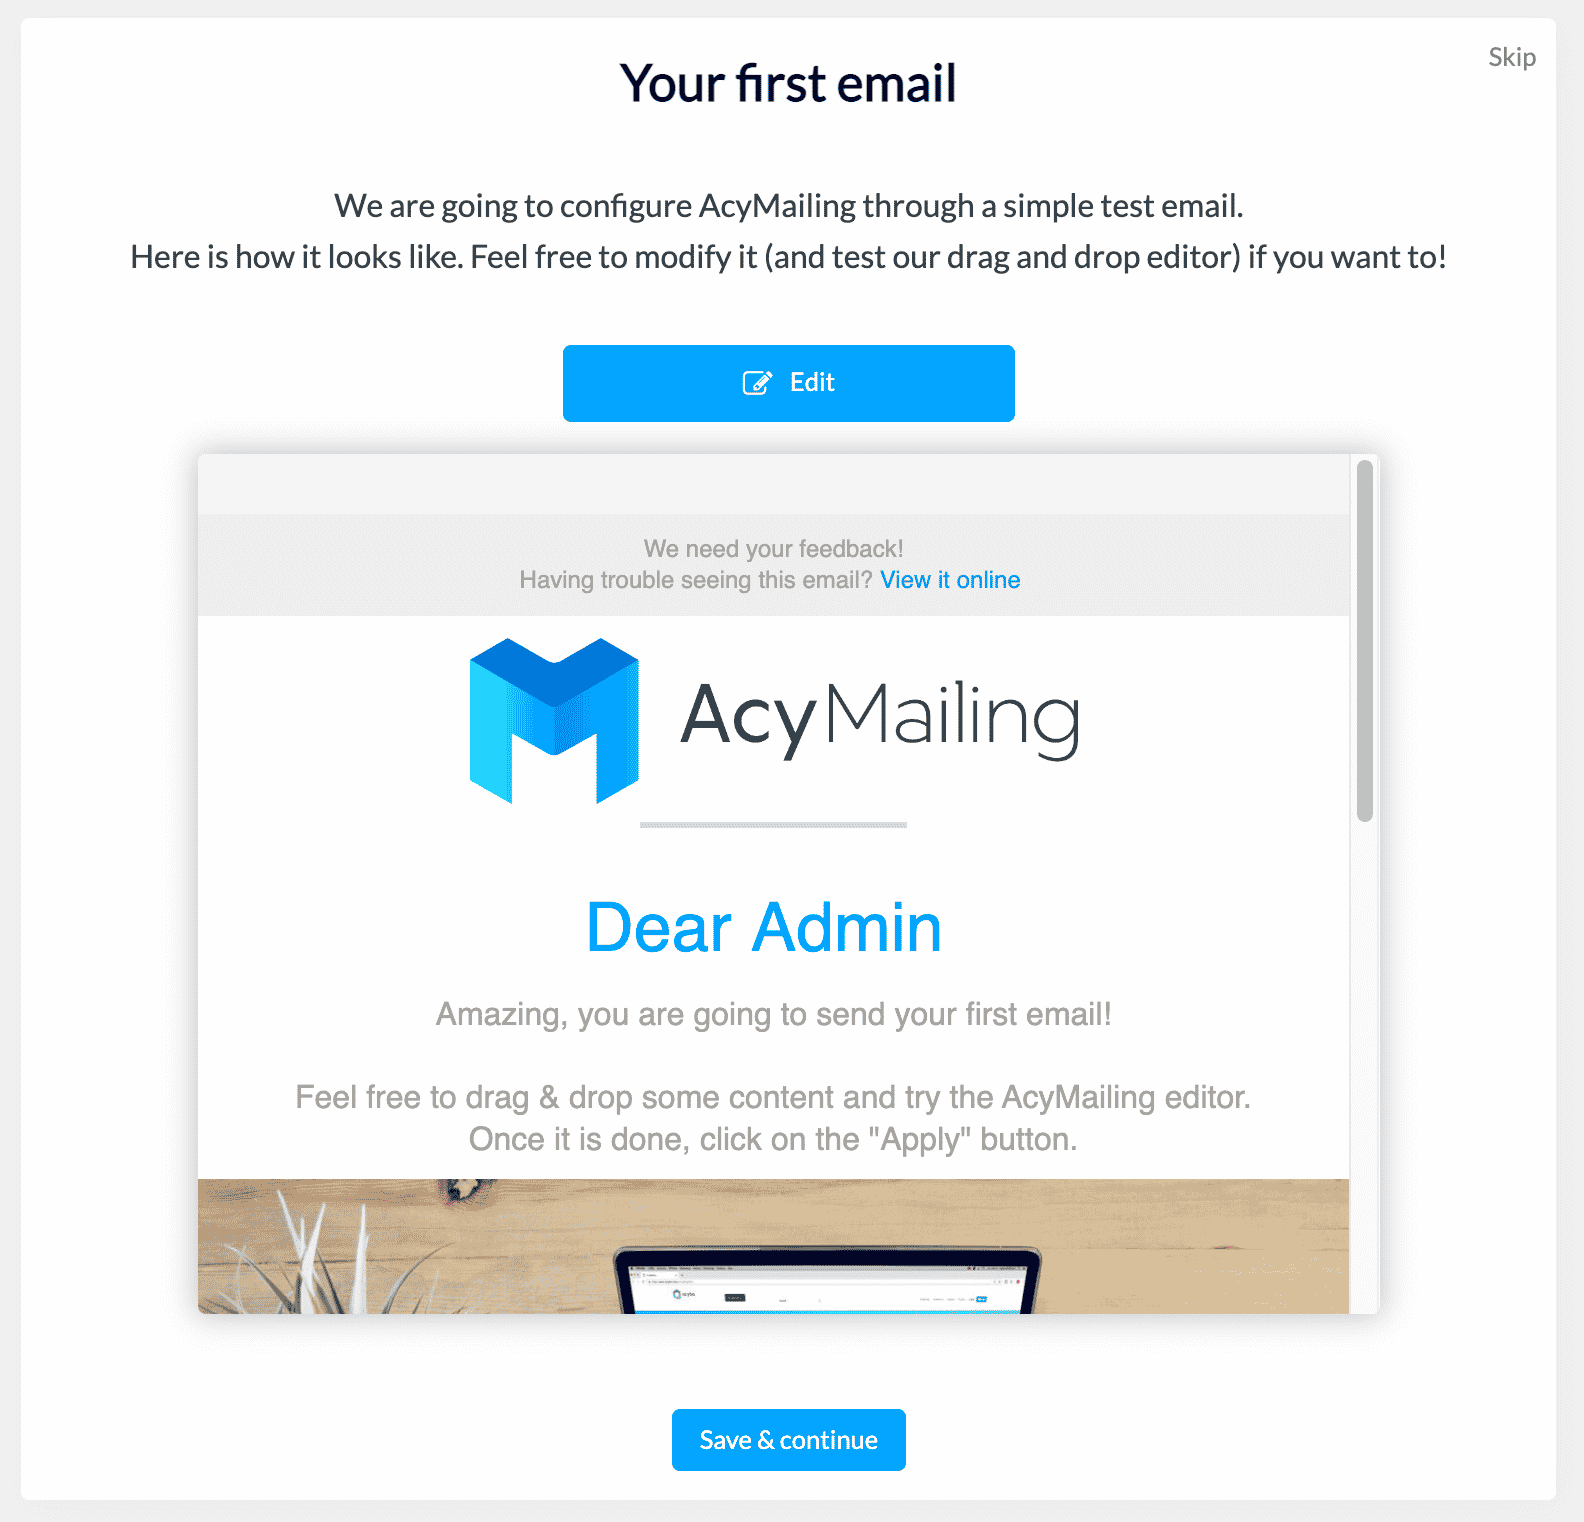
Before you can set anything, AcyMailing invites you to go through a few steps.
A configuration wizard takes you by the hand to:
- Create your first email.
- Import your subscriber list, if you already have one. You can do this with a CSV file, by hand, or using a database.

You don’t have to do this right now, of course. You can come back to it later.
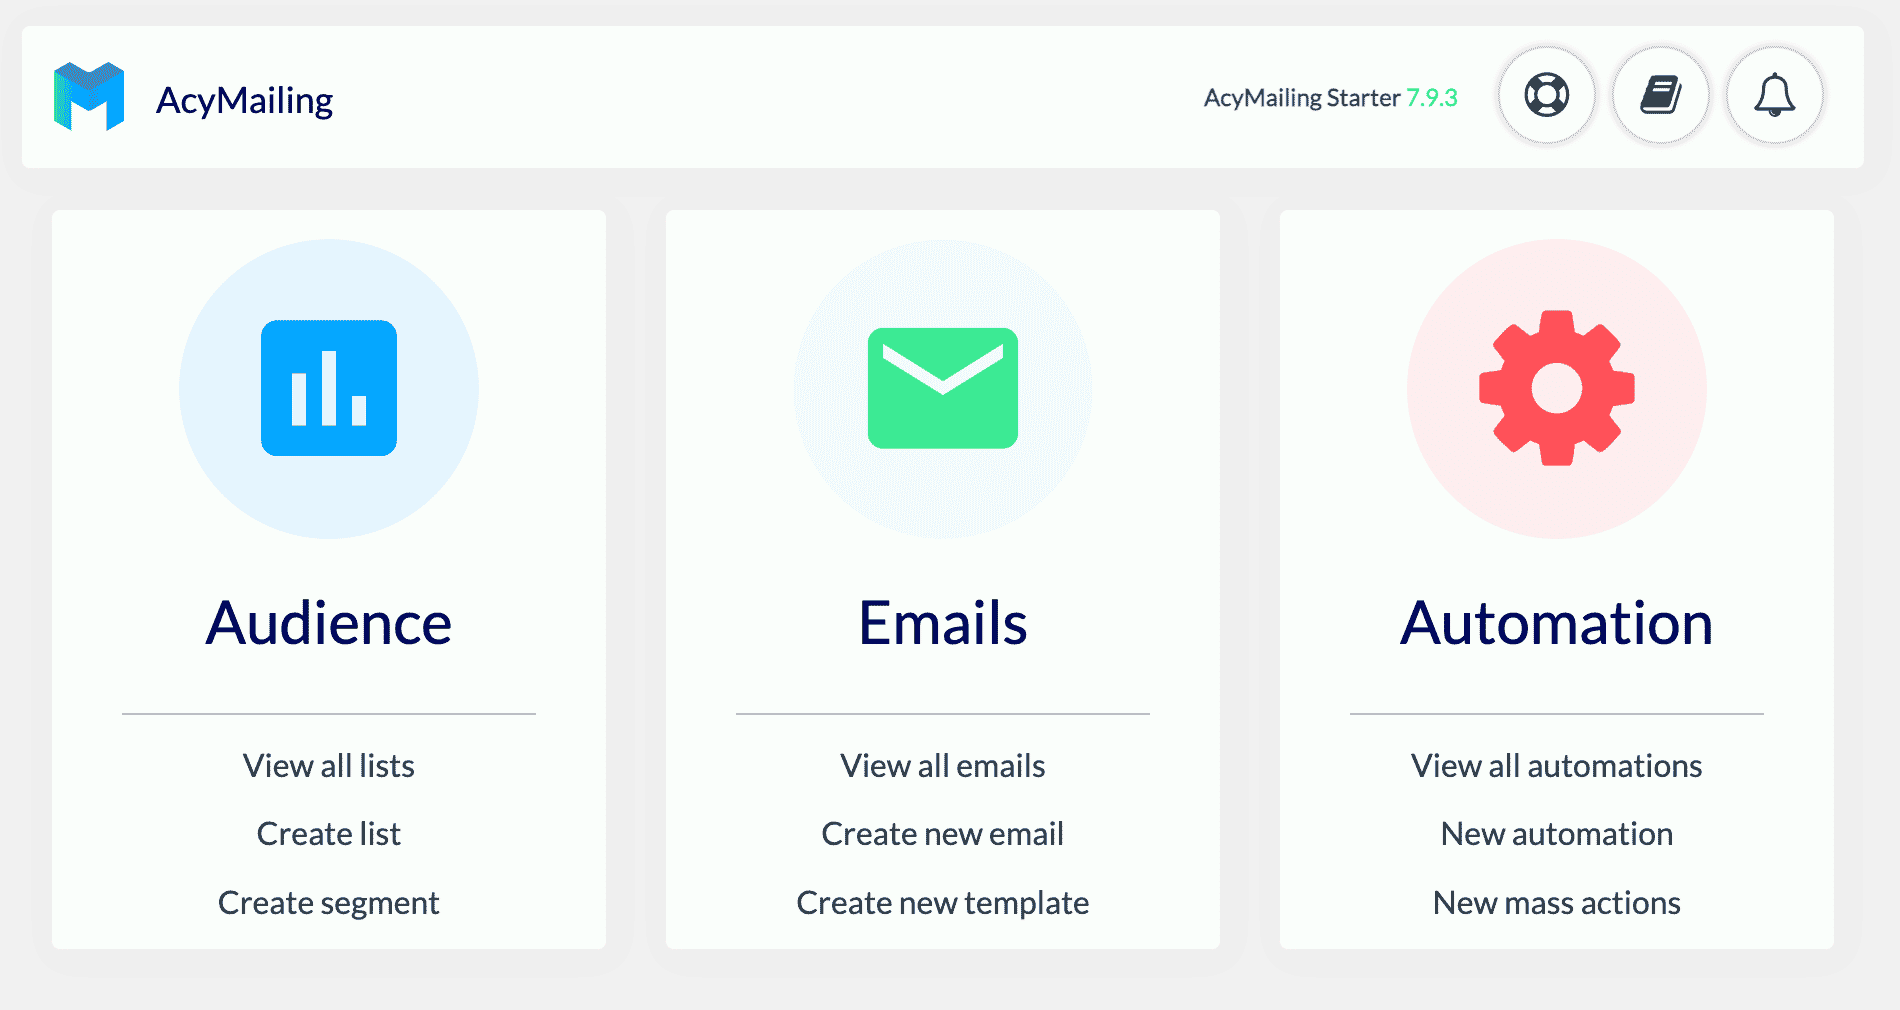
After this introduction, you will notice that the AcyMailing settings are now available. The dashboard offers three main options:
- “Audience,” to create and segment a list.
- “Emails,” to design a new email.
- “Automation,” to set up an automation.

Let’s start with the first element, the creation of a list, which will capture all the contacts who leave you their email address.
How to create a list with AcyMailing
To create a list, there are two ways:
- In the “Dashboard” menu, click on “Create a list” in the “Audience” box.
- Go to AcyMailing > Lists.
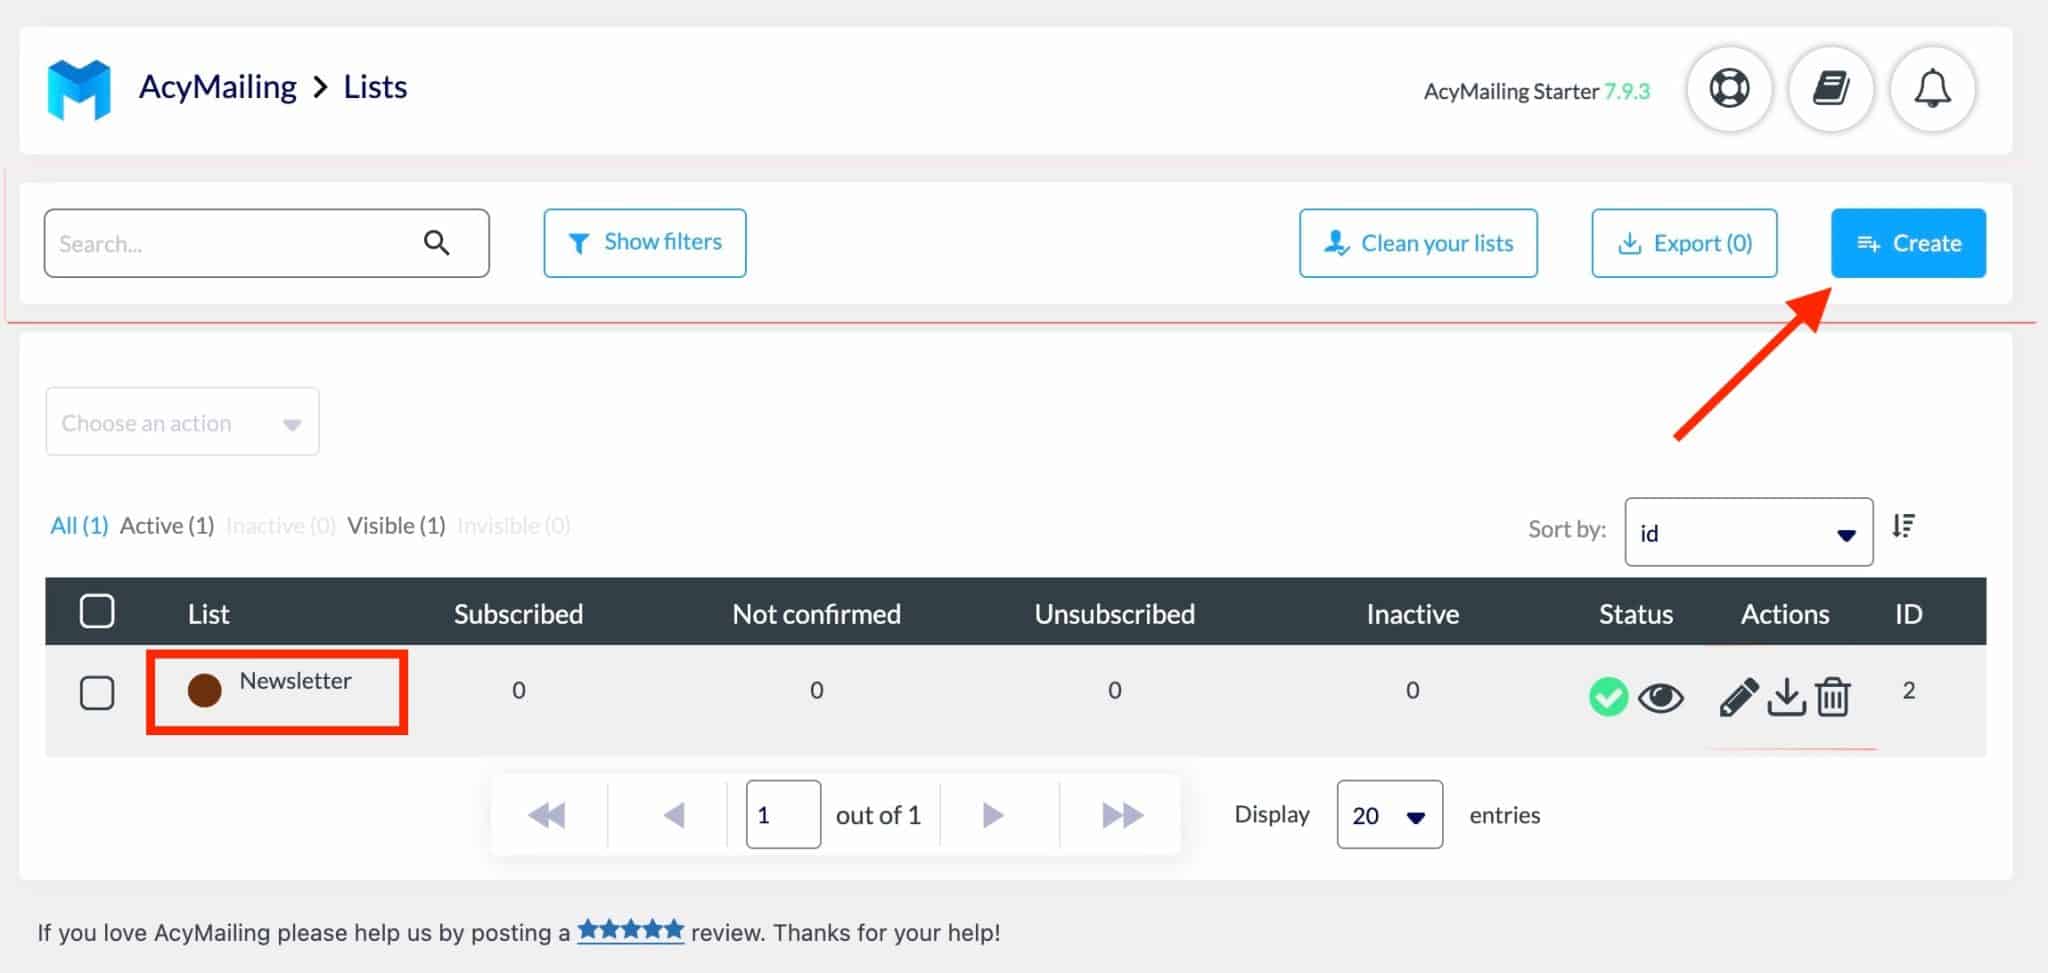
By default, you will see that a list called “Newsletters” already exists. You can either change its name by clicking on it, or design a new one by clicking on the blue “Create” button:

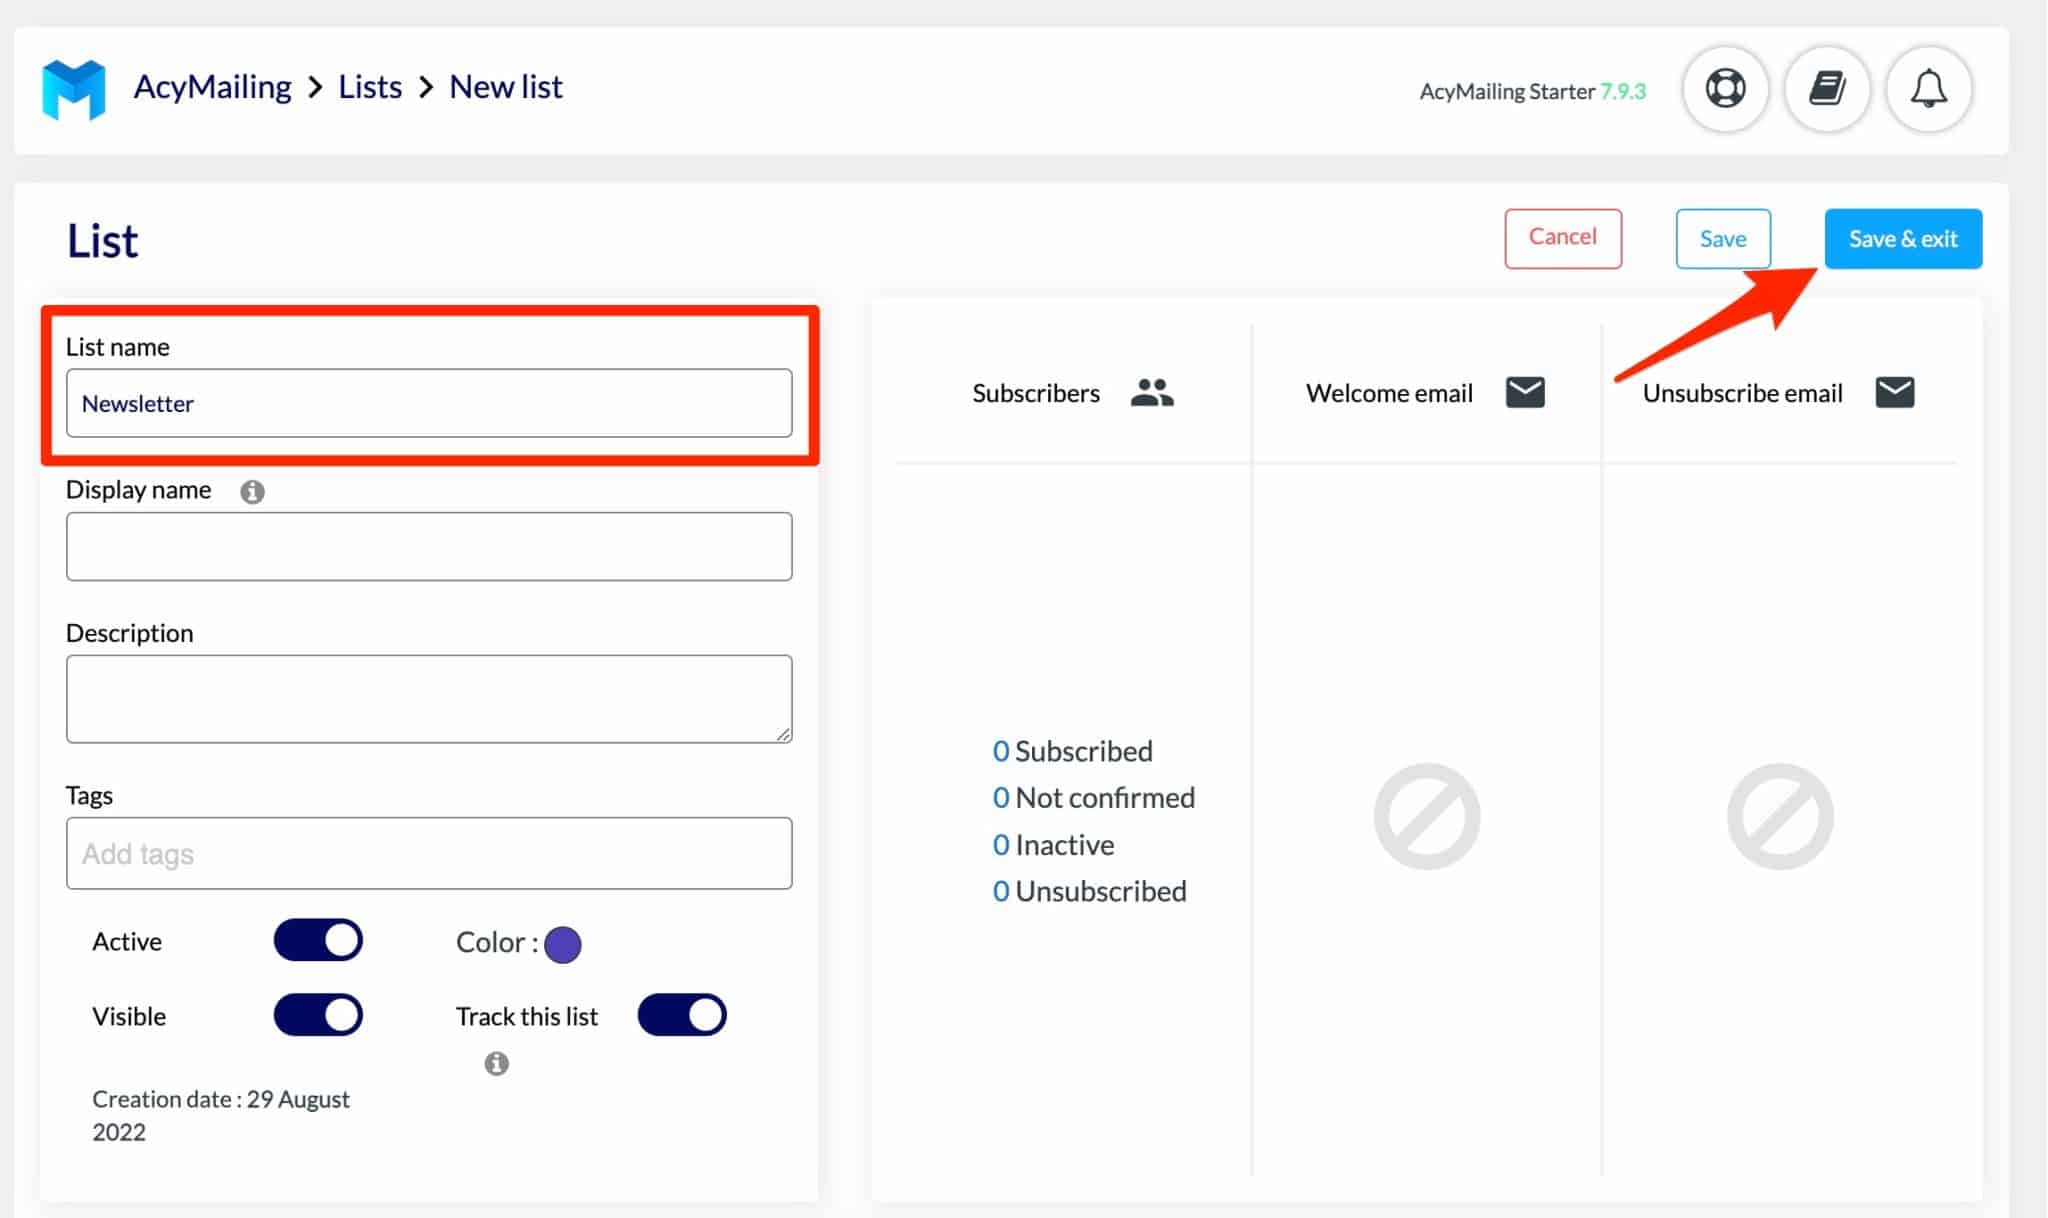
When you are in the list editing menu, give your list the name of your choice, for example, “Newsletter.” You can also:
- Add a description and a label to your list
- Customize its color
- Choose to track it, i.e. activate the statistical tracking of openings and clicks on your emails
A search bar allows you to search for a specific subscriber and you also have access to data about your subscribers (confirmed, inactive, unsubscribed).
Click on “Save & Exit” when you are done. Your first list is now active. You can delete the one added by default by AcyMailing if desired.

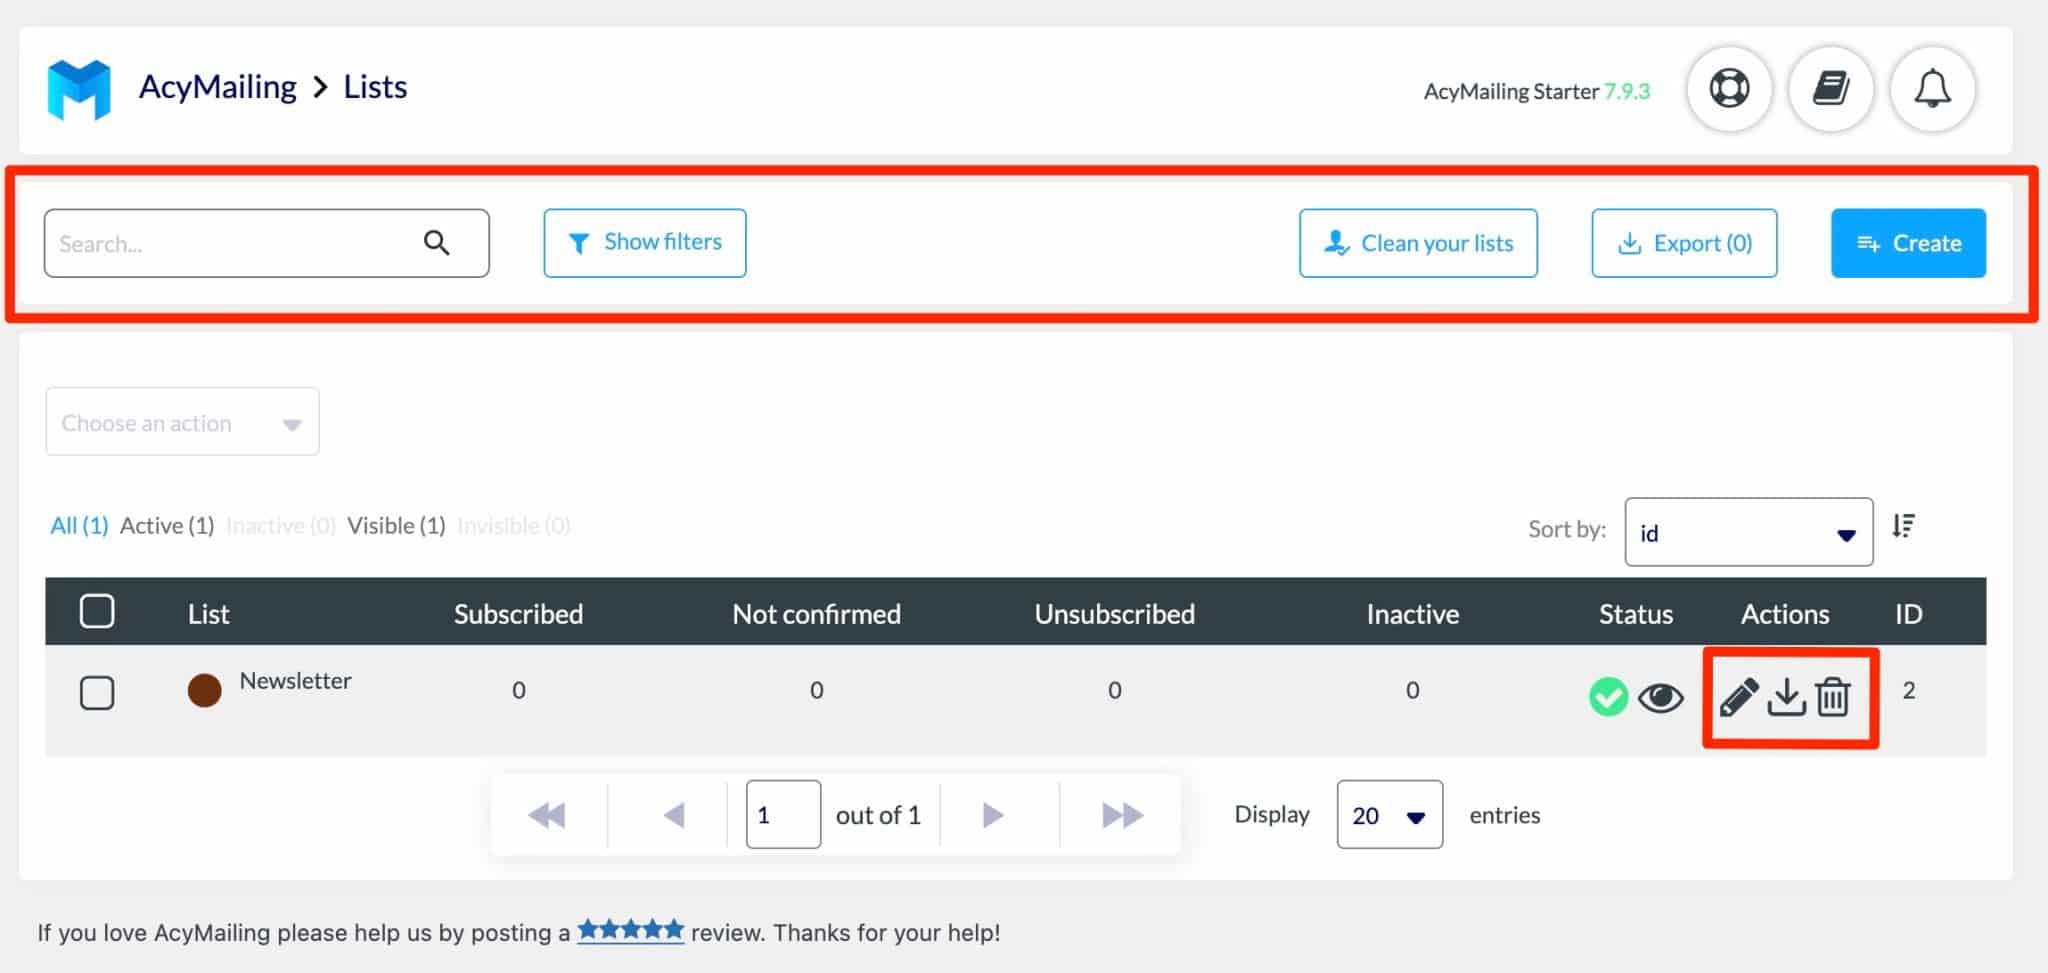
When you are on the general menu dedicated to your lists, you have access to various quick actions. In one click, you can:
- Filter your list
- Clean it with the AcyChecker tool that I mentioned at the beginning of the article
- Make it visible/invisible
- Modify or delete it
Well, your list is ready to receive your first contacts. To do this, they must have the option to subscribe on your site.
This is the purpose of a subscription form, also called an opt-in form. Let’s see how to add one with AcyMailing.
How to create a subscription form for your list with AcyMailing
Choose the type of form
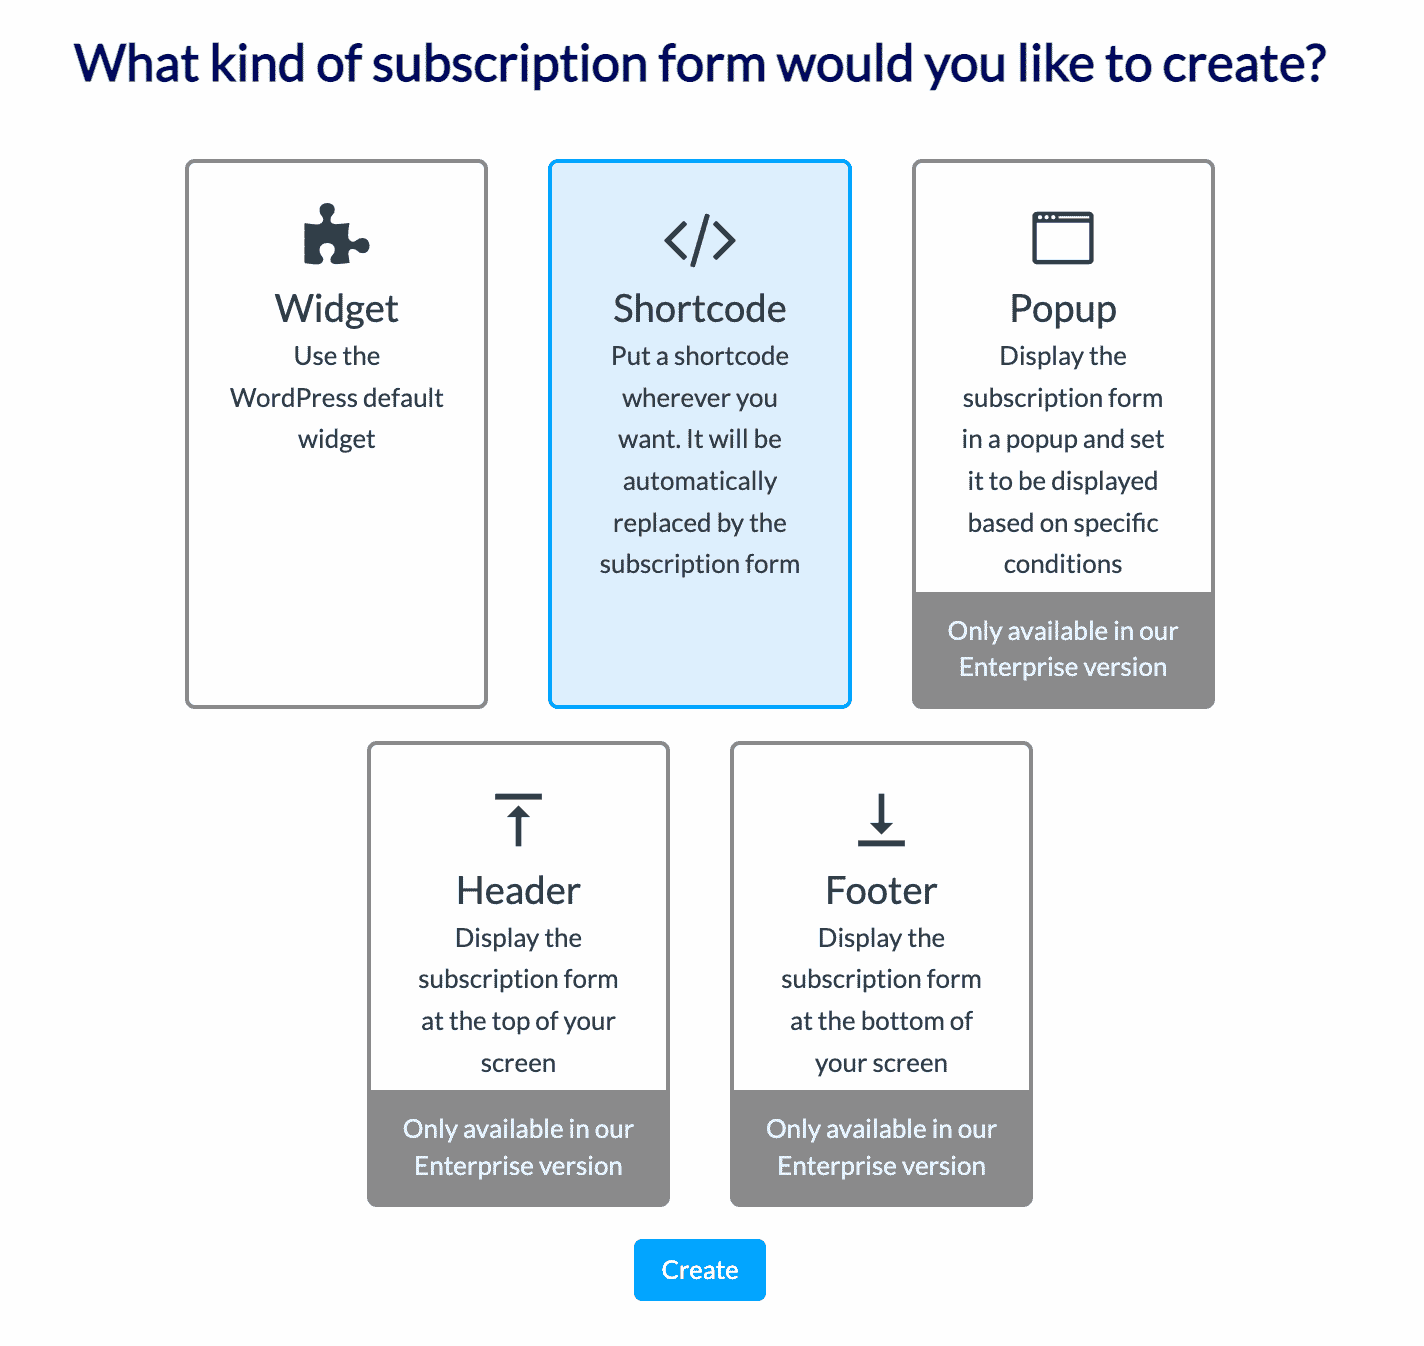
For the procedure, go to AcyMailing > Subscription forms. After clicking on the blue “Create” button, you will be able to choose between two types of subscription forms in the free version:
- A form that uses the default WordPress widget
- A form based on a shortcode
For the purpose of this test, I am choosing the shortcode, which is more flexible than the widget. It will allow me to integrate my form wherever I want in my content, for example, in a post/page, a sidebar, or my footer.

Start by giving your form a name, for example, “Subscription Form.” Once you have saved it, a shortcode will be automatically generated.


Before integrating it into your content, you need to customize two aspects of your form.
This happens in the right part of the editing window, which also gives you a real-time look at your form when you edit it:

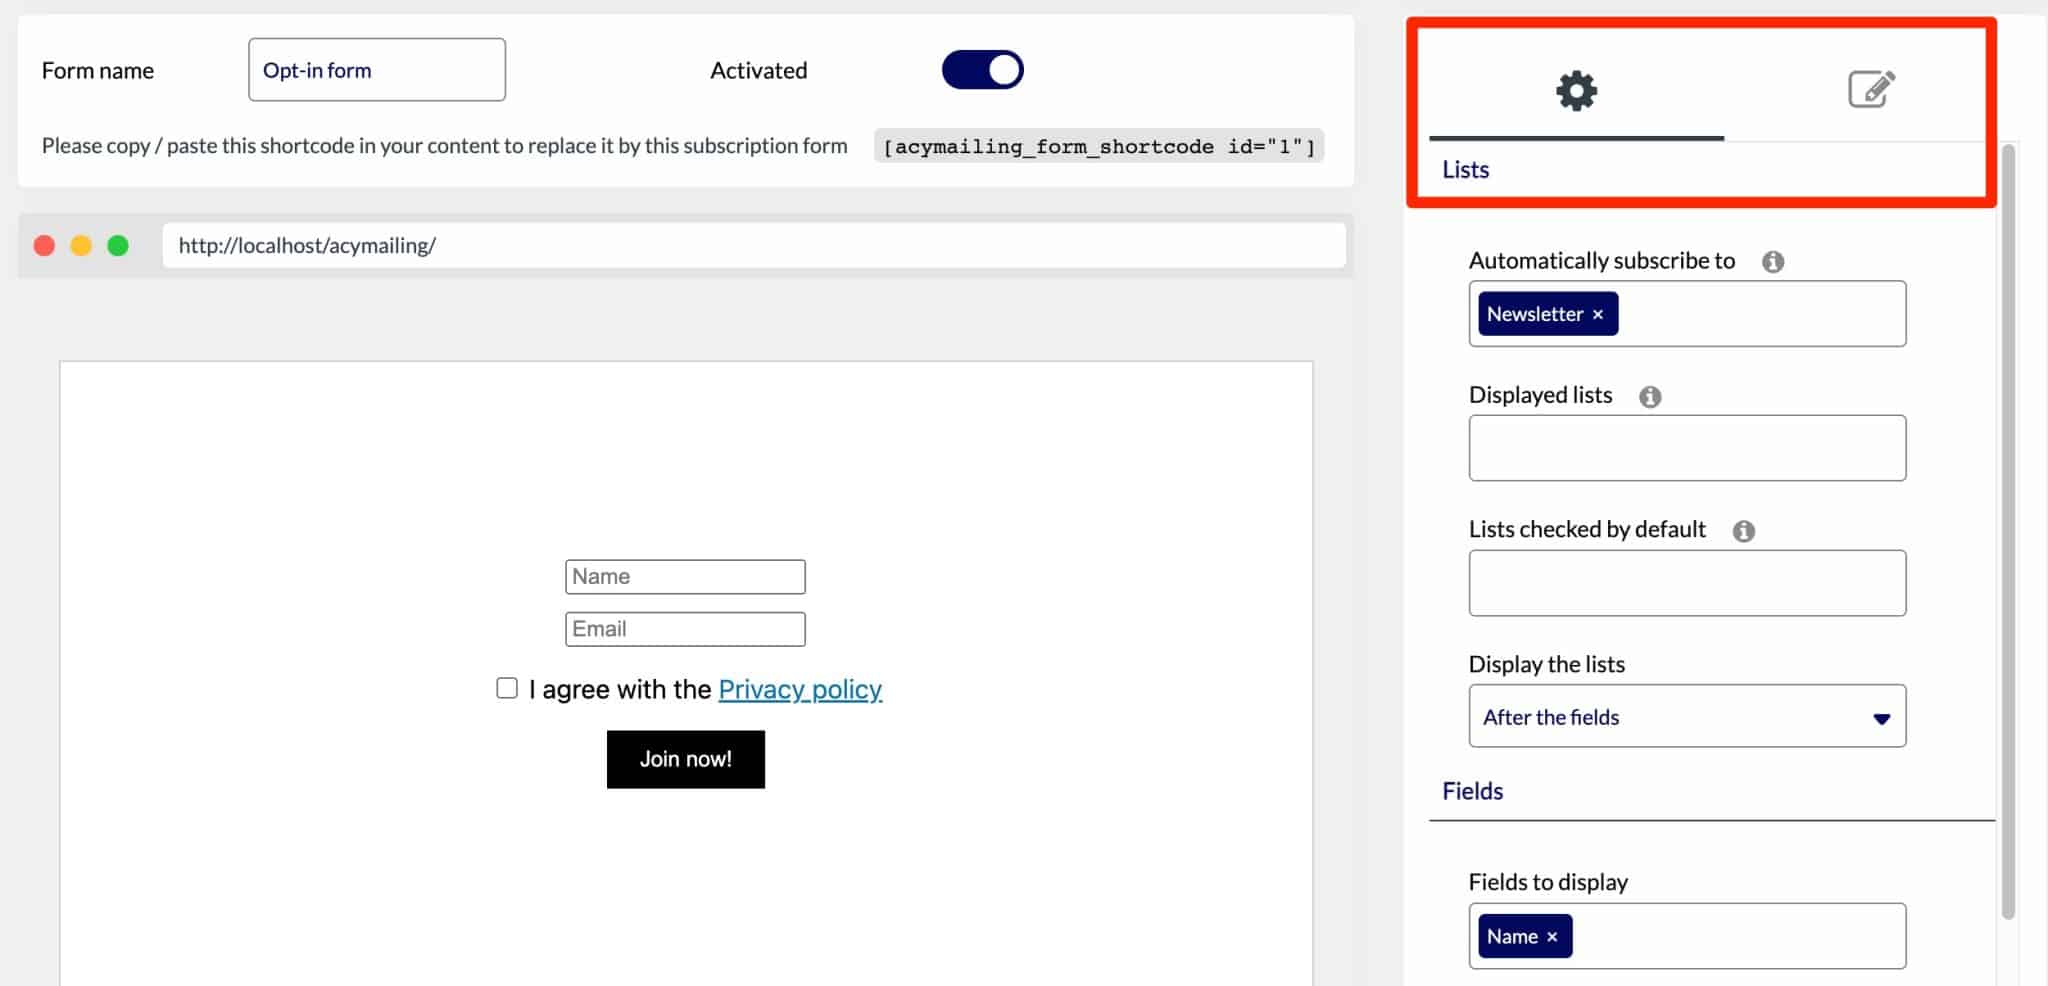
Configuring the fields and content of the AcyMailing form
For the content of the form, AcyMailing asks you to:
- Choose a list to which your subscription form will be linked. This is the “Automatically subscribed to” field. In our example, we are linking it to our list already created, called “Newsletter.”
- Select the fields to be displayed. You can choose “Name,” which adds the fields “Name” and “Email” to your form, as well as “Language,” which allows the future subscriber to choose his language. You can also choose to display the field label inside or outside.
- Link your form to your Privacy Policy page. This results in a checkbox for the user to give their consent to leave their email.
- Finally, you can redirect the person who has just left their contact information to the page of your choice, while displaying a personalized message (e.g. “Thank you for subscribing!”).

Customize the visual appearance
In a second step, you can change the visual appearance of your form. First, you can customize the size of the form, as well as the background and text color.
Next, you can change the text of the subscription button, its color (background and text), and the type and size of the border.
When you are finished, click on “Save and Exit.”
Integrate the form
The last step is to integrate the form into your content. Here I show you how to add it to the end of an article. This is a good way to add a call to action to encourage your visitors to subscribe to your list.
Start by copying the shortcode associated with the form you just created. You will find it in AcyMailing > Subscription Forms:


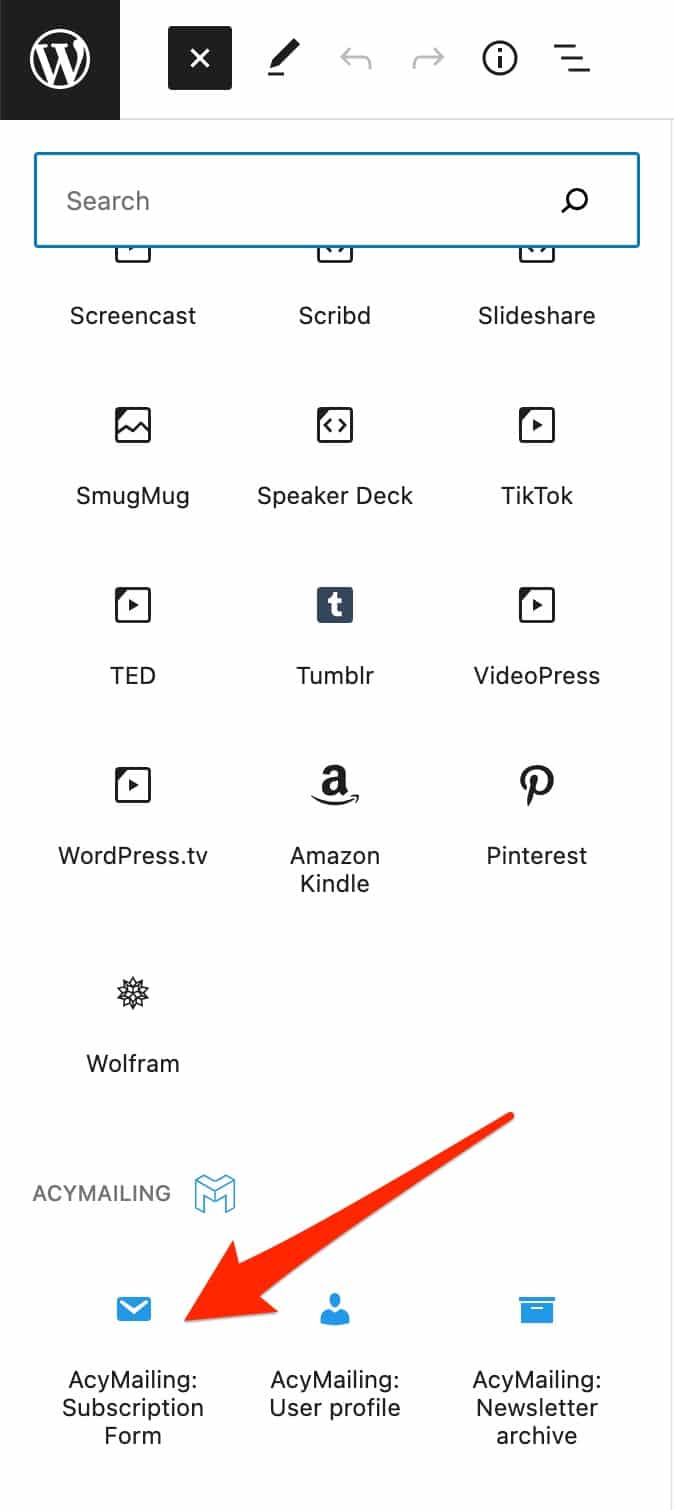
Select the item of your choice or create one for the occasion. When you are on the WordPress content editor, choose the “Shortcode” block, then paste the shortcode inside:

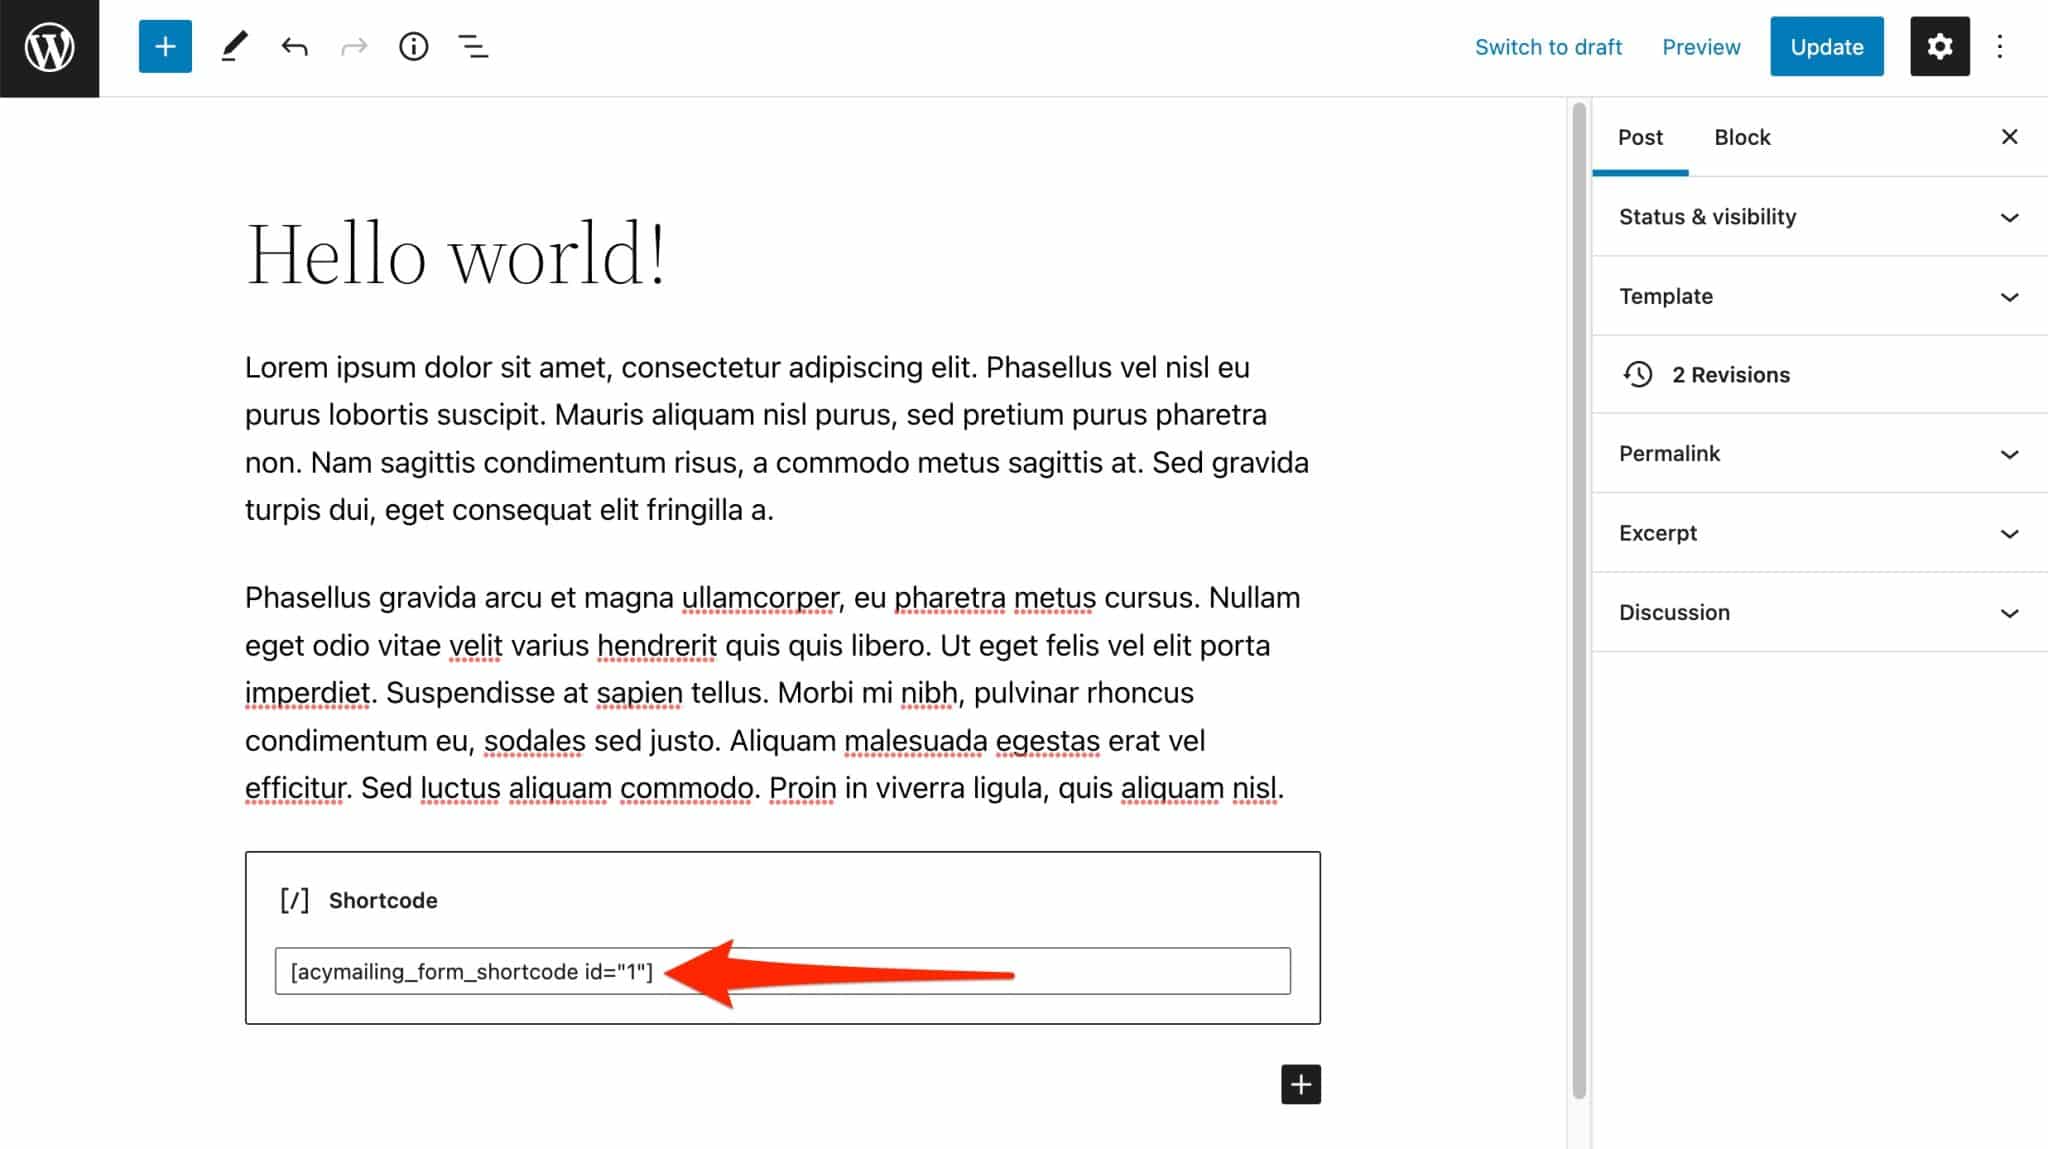
Click on “Update,” and see the result in the front-end, the visible interface of your site:

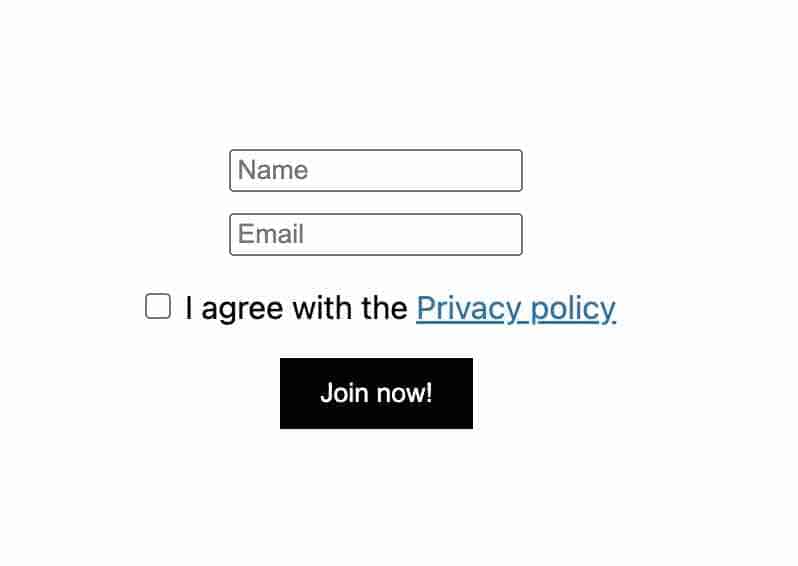
If you wish, you can also design a subscription form directly in an article or a page using the “AcyMailing: Subscription Form” block. However, you will not be able to modify its visual appearance (except by adding custom CSS).

In sum…
As with creating a list, the process of designing a subscription form is simple, intuitive, and quick. In just a few minutes, you’ll end up with an effective and functional form.
However, there are a few limitations to note:
- You only have two fields available (name and email). They are sufficient in most cases, it’s true. But for more specific needs, it is impossible to change the wording of your fields and the text related to the privacy policy without going through the code.
- Changing the visual aspect is interesting, but basic. You can’t add a custom background, for example.
- There are no ready-made templates. (This is not the case when you want to create a newsletter, a task that we will look at in the next section.)


How to create and send a newsletter with AcyMailing
Step 1: Choose the type of email to send
Your list is up and running. Your subscription form is well calibrated and integrated into your content. All you have to do is finish the job by creating your first newsletter.
To do so, click on “Create a new email” on your AcyMailing dashboard (you can also go through AcyMailing > Emails):


You will then have a choice of three types of emails to create:
- Classic campaign
- Welcome email
- Unsubscribe email
Here, I chose “Classic Campaign.” Please note that the process will be exactly the same if you want to design a welcome or unsubscribe email. Only the content will change, of course.

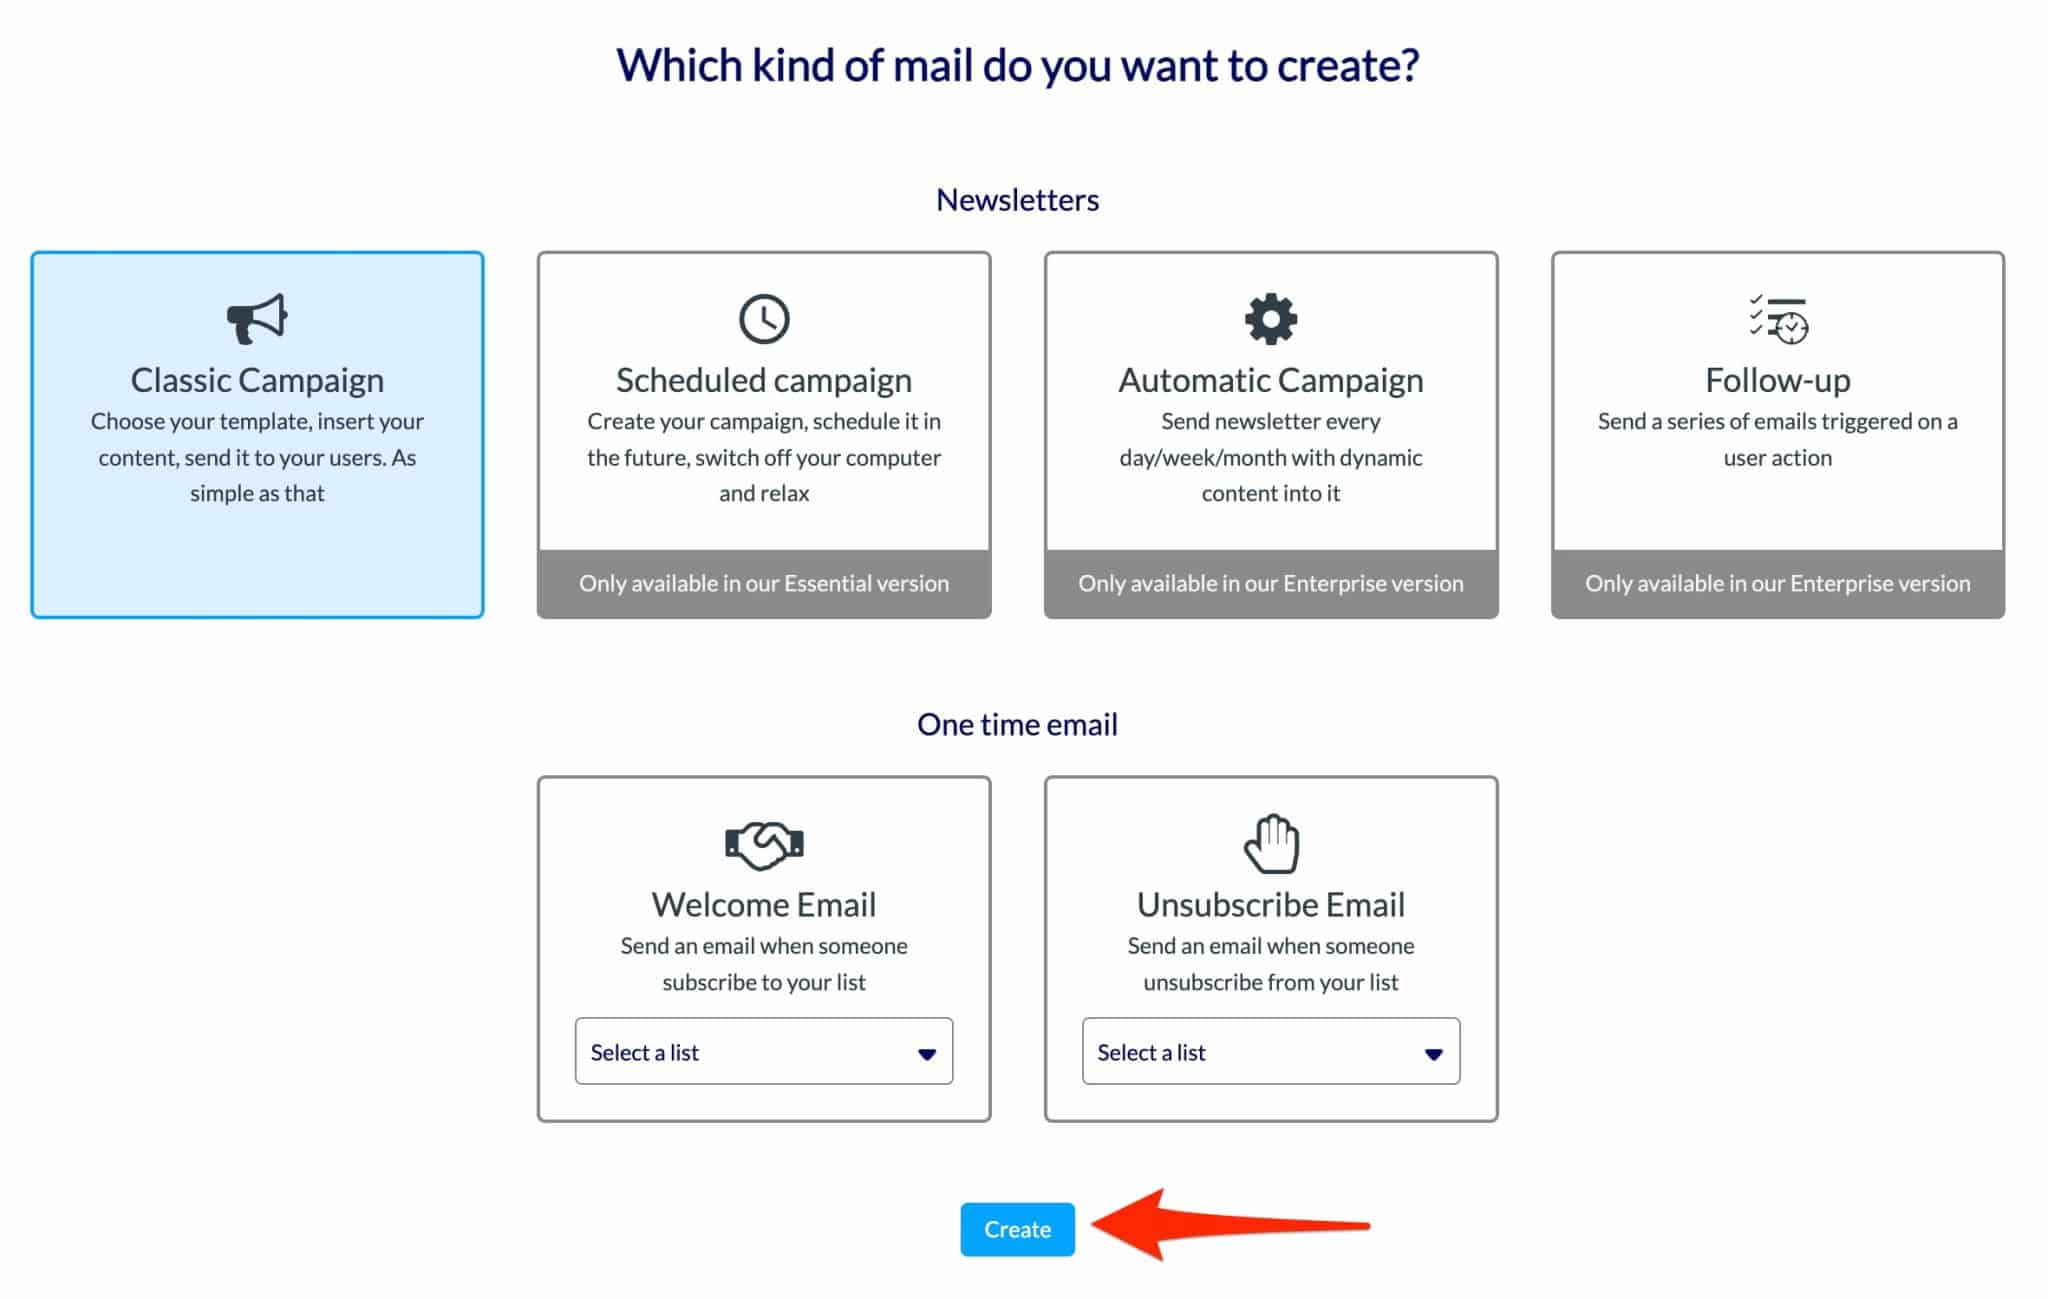
Click on the blue “Create” button to continue.
Step 2: Select an email template
In the next step, AcyMailing invites you to choose one of the eight email templates it offers. They are designed for several spheres to fit the typology of different businesses:
- Automotive
- Company
- Catering
- Events
- E-commerce
- Promotions
- Travel
You can also use the template suggested by the configuration wizard of the plugin. Finally, the last option: you can start from a blank template, if you wish. But the process will be more time consuming than with a premed template.

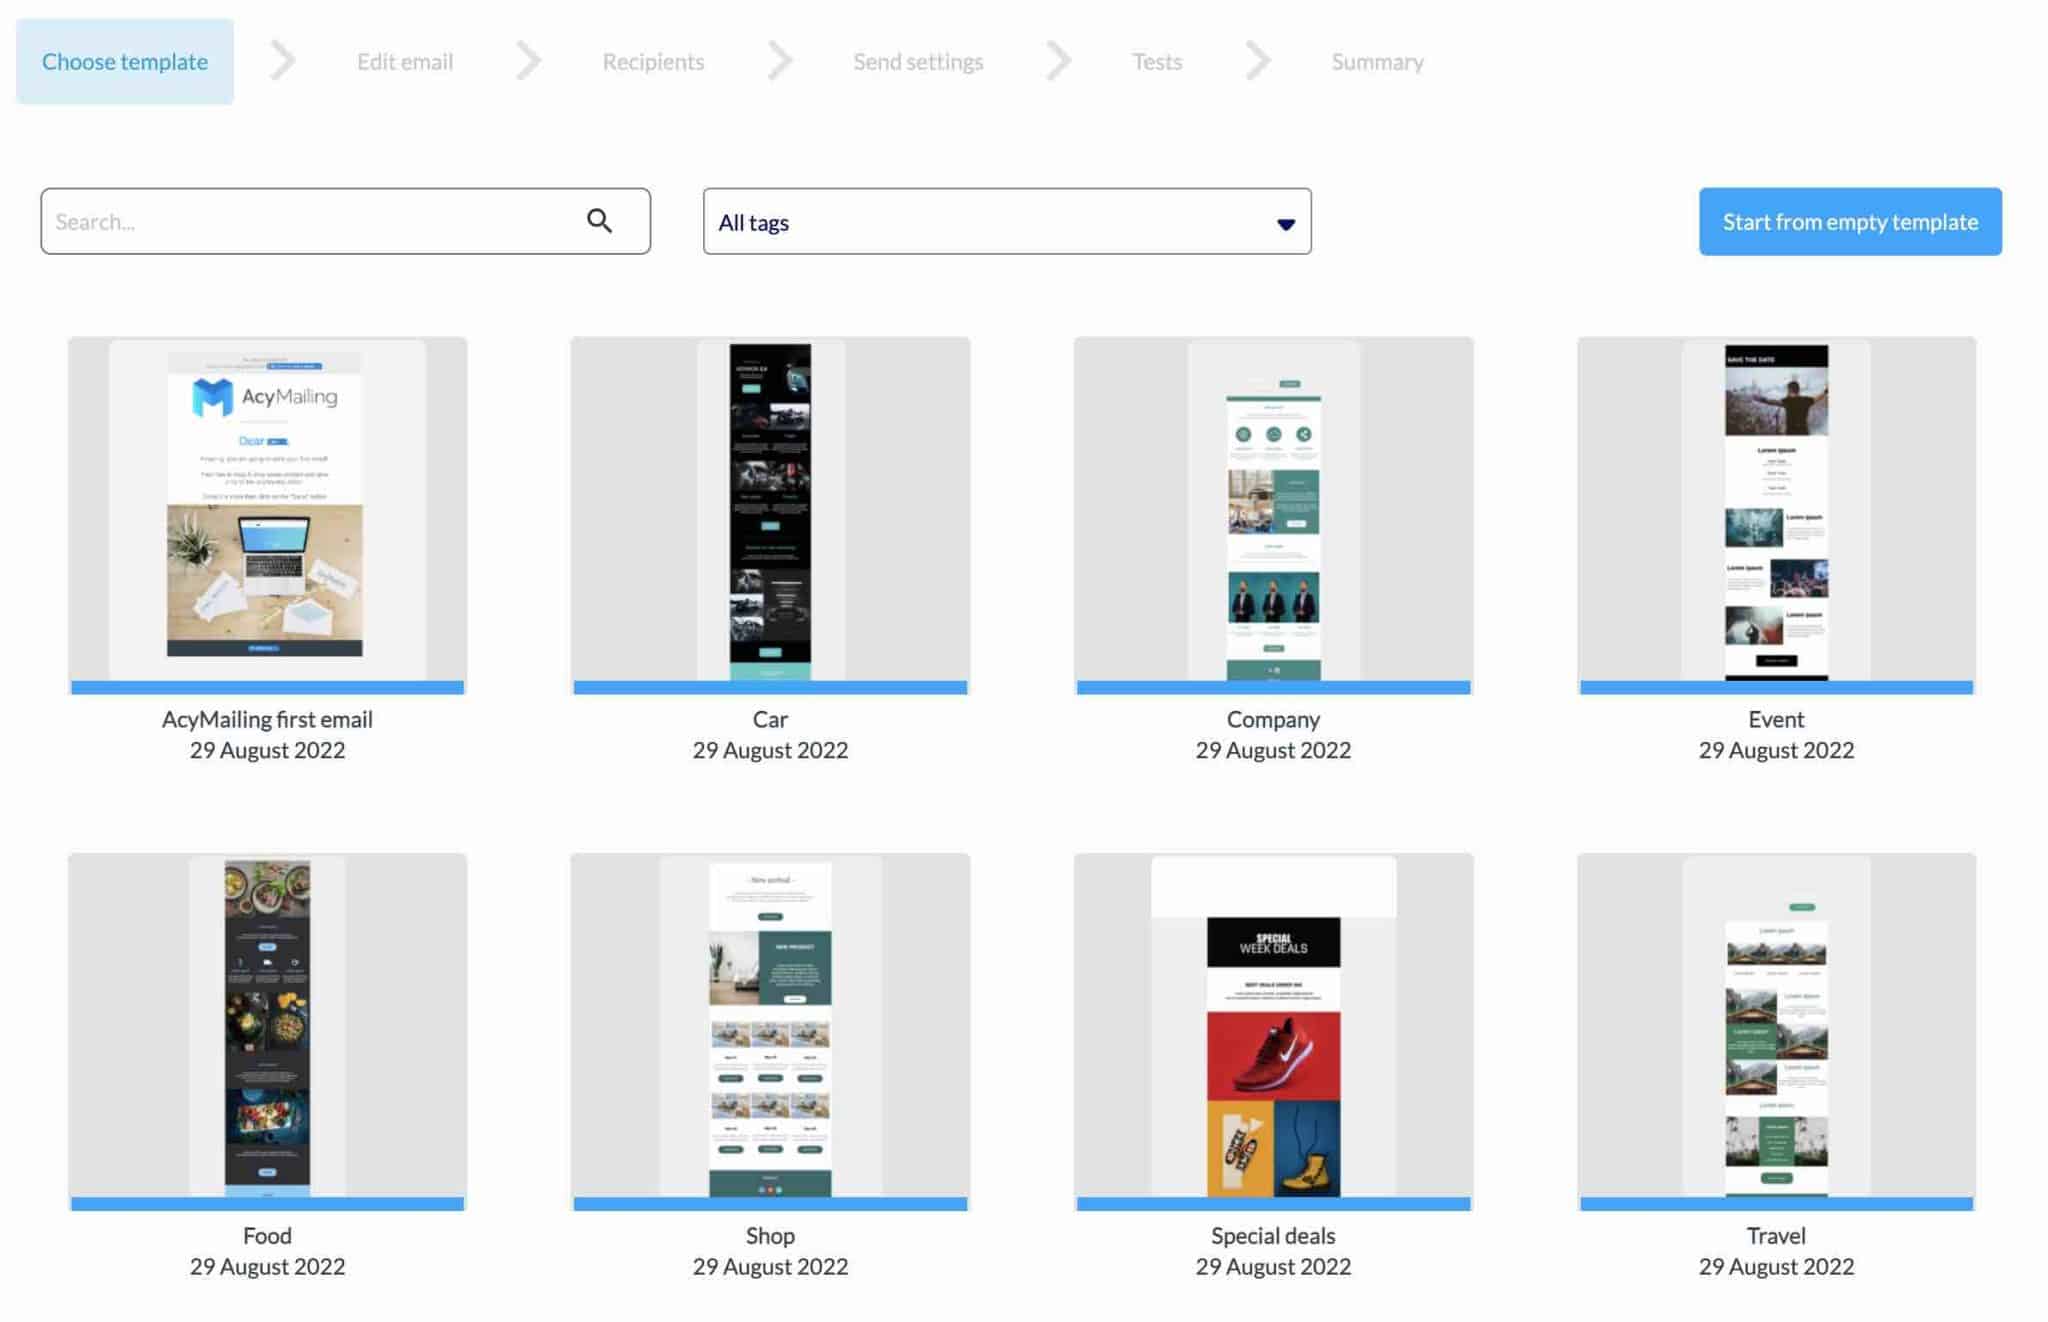
Click on the one of your choice to navigate to the drag and drop editor proposed by AcyMailing.
Step 3: Edit the email
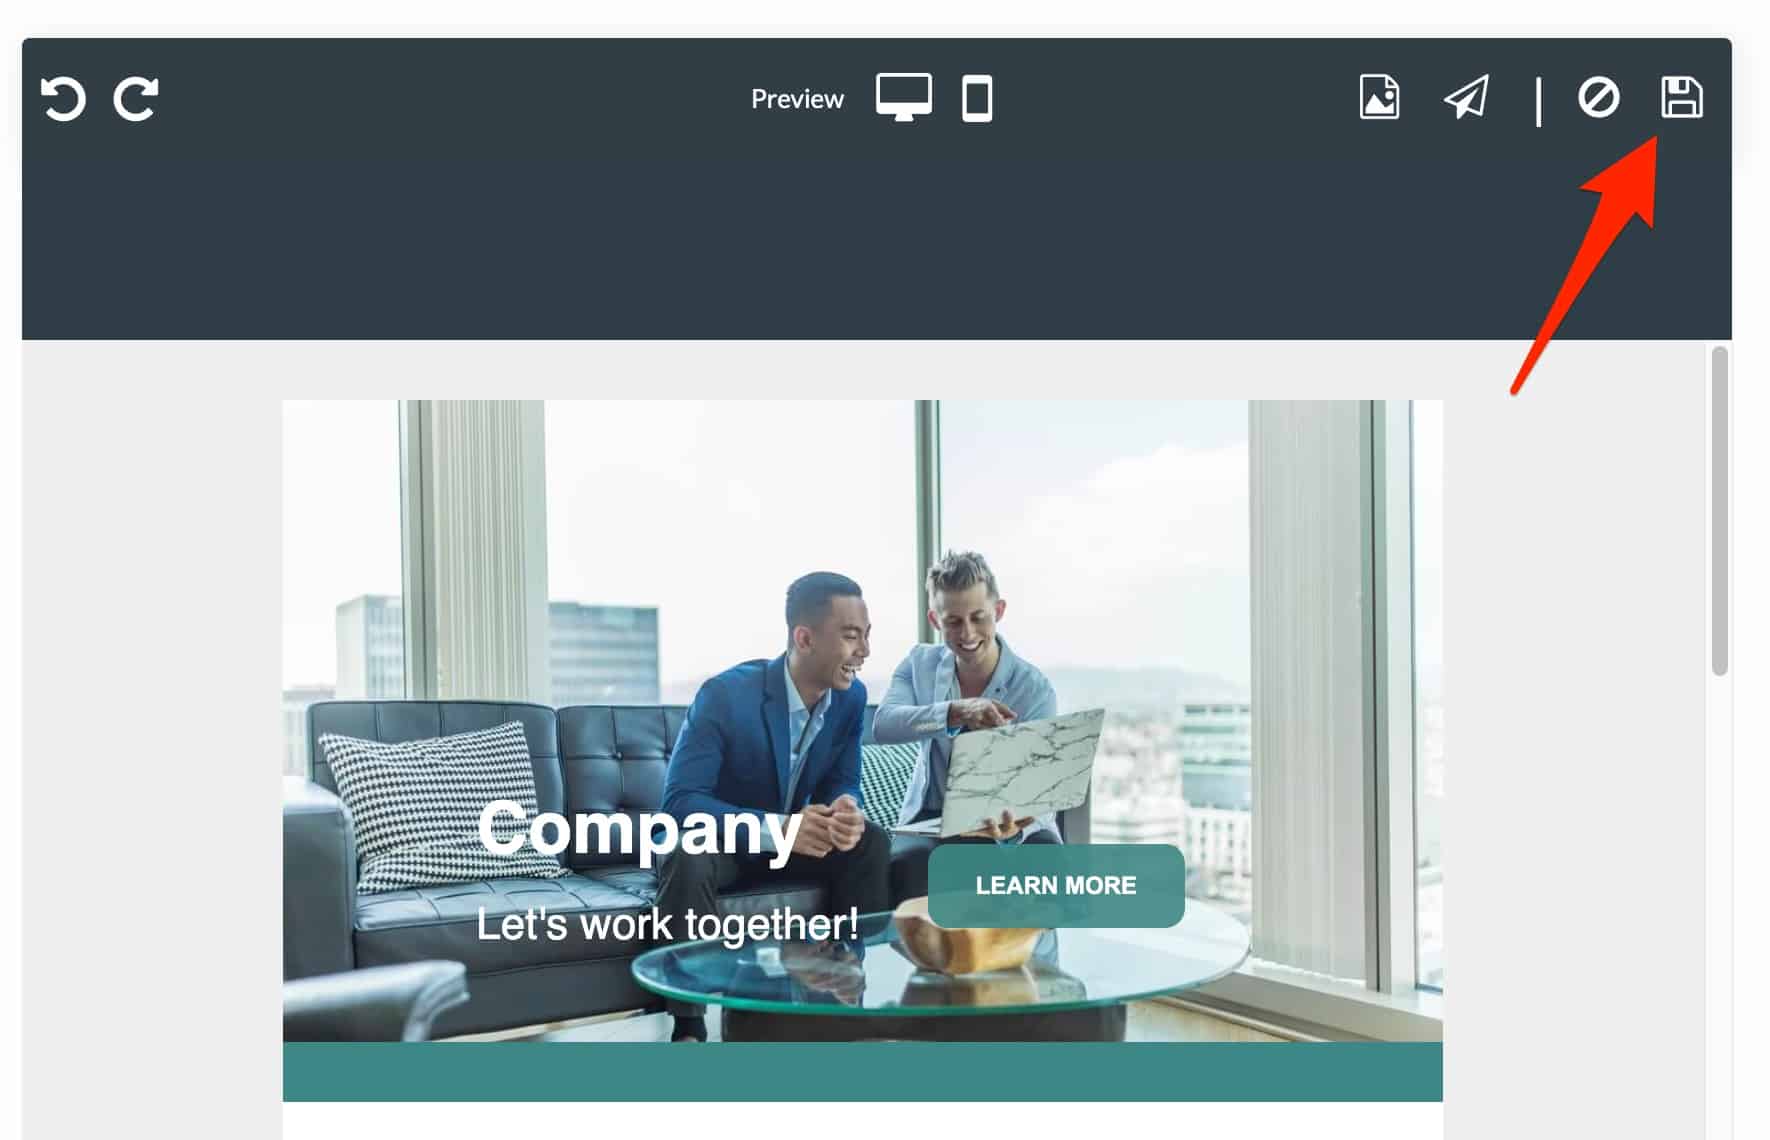
In the third step, get to work on personalizing your newsletter. By default, you will notice that the chosen template is written in English with fake text .
For a professional look, modify it with the editorial content of your choice. But before that, it might be better to modify its structure and aesthetics.
To do this, you can add one to four columns, called “Zones,” and fill them with blocks. As in the WordPress content editor (Gutenberg), blocks are containers in which you can add text, a title, a video, a button, an image, etc.
It works the same way as a page builder like Elementor. You choose the element you want to add, then you drag and drop it wherever you want it to go in the email.
All your blocks can be modified in real time, directly on the screen. For each of them, customization options appear (text size, color, etc.) as soon as you click on them.

Each block you create can be saved, just like the entire email template.
When you are done, click on the diskette to save your template.

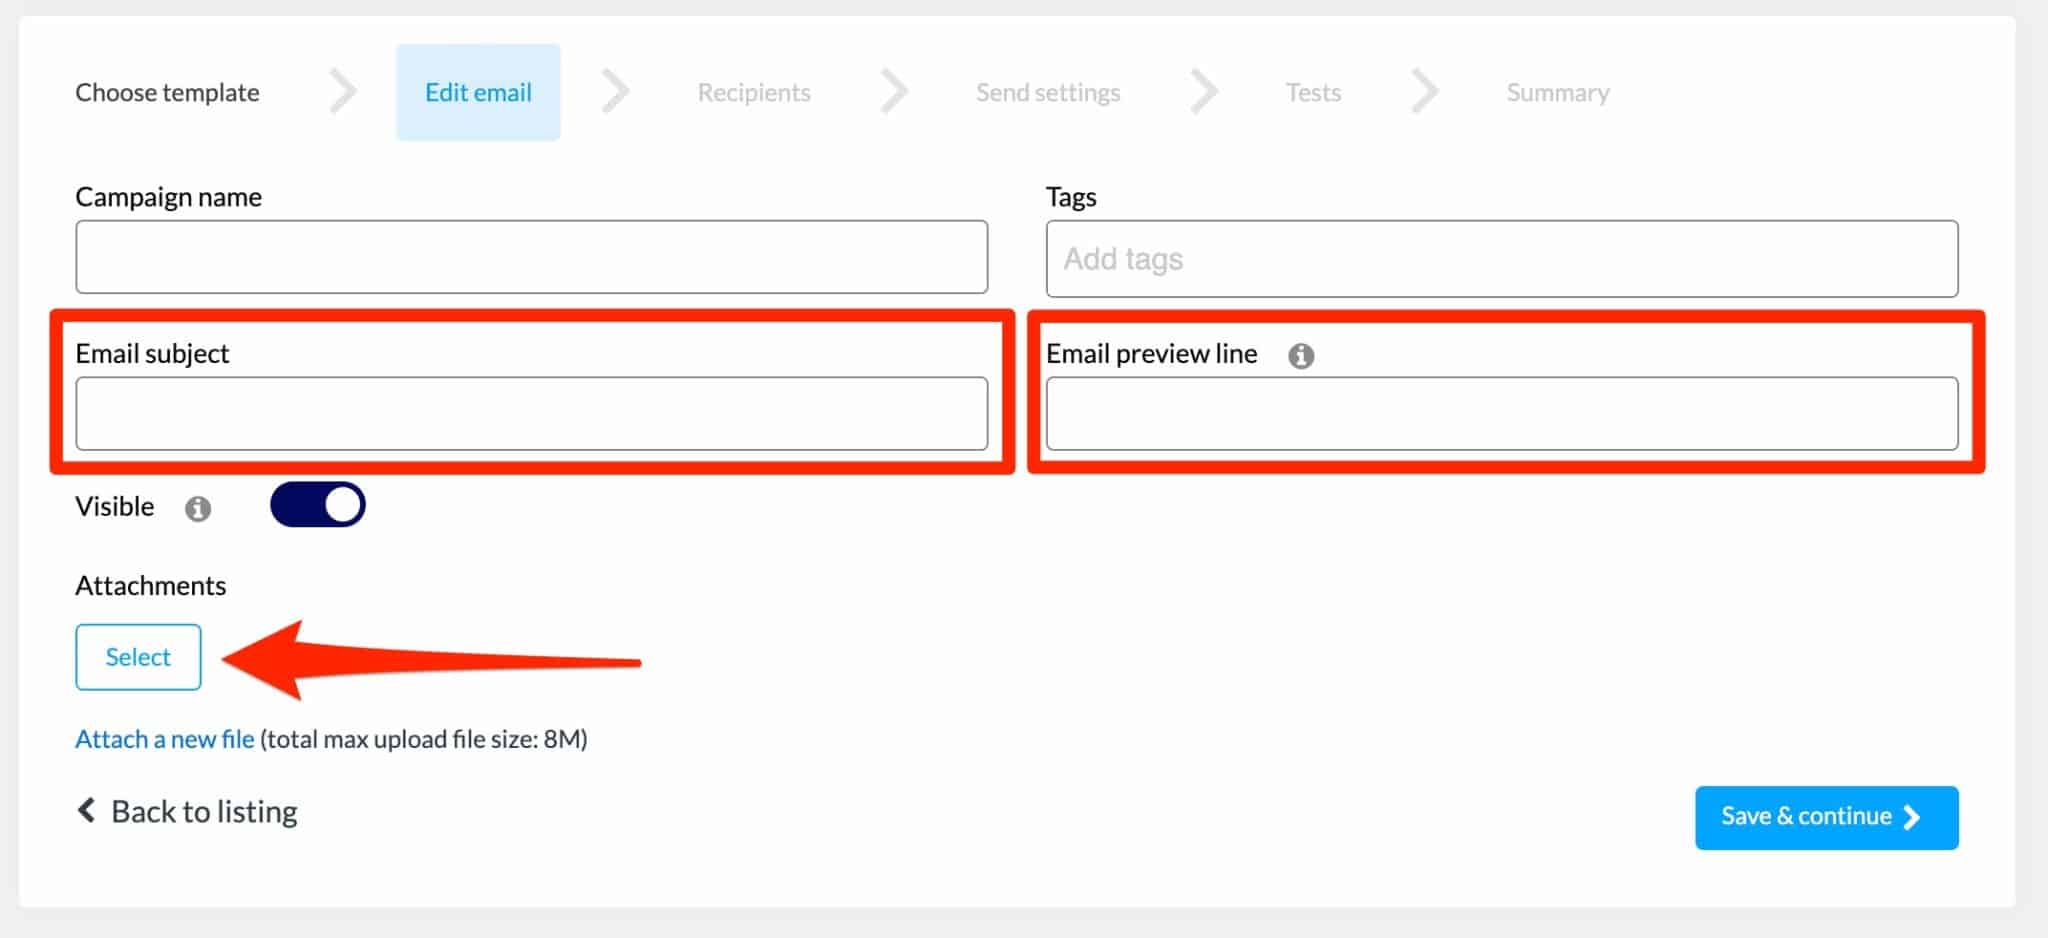
Continue by entering a subject line and a preview text. You also have the choice to add an attachment.

Step 4: Proceed to the sending settings
You are now at step four, which consists of fine-tuning the last details. Now choose the list to which you want to send your newsletter.
Then fill in information about the sender (you): name, email, etc. With the free version, you can’t choose the date and time you want to send the campaign; it will be sent immediately. You will not be able to schedule it.

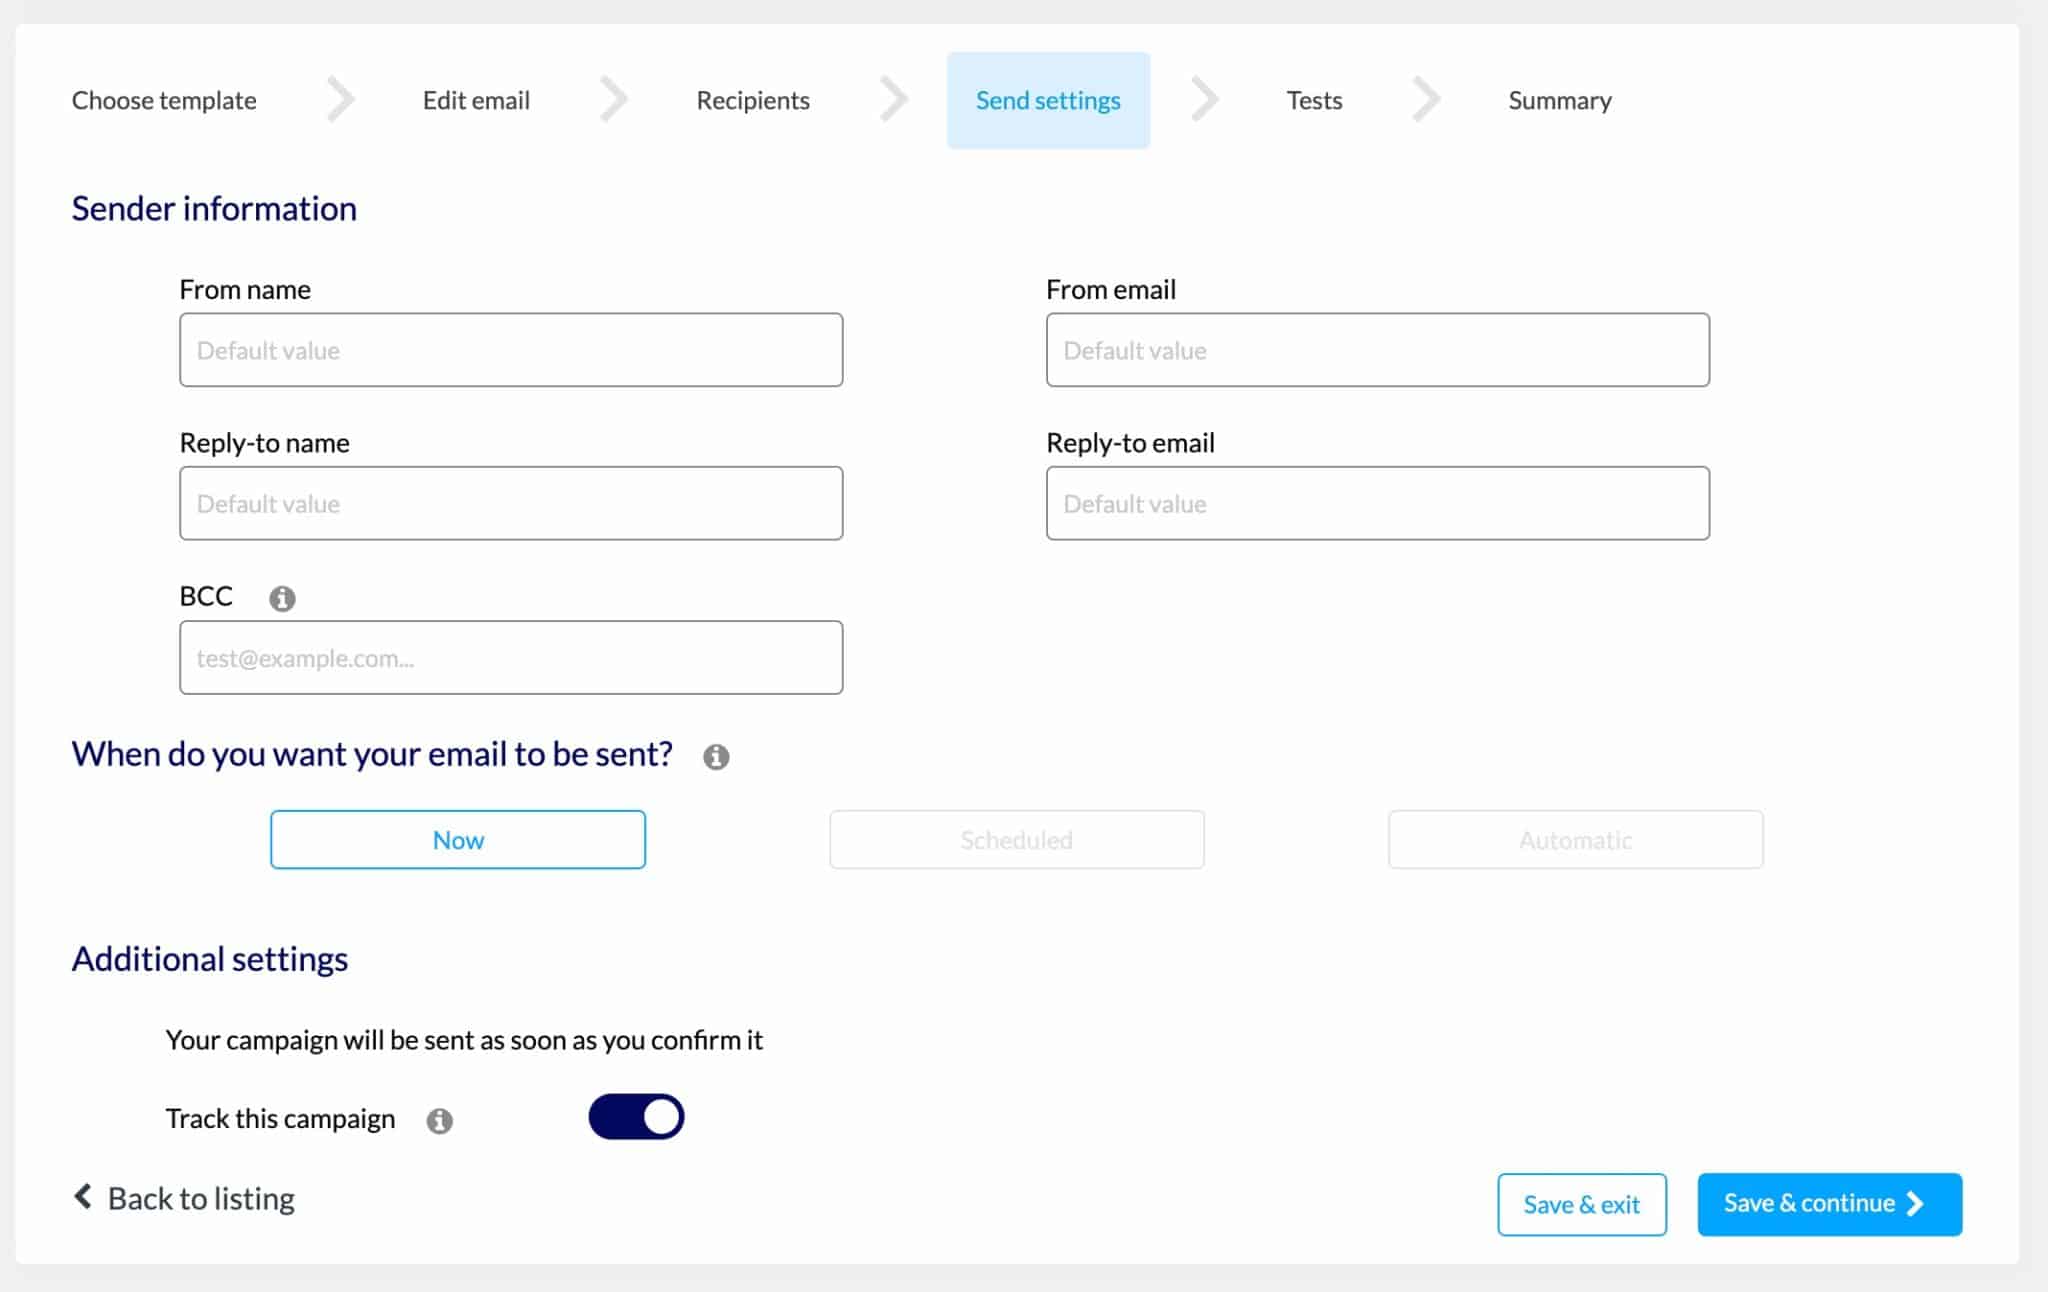
Finally, you can send a test email to the address of your choice to check that everything is displayed correctly.
By default, AcyMailing uses your host’s server to send your emails. This is not the most reliable and efficient solution if you have to send emails frequently. To overcome this problem, AcyMailing offers several email sending services to configure your sending method (Sendinblue, SendMail, SendGrid, Amazon SES). You can find the different options in AcyMailing > Configuration.
All set? Your first newsletter is ready to be launched, congratulations! To keep track of the newsletters sent, you can then explore two submenus:
- AcyMailing > Statistics shows you data on the percentage of emails delivered, the open rate, click rate, and bounce rate.
- AcyMailing > Subscribers lists all the subscribers to your list, with a case-by-case view on each person (open rate, click rate, list membership, etc.).
All the options discussed so far are available for free. If you are already a skilled marketer or if you simply want to benefit from more extended options, discover below what the premium version of AcyMailing can offer you.
Collecting email addresses, via a registration form, implies respecting the GDPR regulation. AcyMailing already provides several options/settings to be in compliance, like the box you can add to an opt-in form so that a user can freely give his consent when he wants to subscribe to your email list. You also have control over the management and deletion of your users’ data (in Configuration > Data Collection).
To adhere to best practices in terms of GDPR, do not hesitate to consult
our dedicated resource on the WPMarmite blog.
Finally, the best thing to do is to get in touch with a specialist in the field, if you have any doubt.
What does the Pro version of AcyMailing offer?
Plan and dynamize the sending of your emails
With AcyMailing Free, the free version of the plugin, no automatic action is allowed. The pro offer allows you to schedule the automatic sending of your newsletters at the date and time of your choice.
In addition, you can also:
- Send a series of emails when a subscriber performs a specific action (click on a specific location, purchase a product, etc.).
- Send a newsletter every day/week/month with dynamic content.
- Send cart reminder emails if you have a WooCommerce store.
Moreover, you can segment your list according to different criteria: age of your subscribers, behavior, occupations, etc.
Add custom fields
By default, the free version offers only two types of fields: “Name” and “Language.”
With the Enterprise version of AcyMailing, you can add custom fields to your subscription forms by displaying the text of your choice, in order to collect additional information about your future subscribers.
A drop-down menu also offers pre-designed fields allowing, for example, to display radio buttons, a checkbox, a file to be attached, etc.

Boost your subscription forms
For your subscription forms, the AcyMailing premium offer allows you to display them in a pop-up window that will appear under certain conditions.
You can, for example, define a delay (in seconds) from which your window will appear, or trigger its display when the user has scrolled X% on the page.

Note also that from the “Essential” offer of AcyMailing, you benefit from a captcha protection as soon as a user wants to subscribe to your list.
Customize automatic emails from WordPress (and WooCommerce)
Already, WordPress sends generic emails for specific actions (e.g. password reset, new user registration).
The problem is that they are not customizable by default (except through the code). You have to make do with what is offered.
With AcyMailing’s “Email overload” menu, forget about this problem. You can now modify a dozen default emails using the plugin’s editor, by drag and drop.
All texts are editable — including those of the default WooCommerce emails — and you can make the email of your choice active/inactive with a single click.


Manage bounces
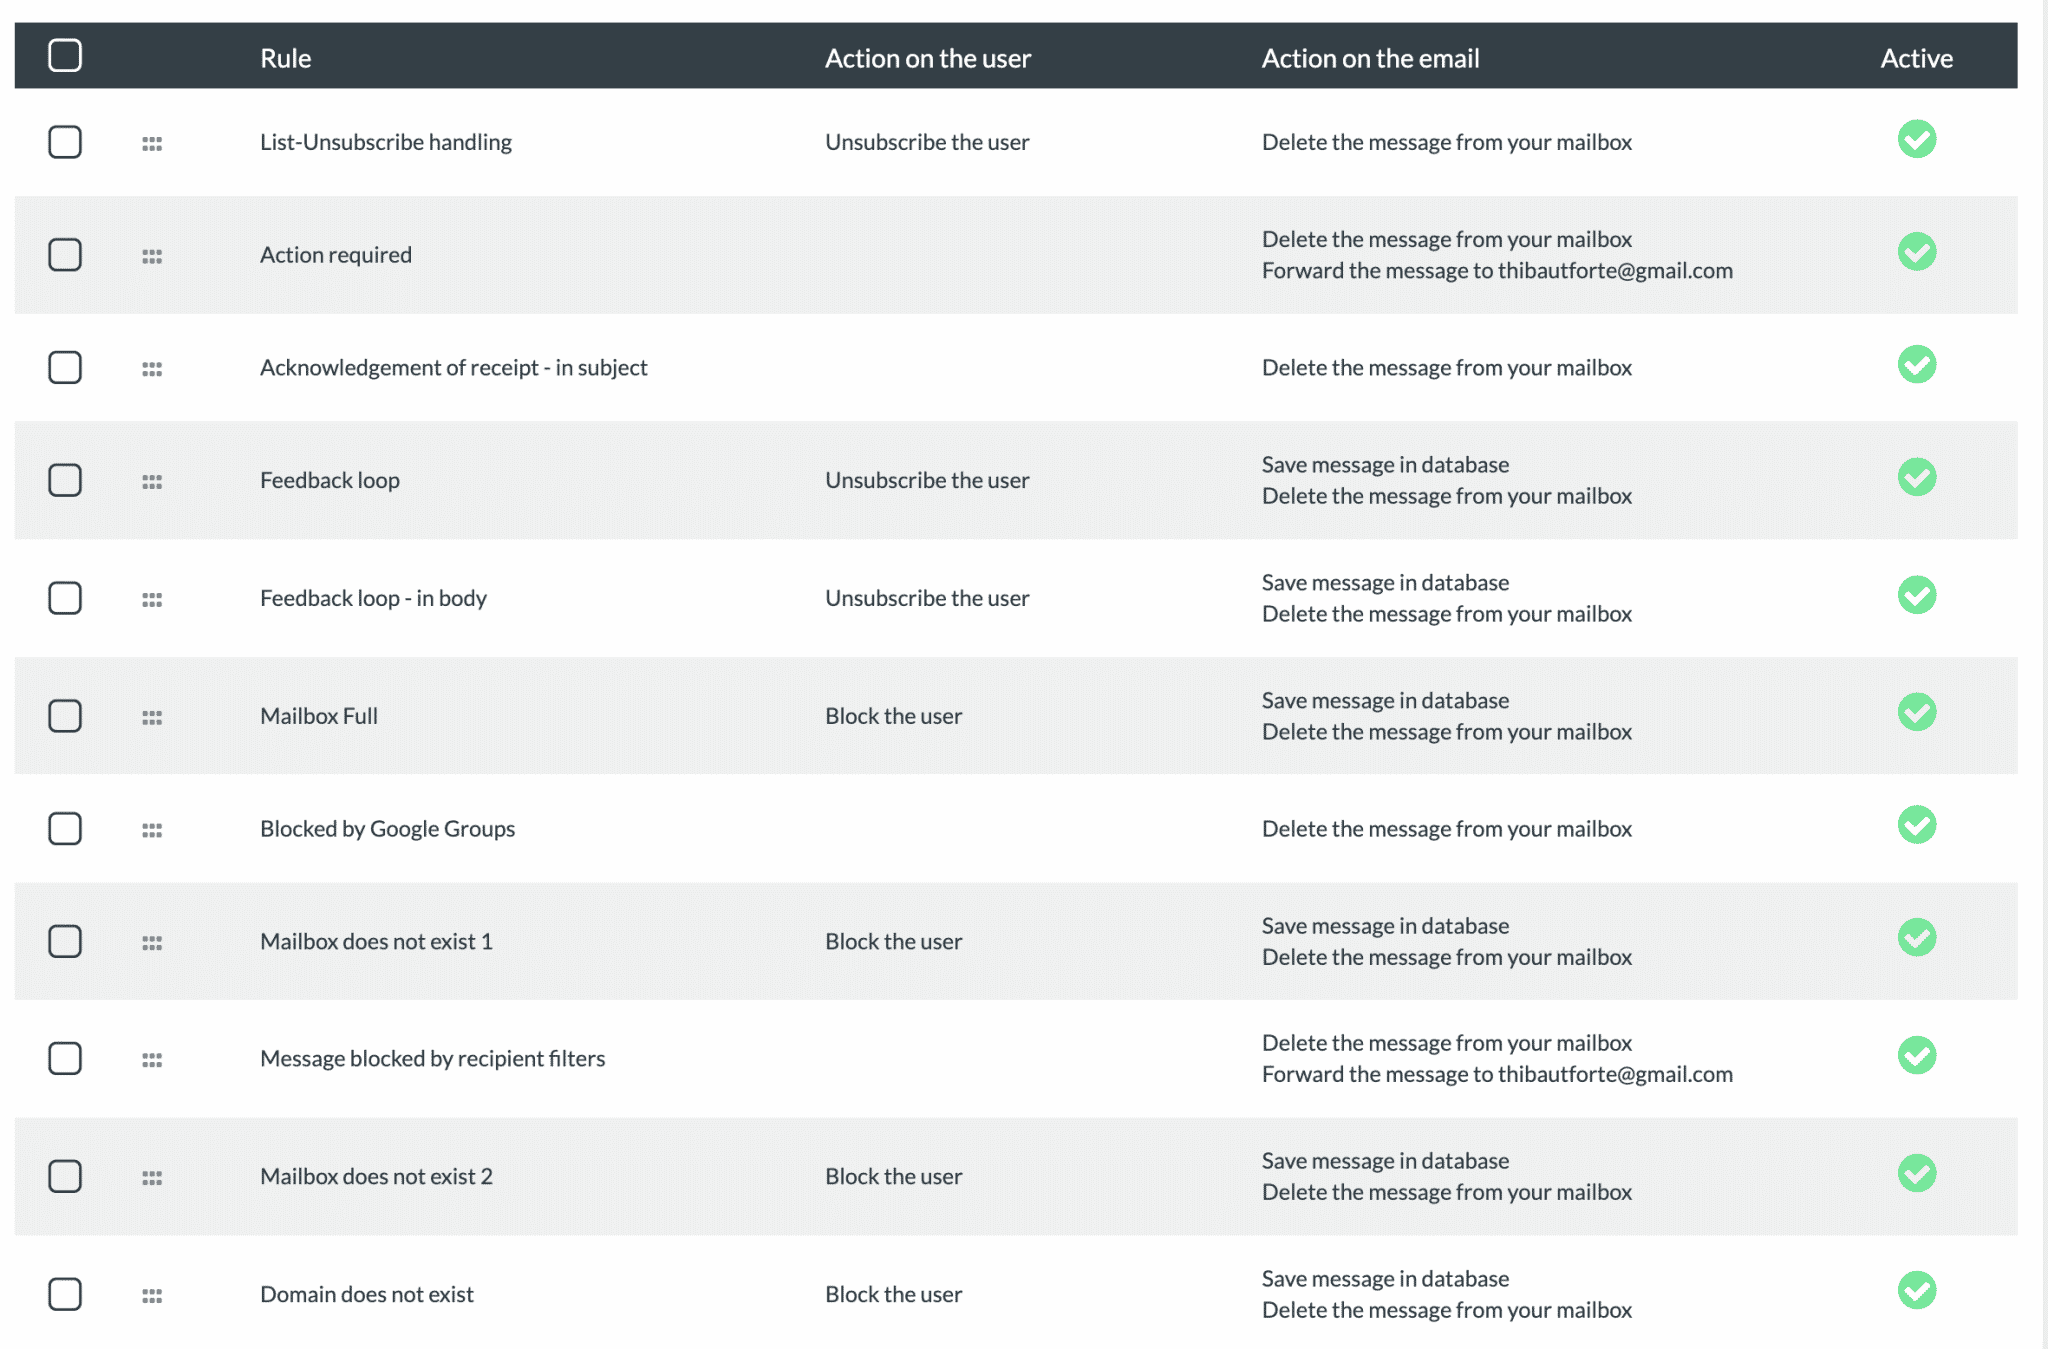
In premium — with the “Enterprise” license — AcyMailing is able to manage all “bounces,” i.e. emails sent to addresses that do not exist or no longer exist.
The plugin can then automatically delete, block, or unsubscribe the confirmed user, if you specify it beforehand (via the AcyMailing > Bounces management menu):

Manage the sending of your emails more closely
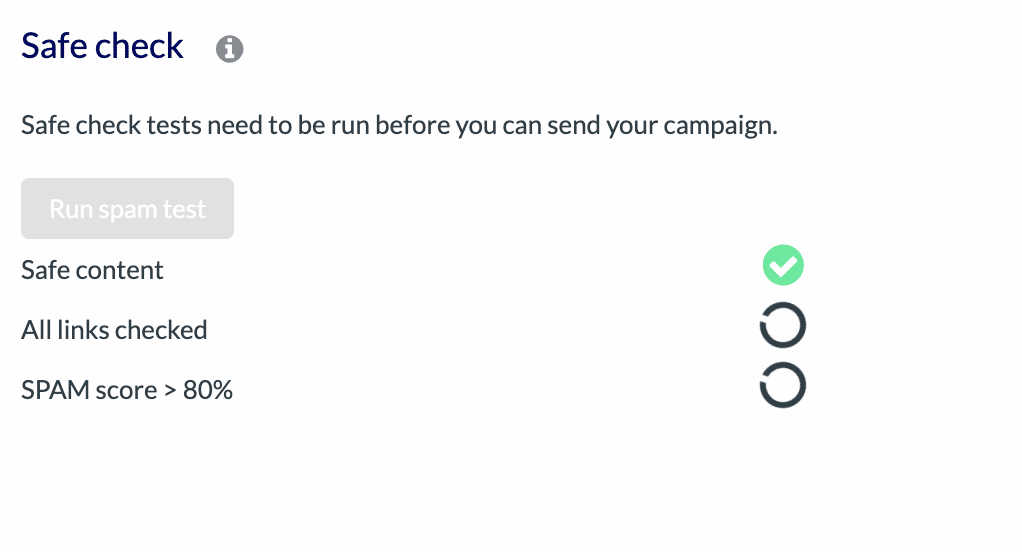
With the “Enterprise” license, you can conduct a security check before sending an email.
Specifically, AcyMailing checks your links and your content and determines if your newsletter can be considered as spam or not. According to the score you have been given, you can modify your email before sending.

To use all the features of this plugin, you will have to pay. Let’s figure out how much it will cost you.
How much does AcyMailing cost?
The AcyMailing plugin is initially available for free. You can either download it from the official directory or activate it directly from your WordPress dashboard.
As a reminder, it does not limit you on the number of emails you can send and the number of users that can subscribe to your list. It has enough basic functionality to start a newsletter at no cost.
So this is the solution I recommend first to test the waters and get your hands dirty.
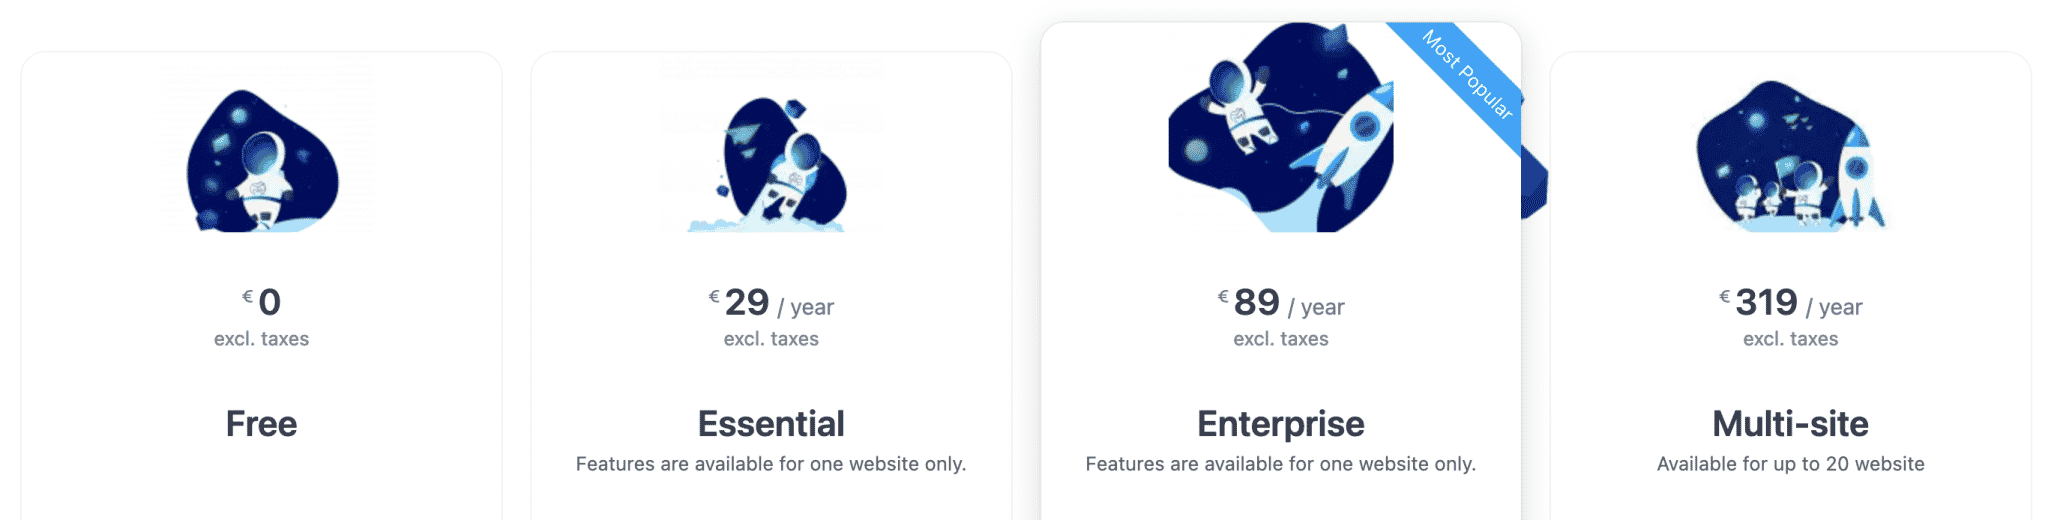
If you are already familiar with the world of email marketing and need more advanced features (automations, conditional emailing, custom fields, bounce management, etc.), you can opt for one of the three premium licenses:
- “Essential,” from $29/year for use on one site
- “Enterprise,” from $88/year for use on one site
- “Multi-site,” from $315/year for use on up to 20 sites

The choice of license depends on two main factors:
- The number of sites on which you want to use AcyMailing. If you intend to activate it on more than one site (e.g. on your customers’ sites), only the “Multi-site” license will be suitable.
- The features you want to use. If the “Essential” license is the most affordable, it is also the one with the least options. To benefit from all the premium options of AcyMailing, you will need to purchase at least the “Enterprise” license.
Compared to the free version, the “Essential” license allows you to send your newsletters automatically and to schedule them, while taking advantage of advanced statistics and captcha protection for your subscription forms.
You now have an overview of the possibilities offered by the AcyMailing newsletter plugin. It’s time to conclude with a little recap of everything you’ve devoured.
Our final assessment of AcyMailing
Strong points
- The ease of use and the intuitiveness of the interface, with an efficient drag-and-drop editor.
- The ability to create and send newsletters without leaving your WordPress interface.
- Extended functionality from the free version.
- No limit on the number of emails and subscribers to your list, starting with the free version.
- The presence of modules (in AcyMailing > Modules) to take advantage of additional options (e.g. adding an article or a page to your emails) and facilitate integration with several key plugins (WooCommerce, Contact Form 7, Gravity Forms, etc.).

- Frequent updates of the plugin. The AcyMailing team strives to keep its plugin evolving by responding to the feedback of its users. For example, Alexandre, the plugin’s project manager, told us that his team was developing its own email sending system (as MailPoet, one of its competitors, already does). A feature to run A/B tests should also be available by the end of 2022.
- The attractive price of the premium version: You can already benefit from extended functionalities for only $29/year.
- The automation and conditional sending features.
- The support, which is responsive.
- All the documents related to the support are well put together, especially the documentation and the forum. On the other hand, we can regret that they are only in English (even if it’s understandable, the audience of the plugin is international)!
Areas for improvement
- For the moment, AcyMailing does not have the option to send emails with its own servers. This should be a thing of the past by the end of 2022.
- The number of templates to customize a newsletter is a bit scarce: Less than ten, both in the free and premium versions. It’s a pity that there are no templates to design more attractive subscription forms. You’ll probably have to use a little CSS to make them fit your graphic charter (unless you’re not very particular about that).
- It’s a pity that the “Enterprise” offer can only be used on one site at most. If you have several client sites on which you intend to activate AcyMailing, you’ll have no other option than to pay $315/year to use the plugin.
Who can benefit from AcyMailing?
From my point of view, AcyMailing is a very intriguing plugin. I was pleasantly surprised by the quality of its interface and the multiplicity of its options.
I think that it can suit all types of profiles. It will be particularly useful for beginners who want to create and send a newsletter from their WordPress interface, without getting lost in endless settings.
Its free, complete version will allow you to start building your list and sending your first emails.
If you’re a more experienced marketer, the premium version will likely be necessary. You will appreciate the automation features, the custom fields, and other advanced statistics.
On the other hand, it might seem a bit light compared to the behemoths dedicated to email marketing like ActiveCampaign or Mailchimp.
It all depends on where you place the cursor of your needs. Not to mention that ActiveCampaign and Mailchimp, to name but two, are used on their own interface (outside WordPress), which can be a inconvenience for you.
With AcyMailing, you don’t have to leave WordPress, which is quite convenient.
For you, what do you think? If you use AcyMailing, what has your experience been?