

Just imagine. You are the head of a martial arts school or a soccer club.
Now, let me ask you a question: how would you communicate with your members about upcoming events or tournaments in a simple way on your WordPress site?


The answer is: by using The Events Calendar plugin, a very popular event management solution for WordPress.
In this tutorial, we will focus on the free version of The Events Calendar. Our goal is to show you how to create your first event, adjust the settings and promote that event to your prospects and customers.
Now let’s get started!
Overview
- What is The Events Calendar?
- How to create your first event with The Events Calendar?
- How to view your event?
- How to add categories to an event?
- How to set up your event?
- What are the recommended settings?
- How to promote your event?
- What add-ons does The Events Calendar offer?
- Our final review of The Events Calendar
Originally written in December 2019, this post was last updated in July 2022.


What is The Events Calendar?

The Events Calendar is a free plugin that allows you to create and manage physical or virtual events via a calendar, directly on your WordPress site. Thanks to this, your visitors can subscribe to them.
The Events Calendar is a basic, active on more than 700K+ active installations, on which you can aggregate other plugins (free or paid) that will allow you, for example, to sell tickets related to your event.
The plugin has a premium version, called The Events Calendar Pro. Available from $99 for use on 1 site, it offers additional features such as:
- Recurring events
- More view types
- Advanced widgets
- Shortcodes
- Additional fields, etc.
Launched in 2009 by Modern Tribe, The Events Calendar is the most popular plugin on the official directory for creating events. Extensible, easy to use and fully customizable, it has reportedly already created over a billion events!
Generally speaking, The Events Calendar is a product integrated into the StellarWP brand since December 2020. The latter hosts all the WordPress software, products and services acquired by the Liquid Web hosting company, such as iThemes Security.
Now that you know a bit more about this flagship plugin, see how to launch your first event with it.
How to create your first event with The Events Calendar?
Step 1: Install and enable the plugin
To begin with, install the plugin on your admin interface. To do so, go to Plugins > Add New.
In the search bar, type “The Events Calendar”. Click on the “Install Now” button and don’t forget to activate the plugin right after:

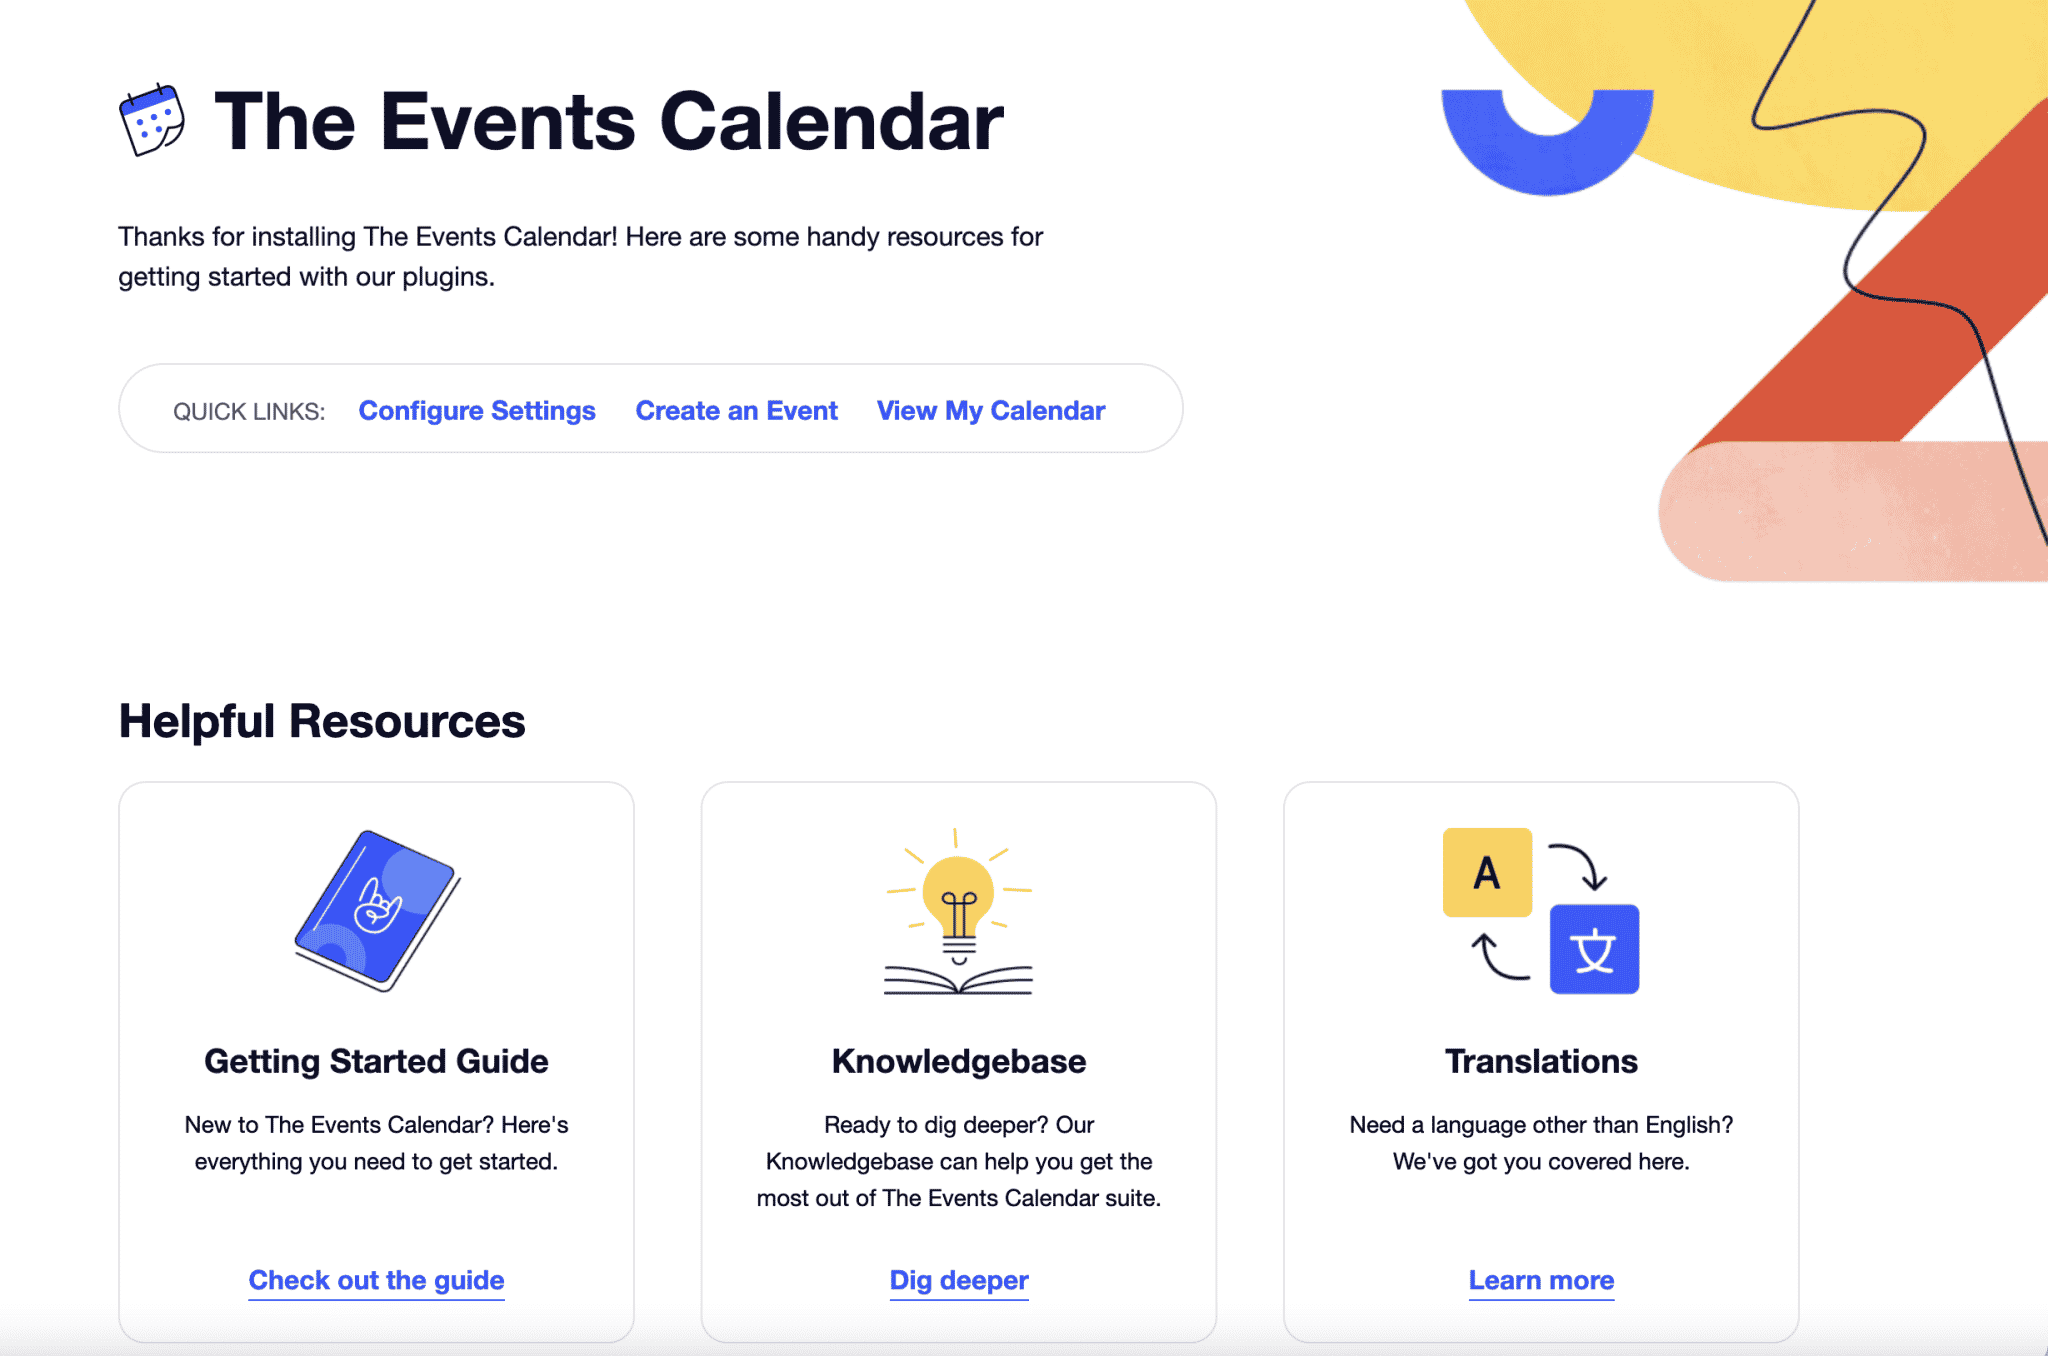
Once done, The Events Calendar offers several resources to make it easier to use:
- A Getting Started Guide
- A Knowledgebase
- A translation tool
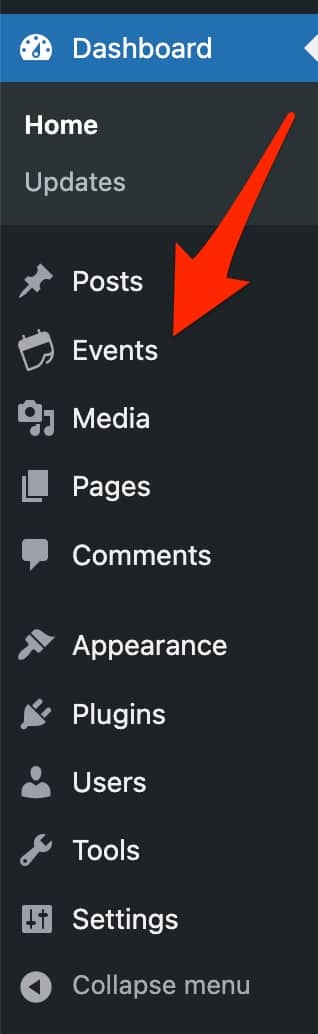
In addition, you will notice a new menu called “Events” in the left-hand sidebar of your WordPress admin.

Step 2: Add a new event
To create a new event, click on the “Add New” link in this menu.
By default, you will find that the plugin uses the classic WordPress editor (TinyMCE) for the user interface. Since WordPress has been using a block-based content editor (Gutenberg) by default since 2018, we will enable this editor to complete this tutorial.
To do the same at home, check the “Activate Block Editor for Events” box in the menu under Events Settings > General.
Then, add the title of your event at the top of the page and enter a description in the box below.
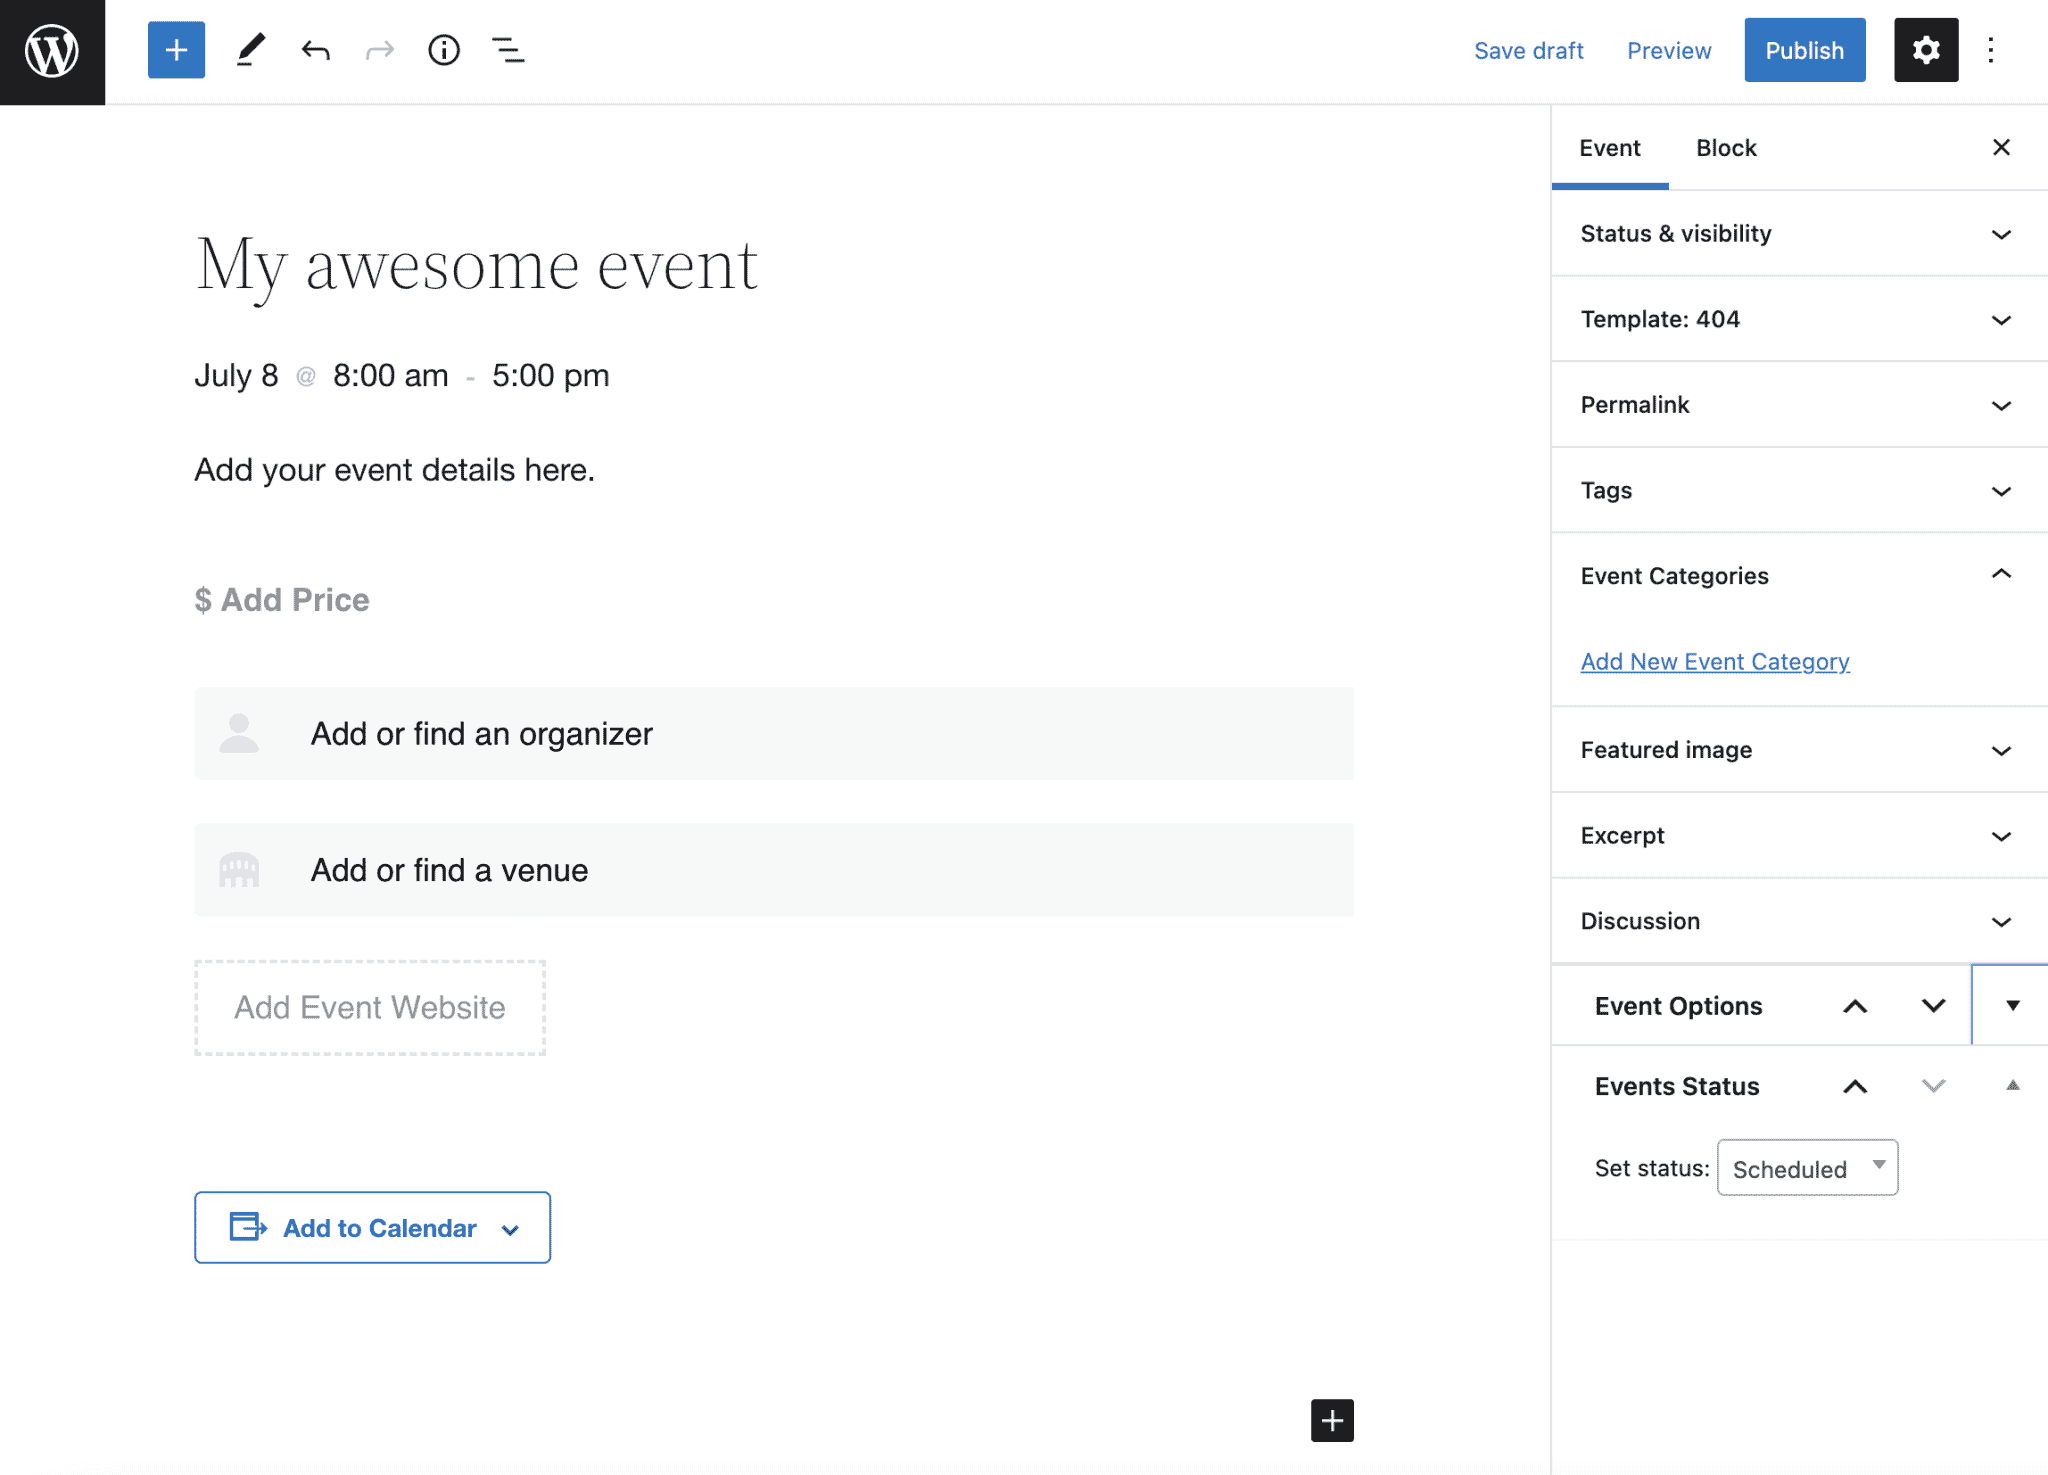
Step 3: Set up the event
Now it’s time to set up your event. By default, you can see that The Events Calendar provides you with several fields, which are actually content blocks:
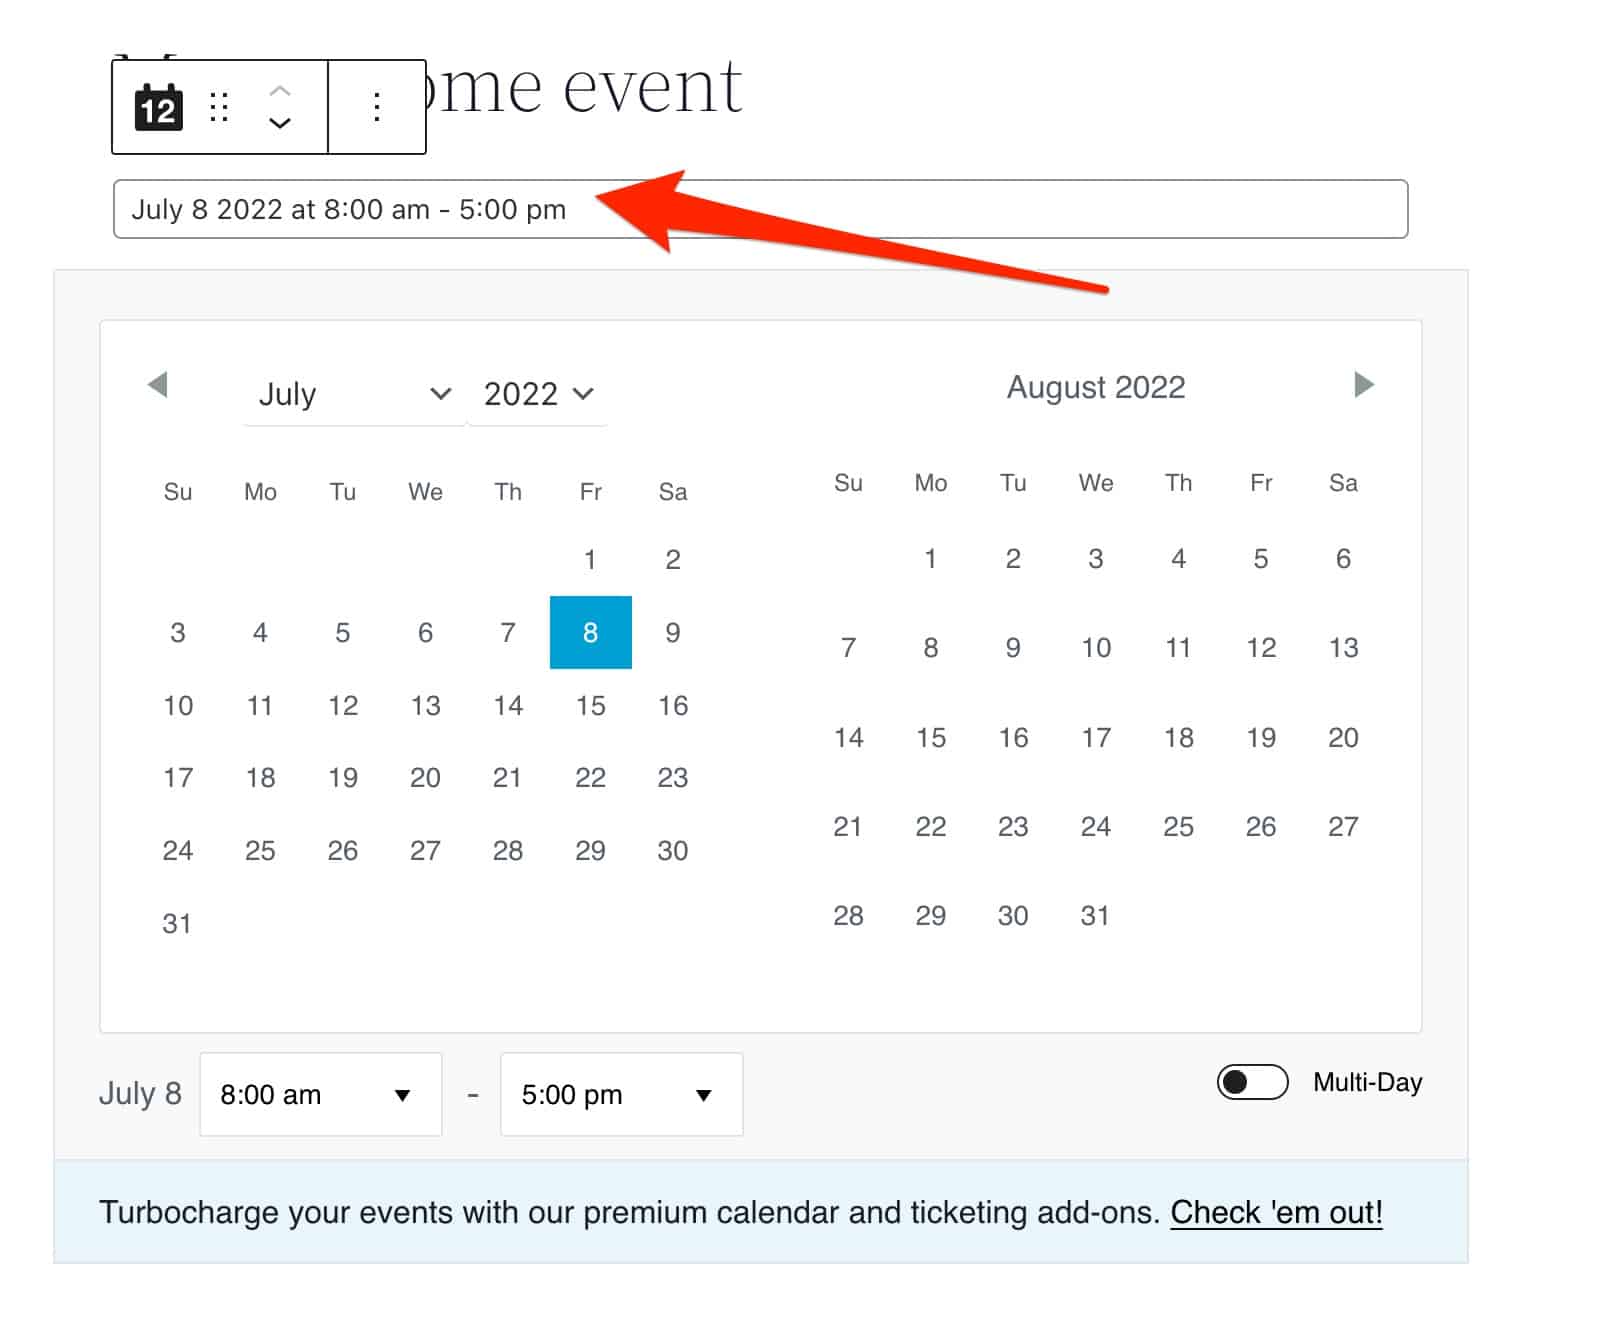
- A block to add a time as well as a start and end date to your event.

- A block to add a price to your event.
- A block to add the name of the organizer.
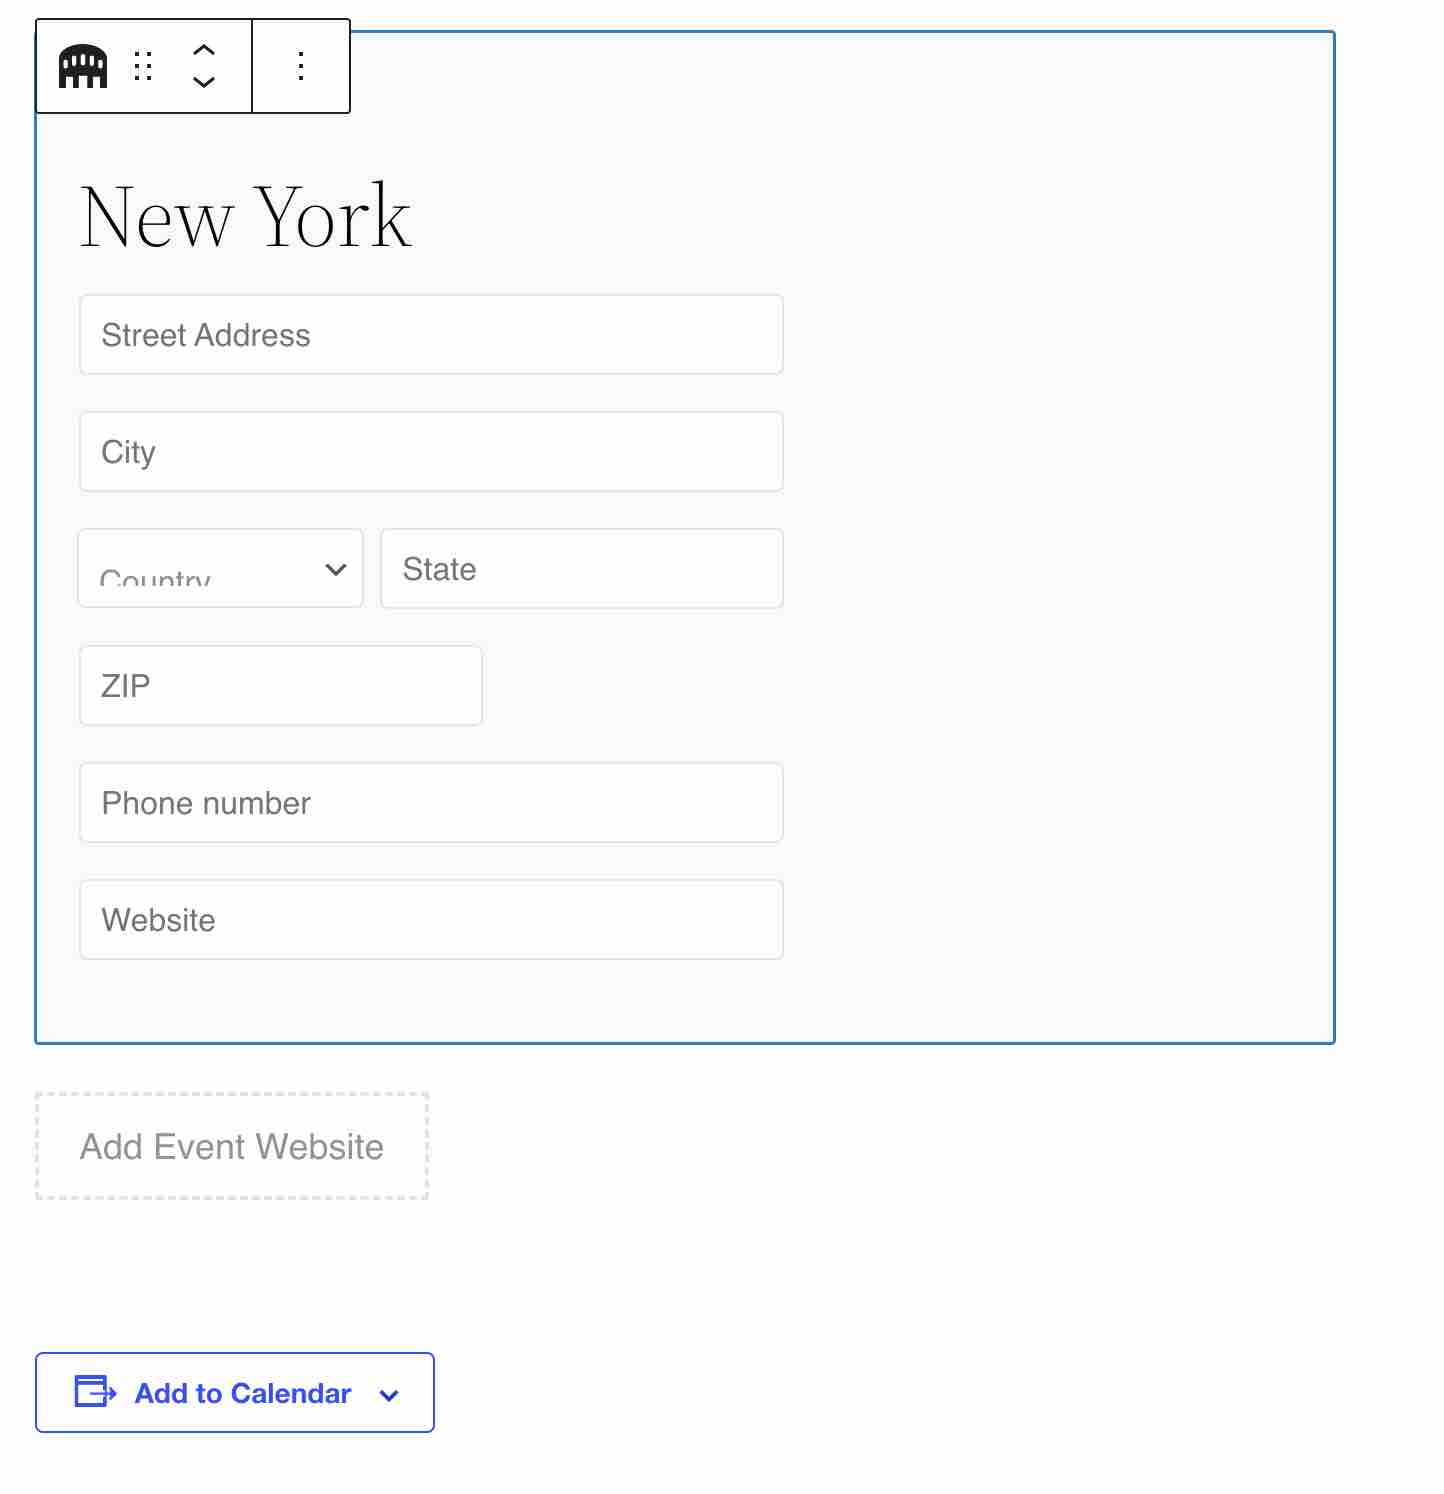
- A block to add the city of the event. You can add details such as the name, address and phone number of the venue. You can also add a map, if needed.

- A block to include a URL to the event website.
- A block to synchronize the event in your visitors’ calendars (Google Calendar, iCalendar, Outlook 365, Outlook Live).
Each block has more or less advanced options in the right-hand sidebar of the content editor.
For example, the block associated to the event price allows you to change the currency and the associated symbol.
You can also delete the blocks you don’t want to use in 2 clicks, and add others (e.g. images).
Categories can also be assigned to events on the right side of the page, in the “Event Categories” tab (we’ll come back to this later).
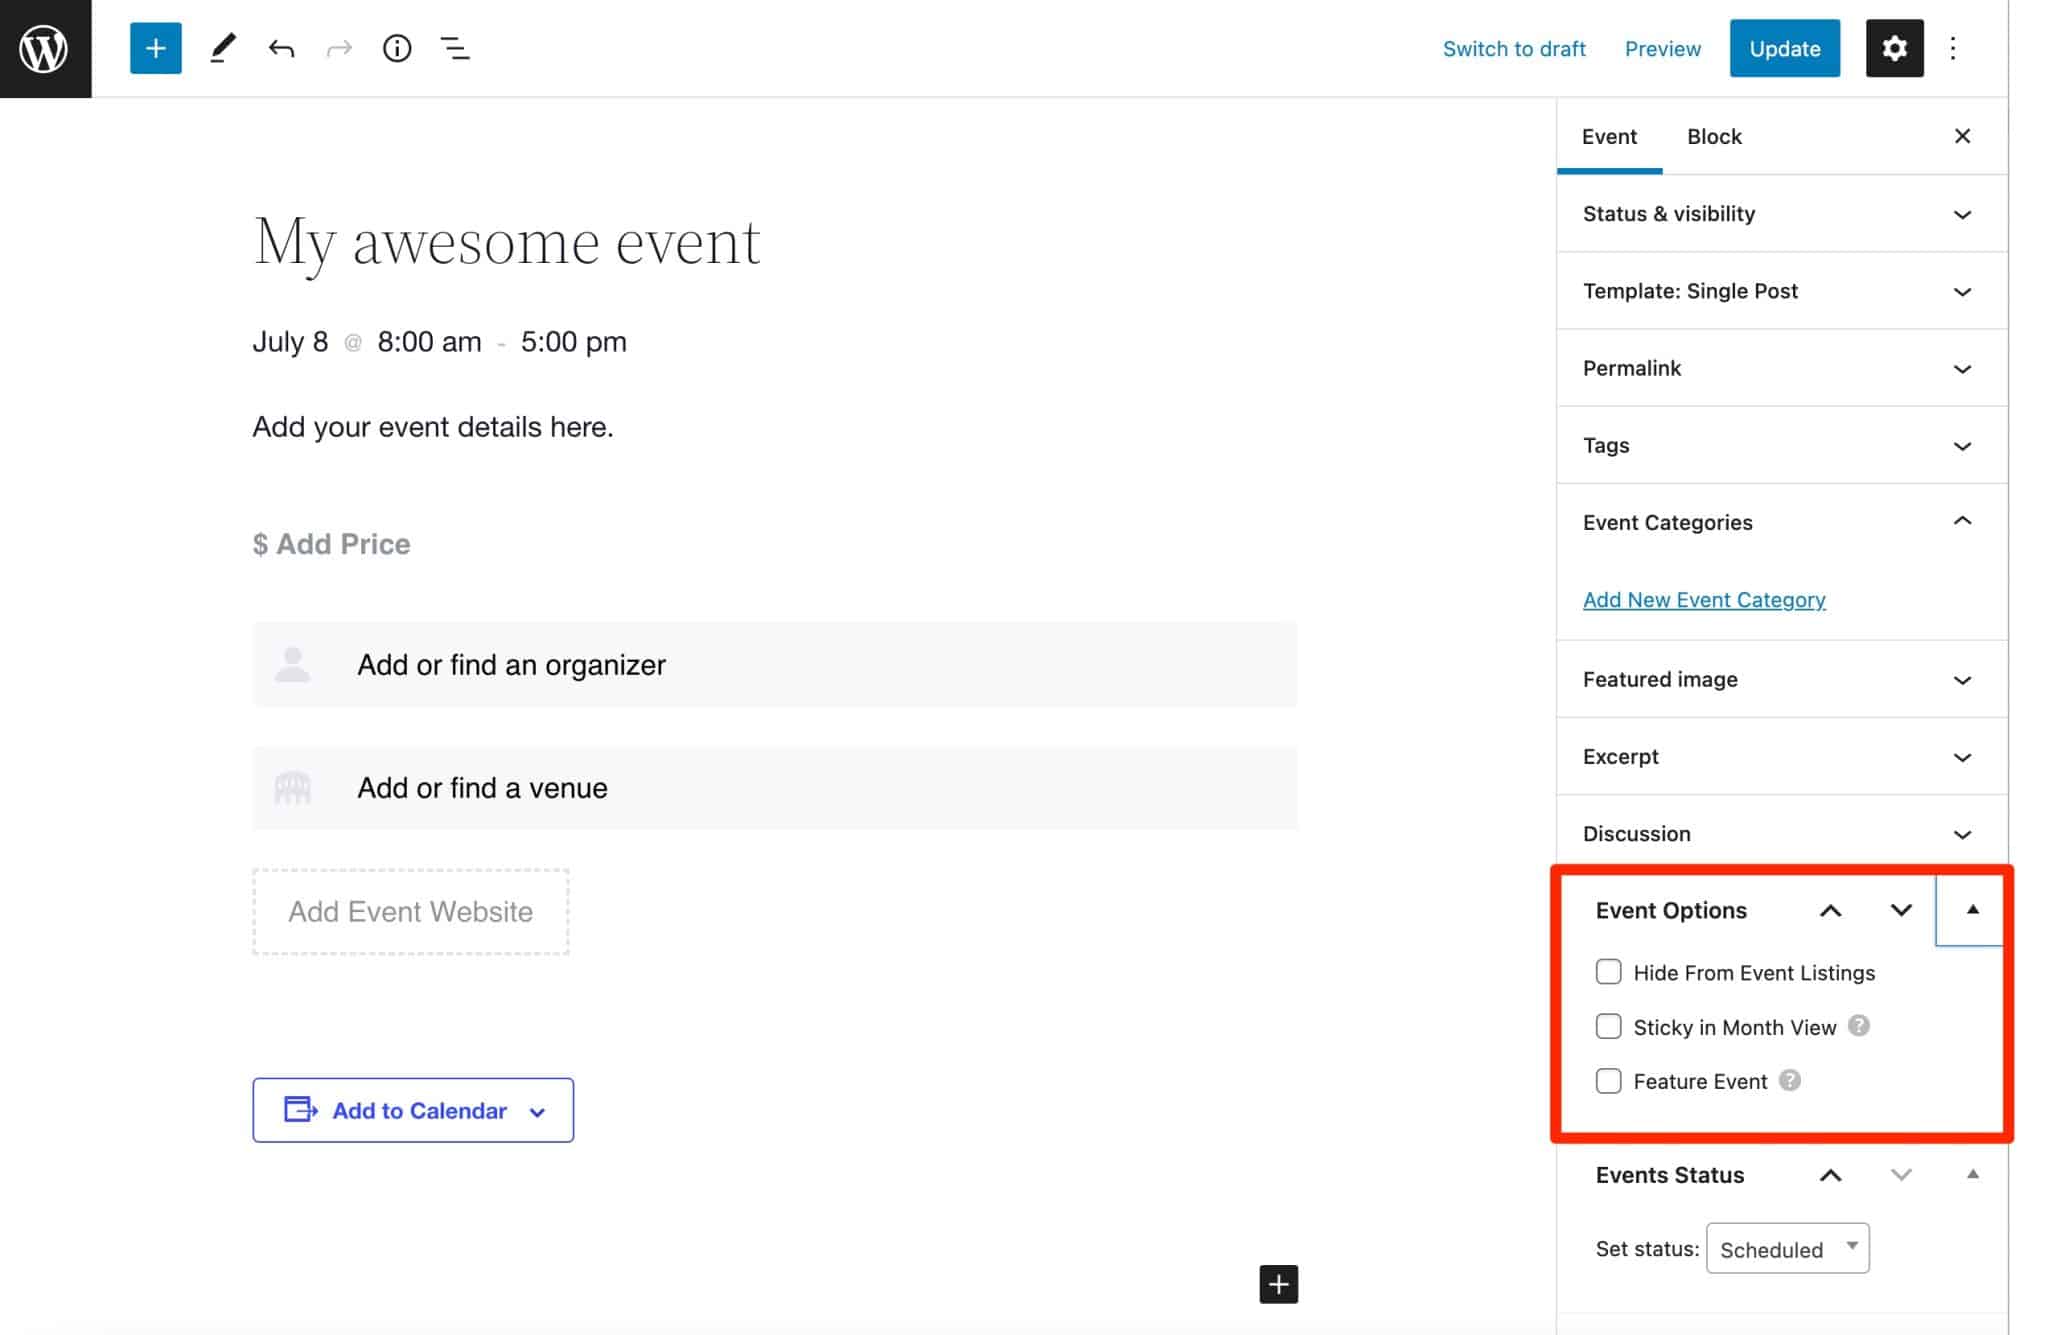
Finally, there are additional options to:
- Hide this event from the Event Listings.
- Make your event Sticky in Month View.
- Feature the event.
Once you are done, publish your event by clicking on the Publish button at the top of the page.
How to view your event?
After you publish your first event, check out your overall event calendar. This will allow you to see what it all looks like.
Your event calendar can be viewed at: www.yourwebsite.com/events/.
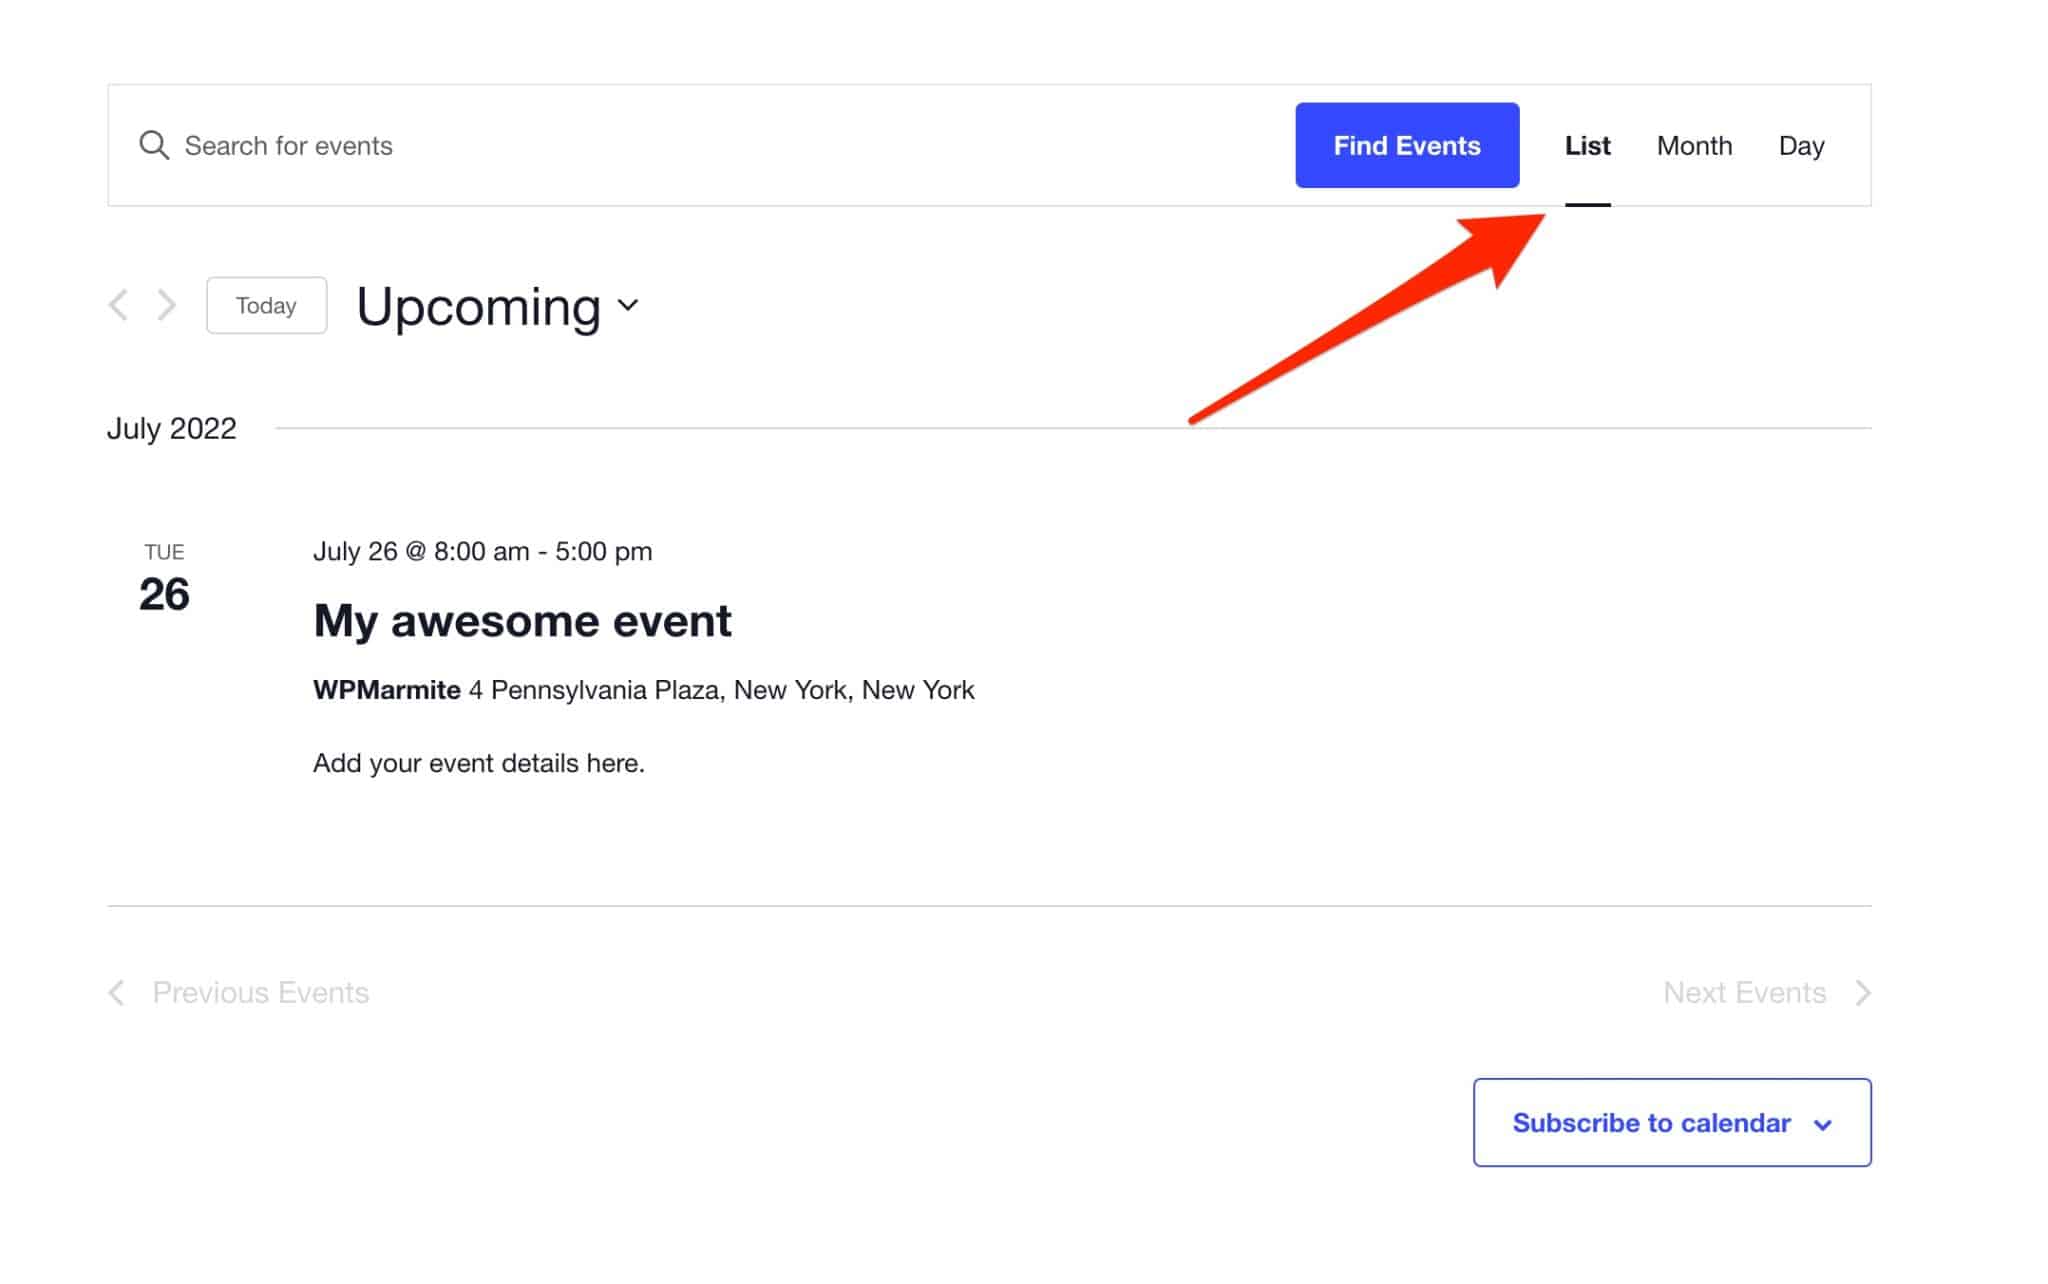
The calendar is easy to view, and allows you to filter results by date (month/day) or by keyword.

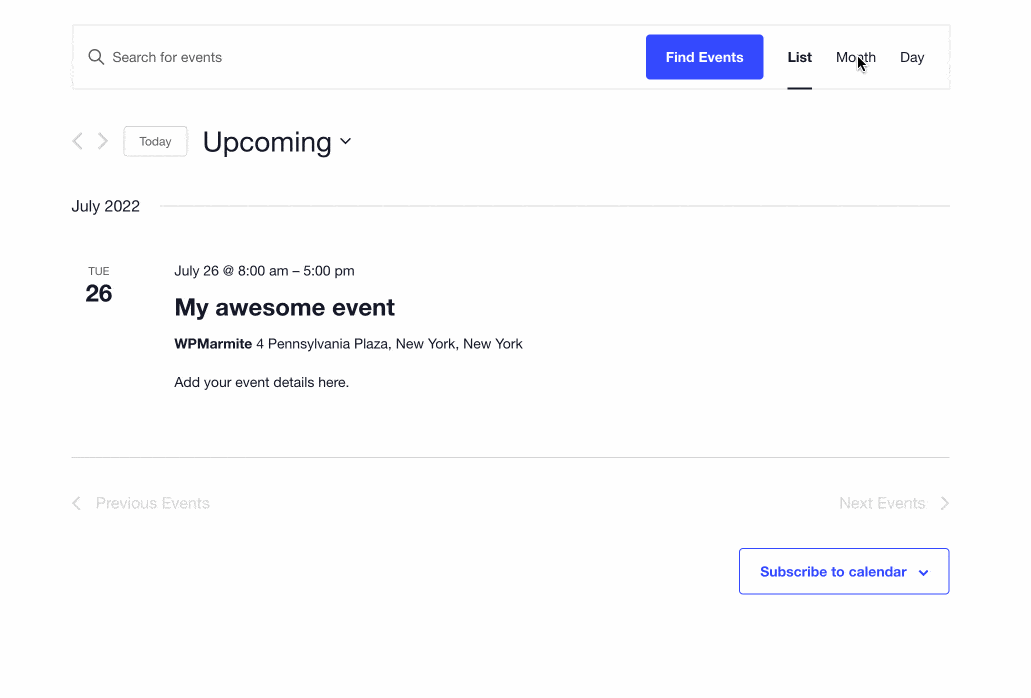
By default, the calendar is displayed in month view, but you can change it to list or day view.
In monthly view, the events are filtered by month (logical, right?). In the “List” and “Day” view, the events can be filtered by day: you can specify the exact day for which you want to see the events.
Click on your event to check that everything is running.
Don’t forget that this is the page for people who are interested in your event. So don’t hesitate to work on it more, and add more content to make the event more attractive.
Later in this post, we’ll talk about how to customize the style of your global calendar and how to promote it on your website.
But before that, let’s take a closer look at how to customize events on your WordPress site.
How to add categories to an event?
Clever trick: assign categories to your events via the “Event Categories” insert on the content editor. This can help you categorize upcoming events, especially if you’re organizing a lot of them.
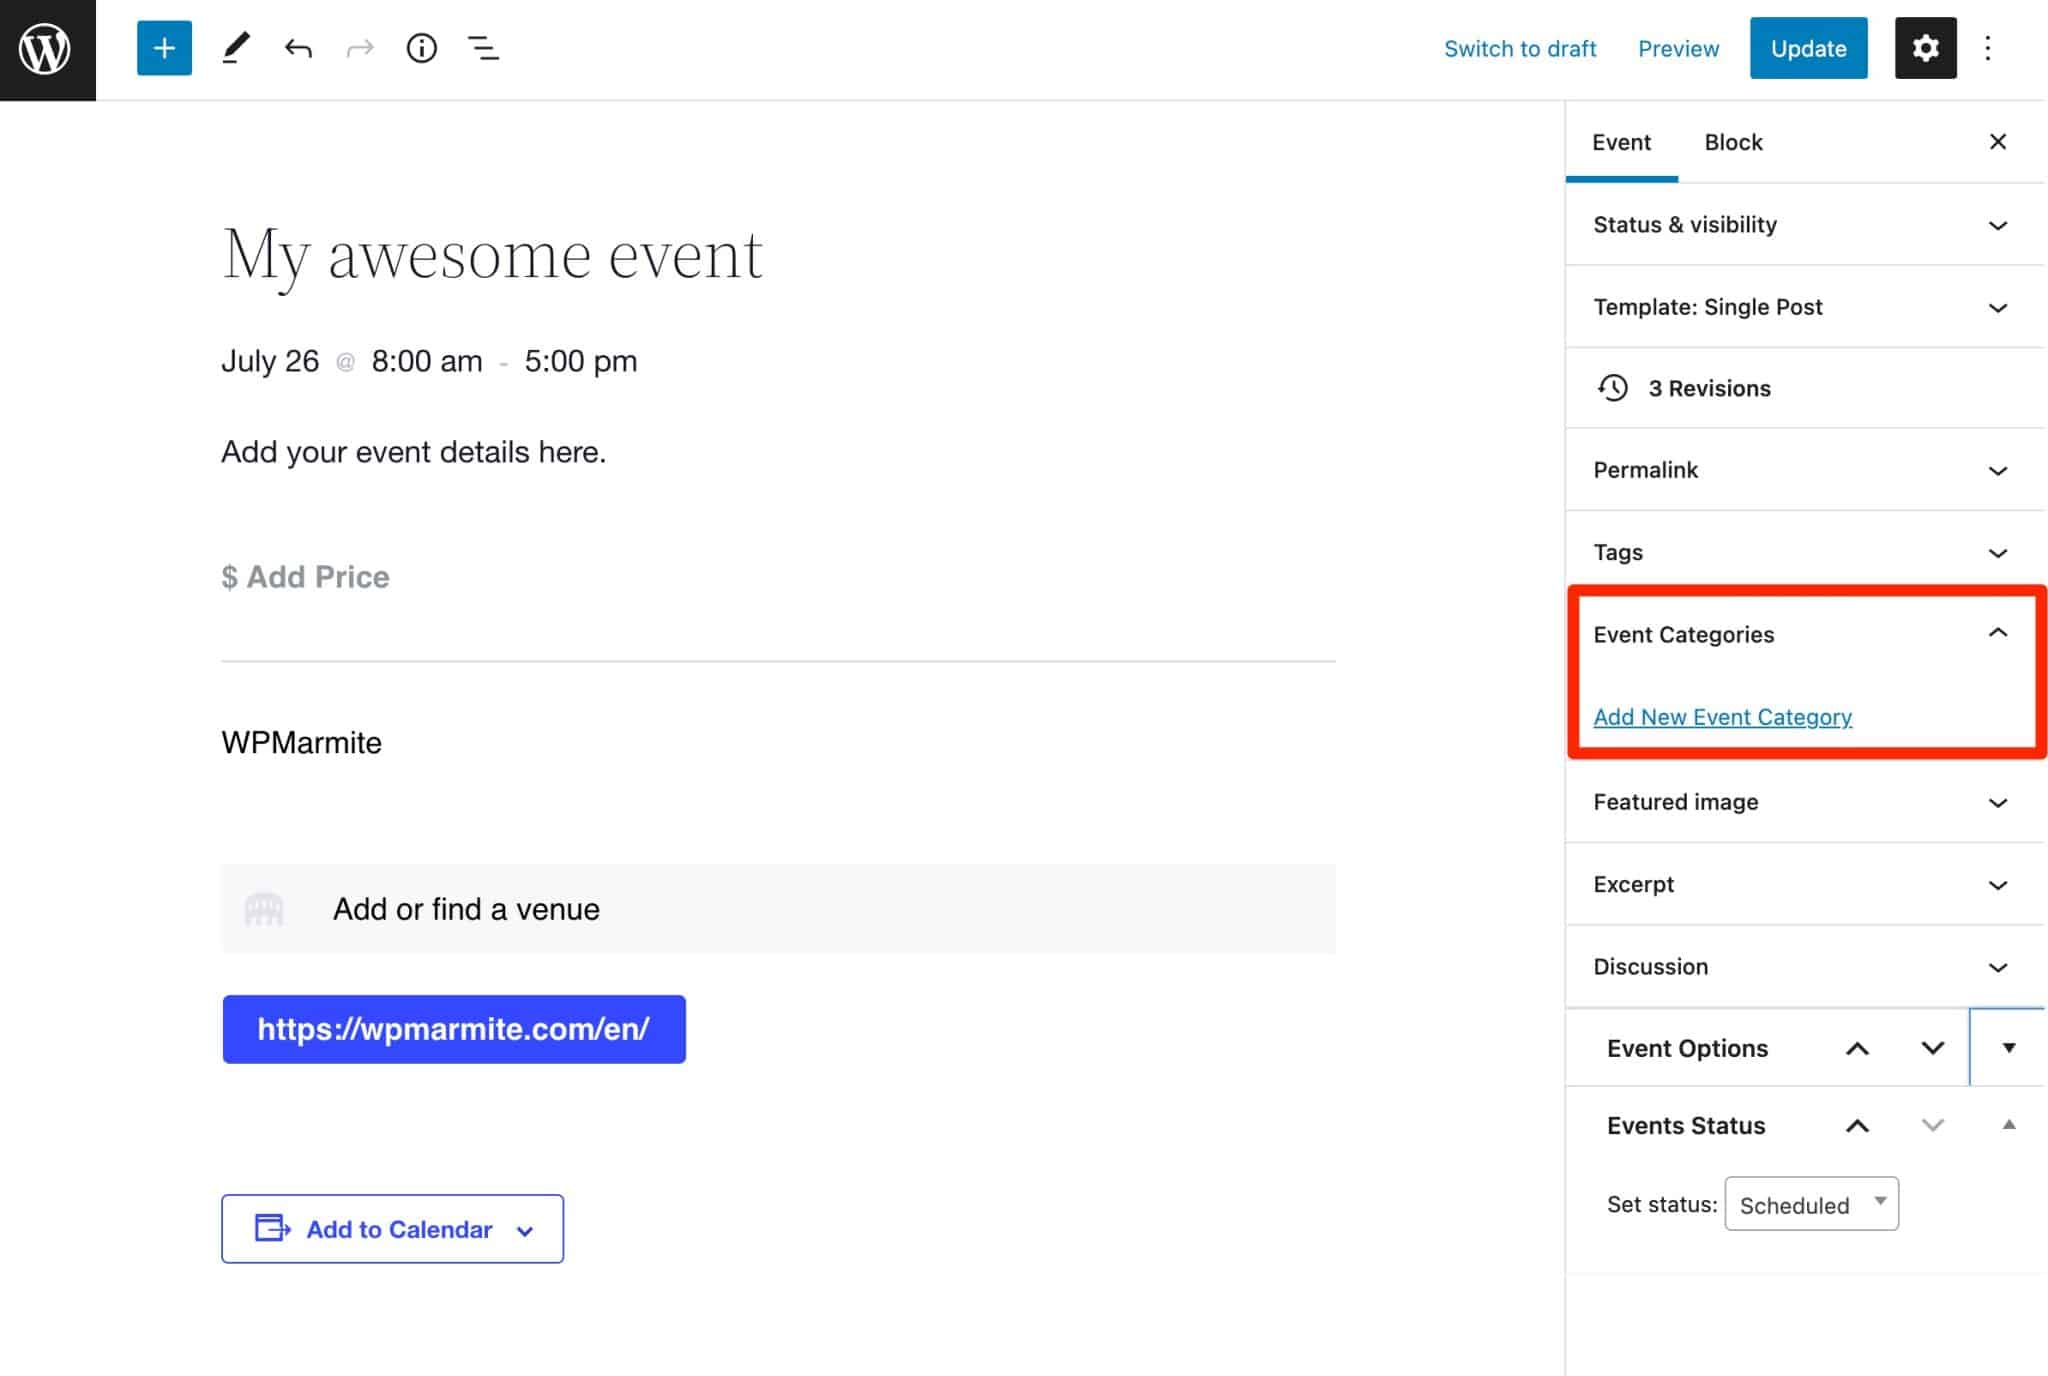
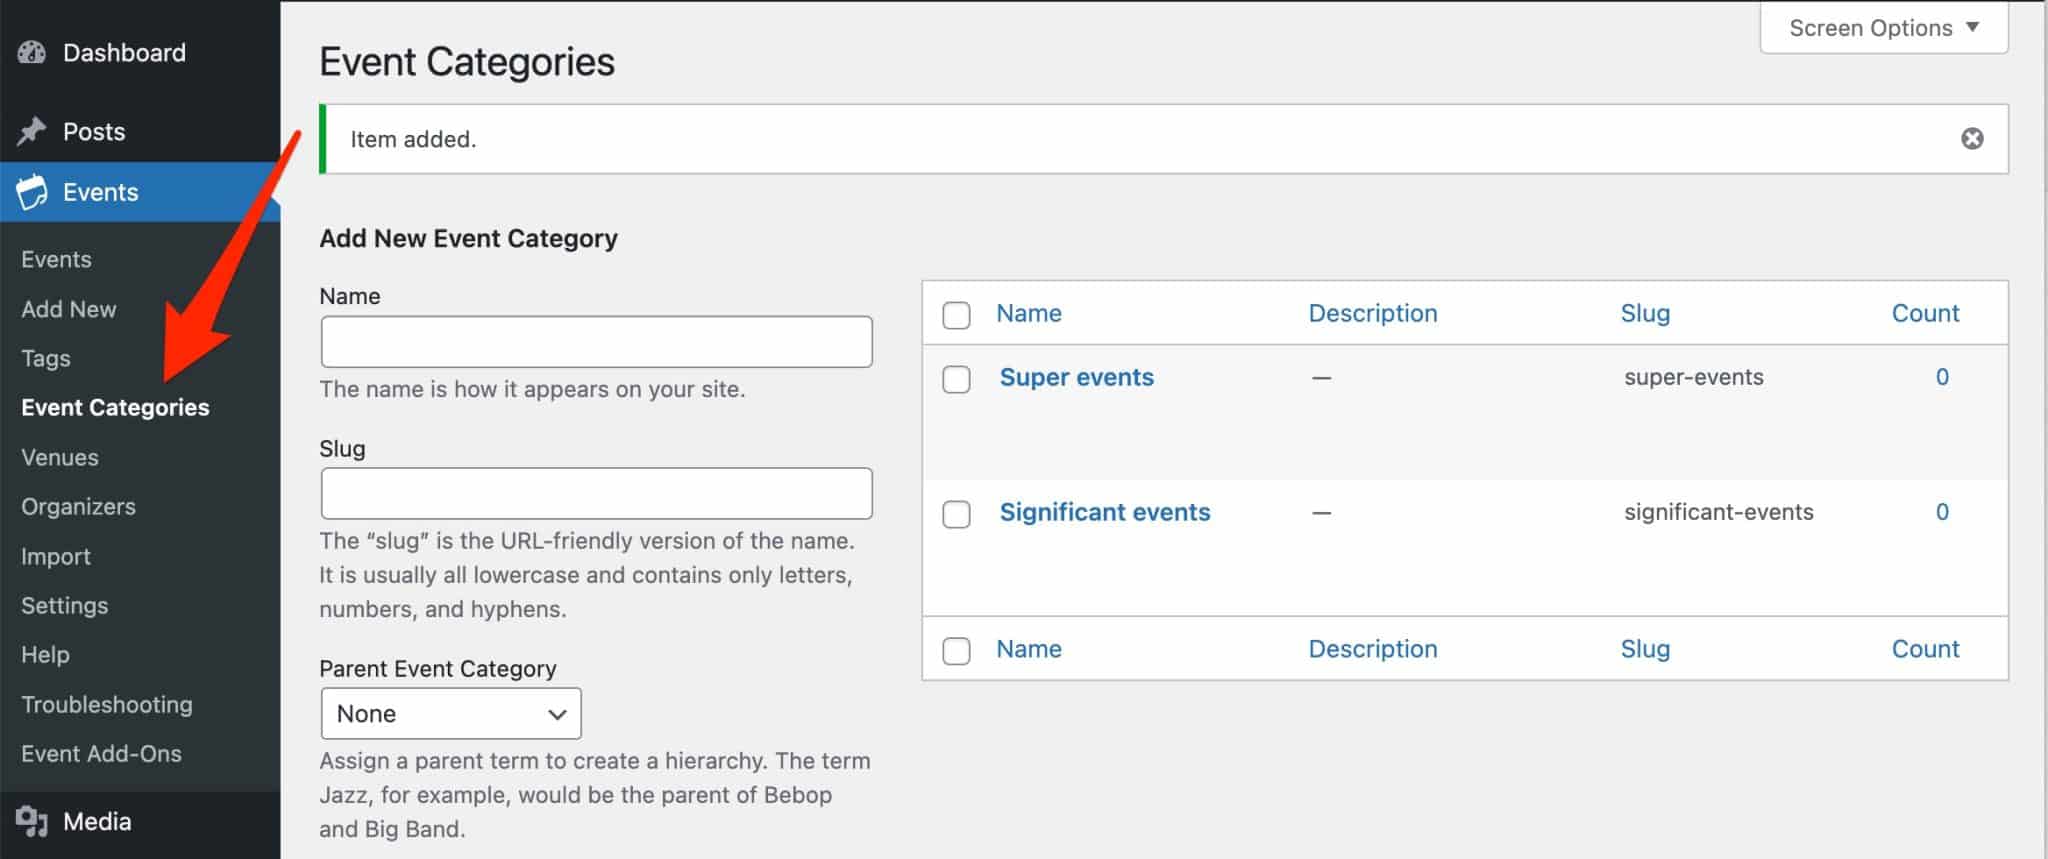
New categories can be created directly from the page, by adding an event category directly when you click on the associated link.
However, if you want to manage the existing categories, I recommend to go through a dedicated menu, accessible via Events > Event Categories.
The principle remains the same as for a post. You add the category or categories of your choice on the fly. If needed, you can also add sub-categories to sort your events even more precisely.
In addition to categories, you can assign tags to your events, to sort your content. Use them sparingly, or simply do without! They can have a detrimental effect on SEO as they can lead to duplicate content.
The city and organizer information you added to your event page is also saved. You can change this information any time.
As you add events, your website saves more tags, categories, cities and organizers. They can be assigned to any future event.


How to set up your event?
The “Settings” submenu of The Events Calendar allows you to further customize things. I encourage you to review all the options available to tailor the settings to your own needs.
Let’s break down the most important tabs first.
The Events Calendar General Tab
In the “General” tab, you can set up:
- The number of events to display per page.
- The display of comments on your event pages.
- The permalink associated with your events. As mentioned earlier, after creating your first event, you can view your calendar at:
www.yourwebsite.com/events/. If you wish, you can change the end of this URL (“events”) to better suit your purposes. For example, you can use “conferences” or “birthdays” instead. - The display of Google Maps, by choosing their zoom level and/or the activation or not of these maps.
- Automatic deletion of your events. Use this option to move events to the trash after a specific amount of time. For example, you can automatically delete a conference and all its information six months after the event.

- Settings related to your time zone for displaying the date and time.
Display tab
The Display tab allows to select the template you want to use, and the types of event views to display. You can also decide which view your calendar uses by default.
Another smart setting is to define the number of events displayed in a day, when your calendar default view is set on “Month”.
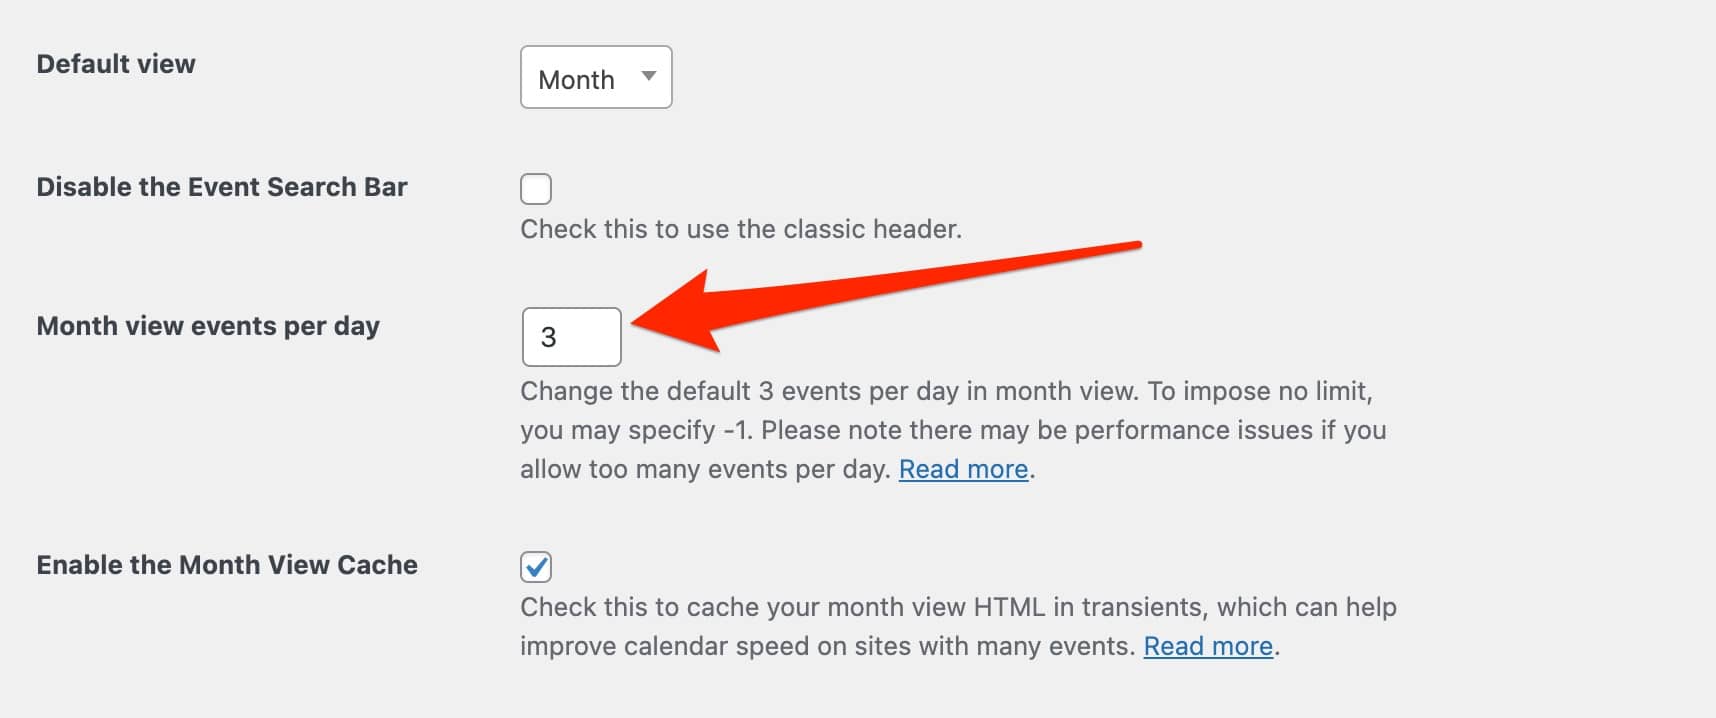
The date and time format used for events can also be changed in the display settings page.
Lastly, The Events Calendar allows you to display HTML code before and after the content of each event.
This is useful in many situations. For example, you can use this feature to promote your online store, or encourage visitors to sign up for your newsletter.
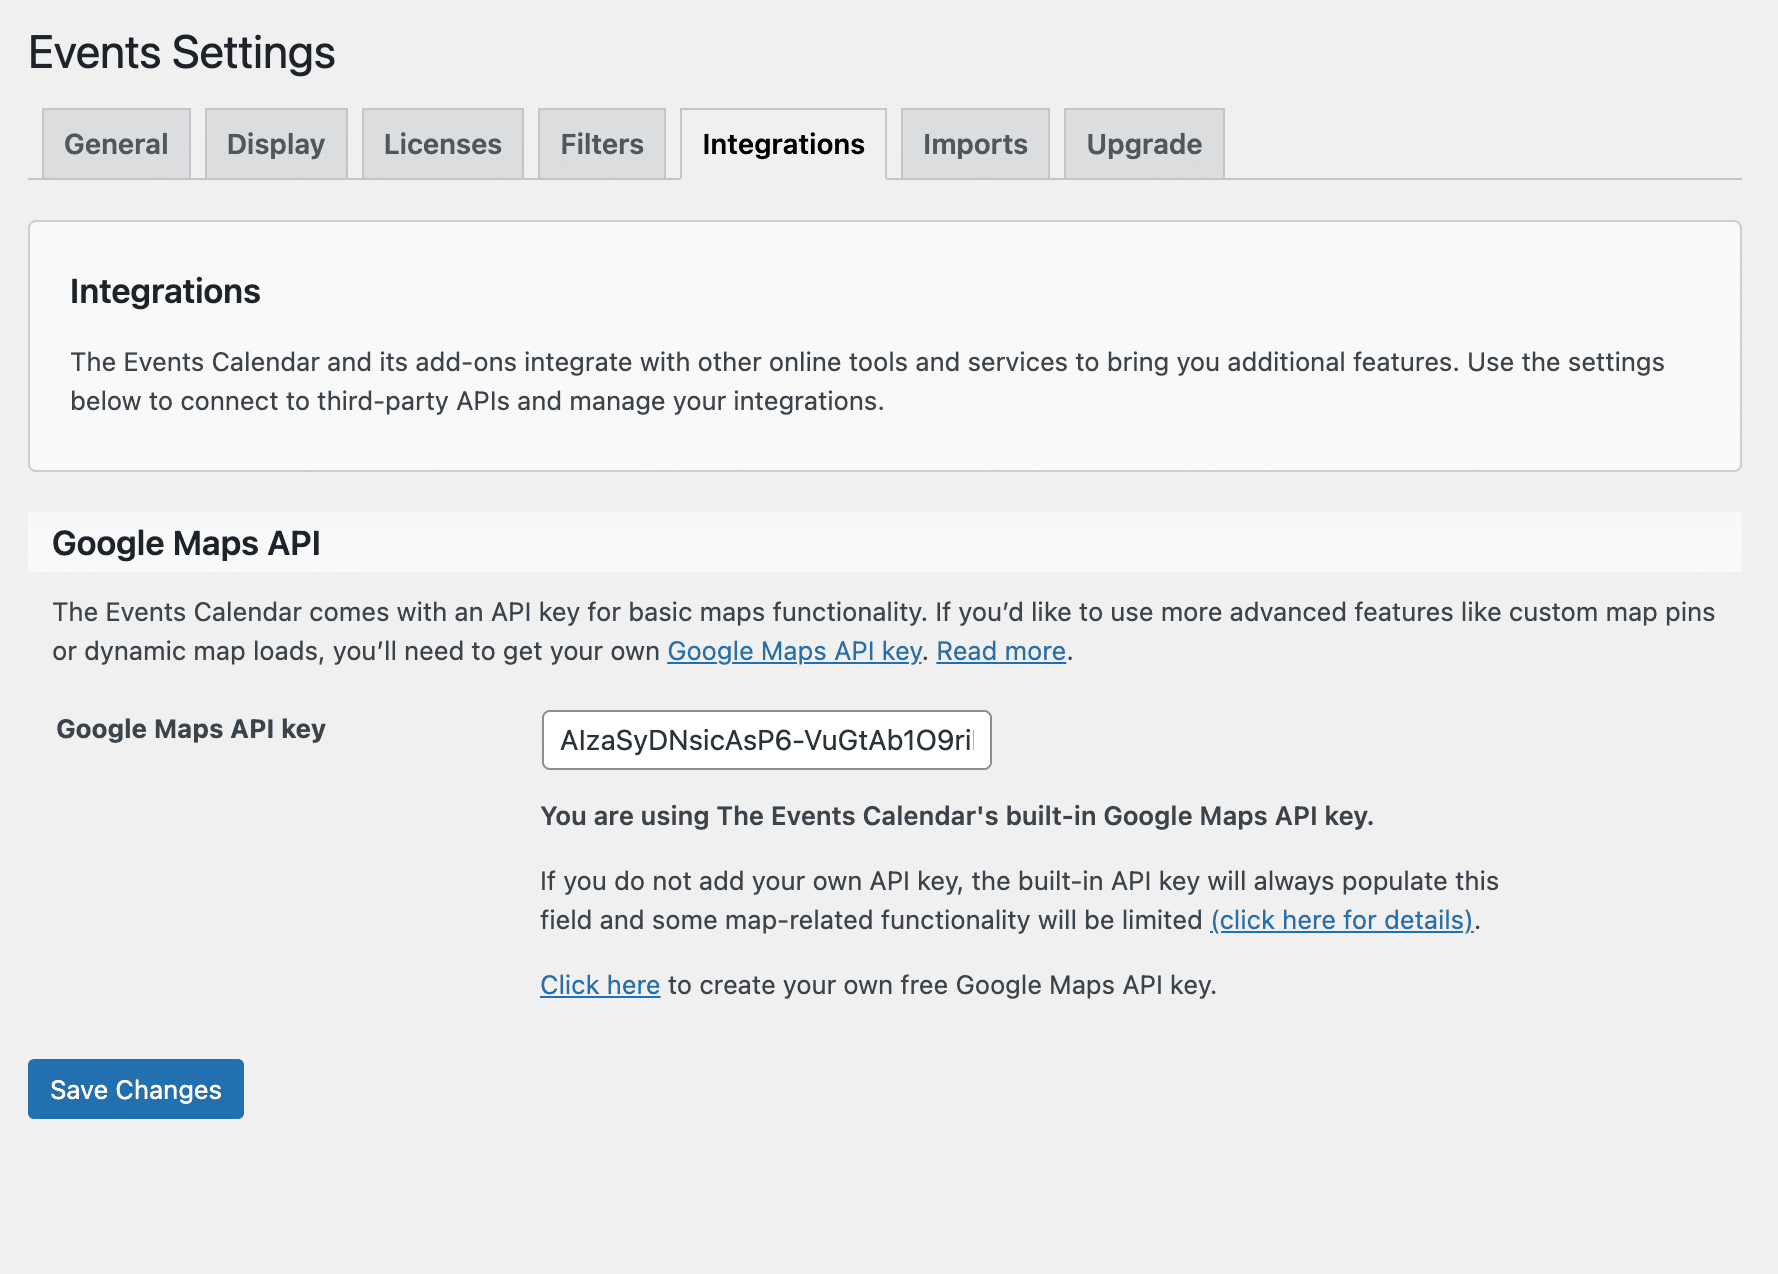
Integrations tab
The “Integrations” tab allows you to integrate “other online tools and services to bring you additional features”.
In the free version of The Events Calendar, only the integration with Google Maps is offered.
By default, the plugin offers an API key that gives access to basic mapping features.
If you want to go further and get, for example, custom city icons or automatic loading of your maps, you will have to create your own Google Maps API key for free (instructions here).
Beyond the 3 major tabs presented above (General, Display and Integrations), you will also have the following tabs:
- “Licenses”, so that pro users can enter their license key, if they use one of the premium add-ons offered by The Events Calendar.
- “Filters”, to add advanced search filters (by category, tag, price, organizer, date, etc.), starting at $89/year for use on one site.
- “Imports”, to configure CSV import settings. This is an essential step if you want to import existing events into The Events Calendar.
What are the recommended settings?
A plugin like The Events Calendar can be used for many types of events, such as conferences, concerts, meetings, charity events, etc.
What sets it apart from other solutions? Its versatility. But it’s hard to recommend optimal settings: it really depends on what you use it for.
That said, there are a few settings you should pay attention to.
- URL slugs: customize the URL slug of your events, to make it more understandable at first glance. By default, it is in English (
events). - Currency: the plugin is by default in US dollars.
- Default display: the monthly display is enabled by default, but you may like the “List” or “Day” format more.
- Date format settings: by default, the plugin is set to the US standard: Month, Day, then Year. If your target audience is based in another country, you can change this setting.
- Google Maps API key: to be enabled if you want to customize more finely the maps linked to your events.
For example, if you are using The Events Calendar to promote tennis games in London, you could change the URLs, and have the term “games” appear. You would also change the currency to £ and the date format to day, month, then year.
I would also encourage you to use categories, cities and organizers. By giving visitors more information about events, you reduce the number of questions you receive through other channels.
How to promote your event?
Once you have created your event and configured all of its settings, you can focus on promoting it.
How to promote your events on your WordPress site?
To help you promote your events, you can first create a link to your main events page in your menu. To do this, go to Appearance > Menus on your admin interface.
The above path will work if you are not using a Full Site Editing (FSE) compatible theme, like Twenty Twenty-Two.
Note that at the time of writing, The Events Calendar did not yet support FSE enabled themes.
Check out our resources on the WPMarmite blog to manage and optimize WordPress menus like a pro.
Alternatively, you can choose to embed a link to each promoted event individually in various relevant areas on your website.
How to promote an event in a widget area?
Now why not promote your events in a widget area provided by your WordPress theme?
Depending on your theme, you can promote an event in your sidebar, footer, etc.
To do this, go to Appearance > Widgets. Select the “Event List” block and add it wherever you want. In the example below, you’ll see that the theme I’m using (Twenty Twenty-One) has only one widget area (the footer).
This “Events list” block offers several settings. Indeed, you can:
- Specify its title.
- Set up the number of events displayed in the widget area.
- Hide the block if there are no upcoming events.
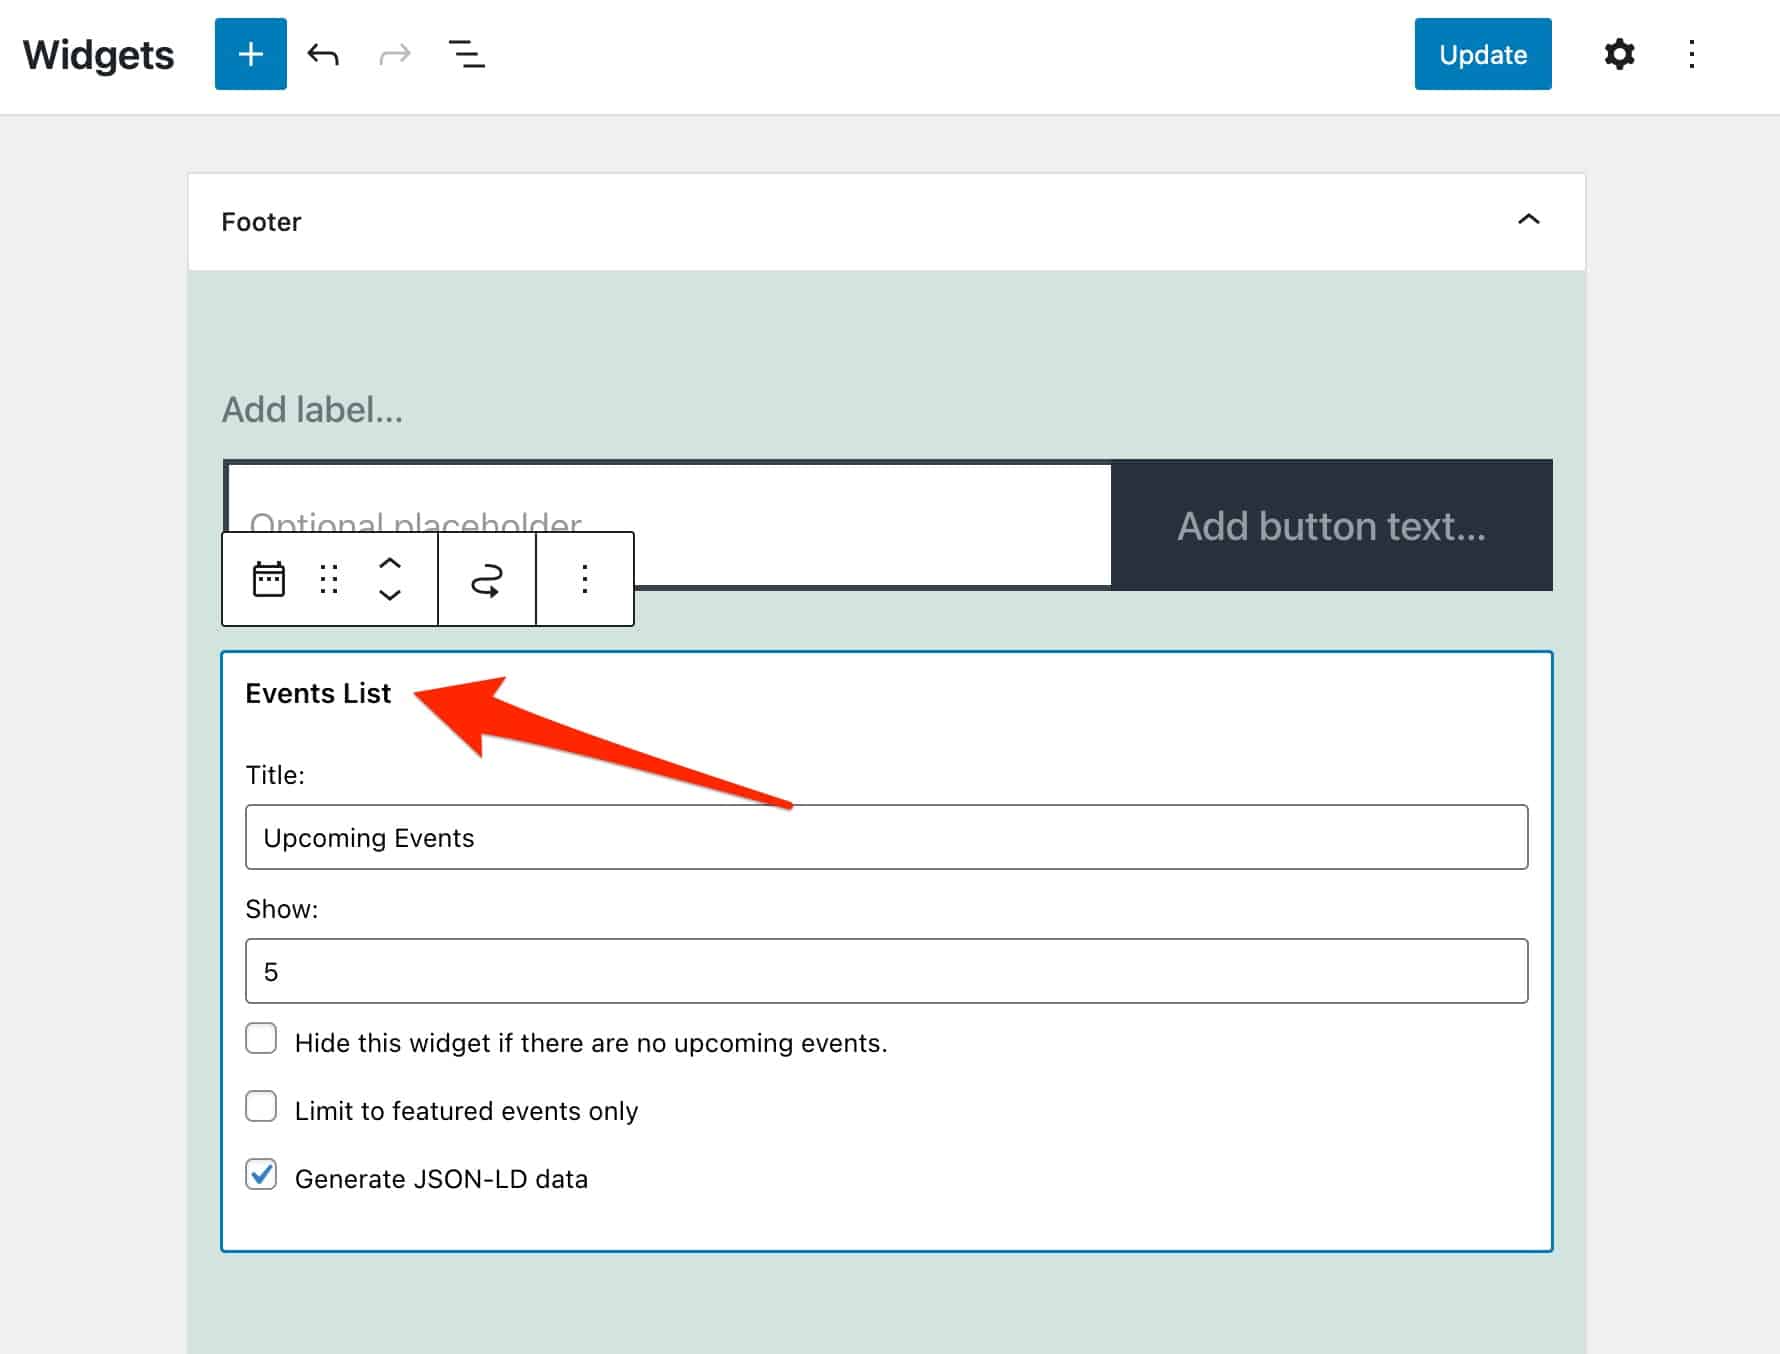
I really encourage you to incorporate this “Event List” block into your website design. It’s a very effective format for promoting your events to your potential attendees.
Of course, you can display your events wherever you want. Once you get the URL of your event information page, you can share it in your newsletter, on your social networks, and on all your communication channels.
Events can also be exported using iCalendar and Google Calendar.
How to customize the style of your event calendar?
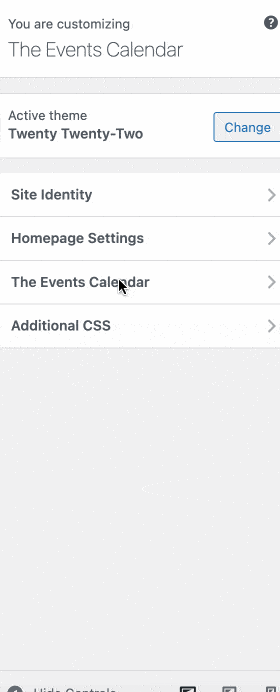
Lastly, the promotion of your event also requires a clean appearance on your site. You can change the colors of your calendar using the WordPress Customizer, which can be found in Appearance > Customize.
Colors can be changed for all view types. You can also change the overall colors and the colors of fonts, background, icons, buttons, etc.

What add-ons does The Events Calendar offer?
At the beginning of this post, I explained that The Events Calendar should be considered as a base on which you can add other plugins/add-ons. Do you remember this?
The first natural recourse is its premium version, The Events Calendar Pro, which we’ve already talked about a bit.
It is possible to go further and make the plugin even more flexible with the help of additional add-ons. You can find them listed in the menu Events > Event Add-Ons.
Here are a few worth mentioning:
- Virtual Events (from $69 for 1 site): to integrate online events into your calendar, including integration with Zoom.
- Event Tickets (from $99 for 1 site): this add-on allows you to set up a ticketing system on your events calendar. It is available in a free version and a paid version (Event Tickets Plus). The latter offers a dedicated integration with WooCommerce, PayPal and Stripe.
- Promoter (from $89): this add-on allows you to create emails related to your events (alerts, automatic reminders, campaigns, etc.).
- Filter Bar (from $89 for 1 site): to facilitate the search for events by category, date, city, organizer, price, etc.
Our final review of The Events Calendar
The Events Calendar is a very convenient solution to create and showcase your events on your WordPress site.
From the free version of the plugin, adding and managing your events is easy. Once the events are published, you can promote them on your website in a widget area.
Download The Events Calendar:
Now it’s your turn to speak up: do you plan to use this plugin on your WordPress site?
Tell us all about it in the comments below!