


Sitting at your computer, you are looking for inspiration for your blog design.
One of the Google results catches your attention. You click to open it and start reading.
You scroll down, a little further, a little more and “Oh man, this post is way too long, I’m not interested in this… Where does it mention the tools to use?!”.


Can you see me coming, with my table of contents? Yes: a great solution to make a post or a page with a large volume of content easier to read is to insert a table of contents with anchor links.
But, what is it? How to do it? What’s the point? Please bear with me. By the end of this post, you’ll have the answers to these questions, and you’ll know exactly how to create WordPress anchor links. Simply, and step by step.
Overview
Originally written in April 2020, this post was last updated in April 2022.


What are WordPress anchor links?
An anchor link is a hyperlink that, when clicked, automatically redirects the visitor to another location on the same page, or to an external page. The visitor no longer needs to scroll endlessly to find the information he came for.
Technically, the anchor element is an HTML element
<a>.
The text between the <a> tags is the anchor. By extension, this refers to the complete link, i.e. the <a> tag and its contents, as in the example below:
<a href="https://wpmarmite.com/en/">Go to WPMarmite</a>
A WordPress anchor link can be added on any element: a text, image, title etc.
To get a good grip on the anchor concept, let’s take a simple example. In this post about the Astra theme, an overview at the top of the page summarizes its content.
You can find your way in the content thanks to the titles of each part.
By clicking on the title of your choice from this table of contents (this is often where anchor links are inserted), you land directly on the part you have chosen to discover:

The anchor is what helps you navigate between the overview and the corresponding sections of the post.
Why create WordPress anchor links?
Now that you understand what an anchor is, you may be wondering if it is useful. Well, the answer is yes, unsurprisingly. There are 3 main reasons:
- It improves the user experience (UX). It’s a great way to make it easier for users to navigate through a page, since they can go directly to the section of their choice, as you saw earlier in the example on the table of contents.
- The display of your pages in Google’s search results can be improved. The search engine can display some anchor links under the meta description of your content, which can improve the click-through rate on your content, and therefore increase traffic on your WordPress site.


- You can link to a section of another page. And this is possible even if it is in the middle or at the bottom of the page. Let’s say you are writing a post. You are talking about your services and you want to link directly to a specific offer, which is at the end of your pricing page. Well, you can do that with an anchor. I will detail how to do it at the end of the post.
All clear to you? Now it’s time to practice. Let’s discover how to set up a WordPress anchor link.
How to create a WordPress anchor link with the content editor?
To make this exercise even more concrete, I’m going to design an overview in which I’ll add an anchor link. Let’s get started!
Step 1: Create the anchor on the title block of your choice
Let’s start by creating the anchor identifier that will be located, not in the overview, but in the body of the text.
For this step, we simply need to give it a unique name. Here is how to proceed:
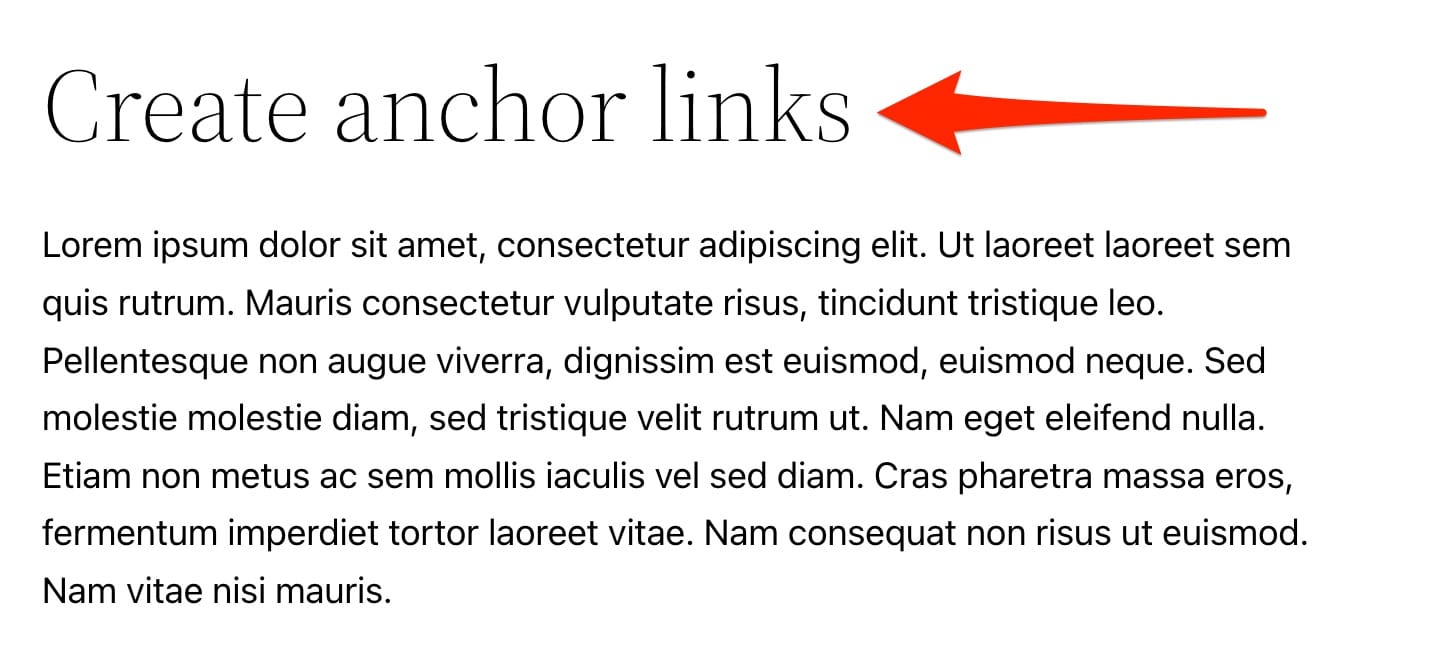
- First, choose the block of the chapter you are interested in, the one you want to point to, for example an h2 title. You can imagine that it is called “Create anchor links”. Let’s click on it.
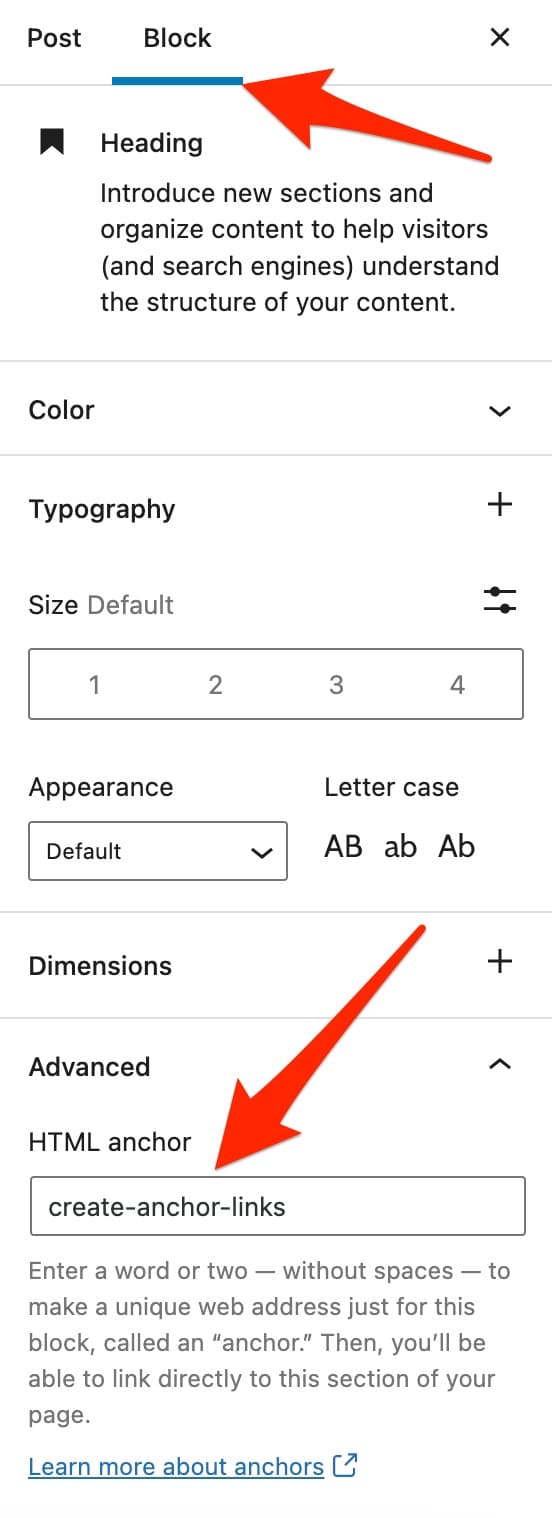
- In the “Block” column of the editor, on the right side of the screen, click on “Advanced”. Then, in the “HTML Anchor” field, choose the name you want to give to your anchor. This is its identifier.
Choose a simple and short name, like “create-anchor-links“, for example. It is best to give a name related to the section to which the link is created.

Regarding the name of your anchor, the WordPress documentation offers some practical advice that you should follow, otherwise your anchor will not be functional:
- Use a unique name per anchor and per web page.
- The anchor name is case sensitive. You can use upper and lower case letters, as long as they are understandable.
- You can use some special characters like the hyphen “
-” or the underscore “_” to separate two words, but no spaces (everything must stick together). - The first character of the anchor name must be a letter.
The WordPress content editor can be a bit misleading in the words it uses when you add your HTML anchor. It does not allow you to create a “unique web address” as it suggests.
It allows you to add an identifier, as we just saw, that you can use to link to your chosen element, that’s all.
Step 2: Create an anchor link to your HTML anchor
For the second step, go back to the beginning of your post:
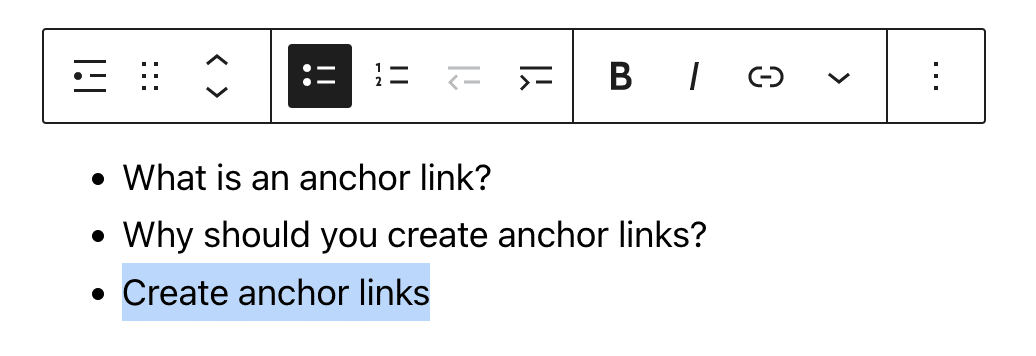
- Start by creating your overview, using a “List” block, for example. Fill in all the chapter titles of your post. Finish by highlighting the name of the chosen chapter. Below is the “Create anchor links” block, for our example:

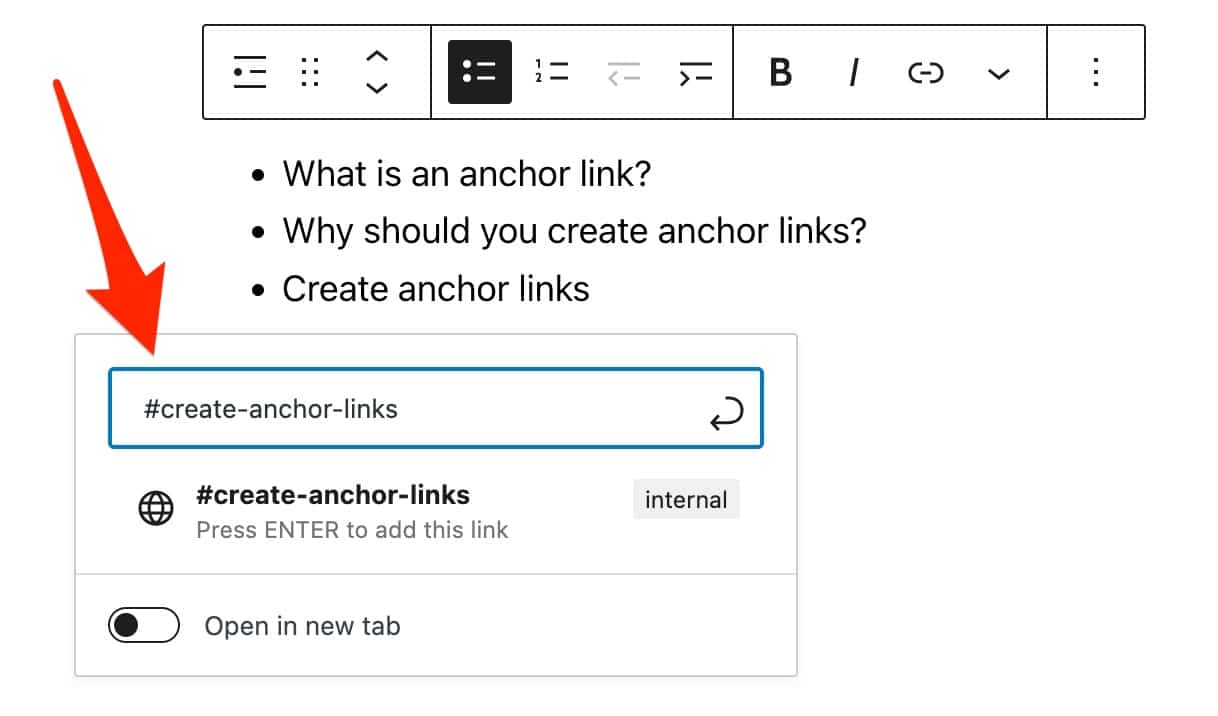
- Create a link with the previously added anchor name
(create-anchor-links). Be careful, there is a subtlety here. This name must be preceded by the#character. In our example, this gives:#create-anchor-links.
This link will lead to the element with the corresponding identifier in the current page (the one you chose in the previous step, i.e. your h2 title):

And that’s it: your anchor link is up and running. Congratulations!
In our example, we have created an anchor link to a page title. In general, any element that can be used to insert a hyperlink (e.g. title, text, image, etc.) can become the link to the anchor of your page.
To add an HTML anchor, the WordPress documentation states that the setting is available for all blocks except:
- The Classic, Read more, Search, Page break blocks
- Widgets blocks (except for Social Network Icons)
- Embedded content blocks
- Theme blocks


How to create WordPress anchor links in HTML code?
If you don’t want to use the “HTML anchor” option offered by the WordPress content editor, it is also possible to create an anchor manually in HTML code, in the content editor as well.
I will unroll the thread just below, again in two steps.
Step 1: Create the anchor for the chosen section
Start by choosing the block you are interested in. Here, I’ll use my h2 example from the previous explanation.
Click on the block button with the 3 little dots, then choose “Edit as HTML”.

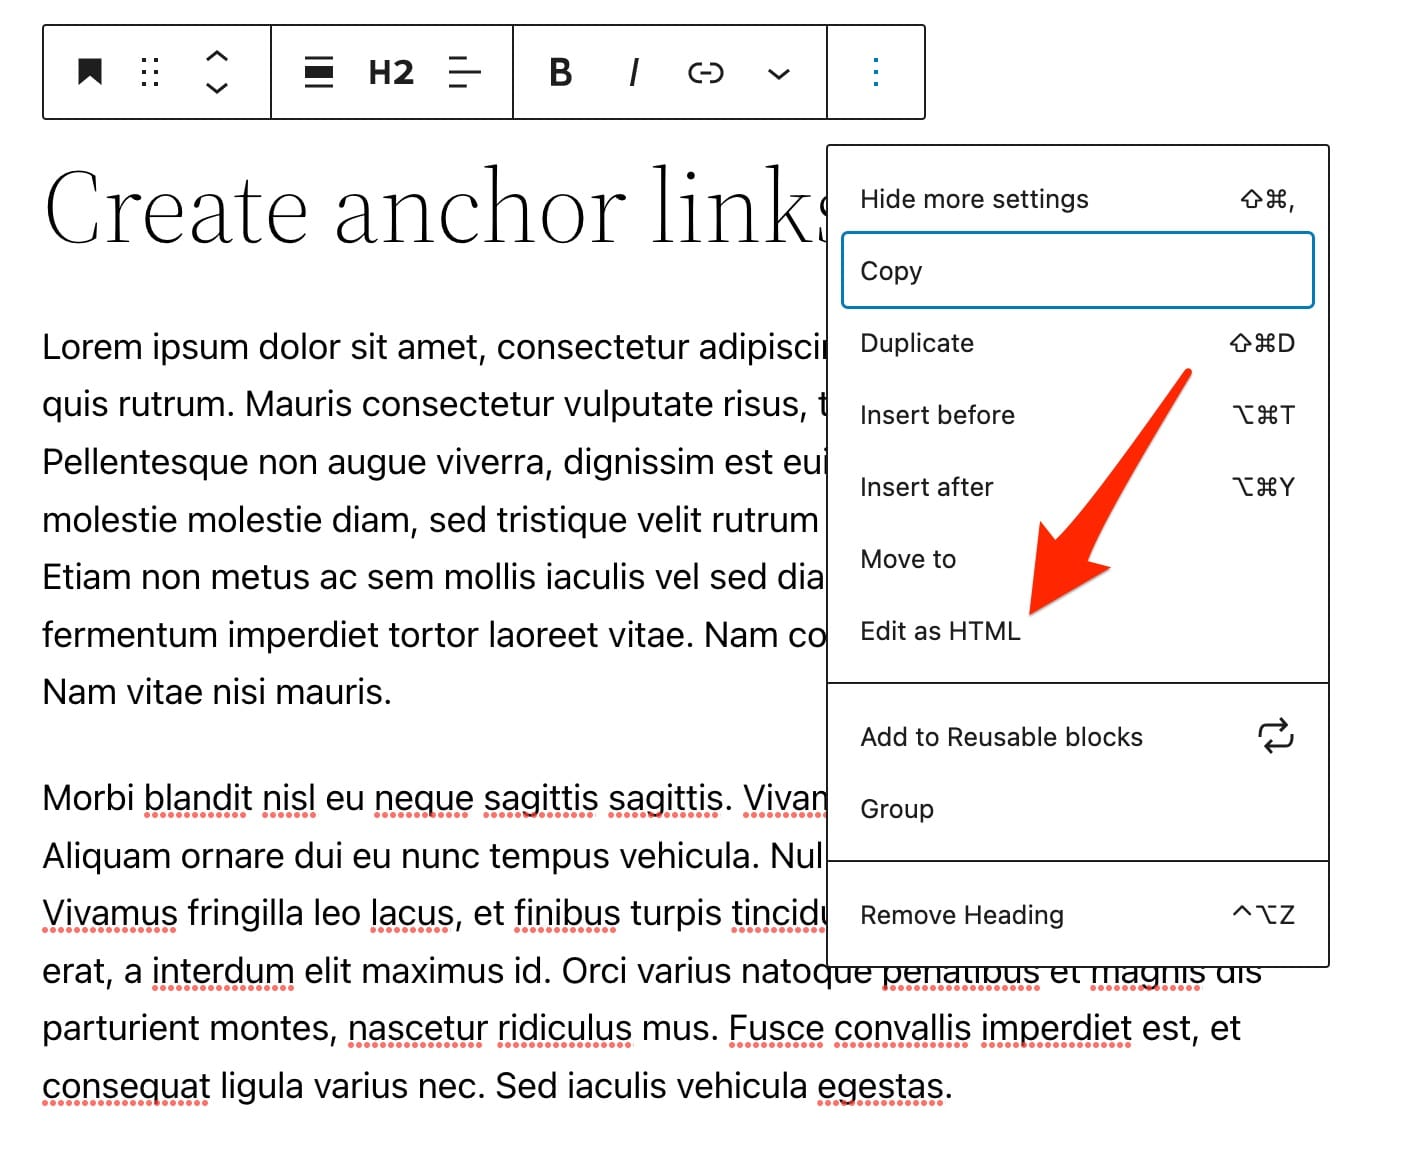
The h2 chosen above is called “Create anchor links”. When you start to edit HTML, you will see:


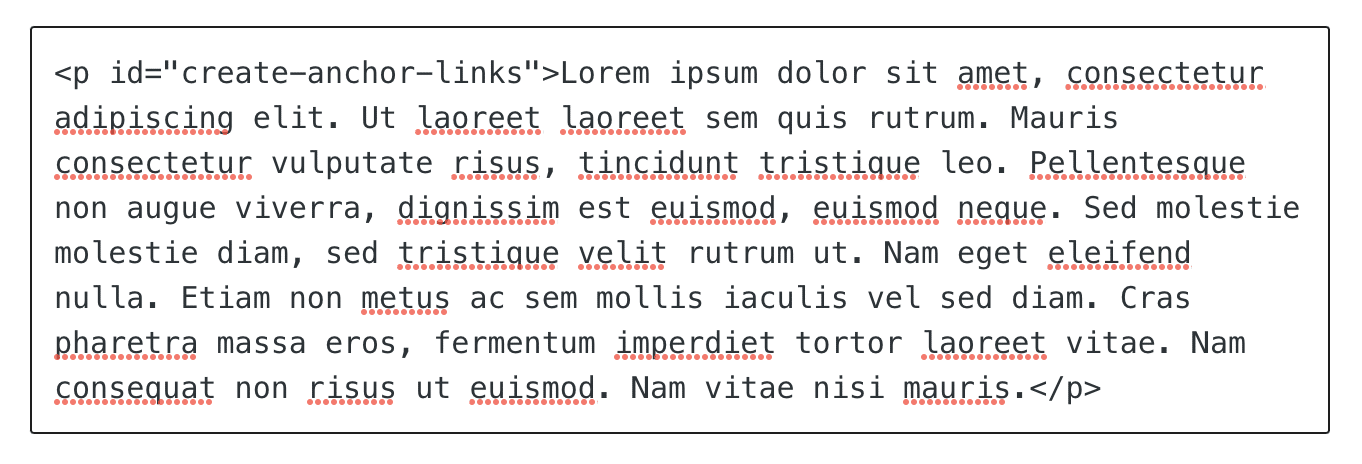
From there, manually add an id attribute to the h2 tag, to give your anchor a name (this will be invisible on the visual editor). Which gives:


If you want to do the same thing in a paragraph, or any other type of block, it’s absolutely possible.
The only difference is that you will not work with an h2 tag, but with a p tag (for paragraph) for example. This would give here:

Step 2: Place the anchor link in the overview
Once again, go back to the overview you created beforehand.
In this table of contents, choose “Edit in HTML” again, if it is not already the case.
Around the anchor text (the name of your chapter), add an <a> tag, and add an href attribute with the name of the identifier as its value, to create a clickable anchor link.
Don’t forget to add the # prefix to reference the id attribute of the block it is linked to.
So you will see:


Again, be careful to use the exact same name (first “create-anchor-links“, then “#create-anchor-links“).
How to create a link to an anchor located on another page?
At the beginning of this post, I promised to explain how to use an anchor on WordPress to send your readers directly to the middle of another page.
To understand this, I’ll use the example I already used: you have a pricing page with several services. In your last post, you want to send your readers directly to the last service on this page.
The first thing to do is obviously to create an anchor on the block of this famous last service (e.g. “last service“), whatever it is. But now you know how to do that. 😉
Then, when you create the link in your post to your service, you just have to:
- Enter the URL of the page, for example: “
https://www.mysite.com/rates“. - Then add the
#prefix of your anchor name, for example: “https://www.mysite.com/rates/#last-rate“.


By clicking on your link, the person will be taken directly to the last rate on your rates page.
Now, so far, I’ve shown you how to create a WordPress anchor link manually, either with the content editor, or with HTML code.
To be even more exhaustive on the subject, you should know that it is possible to add anchors on WordPress with a plugin. I’ll tell you more about this in the next section.
How to create an anchor on WordPress with a plugin?
Do you regularly write posts on your blog? Rather long posts on which you are used to integrate an overview (table of contents) with clickable anchors?
Well, you should know that it is possible to automate this process and to go even faster when you create anchors on your WordPress site using a plugin. For this, there are several solutions that we will see in detail.
Option 1: Use the LuckyWP Table of Contents plugin to create a table of contents
Different plugins are available on the official directory to help you design a table of contents. Among the most famous ones, you will find Easy Table of Contents, Table of Contents Plus, or LuckyWP Table of Contents.
This last one caught my attention because it is the best rated of the three (4.9 stars out of 5) and it is very easy to use, with a lot of customization options.


You can add a table of contents automatically, choose its location (e.g. before or after the first title, after the first text block, etc.). Or, of course, you can manually integrate it wherever you want in your content using a dedicated Gutenberg block.
Once this is done, you can act on the content, the way the overview works and its appearance, with the following settings, among others:
- Adding a numbering for your titles.
- Customizing the name of your table of contents and the different tags (“show”, “hide” etc.).
- Possible management of colors (background, border, title, links, etc.) and font (size, fat).
- Possibility to activate the nofollow attribute.

Download LuckyWP Table of Contents:
Option 2: Use a Gutenberg block plugin
If LuckyWP Table of Contents and others focus on a specific objective – adding and customizing a table of contents – there are other plugins that are more generalist and offer as well an option to add a table of contents.
This is the case with Gutenberg block plugins. These plugins offer their own blocks (content items) dedicated to the WordPress content editor. They allow you to add headlines, calls to action, sliders, forms, a search bar, price tables, etc.
And, of course, for some of them: a table of contents. You won’t always find such advanced settings as with a dedicated plugin like LuckyWP Table of Contents, but it may be enough for you, depending on your needs.
Among the Gutenberg block plugins that offer a table of contents, I could mention for example:
- Ultimate Addons for Gutenberg, designed by the creators of the Astra theme.
- Kadence Blocks, by the creators of the Kadence theme.
- Stackable.
Option 3: Use the Elementor plugin
Finally, the last option I wanted to talk to you about is based on a plugin that is a bit special, since it is a page builder.
Its name? Elementor (affiliate link). It is the most famous of the WordPress ecosystem, with more than 10 million users worldwide.

Thanks to modules (image, text, button, video etc.) and ready-to-use templates, a page builder allows to design the visual appearance of your site without getting your hands dirty with the code (or very little). It uses drag-and-drop very often. We present ten of them in this article.
Even in its free version, Elementor has a widget dedicated to the creation of anchors on WordPress: the so-called “Menu anchor”. It looks just like this:

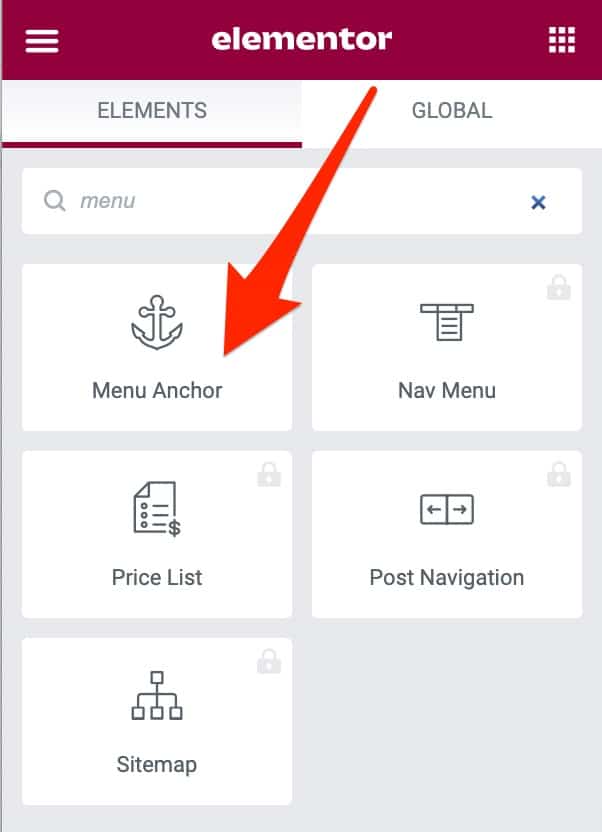
To use it, follow this short tutorial.
Want to go further and start using Elementor? Check out our user guide dedicated to the page builder.
Recap
Throughout these lines, you have discovered several ways to create anchors on WordPress. In other words, you can opt for one of the following solutions, depending on your needs:
- The native features of the content editor
- HTML code
- A dedicated WordPress plugin
Don’t hesitate to test them on a draft to fully understand the manipulation.
Remember, the most important thing is to keep the exact same anchor name! With the # for the clickable anchor link, and without the # for the id of the anchor that is linked to it. Once you understand how to do this, the rest will be a child’s play.
Remember to use it whenever you have long content. Your readers will thank you.
So, do you feel like using anchors now? Tell me in the comments if you have managed to create them on your WordPress site.