


Fasten your seat belt. Sit comfortably in your seat. I turn on the ignition and off we go: I’m taking you for a ride in the Rolls-Royce of plugins to create forms.


This famous supercar is Gravity Forms (GF). Thanks to this proven plugin, you will be able to design more or less complex forms easily, without having to code.
In this article, you will discover the plugin in action, in order to determine if it can meet your needs.
Getting started, available fields, configuring a form, integrating it on a page, or even a preview of the different licenses and their limitations: here is a good overview of the program that awaits you.
Are you ready to dive into the wheels of this well-oiled machine? Get in the car!
Overview
The different links to the official Gravity Forms website are affiliate links. This means that if you buy the plugin through these links, WPMarmite will get a commission. And if there was no affiliate program available, I would have presented the plugin with the same enthusiasm!
Originally written in April 2020, this article was updated in June 2021.


The available fields with Gravity Forms
I told you in the introduction: the fields offered by a form are THE criteria you should look at first, especially because some plugins don’t have all of them, and others charge for them.
So you need to make sure that the uses you have in mind will be possible.
If you want to make a simple contact form, most plugins will allow you to do that easily.
But as soon as you want to have more elaborate fields or you want to set up conditional logic (we’ll talk about this later), the selection of plugins is limited.
And the specificity of Gravity Forms, being paid, is that it offers all the fields from its first license. It will allow you to do many things without having to invest in a too expensive formula.
Here is an overview of all the fields at your disposal when you get the plugin.
Standard Fields

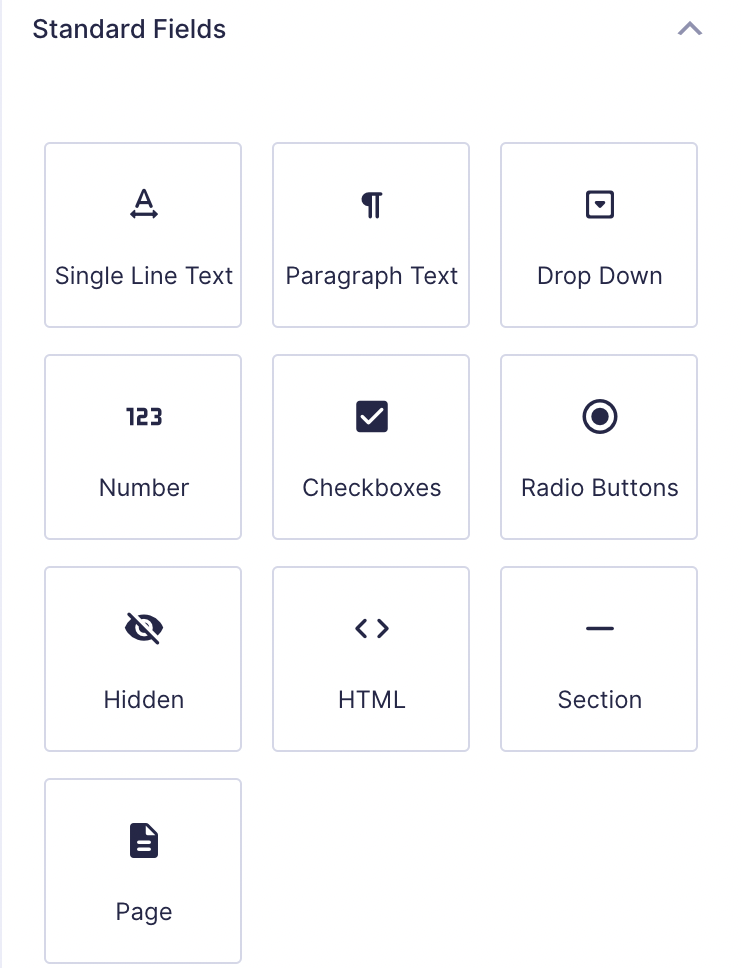
You will find in this part the basic functions of a form (10 in total). Basically, Gravity Forms doesn’t need to do any work with these fields:
- Single Line Text: you leave the possibility for the user to enter some text. This is what we would normally use to fill in the name, the first name, the email address, the website… But you will see that there are better possibilities in the advanced fields.
- Paragraph Text: easy, this is for a large text area. If the user should write a novel, he can even stretch the editing area downwards.
- Drop Down: the user has to “drop down” the list to see all the possible choices. It’s up to you to decide if radio buttons would be more appropriate, so that they see all the options at once.

- Number: you can ask the user to enter a number. You can even limit the available range (between 30 and 50 for example). If you want to go further, you can activate the “calculations”. This way, a field can be filled in according to formulas that you have created and that take data from other fields.
- Checkboxes: this is the classic field when you want to give a choice between several options. You can recognize it by the square checkboxes.
- Radio Buttons: this is the alternative to the “drop-down list”. Here the boxes are round and only one can be selected.

- Hidden: as you can imagine, the user will not see this field. The aim is that it should be a field reserved for you, where you can put an arbitrary value, or that you can use to retrieve information available to Gravity Forms. I’m talking about the user’s IP address for example. Personally, I never use this field.
- HTML: here, it’s simple. You can write whatever you want as long as you know how to use HTML. You could write an introduction in your form, add an image, an audio file… The possibilities are unlimited since you can put whatever you want.
- Section: this is what will allow you to separate several parts of a form by titles. You can even write a small description under each of the titles, allowing you to introduce the next section.
- Page: this field will be useful to separate your (long) form into several pages. The user will then have to click on “Next” to go to the next page. Use sparingly: don’t put in a lot of pages, otherwise the user will get scared when he sees that his submission becomes endless!
That’s it for the “standard” fields, let’s move on to the advanced fields.
Advanced Fields


The specificity of most of these fields is that Gravity Forms will make your life easier with a practical formatting.
- Name: here you can break down the fields that make up the identity of your user. You can ask for a prefix (Mr., Mrs., Ms., Dr., etc.), then a first name, a middle name, a last name, and even a suffix.
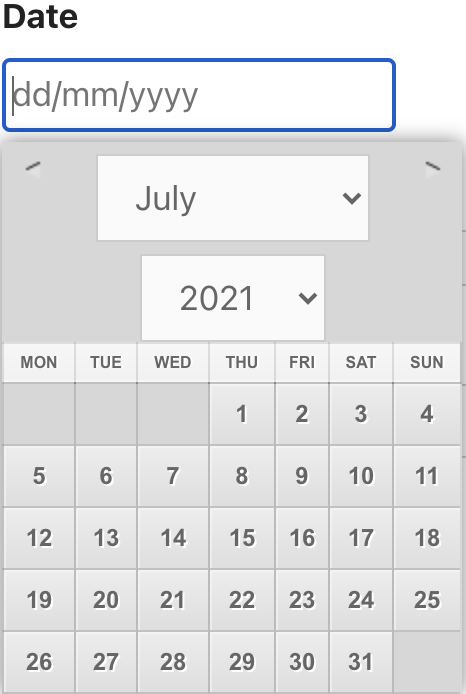
- Date: you can request a specific day through a field to be filled in or a calendar.

- Time: this field will be used to collect a time (in a 12-hour or 24-hour format). However, if you manage time slots, it is best to use a drop-down list.
- Phone: here you can collect a phone number and the basic idea is good: Gravity Forms will check that it is a valid format. But it only works for US numbers. As soon as you select the “International” format, you can even write letters and the form is still submitted. It’s a pity.
- Address: your visitors can enter a postal address here. You can activate / deactivate the different fields that make it up: Address, Address line 2, City, State / Province / Region, Postal code, or Country.
- Website: this time Gravity Forms will check that the format is correct, like https://www.wpmarmite.com for example.
- Email: there will also be a format check here. But in addition, you can activate the confirmation by email. That is to say that the user will have to validate the email received before his request is sent to you.
- File Upload: here you can choose between a single file or several, the type of extensions allowed (jpg, png, pdf…), or the size limit. The user will be able to send you additional resources.
- CAPTCHA: you will need a ReCaptcha account from Google (free) in order to activate it and protect your forms against spam. Their latest version even allows you to identify a user from a robot without having to enter a sequence of numbers and letters, or click on images.
- List: this field is special: it is up to the user to fill in the items in the list. Unlike the drop-down list or the multiple list, for which we prepare the different possible options beforehand.
- Multiple Select: it looks like a drop-down list where you can select several lines. I’m not particularly fond of the format, I still prefer to use checkboxes which are simpler in my opinion.
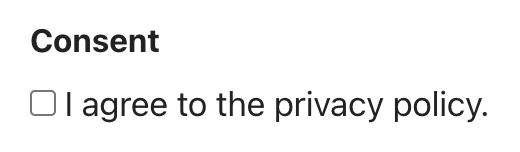
- Consent: in order to be compliant with the General Data Protection Regulation (GDPR), this field allows you to add a checkbox to give your visitors the possibility to accept or not your privacy policy.

As you can see, there is a small downside to these advanced fields: some of them are very specific to the United States and might not correspond to your needs.
And it is difficult to adapt them without touching the code. This is the biggest limitation of Gravity Forms, in my opinion.
But let’s have a look at the other types of fields that are offered to us and that radically change the way we can use the plugin.
Post Fields

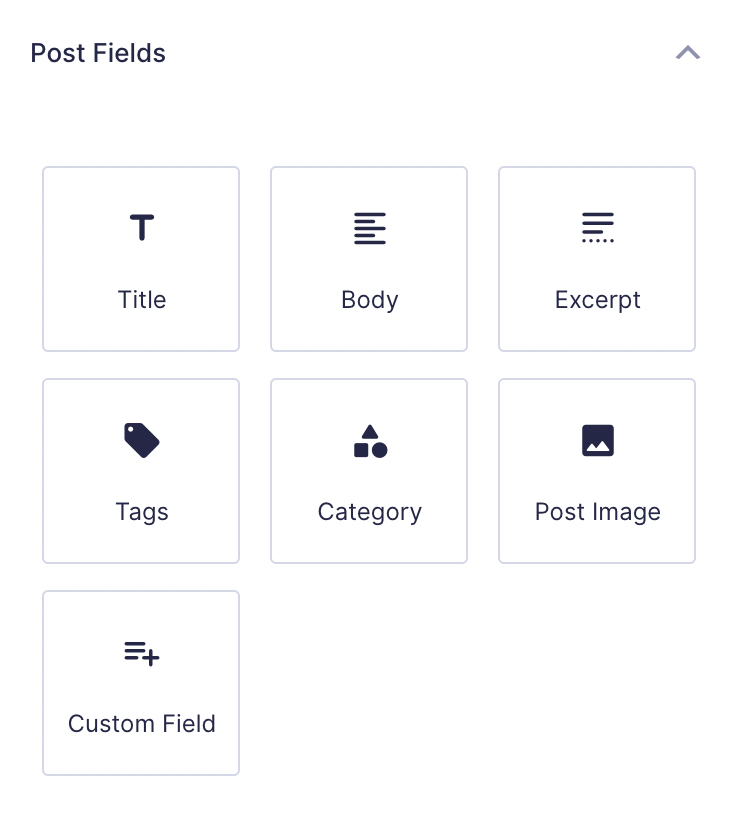
These fields are very useful when you want to give the possibility to your visitors to submit guest posts. Indeed, you can make a complete form for them that will connect perfectly to your WordPress posts.
You will be able to configure that all submissions go to draft. And all you have to do is to go back and edit it before publishing it.
You can also delete it and notify the author if you don’t want to post it on your blog.
Here are the fields at your disposal:
- Title: just like when you write an article in WordPress, this is the very first field.
- Body: your guest author will be able to write his text here. You can specify a maximum number of characters not to exceed. However, the author does not have access to a complete editing interface (e.g. he cannot add media in the body of the text).
- Excerpt: it’s up to you to decide whether or not to use this field. But it will allow your visitors to specify an excerpt, just as you can do in the administration of your articles.
- Tags: your users can submit several tags by separating them with a comma. Unfortunately there is no autocompletion: existing tags are not suggested when you enter them.
- Category: here you will have the drop-down list of existing categories on your blog. No bad surprises, then: the guest post will only be able to select an existing item.
- Post Image: you know the principle: the user will only have to send his file using this field.


- Custom Field: this is more specific and will depend on each person. I know that I personally don’t use custom fields. On the other hand, some of my plugins put values and I’m not going to change them. We’re going to reserve that option for the developers, if you don’t mind.
We have one more type of field, those that bring Gravity Forms closer to a small ecommerce system.
Pricing Fields

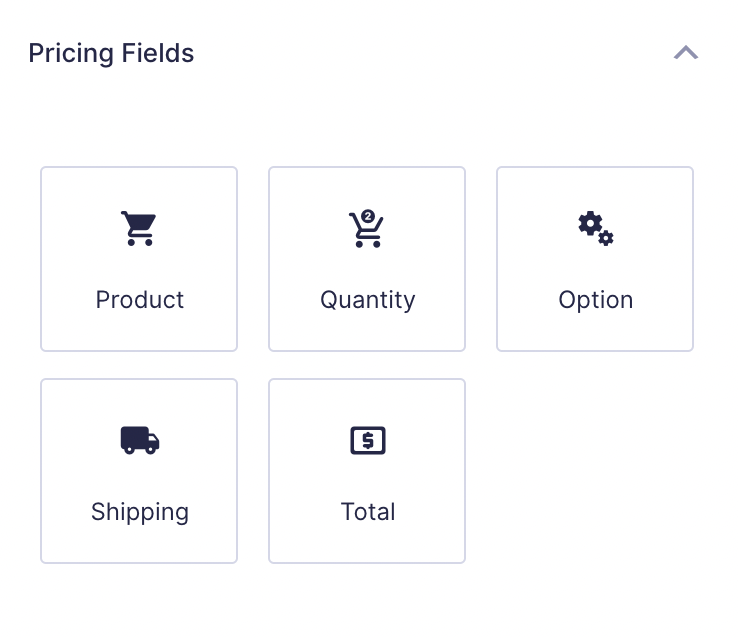
Indeed, if you want to make a price simulator or a small order form, you can do it with the plugin.
But it will never be as complete as a real ecommerce system (like WooCommerce).
- Product: here you can create a unique product or a product with variations (different sizes of t-shirts, for example) and set the price.
- Quantity: this field is always linked to a product field in order to know to which it should be applied.
- Option: we can imagine that you offer different types of printing on your t-shirts (transfer, silk-screening, embroidery). This field will be perfect and will add costs to the total order.
- Shipping: in the same way as the options, you can propose different shipping options here, each with a corresponding price.

- Total: this field has only one purpose: to add up all the products, options and delivery methods entered in the form. This way, the user will clearly see how much the order will cost.
These fields can be used as price simulators or order forms but not as a real ecommerce system if you don’t take the Elite license.
It is indeed thanks to it that you will be able to use payment gateway addons such as Paypal or Stripe.
That’s it! We have just finished the tour of the available fields. I hope that you have been able to measure how far you can go with Gravity Forms. Let’s now take a look at its administration.
Getting started with Gravity Forms
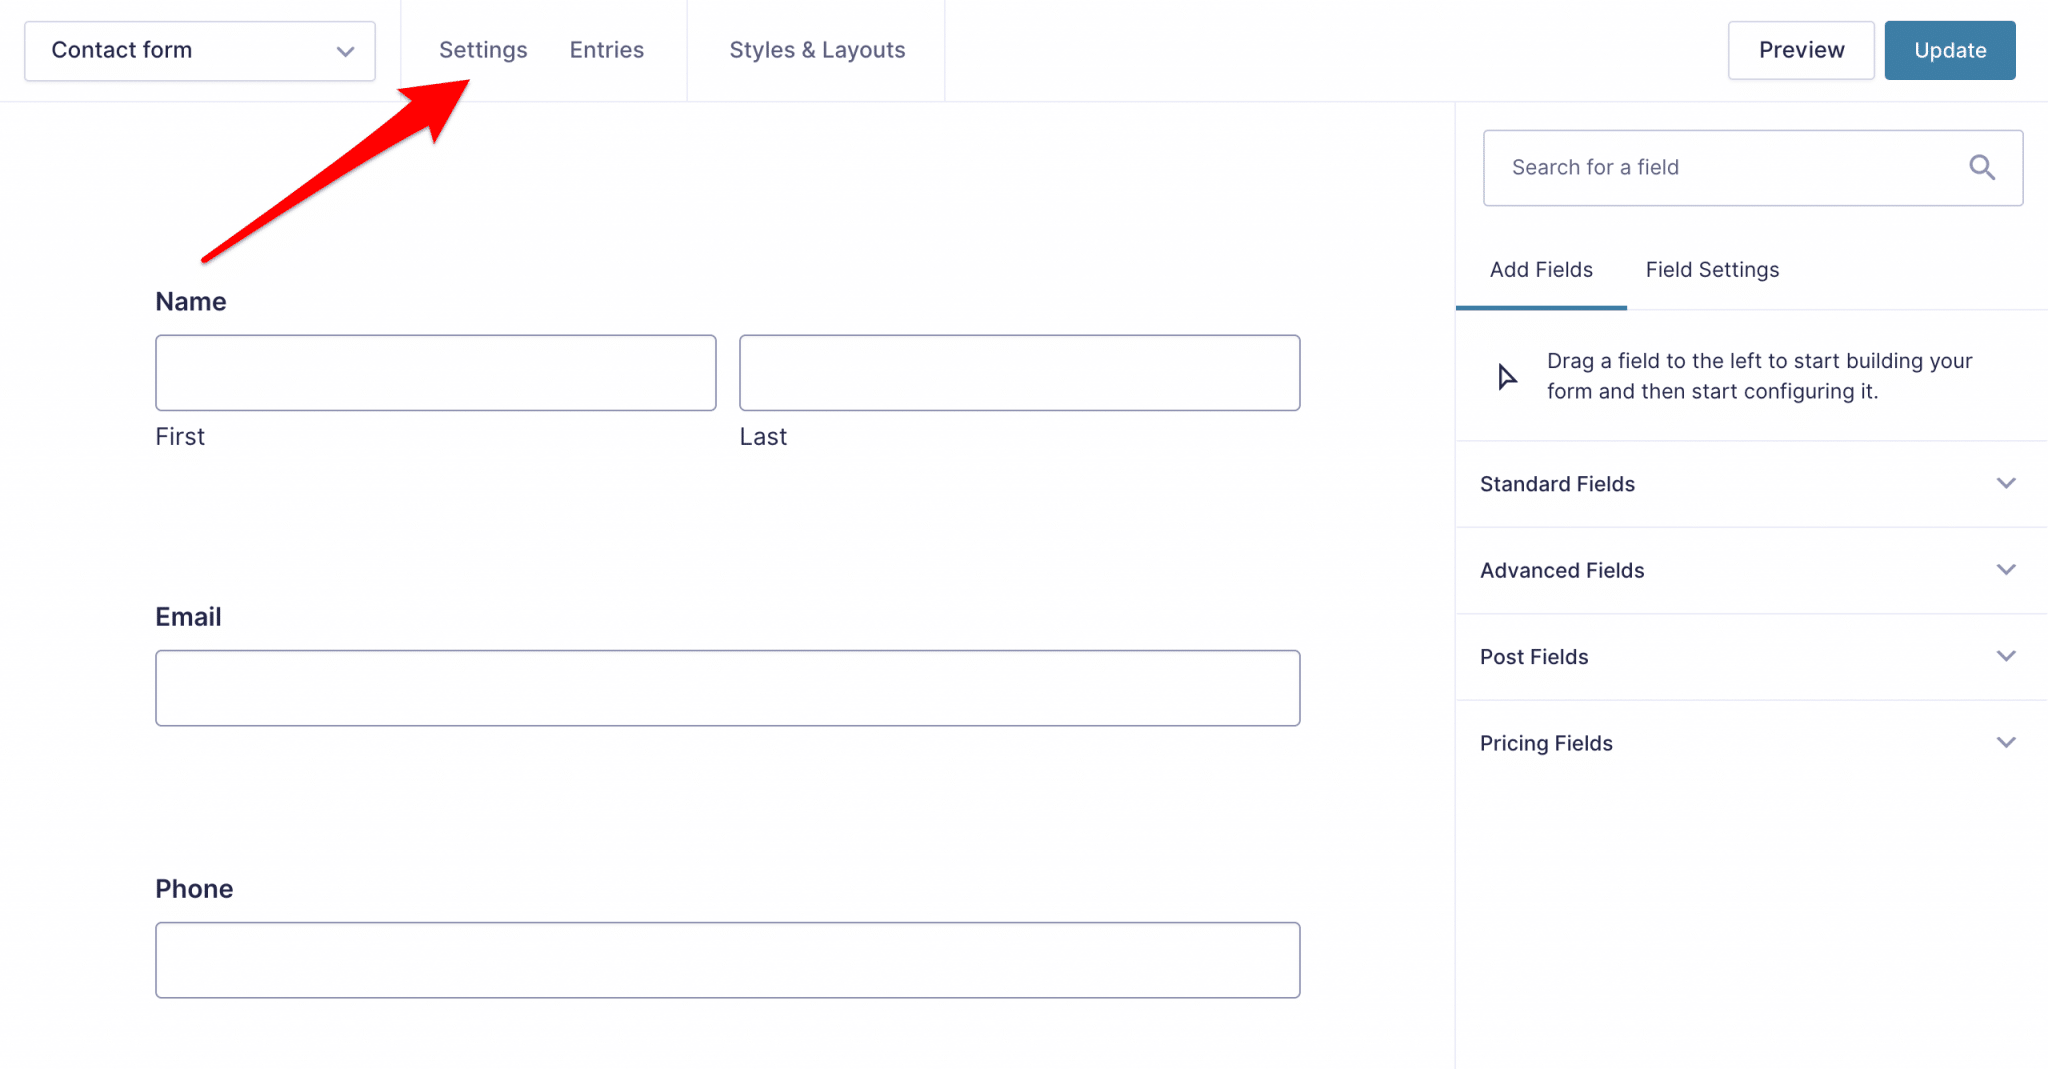
Creating forms
Here, Gravity Forms uses a classic management interface: you will not be disoriented, it looks like WordPress!
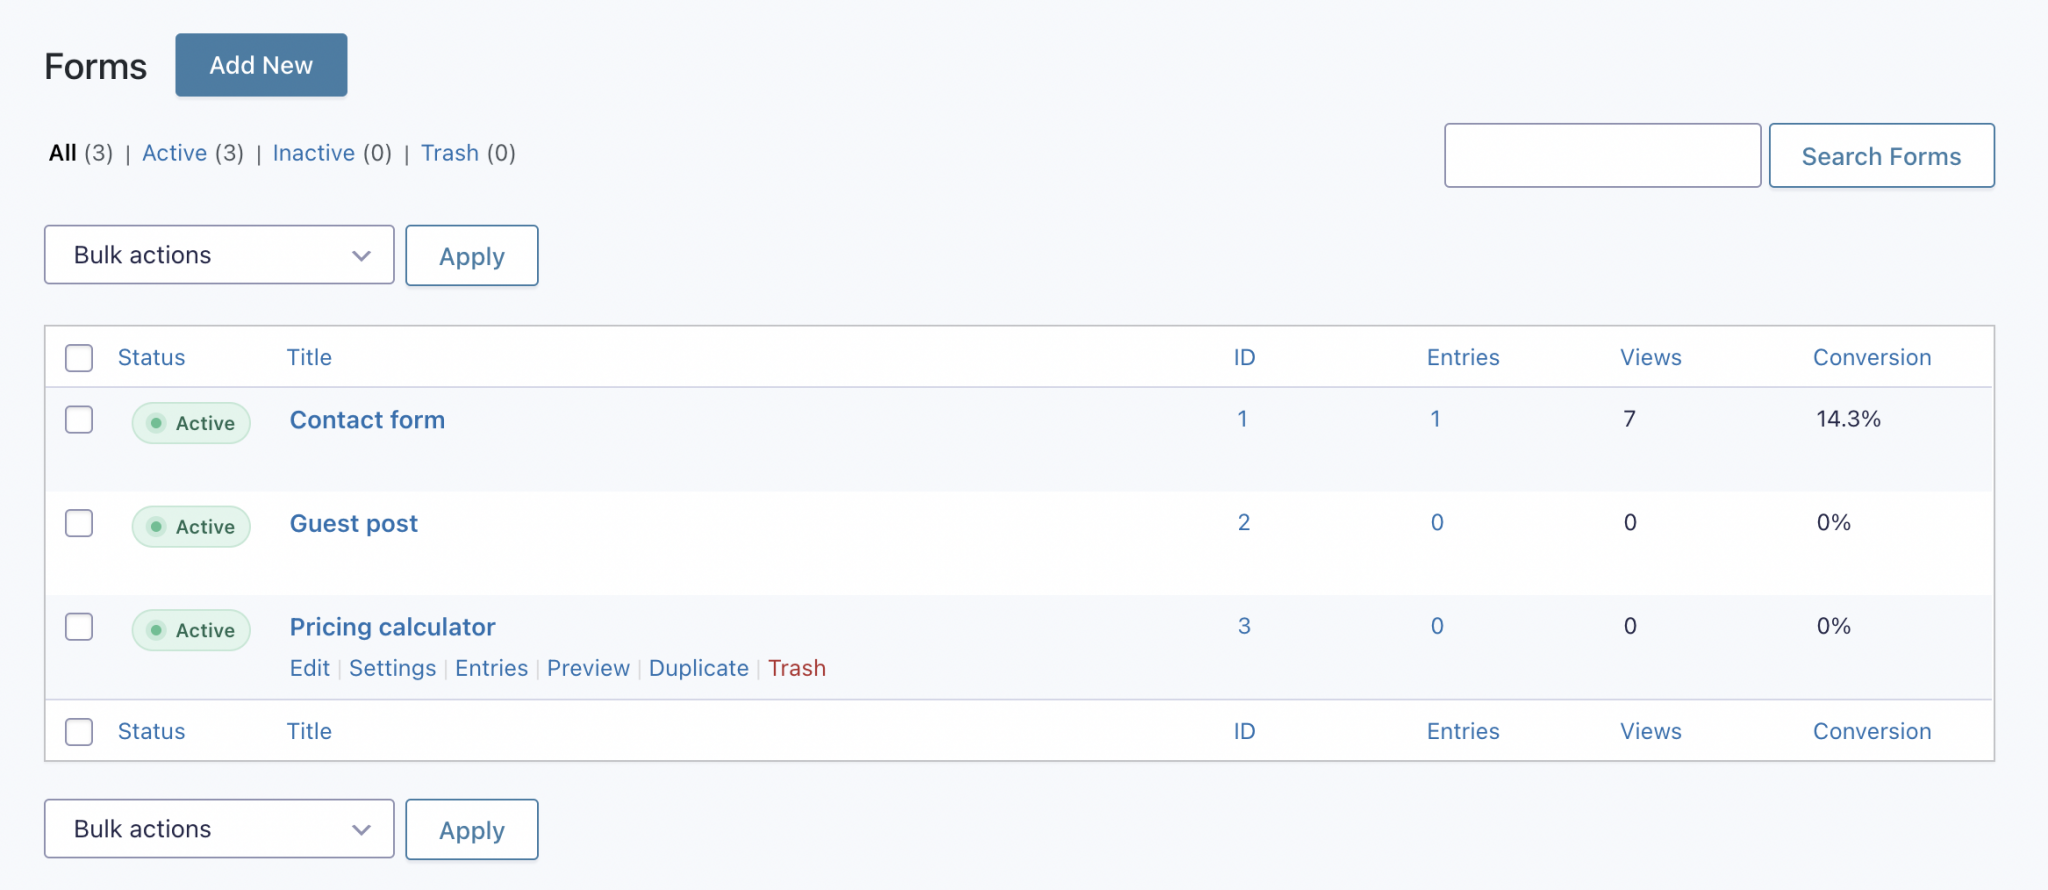
You can add, modify or improve the parameters of each form you have. It is even possible to duplicate a form, which will be extremely useful if you want different versions for different areas on your site.
Now let’s take a look at what the editing interface itself looks like.
Add and organize fields
Here, you’ll need to pick from the available items on the right by clicking on them or dragging and dropping them to the editing area. Then you can reorder them in the same way. Since version 2.5 of Gravity Forms, it is now possible to arrange the fields on several columns (up to 4).
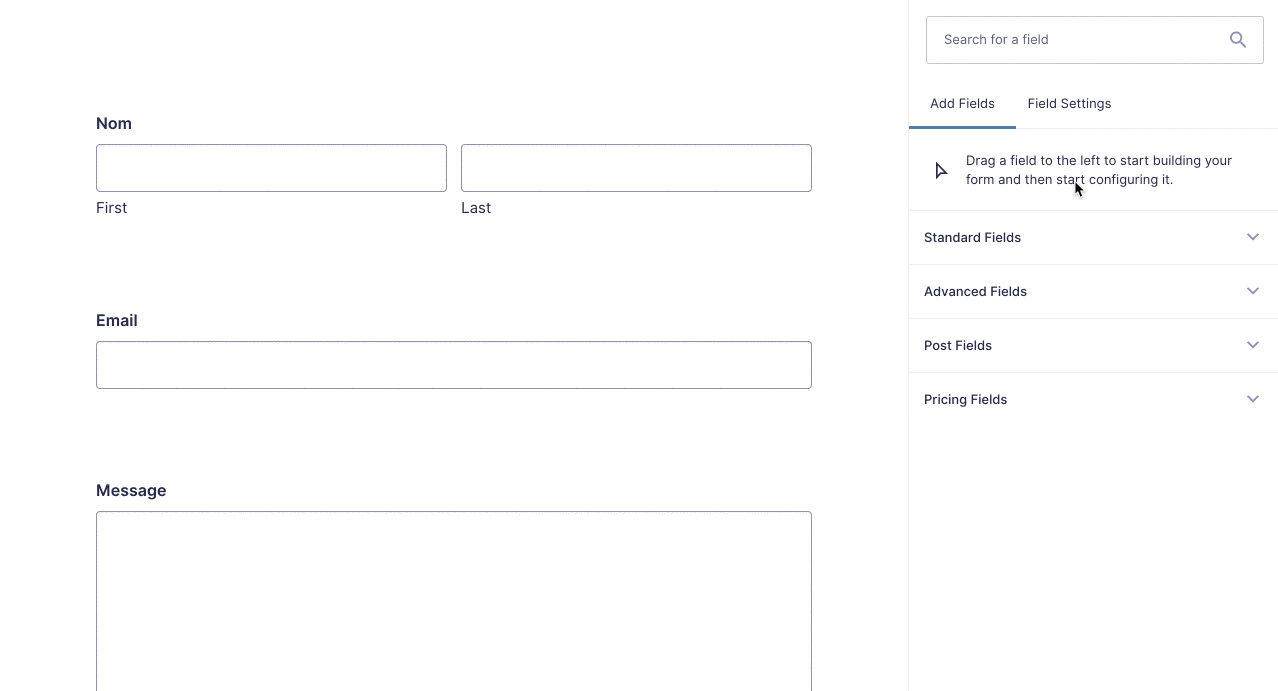
To modify a field, you just have to click on it to display the corresponding parameters.
You can also click on the two sheets icon to duplicate a field. The following icon also leads to the field parameters. As for the pictogram in the shape of a cross, you have guessed it: it is used to delete a field. A popup window will then appear asking you for confirmation.
Finally, you will be able to update all the changes you have made thanks to the blue button (or the color you prefer in WordPress) at the top right of the screen.

We’ll now take a closer look at all the options available for editing a field.
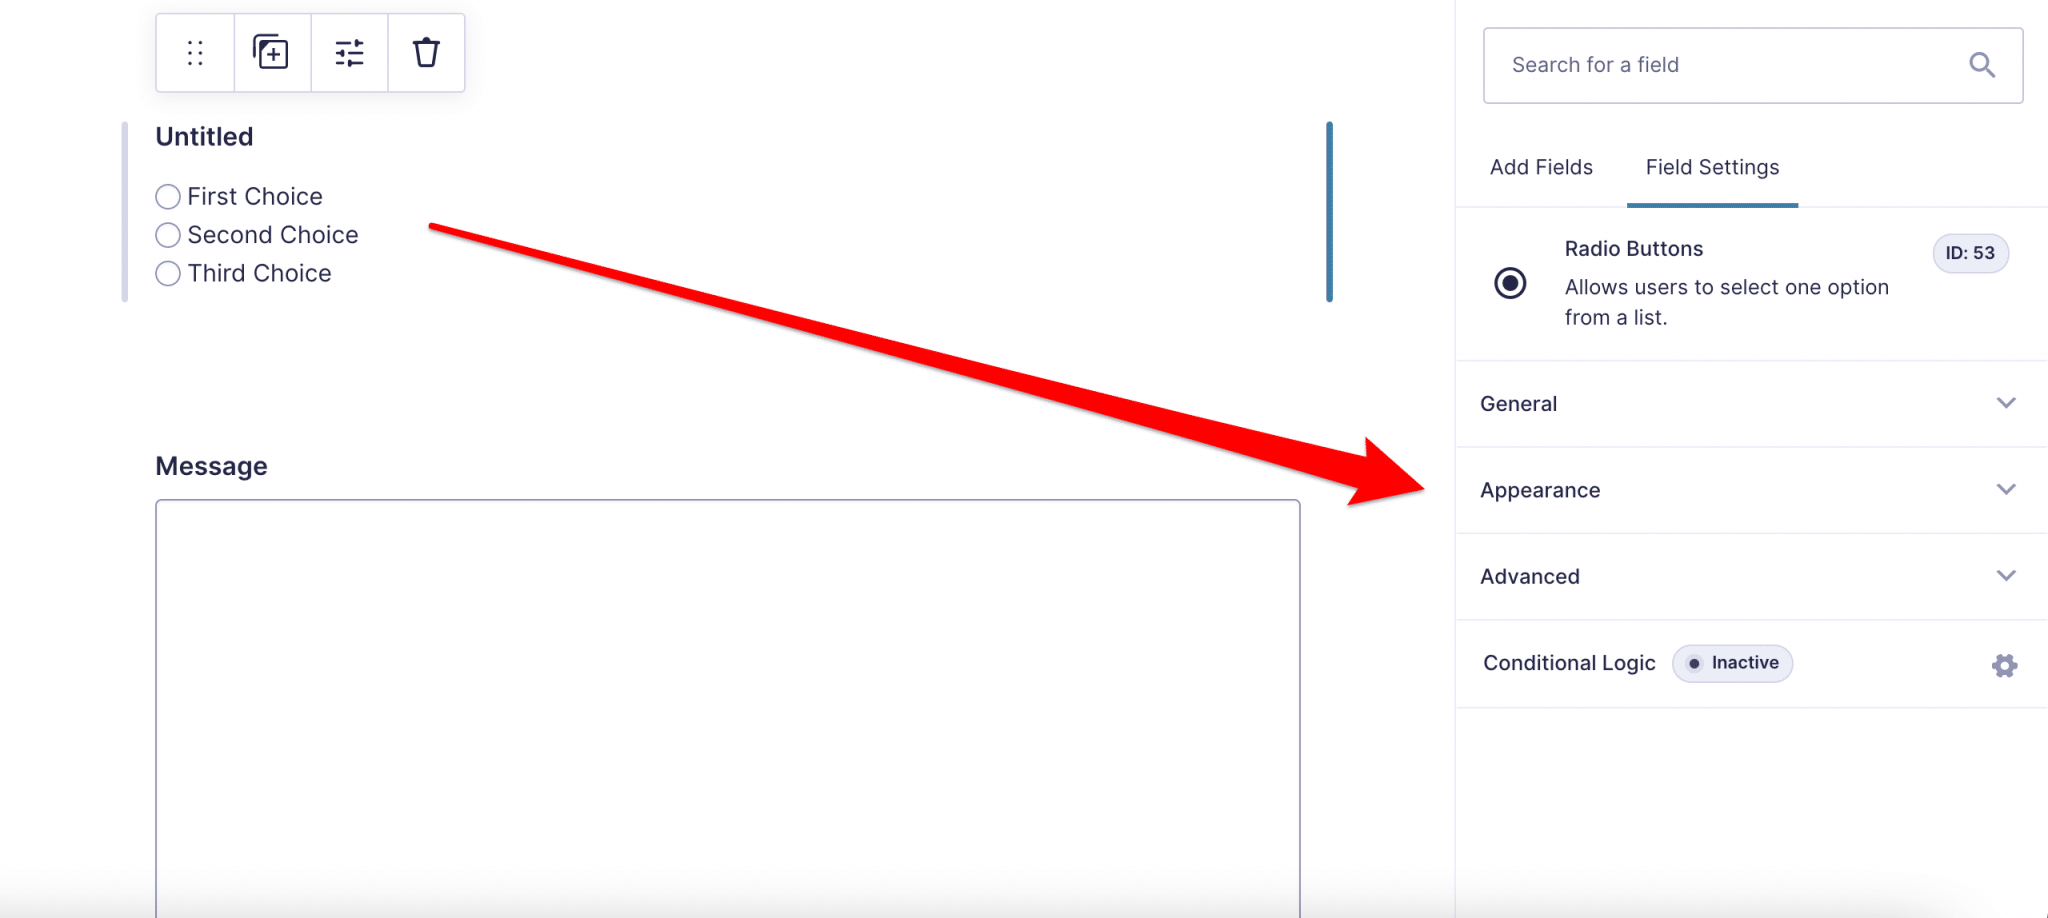
Setting up a specific field
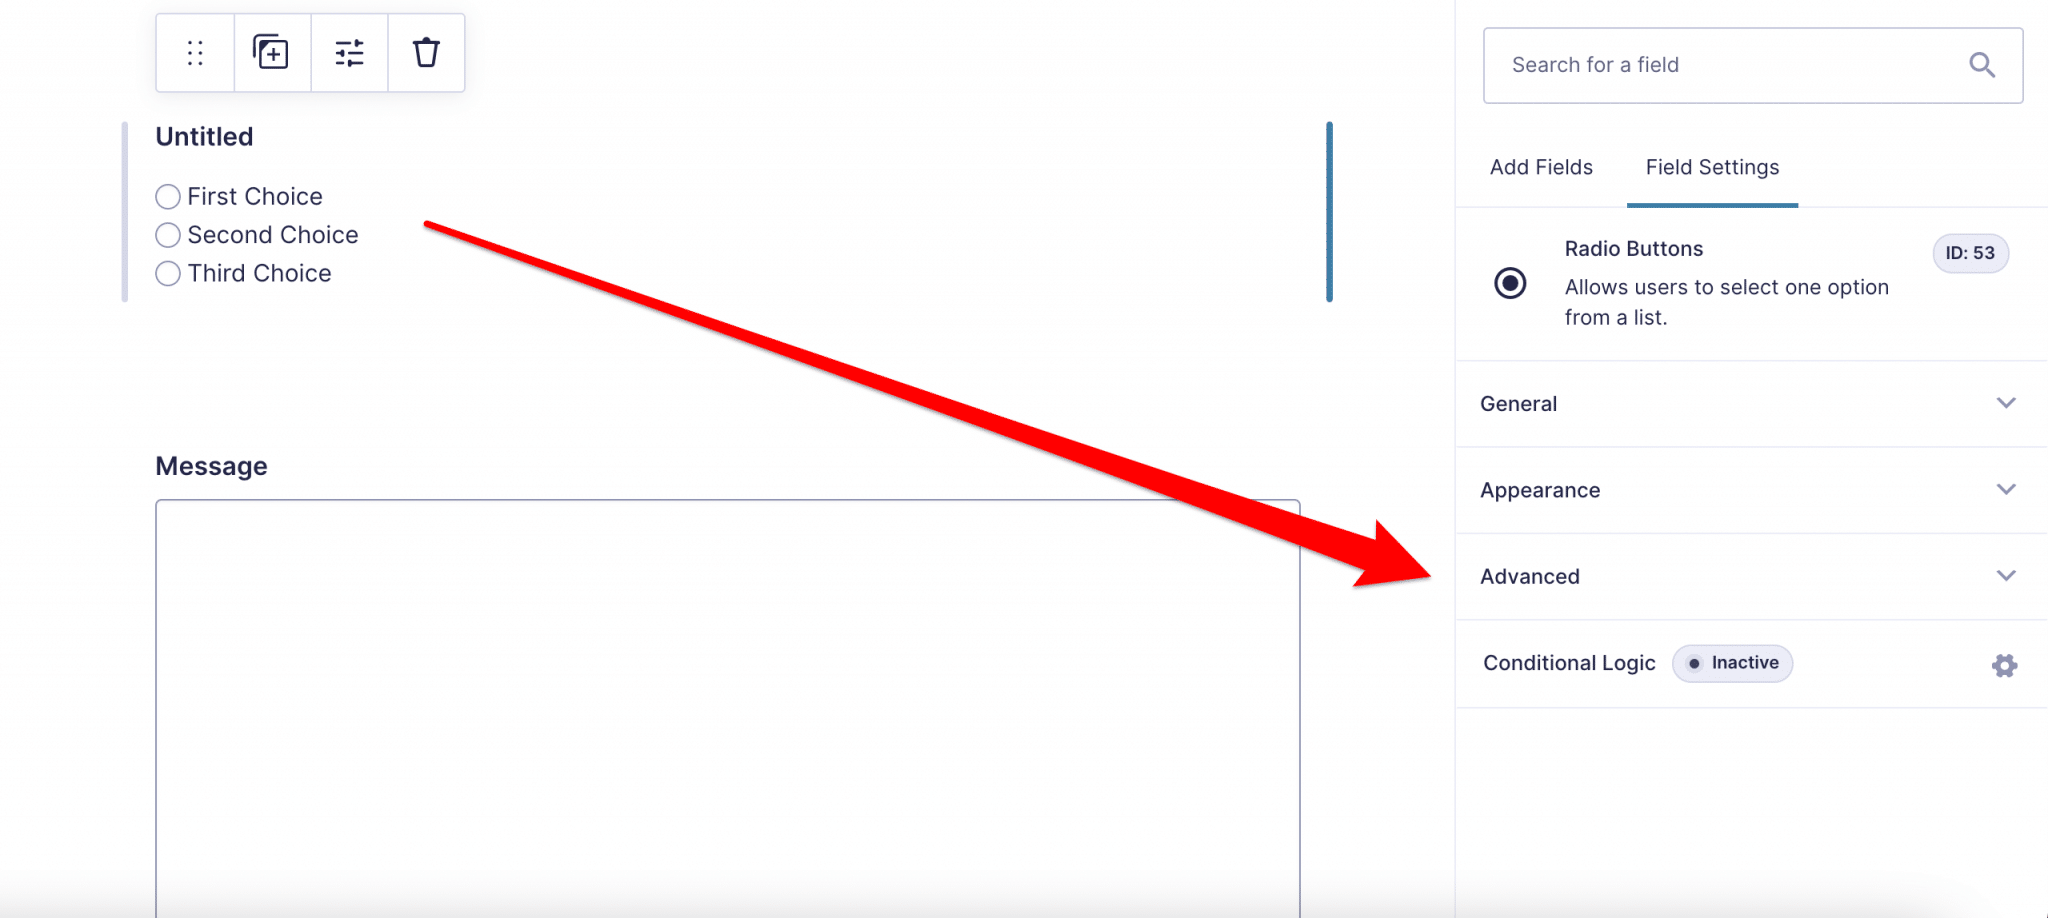
When you open the settings for a field, you’ll have access to 3 different tabs: General, Appearance and Advanced.
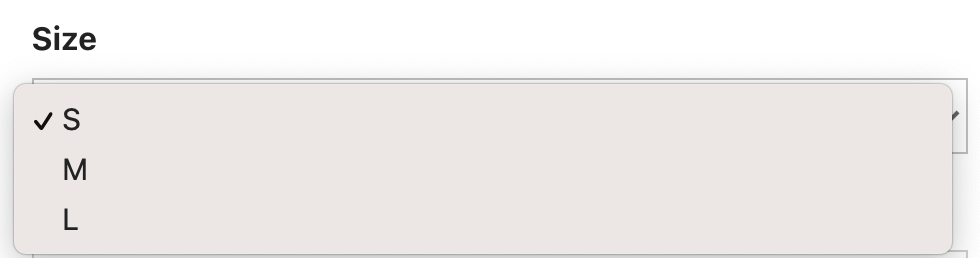
Very often you will have options specific to the type of field you have selected. For example, the settings for the Drop Down List field are not at all the same as those for the Section field.
General section
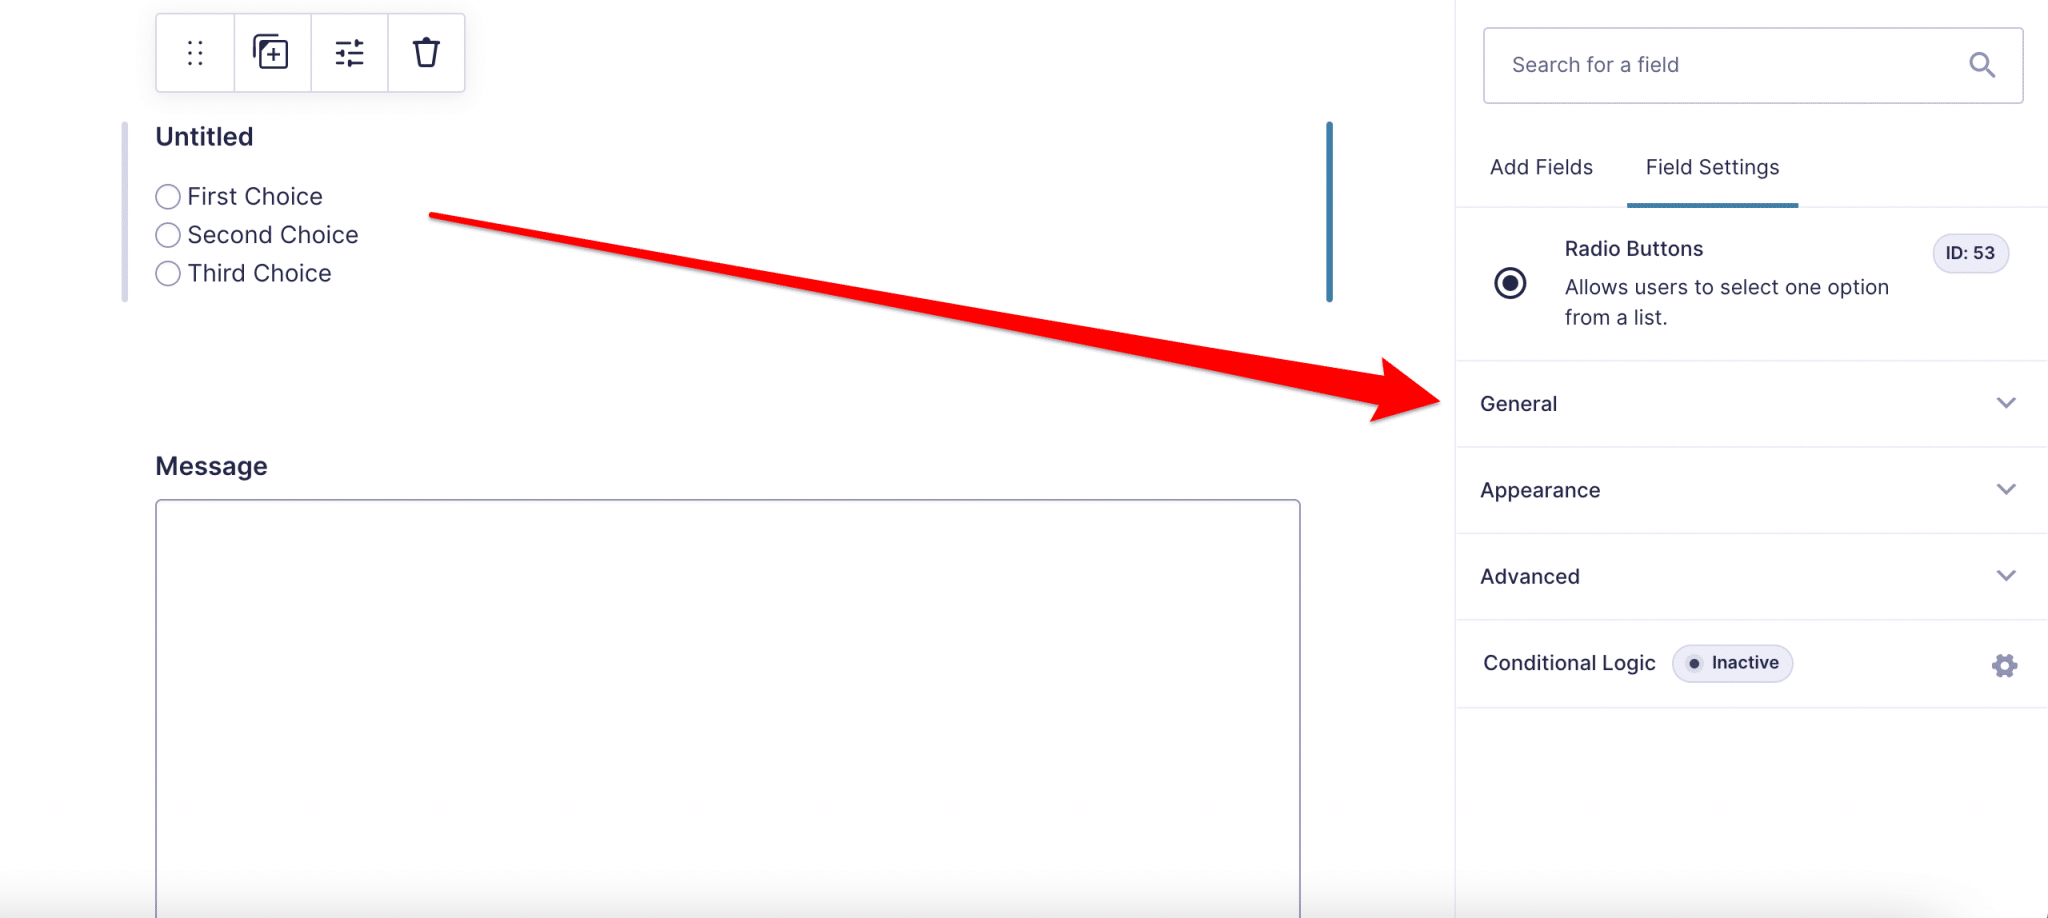
The General section will allow you to modify the field label (the one that will appear on the screen) and to add a description. This will be a small introductory text in which you can add details.
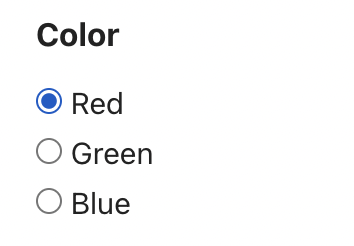
You will then have specific options for each type of field. Thus, as you can see on the above screenshot, I can specify the items in my drop-down list. Whereas for the Name field, I could have allowed my users to declare their identity in several parts (First name, Last name…).
Finally, at the end of this tab, there is a checkbox, and not the least important one: the Required box. This allows you to make a field mandatory and I can tell you that you will use it often!
Appearance section
On the Appearance tab, we will also have specific options. But there are two that you will see very regularly:
- Custom CSS Class, where you can fine-tune the display of different components of your forms. But if you want to play with these options, you will have to know the CSS classes of Gravity Forms. Or rather install the free plugin CSS Ready Classes for Gravity Forms. This will save you from looking at the documentation every time.
- The Field Size is also a recurrent element. Here you can set a field to be small, medium (default), or large. This will vary the width it will take on the screen.
If you want to get rid of the default design of your forms, I invite you to read this post: “How to style Gravity Forms.”
Advanced section
And finally, you will find the Advanced tab. I have to admit that I don’t often modify its different options. However, the very last one deserves the following part of this article.
Conditional Logic
Conditional logics are often a paid feature in form plugins. Here, we cannot escape the rule since Gravity Forms is not free.
However, it is not an addon that you have to buy in addition, it is a native function, and it is very practical.
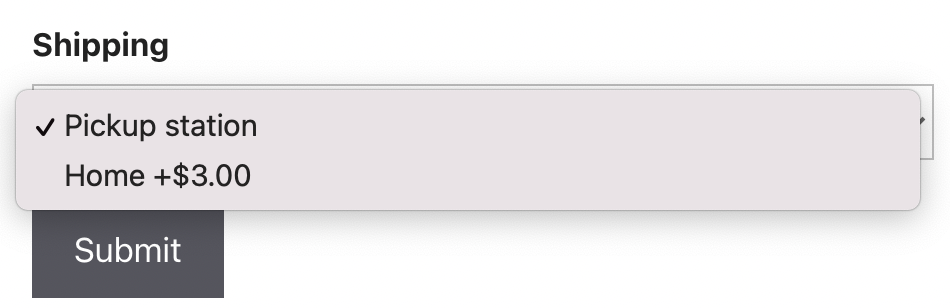
It works as follows: it allows you to display certain fields only if certain conditions are met. Here is an example, if I were a baker with a delivery service:
- If the user contacts me for a home delivery, I will ask him for his postal address.
- If, on the other hand, he comes to pick up his order in store, I don’t need to ask him for this information. I just leave the field blank.
So look at what it does for the customer:


I might as well tell you that this feature is very practical. There are two main reasons:
- You can adapt the level of detail of the information you want to obtain according to the choices of your visitor.
- And you can have a relevant form, without unnecessary fields, while remaining “sober” at first glance. It is only if certain conditions are met that additional fields appear.
So we have just seen how to create and edit forms. But now we’re going to look at all the other important parameters in order to create forms that are just right.


Management, form by form
Now that all the fields of our form are ready, we need to manage the behavior of the form when we fill it in.
Here are the parameters that you will find, form by form, which will allow you to manage the way in which the users will interact.
Settings of a form
The “general” settings of a form are interesting to do a little formatting (really a little) and to manage the display.
First of all, you can customize the location of the labels. You can choose if they will be above, on the left or on the right of the fields.
You can also do this for the field descriptions (above or below), as well as for the “sublabels” (like the First Name / Last Name fields).


Another important setting is the appearance of the Send/Submit button. You can:
- Either leave it as text, or put an image instead.
- Or change its label. A hint: “send”/”submit” is really common, we can do better.


To tell you the truth, I prefer to change the appearance of the button in CSS rather than playing with an image. This requires a bit of technical knowledge but it’s easier to modify.
You can also create a conditional logic that will prevent the end of form button from appearing until certain conditions are met.
You can also activate Save and Continue. This feature allows the user to start filling in the form and then come back to it later if he runs out of time.
You can also play with restrictions, either in terms of the number of entries or the time schedule.
If, for example, you want to organize a contest or giveaway where the first 50 entries win a prize, that’s perfect. And if you also want the form to appear only on a given day, at a given time, then you can use both functions together.
You can also indicate that the user must be logged in to send the form.
As the second to last parameter, you can activate the “honeypot anti-spam” which will prevent robots from sending you false messages. I don’t know if it’s specific to me, but even with the option disabled, I’ve never had false messages.
Finally, you can enable animated transitions. They will be used in particular during conditional logic to make the new fields, hidden until then, appear nicely (we saw this with our baker’s order example).
Alright, that’s all well and good, but when a user completes a form, what happens? This is the role of the next parameter.
Confirmations
When a user clicks on the Send/Submit button (which you will have renamed, to adapt it to the nature of the form), two things can happen:
- Either the fields disappear and a confirmation message arrives instead.
- Or the user is redirected to another page.
Gravity Forms allows you to manage this through confirmations and you can have several of them.
Several? Well yes, by using conditional logic (again), you can define that if a visitor has chosen this option, he will be redirected to this page. And if he chose the other… (drum roll), he will be redirected to another page.
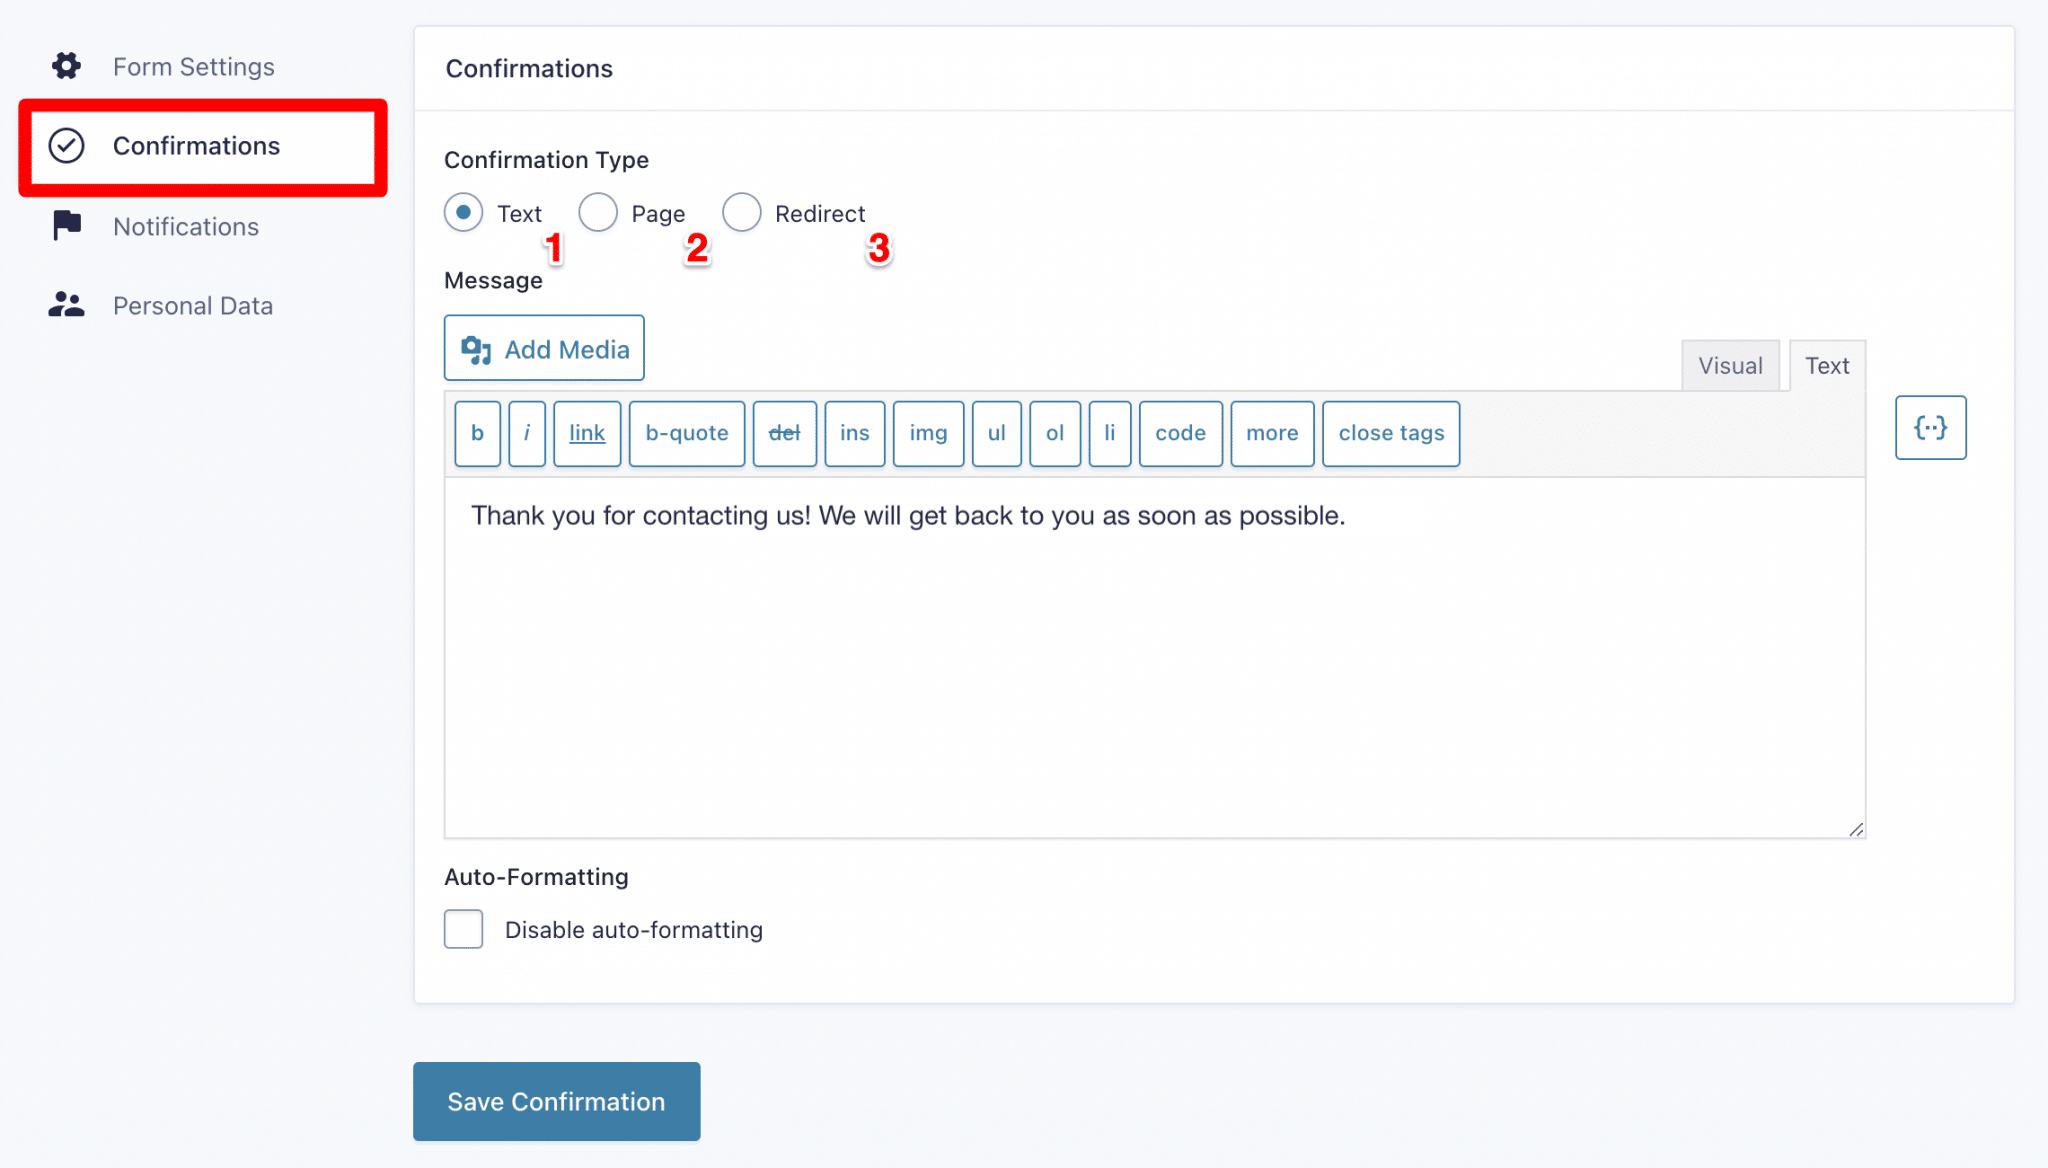
There are 3 types of confirmations possible:
- Text, where you can customize the message that will appear, once the form is submitted.
- Page, where you can choose the page of your site where the user will be redirected.
- Redirect, where you can specify any URL. Even one that is not on your site. Use sparingly though: it would be weird to be redirected to another site when filling out a form.
I’m a big user of the “Page” mode to tell you the truth: I like being able to create a special thank you page for each form.
It’s also useful for giving access to certain resources (training programs, for example) that are only available to people who have left me their contact information.
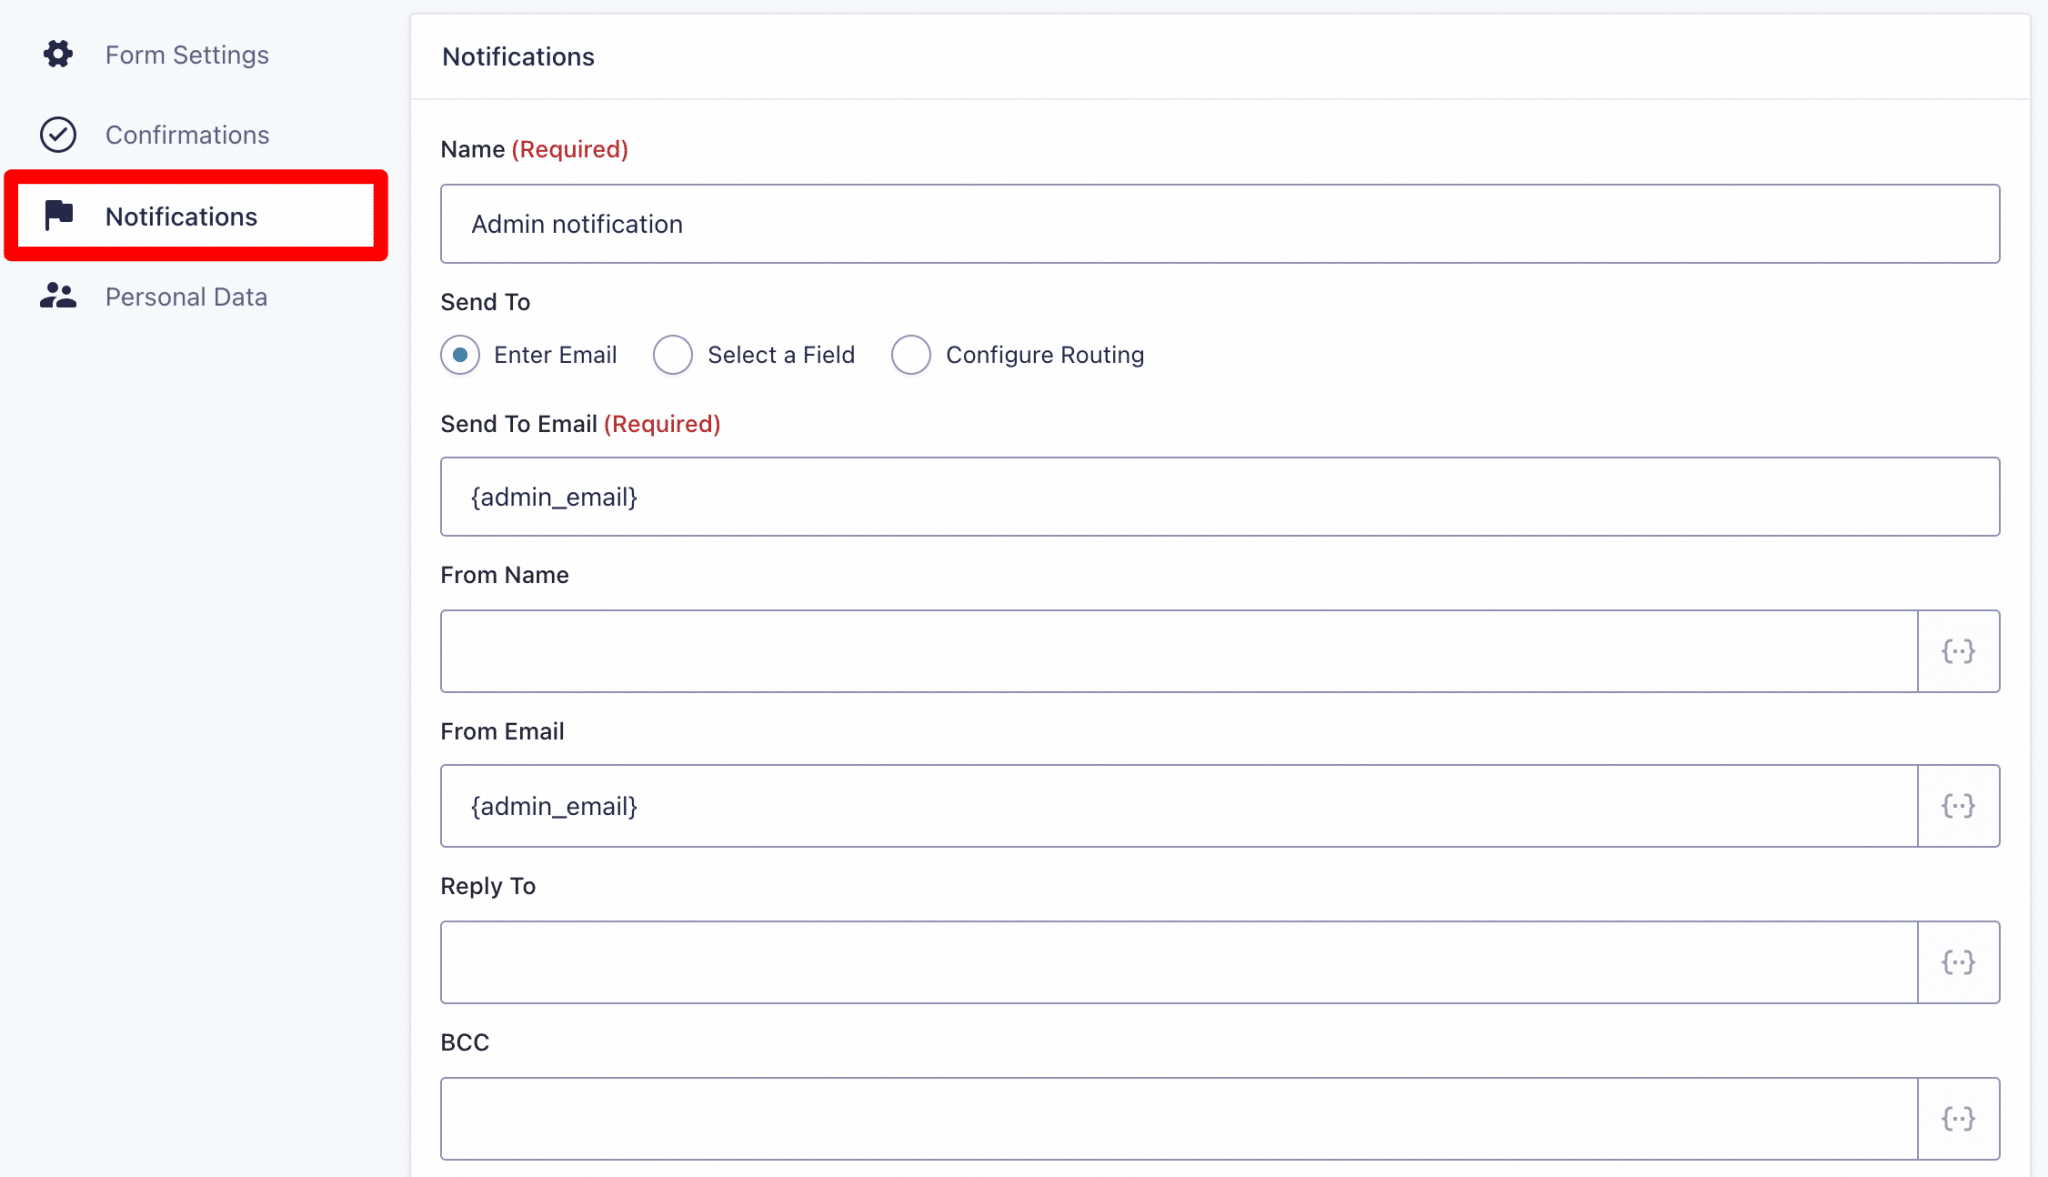
Well, we’ve seen what happens when a form is sent, but there’s one more important point: the notifications you’ll receive (and those you’ll send to the person who just contacted you).
Notifications
This is managed in the Notifications section of the plugin settings. And here again, you can have several. Either to create double notifications, or to use conditional logic.
This is a case I had with a client who manages a national presence. If the user is located in a given region for example, we will guess it through his postal code. And for all postal codes between XXXX and XXXX, we will send a notification to the sales representative concerned.
I won’t hide the fact that it’s a bit cumbersome to manage the day when you have to do all the regions one by one (the “duplicate” function makes sense), but then you have a setup that’s just right.
We can also imagine sending a notification to the user so that he has a copy of his request. And couple this with a checkbox at the end of the form entitled “I want to receive a copy of the form by email”. Then we link the whole thing with a conditional logic and that’s it.
You then have at your disposal all the parameters to compose the notification email. The subject of the email, the sender, the recipient, possible hidden copies… We have everything.
We can even recover the information of the fields to fill these parameters.
Well, we have set up the notifications and they will be sent to you by email. But you can also check them directly in the dashboard.
Viewing messages in WordPress
This is a very useful feature and is offered by default in Gravity Forms: you can see in the same interface all the entries you have received. And this, form by form.
To do this, go to Forms > Entries and you will have a list of all the submissions. You can then change the form using the drop-down list at the top left of the form title (in the example, Contact form).
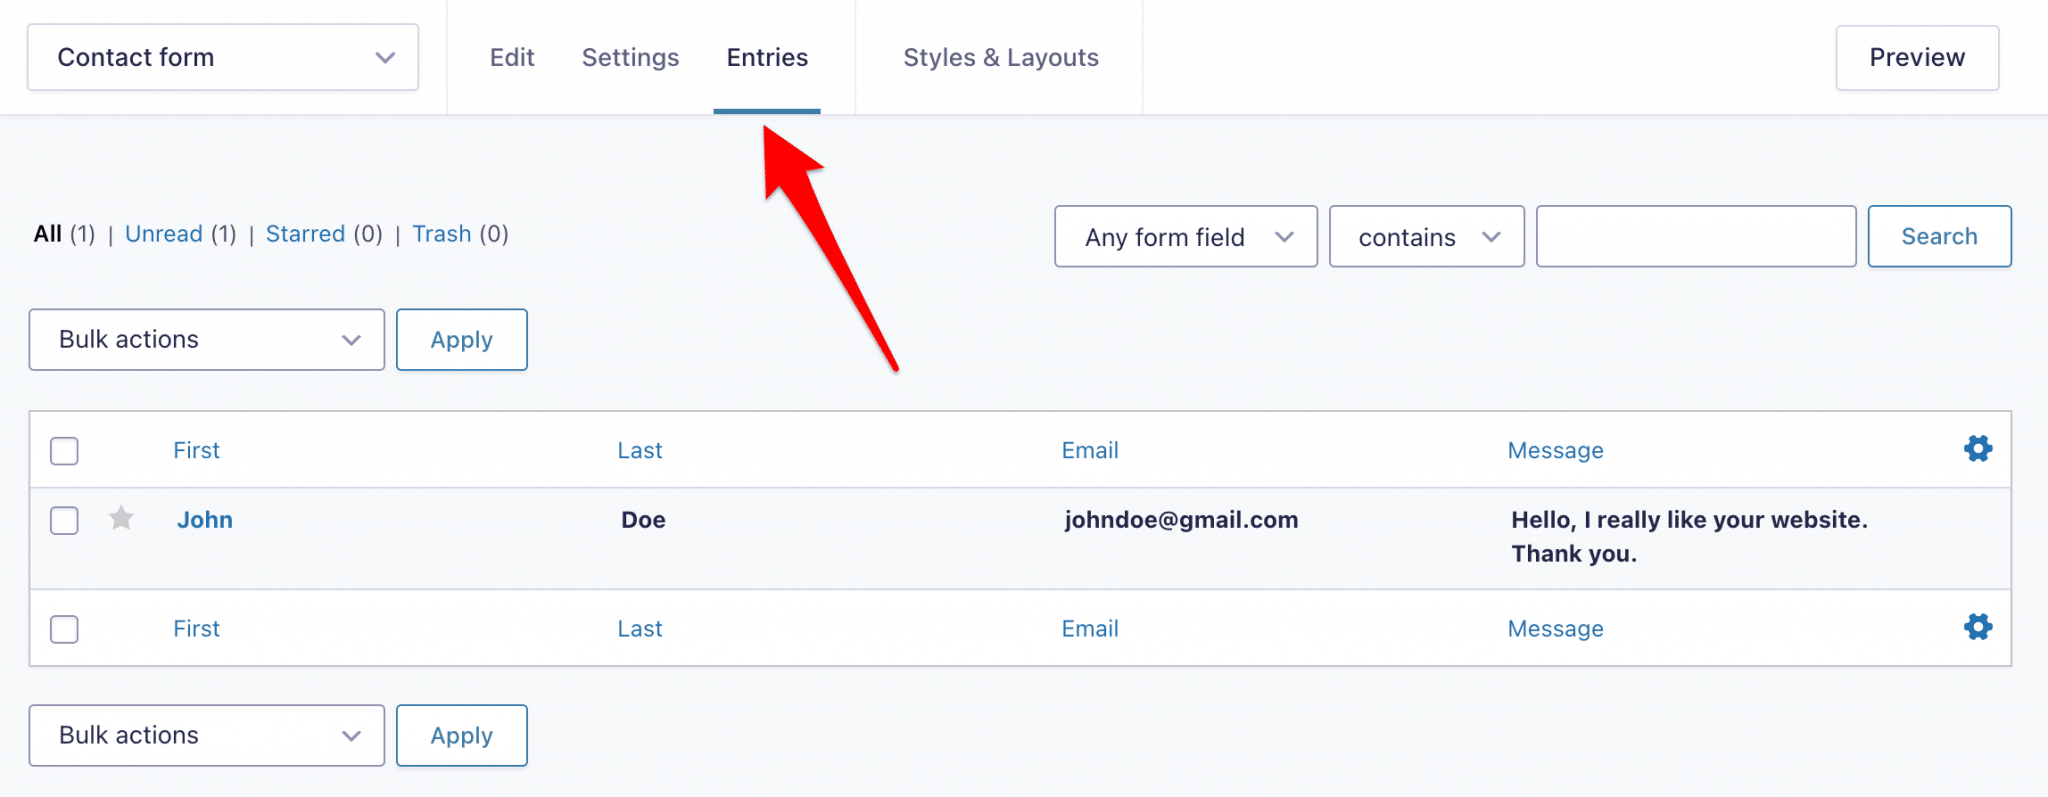
Let’s put it in perspective: this is just a check of archives, you will probably have already had all the notifications in your inbox before!
We are almost ready now, the form is well configured and we miss only one thing: that your visitors use it.
To do this, we will have to make it appear on your site.
Integrate the forms on your site
There are two possible locations for your forms: in the content, or in a widget. Discover the two ways to do it.
Integration in pages (and any other type of content)
Let’s start with an insertion in the content and in particular in a “Contact” page for example. This is the most common case.
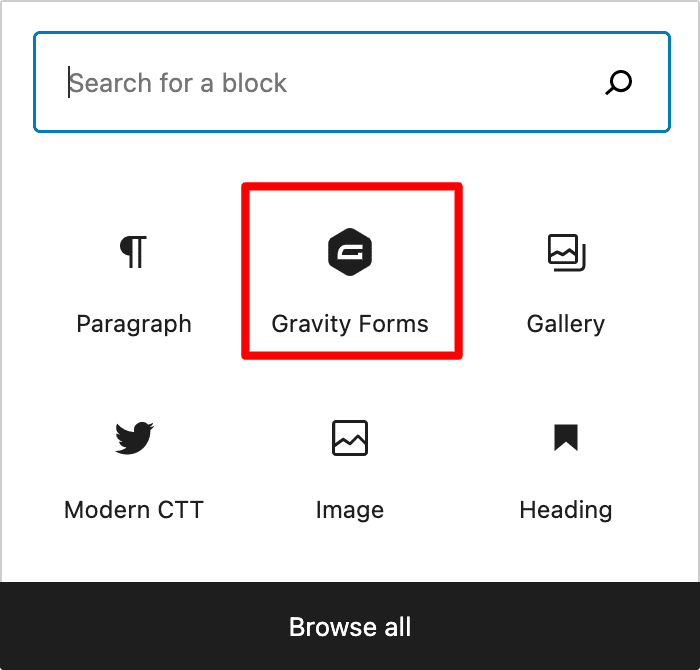
So go to your page as you normally would, and select the Gutenberg block called Form.

Gutenberg is the default native editor of WordPress since version 5.0, so we logically do a demonstration with it. However, Gravity Forms can also be used with the old WordPress editor (TinyMCE).
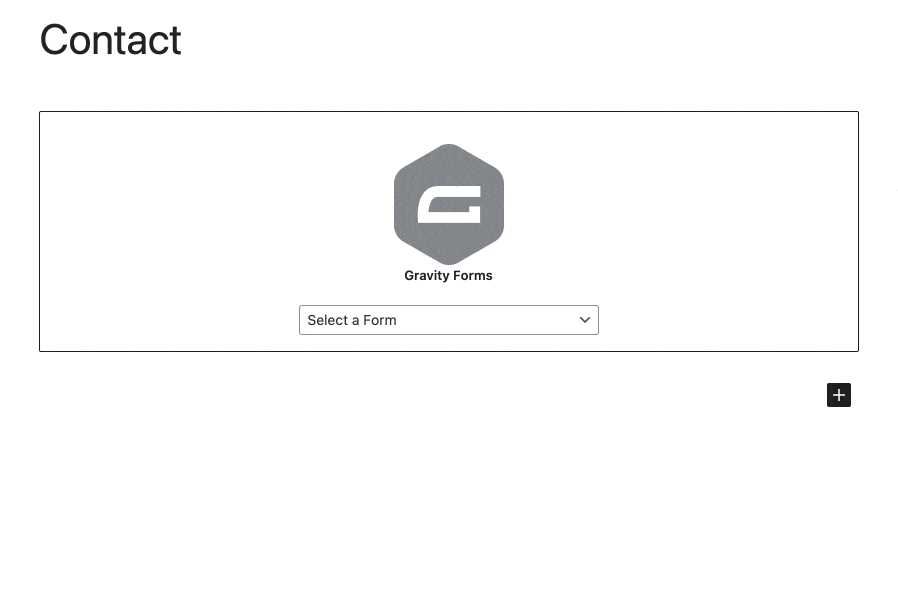
By clicking on it, you will be able to select the form of your choice, then its fields will appear in your editor.

In the settings of the Gutenberg block, you will be able to activate or not certain options.
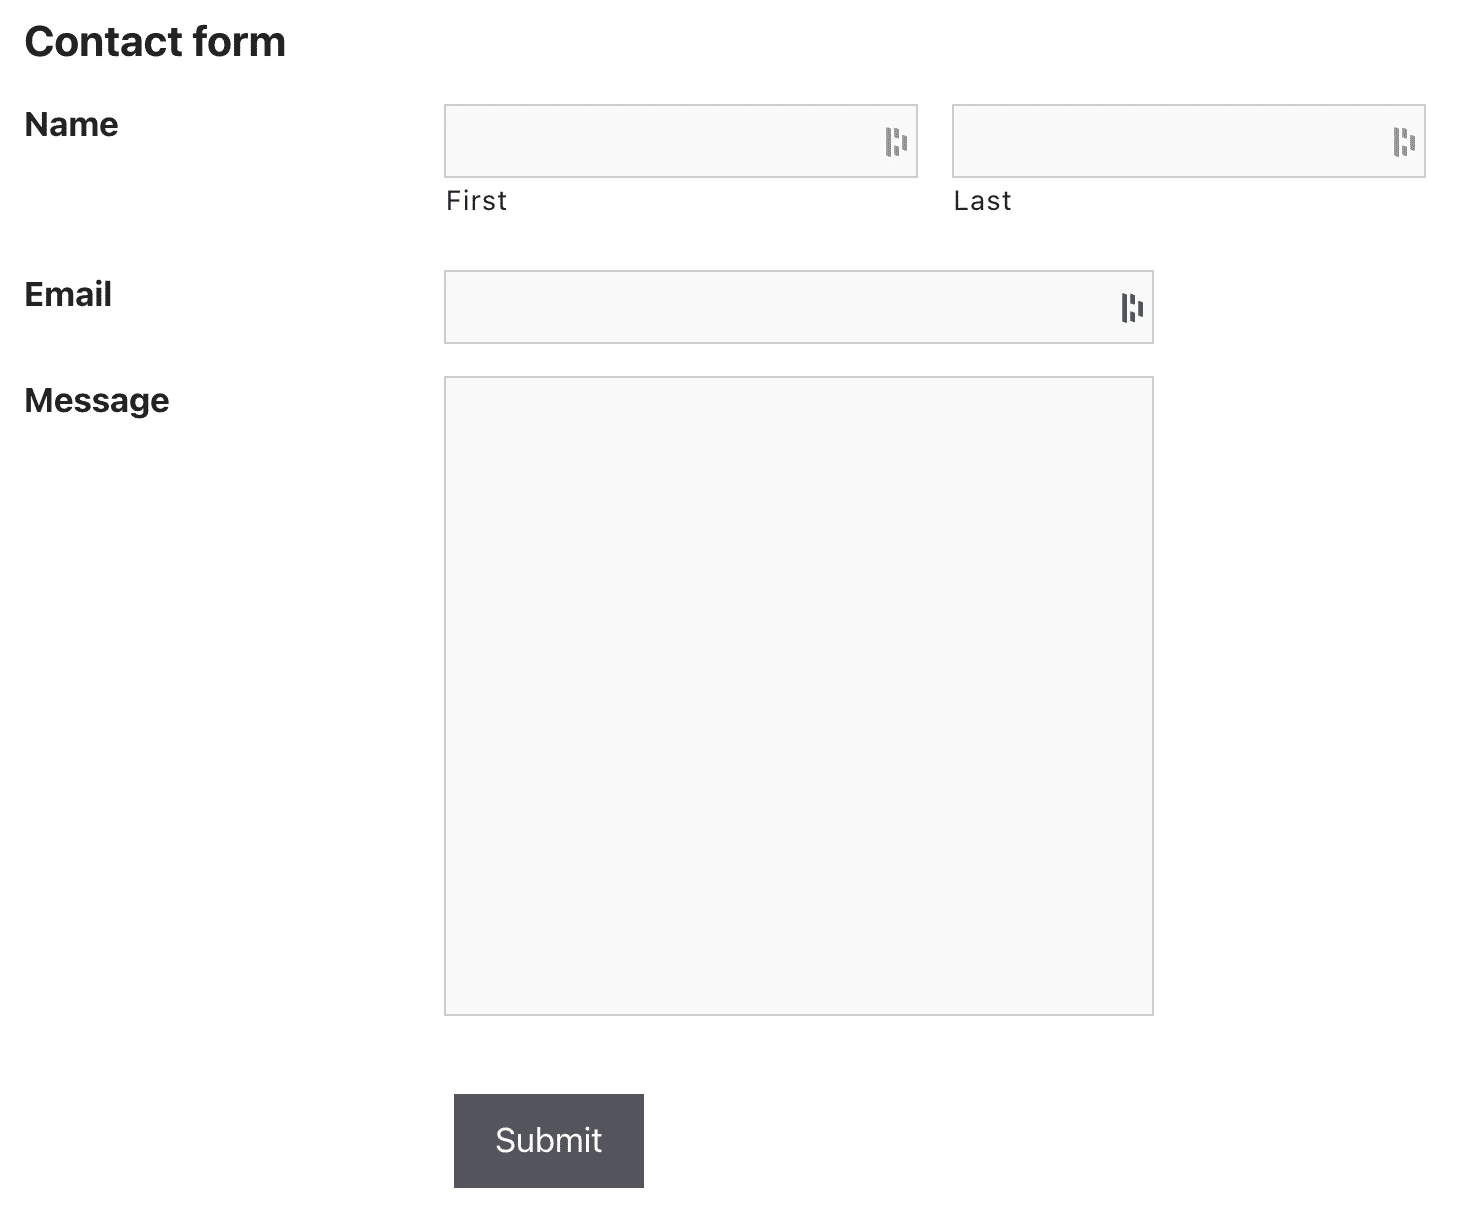
For example, you will be able to display the title or the description (which you will have set up beforehand), or you will be able to activate AJAX.
This means that if there is an error in a field or if the user validates the form, there will be no need to reload the page. So it’s a nicer user experience.

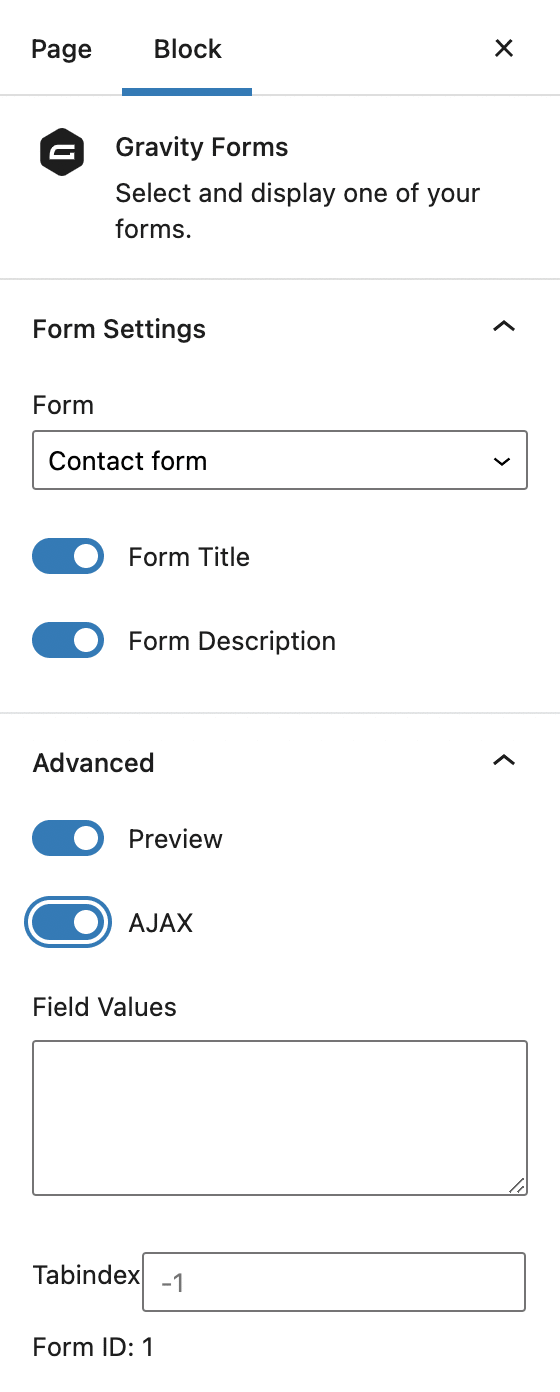
There is a small limitation, however: if you use a captcha, you will not be able to use this feature.
But beyond forms in the body of a page, you can also have them in a sidebar or footer. And guess how?
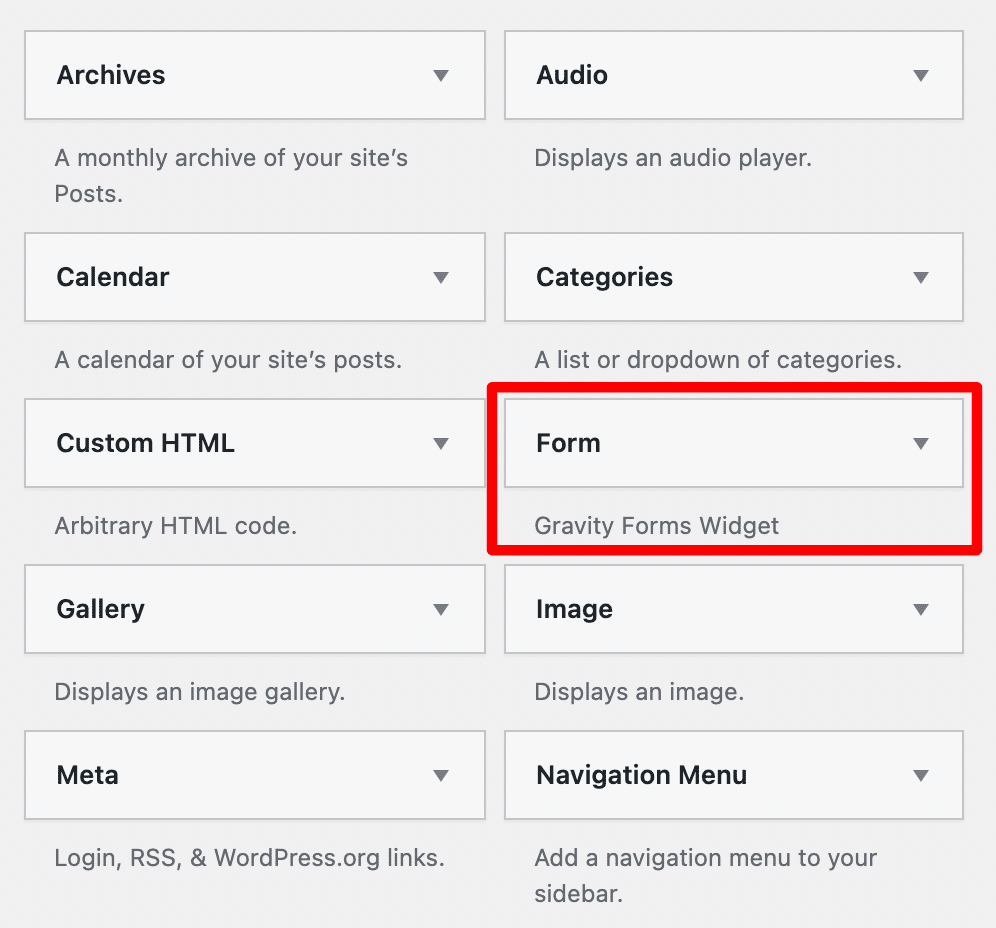
Integrating a Gravity Forms in a widget
If you go to Appearance > Widgets, you will see that there is a new widget, soberly titled Form.

You can then drag it into the widget area of your choice and you’ll have options similar to inserting it into a page.
You will choose the form in question, add a widget title, display the form title or even the description. Again, you can enable AJAX in the advanced options.

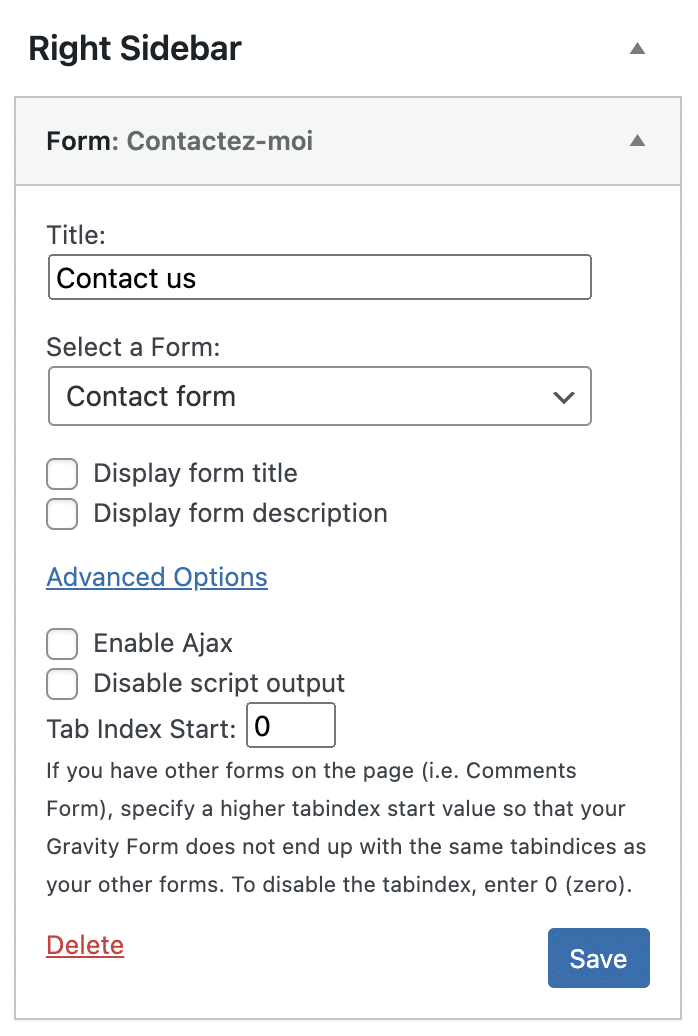
A very interesting option is included: to manage the tab index. Put like that, it’s not very meaningful. But in fact, it’s very practical.
When you have two forms on the same page – let’s say a contact form and a newsletter subscription form in the footer – a conflict appears. If you use the “Tab” key on your keyboard, you won’t go from one field to the other as you imagine, but from one form to the other.
And that’s very frustrating! Hence this tab index where you can give a different number. For example “2”. So that the contact form on your page is at 1 and its value is different from the widget form. So, no more conflicts!
This is the end of the tutorial, there is only one detail left to finish this presentation of Gravity Forms: its price.
How to get Gravity Forms
As I said earlier, you will have to pay for Gravity Forms to use all its features. That’s its particularity. But on the other hand, you will get your money’s worth.
Beside that, I tested the plugins available on CodeCanyon (in the comparison of the best form plugins), and although you have to pay from the beginning too, they are not as good as Gravity Forms.
Gravity Forms offers these three deals:
- The “Basic” license for $59. It is only valid for one site and gives you access to the Basic addons. These addons allow you to integrate Gravity Forms with emailing services (Mailchimp, ActiveCampaign, AWeber, etc.) to manage the subscription to a newsletter. Basically, a Basic license allows you to use GF to manage your contact forms, quotes, host guest posts or make price simulators. But not much more.
- The “Pro“ license at $159. Valid for 3 sites gives access to the Basic and Pro addons. Among the Pro addons, we will note the possibility to integrate Gravity Forms to a CRM (Agile CRM, Capsule CRM), or to link it to Dropbox.
- The “Elite” license at $259. This is the most expensive and the most complete package. You can use Gravity Forms on as many sites as you want, it’s unlimited. And in addition to the Basic and Pro addons, you also have access to the Elite addons. You will be able to use the plugin to make surveys, questionnaires, small ecommerce and automation to other services.

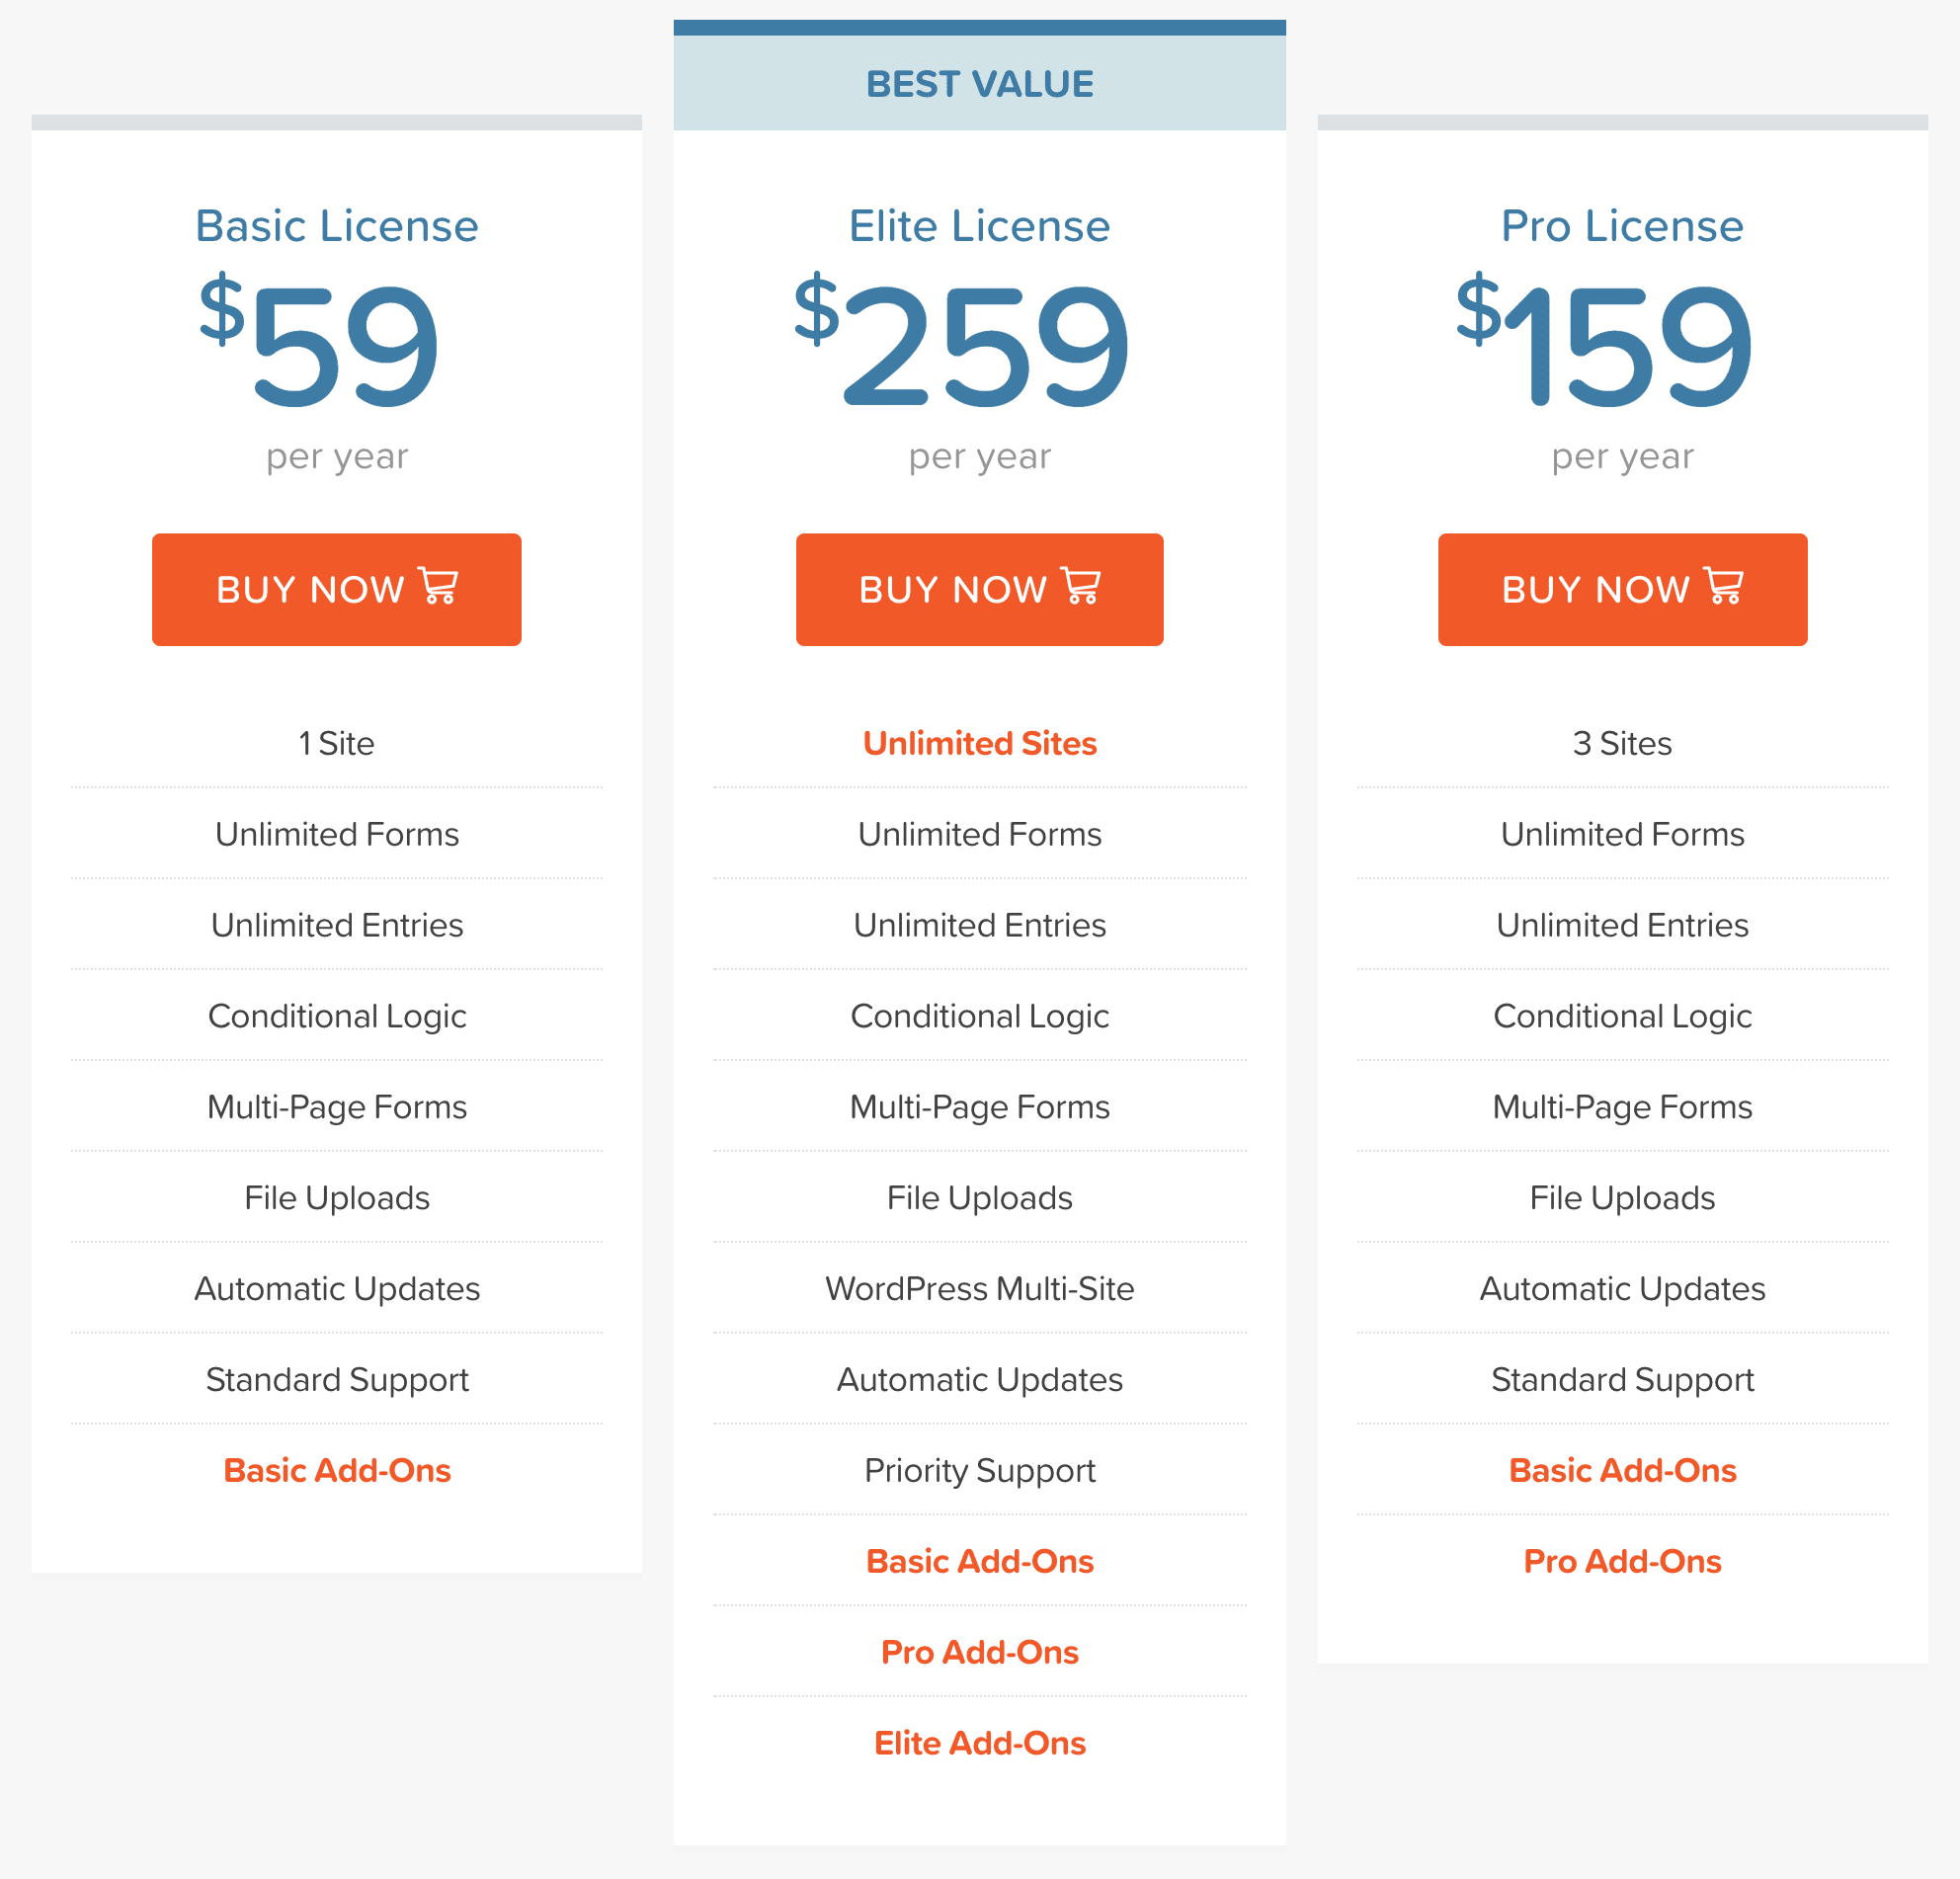
All three packages give you access to updates and support for one year.
If you are convinced that this is the plugin for you, then you can click on the button below to go and buy it.
Visit the official website of Gravity Forms:
To conclude: I can’t do without Gravity Forms anymore
For a long time, I was limited in what I could offer to my clients regarding forms. It was very frustrating…
I wasn’t really comfortable paying $200 for a single plugin. But I finally took the plunge and I don’t regret it.
Since then, I know that I have no limits regarding forms and the cost is finally paid back according to the number of projects I work on. It’s almost as if my clients were paying the license for me every year!
That’s why I really advise you to invest in Gravity Forms if you want to make good forms. And in the long run, it’s even a “small” expense compared to the serenity and quality of the forms you’ll be able to make.
I hope this little tour has lived up to your expectations.
Enough about my adulation for this plugin, now it’s your turn! If you are already using Gravity Forms, what do you think? Are you satisfied? Do you plan to keep it forever?
And if you don’t have it yet, do you want to buy it now? Or is there something you don’t like?
As usual, the conversation continues in the comments!