


Plugins, themes, or even WordPress core: as you probably know, updating your site is essential to protect you from security breaches and to ensure its proper functioning.
The problem is that this can take time. A lot of time. Especially if you’re hitting the updates manually, plugin by plugin.
If you have only one site, that’s fine. But imagine if you have to manage 2 sites, 5 sites, 10 sites, 30 sites. Your schedule may fill up quickly. However, doing maintenance 24/7 is not necessarily your goal.


Fortunately, there are very useful tools to manage several sites at the same time automatically, from a single dashboard. And by the same token, save a very precious time.
One of them is called MainWP. As you will see throughout this article, this plugin goes much further than the “simple” option to update your sites.
In practice, it offers a real site management system.
Overview
- What is MainWP?
- How does it work?
- What are the basic features of MainWP?
- What are the system requirements for using MainWP?
- How to install MainWP ?
- How to configure MainWP ?
- How to add a WordPress site to your MainWP dashboard?
- Focus on two major features of MainWP: backup and monitoring
- The other free extensions of MainWP
- Boost your maintenance with paid extensions
- How much does MainWP cost?
- Our final review
Originally written in June 2016, this article was last updated in April 2022.


What is MainWP?

MainWP is a free and open source plugin that allows you to manage the maintenance of all your WordPress sites from a single dashboard.
From there, the possibilities are multiple: it can update plugins, themes, WordPress core, security scans, backups, post/comment/user management, etc.
One click to update all your WordPress sites. One click to install your favorite plugin on all your sites. One click to add, remove or modify the role of all your users.
See how much time you save?
MainWP is self-hosted: it works only on a WordPress installation, and not in SaaS mode (Software as a Service) like one of its main competitors, ManageWP.
The main advantage is that with this system, you keep your private data safe.
Finally, MainWP can be used on an unlimited number of sites. Now, let’s start with how this plugin works. Or rather, these plugins.
As you will see, MainWP works in a rather atypical way.
How does it work?
MainWP is operational thanks to two free plugins:
- MainWP Dashboard (20K+ active installations, 4.9 stars) allows you to install MainWP’s site management system and dashboard. This will be so to speak your HQ: you will be able to manage all your WordPress sites from there, regardless of the hosting server they are installed on.
- MainWP Child (700K+ active installations, 5 stars) should be installed on all the WordPress sites you want to manage with MainWP.
It allows you to link your child sites to your dashboard (the parent site on which MainWP Dashboard is installed).
MainWP Dashboard is a basic foundation for generic maintenance. A bunch of useful free and paid plugins accompany this base for more specific maintenance.
I will come back to this later in the article.
What are the basic features of MainWP?
By installing MainWP Dashboard and its free plugins, you have access to:
- One-click updates of the core and WordPress plugins and themes.
- Multiple scheduled backups to different repositories (via UpdraftPlus, BackWPup, etc.).
- Security scans (via Sucuri) to detect malware, bugs and other spam.
- User management (addition, rights, passwords).
- Management of articles and pages (publication, update, edition).
- Management of plugins (addition, deactivation).
- Update settings (automatic and ignored).
- Monitoring of your sites (in particular via the UptimeRobot service).
- Email notifications of backups, updates and unavailability of your sites.
- Security of your dashboard.
- Control of abandoned plugins.
Bonus: If a plugin or theme hasn’t been updated in a while, MainWP creates a “possibly abandoned” status to draw your attention on the probable need for a new plugin.
What are the system requirements for using MainWP?
MainWP requires some basic configuration for the system to work properly. At the time of writing, the minimum recommended requirements are as follows (this is not an exhaustive list):
- WordPress 3.6 or higher
- PHP 5.6 or higher
- MySQL 5.0 or higher
- WordPress PHP memory limit: at least 64 MB
Of course, it is recommended and preferable, especially for security and performance reasons, to have a site running the latest version of WordPress and PHP (check all requirements).
If in doubt, contact your web host to find out the capabilities of the server that will host the MainWP plugin.
See also the list of compatible hosts. Please note that this list is not exhaustive. Chances are that MainWP will work with most of them.
If you want to manage the maintenance of 30 sites or less, MainWP says a shared server can keep up. For more than 30 sites, MainWP recommends switching to VPS hosting (Virtual Private Server), which is more scalable in terms of resources.
How to install MainWP ?
Step 1: Create a “fresh” WordPress installation
To begin with, let’s start with a clean environment dedicated to the plugin. To do this, install WordPress on your favorite web host.
As mentioned above, I strongly recommend a VPS or a dedicated server for optimal use (you can also install MainWP locally).
On this new installation, there is no article, no page. You’ll need to set the site to maintenance mode (with a coming soon page). This installation is exclusively used to host your MainWP dashboard.
And you need to secure it, this is fundamental. To assist you, this resource handles this topic.
Step 2: Activate the plugin
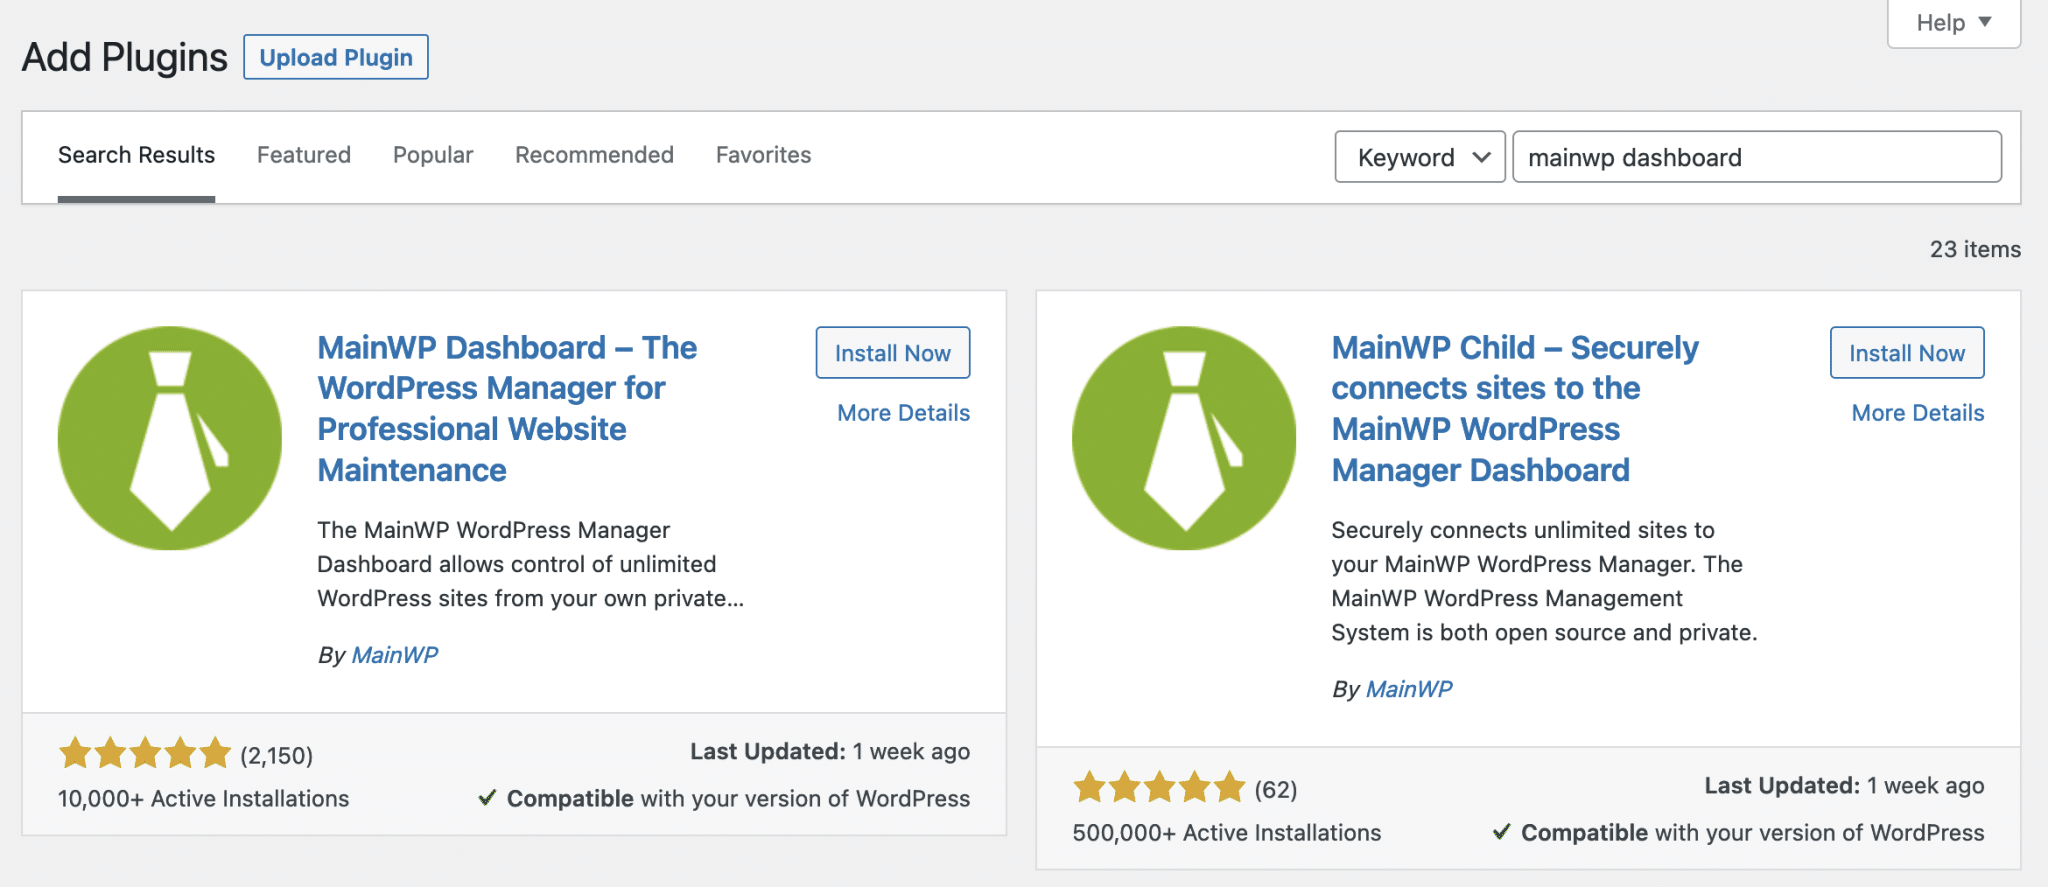
From your new installation, go to Plugins > Add New. Download MainWP Dashboard, then activate the plugin. Surprise! You can enjoy a pretty clear Quick Setup Wizard.

Follow the steps for verification and setup. There are no particular settings to recommend, it’s up to your liking.
You will be asked to connect a “child site” for example (I will show you in detail how to do this in the next part), or to activate the MainWP Advanced Uptime Monitor plugin to monitor the availability of your site.
On the other hand, it is important to create an account with MainWP to be able to download the free plugins (smart guys!).
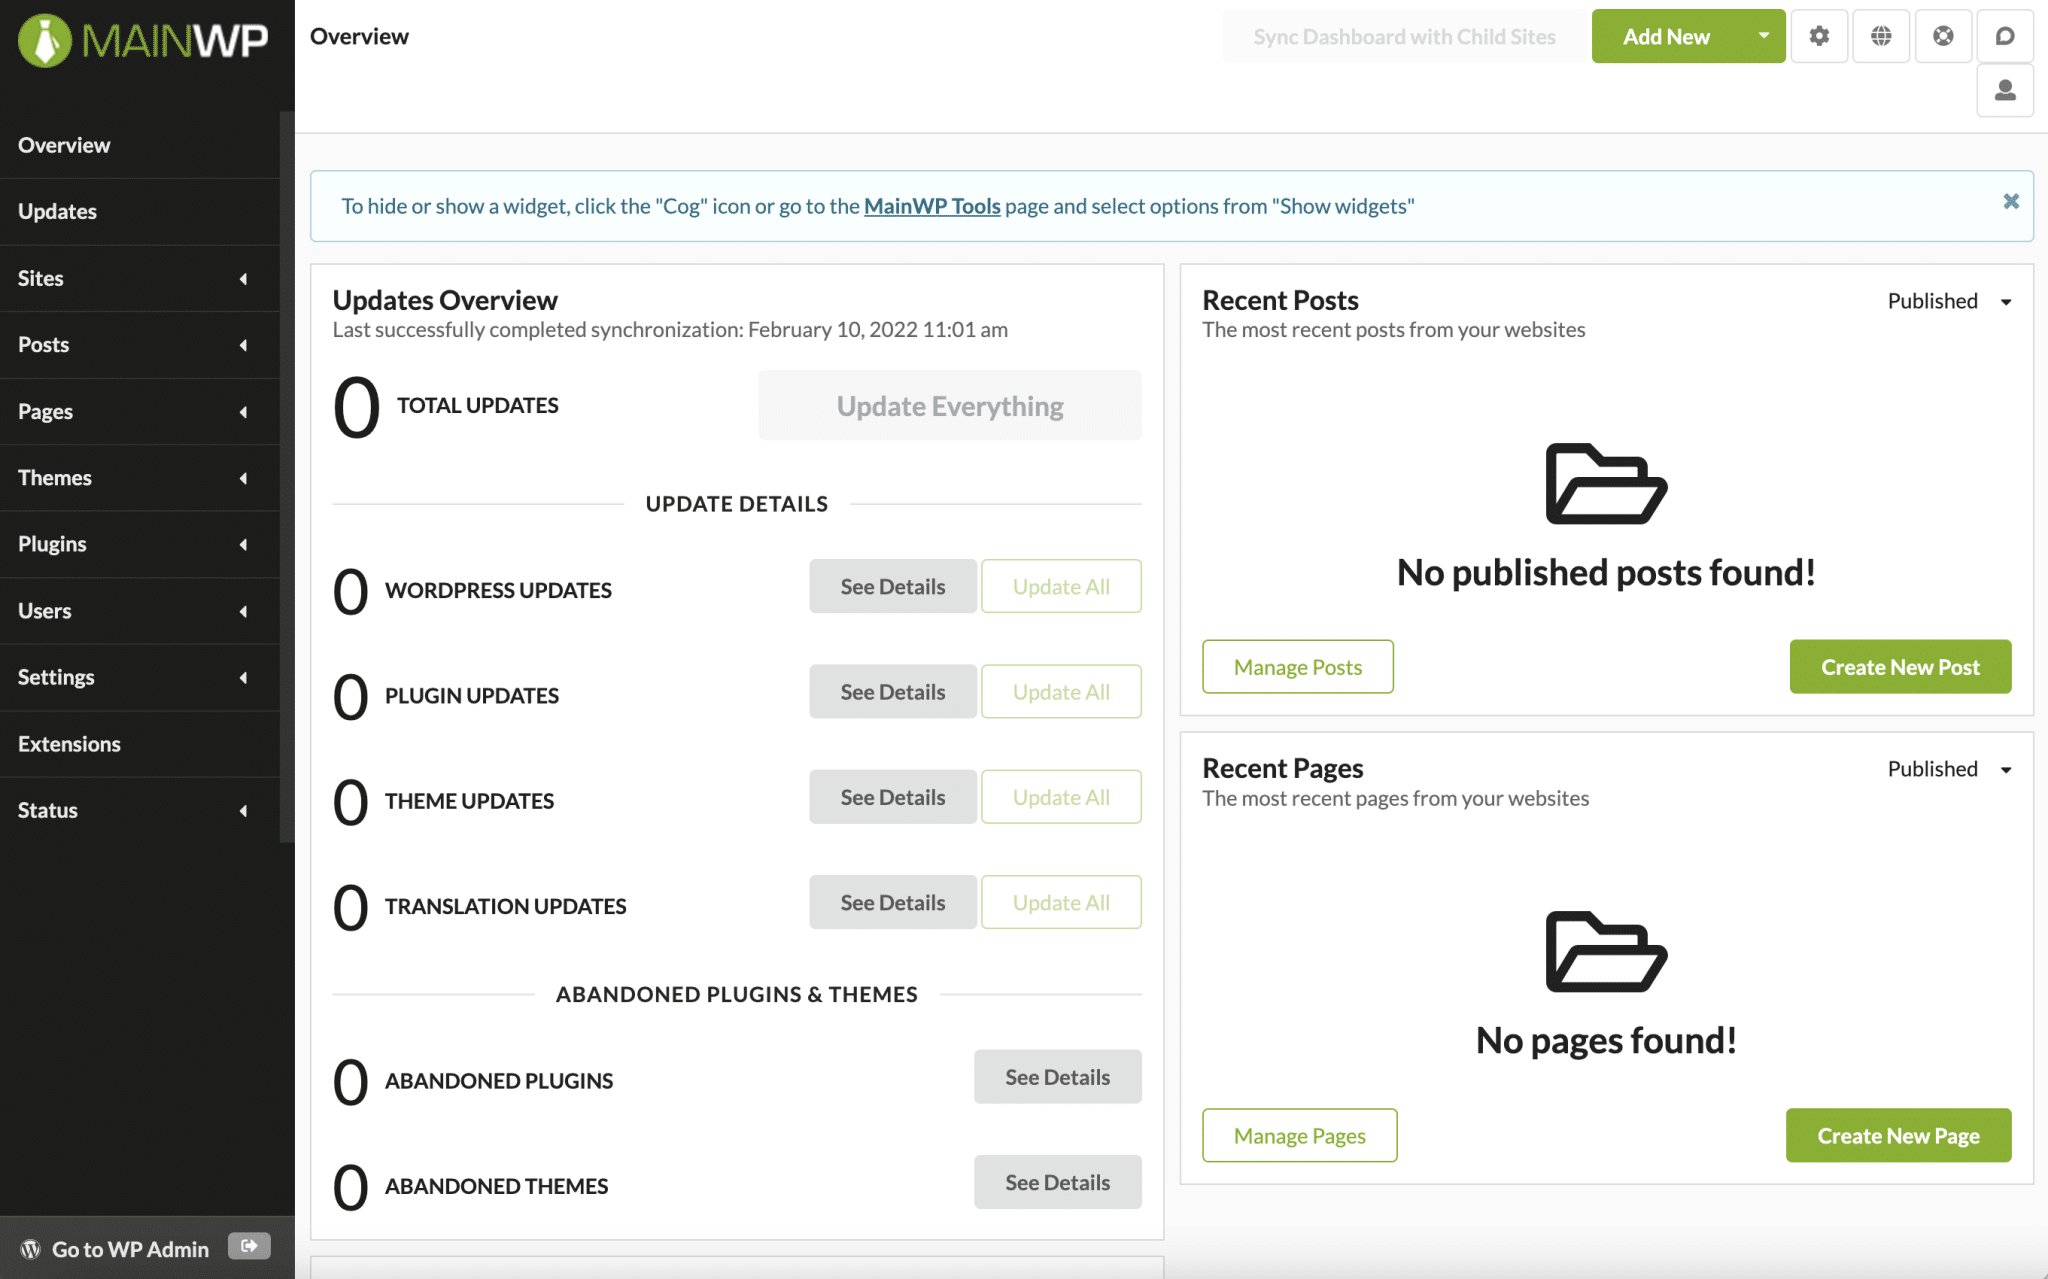
Congratulations, your dashboard is now installed. Here is what will be displayed on your screen:
Without further ado, let’s move on to its configuration.


How to configure MainWP ?
MainWP offers a dashboard with access to settings via 11 menus located in the sidebar.

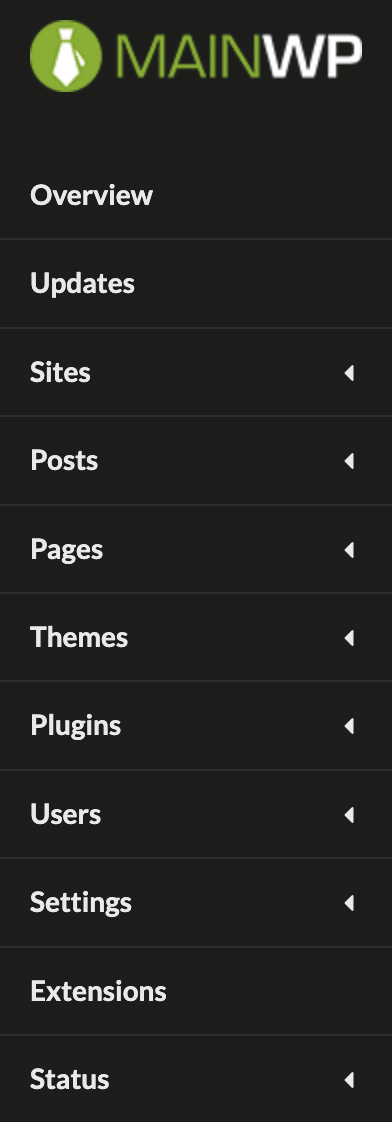
Let’s break down each menu one by one:
- Overview gives quick access to the plugin’s basic options: updates, connection status and security issues. There is also a shortcut to create a new article and a new page.
- Updates allows you to update your child sites (themes, plugins, translations and WordPress core).
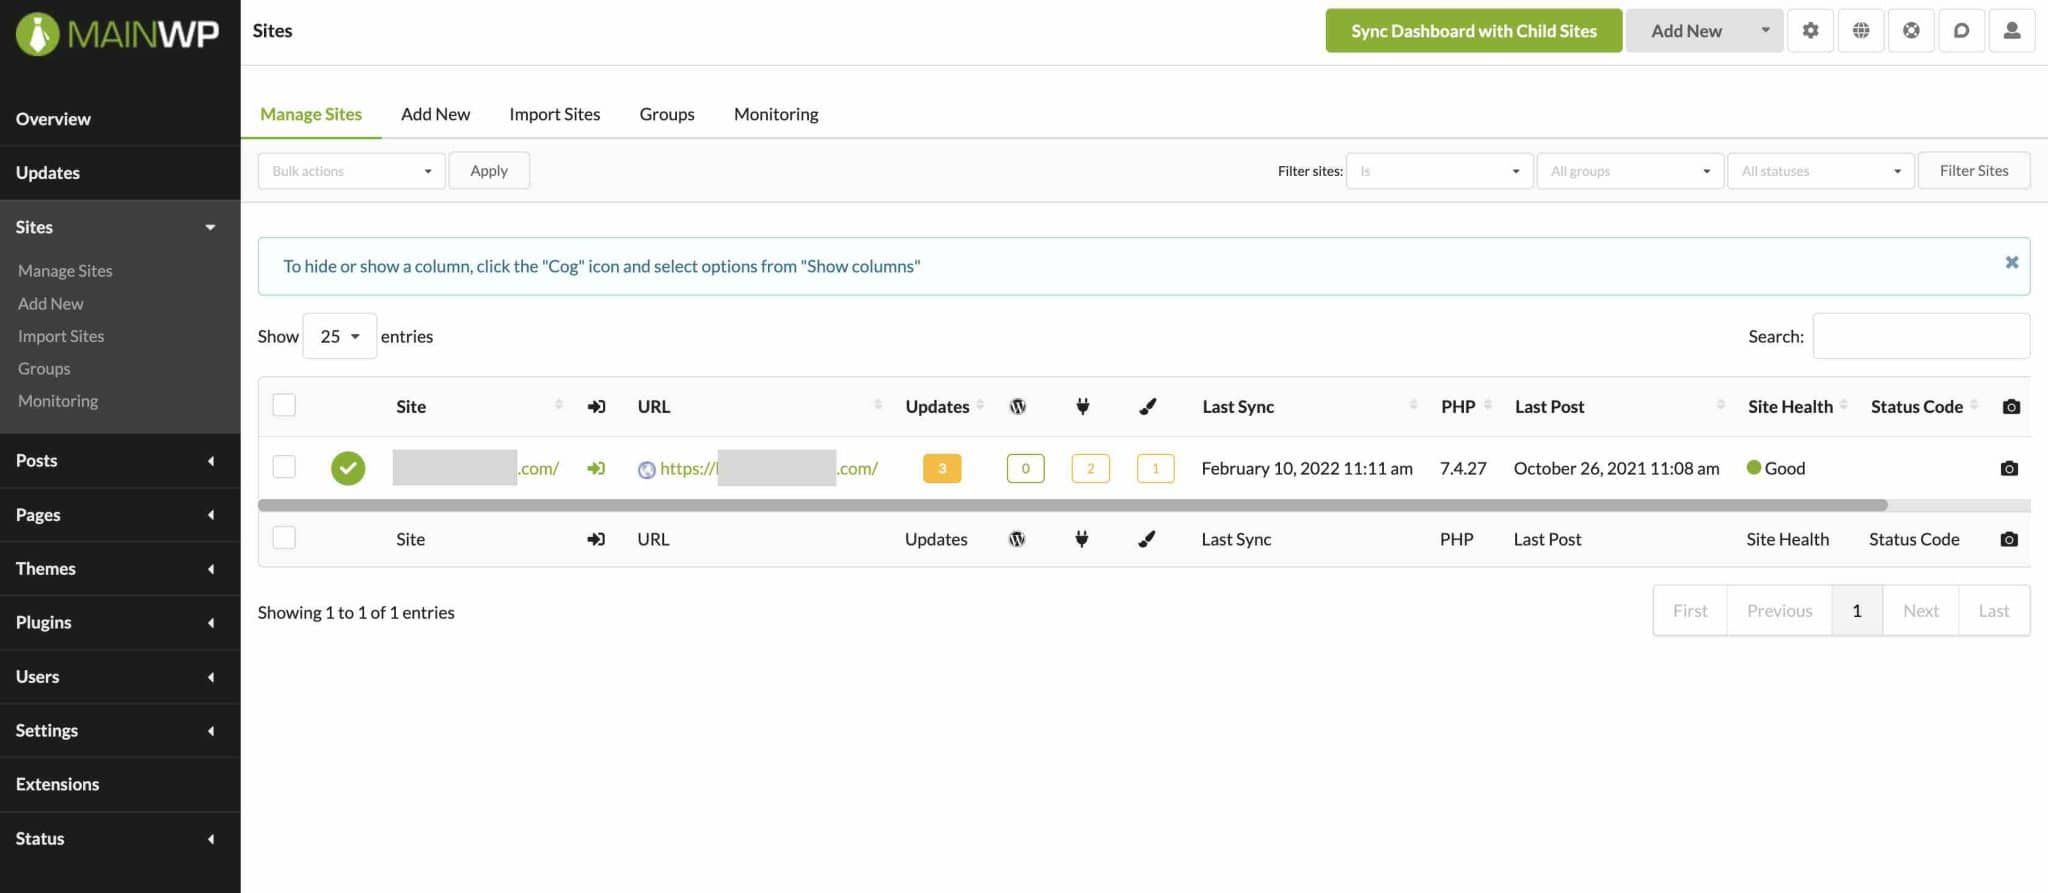
- Sites allows you to add new child sites and manage them. You can create groups to classify several sites, for example if they are from the same client. This is also where you can access the monitoring of each site.
- Posts will be used to edit, check and delete the articles of each of your sites.
- Page: same as for the articles.
- Themes: used to manage the themes of each of your sites, including their activation/deactivation/deletion as well as the possibility to activate automatic updates.
- Plugins: same as for themes.
- Users gives access to user management: create new users on your child sites, or quickly update the password of the administrator who was used to connect to your MainWP dashboard.
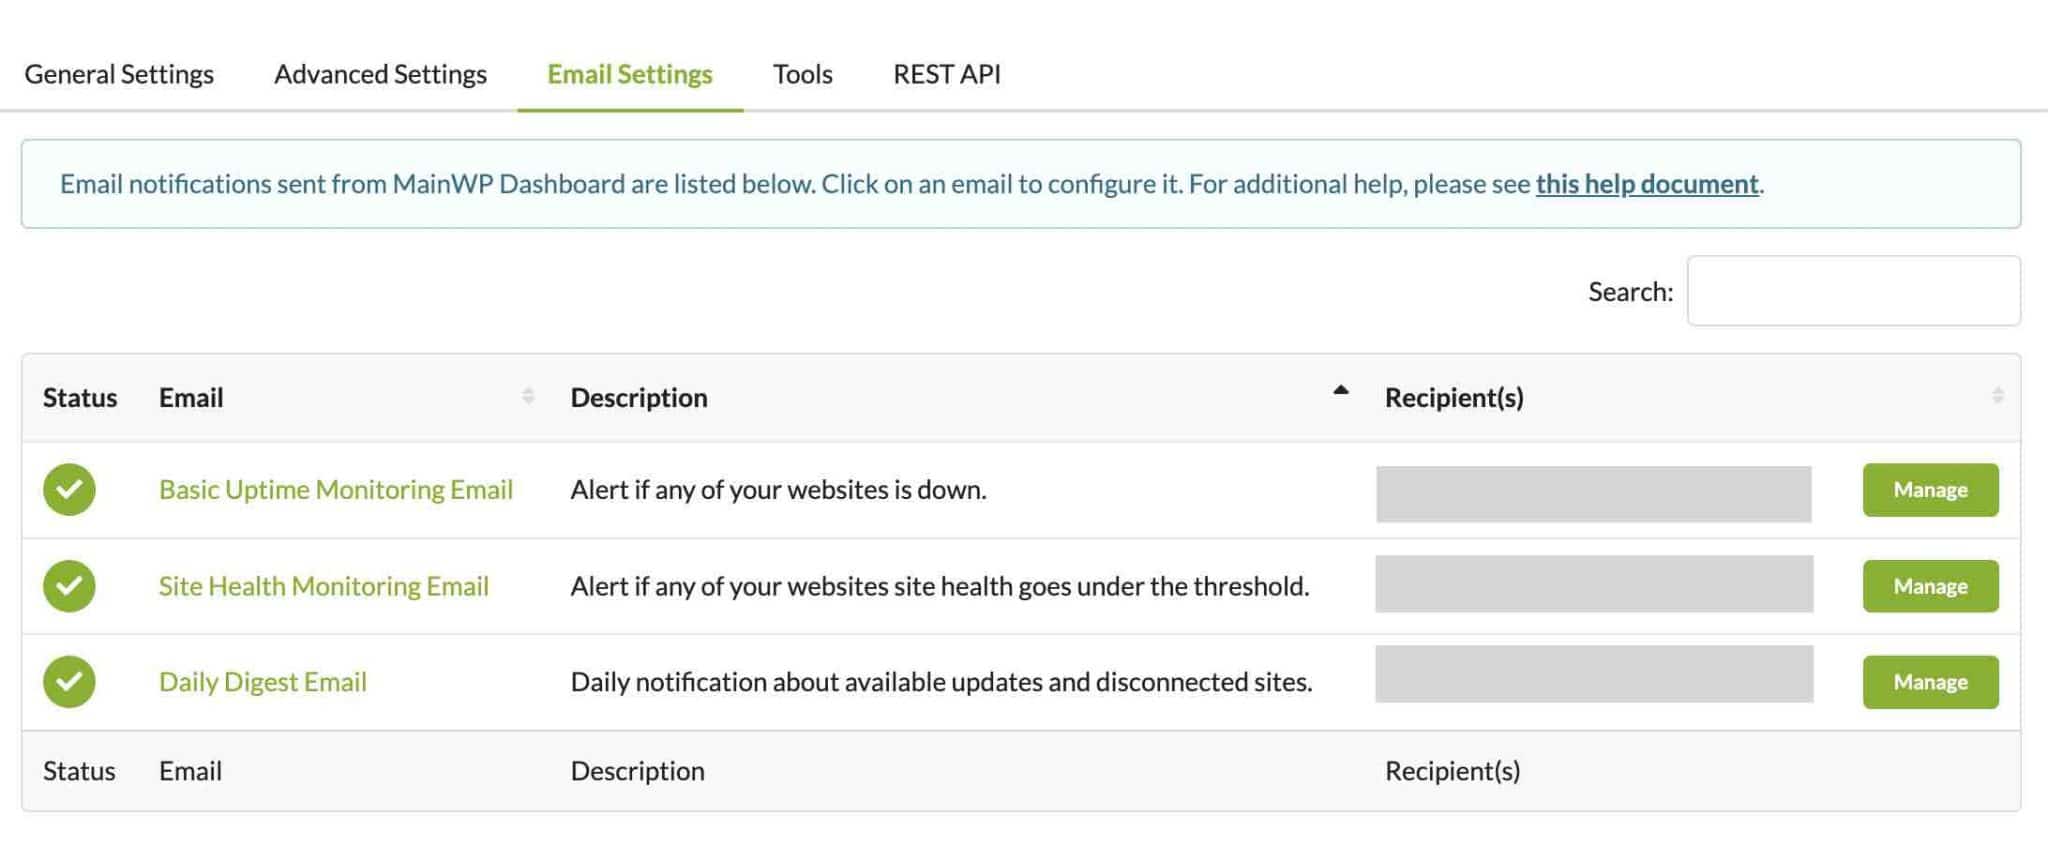
- Settings allows you to adjust the plugin’s settings. General settings allow you to set the frequency of updates, your widgets on your Overview, and update confirmations, for example. The Advanced settings can be useful if you have special needs related to IP settings and the number of simultaneous requests. Otherwise, leave the default settings. You also have control over the notifications you want to receive by email (e.g. if your WordPress site is down).
- Extensions is used to install, activate and manage all MainWP extensions.
- Status informs you about the status of your server, for example.
As you can see, there are many options. It takes a little time to get familiar with the options but, overall, it is rather easy to get used to the interface.
You can quickly understand where to perform the different actions. Speaking of which, let’s see how to add a child site to your dashboard.
How to add a WordPress site to your MainWP dashboard?
The principle is simple, trust me. It consists of 3 steps:
- Go to the admin of one of the WordPress sites you wish to manage.
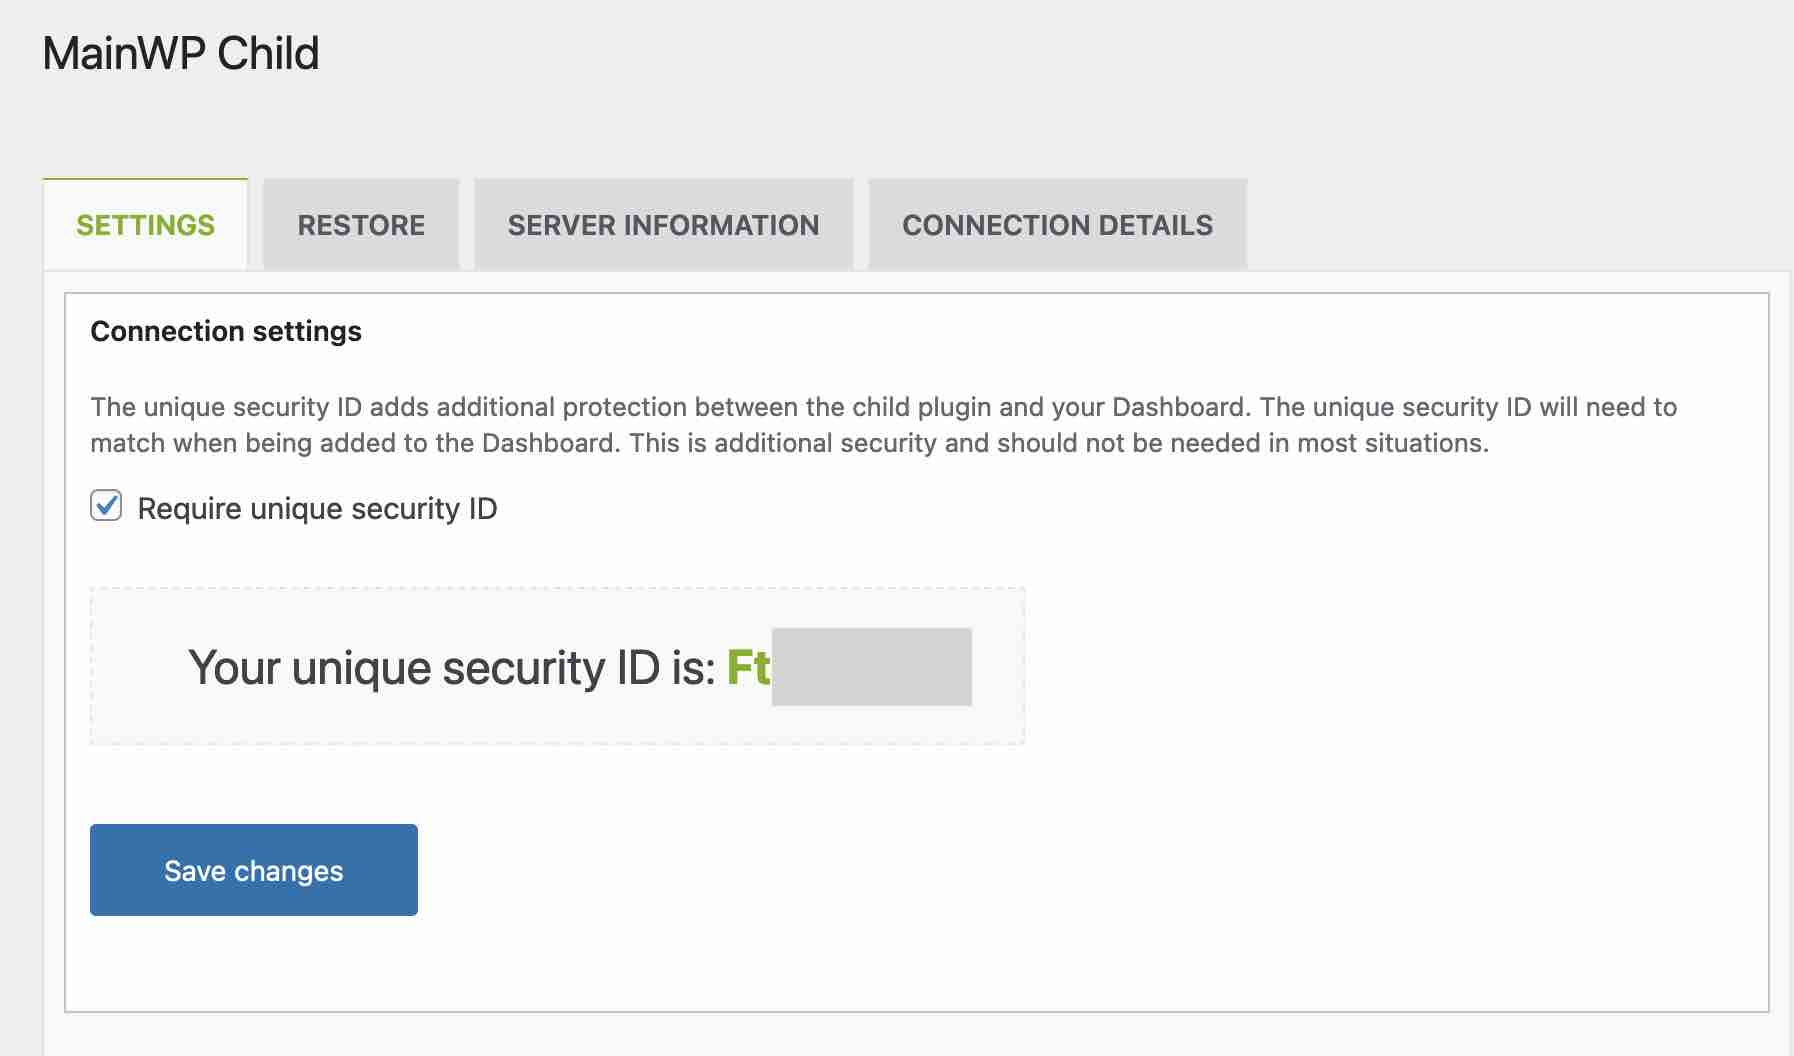
- Install and activate the MainWP Child plugin. Keep in mind that it will act as a gateway between this site and your MainWP dashboard. To add additional protection between the child plugin and your dashboard, go to Settings > MainWP Child, and check the “Require unique security ID” box. Save the changes, then copy the generated ID.

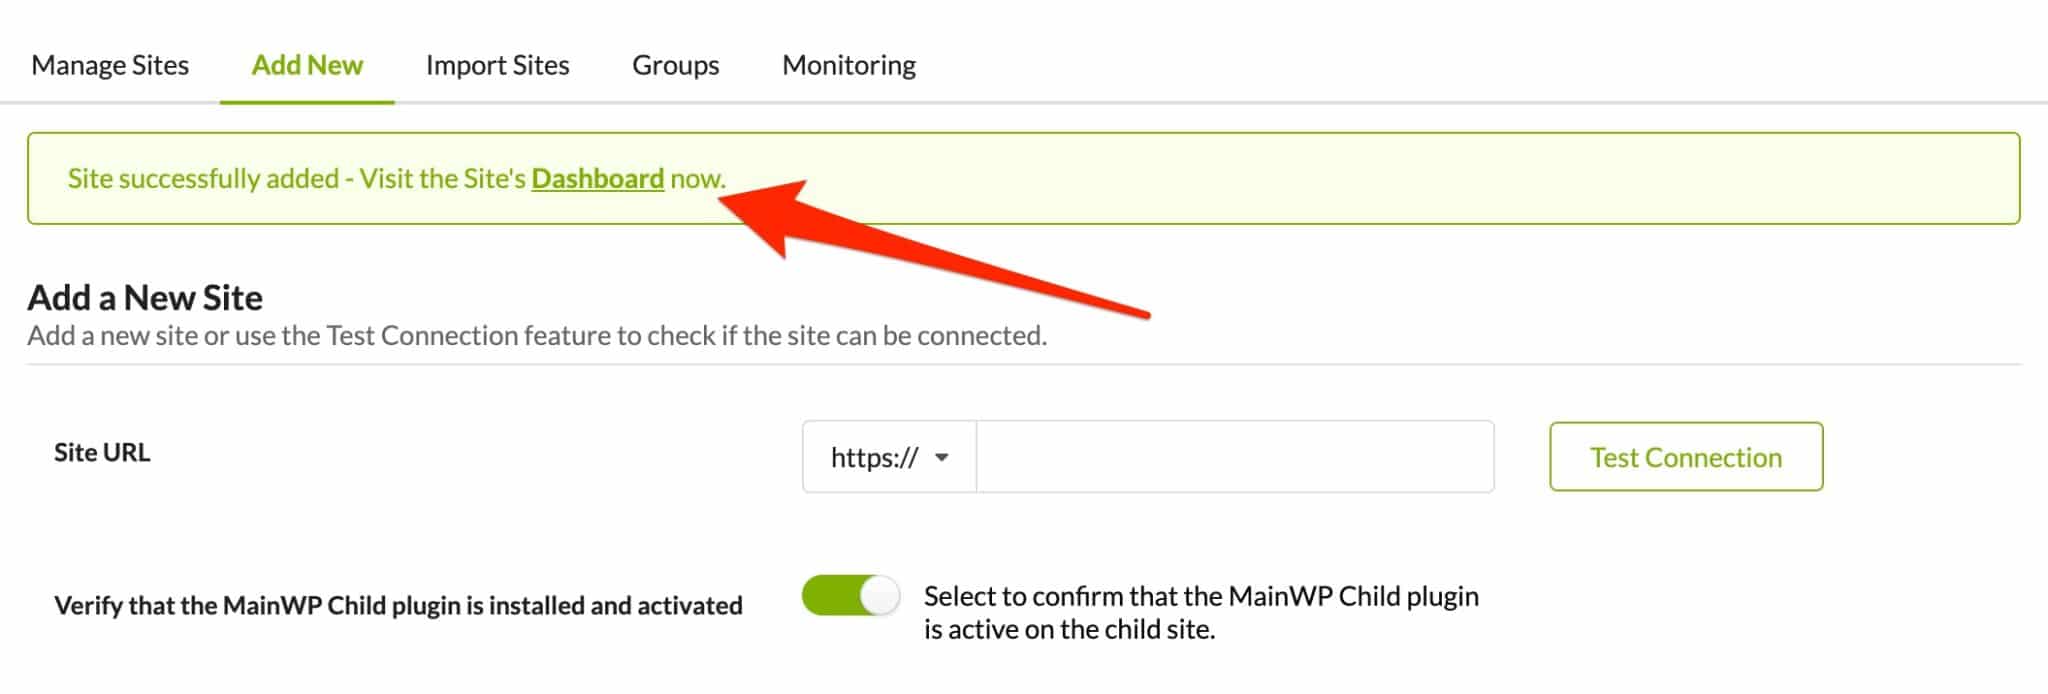
3. Add the child site to your main site, the one with the MainWP Dashboard plugin enabled. To do this, go to MainWP > Sites > Add.
Enter the URL of the site, the administrator ID (I’ll punish the user that still has “admin” as ID) and the title of the site. Then, in the advanced options (click on “Show optional settings”), insert the unique security ID you copied earlier, and validate.
If it works, you will see the message below:
Repeat this process for each site you want to manage.
I advise you to create groups when adding your sites. You will be able to find your way around more easily when you have more than a dozen sites to manage.
Focus on two major features of MainWP: backup and monitoring
How to back up your sites with MainWP?
You can back up all your child sites using the plugins provided by MainWP.
In its free version, MainWP offers integration with:
- BackWPup
- UpdraftPlus
- WPvivid Backup
Out of the three, I suggest you to use UpdraftPlus. It is stable, complete and easy to use. It is also more suitable for beginners than the first two.
Scheduling automatic backups with UpdraftPlus requires two important steps.
Step 1: Install the MainWP UpdraftPlus plugin on your MainWP Dashboard
- Go to MainWP > Extensions
- At the top of the page, log in with your MainWP username and password, or create an account on this page.
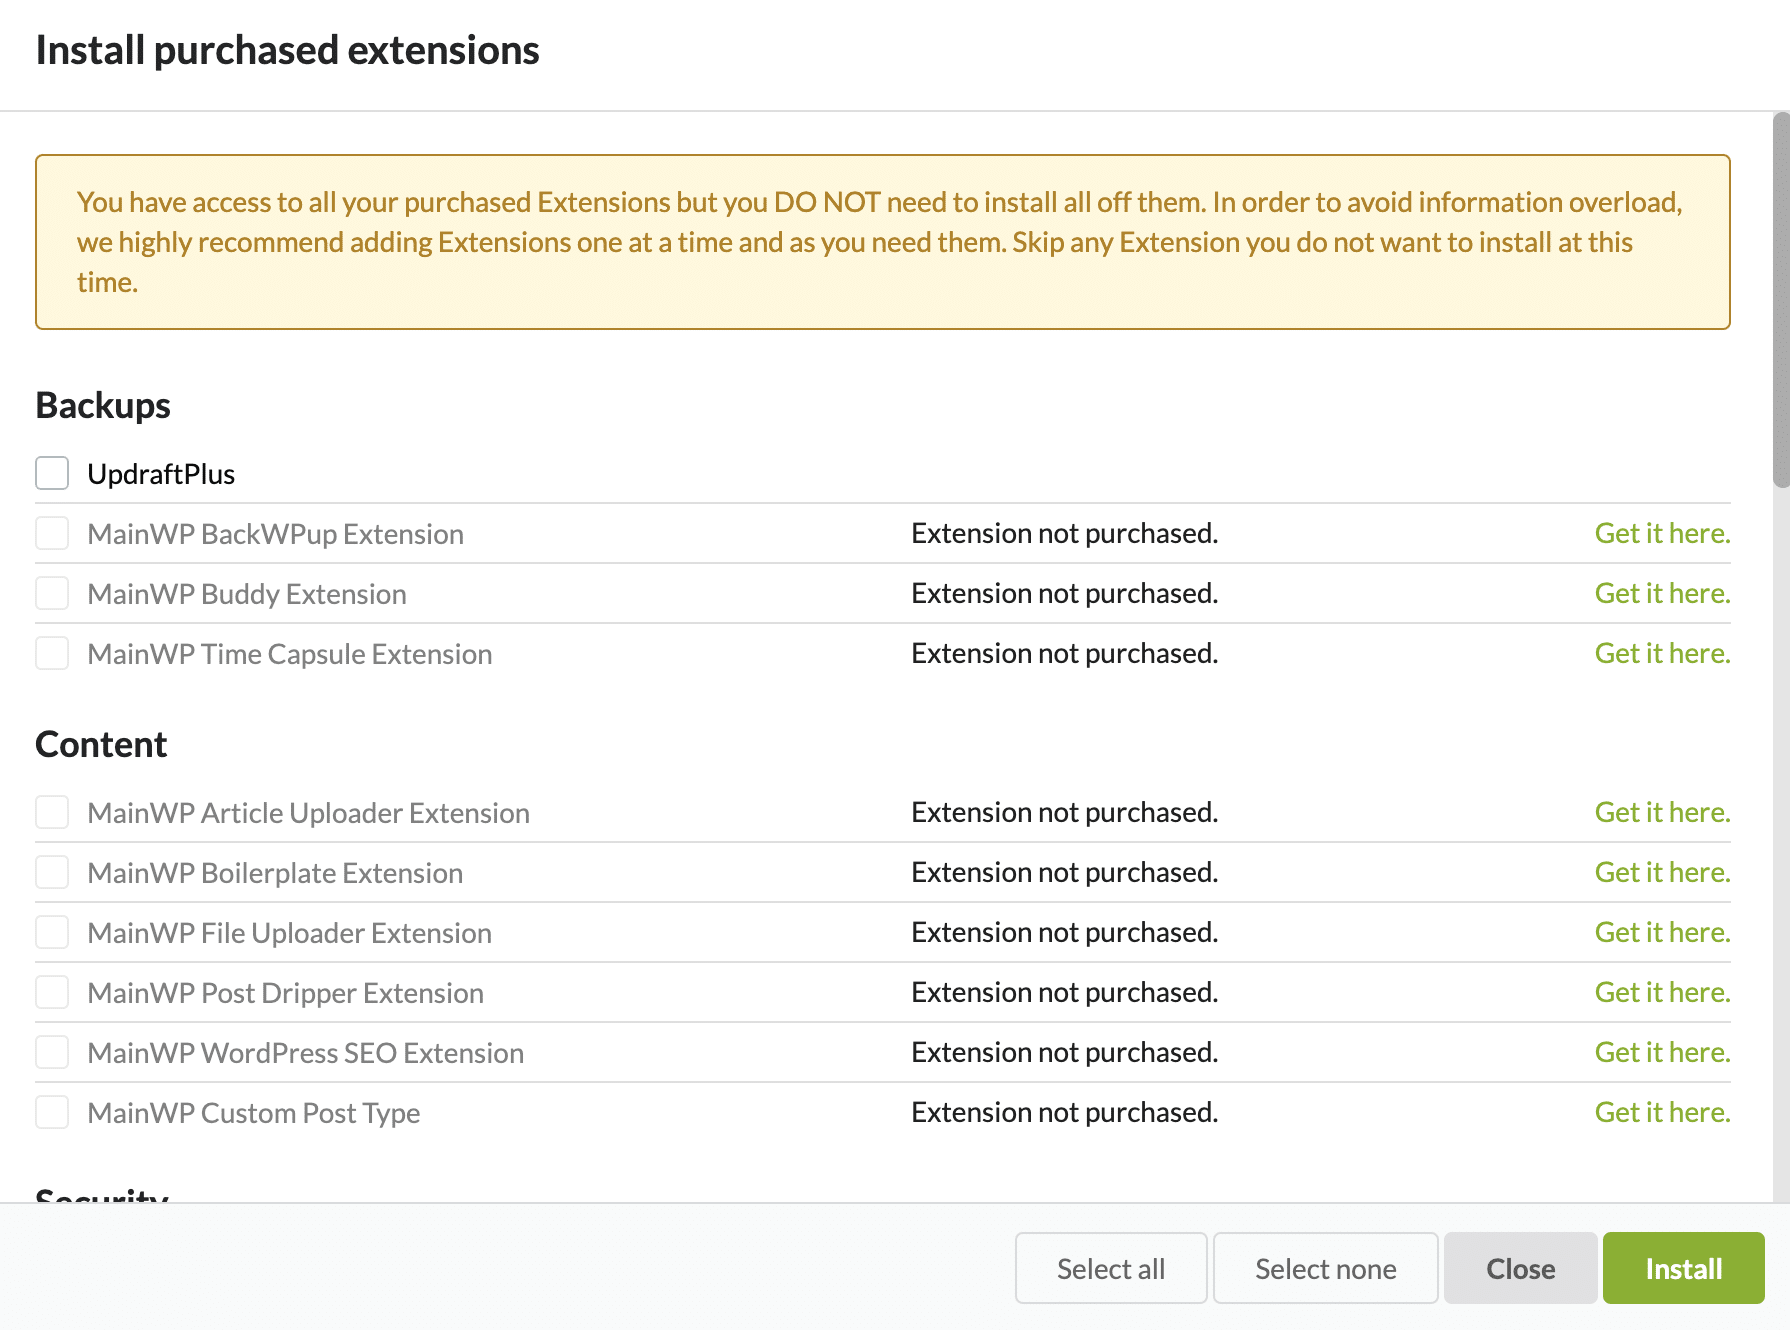
In order to install the plugin, you must purchase it (without paying a cent, in our case). - Get the MainWP UpdraftPlus extension by visiting this page. On the MainWP UpdraftPlus page, click “Download Now” and then “Proceed to checkout”.
Fill in the required information and then click on “Place order” to complete the process. Don’t worry, you do not need to enter any payment information. It’s all free. - Go back to MainWP > MainWP Extension > Install extensions.
- Check the box for UpdraftPlus, and at the bottom, click on “Install”.
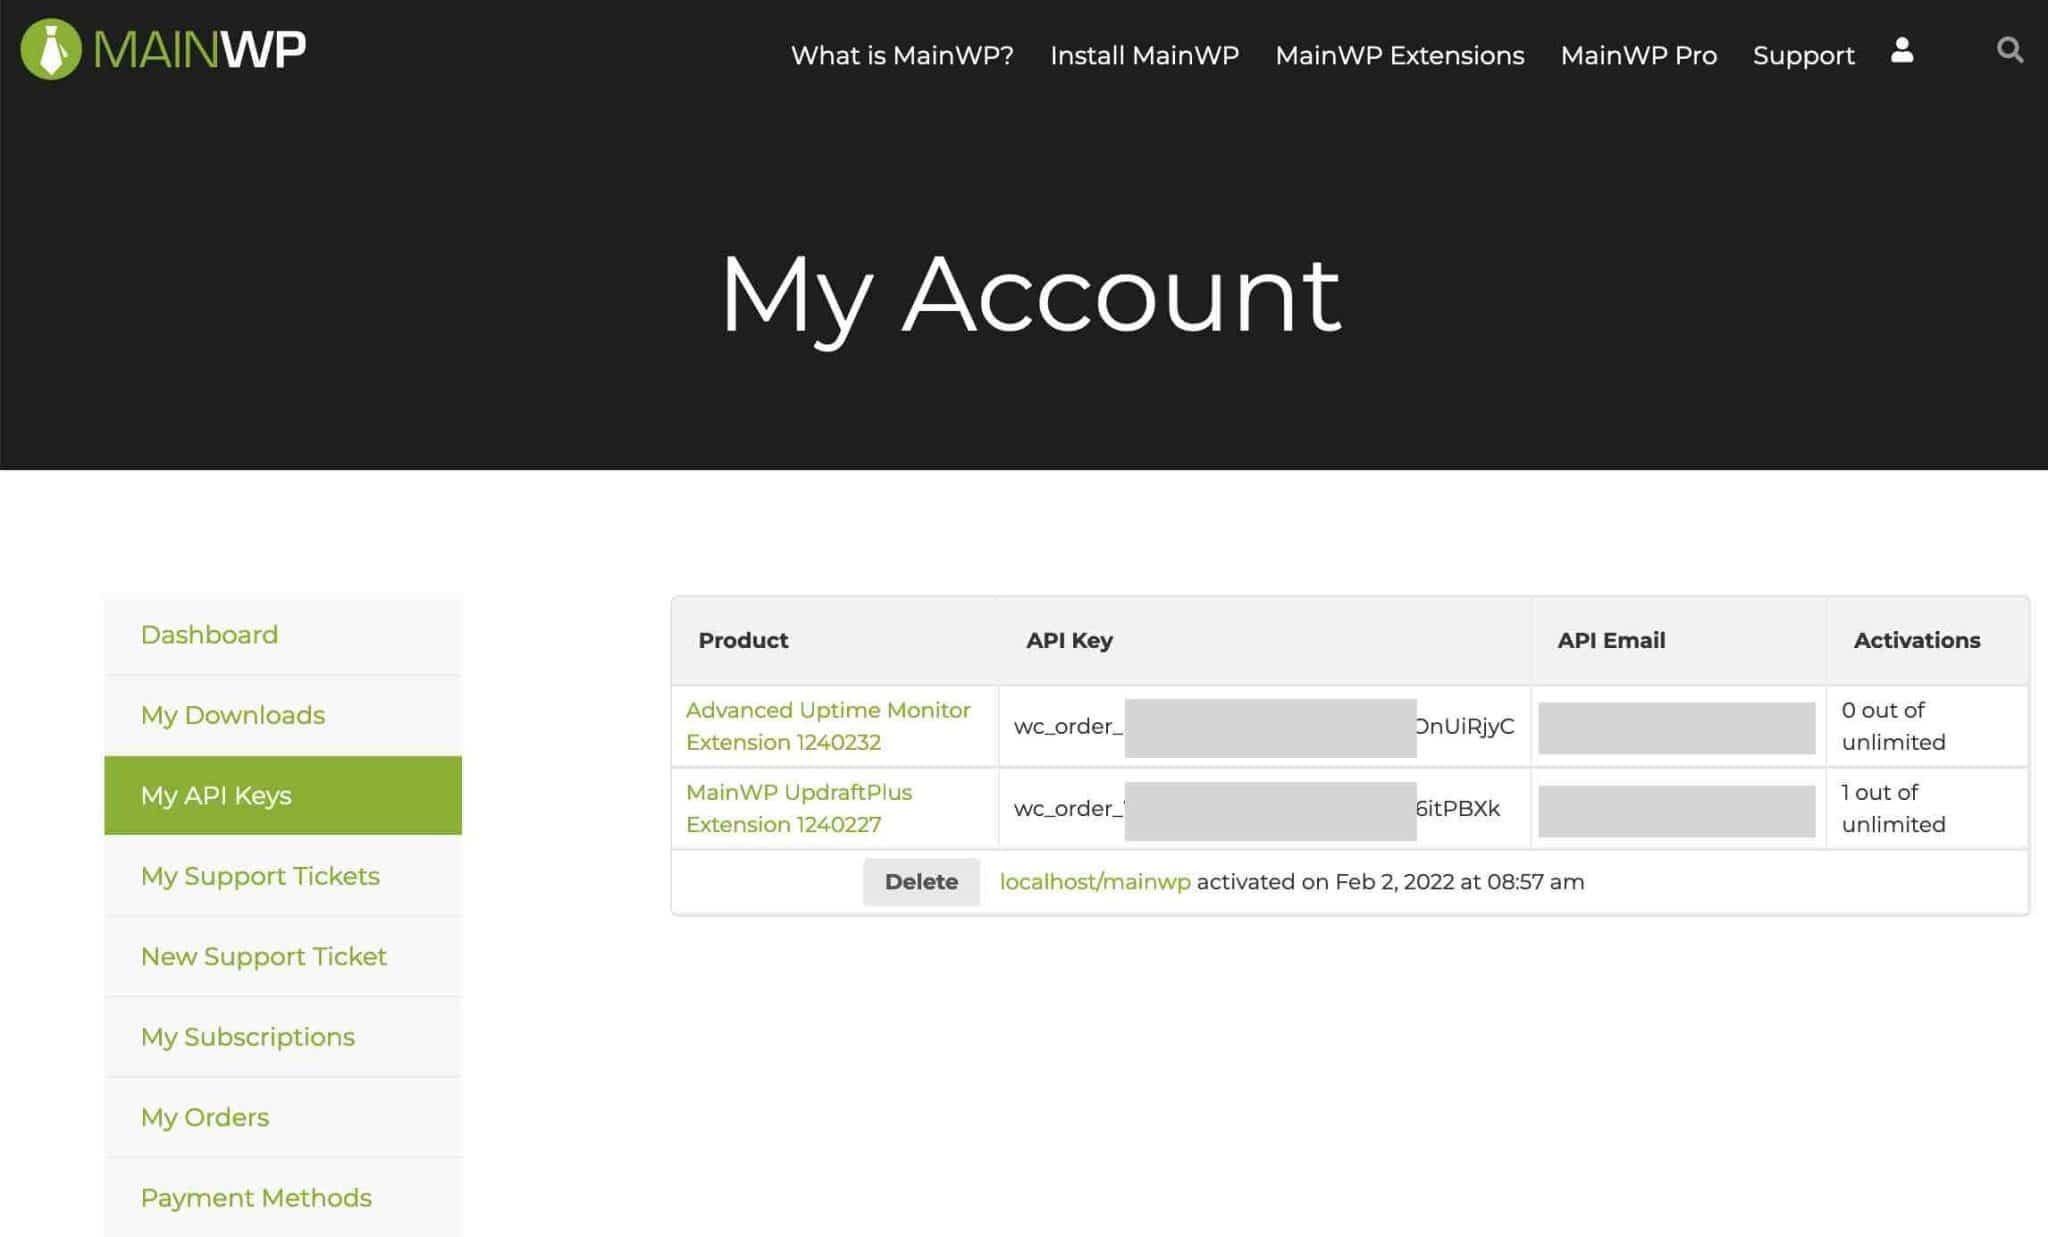
A new UpdraftPlus tab has appeared in the MainWP menu. The extension is installed and activated, but in order to use it, you need to add a license API key and the corresponding email.
Both can be found in the “My API Keys” section of your MainWP account.
Step 2: Install the UpdraftPlus WordPress Backup Plugin on your child site
The MainWP UpdraftPlus extension should only be installed on your dashboard site. On the child site, the UpdraftPlus WordPress Backup plugin should be activated (the one you can find in the official directory).


Proceed as for a regular plugin. Finish by synchronizing your child site with the MainWP dashboard:

Step 3: Schedule automatic backups
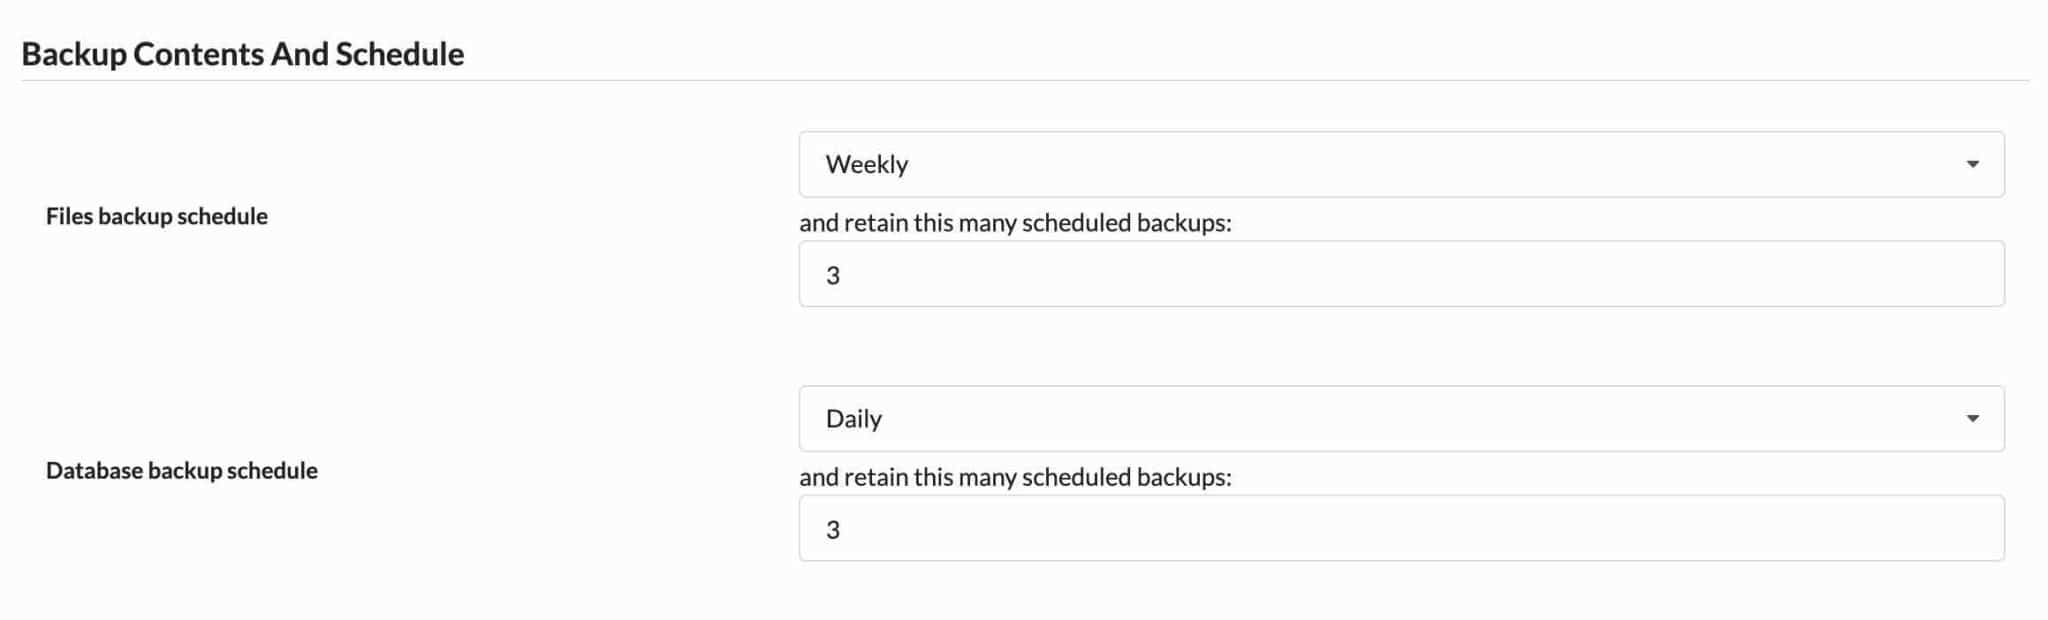
Go to MainWP > Extensions > UpdraftPlus, then click on the “Settings” tab.
Schedule the backups of your files and database in the “Backup Contents And Schedule” section. These settings depend on the content of the site and your personal choices. A regular backup of your database is still recommended.
Enable email reporting when backups are performed, and finally select the remote storage space (Google Drive, Amazon S3, Dropbox, etc.) you want to send your backups to.
If you don’t choose one, MainWP will send those backups to your server. This is obviously not recommended for security reasons (if your site is hacked, your backups will be compromised).
If you have no other specific needs, you can leave the default settings. Remember to save by clicking on the green “Save changes” button at the bottom of the page.
How do you monitor the availability of your sites with MainWP?
You need to be kept informed if your sites are down: in a maintenance package, this is essential.
Through its MainWP Dashboard, MainWP offers a feature to monitor your site (i.e. control its status).
It can be accessed in the general settings, in the “Basic availability monitoring” section.
You can specify a checking interval ranging from “every 5 minutes” to “once a day”.
However, as MainWP points out, this option can cause problems with server resources. Therefore, if you have a lot of sites to check, MainWP recommends using its own extension: MainWP Advanced Uptime Monitor.
This works hand in hand with the UptimeRobot tool (it uses its API) and notifies you when one or more of your sites are not responding.
Install and activate MainWP Advanced Uptime Monitor by following the same steps as for UpdraftPlus. To summarize, you need to:
- Get the extension from the MainWP website
- Install it on your site
- Activate the corresponding API key
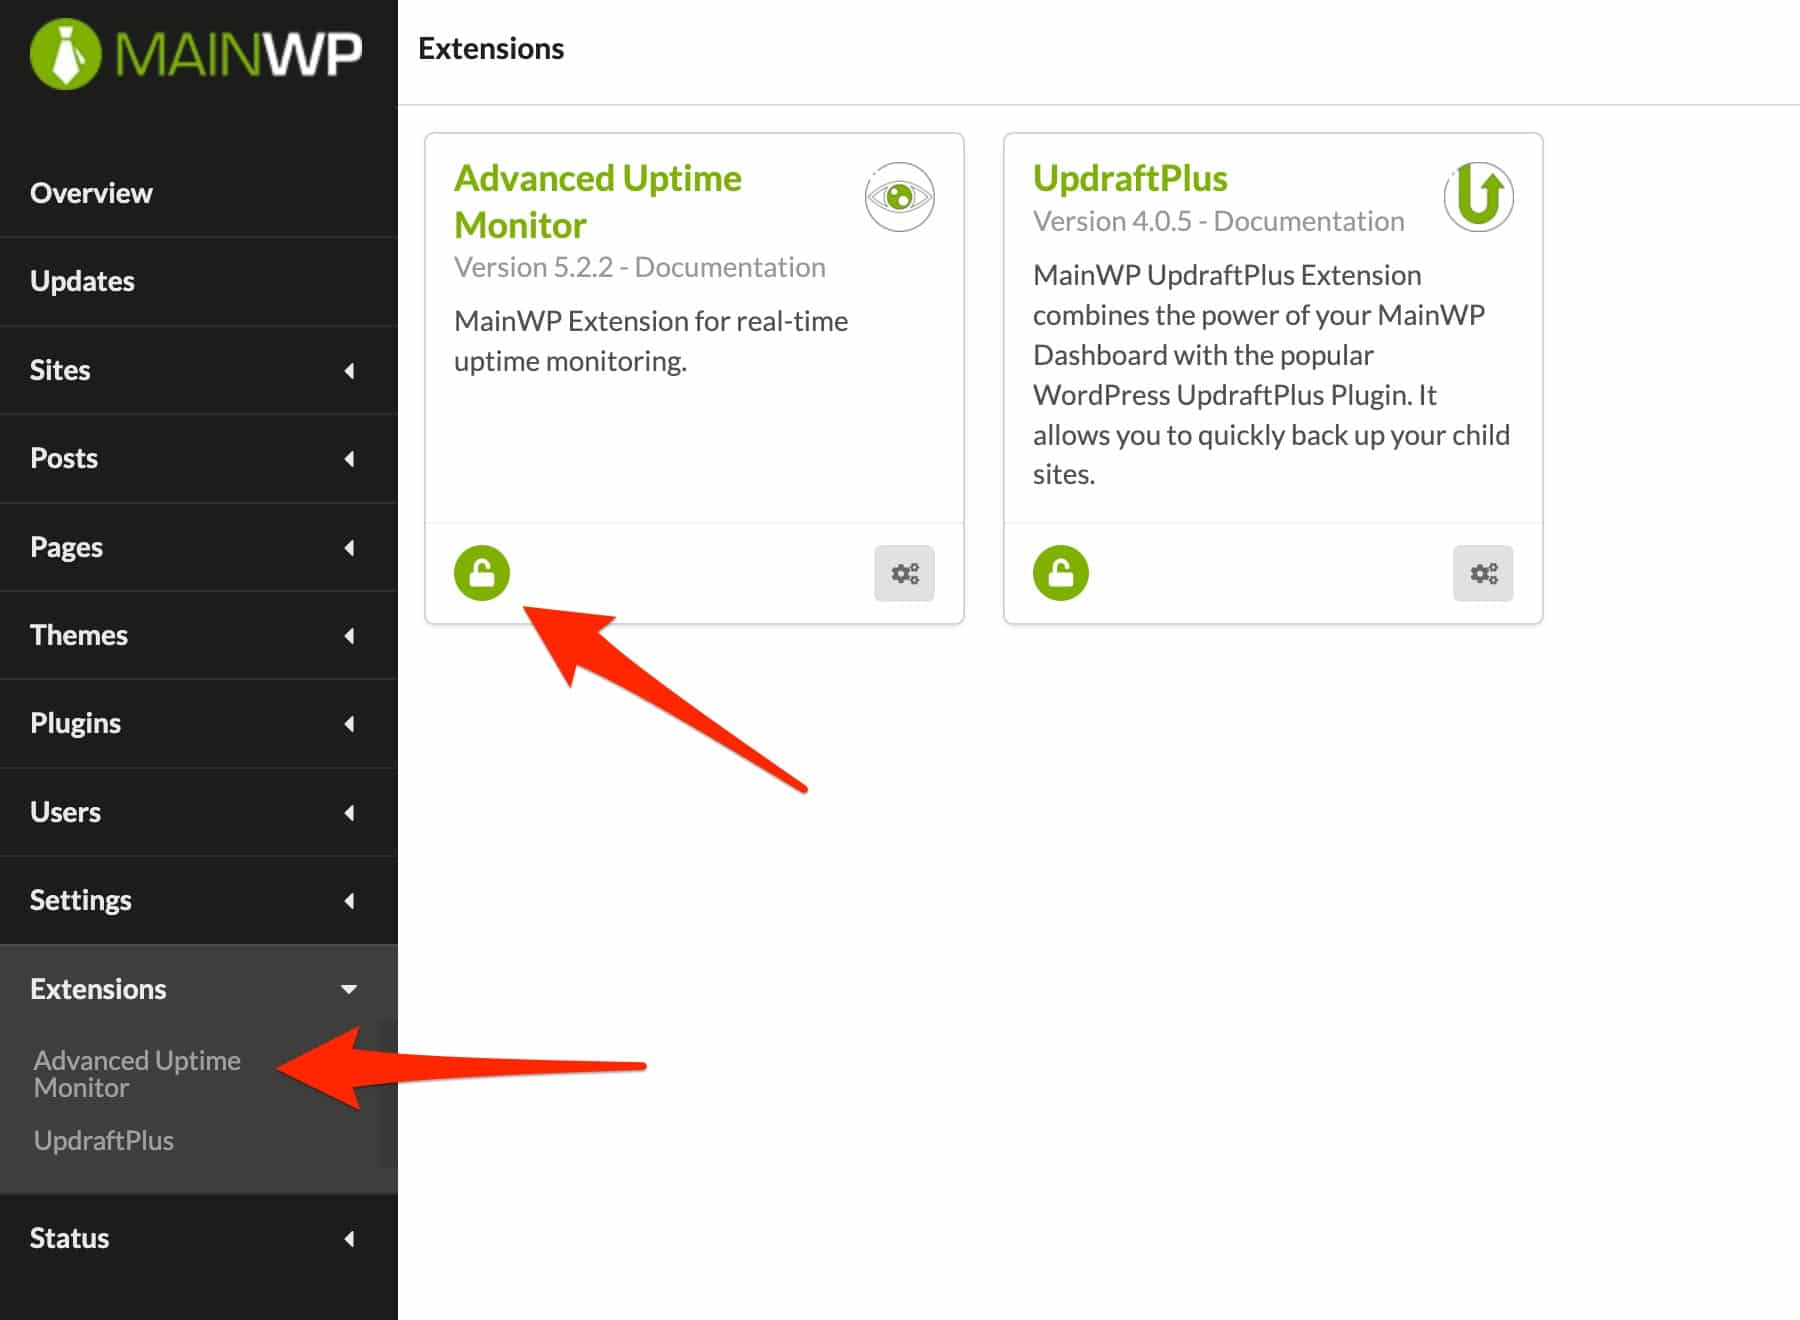
When everything is OK, the extension will appear on your dashboard, alongside UpdraftPlus:
To access real-time monitoring of your WordPress sites’ availability, you need to enter your UptimeRobot API key, which requires creating an account with this (free) tool.
Once you have entered your API key, click on the “Create New Monitor” button then specify the following settings:
- Monitor Type: HTTP(s), Keyword, Ping or TCP Ports. The first choice, HTTP(s), should be suitable in most cases.
- Friendly Name: a nice name to recognize the site in question.
- URL (or IP): the URL of the site you want to monitor.
- Monitoring interval: the time period, in minutes, that elapses between each check of availability of your site. In the free version, you cannot go below 5 minutes.
- Select alert contacts to notify: select the email address to receive notifications in case of unavailability of your site.
Click on “Create Monitor” to validate and repeat these actions for each site you want to monitor. From the Advanced Uptime Monitor dashboard, you will be able to view statistics, pause and edit all your sites.
If a downtime is detected, you are immediately notified by email. I only regret the absence of the reasons for the downtime in this integration.
The other free extensions of MainWP
Beyond these two very important features to maintain a WordPress site, MainWP offers other free extensions to meet other needs, such as:
- Clean and Lock, to remove unwanted sections of your MainWP Dashboard site, and even make your Dashboard page inaccessible (except to you).
- Custom Dashboard, to change the look of your dashboard (colors, fonts, buttons, etc.).
- Vulnerability Checker, to find out about vulnerable themes and plugins on your child sites.
- WooCommerce Shortcuts adds a widget to your child sites’ dashboard, providing quick links to your WooCommerce pages.
There you go, congratulations! Your generic maintenance base is now up and running. You can edit, monitor, secure and backup all of your WordPress sites.


Boost your maintenance with paid extensions
MainWP also has over 30 paid extensions that allow you to take your maintenance to the next level.
- File Uploader allows you to upload your files from the MainWP Dashboard, without going through your FTP client or your cPanel interface. This is how I send my CSS files, among others.
- Bulk Settings Manager gives you more rights in the WordPress settings. You can easily access basic settings such as permalinks or thumbnail size for each of your child sites, from your dashboard site.
- White Label is very powerful. This extension allows you to customize the MainWP Child plugin of the client site. It’s the white label principle: you replace the whole MainWP visual identity by your own. You can also customize the admin and login, as well as act on the information visible by your client (widgets, meta box, etc.).
- Clone allows you to duplicate a child site quickly.
- Favorites saves your favorite extensions and offers significant time saving when installing a new site.
- Pro Reports is essential in a professional maintenance package. This extension offers the possibility to create customizable maintenance reports ready to be sent to your clients (e.g. plugins activated/deactivated, backups performed, media uploaded, security scan, monitoring, Google Analytics, etc.)
- Maintenance gently cleans up post revisions, drafts, spam, optimizes the database and alerts you in case of 404 errors.
- WordPress SEO offers the integration of the Yoast SEO plugin.
- iThemes Security also offers the features of the famous plugin.
- Google Analytics gives you insight and information about the traffic of your customer sites.
- Page Speed integrates the Google Pagespeed Insights for WordPress plugin and gives an overview of the access times of your sites. It also allows you to be warned in case of a drop in its performance.
- Lighthouse audits the performance, accessibility and SEO of each of your child sites.
How much does MainWP cost?
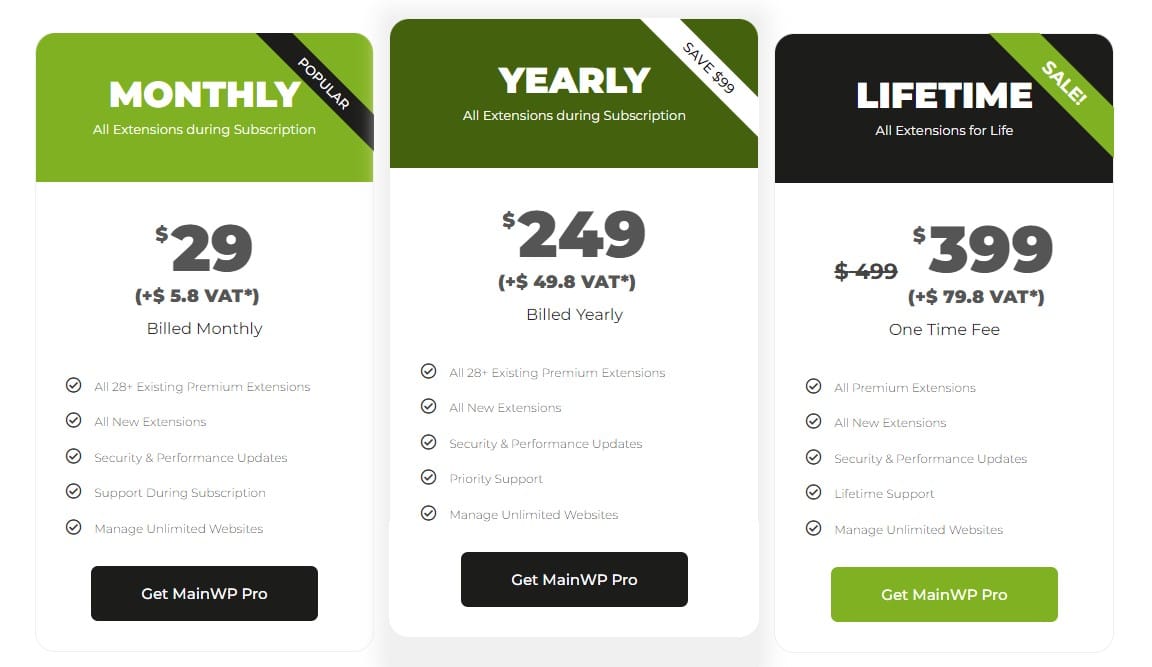
MainWP is a free open source tool. For the rest, it works like WordPress. If you want to add other features, you have to use a plugin.
As you have seen, about thirty of them are not free. To benefit from all these extensions – it is not possible to get them individually – MainWP proposes 3 plans:
- Monthly subscription: $34.8/month. This is expensive in the long run, but it’s a good way to get started.
- Yearly subscription: $298.8. This offer is interesting in the medium term and gives you additional financial flexibility.
- Lifetime subscription: $478.8. With the one-time payment, you gain access to all the benefits of MainWP without having to renew your subscription each year. It is very attractive in the long run.
For each offer, you get access to all current and future extensions, updates and support. A 30-day money back guarantee is also included.
Our final review
MainWP is a very practical plugin to manage and maintain an unlimited number of sites efficiently.
It’s easy to use, once you get the hang of how it works.The documentation and a series of explanatory videos are highly appreciated.
However, we can regret the multiple actions to perform to install a home-made plugin at the beginning. For the rest, it’s not bad at all. 😉
Of course, there are competitors such as ManageWP or InfiniteWP which are doing very well and offer interesting interfaces and affordable systems.
Meanwhile, the functionalities remain the same, more or less. Only the price can make the difference. Or the question of being self-hosted or not.
Don’t forget that with MainWP, it is preferable to use a blank personal WordPress installation, which can be a bit restrictive.
Download the MainWP Dashboard plugin:
MainWP, for whom?
In the end, the plugin can suit any type of profile, from beginners to experienced technicians.
However, it is primarily aimed at people who are in charge of maintaining several sites at the same time, like WordPress agencies or freelancers, whose job is to create sites.
With MainWP, you no longer need to log in to each site individually to perform basic actions. Each site can be managed from a single dashboard.
So, are you hooked? Would you use MainWP to manage all your sites? Tell me all about it in the comments.