


Do you know Formidable Forms? This plugin promises to make “developer’s dream come true”.
Are you dying to drive a Ferrari? Enable this plugin. Winning the lottery would thrill you? Same answer.
Don’t believe it? You’re right. Of course, however powerful it may be, a WordPress plugin doesn’t have those magical powers yet.


Formidable Forms “only” helps you design very advanced forms of all kinds (the dream), without having to code (the reality).
And believe me, it has a lot to offer. To take the full measure of it, we’ve put together a nice test, so you can make your own opinion.
What if this plugin was really formidable?
Overview
- What is Formidable Forms?
- What are the main features of Formidable Forms?
- How to create a contact form with Formidable Forms in 4 steps
- How to embed a form in your content with Formidable Forms?
- What are the settings offered by Formidable Forms?
- What are the add-ons offered by Formidable Forms?
- How much does Formidable Forms cost?
- What about GDPR compliance?
- Our final review on Formidable Forms


What is Formidable Forms?


Formidable Forms is a freemium WordPress plugin that allows you to create various and advanced forms (contact, payment, quiz, survey, etc.) without technical skills. It works with drag and drop and provides ready-to-use templates.
The homepage of its official website states that more than 300,000 companies already trust Formidable Forms, and not the least (Audi, Apple, Warner Bros, H&M).
It has more than 300K+ active installations according to the data provided by the official WordPress directory.
This puts it in the Top 5 of plugins dedicated to form creation, behind competitors like:
- Contact Form 7 (5M+ active installations).
- WPForms (5M+ active installations).
- Ninja Forms (800K active installations).
- Forminator (500K+ active installations).
Formidable Forms is available in two versions:
- A free version called Formidable Form Builder. Available on the official directory, you can install and enable it directly from your WordPress dashboard.
- A premium version called Formidable Forms, with four different licenses (starting at $39.50/year). I’ll come back to this in detail at the end of this post.
“Simplicity” and “attention to details”
Formidable Forms is the flagship product of the Strategy 11 company, which has been developing and maintaining WordPress plugins for over a decade (Business Directory, AWP Classifieds).
Its founders, Steph and Steve Wells, say they are committed to “excellence through attention to detail” and “simplicity”.
The About page also states that the Wells are advised by Syed Balkhi, CEO of Awesome Motive, the company behind WPBeginner, OptinMonster, MonsterInsights, Smash Balloon, and… WPForms.
The Awesome Motive website also indicates that the company participates in the development of Formidable Forms as an investor.
For example, Formidable Forms is part of the growth accelerator created by Awesome Motive, which includes various companies in the WordPress ecosystem (Pretty Links, MemberPress, ThirstyAffiliates, etc.).
What are the main features of Formidable Forms?
Availability of essential options
First of all, Formidable Forms offers some great features for a form plugin. I’m thinking for example about:
- A drag and drop editor to design forms easily.
- Templates to avoid starting from a blank page and to save time.

- Native protection against spam.
- Responsive aspect of your forms, essential for them to be displayed correctly, whatever the type of device used by your visitors (computer, smartphone, tablet).
- Possibility to customize the visual appearance of your forms (colors, text, margins etc.) from the free version of the plugin, and without coding.
- Integration with various tools (e.g. CRM, email marketing software, payment gateways).
- Integration with the WordPress content editor (Gutenberg), with a dedicated block to integrate your forms once created.
Possibility to design various and advanced forms
Flexible and scalable, Formidable Forms also allows you to create complex forms of various types:
- Contact form.
- Payment form, with Stripe and PayPal integration.
- Calculation form.
- Form for designing polls, surveys and quizzes.
- Form to collect donations.
- Form to collect the email address of your visitors (opt-in form).
- Login form to access a member area, for example.
- Form to subscribe to your newsletter, etc.


In the premium version, all these form types can be coupled with even more advanced options:
- Conditional logic, in order to display certain fields only if certain conditions are met (e.g. filling in a particular field).
- Step-by-step field filling: the user can fill in a field only if he has filled in the previous one.
- The possibility to create what Formidable Forms calls “Views”. With these, you can format, filter and display the data collected through your forms to create calendars, job offers, tables, menus etc.
- Hooks (more than a hundred) allow developers and technicians to extend the functionality of the plugin.
How to create a contact form with Formidable Forms in 4 steps
In order to explain how Formidable Forms works, we will use the free version of the plugin, which is enough to create an efficient contact form. Of course, if you want to benefit from additional options, the Pro version will be more complete. We will detail its features and prices later in this post.
Step 1: Install and enable Formidable Forms
To get started, install the plugin from your WordPress administration interface (back office).
Go to Plugins > Add New and type “Formidable Form Builder” in the search bar:
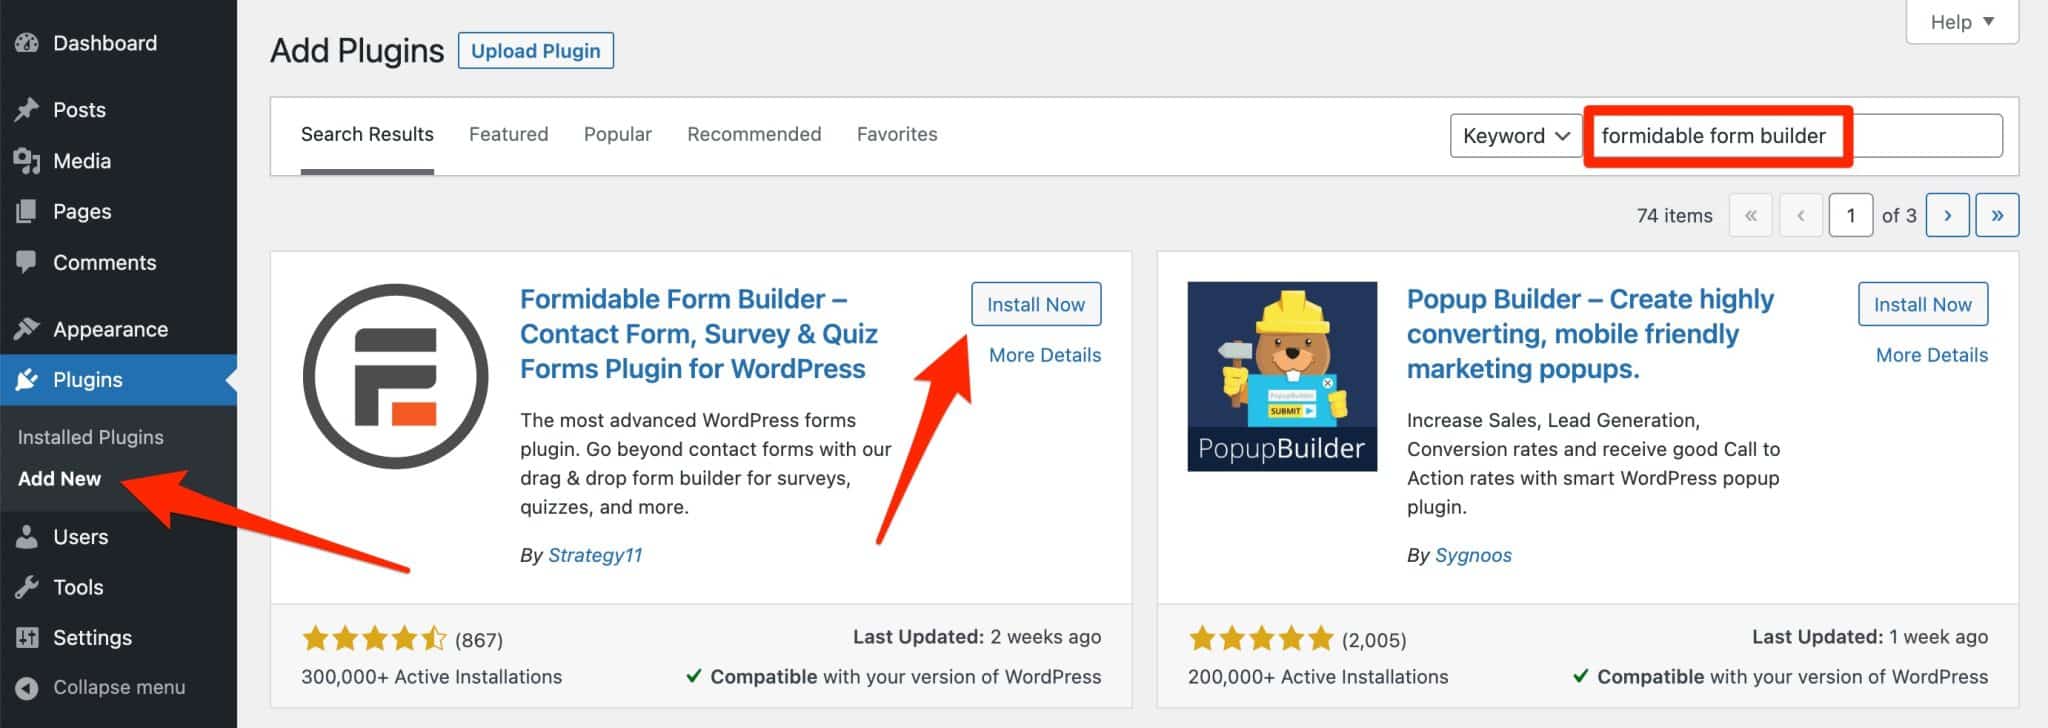
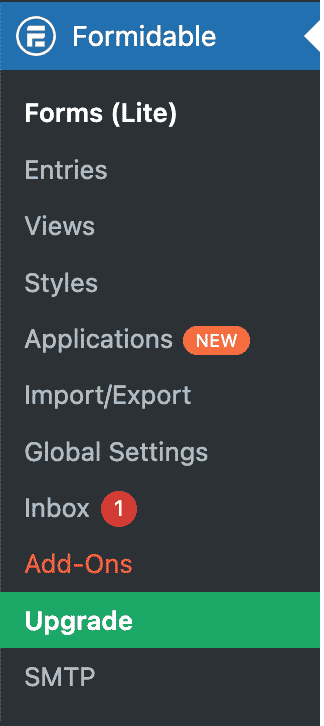
Remember to enable the plugin to make it operational on your site. At this point, a new menu named “Formidable” will appear on the sidebar of your site:

To install Formidable Forms after purchase, download the zip file of your license from your customer area, then add it to your WordPress site in Plugins > Add New > Upload Plugin.
Step 2: Enable a form template
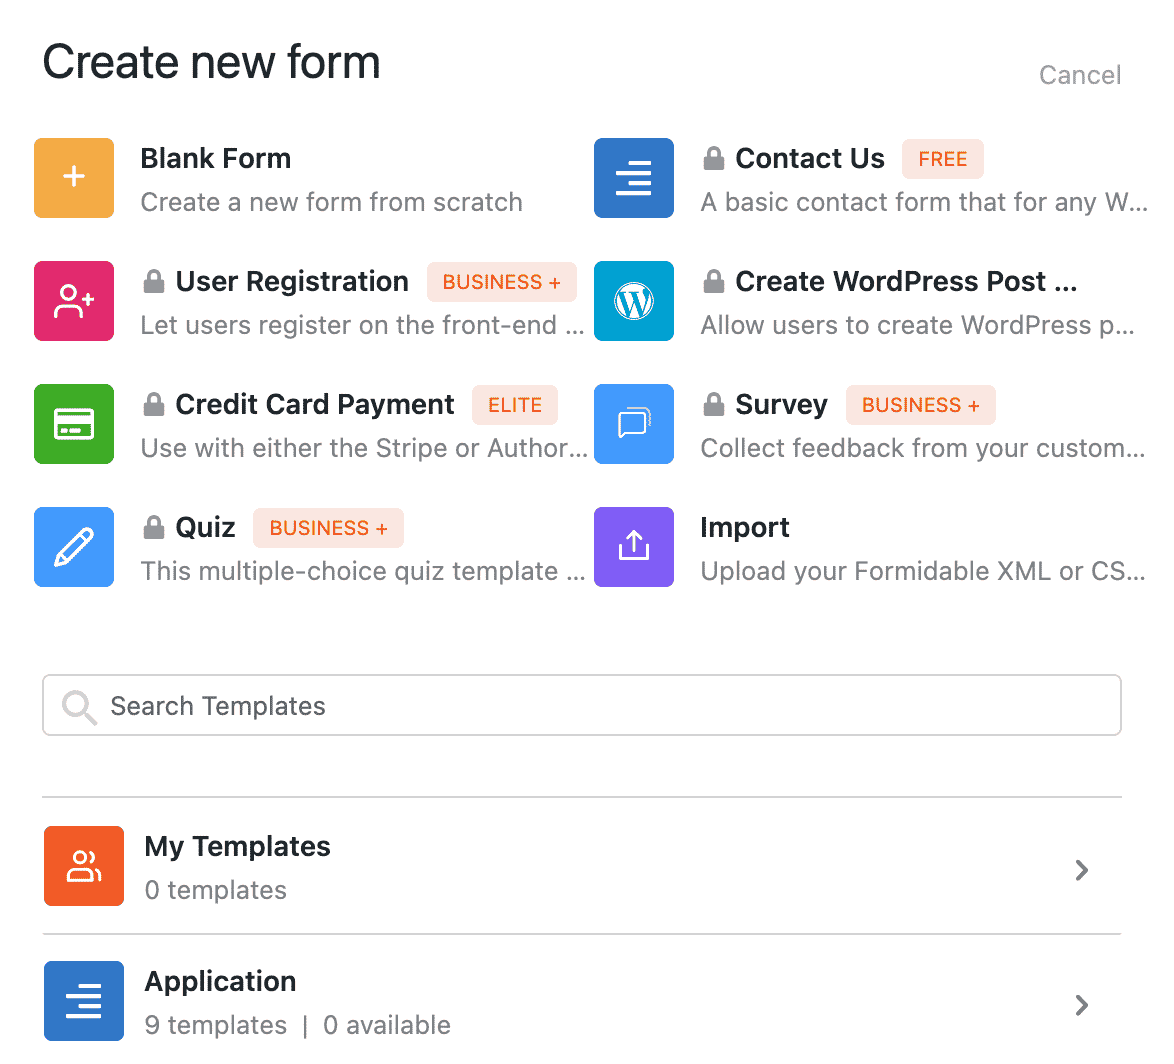
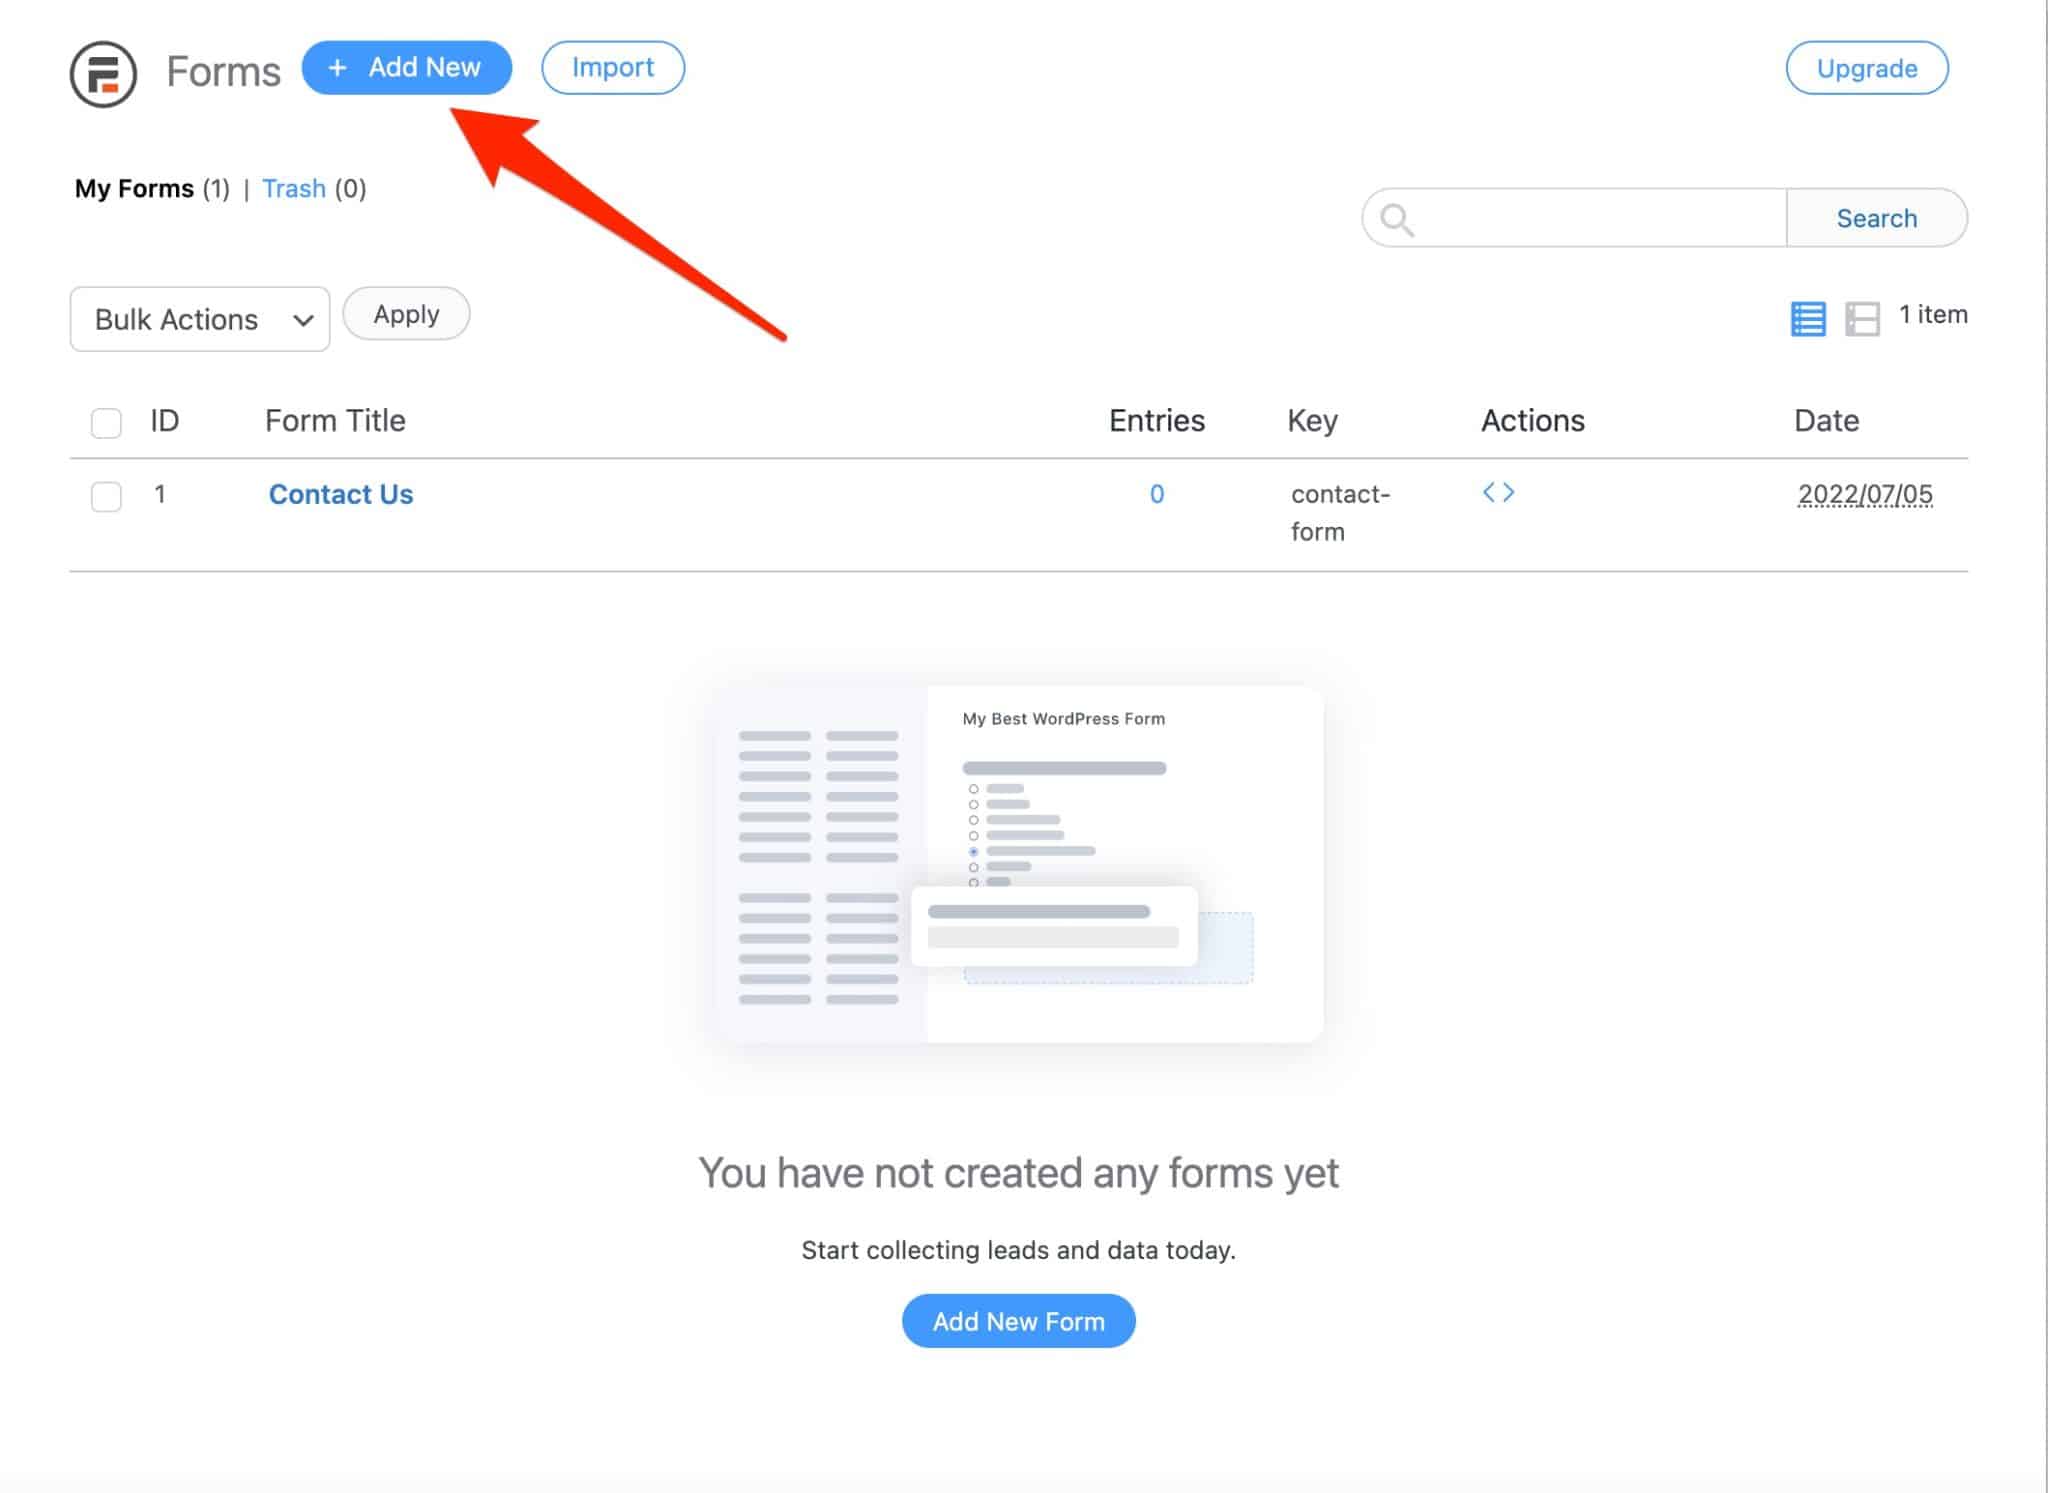
Once the foundation is laid, start building your first form via the Formidable > Forms (Lite) menu. Click on the “Add New” blue button at the top of the page:
At this point, you have two options:
- Start from scratch with a blank form.
- Enable a form template that is already operational. All you’ll have to do is customize it according to your wishes.
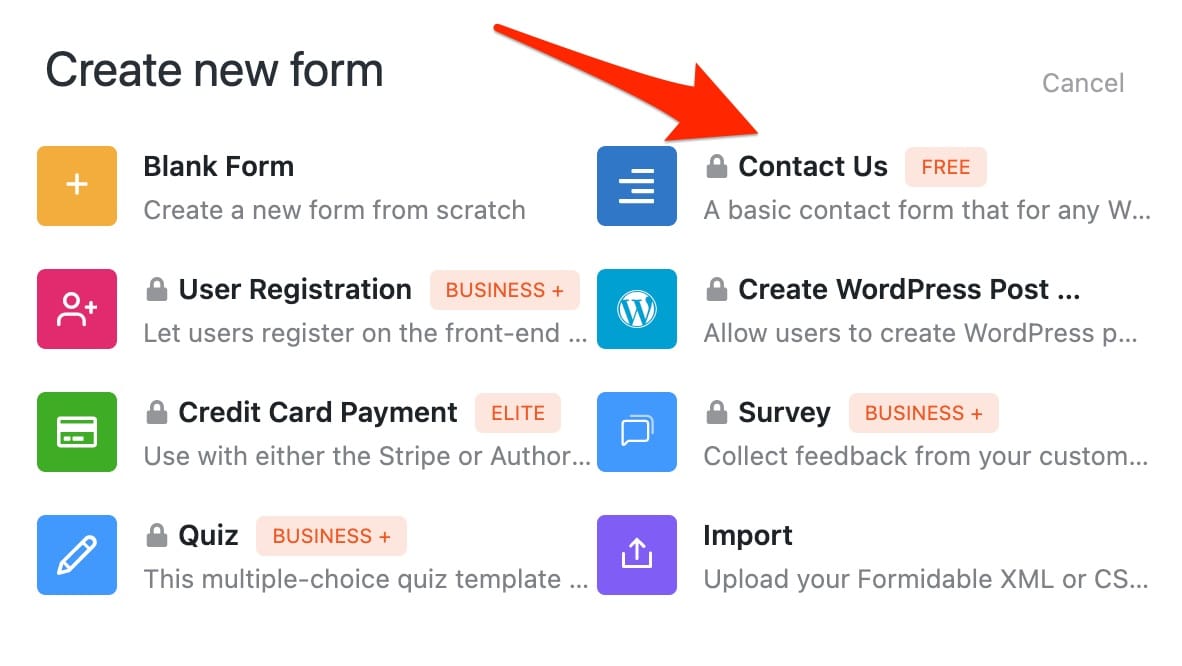
For the purpose of this test, I choose the template named “Contact Us”, which allows you to create a contact form.
With the free version of the plugin, you have about twenty templates, divided into twenty categories (Blank Form, Contact Us, customer service, marketing, survey, quiz, real estate, WooCommerce etc.). Please note that each category does not necessarily feature a free template.
Click on the “Contact Us” template . You’ll see that the plugin will require you to enter your email address to get 10 more templates for free.

This undermines the user experience since you have to go to your email box, then copy and paste the code you just received. This is a necessary prerequisite to be able to customize the template.
Finish by giving a name to your form (e.g. “Contact”).


Step 3: Add fields to the form
Presentation of the Formidable Forms editing interface
Now let’s move on to adding fields to your form (or customizing those already present).
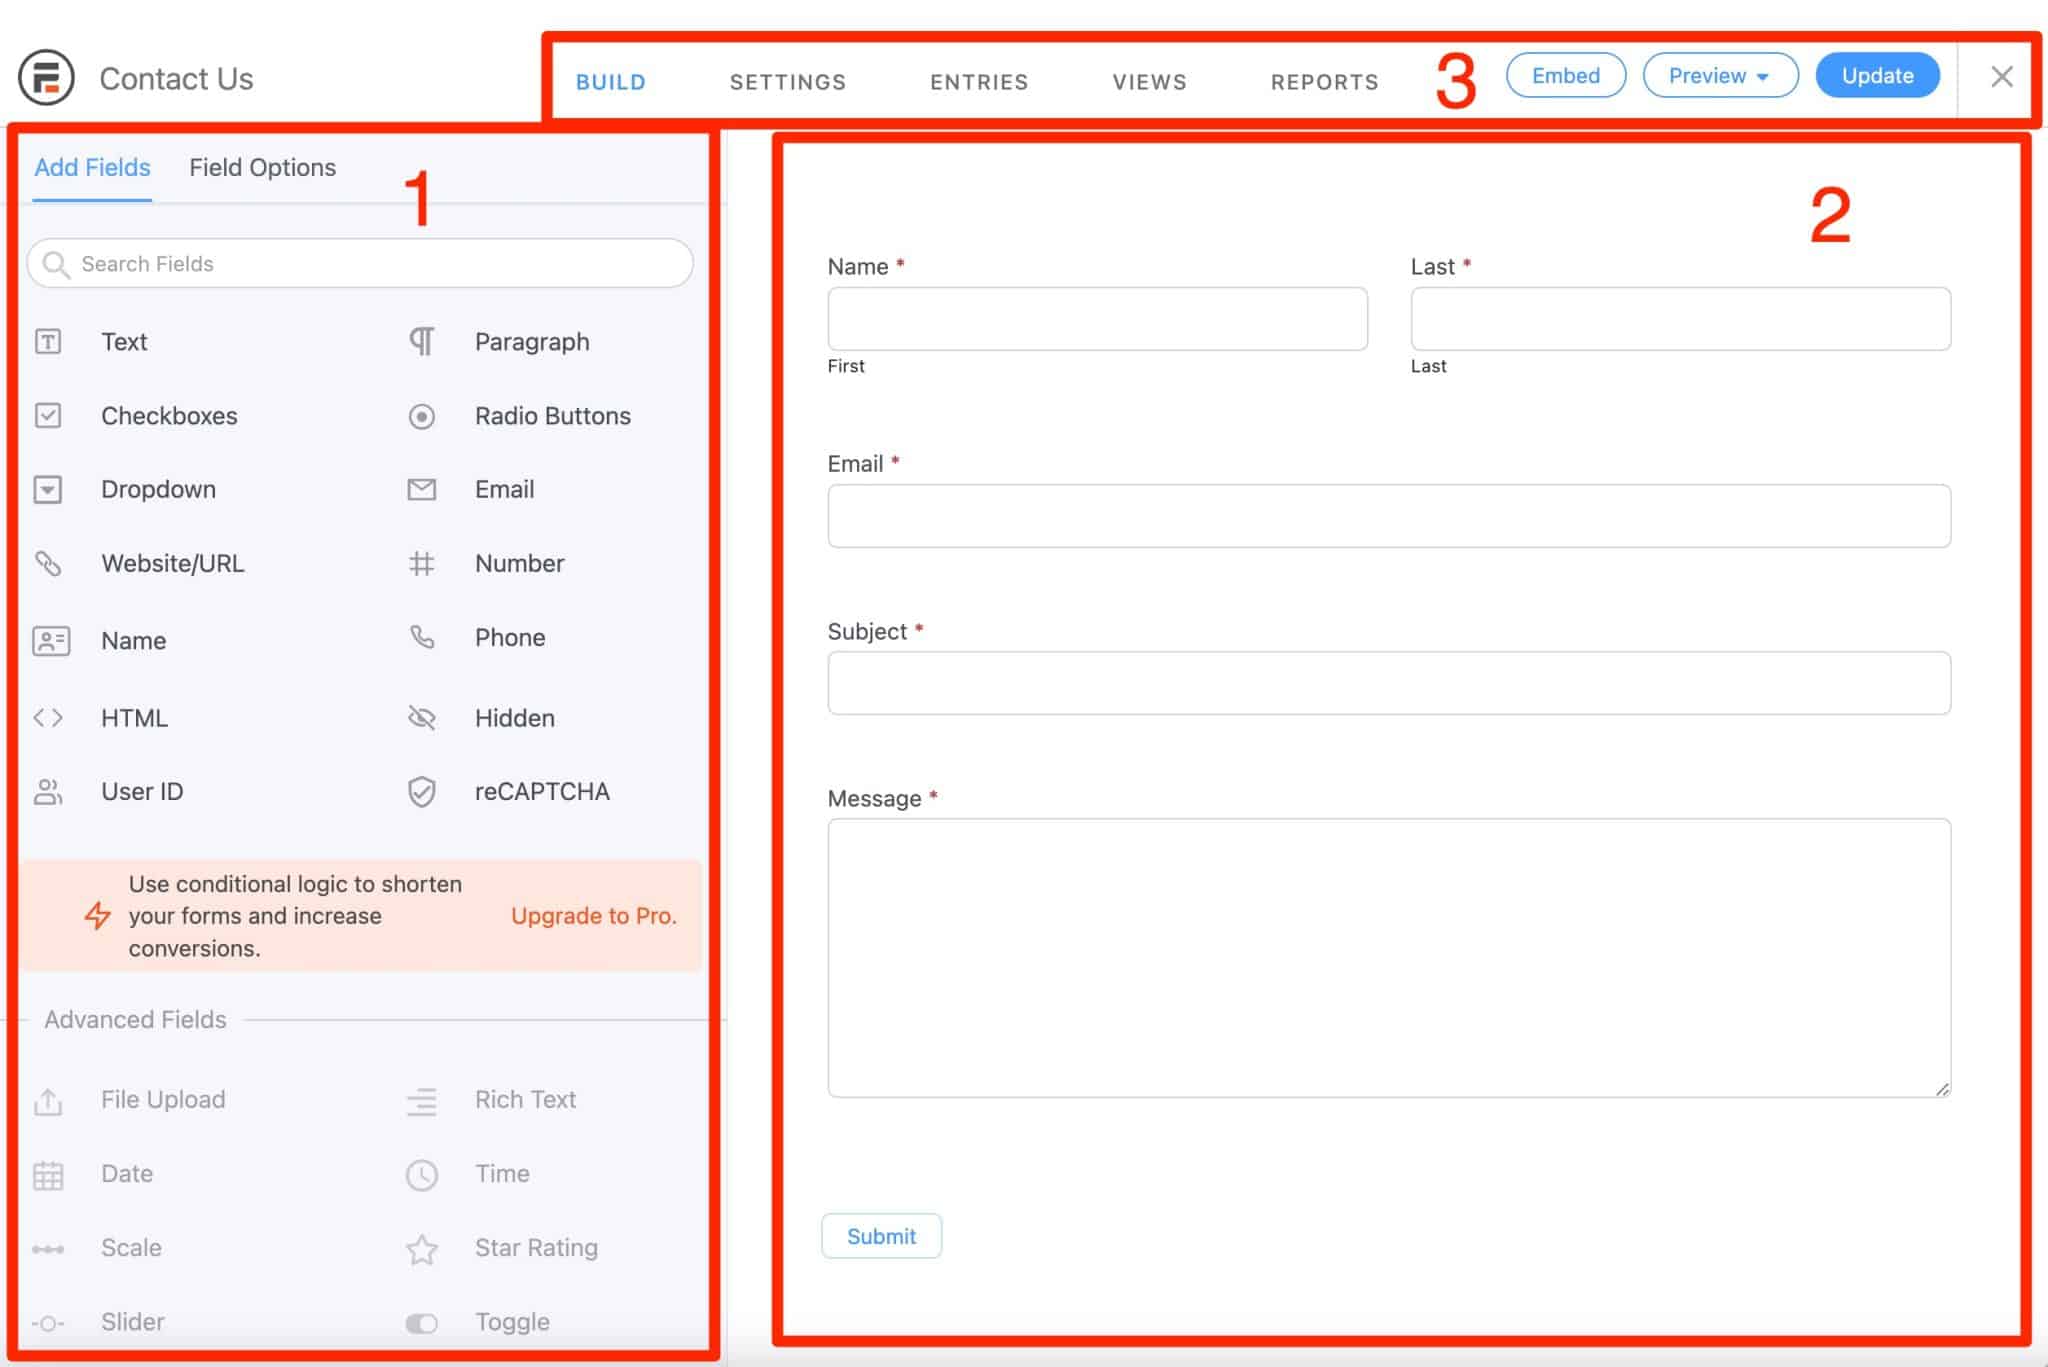
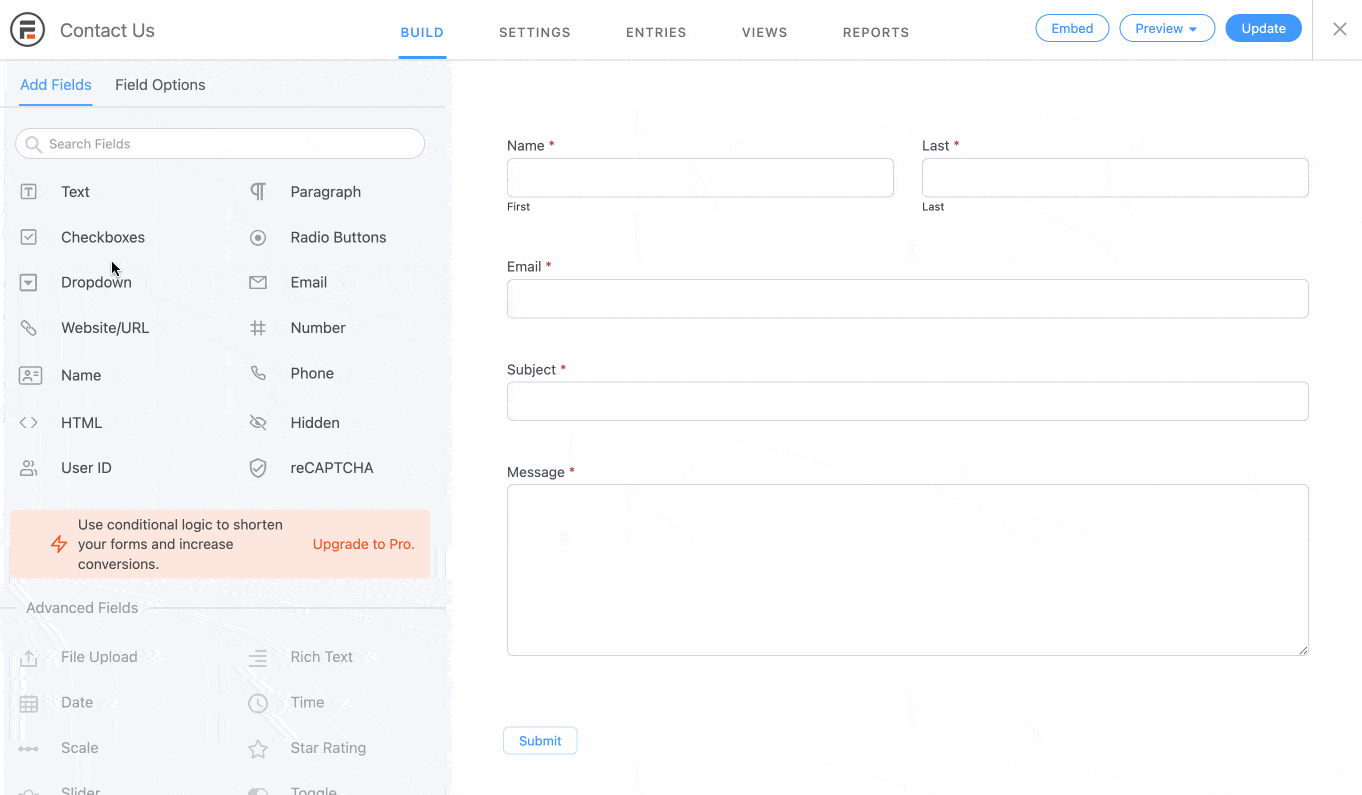
Before jumping into the water, let’s detail how the editing interface of the plugin works. It can be divided into 3 clearly identifiable areas:
- The left area (#1 on the screenshot below) allows you to add the fields of your choice and customize some of their settings, case by case (text, field size, validation message etc.).
- The central area (#2) displays all the fields of your form.
- The upper area of the interface (#3) offers additional settings and an option to preview your form.
What kind of fields can you add to your form on Formidable Forms?
Formidable offers 3 main families of fields:
- Classic fields, all available in the free version of the plugin: Text, Paragraph, Checkboxes, Name, Phone, Email, Radio Buttons etc. In total, there are 14 of them.
- Advanced fields (23 in total, with a Pro license only): File Upload, Password, Credit Card Payment, Search, Date, Signature, Dynamic Field, etc.
- Price related fields (3 options, with a Pro license only): Product, Quantity and Total.
How to add and customize fields in your form?
To add a field to your form, you can:
- Either click on the field of your choice, which will automatically add it after the last field on your form.
- Or drag and drop it wherever you want.
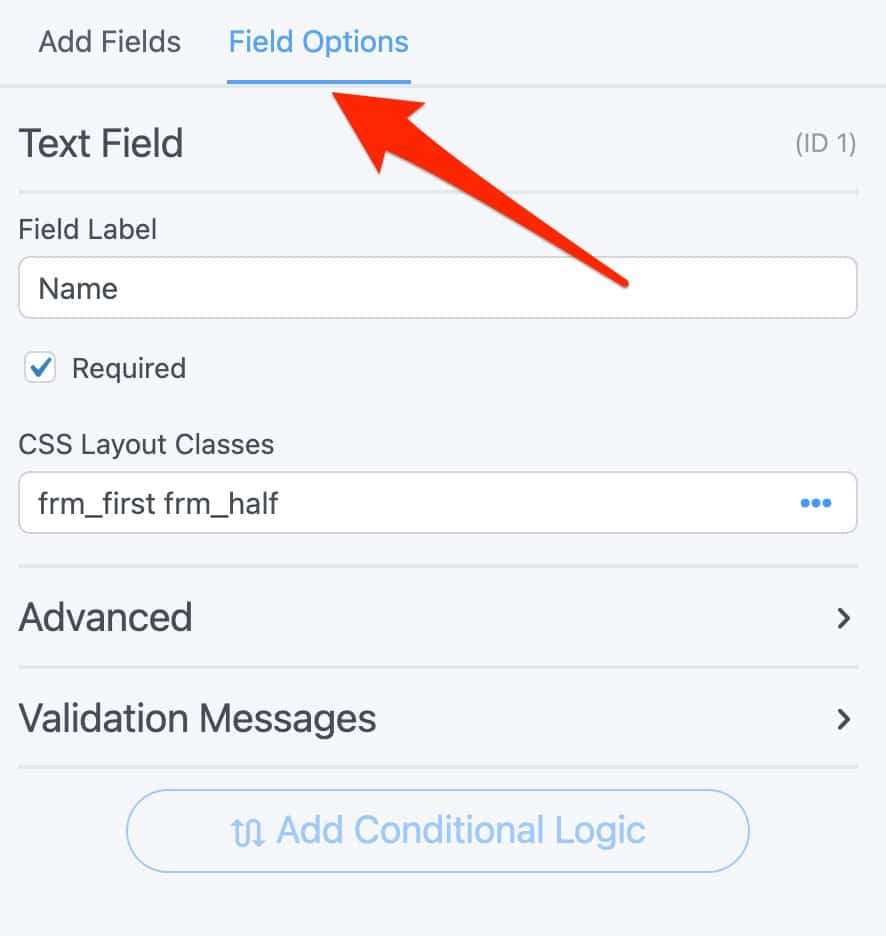
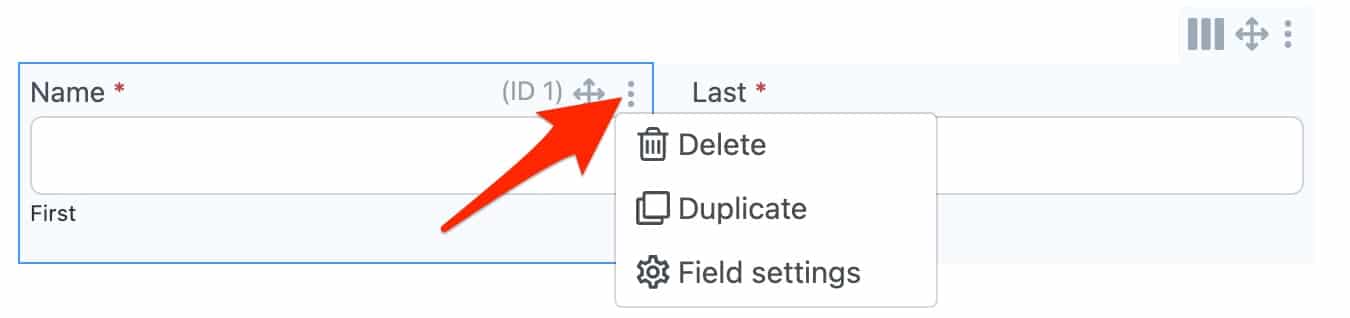
Each field moves to the area of your choice, with a simple drag and drop. You can then customize it by clicking on it. This action “sends” you to the “Field Options” tab which has 3 submenus:
- Text field: to change the field Label (e.g. Last Name or First Name), make it mandatory or not, and add a CSS formatting class.
- Advanced: here you can incorporate a text to specify the expected content of the field, its number of characters, or a mandatory field indicator.
- Validation Messages: to display a message of your choice when a mandatory field is not filled in.

The “Field Options” tab also allows you to set up a form with conditional logic. However, a Pro license is required for this.
By hovering over each field, you can also access quick actions to Delete, Duplicate, or access Field settings (click on the three small dots):

Step 4: Customize the form
Finally, you can make final adjustments to your form via the Settings tab:
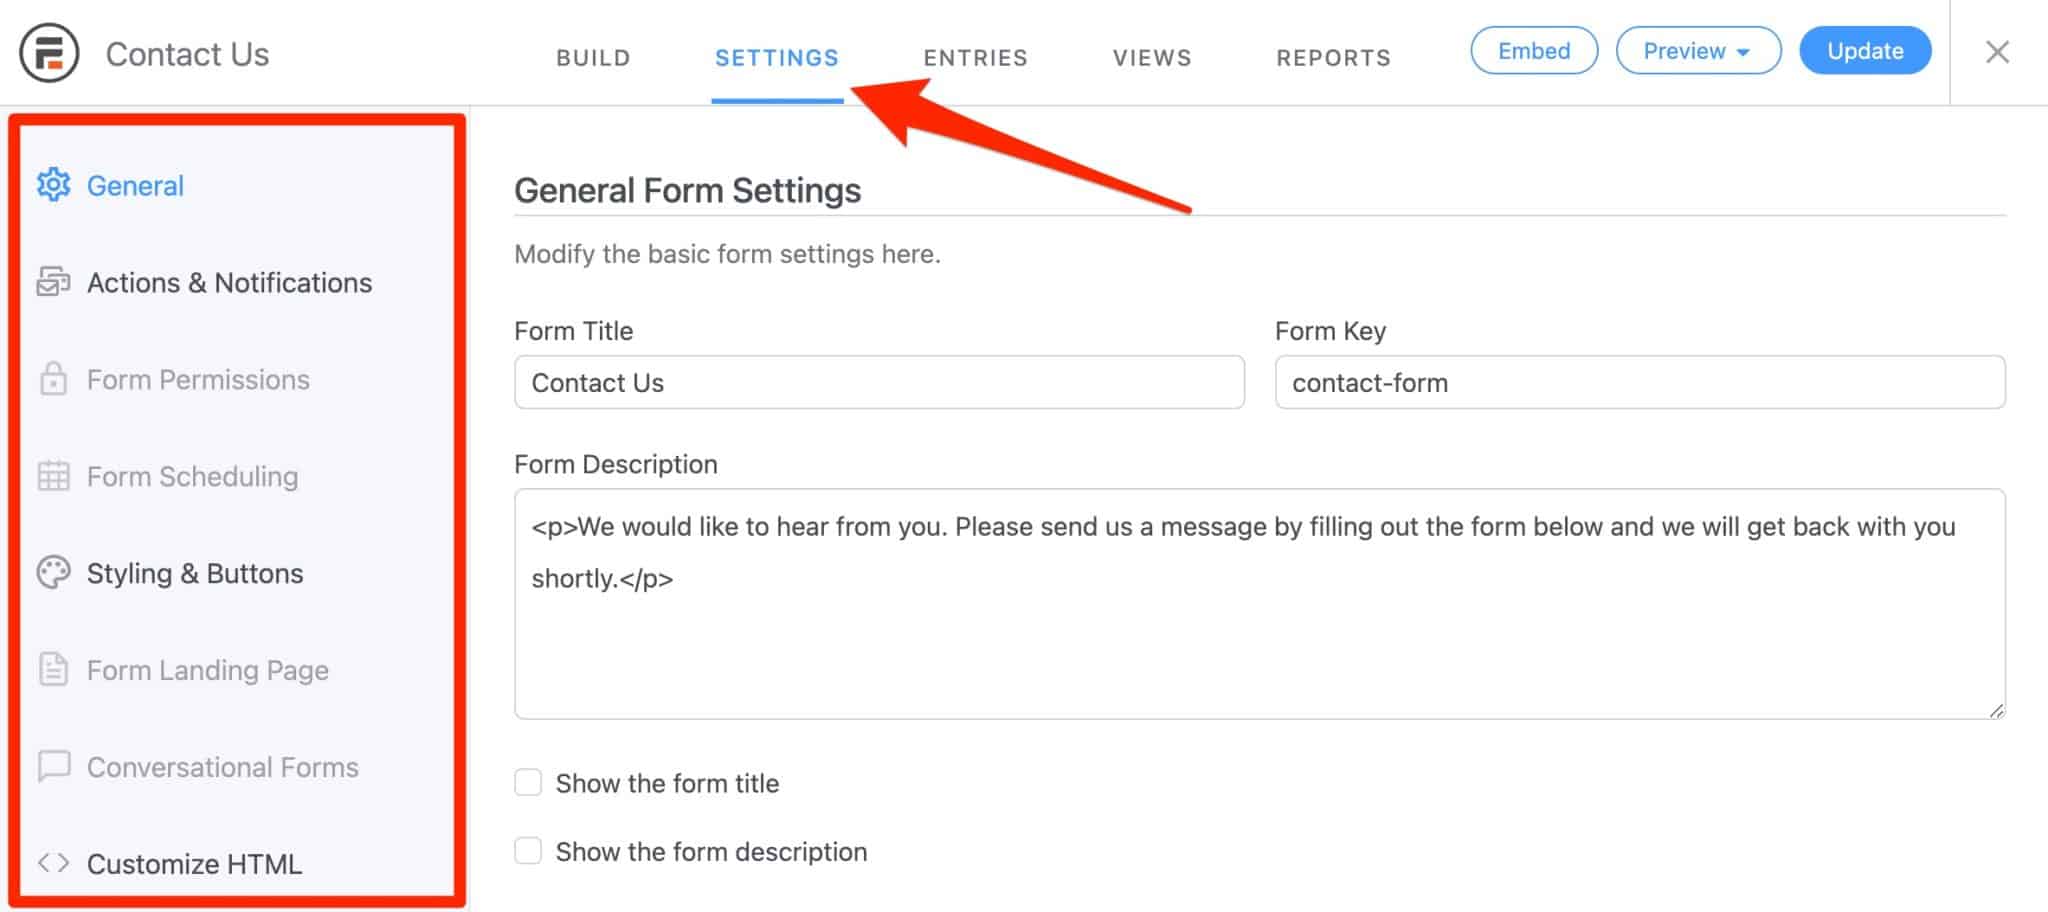
In the free version, 4 sub-menus are available:
- General: here you can for example choose a specific action when someone submits your form. It is possible to display the message of your choice, to redirect to a specific URL, or to display the content of a page. You can also load and save the form creation page in AJAX, to speed up its display.
- Actions & Notifications: allows you to send an email when someone fills and submits a form.
- Styling & Buttons: you can customize your form (more details on this later) and select a style for your form. This is also where you can change the text of the “Send” button.
- Customize HTML: as the name suggests, this sub-menu allows you to customize your fields using the HTML language.
When you are done with your settings, remember to click on the “Update” button to save them. Without further ado, you will now discover how to embed your form within your content.
How to embed a form in your content with Formidable Forms?
Now your form is waiting to be displayed on your pages or posts. You can find it ready to use on your administration interface, through the Formidable > Forms (Lite) menu.
In the “Actions” tab, you can click on the two angle brackets to open a popup window that will offer you 3 ways to integrate your form:
- By selecting an existing page.
- By creating a new page.
- By opting for the manual method.
Let’s see this right away.
How to integrate a form designed with Formidable Forms in a page or a post?
Using the Gutenberg block proposed by Formidable Forms
To integrate a form in a page or a post, you can first use the Gutenberg block called “Formidable Forms”.
Select it, then choose the form of your choice in the drop-down menu:
You can then make some adjustments in the sidebar on the right (display the title or description of the form, minimize the HTML), in the “Options” menu.
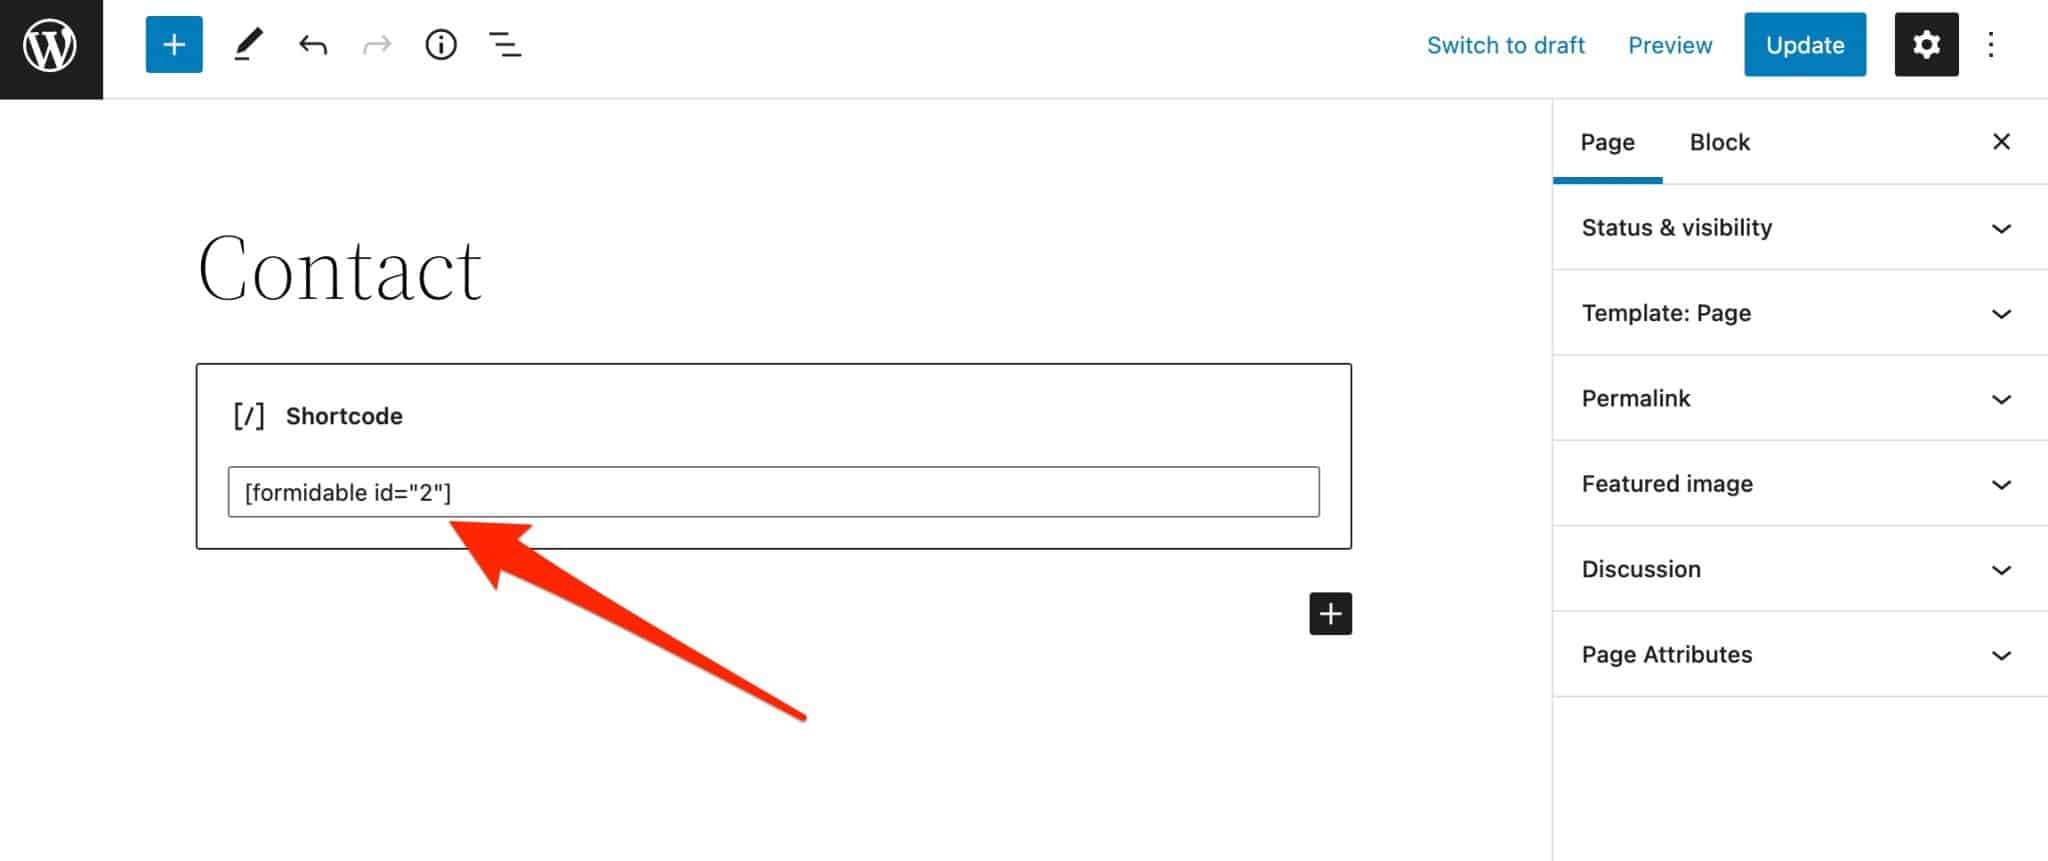
Use the “Shortcode” block
Since we’re in the WordPress content editor, let’s stick with option #2. You can also use the “Shortcode” block, and add the shortcode associated with your form.
In my case, it looks like this: [formidable id="2"]:
How to embed a form in a widget area with Formidable Forms?
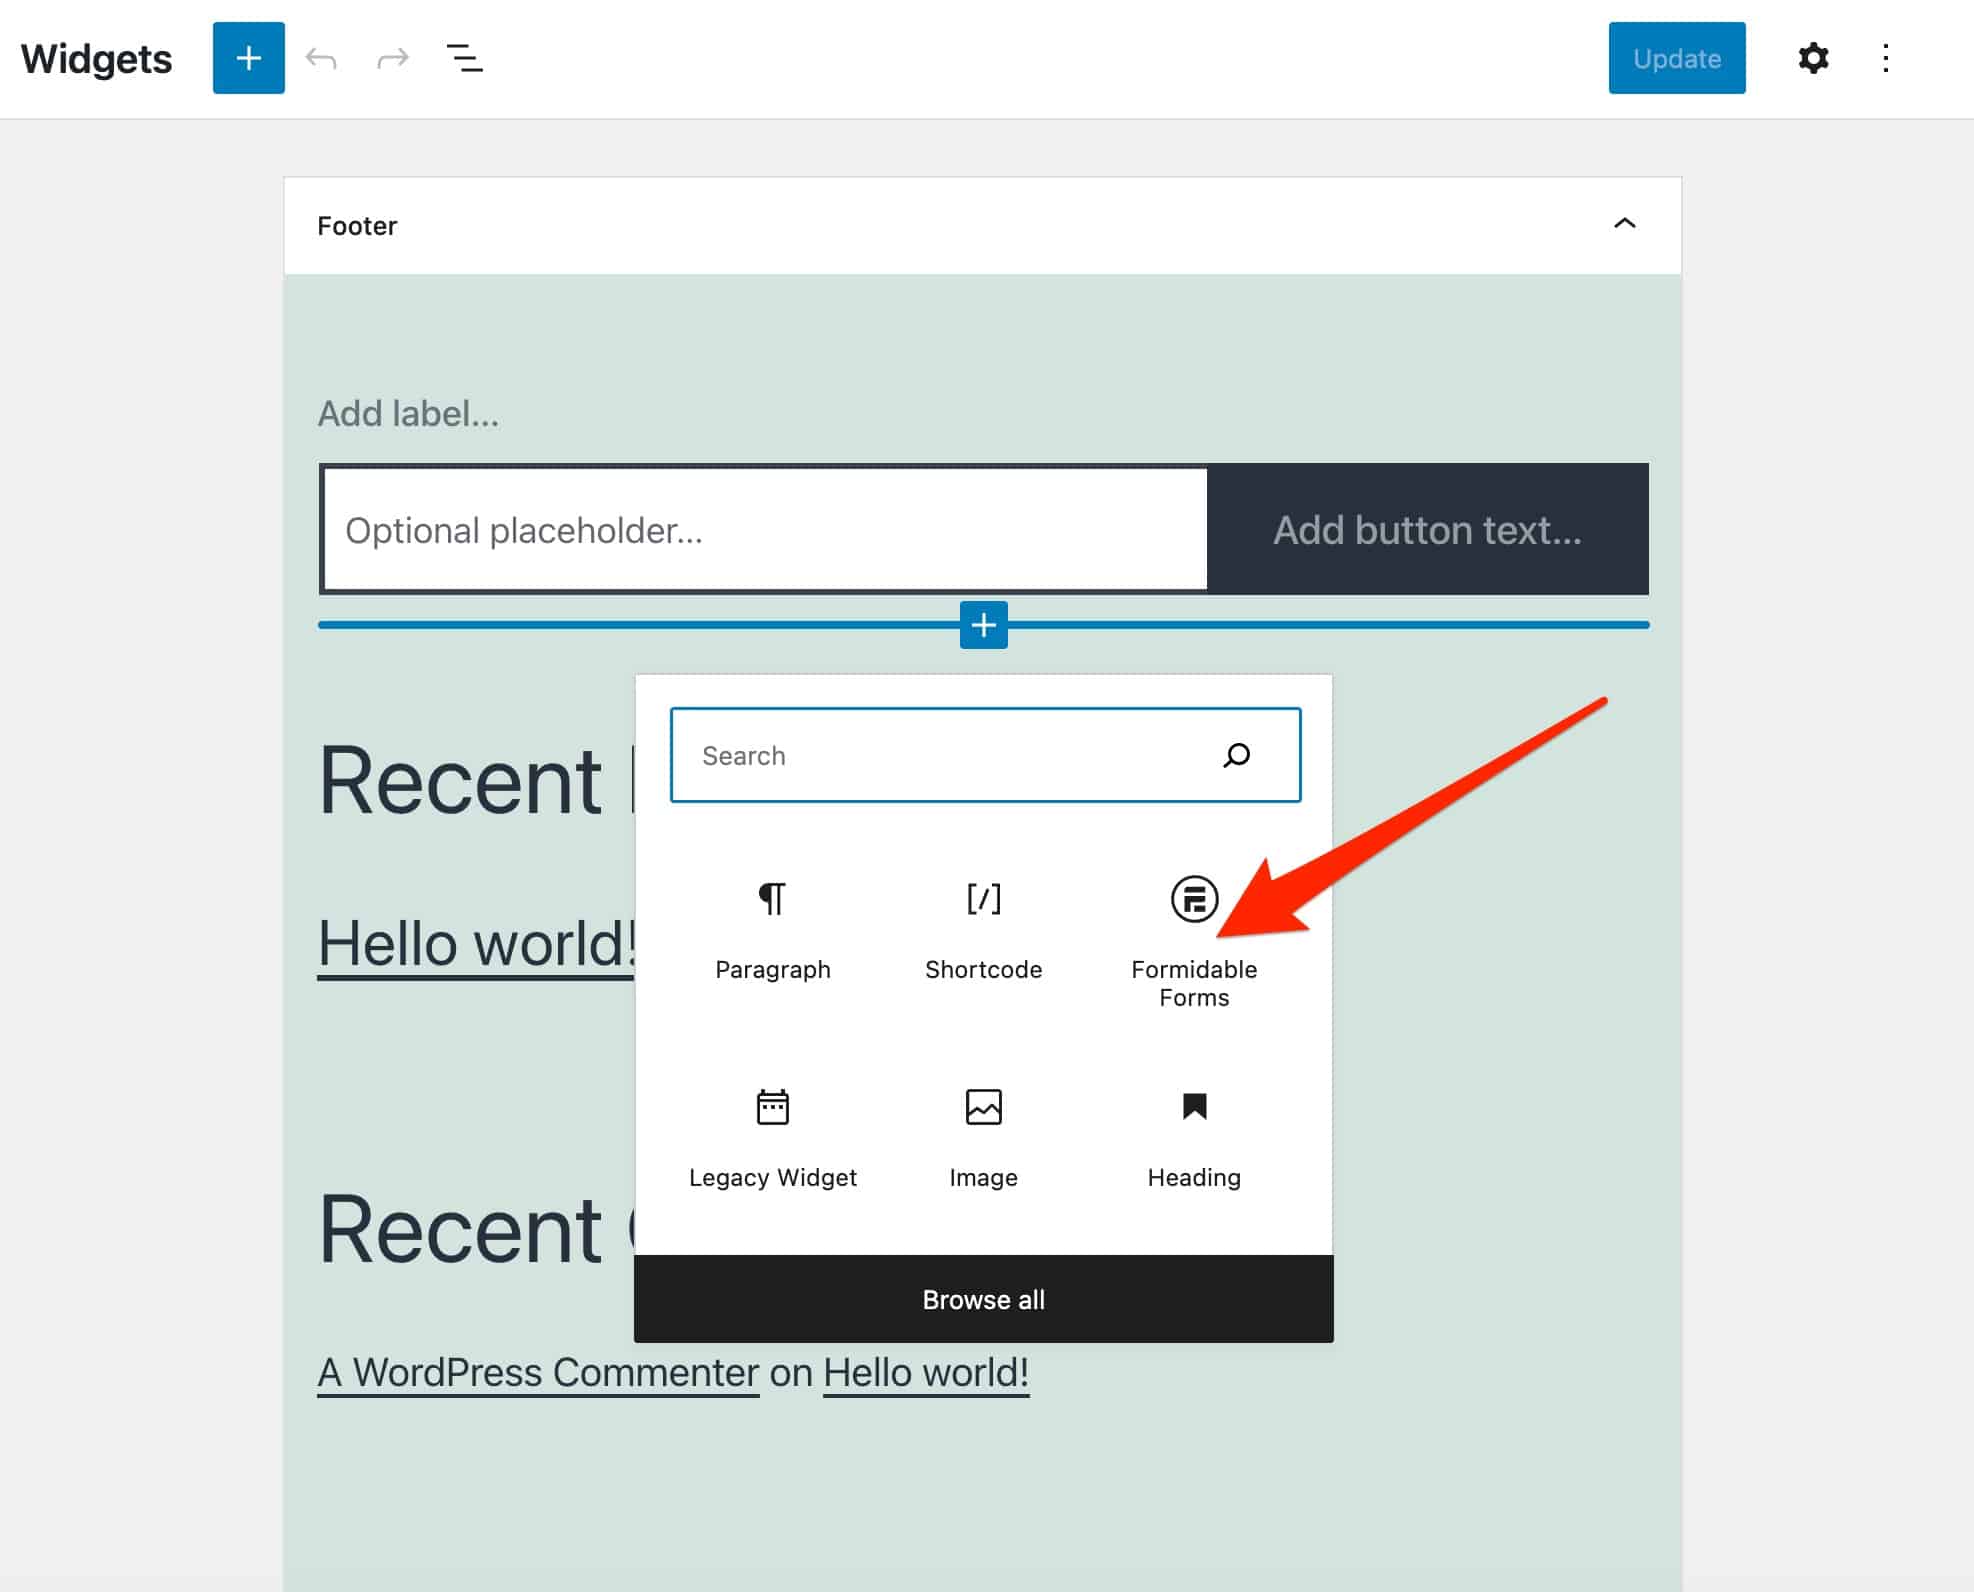
Pages and posts are the first places you probably think of to add a form. However, it is possible to integrate them elsewhere, depending on the possibilities offered by your theme.
I’m thinking for example of specific widget areas like the footer or the sidebar.
The number and type of widget areas offered depend on the theme you use.
In practice, you have two ways to proceed:
- If you use a Full Site Editing (FSE) compatible theme like Twenty Twenty-Two, go to Appearance > Editor to add your form in your footer, for example.
- If you are not using an FSE compatible theme, go to Appearance > Widgets. In the widget area proposed by your theme, you can then integrate either the “Formidable Forms” block or the “Shortcode” block corresponding to your form. On the example below, you can see that the theme I’m using for this test (Twenty Twenty-One) offers only one widget area (Footer):
How to integrate Formidable Forms to Elementor?
Finally, Formidable Forms also integrates directly with the most famous page builder of the WordPress ecosystem: Elementor (5M+ active installations).
The way it works is similar to the “Formidable Forms” block offered on the content editor. On Elementor, you add a widget called “Formidable Forms”, then select the form of your choice.
You can also enable/disable the same options as in the content editor (form title and description, HTML minification).
What are the settings offered by Formidable Forms?
So far, you have seen how to customize a form on a case by case basis. The general settings proposed by Formidable Forms allow you to act on all your forms at the same time.
You can access them in the general menu of Formidable Forms:

Let’s now describe each sub-menu.
Forms (Lite)
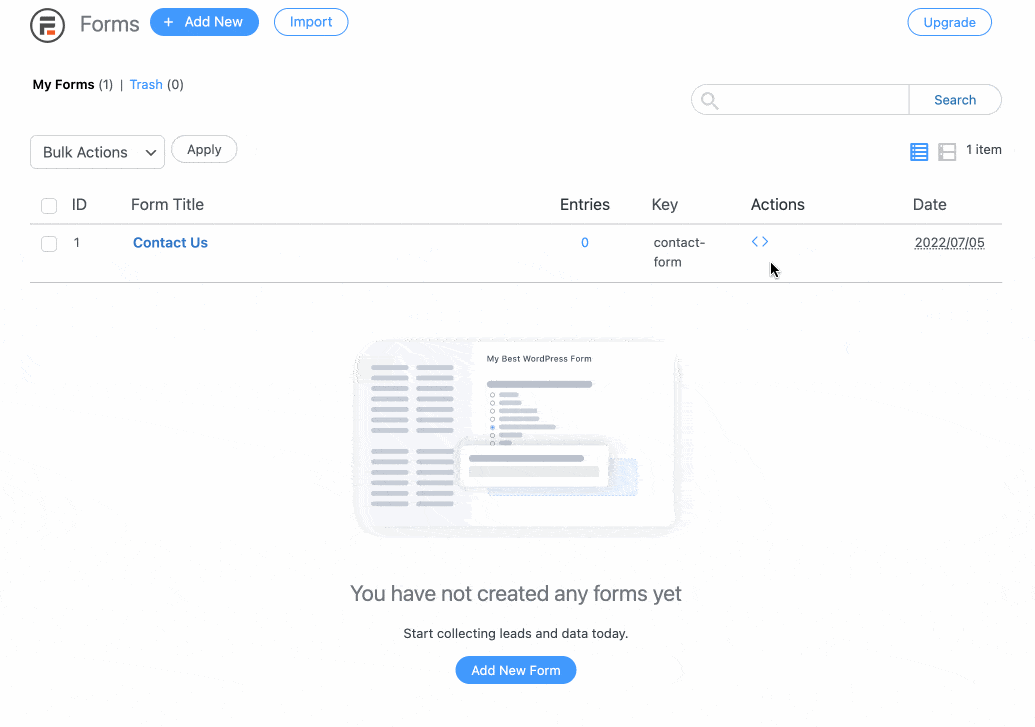
This sub-menu displays all the forms you have created, as well as their creation date and the number of people who have filled out your form.
From this dashboard, you can also add a new form, but also modify, delete or duplicate an existing form.

Entries
Here you can access data related to your leads (with a Pro license only), i.e. the people who have filled out and submitted one or more of your forms.
For example, for each form you will find:
- The first and last name of the person who filled in the form.
- The date the form was sent.
- The person’s email address, etc.

Views
Views are a very powerful feature. Available from the “Plus” premium license, they allow you to display the data collected via a form in the form of:
- A grid
- A calendar
- A table
Styles
With the “Styles” sub-menu, you can set the default visual appearance of all your forms. This is an option that competitors such as WPForms or Ninja Forms do not offer free of charge, as you have to use CSS to achieve your goal (unless you opt for one of their Pro licenses).
You can change the colors, margins, borders, alignment or text size of a dozen elements such as the:
- Form Title
- Form Description
- Field Labels, Field Colors, Field Settings and Field Description
- Check Box & Radio Fields
- Buttons
- Form Messages
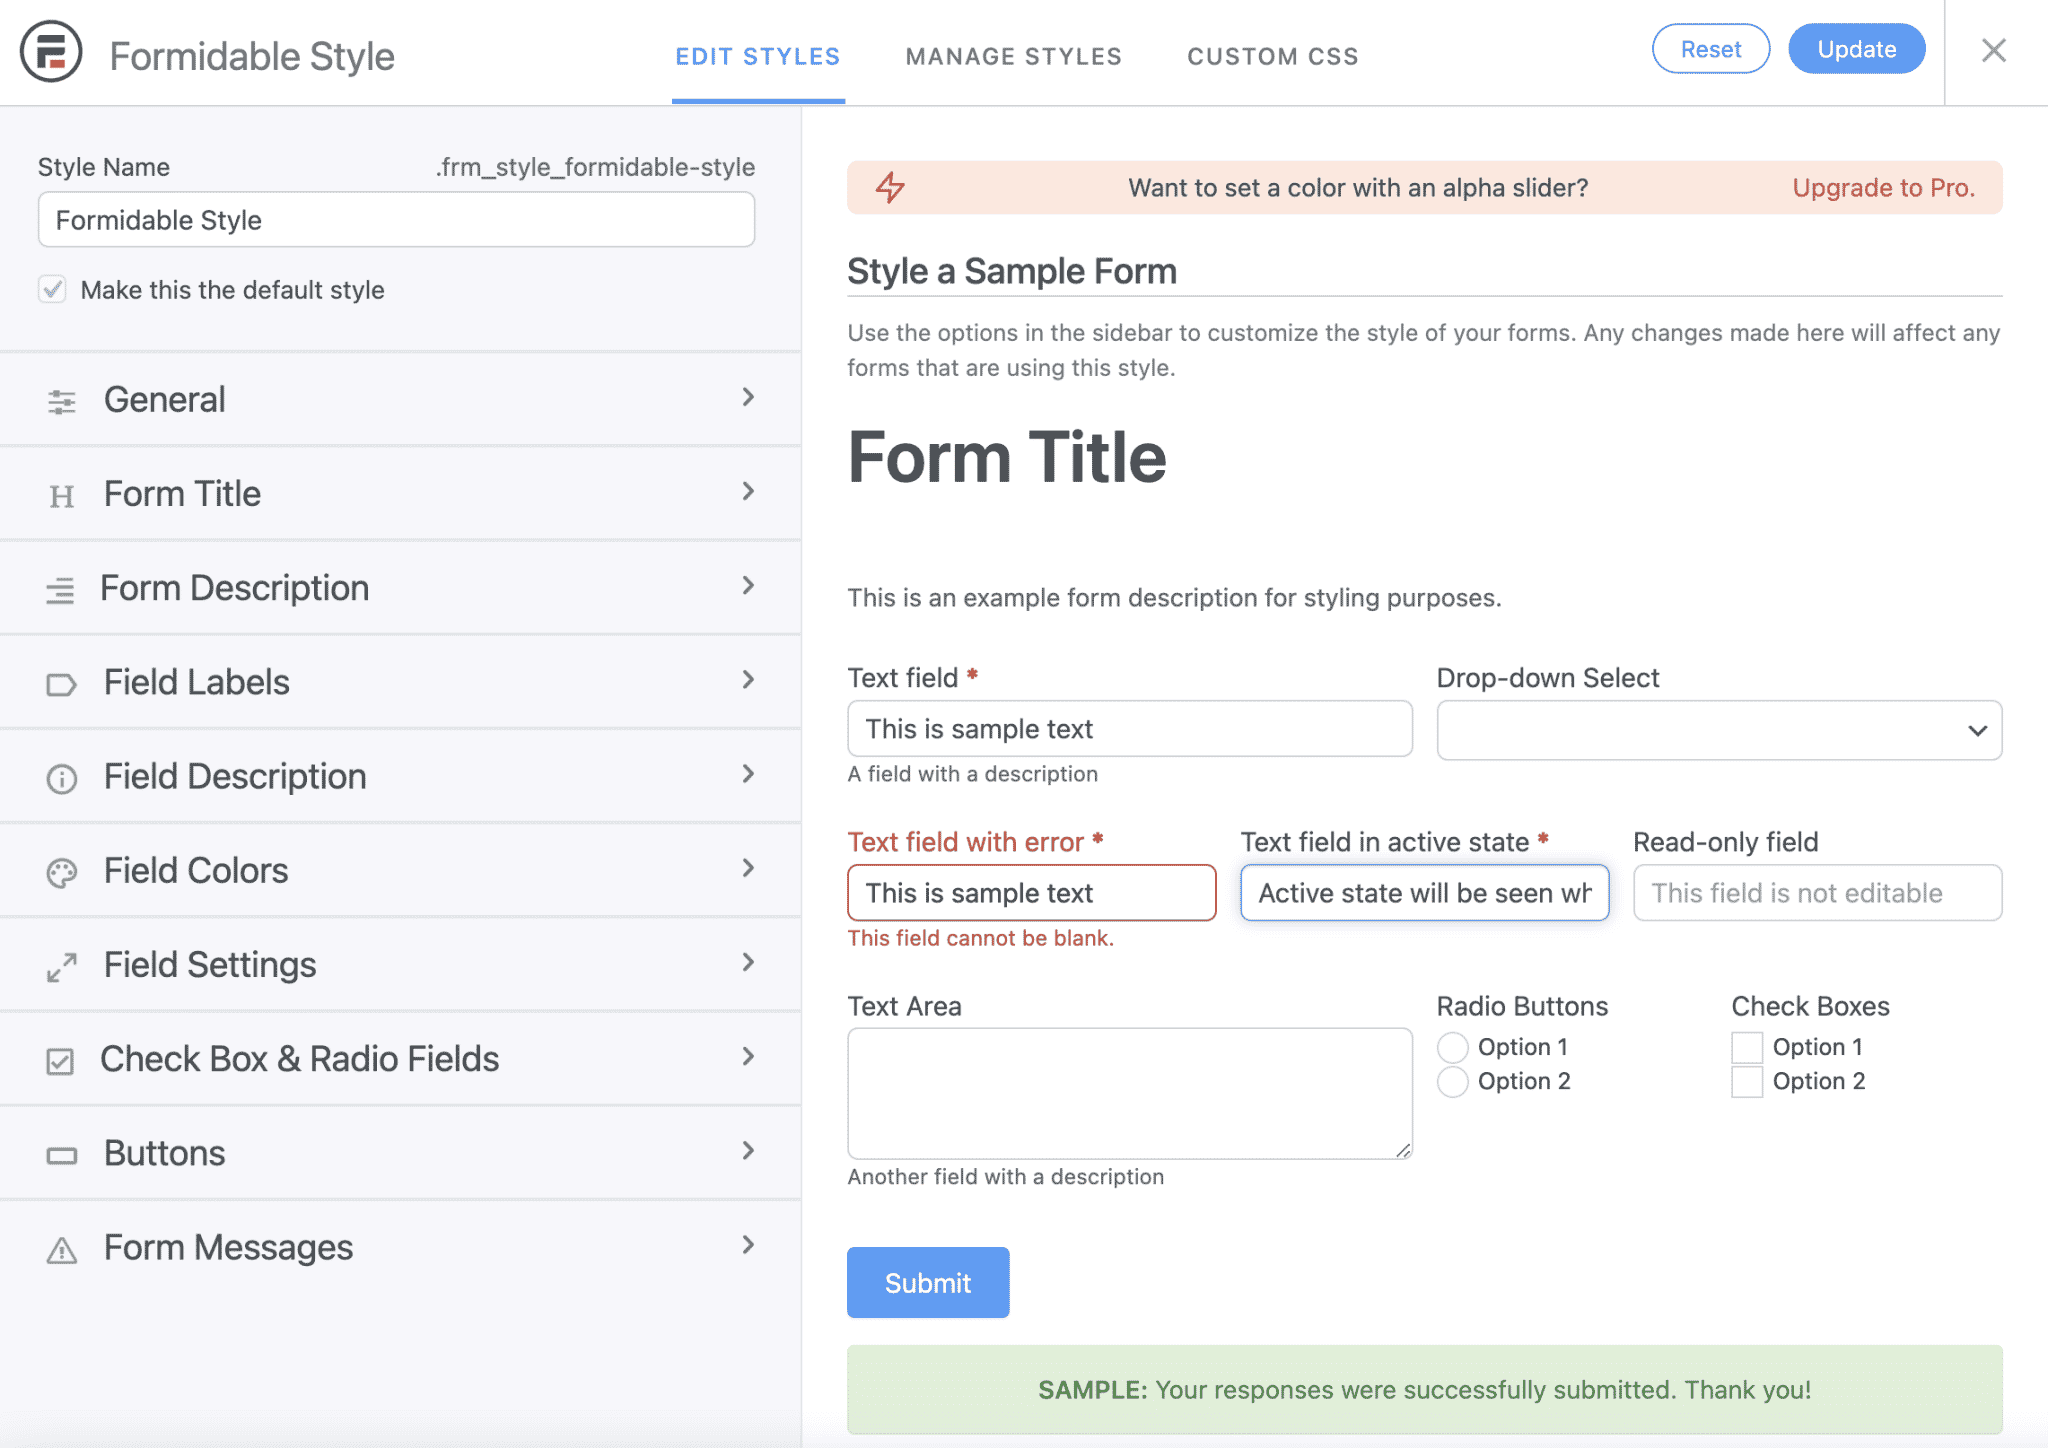
In addition, you can also add your own custom CSS code, if needed.
Applications
Applications is a new premium feature offered by Formidable Forms at the time of writing.
With it, you can organize your forms and views in the same workspace.
Import/Export
Here, it is possible to import forms in XML format on your site (in Pro version only), but also to export your forms, entries and views on another site (in XML or CSV format).
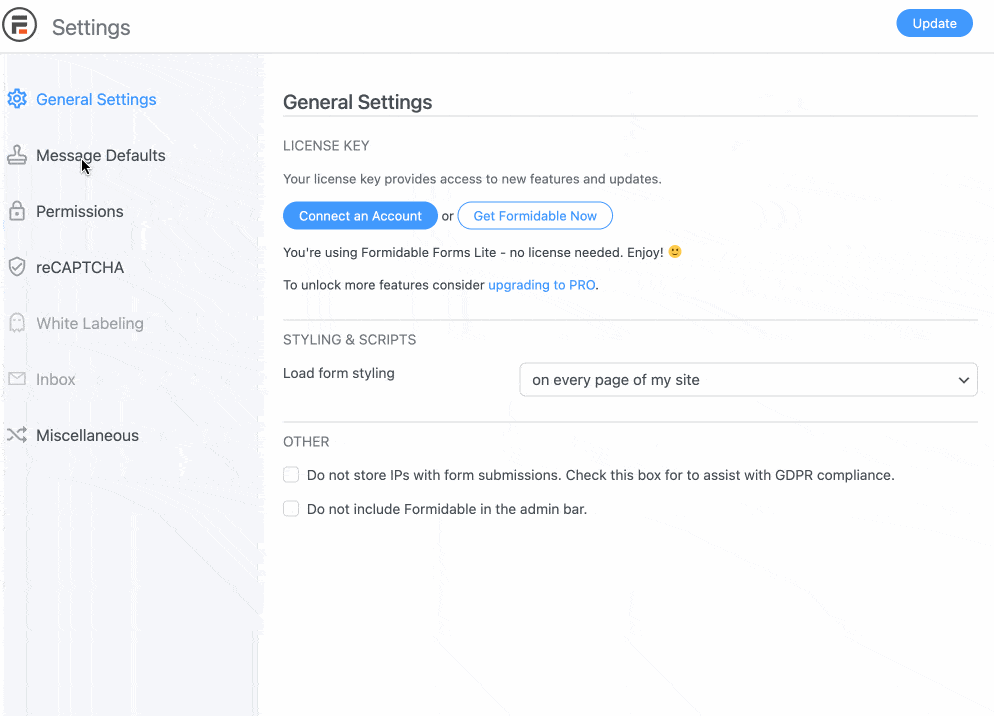
General Settings
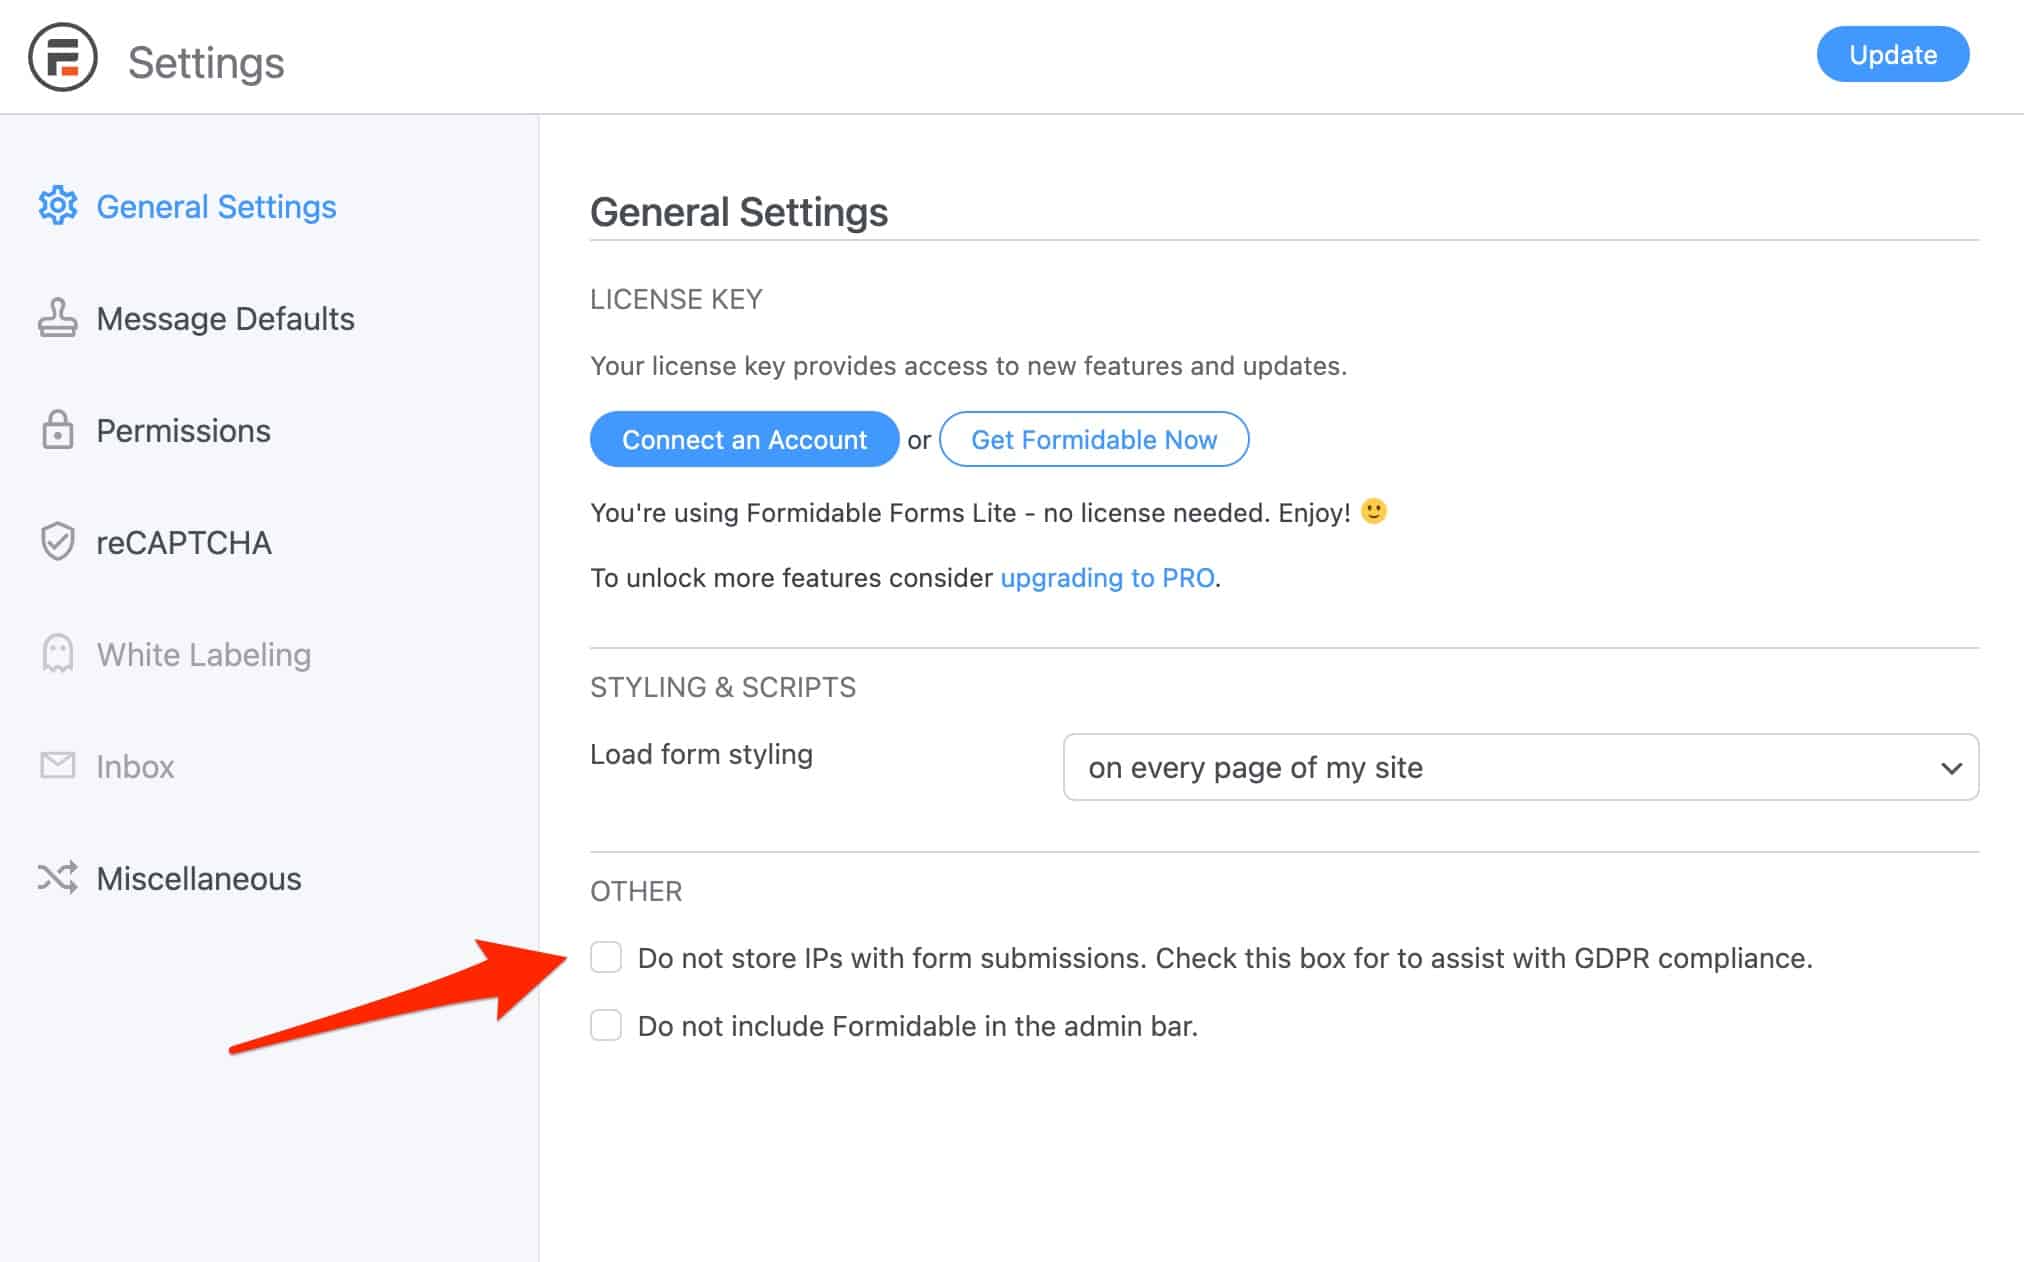
This sub-menu offers settings on different aspects. You can:
- Choose to load your form styles on every page of your site, or only on the pages/posts where they have been added.
- Specify if you want to store or not the IP addresses sent when submitting a form.
- Set the default messages that are displayed when a form is filled in. I’m thinking for example of the message that is displayed when the answer in a field is incorrect or missing.
- Select the user roles that have access to the Formidable Forms features.
- Set up a reCAPTCHA to fight against spam.
- Enable white label (premium).
- Send email notifications when a form is completed.
- Enable the SMTP protocol (via the WP Mail SMTP plugin) to improve the deliverability of your emails, as WordPress is not an email marketing service.
What are the add-ons offered by Formidable Forms?
To go further in the customization of Formidable Forms, you can also rely on paid add-ons to integrate the form plugin with various tools.
You will have access to the add-ons from the “Plus” license of Formidable Forms. The more expensive your license gets, the bigger the choice of add-ons is.
In total, Formidable Forms offers more than thirty add-ons divided into several categories:
- Ecommerce: you can for example integrate Formidable Forms to WooCommerce, to add custom fields to your forms.
- Email marketing: Formidable integrates with several tools (Mailchimp, ActiveCampaign, AWeber, MailPoet etc.) to add contacts who have filled out a form to the subscriber lists created with a particular email marketing service.
- CRM: you will be able to integrate the data from your forms with CRMs such as HubSpot, Salesforce or Highrise.
- Multilingualism: integration with Polylang or WPML allows you to translate your forms into the language of your choice.
- Appearance and user interface: for example, you can display your forms in a modal window, or create landing pages.
Formidable Forms also offers an add-on to connect WordPress to Zapier. With this tool, you can integrate your forms with hundreds of different services.
Of course, these add-ons have a cost. Let’s review this in the next part, which deals with Formidable Forms pricing.
How much does Formidable Forms cost?
Formidable Forms can first be used for free in its Lite format. To upgrade to more advanced options, you can opt for one of the 4 licenses:
- “Basic”: $39.50/year for use on up to one site.
- “Plus”: $99.50/year for use on up to 3 sites.
- “Business”: $199.50/year for use on up to 7 sites.
- “Elite: $299.50/year for unlimited use.

What should you consider when choosing a license?
The use of a particular license depends on several factors:
- The number of sites on which you want to use Formidable Forms. For example, if you want to enable it on more than 7 client sites, you will automatically have to use the “Elite” license.
- The type of add-ons you want to use. The “Basic” license does not offer any. Otherwise, the higher the price of the license, the more add-ons you will get.
- The importance you give to templates. The “Basic” license offers more than 50 templates, while the “Elite” license offers almost 200 of them.
- The type of support you want. Business and Elite customers have access to faster support than Basic and Plus customers.
Each license comes with a 14-day money-back guarantee. Please note that after one year, if you wish to renew your license to continue to receive support and updates, the price of each license doubles: Basic increases to $79/year, Plus to $199/year, Business to $399/year and Elite to $599/year.
In terms of pricing, to give you an idea, Formidable Forms is roughly in line with what two of its main freemium competitors offer: WPForms and Ninja Forms.
What about GDPR compliance?
After mentioning the pricing, a small but essential aside on the General Data Protection Regulation (GDPR).
This European regulation, in force since 2018, has as its main objective to ensure that every individual has control and protection of the personal data they disseminates when browsing the web.
You see me coming: when one of your visitors fills out and submits a form on your site, they submit personal data to you as well (last name, first name, email address, phone number, etc.).
To comply with the law, you must respect this regulation, which imposes several rules. For example, your visitor must be informed that they are sharing their data, and know explicitly for what purpose.
The subject being vast and technical, the most efficient way is to get in touch with a specialist in the matter (e.g. a lawyer), who will be able to guide you.
In parallel, do not hesitate to check the following resources:
- Our dedicated post on the WPMarmite blog.
- The recommendations of the European Union monitoring data protection in Europe.
Formidable Forms allows you to apply some of the GDPR rules, via various options.
For example, you can add a checkbox to collect the user’s consent, disable the tracking of IP addresses or stop recording form submissions altogether.
Our final review on Formidable Forms
After this complete tour of the Formidable Forms plugin, it’s time for the finishing touches. To conclude, let’s recap the strengths and weaknesses of this plugin, and review who we think it’s primarily for.
Strengths of the form plugin
- A plugin that is quick to install and overall easy to use.
- The drag-and-drop interface, useful to create and manipulate a form without coding.
- The changes visible in real time on your screen, as soon as you make a modification.
- The style settings of the form, available from the free version. Thanks to this, there is no need to get your hands dirty.
This is a real added value compared to some competitors (WPForms, Ninja Forms), which do not offer this type of option for free. - Spam protection natively integrated on Formidable Forms.
- The possibility to create almost any type of form you can think of: contact, payment, subscription, quote, etc.
- The very advanced features to create complex forms, but also to use their data using the “Views” feature.
- The documentation, rather well put together with many topics covered, videos and screenshots to illustrate the point.
Weaknesses of Formidable Forms
- The conditional logic is available, but only in premium. However, it is also the case with most of the form plugins on the market.
- There are few templates compared to what some competitors offer, like the behemoth WPForms, for example.
- The number of fields is quite limited in the free version, which is also logical. To take advantage of the full power of Formidable Forms, you will have to upgrade to a paid license.
- Creating advanced forms requires a learning curve.
- The prices are high, especially if you want to renew your license after the second year. However, these prices are similar to what Formidable Forms’ main freemium competitors offer.
Who is Formidable Forms for?
In its Frequently Asked Questions, Formidable Forms states that its plugin is “the WordPress form plugin of choice for smart developers, freelancers, and agencies.”.
Indeed, Formidable Forms is a quality plugin that does the job. However, I don’t think it’s suitable for every profile:
- If you want to design a simple contact form, for free, I find WPForms or Ninja Forms even easier to use and better suited to a beginner audience.
- Formidable Forms seems to me above all intended for profiles that are a little more experienced and wish to create advanced forms (e.g. calculation forms, quizzes, surveys, polls etc.). For this purpose, it is most complete and offers the most options.
Download Formidable Forms:
In premium, an alternative like Gravity Forms (affiliate link), for example, will be just as powerful and cheaper.
Do you agree? What do you think about Formidable Forms? Give me your opinion in the comments.