If I say “ninja”, what do you think of? To me, three ideas come to mind:
- Leonardo, Donatello, Michelangelo and Raphael (sorry Splinter and April). I’ll spare you the introductions, you’ve recognized them.

- Fighting spies, mostly skilled nunchaku / shuriken enthusiasts.
- Ninja Forms, a famous plugin to create forms on WordPress. This is where my little WP aficionado side comes in.
In this post, we will focus on the third reference, the one related to the form plugin. In advance, my apologies to the Teenage Mutant Ninja Turtles fans who thought they were in for a revival.
For your webmaster/site creator activity, Ninja Forms will be more interesting to talk about. At the end of these lines, you will know everything about how it works, its qualities and its weaknesses.
Overview
- What is Ninja Forms?
- What are the main features of Ninja Forms?
- How to create a contact form with Ninja Forms in 4 steps
- How to integrate a form with Ninja Forms in your content?
- What additional settings does Ninja Forms offer?
- What are the add-ons offered by Ninja Forms?
- How much does Ninja Forms cost?
- What about the GDPR compliance?
- Our final review on Ninja Forms
What is Ninja Forms?

Ninja Forms is a freemium WordPress plugin that allows you to create different types of forms (contact, login, booking, payment etc.) without coding. It uses drag and drop and offers ready-made form templates to avoid starting from scratch.
Ninja Forms is available in two versions:
- A free version, which you can install and activate from your WordPress dashboard.
- A premium version, available from $49/year. Add-ons are also available for purchase individually, as detailed at the end of this post.
With more than 30 million downloads and 600K active installations, it is one of the most popular plugins for creating a form in the official directory, behind Contact Form 7 (10M+ active installations) and WPForms (5M+ active installations).
Read on to find out what Ninja Forms is all about, and why it has attracted massive audiences.
What are the main features of Ninja Forms?
A plugin designed for beginners…
“100% beginner friendly”. This is the major marketing argument put forward by Ninja Forms.
Its main target is non-technical users who don’t know how to – or don’t want to – code to create a form, but still want a professional look.
For this purpose, Ninja Forms offers several valuable features:
- A drag and drop WYSIWYG editor (What you see is what you get). All your changes and modifications are visible in real time, on your screen.
- Ready-to-use templates to create your first forms without starting from scratch… and save precious time.
- A clear and uncluttered interface, with understandable and clear options, to avoid drowning in endless choices.
- Integration with the WordPress content editor (Gutenberg), with a dedicated block to integrate your forms once created.
- Responsive forms, which automatically adapt to the various screen sizes of your visitors without any modification on your part.
- The style of the forms inherited naturally from your theme, which allows to stick to your style guide in an automatic way.
- Native protection against spam with integration to Akismet and Google reCaptcha.

… but also for developers
If Ninja Forms allows you to design easy-to-use forms “that will make you feel like a professional web developer”, its creators have also thought about developers.
With Ninja Forms, users can easily improve or optimize their forms thanks to the available hooks, very useful to extend the features of the plugin.
Besides that, Ninja Forms also offers an extension called Webhooks, to send your form data to a third-party tool that doesn’t offer integration with WordPress.
Ninja Forms, a scalable plugin
The possibility to create various forms with Ninja Forms
Its description makes it clear: Ninja Forms is a form builder, in the broadest sense.
Obviously, you can set up contact forms with it. But limiting it only to that would be far too reductive. In fact, the creative possibilities are almost unlimited (provided you use a license or premium add-ons).
Ninja Forms lists about fifty types of forms in its Frequently Asked Questions on its official directory page. Among the examples, we find:
- The contact form, for people who want to ask you questions.
- The form to collect the email address of your visitors (opt-in form).
- The payment form, if you want to sell a product or a service on your WordPress site. Ninja Forms integrates with Stripe and PayPal payment gateways.
- The login form to access a member area, for example.
- The reservation form for a hotel or a restaurant, among others.
- The booking form for your newsletter.
- The form to download one or more files.
- The form to make a donation, etc.
Advanced options offered in premium
While Ninja Forms offers a base with classic fields (name, first name, email, phone, message, send button, etc.) to create relatively simple forms in its free version, it is possible to go much further with its premium offer.
Depending on the add-on or license you use, you can:
- Set up a form with conditional logic. This system allows you to display certain fields only if certain conditions are met (e.g. filling in a particular field).
- Design multi-step forms. The user will only be able to fill in a field once he has filled in the previous one.
- Create forms allowing the downloading of files, with specific options. For example, it is possible to specify what type of file you want to offer for download, and even to send the files downloaded by your visitors to third-party storage spaces (e.g. Amazon S3, Dropbox, Google Drive).
- Design forms that calculate the price of a product or service based on the fields filled in by the user.
Integrations with third-party tools to automate your processes
Finally, you won’t be outdone in terms of flexibility with Ninja Forms. It integrates with an ecosystem of over 1,000 services, thanks to its integration with Zapier.

This form plugin is very practical too thanks to an integration with an email marketing platform. Ninja Forms does the job, since you can connect it to Mailchimp or ActiveCampaign (in premium, though), to name a few.
In this case, the contact information of your visitors that you have collected will land directly in the contact list of your choice.
That’s it for this first overview that allowed us to make the presentations. Now, let’s discover more in detail the personality and character of this form plugin.
To do this, we’re going to put it through the mill to see what it’s all about. Through a concrete example, you will learn how to design a contact form from scratch. Jump in!
How to create a contact form with Ninja Forms in 4 steps
In order to explain how Ninja Forms works, we’re going to use the free version of the plugin, which is sufficient to create an efficient contact form. Of course, if you want to benefit from additional options, the Pro version will be more complete. We will detail its features and prices later in this post.
Step 1: Install and enable the plugin
To begin, install the plugin from the back office of your WordPress site.
To do this, go to Plugins > Add New:

After enabling the plugin, you will see a settings menu called “Ninja Forms” in the left sidebar of your admin. This general menu is broken down into 7 sub-menus.
This is where you will start creating any new form:

To install Ninja Forms after purchase, upload the zip file of your membership or add-on to your client area, then add it to your WordPress site in Plugins > Add New > Upload Plugin.
Step 2: Choose a form template
Without any transition, let’s move on to step 2: adding a new form. To do this, follow this path: Ninja Forms > Add New.
The plugin sends you to a page with 3 tabs:
- The “Forms” tab lists 17 form templates so you don’t have to start from scratch. At the time of writing, ten of these were available with the free version, and seven required the premium package.
- “Services” first offers to setup “Add-on Manager” (beta version), a tool to install all your premium add-ons in one click. It only makes sense to use it if you are using the Ninja Forms Pro package.
Ninja Forms also allows you to activate the SendWP plugin. This plugin improves the deliverability of email notifications sent by Ninja Forms. By default, WordPress takes care of this. However, as it is not an emailing service, it may have difficulties to pass the anti-spam barriers used by email clients (e.g. Gmail, Yahoo, Outlook etc.). - “Apps & integrations” presents the premium add-ons offered by Ninja Forms.

To design our contact form, we will use the template called “Contact Us”. Click on it to enable it.
Of course, you still have the option of starting from a blank page, by choosing the “Blank Form” template.
Step 3: Add fields to your form with Ninja Forms
A clear, full-screen interface
That’s it: you’re on the Ninja Forms editing interface. At first glance, you’ll notice that it’s clean and not overloaded.
It is set to full screen to avoid distractions, allowing you to focus entirely on creating your form.
Let’s break down how it is organized and how it works:
- At the top, on the left hand corner (area #1 on the screenshot below), you have 3 tabs to customize the fields of your form and its behavior (display settings, restrictions, email notifications etc.).
- In the center of the screen are the fields of your form (area #2).
- At the top right hand corner (area #3), you can leave the editing interface by clicking on the cross, publish your form, or share your form as a public link (link icon, we will come back to this later).
- At the bottom right hand corner (area #4), the “+” button offers a list of fields to add to your form.

What types of fields are proposed?
Click on the “+” button to add the fields of your choice, divided into 4 categories:
- Common fields: checkbox(es), drop-down list, images, send, paragraph, date/time, multiple selection, radio buttons, text line.
- User info fields: address, city, email, first name, last name, country, city, phone, zip code.
- Layout fields: HTML, repeatable field set, divider.
- Miscellaneous fields: confirmed, hidden, number, reCAPTCHA, anti-spam, star rating.
In total, no less than 28 fields are offered to you with the free version. This is a very large number that makes Ninja Forms stand out from the competition in this particular area.
For comparison, one of its competitors, WPForms, offers “only” 10 fields in its free version.
With Ninja Forms, you can enjoy the classic fields that are essential for any contact form (name, first name, email, send etc.), but also more advanced fields to design more advanced forms (notes, repeatable field set, etc.).
How to add and customize fields in your form?
To add a new field to your form, hover over it with your mouse, then drag and drop it to the desired area on your form.
To customize it, click on it. You can then:
- Change the wording and make the field mandatory.
- Display an indicative text in the field (e.g. “Your name” to indicate to the user that they must enter their name), or even display a text editor if you want the user to have access to more advanced editing options for the text they add. Click on the “Done” button to save your changes.
- Save the field and its settings by clicking on the star icon. You will be able to reuse it ready-made in your next forms.

By hovering over each field, you can also access quick actions to delete, duplicate or modify the field:

Step 4: Make the final settings
Once your fields are integrated and configured, you can fine-tune your form using the last two settings tabs. “Emails and actions” offers you 4 options:
- Record Submission (record data each time a form is submitted). You can exclude certain fields and set a time limit after which the data will be deleted.
- Email Confirmation to let your visitor know that the form has been submitted.
- Email Notification to let the site administrator (e.g. you) know that someone has completed and submitted your form.
- Display a Success Message as soon as the user submits a form.

Each option is activated and deactivated with one click and can be individually set as a field by clicking on it.
Finally, the “Advanced” tab has two options:
- “Display Settings”. In this menu, you can choose to display the title of your form, to delete the fields and to hide the form after sending. You can also change the position of the default tag (above, below, to the left, to the right or hidden in relation to its field).
- “Restrictions” allows you to accept only one form submission per user, if you wish. To do this, select the “Email” field in the “Unique Field” box.

And that’s it, your form is ready. Publish it by clicking on the relevant button. Now you will learn how to integrate it into your content.
By default, Ninja Forms does not offer any options to customize the visual appearance of your form (colors, typography, border, background etc.). The plugin inherits the style of your theme, to ensure a certain style continuity.
To precisely influence the style of your form, you will need to add CSS code or use the “Layout and Styles” add-on.

How to integrate a form with Ninja Forms in your content?
How to embed a form in a page or post?
Your form is all shiny and new. So let your visitors enjoy it by adding it to your posts and/or pages. Ninja Forms offers 3 ways to integrate a form.
Use the Gutenberg block proposed by Ninja Forms
The first option is to use the Gutenberg block proposed by Ninja Forms. Go to the page of your choice (e.g. your Contact page), and add the block called “Ninja Form”.
All you have to do is select your form from the drop-down list and it will be displayed:

Use the “Shortcode” block
Second option, very similar. Except that this time, the name of the block changes. Select the “Shortcode” block and paste it, associated with your form inside.
You can find this shortcode in Ninja Forms > Dashboard. It is in this format: [ninja_form id=2].

Append your form
Don’t like Gutenberg blocks? Then you can also add your form to your content by selecting it in the “Append a Ninja Form” box located in the “Page” tab of the WordPress content editor.
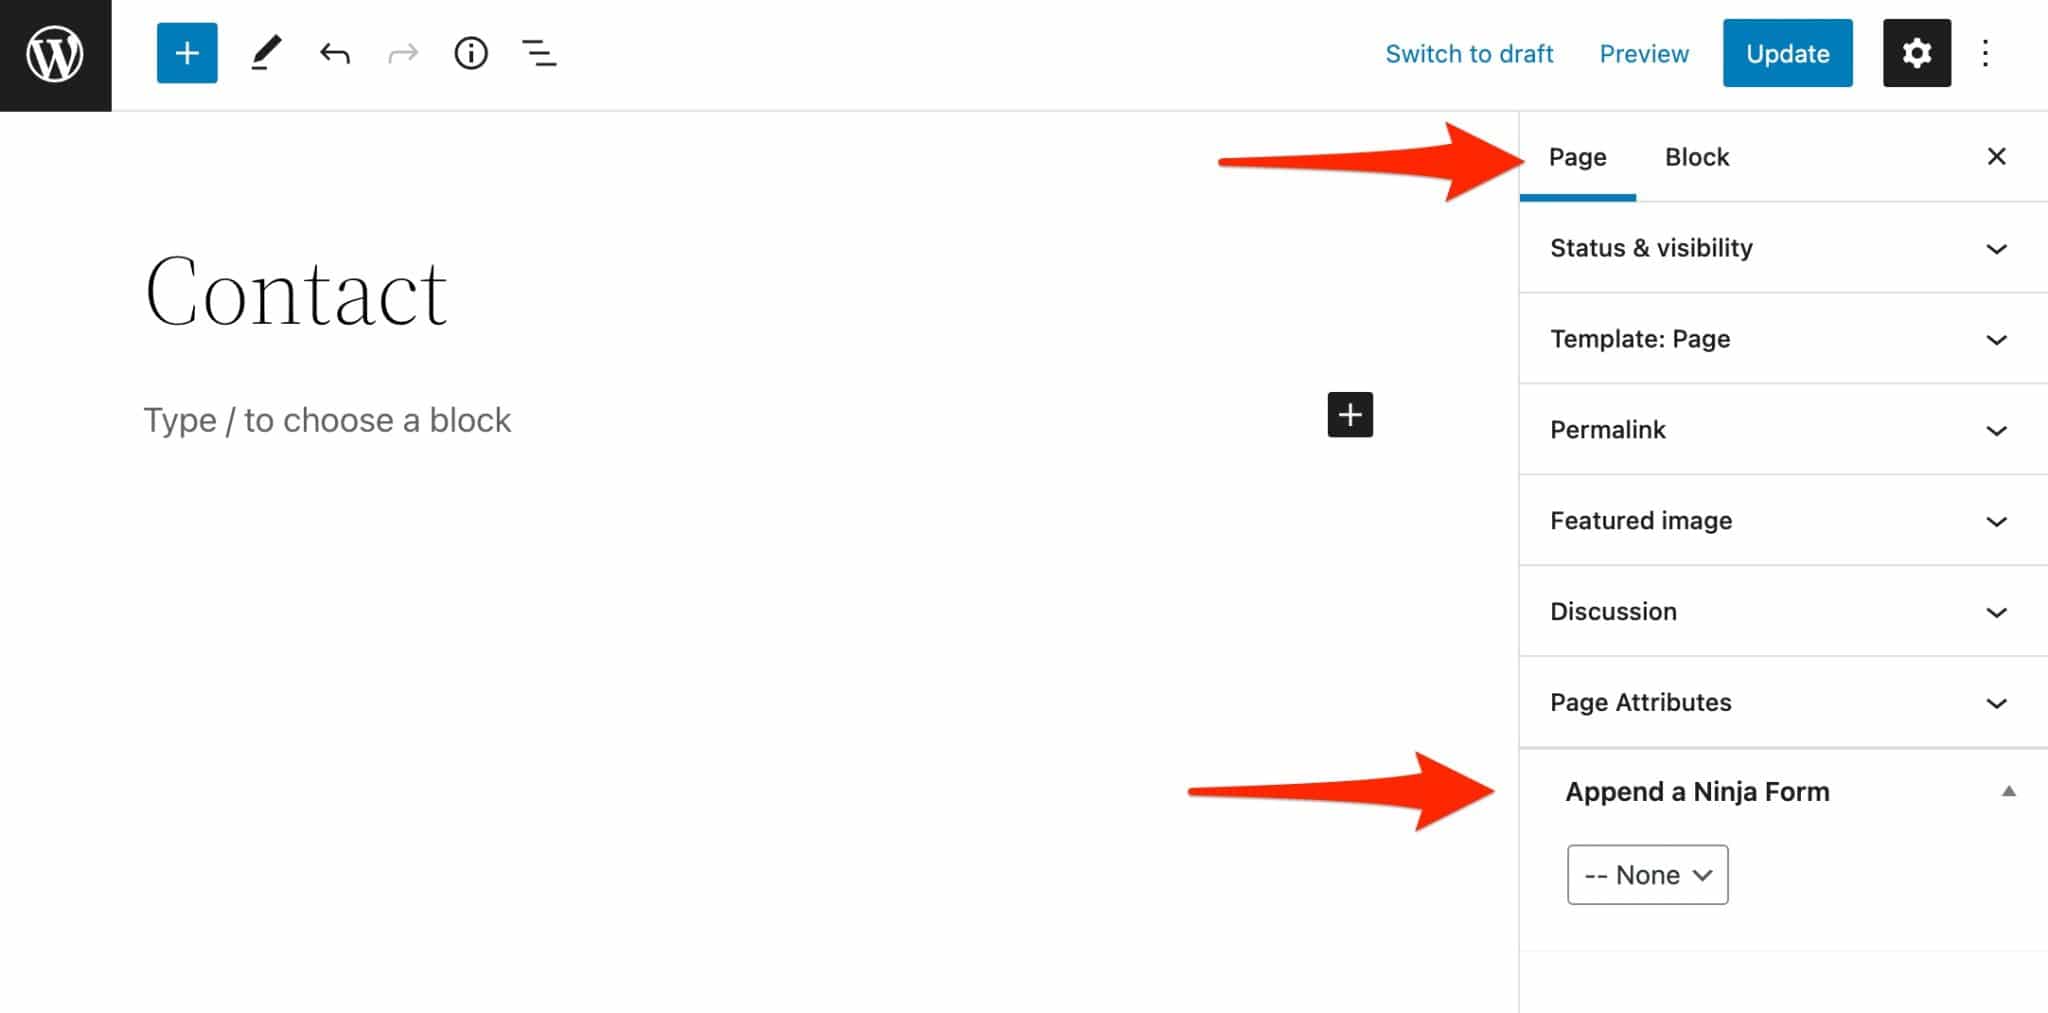
However, in this case, you will not be able to choose where your form will be displayed. By default, it will be positioned at the end, after your content.
How to integrate a form with Ninja Forms into a widget area?
Pages and posts are the main types of content offered by WordPress. But these are not the only places where you can add a form.
It is also possible to integrate it into a widget area such as your sidebar or footer.
The number and type of widget areas offered depend on the theme you use. It may not offer a sidebar, for example.
In practice, you have two ways to proceed:
- If you are using a Full Site Editing (FSE) compatible theme like Twenty Twenty-Two, go to Appearance > Editor to add your form in your footer, for example.
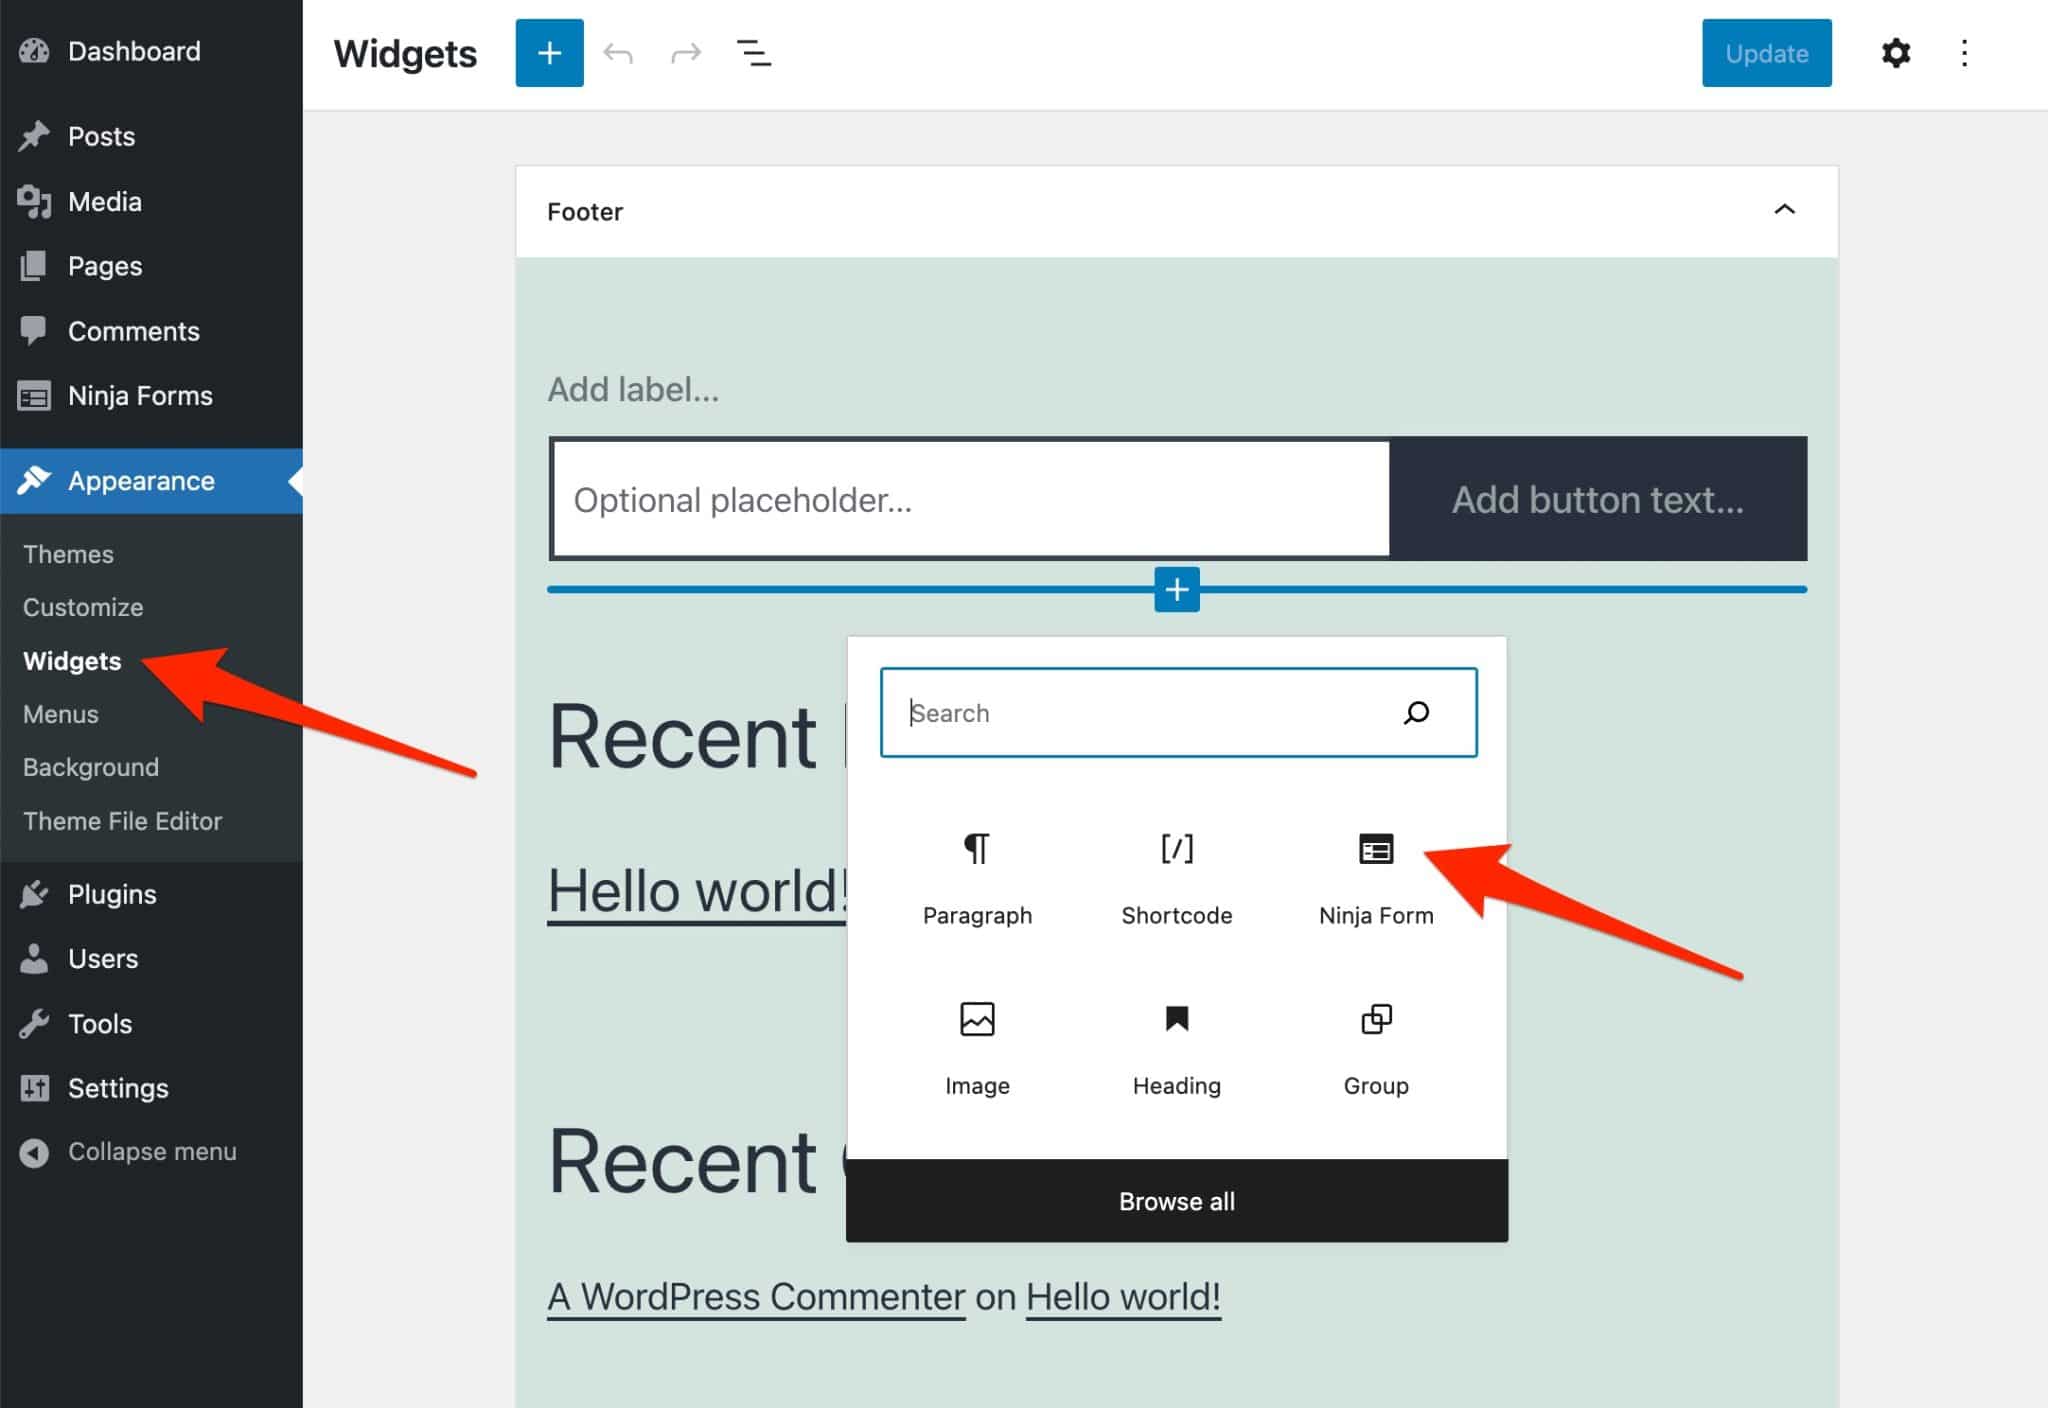
- If you are not using an FSE compatible theme, go to Appearance > Widgets. You can then embed either the “Ninja Form” block or the “Shortcode” block corresponding to your form in the widget area provided by your theme. On the example below, you can see that the theme I’m using for this test (Twenty Twenty-One) has only one widget area (Footer).
How to integrate Ninja Forms with Elementor?
Let’s continue to talk about integration, because it’s not over yet. If you’re part of the huge user base (more than 10 millions) of the Elementor page builder, you should know that you can take advantage of a dedicated integration to the most popular page builder of the WordPress ecosystem.
To do so, simply select the “Ninja Forms” widget on the Elementor editor, then select the form of your choice. With this, you will be able to customize the look and feel of your form directly from the Elementor interface.
How to create a public link to access your form directly?
Finally, there is one last way to display your form to your visitors. Rather than embedding it in your pages, you can offer your visitors direct access to it by clicking on a link.
To do this, here are the steps to follow:
- On the form editing interface, click on the icon representing a link.
- Enable the “Allow a public link” option.
- Copy the generated link to your form.
What additional settings does Ninja Forms offer?
Your current form is already functional and efficient, but you can tweak it and fine-tune it a bit more thanks to some of the options offered in the general menu of Ninja Forms.

To see it more clearly, let’s take a look at each sub-menu.
Dashboard
Here you will find all the forms you have created, with their creation date and their shortcode.
Clicking on the gear icon allows you to Edit, Duplicate, Preview and Delete a form.

You can also add a form from this dashboard, and enable the services and add-ons offered by Ninja Forms.
Submissions
The “Submissions” sub-menu compiles the data related to your leads, i.e. the people who have filled in and submitted one or more of your forms.
For example, for each form you will find:
- The name of the person who filled out the form.
- The date the form was sent.
- The message written.
- The person’s email address.
You can download all this data if you wish.
Import/Export
As the name suggests, this sub-menu allows you to import or export your forms. For example, you can use it to export one of your forms to another WordPress site that you manage.
Note that you can also import or export only certain fields of your choice.
Settings
Within this submenu, you can make:
- General settings regarding the date format to be applied and the currency used, if you display certain amounts in your forms.
- ReCAPTCHA settings, to configure the CAPTCHA system proposed by Google (secret key, language, theme).
- Advanced settings. There are two interesting options to note. If you check the “Form builder dev mode” box, you will have additional settings on the form creation interface. But beware, you’ll also end up with more options that can be very confusing.
Finally, choosing an “Opinionated Style” (light or dark) can be a useful recourse in case your forms do not inherit the default style of your theme.

It is also in the “Settings” sub-menu that you can activate the memberships of your add-ons, via the “Memberships” tab.
What are the add-ons offered by Ninja Forms?
While the free version of Ninja Forms is already well stocked with options, it is possible to go much further with add-ons that you can purchase individually.
The list of add-ons can be found in Ninja Forms > Add-ons.
At the time of writing, there are 41 add-ons in several categories:
- Add-ons to improve the appearance and display of your forms. For example, “Layout & Styles” allows you to customize the style of your forms, while “Conditional logic” will help you add conditions.
- Add-ons for sharing documents and data. “File Uploads” will be useful to manage all the files you want to upload on your forms (size, file type, export to the cloud, etc.). “Excel Export” allows you to export your Ninja Forms to an Excel spreadsheet.
- Add-ons for accepting payments, including PayPal Express and Stripe.
- Add-ons to integrate Ninja Forms with email marketing tools such as Mailchimp, ActiveCampaign, AWeber, MailPoet or ConvertKit, to name a few.
- Add-ons to give your visitors more freedom. “Front-end Posting” allows your visitors to publish content by submitting a form. The publication of your choice (e.g. a post) will be published as a draft and you can validate it if you wish.
- Add-ons to connect your forms to your CRM (Zoho, Salesforce, Capsule etc.).
- Add-ons to get notifications each time a form has been submitted. This can be done via SMS or Slack, if you wish.
Ninja Forms also offers an add-on to connect WordPress to Zapier. With this tool, you can integrate your forms with hundreds of different services.
Of course, these add-ons have a cost. I’ll tell you more about this in the next section about Ninja Forms’ pricing.
How much does Ninja Forms cost?
Are you interested in the Ninja Forms premium package? There are two ways to get it.
Opt for a Membership
First of all, you can buy one of the 4 Memberships offered by Ninja Forms:
- “Basic”: $49/year for use on up to one site.
- “Plus”: $99/year for use on up to 3 sites.
- “Pro”: $199/year for use on up to 20 sites.
- “Elite”: $299/year for unlimited use.

When choosing between these memberships, please take into account:
- The number of sites you want to use it on. If you are creating sites for clients, look at the limitations attached to each membership. For example, unlimited use of Ninja Forms is only available with the “Elite” membership.
- The add-ons you want to use. The less expensive the membership, the fewer add-ons it offers. For example, the “Basic” membership includes “only” 4 of the 41 add-ons offered by Ninja Forms. Make sure that they correspond to the use you want to make of them.
Buying an add-on individually
If you are only interested in one or more add-ons, you can also buy them individually. Ninja Forms was originally designed to be an add-on only (the developers later sold memberships).
In some cases, an add-on can be more advantageous than a membership.
Each add-on is offered in 3 packages:
- $49 on average for use on a maximum of one site.
- $72 on average for use on up to 5 sites.
- $99 on average for use on up to 20 sites.
Understood about the prices? Then let’s move on to the thorny issue of GDPR.
What about the GDPR compliance?
When we talk about forms, there is often a word that comes back to our mouth. Well, rather an acronym: GDPR.
The General Data Protection Regulation (GDPR) governs the processing of personal data within the European Union. And this concerns in particular the information that you will collect on your visitors (e.g. name, first name, email, etc.) each time they will fill in and send one of your forms.
Several rules must be respected in order to be compliant. To make sure you don’t make any mistake, the best thing to do is to contact a specialist in the field if you have any doubt.
You can also check the following resources to help you comply:
Well, I think we’ve done a pretty complete tour of the plugin. So let’s recap everything we’ve seen so far.
Our final review on Ninja Forms
As a conclusion, let’s go over the strengths and weaknesses of Ninja Forms. I’ll finish by telling you who I think the plugin is for.
Strengths
- The ease of creating a form: it’s simple and fast.
- The drag and drop interface.
- The number of fields available in the free version.
- The proposed settings, that are just right. There are not too many to avoid drowning, and just enough not to remain hungry.
- The possibility to create many types of forms (contact, payment, etc.).
- Native protection against spam and the possibility to integrate the Google reCAPTCHA service.
- The many features dedicated to developers.
- The option to link to a form by sharing a hyperlink associated with it.
- Ninja Forms’ documentation, very detailed and didactic.
Weaknesses
- The conditional logic is available, but only in premium. However, it is also the case with most of the form plugins on the market.
- There are few templates compared to some competitors, like the giant WPForms, for example.
- You can’t customize the style of the form in the free version (unless you know CSS).
- The drag & drop interface is sometimes a bit frustrating: there are a lot of accordions (drop-down menus) rather than tabs. This means that you have to click on a lot of buttons and scroll a bit (which is not a big deal either, by the way).
- No integration with email marketing tools or CRM is offered in the free version.
- Ninja Forms can become very expensive depending on the number of sites you need to install it on, and the number of add-ons you want to use.
Who is Ninja Forms for?
In the end, Ninja Forms is more appealing than disappointing, with benefits that seem to outweigh the drawbacks.
First of all, it’s a plugin that will satisfy non-technical users and beginners, thanks to its simplicity of use. Its free version will be enough if you want to design a contact form without coding, in a visual way.
As it has more than one trick up its sleeve, Ninja Forms will also appeal to more technical profiles, thanks to the many hooks it offers.
Download the Ninja Forms plugin:
If I had to compare it to some competitors when making a choice, I would say that its free version is equal to WPForms. The latter plugin offers fewer fields than Ninja Forms, but in my opinion, its form building interface is even easier to use.
In premium, an alternative like Gravity Forms (affiliate link), for example, will be cheaper and just as powerful.
What about you, what’s your opinion on Ninja Forms? Share your feedback in the comments.

Receive the next posts for free and access exclusive resources. More than 20,000 people have done it, why not you?

Continue reading
Articles posted in WordPress PluginsOur review of B2BKing: A WooCommerce plugin built for B2B commerce
“Hi, I need 200 units of this product with fast shipping please”. As an online store owner, receiving this kind of message puts a smile on your face. Answering it, on the other hand, becomes a lot less fun… Basically,…
GTranslate on WordPress: our full review of this tool for creating a multilingual site
“Hello, how are you?” “What do you think of this computer mouse?” For you, everything is easy to understand in these two sentences. For someone living deep in the Shetland Islands or Yucatán, it’s probably a bit more complicated… If…
Air WP Sync: Test and review of this plugin for integrating Airtable into WordPress
Do you use Airtable and WordPress? Then some of your days probably look something like this. In the morning, you update your Airtable database as soon as something changes. In the afternoon, you copy and paste the same data into…