“The WordPress Multilingual Plugin.” That’s how WPML is presented on the homepage of its site.
If you want to translate your site into different languages, you should bet on it. It’s the historical one, on the market since the end of the 2000’s, when WordPress hadn’t even launched its 3.0 version yet.

The ultra-popular one, with over a million users worldwide, which is quite a lot of people.
So yes, WPML is the essential multilingual plugin of the WordPress ecosystem. But is it THE plugin to adopt on your site? That’s what you’ll find out in this detailed test of a plugin that is the talk of the town.
Overview
- What is WPML?
- How to install WPML on WordPress?
- Settings related to languages
- How to translate a post or a page into another language?
- How to translate other elements of your site?
- How does WPML integrate with page builders?
- WPML and WooCommerce
- Documentation and support
- How much does WPML cost?
- Our opinion on WPML
This article was written using WPML version 4.5, released in October 2021.
What is WPML?

WPML is a premium plugin that “makes WordPress run multilingual”, as stated on its About page. Specifically, it says that the plugin “lets authors write content in different languages and translate content. It also includes advanced features for translation management and an interface for professional content translation. “
Launched in 2007, WPML is the “big boss” of multilingual plugins on WordPress, in terms of the number of users. According to the figures it reports, WPML is used on about a million sites, making it the most popular on the market.
By comparison, its main competitor, Polylang, claims 600,000+ active installations for its plugin.
Behind WPML is the company OnTheGoSystems, which also offers other tools such as:
- Toolset, which allows you to add custom post types, fields and taxonomies to your WordPress site.
- IcanLocalize: a professional translation service.
The advantages of WPML
If WPML has been able to carve out quite a share of the cake for more than a decade, it’s because it concentrates quite a few assets, highlighted on its home page:
- It allows you to translate all the elements of your site: posts, pages, custom post types, menus, widgets. Not to mention the texts of your plugins and your theme.
- It is compatible with many famous themes and plugins: Yoast SEO, Elementor, Divi, Gravity Forms, WooCommerce.
- It helps you to optimize your site for multilingual SEO.
- It allows you to translate the contents of your online store created with WooCommerce.
- Its support (user assistance) is supposed to be very reactive.
If WPML has a good reputation among its users, it generates rather mixed reactions from the community of experienced WordPress developers and technicians.
An example? The French agency Whodunit, a WordPress specialist, called WPML a“technological dead end” in an article published on its blog. They criticize it – rightly – for being obsolete, because it adds its own tables to your database, rather than relying on WordPress taxonomies to manage multilingualism.
While this is now obsolete, it was the right solution when WPML was launched, because custom taxonomies did not exist yet. Changing the system from one day to the next is not easy, especially with more than a million users…
The WPML team also told us that the creation of dedicated tables (18 for the Core of the plugin, for the record) meant that the other tables were not cluttered, while having the least impact on loading speed.
That’s it for the technical side of things, with what’s going on behind the scenes, so to speak.
But you, you surely want to see the showcase: the WPML features. In order to start forming your own opinion about this plugin, let’s check out its settings and other options.
To understand everything about multilingualism and WordPress, take a look at our article on the subject. You will find out about best practices and language management on your favorite CMS.
How to install WPML on WordPress?
How does this multilingual plugin work?
Before downloading the plugin on your WPML.org account, and then activating it on your WordPress site, it is worthwhile to explain the rather singular way WPML works.
On the downloads page of your account, you will have access to 14 plugins. WPML recommends that you install four of them (and not just one, careful), which “every multilingual site needs”, to quote its words:
- WPML Multilingual CMS: this is the basic plugin, the Core of WPML.
- String Translation: to translate your site’s translation strings, i.e. “texts that are not in the publications, pages or taxonomy”, says WMPL (e.g. site slogan, widget titles, etc.).
- Translation Management: this module helps you manage your translations and allows you to work with a team of translators or translation services.
Since the release of WPML version 4.5 in October 2021, this module has been integrated into the WPML core, inside the WPML Multilingual CMS plugin. So you don’t need to activate it anymore. - Media Translation: to “choose images and other media for the translated content”.
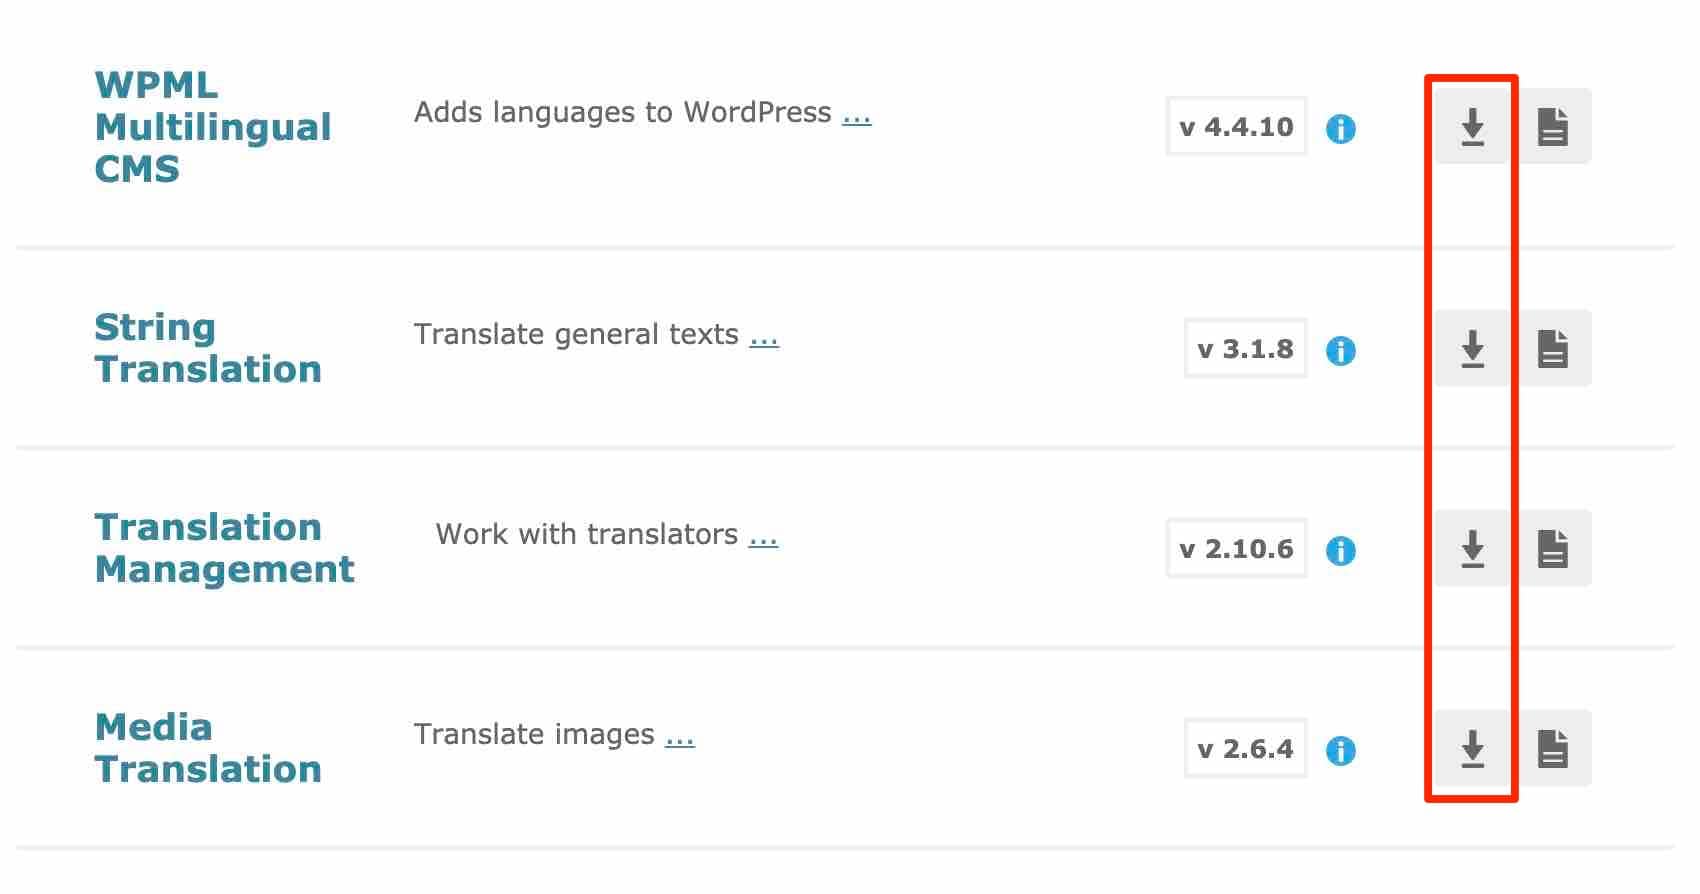
If the above plugins are automatically present in the WMPL “Multilingual CMS” and “Multilingual Agency” Licenses, it is not the case for the “Multilingual Blog” License. For example, the “Multilingual Blog” license does not give access to the “String Translation” module and the “Translation Management” module is not included in the basic plugin (WPML Multilingual CMS).
Is everything clear to you? In that case, activate the three plugins – no need for Translation Management if you use WPML 4.5 at least – on your WordPress administration.
A 6-step configuration wizard
When it’s done, a wizard will help you configure the first settings, which we’ll see step by step, just below.

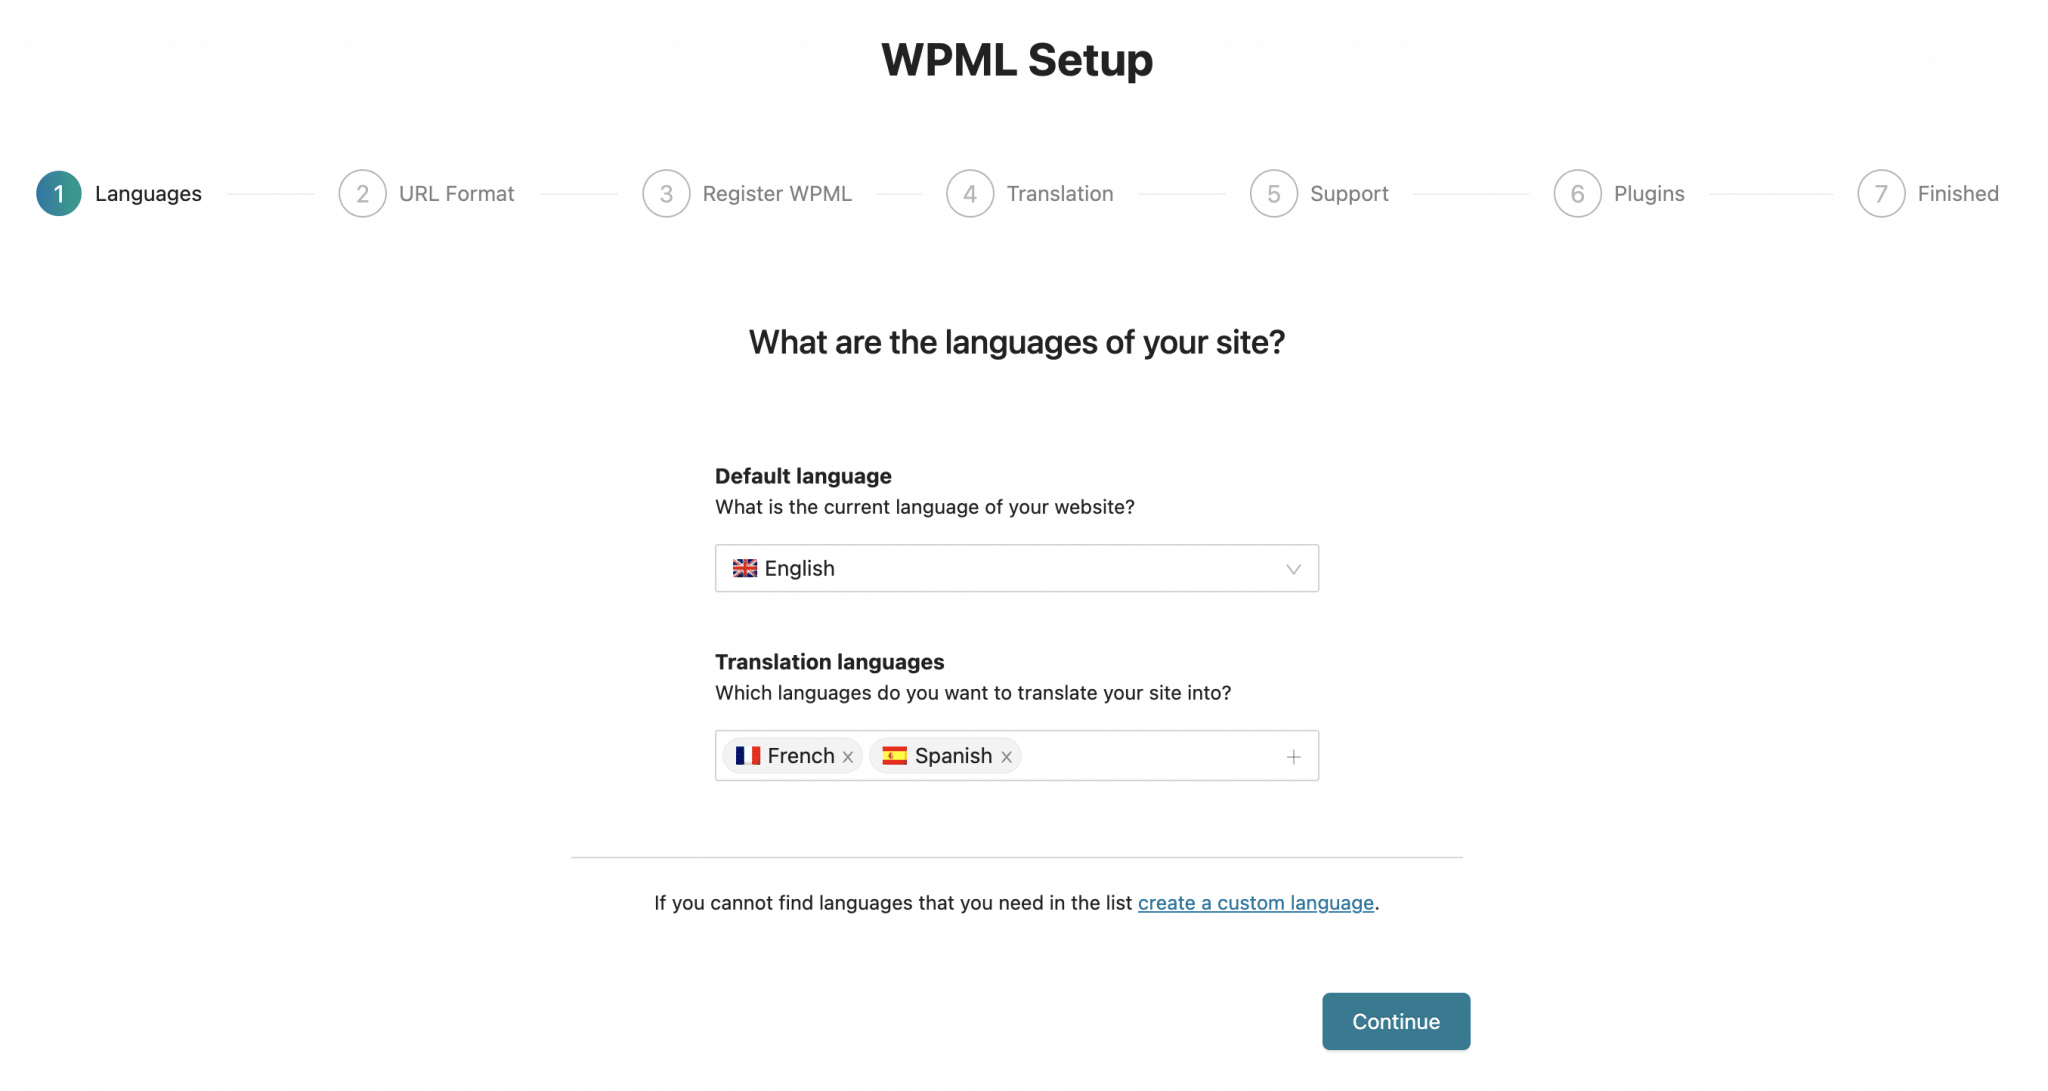
Step 1: Choose the languages of your site
First, you must choose the default language of your site, and the languages you want to translate it into.
There is no lack of choice, with about 60 languages available, from English to Spanish, including Welsh and Quechua.
WPML also provides access to regional languages, such as Catalan and Galician.
If your choices are not yet finalized, you can of course add or remove a language later.
For the purpose of this test, I choose to translate my site into French and Spanish.
Step 2: Select the URL format
WPML offers you the choice between 3 possibilities:
- Different languages in the directories. For example:
mysite.com/en/for English andmysite.com/fr/for French. - A different domain per language. For example:
mysite.comfor the English version andmysite.frfor the French version. - Language name added as a parameter. For example,
mysite.com?lang=enfor English.
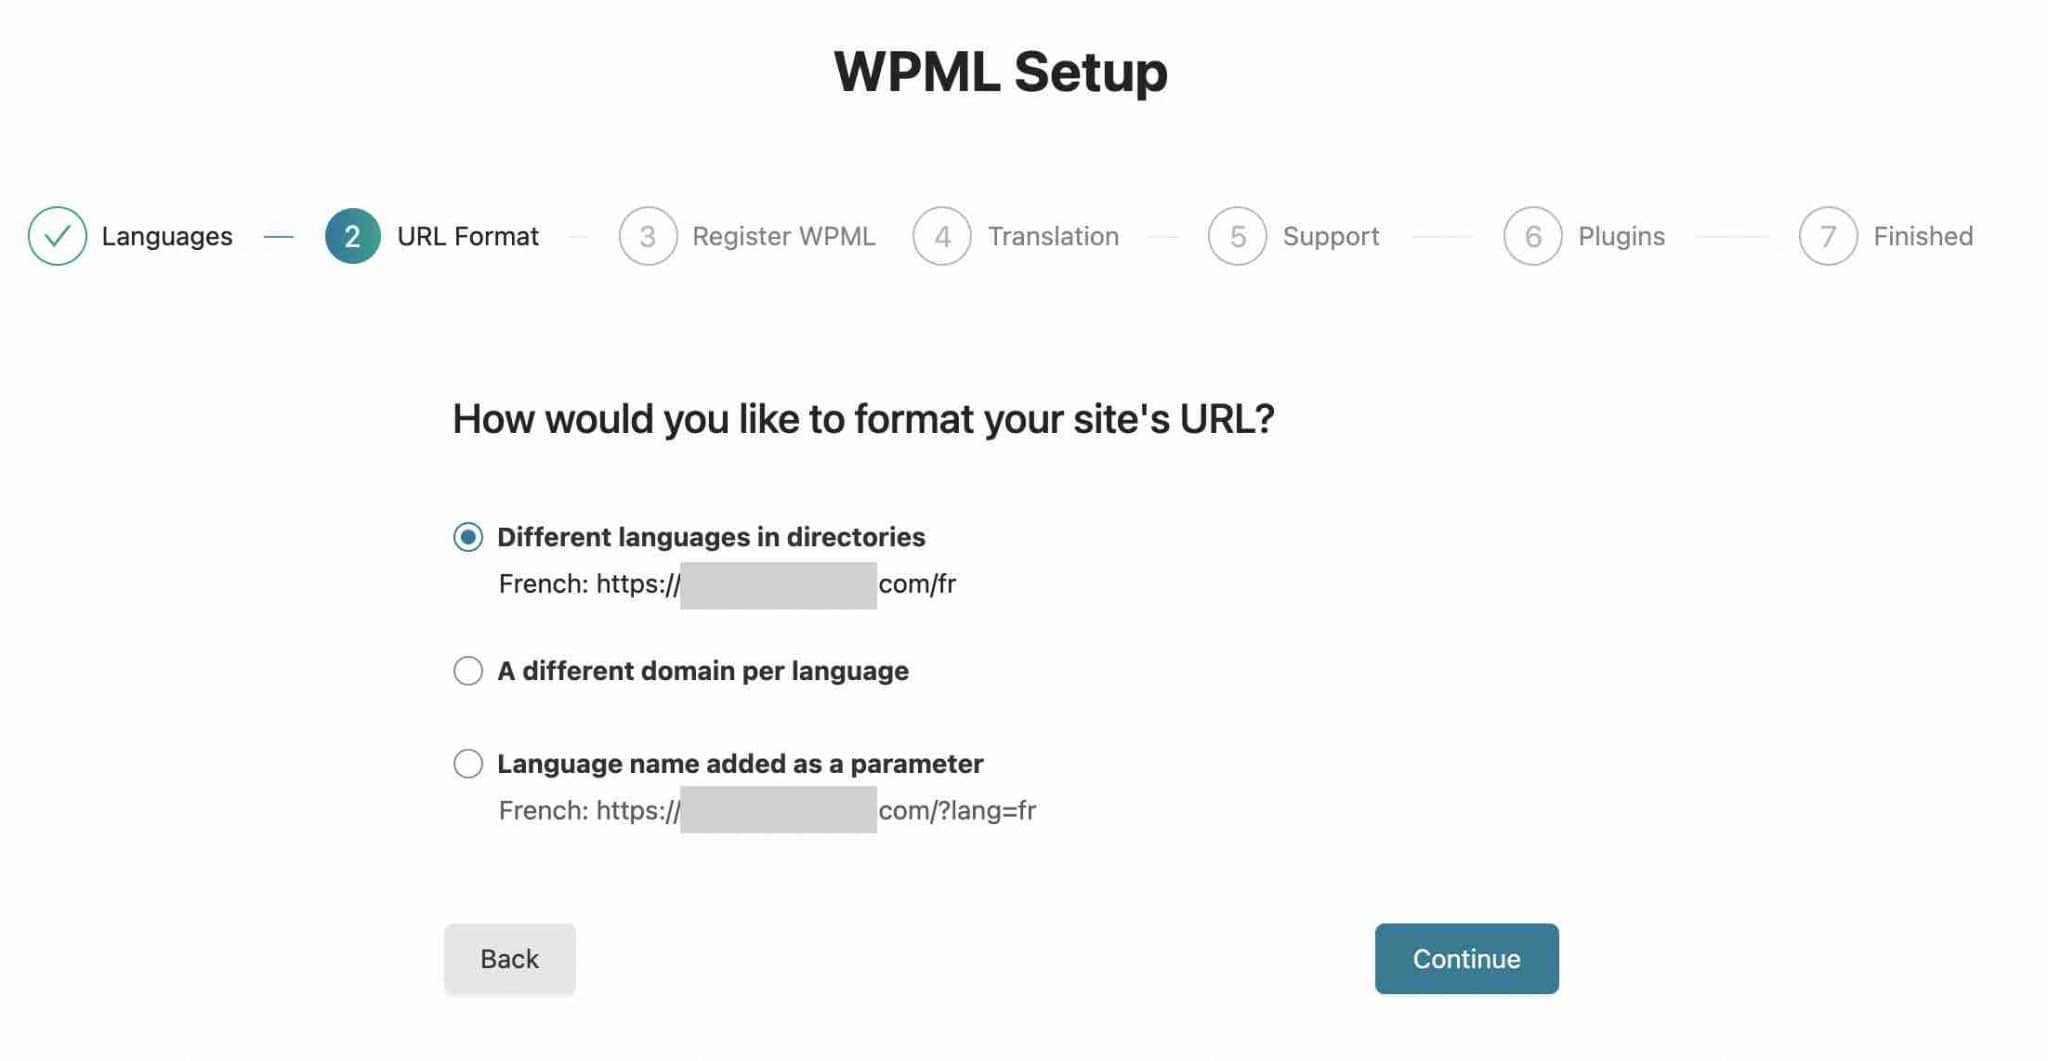
The choice of a particular structure depends on your project and your needs. For the English version of WPMarmite, which is presented in this format https://wpmarmite.com/en/Alex chose for example to start with a URL structure determined by the directory name, keeping the main domain name with a language slash.
Want to know more about multilingual SEO? Check out expert advice and best practices for optimizing your site in this article.
If you choose the “A different languages in directories” option, WPML says that for it to work, “your site’s permalink structure must be different from the default” (but that’s probably a setting you’ll have already made).
In this case, we recommend that you use the “Post name” setting in Settings > Permalinks.
Be careful if you choose to change the structure of your permalinks. The idea is to do it as soon as you install WordPress. If you do it afterwards, you will have to redirect your content because the URLs of your content will have changed format, which will result in 404 errors for your visitors. To know how to proceed, check our dedicated resource.
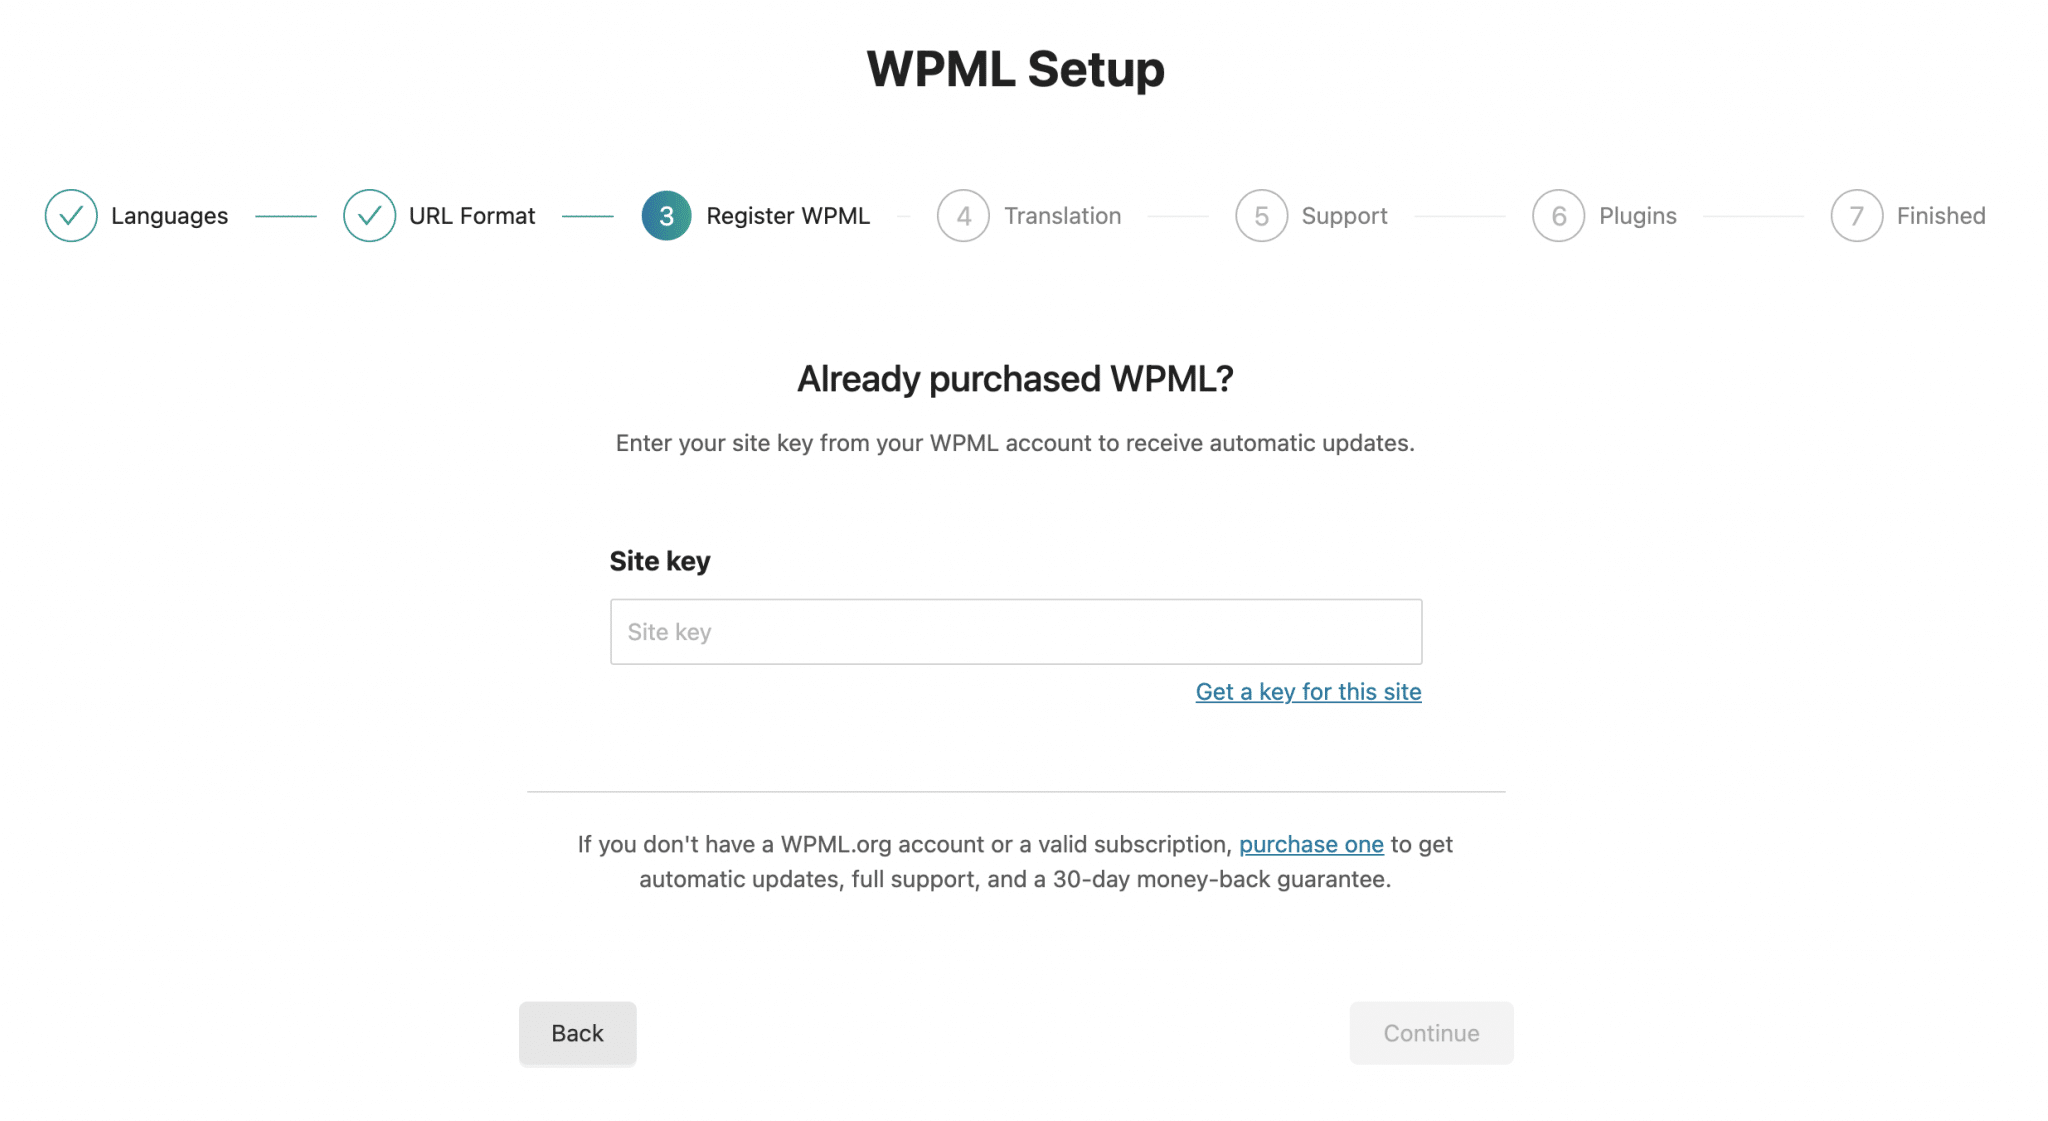
Step 3: Register WPML
Now it’s time to register your WPML license key, a necessary prerequisite to receive automatic updates from the plugin, which is always a good idea, especially for security reasons. 😉
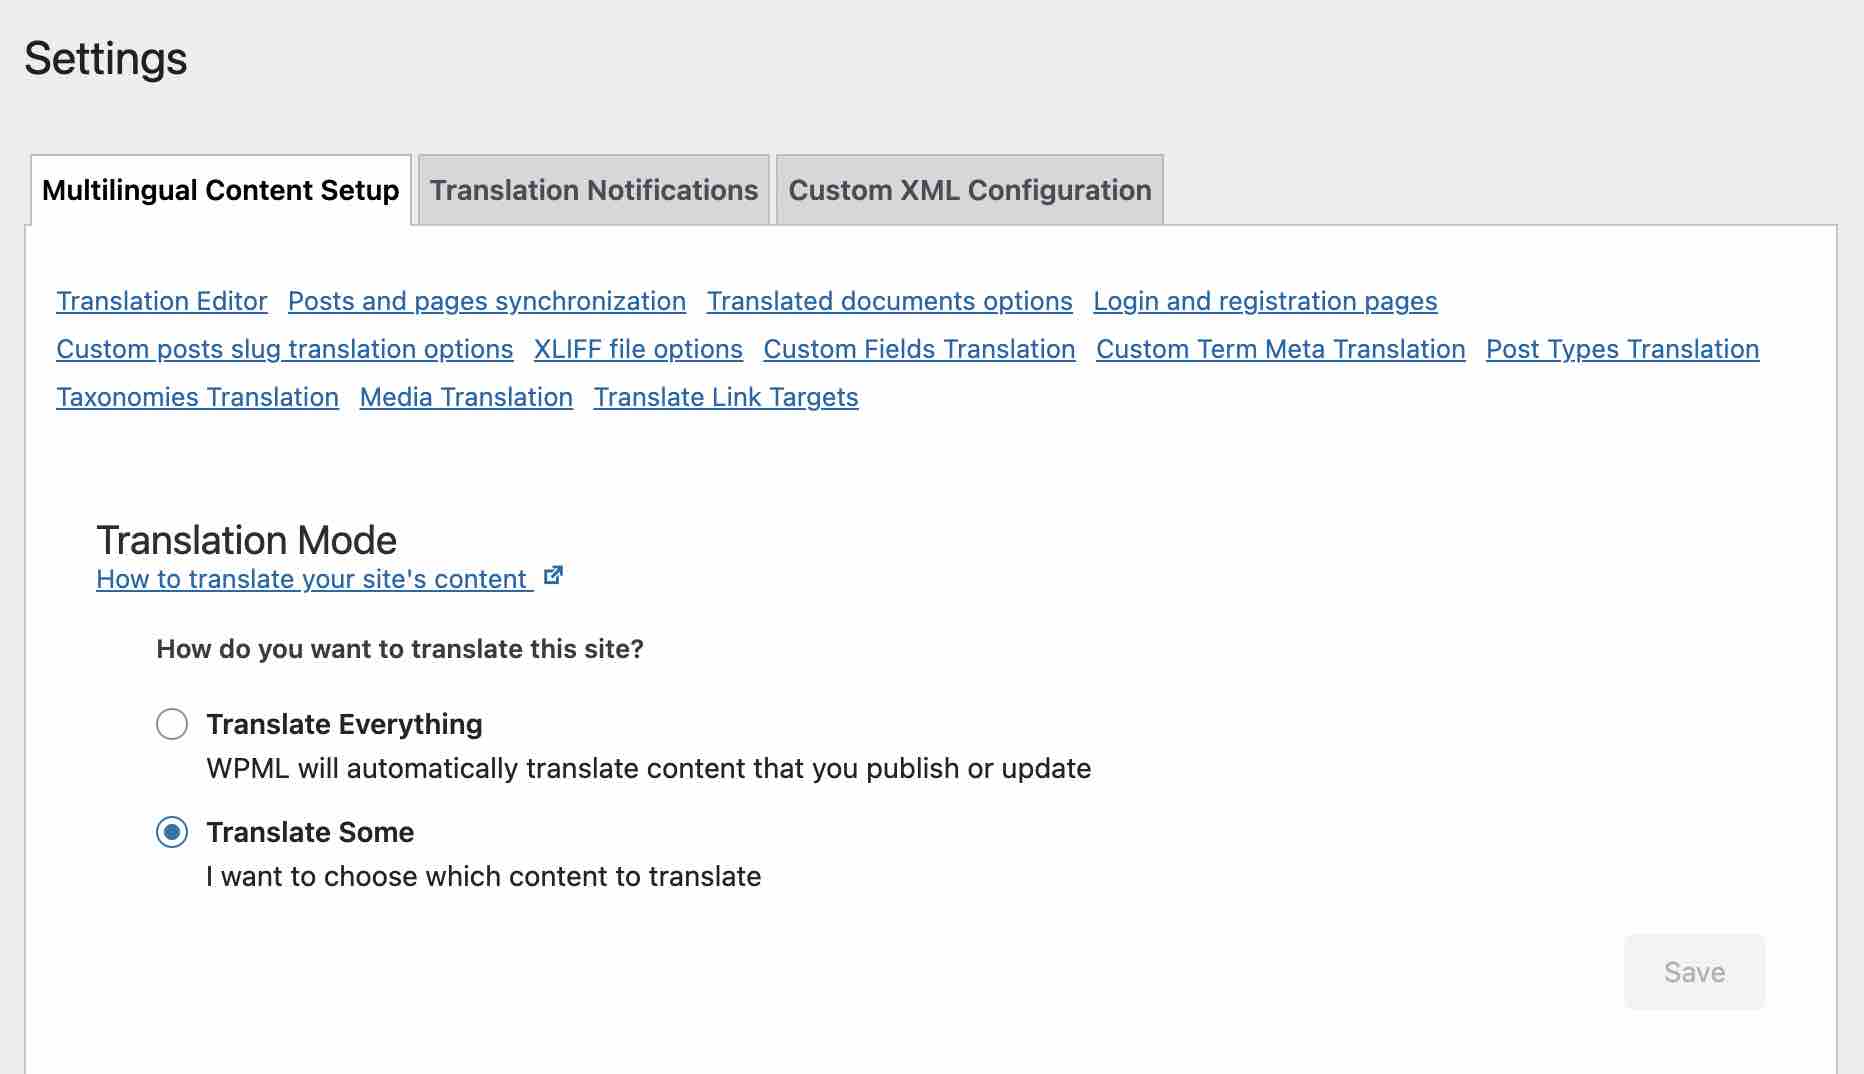
Step 4: Choose a translation mode
In the 4th step, you must first choose how you will translate your site:
- Either all the contents of your site will be translated automatically.
- Or you translate the content of your choice, case by case, if you do not need to translate your whole site.
Then, you can select who will translate the content: you, a user who acts as a translator, or a professional translation service.
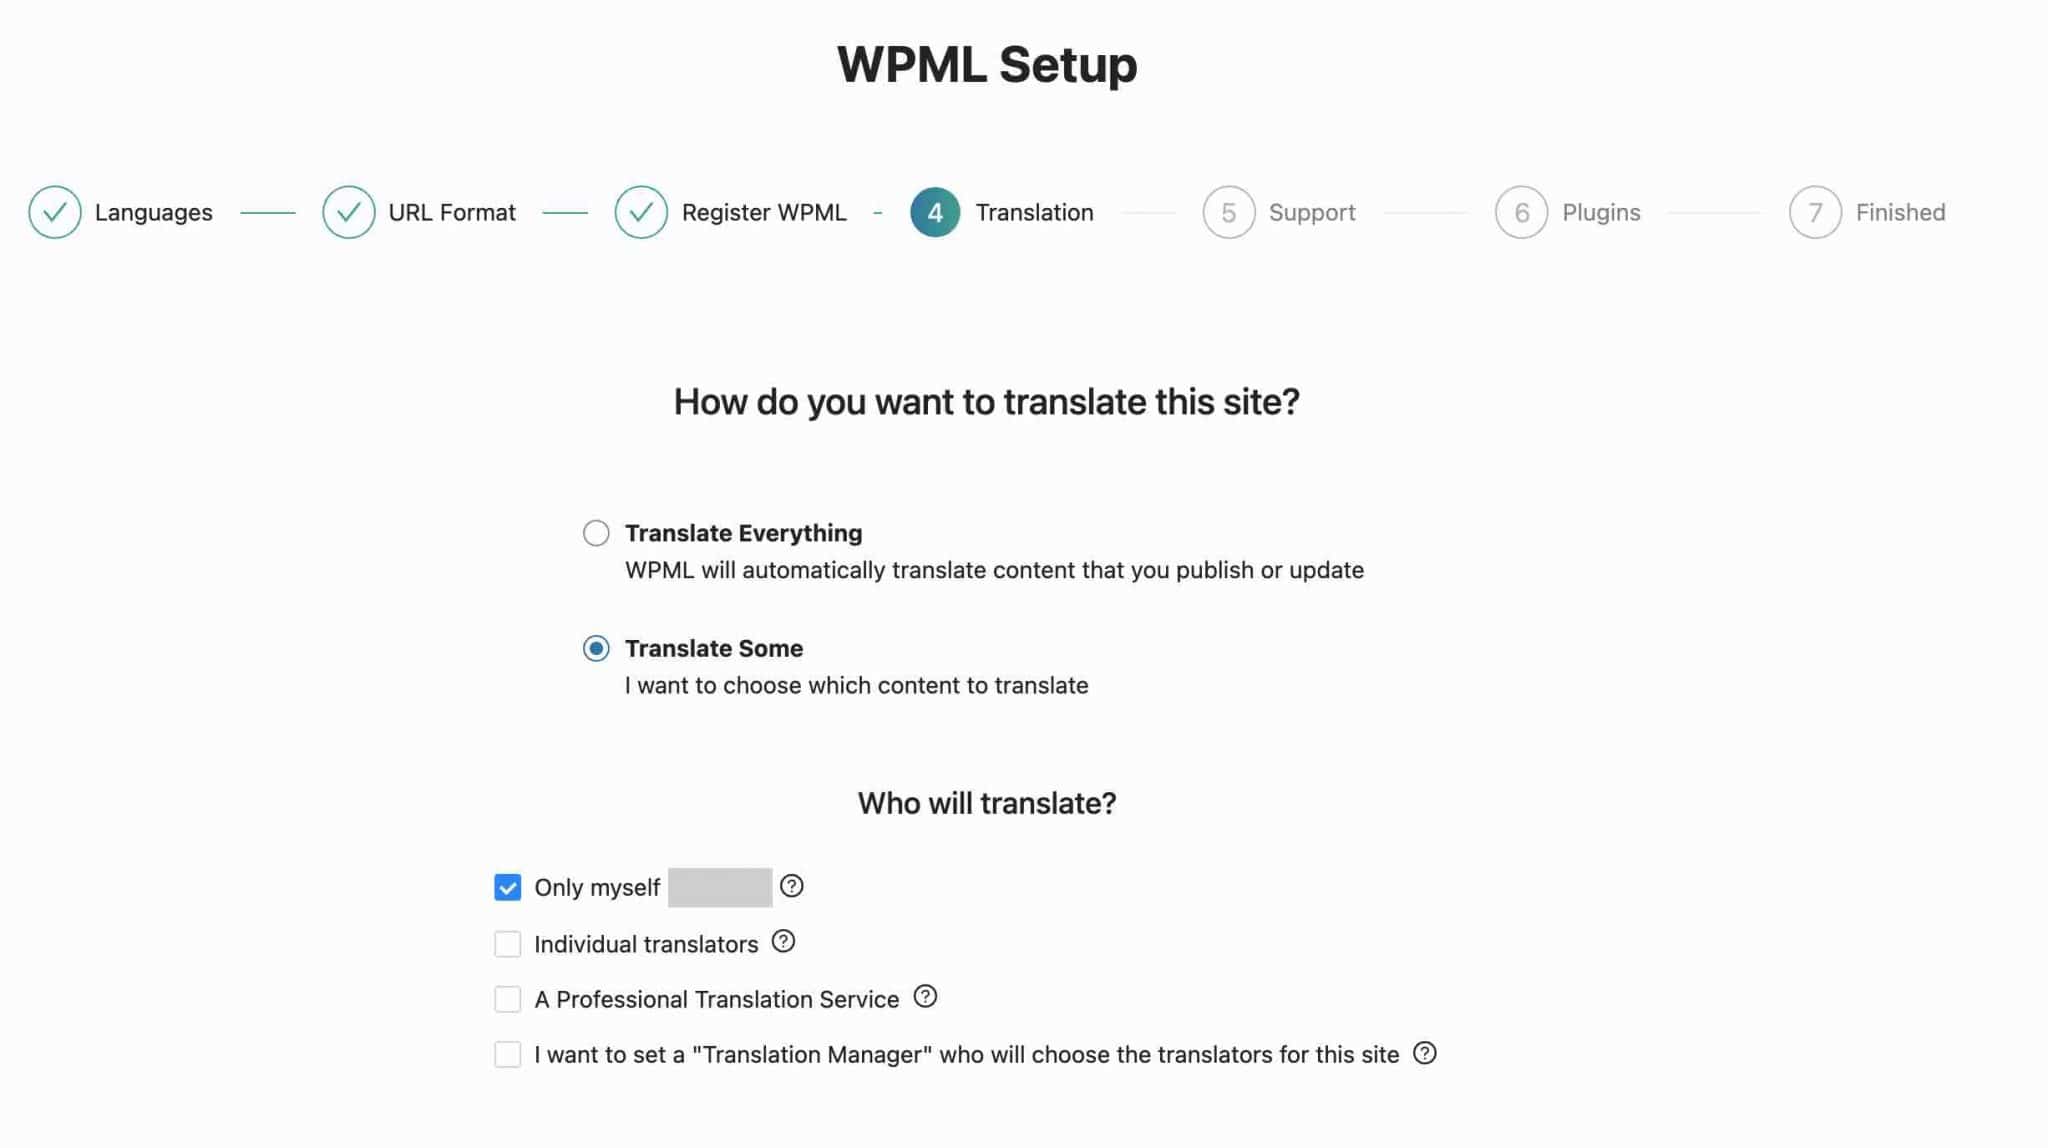
Of course, your choices are not final at this point. You can change everything as you wish later on, in the WPML settings. If you hesitate, leave the default configuration.
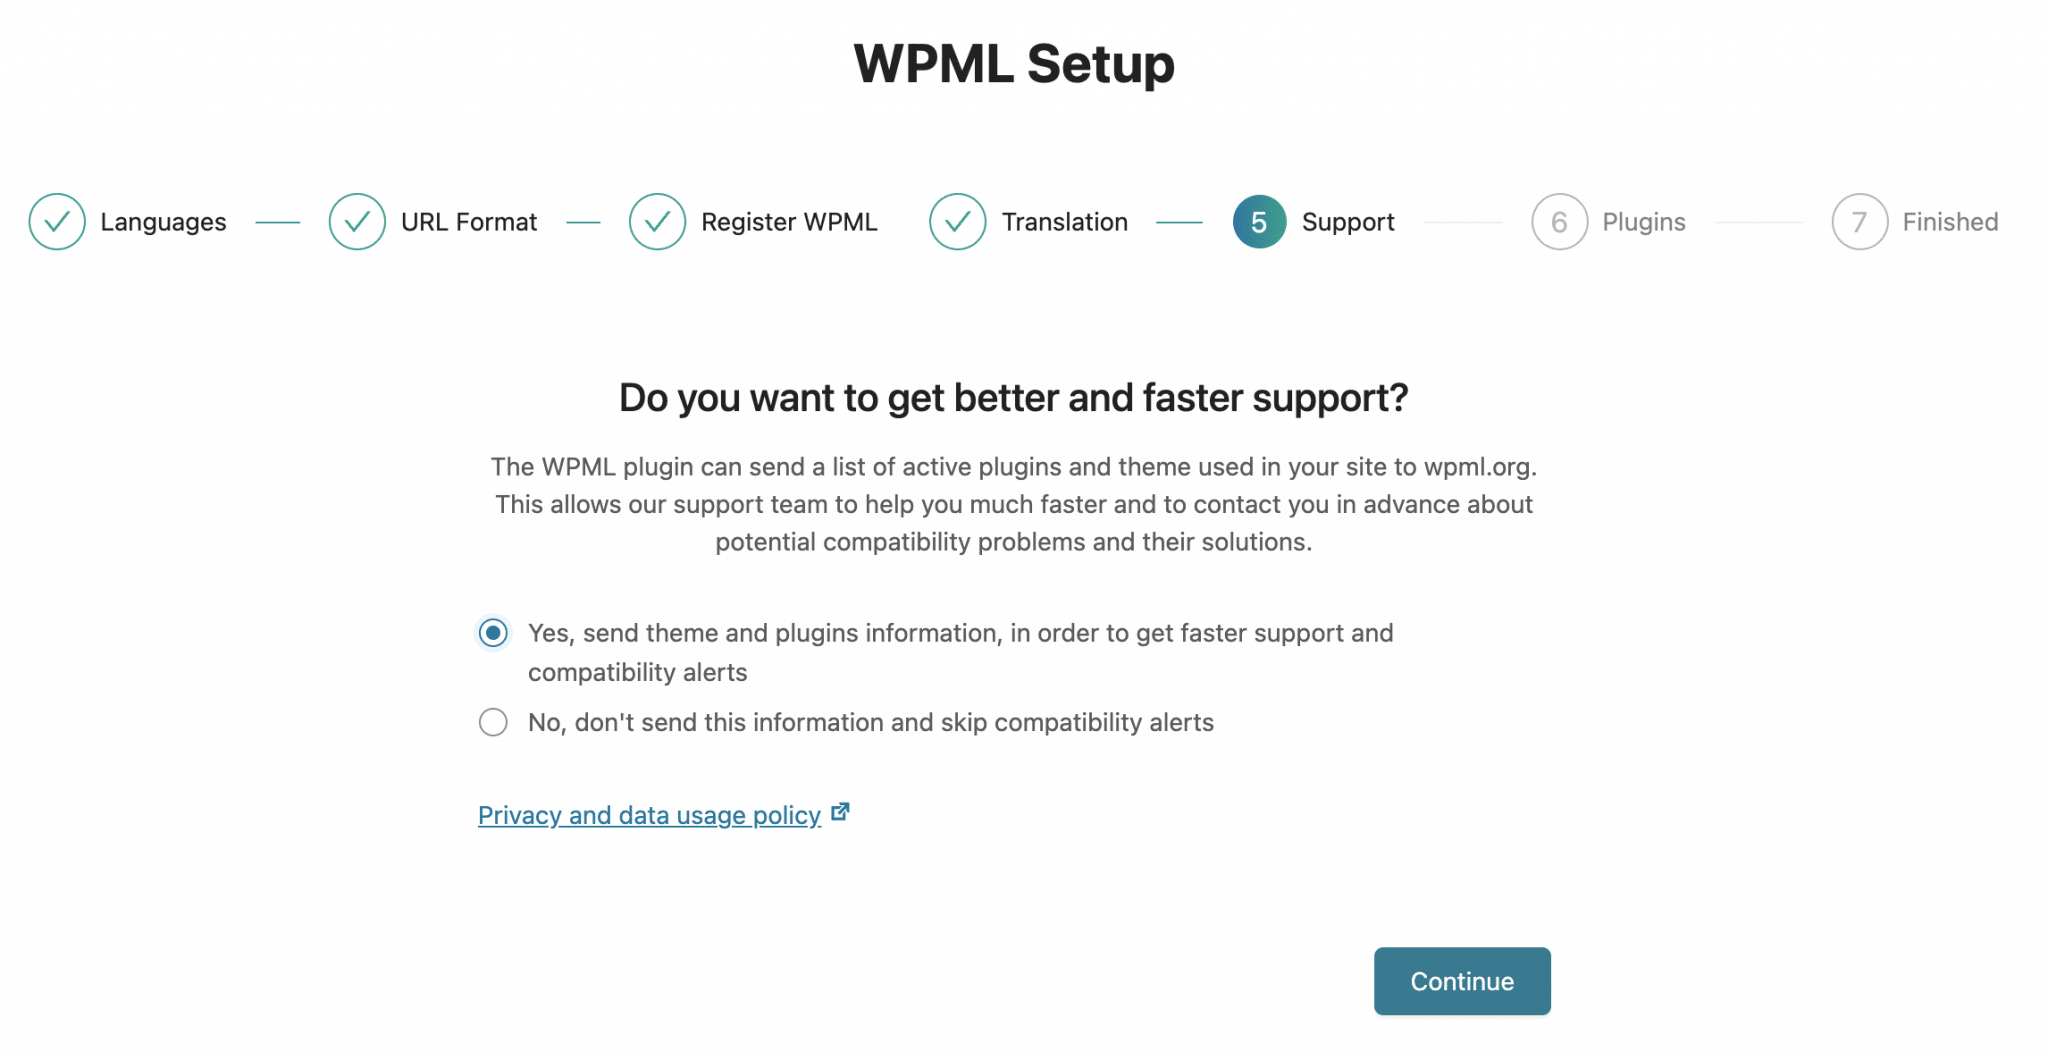
Step 5: Set up a technical support
WPML now asks you to define if you want to “send a list of active plugins and theme used in your site” in order to “help you much faster”, “about potential compatibility problems”.
This can be useful so you can check the box, if you find it relevant.
Step 6: Activate any WPML add-ons
Finally, WPML recommends that you activate some of its add-ons to “translate strings, media, admin texts and more”.
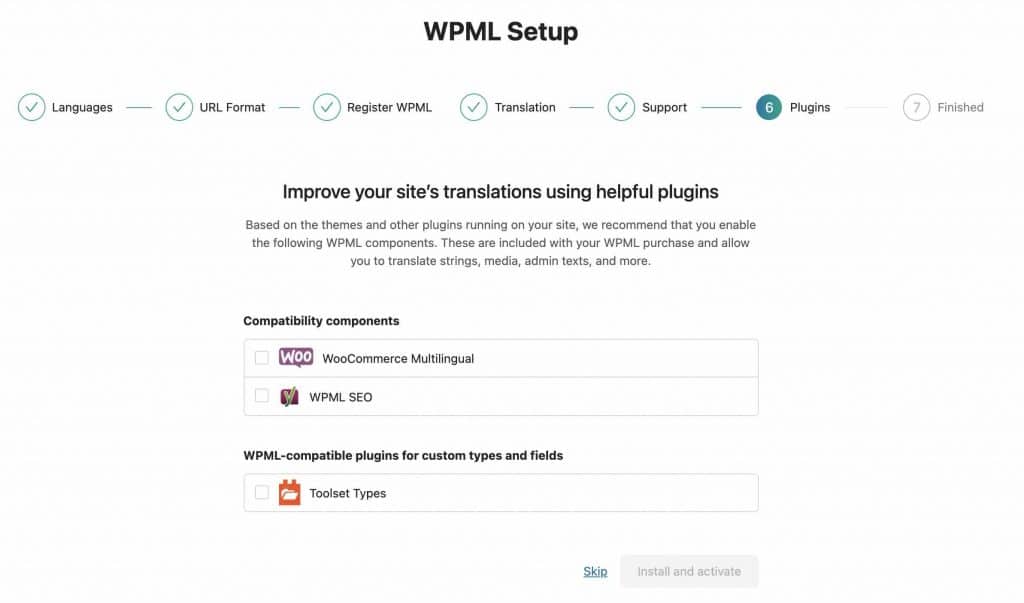
These include Toolset, its in-house plugin that I mentioned at the beginning of the article.
When you’ve finished your work, WPML redirects you to the “Translation Management” submenu in your WordPress administration interface.
This is where you can start your first translation jobs. Other submenus are also present in the sidebar, on the left of your administration interface (their number also depends on the WPML modules you have installed, so it may be different for you). Here’s a quick tour of them, just below.

Presentation of the WPML menu
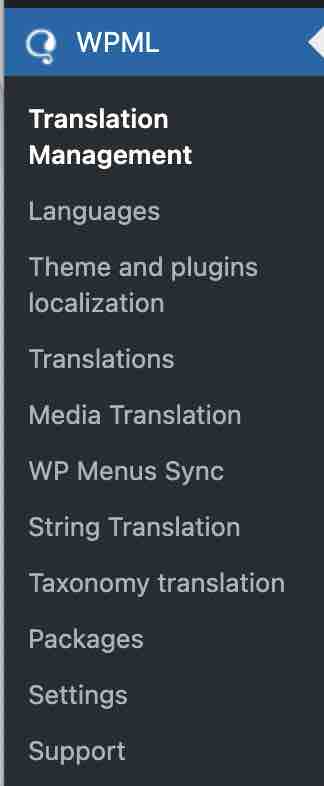
The WPML menu is composed of 11 submenus:
- “Translation Management”: offers a dashboard to help you collaborate with a team of translators or translation services. You can send content to be translated and check the progress of ongoing tasks.
- “Languages” is the most comprehensive. This is where you’ll make most of your settings, such as choosing site languages, language selector, or URL format.
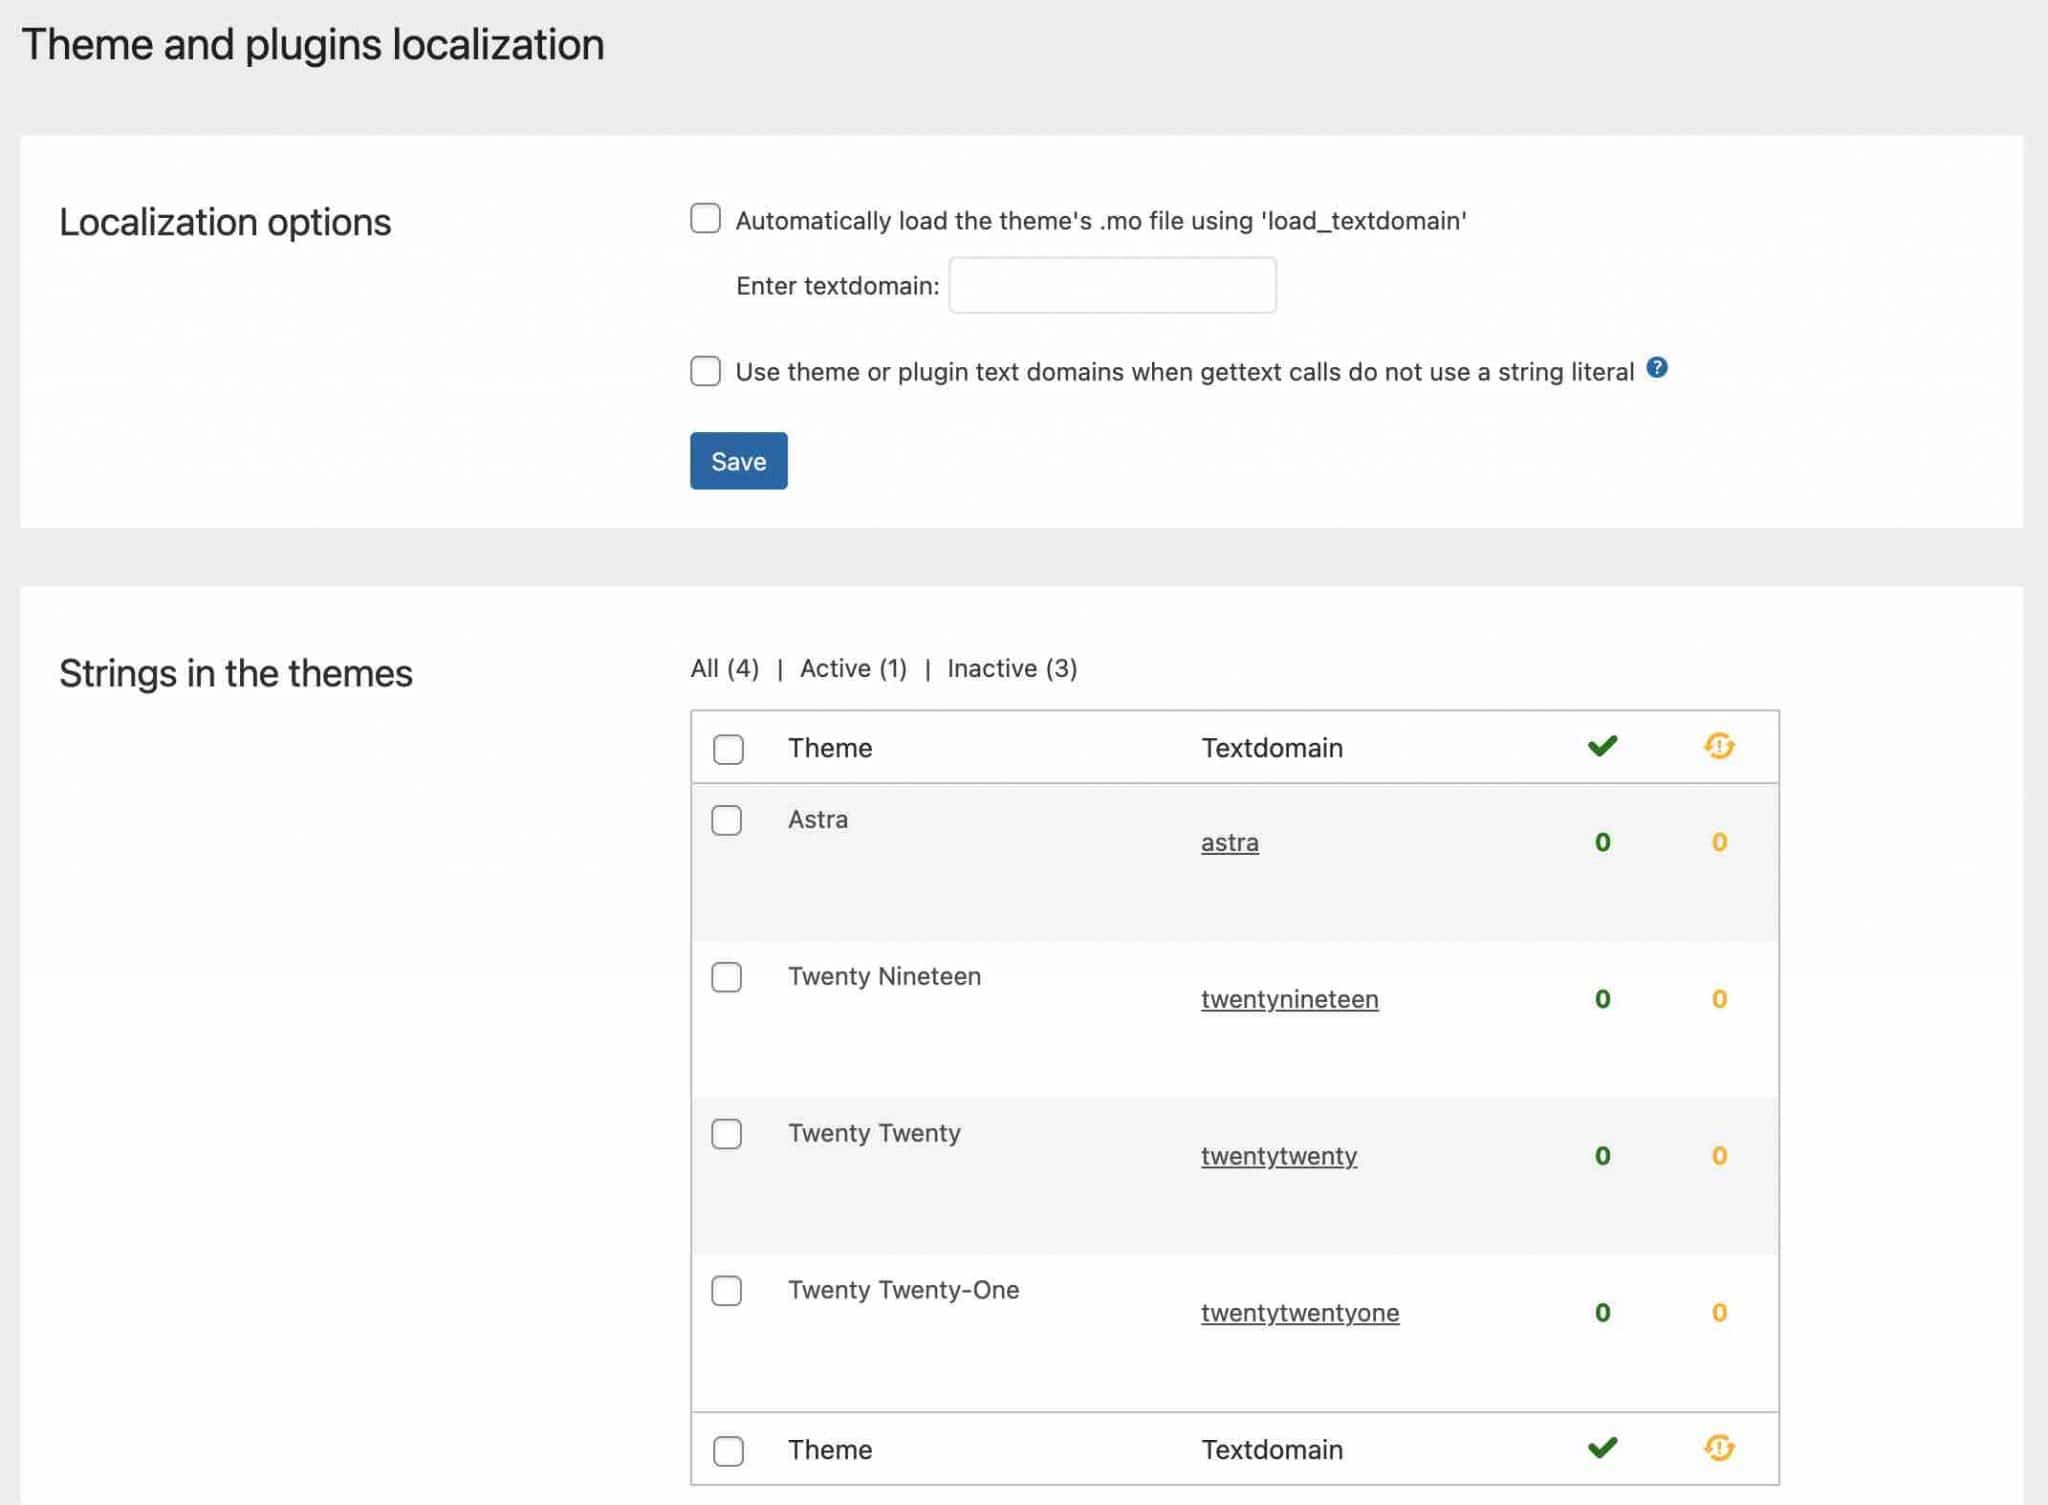
- “Theme and plugins localization”: lists the strings (content) detected by WPML within your themes and plugins.
- “Translations”: lists your pending translations.
- “Media Translation”: allows you to use the WordPress Media Library in different languages. You can control which images will be displayed for each language.
- “WP Menus Sync”: is where you can synchronize the menu structure from the default language to the secondary languages.
- “String Translation”: will help you translate the interface strings directly from WordPress, without having to use
.mofiles. - “Taxonomy Translation”: this submenu will allow you to translate your taxonomies (e.g. categories, tags).
- “Packages”: here you will find the strings generated when a page is translated with a page builder.
- “Settings”: allows you to configure basic settings using check boxes. For example, you can define here how to translate publications and pages, choose options for synchronizing publications and pages, etc.
- “Support”: displays informations about your WPML and WordPress configuration, as well as links to technical support.
What can we say, so far? As you can see, many settings are presented. Even if everything is relatively clear, the interface remains crowded when you see it.
To help you find your way around, I’ll detail several basic settings into small step-by-step tutorials.
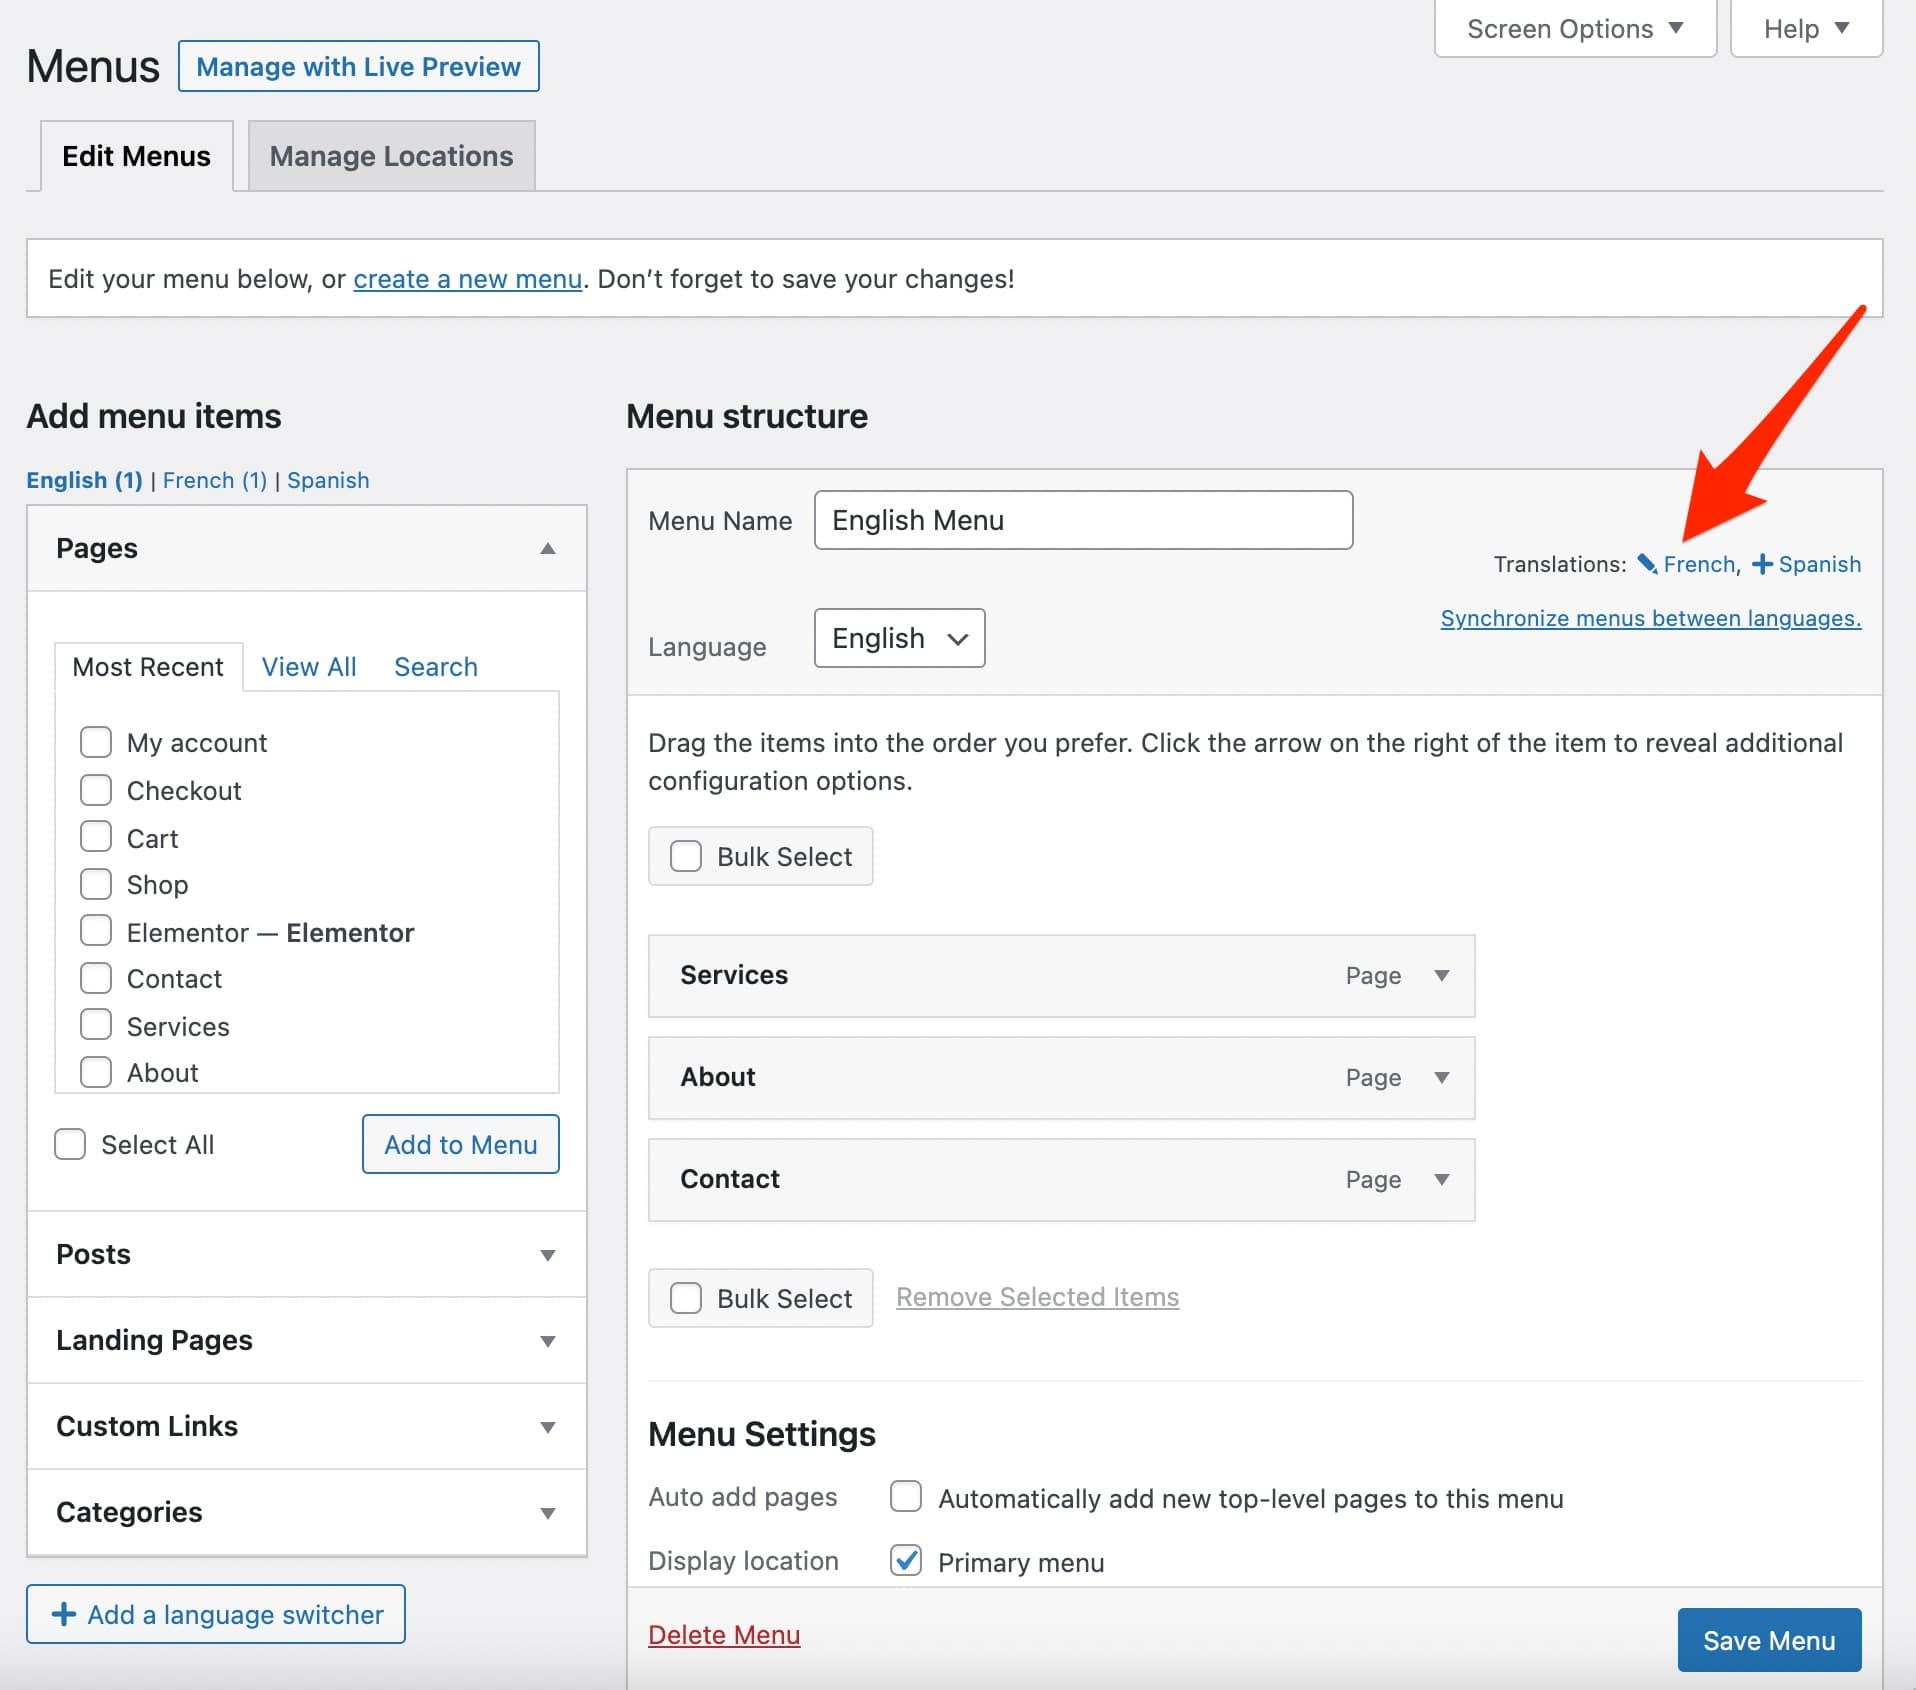
Settings related to languages
How to add and edit a language?
During the configuration phase of the plugin, you normally added one or more languages to translate. If you change your mind, go to the WPML > Languages menu or the “Site languages” link to add or remove a language.
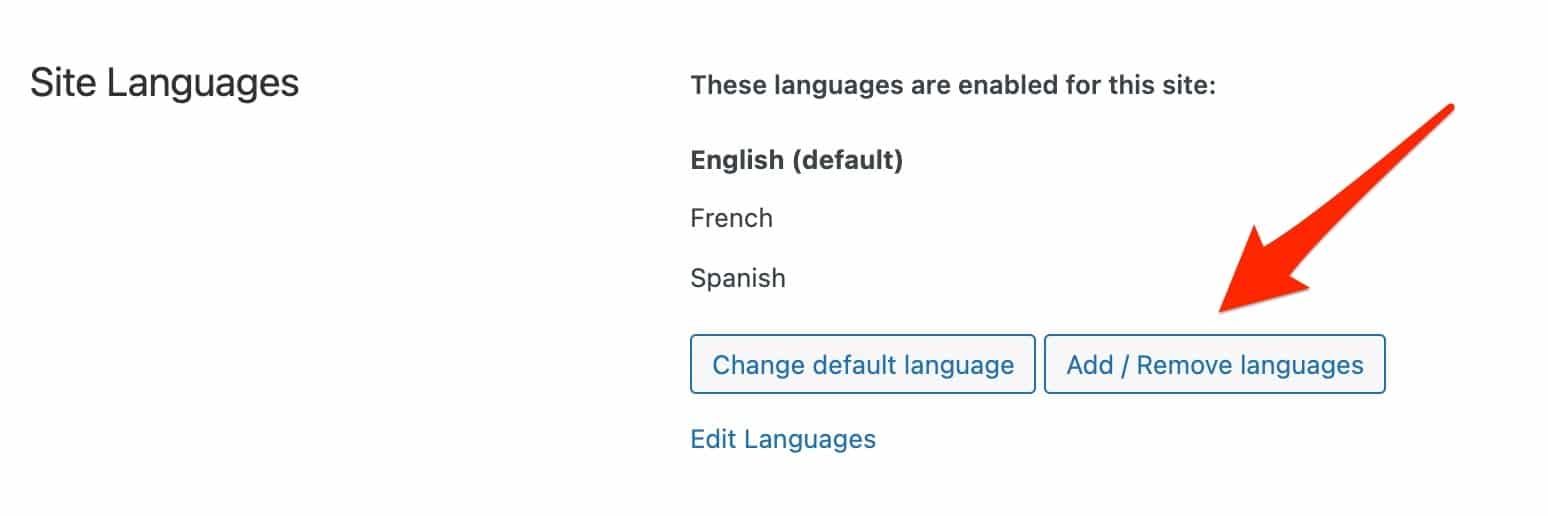
By clicking on the “Add/Remove languages” button, you will have access to the 60 or so default languages offered by WPML.
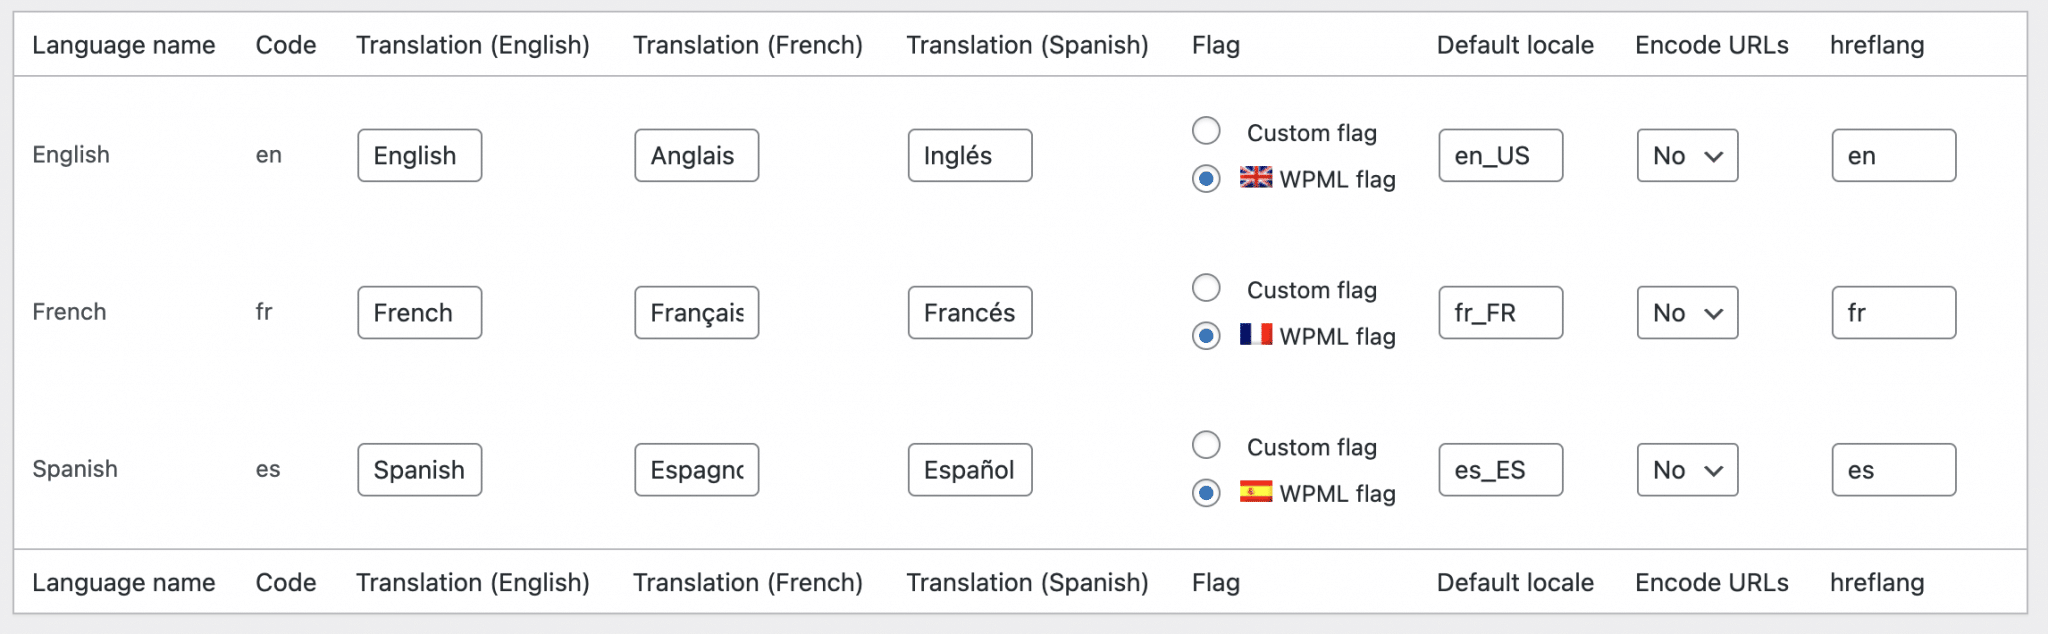
If the language of your choice is not there, you can add it manually by clicking on “Edit Languages”. Choose “Add Language” at the bottom right, then fill in the information requested.

Among them, you will see that you can act on several parameters:
- The code, i.e. a value that identifies the language. For example, “en” for English and “fr” for French.
- The translation, i.e. how the name of the language will appear to your visitors.
- The flag, you can add a custom flag or use the one proposed by default by WPML.
- The regional parameters of the language.
- The URL encoding. I advise you to leave the default setting “No”, as recommended by WPML if you’re not sure about it.
hreflang: the code that Google requires for a particular language. Leave the default language settings proposed by WPML.
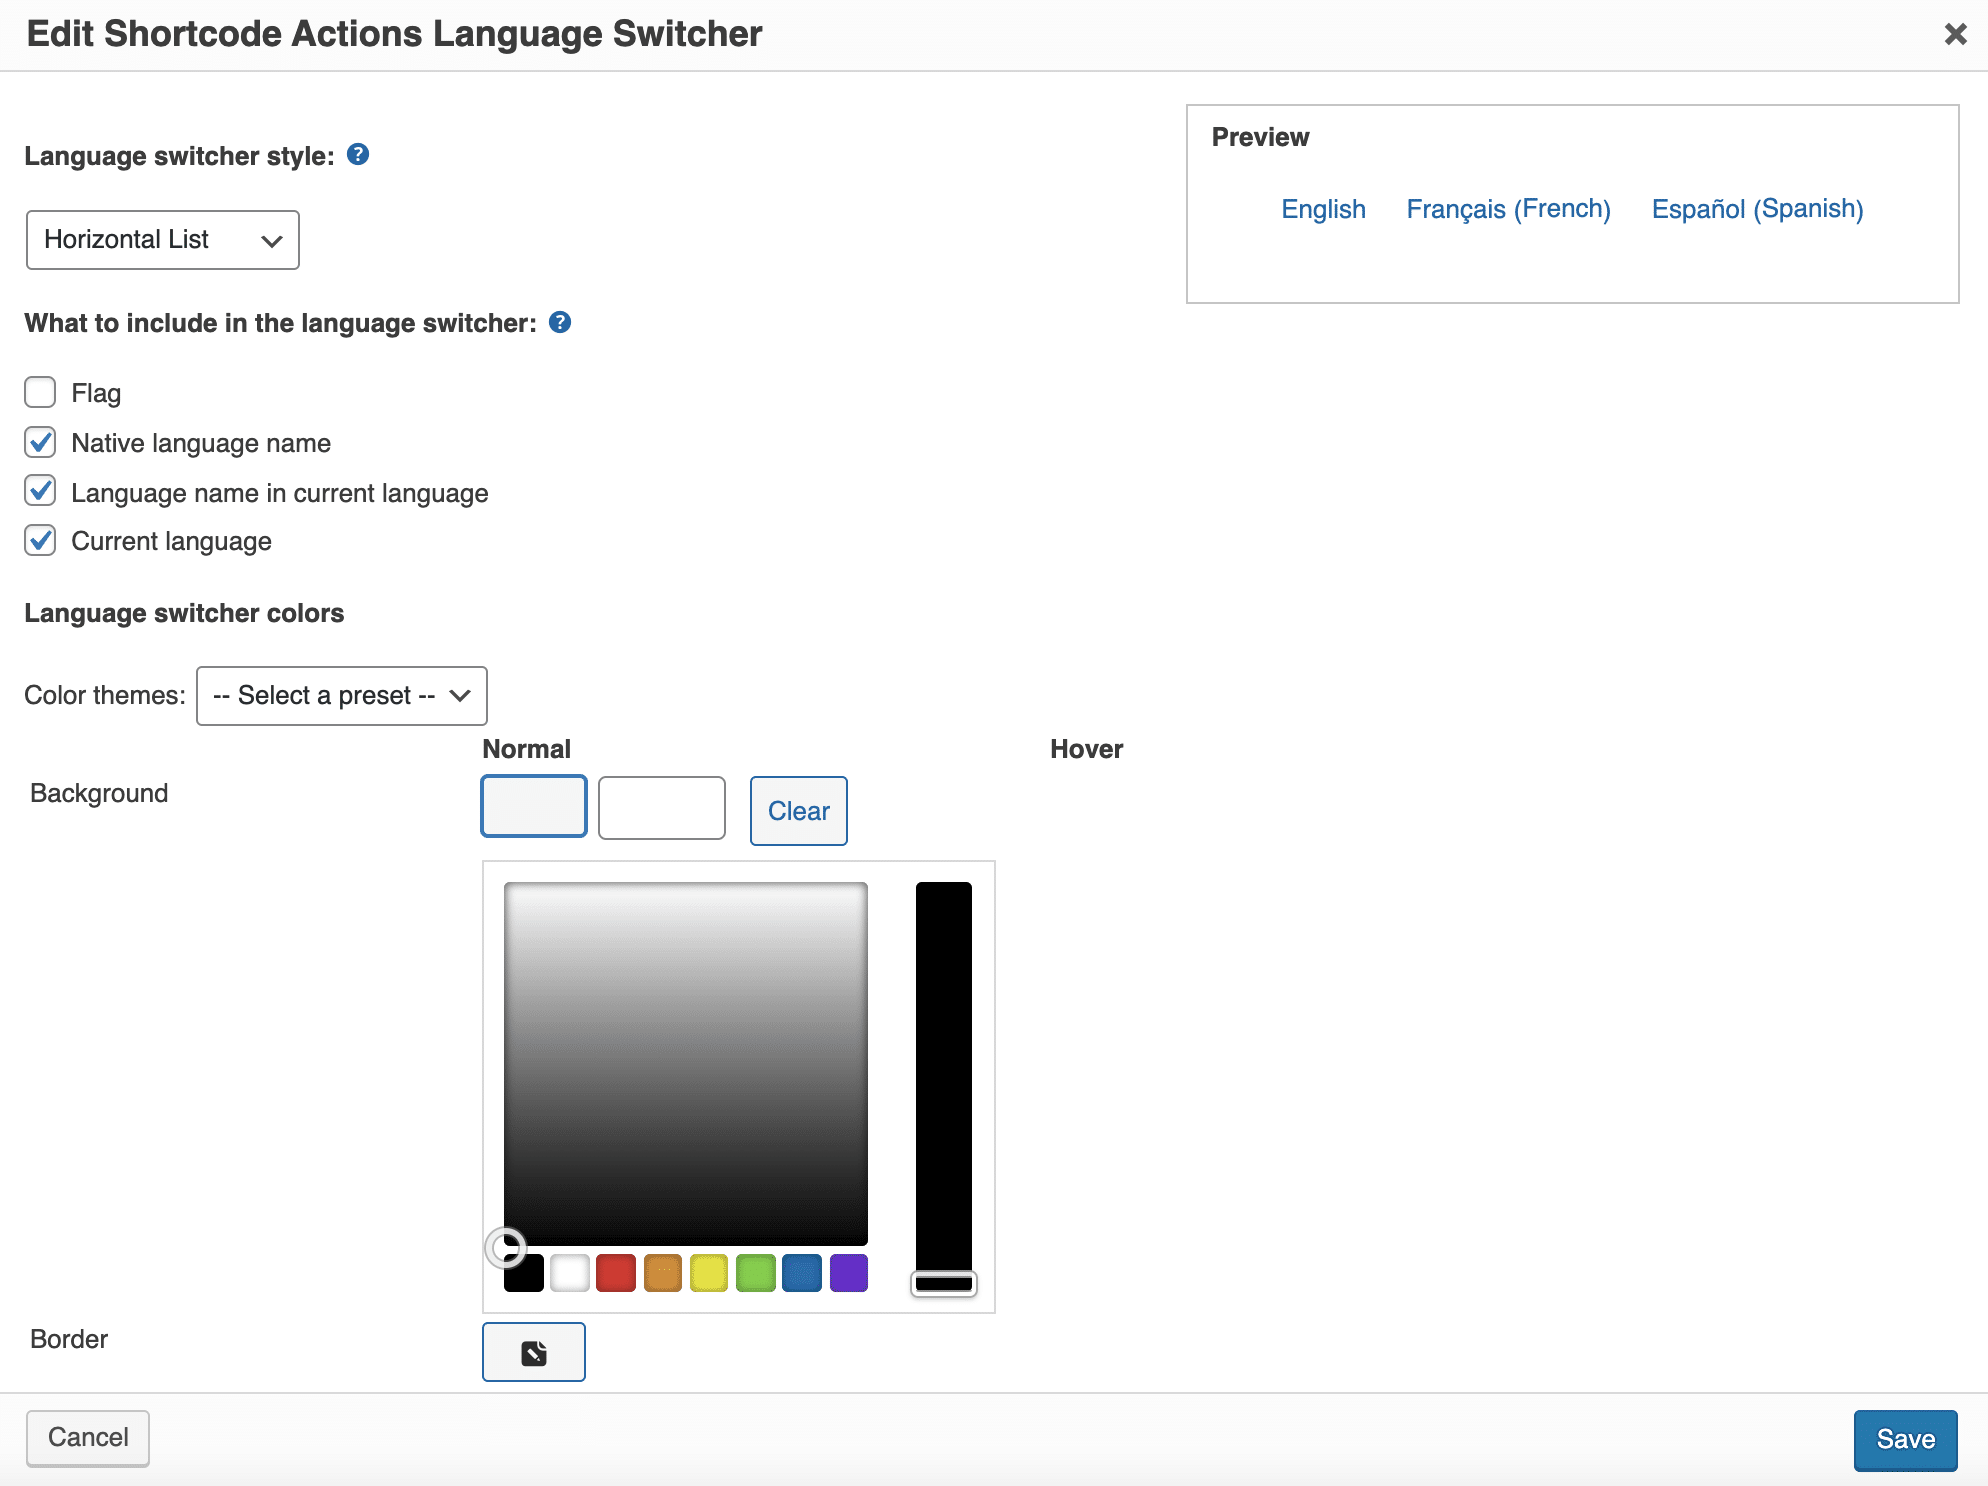
How to add a language selector?
Now, how to make it easy for your visitors to choose the language of their choice on your site? Answer: by providing them with a language selector.
To do this, go to WPML > Languages > Language Selector Options. You can:
- Choose the appearance order of the languages with a simple drag and drop.
- Hide the language or redirect to the home page of the language that has missing translations.
- Add CSS code to change the visual appearance of the selector.
The options you set here will be applied to all language selectors you add.
If you don’t know CSS, don’t worry! WPML allows you to create your own custom language selector, via the menu of the same name.
If you choose to use flags in your language selector, you will be able to play with their visual appearance without coding, by entering their height and width in pixels, but especially by changing their colors (background, border, font).
Using flags is often a natural first reflex. However, in practice, the display of flags is not necessarily a good practice. Indeed, we can think that a Brazilian will not necessarily click on a Portuguese flag. It is better to simply click on the name of the language.
The different types of language selectors
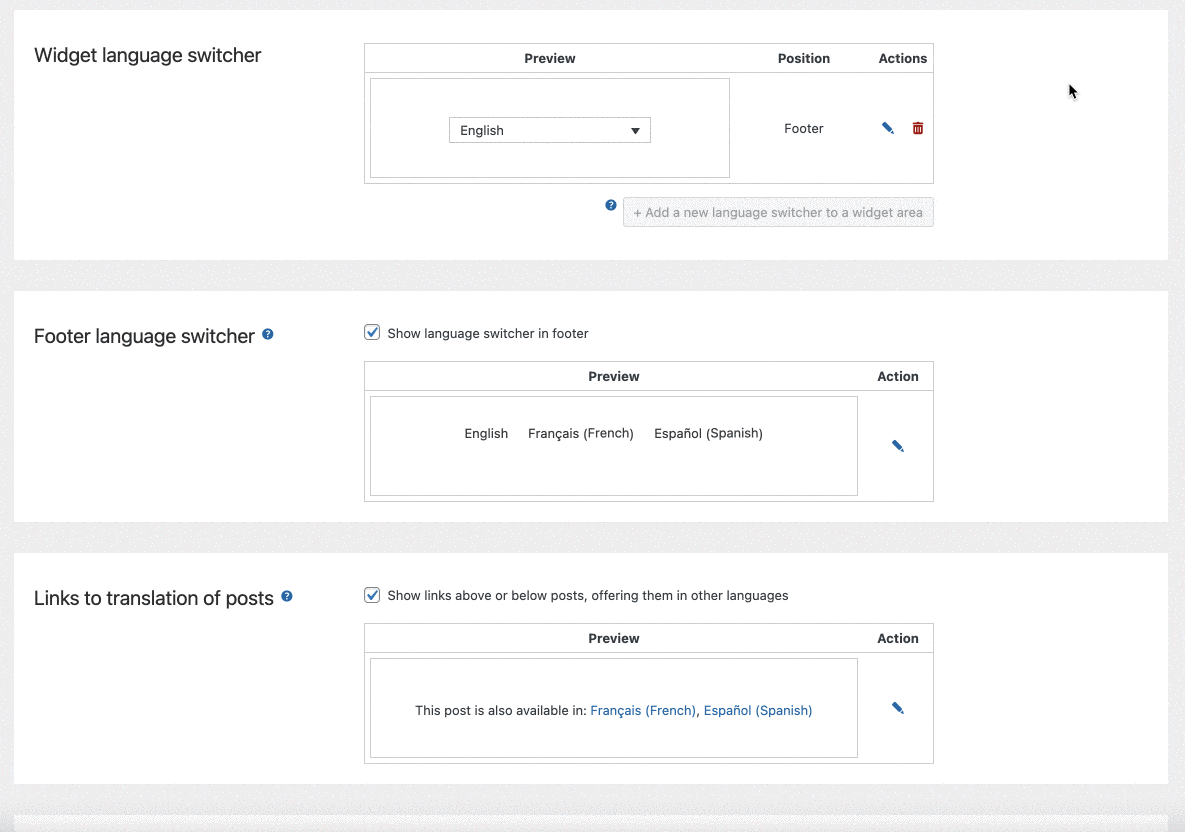
By default, WPML offers you to add a language selector in 4 different places:
- In a menu.
- In a widget area.
- In the footer.
- Above and/or below your publications, in the form of a hyperlink.
Each location has its own preview in the settings menu, and you can change it individually by clicking on the pen icon.
This will open a highlighted pop-up window:
If you wish, you can also add a language selector within your content (article or page) by adding the shortcode [wpml_language_selector_widget]. To do this, use the “Shortcode” block on the WordPress content editor, and paste the above shortcode into it.
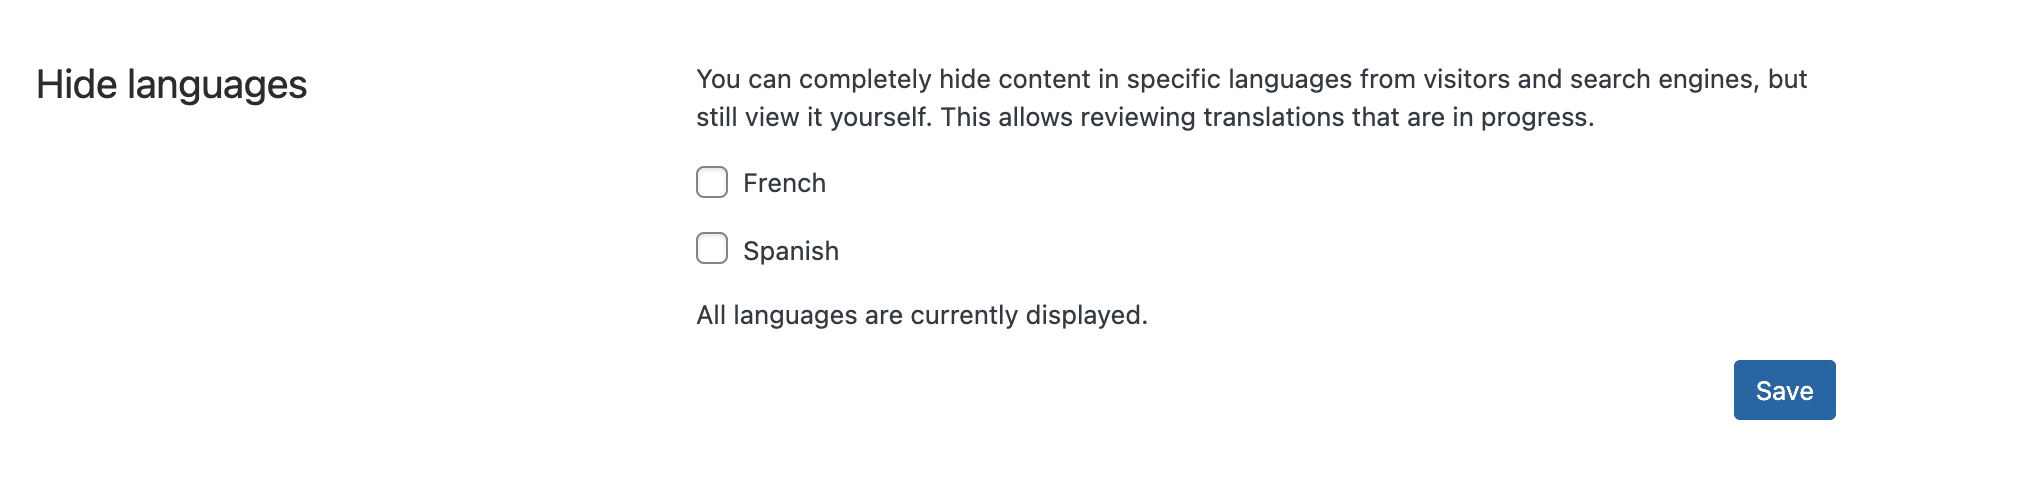
How to hide the languages?
Finally, if you haven’t had time to finish and polish your translations yet, you can hide some languages from your visitors and search engines, while still viewing the content on your side.
This is an opportunity to work on your production without any stress:
How to translate a post or a page into another language?
Manual translation
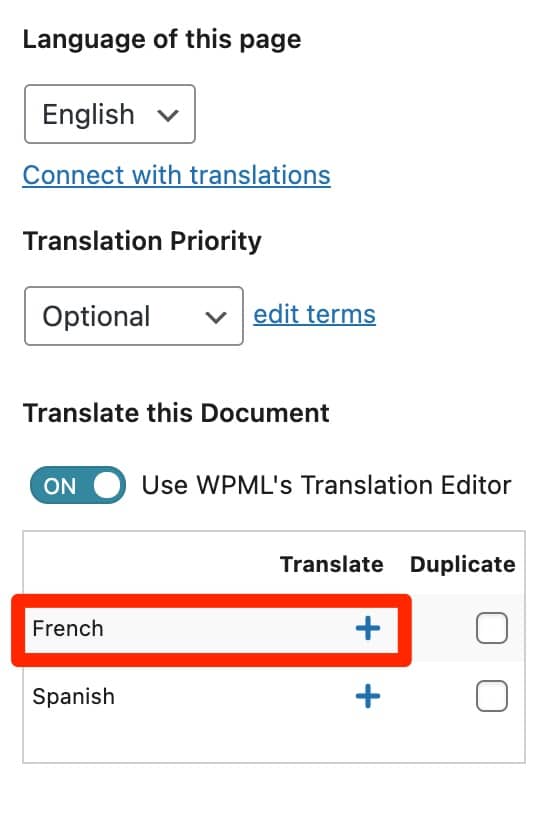
First, you can translate your content yourself, manually (without automatic help). To do this, go to the “Posts” or “Pages” menu, for example.
On the level of the created pages, you can add a translation in the language of your choice by clicking on the “+” icons.
Once your page is created in another language, you can modify it by clicking on the “pen” icon.
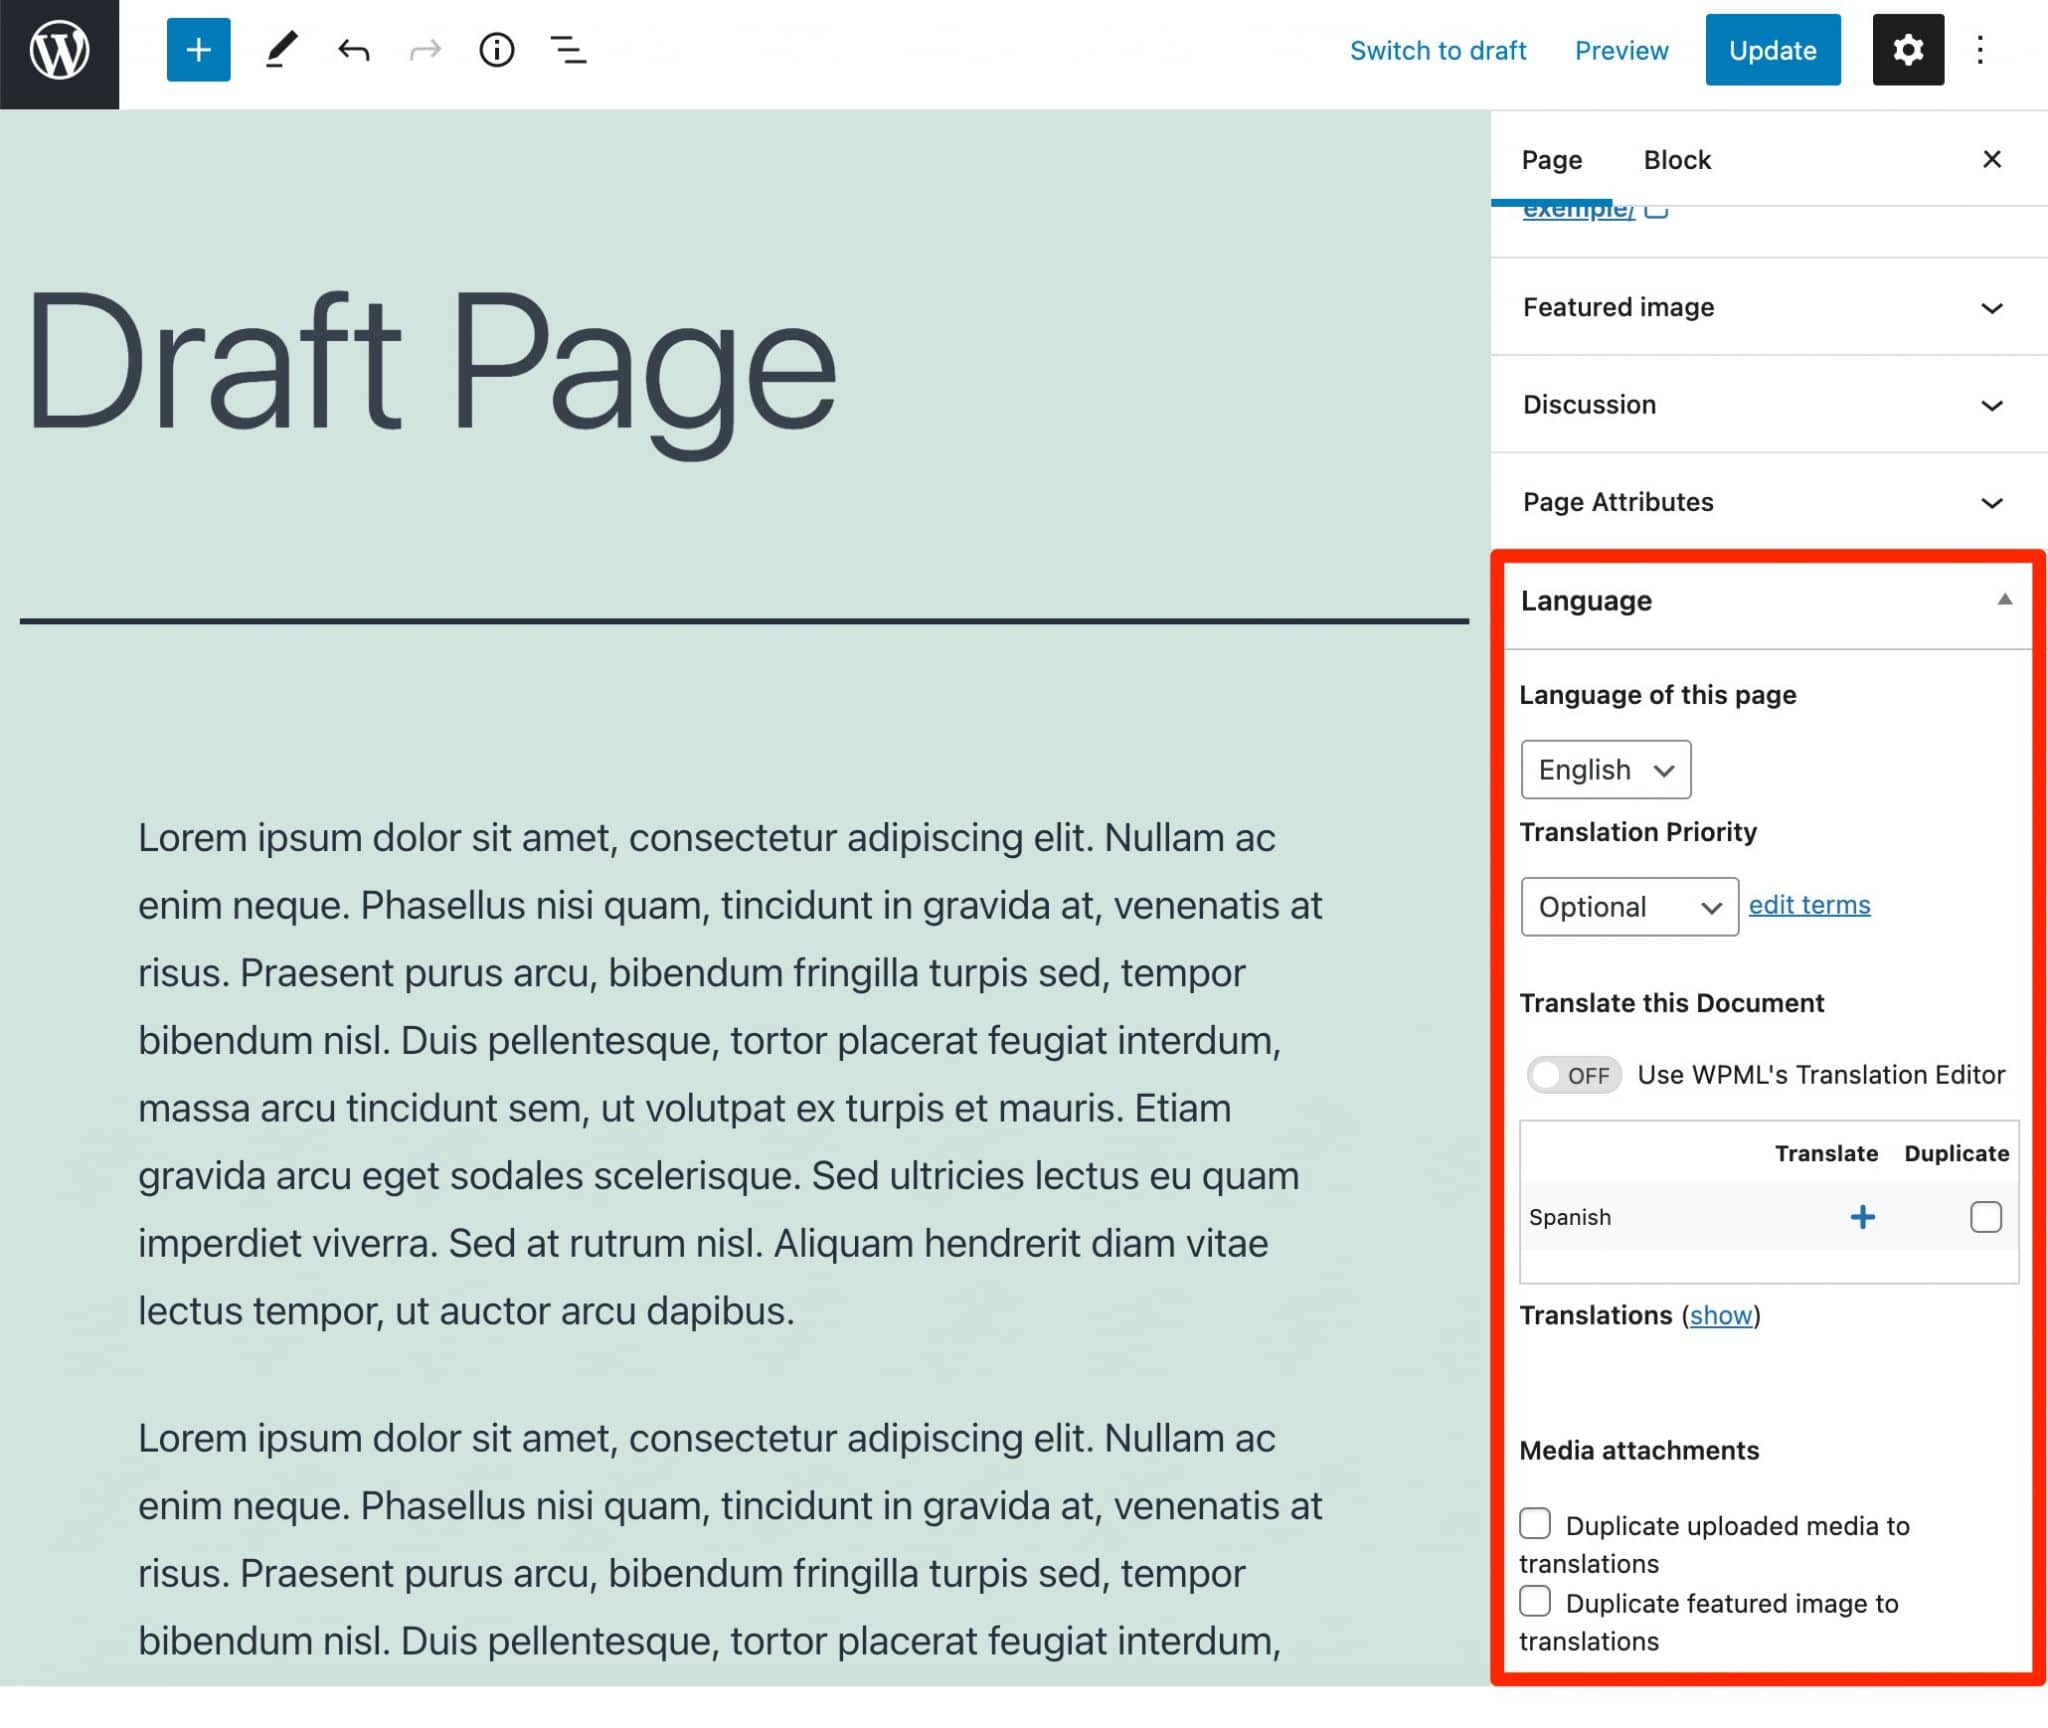
For your information, here is an explanation of the different editing icons proposed by WPML:
Note that you can also find informations about the translation of a content in the “Language” tab of the content editor:
The automatic translation of the whole site
The latest version of WPML (4.5, released in October 2021), at the time of writing, offers a new feature called “Translate Everything”.
You can activate it by going to WPML > Settings:
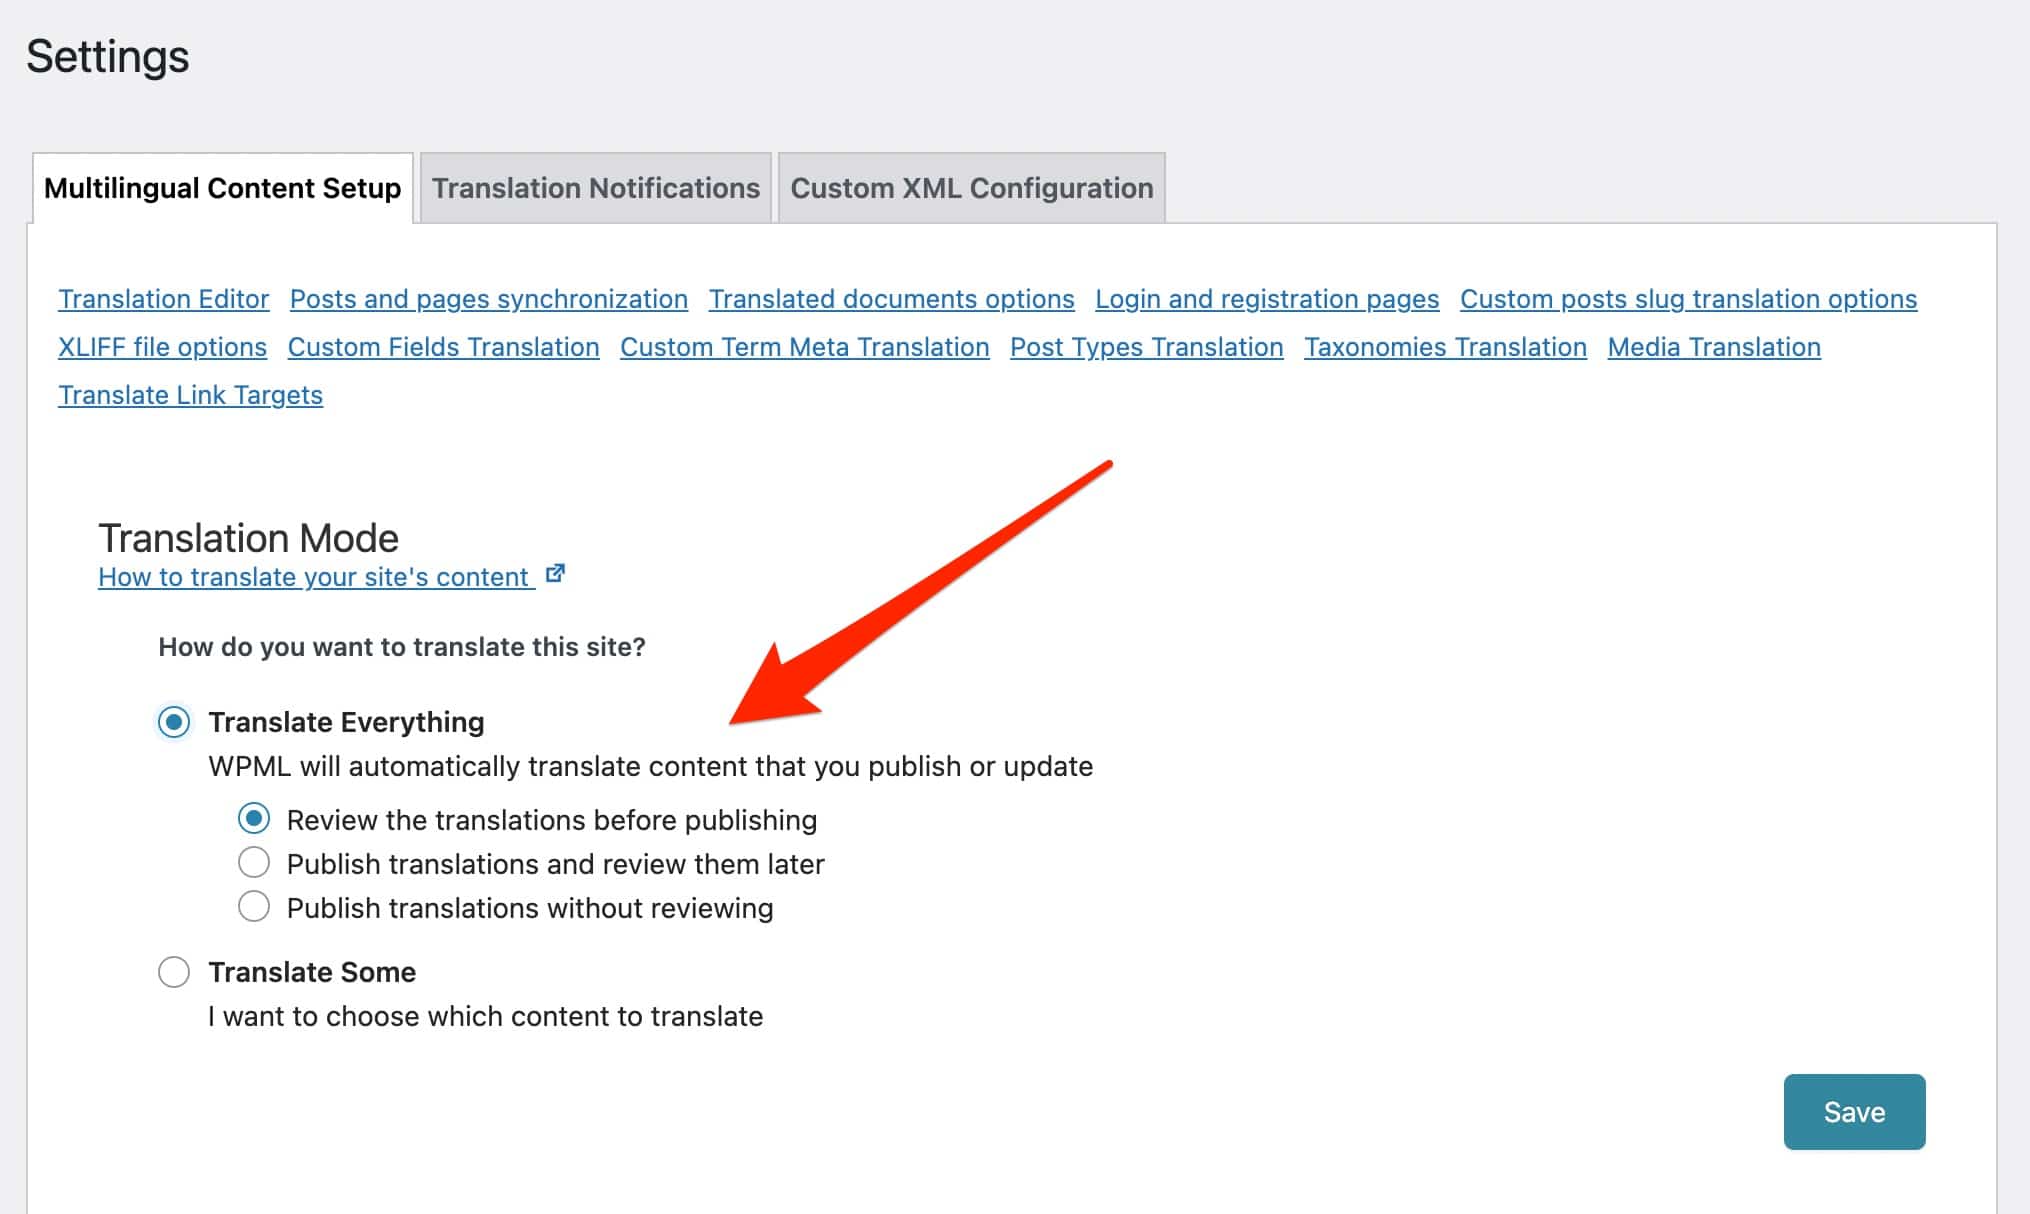
With it, you have two starting options:
- Automatically translate all your current content immediately as soon as you publish it, and new content as you create it.
- Automatically translate only new content.
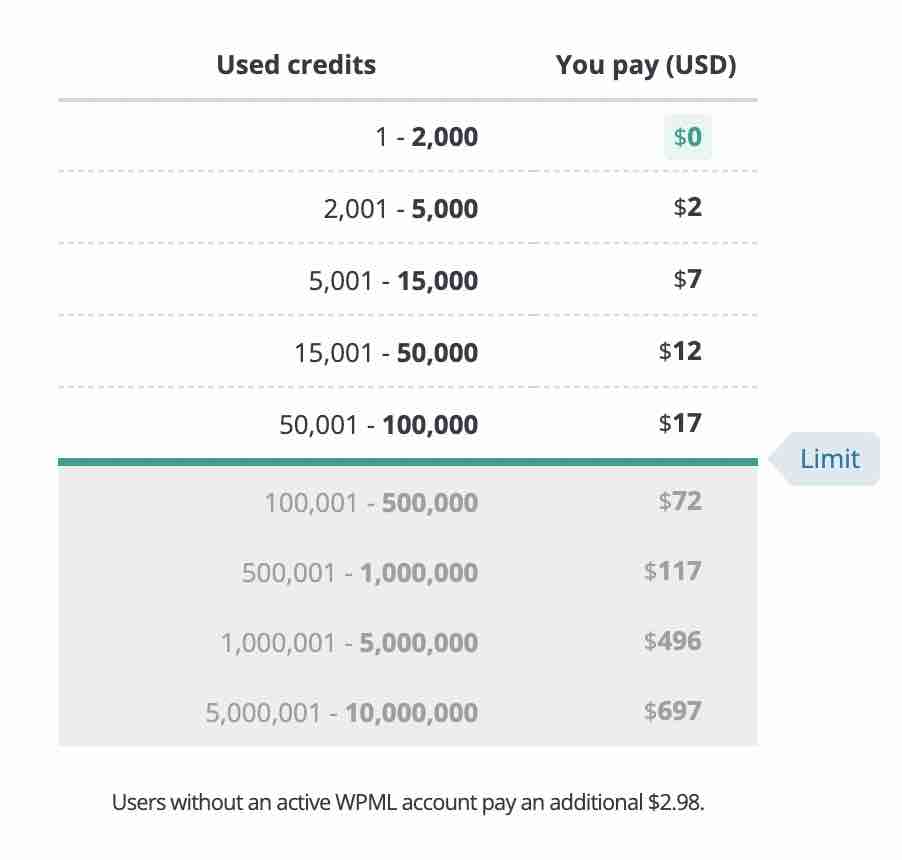
However, you must have a machine translation account to take advantage of this option. Each customer has 2,000 credits per month, which runs out quickly if you create a minimum of content.
Beyond that, it is a paid service whose price varies depending on the translation engine used: Microsoft Azure, Google Translate and DeepL, from the cheapest to the most expensive (detailed explanations here). The pricing table is available below, FYI:
If you choose to use “Translate Everything”, you still have control over what you want to edit. You can choose to:
- Check the translation of your content before publishing it.
- Publish your translations and check them later.
- Publish your translations without checking them.
To understand all the details of this new feature, here is an explanatory video:
WPML specifies that this feature allows to translate pages, articles, custom content types, taxonomies, WooCommerce products, etc.
However, menus, widgets and other form fields must always be translated using the “String Translation” module. For the latter cases, WPML indicates that “the context is generally not sufficient for the machine translation to translate them efficiently”.
Machine translation on a case by case basis
While the “Translate Everything” feature is interesting, it doesn’t give you a lot of flexibility. With it, ALL your content (new and/or old) will be automatically translated.
If you want to go case by case and choose precisely which post or page you want to translate automatically, you will have to go through the “Translation Management” menu, by activating the “Translate Some” translation mode beforehand (via WPML > Settings).
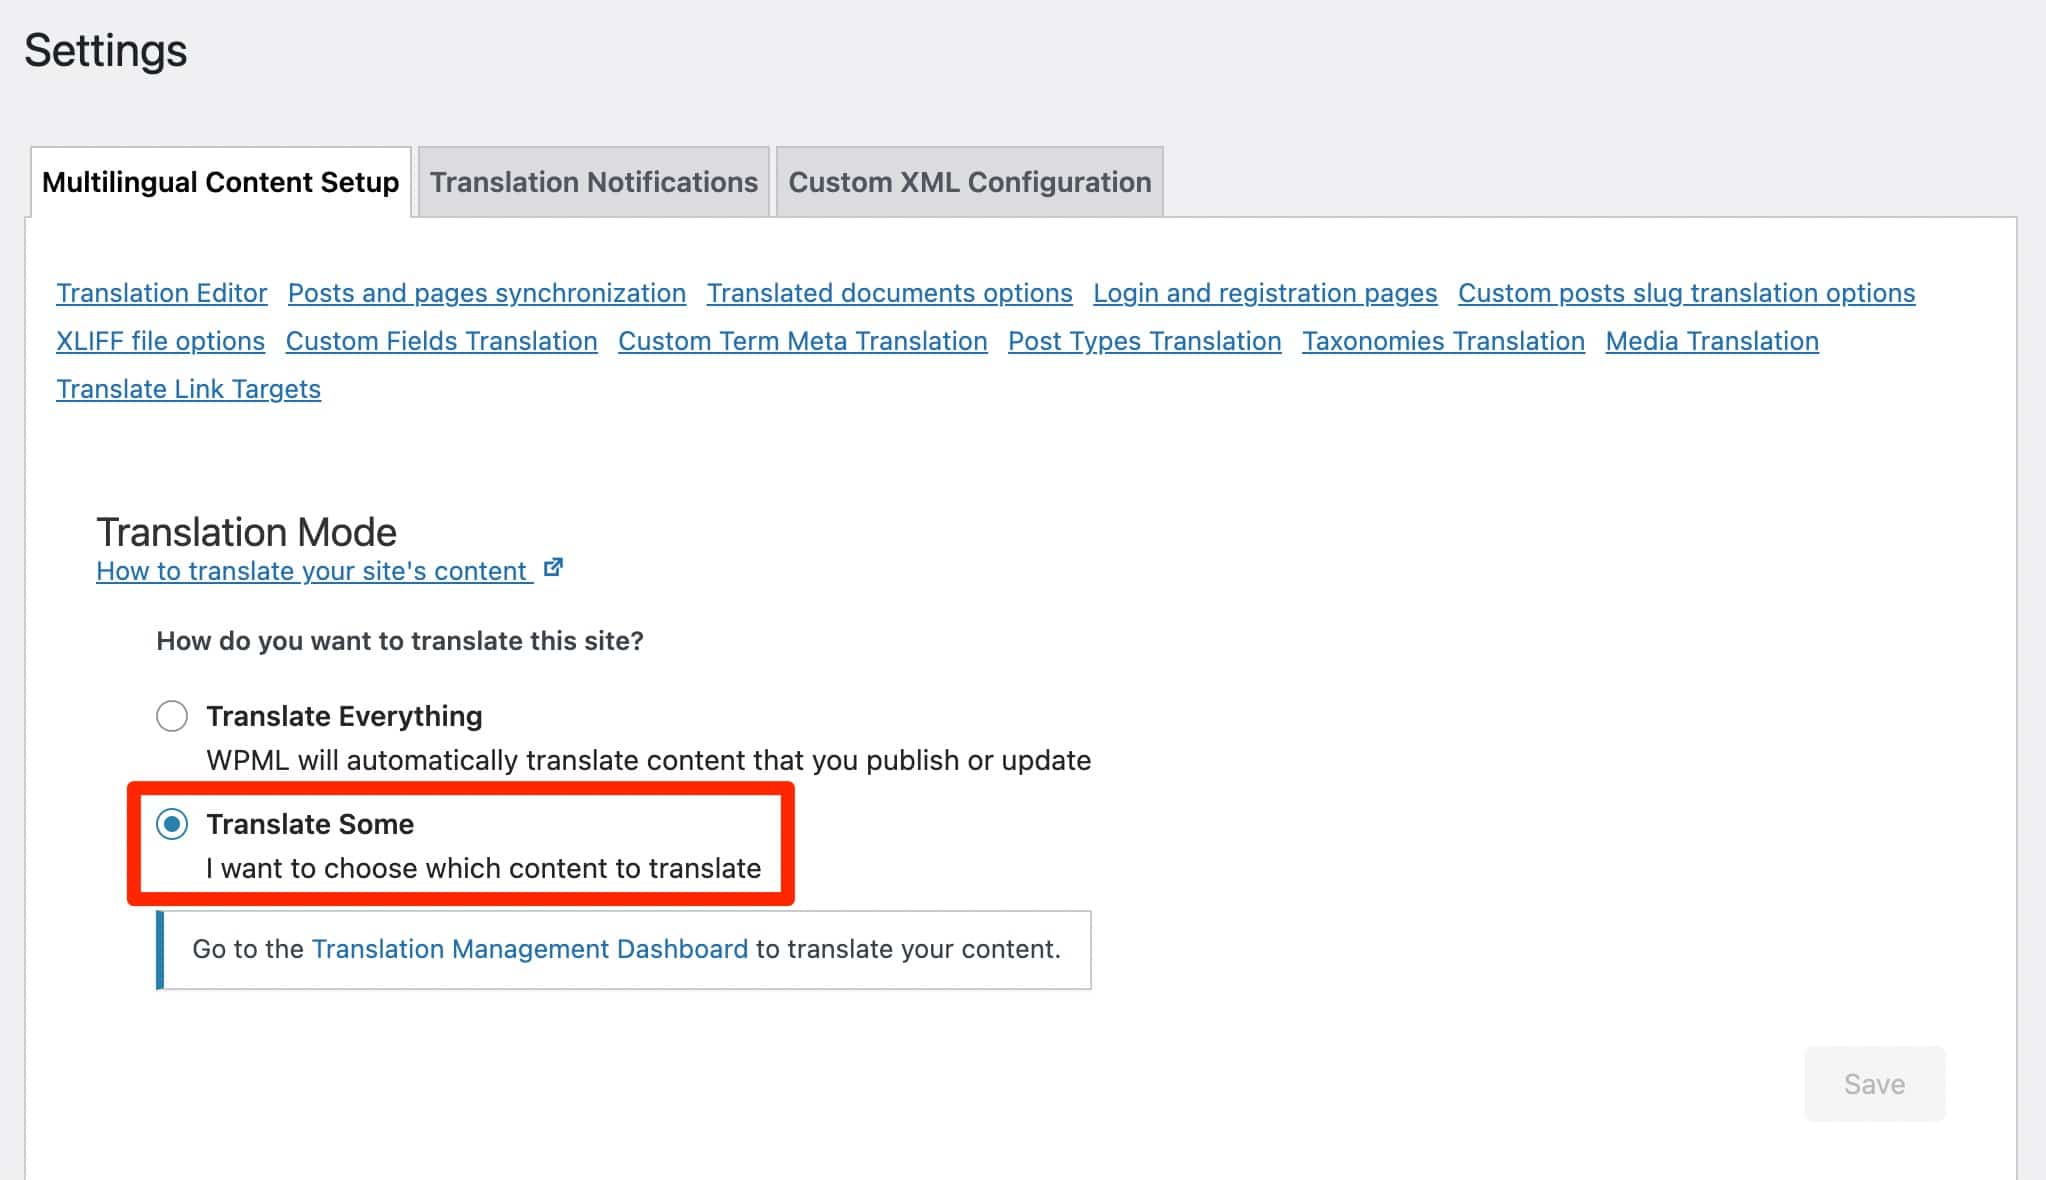
For your information, this “Translation Management” menu is accessible with the “Multilingual CMS” and “Multilingual Agency” licenses. It is in fact the former “Translation Management” add-on, which was added to the WPML Core when version 4.5 was released (remember the beginning of the article).
Again, the automatic translation will be done by a machine, but you can also opt for translation by multiple users, as well as for a paid translation service by professional translators. Let’s break down each of these options.
“Translation Management” gives access to an advanced translation editor, whose objective is to help you translate faster, thanks to machine translation.
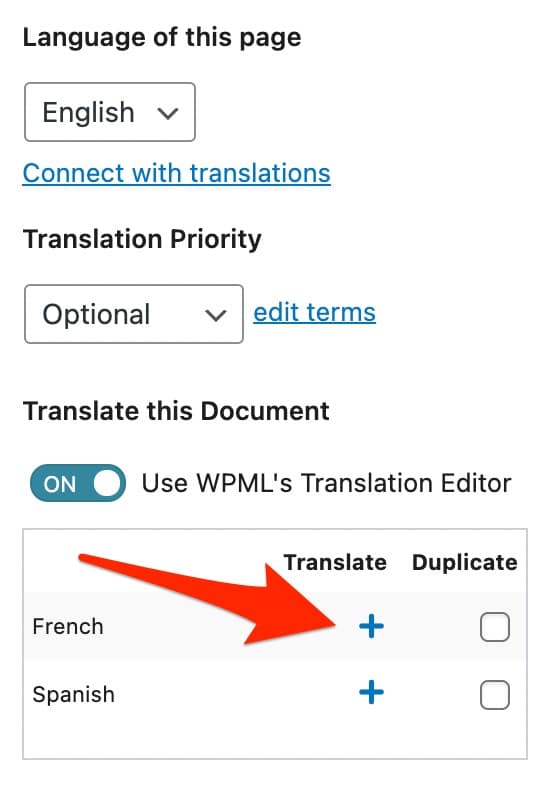
For the example, I created a very short About page, using some content from WPMarmite’s site.
To take action, I go to the WordPress content editor to edit my page, and I click on the “+” icon associated with the French language flag:
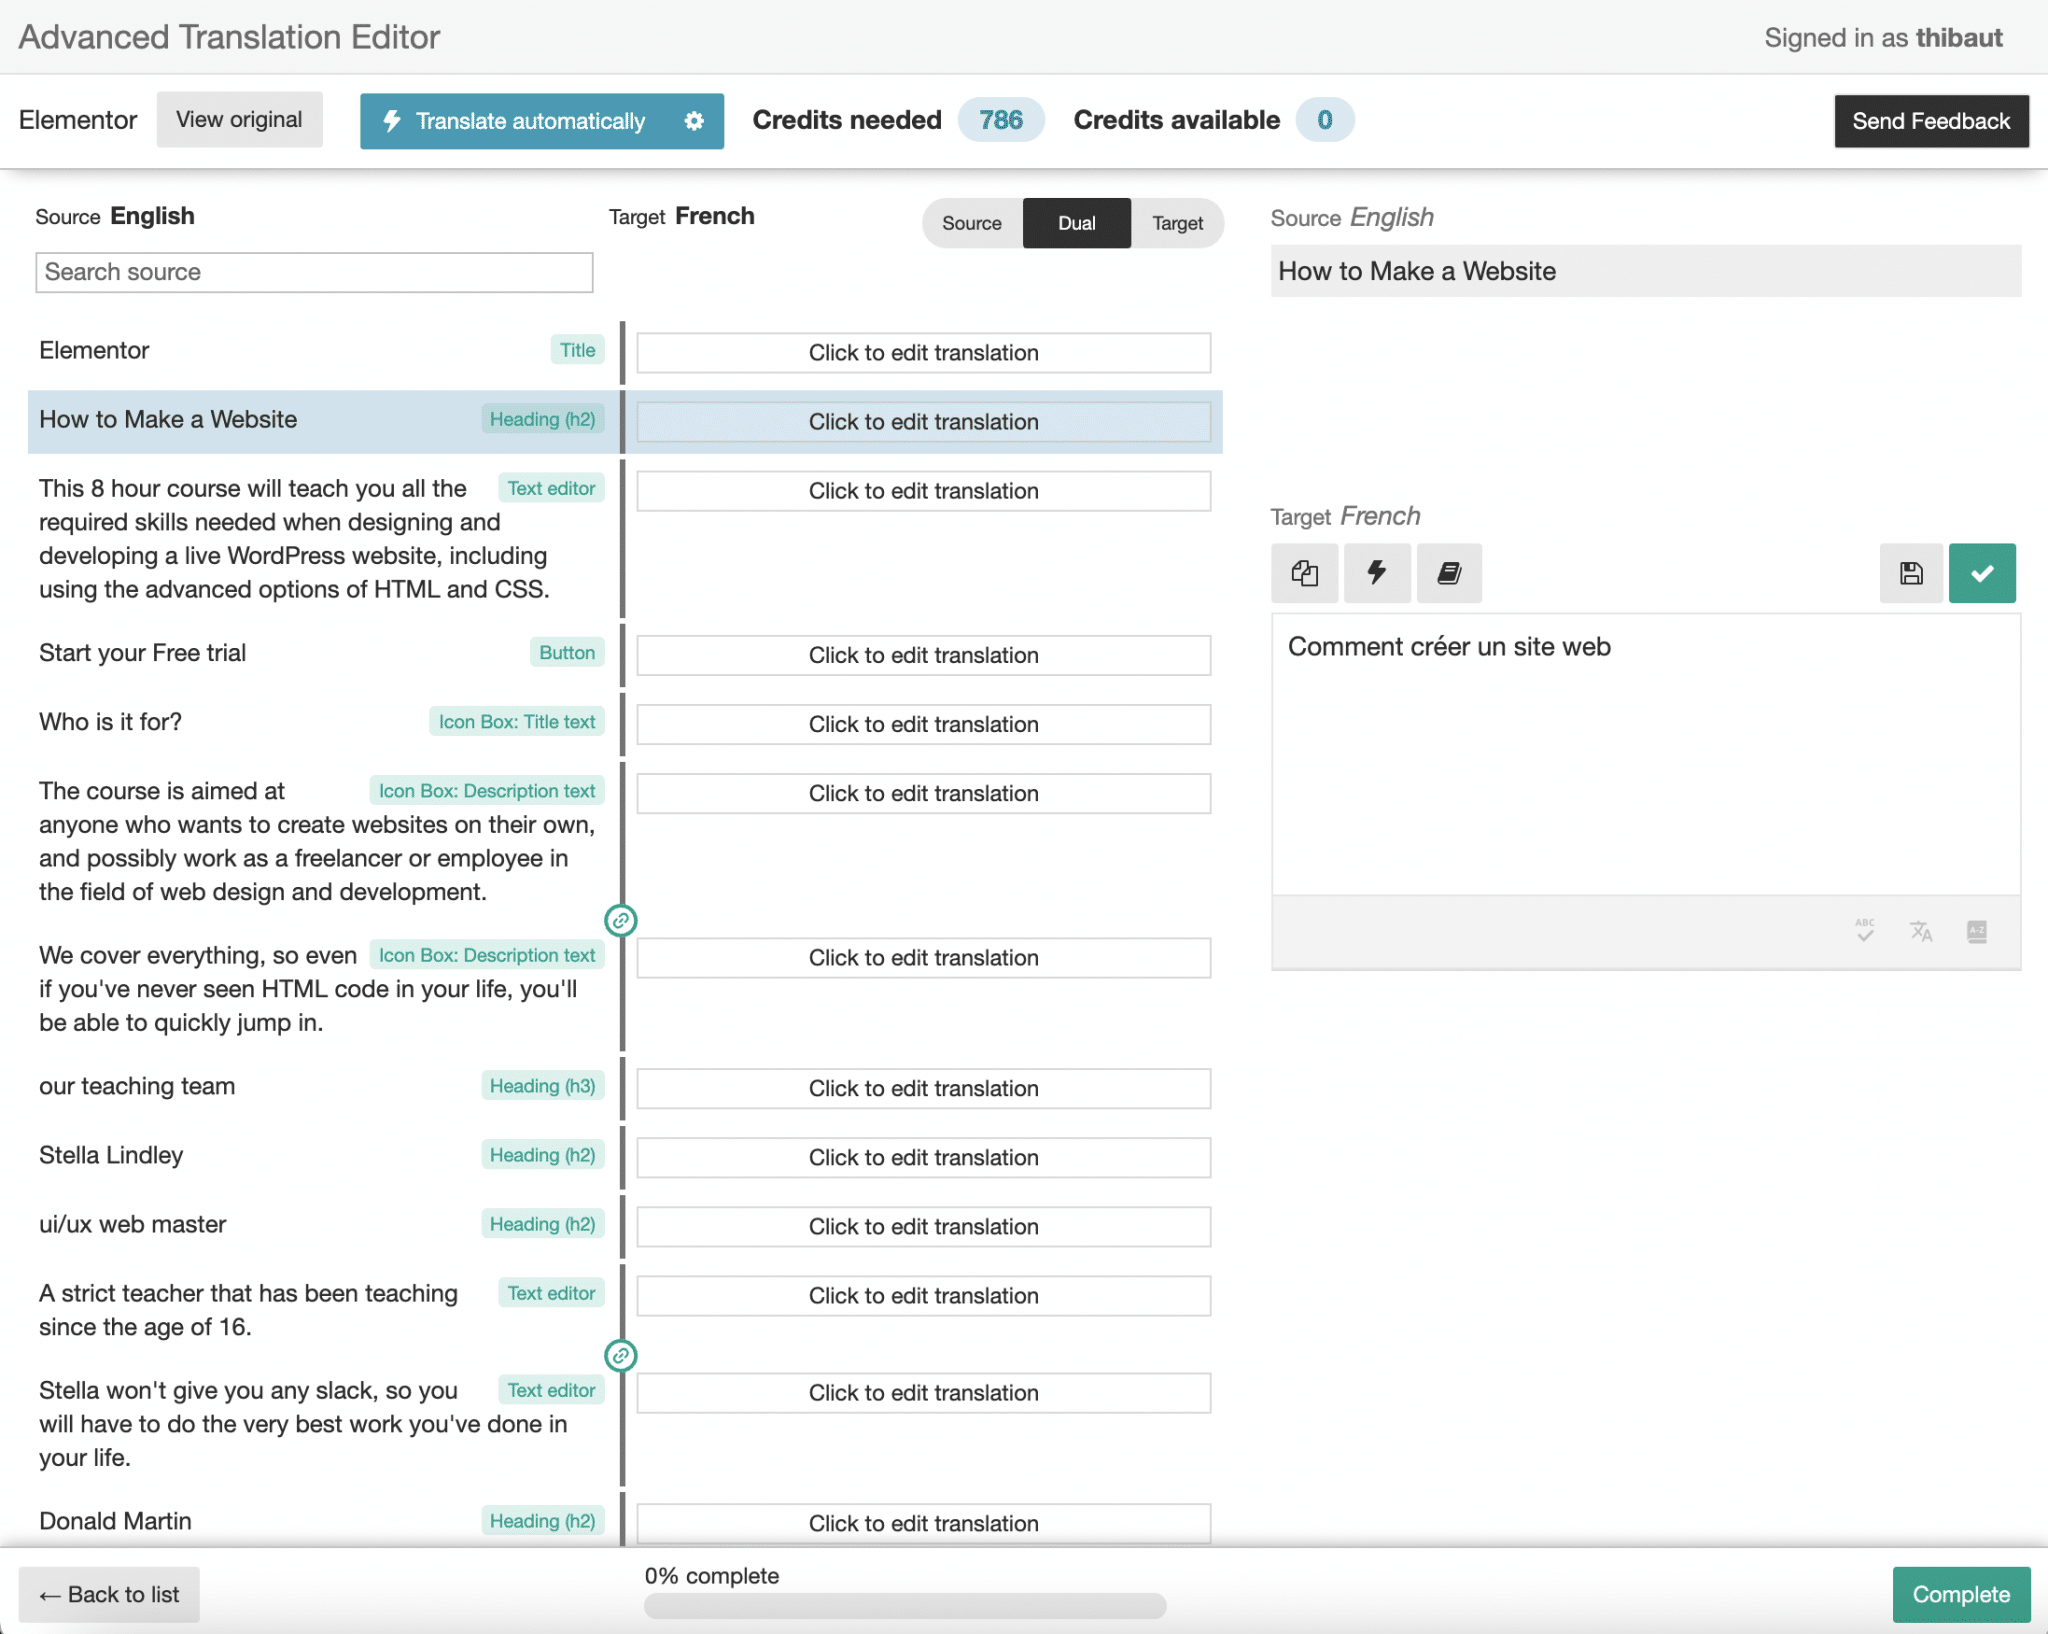
WPML then redirects me to its advanced translation interface:
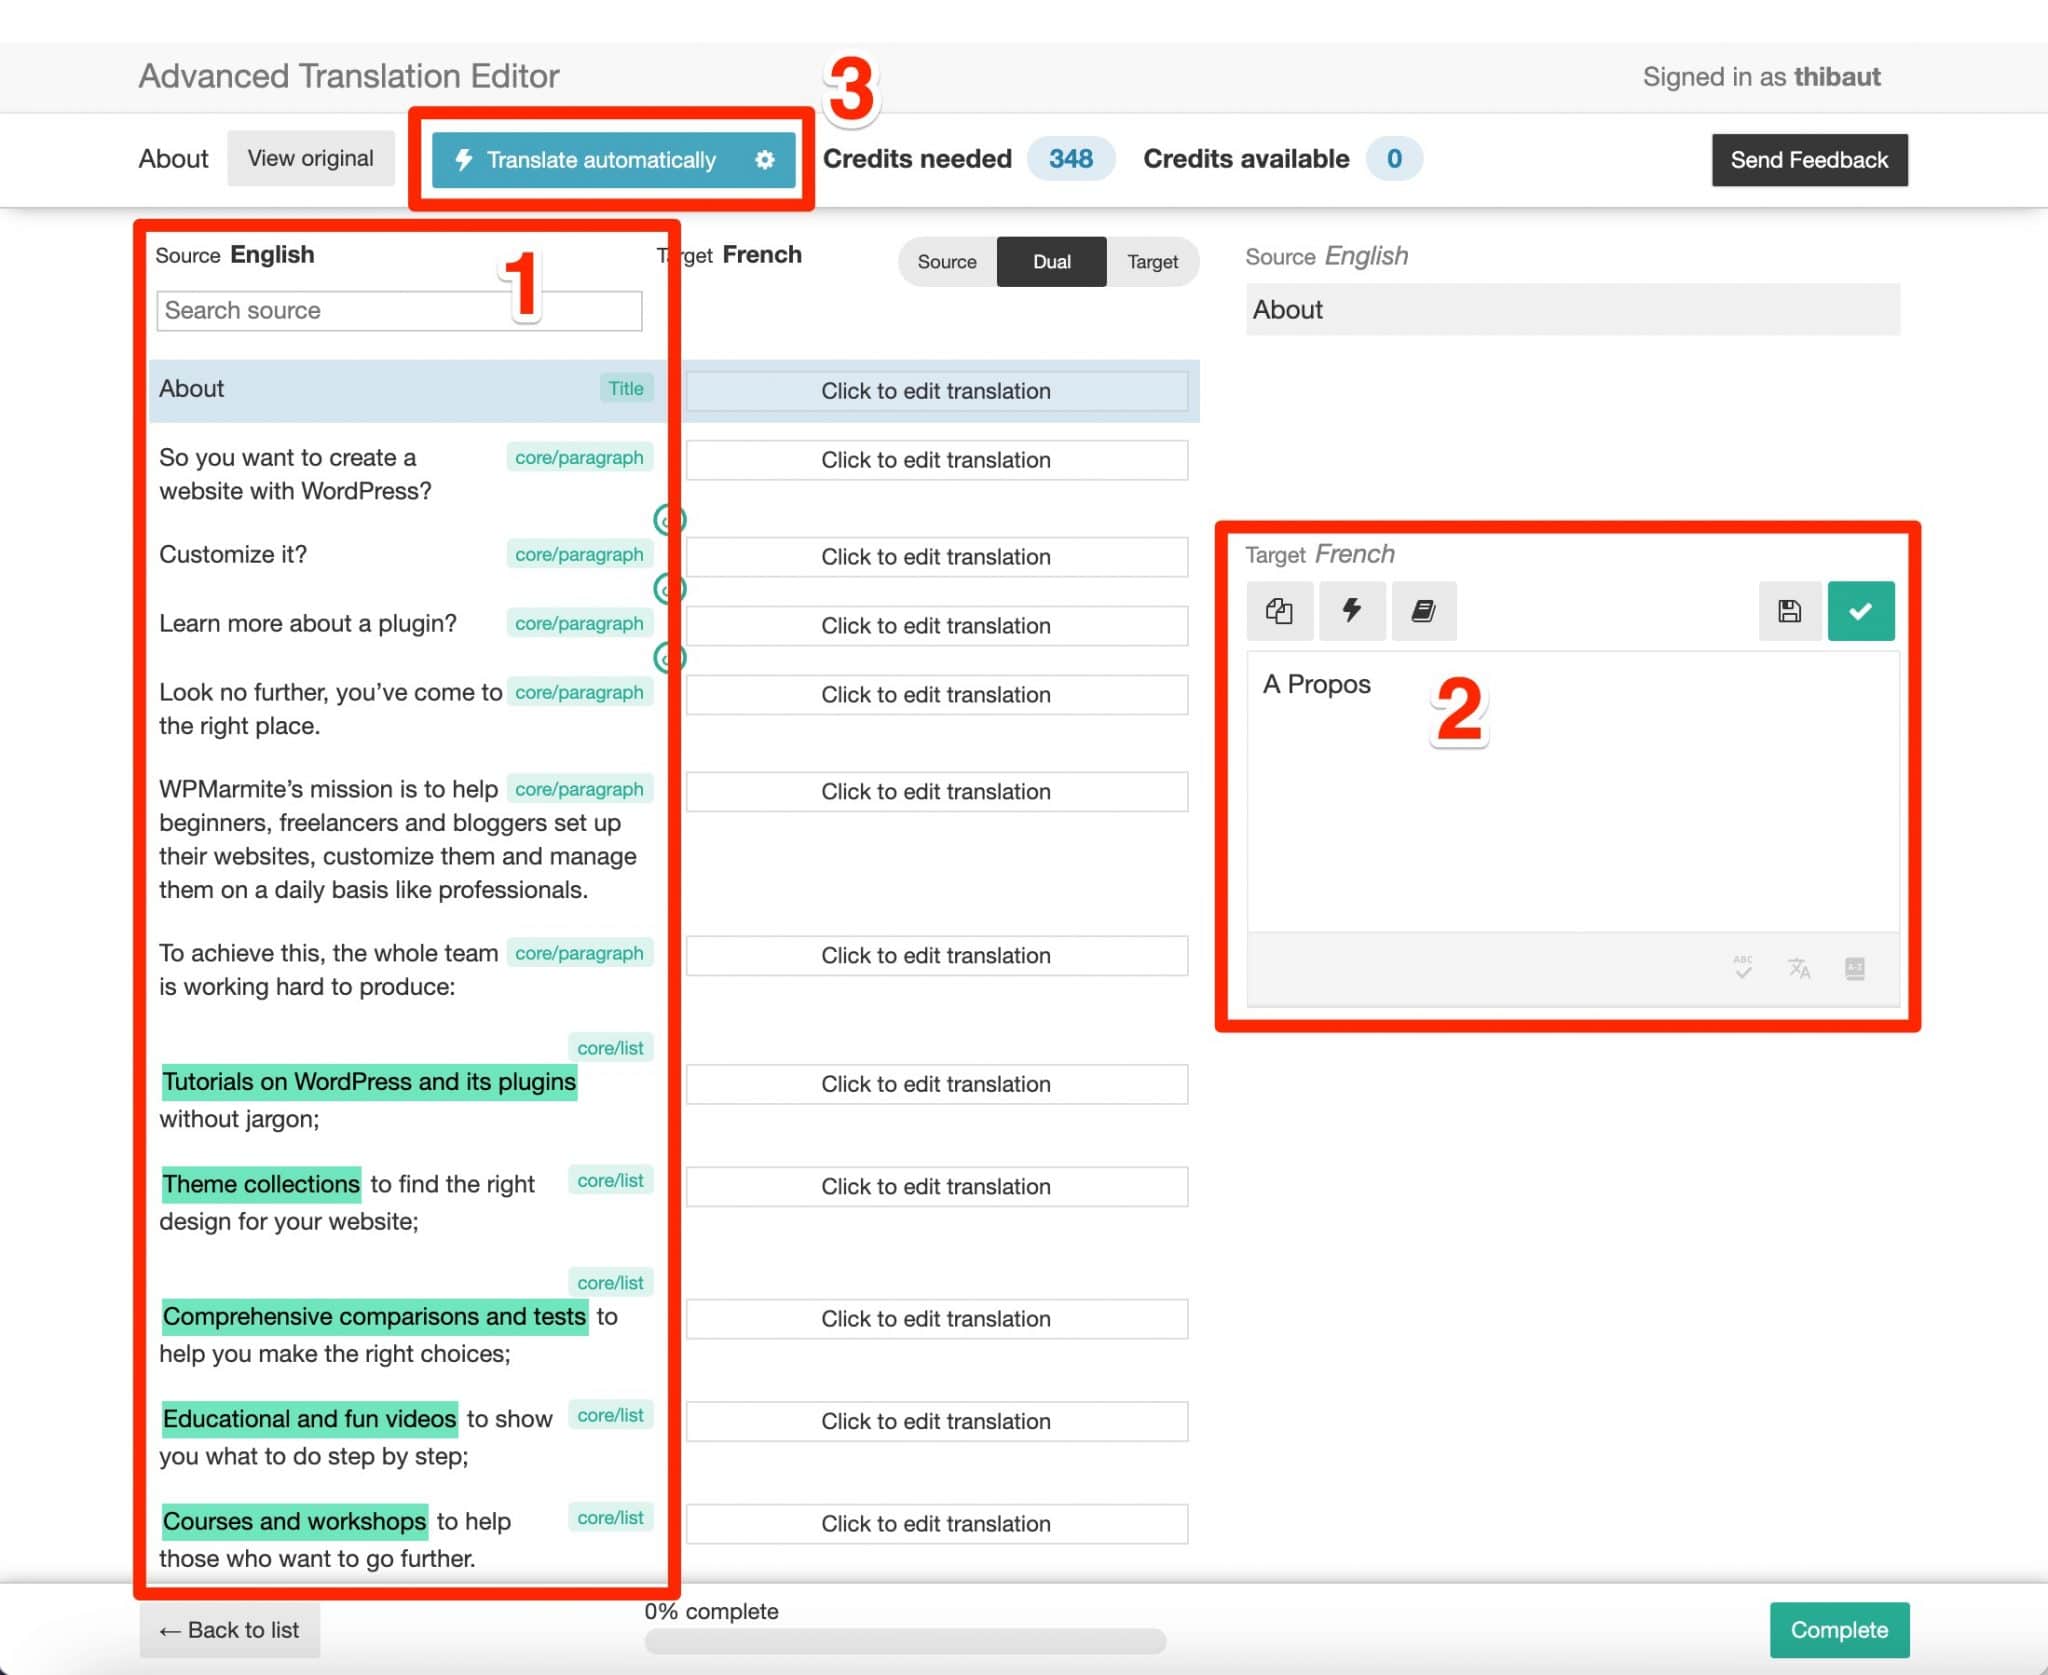
On the left, I can see the content of my page in English, divided into different parts (number 1 on the above screenshot).
On the right, I can modify each text zone manually, by clicking on it beforehand (number 2).
If I want to go faster, I can take advantage of WPML’s automatic translation service, by clicking on the blue “Translate automatically” button at the top of the page (number 3).
But for that, you need credits (here, I need 348 credits). By signing up for free, you have access to 2,000 credits per month, as I mentioned earlier.
WPML specifies that new “Multilingual CMS” and “Multilingual Agency” accounts purchased after the release of WPML 4.5 (in October 2021) “have free automatic translation credits included in their WPML.org account (Editor’s note: 90,000 for the CMS license and 180,000 for the Agency license). These credits recharge each time you renew your account and can be allocated to any of your registered sites.
WPML adds that it believes these credits “are sufficient to translate 80% of sites”. It’s up to you to see what happens. 😉
Other types of translation
Translation by other types of users
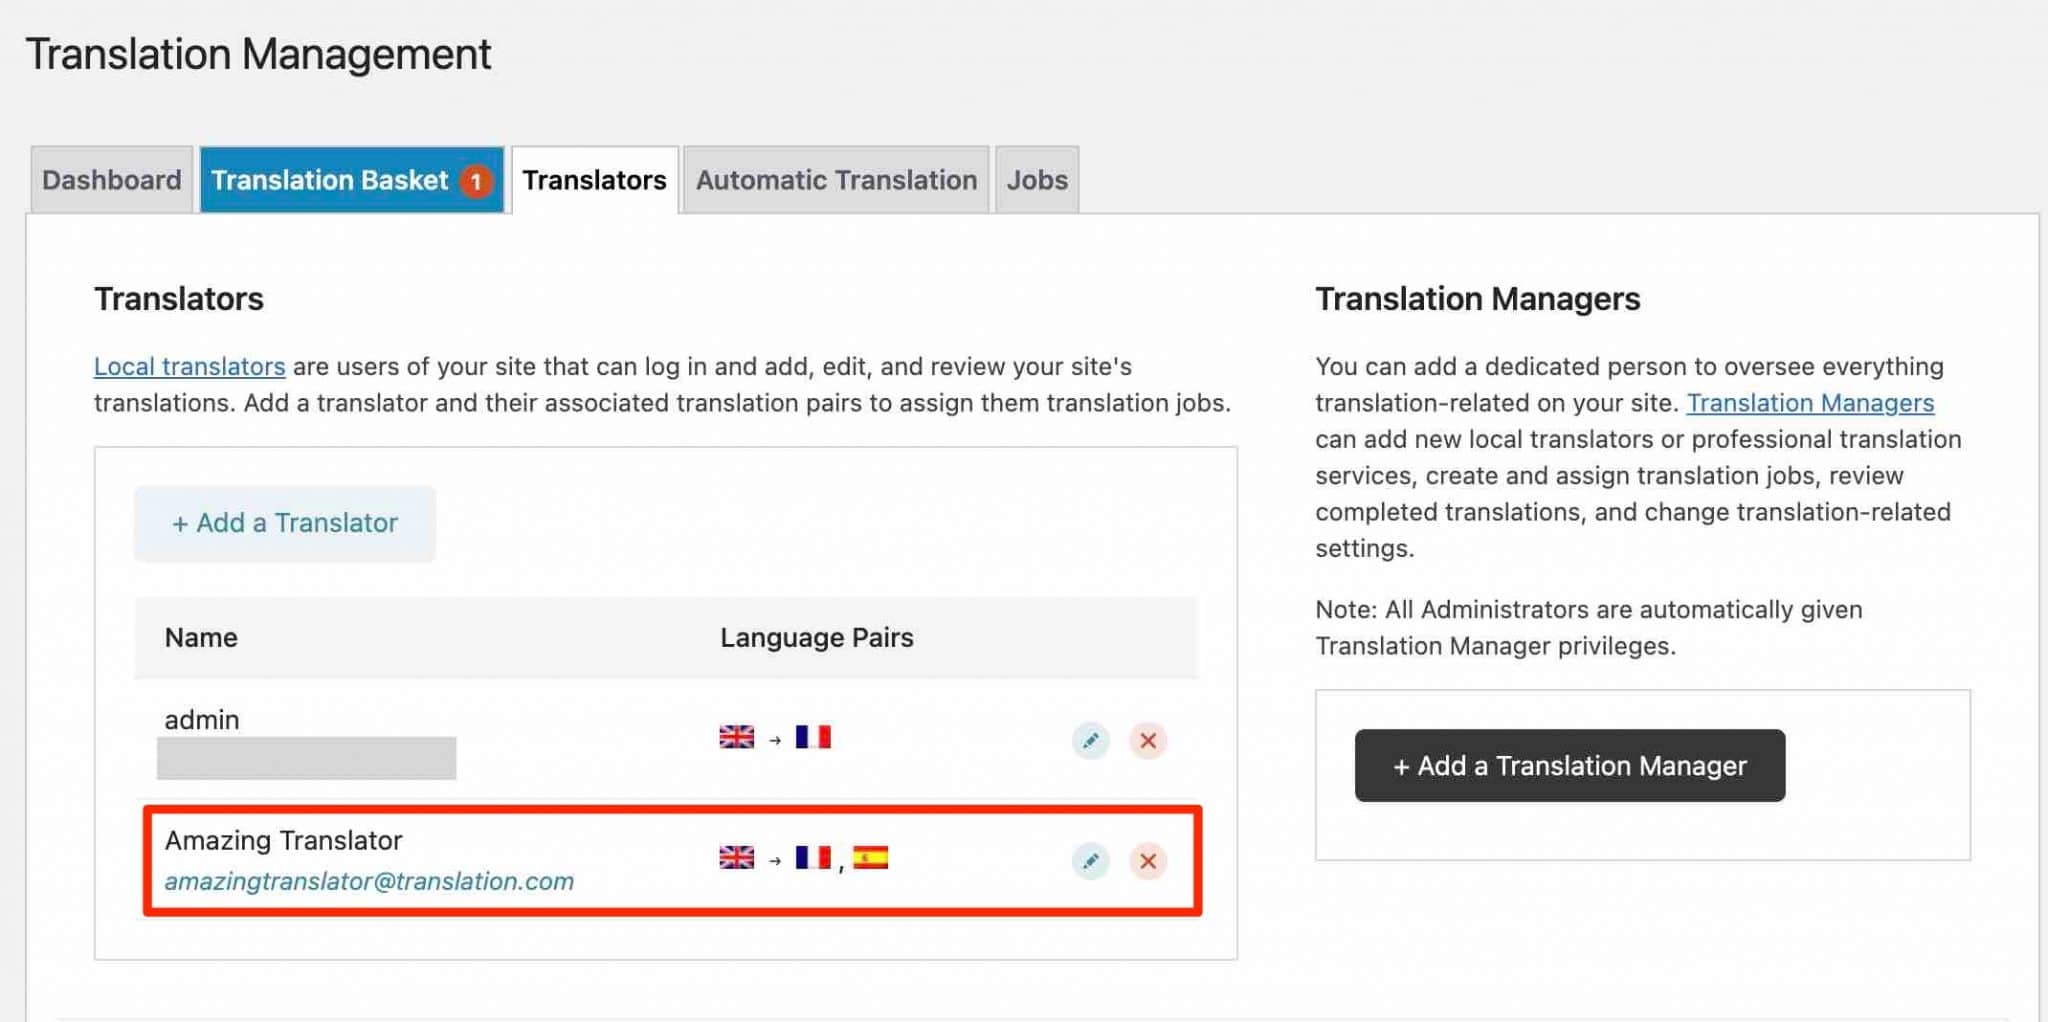
Do you want to entrust the translation of your content to one of the users of your site? You can do it through the menu Translation management > Translation roles > Add a translator.
If his user profile does not exist yet, you can create it by adding his contact information (last name, first name, email, username, WordPress role), and then assigning him languages to translate.
When it’s done, his profile will appear on the dashboard in the WPML > Translation Management submenu:
Next, on your translation dashboard, under the “Translation Management” menu, choose the page (or post) you’re interested in, and add it to the translation basket.

Go to the “Translation Basket” tab and choose which translator will be responsible for the translation:
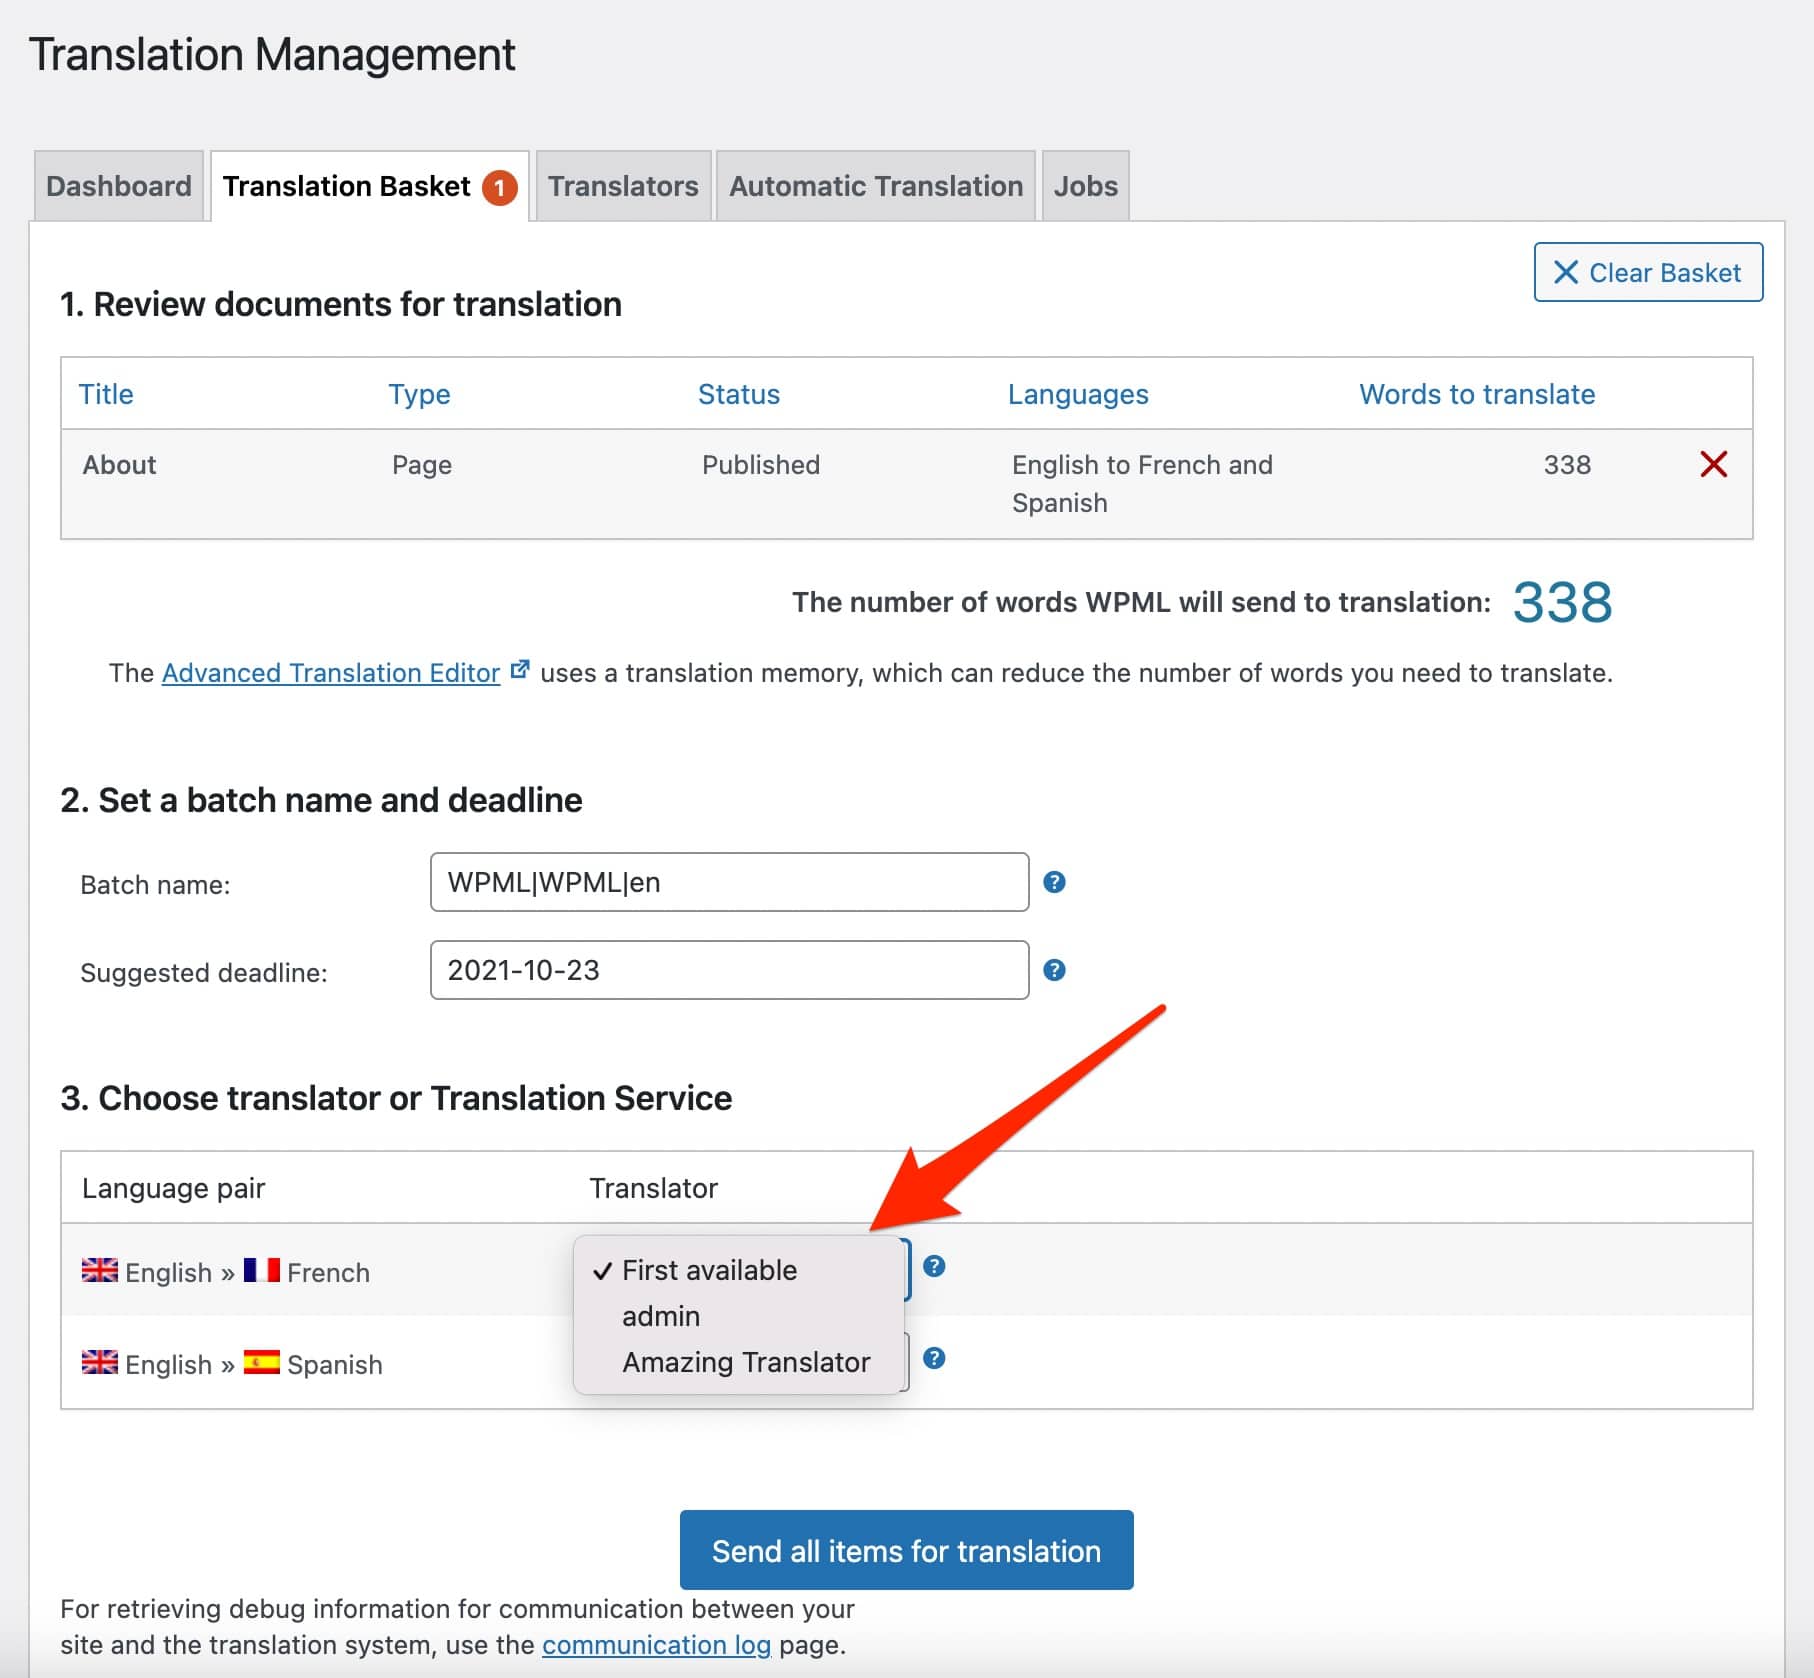
The designated translator will receive an email with instructions on how to translate the content you’ve assigned.
Translation by a translation service
The last option is to use the services of a professional translator. WPML works with more than sixty translation services around the world, listed here.
You can also find them on the “Translators” tab of the “Translation Management” submenu.
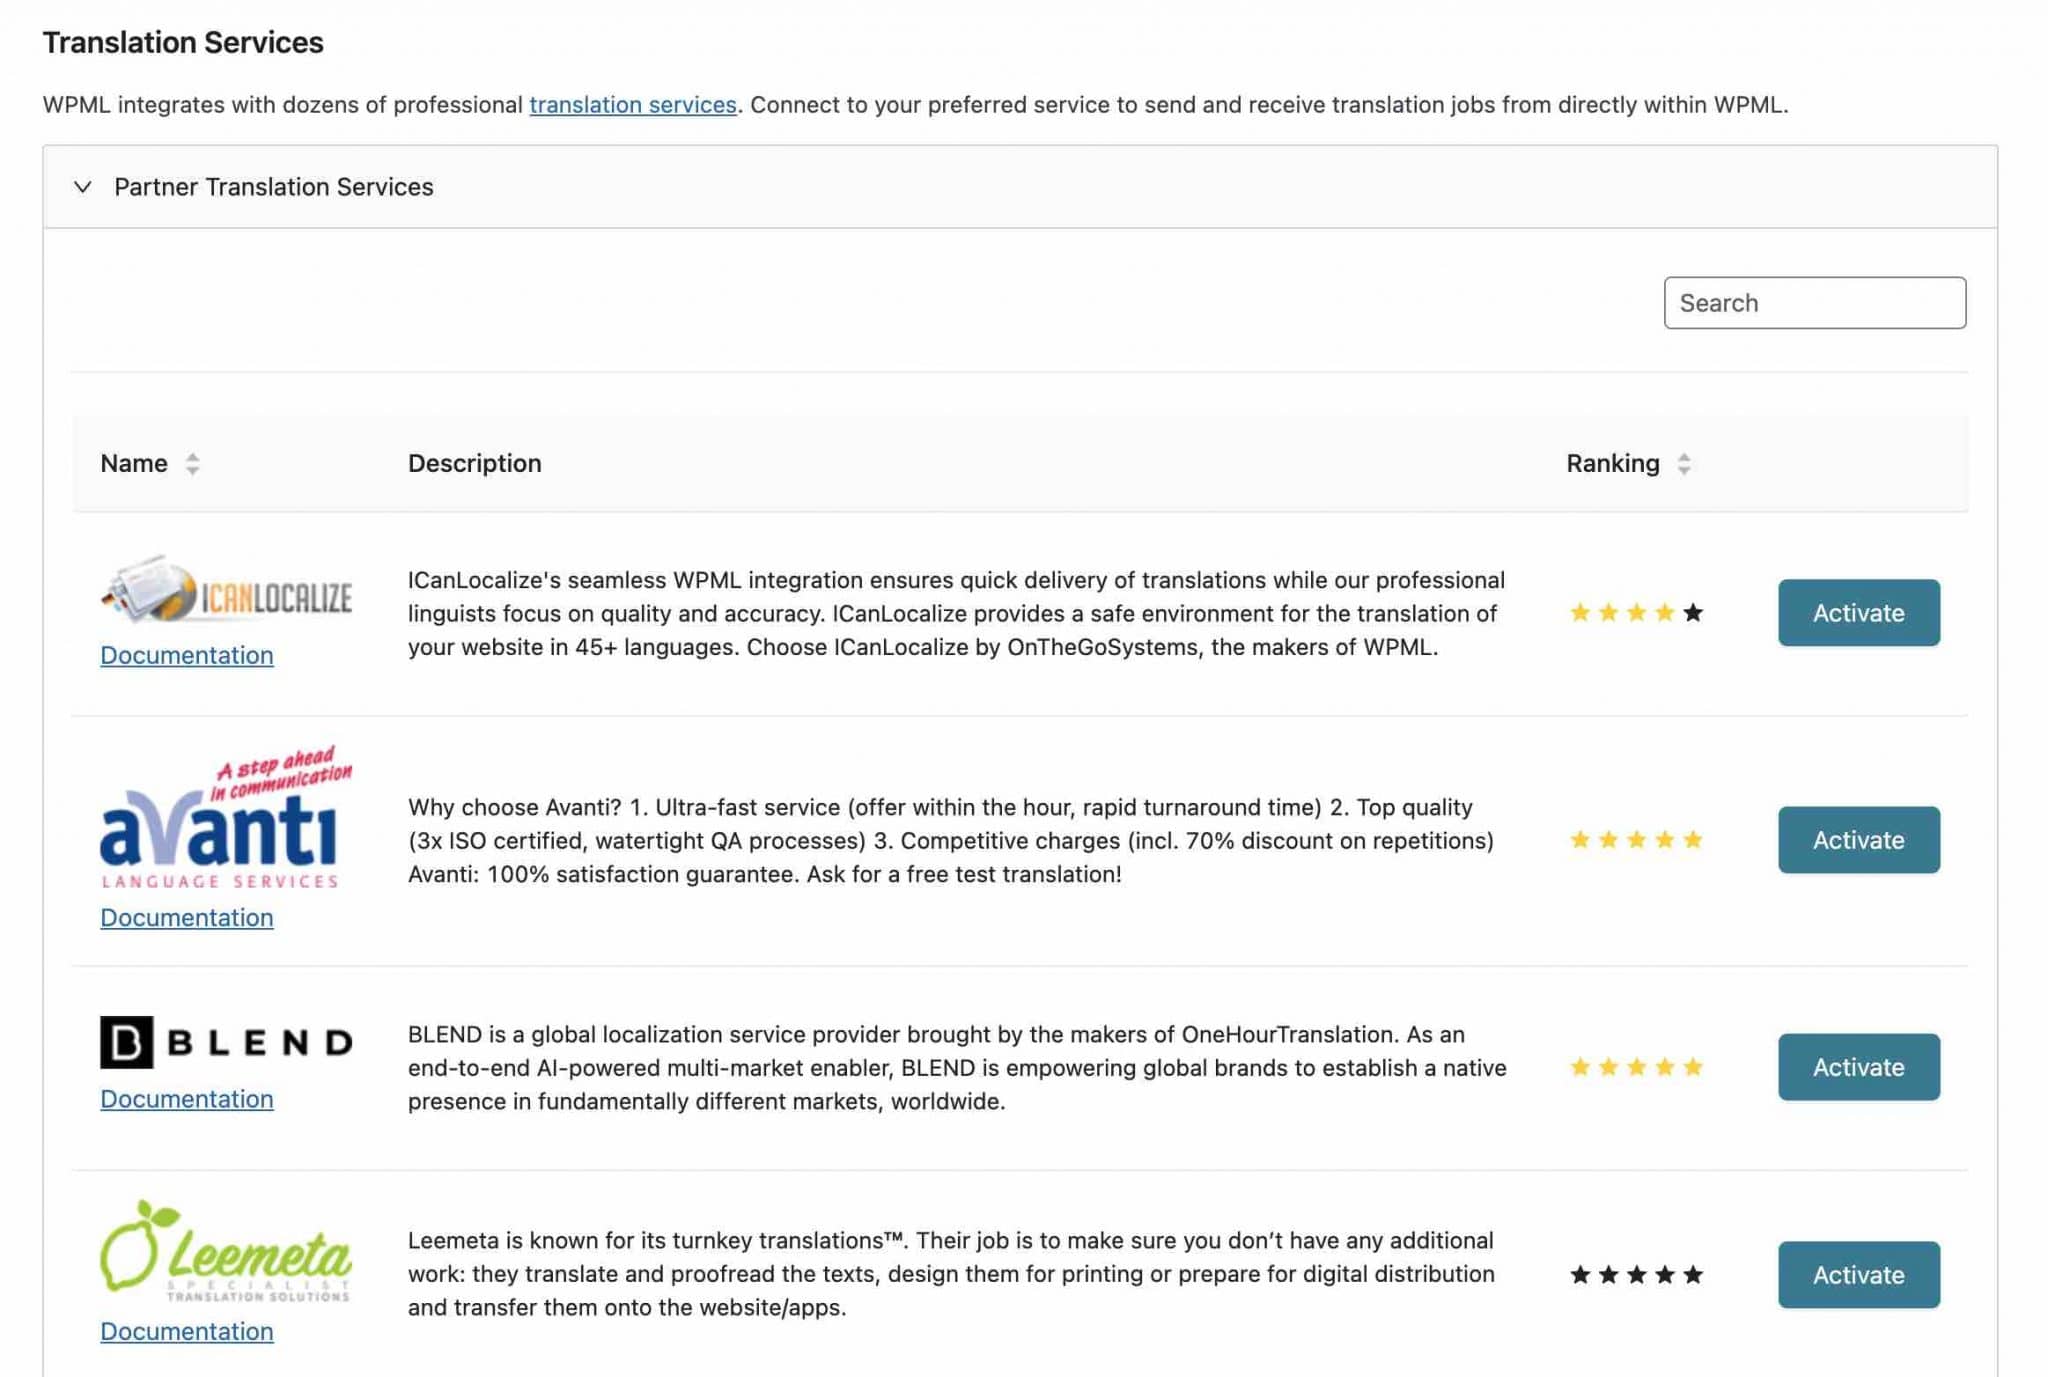
You can ask them for a quote and as soon as a service catches your eye, you have to create an account with them, then add an authentication key on WPML.
In the “Translation Management” menu, send the page of your choice to the chosen service. The service will receive the content to be translated in a file that it will edit in a separate program. You will be notified when you receive the translation.
How to translate other elements of your site?
Menu translation
First, you must have a proper menu created in the main language of your site.
When everything is OK, click on the little “+” icons associated with the language of your choice, to manually create your menu.
Add the pages that you have created in your language (below, French):
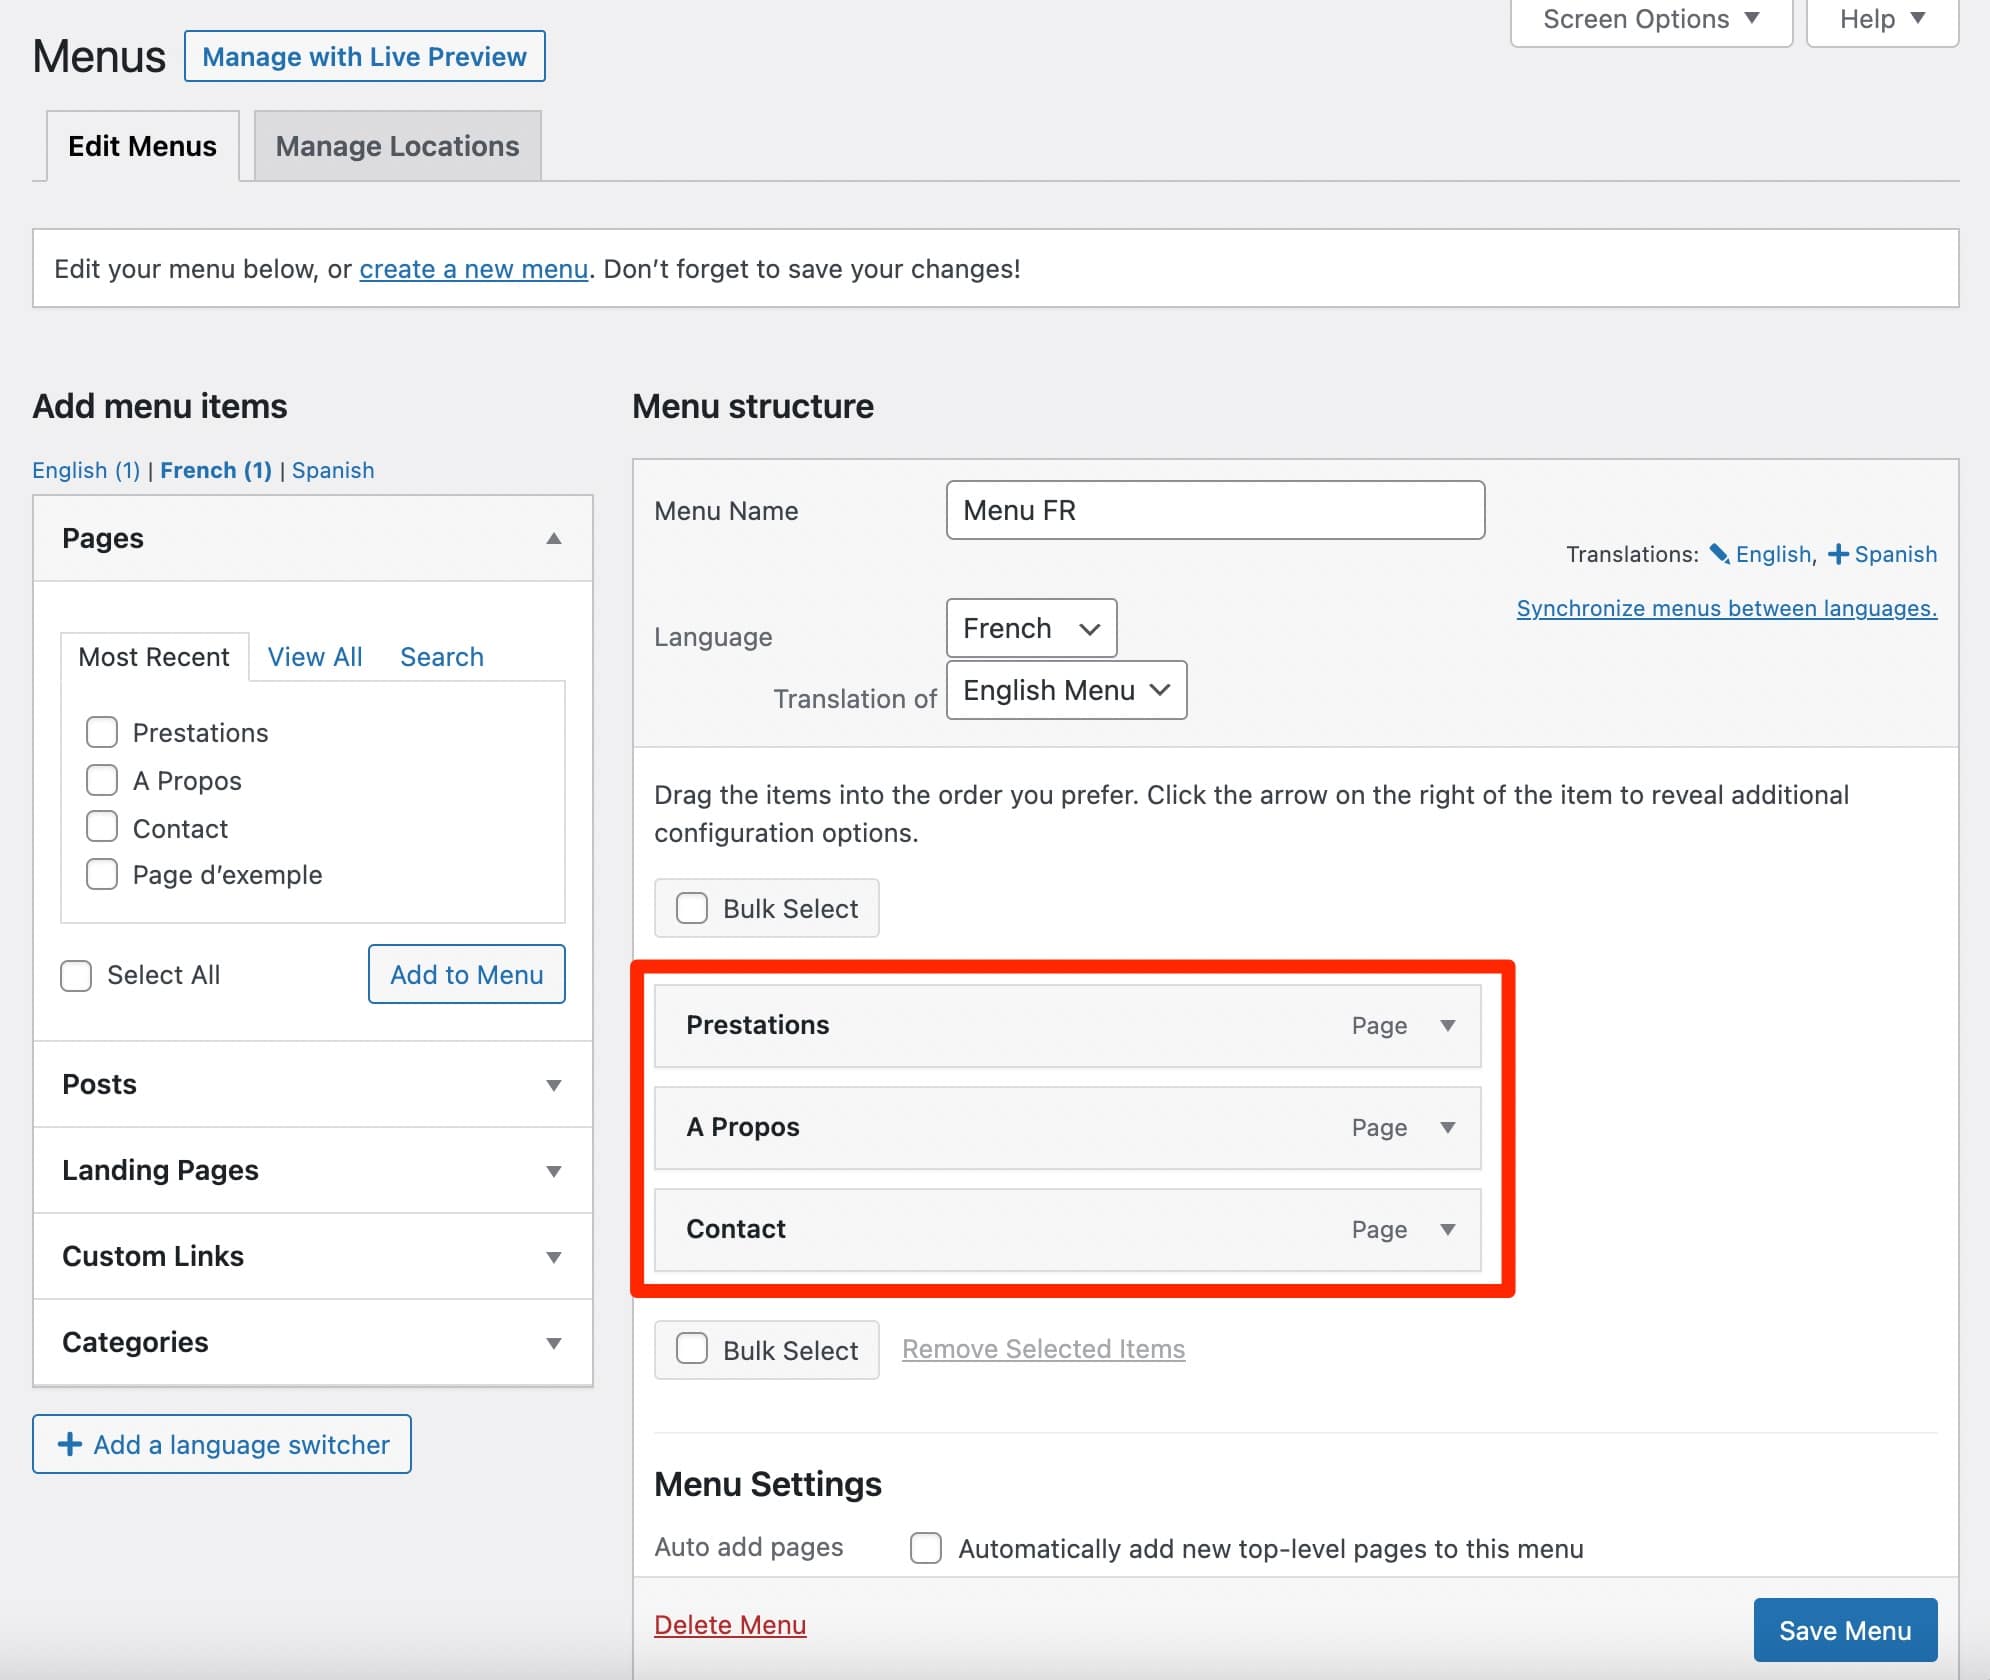
How to automatically synchronize your menus with WPML?
By going through WPML > Synchronize WP menus, you will have access to a very practical option: the synchronization of your menus in different languages.
This means that as soon as a modification occurs on the default language menu (e.g. adding or deleting a page), WPML will update these elements in the menus of the other languages.
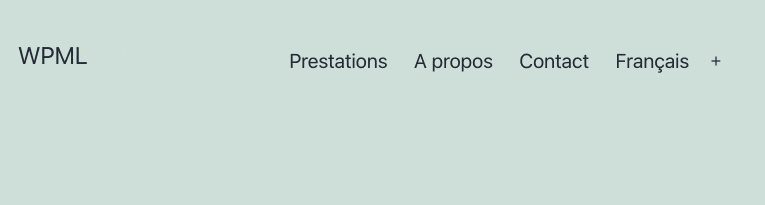
How to add a language selector in your menu?
In order to add a language selector in your menu, there are two possibilities:
- Go to WPML > Languages > Language Selector Options.
- In Appearance > Menus, click on the “Add a language selector” button.
The settings menu popup window will open, and you can make the desired adjustments.
On the visible interface of your site, this is what it looks like:
Widgets translation
After the menus, it’s time for the widgets. To translate them, you must first install the WPML “String Translation” module.
Then, go to the WPML > String Translation menu. Sort by widgets, then select the one you want to translate. Manually enter the text of your choice.
Below, I’m translating the native “Categories” widget from English to French:
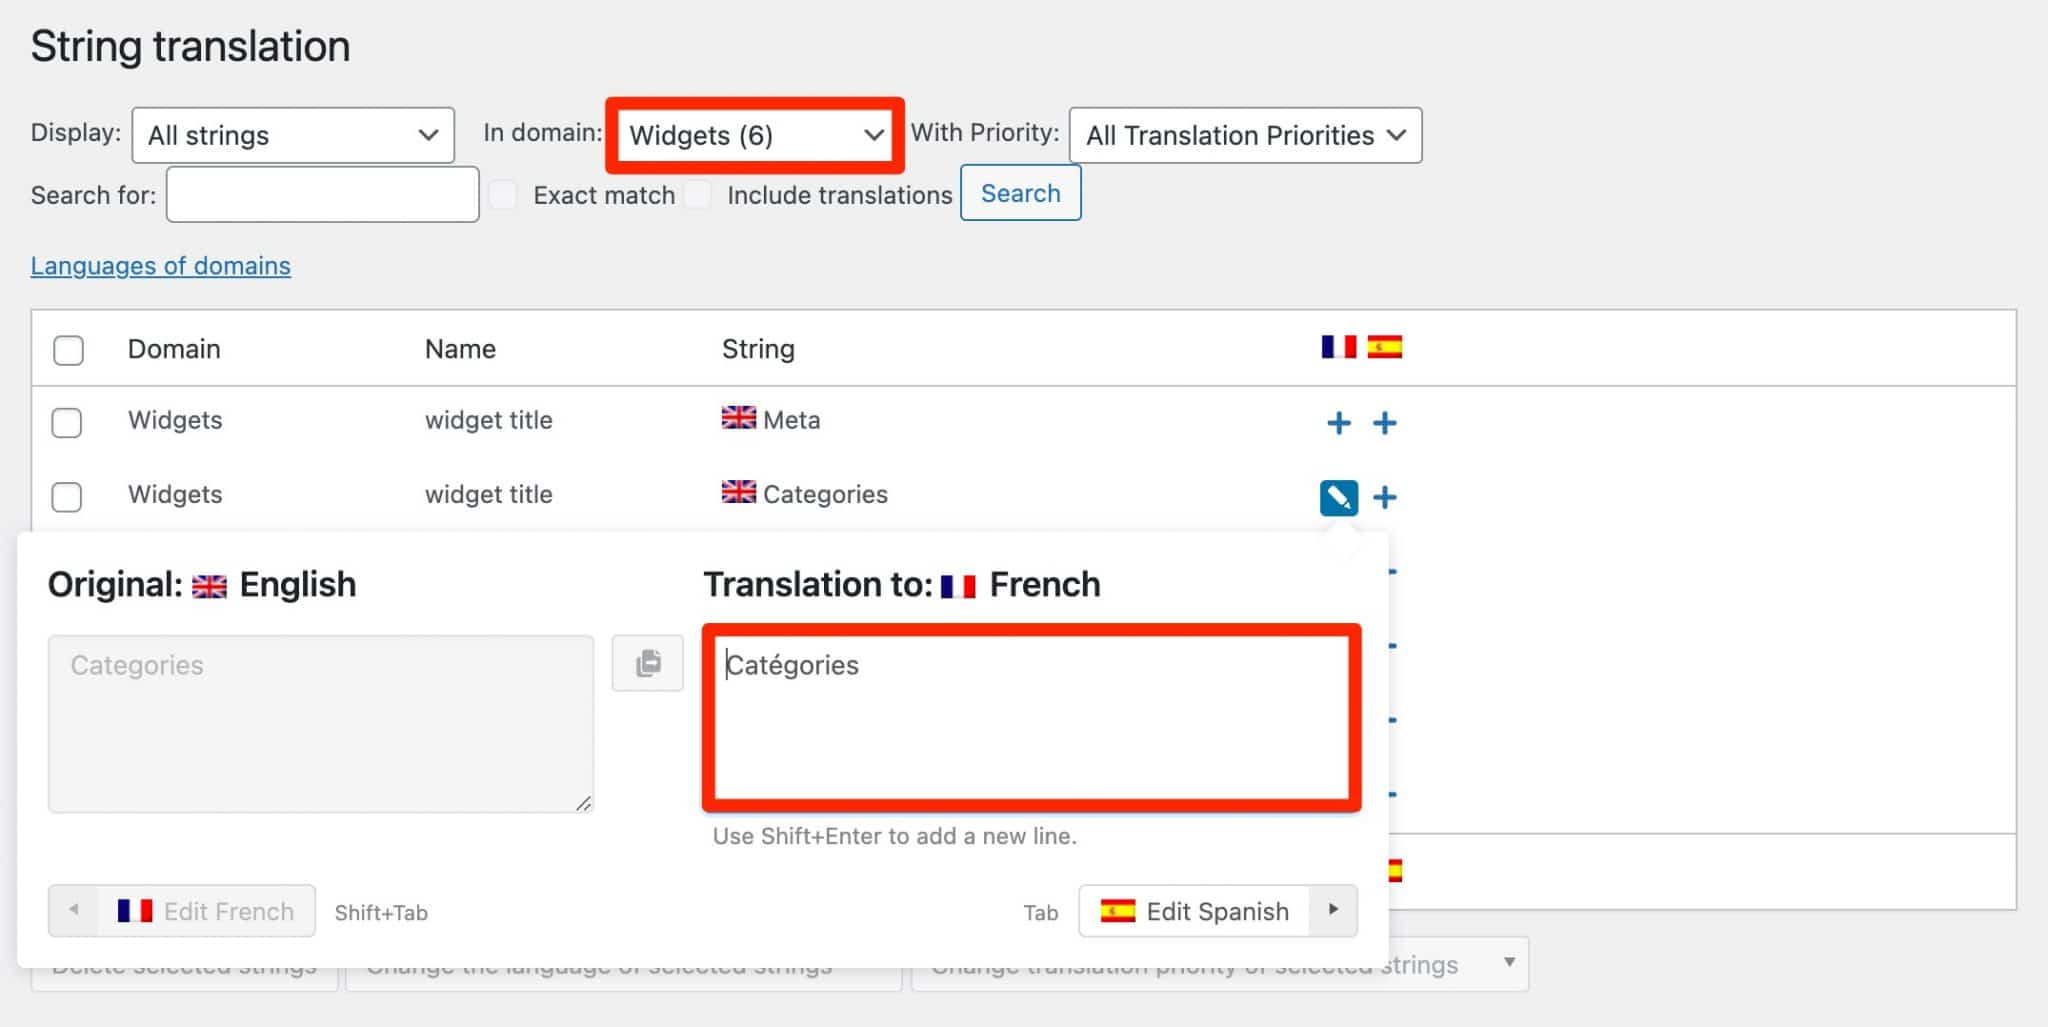
The String Translation add-on, which you’ve seen in action to translate the text of your widgets, allows you to translate texts that are not in the publications, pages or taxonomy (e.g. site tagline, admin screen texts, etc).
Media translation
To translate the elements present in your Media Library (images, illustrations, logos, etc.), you can first proceed manually using the main WPML plugin (“WPML Multilingual CMS”), exactly as you would do with a page or a post, within the content editor.
If you want to “show different images for content in different languages and translate the meta texts of those images”, as WPML says, the “Media Translation” add-on will be required.
This is convenient and indispensable for images with text.
For example, if your logo includes text in English, you probably want your French-speaking visitors to have a personalized version of this logo, with text in French.
To do this, go to WPML > Media Translation, then select the image you want to change:
More advanced translations: taxonomies and custom fields
By translating your menus, widgets and other media, you will already cover a lot of needs. If you have a little more technical knowledge and use custom fields and taxonomies on your site, you will need to translate them.
WPML has everything you need in store for that. I won’t go into the details here, to avoid losing the most novice users.
If you’re interested, check out the WPML documentation for the following scenarios:
- Translation of post categories and custom taxonomies
- Translation of custom post types
- Translation of custom fields
After this presentation of the translation of various elements, with concrete examples, let’s see how WPML integrates with tools that are now essential for designing a WordPress site: page builders.
How does WPML integrate with page builders?
WPML says that it “makes it easy to translate pages using your favorite page builder”.
Basically, it says it integrates with the most famous of them, such as Divi Builder, WPBakery, Beaver Builder, Oxygen Builder or Elementor.
A page builder is a tool that allows you to create rich and complex layouts for your content without touching a single line of code, especially through the use of ready-made templates. Editing is often drag-and-drop and in real time. If you want to know more about this topic, we present you 10 major page builders in this selection.
To verify this, we tested WPML with Elementor, the most popular page builder in the official WordPress directory (5+ million active installations).
In order to work properly, WPML indicates that you need to have installed its base plugin, as well as its add-on module “WPML String Translation”.
To do this, I created a page in which I installed a site template proposed by Elementor, which contains English content.
The purpose is to translate it into French. Therefore, once on my page, I click on the “+” icon associated with the French language, in the sidebar of the WordPress content editor:
Then I lend on the advanced translation editor of WPML (remember?), within which I find all the content of the Elementor template (in English, then).
I just have to translate manually each text area (or use the automatic translation if you have credits for that):
When you’re done, save your progress, then find the result automatically applied on your page in French.
WPML and Elementor, is it all good for you? OK. In that case, let’s move on to another famous plugin: WooCommerce. If you have an online store, you probably use it (WooCommerce is active on 5+ million sites).
And if you want to make your store multilingual, you’ll have to translate your WooCommerce generated pages, products and all related elements.
Let’s see what WPML has to offer on the subject.
WPML and WooCommerce
To make your WooCommerce store multilingual and multicurrency, WPML has a trick: the WooCommerce Multilingual plugin, which you automatically have access to by purchasing the Multilingual CMS License or Multilingual Agency.
For WooCommerce Multilingual to work optimally, WPML specifies that you need to install its base plugin, but also the “String Translation” and “Translation Management” add-ons.
Don’t forget to activate WooCommerce (version higher than 3.9 at least).
After activating the WPML ecommerce plugin, you will be pleasantly surprised to find a configuration wizard, which will help you to:
- Translate your store pages.
- Choose the attributes that need to be translated.
- Determine if you need multiple currencies.
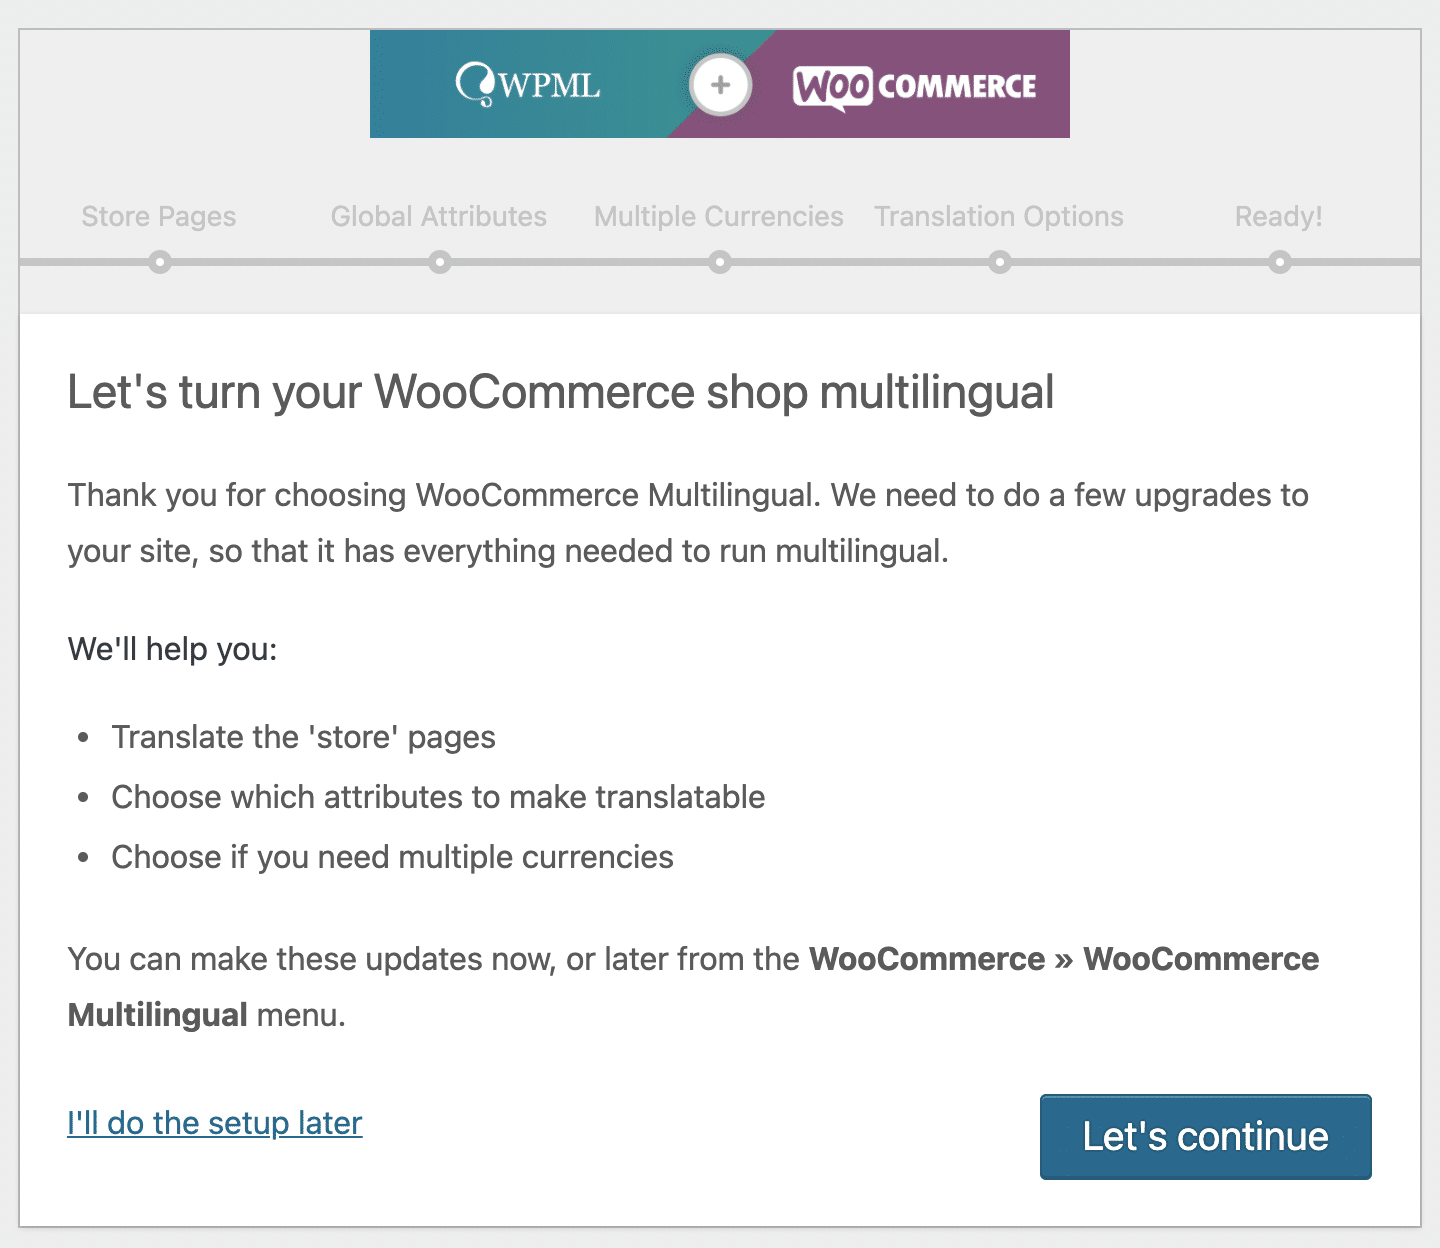
Not a bad way to get started. After this initial configuration phase, you’ll land on the WooCommerce Multilingual settings page, which has 8 tabs.
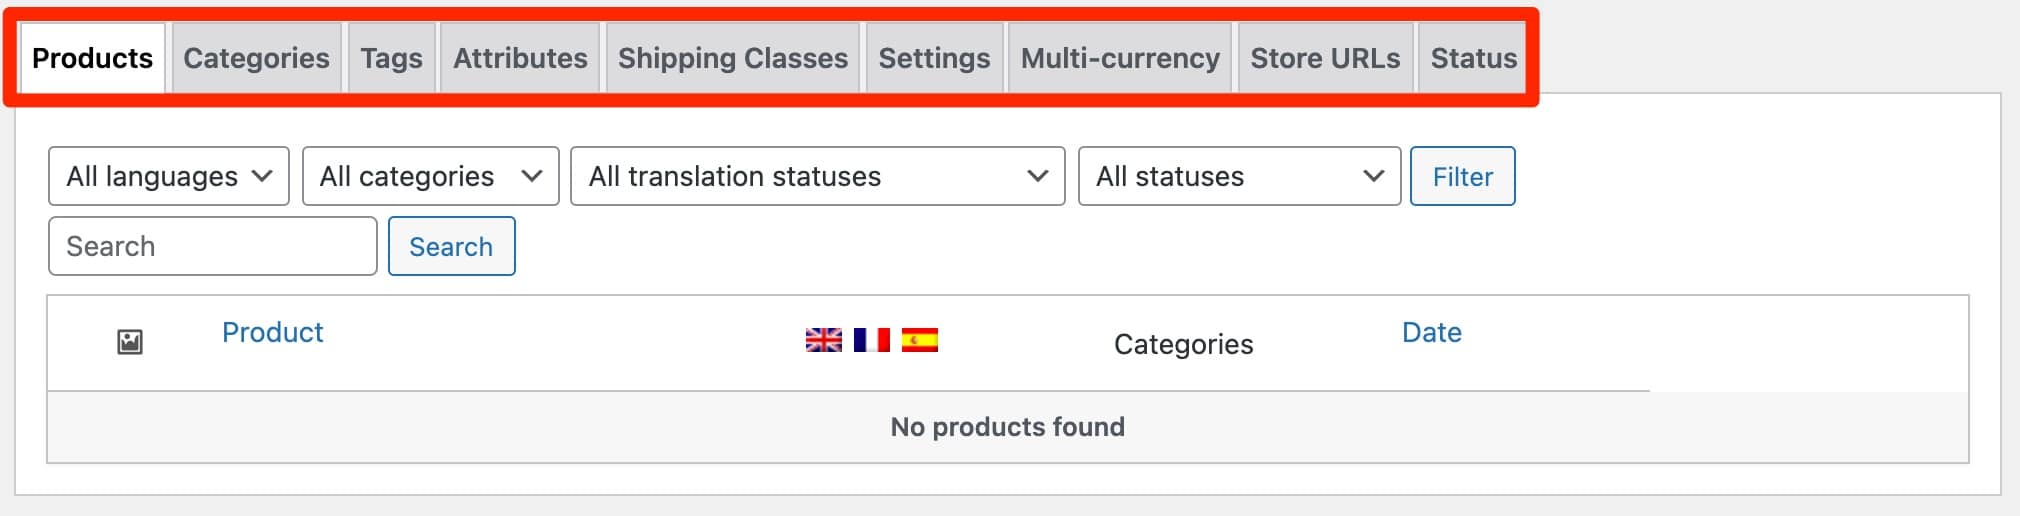
From this hub, you can, among other things:
- Translate your products.
- Translate your categories, tags, product attributes and shipping classes for delivery.
- Activate the multi-currency mode.
- Translate all strings that are used by WooCommerce by building different types of URLs.
For the rest, WooCommerce Multilingual also allows you to translate native WooCommerce emails (e.g. those related to a new order, a failed order, etc.).
Finally, note that your “Shopping Cart” and “Checkout” pages should be correctly and automatically translated if the theme and plugins you are using are translated into the language of your site. If not, you’ll have to make some adjustments, as WPML explains here.
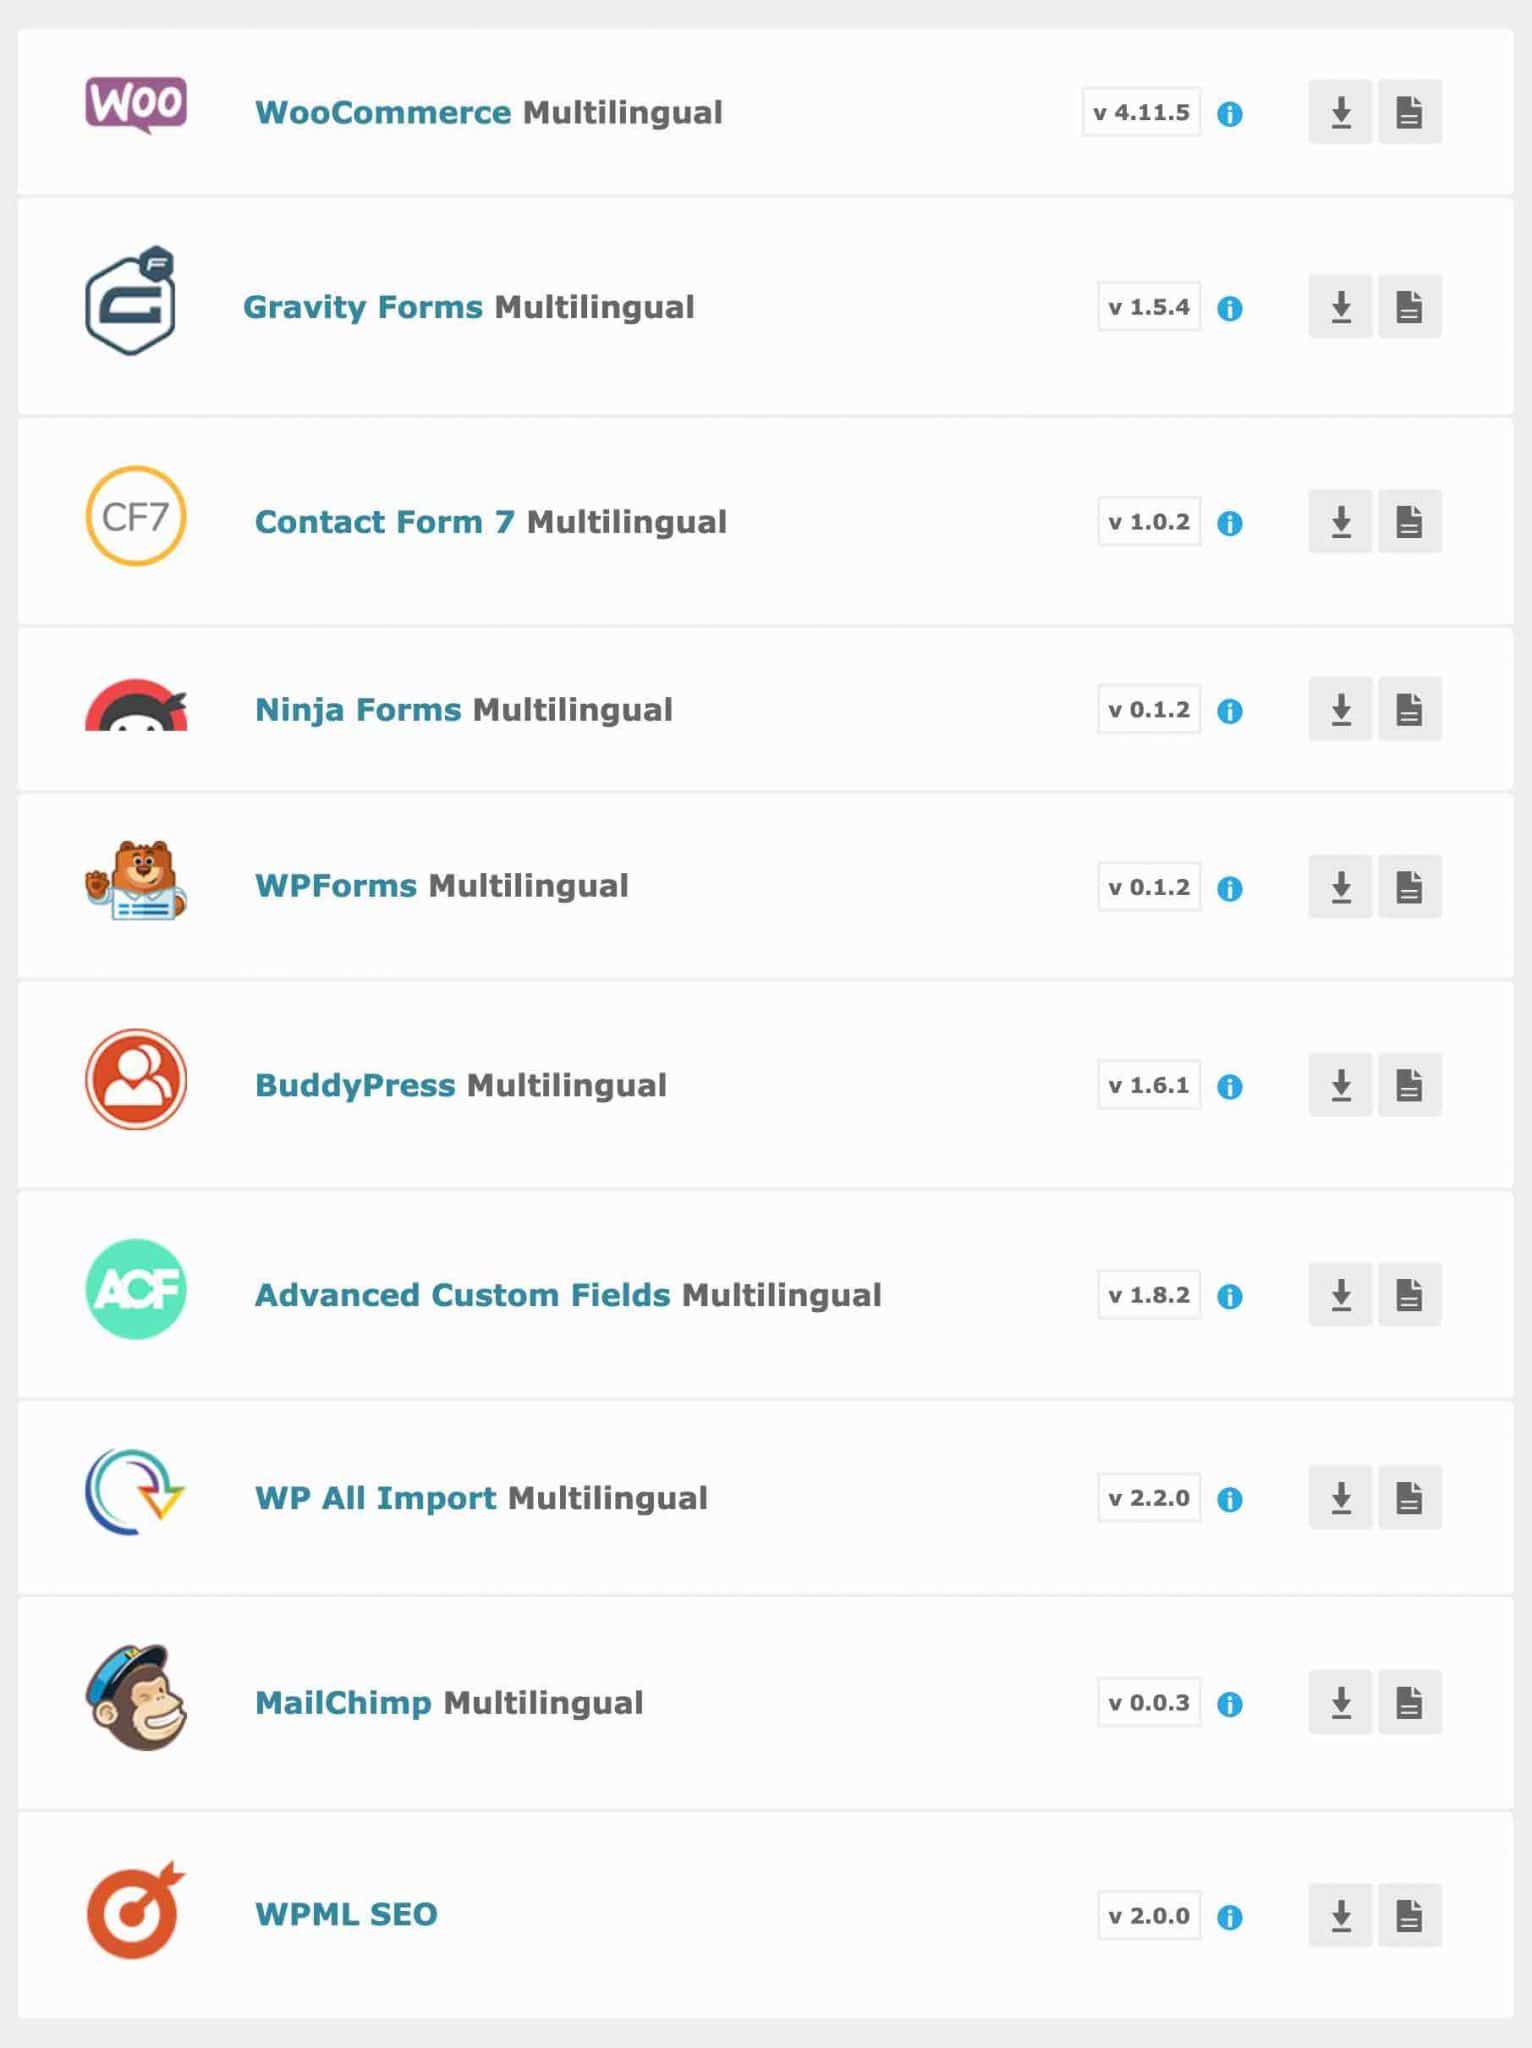
We have focused on WooCommerce, but WPML also offers additional add-ons to help you translate a dozen famous plugins, especially those dedicated to the creation of contact forms (Gravity Forms, Contact Form 7, Ninja Forms, WPForms), as you can see below.
Documentation and support
If you have been following this article since the beginning, you must have realized the wide range of possibilities offered by WPML. You can do a lot of things with this plugin, with the risk of getting lost quickly, especially when you are new to it.
To help its users, WPML has a very complete and well illustrated documentation.
To help you out of the quagmire you may find yourself in, WPML also offers tutorials and case studies.
If you’re a visual learner, you can check out the plugin’s YouTube channel, where there are about 60 well-targeted videos. For example, the one below shows you how to translate the SEO texts of the Yoast SEO plugin (e.g. title and meta-description tags, Breadcrumb, etc.):
Finally, if you are still in trouble, you can rely on WPML support. That’s the advantage with a premium plugin.
I haven’t had a chance to test it, but it’s supposed to be fast. WPML guarantees to “respond to support requests within 12 hours, Monday through Friday.”
Now, let’s talk about the financial aspect: does WPML have a good value for money?
How much does WPML cost?
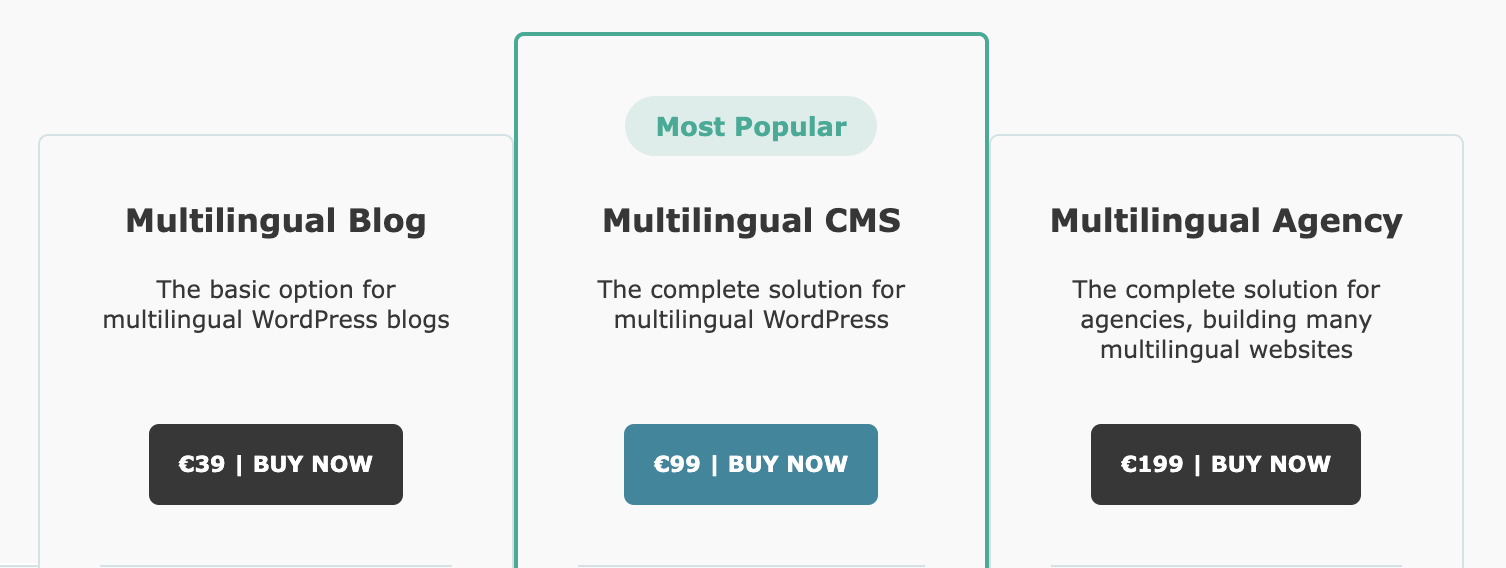
As mentioned at the beginning of this article, WPML is not free! The plugin is only available in premium version, in the form of 3 Licenses:
- Multilingual Blog: €39/year ex. VAT (i.e. $42/year)
- Multilingual CMS: €99/year (i.e. $108/year)
- Multilingual Agency: €199/year (i.e. $216/year)
To know which version to choose, consider the features you need, and the use you want to make of WPML (on how many sites do you want to use it?).
In order to help you decide, here are some indications:
- The Multilingual Blog License has the fewest options. It does not allow you to translate ecommerce sites, custom fields, widgets, texts in the admin of themes and plugins, etc. Moreover, it does not offer automatic translation and can only be used on 1 site. WPML indicates that it is intended for “simpler sites that are mainly a WordPress blog”, hence the name of the License.
- The Multilingual CMS and Multilingual Agency licenses include all the options offered by WPML. The main difference is how you want to use them. With the Multilingual CMS License, you are limited to one installation on up to 3 sites. The Multilingual Agency License, on the other hand, offers unlimited use. Finally, the number of free credits for automatic translation also varies from simple to double (90,000 for the Multilingual CMS license and 180,000 for the Multilingual Agency license).
Each license includes support from the WPML team, updates to the plugin for one year, and a 30-day money-back guarantee.
Renewal is at a lower rate, with a discount of around 25% on the initial price, depending on the License.
For example, the annual renewal of the Multilingual CMS License will cost you €88.80 (i.e. $96), compared to €99 (i.e. $108) for the first purchase.
To get a first idea, take a look at how WPML’s pricing compares to some of its competitors:
- WPML vs Polylang: Polylang offers a free version of its plugin, already well supplied with options. Its paid licenses range from €99/year (i.e. ± $115/year for a use on 1 site) to €495 (i.e. ± $573/year for a use on 25 sites).
- WPML vs MultilingualPress: MultilingualPress is only available in premium. Its offers range from $99/year (for 3 languages maximum) to $599/year (for 18 languages maximum).
Our opinion on WPML
Now it’s time to take stock. Throughout these lines, you have discovered WPML from every angle and learned how to configure it thanks to several practical cases.
In the end, what to think of this plugin? Should you use it for your future projects?
As a pioneer in the multilingual plugin market, WPML has established itself over time as a first choice solution for WordPress users: over a million people use it.
In use, I would say that the main advantage of WPML lies in the very wide range of settings it offers. Clearly, you can do everything with it, as long as you start with its Multilingual CMS License.
This is both very interesting and confusing. I can tell you: I struggled a bit when I dug into its settings.
It’s not easy for a beginner to get the hang of it, especially if you compare it to one of its competitors: Polylang. In my opinion, this is a serious obstacle to use.
The other drawback is the “massive” aspect of the plugin. WPML contains a lot of features and code, code that requires time to be executed.
When setting up the plugin, you must therefore make sure to install only the components you need, which the plugin allows thanks to its modular aspect.
For your information, WPML also offers a 12-month performance guarantee: if your site encounters performance problems because of WPML, the plugin team will refund you if they’re unable to fix them.
Want to see what a site using WPML looks like? Check out BeautifulPress’ selection.
To sum up, if I had to choose a multilingual plugin, I would rather go for Polylang (freemium), which is simpler and better built technically (remember that when it was launched, WPML could not be built like Polylang today, because custom taxonomies did not exist yet), even if it is true that its premium offers are higher than those proposed by WPML.
Download the WPML plugin:
But maybe you have a completely different opinion. Are you a strong supporter of WPML? Or on the contrary, you can’t stand it? Tell us all about it in the comments.

Receive the next posts for free and access exclusive resources. More than 20,000 people have done it, why not you?

Continue reading
Articles posted in WordPress PluginsOur review of B2BKing: A WooCommerce plugin built for B2B commerce
“Hi, I need 200 units of this product with fast shipping please”. As an online store owner, receiving this kind of message puts a smile on your face. Answering it, on the other hand, becomes a lot less fun… Basically,…
GTranslate on WordPress: our full review of this tool for creating a multilingual site
“Hello, how are you?” “What do you think of this computer mouse?” For you, everything is easy to understand in these two sentences. For someone living deep in the Shetland Islands or Yucatán, it’s probably a bit more complicated… If…
Air WP Sync: Test and review of this plugin for integrating Airtable into WordPress
Do you use Airtable and WordPress? Then some of your days probably look something like this. In the morning, you update your Airtable database as soon as something changes. In the afternoon, you copy and paste the same data into…