


On his little face radiates an infectious good mood. Probably the result of his friendly smile.
Move your mouse over his face and you’ll see: he’ll even wink at you to say hello.
This chimpanzee has a mischievous look, but you have no chance to meet him in a zoo. His favorite environment: the world of email marketing, where he reigns supreme.


This chimpanzee is the face associated with the famous Mailchimp tool – chimp, hence the name – which is used to send newsletters.
And you know what: it is possible to associate Mailchimp with WordPress, in order to make the two softwares work hand in hand, without it becoming a headache.
This post provides you with a detailed instruction manual, with step-by-step explanations and screenshots to help you find your way around.
Ready to jump from branch to branch, like a chimp eager to discover a new playground? Let’s go!
Overview
- What is Mailchimp?
- How to use Mailchimp on WordPress?
- How to link Mailchimp to WordPress with the MC4WP plugin?
- How to add a subscription form to your email list with the Mailchimp for WordPress plugin?
- How to add your form to your WordPress site content?
- How to send emails with Mailchimp?
- The advantages of the Pro version of the Mailchimp for WordPress plugin
- Go further with Mailchimp for WordPress add-ons
- What integration of Mailchimp for WordPress with plugins?
- Documentation and support
- What is the value for money?
- Our final opinion on MC4WP
The version of the MC4WP: Mailchimp for WordPress plugin used in this test is 4.8.6.


What is Mailchimp?

Mailchimp is an “all-in-one marketing platform for small business”, as it describes itself on its “About” page. Founded in 2001 in Atlanta (United States), it first became known as an email marketing tool.
With exponential growth – Mailchimp has even reached an agreement with Intuit, in September 2021, with a view to a buyout in the coming months – Mailchimp has gradually diversified. Today it offers a wide range of various services:
- Emailing: sending emails/designing subscription forms for your newsletter, campaign planning, A/B tests, etc.
- Creation of websites and online stores.
- Customer relationship management (CRM).
- Design of landing pages.
- Marketing automation.
- Statistical analysis tool.
- Etc.
Mailchimp is the most popular email marketing tool in the world. According to its latest annual report (at the time of writing), published in 2020, it claims nearly 15 million users. These users sent a total of 333,635,013,935 emails in 2020.
That’s quite a lot, don’t you think? That’s more than 1,000 times the total population of the U.S., after all…
Some advantages…
If Mailchimp is widely used throughout the world, there must be good reasons for it. Indeed, this marketing platform has several undeniable advantages:
- It is easy to use, which makes it a tool of choice for the beginner in email marketing. To take full advantage of its features, you don’t need to code, for example.
In addition, its editing tool is very practical and can be manipulated by drag and drop. - It is complete, since it allows you to do several things at once, from the simple sending of an email to the design of advertisements, including the automation of your marketing.
- It is free up to 2,000 subscribers, but with some limits: 10,000 emails sent per month and a daily limit of 2,000 emails sent. Very practical for those who want to get their first foot in the world of email marketing without taking financial risks.


Beyond these advantages, using Mailchimp – and this is also true for any decent email marketing tool – has a real advantage compared to using a plugin that would be based on the default email sending system of WordPress.
You ensure a higher delivery rate – WordPress is basically a tool designed for blogging, not for sending emails – and have a better chance of not having your emails end up in your subscribers’ spam.
On the other hand, your web host, especially if it is a shared one, may impose limitations on its servers, which would prevent your emails from being delivered properly.
For this, it is therefore recommended to use the servers of an email marketing service.
…but also some drawbacks
Despite everything, Mailchimp is not perfect. It does have a few shortcomings that should be pointed out before moving on to the next step:
- Its marketing features, for example in terms of automation (1 step possible only in the free version), are limited compared to other tools like ActiveCampaign, which Alex uses to communicate with you via email.
But frankly, if you are a beginner in the world of email marketing, what Mailchimp offers will already be more than enough. - If your list of subscribers includes several thousands of contacts, the software can quickly become expensive (more info in the part related to the value for money of Mailchimp).
That’s it for the general picture of Mailchimp, which helps you to better understand who this major player in the world of emailing is.
Without further ado, let’s see how you can use this tool on WordPress.
By the way, check out our detailed guide about choosing your domain name and the one for creating a professional WordPress website. And because we love helping you out, take a look at the best free WordPress themes.
How to use Mailchimp on WordPress?
A two-step process
Since Mailchimp is an external service and unrelated to WordPress, you need to proceed in two steps for the two tools to work hand in hand:
- First, you need to create a Mailchimp account.
- Then, you need to connect Mailchimp to your WordPress site.
For the second phase of the process, there are two ways to do it:
- Manually. For example, it is possible to create a newsletter subscription form (opt-in form) on the Mailchimp interface. At the end of the process, Mailchimp will provide you with a piece of code to copy and paste into your theme. This means getting your hands dirty.
- Using a dedicated plugin. By doing this, you can customize it to your liking without leaving the WordPress interface, and never touch the code. For a beginner, this is the easiest and fastest way.
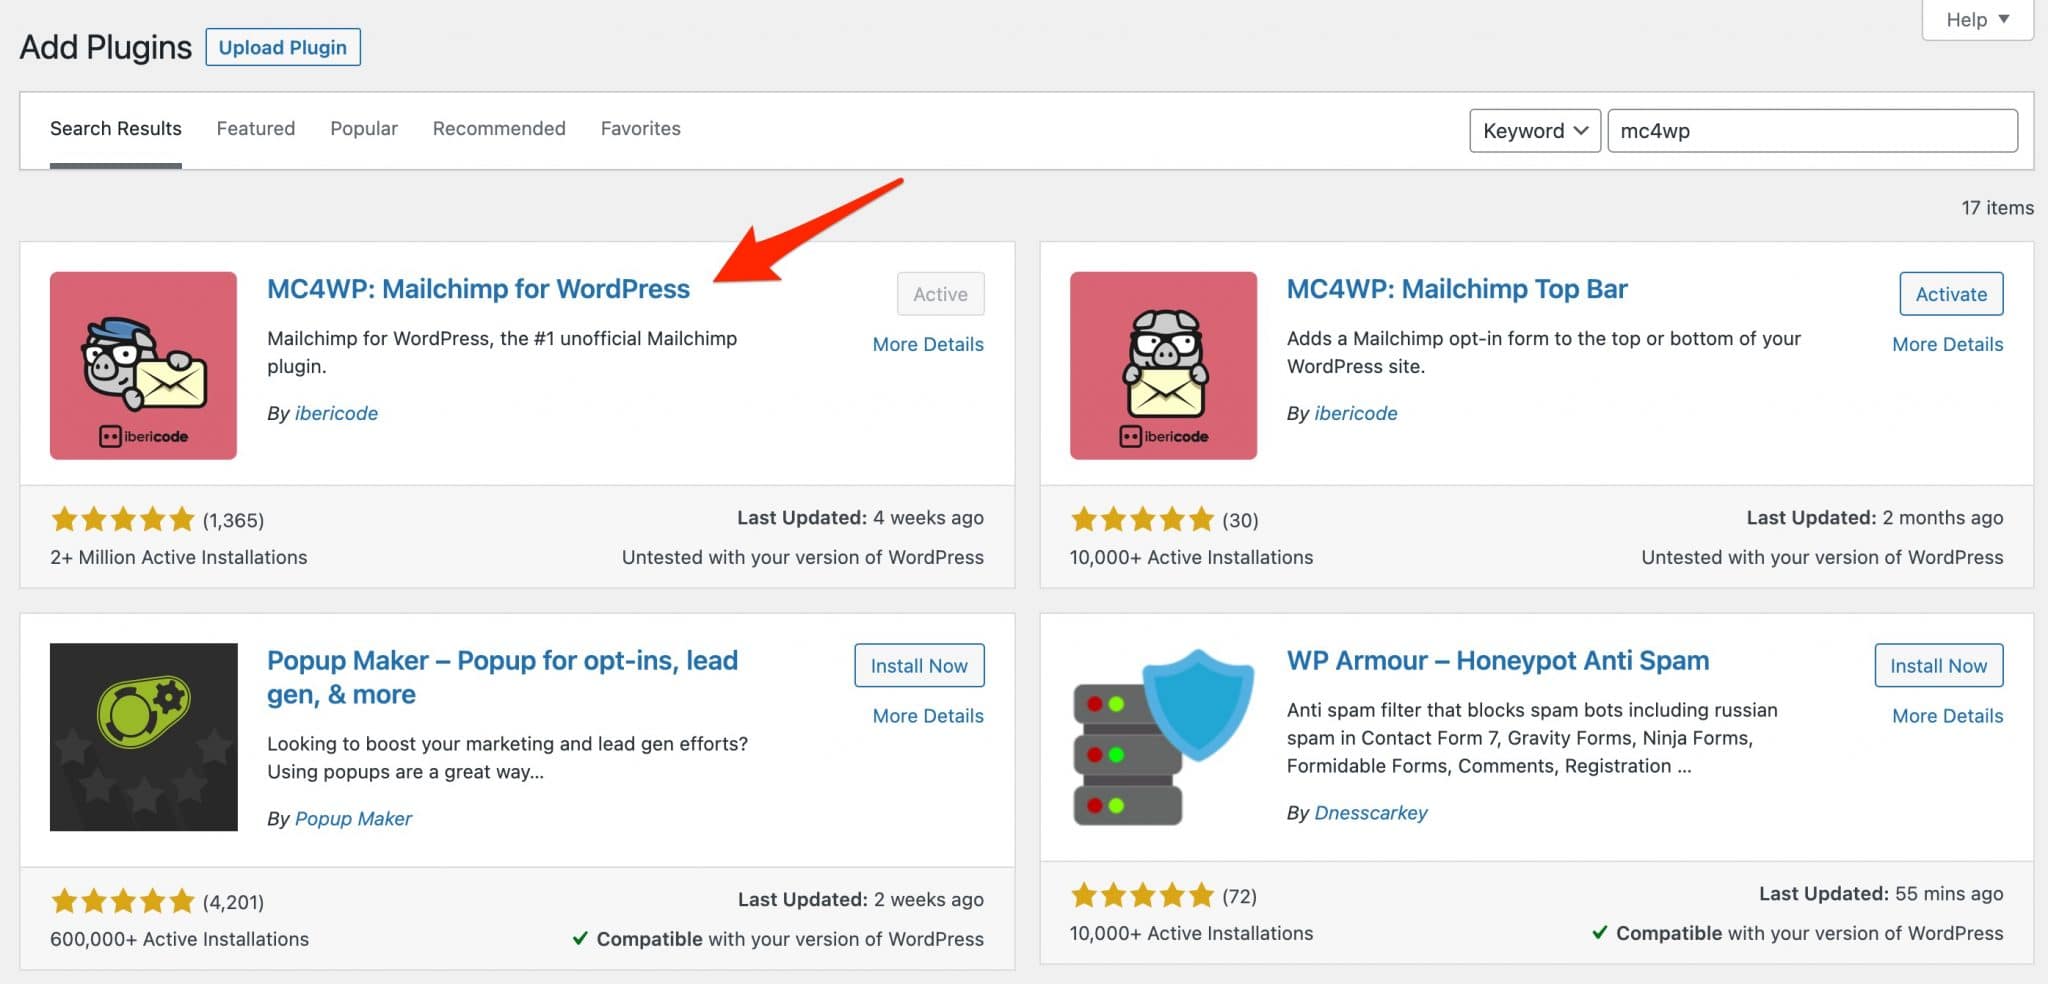
Of course, there are multiple plugins dedicated to this on the official WordPress directory. For the purpose of this tutorial, we chose the MC4WP: Mailchimp for WordPress.

Why choose the Mailchimp for WordPress (MC4WP) plugin?
A choice motivated by several reasons:
- It is the most popular (more than 2 million active installations) on the query “wordpress mailchimp”.
- It is frequently updated and has been in the circuit for several years, which demonstrates the commitment of its developers to maintain and improve it.
- It is very well evaluated by its users, with an overall rating of 4.8/5.
- It is easy to use, as you will see throughout these lines.
- Its free version is enough to get you started. And if you ever want to go further, a Pro version is also available.
Now let’s get down to business: it’s time to link Mailchimp to WordPress with the Mailchimp for WordPress (MC4WP) plugin.
How to link Mailchimp to WordPress with the MC4WP plugin?
If you have followed correctly, you know that you must first make yourself known on Mailchimp by creating an account. Then you have to install the MC4WP plugin.
Let me explain how to do it step by step.
Step 1: Create and set up your Mailchimp account
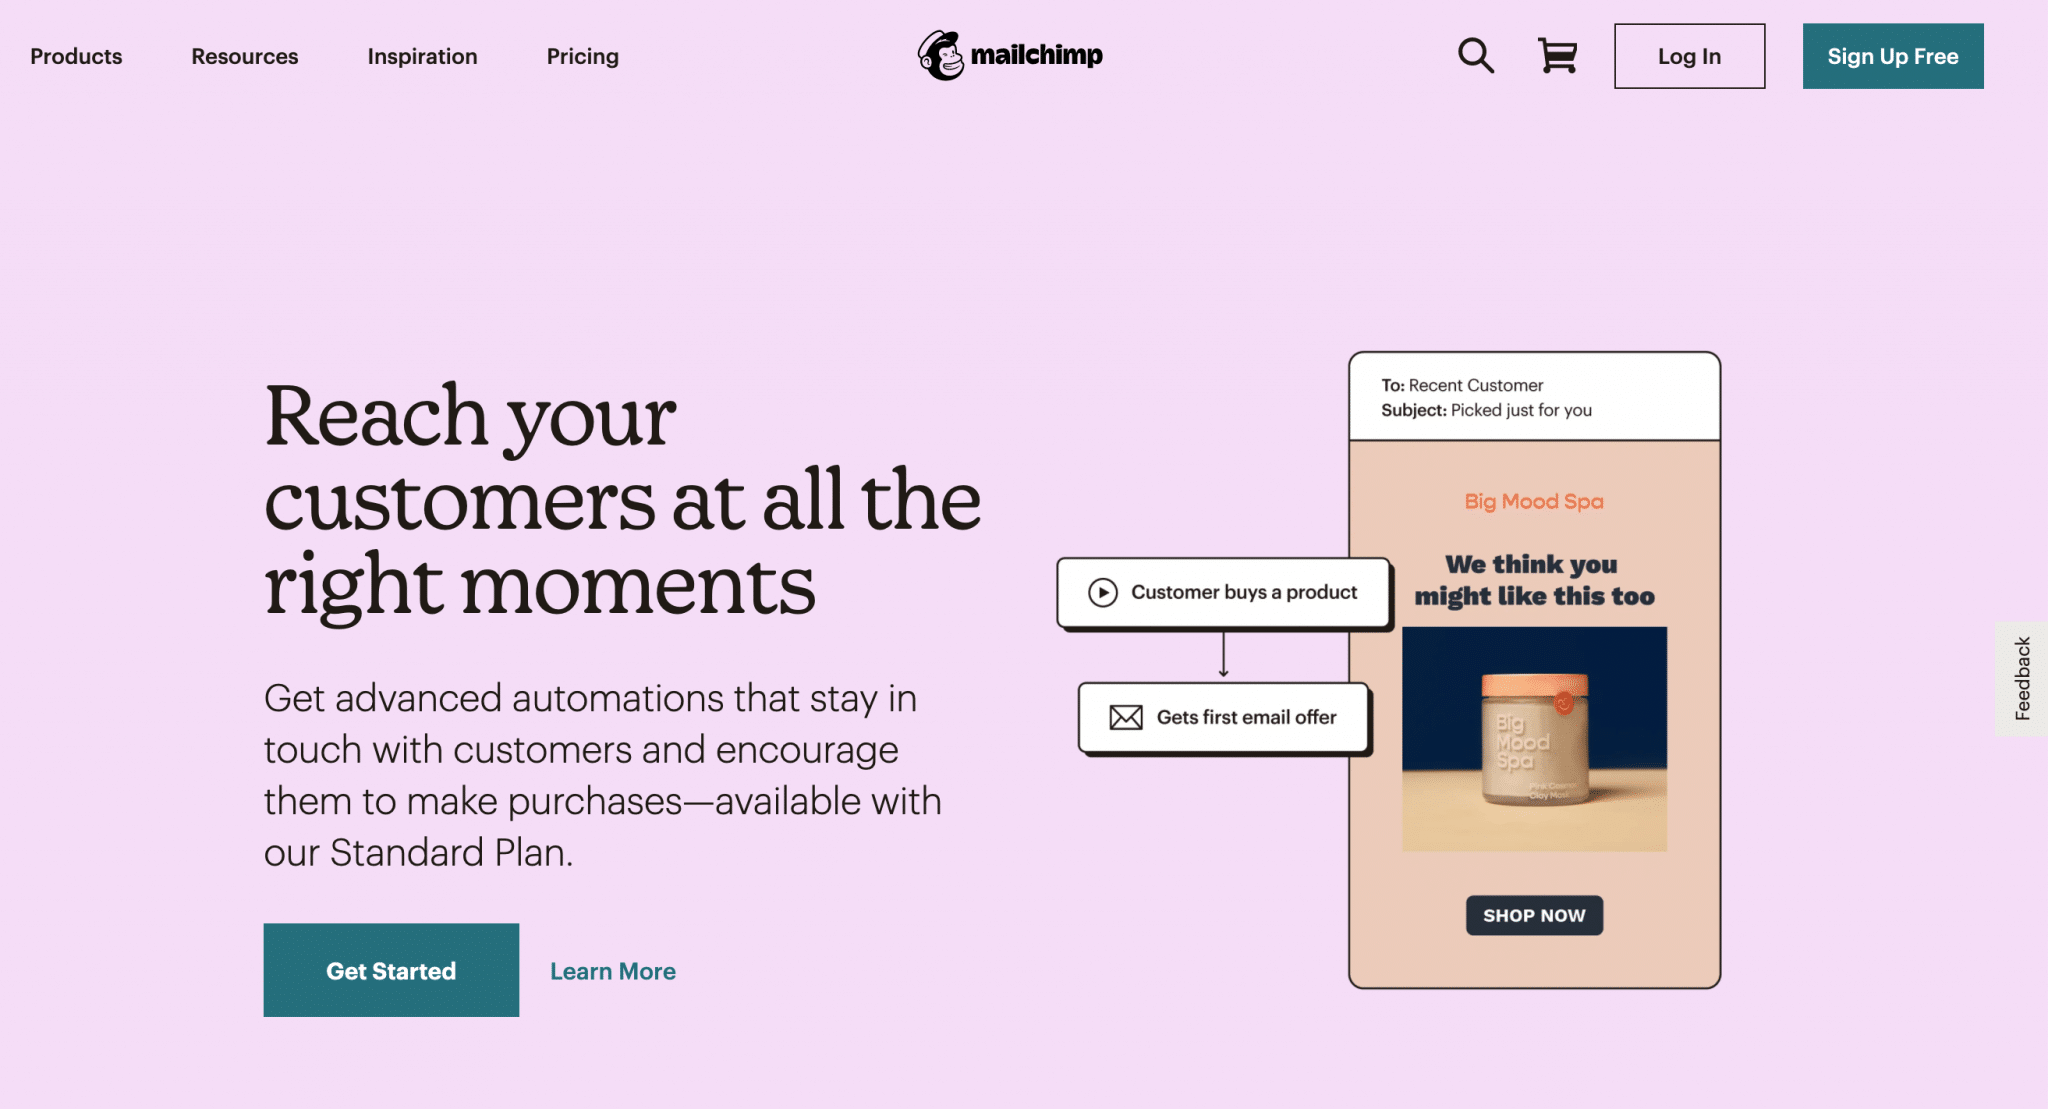
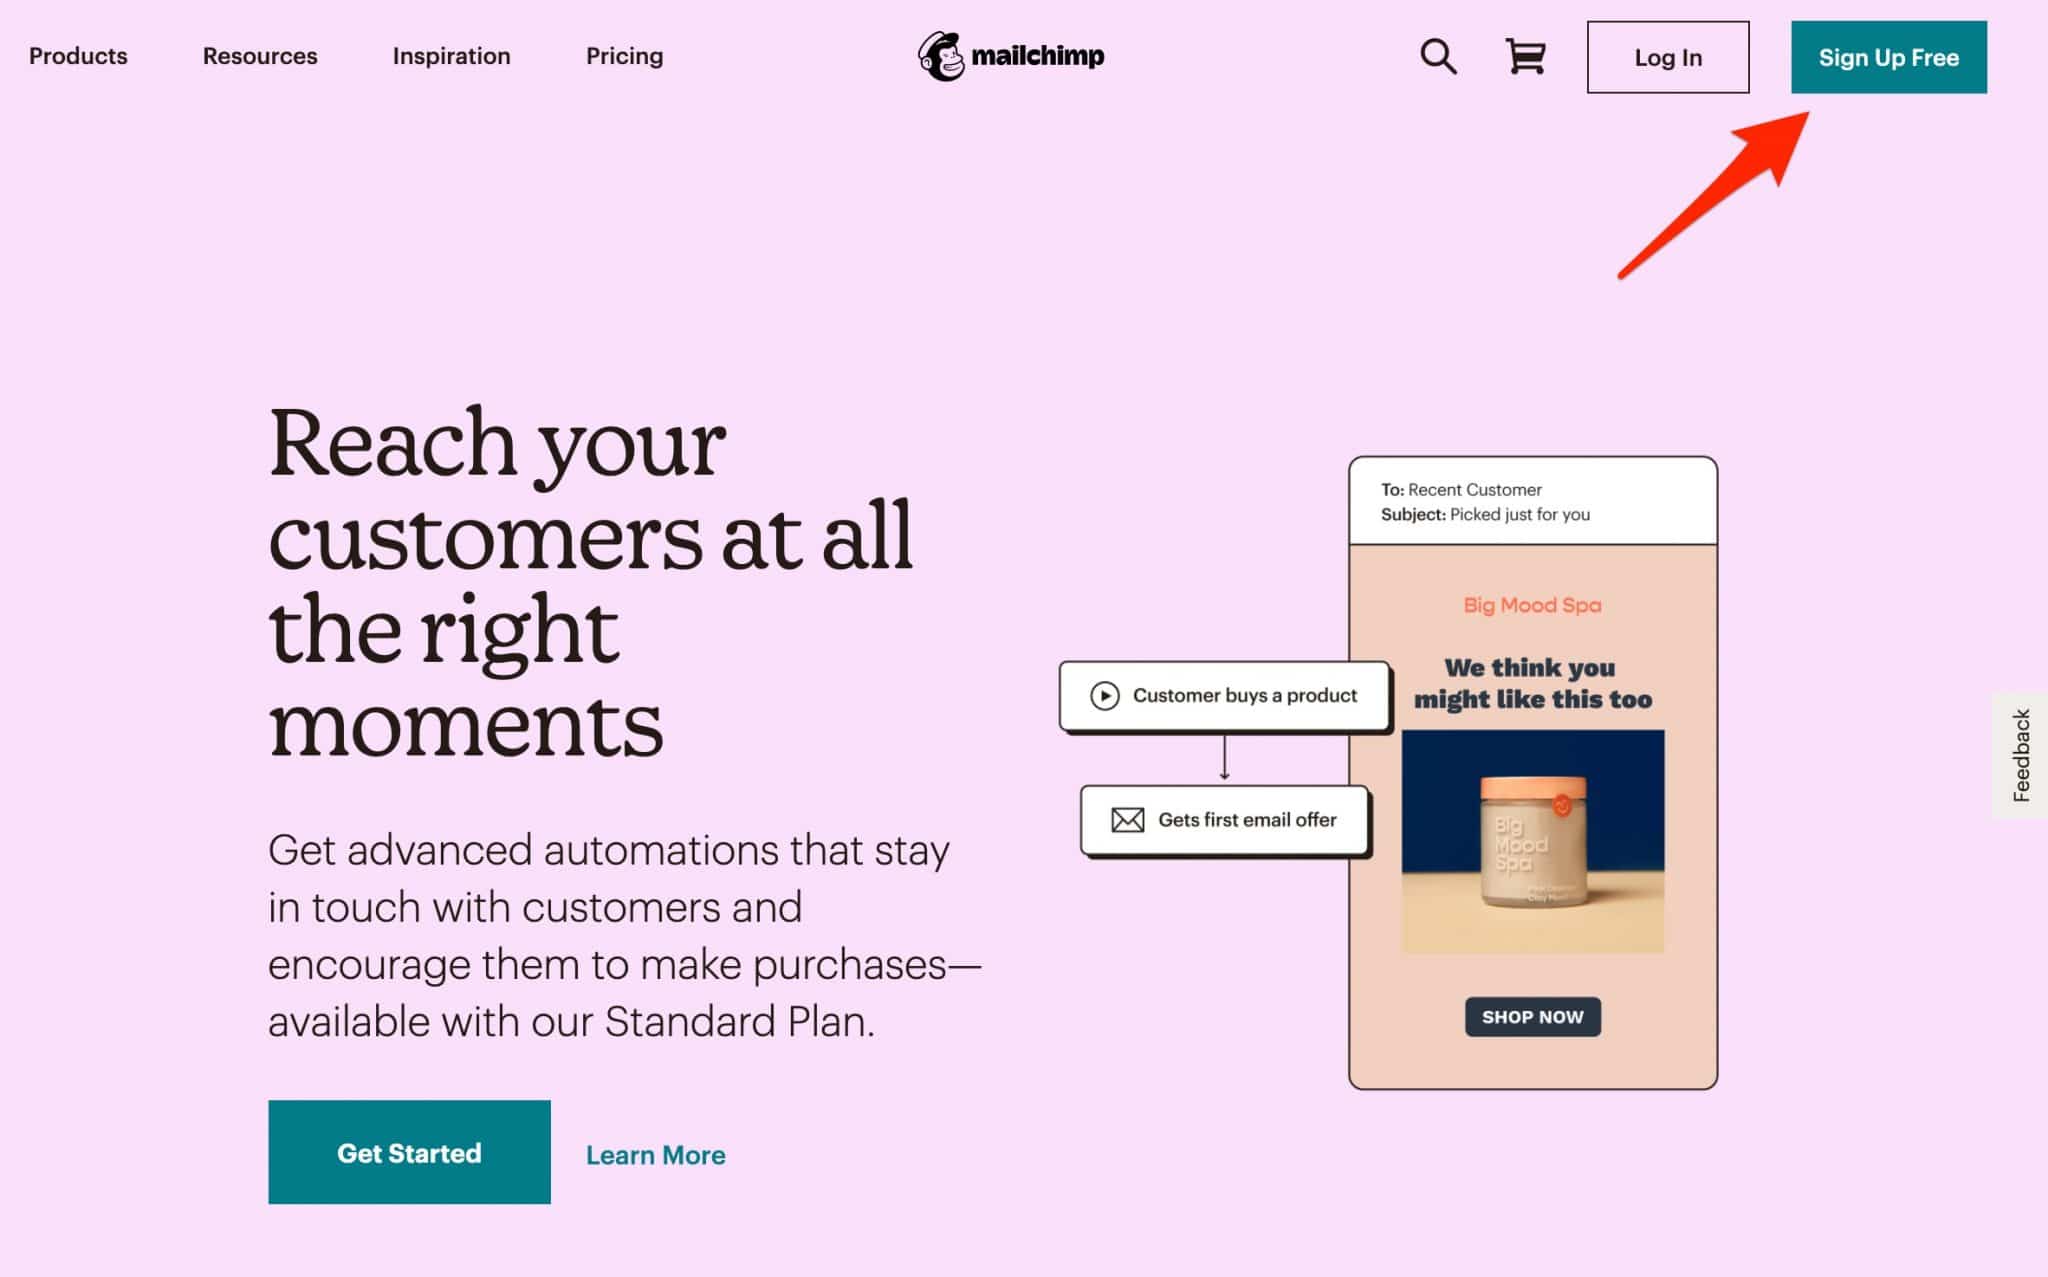
On the Mailchimp homepage, click on the “Sign Up Free” button on the top right.

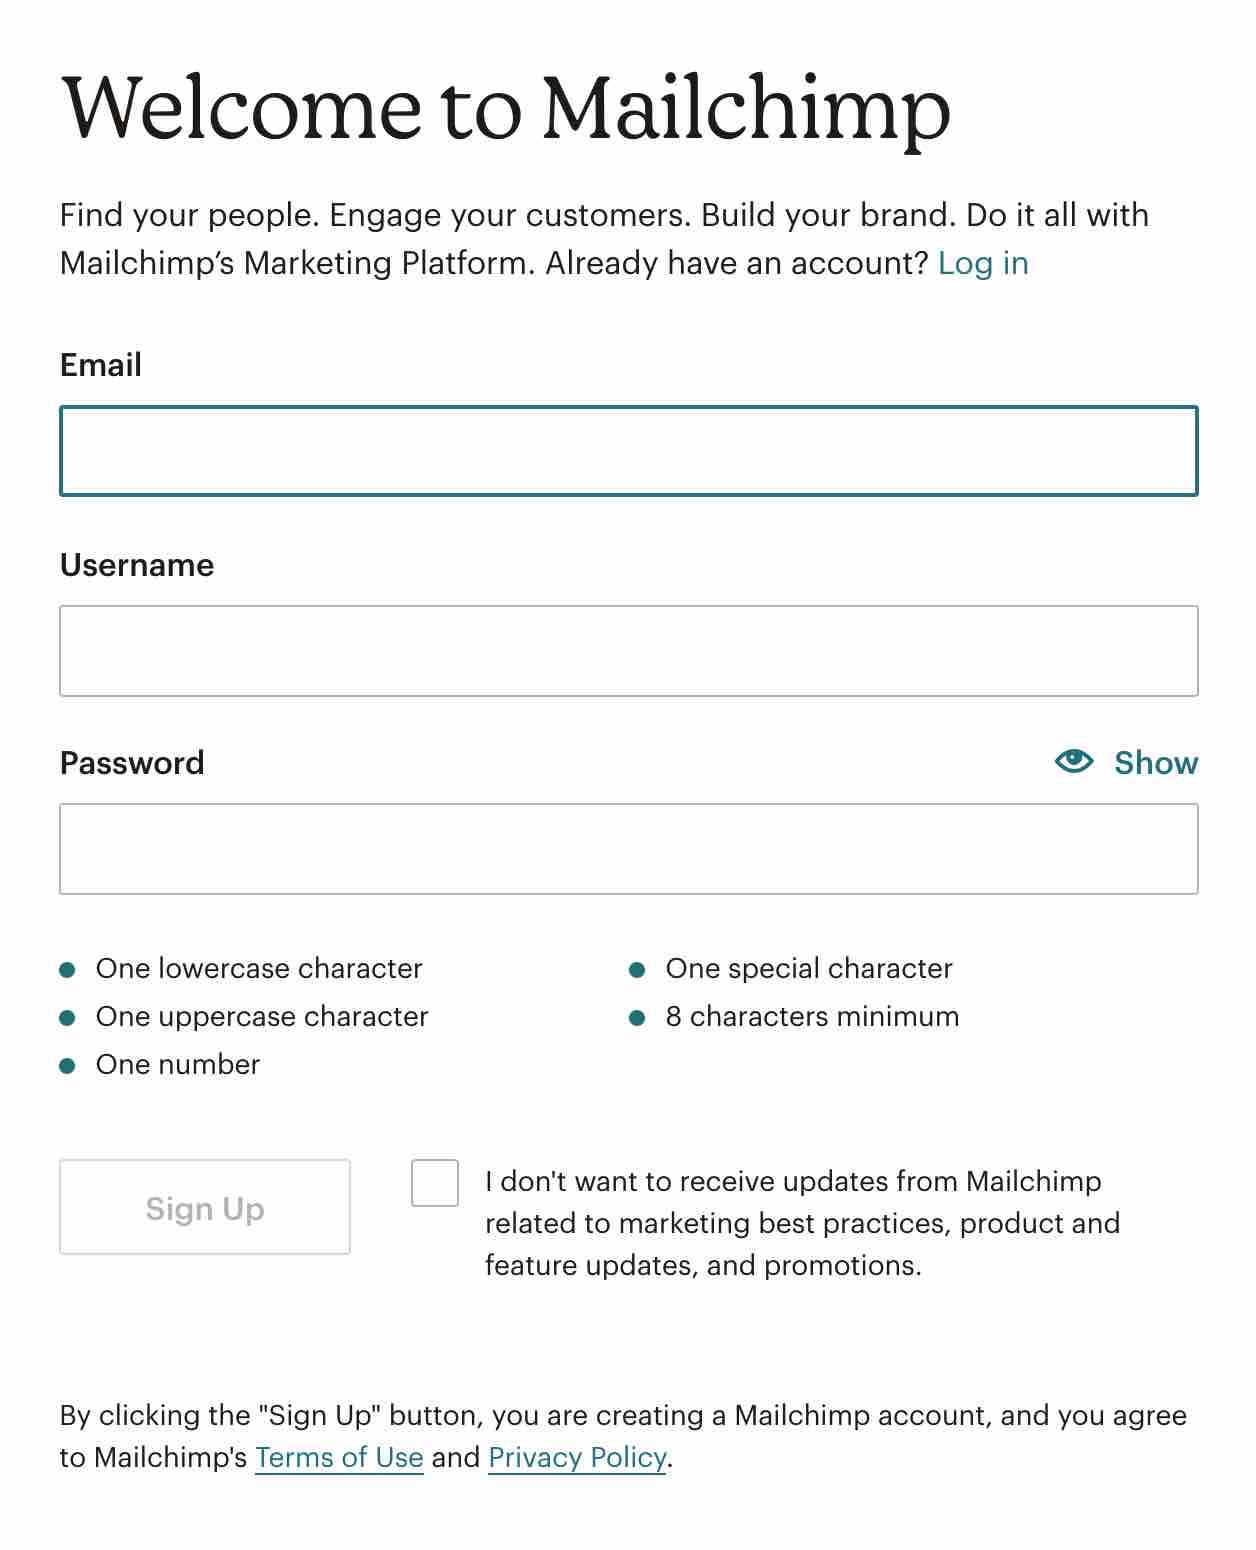
Then fill in the required information: email, username and password, and click on the “Sign Up” button:

You will immediately receive a link by email to activate your account. Warning: check your spam folder, the email arrived there on my side. 😉
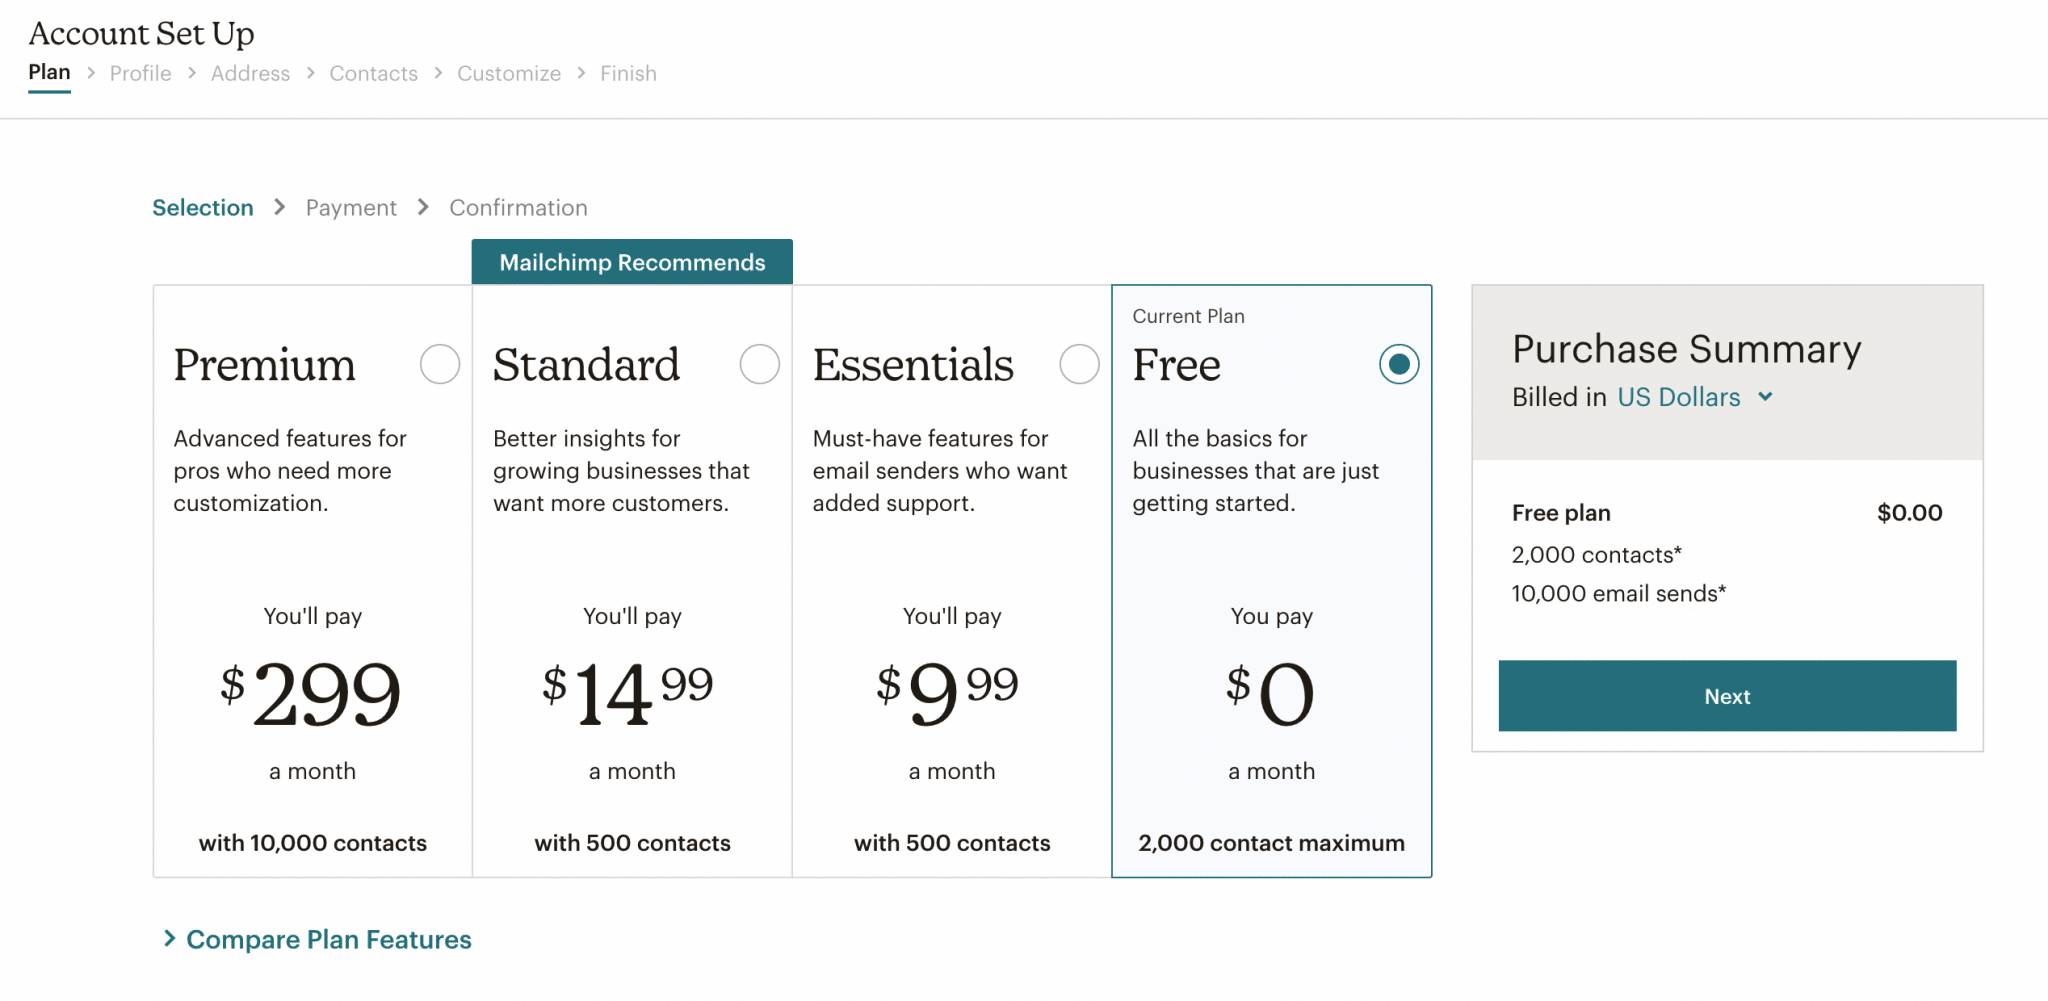
Then, Mailchimp offers you to choose among its 4 plans. By default, the free offer must be selected. It is enough to start with, so you can stay on it.
There is nothing to stop you from upgrading to a higher plan if you need to. Click on the “Next” button.
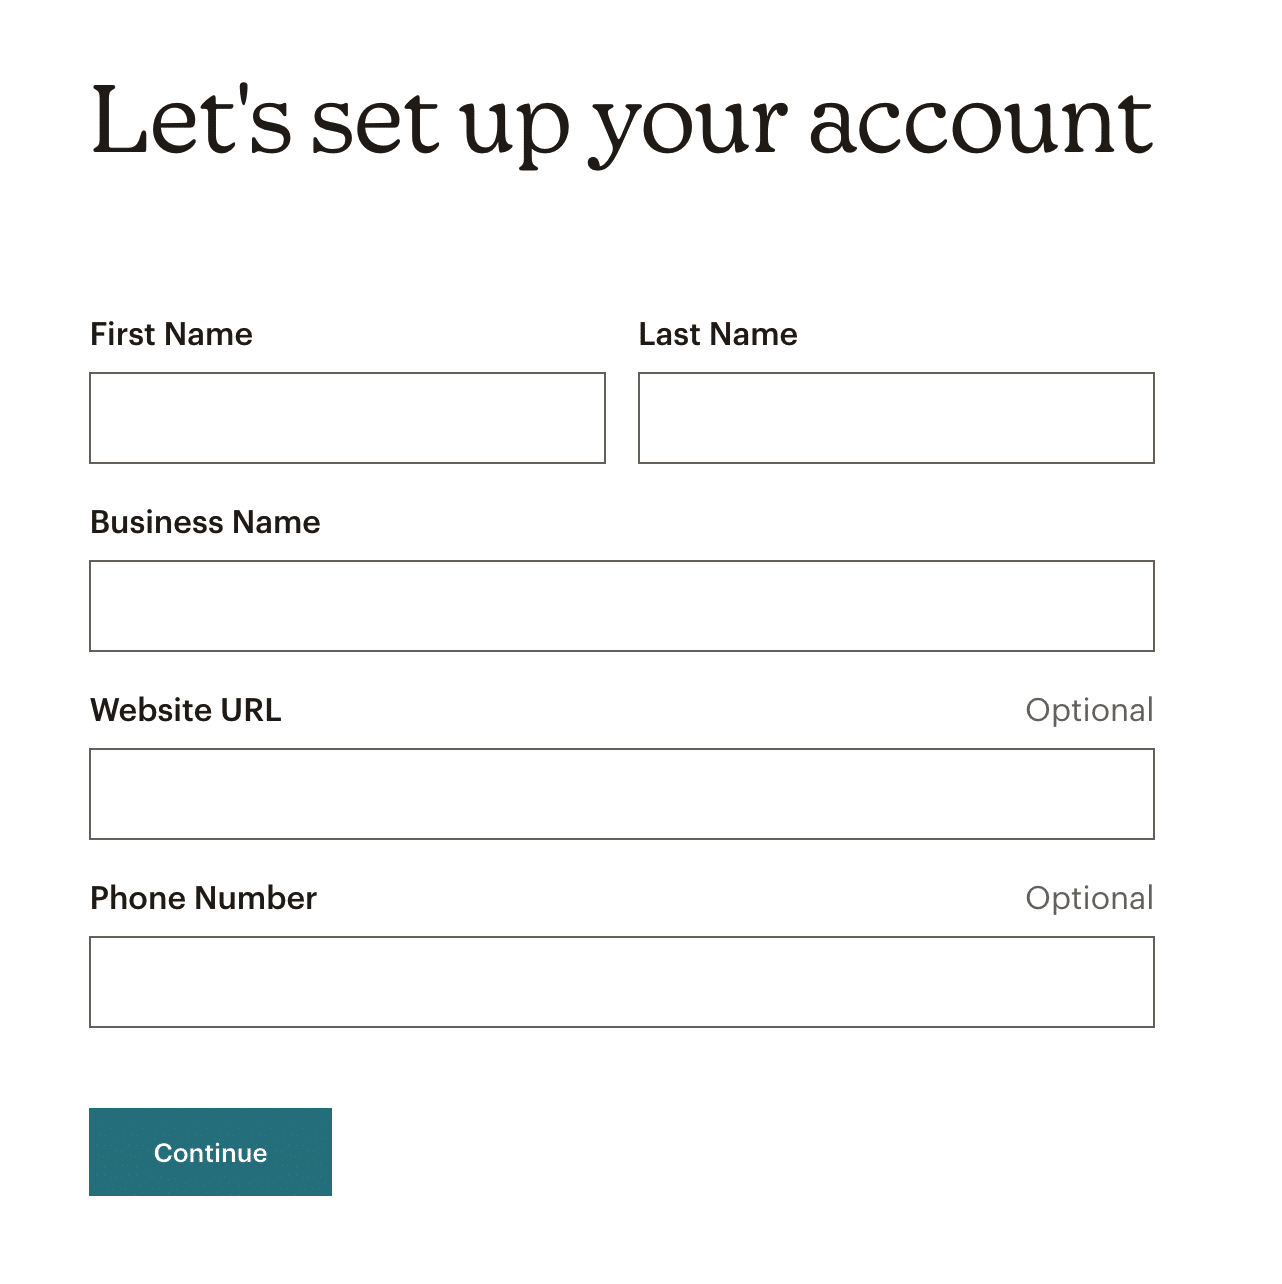
Now it’s time to fill in some personal information about your account:
- First name
- Last name
- Business name
- URL of your website (optional)
- Phone number (optional)
Click on the “Continue” button.

Do the same thing right after with your address information.
Then you have to choose if you have a contact list, and indicate if you sell products or services online.
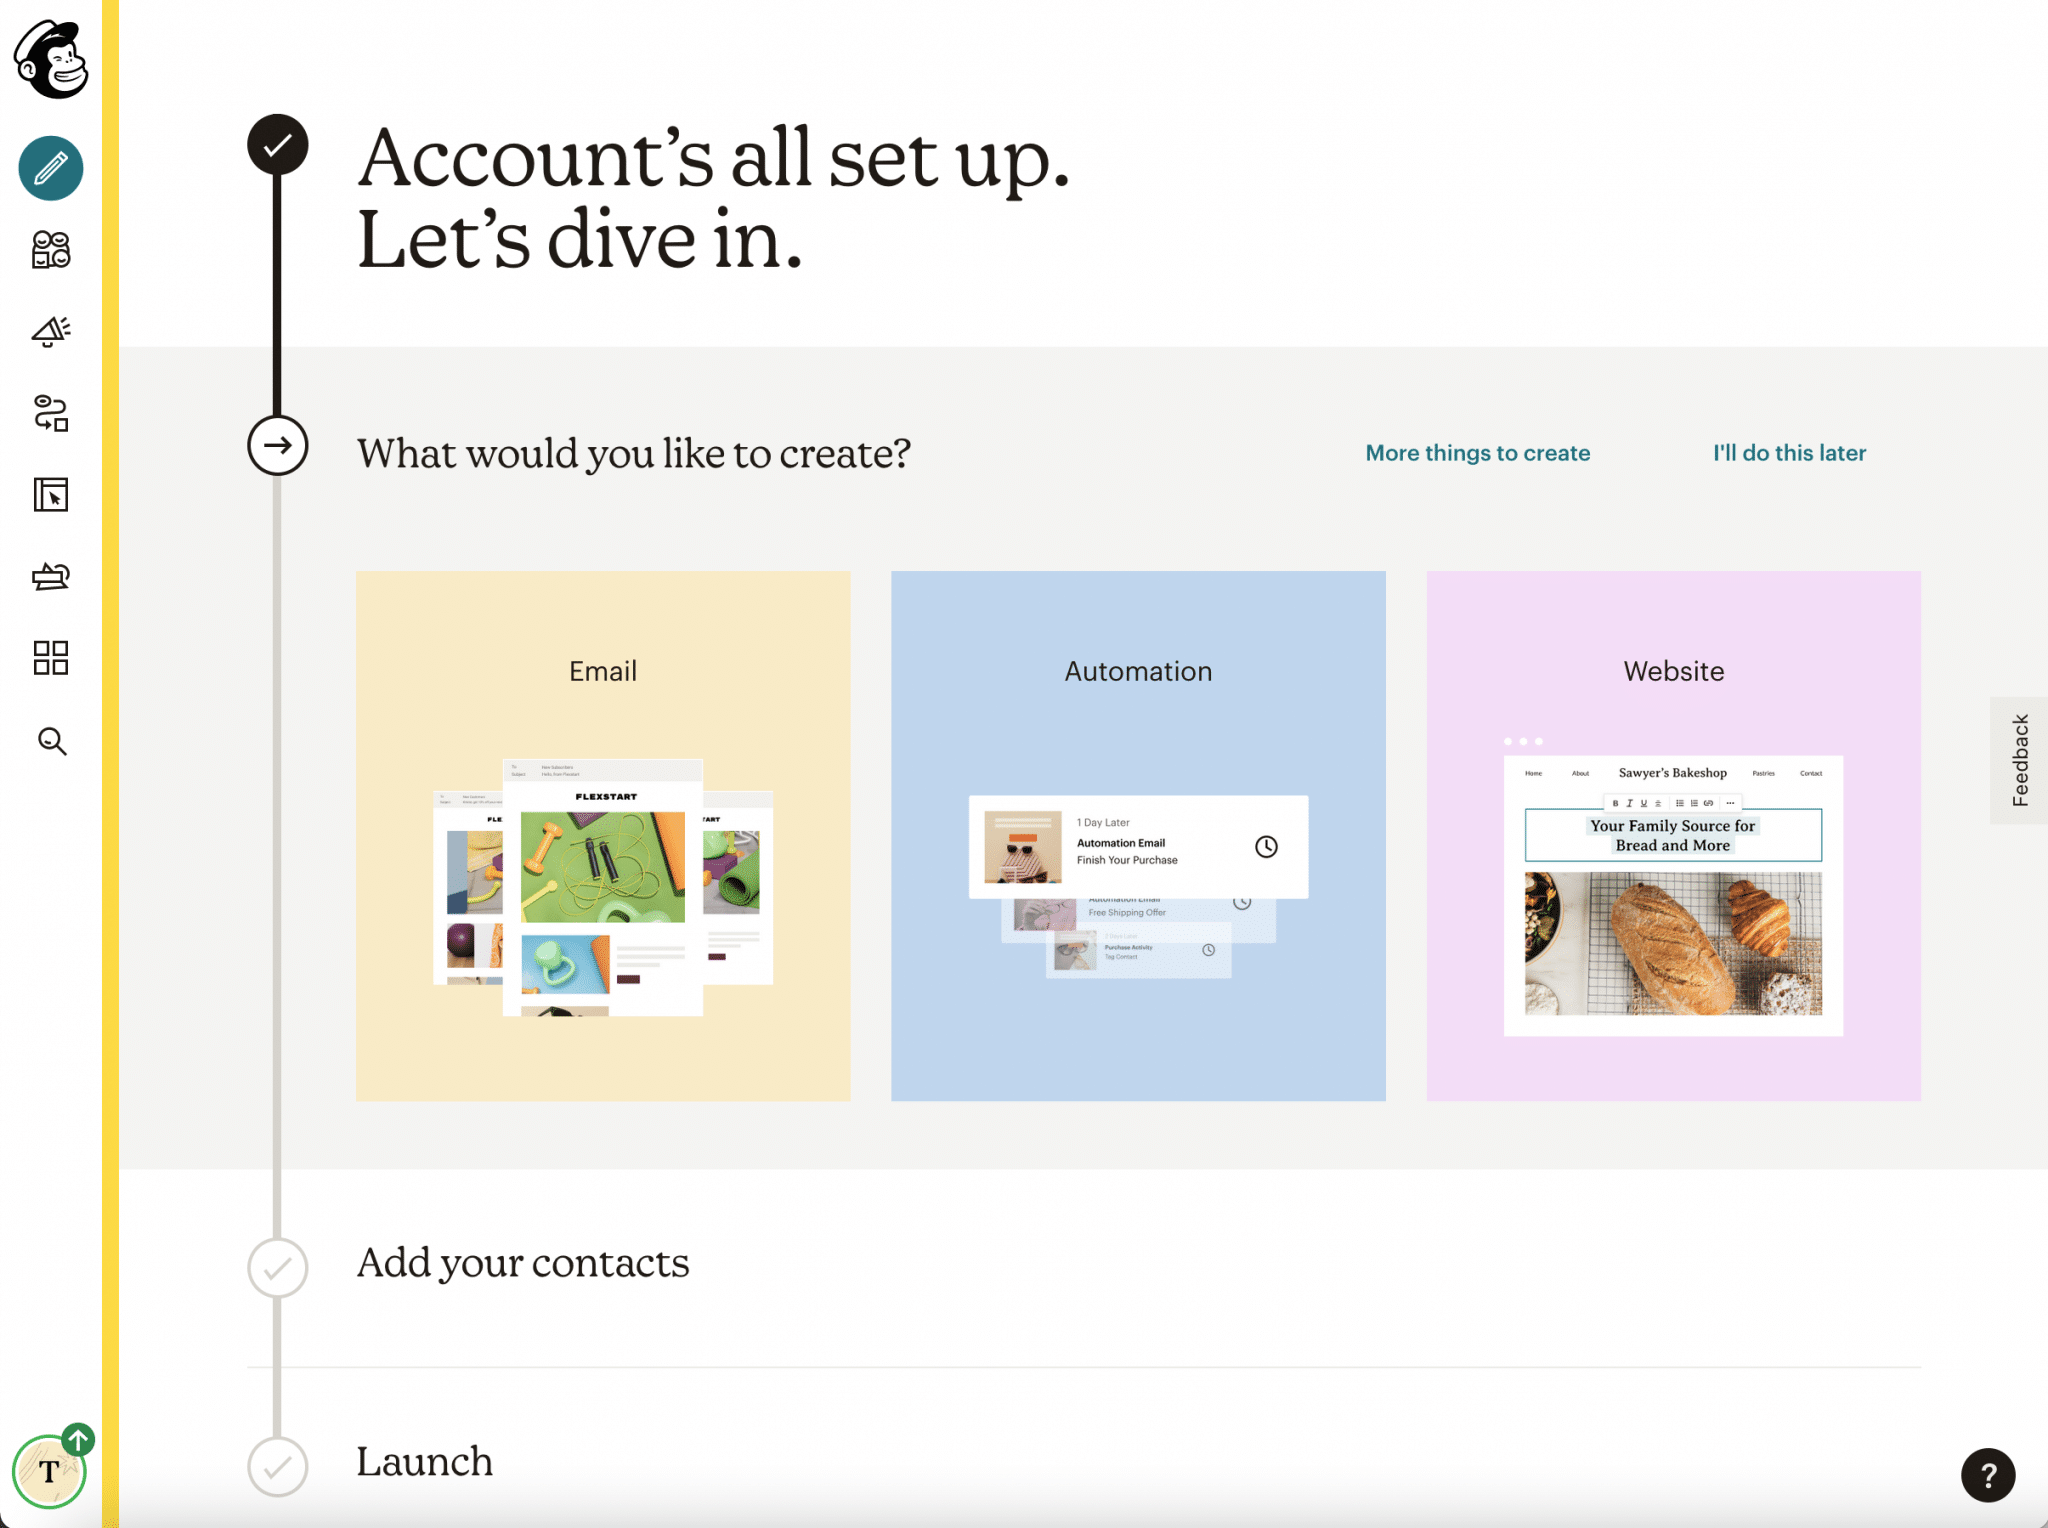
And that’s it, everything is good, well done! If all goes well, Mailchimp will redirect you to its dashboard, where you will find a shortcut to create emails.

Step 2: Activate the Mailchimp for WordPress plugin
Your Mailchimp account is now created. You can now go back to your WordPress dashboard.
Install and activate the Mailchimp for WordPress (MC4WP) plugin through the Plugins > Add New menu.

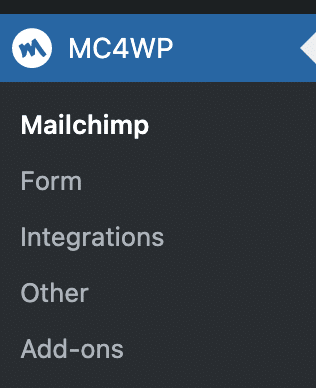
Once you have done this, you will have access to a streamlined settings menu with 5 submenus:
- “Mailchimp”: this is where you will enter your API key (I’ll come to that in step 3).
- “Form”: to add a new subscription form to your email list.
- “Integrations”: this page lists all the possible integrations of MC4WP with other plugins, such as Contact Form 7, Gravity Forms, Ninja Forms, etc.
- “Other”: gives access to a usage tracker and a debugging log.
- “Add-ons”: presents the premium features of the plugin, as well as 4 free add-ons.

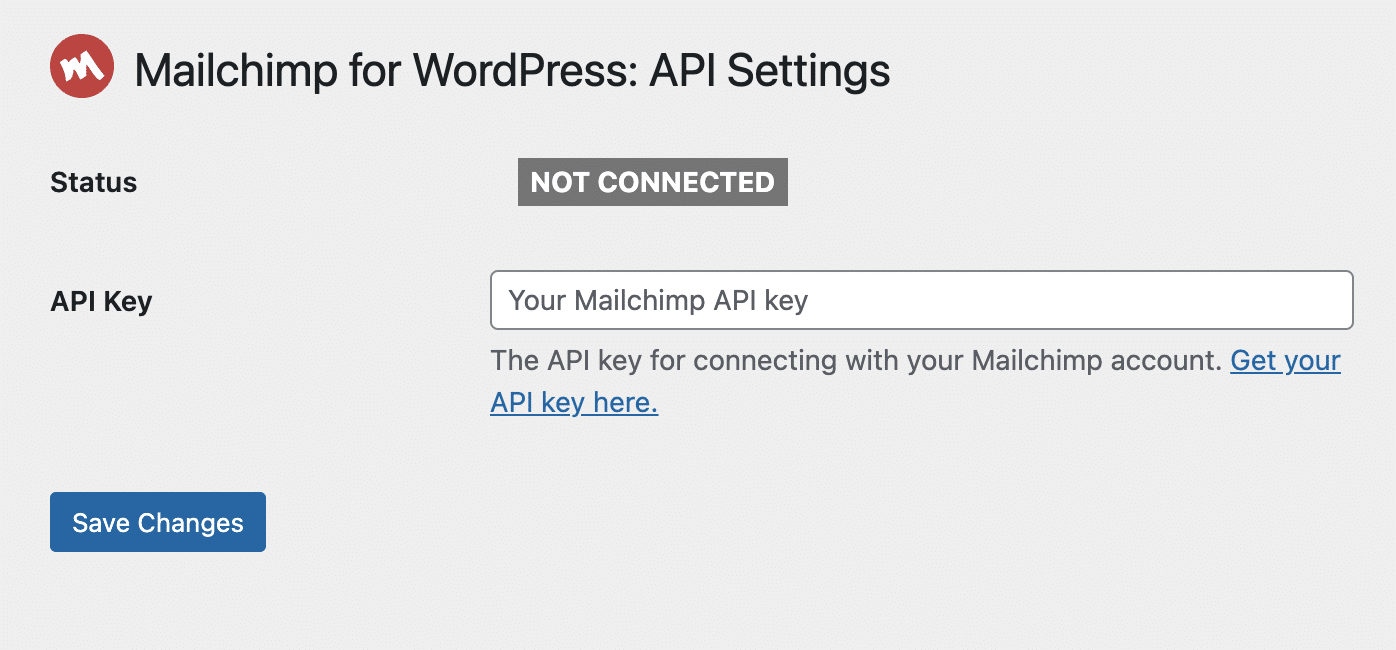
Step 3: Enter your Mailchimp API key
API stands for Application Programming Interface.
As stated in this article, an API is “a software intermediary that allows two applications to talk to each other”.
More simply, this famous key will allow you to connect the MC4WP plugin to Mailchimp, so you can use it.
To get this key, click on the link in the MC4WP > Mailchimp menu.

Log in to your account when prompted, then click on the “Create A Key” button:

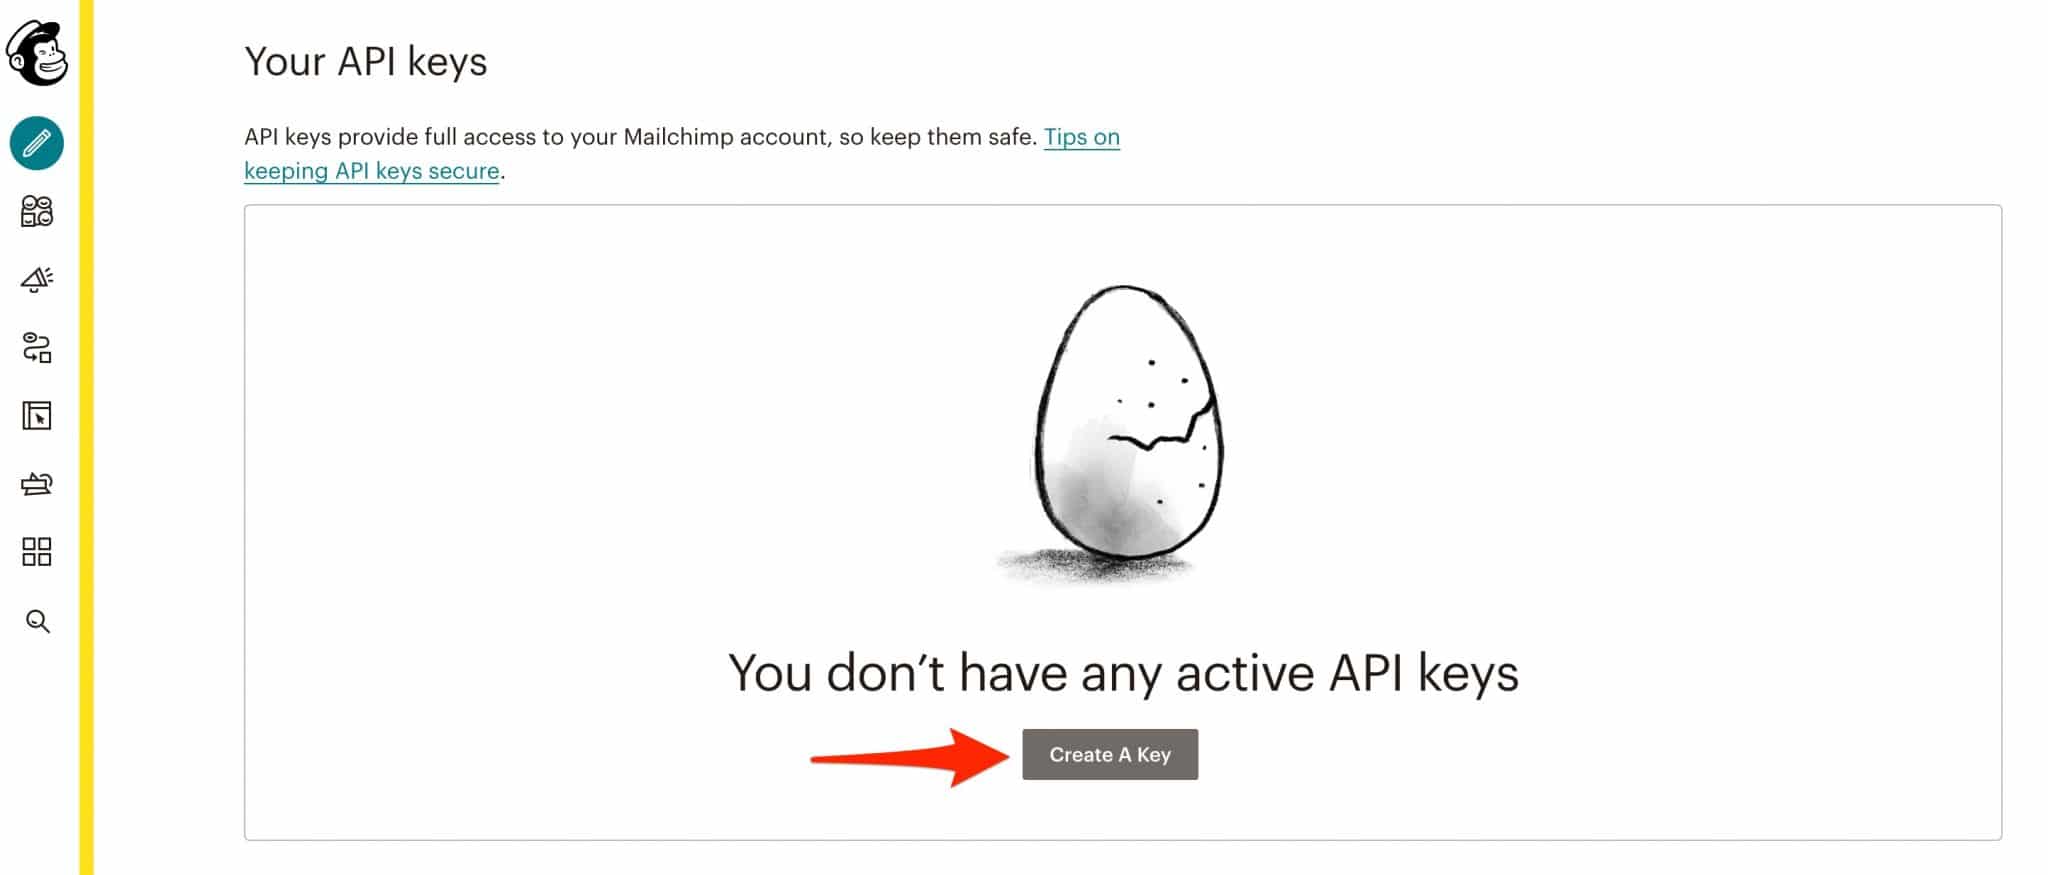
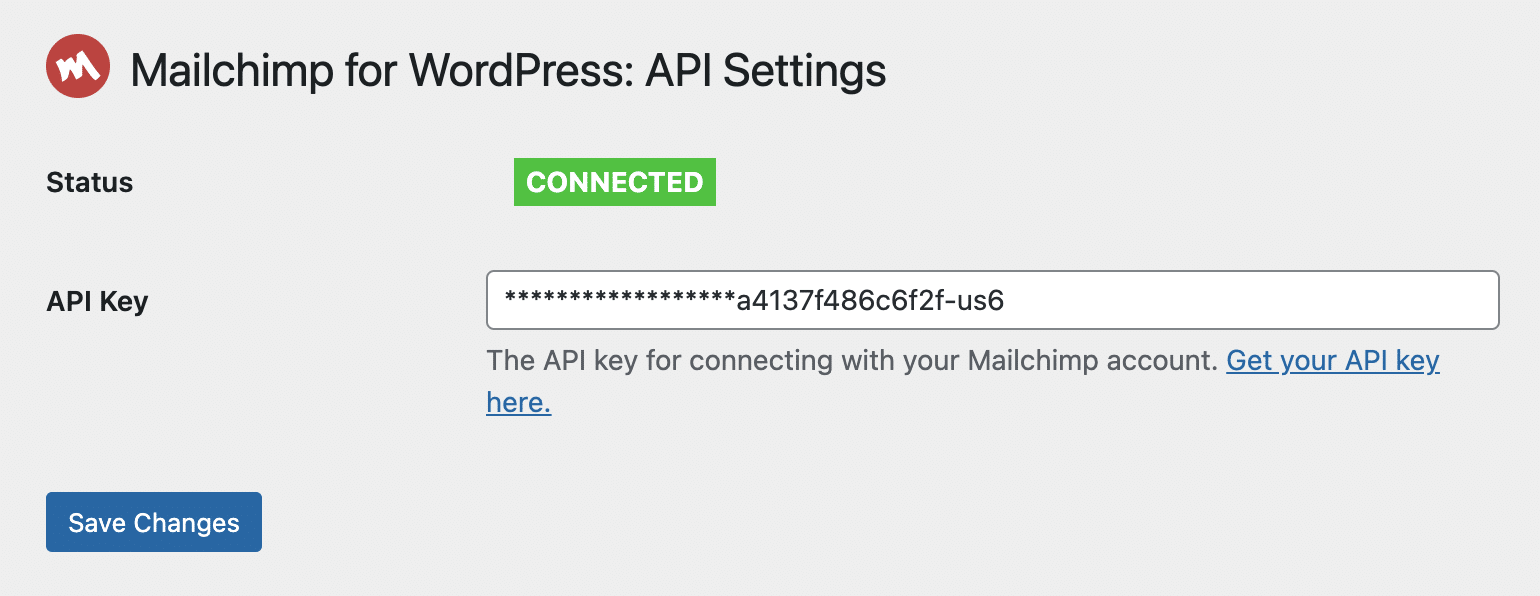
Copy the automatically generated key and paste it into your back office in the box provided.
The status should have changed to “Connected”, this means that the plugin and Mailchimp can now interact together.

By default, Mailchimp has automatically created a list with the name of the website you specified during the account creation process.
This list is essential to be able to send emails. It lists all the emails of people who have signed up (or will sign up) via a form that you will place on your WordPress website.
Without email addresses at your disposal, you will have trouble communicating with anyone.
To know how to create this famous opt-in form, keep reading.
How to add a subscription form to your email list with the Mailchimp for WordPress plugin?
On your WordPress dashboard, go to the MC4WP > Form menu. Mailchimp should attach said form to your list by default.
Click on “Add new form”.
You will then find yourself on an interface with 4 tabs, which we will detail:
- Fields
- Messages
- Settings
- Appearance
The free version of the Mailchimp for WordPress plugin allows you to create a single subscription form for your email list.
The Fields tab of Mailchimp for WordPress
The “Fields” tab is divided into 3 parts:
- On the top part, you have access to a list of fields (number 1 on the screenshot below). The classics are there (first name, last name, phone number, city, etc.).
As soon as you click on the desired field, a window will open to allow you to add your information.
I advise you to include the field called “Agree to terms”. It allows you to make your visitors accept your privacy policy and to be in compliance with the GDPR. - On the bottom left, you have access to the HTML code of the form, which you can modify (number 2).
- On the bottom right, you have a preview of the form with your different fields (number 3). The fields you add as you go along will appear here.
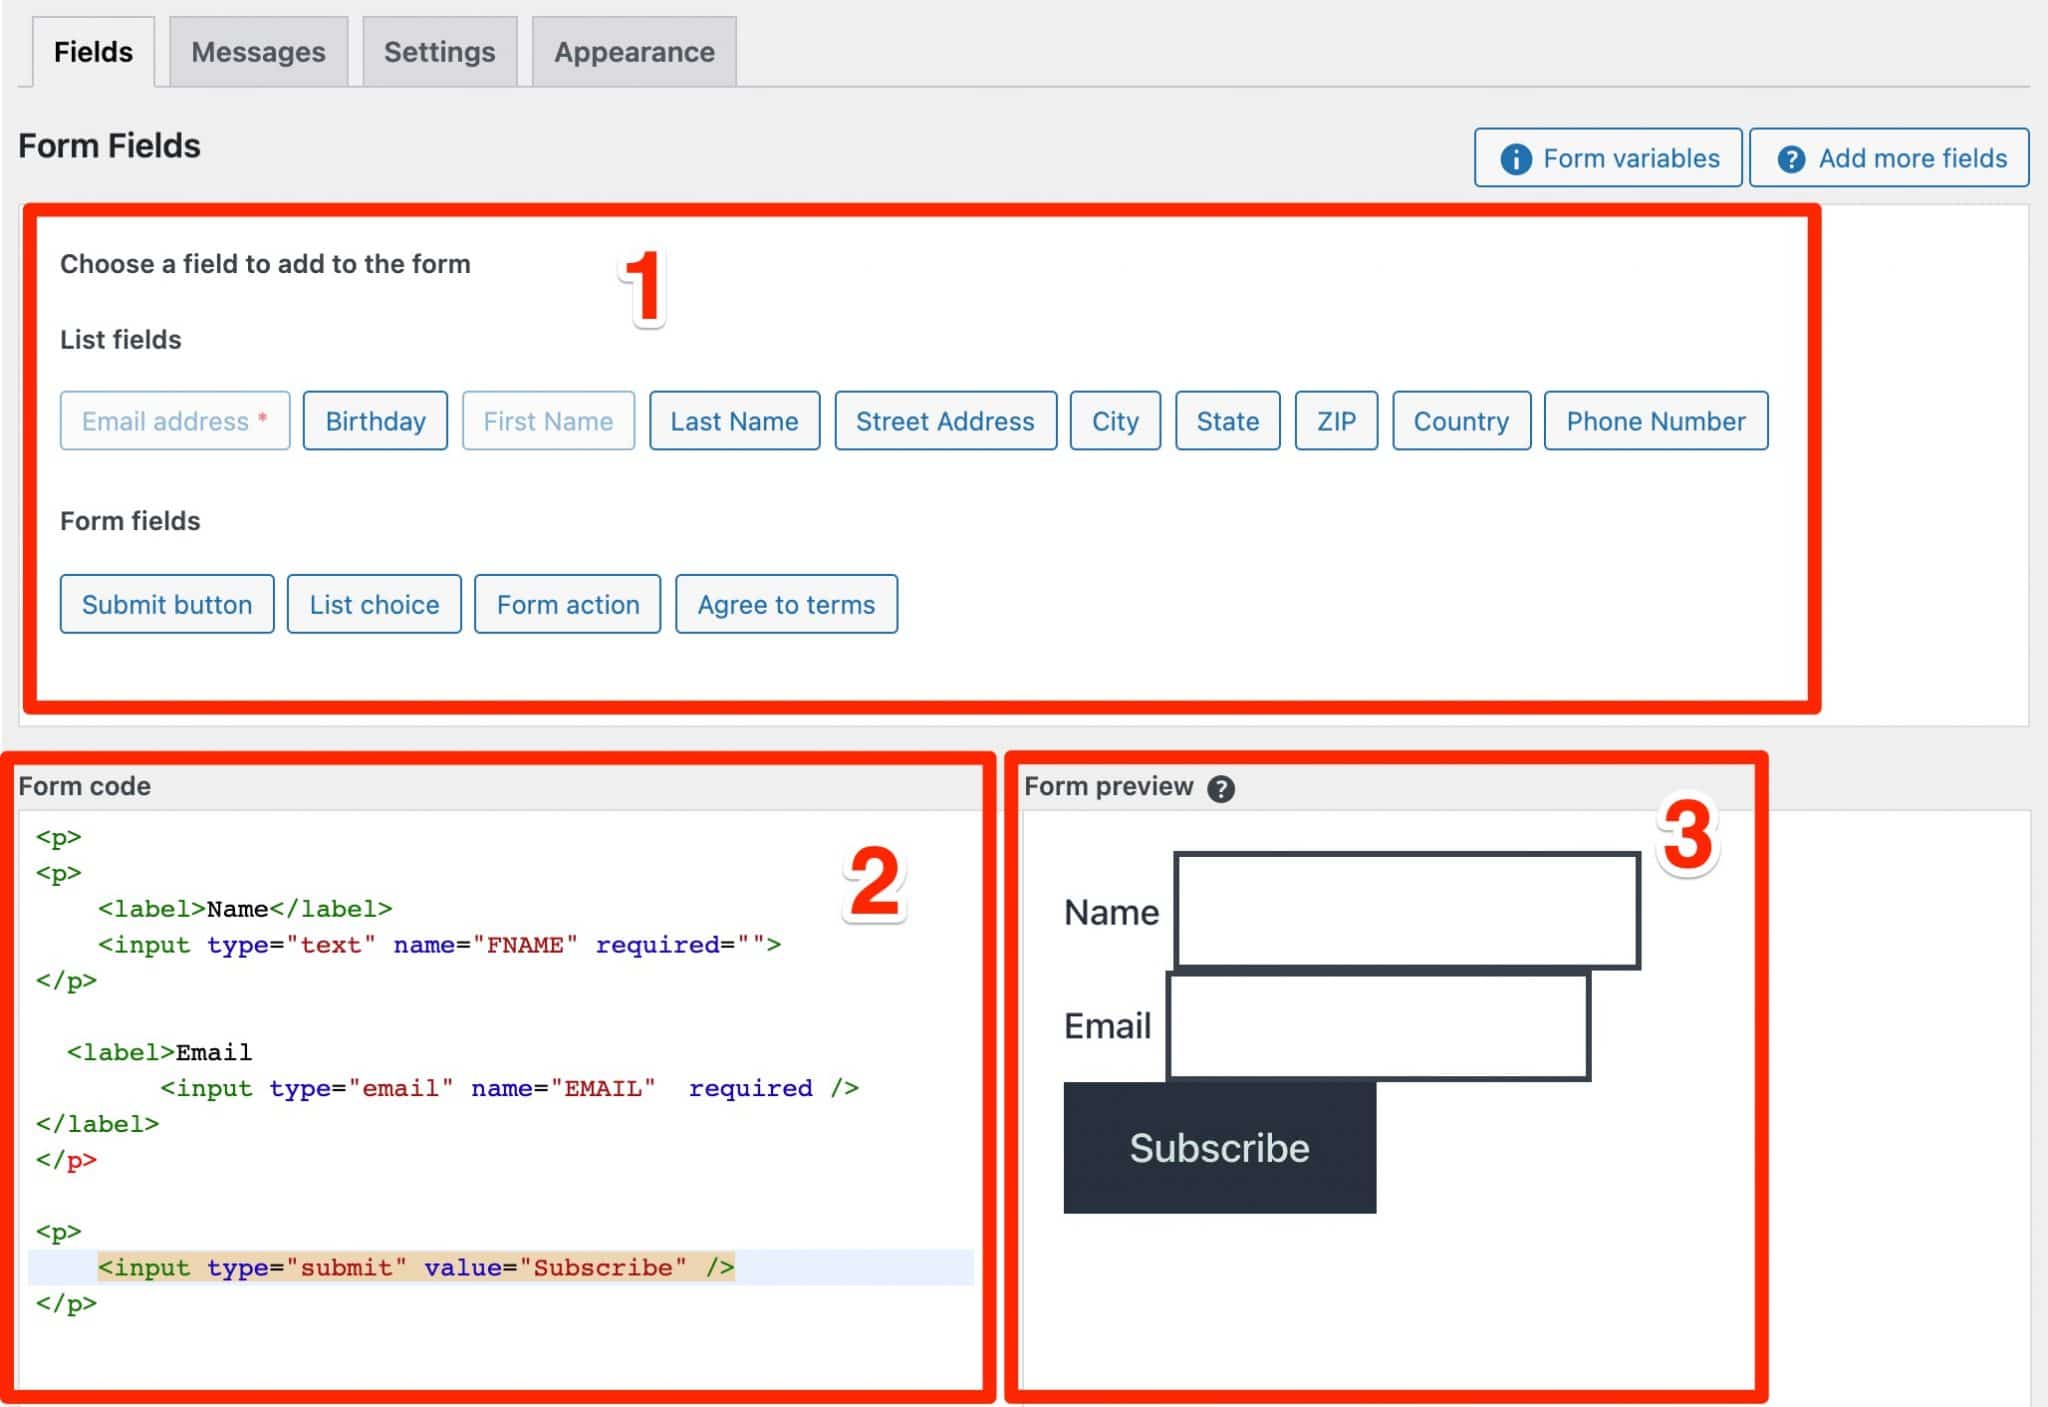
For an even more advanced use, you can also add new fields through your Mailchimp interface, but also dynamic form variables.
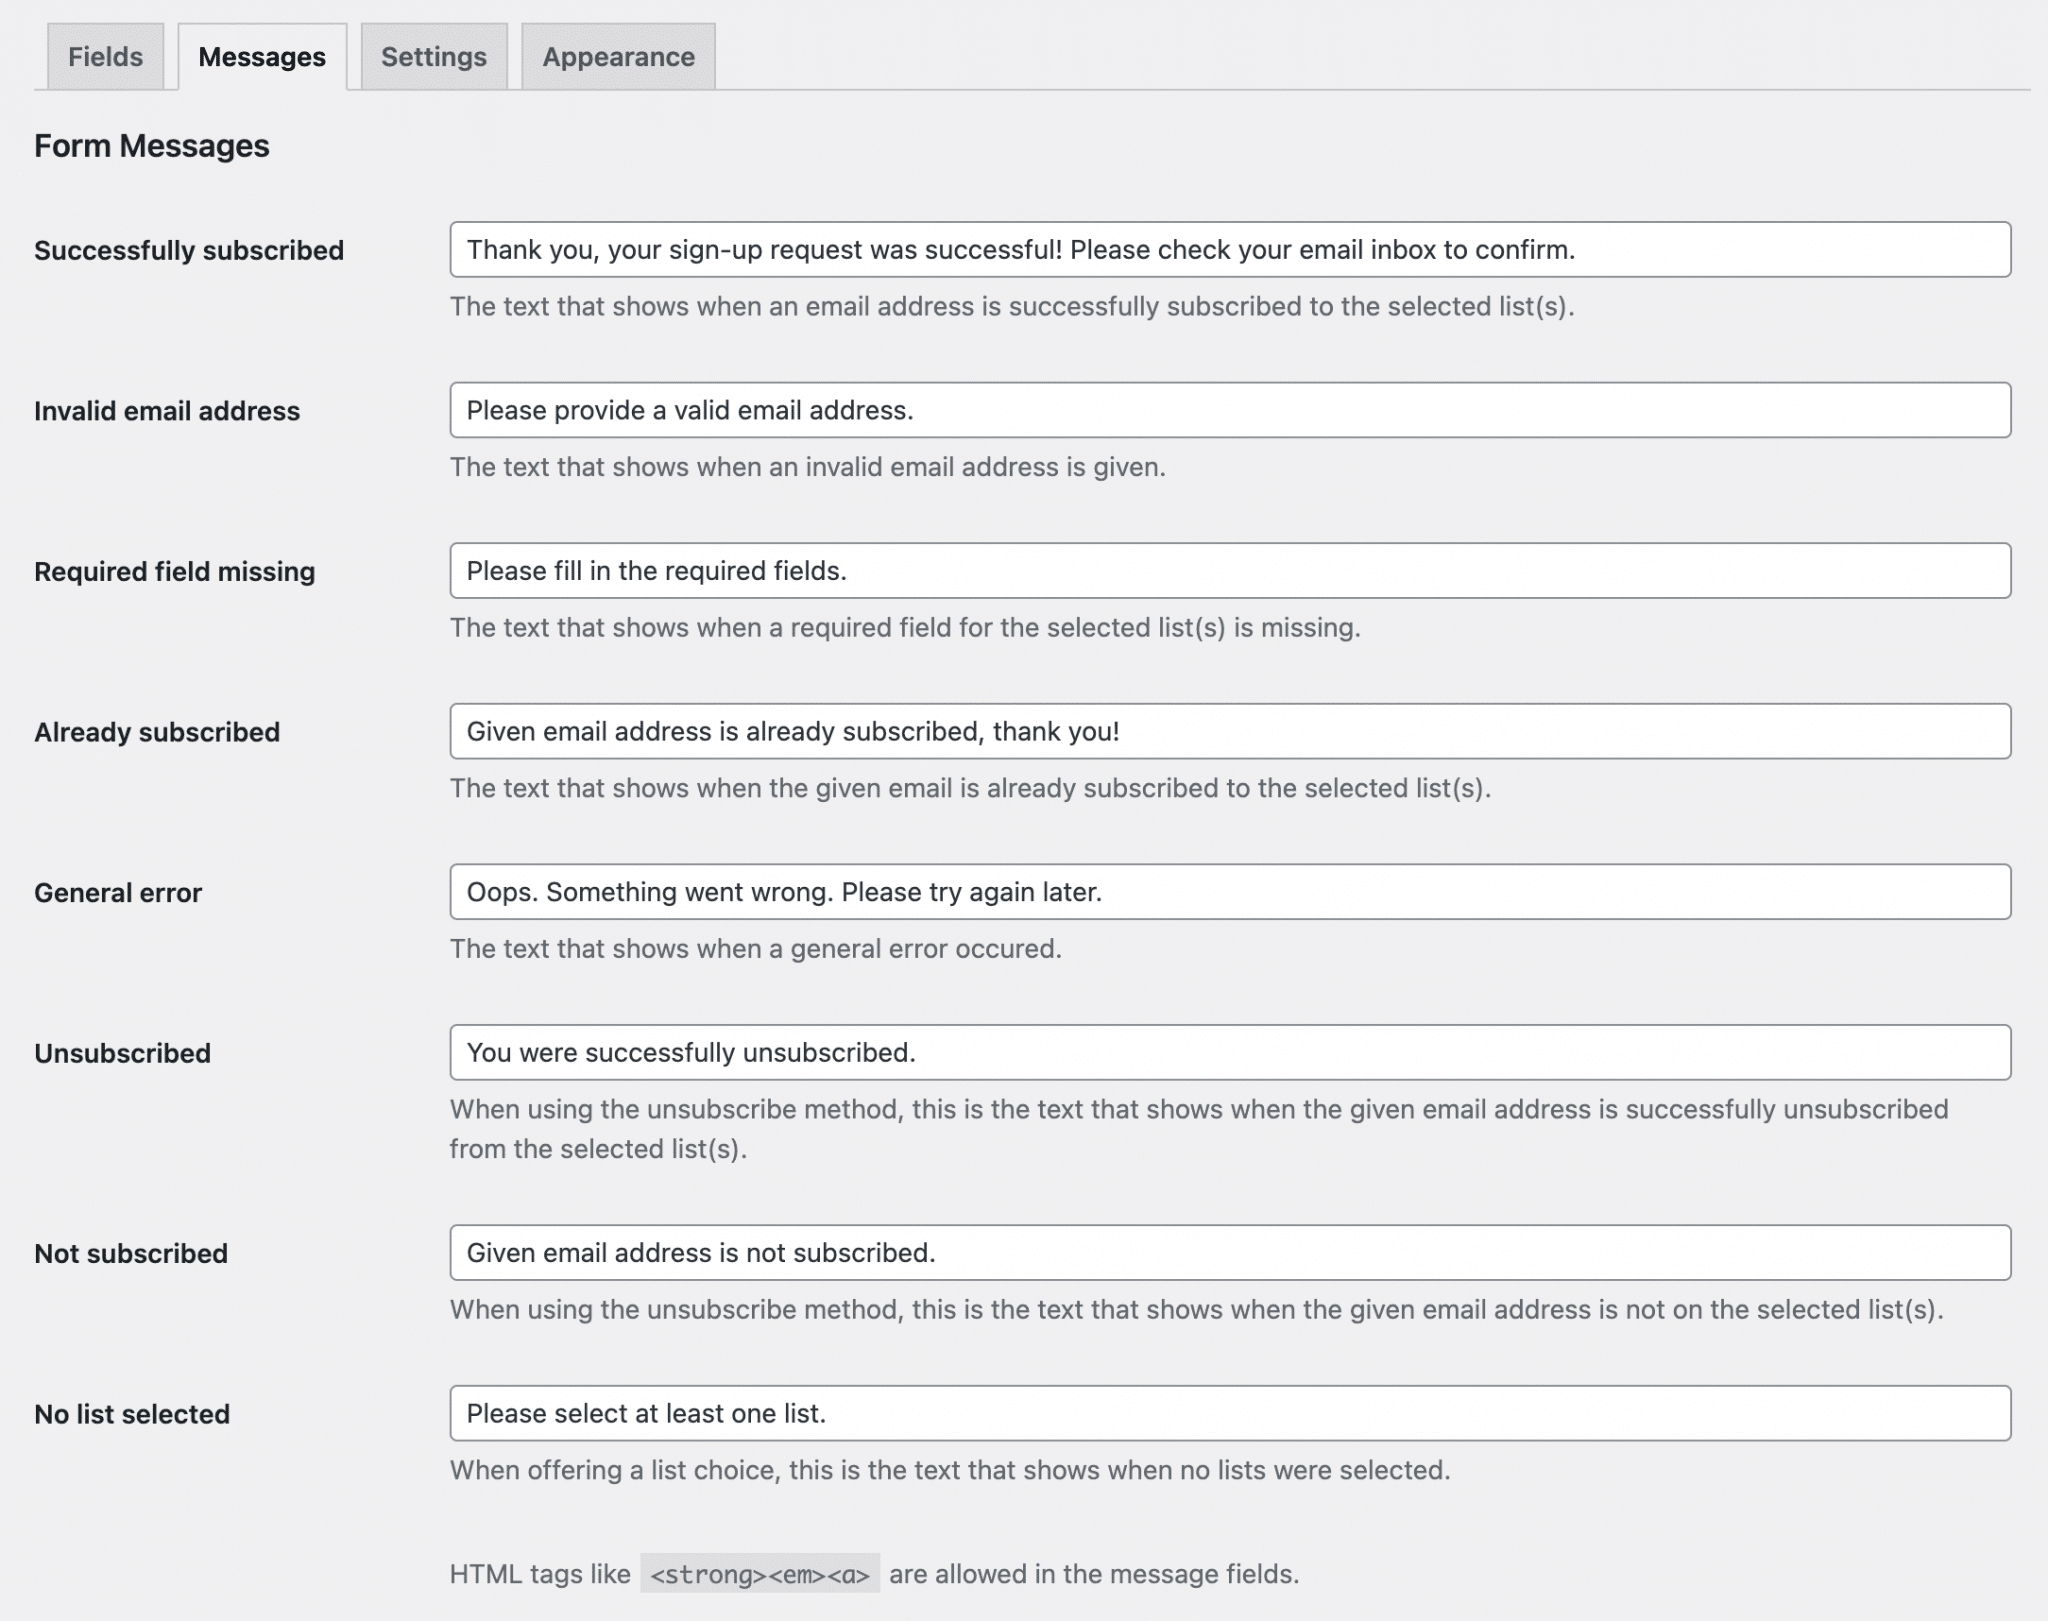
The Messages tab
In this tab, you can translate and modify all the texts displayed by the form when a user registers, unsubscribes, does not fill in a mandatory field, etc.
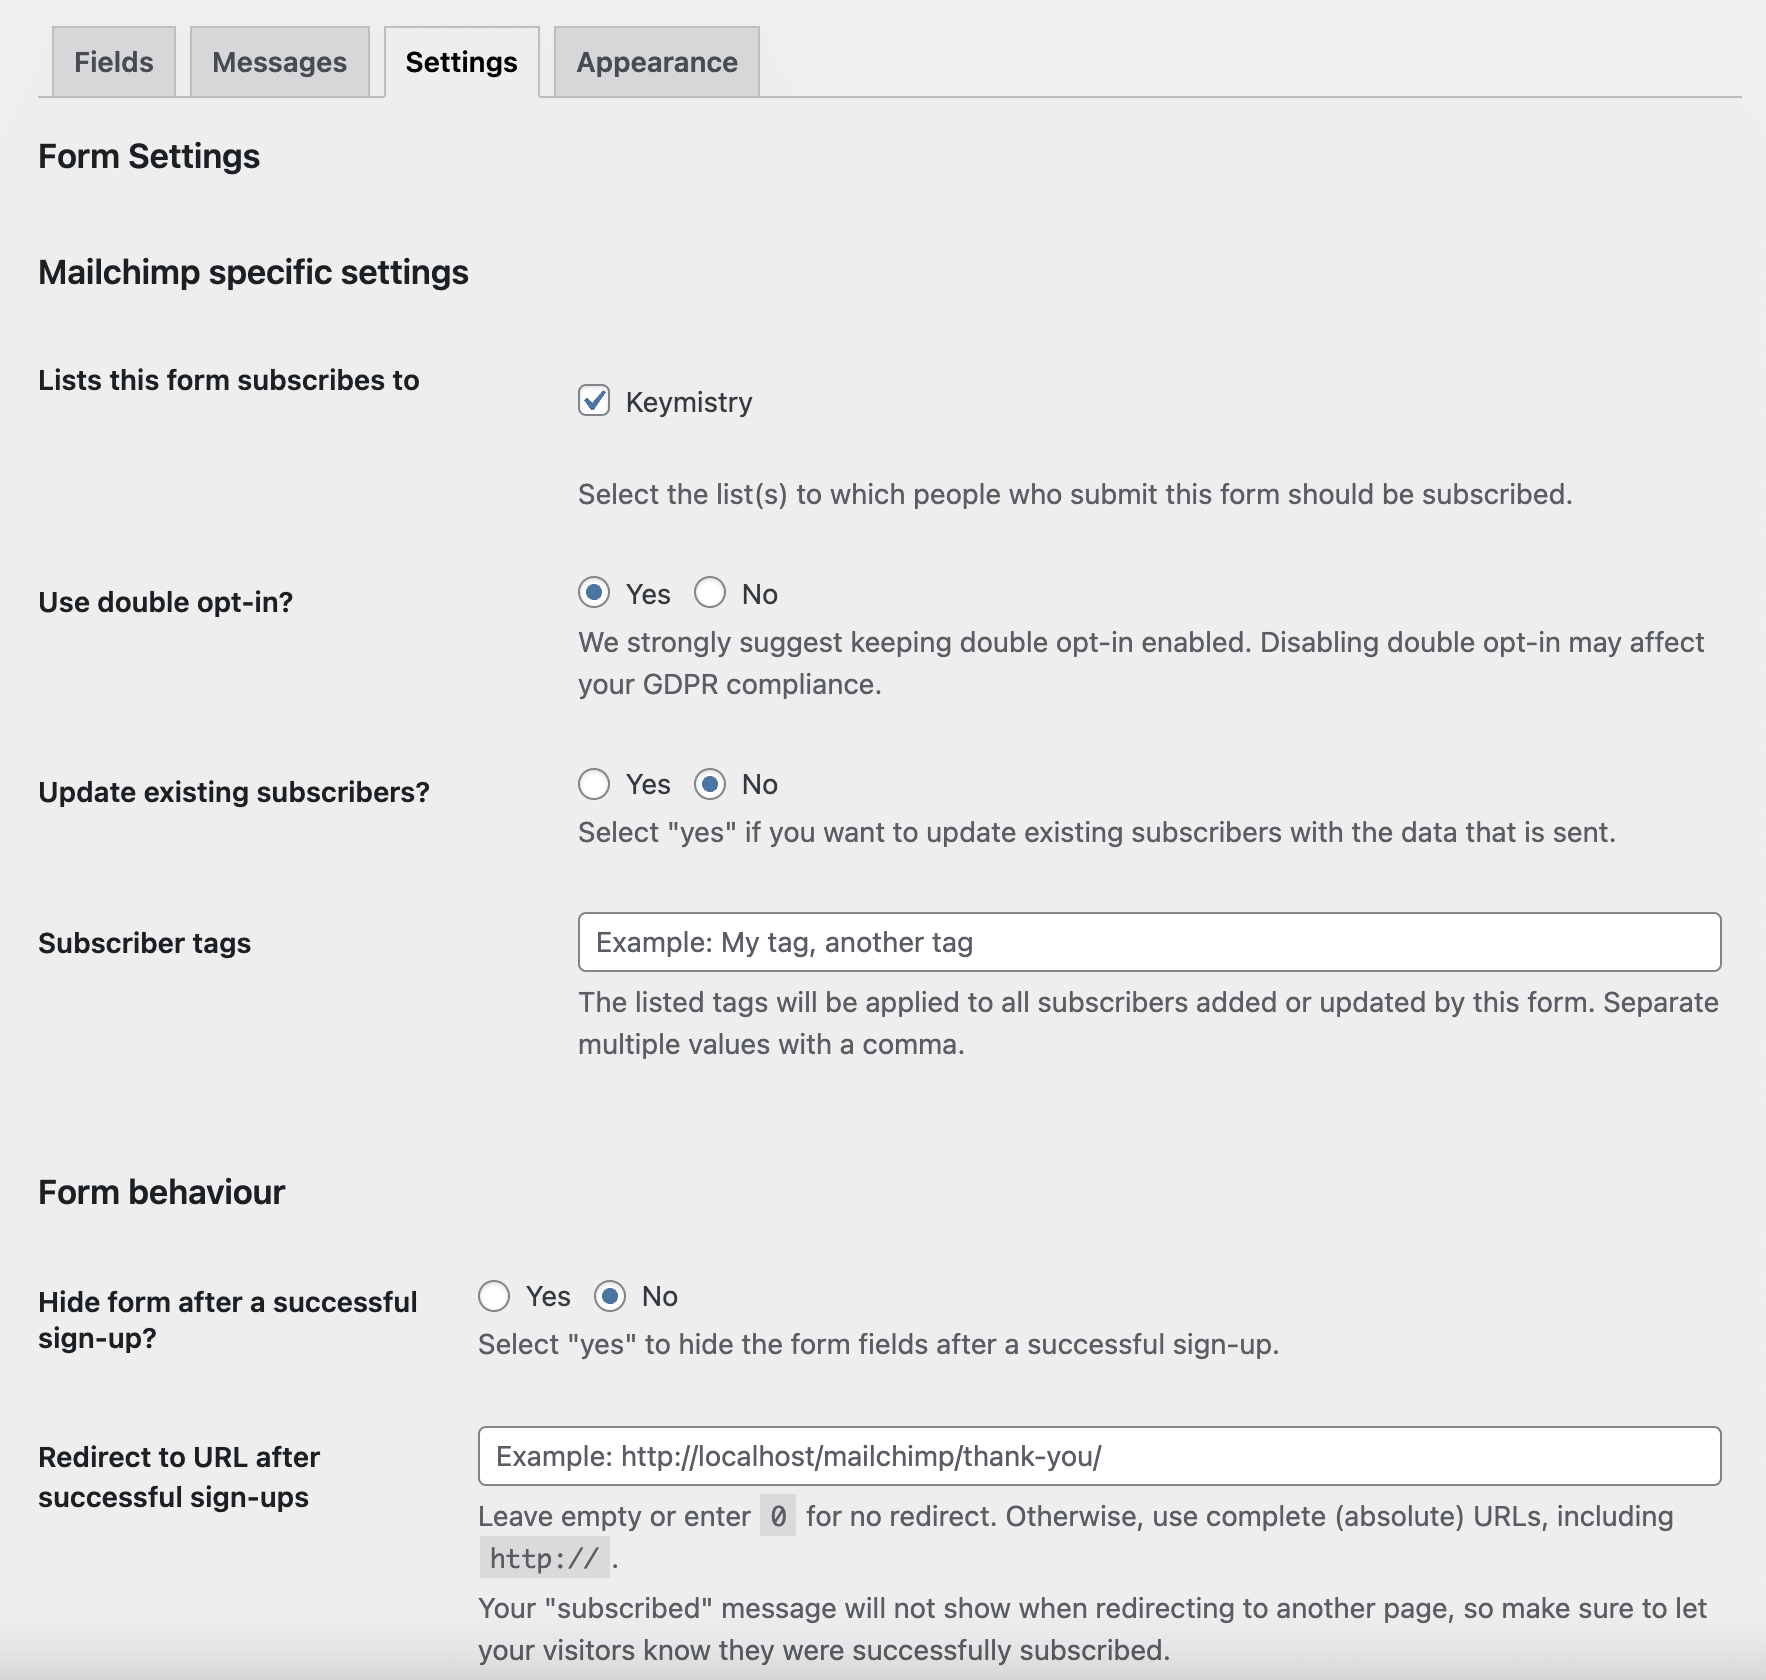
The Settings tab
This is where you will find the form settings:
- Use double opt-in. By default, this box will be checked and I advise you to leave it on “yes”. This is very practical to avoid getting spam addresses. As soon as your visitors have validated the registration form for your newsletter, they will receive an email asking them if they really want to register and will have to confirm again.
- Do you want to hide the form after a successful sign-up? Enable this option, which will allow you to display a button or a link, for example.
- Redirect to a URL after a successful sign-up: this allows you to keep the visitor on your site by directing them to a strategic page, or at least one that you want them to visit (e.g. homepage, store, blog, etc.).
The Appearance tab
Finally, this last tab allows you to customize the style of the form. By default, it inherits the appearance of your theme, but you can also choose from 5 color themes.
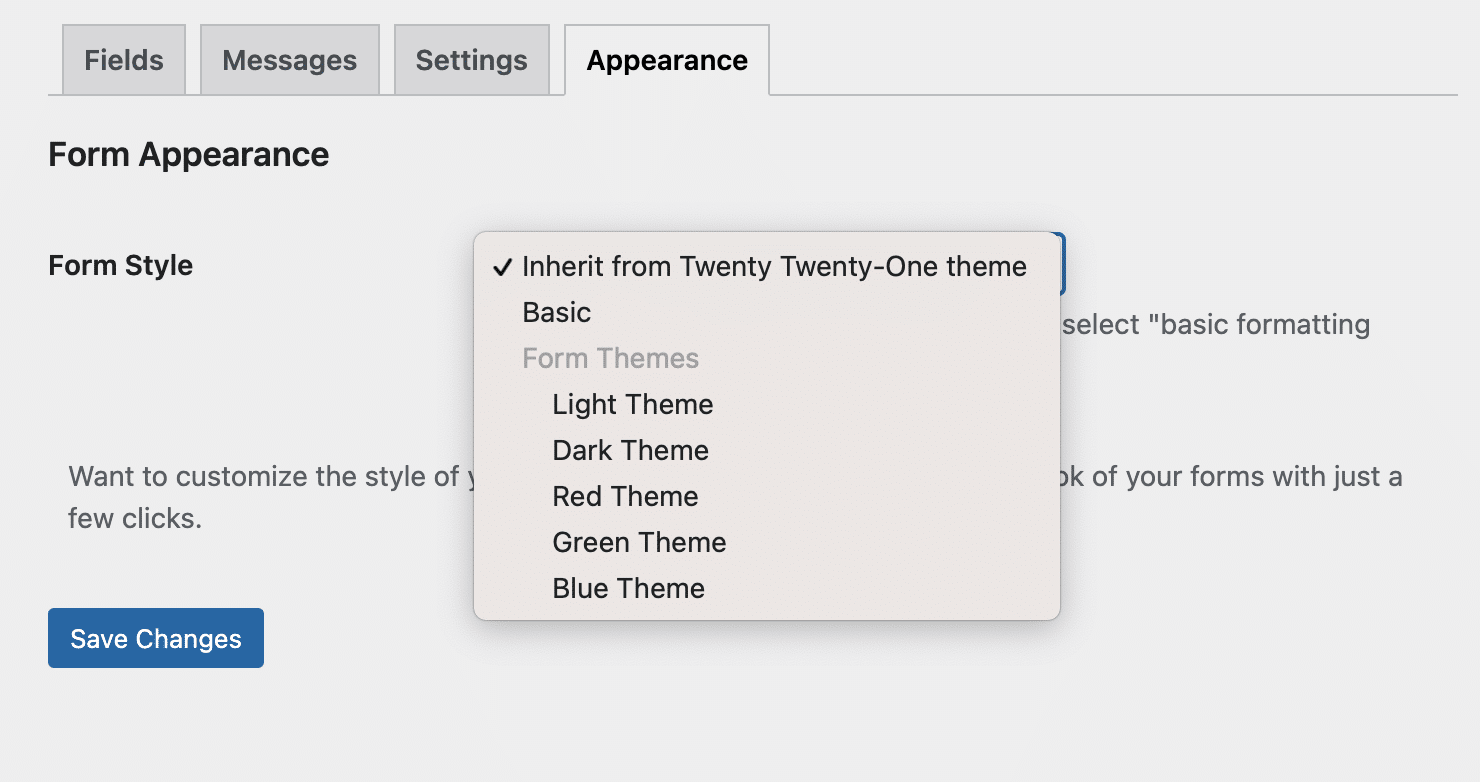
The options are very limited here. Let’s just say that you are more affected than you are able to act, since you don’t have precise control over all the appearance details.
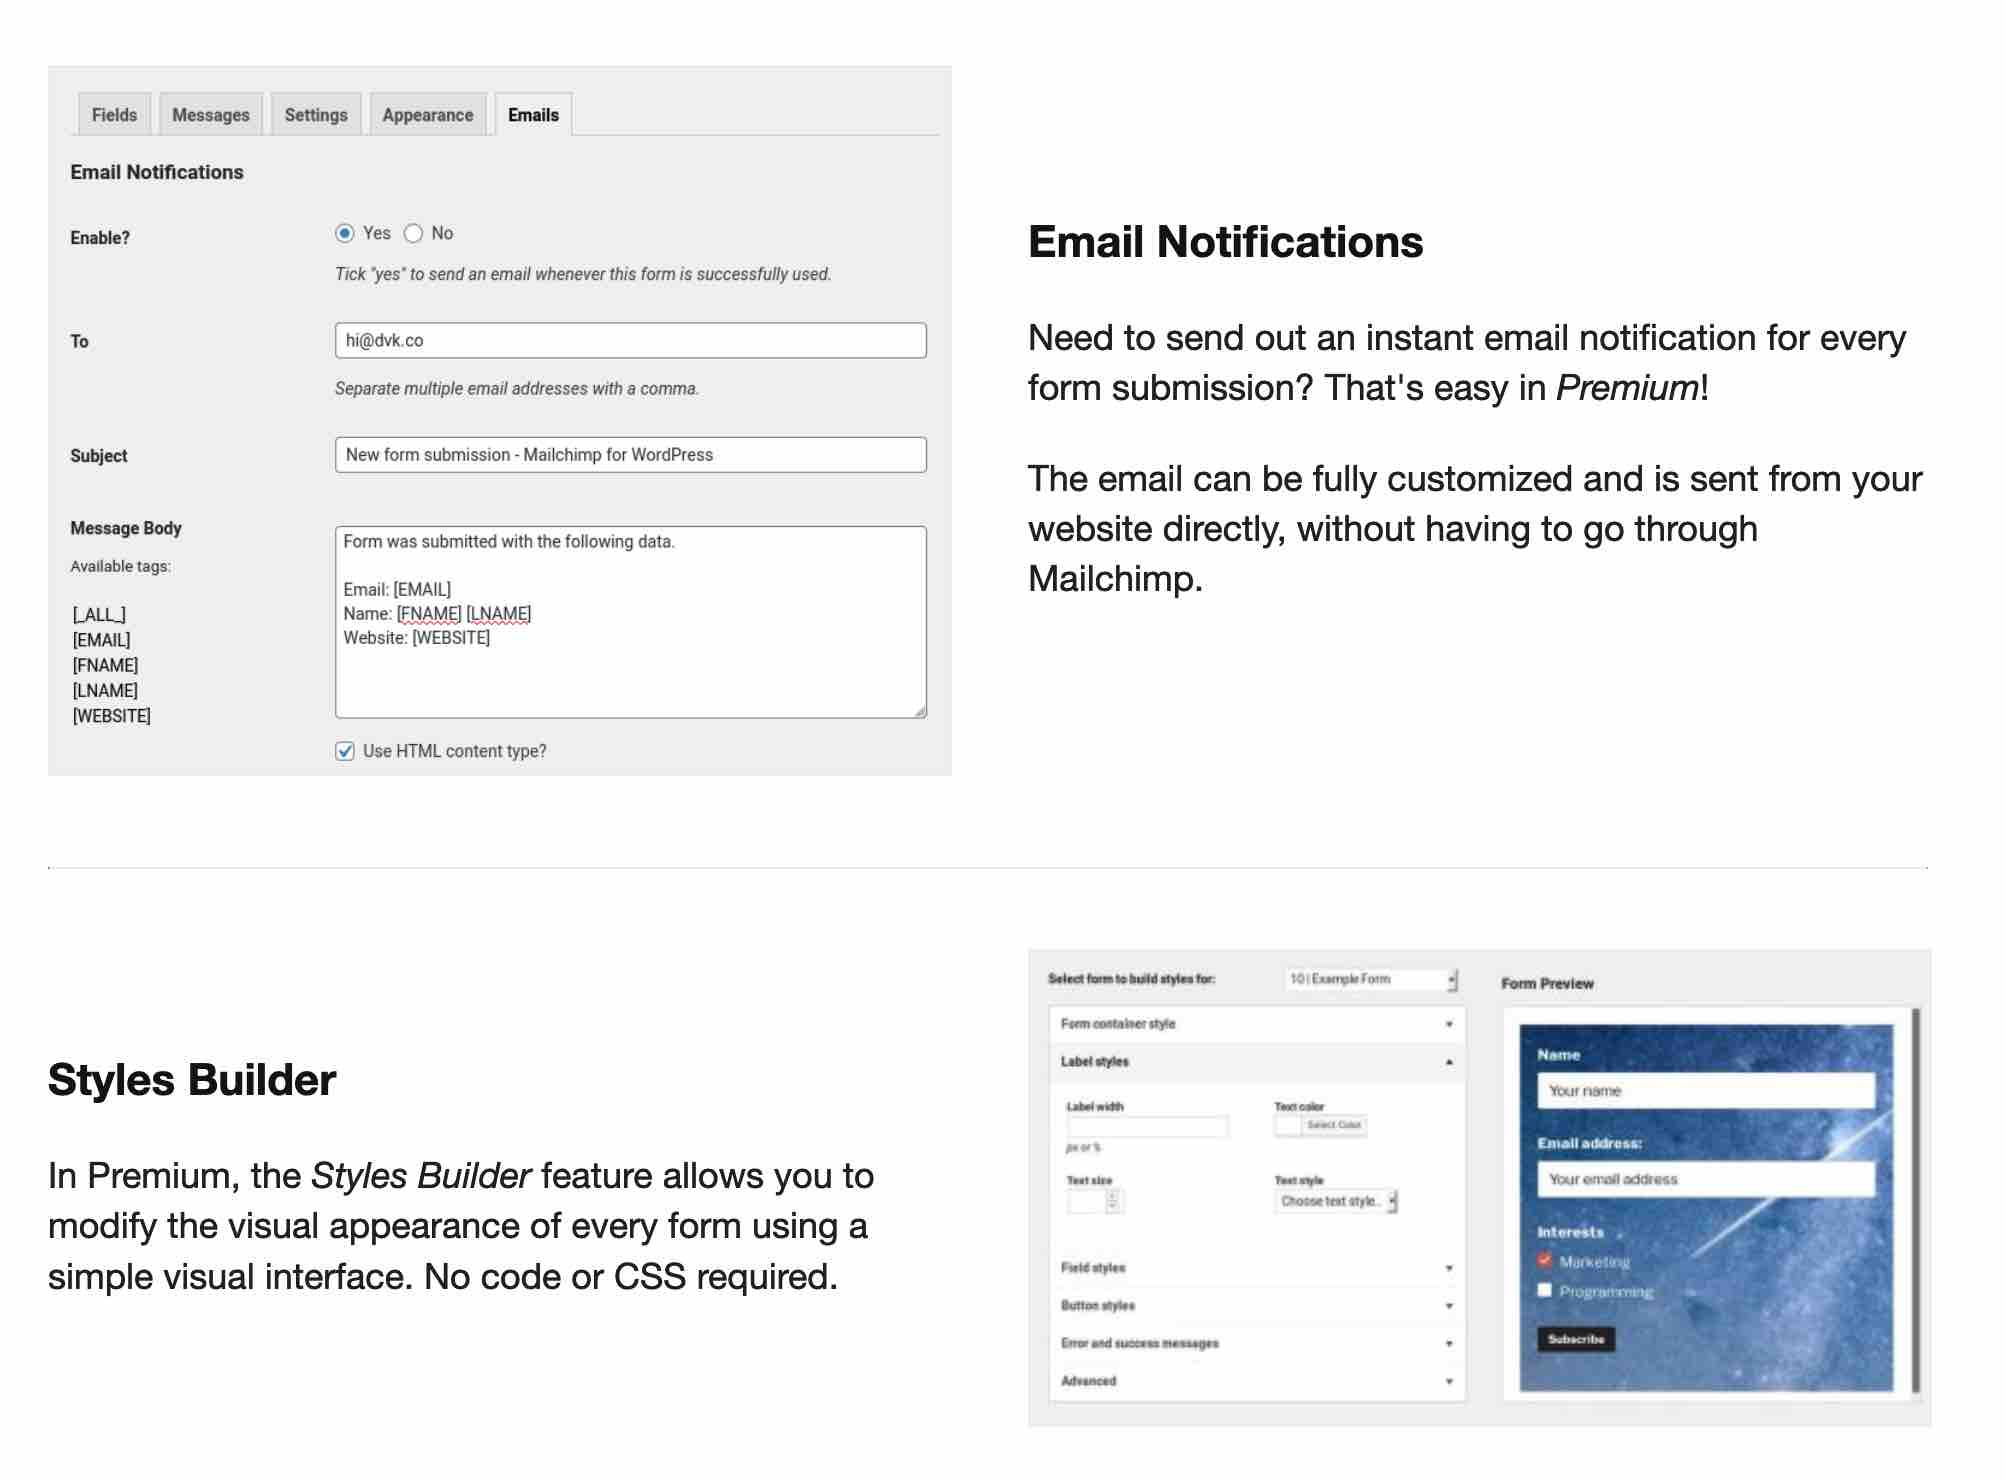
To go further, you’ll have to use CSS code, or switch to the Pro version of the plugin, which offers a “Style builder”, to modify the appearance of your form without coding within a visual interface.
You can also proceed manually by using the Mailchimp interface to create your form, following this user guide.
Once your form is created, you can paste the HTML code associated with it on your site.


How to add your form to your WordPress site content?
Have you designed and refined the look of your form? All that’s left is to display it to your visitors.
How to add a form to a post or a page?
The first classic use case: adding your opt-in form to a post or a page.
On your blog posts, you can use it as a call to action to encourage your readers to subscribe to your newsletter.
To do this, go to the area of your choice on a post or a page, then select the block called “Mailchimp for WordPress Form”:
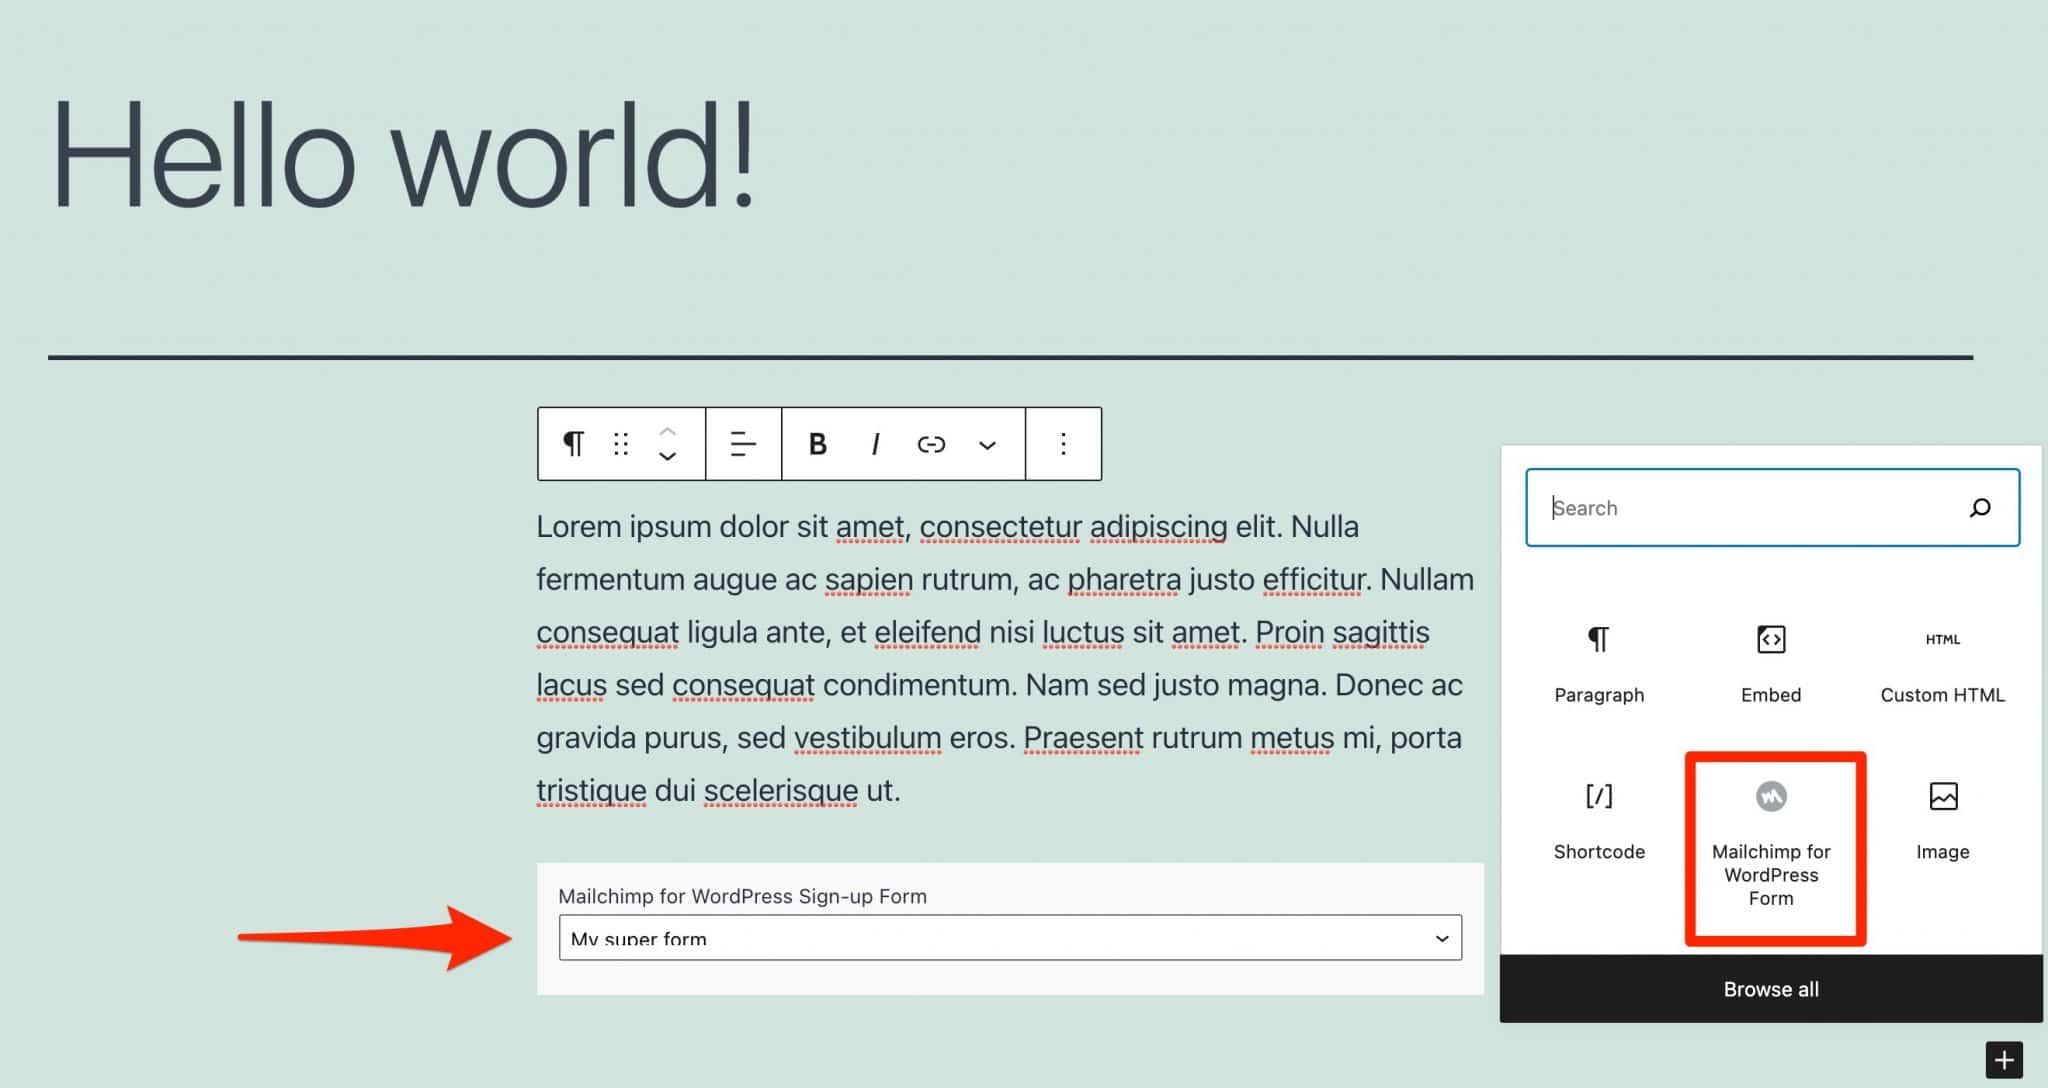
Less intuitive but just as effective: you can also add the following shortcode [mc4wp_form] in your content (for example, inside the “Shortcode” block) to display your form.
How to add a form in a widget area?
Second use case: adding a subscription form to your Mailchimp email list in a widget area.
I’m thinking for example of your sidebar or footer. The presence and multiplicity of these widget areas will depend on your theme, so you may not have the same options.
For example, for the purpose of this test, I used the native theme Twenty Twenty-One, which only offers one widget area: the footer.
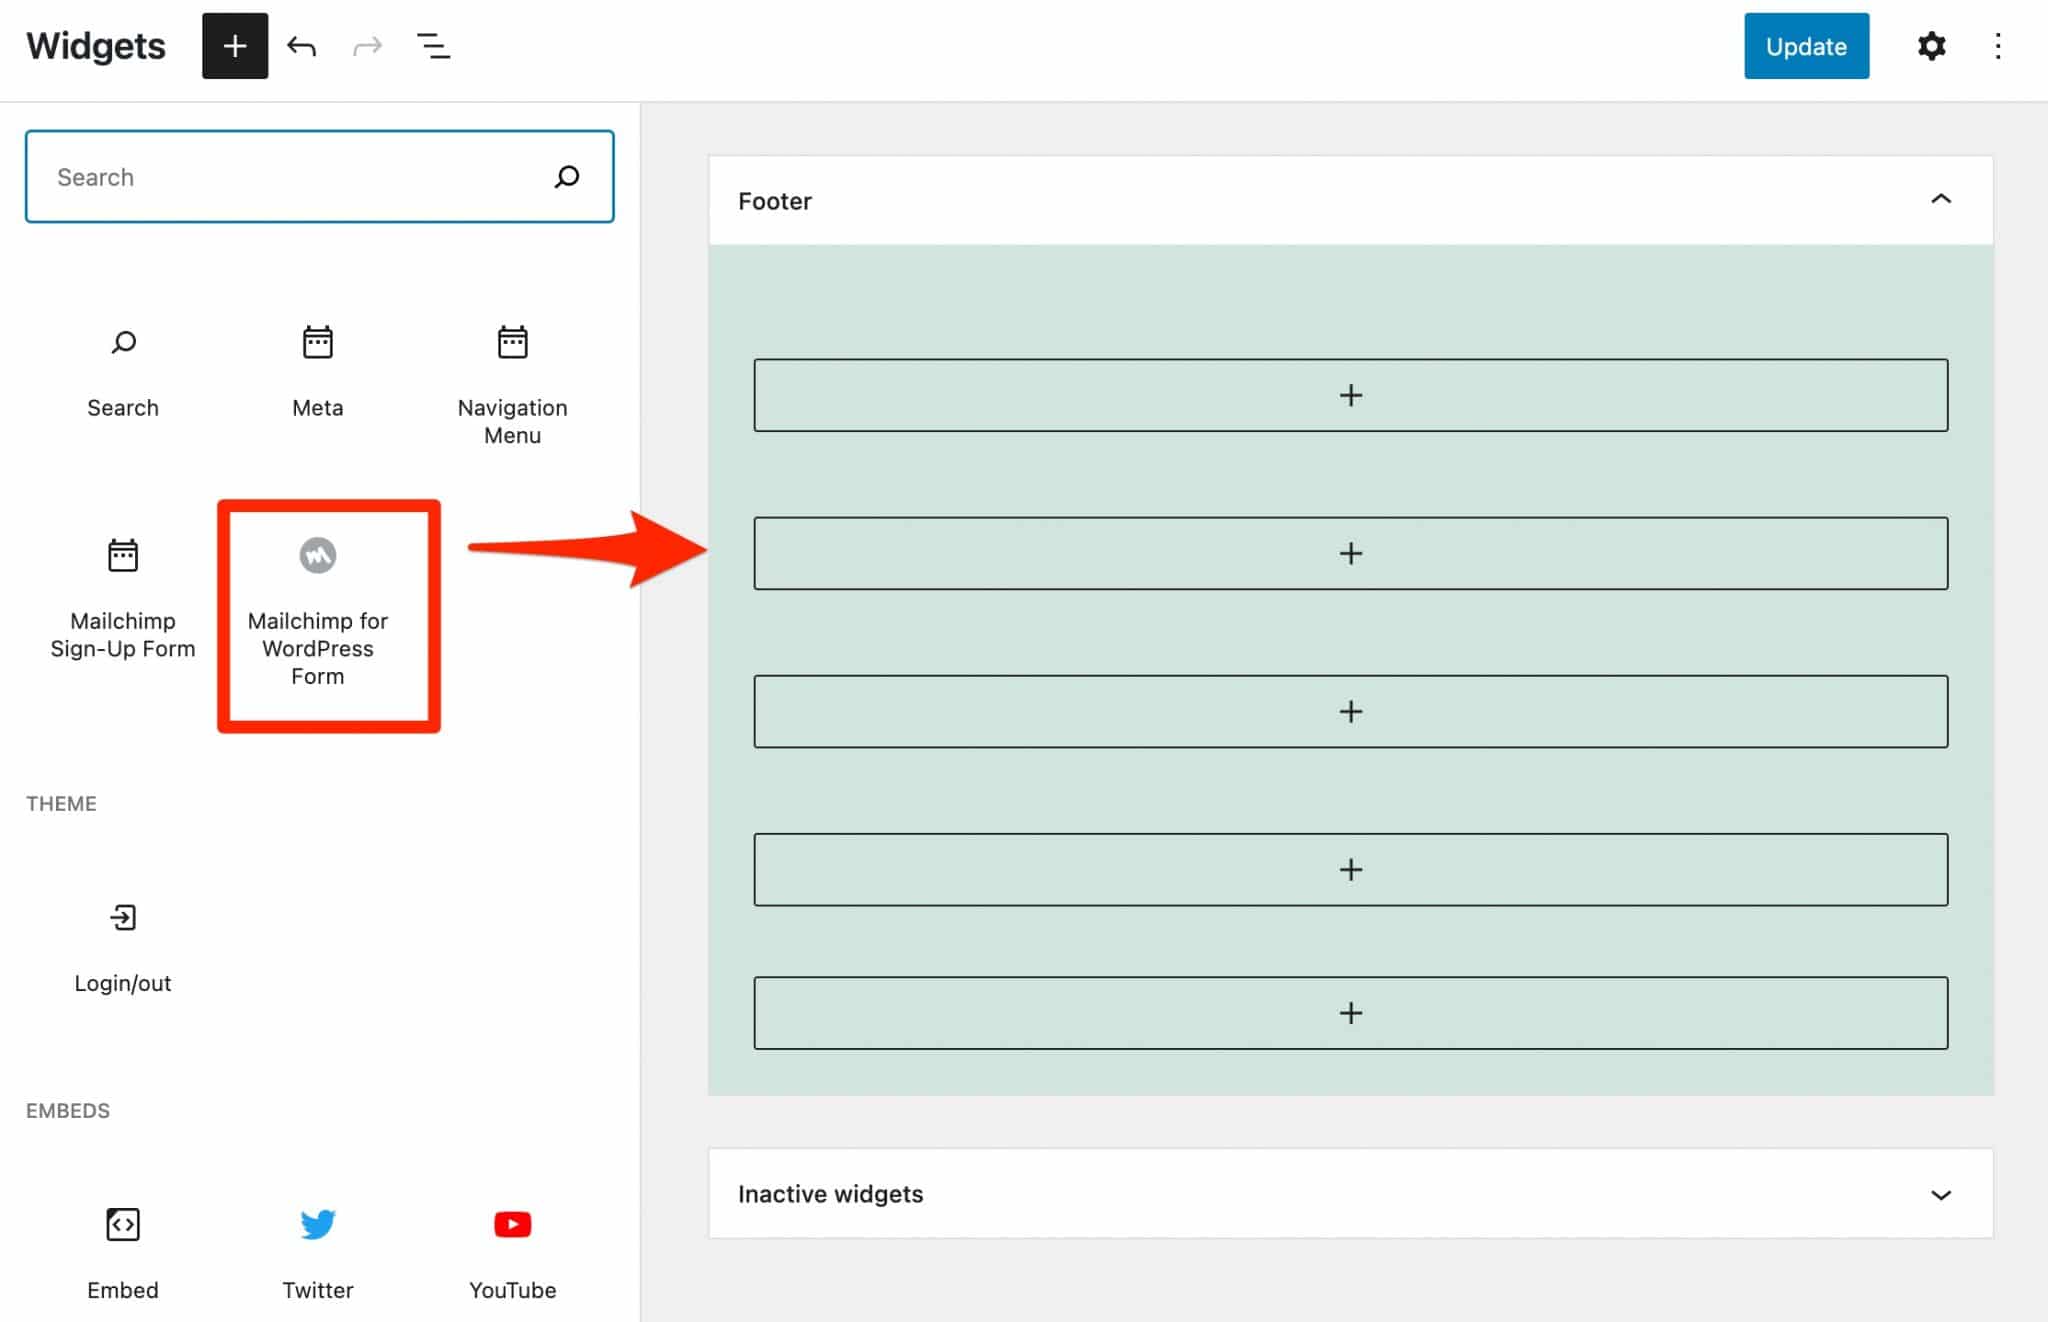
But let’s go back to the procedure. Go to the menu Appearance > Widgets. Since the release of WordPress version 5.8, in July 2021, the widget areas are managed with blocks.
You just have to add the “Mailchimp for WordPress Form” block in one of the available widget areas, just like for a post or a page:
Save, and go admire the immediate rendering on the visible interface of your site:


If you want to keep the old interface of your widgets, use the Classic Widgets plugin, which it will be “supported and maintained until at least 2022, or as long as is necessary”, says its description on the official directory.
There you go: the main functionality of the Mailchimp for WordPress plugin is to help you design a subscription form for your newsletter.
However, its interface does not allow you to create and send emails. But since it’s the logical next step and I guess you still want to know how to do it, let’s check out a little overview in the next part.
How to send emails with Mailchimp?
You’ve got it: we now leave your WordPress administration interface to go to the dashboard of your Mailchimp account.
In the sidebar, on the left side of the screen, select “Create”, where there’s the icon with a pen:


On the next page, click on “Email”. A drop-down menu appears, with 3 choices at your disposal:
- Regular: to send a classic newsletter, a welcome email, etc.
- Plain text: to send a newsletter without any particular formatting, like a classic email.
- Template: to create your own newsletter template or modify one to your liking and then send your emails.
The creation of automated emails takes place in the Customer Journeys menu, but you only have the right to 1 step with the free version.
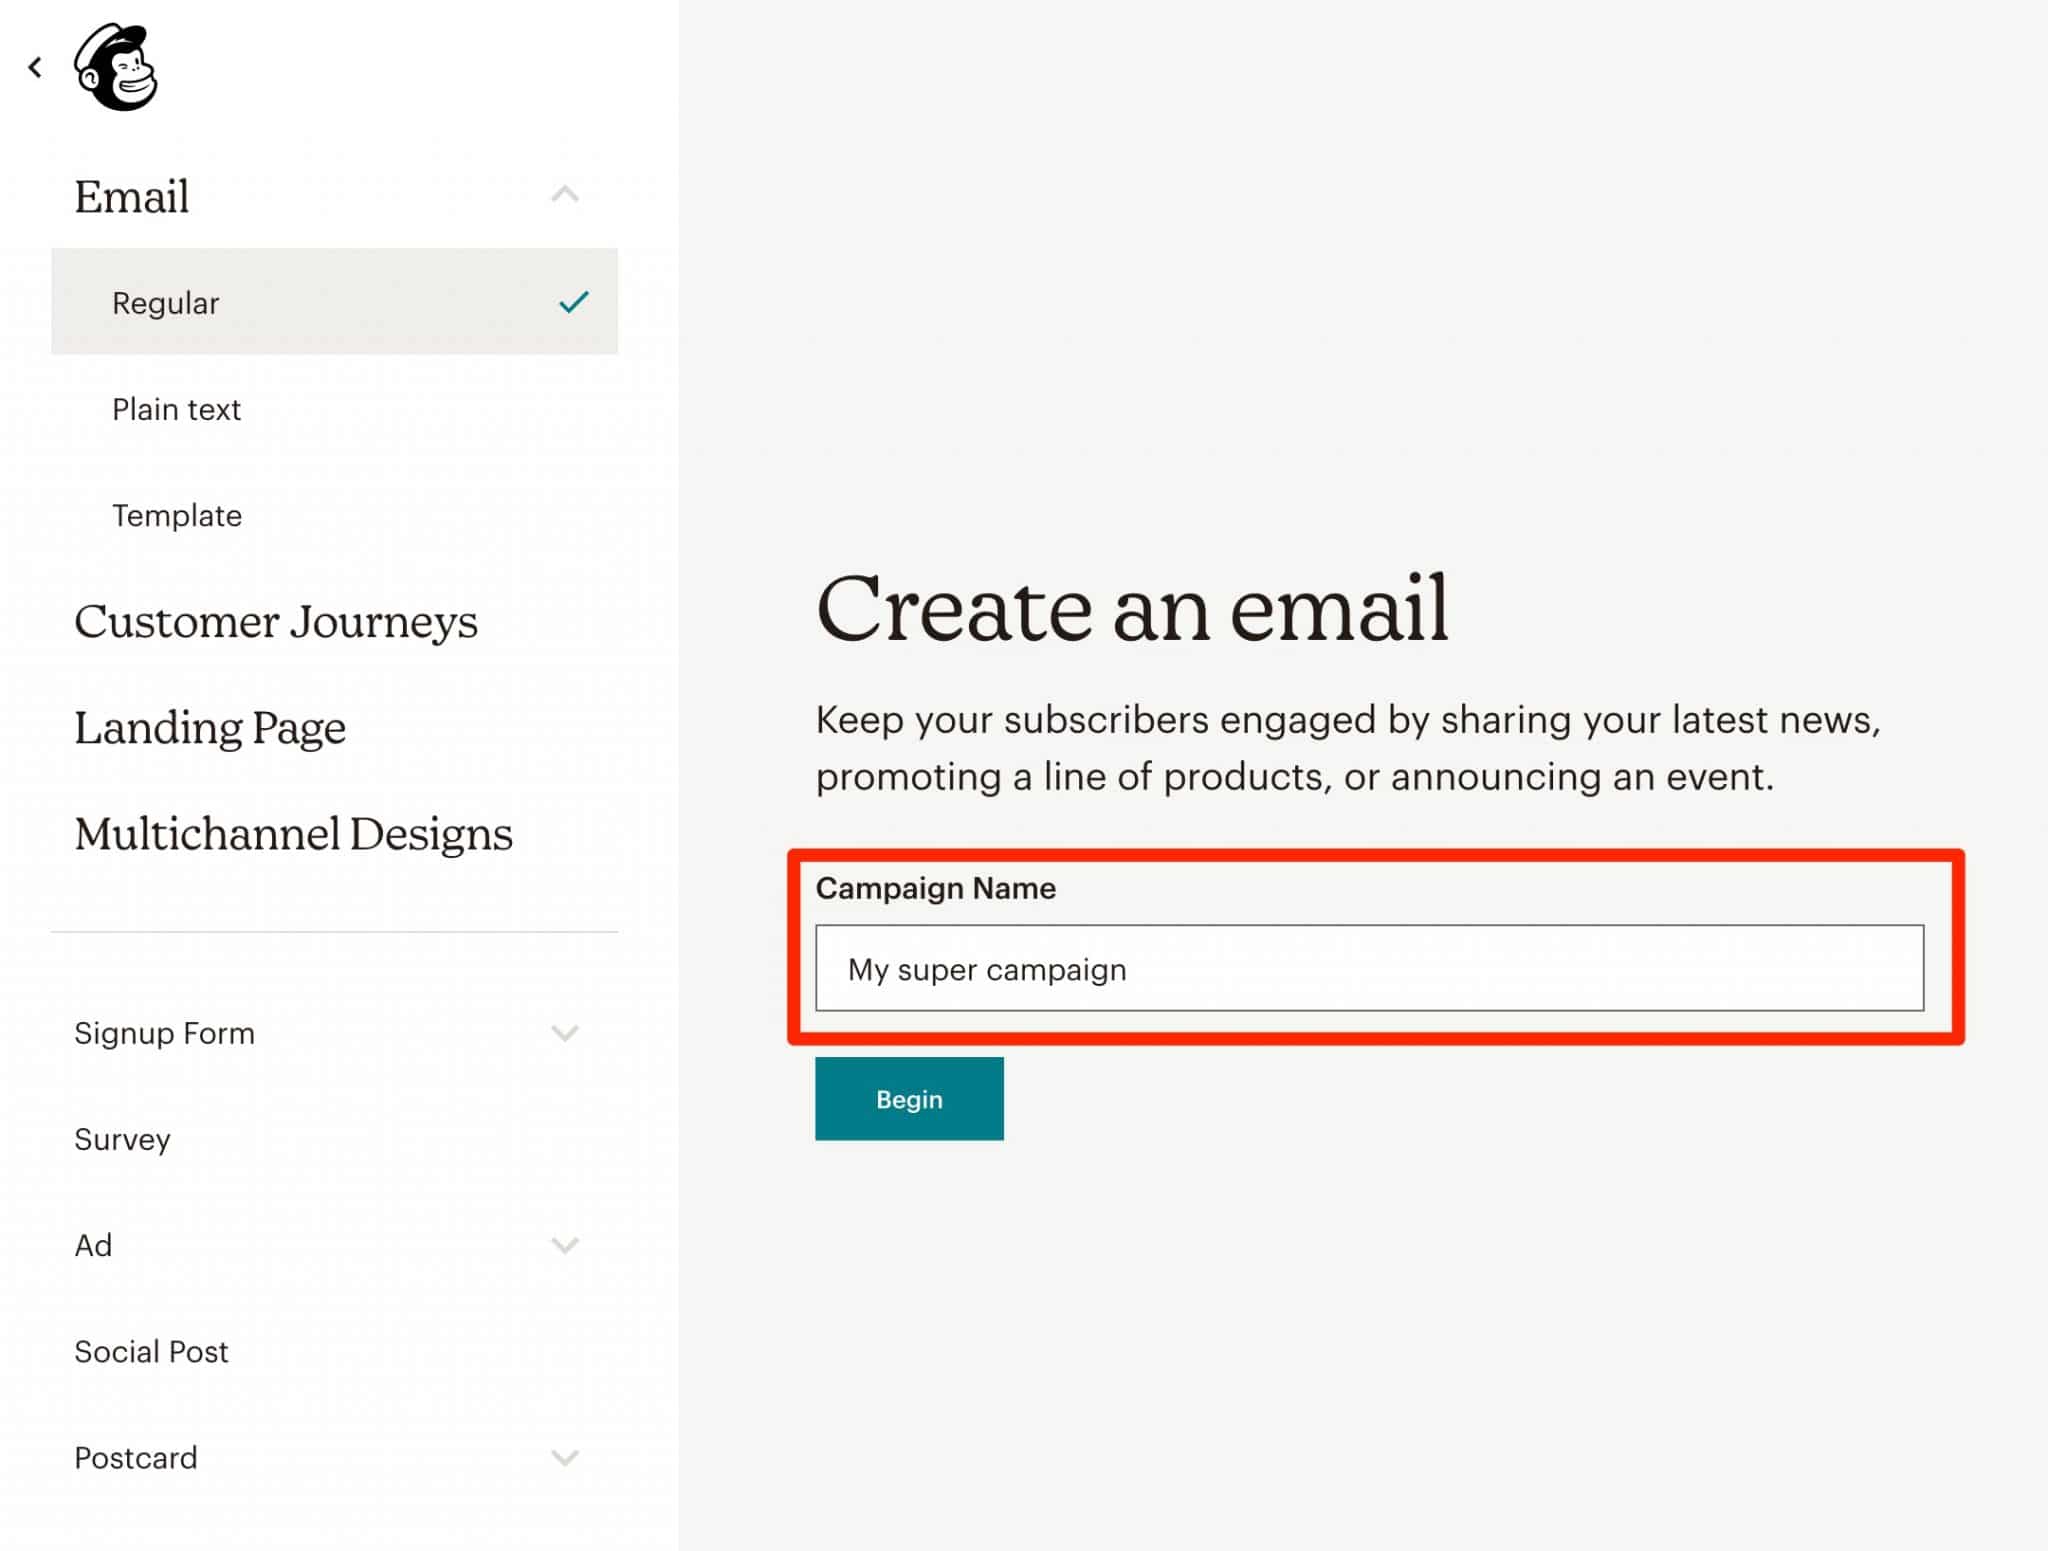
For the example, we’ll choose “Regular” (you’re just starting out, you might as well keep it simple). Give it a name of your choice and click on the “Begin” button.

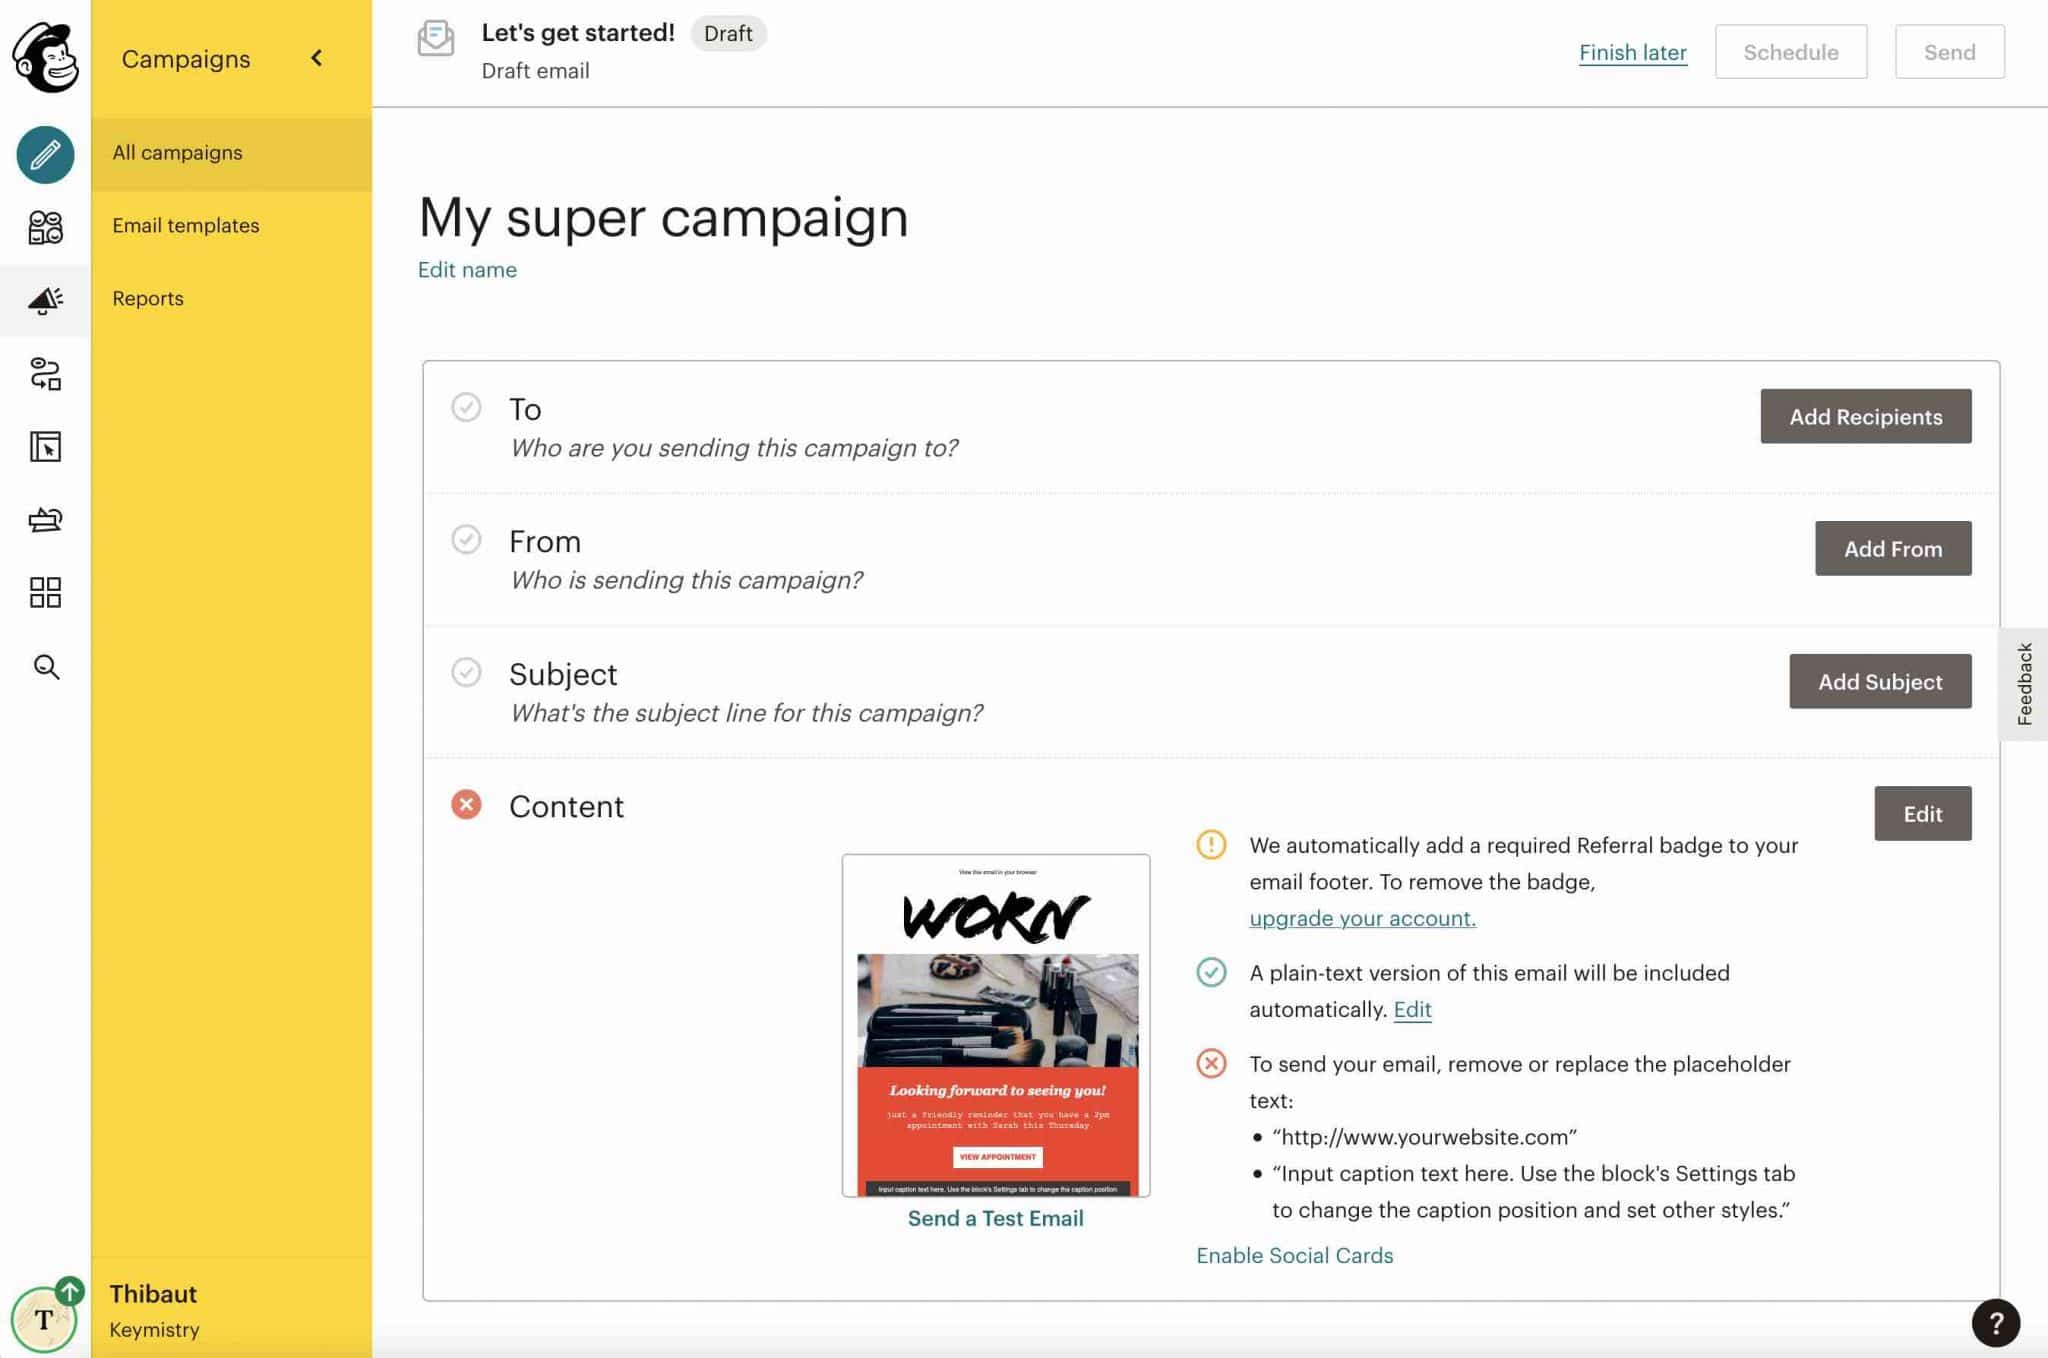
4 fields are then available:
- To: to define who to send your emails to. When you click on the “Add Recipients” button, you will be able to choose your previously created mailing list. Save.
- From: to edit the name and email address of the sender, so yourself.
- Subject: to choose the subject of the email, as well as the subtitle (Preview text) that often appears on inboxes. Define here what you want and save it (but make sure it is interesting enough for your subscribers to open your emails).
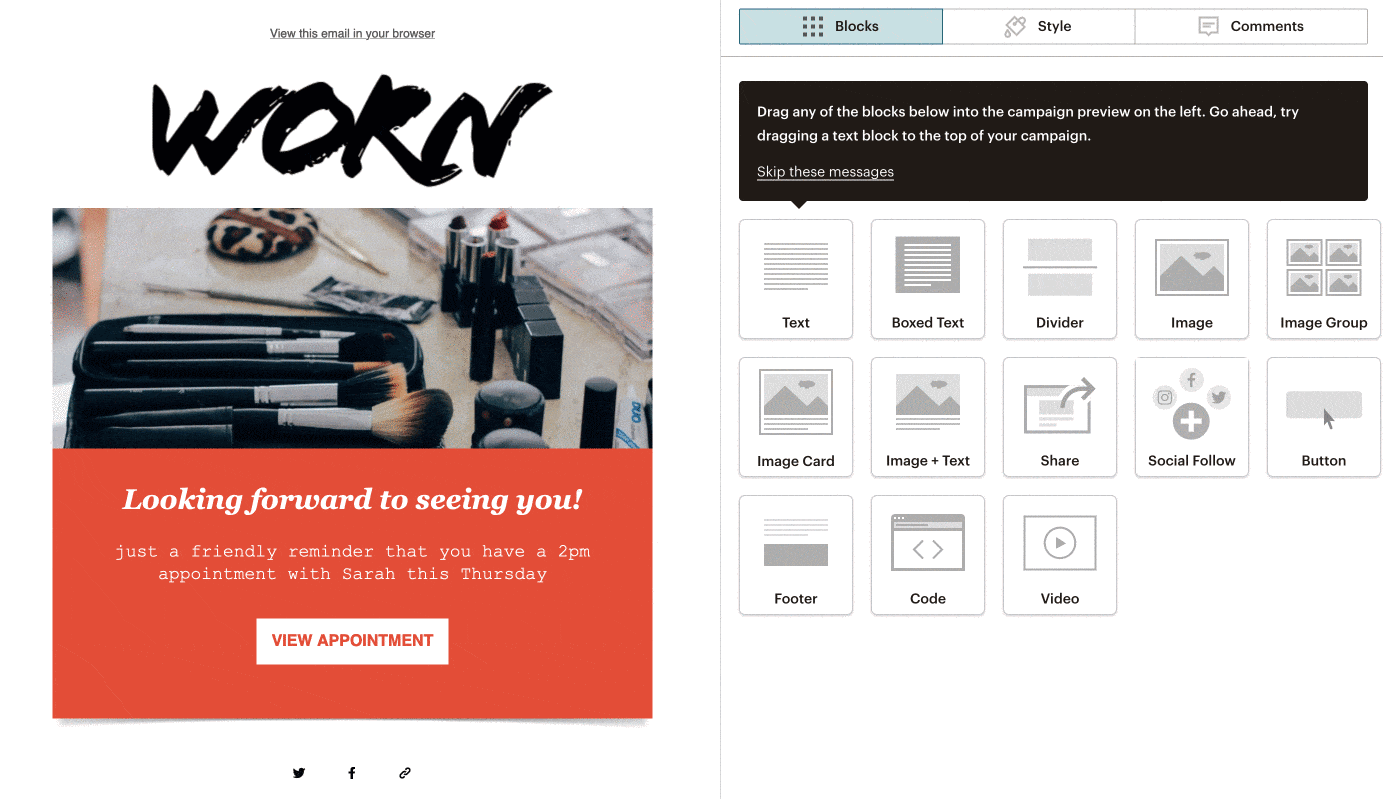
- Content: to edit your email. You can choose predefined email types or particular layouts in the “Layouts” tab. The “Themes” tab offers you already formatted emails that can be used in different areas (Newsletters, Ecommerce, Holidays, Photos, etc.).
Once you have chosen your Layout or your Theme, a visual editor allows you to act on the content and design.
You can easily add and edit any element using drag and drop.

Once you’ve made your changes and your email design is in place, click the blue “Save & Close” button in the bottom right corner.
This will take you back to the previous settings page.
All that’s left is to send your beautiful newsletter by pressing the “Send” button.
After this little stroll through the Mailchimp email editing interface, let’s return to your WordPress dashboard.
For the moment, you have seen the functionalities of the free version of the Mailchimp for WordPress plugin.
To be complete, here is what the premium version of the plugin offers.
Check out the best practices for writing your emails in our post about how to write a newsletter.
The advantages of the Pro version of the Mailchimp for WordPress plugin
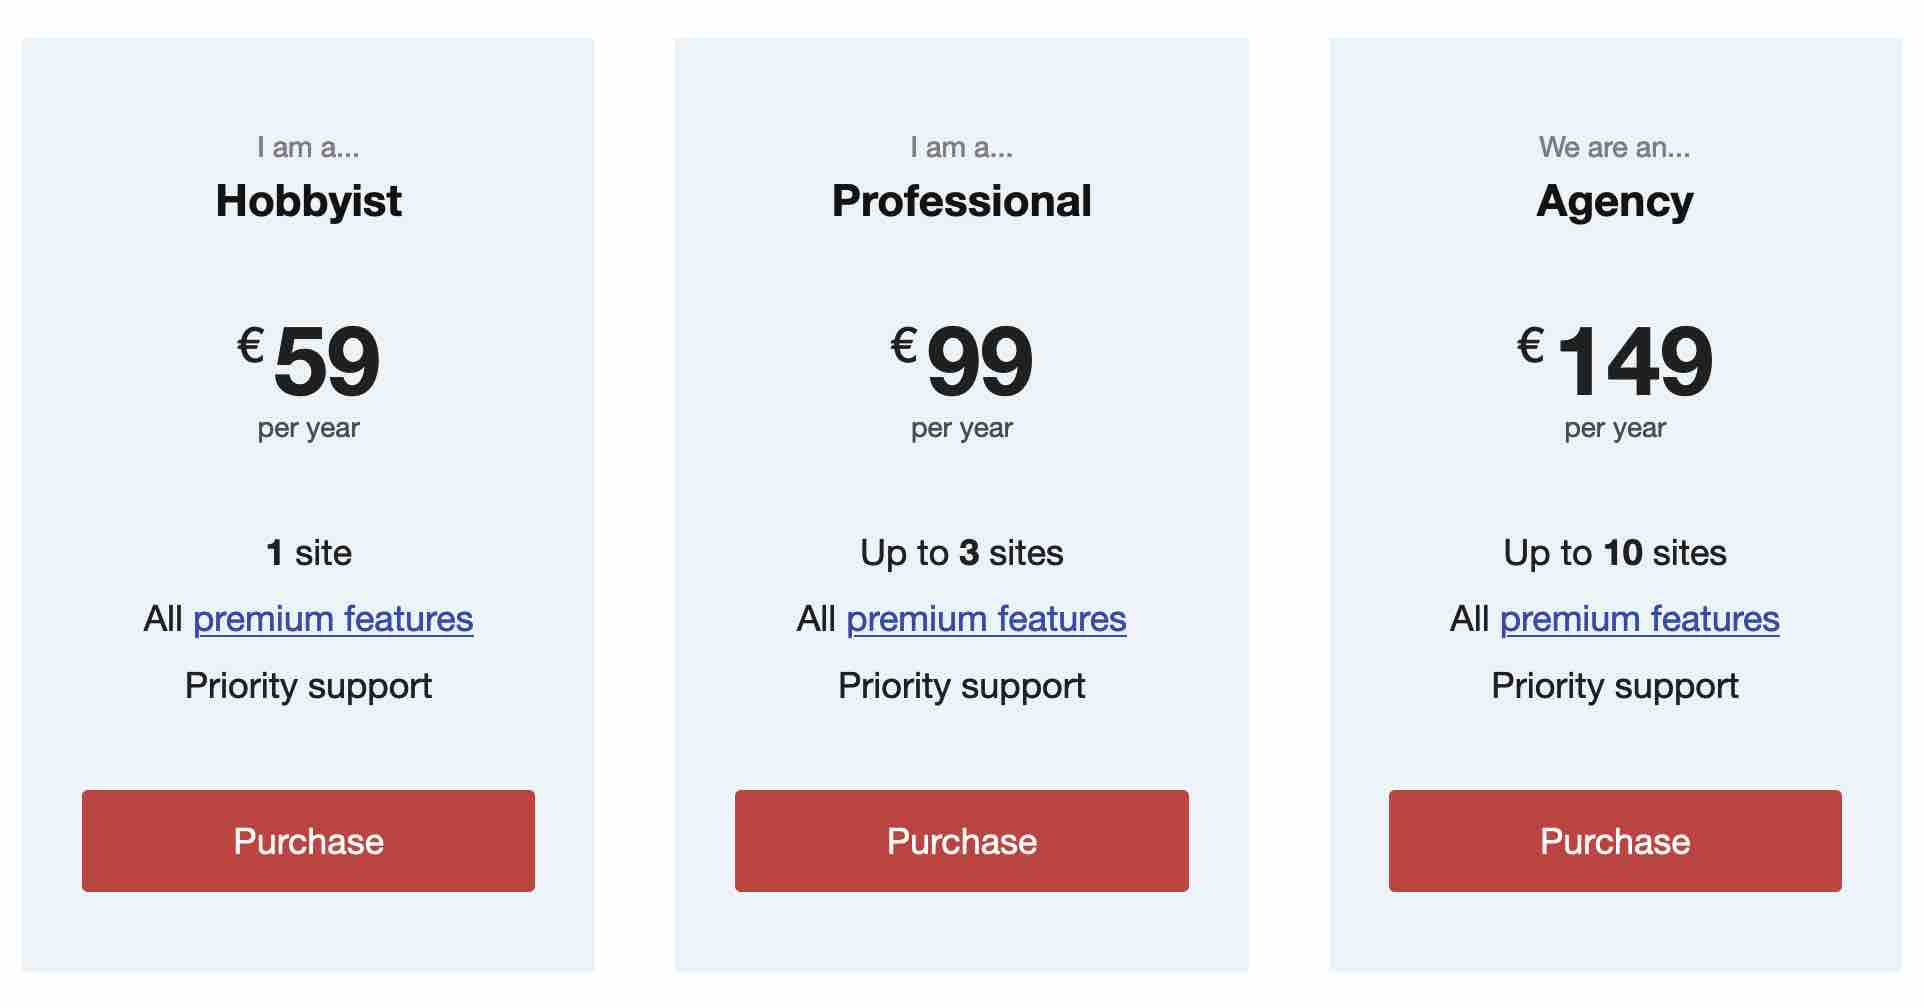
Logically, it is the idea of a Pro version, you will have more options with Mailchimp for WordPress premium (from $59/year for a use on 1 site):
- You can create an unlimited number of opt-in forms.
- The “Styles builder” feature helps you change the visual appearance of your form, without touching a single line of code.
- WooCommerce integration allows you to see exactly what your subscribers have ordered from your store, and how much revenue your Mailchimp campaigns generate. You can also create list segments based on your subscribers’ purchase activity, use product recommendations and retrieve abandoned carts.
- A statistical analysis tool helps you to detect how and by which means your site visitors have subscribed to your email list.
- You can activate an email notification when someone subscribes to your form.
Go further with Mailchimp for WordPress add-ons
MC4WP: Mailchimp Top Bar (free)

With MC4WP: Mailchimp Top Bar, you will be able to add a notification bar at the top or bottom of your site.
After activating this plugin, you will have a “Top Bar” submenu in the MC4WP settings menu (you must have activated the Mailchimp for WordPress plugin to be able to use this free add-on, and the others that are offered).
As far as settings are concerned, we find again the simplicity of the options already proposed by the basic plugin (MC4WP). The environment remains the same, with the presence of several tabs.

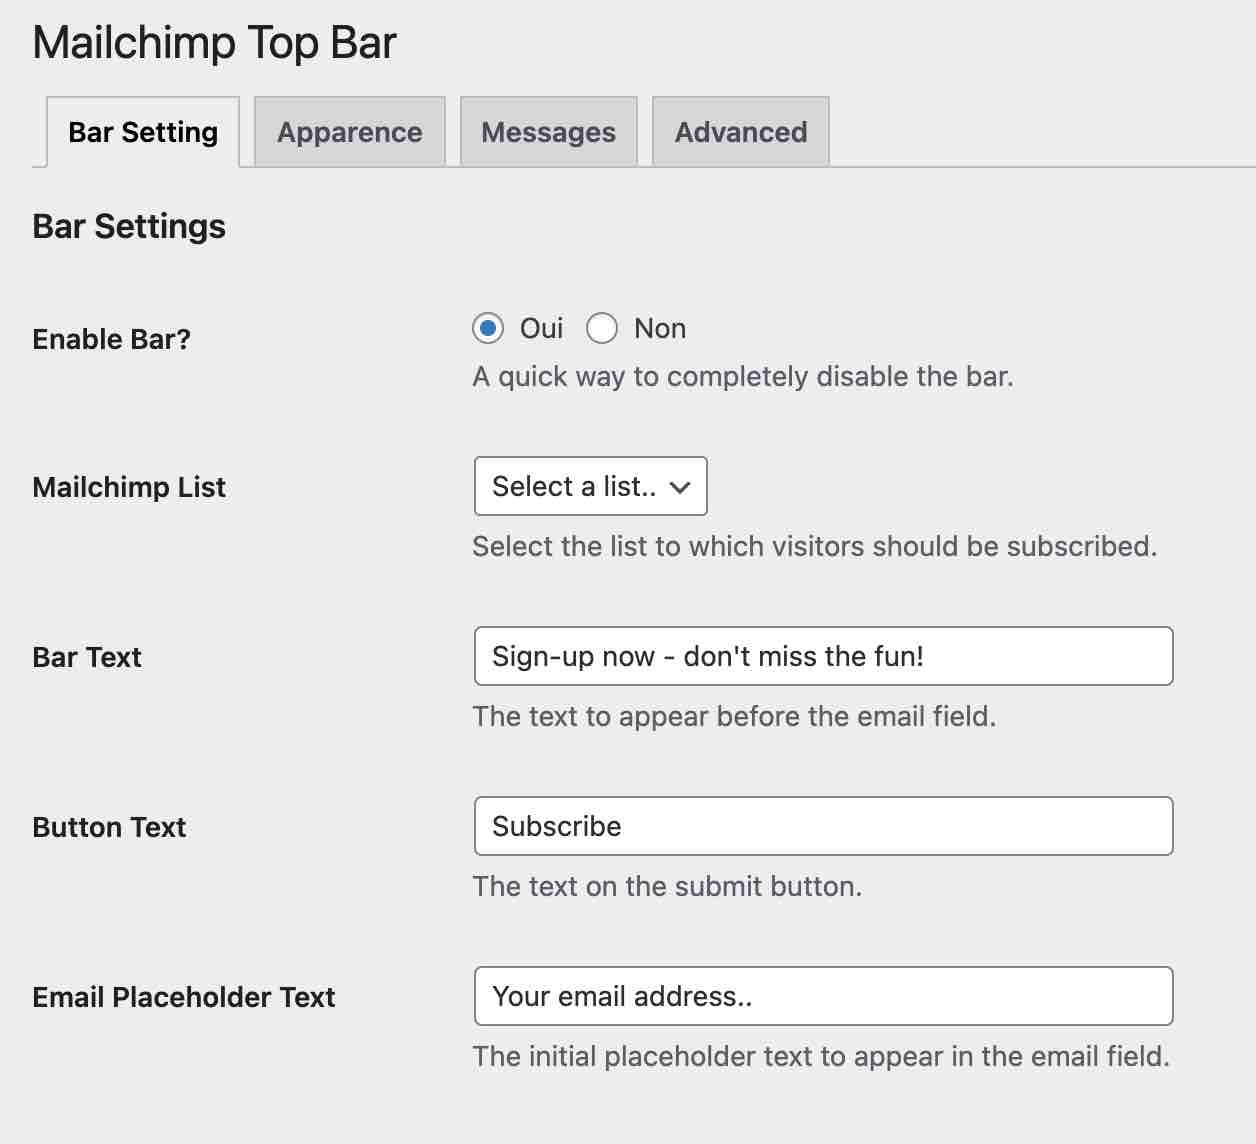
You have control over:
- The message to display on your notification bar.
- The text of the call to action button.
- The message to include in the form field.
- The visual appearance of the top bar: choice of 3 sizes, choice of the color of the bar, the text and the button, as well as the possibility to make the notification bar sticky (fixed when scrolling).
- More advanced settings like double opt-in configuration, redirection to a URL of your choice after registration, or deactivation of the bar after the person has filled in their email address, which will of course end up in your Mailchimp contact database, that’s the goal. 😉
In the end, the plugin is sober and efficient, and does the job very well.

We can only regret not being able to add by default at least one additional field (eg: name or first name) without going through the code.
Boxzilla


Wondering how to display a registration form in a pop-up window? Look no further than Boxzilla.
You can also act, among others, on
This plugin, made by the creators of MC4WP (Ibericode), is as easy to configure as MC4WP: Mailchimp Top Bar. Its real advantage is that you can add conditional display rules to control the appearance of your pop-up window.
You can also act, among other things, on:
- The positioning of your pop-up: top left/right, center, bottom left/right.
- Its animation when it appears (fade in or slide in effect).
- The moment of appearance of your window. For example, when the visitor has scrolled through 50% of the page, etc.
The main problem encountered when using the plugin is that there is no option to add a contact form in the pop-up, which is the goal when using Mailchimp together. 😉
In fact, it is possible to do this by adding the shortcode of your form created with MC4WP, hence the interest of using the two plugins of the same family.
Boxzilla also offers several paid add-ons if you wish to benefit from more functionalities (e.g. display a pop-up when the visitor is about to leave your site).
Note that Mailchimp for WordPress offers two other free add-ons. MC4WP: WPML Integration allows integration with the multilingual WPML plugin. MC4WP: Mailchimp Activity gives access to a dashboard with stats on your list, directly on your WordPress administration interface.
At the time of writing, MC4WP: Mailchimp Activity has not been tested with more than three major WordPress updates.
In this part, I have introduced you to the Mailchimp for WordPress in-house plugins. Let’s continue with plugins and their integration to MC4WP.
What integration of Mailchimp for WordPress with plugins?
A fine integration with several famous plugins
On its presentation page on the official directory, Mailchimp for WordPress indicates that it offers a “seamless integration” with several famous plugins.
These are mostly plugins to design contact forms, such as Contact Form 7, Gravity Forms, Ninja Forms or WPForms.
Not to mention membership plugins, such as MemberPress, BuddyPress or Easy Digital Downloads, to name but a few.
In fact, this integration puts additional options in your hands, using the listed plugins.
For example, if you are a fan of Contact Form 7, adding a shortcode in your contact form will allow you to include a checkbox to encourage the person to subscribe to your newsletter.
If so, its contact information will land within your Mailchimp email list.
How to link Mailchimp to WooCommerce?
In the plugin department, let’s check WooCommerce! Mailchimp for WordPress offers – of course – an integration with the plugin to turn your WordPress site into an online store.
This happens through its premium version, which has several features in terms of ecommerce:
- You can send an email following a cart abandonment, in order to try to finalize the sale.
- You can segment your Mailchimp subscriber list according to the purchase history of your customers, for an even more targeted communication.
- Thanks to the tracking features of your emails, it is possible to know on a case by case basis what purchase amounts your email campaigns have generated.
- You can automatically import your products, orders and WooCommerce customers on Mailchimp.
Moreover, if you don’t want to switch to the premium offer, know that Mailchimp also offers its official plugin: Mailchimp for WooCommerce (free).


Specifically, this plugin will connect your WooCommerce store to Mailchimp, while providing you with various options:
- Automatic synchronization of your customers and their purchase data with your Mailchimp account.
- Automatic follow-up of customers after purchase.
- Product recommendation.
- Recovery of abandoned carts.
- Ask your visitors to subscribe to your newsletter during the checkout process, etc.
What integration of Mailchimp with Elementor?
We end this part on plugins with Elementor. It’s impossible not to mention this page builder, I mean, THE number 1 page builder of the WordPress ecosystem.
The Mailchimp for WordPress plugin does not offer integration with it, but Elementor has thought of you if you use Mailchimp.
It is possible to link the two tools by using the Elementor Pro (affiliate link) “Form” widget.
This video shows you how to do it. You will see, it’s very simple:

Documentation and support
Even if this article is here to take you by the hand to configure Mailchimp on WordPress, it may not have all the answers.
As you experiment, you will probably encounter some blocking factors, which is normal.
To help you, Mailchimp has a very good documentation.
Most of the major topics are covered to answer the questions you are likely to ask yourself when you start taming the beast (the little chimp, remember):
- How to grow your audience.
- How to create your first email campaign.
- How to create an automation, etc.
That’s it for the Mailchimp software itself. The Mailchimp for WordPress plugin, on the other hand, provides you with a knowledge base that is just as extensive, including nearly 90 topics.
You will appreciate the step-by-step explanations, with screenshots to illustrate what is being said.
Now, let’s talk about money.
What is the value for money?
Mailchimp’s prices
Here again, we will divide our explanations into two parts. Let’s start with the Mailchimp tool, which offers 4 pricing plans:
- Free
- Essentials
- Standard
- Premium

To understand Mailchimp’s pricing, you have to untangle a lot of knots. If I had to summarize, I would say that choosing one plan or another depends on four major elements:
- Your number of subscribers. If you are just starting out and have less than 2,000 subscribers, the Free plan may be sufficient.
- The features you want to use. Be careful, even if you have less than 2,000 subscribers to your email list, the Free plan will not be suitable for you if you want to schedule your emails, create advanced automations, or remove the Mailchimp brand from your emails. All this is impossible with the Free plan.
- The number of email lists (called “Audiences” by Mailchimp) you want to create. You can only create one with the free plan. Only the Premium plan offers unlimited audiences.
- The maximum number of emails you want to send each month. With the Free plan, the limit is set at 10,000, with a daily limit of 2,000 emails sent. And it can go very fast, mind you. Imagine you have 1,900 subscribers and you want to send more than 5 emails per month to your entire list, you will already exceed the allowed quota (Mailchimp will then charge you for the excess). For comparison, the Essentials plan sets the monthly sending limit at 500,000 emails (1.2 million with the Standard plan and 3 million with the Premium plan).
All Mailchimp price plans offer you the possibility to create a website or an online store for free, thanks to their dedicated tool. However, you will be very limited compared to the unlimited creative possibilities offered by a software like WordPress.org.
Honestly, it’s difficult to detail everything on a case-by-case basis, as there are so many options and combinations possible. The easiest way is to check this detailed comparison between the different offers.
To try to give you an idea of the price you might pay, let’s start with an example of a list of 2,500 subscribers. Let’s assume that you want to have something that is as professional as possible, with for example the possibility to remove the Mailchimp brand from your emails, which this plan allows.
In this case, it will cost you $30.99/month, or a total of $371.88/year. With limited marketing features, especially in terms of automation
What can we learn from all this? Well, first that Mailchimp is very interesting for the person who wants to start in the world of email marketing. Its free plan is a real asset. If you stay within the limits and do not exceed the (low) imposed limits, it will be perfect.
Some of its competitors also offer a free service, but it is often much more limited. For example, Aweber limits you to 500 subscribers and a maximum of 3,000 emails per month.
The French Sendinblue, on the other hand, limits you to sending 300 emails per day in its free offer.
On the other hand, Mailchimp reaches some limits when you want to take advantage of advanced marketing features. This might not be your case at first, but you might one day need to automate your marketing and create advanced email sequences with multiple sending scenarios.
In this case, a tool like ActiveCampaign, which Alex uses on WPMarmite, seems more appropriate. For 2,500 contacts, it will cost you $45/month, which is almost double what Mailchimp offers, I know. But the options offered are much more powerful.
Price of Mailchimp for WordPress
Talking about the price of the Mailchimp for WordPress plugin is much simpler and faster. On the one hand, you can use the free plugin.
I remind you its limitations: you can only create one subscription form, its styling is very basic without going through the code, and ecommerce features are non-existent.
To benefit from all the options of the plugin, turn to the premium offer, available from ± $69/year for a use on 1 site.

Our final opinion on MC4WP
Mailchimp is an essential tool to start in the world of email marketing. Number 1 on the market, it is perfectly adapted to beginners who want to start, because of its simplicity of use and its free offer: you don’t take any risk to use it.
To associate it with your WP site, a good solution is to use the Mailchimp for WordPress plugin (MC4WP), which has several undeniable advantages:
- Easy to use.
- You can make all your settings without leaving your WordPress dashboard, which limits the back and forth between your site and Mailchimp.
- Its advanced integration with several famous plugins is a real plus.
- Mailchimp for WordPress can be customized if you are a technician, thanks to the provision of snippets (pieces of code), for example.
Download the MC4WP: Mailchimp for WordPress plugin:
While it is a solid option for linking Mailchimp to WordPress, MC4WP is not alone on the market, even though it leads by far in the number of active installations.
If you don’t like it, you can also turn to Easy Forms for Mailchimp (100,000+ active installations), which I haven’t tested.
On the other hand, it’s good to point out that there are all-in-one freemium plugins to manage the whole email marketing aspect of your business. If they are not only dedicated to Mailchimp, they allow an integration with several email marketing software, including Mailchimp.
One of them, MailOptin, is particularly interesting in its free version. It allows you to create opt-in forms with advanced display rules directly from the Customization Tool.
You can also send automatic emails whenever you publish a new post, again without leaving WordPress. The options won’t be as advanced as with Mailchimp, but it can be interesting if you want to combine everything in one place.
Now it’s your turn to speak up. What do you think of Mailchimp, and one of its flagship plugins, Mailchimp for WordPress?
Tell us all about it in the comments.