Managing multiple WordPress sites at once is your daily reality? Then you probably know that sweet, delightful feeling: the to-do list that grows longer with every plugin update, every site to monitor separately, every backup to check manually.
Multiply that workload by five, ten, or twenty sites, and aaahhhhhhh. Help, who dared call that a sweet feeling? Us? Fine, we stand corrected.
Calling it “aggravating” instead would be a bit more accurate. Because those long minutes and hours ticking by, all that time spent on such time-consuming tasks instead of focusing on your core business, it wears you down, it really does.

The hosting provider Cloudways said no to putting up with all that. It decided to tackle this problem head-on with its Site Manager, a tool designed to centralize the management of multiple WordPress sites from a single dashboard.
In the lines that follow, we’ll walk you through its key features, and how to use it day to day to manage the maintenance of your sites.
And of course, we’ll share our verdict after putting its approach to the test. Follow along, we’ll take it nice and easy.
- What are the challenges of managing multiple WordPress sites?
- What is Cloudways Site Manager?
- How to activate Cloudways Site Manager to manage multiple WordPress sites?
- Getting to know the dashboard and the tool's interface
- How to use Cloudways Site Manager to manage multiple WordPress sites?
- How to update the PHP version of WordPress with Cloudways Site Manager?
- Use cases for freelancers, agencies, and developers
- How much does Cloudways Site Manager cost to manage multiple WordPress sites?
- Our final verdict on Cloudways Site Manager for managing multiple WordPress sites
This page is sponsored. Some links to Cloudways are affiliate links. If you purchase hosting through one of them, WPMarmite will earn a commission.
This affiliate revenue helps WPMarmite pay its writers for their research and writing work. Know that we remain impartial. If a product isn’t worth it, we’ll say so (or we simply won’t cover it).
What are the challenges of managing multiple WordPress sites?
Regular updates, reliable backups, performance monitoring, staying on top of security: it’s no news to you that managing a single WordPress site takes discipline.
Now, imagine this. You’re taking care of 12 sites with 18 WordPress plugins per site and several themes.
Grab your calculator, and bam, the result: you need to check nearly 250 components that might need an update.
All of a sudden, the nature of the workload changes. So does the time you need to set aside for it.
In practice, several friction points come up again and again for freelancers, agencies, and WordPress developers managing a portfolio of sites:
- updates that eat up soooo much time: logging in individually to each site to check plugins, themes, and WordPress core quickly adds up to several hours a week
- the risk of human error: an update applied without prior testing can break a feature, or even make a site inaccessible. Ah, the infamous white screen of death, you know the one…
- inconsistent backups: without a centralized process, it’s easy to forget to back up a site before a sensitive update. Except that by the time you get hacked, it’s already too late
- weakened security: outdated plugins and themes remain one of the main entry points for attacks on WordPress. According to Patchstack’s 2026 WordPress security report, plugins account for 91% of the vulnerabilities detected on a WP site
- a lack of overall visibility: without a shared dashboard, it’s hard to tell at a glance which sites need attention.
This isn’t specific to Cloudways: it affects the entire WordPress ecosystem as soon as a user goes beyond two or three active sites.
That’s precisely the ground on which Cloudways’ Site Manager positions itself.
What is Cloudways Site Manager?
Overview and how Cloudways Site Manager works

Cloudways Site Manager is a centralized dashboard, built into the Cloudways platform, that lets you carry out maintenance tasks for multiple WordPress sites in one place: updates, theme and plugin management, adding users, performance monitoring, and even automatic WordPress login.
Launched in March 2026, Site Manager replaces the older SafeUpdates tool, which relied on WP-CLI – a command-line interface – and imposed limited workflows, causing delays, especially for agencies managing hundreds of websites.
A natural evolution of SafeUpdates, Site Manager is a more modern, powerful, and efficient tool.
It runs on a plugin-based architecture that syncs data within seconds, cutting update times and making operations more reliable.
Unlike a plugin you’d install on each site, Site Manager operates at the level of the hosting platform itself.
It communicates with every WordPress application to detect available updates, track performance, and carry out the actions you request, without you needing to log in individually to each admin interface.
Key features of Cloudways Site Manager for managing multiple WordPress sites
To manage multiple WordPress sites, Cloudways Site Manager brings together a set of features organized around five main areas:
- Smart updates: automatic detection of available updates, a full backup before every intervention, automatic rollback on failure (with no action needed on your part), and cache clearing after each update.
- Advanced testing: cloning your site into a test environment (sandbox) and a visual before/after comparison to spot any regressions. Site Manager never works directly on your live site. This guarantees that all your websites stay online, secure, and error-free after an update.
- Monitoring and alerts: tracking of PageSpeed Insights scores, PHP error reporting, detailed activity logs, and email or Slack notifications.
- Management tools: centralized administration of themes, plugins, and users, one-click login (SSO) to the WordPress admin area, and bulk actions across multiple sites (updating themes, plugins, and WordPress core all at once).
- Automation and scheduling: scheduling updates for set time slots, either per site or globally.
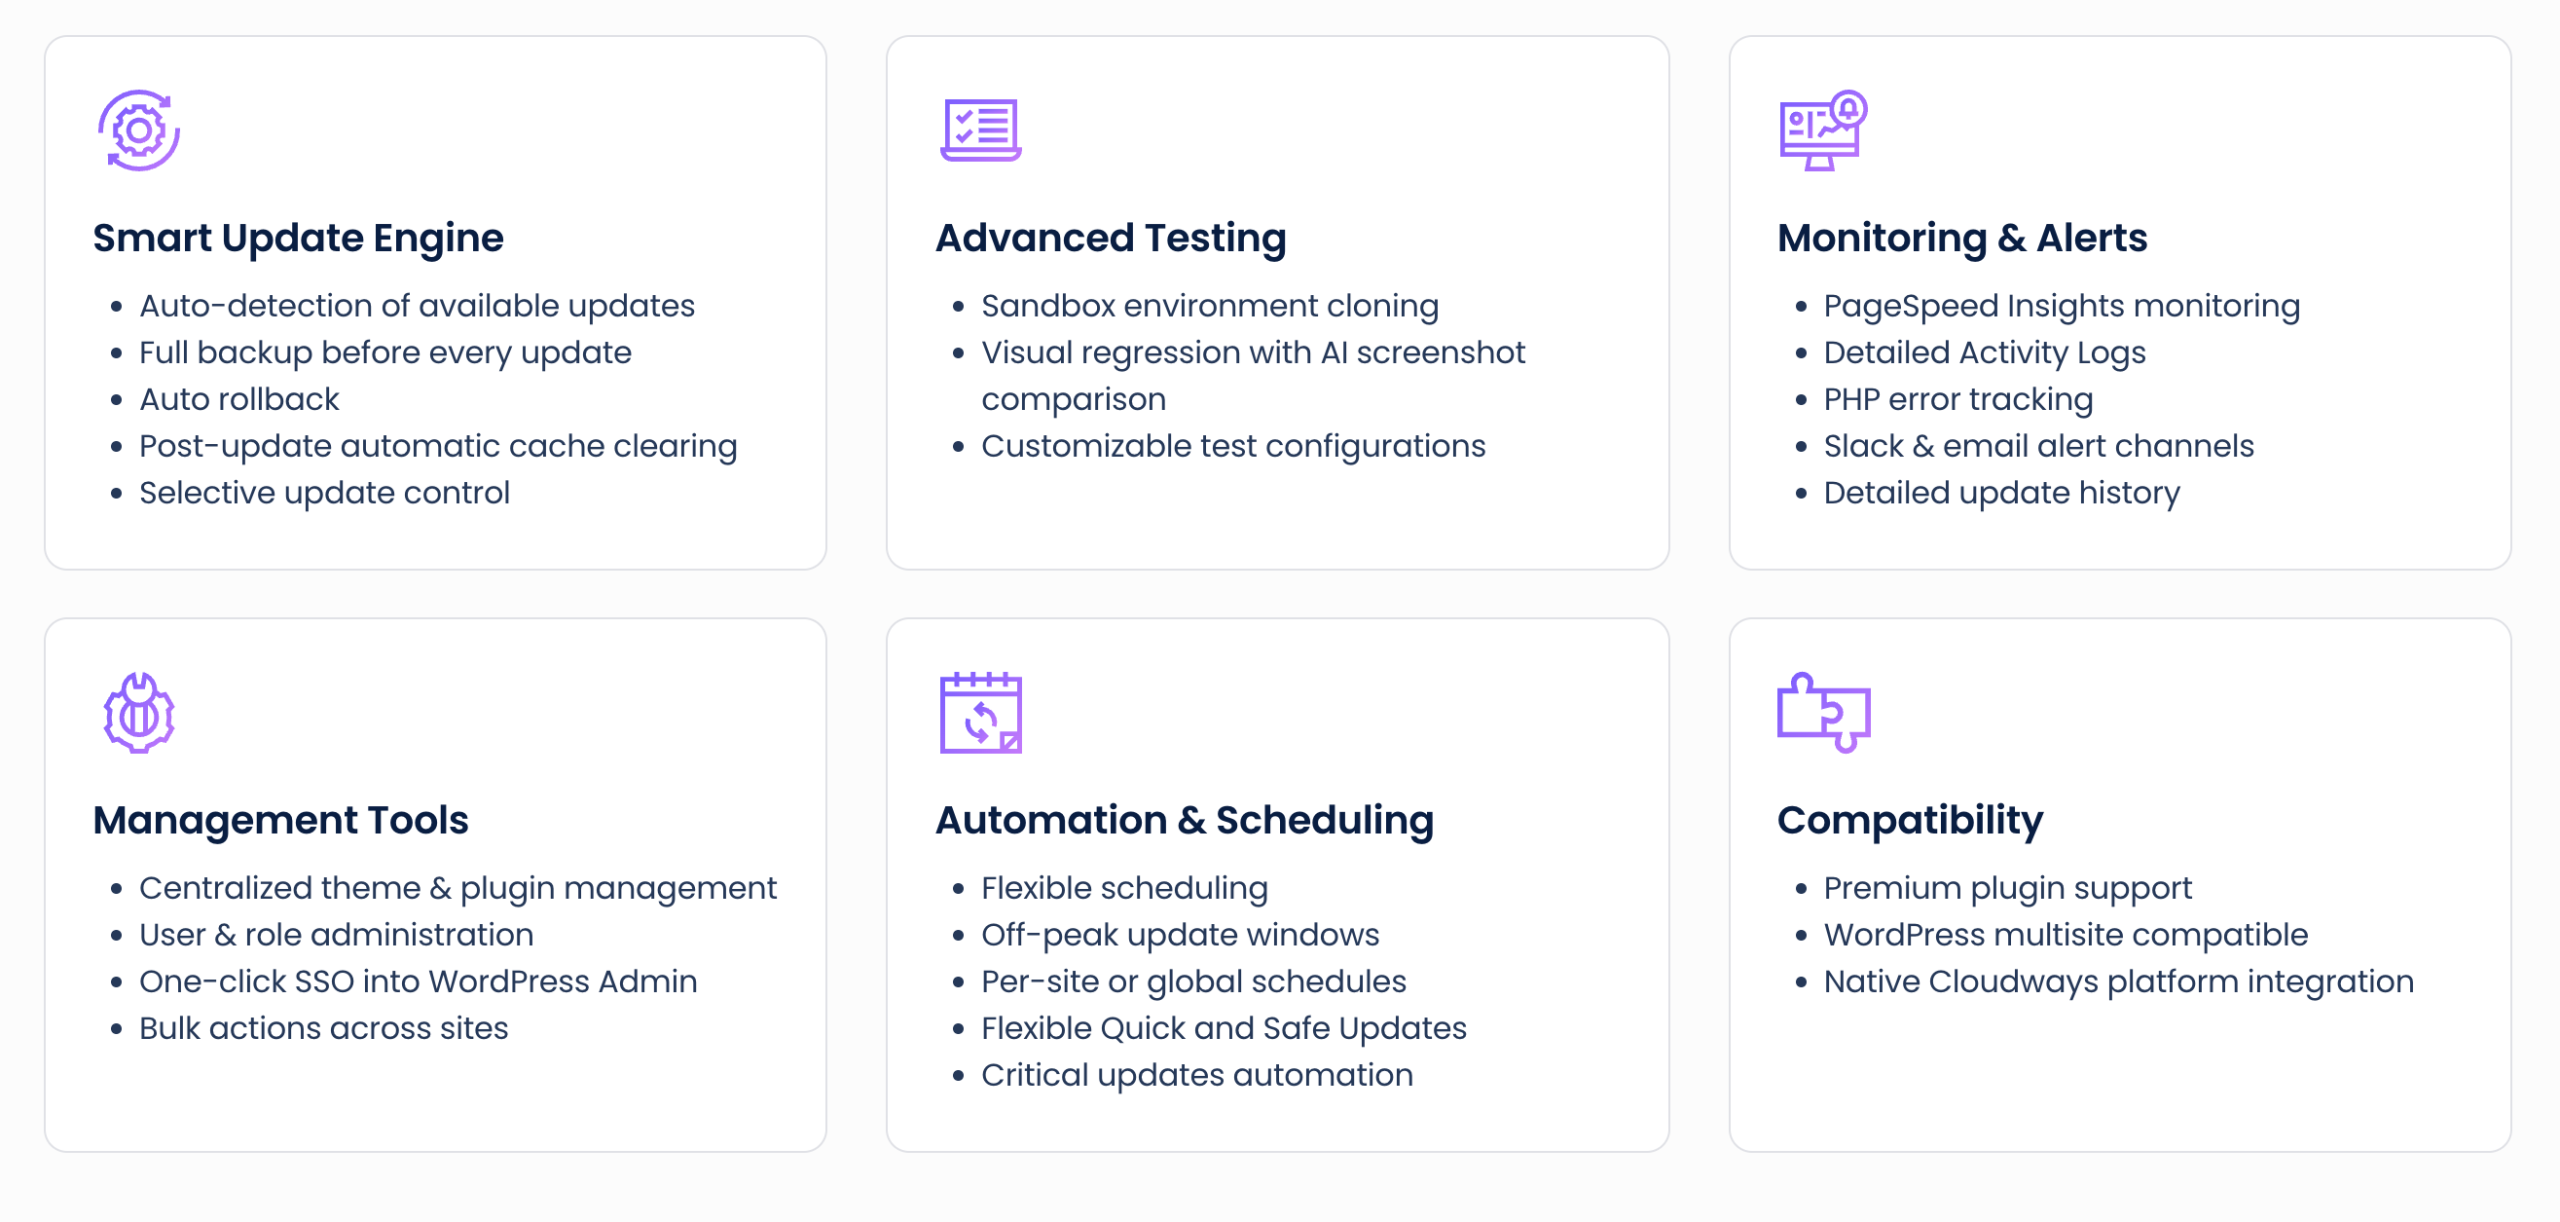
In the end, rather than juggling several third-party tools – one for backups, one for monitoring, one for updates – you get a complete chain, from detection to validation, all within a single centralized interface.
Comparing Site Manager with traditional workflows
To measure the tool’s real-world impact, let’s compare two ways of managing, say, fifteen WordPress sites.
In a traditional workflow, you have to log in to each admin interface, check for available updates, run a manual backup or use a dedicated plugin, apply the update, then visually check that nothing broke.
That sequence, repeated across fifteen sites, easily adds up to several hours, not counting the time lost if a problem crops up afterward.
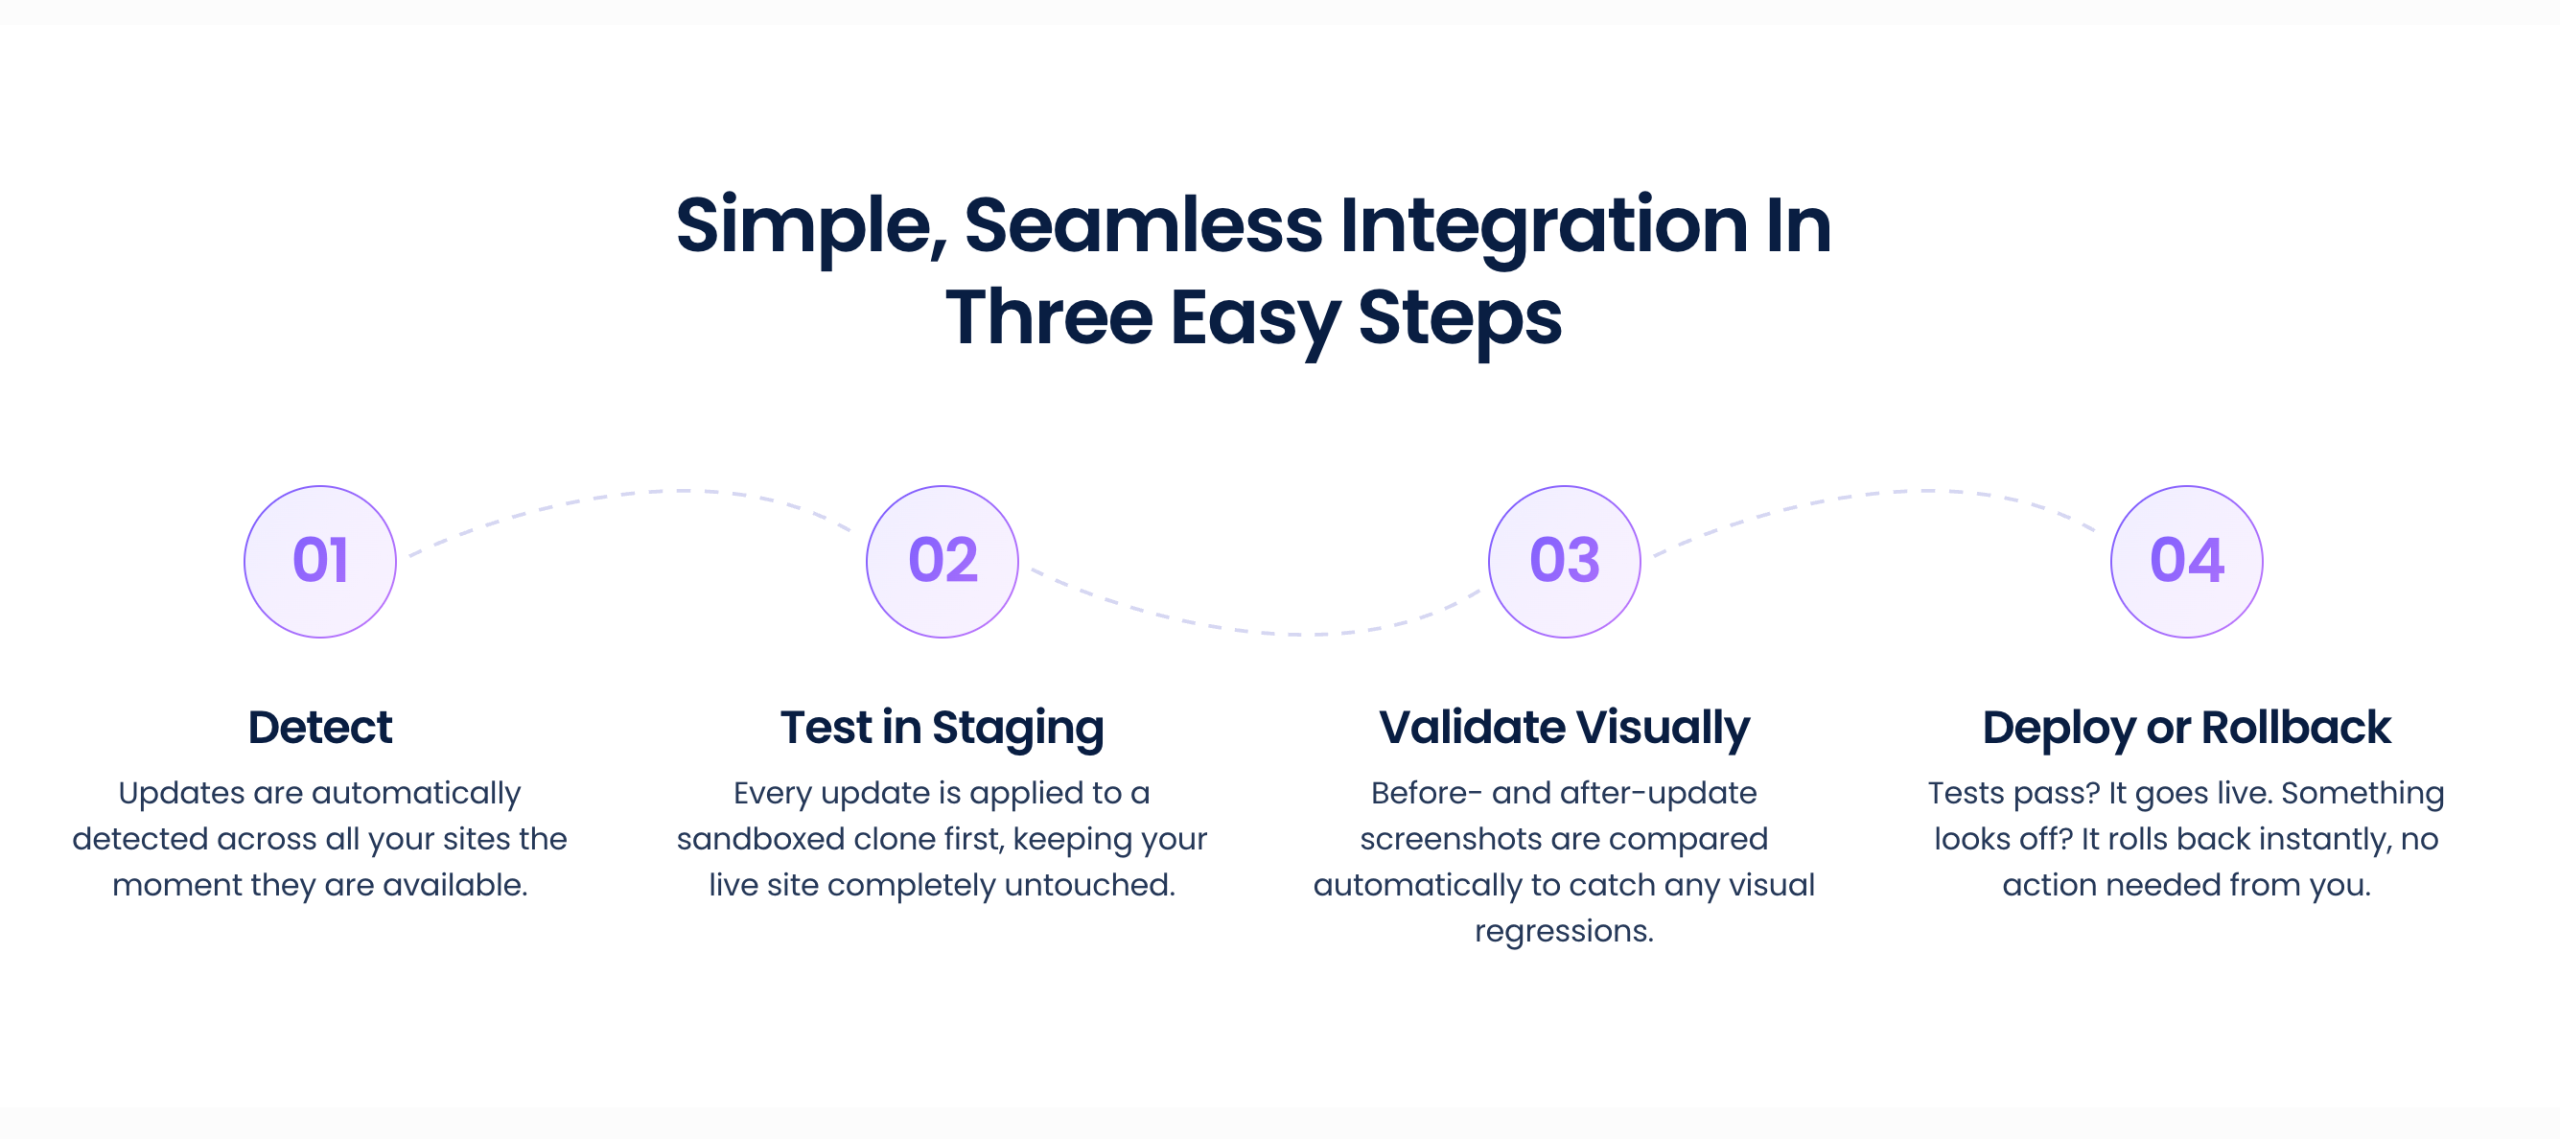
With Site Manager, that same sequence is largely automated: detection, backup, applying the update in a test environment, visual verification, and deployment (or rollback) all happen from a single screen, or even on a schedule with no action needed from you at all.
The problem Site Manager actually solves isn’t so much “how do I update WordPress”, something you already know how to do, but rather how do you apply that same rigor at scale, without spending a disproportionate amount of time on it and without taking any risks.
That’s an important nuance: the tool doesn’t replace WordPress best practices, it industrializes them.
What is Cloudways?

Before going any further, let’s say a few words about Cloudways, the host behind Site Manager.
Cloudways by DigitalOcean is a managed cloud hosting platform founded in 2011, with more than 100,000 customers around the world.
Rather than running its own data centers, Cloudways builds on the infrastructure of major cloud providers (DigitalOcean, AWS, Google Cloud, Linode, or Vultr), and adds a simplified management layer on top:
- a unified interface
- 24/7 support
- free SSL
- caching optimized for WordPress
- and one-click staging environments.
As we explain in our full review of the host, Cloudways is aimed more at intermediate to advanced WordPress users who already have solid technical skills (freelancers, agencies, developers, ecommerce managers).
That aside, let’s get back to Cloudways Site Manager. If all’s well, you’re probably eager to know how to start using this tool? We’ll cover all of that in the next section.
How to activate Cloudways Site Manager to manage multiple WordPress sites?
To get started, you’ll first need a Cloudways hosting account. Once you have one, log in to your client area.
Head to the “Flexible” menu in the sidebar on the left of the screen, then to the “My applications” submenu.
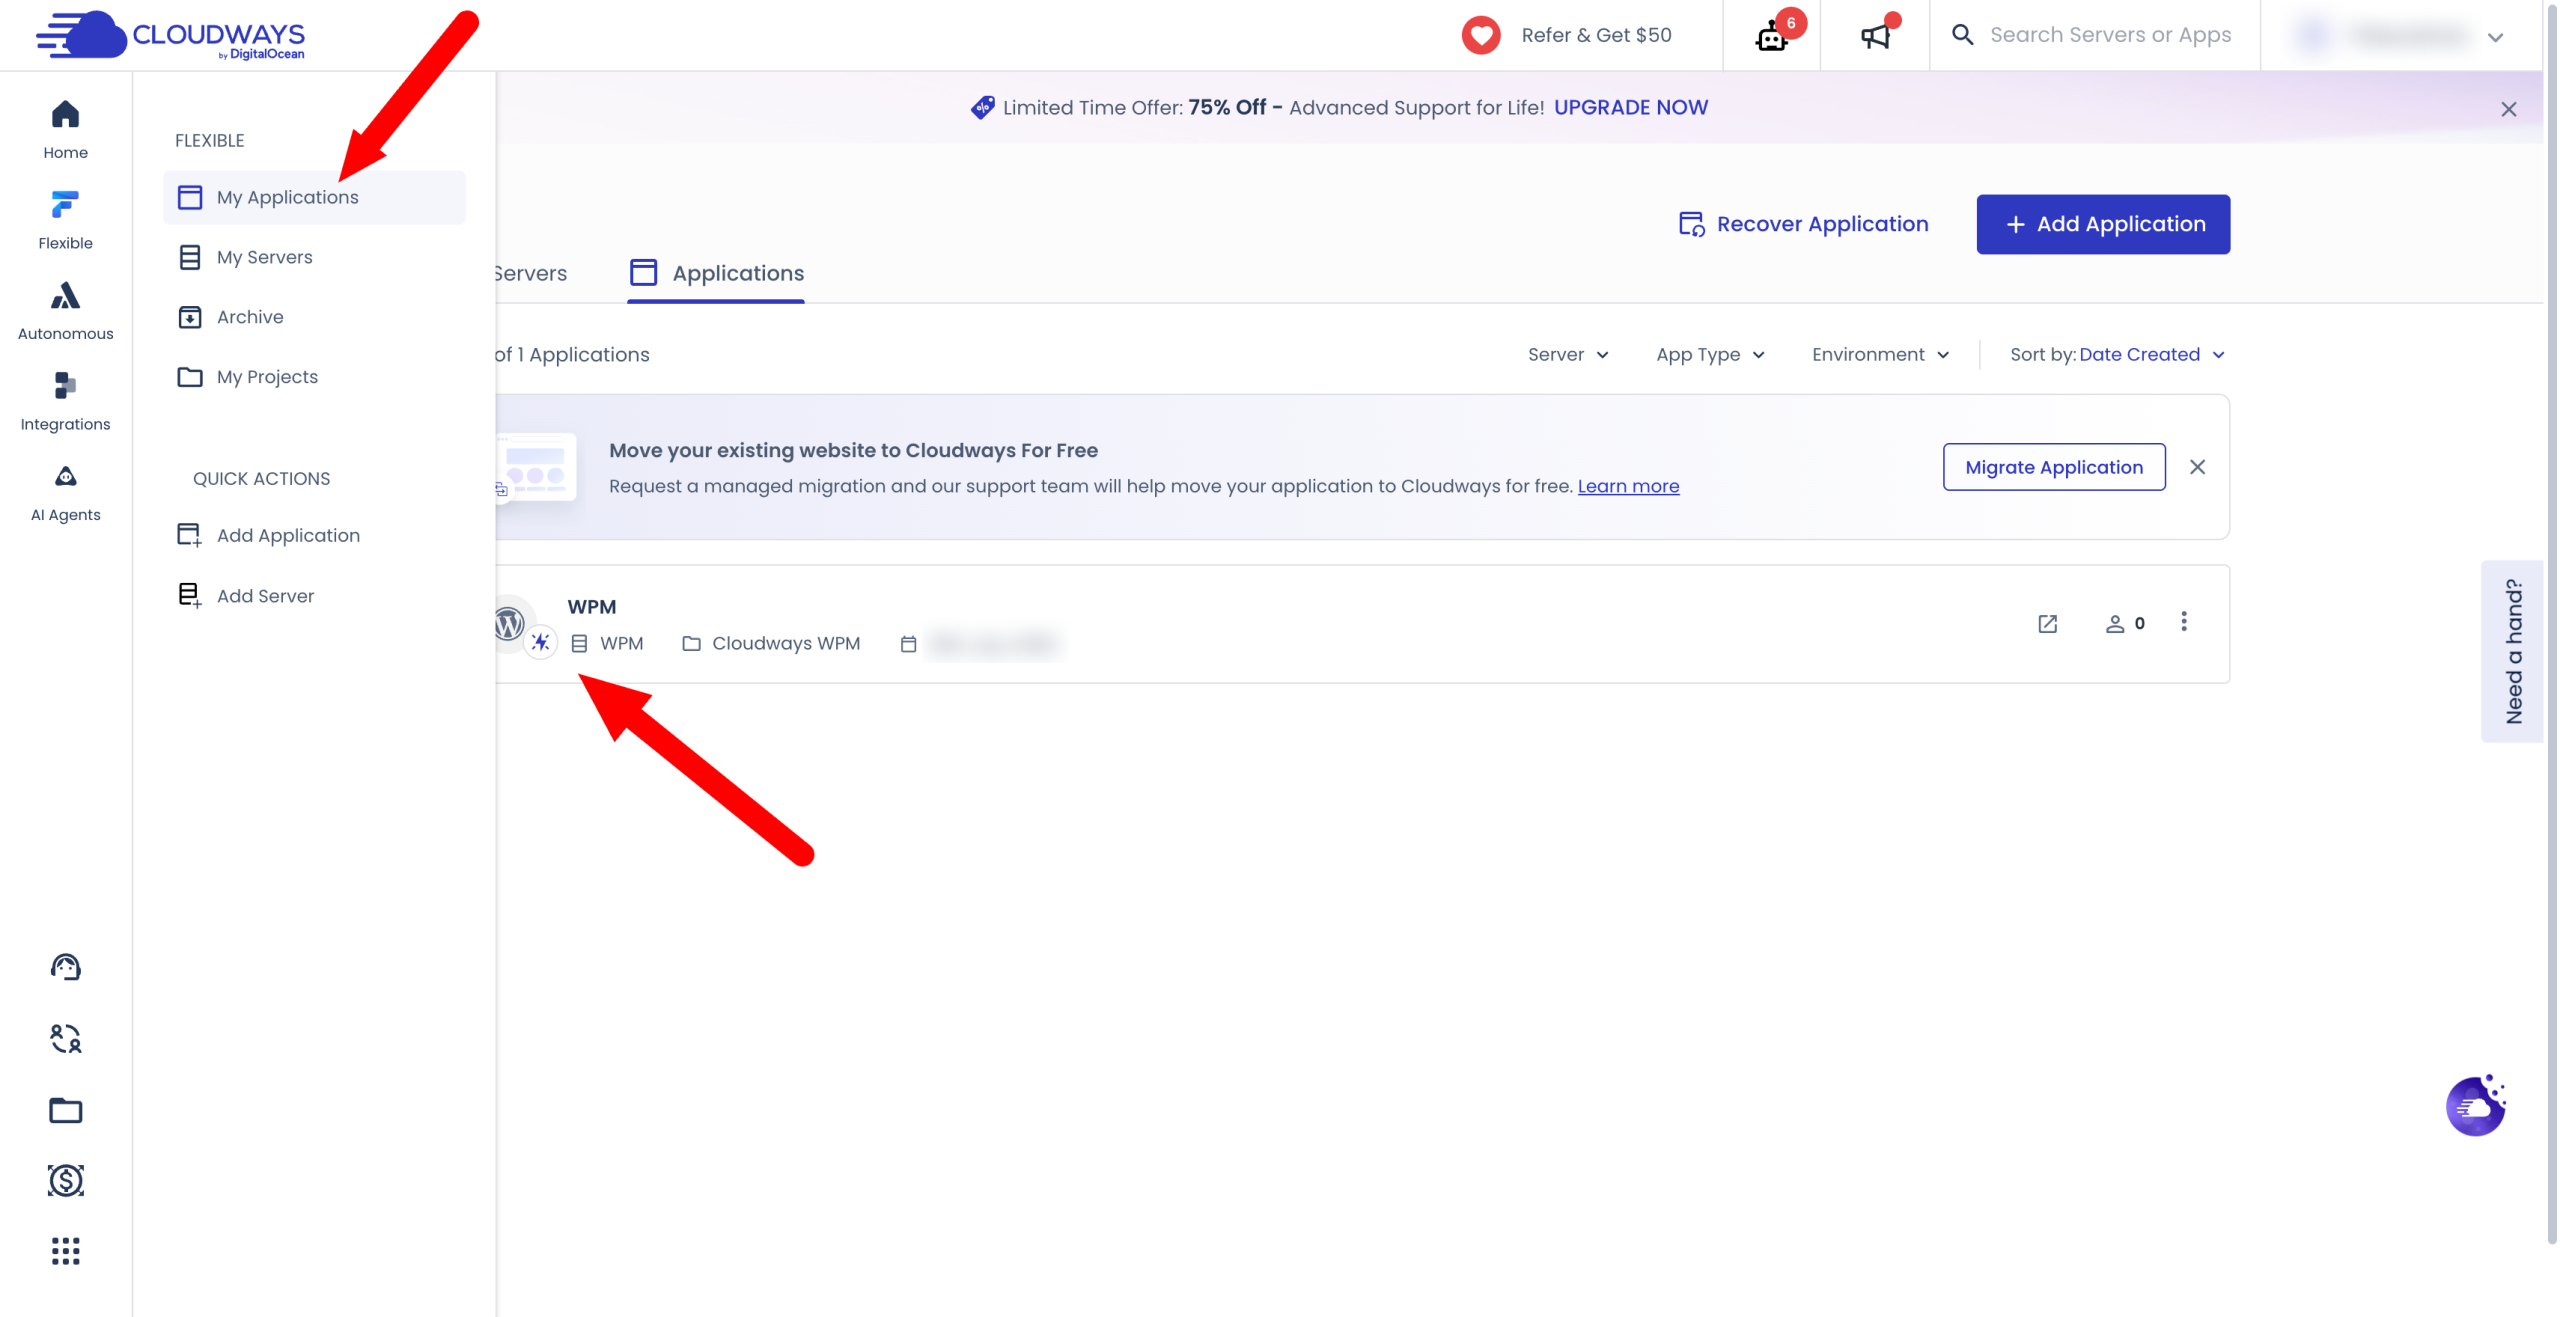
Create an application, or select the one linked to your WordPress site. Clicking it takes you to your Cloudways admin interface.
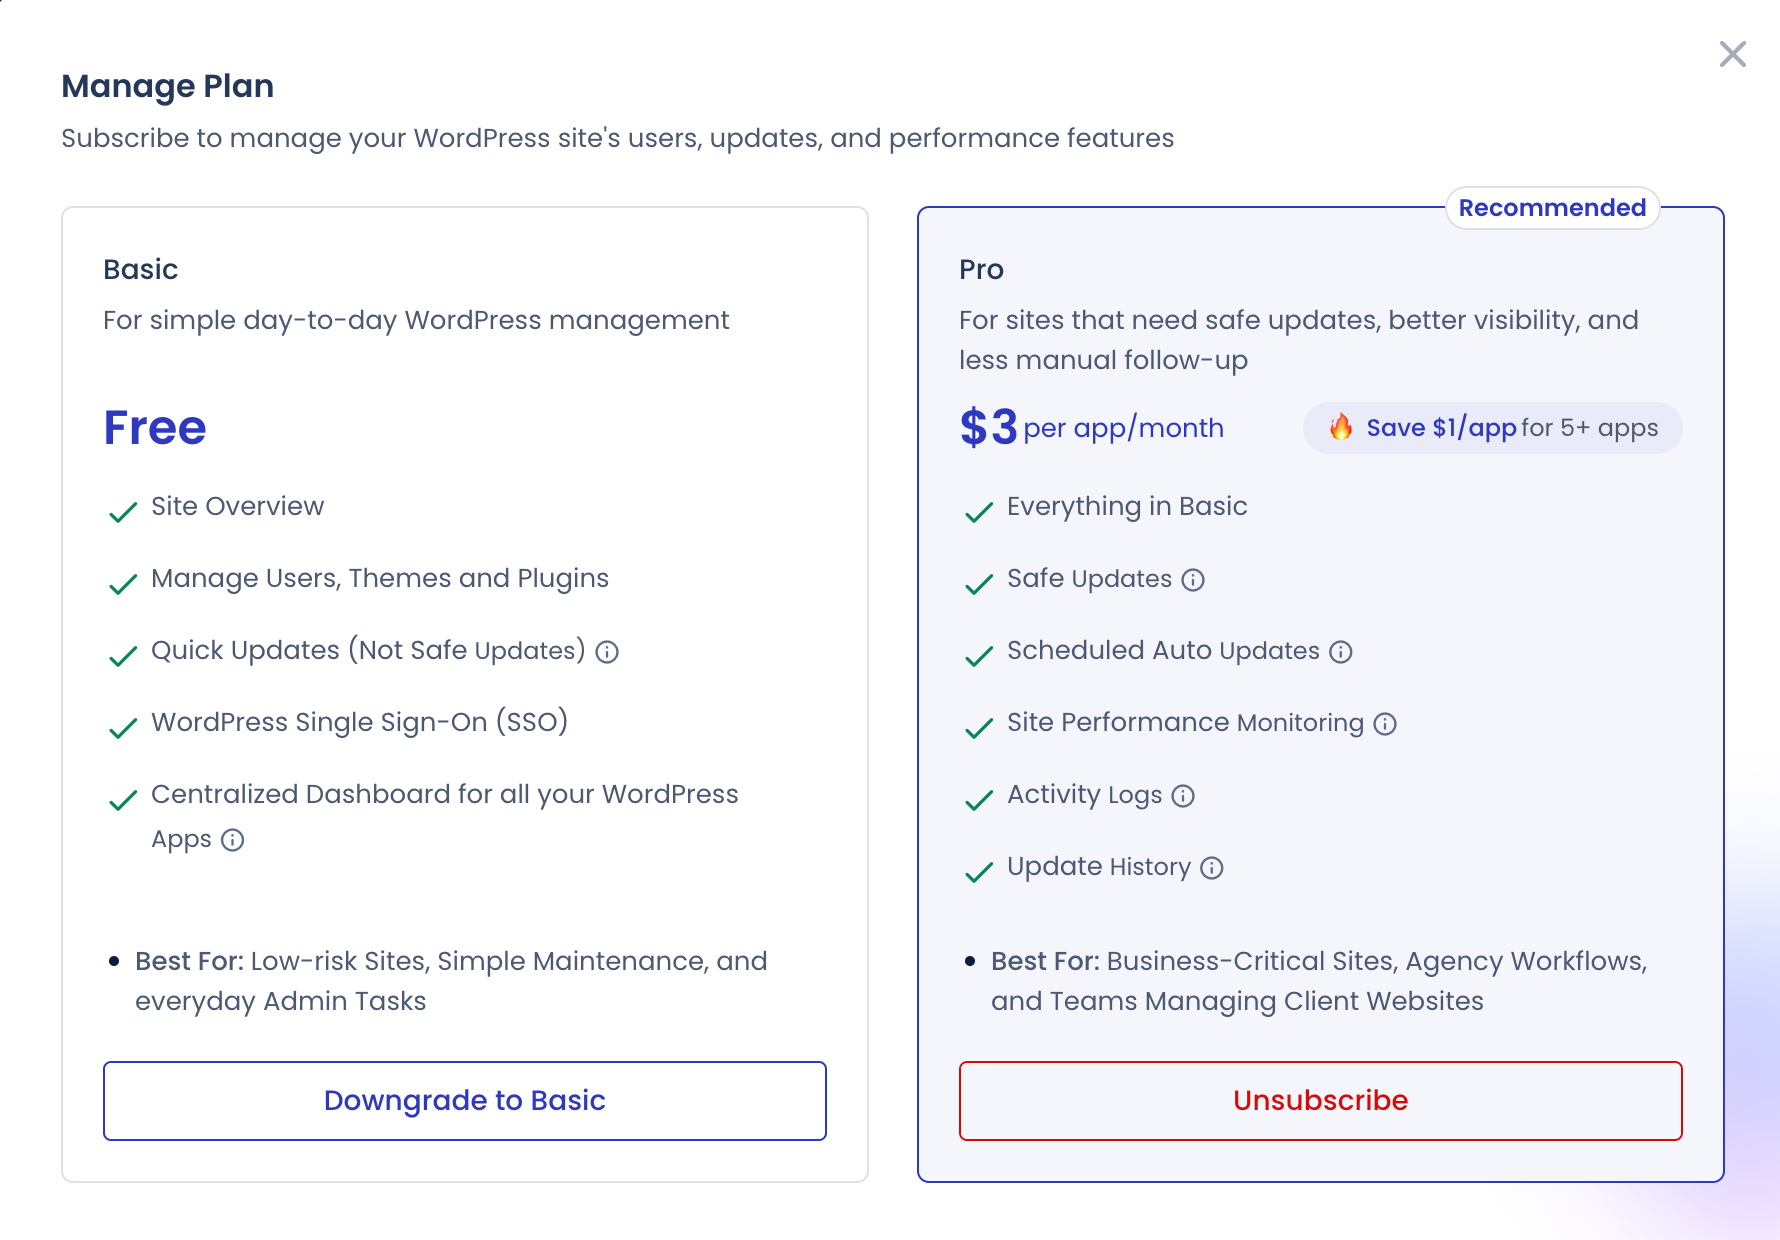
On the left, you’ll find a menu called “Site Manager.” Click it, and Cloudways Site Manager will offer to activate either its free plan (Free plan) or its Pro plan (starting at $3 per application/month). We’ll explain the differences between the two plans in detail at the end of this article.
To sum it up quickly here, know that the Pro version is of course much more full-featured (it notably includes the flagship safe-update feature with rollback if something goes wrong).
To get started, go with the free plan to test the tool and its options. If needed, you can switch between plans (including going back from a paid plan to the free one) whenever you like.
Getting to know the dashboard and the tool’s interface
So, is Cloudways Site Manager all set up on your end? Great, let’s now explore its dashboard for managing multiple WordPress sites.
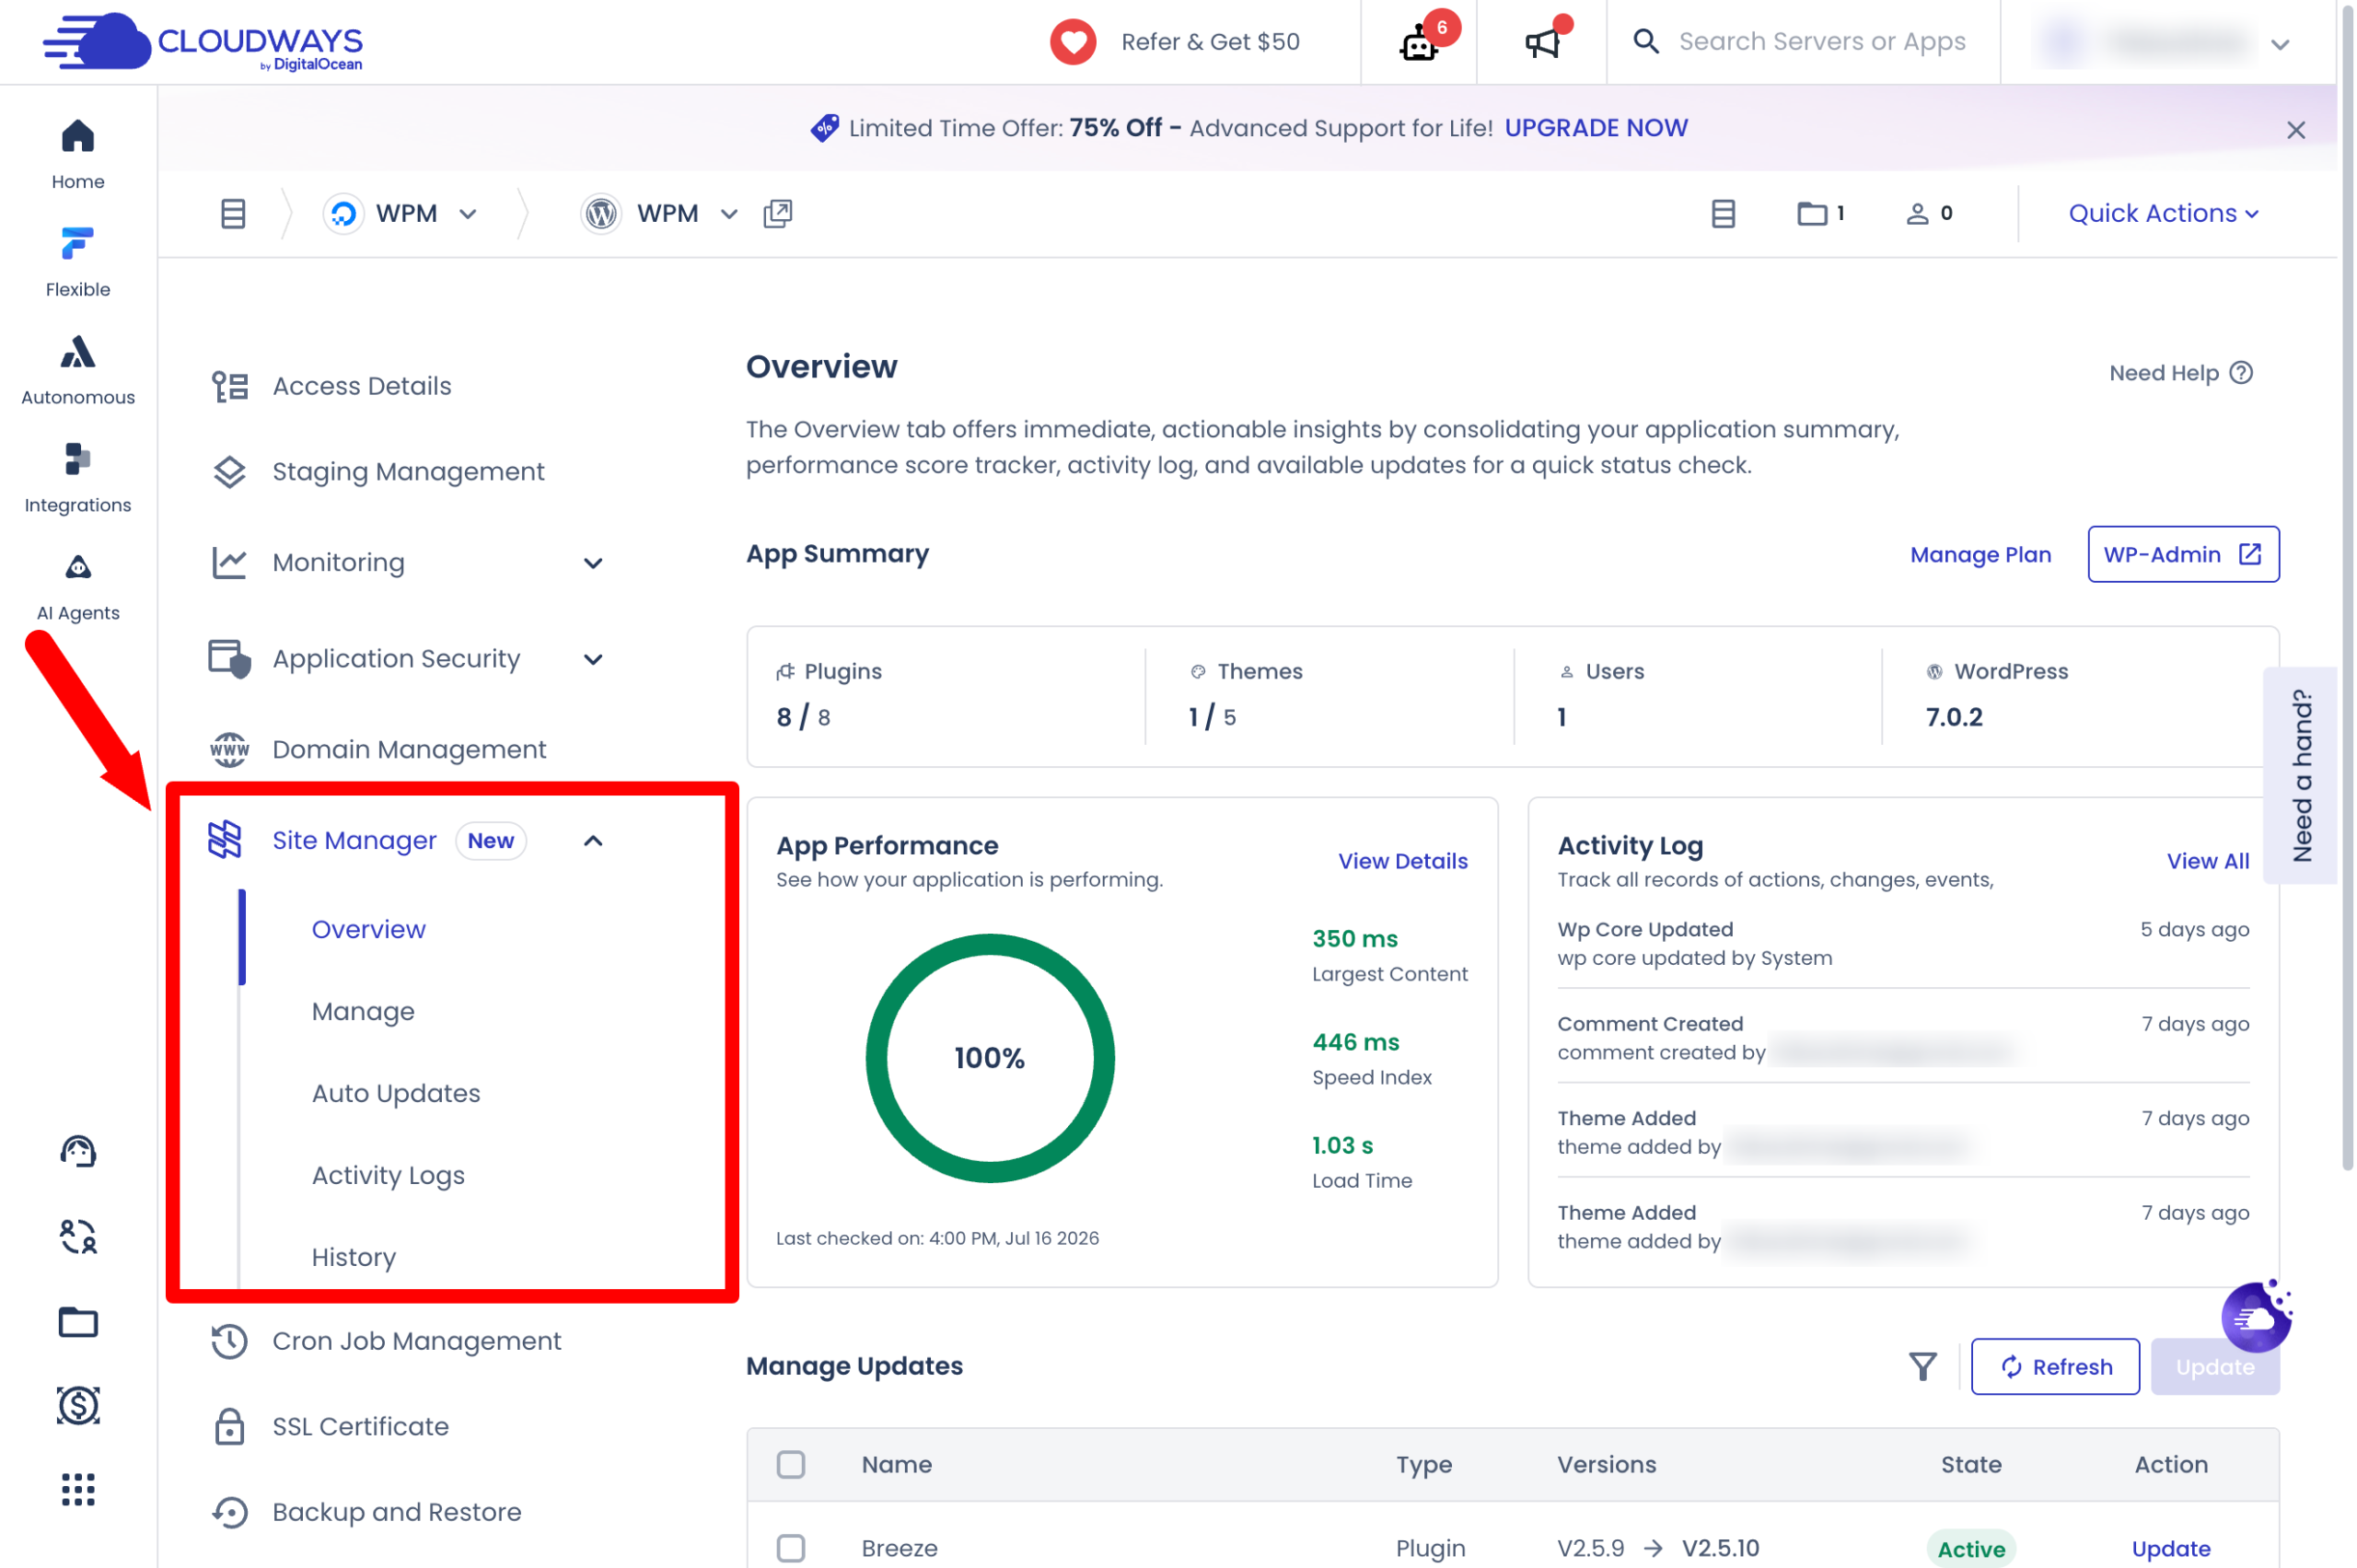
First off, you’ll notice that Site Manager has five main menus:
- Overview.
- Manage.
- Auto Updates.
- Activity Logs.
- History.
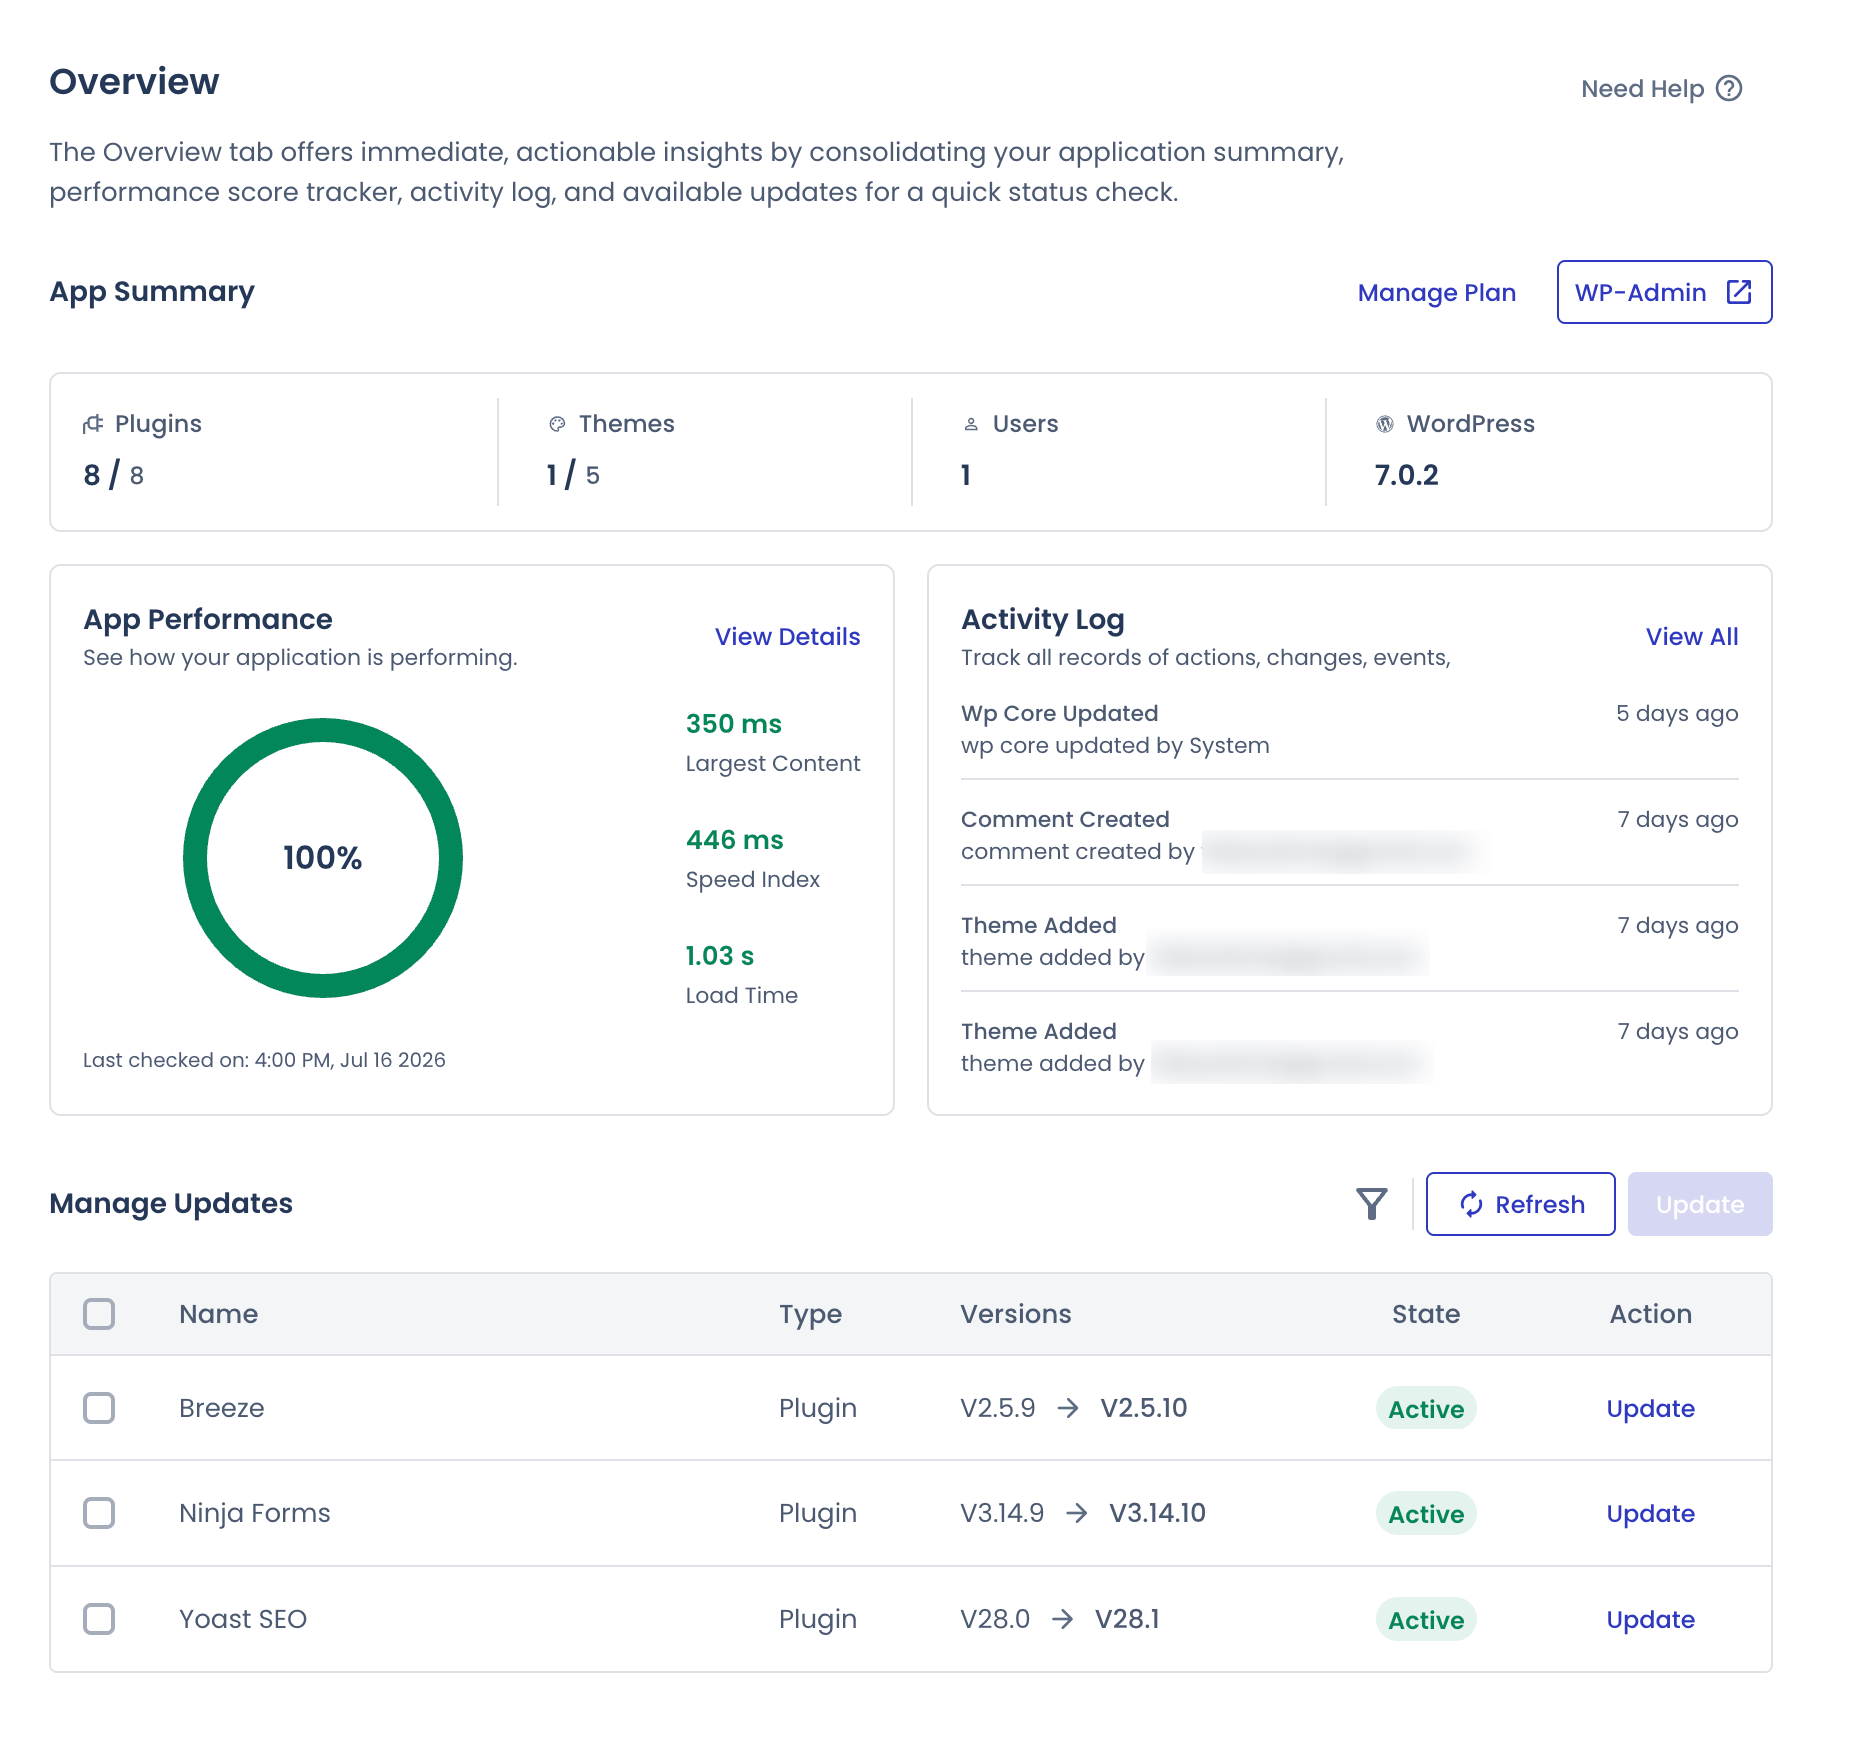
The dashboard (“Overview” menu) provides an overview with immediate, actionable information at several levels:
- a summary of your site, with plugins and themes (active/total), users, and the WordPress version you’re running
- a tracker for your performance score (App Performance), with the option to see more detail by clicking “View details.” You get access to certain Core Web Vitals metrics, since Cloudways relies on Google’s Page Speed Insights to analyze your pages’ loading speed. To dig deeper into the topic, take a look at our guide on performance with Cloudways
- an activity log (Activity Log)
- available updates (Manage Updates). If there are any, you can apply them in a single click right from here.
At a glance, you can quickly check your site’s current status and fix any issues you come across.
This overview serves as an entry point, and each site then has its own detailed record, where you’ll find every menu dedicated to managing it: automatic updates, activity logs, history. We’ll break down each of these menus in the next section.
Another important thing to keep in mind: getting up and running doesn’t require any special technical skills.
In its layout, the interface stays close to the Cloudways dashboard you already know for managing your servers and applications.
If you want to go through the menus in detail with us, to see exactly how to use Site Manager day to day, let’s dive in.
How to use Cloudways Site Manager to manage multiple WordPress sites?
The Manage menu in Cloudways Site Manager
Managing and updating WordPress plugins and themes
The Manage menu brings together everyday management actions for a given site: administering plugins and themes (installing, updating, activating, deactivating, deleting), as well as managing users and their roles, all without going through the WordPress admin area.
In practice, this is the menu you’ll use most often for one-off interventions:
- adding a new user for a client
- disabling a problematic plugin
- or quickly checking the list of active plugins on a site.
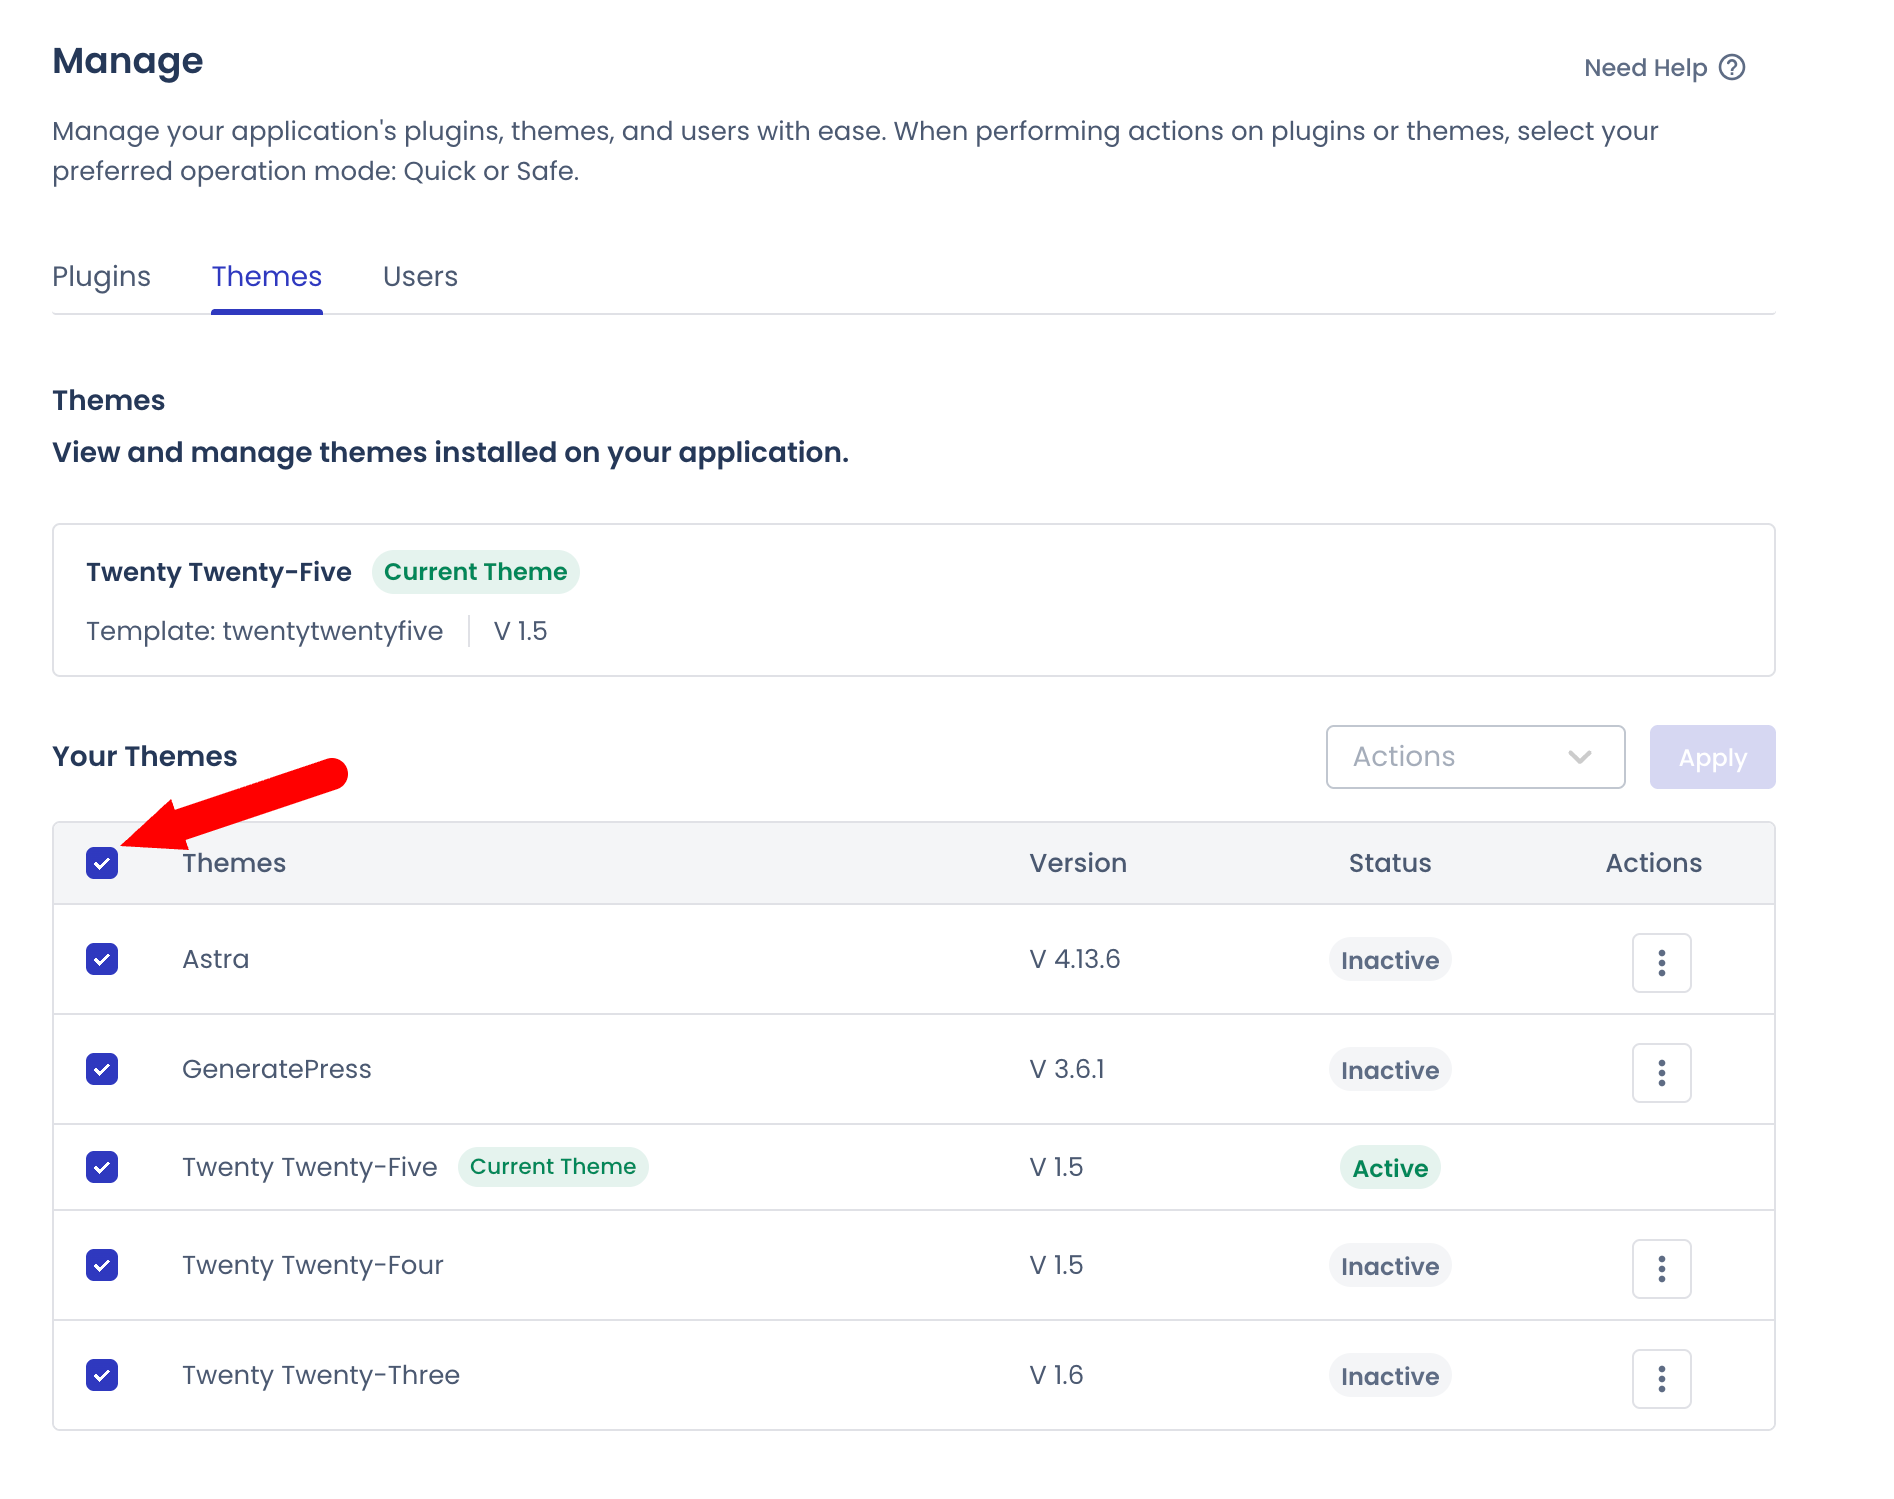
Clicking the “Plugins” or “Themes” tabs gives you a view of everything installed on your site, along with its version, its status (active/inactive), and the actions you can take.
By clicking the three-dot icon, you can, for example, activate/deactivate, update, or delete a plugin or theme:

If you want to carry out a bulk action on several plugins/themes at once, check the box next to “Themes” or “Plugins”:
Managing users
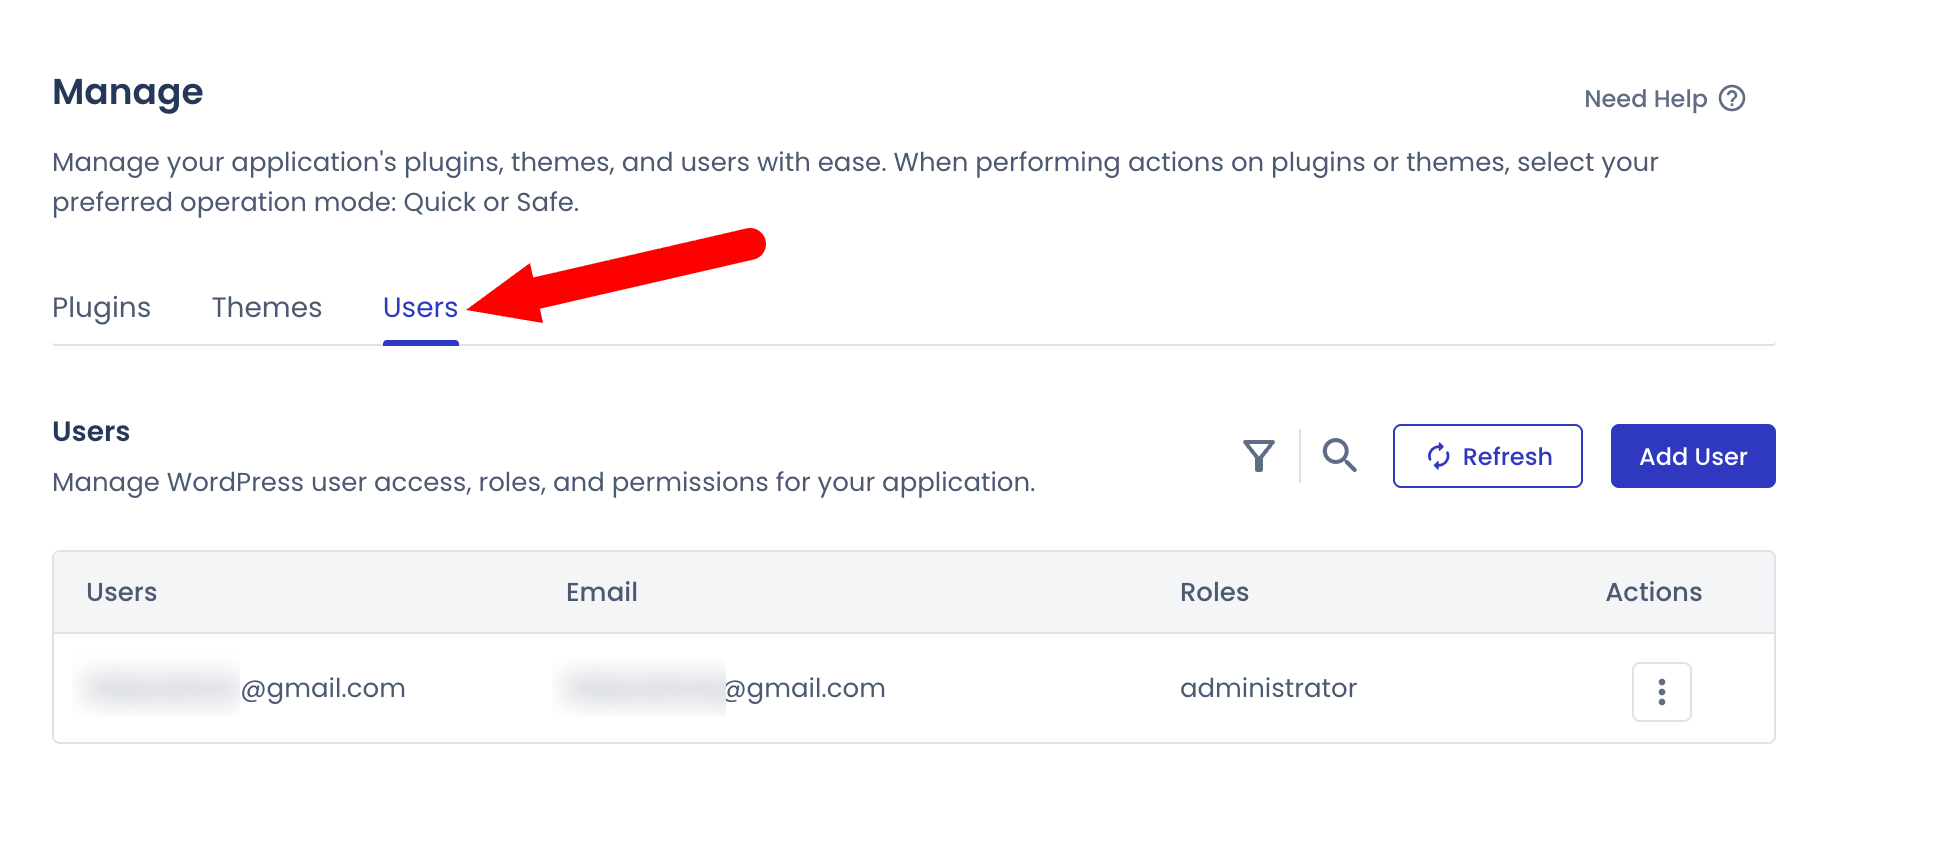
Now, by heading over to the “Users” tab, you’re able to manage access, roles, and permissions for your WordPress site’s users.
You can add a user (the “Add user” button), refresh the page (the “refresh” button), and carry out various actions for each user by clicking the three dots:
- WP-Admin: to log in directly to the WordPress dashboard as that user
- Change Password: to change the user’s password
- Set as Default User: to set the default WordPress user for SSO access (automatic login to the WP dashboard).
If needed, you can also change a user’s role or delete them.
The Auto Updates menu for updating your plugins and themes safely
Now let’s move on to the “Auto Updates” menu. This is where you set up the schedule for automatic updates on your WP site (plugins, themes, and WP core).
For each site, you can set an update schedule, choosing between a Quick Update and a Safe Update.
The two types of updates available for managing multiple WordPress sites
Quick Update applies changes directly to your live site, with no intermediate validation step.
It’s faster, but Cloudways is upfront about the trade-off: the interface itself notes that this option can carry risks if an update isn’t compatible with your setup.
Safe Update, on the other hand, first clones your site into a test environment, applies the update there, then compares before/after screenshots to detect any visual regressions.
If everything checks out, the update is deployed to production. If not, the site automatically reverts to its previous stable version.
How to set up an automatic WordPress update with Cloudways Site Manager?
To set up an automatic update system, head to the “Scheduling” tab. Turn on the option by clicking the small radio button provided.
Then, set your backup options:
- day and time for the backup (in “Set Automatic Schedule Update”)
- what’s included in the backup (in “Configure Update List”). By default, Site Manager backs up your entire site (plugins, themes, core), but you can also choose case by case what to include or exclude
- the type of update (in “Update Type”). You can choose between Quick and Safe Update. 
- sensitivity to visual regression (in “Visual Regression Sensitivity”). You can set a sensitivity threshold not to exceed (ranging from 0% to 10%) for changes in your site’s appearance. If the visual difference exceeds the threshold you set, Site Manager halts the update and rolls back the changes
- whether to continue if an update fails for a specific plugin or theme (in “Smart Skip for Plugin/Theme Update Failures”). If you turn on this option, Site Manager won’t stop the entire update process if a specific plugin or theme fails
- rolling out a critical update for vulnerabilities in your site’s WordPress core, themes, and plugins to protect it against potential exploitation attempts (in “Critical Updates”).
Once you’re done, click the blue “Save Changes” button to save your settings:
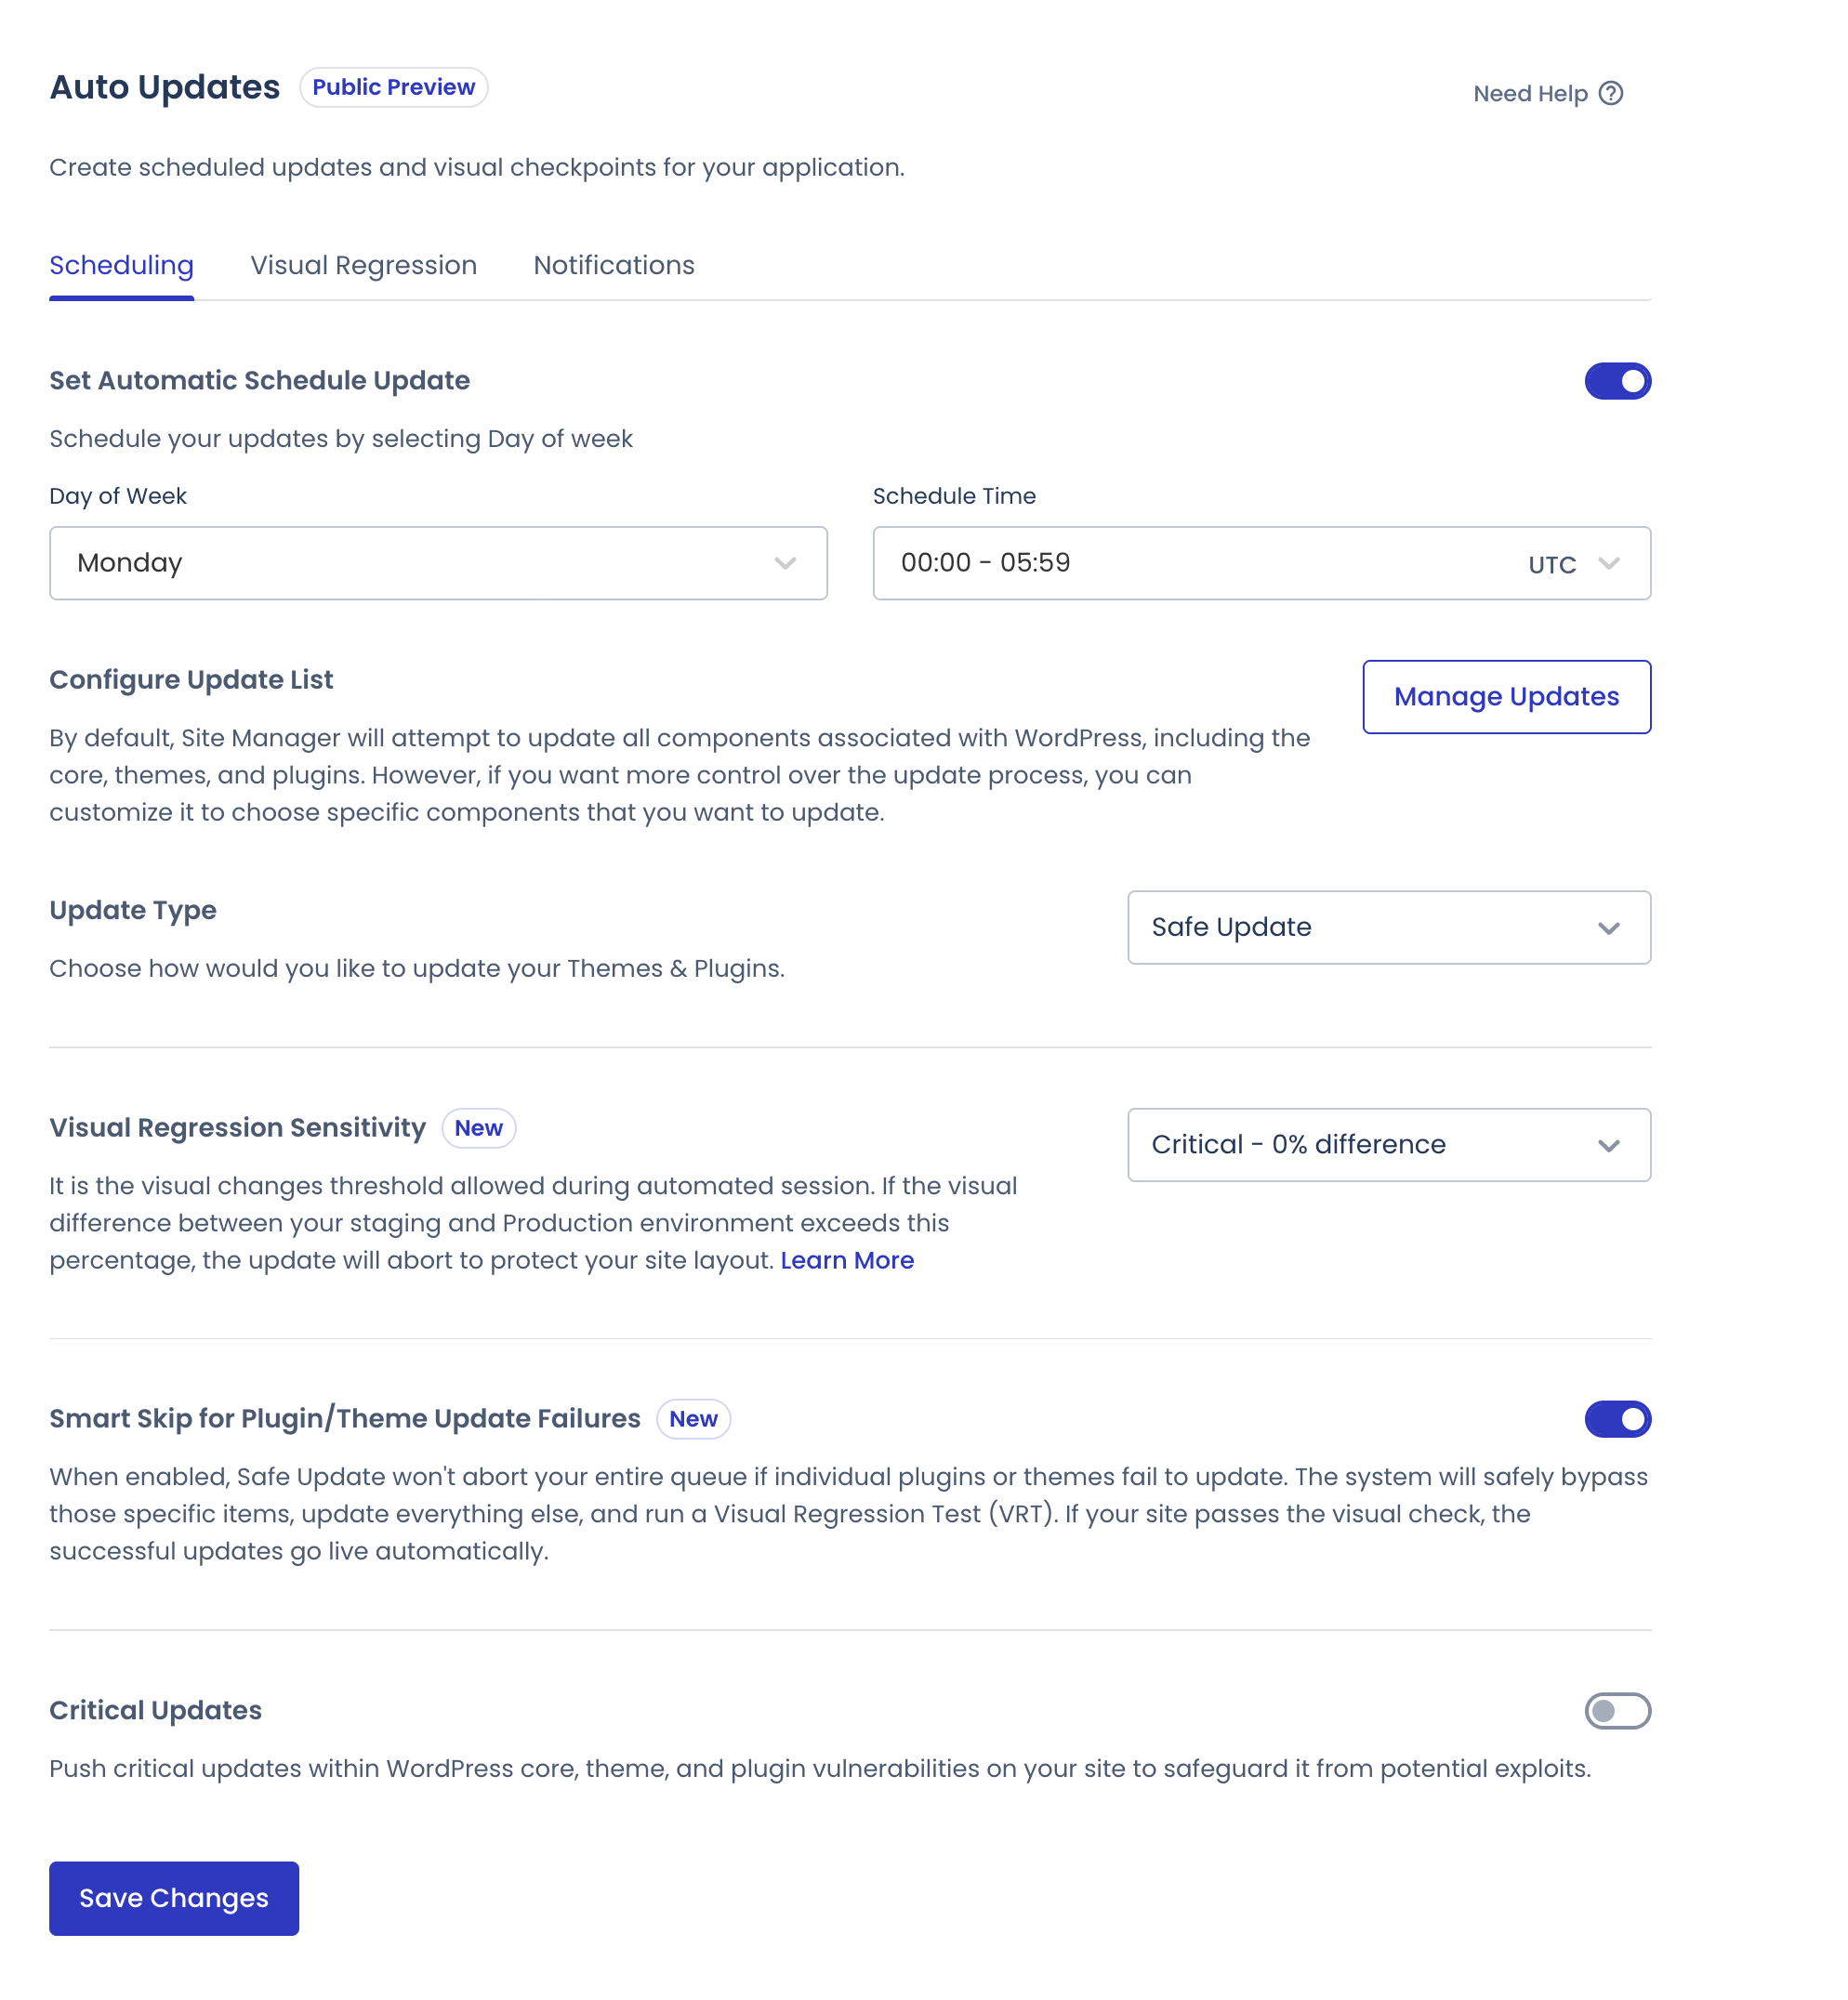
Finally, know that in the “Notifications” tab, you can choose to receive update notifications (up to 4 email addresses possible) and stay informed of scheduled changes, successful updates, or failures.

The Activity Logs menu
Moving right along to the “Activity Logs” menu. Here, you can track all the activity on your WordPress site, with a chronological list of actions and changes made by different users.
The activity logs record the following events:
- plugin and theme updates
- changes to posts or pages
- actions on WooCommerce products
- changes to user roles
- login activity
- comment moderation
- plugin installation or deletion.
Also worth knowing: these logs are stored on an external server to optimize performance.
And if needed, you can pause the display of your activity log by clicking the three dots and selecting “Disable Activity Logs.”

The History menu
Alright, let’s move on to the “History” menu. This one complements the activity logs with a dedicated history of scheduled automatic updates (core, themes, and plugins) and their execution dates.
You’ll find, site by site, a list of detailed logs (successful operations and failures) to help you troubleshoot any issues.
Whenever possible, make it a habit to check this history after every major update run.
It lets you confirm that everything went as planned, without having to rely solely on notifications received by email or Slack.
Bulk management of updates across your WordPress sites
So far, we’ve gone case by case, walking through Site Manager’s features within one particular WordPress application (site).
If you want to manage multiple WordPress sites at the same time, you can also access a centralized dashboard that gathers all your sites connected to Site Manager (Basic and Pro versions).
To get there, go to Integrations > Site Manager:

In the “Overview” tab, you’ll find your sites and can add more by clicking the blue “Add Apps to Site Manager” button.
For example, you can access the admin area of the site of your choice or change its plan by clicking the three dots:

In the “Manage Updates” and “Auto Updates” tabs, you can select several applications at once and apply the same action to all of them in a single operation: updating WordPress core, plugins, themes, and so on.
Just like with an individual update, you choose between quick mode and safe mode, depending on the level of risk you’re willing to accept for the sites involved.
If you’re an agency managing sites with different stakes, say a showcase blog and a WooCommerce store, this lets you reserve safe mode for the most sensitive sites, while keeping quick mode for simpler sites that don’t need that extra validation.
Well, congratulations: you now know how to manage multiple WordPress sites when it comes to themes, plugins, and updates (among other things).
But that doesn’t cover every technical aspect of your sites. What about, say, the PHP version?
How to update the PHP version of WordPress with Cloudways Site Manager?
Let’s be upfront about this. Updating your WordPress site’s PHP version isn’t done directly from the Site Manager menus we’ve just covered.
This falls under your application’s server settings, accessible from the Settings & Packages tab of your Cloudways application.
Still, we think it’s worth a quick word here for a simple reason: even though it’s separate from Site Manager itself, this process fits the same unified-platform philosophy: you don’t need to leave your Cloudways account to handle this more technical side of your sites.
To change your WordPress site’s PHP version, follow this path from the “Flexible” menu: My Servers > Settings & Packages > Packages.
In the “PHP” tab, click “Modify” and choose the version you want.
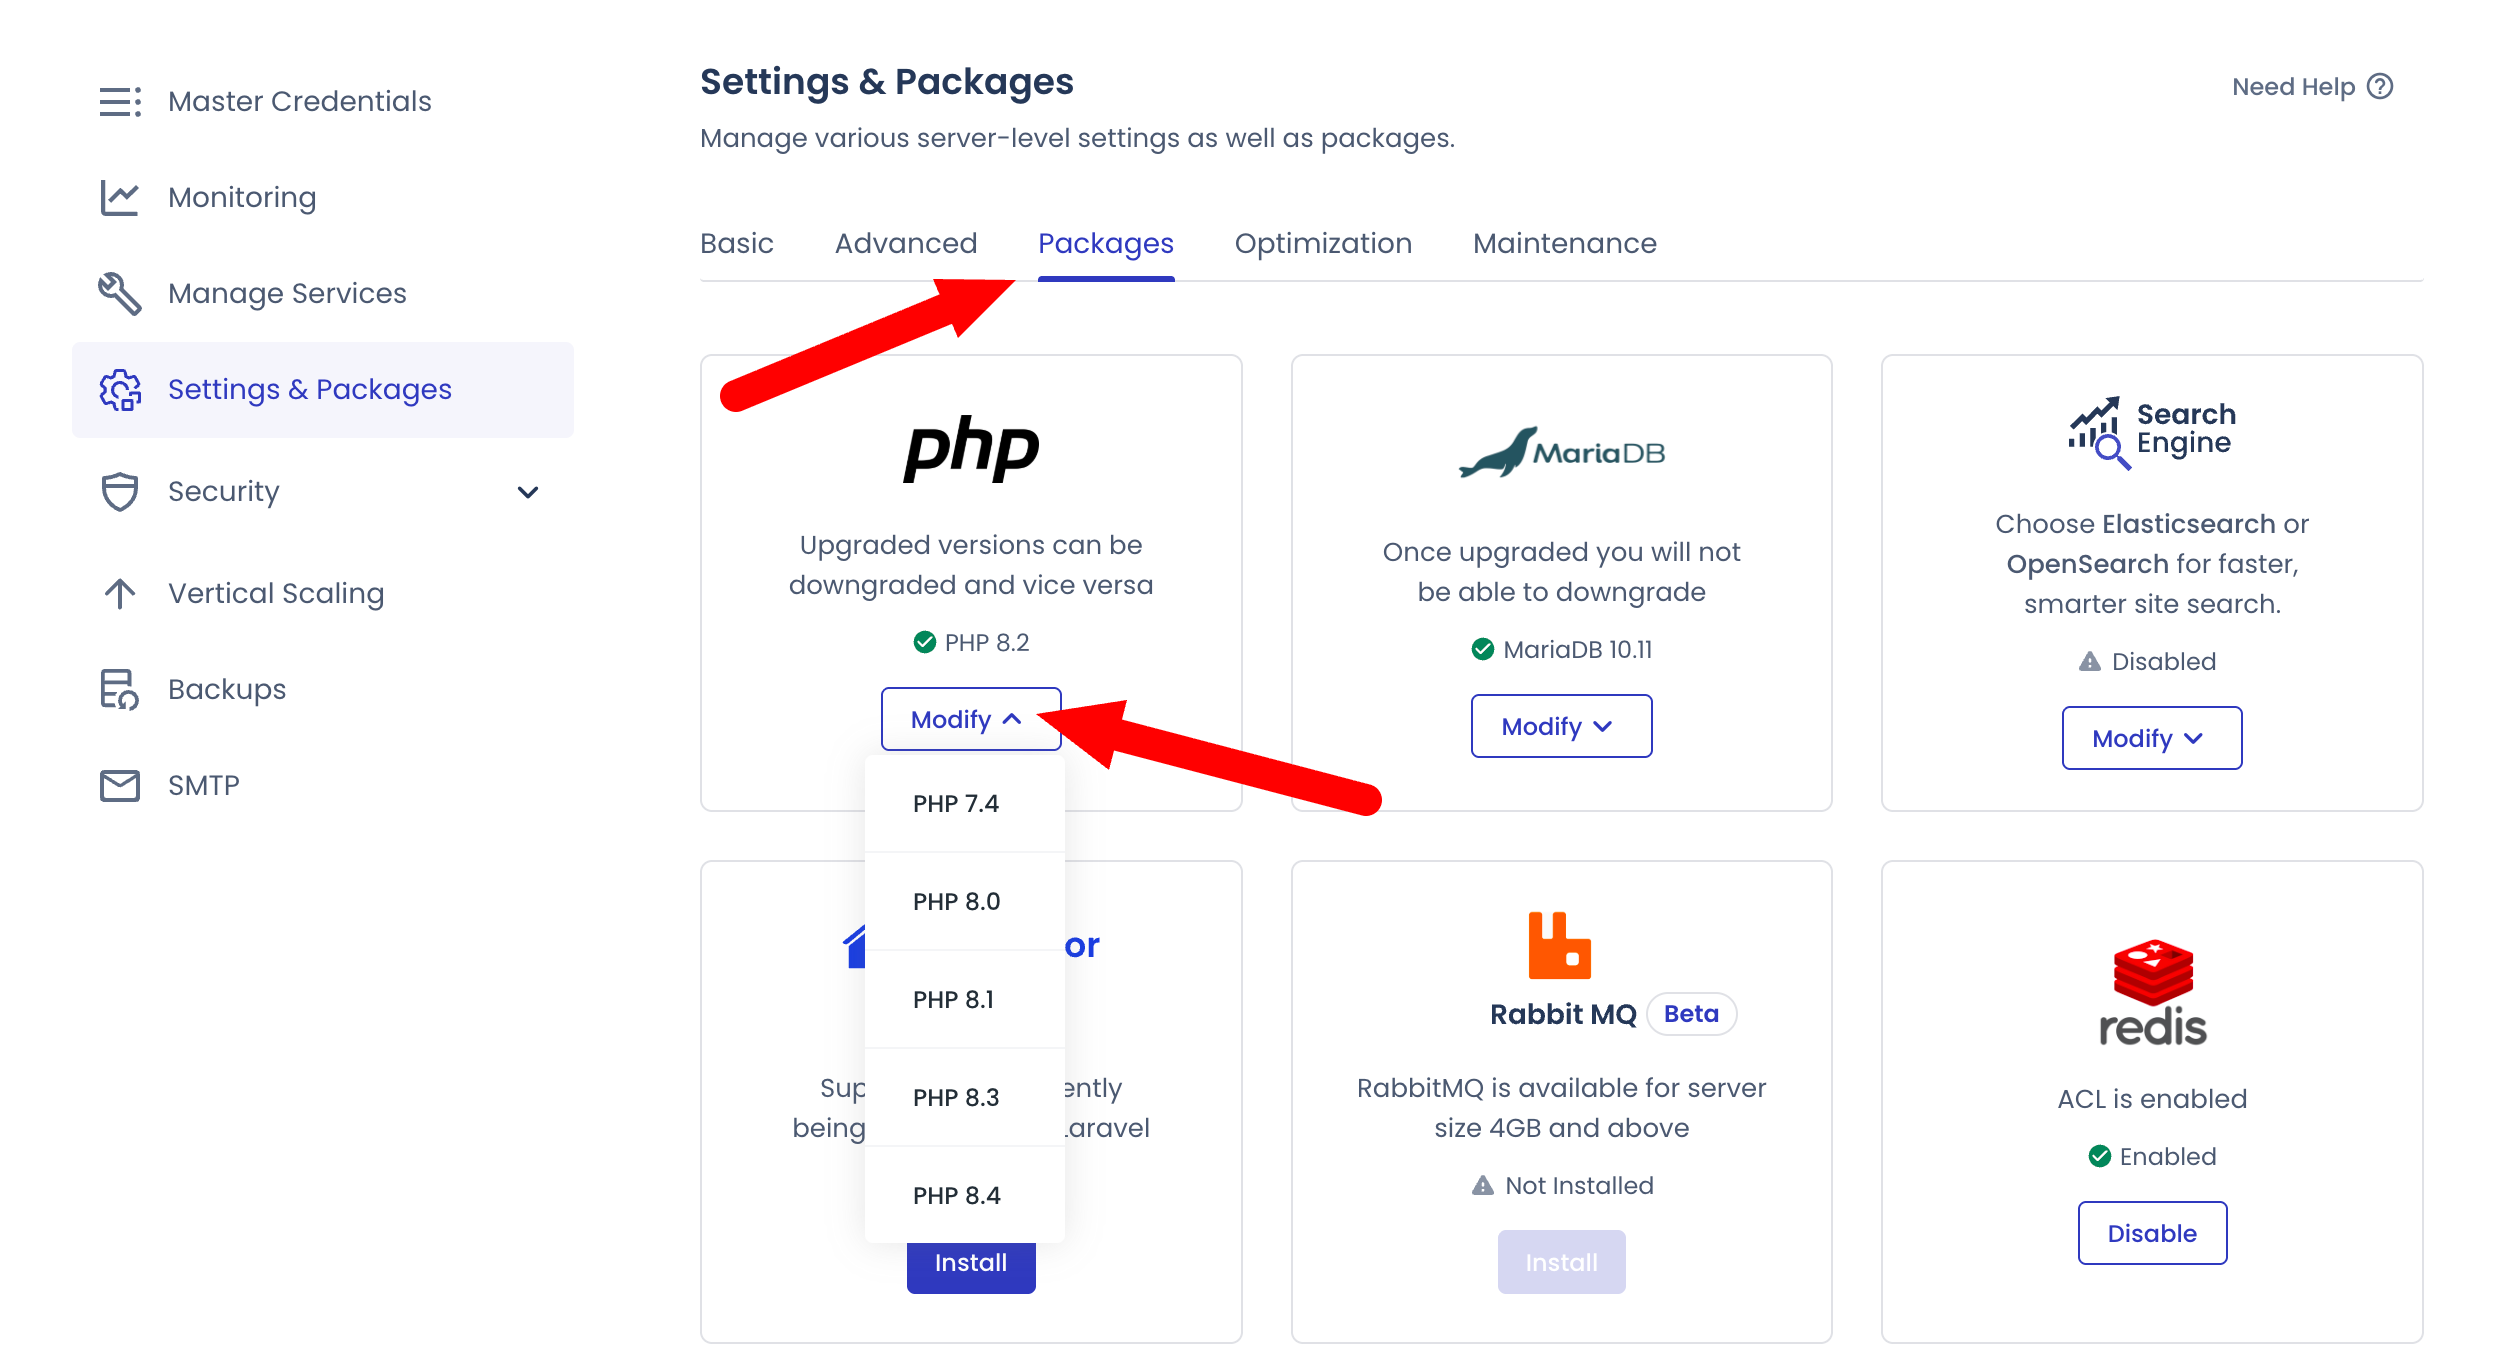
The switch takes just a few minutes, with no extended downtime for your site.
Don’t update your WordPress site’s PHP version without taking a few precautions first. Always back up your site beforehand (files + database), then check that your themes and plugins are compatible with the new PHP version you’re about to install.
Some older plugins still use deprecated functions, which can cause errors after the switch. To learn more about this, check out our dedicated guide.
As you’ve just seen, centralizing the management of multiple WordPress sites looks great on paper. But which profiles actually benefit from it day to day?
Let’s untangle that just below, with a few concrete use cases.
Use cases for freelancers, agencies, and developers
Site Manager doesn’t appeal to every type of WordPress user in the same way.
It’s not just aimed at large agencies managing several hundred sites.
In reality, its value shows up as soon as you go beyond a handful of WordPress installs.
That said, depending on your situation and needs, it fits in different ways:
- Are you a freelancer or independent? If you manage your own site plus a handful of clients’ sites, the free plan is generally enough to cover the essentials: a centralized dashboard, one-click login, plugin and theme management, and quick updates. You save time with no extra investment.
- Do you run a web agency? Things change once your portfolio of sites grows. Safe updates, batch scheduling, and activity logs become selling points for building a recurring maintenance offer for your clients, with clear traceability of your work.
- Are you a developer? The combination of visual regression testing, custom scheduling, and detailed logs lets you fold Site Manager into a more rigorous deployment process, especially on projects where stability matters most, like WooCommerce stores.
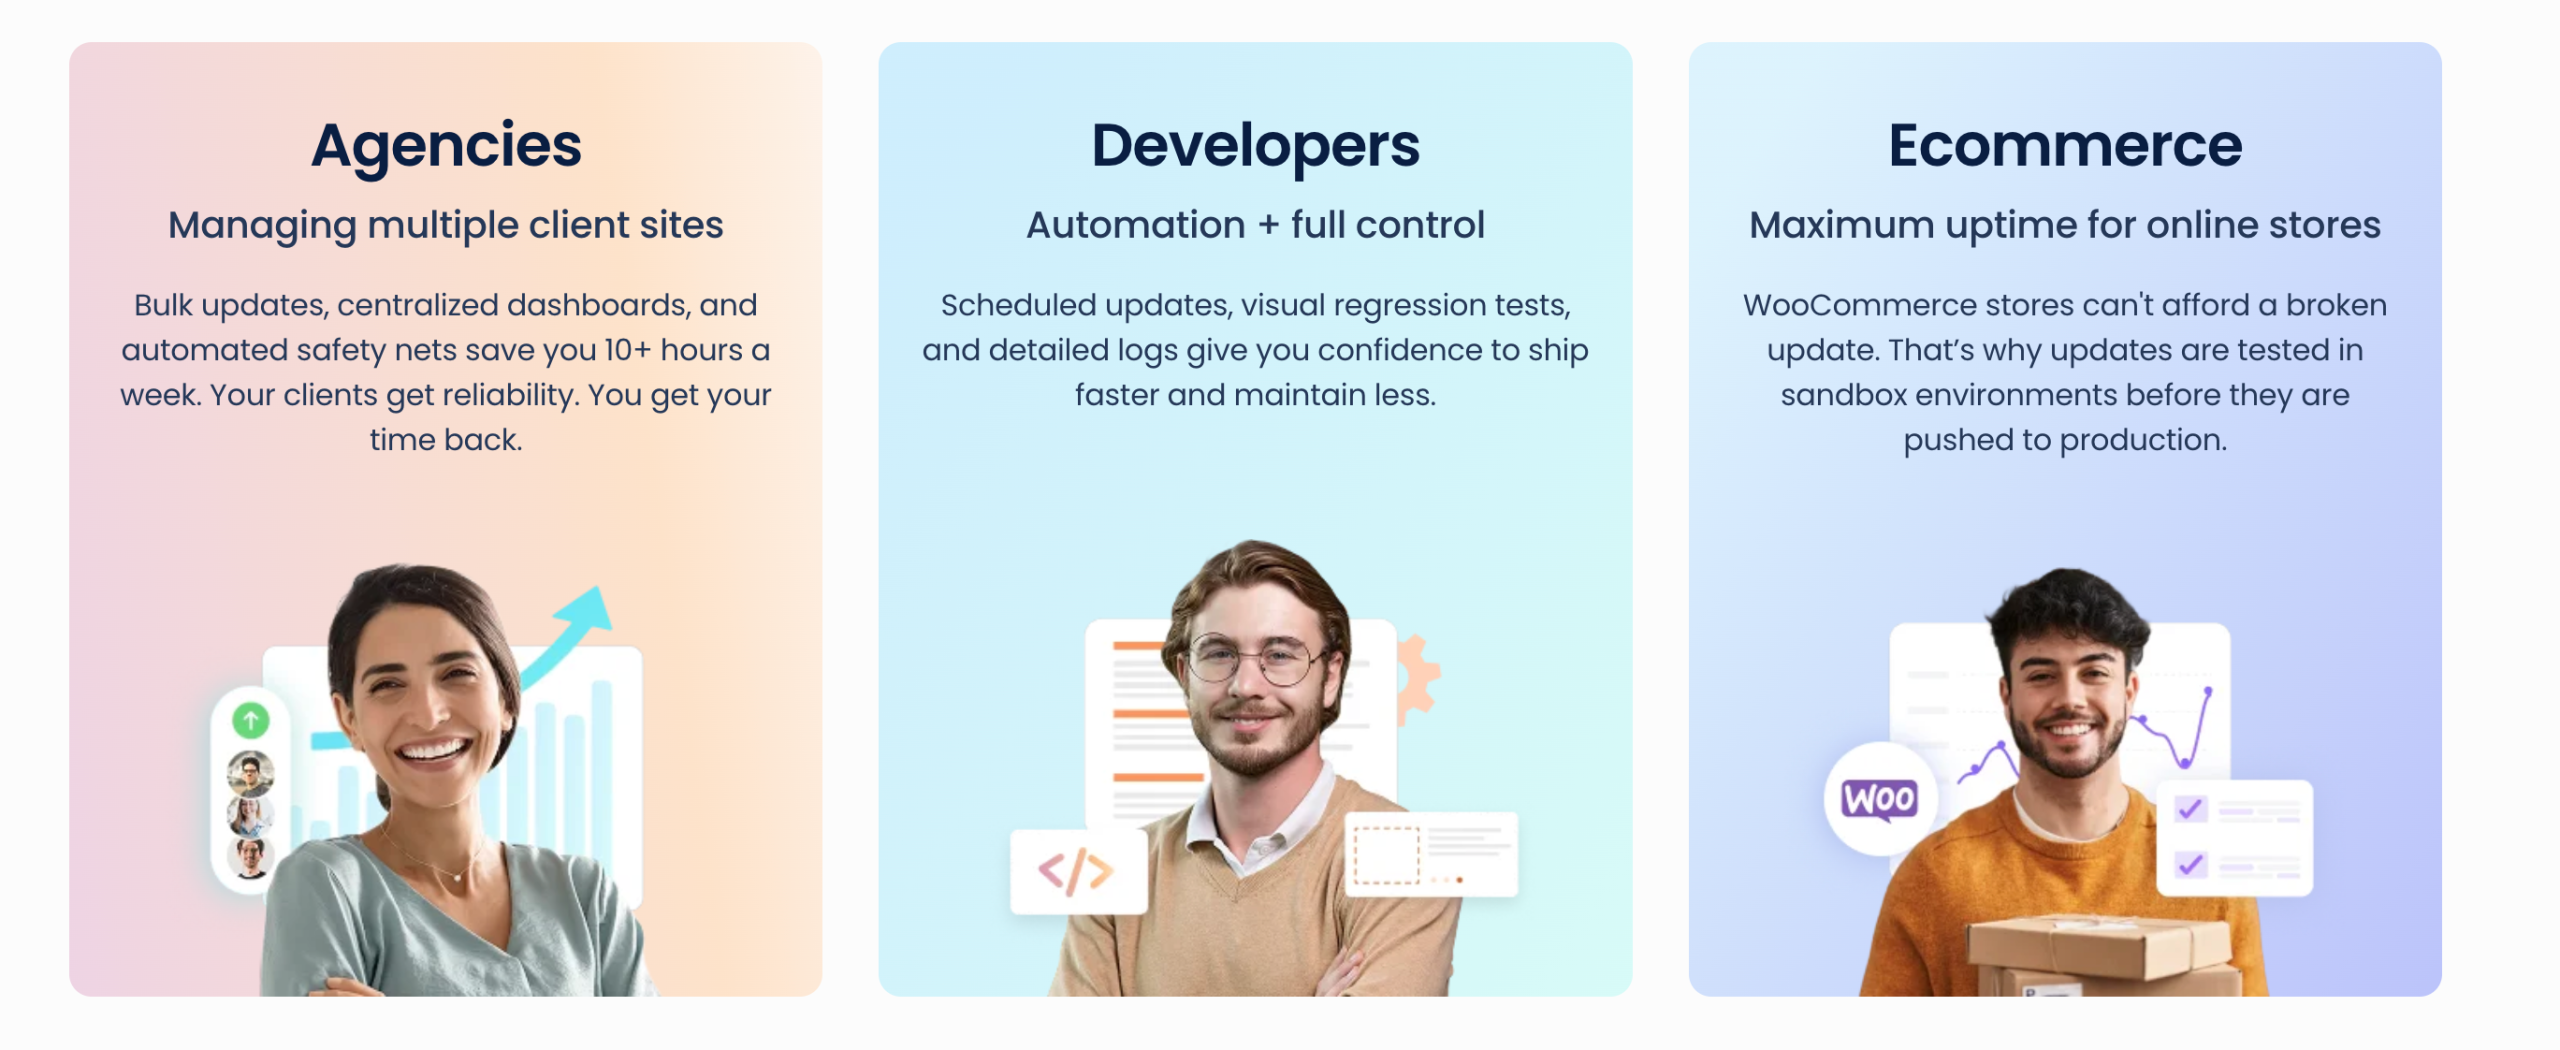
Either way, one of Site Manager’s biggest strengths is its ability to scale with the size of your portfolio when managing multiple WordPress sites.
You can very well start with one or two sites, then expand your coverage as your business grows, without ever switching tools.
How much does Cloudways Site Manager cost to manage multiple WordPress sites?
A freemium model, two tiers of access
Whatever your profile, one question naturally comes up before adopting a new tool: how much does it cost?
Cloudways Site Manager is no exception. It runs on a freemium model, with two tiers of access:
- The “Basic” plan is free and gives you access to the essentials: a centralized dashboard, one-click login to the WordPress admin, management of plugins, themes, and users, and quick updates.
- The “Pro” plan unlocks the more advanced features: safe updates with sandbox validation, visual regression testing, performance monitoring, scheduled automatic updates, full history, and detailed activity logs.
If you’d like, here’s a comparison table of the features between the Basic and Pro versions:
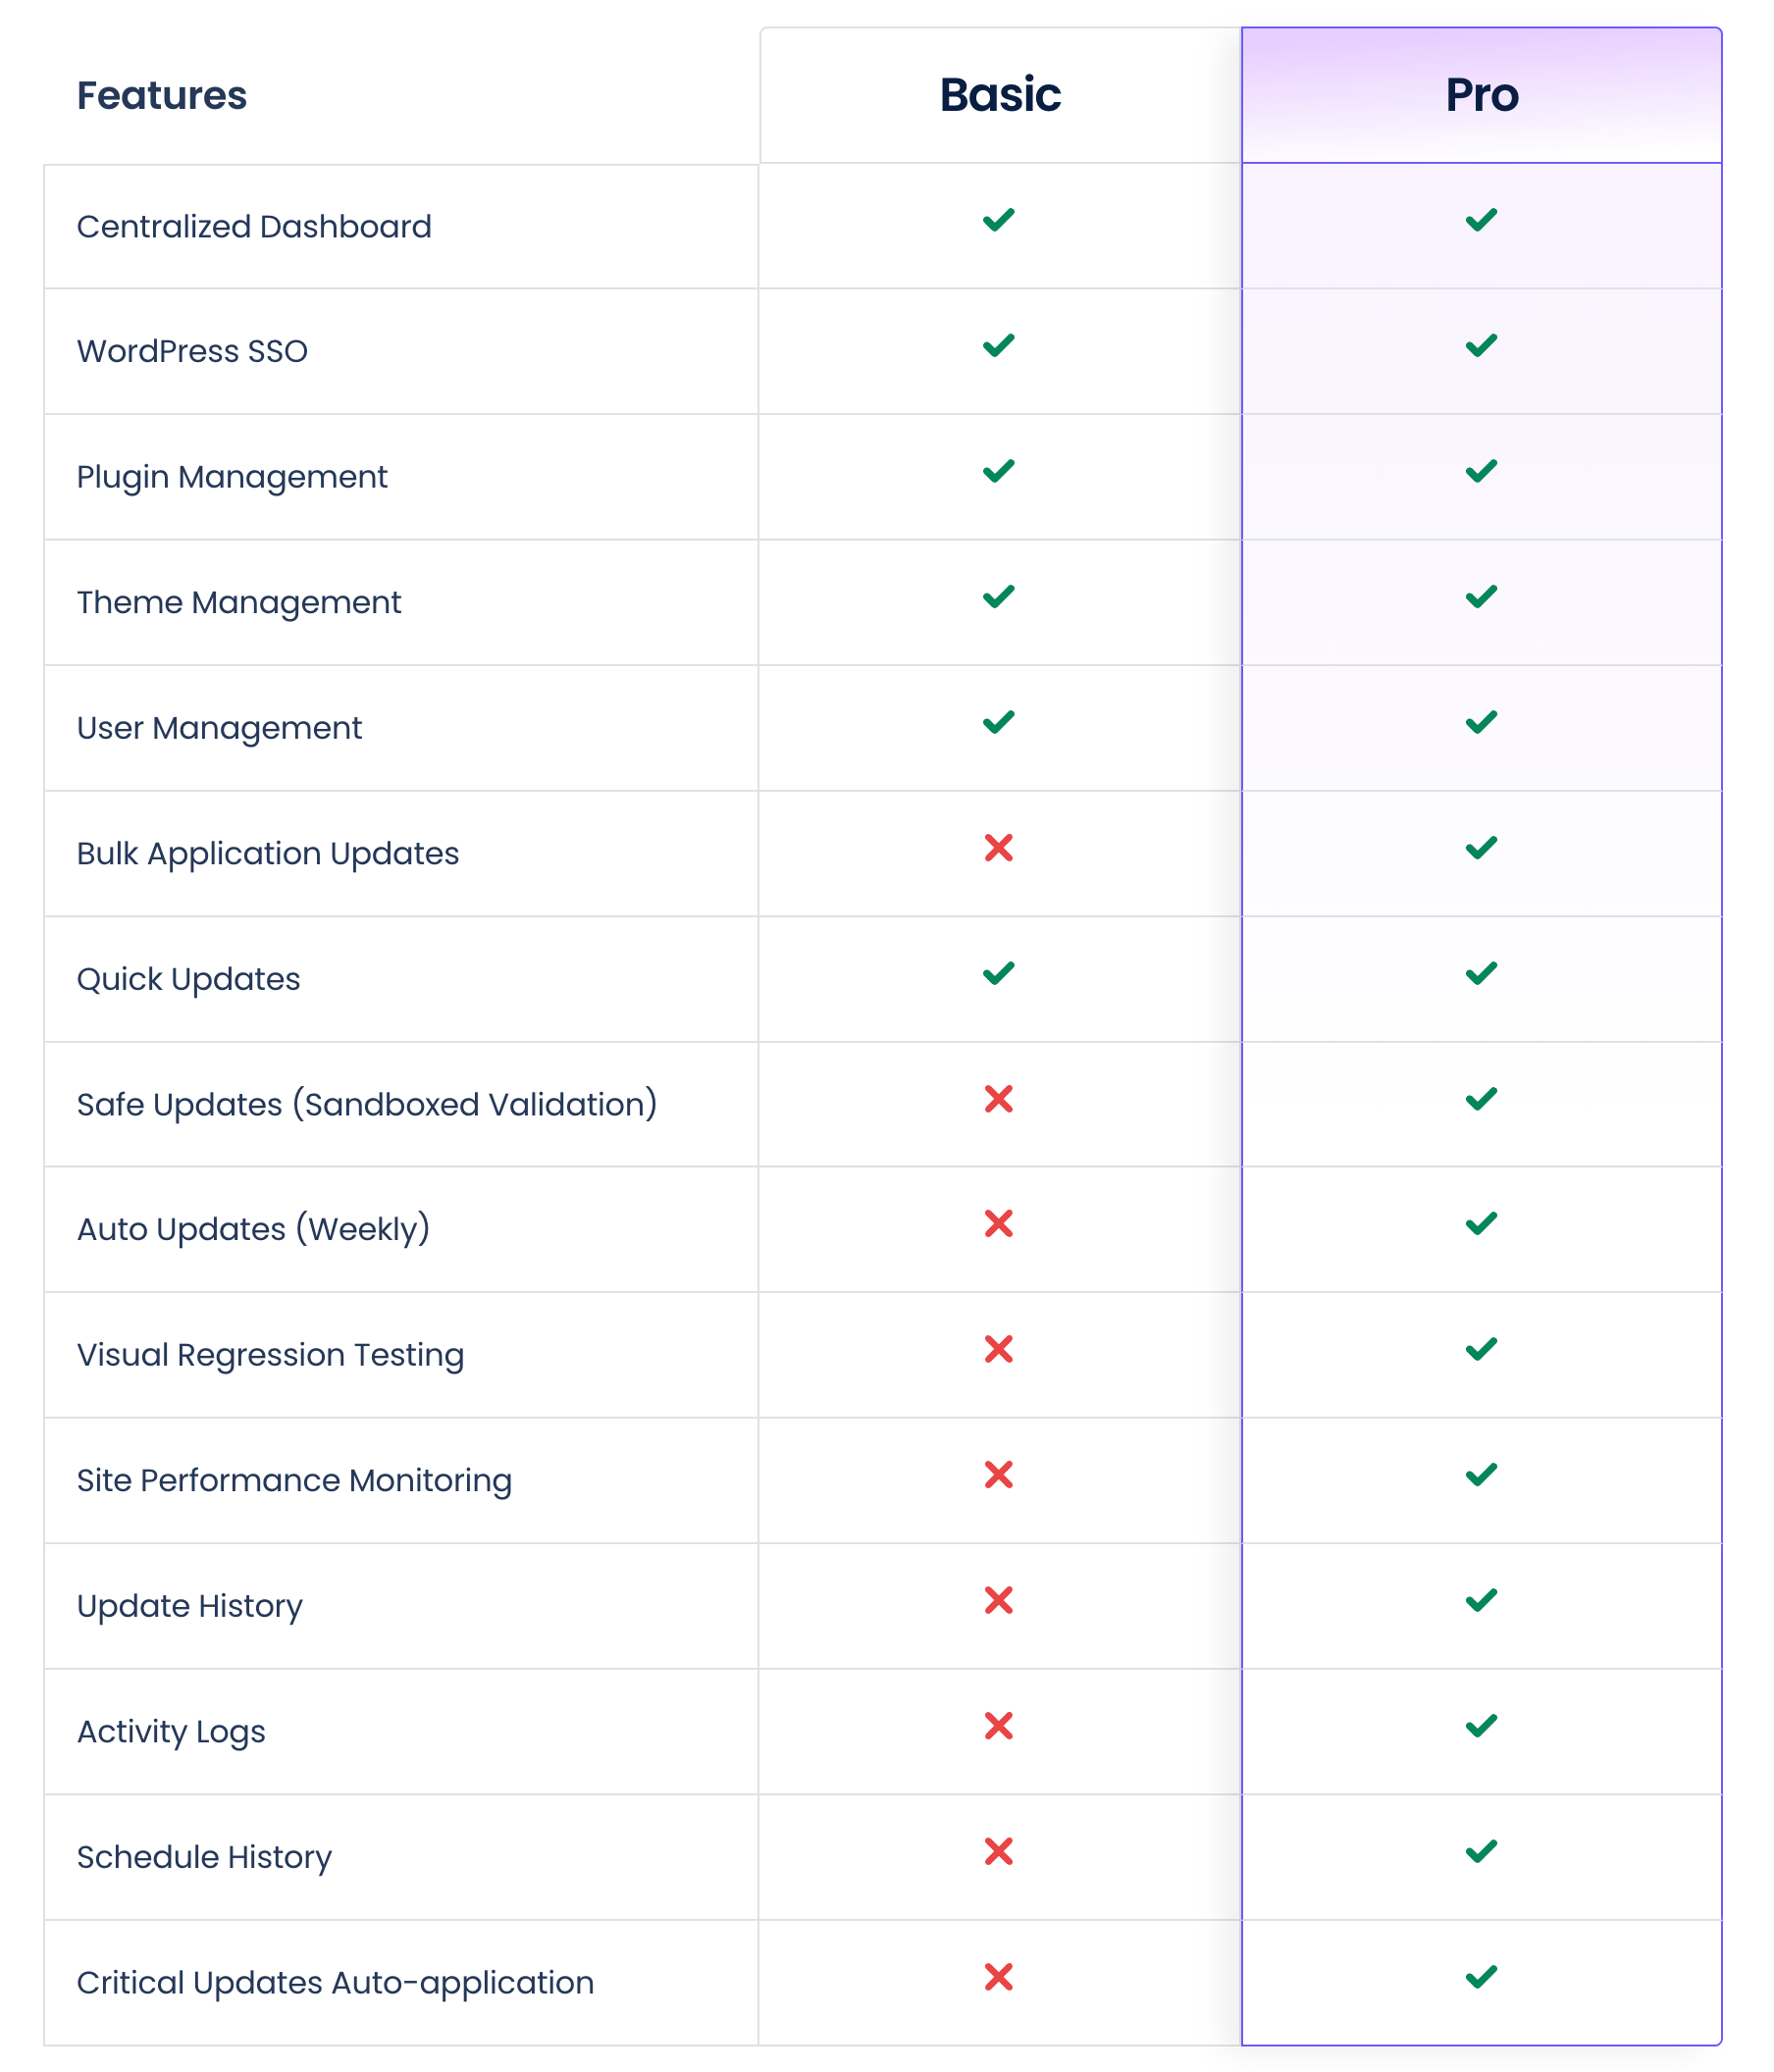
A Pro plan starting at $3/month per site
As for the Pro plan, it’s billed per application, not per server. The pricing is as follows:
- Up to 5 applications (sites): $3 per application per month.
- 6 applications or more: $2 per application per month.
Cloudways doesn’t offer a free trial for its “Pro” plan. That said, you can switch between the two plans at any time, which gives you the option to try the “Basic” plan before investing in the “Pro” version, should your needs change.
Our final verdict on Cloudways Site Manager for managing multiple WordPress sites
After going through Cloudways Site Manager’s main features, it’s fair to ask whether this tool adds real value to the process of managing multiple WordPress sites.
Before answering that, one thing is worth pointing out. While it’s nothing revolutionary, this tool
fits into a logical evolution of the management platform offered by the host.
Rather than trying to compete with the many WordPress management tools already well established on the market, Cloudways chose to build directly into its interface a set of features that address site administrators’ most common needs.
This integration has an obvious advantage: everything stays centralized within the same hosting environment.
For Cloudways users looking to manage multiple WordPress sites more efficiently, Site Manager is therefore a coherent, easy-to-learn, and sufficiently complete solution for simplifying the main maintenance tasks.
It’s probably not the tool that will transform the way you work overnight.
On the other hand, it can save you precious time in your day-to-day site management. And as they say, that’s priceless.
If you’re already hosted with Cloudways, activating Site Manager on your applications costs nothing (with the “Basic” plan) and can already simplify a good chunk of your maintenance routine.
Ready to give it a shot? Go discover it by clicking the button right below:
