“DNS_PROBE_FINISHED_NXDOMAIN.” You’ve probably already broken out in a cold sweat over these few soft words.
And that’s normal, because it’s one of the most frequently encountered error messages on the web.

If you’ve made Google Chrome your browser of choice (like more than one in two users), you can’t have escaped it.
This error can become a real headache, as it prevents you from accessing the website you’re so interested in, and can block important actions.
But don’t panic. In this tutorial, we’ll look at what this error actually consists of, what the main causes are, and above all what practical solutions there are to quickly and efficiently resolve the DNS_PROBE_FINISHED_NXDOMAIN error.
Fasten your seatbelts and let’s go!
What is DNS_PROBE_FINISHED_NXDOMAIN?
To understand exactly what the DNS_PROBE_FINISHED_NXDOMAIN error means, it’s essential to go back to the basics of how the Internet works: DNS (Domain Name System) lookups.
Every time you enter a URL into your web browser, it must translate the domain name (e.g. www.myawesomesite.com) into an IP (Internet Protocol) address that web servers can understand and process (e.g., 192.168.123.132).
This process is managed by the DNS server system, which performs the necessary translation.
If everything works as expected, you’ll be directed to the desired site.
Otherwise, the DNS_PROBE_FINISHED_NXDOMAIN error message appears, indicating that the server has failed to associate the domain name with the appropriate IP address.

The main causes of the DNS_PROBE_FINISHED_NXDOMAIN error
Now that you have a general idea of how DNS works, let’s take a look at the potential causes of this error:
- The domain address is misspelled
- Your computer’s DNS settings are incorrectly configured
- The browser cache is corrupted
- The DNS cache contains obsolete data
- VPN, antivirus, or firewall blocks connection
- The DNS server is temporarily down or incorrectly configured
- The hosts file is misconfigured
- Your host is experiencing a hardware problem
Rest assured: there may be many causes of this error, but there are also many solutions!
Now let’s take a closer look at the various solutions you can implement to correct the DNS_PROBE_FINISHED_NXDOMAIN error.
How to resolve the DNS_PROBE_FINISHED_NXDOMAIN error
Solution #1: Check the spelling of the domain name
It may sound silly, but it happens (and more often than you might think), as in the screenshot above!
First of all, check that you’ve spelled the site URL correctly, then refresh the page.
If the problem persists, move on to the next step.
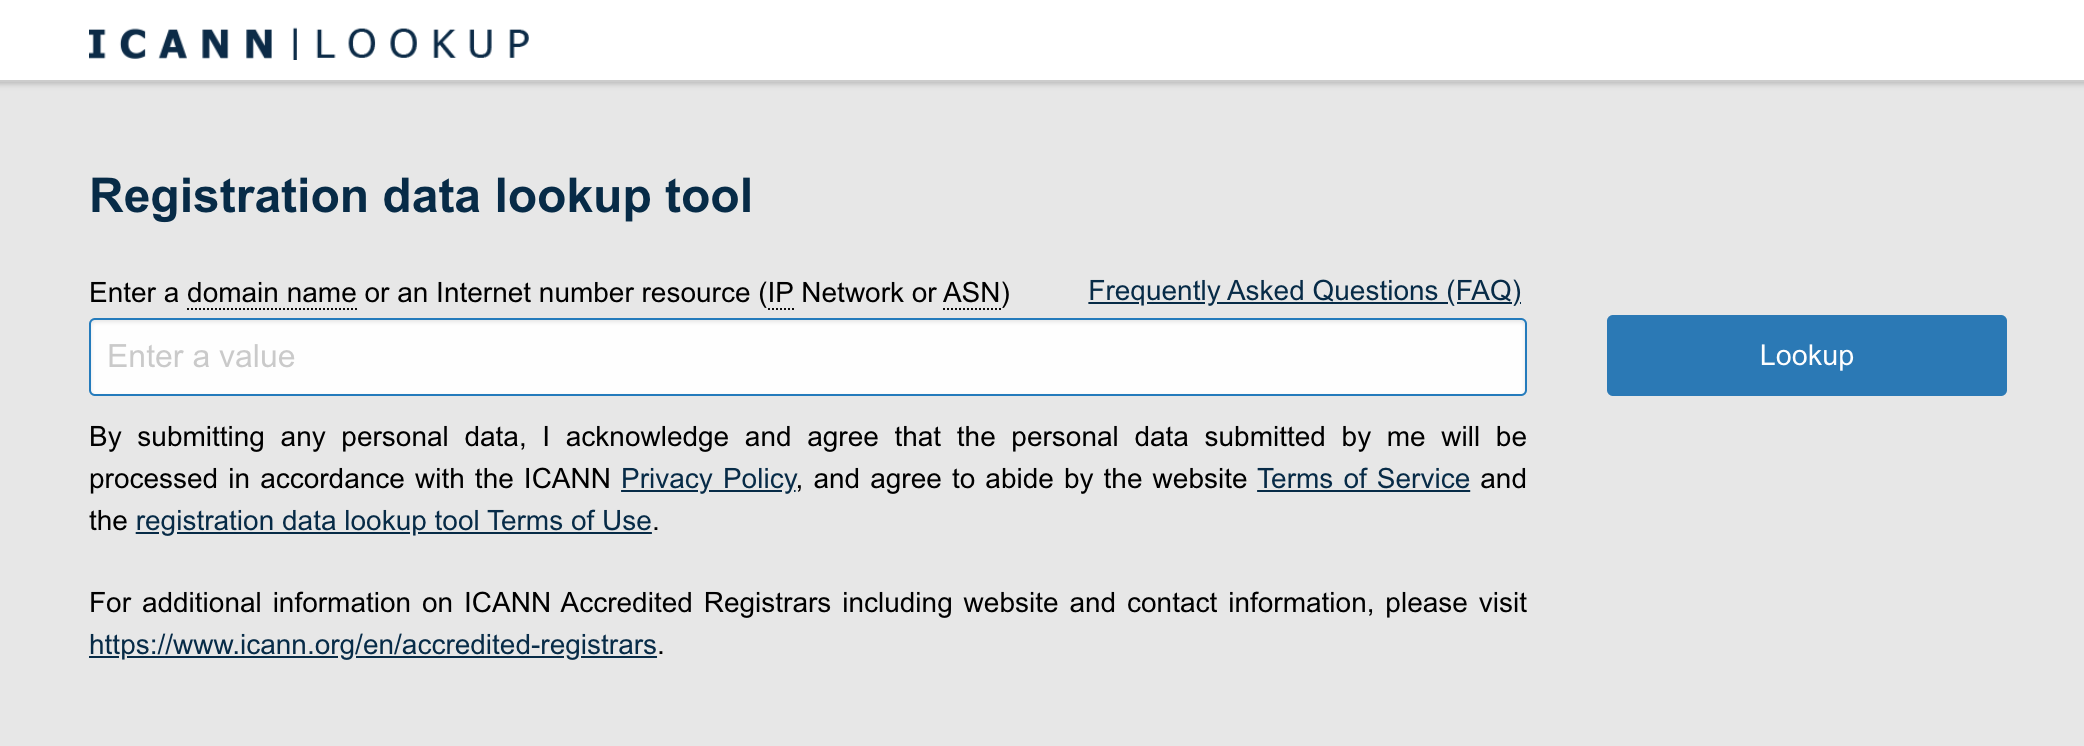
Solution 2: Check that the domain is active
If the domain is spelled correctly, it may be expired or inactive.
To check that the domain is active, use the ICANN (Internet Corporation for Assigned Names and Numbers) search tool.
Enter the URL of the site you wish to visit in the search bar, and check that the domain is active.
Solution 3: Check the network connection
Again, it may sound basic, but who hasn’t had this happen?
Simply rebooting your router can often solve underlying connectivity problems.
If you get the DNS_PROBE_FINISHED_NXDOMAIN error, make sure your Internet connection is working properly.
Make sure all cables are properly connected, and check the quality of the Wi-Fi signal.
Still having a problem? Let’s move on to the next solutions.
Solution 4: Renew your IP address
In some cases, it may be useful to renew your IP address, including for security reasons.
Here’s how it works:
Renewing your IP address on Windows
- Find the command prompt (you can type “cmd” in the Windows search bar), and select “Run as administrator.”
- Type the command
ipconfig /release, then press “Enter.” - Type the command
ipconfig /renew, then press “Enter.”

This will force your machine to obtain a new IP address and may solve network configuration problems.
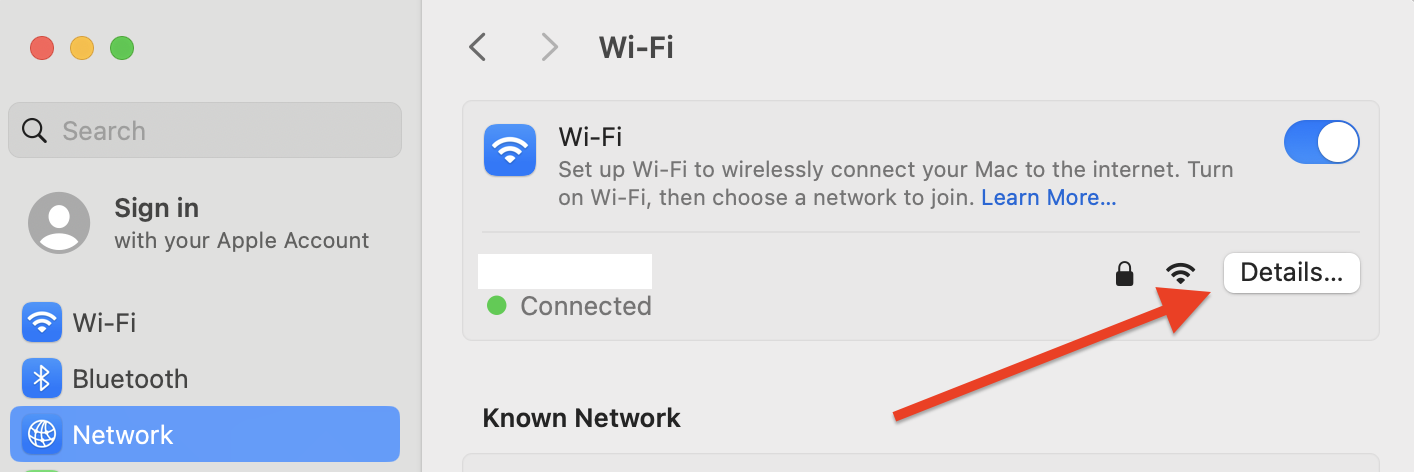
Renewing your IP address on MacOS
- Click on the “Apple” icon at the top left of your screen, then on “System Preferences.”
- Go to the “Network” menu, select your current connection and click on “Details.”
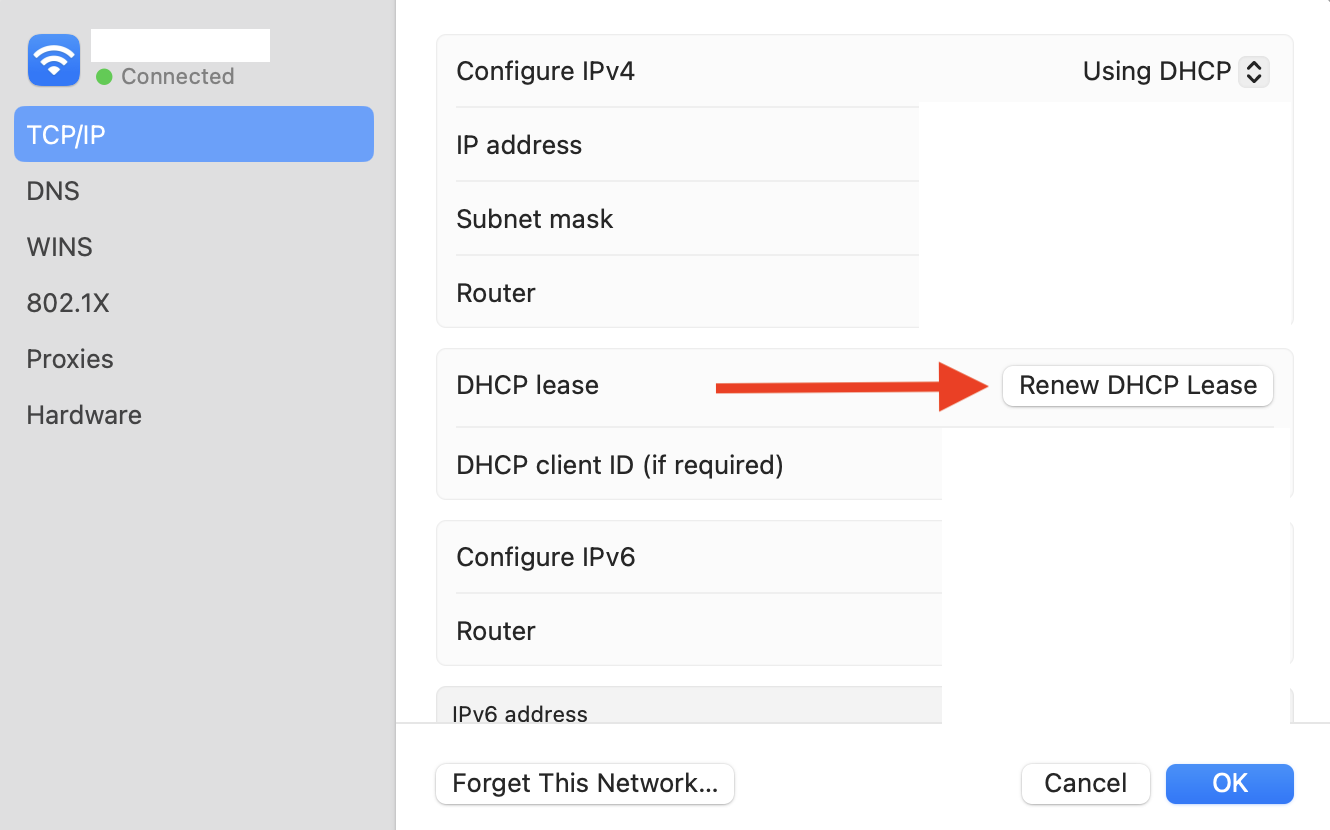
- In the “TCP/IP” menu, click on the “Renew DHCP lease” button.
Solution 5: Empty cache and delete cookies
Sometimes, the culprit behind a DNS_PROBE_FINISHED_NXDOMAIN error may simply be the cache or obsolete cookies stored by your web browser (tsk tsk!).
Deleting this data can put an end to a few unexpected malfunctions.
If you use Chrome, you can empty your cache by copying and pasting the following address into your browser: chrome://settings/clearBrowserData
Don’t forget to restart the browser after clearing your cache to ensure that the changes take effect.
Solution 6: Temporarily disable VPN tools and/or security software
VPNs and security software such as anti-virus and firewalls can cause the DNS_PROBE_FINISHED_NXDOMAIN error.
Although these programs are essential to protect your system, in certain situations they can block access to certain websites for no apparent reason.
If you’re experiencing DNS resolution problems, you can try temporarily disabling this software.
Bear in mind that once these tools are deactivated, you may be exposed to potential malware. So try to open the page returning a DNS_PROBE_FINISHED_NXDOMAIN error only if you’re sure it’s a trusted site, then reactivate these tools immediately afterwards.
If the connection to the page is established correctly after this deactivation, congratulations! You’ve identified the cause of the problem.

Solution 7: Restart DNS client (Windows)
If you’re using Windows, you can reconfigure DNS settings by restarting the DNS client.
This program resolves and stores IP addresses in the DNS cache, linking the browser to the DNS server.
To check the status of the DNS service and, if necessary, restart it, follow these steps:
- Open the “Run” dialog box, from the “Start” menu or by pressing Windows + R.
- Type “msconfig” and confirm by pressing “OK.” In the “Services” tab, look for “DNS Client.”
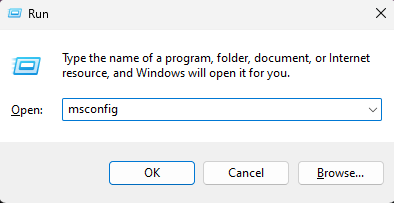
- Uncheck the box to disable it, then click “OK.”
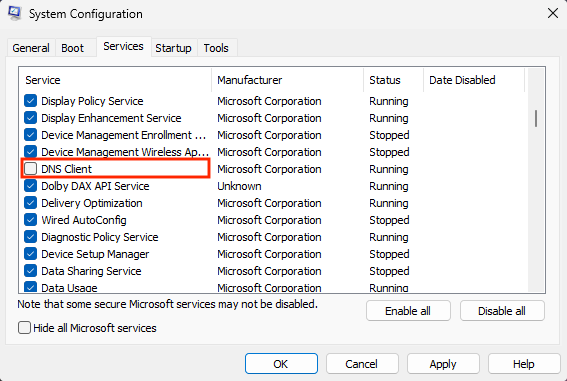
- Restart your computer, and repeat the first two steps. This time, check the box in front of “DNS Client” to activate it.
- Restart your computer and check that the DNS_PROBE_FINISHED_NXDOMAIN error has disappeared.
Solution #8: Clear DNS cache to correct DNS_PROBE_FINISHED_NXDOMAIN error
The DNS cache is closely linked to the DNS client. It stores all the IP addresses of websites previously visited on the same computer.
Browsers use this to open pages as quickly as possible, but it can lead to DNS_PROBE_FINISHED_NXDOMAIN errors when IP addresses are out of date.
In this case, you need to clear the DNS cache to resolve the error. We’ll look at how to clear the DNS cache on Windows, Mac OS, and Chrome.
Clear DNS cache on Windows
- In the Start menu, find Command Prompt. Then click on “Run as administrator.”
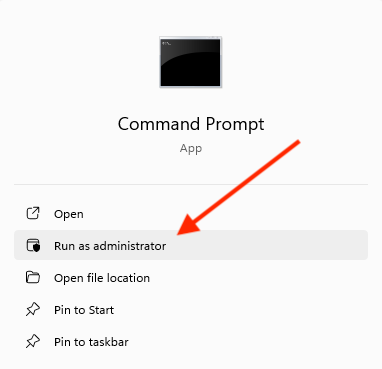
- Enter the command “ipconfig /flushdns”, then press Enter to execute.
Clear DNS cache on MacOS
- Open the Terminal application.
- Enter the following commands, then press “Enter”:
sudo dscacheutil -flushcache; sudo killall -HUP mDNSResponder - Enter your password and press “Enter” again.
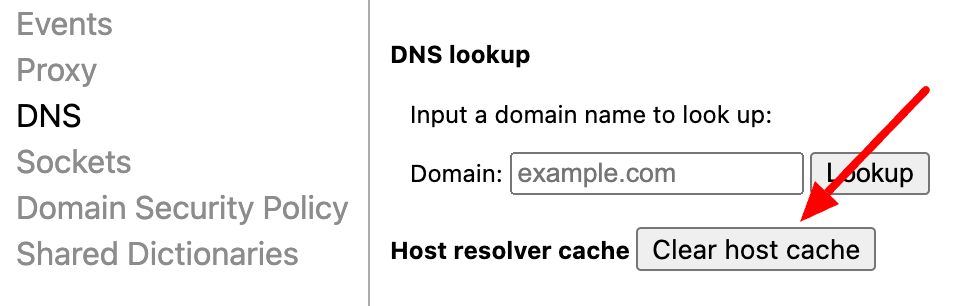
Clear Google Chrome’s DNS cache
Google Chrome also has a DNS cache, different from that of your operating system. Here’s how to clear it:
- Type ”
chrome://net-internals/#dns” in Chrome’s address bar. - Click on the “Clear host cache” button .
Solution 9: Change DNS server
If clearing the DNS cache doesn’t fix the DNS_PROBE_FINISHED_NXDOMAIN error, you can try changing your DNS server.
Sometimes, the server you’re using may be temporarily out of service or incorrectly configured. By default, DNS servers are automatically assigned by your ISP.
In this case, opting for an alternative DNS server can correct our famous error.
For this example, we’ll be using DNS servers provided by Google, which generally offer good performance and reliability.
Here’s how to modify the network configuration to redirect the request to one of these servers:
Changing DNS on Windows
- Go to your Control Panel > Network and Internet > Network and Sharing Center.
- In the left-hand menu, click on “Change adapter settings.”

- Right-click on your current connection, then click on “Properties.”
- Select “Internet Protocol version 4 (TCP/IPv4)” and click on “Properties.”

- Click on “Use the following DNS server addresses” and enter the following data:
- Preferred DNS server:
8.8.8.8 - Alternate DNS server:
8.8.4.4
- Preferred DNS server:
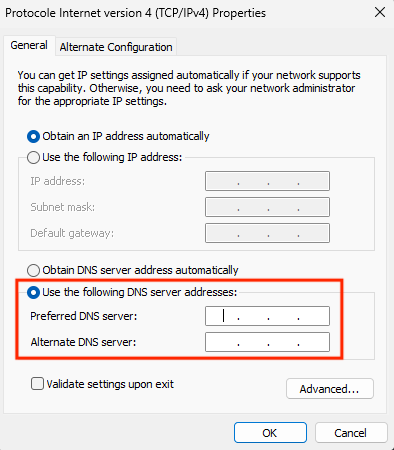
- Click “OK” to save changes. Restart the browser and check that the DNS_PROBE_FINISHED_NXDOMAIN error has been resolved.
Changing DNS on MacOS
- Click on the “Apple” icon at the top left of your screen, then go to “System Settings,” and click on “Wi-Fi”.
- Select your current local connection, and click on the “Details” button.
- Click on the “DNS” tab and on the “+” button.
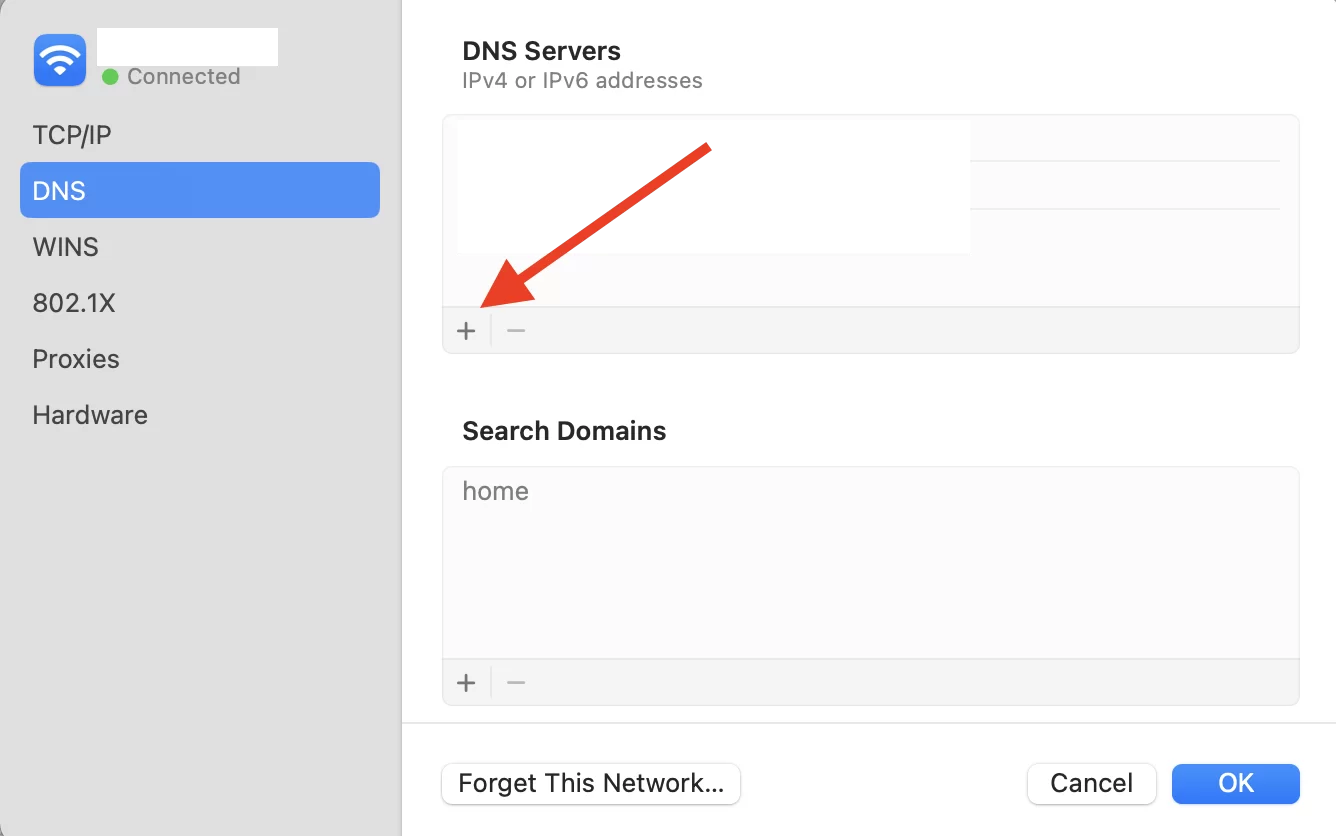
- Enter the addresses of the new IPv4 DNS servers one after the other, then click “OK”:
8.8.8.88.8.4.4
- Restart your browser to check whether this operation has resolved the error.
Solution 10: Reset Chrome indicators
Chrome has experimental features, called “Flags” or Chrome indicators, which allow you to test options in advance.
These features are made available to test new functions before they are officially integrated into the browser.
Some of them may be misconfigured and cause the DNS_PROBE_FINISHED_NXDOMAIN error.
In this case, you can reset the Chrome indicators by following these steps:
- Start Google Chrome.
- Type
chrome://flagsin the address bar, and press Enter. - This allows you to see which new features are active. Click on the “Reset All” button at the top of the page to restore the default settings.

- Restart your browser to see if the problem has been solved.
Solution 11: Check the hosts file
Your computer’s hosts file allows you to manually associate IP addresses with domain names, without using a DNS server. If this file has been modified (intentionally or by accident), this may cause the DNS_PROBE_FINISHED_NXDOMAIN error.
Every computer has its own hosts file, and errors can occur if you’ve installed software that modifies this file, or if a user has tried to block certain sites manually.
Inspecting this file for any erroneous configuration may enable you to quickly resolve the problem.
Check hosts file on Windows
- In the Windows search bar, type “Notepad” and select “Run as administrator.”
- Click on File > Open. Change the file filter from “Text documents (*.txt)” to “All files.”
- In the search bar at the bottom of the window, enter this file name:
C:\Windows\System32\drivers\etc\ - Select the hosts file and open it.
- Below lines beginning with #, the file displays a list of blacklisted websites.
- If the website you’re trying to visit appears in this list, delete it.
Check hosts file on MacOS
- Open Terminal.
- Enter the following command, followed by your password:
sudo nano /private/etc/hosts - Once you’ve opened the hosts file, you can see the blacklisted websites below the last line starting with
::1. - Delete the inaccessible site information, then confirm your changes. Use
Ctrl+Oto overwrite the hosts file, thenCtrl+Xto close it.
Conclusion on the DNS_PROBE_FINISHED_NXDOMAIN error
In short, the DNS_PROBE_FINISHED_NXDOMAIN error can be frustrating, but it can be easily resolved with a series of simple checks or adjustments to your network settings.
Whether by checking the site’s domain, resetting DNS settings, or modifying Chrome flags, for example, various solutions can quickly restore access to your favorite sites.
If none of the 11 solutions proposed in this article succeeds in resolving the DNS_PROBE_FINISHED_NXDOMAIN error, please contact your ISP or hosting provider to try and find a solution.
Have you experienced this error yourself? If so, what solution have you implemented to resolve it? Also, do you know of any other techniques not yet covered in this article? Let us know in the comments. 👇

Receive the next posts for free and access exclusive resources. More than 20,000 people have done it, why not you?

Continue reading
Articles posted in WordPress TutorialsHow to update the PHP version of your WordPress site
What comes to mind when you think of WordPress speed and security? Your favorite plugins, perhaps? You should also think about… PHP! If you’re looking for a site that loads fast, while offering a solid shield against hacker attacks, there’s a…
How to create an effective HubSpot conversion funnel on WordPress (complete guide)
In the drawers of a kitchen, there are often two very useful utensils lying around. The first is the colander. And to illustrate, some WordPress sites unfortunately resemble it. Why? Well, because visitors arrive on the site in question… then…
How to fix the ERR_CONNECTION_REFUSED error: A complete guide
Does your browser display the ERR_CONNECTION_REFUSED message when you try to access a website? This error means that the target server – or your own configuration – is actively rejecting the connection request, leaving you at a dead end. But…