5 minutes. It seems that you can do a lot of things in that period of time.
Go grab a donut. Brush your teeth. Blink 100 times. Make a phone call. Make a chocolate mousse.
And the best of all: install WordPress. This is one of the reasons why our famous CMS (Content Management System) is so popular.
Ah, the famous “5-minute installation”. Confusing for a beginner, isn’t it? 5 minutes: impossible, according to you.
You’re thinking that the creators of WordPress must have forgotten a 0 after the 5. Or that their minutes are actually hours.
After some research on the subject, and the discovery of the barbaric terms FTP, MySQL, or phpMyadmin, you come to the following conclusion: WordPress and its community take you for a fool (you’re not, of course).
A 5-minute installation? Yeah, right!

Well, let me tell you, it’s quite possible, even if you are a beginner.
“Yes, you can”, as good old Barack Obama would say.
To do this, I will show you 3 ways to do it. I will detail them through a step-by-step process, simple and accessible.
Of course, you don’t have to install WordPress in all these ways. Just use what’s relevant to you.
And while we’re at it, don’t go so far as to run a stopwatch, though! If I go a bit over the expected installation time, please don’t complain. 😉
Speaking of time, let’s talk about the overview without further ado.
Overview
Originally written in May 2018, this article was updated in November 2021.
To learn how to create a WordPress site from scratch, check out our complete guide.
How to automatically install WordPress on the web host?
The automatic installation corresponds to what the hosts call 1-click installation.
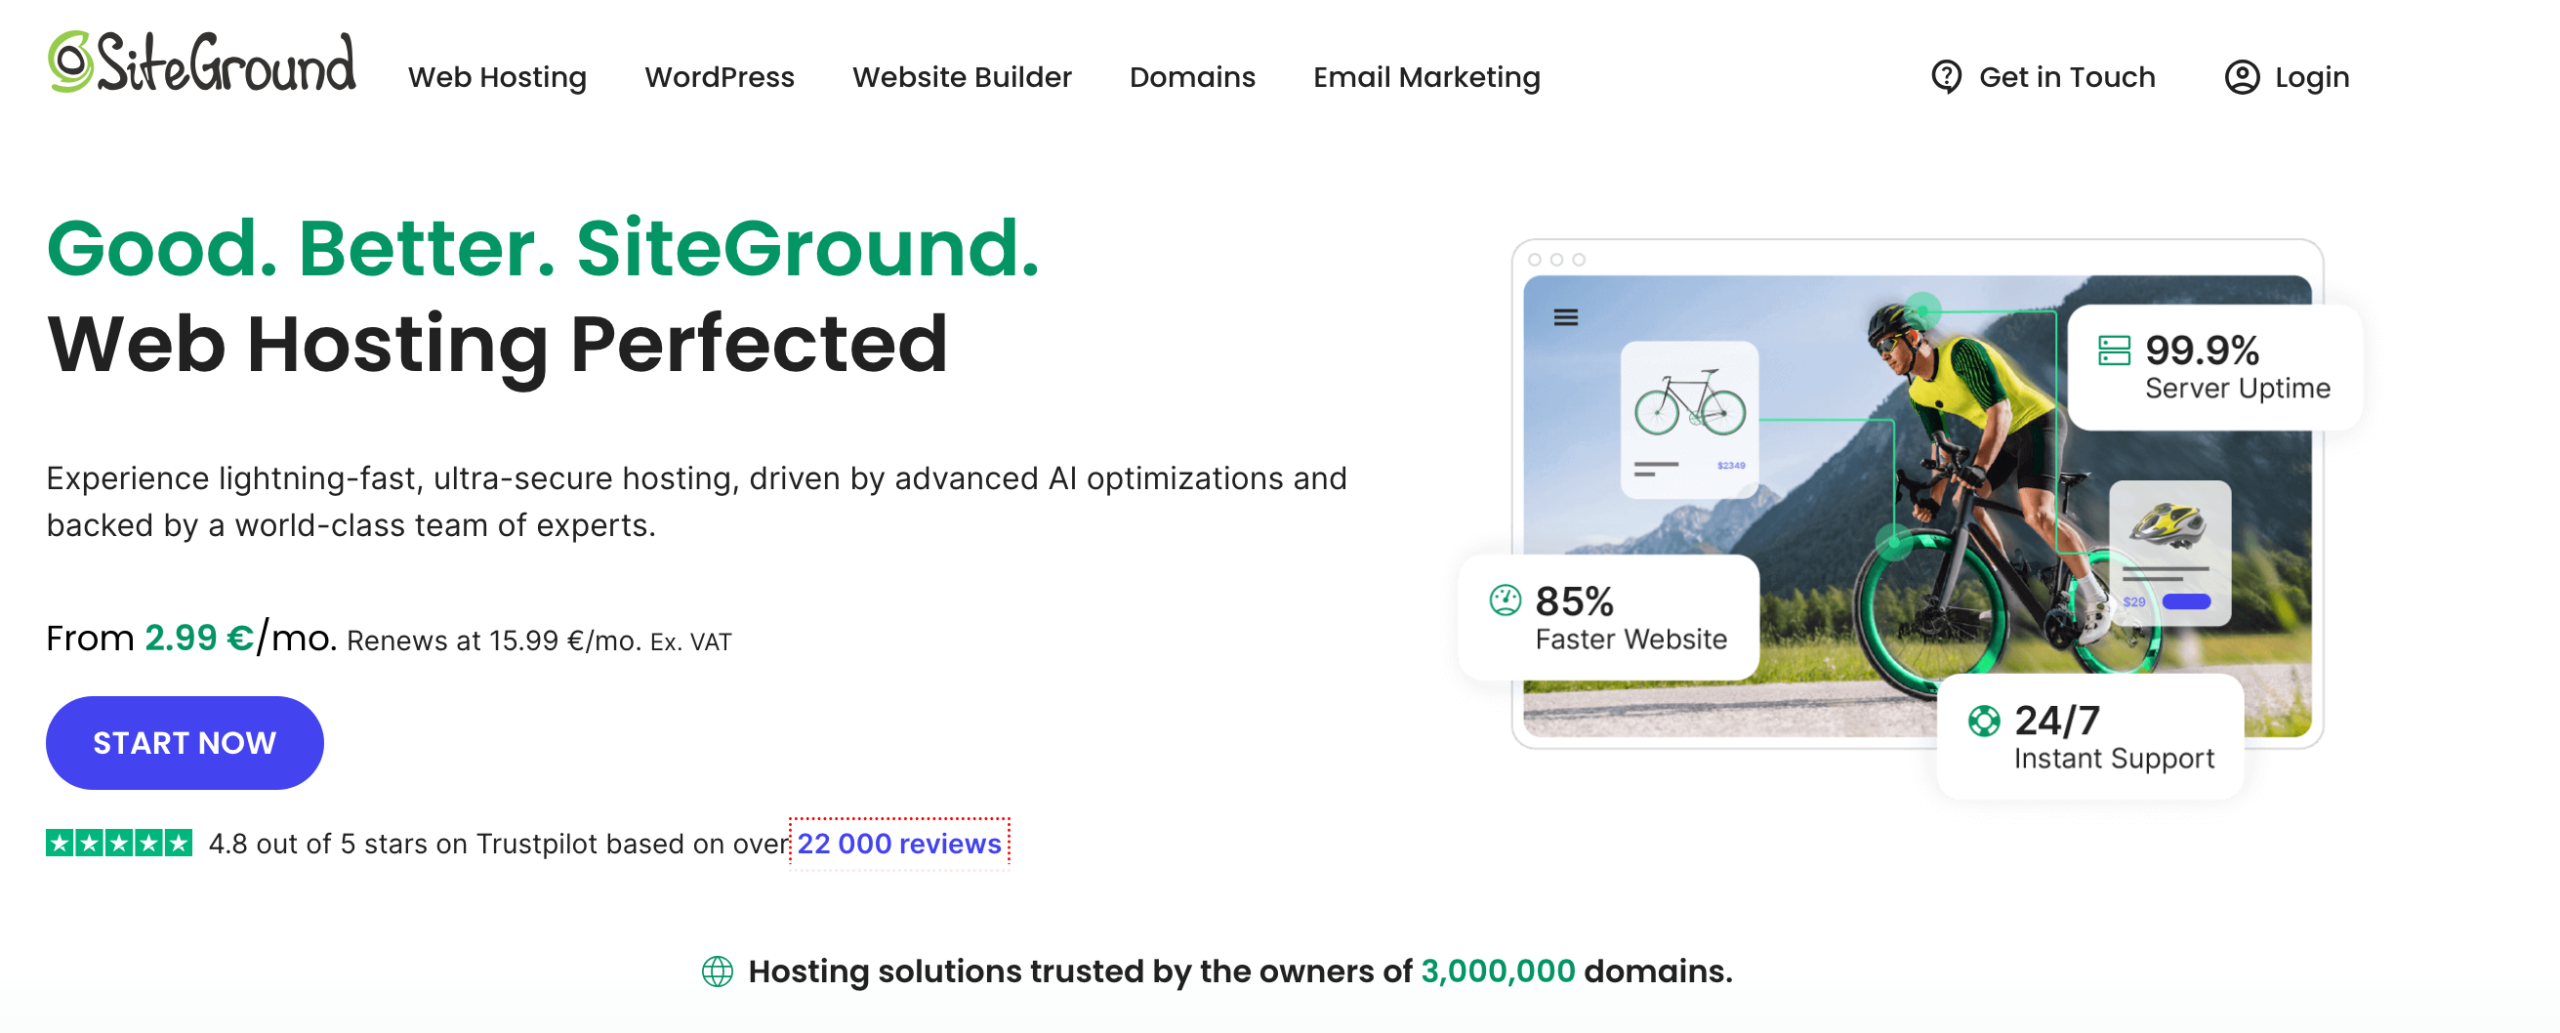
For the purpose of this test, we will focus on the installation process specific to one of them, which is among the most famous on the market: SiteGround.
For the others, we invite you to check their documentation and support, if needed.
How to install WordPress on SiteGround?
SiteGround offers three managed WordPress and WooCommerce hosting packages, starting from $2.99.
Transparency point: the links to SiteGround are affiliate links. That is to say that if you buy a hosting package from them through our links, WPMarmite will get a commission. This helps us to pay the research and writing work of the blog editors and to build a fund to buy and test themes, plugins, etc. To learn more, take a look at our publishing policy.
To get started, go to the SiteGround website and click on the “Start now” button.
You’ll need to choose your desired plan among the ones presented by SiteGround.
You’ll have to create your domain name or use the one you already have.
Then, you’ll have to create your account by filling in your information and then pay.
Then, you will receive an email from SiteGround including login instructions and account management guidelines. I advise you to copy and paste it into a text file and save it on your computer.
Now, to start the WordPress installation process, you need to go to the SiteGround Site Tools control panel.
Site Tools is SiteGround’s in-house administration interface. It is a dashboard that centralizes all the web hosting and management tools offered by SiteGround in one place.
Go to the WordPress > Install & Manage menu, and click on the “Select” button under “WordPress”.

Fill in the different fields:
- Domain: choose the domain on which you want to install WordPress.
- Choose Language: choose the one to your liking.
- Installation Path: choose “Main folder”.
- Admin Info : enter your username (not “admin” for security reasons), a password (use the generator provided to obtain a sufficiently complicated one) and your email address.
- Add-ons: Uncheck the box “Install with WordPress Starter” if you don’t want to use WordPress Starter’s SiteGround plugin.

Then, you just have to click on the “Install” button, and the auto-installer will do the job for you. 😉
How to install WordPress manually in 5 steps?
Clarifications and prerequisites
As you’ve just seen, the automatic installation of WordPress is primarily intended for beginners. With it, it is true that you won’t have to complicate your life.
So why bother with a manual installation? Well, you see, it is recommended for three main reasons:
- Sometimes hosting providers install things in addition to WordPress.
- Manually, you stay in control of the configuration and have more customization options.
- Automatic installations do not always support the latest version of WordPress. If this is the case, you will need to update immediately after the installation. Remember this: it is very important to keep your site up to date, especially for security reasons.
In order to install WordPress with any web host, you will need several essential ingredients:
- An Internet connection. If you’re reading this post, that’s fine. 😉
- A computer. No, you can’t manually install WordPress from a tablet or a smartphone yet. Sorry.
- A web hosting service from the provider of your choice. WordPress recommends a hosting server “using PHP version 7.4 or higher and MySQL version 5.6 OR MariaDB version 10.1 or higher”, at the time of writing this update.
- A domain name. To make the right choice, see our ultimate guide on the subject.
- A database.
- An FTP client, i.e. a software that allows you to communicate with your server. I’ll use Filezilla. But you can also turn to Cyberduck or Transmit.
- The latest version of WordPress.
- Your passwords to log in to your FTP client. Usually, you will find them in the welcome email that your web host sent you.
Did you check off each line? Now let’s look at the 5 key steps to installing WordPress online.
Step 1: Download the WordPress files
You may have read this somewhere before, but it’s always good to remember it.
Remember that WordPress works with 2 main elements: a database, which we’ll create next. And the WordPress core files (“Core is the set of software required to run WordPress“ i.e. everything that keeps the machine running).
You can find it on the official WordPress website.
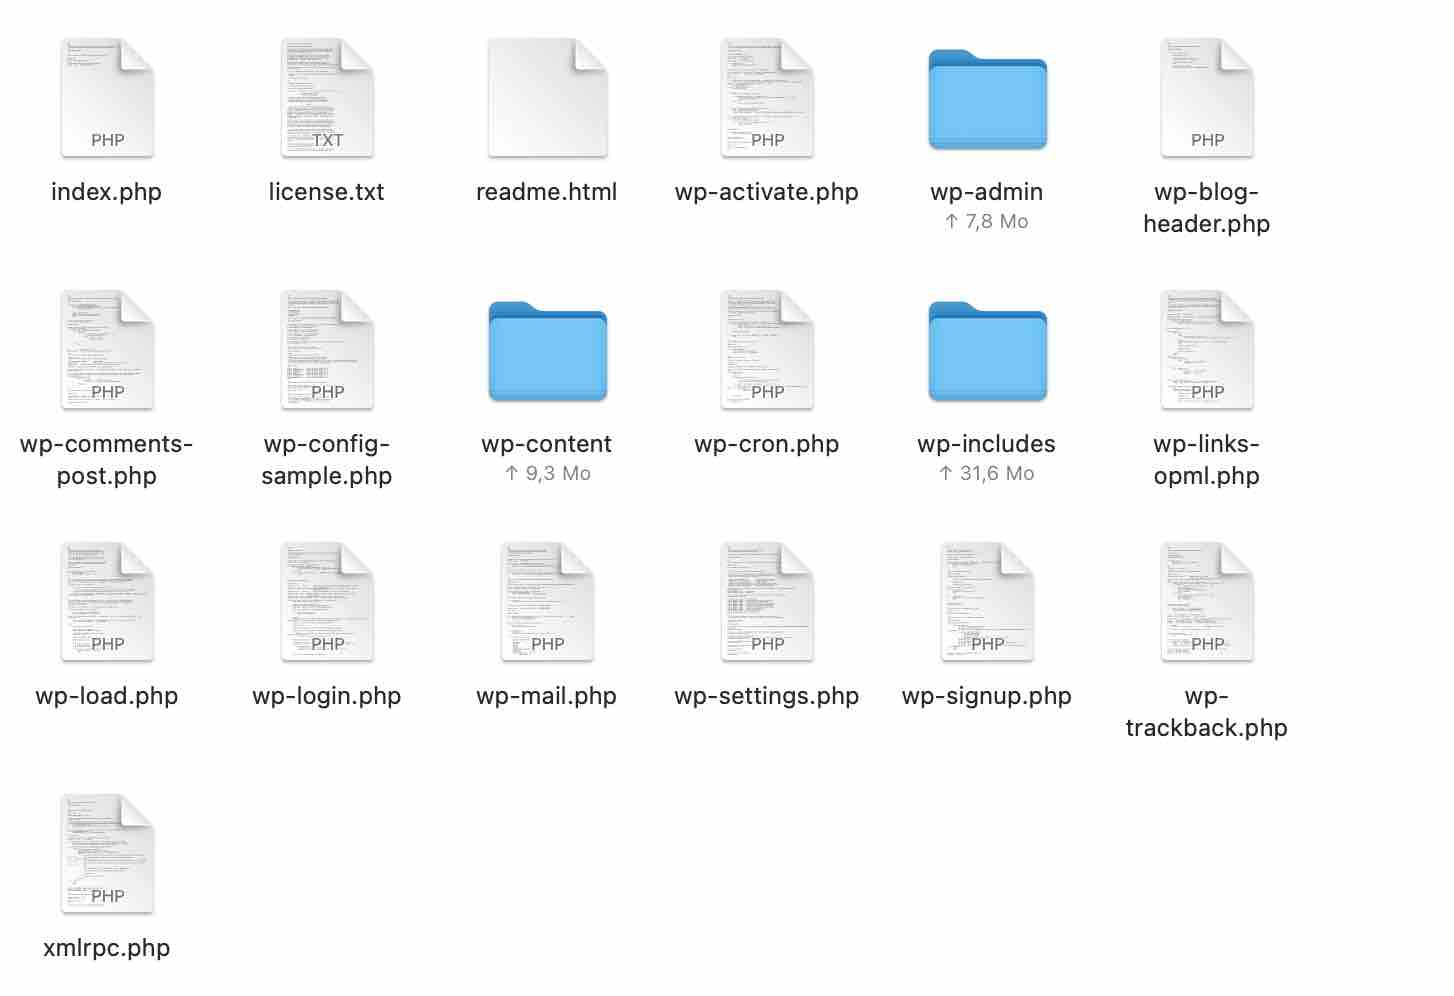
You’ll get a zip file that you can unzip, and place on your computer (on the desktop, for example). Inside, you will find this type of file:
Please note that we are talking about WordPress.org, the self-hosted version that anyone can download and use for free. It should not be confused with WordPress.com, which is a hosting platform. To understand the differences between the 2 versions, see our dedicated article.
Step 2: Create the database
The database (DB) is surely the most important element of a WordPress site. It contains all the information related to your site (content, settings and users).
If you accidentally delete it, or if it is hacked, you’re in trouble!
Therefore, always remember to make regular backups of your site.
I will now explain you how to create one at your host.
For your information, I detail the process at SiteGround. Don’t panic: the general pattern remains the same with other hosts.
Start by going to Site Tools, and then to the Site > MySQL tab.
For your information, MySQL is a software that allows you to manage databases.
Click on the “Create database” button.

Note that the database names are automatically generated.
Create a user for the database
Once your database is freshly created, go to “Users” tab and click on the “Create user” button to create a new database user.

Add a user to the database
Finally, you need to give the user privileges to the database by adding a user.
To do this, go to the “Manage Users” section, and click on the “Add new database” button (in the “Actions” column).
The most common way is to give the user all privileges.
However, still for security reasons, I advise you to check only:
- Create
- Delete
- Insert
- Select
- Update

To conclude this part, click on “Confirm”.
And that’s it, you’re done with creating a database. A piece of cake, right?

Step 3: Send the files to the server via FTP
The third step is to upload your files to the server. To do this, you will need to download and install an FTP client.
There are several of them, the most famous being Filezilla. This is the one I personally use. For his part, Alex recommends Cyberduck. It’s up to you to decide which one suits you best.
Anyway, launch Filezilla.
Want to extend the fun with FTP? Find out in detail how to use this tool to access the files on your site.
Connect to your server
Next, you’ll need to configure your FTP client so that it can connect to your hosting space. To do this, you need:
- The host
- The ID (or username or login)
- The password (the same one to log in to your SiteGround dashboard)
These three pieces of information can be found in the welcome email sent by your hosting provider. Do you remember? Now, there are 2 ways to proceed:
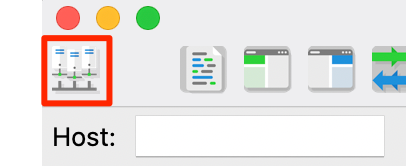
- Either you enter this information via the menu below.

- Or you enter them in the site manager by clicking on the icon framed in red on the picture below.
The advantage of this method is that you won’t have to enter this information (host, login, password) every time you connect to Filezilla.
Transfer WordPress files to the server
To transfer your WordPress files to the server, go to the left-hand window of Filezilla. Locate the WordPress folder that you have previously downloaded. In my case, it is on the desktop.
Select all the contents of that folder (but not the folder itself), i.e. the wp-includes, wp-content, wp-admin + several other files.
Drag and drop to the right window. Go to the root directory of your website, where your main domain name is configured.
Note that this location may vary from one host to another. At SiteGround, it is called public_html. Sometimes you will find it under the name www. For others, it will be htdocs.
The important thing is to move your WordPress files INSIDE this root directory.

And I repeat: do not put your wordpress folder in there, otherwise the site will be available on mydomain.com/wordpress and you will have to migrate.
As a beginner, you don’t want to do this kind of change, right?
You can see the progress of the transfer in the bottom bar of Filezilla. It may take a few minutes, that’s perfectly normal.
Great! Now you know how to install WordPress with an FTP client.
Relax, you’ve made good progress.
Step 4: Link your site to the database
Now that your files are on the server, you’ll need to link to your database.
Go to your favorite browser and enter your domain name. For example: www.myamazingwebsite.com.
You should see the following page. Click on the “Let’s go!” button.

To fill in the required fields, you just have to transfer the data you already filled in on your cPanel when you created your database (see step 2).

- Database Name: the name of the database on which you want to install WordPress.
- Username: this is your MySQL username.
- Password: the user password for your MySQL database.
- Database Host: you can leave
localhost. If you are hosted at SiteGround, for example, this MySQL connection address will work. If localhost doesn’t work, ask your hosting provider. - Table Prefix: I invite you to pay particular attention to the prefix of the tables in your database. By default, the
wp_tables are associated with WordPress. And nasty hackers know this. A good idea is to change them as soon as the installation is done. Don’t hesitate to put something more complicated, even incomprehensible, instead ofwp_. For example:dgh47yz_.
Finish by clicking on “Submit”.
Step 5: Set your login details
Just a little more effort and you will reach the end of this manual installation process. Here is the last page you should see:

This is where you need to fill in some essential information to be able to connect to your site’s administration interface, including:
- Site Title: this is the name of your site (e.g. WPMarmite) and usually appears in the header of your site, at the top left of your pages. You can change it at any time, and replace it with a logo, for example.
- Username: this is the name you will use to log in to the administration interface of your WordPress site. Don’t use “admin” as your login name, or the name of your site. Choose something more complicated, again for security reasons.
- Password: this speaks for itself. Choose a (very) complex password (with numbers, letters, capital letters and special characters, for example). Don’t hesitate to use the generator offered by WordPress to help you.
- Your Email: this is the address where you will receive emails sent by WordPress (e.g. requesting a password reset, adding a new user, posting a new comment, etc.).
- Search Engine Visibility: do not check the box “Discourage search engines from indexing this site”. Unless you want your site not to appear on Google, Bing, Yahoo and others.
Last action: click on “Install WordPress”. And you’ve reached the end of the process.
Now go strut your stuff on your administration interface by clicking on the “Connect” button (see screenshot below), or by typing the following address on your favorite browser: nameofyoursite.com/wp-login.php.

Congratulations! You now know how to download and install WordPress manually.

How to install WordPress locally?
Why install WordPress locally?
Installing WordPress locally means that you are going to put it on your computer, without having to use the services of a hosting company.
There are both advantages and disadvantages to using this method.
Some disadvantages..
Here is a summary of the points to remember, starting with the disadvantages:
- Locally, the configuration is different from that of the server. This can cause problems when switching the site online.
- Not all tools/software allow you to show the progress of your work to a client, remotely. The Local software, which I will introduce to you next, offers this feature. Stay tuned, a gold mine in sight.
… But also undeniable advantages
Personally, I’m used to working locally, and I see several advantages:
- Test themes and plugins without risk. In case of conflict or bug, no worries, you will be the only one to see it. Imagine the mess if the site was already online. 🙁
- Have a copy of your site in case of hacking or server crash.
- The local site will be faster.
- There is no need for Internet if you want to do development on your local site.
How to install WordPress with Local?

Local was created by a company that specializes in WordPress hosting: Flywheel.
That’s why you may know it by its former name: Local by Flywheel.
The latter changed its name in 2019, after it was bought by WP Engine, the giant American web host.
Local is a great software, and a free one! It is characterized by its simplicity of use and speed.
It is compatible with the two main operating systems: Windows and MacOS.
Its clean and colorful interface will probably seduce you. Since I tested it, I have put MAMP on the back burner.

But wait, it’s not over yet. Here are some other great features you’ll enjoy with Local:
- You can give your client a URL to show them the progress of their site. This is impossible with MAMP, for example.
- The tool installs WordPress in a few clicks, automatically. You don’t have to deal with a long and technical process.
- You can install multiple sites and manage them locally from a single interface. Even better: each site can have a different configuration. For example, you can use a different version of PHP or MySQL for each site, if you wish.
- It is possible to save your local sites to remote storage spaces, such as Google Drive or Dropbox.
- Local supports SSL to create https sites.
- If you’re hosted by Flywheel or WP Engine, Local has a feature called “Connect” that will send your local site to the online server for you.
All this makes your mouth water and makes you want to start tasting, right? See how to tame this tool to install WordPress locally. We’ll break it down into 4 simple steps.
Step 1: Download and Install Local
To start, download Local by visiting its official website. Click on the “Download” button at the top right of the page.
You will be prompted to choose your platform (Mac, Windows or Linux), and then fill in your first and last name, email address and phone number.
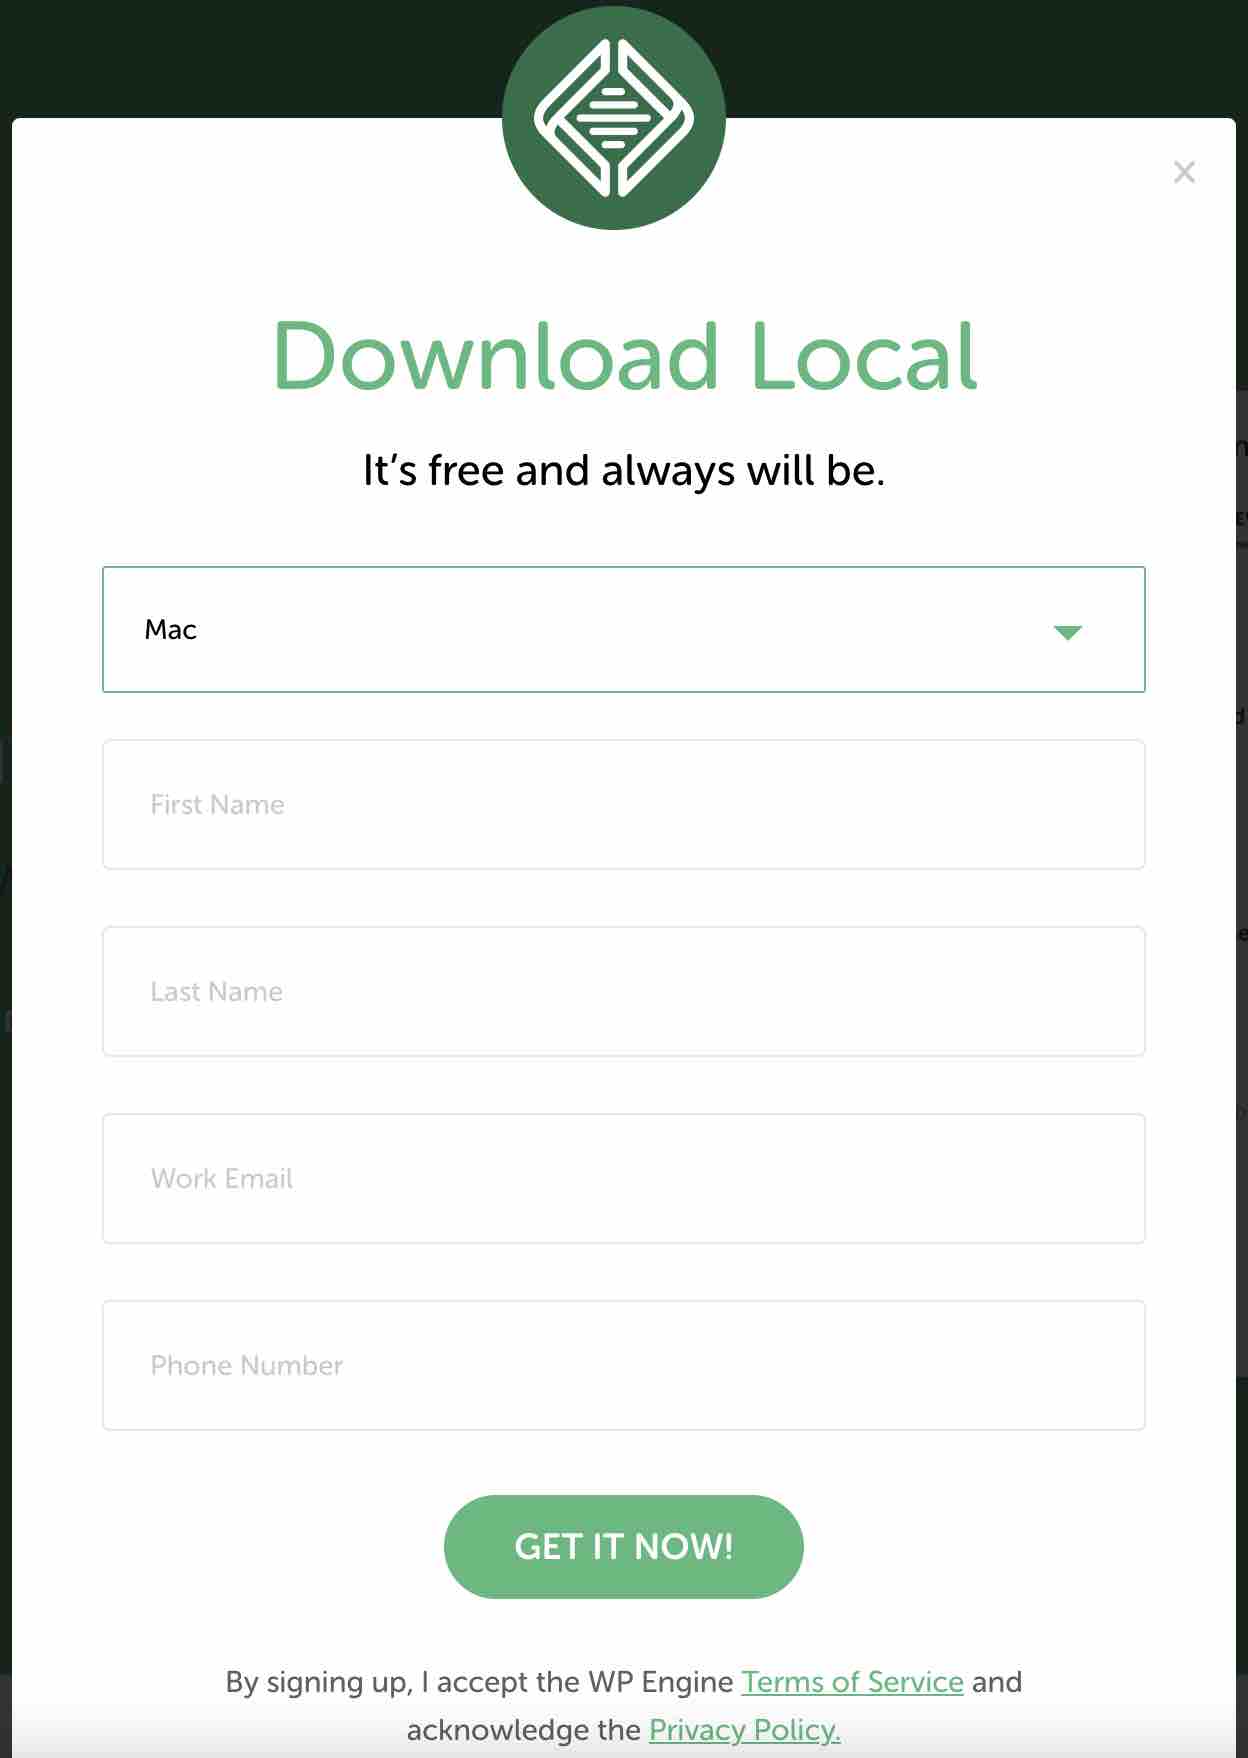
Click on “Get it now!” and install Local on your computer.
Local is now installed on your computer. Before moving on to step 2, click the “Create a new site” button to create a new local site.

Step 2: Give your site a name
A new window will pop up and will first ask you to enter the name of your site (What’s your site’s name?). It’s up to you what you want to put here.
Just below, you will have 3 advanced options. They will allow you to:
- Customize the domain name of your local site (local site domain).
- Change the directory in which your local site will be saved (local site path).
- Create a site from a template (create site from Blueprint). This option allows you to use a local site template that you have created beforehand with the settings, content and plugins of your choice, so that you are not starting from scratch.

When you are done, click on the green “Continue” button, to go to step 3.
Step 3: Choose the development environment
On this new window, you are invited to choose your development environment, with a version of PHP (the software that runs WordPress) and MySQL (the system that manages your database).
Here you have two options:
- Preferred: Local chooses a recent version of PHP and MySQL for you. Use this option in the vast majority of cases.
- Custom: use this option if you want to choose your PHP and MySQL versions and customize your development environment.
You know the rest: click on “Continue” to finish the configuration.

Step 4: Enter login credentials
The final step in the Local installation process is to choose your login credentials for the WordPress administration interface.
Here you are prompted to enter:
- A username
- A password
- An email address
Finally, you can indicate whether your installation is a WordPress multisite (is this a WordPress multisite?).
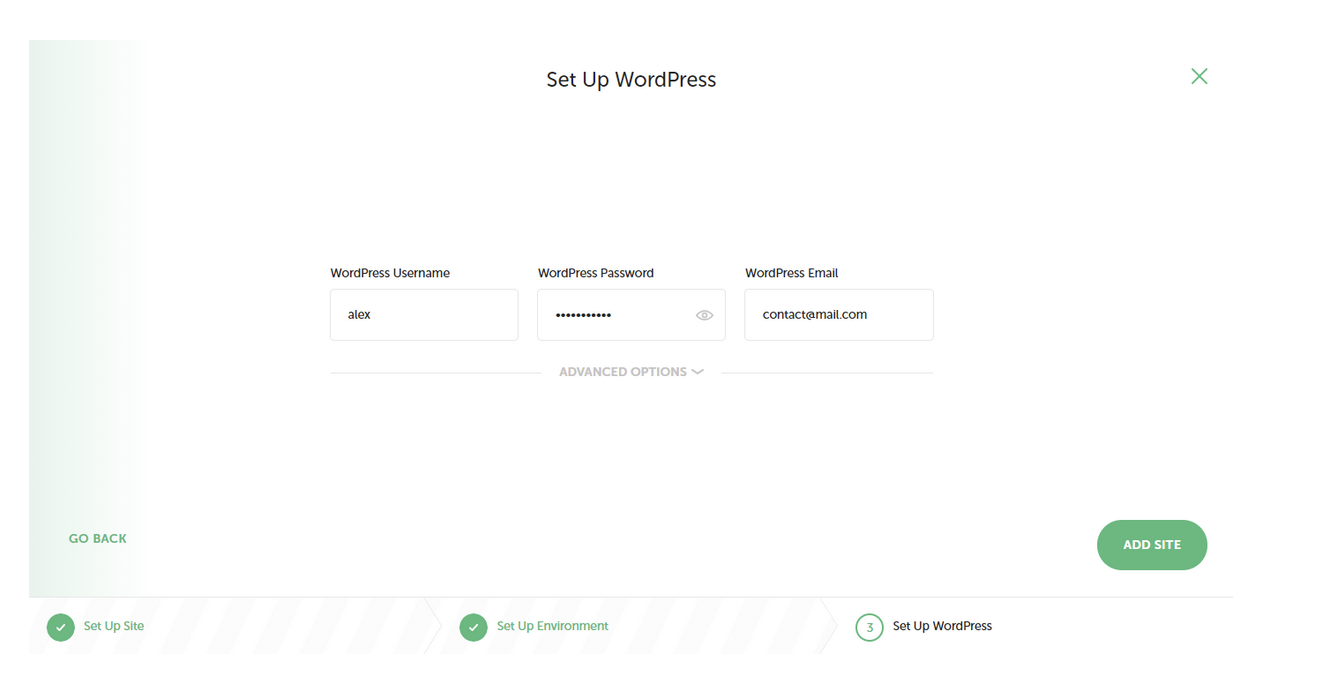
Click on the “Add site” button at the bottom right, and you’re done.
Process complete: your local site is now installed. Running time: less than 3 minutes. If all goes well, you should see a small green dot next to your site name.
Then click on “Open site” to view your baby. You can of course go to the back office by clicking on “Admin”.

Local is a very powerful and efficient tool, but it is not the only one on the market. If it doesn’t suit you or if you want to see something else, you can also turn to one of its competitors, DevKinsta (by the hosting company Kinsta). The latter is also 100% free.
How to install WordPress with MAMP?
If, for some reason, you don’t want to work with Local, here’s how to do it with MAMP, another free tool for working locally.
MAMP will allow you to install WordPress on Mac and Windows, but the process will be more time consuming and technical than with Local. 😉
If you work on Windows, you should know that there is also a platform to install WordPress locally on this operating system only. It is called Wamp. I won’t talk about it in details here, because I find it more complex to handle than MAMP.
Before starting, a little definition clarification. MAMP is an acronym meaning:
- MacOS: the operating system (but you can also use it under Windows).
- Apache: the web server.
- MySQL: the database management system.
- PHP: the development language.
In short, MAMP allows you to simulate an online site, but on your computer.
Note that MAMP will also install MAMP Pro. But the free version is enough to work locally.
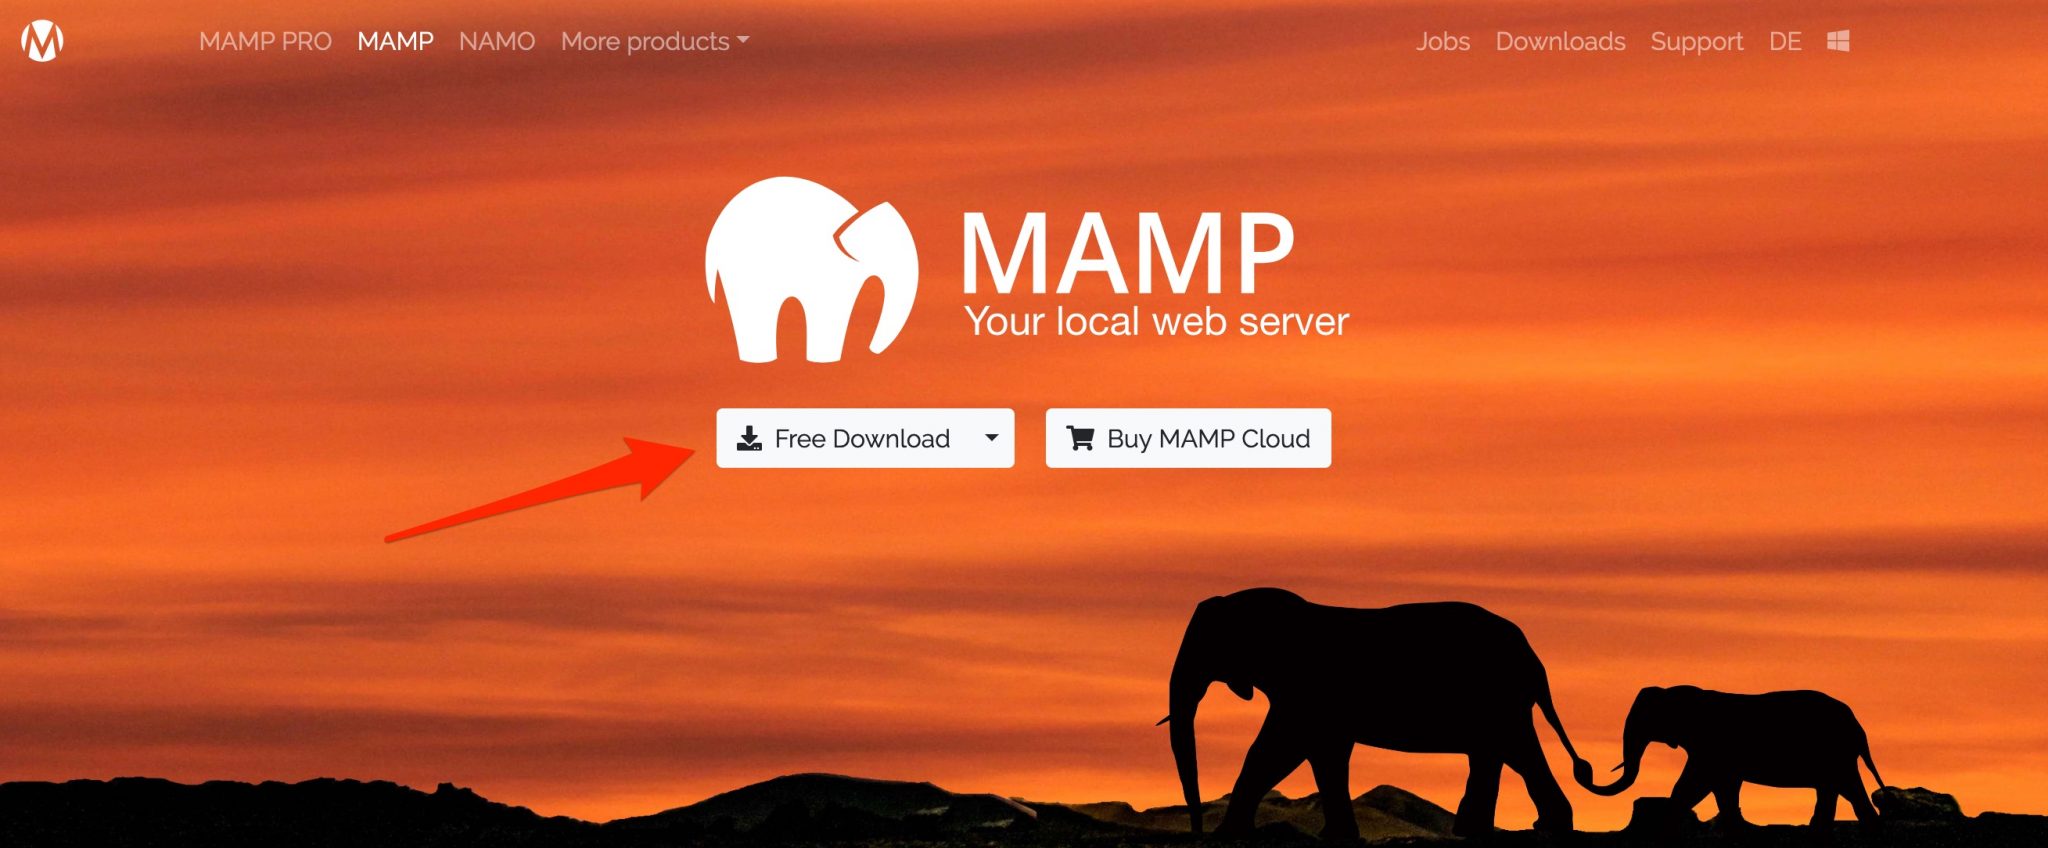
Step 1: Install MAMP
Go to the MAMP website and click on “Free Download”. Download the application, install it and open it on your computer.
Step 2: Configure MAMP
Go to the MAMP “Preferences” menu (MAMP > Preferences), then go to the “Ports” tab. You can change the default ports by filling in the following data, present in the screenshot below:

Setting Apache on port 80 allows you to access your sites locally from the url http://localhost, instead of http://localhost:8888. Admit that we can see more clearly without all these eight. 😉
But you will automatically have to enter your administrator password every time you start the servers.
The second setting you can make is in the “Web server” tab. By default, MAMP considers the htdocs folder as the root of the server. This is where you will place your future sites.
You can choose another folder, if htdocs doesn’t seem to speak for itself. For example, mycoolsites. Just click on “Select” next to “Document Root” to indicate the correct path.

Now you can click on “Start Servers”.

The MAMP start page should automatically open in your browser:
Step 3: Install the WordPress files
Go to this link to download the latest version of WordPress. Unzip it and place it in your root folder(htdocs or the one of your choice).
Remember to rename the folder. By default, it will be wordpress. You can for example give it the name of your site.
Step 4: Create the database
On the page opened by MAMP in your browser, click on Tools > phpMyAdmin.

FYI, phpMyAdmin is a web application to manage your database. Once on its interface, click on the “Databases” tab at the top of the page.
In the “Create database” field, name the database. Be careful not to include spaces, accent or special characters, and use lower case. Example: mycoolsite.
For the interclassification, leave the proposed value: utf_8_general_ci.
Click on “Create”. Normally, the database appears on the left.

Step 5: Linking WordPress to its database
If you followed the initial settings correctly, you just need to type the following URL into your browser: http: //localhost/yoursite.
In my example, this is http://localhost/mycoolwebsite.
If you did not do the above settings, the URL will look more like http://localhost:8888/mycoolwebsite/.
You should get the following page. Doesn’t this look familiar?
Click on “Let’s go!”.
After that, the logic is the same as for a manual installation, except for a few details.
Let’s take a closer look:
- Database Name: the one you entered on phpMyAdmin.
- Username:
root: you will always use this login locally. - Password:
root: you will always use this password locally. - Database Host :
localhost. - Table Prefix: avoid using
wp_(even if you don’t risk being hacked locally).
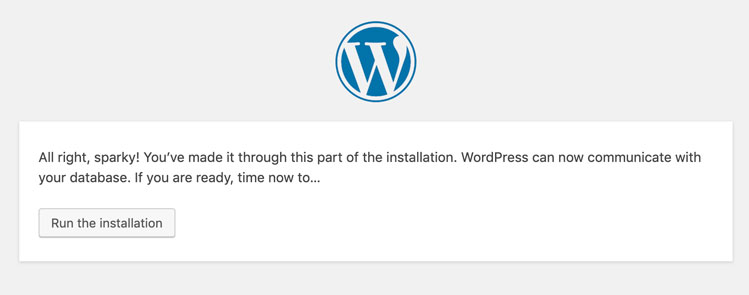
Click on the “Submit” button and the page below should appear. Choose “Run the installation”.
Then just follow the advice given during the manual installation.
Installing MAMP locally: operation completed. Good job.


And now it’s your turn
You have just finished reading this article that explains how to install WordPress step by step. I hope you enjoyed it and that you understood what I was saying.
In summary, there are 3 types of installations:
- Automatic installations, which are more for people who are new to WordPress.
- Manual installations, which are generally used by more experienced people.
- Local installations, to work in complete serenity on your computer.
As you can see, it’s quite simple to set up. Even if you are a beginner, there is nothing to stop you from starting with a manual installation, and vice versa.
Now it’s time to put it all into practice.
Start by telling me, in the comments, which method you will use. Or the one you usually use.
Are you a strong advocate of manual installation? Do you work on a local environment?
Do you know of any solutions we haven’t mentioned? Let me know just below.

Receive the next posts for free and access exclusive resources. More than 20,000 people have done it, why not you?
Continue reading
Articles posted in WordPress TutorialsHow to update the PHP version of your WordPress site
What comes to mind when you think of WordPress speed and security? Your favorite plugins, perhaps? You should also think about… PHP! If you’re looking for a site that loads fast, while offering a solid shield against hacker attacks, there’s a…
How to create an effective HubSpot conversion funnel on WordPress (complete guide)
In the drawers of a kitchen, there are often two very useful utensils lying around. The first is the colander. And to illustrate, some WordPress sites unfortunately resemble it. Why? Well, because visitors arrive on the site in question… then…
How to fix the ERR_CONNECTION_REFUSED error: A complete guide
Does your browser display the ERR_CONNECTION_REFUSED message when you try to access a website? This error means that the target server – or your own configuration – is actively rejecting the connection request, leaving you at a dead end. But…