The other day, I realized that adding a favicon to WordPress isn’t just about adjusting a little logo. In fact, it goes so much further.
Should I explain?
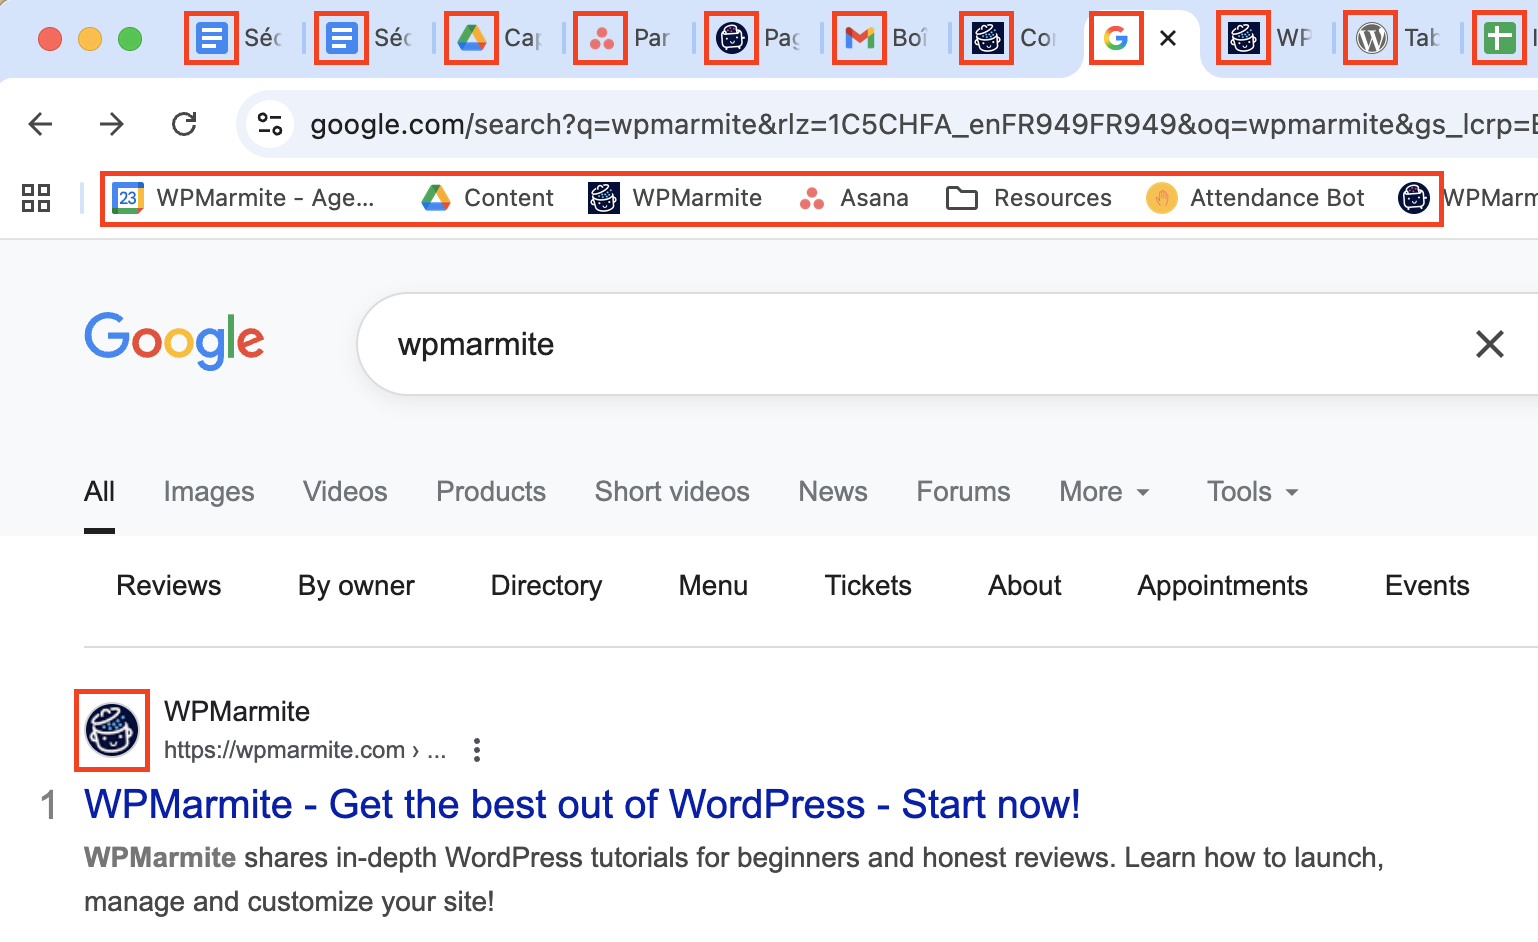
I was looking for a plugin to help a friend sell his meditation videos. I open a blog, then two, then three, I go on Reddit, I check out the reviews on WordPress.org, I open ChatGPT… Three plugin homepages and three feature pages later, I find myself with 25 tabs open:

Who can top that?
My browser starts to slow down, the titles are illegible. I say to myself: Alright, I’ll scale back. I’ll close the pages that mean the least to me.
Automatically, I start with those… without a favicon.
And then it hit me.
One of the three plugins I was going to recommend has been taken out, just because it didn’t have a recognizable logo in the tab!
And I thought: Wow. What if this was my business? Lost in the shuffle. Forgotten. What a loss of earnings!
A favicon can really change everything!
So, for today’s program:
I’m going to show you that there are three ways to add a favicon to WordPress to make sure it displays correctly on all platforms: web, Android, and iOS.
We’ll also look at how to create a striking favicon, with exclusive advice from a graphic designer, and how to check that everything displays properly once it’s online.
But let’s start at the beginning by looking at what a favicon is, and why you absolutely must have one.
- What is a favicon and why add it to WordPress?
- 5 essential steps before adding a favicon to WordPress
- How to create a WordPress favicon
- How to add a favicon in WordPress (3 methods)
- 6 key questions for choosing your favicon strategy
- Check that your favicon works: The post-publication checklist
- Troubleshooting: Solving the most common bugs
- Conclusion: the little icon that makes all the difference
What is a favicon and why add it to WordPress?
The favicon is that little square logo we see everywhere online without even paying attention to it.
And yet, it’s essential for quickly recognizing a site. It’s a square mini-image, often taken from your brand’s logo, but with maximum impact.

Its primary aim? To attract visual attention in a saturated environment where everything looks the same. Because let’s be honest: in a browser full of tabs or a well-stocked favorites list, it’s the favicon that makes all the difference in finding a site in the blink of an eye.
Where can I find a favicon?
Just about everywhere, in fact! Here’s a list of the places where it’s displayed:
- Browser tabs: Where it helps you find the right site among several tabs that might be open (ideal for those who open 25 tabs in the blink of an eye…).
- Favorites bar: For quicker access to your favorite sites, such as your bank, your email, or your favorite WordPress blog, of course. 😉
- Google search results: A little icon that appears next to the site name, very useful for reinforcing your brand image in the SERPs (Google results pages).
If this still sounds unfamiliar, take a look at these examples:
- Browsing history: A quick search and you can visually recognize the site, even without reading the text. Here’s an example from my iPhone. See the little pot?
- Mobile home screen: If a user registers your site as a shortcut, the favicon is displayed again. Classy, isn’t it?
So you see what a favicon is, right? 😄 Let’s move on to the next step: Why should you add a favicon to your WordPress site?
3 advantages of adding a favicon to WordPress
Let me give you 3 convincing arguments to make the favicon an integral part of your visual identity.
1. Credibility: You gain in professionalism
A favicon immediately gives the impression of a well-kept, successful, and well-constructed site. It tells us that you’ve taken the time to do everything right, right down to the last detail.
It’s also a visual cue consistent with your logo and which is found in Google search results, bookmarks, history… in short, anywhere your site can leave its mark. And it has to be said, this consistency reinforces trust in a brand.
2. User experience: You make navigation easier
Many of us often have several tabs open at the same time, so the favicon plays a key role in finding our way around quickly. I use them all the time in my daily web browsing, and I imagine you will too. For example:
- I click on my favorites without reading the names, simply by recognizing the icon.
- If I close a page by mistake, a quick glance at the history is enough to find my way back in a matter of seconds.
Ah, how handy those favicons are! 😄
3. Marketing & conversion: Boost your results
A site that’s immediately recognizable is a site to which people return more easily… and more often. And that’s perfect for reducing shopping cart abandonment, increasing clicks in Google search results, and boosting your revenue.
Because if your site goes unnoticed in a sea of tabs or anonymous bookmarks, you risk losing visitors without even knowing it.
Remember my story in the introduction? I’d closed everything without thinking, and the sites without favicon were the first to go.
That’s exactly what we want to avoid, isn’t it?
I know you can’t wait for me to tell you how to add a favicon to WordPress — and I understand!
👉 By the way, if your favicon is already ready, you can skip ahead to the tutorial below.
But if you’d like to discover a few little design secrets to make sure your favicon really pops, then stick with me a little longer.
5 essential steps before adding a favicon to WordPress
Long story short: I had a chat about favicons with a really nice designer, and since I always pass on good ideas, here are his tips for a really effective favicon.
👉 Before adding the favicon to your site, be sure to check these 5 fundamentals:
1. Use the right size
Your favicon should be square (1:1 format, four equal sides) and measure at least 48×48 pixels. However, for WordPress, the recommended size is 512×512 pixels, as you can see in the media library below:

Some platforms still use smaller sizes, so it’s best to plan for several sizes, as we’ll see later on in the article.
2. Choose the right format (ICO, PNG, WebP)
I’m a big fan of next-gen formats like WebP, for their lightness and compression efficiency. For a favicon, PNG also does the job perfectly, especially if you need to manage transparency. And for older browsers, ICO is still the most widely supported format. In short, ICO, PNG, or WebP all work very well these days. There’s really no rule set in stone anymore.
3. Adapt your logo and create a simplified but coherent version
A favicon is tiny, so forget about overly detailed logos. The idea is not to reinvent an entire visual identity, but rather to keep your codes, colors, and fonts, while creating a variation consistent with your brand image.
I’ll show you:
- At WPMarmite, we didn’t use the whole logo, we just used the pot (the marmite in French!).

- Netflix? Just a red N. It’s a good thing they didn’t choose a royal blue N, for example, because we wouldn’t have really understood why.

- Airbnb? Not the whole word, but just their “Belo” symbol.

Are you with me? Let’s put it to the test with a little game:
Let’s imagine a yoga studio called Namaste Yoga, with a lotus flower.
Two options for favicon design:
- Answer A: Put the whole name with the lotus flower.
- Answer B: Put only the lotus flower.
What do you think?
We agree on what works best visually: obviously answer B, so there’s no need to get a second opinion.
4. Managing transparency and different backgrounds
You’ve probably already noticed that not all browsers use the same background behind favicons. And I don’t know about you, but I’ve been known to activate the dark mode on apps like Slack or even Chrome on mobile.
So we have:
- On Chrome: tabs are light gray or bluish
- On Safari: a somewhat darker grey
- In private browsing: often black
👉 Result: If your favicon has a fixed gray background, it can either blend in with the background, or visually clash. Sometimes the best solution is to use a favicon with a transparent background, so that it adapts to all contexts, while remaining true to your visual identity.
5. Preparing the favicon for Google
Well, appearing in the first Google results is already the grail. But appearing with your favicon is even better. 😎
For Google to display it correctly, follow these tips:
- Make sure that Googlebot Image can access the favicon file and the home page. (No blocking in the robots.txt file, no strange redirects…).
- Add an HTML tag in the header of your home page that looks like this:
<link rel="icon" href="https://u9m4v4n3.delivery.rocketcdn.me/path/to/favicon.ico">
Wait, before you say, “Ah, but there’s already code I have to add…” — rest assured, WordPress automatically adds this tag to the header of your pages.
So if you’re using WordPress, you don’t have to do a thing to get your favicon displayed in Google.
For the curious, here’s what a favicon link looks like on WordPress.
<link rel="icon" href="https://votre-siteWordPress.com/wp-content/uploads/2025/08/favicon.png" sizes=" x " />
Now you know why you need a favicon and how to design it effectively. Shall we move on to creation?
How to create a WordPress favicon
Let me show you three quick, easy, and effective ways to create your favicon.
1. Via the WordPress media library
(The method I call “efficient laziness”: fast but not ultra-professional).
If you want to start from your current logo:
- Go to Media > Media Library and import your logo again (do not touch the original linked to the site).
- Click on “Modify” to edit the logo.
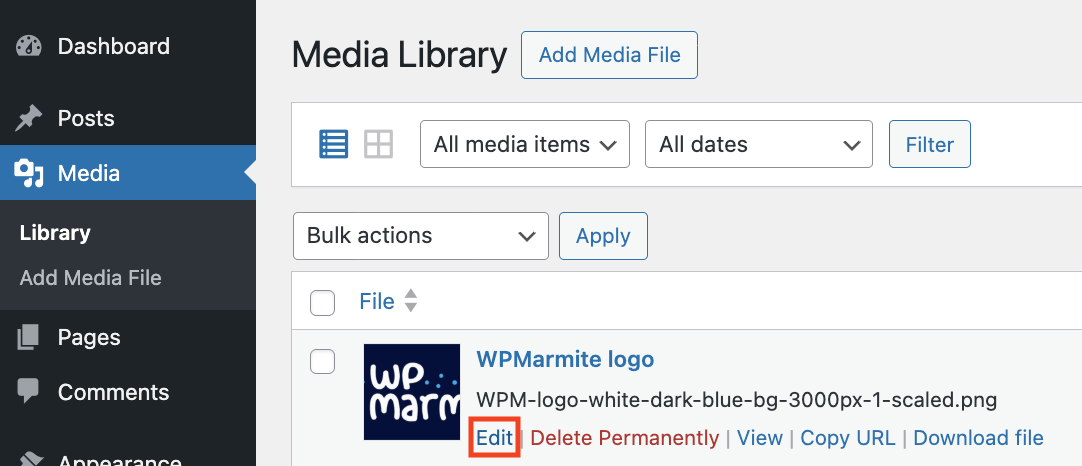
- Crop to 512 x 512 px (square format) and click on the “Apply crop” button. Don’t forget to save.
2. Via image creation software
(More freedom and creativity, but requires a minimum of design knowledge)
Possible tools to consider (from the simplest to the most advanced): GIMP, Canva, Photoshop.
Here’s an example using Canva, which is accessible even if you’re a beginner:
- Create a new 512 x 512 px square format and import your logo if it’s not already in your Canva library.
- Copy/paste your symbol (or part of your logo) into the square.
- No symbol? No problem!
For example, if your site is called your name.com, you can create a favicon with your initials (“AB” for Annie Banks, for example), using your usual font and brand colors:
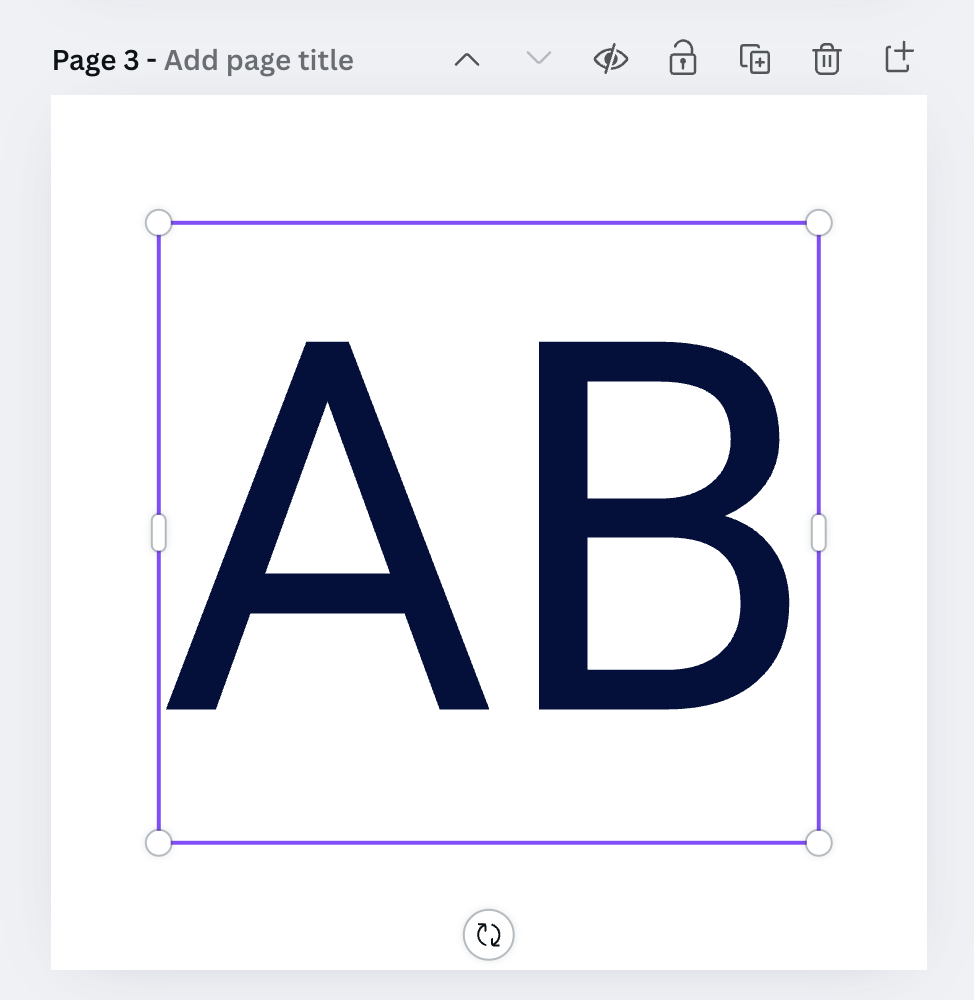
- Then export the image as a PNG file, with transparent background, in 512 x 512 px format:

👉 With Canva or Photoshop, you can see that creating a favicon is already much more professional and the creative possibilities are almost endless.
3. Via a favicon generator
(Ideal if you want a multi-media version).
The tools I recommend are Favicon.io, Real Favicon Generator, and LogoFast.
Here’s what you can do on Favicon.io, for example:
Option 1: Create a favicon with text
- Enter your initials (e.g. “AB”) and choose the font, colors, and size.
- Click on “Download” to obtain a ZIP file containing all the formats required for all uses.

Option 2: Convert an existing image
What if you already have a PNG symbol (for example, a lotus flower in your logo), but the file isn’t in the right format or size?
No problem:
- Drag and drop your image onto favicon.io and start the conversion to ICO or multiple sizes:
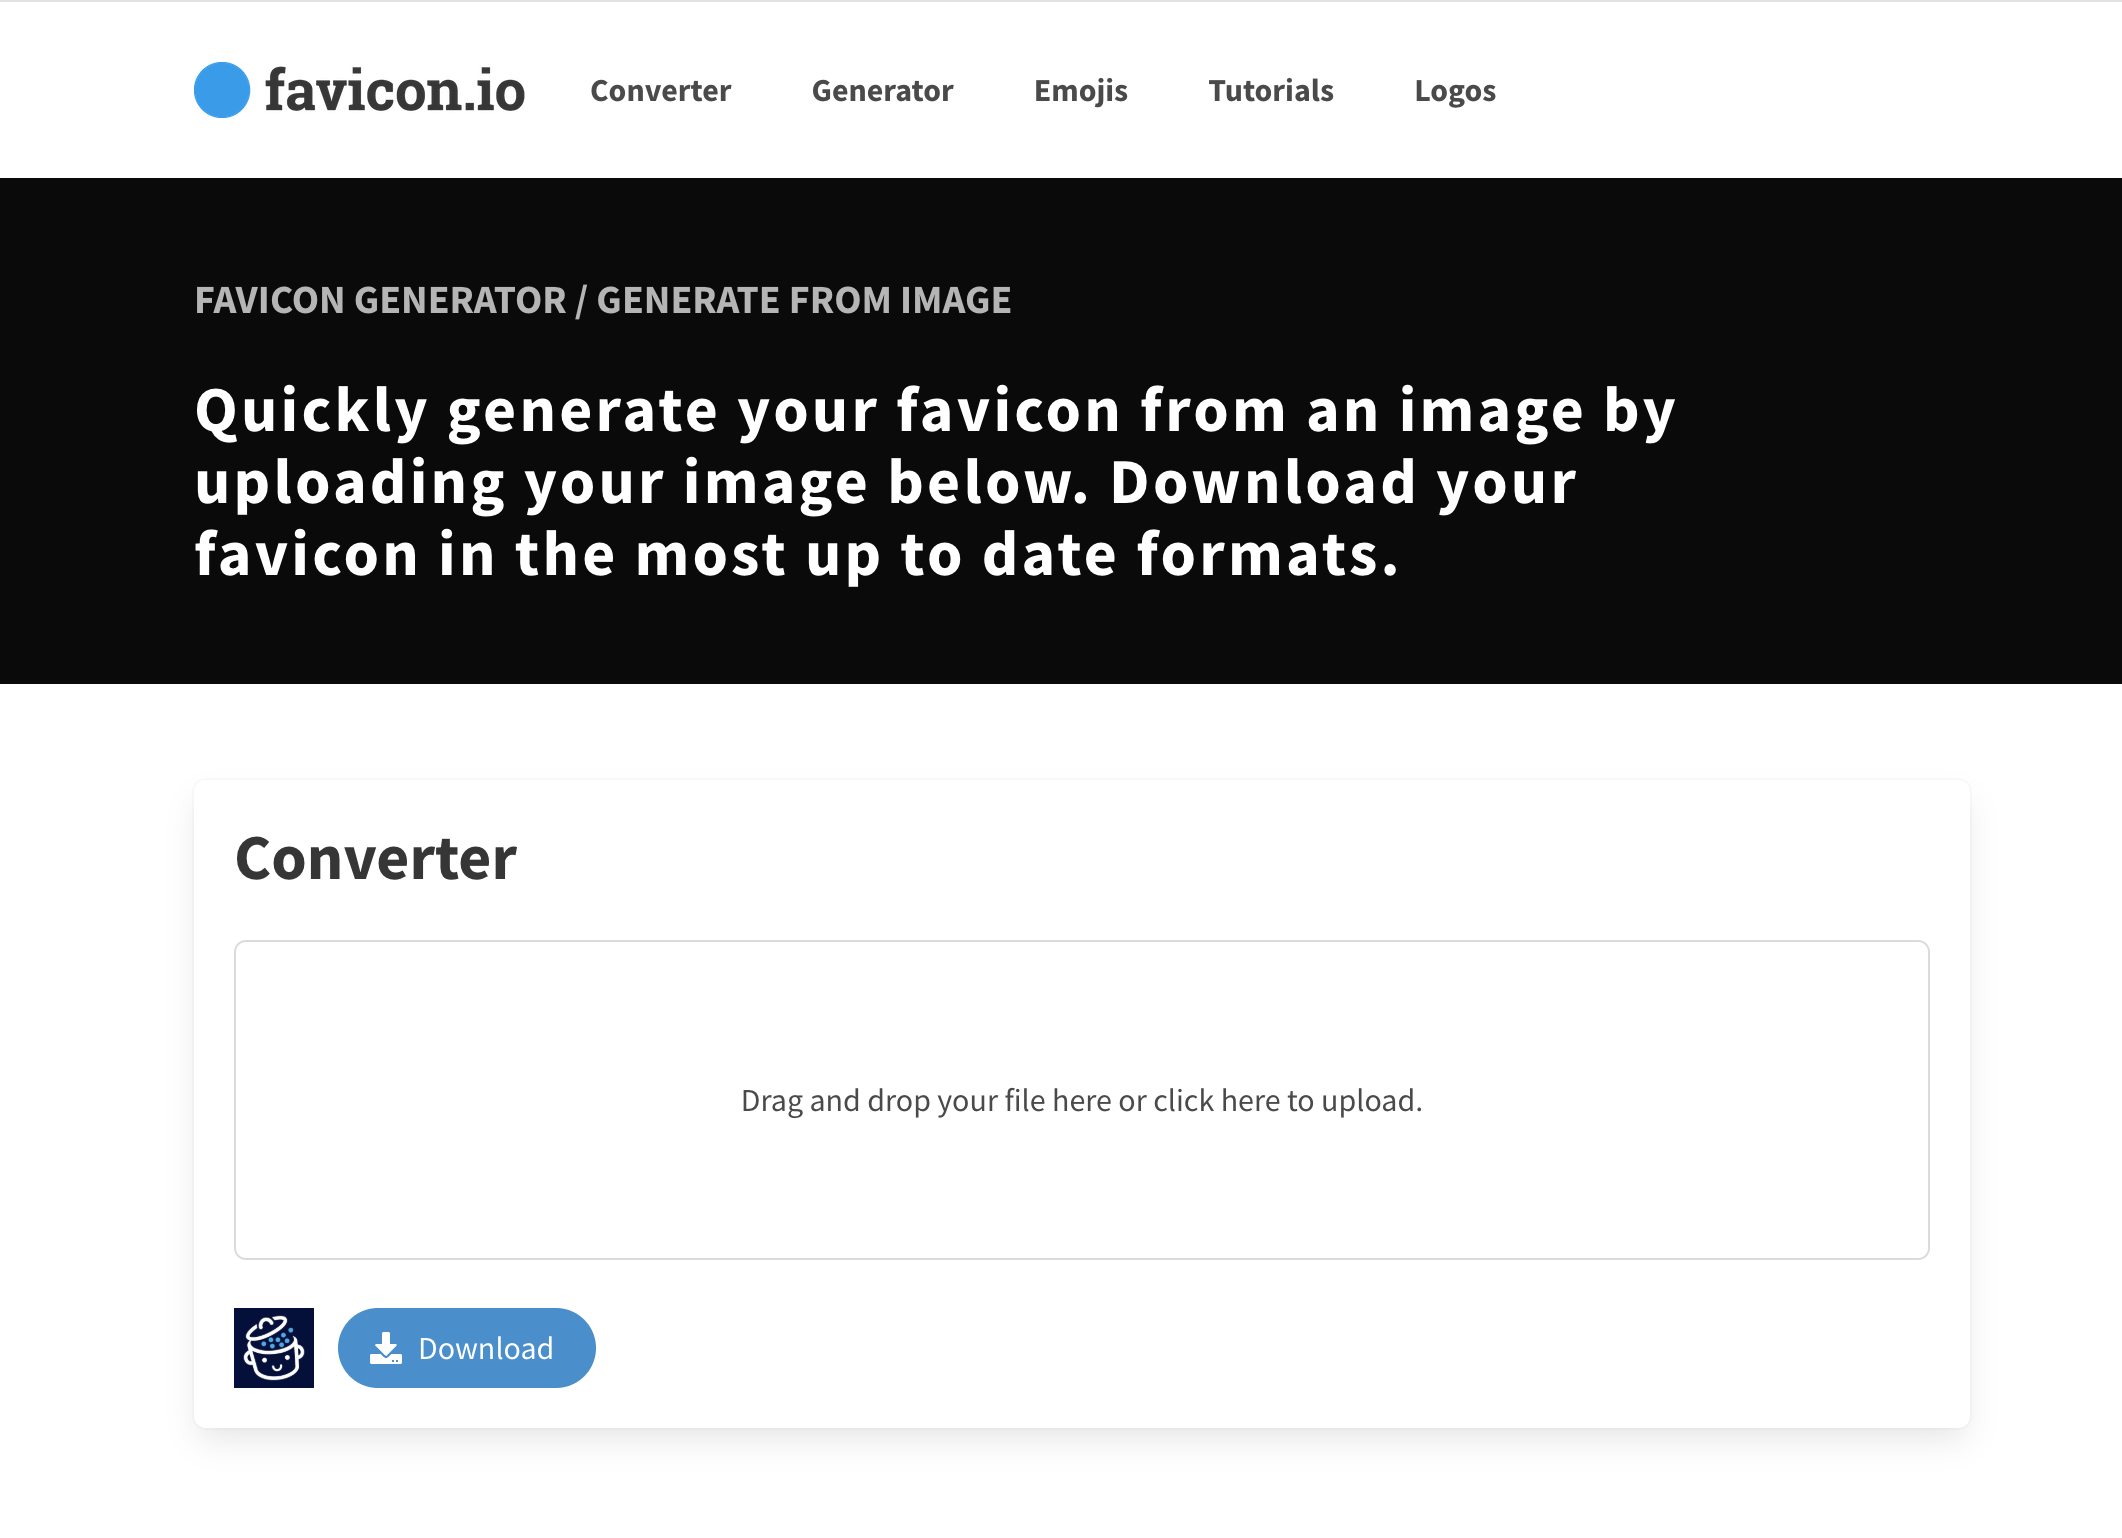
- Click Download again and you’ll get the same result: a ready-to-use ZIP file.
And this famous ZIP file, what exactly does it contain?
It contains all the necessary variations for a good display adapted to all browsers and devices (mobile, tablet, shortcuts, etc.). So there are several sizes and formats (ico and png, svg…). And the good news is that everything can be used in WordPress, which is really practical.
Option 3: Use a simple icon
There’s also the option of creating a favicon from an icon. This is ideal if, for example, your site can be summed up in a pictogram. Let me explain. For a video site, you could opt for the triangular “play” button or for film. We’ve used an apple symbol in the example below with LogoFast:

With LogoFast, you can choose the icon, the color, the size (512 px, of course) and then export it as a PNG using the Download button.
👉 To conclude on favicon generators, let’s just say that on the creative side they are acceptable for creating favicons with letters or icons. On the other hand, these are not tools for creating a symbol or a logo variation from A to Z. It’s better to have a ready-to-use PNG file or an existing visual. Basically, I think these generators are excellent for automatically creating the ZIP with all the right formats, but not for creating the favicon design.
Drum roll… Here’s the key phase you’ve been waiting for!
Now that you’ve got the hang of the favicon…Should we add it in WordPress?
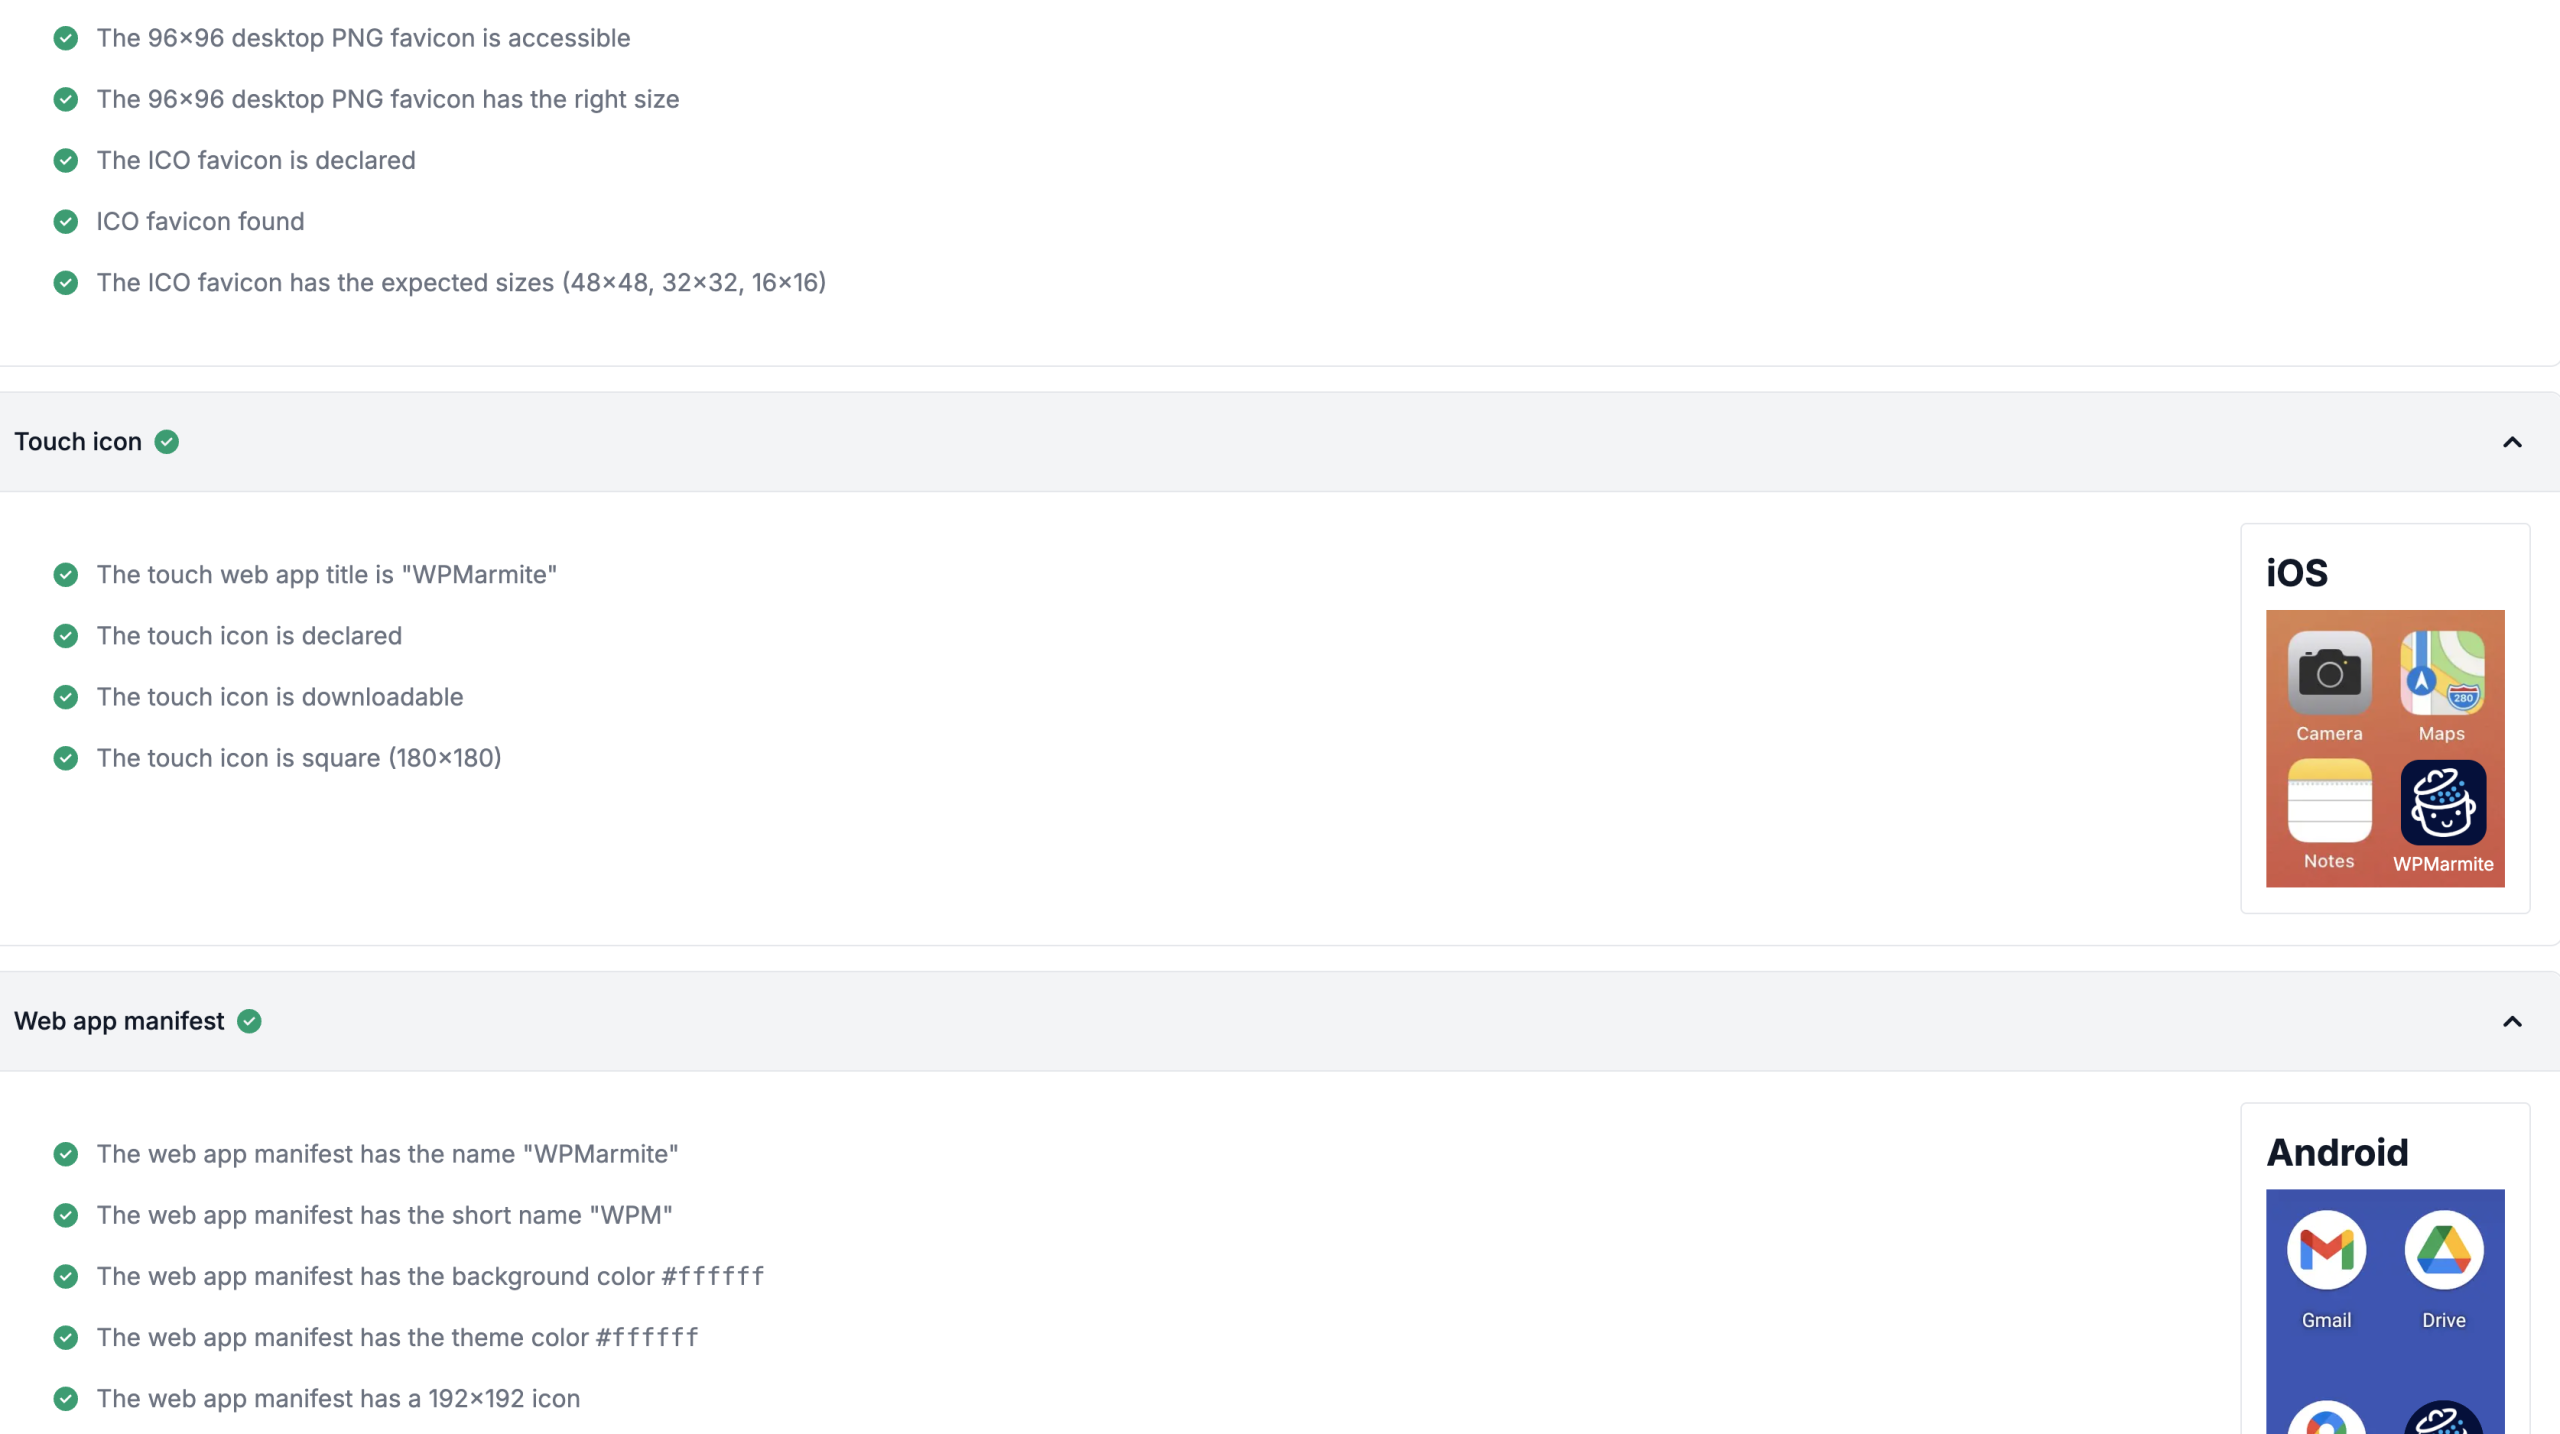
And because I do things thoroughly, I also test each method with Favicon Checker to see if everything displays well on Android, iOS, or even Chrome.
Here we go!

How to add a favicon in WordPress (3 methods)
There are three ways to add a favicon to WordPress: via the dashboard, with a plugin, or manually with FTP. Let’s take a closer look.
1. Add a favicon via the WordPress dashboard (native option)
This is the best-known method, and for good reason: it’s simple, fast, and directly integrated into WordPress.
Steps to follow:
- Go to Settings > General > Site Icon > “Choose a site icon”.
This works for all themes, even block-based themes and the Site Editor.
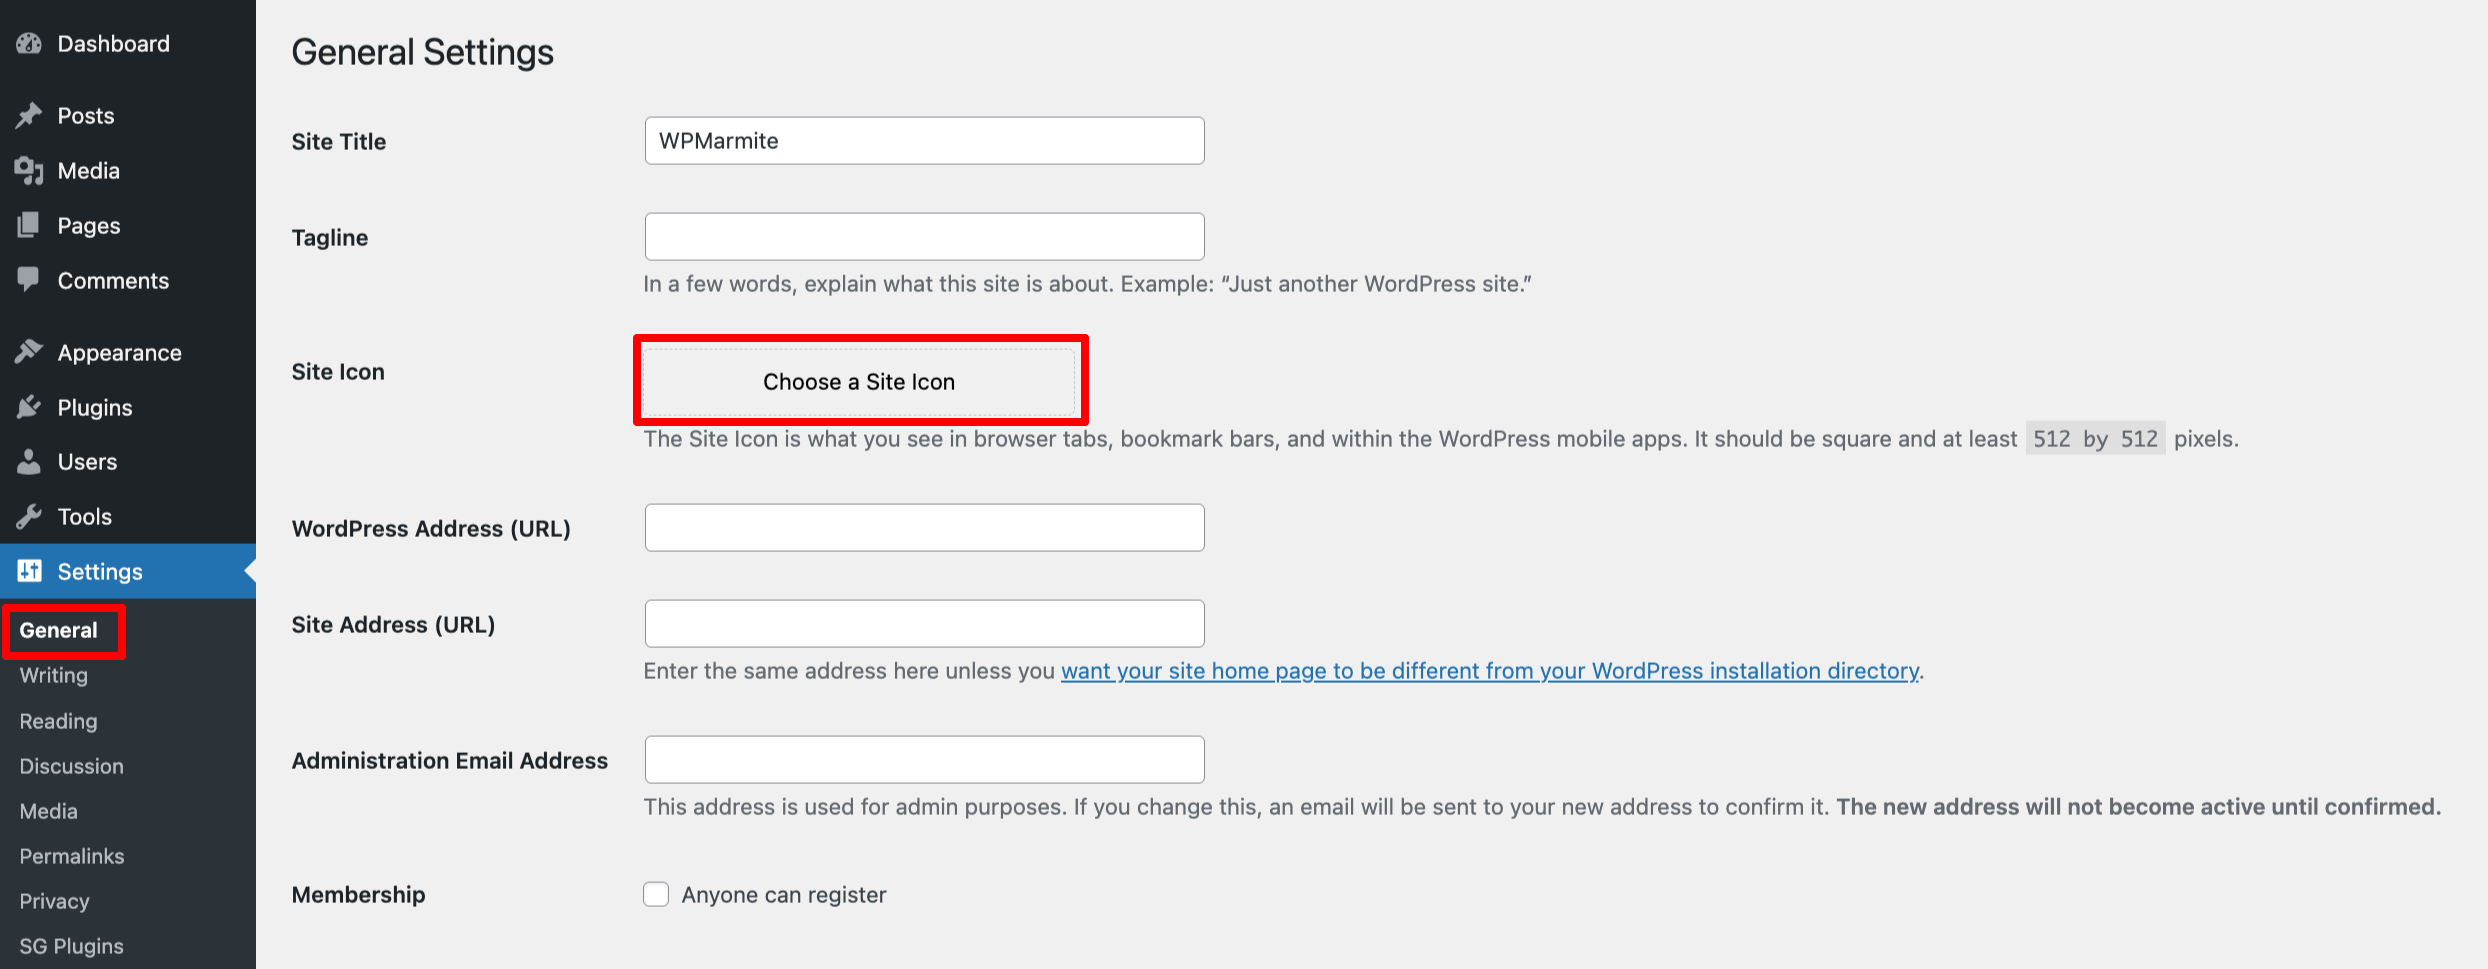
- Select the favicon and click on the “Set as site icon” button.
Advantages: It’s simple, it’s fast, and frankly, it’s the basic method. The one everyone knows and uses.
Limitations: You can only add a single file. As a result, you can’t plan a specific version for mobiles, another for desktop browsers, and so on. It’s clean, but a little limited.
Level: Beginner.
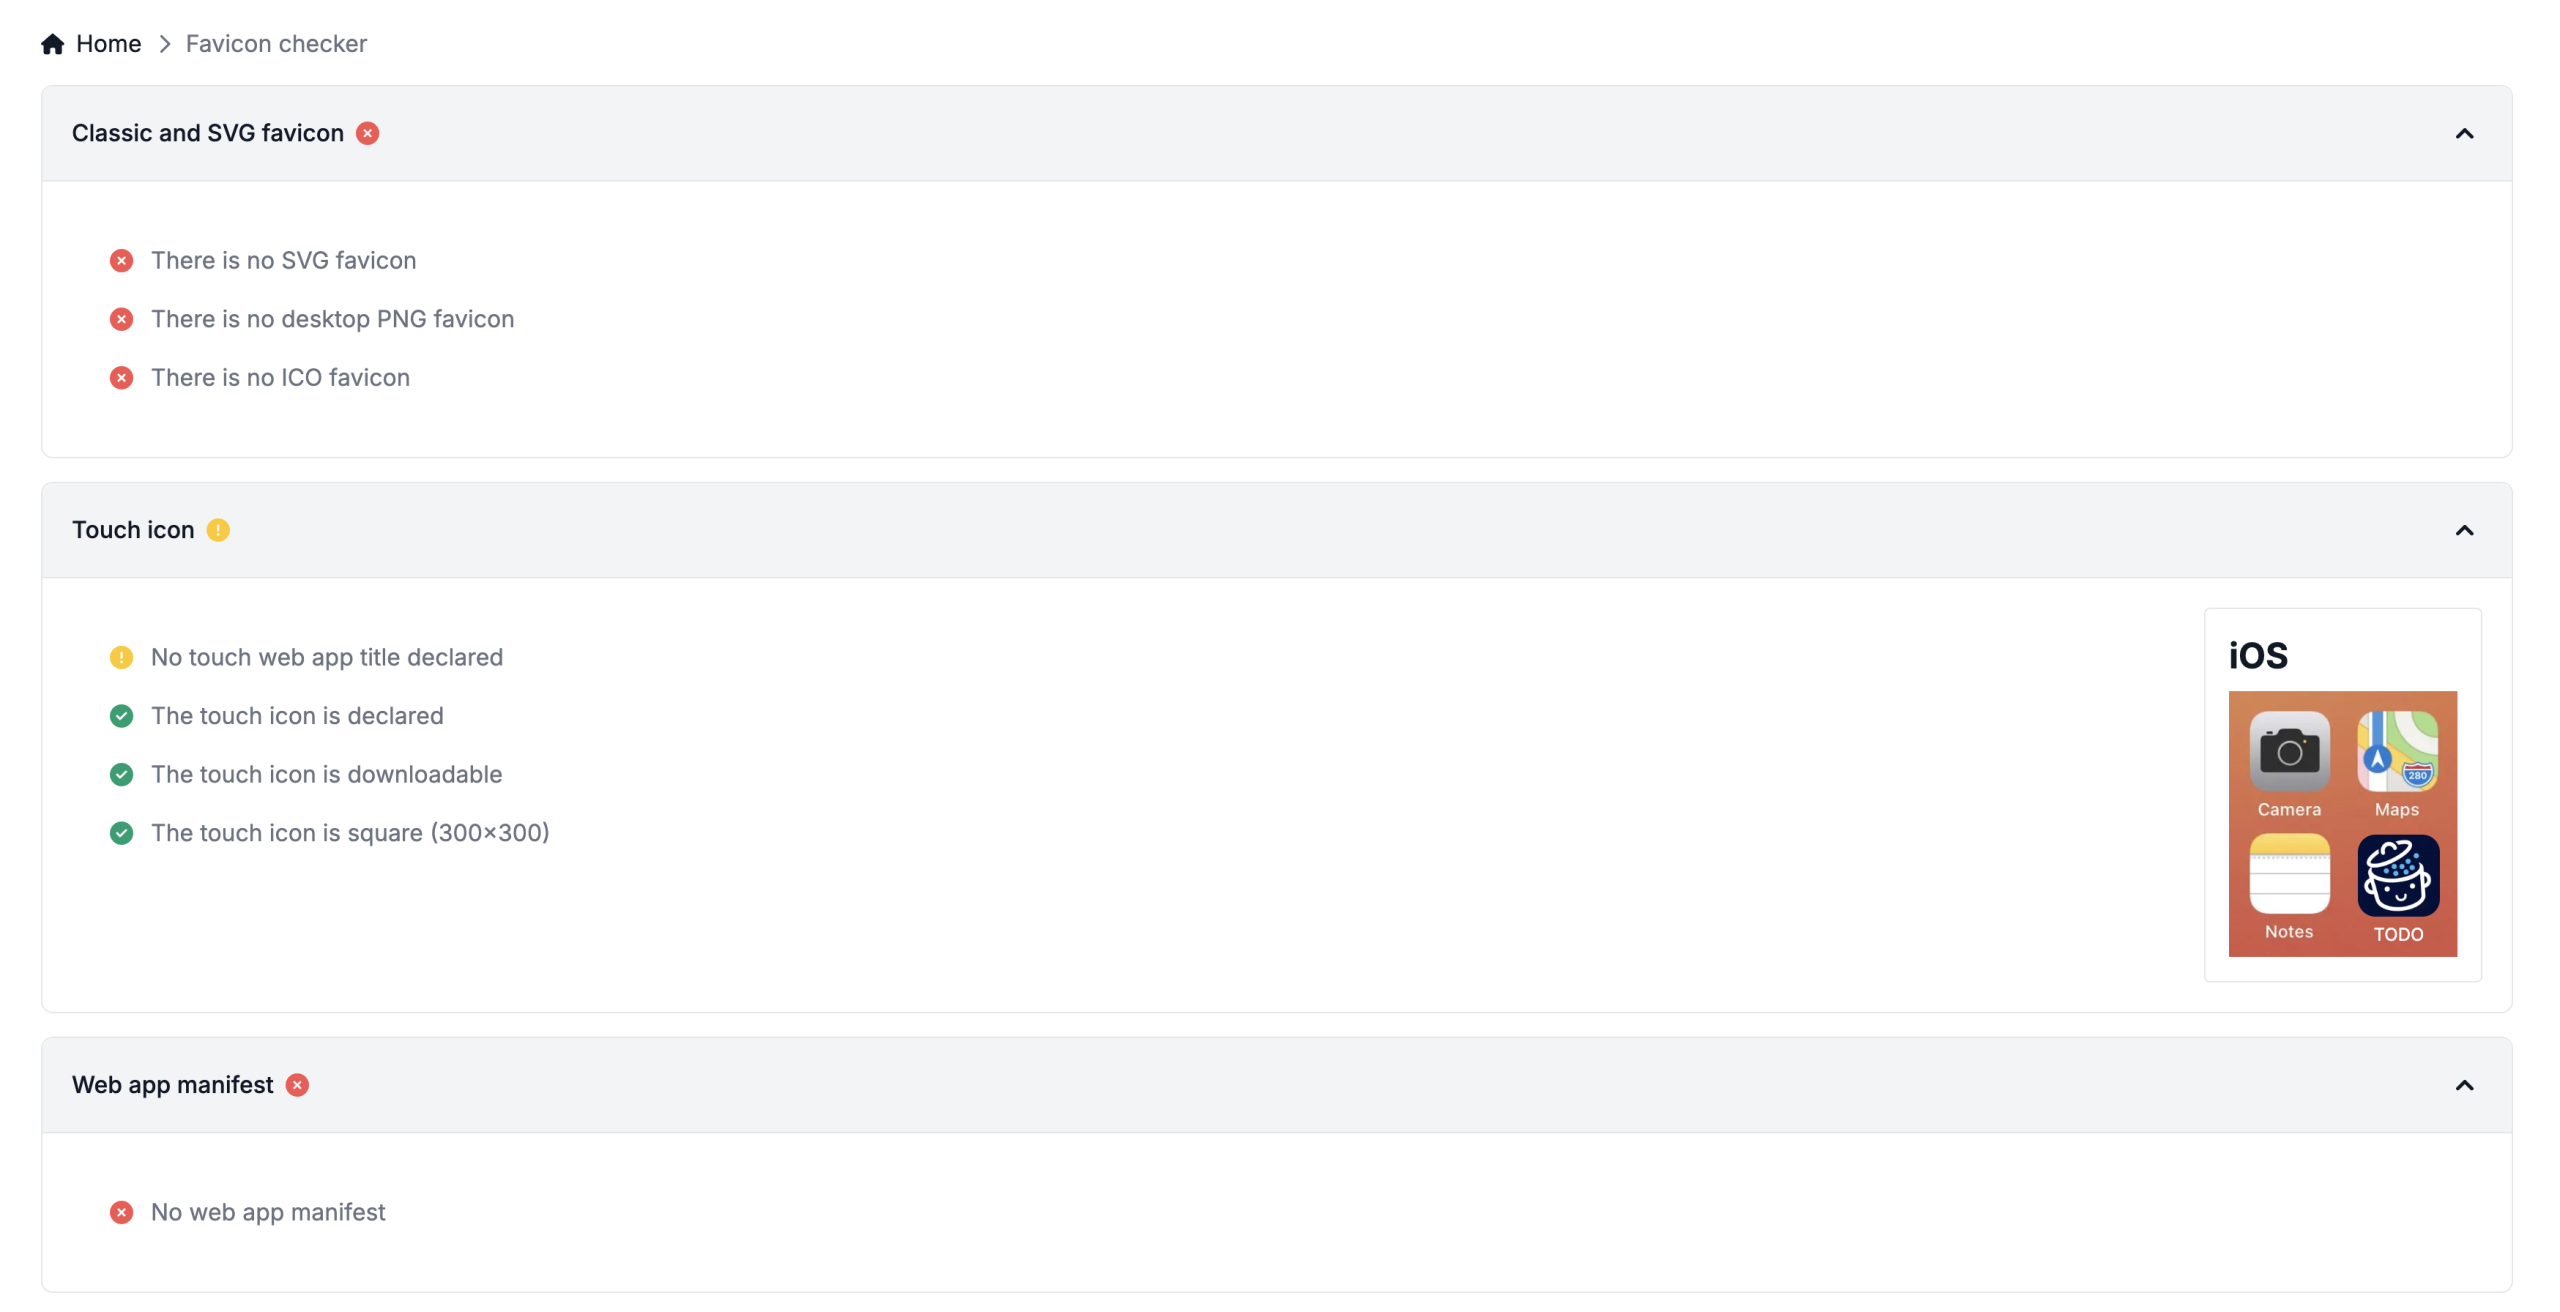
Score on the Favicon Checker:
According to the Favicon Checker analysis, here’s what’s missing or what could be improved:
- No favicon in SVG format
- No specific PNG favicon for computer formats (e.g. desktop shortcuts)
- No ICO favicon (useful for ensuring compatibility with all browsers)
- No web application title defined for iOS shortcuts
- No manifest file present
You can see the visual result here:
2. Add a favicon via a plugin: Real Favicon Generator (multiple formats and automatic integration into WordPress)
The Real Favicon Generator plugin is the ideal solution for those who want to generate all necessary formats (mobile, tablet, computer…) with maximum compatibility, without writing a single line of code.
Steps to follow:
- Install the Favicon by RealFaviconGenerator plugin directly via Plugins > Add plugins and click “Install now.” See our guide if you need help installing an plugin.

- Go to Appearance > Favicon and select the media from the WordPress media library, or paste the URL directly.

- Click on the “Generate favicon” button.
Penultimate step: Generate the favicon and go to their platform
- You’ll arrive at the plugin’s website, where you can view your favicon in dark mode and on Apple Touch, and create your own Web App Manifest to indicate how the favicon will be displayed on mobile.
The Web App Manifest is a small file that tells the app how to display the site if it’s added to the home screen.
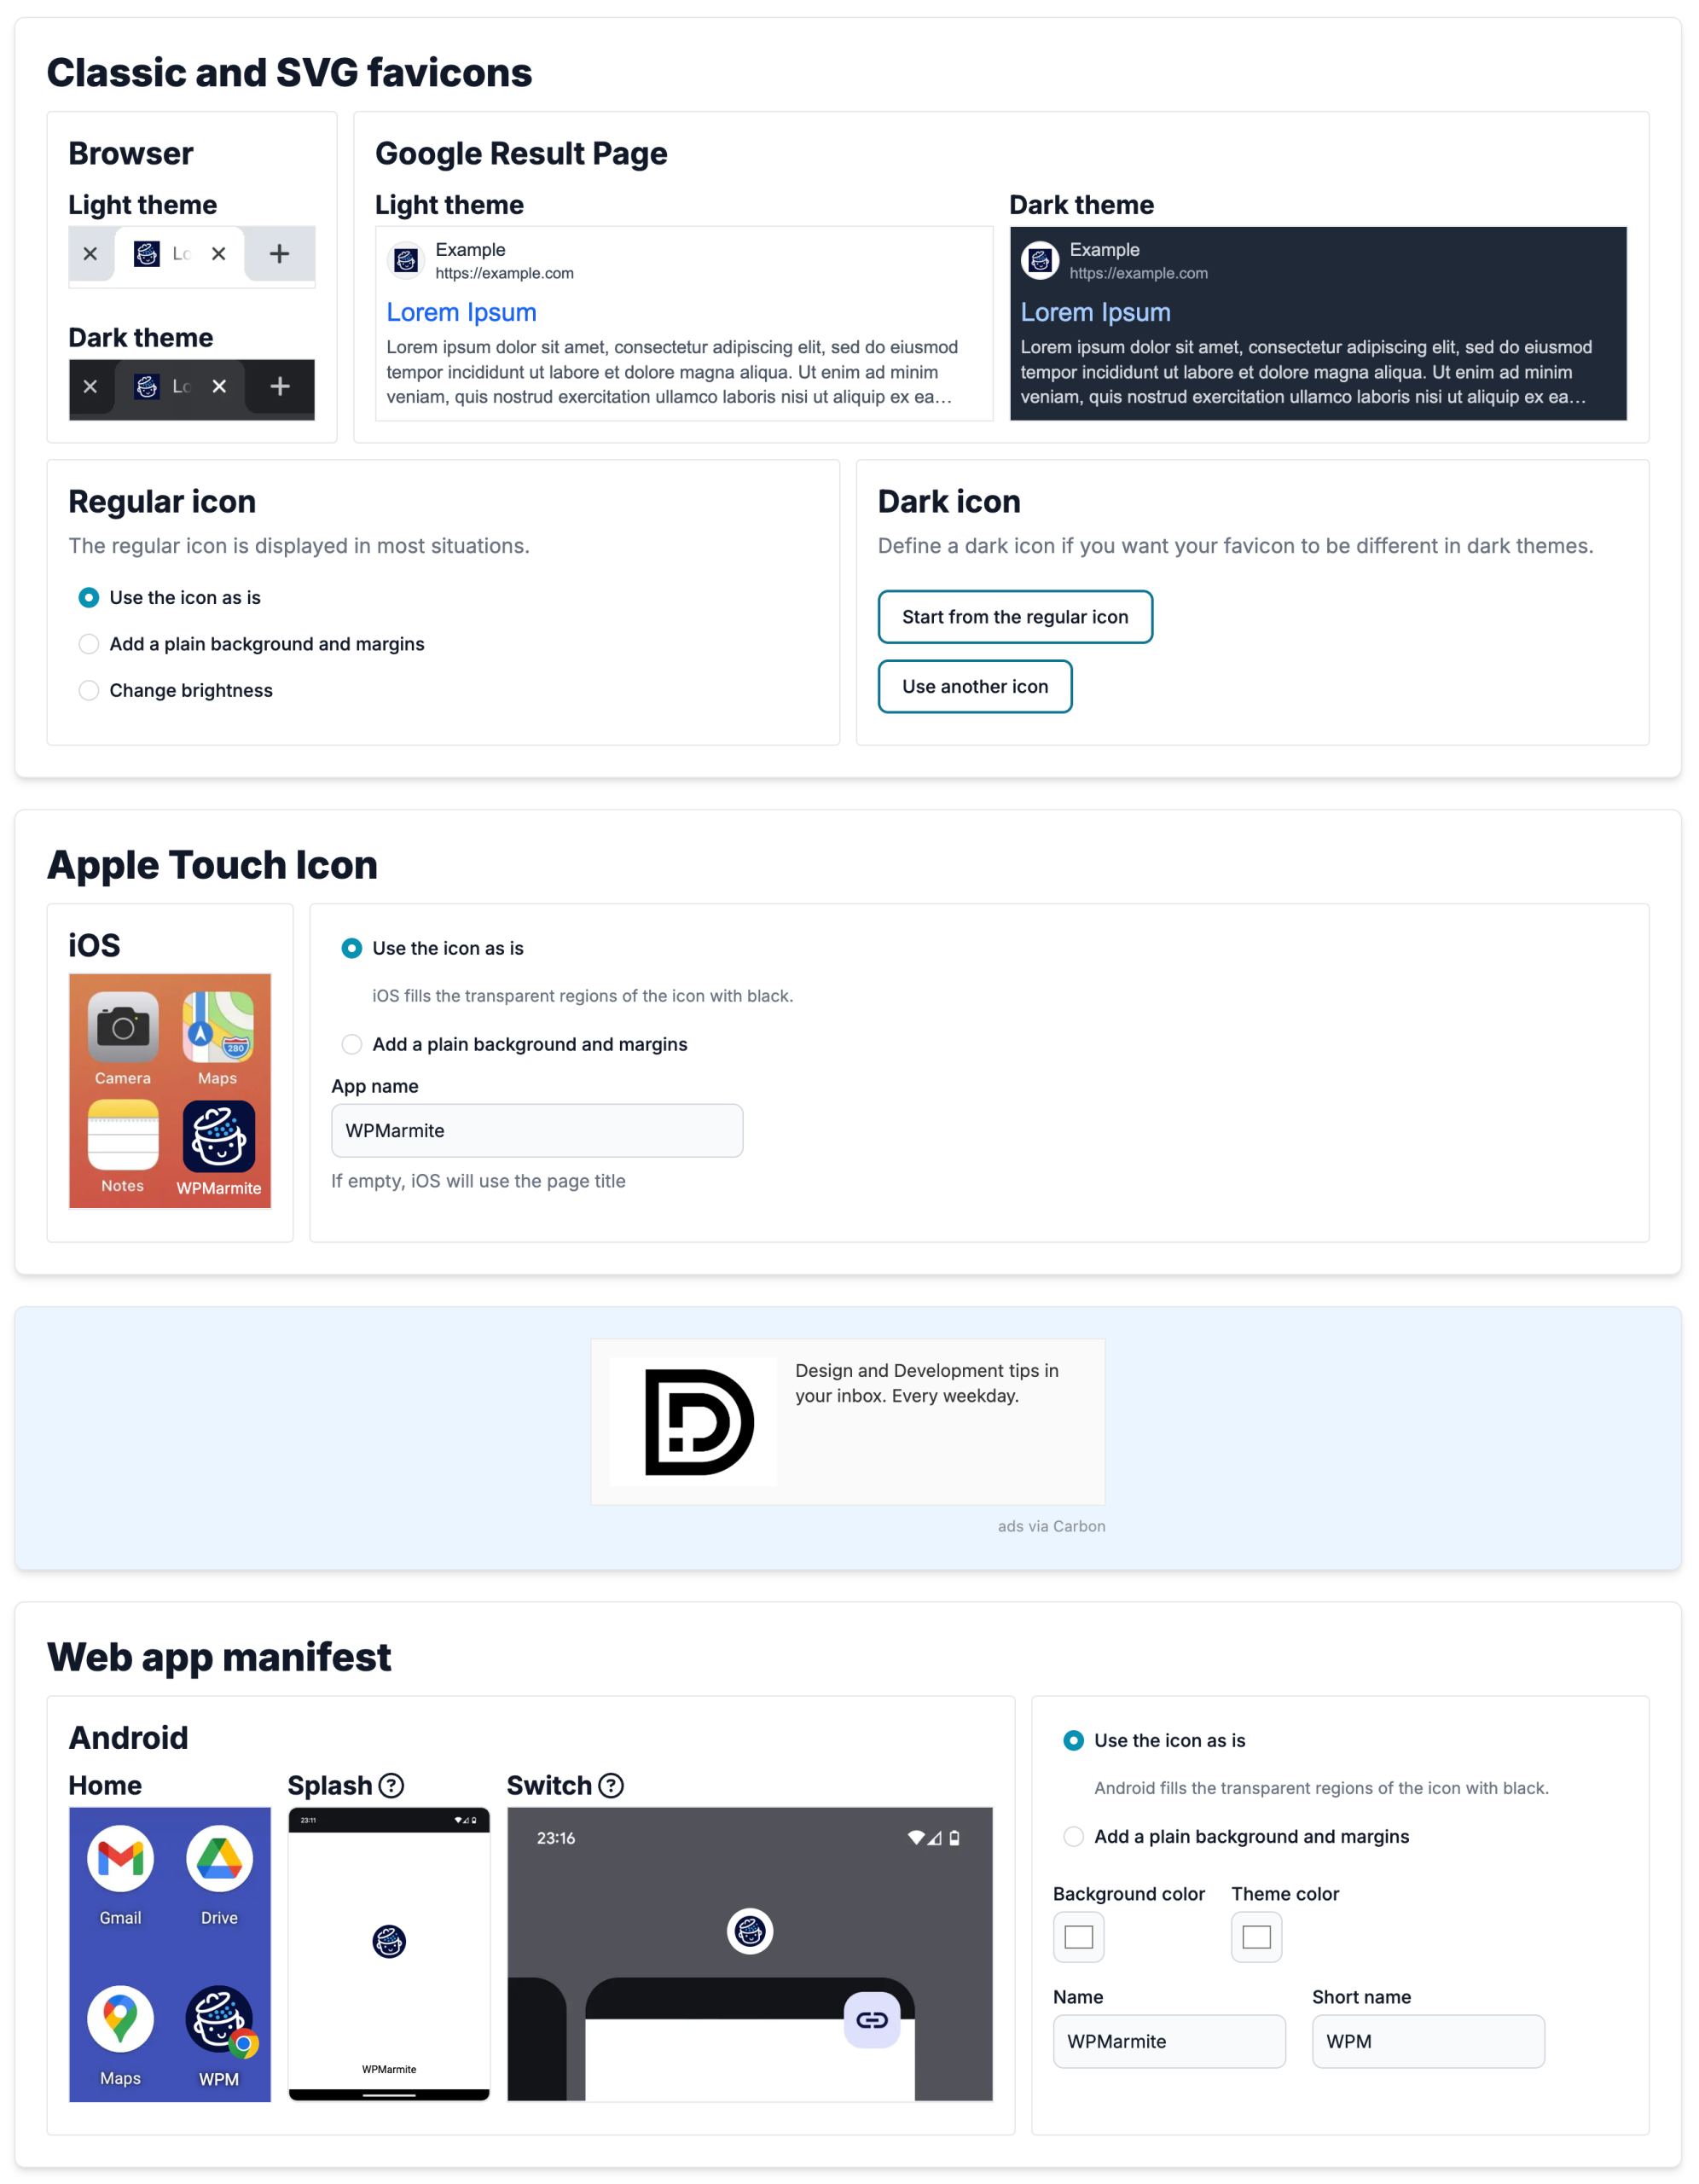
- And for the last step, click on the “Generate and install favicon” button to generate and install all versions of your favicon in WordPress.

Advantages: This plugin automatically generates all the formats and sizes you need for desktop shortcuts, iPhone / iPad, Android devices, home screen shortcuts, and more. It also generates the famous Web App Manifest. And what’s more, it adds it all to WordPress for you. In short, a very complete level of compatibility without touching the code.
Limitations: It’s just one more plugin to install. And if you’re the kind of person who prefers lightness when it comes to plugins, that can be a drag.
Level: Beginner to intermediate
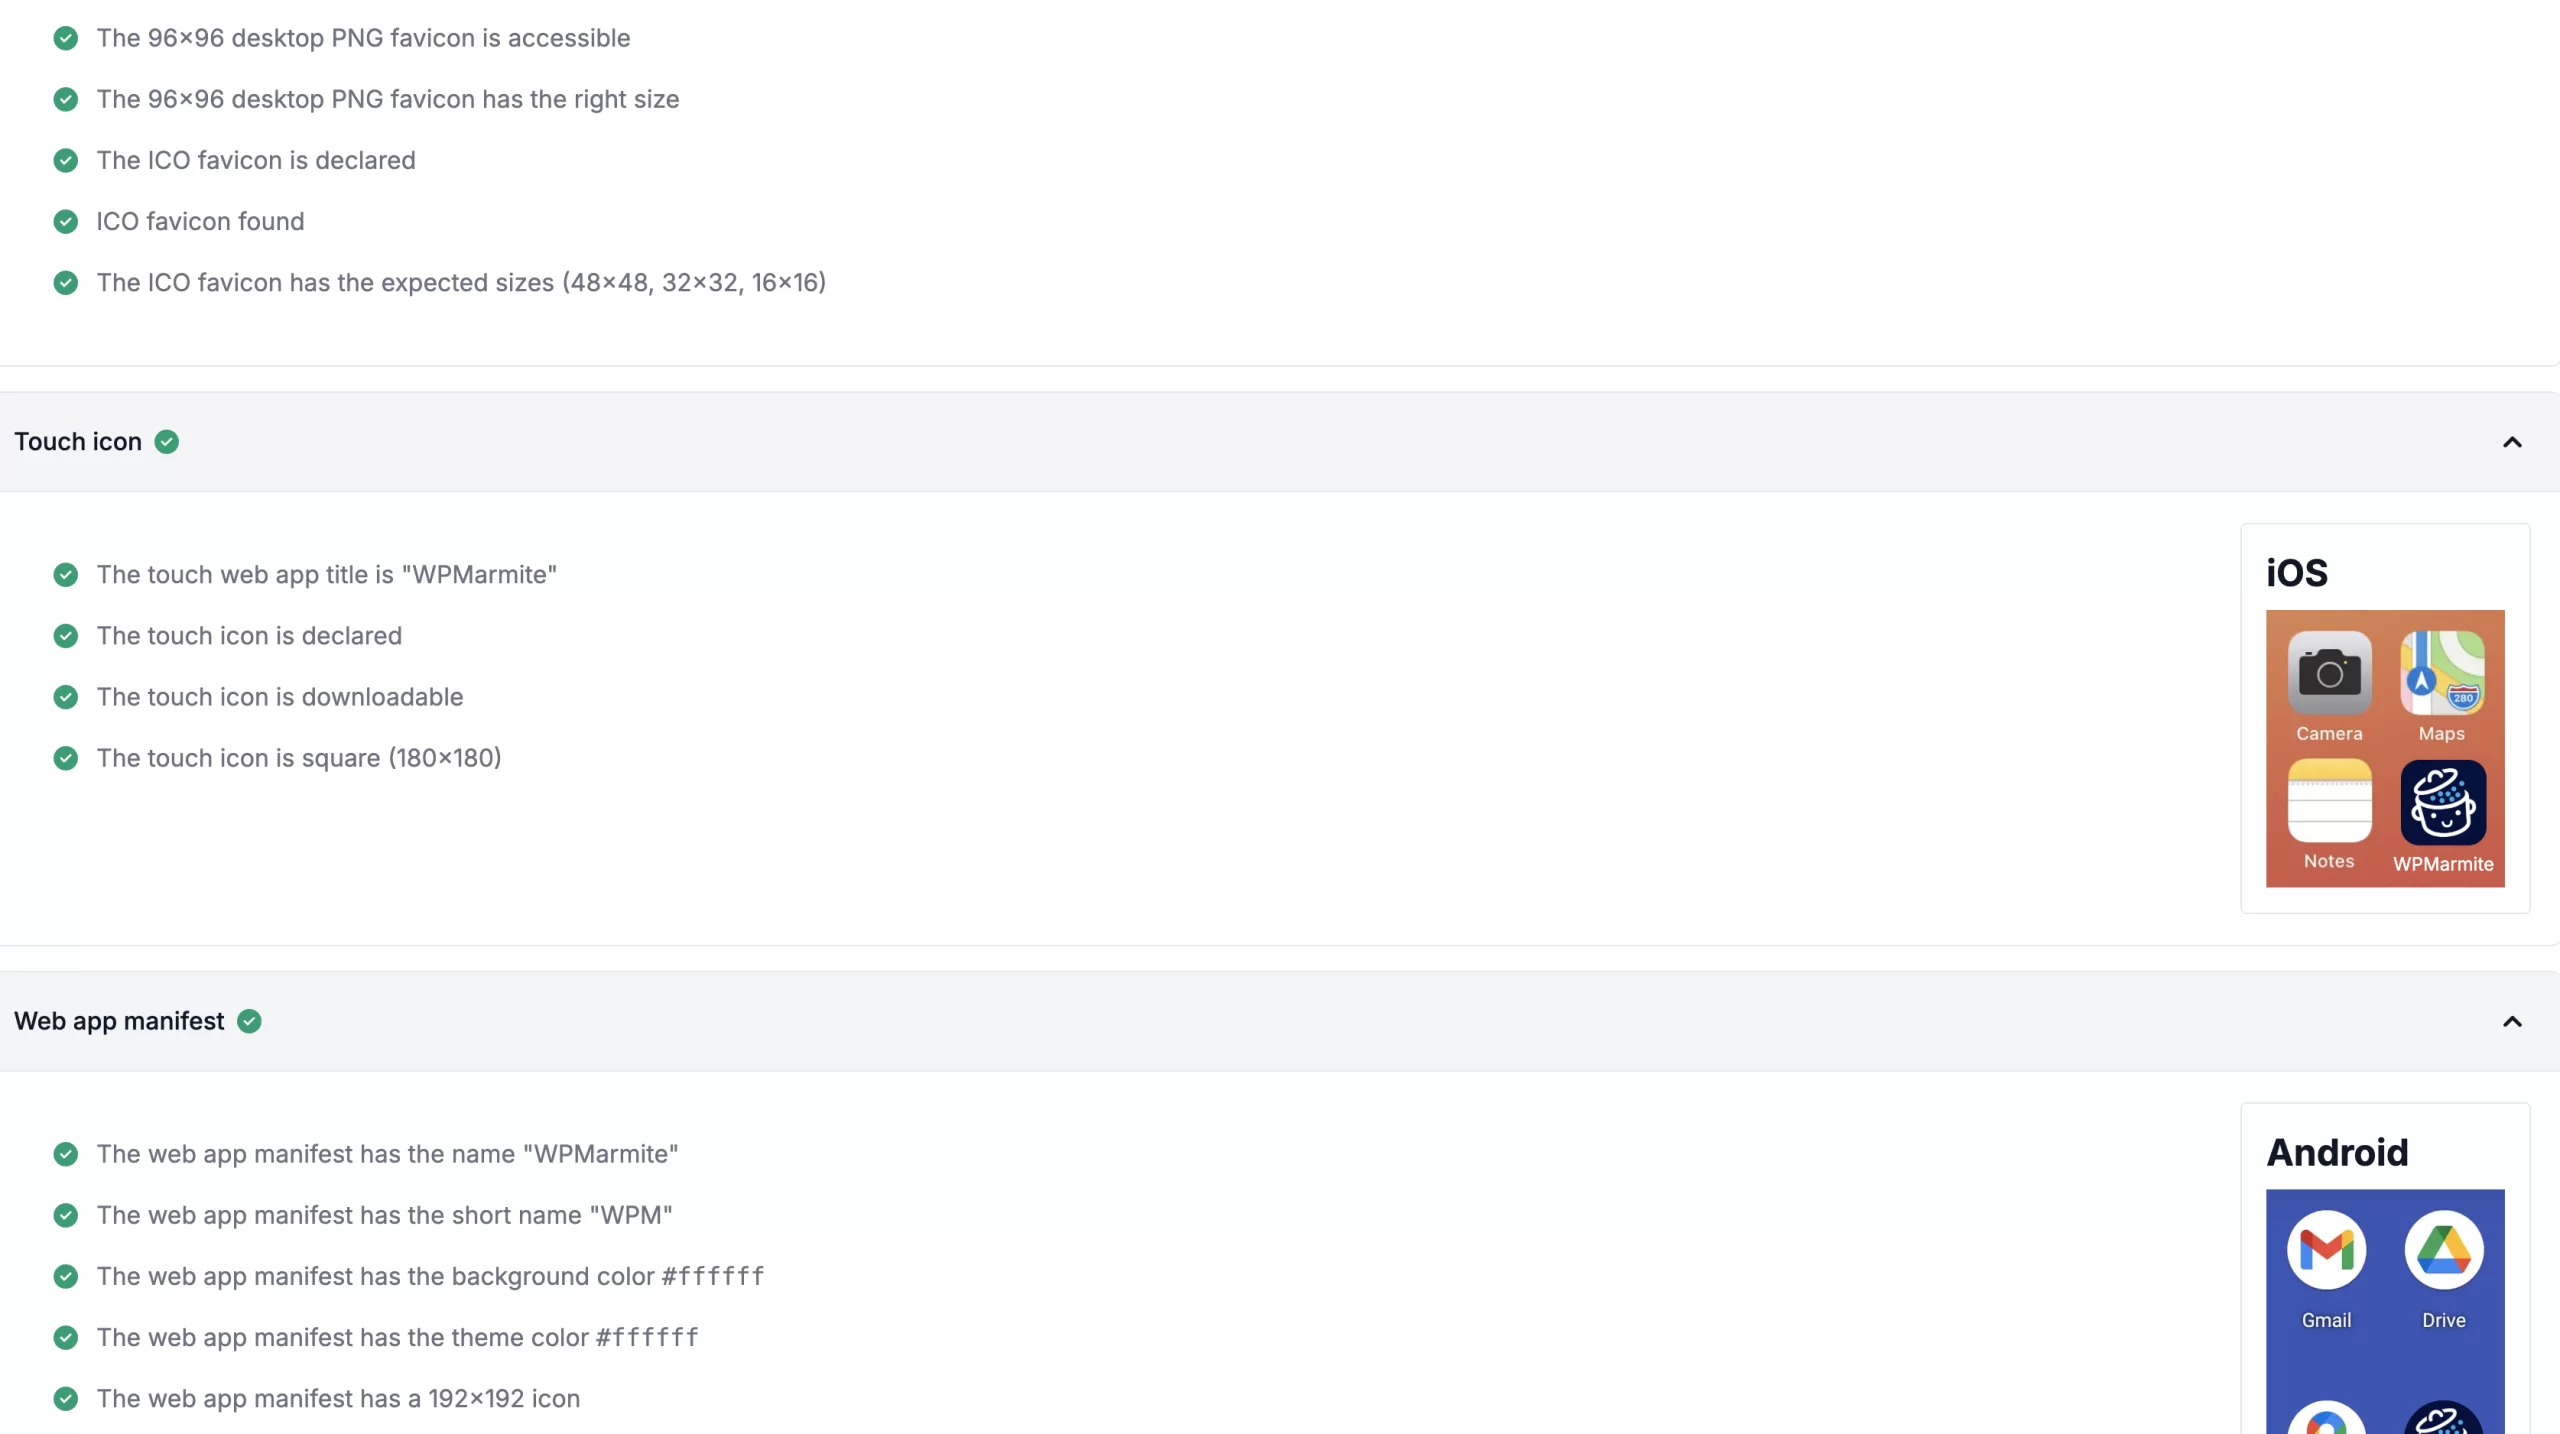
Favicon Checker score:
All the sensors are green and I’ve got the right sizes for all the digital media.
3. Add favicon manually via FTP (same result as plugin solution, but using code)
This method is aimed at users who are comfortable with the code and structure of a WordPress site. It allows you to do exactly the same thing as the Real Favicon Generator plugin, but without installing a plugin.
Steps to follow:
- Generate your favicon and associated code with an online tool like Favicon.io. The tool generates the files and code for you to put into WordPress.
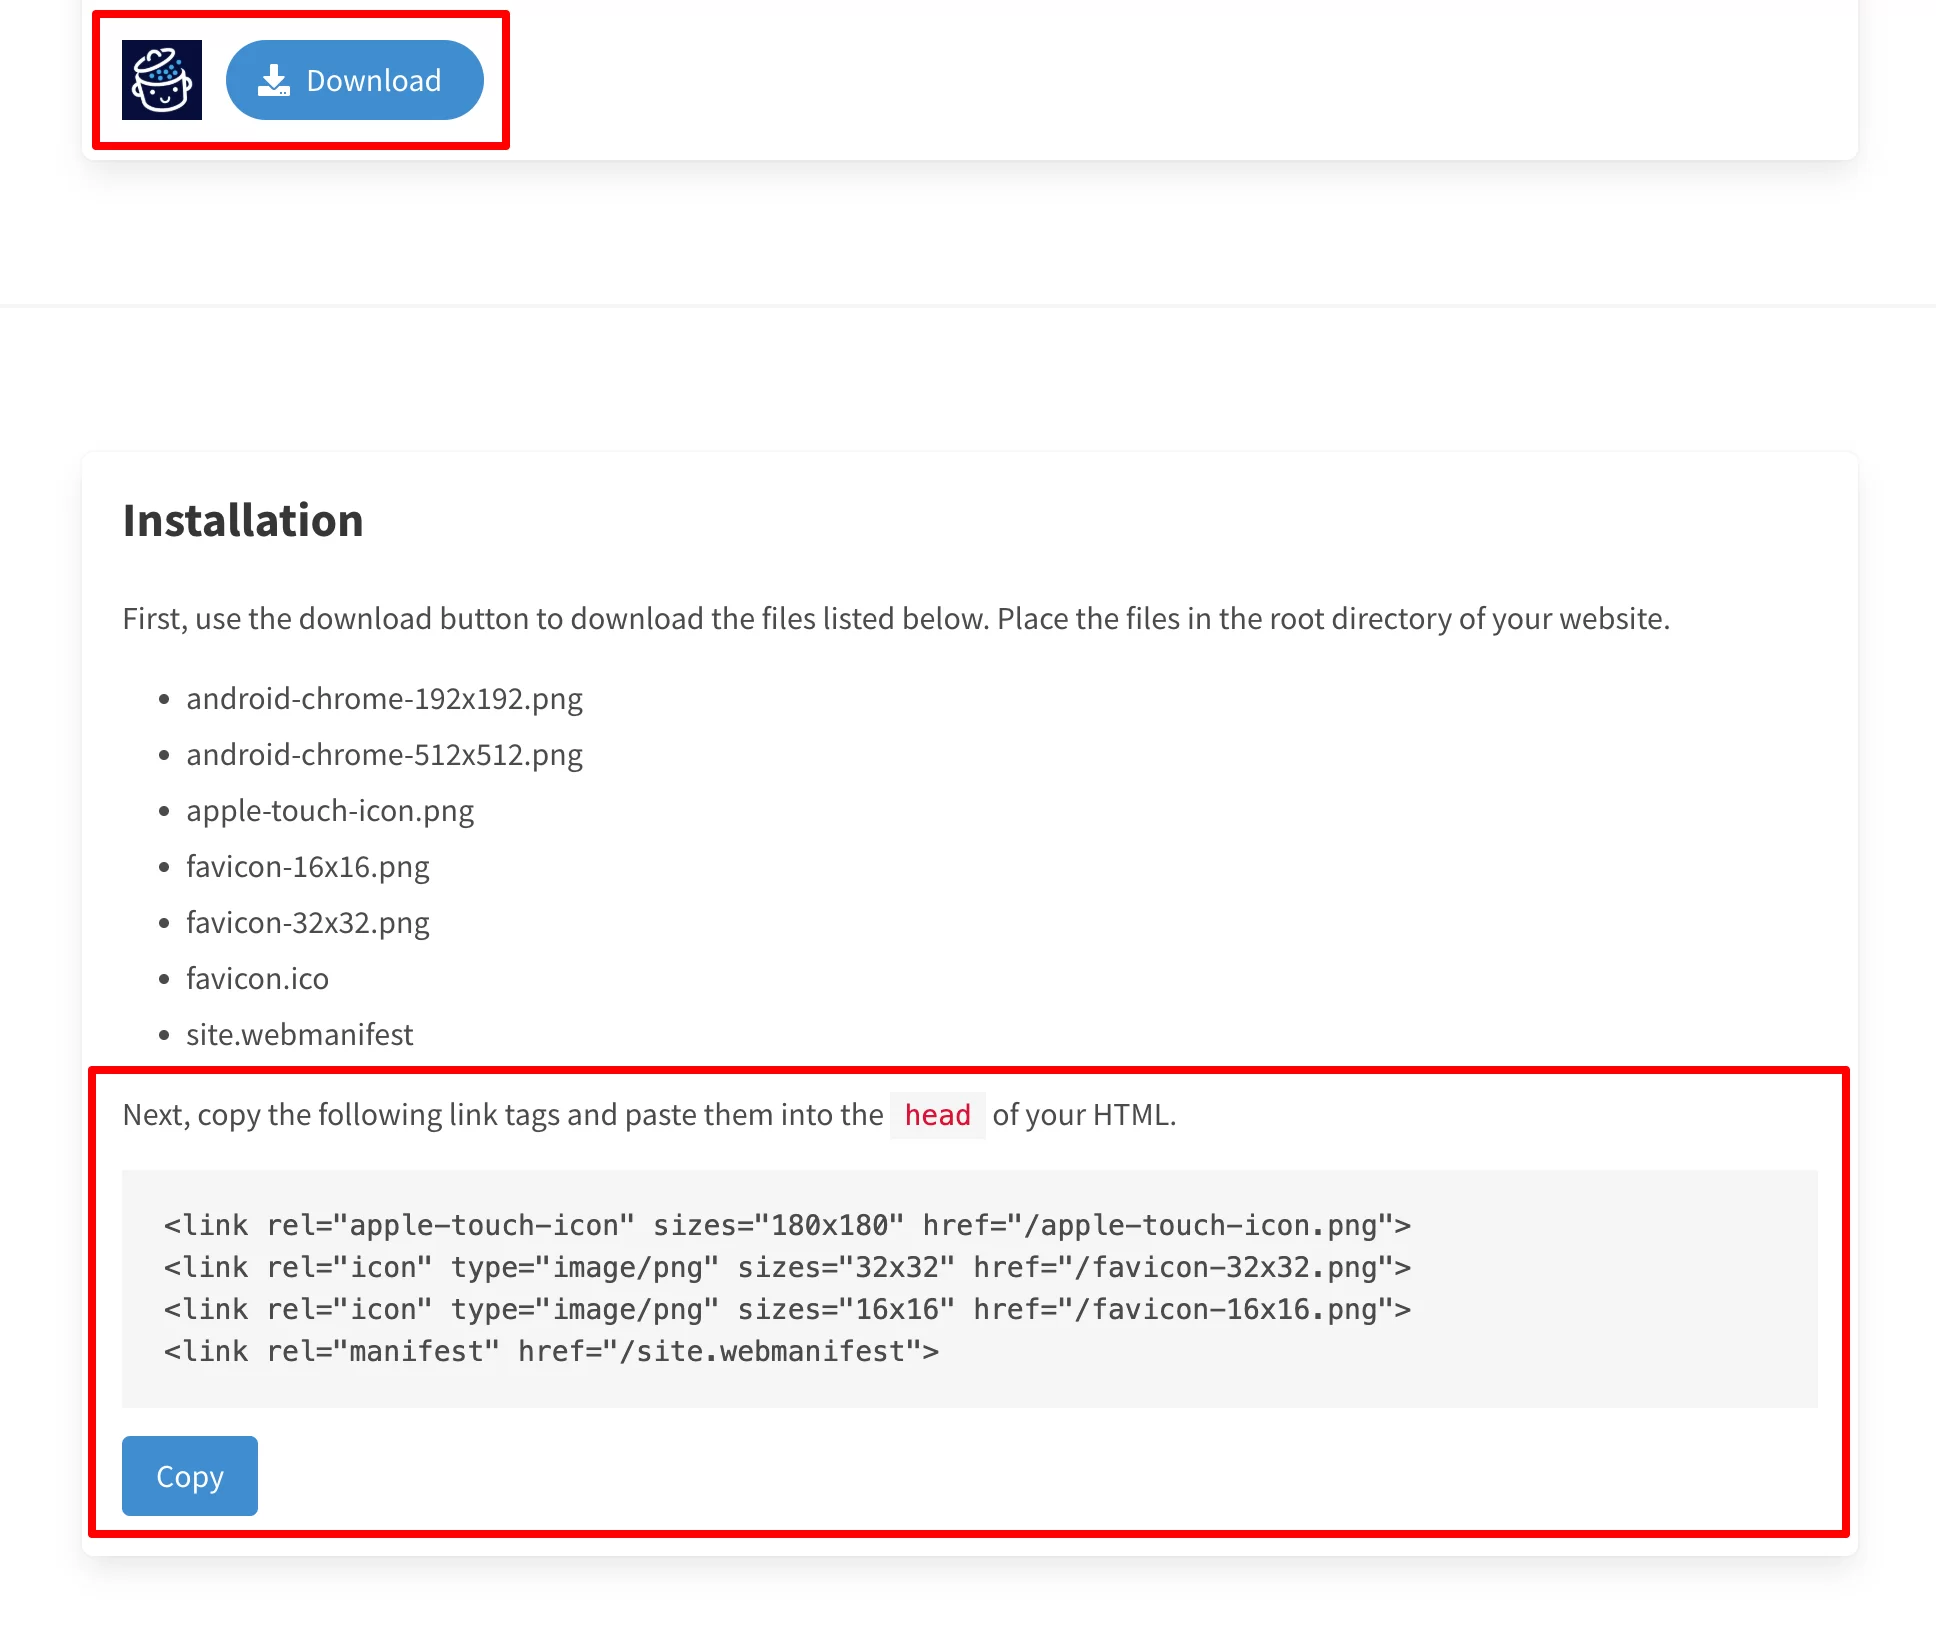
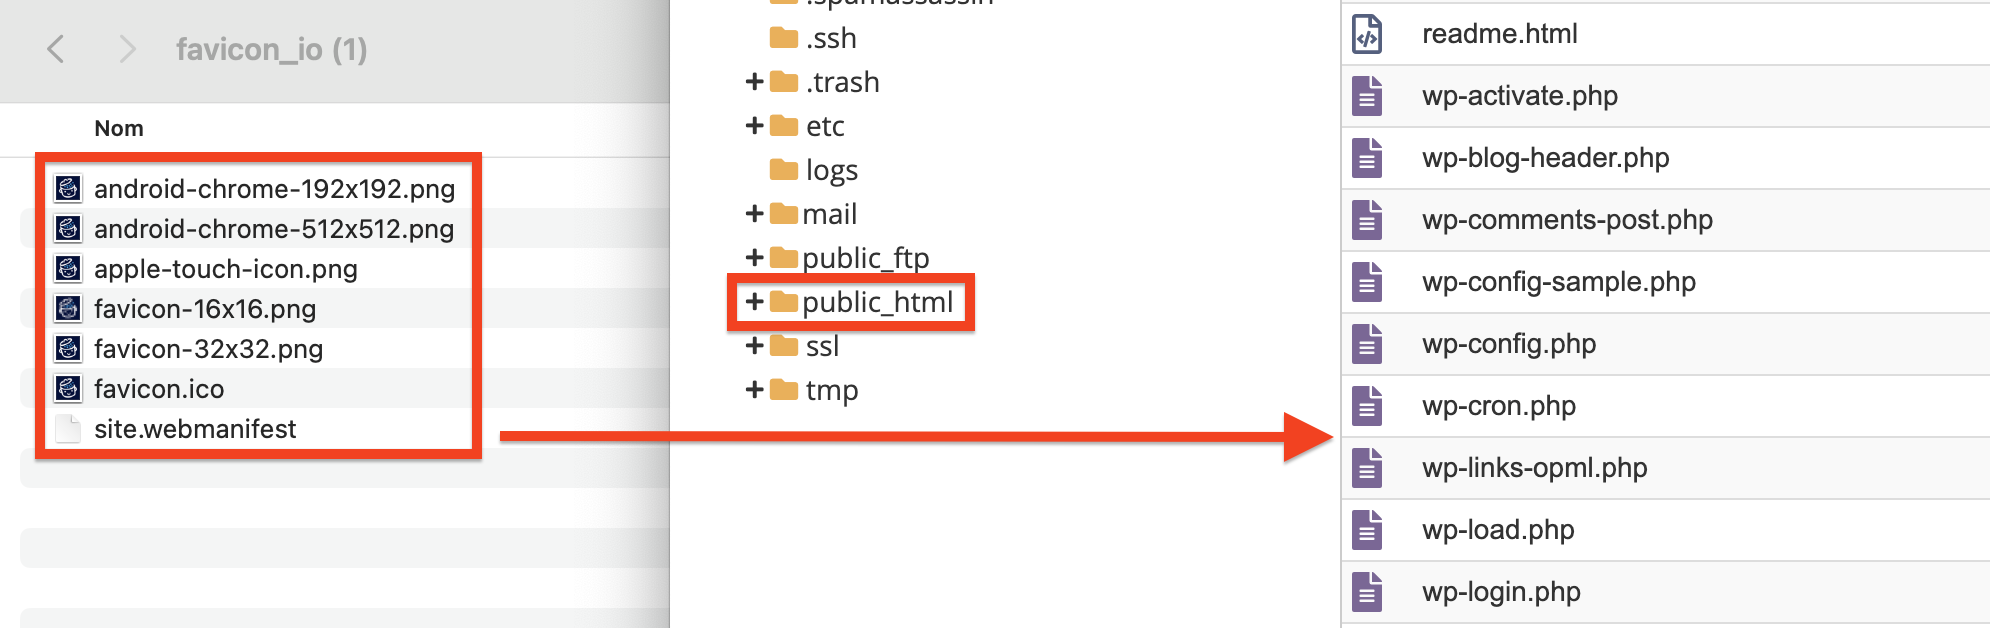
- Download the ZIP file. It contains all the necessary formats: ICO, PNG, Apple, and Android icons, as well as the webmanifest file (we’ve already seen this above 😉):

Note: For the last two steps, a quick backup of your site before adding code or editing FTP files won’t do any harm…
- Unzip the ZIP file, then add all the files to the root of your WordPress site via FTP. That is, in the same folder as wp-content and wp-admin. The root directory is usually called public_html.
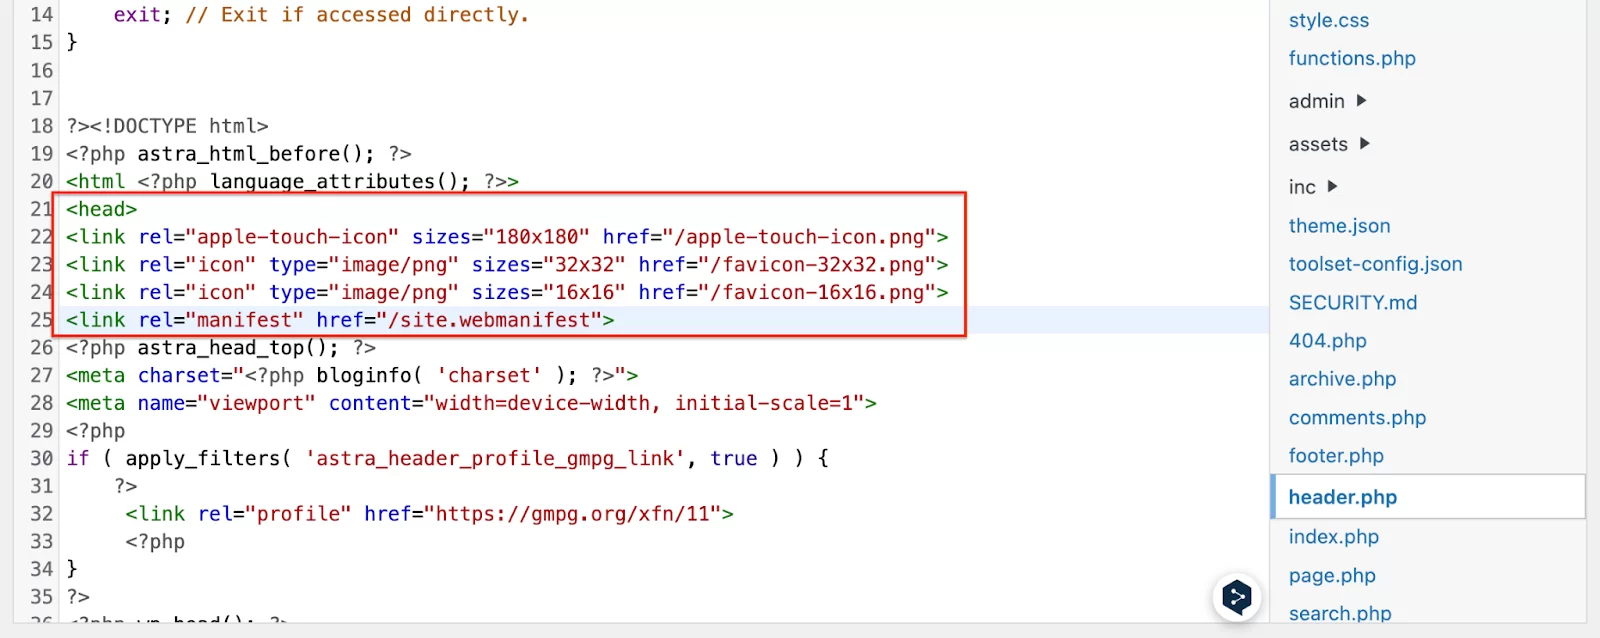
- Go back to your WordPress dashboard and open your header.php file via Appearance > File Editor > Header.php, and just before
</head>, add these code tags:
<link rel="apple-touch-icon" sizes="180x180" href="https://u9m4v4n3.delivery.rocketcdn.me/apple-touch-icon.png">
<link rel="icon" type="image/png" sizes="32x32" href="https://u9m4v4n3.delivery.rocketcdn.me/favicon-32x32.png">
<link rel="icon" type="image/png" sizes="16x16" href="https://u9m4v4n3.delivery.rocketcdn.me/favicon-16x16.png">
<link rel="manifest" href="https://u9m4v4n3.delivery.rocketcdn.me/site.webmanifest">
It should look something like this:
Advantages: You’re not dependent on a plugin, you retain total control, and your favicon is perfectly compatible with all devices (Android, Apple, desktop browsers, etc.).
Limits: You need to have a minimum command of code and be comfortable using FTP.
Level: Advanced / Experienced
Score on Favicon Checker:
It’s all green here too!
🎉 And there you have it, mission accomplished: You now know the three ways to add a favicon to WordPress! But if you’re still unsure which method is best for you, the next section should shed more light.
6 key questions for choosing your favicon strategy
Here’s a mini-guide to help you navigate between online generators, plugins, and a few lines of code.
1. Is your logo already suitable for a favicon (square format, symbol, initial)?
✅ Yes. Simply create a 512 x 512 px version (PNG format) and add it to your site.
❌ No. Ask a graphic designer (or create a simple adaption yourself with a letter, pictogram, or symbol). Keep your colors consistent with your corporate identity.
2. Do you want your displays to be perfectly consistent across all media?
✅ Yes. Use a complete favicon generator (such as Real Favicon Generator) that provides you with all the necessary formats.
❌ No. A simple integration via Settings > General > Site icon will be more than enough.
3. Are you comfortable adding HTML code or using FTP?
✅ Yes. You can manually add the code to your child theme’s header.php file, and send the favicon files (in the correct formats) via FTP.
❌ No. Opt for the no-code methods: Either via Settings > General > Site icon and you’re done, or using an all-in-one plugin that adds all the right sizes for you in header.php.
4. Are you just starting out with a personal blog?
Objective: A favicon that’s quick to create with letters or an icon and, above all, easy to install.
Solution: Use a free generator (such as Favicon.io or LogoFast) and upload a square PNG image, or create a simple square on Canva.
Integration: Opt for the no-code method: via Settings > General > Site Icon.
5. Do you manage an online business site with an average technical level?
Objective: A professional favicon, well integrated and, above all, without getting lost in the code.
Solution: Work with a graphic designer to create a variation of your logo and an optimized image.
Integration: Use a plugin like Real Favicon Generator, which creates all the sizes and displays them in the code for you.
6. Are you a developer or a design-oriented WordPress agency?
Objective: An impeccable brand image on all media (mobile, desktop, shortcuts, etc.).
Solution: Create a custom favicon with your graphic designer and ask your dev to upload the HTML code.
Integration: Via FTP + insertion of HTML code in the child theme’s header.php. You retain total control over appearance and compatibility.
Does this help you? Do you see yourself in these questions?
👉 Now it’s time to check that everything is working as planned. We don’t want to have done all this for nothing!
Check that your favicon works: The post-publication checklist
Once your favicon is online, you’ll need to do a little checking to make sure it’s displayed correctly everywhere. Here are two simple ways to do this with complete peace of mind.
Method 1: Manual testing (old-fashioned but effective)
Here’s a quick checklist for testing your favicon by hand, and don’t forget to bookmark your site, for example.
- On computer: Chrome, Firefox, Safari, Edge
- On mobile and tablet devices: iOS, Android
- In dark and light mode (some browsers change the background)
- By adding it to your favorites, tabs, home screen shortcuts, and so on
- By consulting your browsing history
- And finally… in Google search results! Yes, it should be there too.
Method 2: Use a dedicated tool (faster, more precise)
If you’d rather get straight to the point and check it all at once, I’d recommend a handy bonus tool: Real Favicon Checker.
It provides clear answers to questions we don’t necessarily think to ask ourselves:
- Is my favicon.ico file correct?
- Does my favicon display well on iOS? And the title too?
- Is it ready to appear in Google results?
The tool scans all this for you and suggests areas for improvement if necessary.
For example, here I’ve installed my favicon via the “Site icon” option on WordPress. Result: I discover that I’m missing a PNG file for the desktop shortcut, a title for the Apple shortcut, and the famous Web App Manifest.
Troubleshooting: Solving the most common bugs
Here are the most common problems, with simple solutions. This is usually more than enough to get things back on track.
Favicon not displayed at all
There are several solutions available to you:
- Clear your browser’s cache, and WordPress’s if you use a caching system.
- Forcibly refresh the page (Ctrl + F5 or Cmd + Shift + R).
- Check your favicon format: ideally ICO or PNG.
If necessary, convert your image with an online tool or favicon generator. - Use a tool like the Real Favicon Checker to quickly spot what’s blocking your work.
The favicon is blurred or misaligned
In most cases, this is due to the size of the file:
- Make sure your favicon measures 512 x 512 pixels, as recommended by WordPress. If it’s too small, it will be blurred on high-definition screens.
- Remember, if it’s not perfectly square, it’s likely to be off-center or cropped.
Favicon not displayed in Google results
Not necessarily a bug, but rather a question of criteria:
- Google uses its own rules for displaying a favicon in search results.
- Check that your favicon URL is properly structured and declared in the site code.
- The image must be in the right format, accessible and valid.
- The display may take a little time: patience, patience, it may take a few hours or even a few days.
Conclusion: the little icon that makes all the difference
I hope that the favicon is no longer just a detail for you, but that it means a lot (you’ve got it, I hope 😉 ).
This little visual reinforces your brand’s image, gives your site a more professional look, and helps your visitors find you easily.
Take care in its creation: the right format, the right size, visual consistency across all media.
Choose the method that suits you best: via WordPress, with a plugin, or manually.
And once online, test everywhere to make sure everything displays correctly on iPhone, Android, and the web in general.
What about you? Does a site without a favicon disturb you too?
Do you rely on that little logo to help you find your way around the web every day? Let us know in the comments section!

Receive the next posts for free and access exclusive resources. More than 20,000 people have done it, why not you?

Continue reading
Articles posted in WordPress TutorialsHow to update the PHP version of your WordPress site
What comes to mind when you think of WordPress speed and security? Your favorite plugins, perhaps? You should also think about… PHP! If you’re looking for a site that loads fast, while offering a solid shield against hacker attacks, there’s a…
How to create an effective HubSpot conversion funnel on WordPress (complete guide)
In the drawers of a kitchen, there are often two very useful utensils lying around. The first is the colander. And to illustrate, some WordPress sites unfortunately resemble it. Why? Well, because visitors arrive on the site in question… then…
How to fix the ERR_CONNECTION_REFUSED error: A complete guide
Does your browser display the ERR_CONNECTION_REFUSED message when you try to access a website? This error means that the target server – or your own configuration – is actively rejecting the connection request, leaving you at a dead end. But…