Yum, yum, yum. With their little chocolate chips and tasty dough, they’re a real treat. Chewy or crunchy, we love cookies.

There are cookies you can eat… and then there are the ones you use on your WordPress site. To enjoy some of them, there are strict rules to follow.
In particular, your visitors must give their consent. And making your site compliant in this area isn’t always a piece of cake. In fact, it’s often quite a headache!
Fortunately, there are solutions that make everything easier. One of them is called Cookiebot.
In this article, we’re going to take you deep inside this tool. In particular, we’ll show you how it can help you set up a compliant cookie consent banner on your WordPress site.
This article is sponsored. Some links to Cookiebot by Usercentrics are affiliate links. If you purchase one of these licenses, WPMarmite will receive a commission. Thanks to affiliation, WPMarmite is able to remunerate the research and writing work of the blog’s editors. But we remain impartial. If a product isn’t worth it, we’ll say so (or we don’t share about it).
What is Cookiebot?

Cookiebot is a cookie consent management platform that enables you to comply with international data privacy regulations (ex. GDPR).
In particular, the tool allows you to easily add and customize a cookie consent banner on your WordPress site. Owned by Usercentrics, Cookiebot CMP (Consent Management Platform) was launched in 2012. It is a pioneer in this sector and one of its historic players.
Cookiebot by Usercentrics even presents itself as “the most reliable cookie consent solution on the market.”
Several statistical data highlighted on its official website testify to its popularity and massive adoption by users:
- 600,000 solution customers to date
- Use on 2.3 million websites and applications
- 7 billion user consents per month
- Translated into 47 languages
What are cookies and what do they do?
It’s probably not lost on you that Cookiebot contains the word cookie. Cookies are a central concept that are very important to understand in order to grasp the usefulness of Cookiebot CMP. Let’s take a closer look.
Cookies — not the crunchy kind — what exactly are they?
Google offers a clear and concise definition. They are “small pieces of text sent to your browser by a website you visit.”
They enable memorization of information about the surfer and his or her behavior in order to implement — among other things — more precise and targeted marketing during future web browsing.
Cookiebot indicates that there are several main categories of cookies:
- Essential cookies
- Performance or statistics cookies
- Preference cookies
- Marketing targeting cookies
The use of most cookies is strictly regulated. This means that users must give their prior consent (agreement = opt-in; or refusal = opt-out) before cookies can be used to collect their data.
This is particularly the case in the European Union, with the GDPR and ePrivacy Directive, but other countries and some US states regulate cookies as well.
What is Cookiebot’s role in cookie management?
To manage all this, Cookiebot CMP comes into play. In technical terms, here’s how it works in the background:
- It connects to your site.
- It automatically scans for all cookies and trackers.
- It categorizes them for you.
- Finally, it generates a consent banner that allows your visitors to choose which types of cookies they accept or reject.
It’s an all-in-one solution that combines simplicity and data protection compliance for your WordPress site.
With Cookiebot, your users receive clear and transparent information about the types of data that will be collected, how it will be used, and with whom it will be shared.
And in the event of an audit by a data protection authority, you can rest easy.
Cookiebot records every consent and every modification, thus constituting indisputable legal proof.
As part of the GDPR, you must obtain an internet user’s consent before depositing cookies linked to advertising-related operations, social network cookies generated by share buttons, and certain audience measurement cookies.
While Cookiebot by Usercentrics helps you comply with this regulatory framework, don’t forget that full compliance with privacy regulations extends beyond the simple use of CMP software.

What are Cookiebot’s main features and benefits?
Cookiebot doesn’t just display a banner on your WordPress site. It’s a robust solution with a wide range of options.
Automatic analysis, management, and blocking of cookies
Thanks to a patented technology, Cookiebot scans your site every month to automatically detect all cookies and trackers present, even those added by third-party scripts.
The tool then classifies cookies and trackers into categories:
- Essential
- Preferences
- Statistics
- Marketing
An automatic block is then set up until users give their explicit consent.
If required, you can even schedule an on-demand cookie analysis to regularly update all cookies and trackers mentioned in your banner and cookie declaration.
In parallel, Cookiebot allows you to automate your cookie declaration with descriptions of each cookie and tracker used on your WP site.
A 100% customizable consent banner with Cookiebot
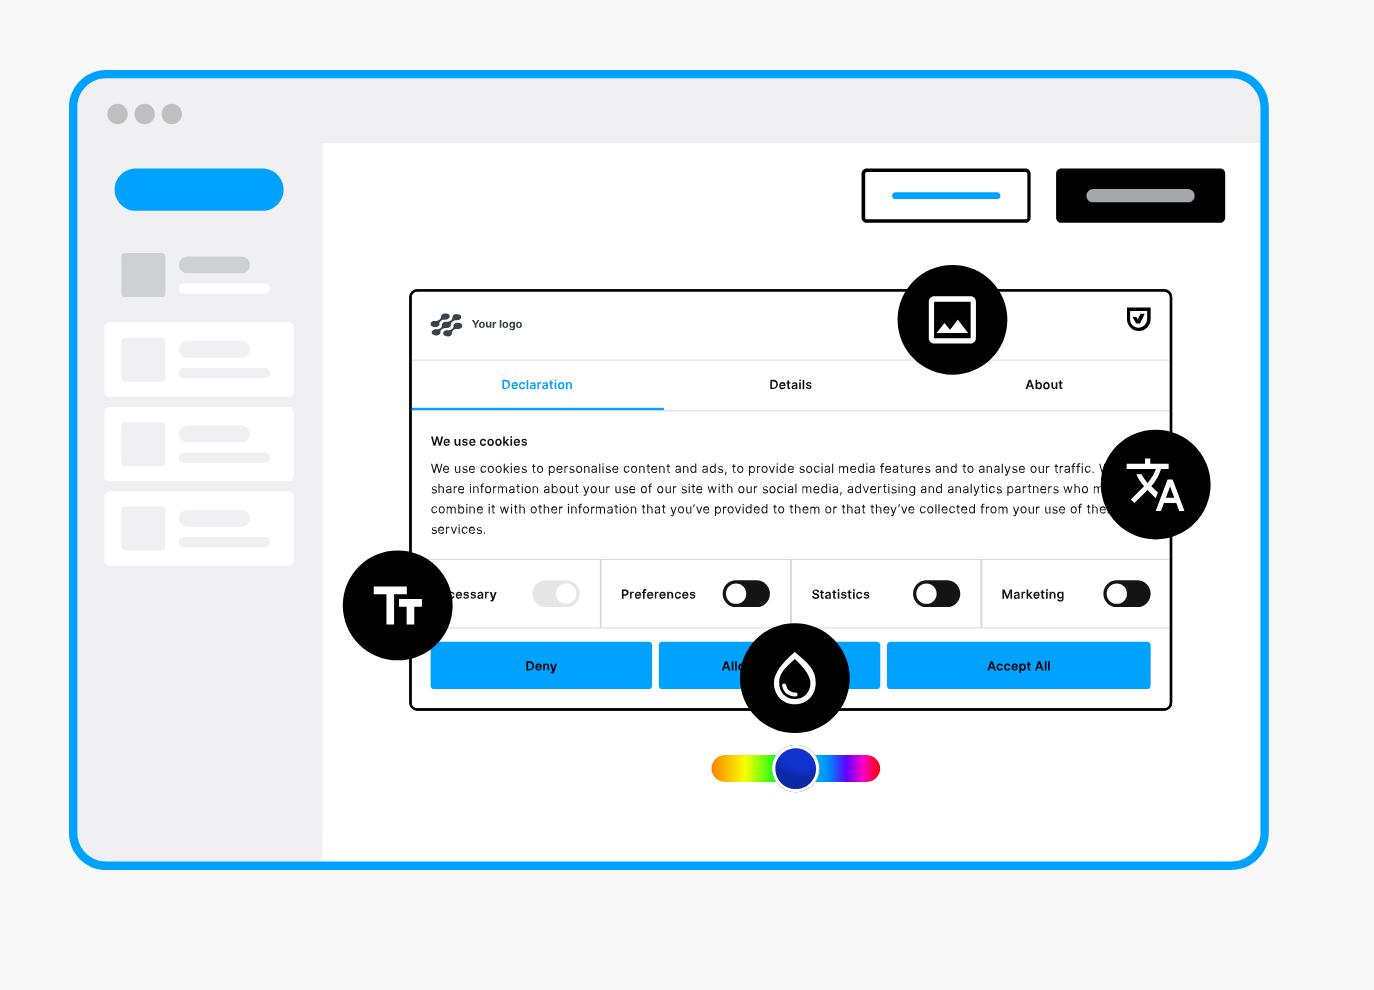
The problem with many consent management solutions is that you don’t always have control over the appearance of the consent banner.
And let’s face it: they’re often pretty ugly and don’t fit in with your WordPress style guide.
Cookiebot CMP gives you peace of mind. The tool stands out for its highly customizable aspect. We’ll come back to this in more detail in a later section, but as a preview, know that you’ll have complete control over a number of aspects, including:
- Banner design
- Contents of the banner
- Its location on your site
- The multilingual aspect, with translation available in 47 languages
To make life even easier and save time, they also offer pre-designed banner templates.
And if you’re feeling like a coder, you can even create custom banners via HTML, CSS, and JavaScript.
Optimal user experience
Cookiebot’s advantages also include its ease of use. The tool requires no technical knowledge to use. It’s suitable for all types of WordPress users, including beginners.
Simple and intuitive, Cookiebot CMP automatically tracks, classifies, and blocks cookies, and automatically updates itself in line with regulatory changes.
After installation and initial configuration, maintenance is minimal thanks to automated updates.
Usercentrics’s consent management solution takes care of your WordPress site’s privacy compliance.
Compliance with the most stringent regulations
Thanks to Cookiebot by Usercentrics, you can of course comply with the following regulations and legislative frameworks (non-exhaustive list):
- GDPR (European Union)
- ePrivacy (European Union)
- Digital Market Regulation (DMA, European Union)
- IAB Transparency and Consent Framework (TCF) (European Union)
- CPRA/CCPA (California)
- Brazilian General Personal Data Protection Act (LGPD)
In addition, Cookiebot immediately supports Google’s Consent Mode and Microsoft’s UET Consent Mode to automatically adjust the operation of Google and Microsoft tags according to users’ explicit consent decisions.
Secure storage and tracking of consent
To prove your good faith in the event of an GDPR audit, Cookiebot has the answer. Usercentrics’s consent management platform generates compliance reports that you can archive.
Consent is stored for a maximum of 12 months in a secure cloud environment on servers located in Europe.
All consent records are available for auditing purposes or for data subject access requests, and can be exported in CSV format if required. And for a clear overview of your cookie management, you have access to an analytical dashboard with opt-in/opt-out statistics.

Cookiebot integrations with third-party tools
Last but not least, Cookiebot integrates seamlessly and flexibly with various third-party tools such as Google Tag Manager and Google Analytics.
Not to mention that they’re compatible with a wide range of CMS (Content Management Systems) such as Shopify, Wix, Magento, Drupal, and of course, WordPress.
By the way, integration with WP takes just a few clicks, thanks to a dedicated plugin. We’ll explain it all in the next section, so don’t go anywhere.
How to install Cookiebot on your WordPress site
Now that you’ve mastered all the intricacies of cookies and have a comprehensive overview of Cookiebot’s functionality, it’s time to get down to business.
If you want to display a nice consent banner on your site, you’re going to have to get your hands dirty. The easiest way is to use a dedicated WordPress plugin. Keep reading to find out how.
If you don’t want to use a plugin, you can also add a Cookiebot consent banner manually, using code. The procedure is detailed in this resource.
Step 1: Create an account on the Cookiebot website
To get started, visit the official Cookiebot website to create an account. At the top left of the screen, click on the “Start free” button:
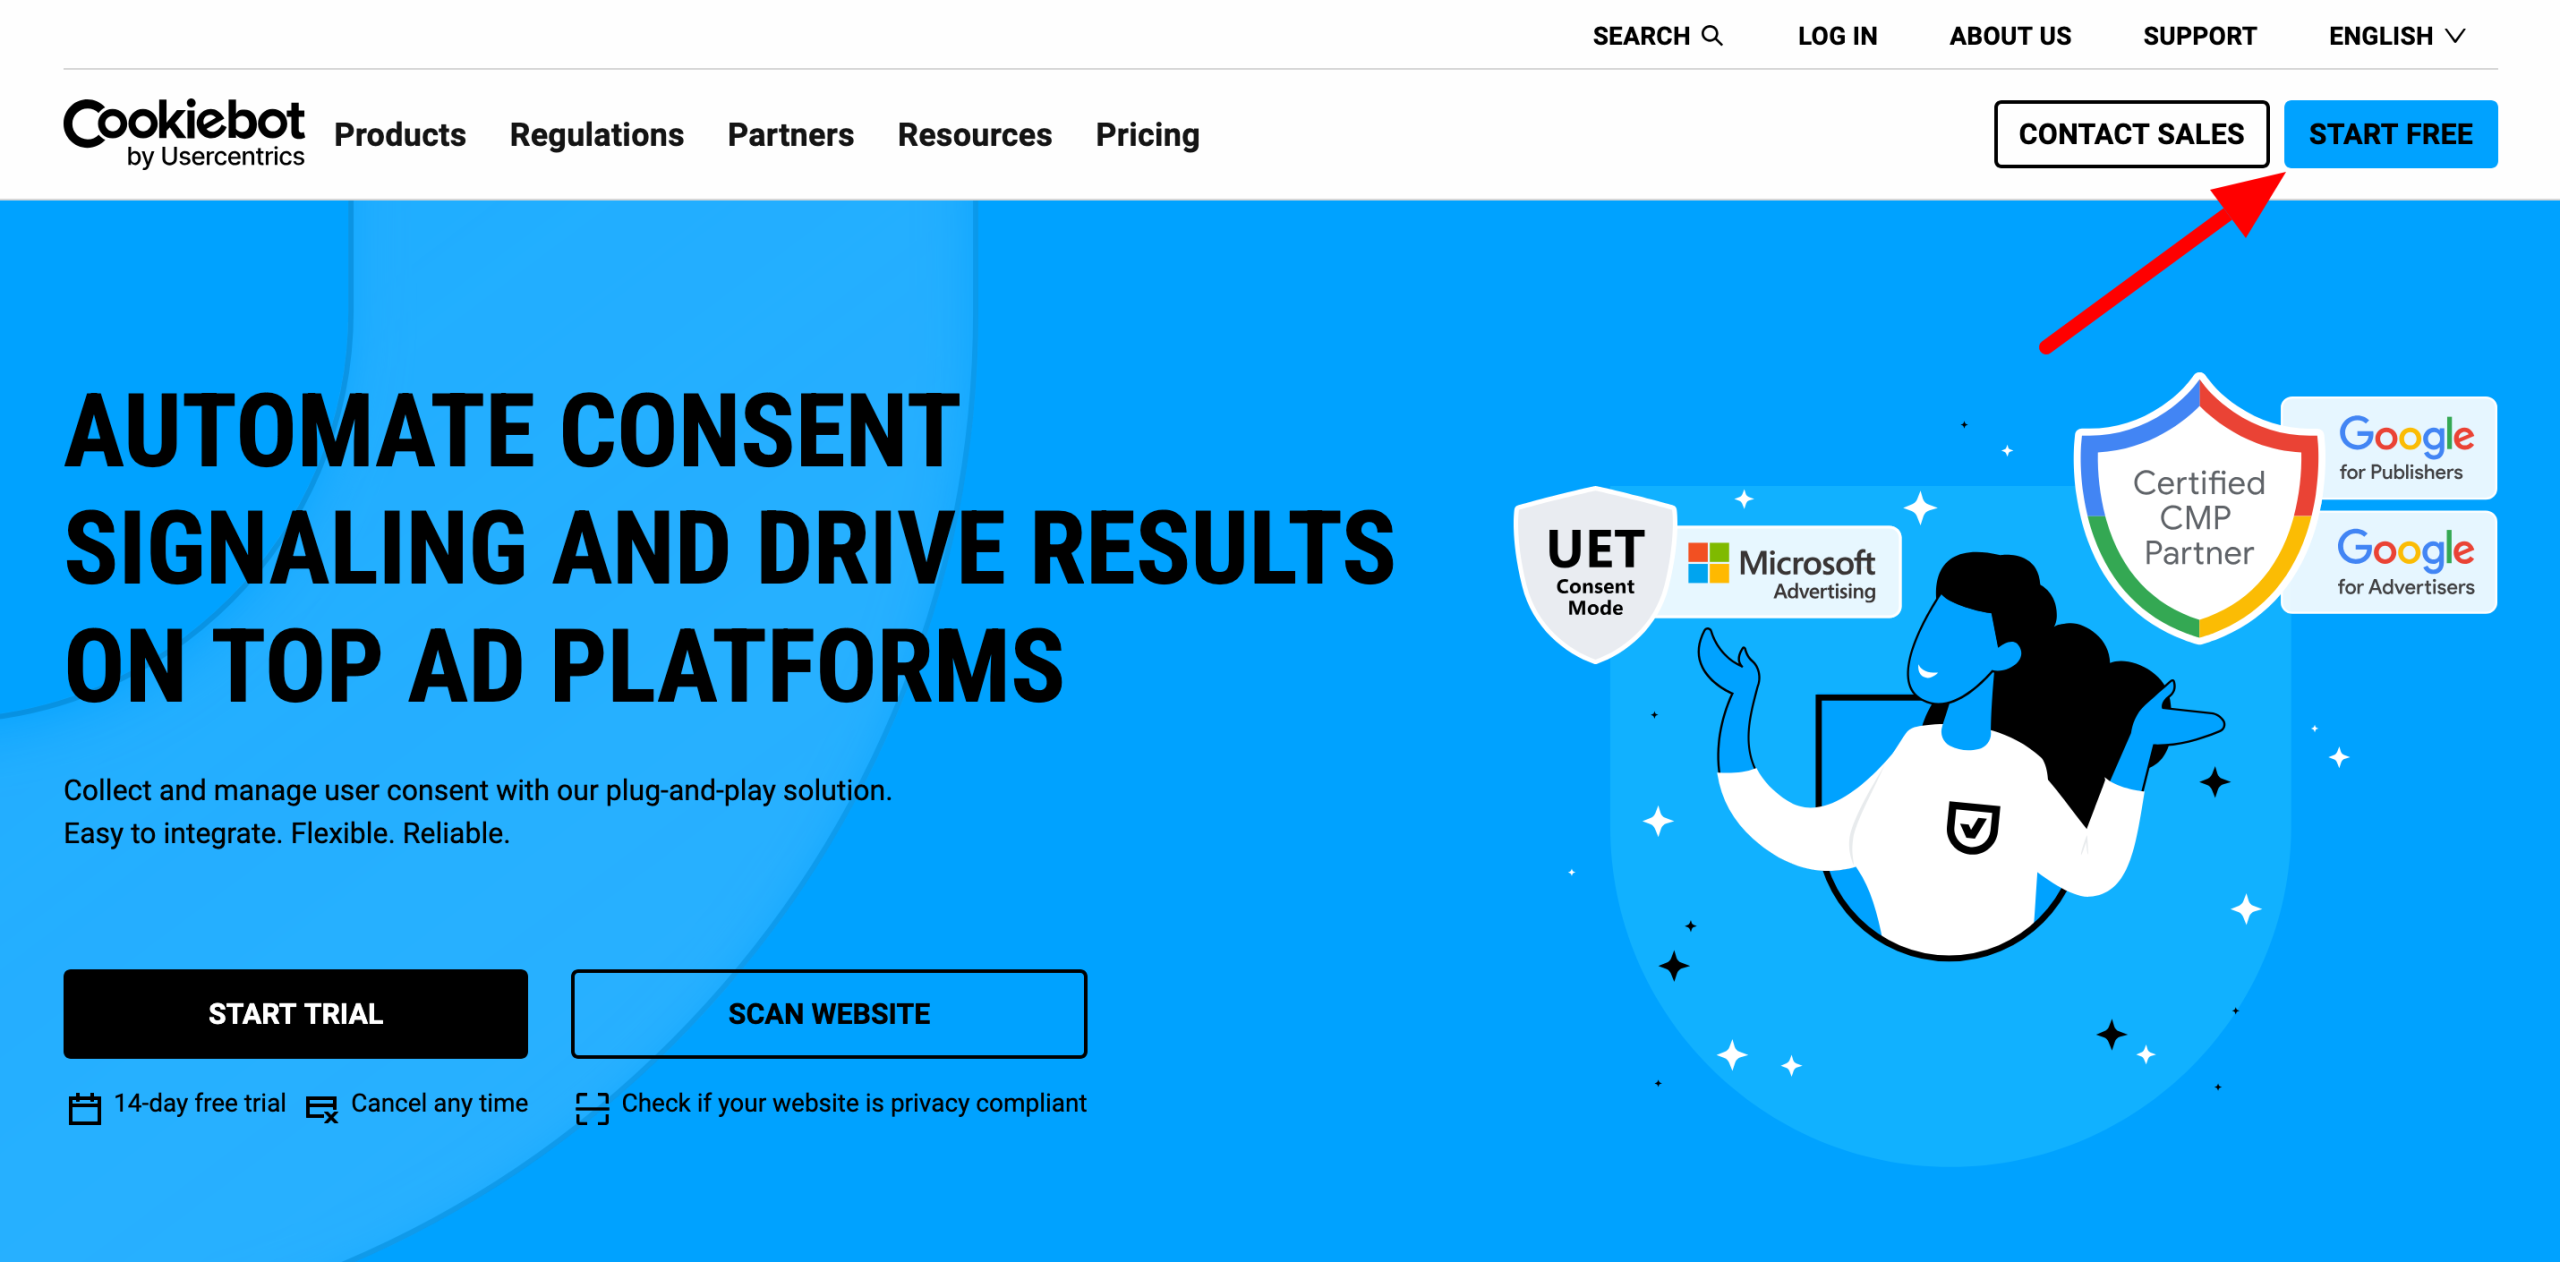
A free 14-day trial allows you to test the product without credit card or commitment.
You can create an account easily by registering an email address and password, or by using a Google or Microsoft account.
When this is done, you will land on the Usercentrics consent management platform dashboard:

Step 2: Add your domain name to your Cookiebot account
Without further ado, let’s move on to step 2. Continue by adding your domain name (e.g. wpmarmite.com) to your Cookiebot dashboard.
To do this, go to the “Domains & Aliases” menu, then click on the “Add domain” link in the “Add your first domain” box:
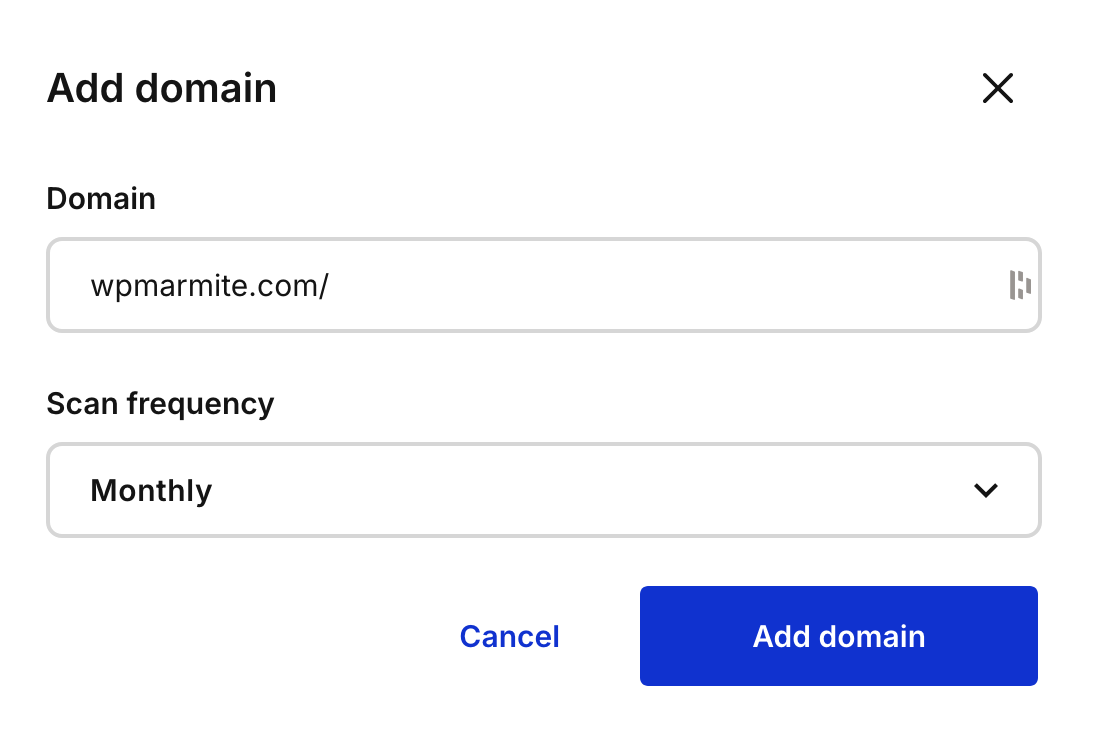
The tool will then trigger a scan of your site, which should be completed within 24 hours. The results will be available in the “Cookies & Reports” menu, for your information.
Step 3: Install Cookiebot on WordPress
Thirdly, log into your WordPress administration interface to activate the Cookiebot plugin. To do so, go to Plugins > Add plugins.
In the search bar, type “Cookiebot,” then install and activate the plugin called “Usercentrics Cookiebot — Automatic Cookie Banner for GDPR/CCPA & Google Consent Mode”:

Step 4: Connect WordPress to your Cookiebot account
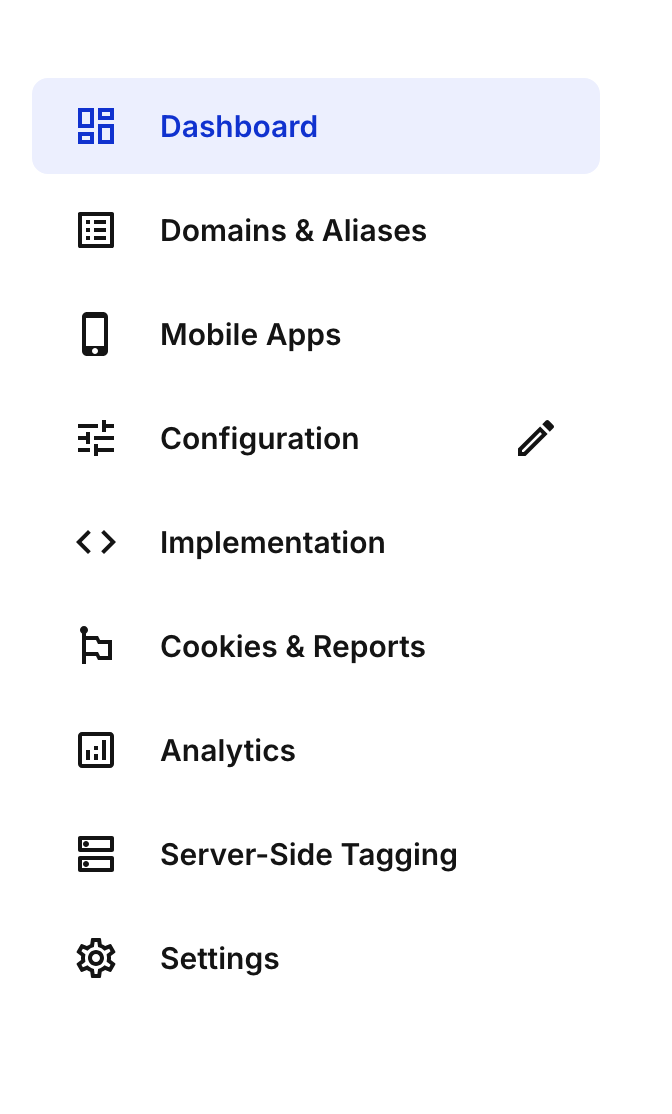
To complete the installation process, simply connect your WP site to your Cookiebot account.
On your Usercentrics dashboard, click on the “Implementation” menu.
In the “CMP Banner” tab, copy the series of numbers corresponding to the name “Domain Group ID”:

All making sense so far? Then head to your WordPress dashboard, in the Settings > Configure Settings.
In the “Parameter ID or Domain Group ID” box, paste the code you’ve just copied:

If all goes well, your consent banner will now be displayed on your site:

If you would like a summary of the steps described above, watch this video:
How to configure your cookie banner on your WordPress site
Your consent banner is now active on your site. It’s a nice first step, but don’t stop now: you’ve still got some work to do.
As it stands, the banner is displayed:
- In English (the default language)
- With predefined colors that don’t necessarily match your brand image
- In an imposing dialog box in the middle of your screen
So now it’s time to personalize it all.
Customize the consent banner
First of all, you can modify the design and visual appearance of the banner. For basic customization, you need to go to your “Cookiebot by Usercentrics” interface, in the “Configuration” menu.
There are three main tabs at the top of the page: Design, Content, and Privacy.
In the “Design” tab, you can first modify:
- The layout and style of your banner
- Its design, with the option of adding a logo and changing the style of the buttons
- Compliance, including the choice of consent method (explicit or implicit)

As for the “Content” tab, this is where you choose your default language and can customize all the messages in your consent banner (they offer default text, rest assured).

The “Privacy” tab allows you to customize the window so that your users can easily check or update their consent.
In particular, you can control the colors and the position of the little icon (left or right, top or bottom):

And of course, let’s not forget the “Legislation presets,” which allow you to ensure compliance with certain regulations (ex. GDPR) for your domain name.

If required, you can also take advantage of the interface’s other menus to make other settings and access analytical and cookie reports, for example.
In the end, it’s up to you what settings you want to make, but here’s an example of what you might end up with:

If you use your global Usercentrics account, you can access even more advanced settings. On the other hand, the interface is much more extensive and can be a little confusing. Consider it if you find that the settings are too limited on your “classic” Cookiebot by Usercentrics account.
What settings do I need on the WordPress interface?
Speaking of settings, you also have access to additional options on your WordPress dashboard now.
Go to Cookiebot > Settings to find out more. Here you’ll find 6 tabs:
- General settings: to select your language and choose your cookie blocking mode (automatic or manual)
- Additional settings: allows you to display or hide your consent banner on your site with a single click
- Google Tag Manager: To connect your Google Tag Manager account to Cookiebot. In particular, this ensures that scripts load in the correct order and use the correct parameters you have specified.
- Google Consent Mode: To enable/disable this mode (active by default). This mode provides a way for your website to measure conversions and obtain analytics data while being fully GDPR compliant when using services such as Google Analytics, Google Tag Manager (GTM), and Google Ads.
- TCF: if you wish to use the IAB TCF v2.0 framework on your consent management platform
- Multiple configurations: if you want to add a second banner or alternative configuration to your website by creating a second domain group and defining it for a region

What are the alternatives to Cookiebot?
Although Cookiebot is a very powerful solution, other alternatives exist on the WordPress plugin market. These include:
Each of these solutions has its strengths and limitations. The right choice will depend on the level of personalization you want, your budget, and the type of site you manage.
However, they don’t offer the same advanced personalization and consent management options as Cookiebot.

How much does Cookiebot cost?
After mentioning a few competing solutions, let’s return to Cookiebot to discuss its price, an often decisive factor in the choice of a tool.
Cookiebot offers a pricing structure based on the number of pages on your WordPress site, as well as the number of domains on which you wish to activate the tool.
Remember to check how many pages your WordPress site actually has (via an XML sitemap, for example) before choosing a particular license.
First of all, there’s a free plan with limited functionality: you can use it on one domain only, containing up to 50 subpages.
Not enough for you? You’ll have to upgrade to a premium license, of which there are five at the time of writing:
- Premium Lite: From $8/month for a domain with up to 50 subpages
- Premium Small: From $16/month for four or more domains with up to 350 subpages
- Premium Medium: $35/month per domain with up to 3,500 subpages
- Premium Large: $56/month per domain with up to 7,000 subpages
- Premium Extra Large: $96/month per domain with over 7000 subpages

Each license includes all Cookiebot premium features (banner personalization, cookie and tracker management, integrations, analyses and reports, etc.).
As a reminder, Cookiebot offers a 14-day free trial as soon as you create an account with them. During the trial period, you have access to all Cookiebot CMP Premium features.
Our final review of Cookiebot
You’ve reached the end of this Cookiebot presentation. Before we close up shop, it’s time to recap what we liked and didn’t like about it, as well as our opinion of Cookiebot.
At Cookiebot, we loved:
- Simple installation via the Usercentrics Cookiebot plugin
- Automatically block cookies until your visitors give their consent
- Full analysis and monthly update to identify the cookies and tracking technologies you use
- Fine-tuning your consent banner
- The multilingual aspect of the tool
- Compliance with major international regulations
- The free plan
What we didn’t like as much:
- The price, which can rise quickly for large sites
- Settings scattered between your WordPress administration interface and your Cookiebot customer account
What does WPMarmite think?
Having examined its features, installation, and costs, what do we think of Cookiebot?
At WPMarmite, we believe that Cookiebot is one of the best solutions on the market for managing cookie consent on WordPress.
Its relative ease of use, automatic scanning, and legal compliance make it a solid choice for beginners and experienced webmasters alike.
If you have a small site (less than 50 pages), the free version will suffice to get you up and running.
If your site is larger, investing in a premium plan is well worth it, as it saves you hours of manual labor and protects you from the legal risks incurred if you don’t implement a consent management policy that complies with current regulations.
Want to give it a try? Visit Cookiebot’s official website to start familiarizing yourself with its interface and functions:

Receive the next posts for free and access exclusive resources. More than 20,000 people have done it, why not you?

Continue reading
Articles posted in WordPress PluginsOur review of B2BKing: A WooCommerce plugin built for B2B commerce
“Hi, I need 200 units of this product with fast shipping please”. As an online store owner, receiving this kind of message puts a smile on your face. Answering it, on the other hand, becomes a lot less fun… Basically,…
GTranslate on WordPress: our full review of this tool for creating a multilingual site
“Hello, how are you?” “What do you think of this computer mouse?” For you, everything is easy to understand in these two sentences. For someone living deep in the Shetland Islands or Yucatán, it’s probably a bit more complicated… If…
Air WP Sync: Test and review of this plugin for integrating Airtable into WordPress
Do you use Airtable and WordPress? Then some of your days probably look something like this. In the morning, you update your Airtable database as soon as something changes. In the afternoon, you copy and paste the same data into…