
What comes to mind when you think of WordPress speed and security? Your favorite plugins, perhaps? You should also think about… PHP! If you’re looking for a site that loads fast, while offering a solid shield against hacker attacks, there’s a…
What’s a tag for you? Cause it makes me think about things like:
“Brandon + Kelly for life.” Or “1998 represents”. Or “WPMarmite, I love you.”
In short, personalized messages that you discover while walking in the street (yes, there are rebels who tag WPMarmite).

But it’s not this kind of tags that I’d like to talk about today.
You’re not here to talk about Street Art, I guess. So let’s just stick to marketing, since that’s what this is all about.
Today’s post will be about how to use Google Tag Manager on WordPress.
I warn you: this is a technical topic. But you know WPMarmite: we’ve done our best to keep the jargon to a minimum, and to make this complete guide accessible to beginners.
Alright, here’s my paint spray to draw an overview that doesn’t stain. Spriiitz, spriiitz, spriiitz…
Overview
- Google Tag Manager, let’s make introductions
- Why use Google Tag Manager?
- How to install Google Tag Manager on WordPress with a plugin?
- How to install Google Tag Manager on WordPress without a plugin?
- How to use Google Tag Manager?
- How to add a tag: detailed tutorial
- What about the privacy of your data?
- Google Tag Manager, for whom?
- Conclusion on Google Tag Manager and WordPress
You will come across affiliate links in this post. That means WPMarmite will get a commission if you purchase a product or a service through these links. This is a way to reward the research and writing work of the editors. However, it does not prevent us from being impartial so if we don’t like something, we’ll let you know for sure!
Google Tag Manager, let’s make introductions
Google Tag Manager, what’s that?
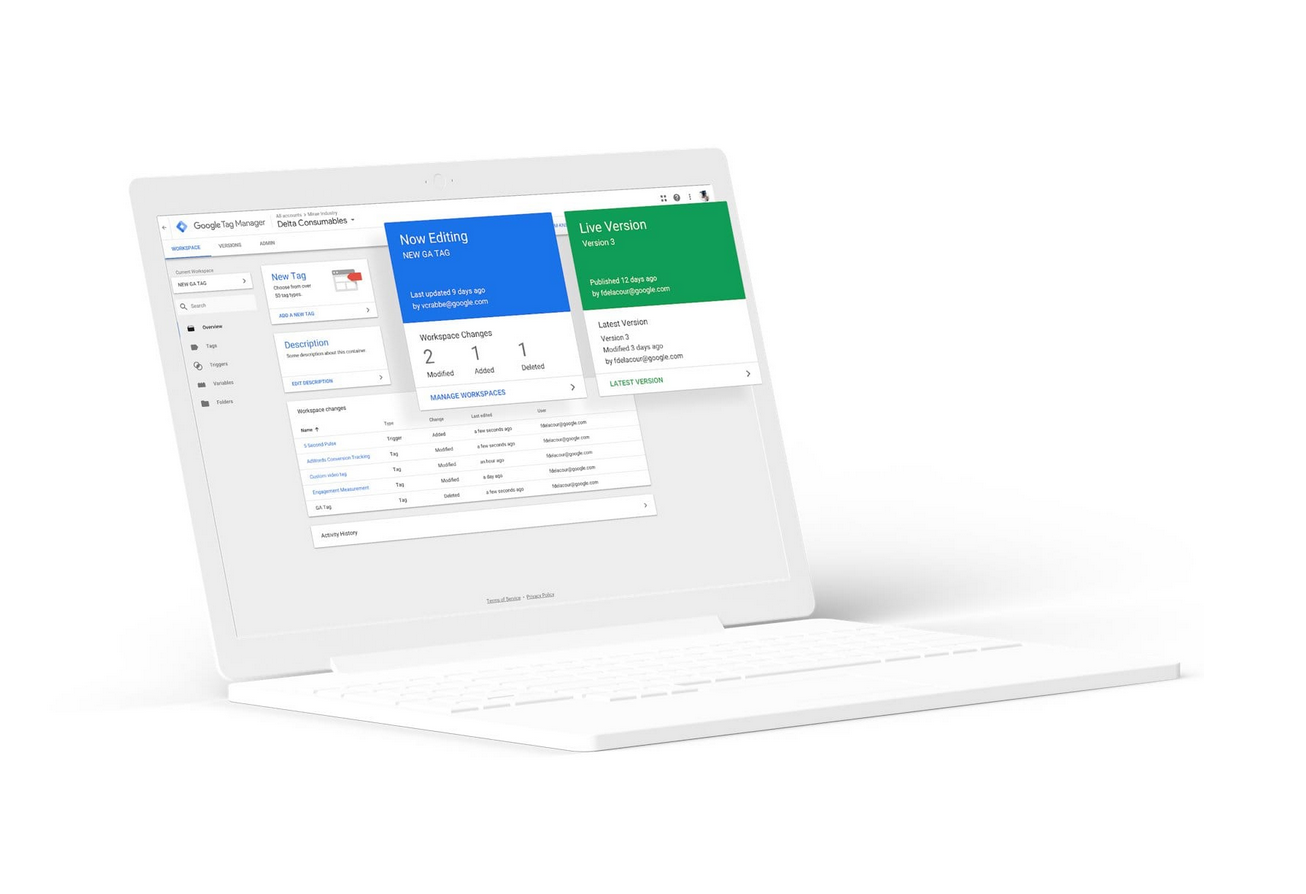
Google Tag Manager (GTM) is a free tag management system designed by Google.
From a single user interface, this tool allows you to add ready-to-use tags on your website, without touching the code.
The purpose of these tags is to collect analytical data, to measure and improve the effectiveness of your marketing actions.
Huh, but what is this gibberish? Maybe that’s the question you just asked yourself as you read these lines.
Don’t worry! To get a clearer picture, let’s first dissect the marketing term, tag, which is our core topic of the day.
What is a tag?
A tag is a piece of code – most often JavaScript or HTML – that you add to your website in order to collect certain information, especially about the behavior of your visitors.
This piece of code – also known as snippet – then sends the information it processes to a third party tool. This tool gives you back the data collected in a precise way, classifying it according to different indicators.
Among the famous tags, I could mention:
- The tracking code Google Analytics: once added in the source code of your website, you can access your traffic statistics from your Google Analytics account.
- The facebook pixel.
Visually, a tag looks like this:
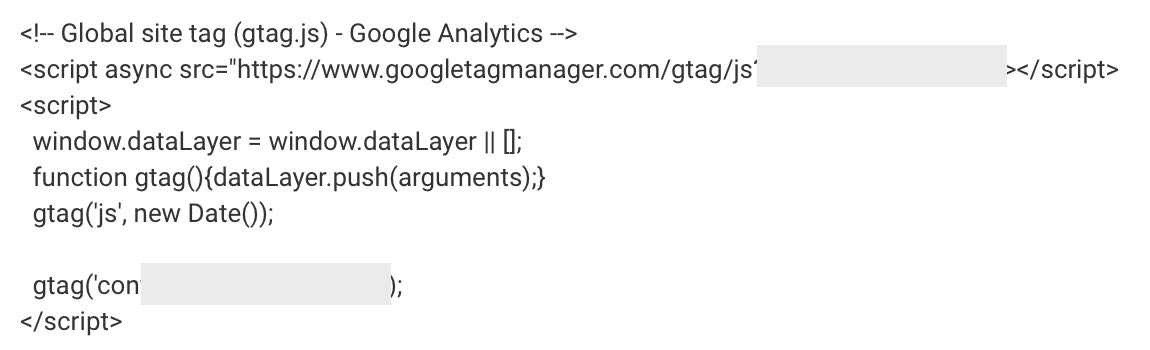
Thanks to a tag, you can access the following information:
- The number of clicks on a newsletter subscription button
- The number of times a PDF has been downloaded.
- The number of clicks on an add to cart button.
- The time spent on a page etc.
From a marketing point of view, this is very interesting. It allows you to know precisely who does what on your website, and to adjust your strategy accordingly.
Why use Google Tag Manager?
Because it’s fast and efficient
OKAY. This is great but what’s up with Google Tag Manager, then?
To understand this, let’s continue with our famous tags. If you want to use several of them, the installation process may be quite long, tedious and technical.
Imagine the thing. On a beautiful spring day, a sudden urge to add the Facebook pixel, the GA tracking code, and the Google Ads (formerly Adwords) tracking code take hold of you.
Good luck! Each time, you’re going to have to add the code for the relevant tracking tag – or include it in a dedicated plugin, if one exists – on your WordPress website.
While multiplying back and forth trips between the different platforms… For example, for the Facebook pixel, you will need to get the relevant piece of code from your Facebook page, then go to WordPress to add it.
And repeat it for each tracking code you’re interested in.

Google Tag Manager simplifies the whole process. Using GTM, you only have to add two pieces of code to your website ONE time, when you install the tag management system.
This manipulation allows you to link the Google platform to WordPress, and can be done through a plugin, as I will detail later.
Because there is no need to touch the code
Then everything is centralized by GTM. You can add, modify and delete your tracking tags from the same interface, without touching a single line of code.
To make things simple, Google Tag Manager takes care of adding the tags to your site for you, thanks to an automated system. And that, for a beginner, is pretty good, right? No need to call a developer anymore!
In total, GTM is compatible with about fifty tags, whether they are home-made (e.g. Google Analytics, Google Ads, Google Optimize etc.), or from third-party solutions (e.g. Adobe Analytics, Clicky, HotJar, LinkedIn etc.).
And you can even add your own custom tags, if you can touch a bit of your WordPress development.
Because Google Tag Manager is a complementary tool to Google Analytics
We often tend to confuse them because they are two free tools made in Google.
But in reality, what is the difference between Google Tag Manager and Google Analytics?
You have to understand that they have nothing in common. To sum up in a few lines:
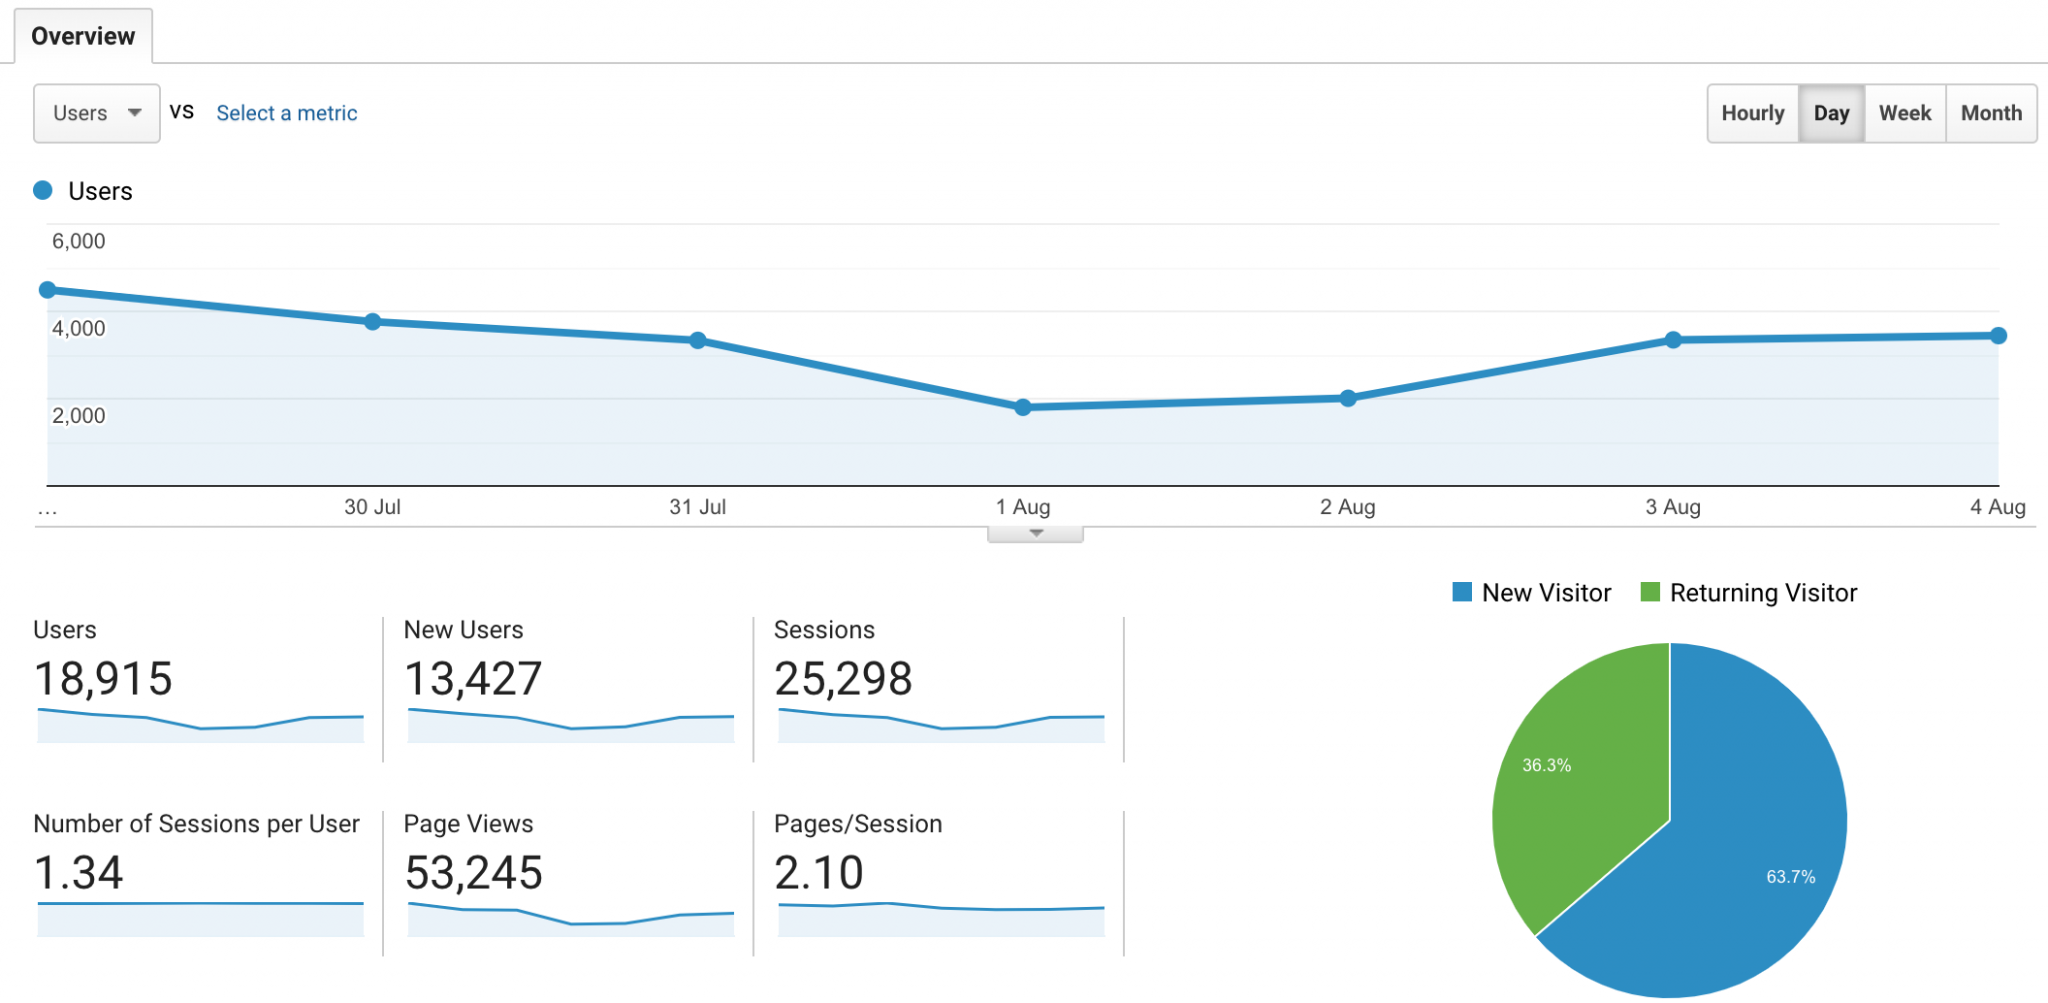
- Google Analytics allows you to consult data relating to traffic on your website, most of which can be accessed via Dashboards. You therefore have access to statistics (bounce rate, number of page views, etc.).
- Google Tag Manager does not provide access to encrypted data. It is not an analytical tool. It just allows you to quickly add tags from third-party tools to your WordPress website without touching the code, from a single interface.
However, these two tools can work hand in hand. Let me explain. For example, Google Analytics allows you to set your own conversion targets to find out if your visitors are doing specific actions you want them to do (e.g. number of clicks on a button to download a PDF).
Except that, technically, this requires a minimum of knowledge and, most importantly, you will have to add code in your pages for each purpose, and manage it.
For its part, GTM allows you to do the same thing – and even more precisely – but without coding. And if you want, you can even find all the information collected by your tags on… Google Analytics.
In this case, GTM acts as a kind of intermediary: it dispatches the information collected on your website (the sender) to Google Analytics (the receiver).
I hope you’re still following! 😉
By the way, in case you want to know how to install Google Analytics on WordPress. You’re welcome! 😉
Because you preserve the loading time of your pages
We end with a last advantage of Google Tag Manager: it allows you to preserve the loading time of your pages.
By default, tags created with GTM load asynchronously, i.e. in parallel, without blocking the page load.
The loading speed of your website is one of the many criteria that Google uses to position a page in its search engine. If you are interested, this resource explains how to optimize a WordPress website without breaking the bank.
After this theoretical vision of Google Tag Manager, let’s move on to case studies. To begin, you will learn how to create a GTM account. A necessary pre-requisite before installing Google Tag Manager on WordPress.
For your information, there are two solutions: Google Tag Manager for free, which is the only one we talk about in this post and which is more than enough to start. The paid solution (Tag Manager 360) is dedicated to large companies.

How to install Google Tag Manager on WordPress with a plugin?
Step 1: Creating a Google Tag Manager account
To get started, go to the Google Marketing Platform to create a Tag Manager account. Click on the blue Start for free button.
It is necessary to have a Google account to use Google Tag Manager. If you have a Gmail account, for example, that will work.

You will be redirected to a page where you can create your account. You will be asked to fill in several fields in a Google Tag Manager form :
- Account name: For example, enter the name of your company.
- Country: Where do you live? Ok then put that in there.
- Container name: Fill in the web address of your website. For your information, the container is a piece of code that will contain all the tags that you will have created afterwards with GTM.
- Target platform: This is the platform on which the tags will be added. For a WordPress website, choose Web. Note that you can also use GTM on mobile applications (iOS and Android).
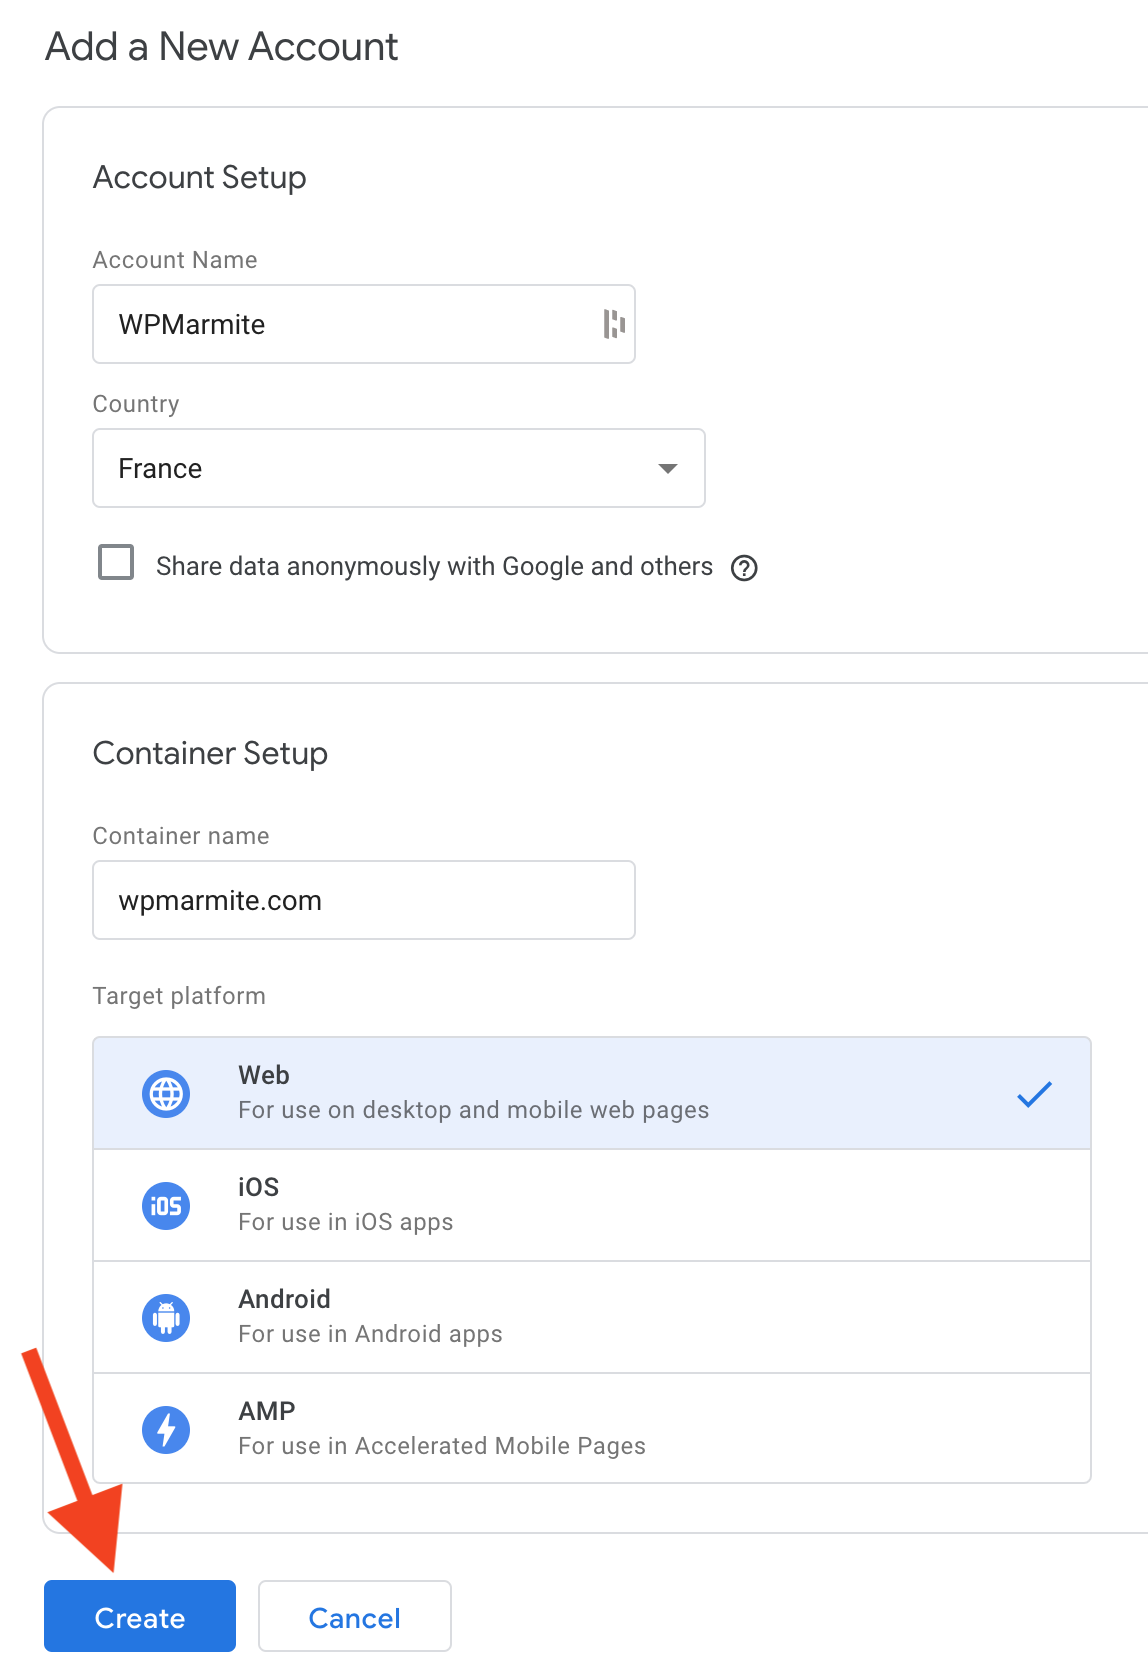
When all fields are completed, click the Create button, and then accept the Google Tag Manager Terms of Service.

In the next step, a window should be highlighted. It will offer you to manually add two pieces of code:
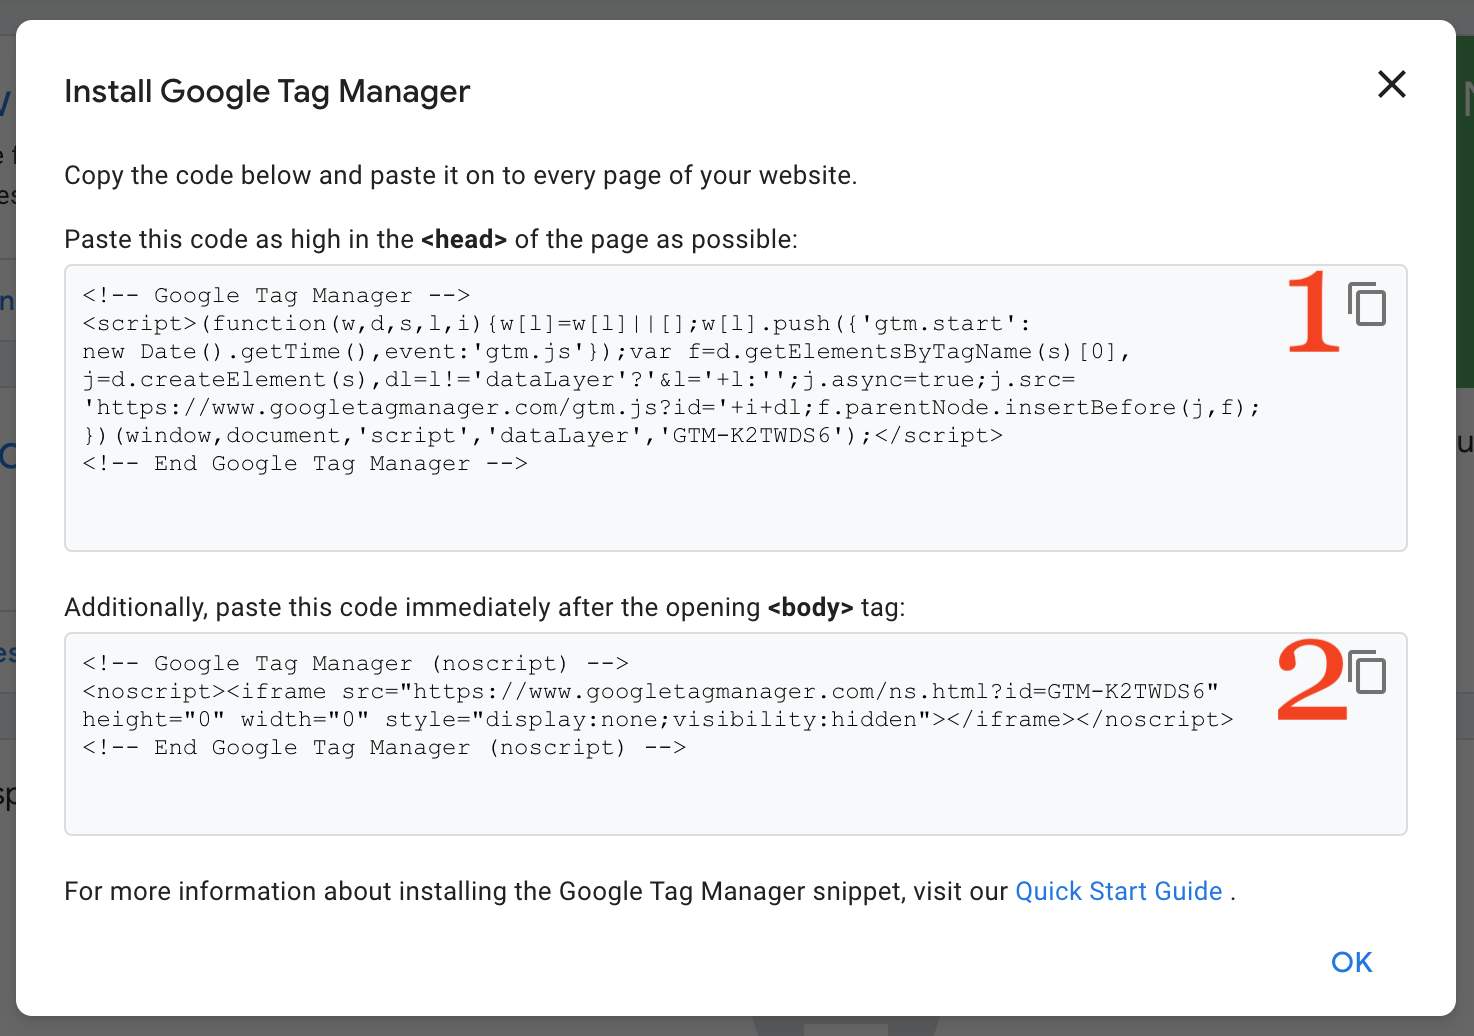
The first piece of code must be embedded in the <head> tag of your page (if possible, as high as possible in order to optimize the triggering of the GTM tag), the second in the <body> tag, just after the opening of the tag.
If your legs flop and your jaws flap in front of your screen, here’s a solution to save you from getting your hands dirty: using a google tag manager plugin for WordPress.
But may the most reckless among you rest assured: you are not forgotten. You’ll see later how to install Google Tag Manager on WordPress manually.
Step 2: Installing the Google Tag Manager plugin for WordPress

You can bet on this horse with your eyes closed. But why this one?
With more than 300,000 active installations, it is the most famous plugin of the official directory on our topic of the day. Moreover, it is highly rated (5 stars out of 5) and frequently updated.
This last point is important (about updates), and this is not the case with competing plugins such as Inpsyde Google Tag Manager, for example.
So you might as well avoid them, knowing that regular updates are very important to ensure the safety of your website.
After this aside, let’s go back to our dear Google Tag Manager for WordPress plugin.
To activate it on your WordPress website, go to your administration interface and go to Plugins > Add New. Enter its name in the top right search bar.

Click Install Now, then remember to click again as soon as it shows the Activate button (to activate the plugin).
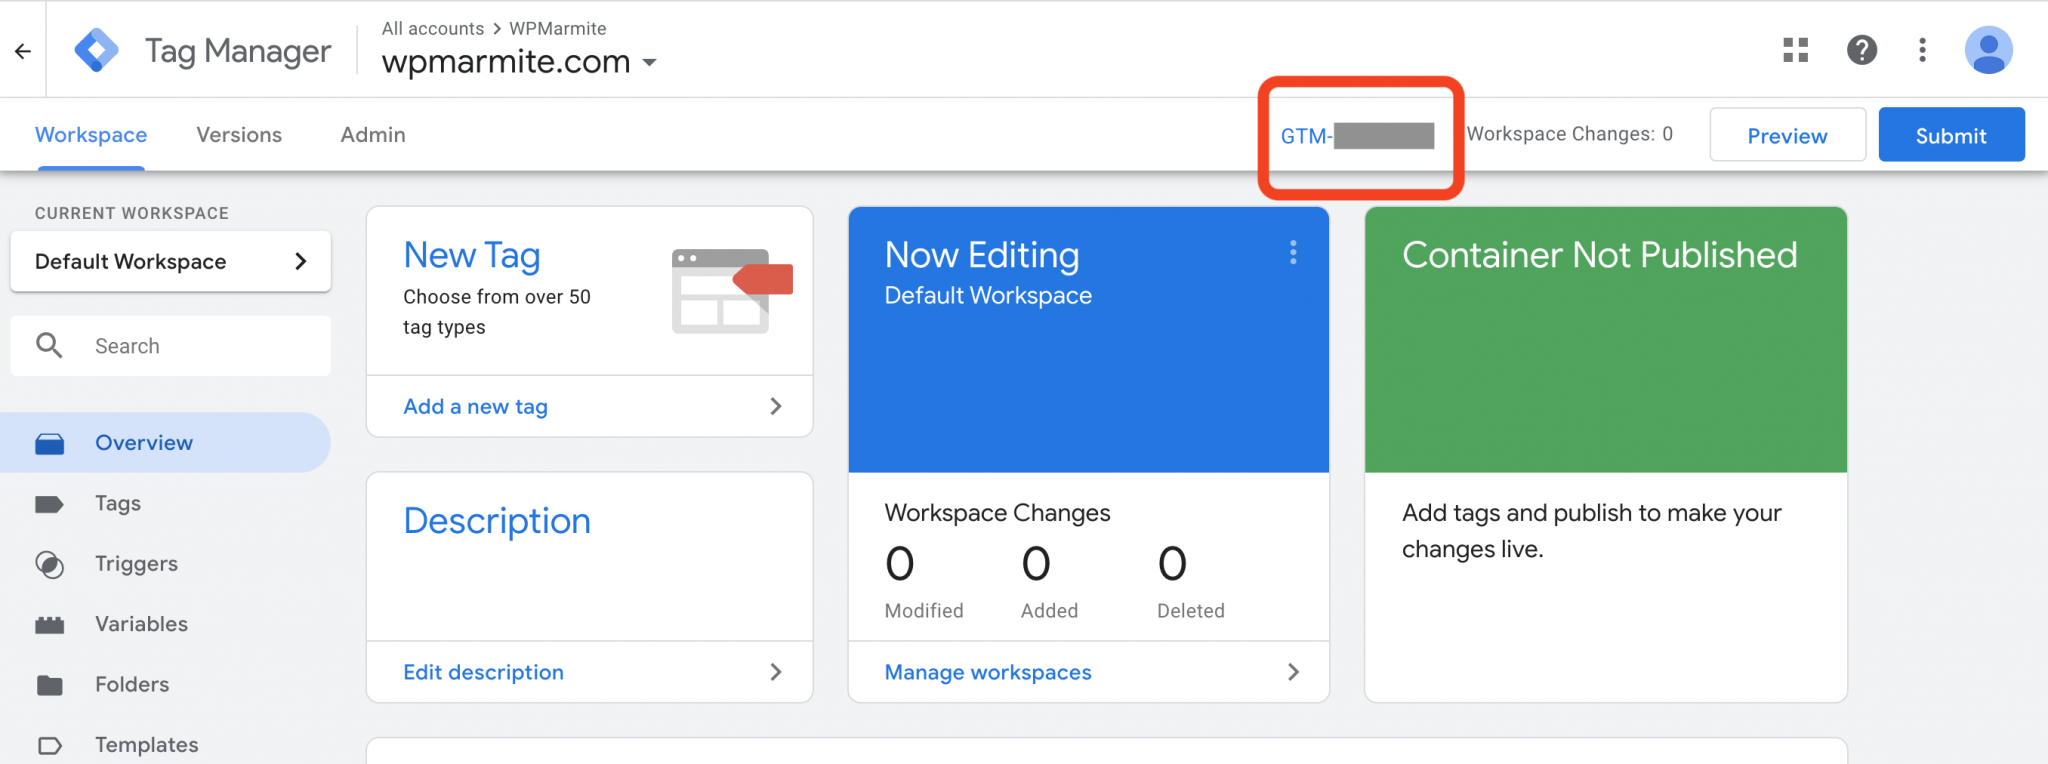
An information note will then appear at the top of your screen, inviting you to enter your Google Tag Manager ID.
You’ll find this ID on your Google Tag Manager interface. It starts with GTM- (see below).
On your WordPress Dashboard, click on the link mentioned to continue.

On the page that just opened, you need to make two settings in the General tab of the plugin:
- The addition of your Google Manager ID
- The choice of the placement of the code of the second part of your container (Container code placement). Remember, this is the famous piece of code that GTM suggested you to insert manually after the
<body>tag. By default, our plugin will add it in the footer. This is not recommended by Google, but it will work in most cases. You can also choose another option (e.g. Codeless injection), but with the risk that it will affect the display of your website. It’s up to you.
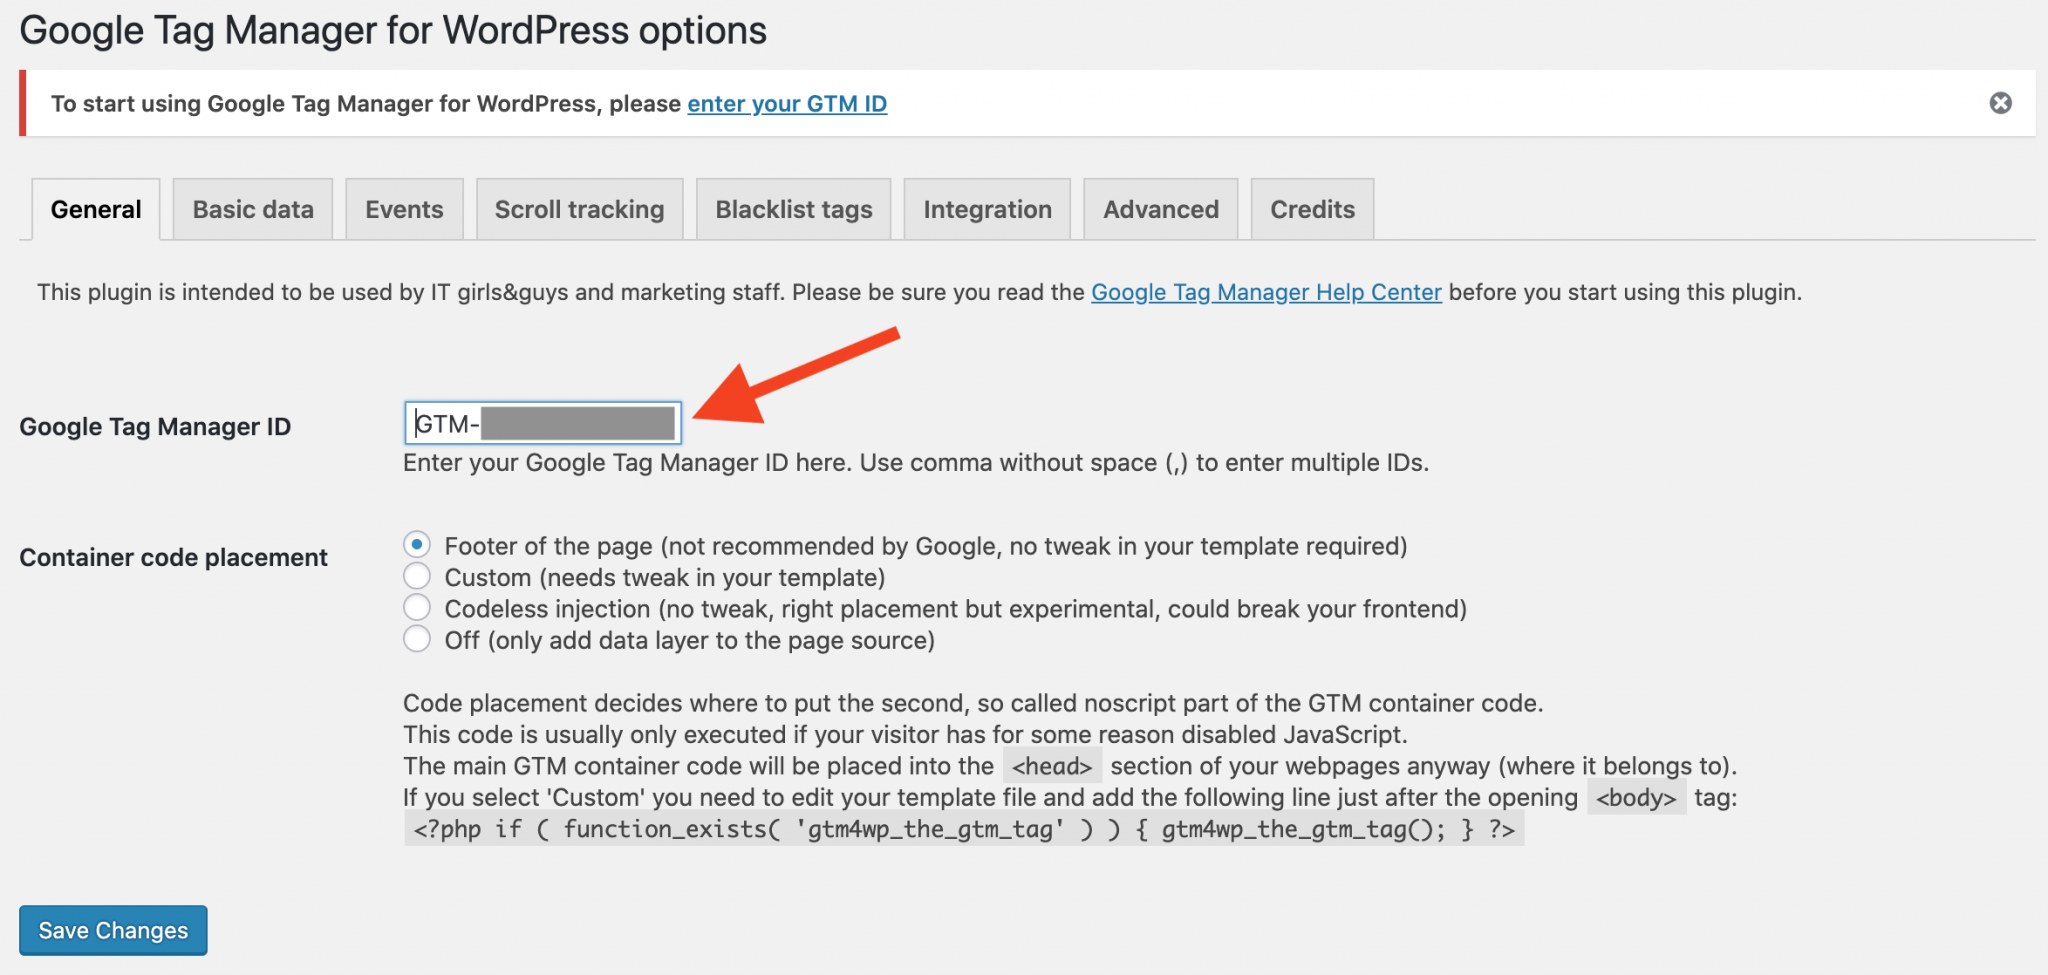
Finish by clicking on the Save Changes button. Now your WordPress website is ready to receive your first tag.
Before we see how to do this, promises are made to be kept: after the plugin method, let’s move on to the manual method, which will suit those of you who are not afraid to get their hands dirty. Because yes, you can also add Google Tag Manager to WordPress with your little hands.

How to install Google Tag Manager on WordPress without a plugin?
Still motivated to dive into the source code of your WordPress website? Then let’s go!
However, I’d rather tell you one thing up front: the process is technical. If you’re not sure about what you’re doing, don’t do it and use the plugin previously mentioned. That’s better than having your website crash
To start, back up your website (files + database). Many plugins allow you to do this. If you are not yet up to date, it is urgent. To help you choose the right one, check out our comparison of the best backup plugins.
Then, remember: Google Tag Manager asks you to install two small code snippets on your website.
One should be placed as soon as possible in the <head> tag. The other is to be placed as soon as possible in the <body> tag.
All WordPress themes provide us with a hook (a PHP script) that allows us to write in the <head> tag. It is this hook that is used to write the <link> tag responsible for loading our stylesheet, for example. Without this hook, we wouldn’t have any custom style for our websites!
But the hook (and corresponding tool function) allowing to write just after the <body> tag is only very recent (WordPress 5.2). So your theme may not have it if it hasn’t been updated for a while.
Check if you can place your snippet
You must first check that your theme allows you to host the corresponding snippet.
Everything happens in the header.php file. It is in this file that the <body> tag is opened. You just have to check the presence of the wp_body_open() function, or the hook of the same name.
If, just after the opening <body> tag, you find a line like:
HTML
Then it’s all clear! You can graft yourself to this place to insert the snippet provided by Google.

If not, then you need to duplicate the header.php file of your parent theme in your child theme, and insert the line below just after the opening <body> tag:
HTML
There you go!
A child theme is a sub-theme that inherits all the features and style of the main theme, also called the parent theme. By using a child theme, you make sure you don’t lose your GTM code when you next update your theme.
Insert your snippets
To insert your code snippets, look for ‘wp_body_open’ and ‘wp_head’.
In functions.php of your child theme, just copy and paste the below snippets between the PHP tags <?php and ?>:
HTML
HTML
Don’t forget to replace the # present in the two pieces of code above by your Google Tag Manager ID.
How to use Google Tag Manager?
Workspace overview

Three main tabs are available at the top of the GTM interface:
- Workspace: Allows you to add a tag and manage your workspaces.
- Versions: Provides access to data when your Container is published. This tab allows you to fill in all the changes you have made from one version to another, to give a title to each of your versions for better readability, etc.
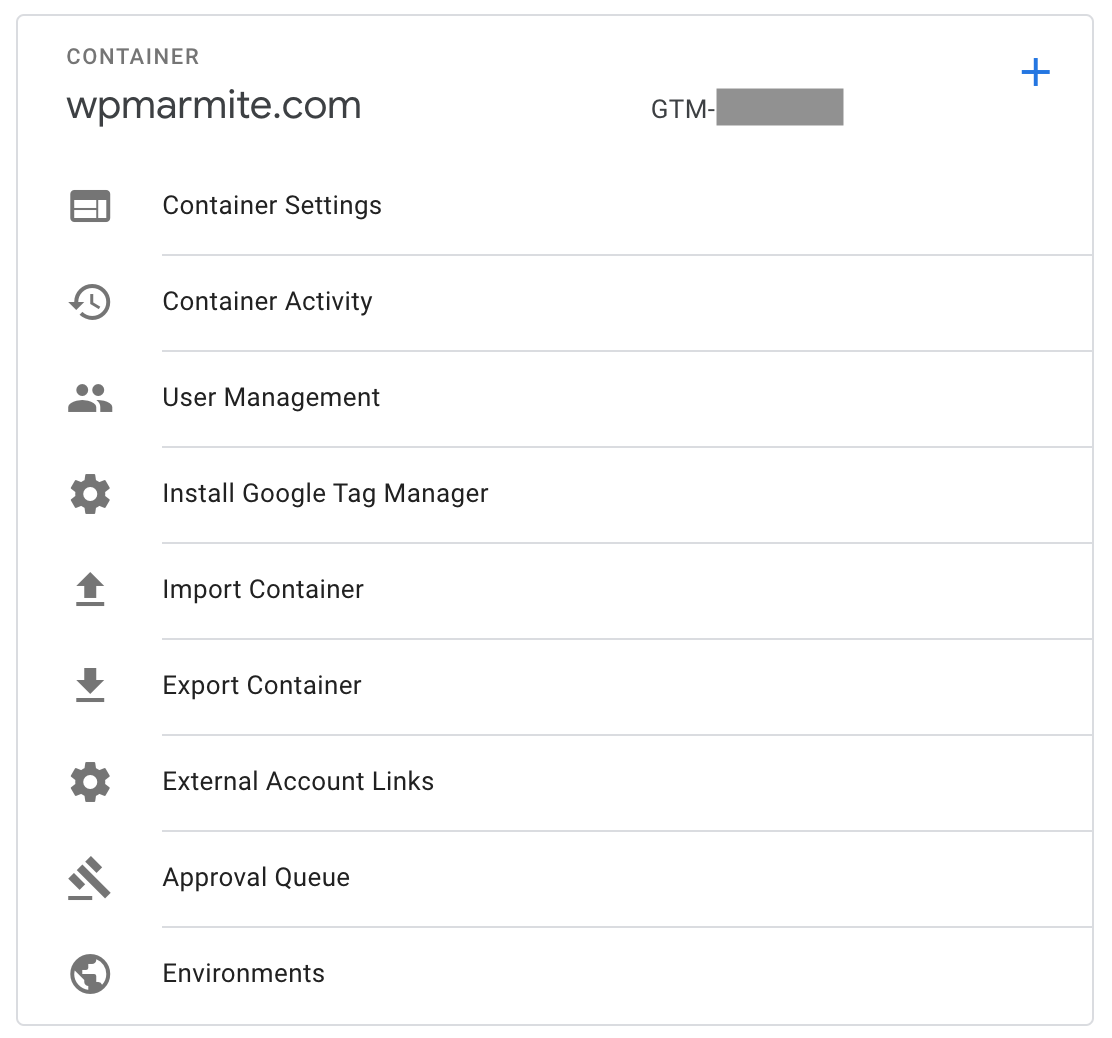
- Admin: this is where you can set up your account and your Container (e.g. change its name, import or export it, find associated pieces of code, invite other users to access your Google Tag Manager account, etc.).
In the left column of the Workspace tab, you have access to several links to create tags, triggers and variables.

So many barbaric terms that I’ll explain in the next part.
How Google Tag Manager works
The container
To schematize, you can compare the container to a box containing all the tags you will add as you go along, as well as the elements associated with it (e.g. triggers, variables).
Let’s say the container is the cabinet, the tags representing drawers.
If you understood well my previous explanations, you know that this container is associated to a code composed of two pieces. These pieces are added on your website:
- either via an extension which takes care of it by itself,
- or manually.
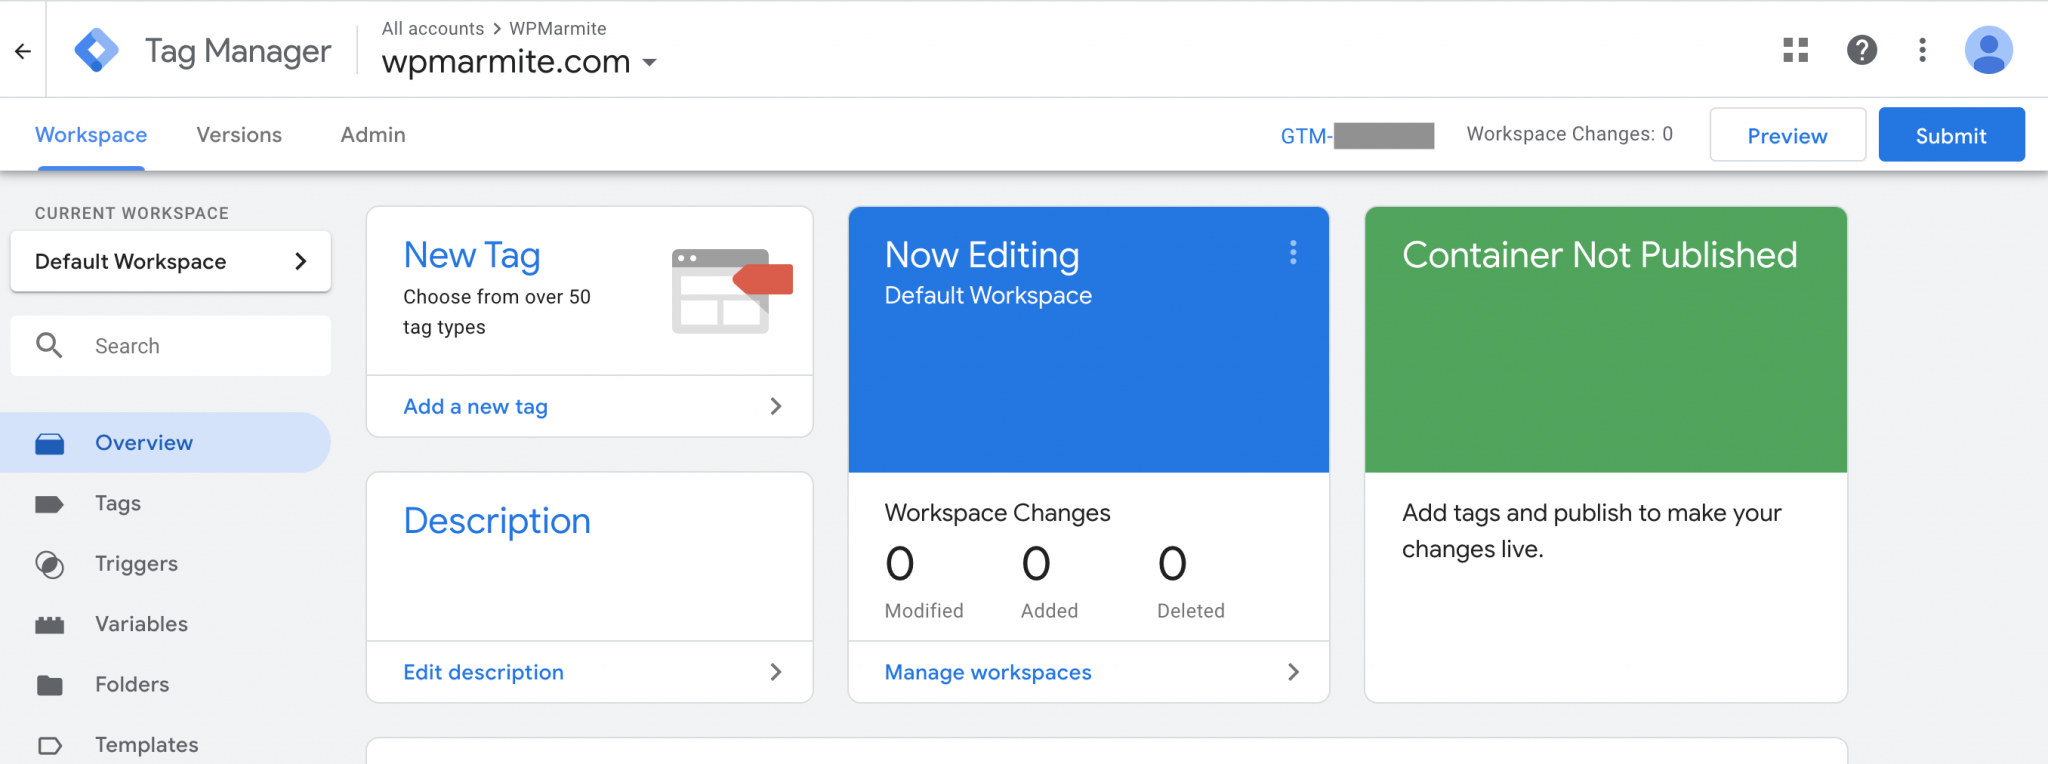
For Google Tag Manager, the container is your website. Remember, it’s the one you entered when you created your account.
Ok, let me refresh your memory. If I go to the Admin tab of my GTM interface, you can see that the container is associated with the wpmarmite.com website.
After the container, let’s see the tags.
Your account can have several containers if wanted.
The tags
Tags on Google Tag Manager are pieces of code that allow you to track essential actions performed by your visitors (such as conversions) on your website’s pages. The information they collect is then transferred to third party tools such as Google Analytics, your advertising platforms (Facebook, LinkedIn) etc.
For example, the Facebook pixel is a tag that helps you measure and optimize your Facebook ads.
The Google Analytics tracking code allows you to track visits to your website.

Thanks to Google Tag Manager, you can find all these tags in the same place, on the same interface.
The triggers
A trigger is an element that will trigger the sending of a tag to your website based on an action performed by your visitors (e.g. clicking on a link, viewing a specific page, precise scroll level on a page, etc.).

For example, you can trigger the tag of your choice as soon as one of your visitors:
- downloads an ebook
- press the Play Video button
- adds a product to the Shopping Cart of your WooCommerce store
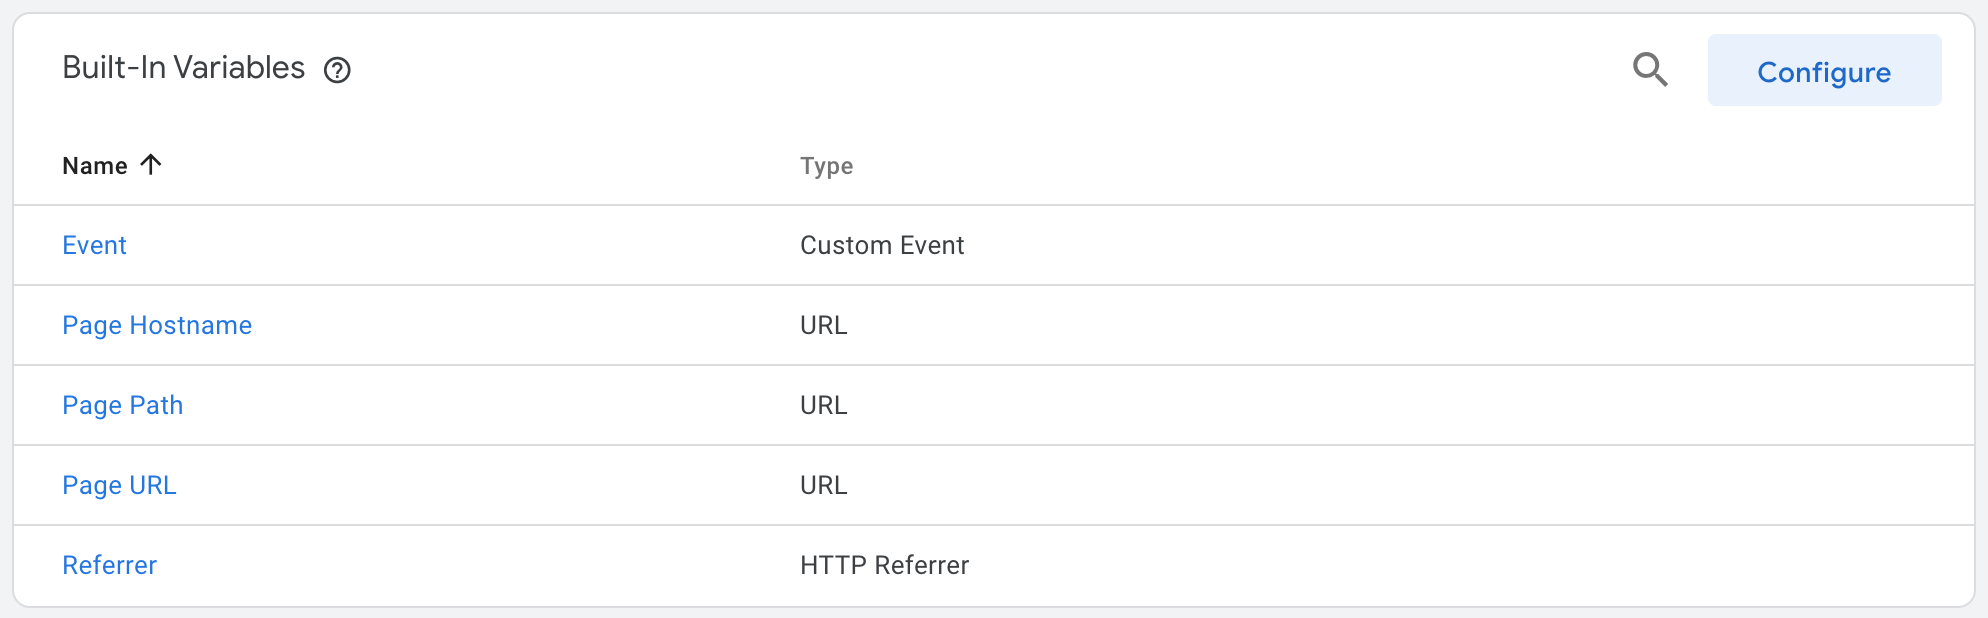
The variables
Let’s finish with what I think is the most technical element. I’ll try to keep it simple so you won’t get lost.
According to Google, a variable is “a named placeholder for a value that will change, such as a product name, a price value, or a date”.
A variable is a rule that will allow a tag and its trigger to work. In other words, you can for example specify that a specific “tag” (e.g. downloading an ebook) will only be triggered on a specific trigger (e.g. “Page view” type trigger) specifically located (e.g. specific URL, thanks to the “Page URL” variable).
That’s it for this quick overview of the basic features available in Google Tag Manager.
It’s just a little appetizer so you don’t get lost in too technical details. If you want to go deeper into the subject, I suggest you check out the official Google Tag Manager Help as well as the Google Analytics Academy.
Now let’s move on to the main course: adding a tag to start running Google Tag Manager properly.
How to add a tag: detailed tutorial
On the Workspace tab, click the Add a New Tag link.

The following window will then open:
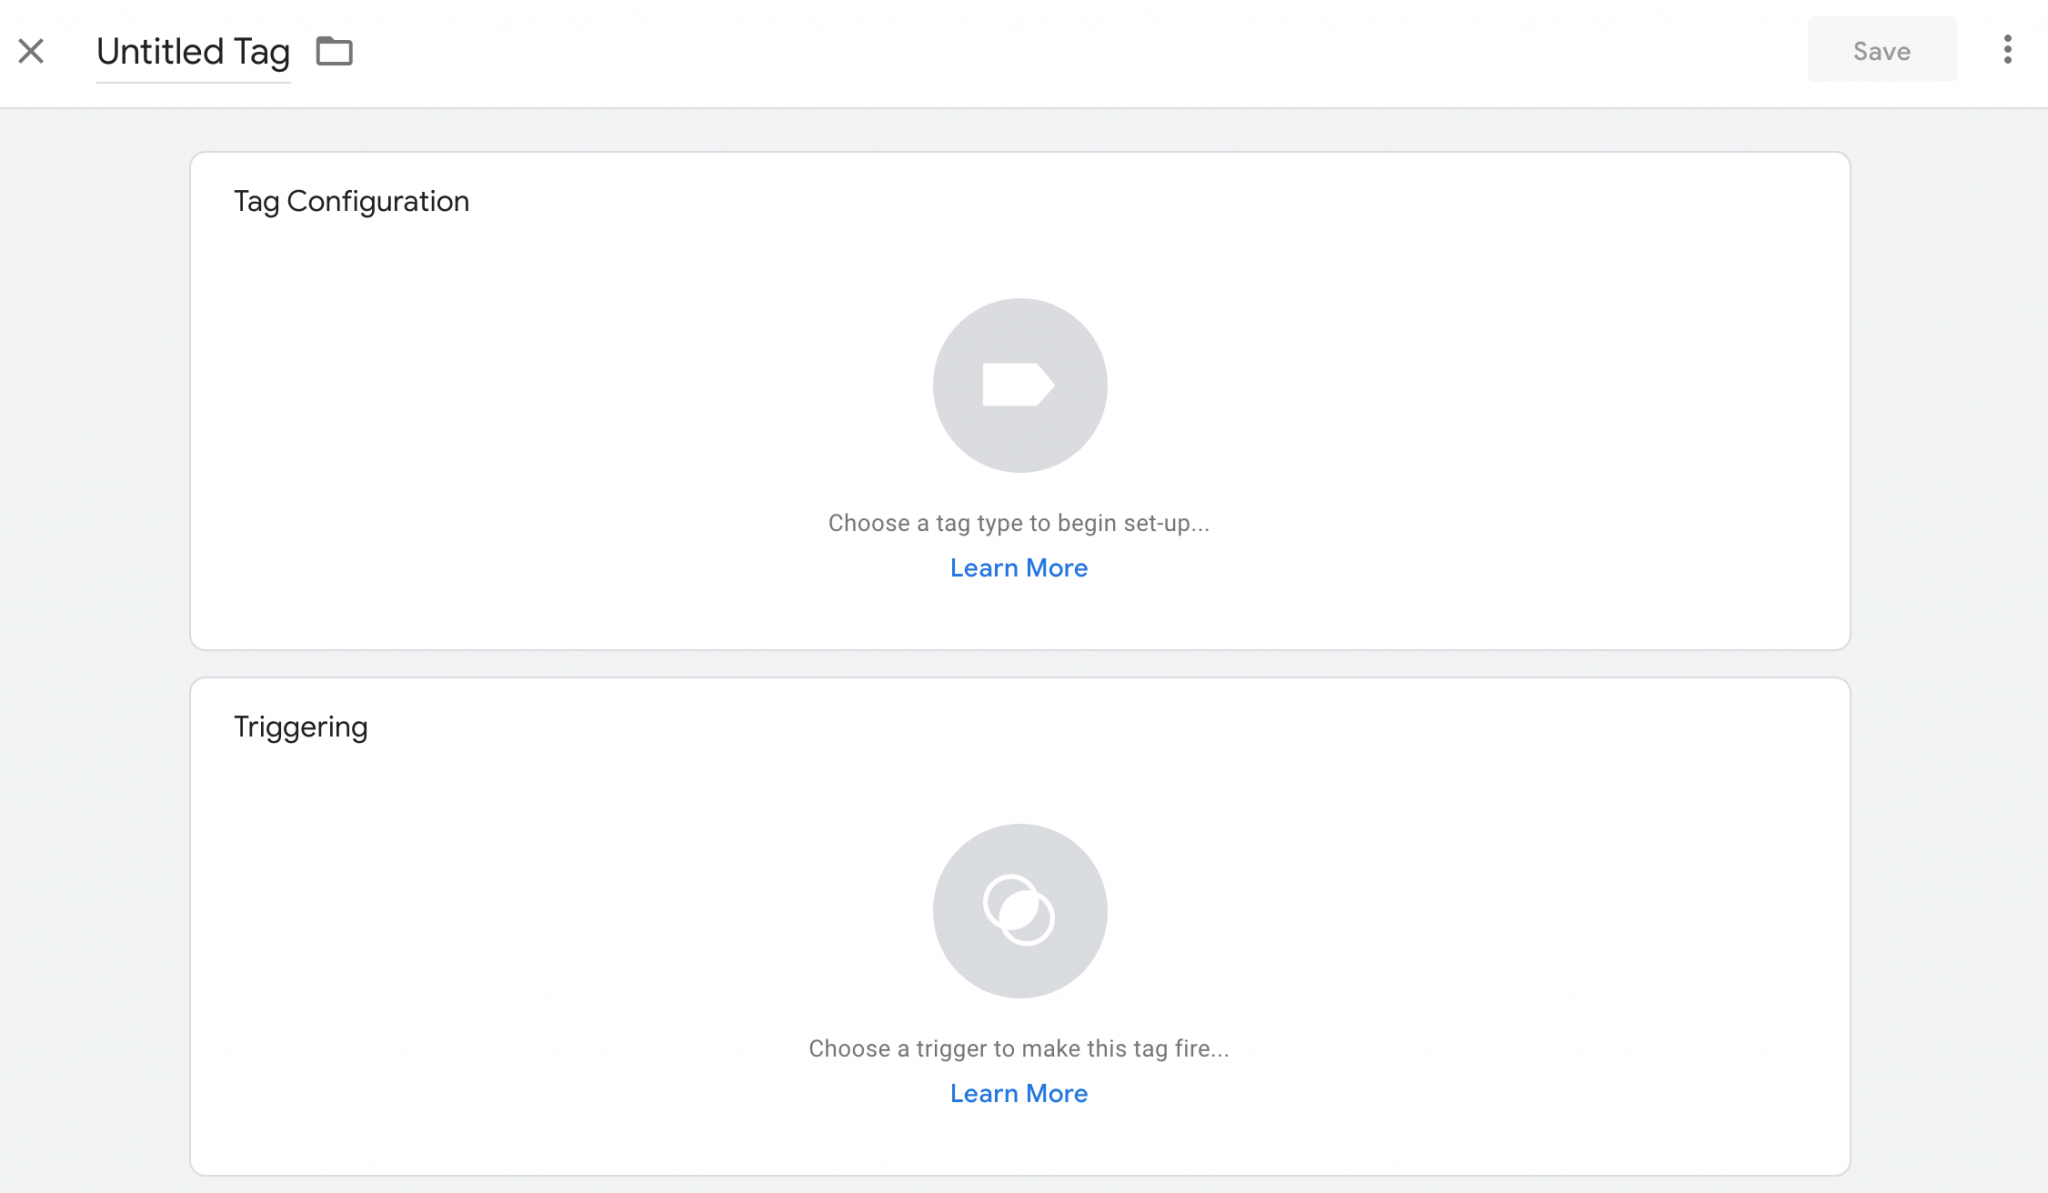
Give a name to your tag, instead of Untitled Tag on the top left corner (e.g. My test tag). Next, you will need to select a tag type, then the trigger that will activate it. Please note that the name given to your tag cannot contain any special characters.
Tag setup
Google gives you a choice of about 50 native templates to choose from.

You will find classics such as the Google Analytics tracking code, the Google Ads conversion tracking, or the LinkedIn Insight tag.
If you don’t find what you’re looking for, there are two possibilities:
- Import a tag template proposed by the community (e.g. the Facebook Pixel).

- Add your own custom HTML tag. But here, you’ll need to have a solid knowledge of web development, or call a developer (this is not supposed to be your goal, by the way).
All right, have you made up your mind? To keep it simple and efficient, I suggest you start by adding a common tag: the Google Analytics tracking code.
You will find it under the name Google Analytics: Universal Analytics. Select it by clicking on it.

If you have already added a Google Analytics tracking code on your website manually or using a plugin, you can migrate to Google Tag Manager. You’ll need to either disable your plugin or manually remove the two pieces of Google Analytics tracking code already in place on your website. In any case, do not add the tracking code twice. You may end up with duplicate data, make your site crash or artificially reduce your bounce rate.
Several track types are proposed. You must select the default choice (Page View), which will enable to track page views throughout my website.

From the Google Analytics Settings menu, choose New Variable to add your Google Analytics tracking ID.
Then, go to the Admin tab of your Google Analytics account. In the Property section, click Tracking Info > Tracking Code. Then copy your tracking ID, which starts with UA-.
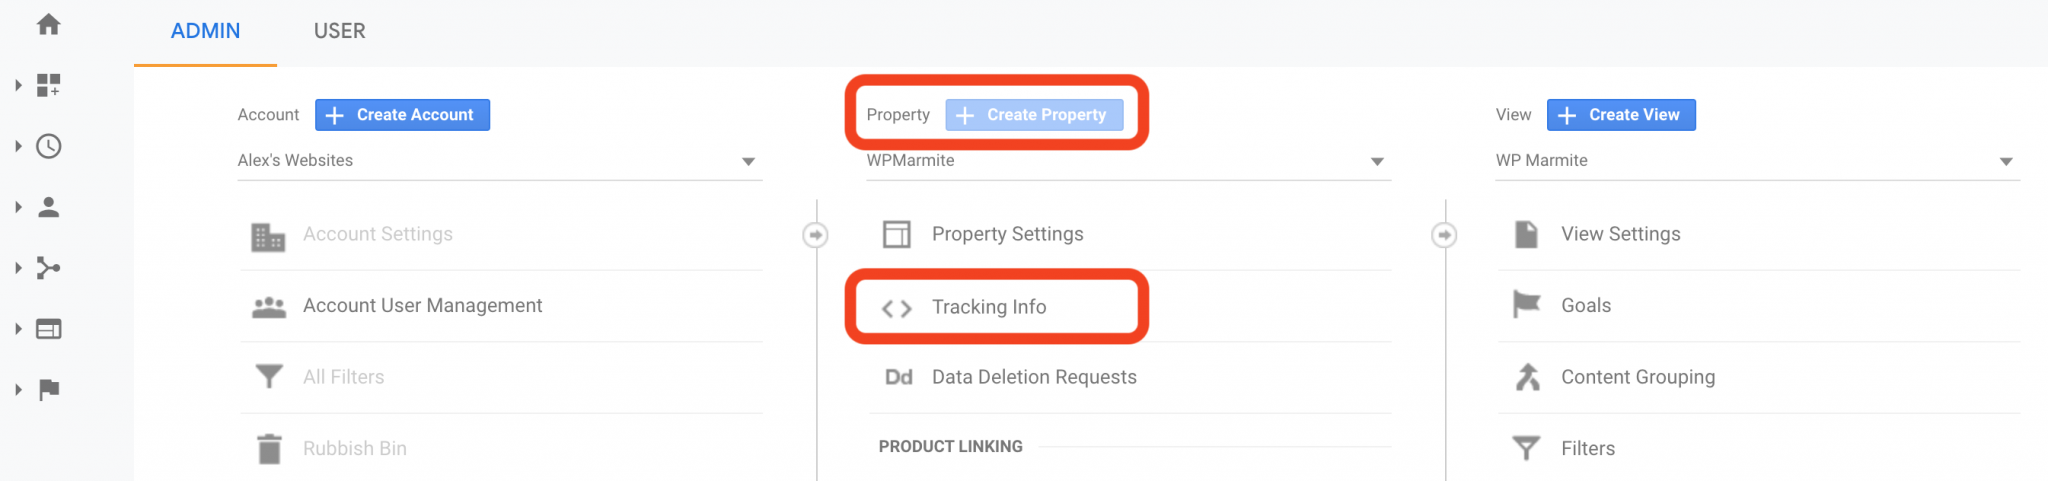
Paste it into the dedicated box on Google Tag Manager.
Then click on the Save button on the top right corner.
Trigger selection
Second step: choosing the trigger. At this stage, two options are possible:
- Create a custom-made trigger by clicking on the Add (“+”) button at the top right of the page.
- Use the trigger that Google Tag Manager offers (All pages). With this one, the tag will be triggered each time a page on your website will be viewed by a visitor. Very good, that’s what we want. Click on it to select it.

Finish by clicking on the Save button in the top right corner. If all goes well, your tag has been created and added to your Workspace.

All you have to do now is activate it by clicking on the Submit button.

In order to definitively activate your tag, you will finally be invited to submit the changes.
If everything is OK, choose Publish and Create Version, give it a name, and click on the Publish button. This will publish your Container and, in turn, make it active on your WordPress website using the plugin you have previously set up.

There you go, well done! You’ve just created your first tag with Google Tag Manager. If you want to explore the technical meanders of GTM and dig deeper, check out the following dedicated posts:
- The Google Tag Manager Workspaces on Simo Ahava’s blog, a “Google Developer Expert for Google Analytics and Google Tag Manager” (I strongly recommend you to check out his entire blog).
- The Facebook group Google Tag Manager.
How to check that Google Tag Manager works on WordPress?
Well, that’s all well and good but is it working properly?
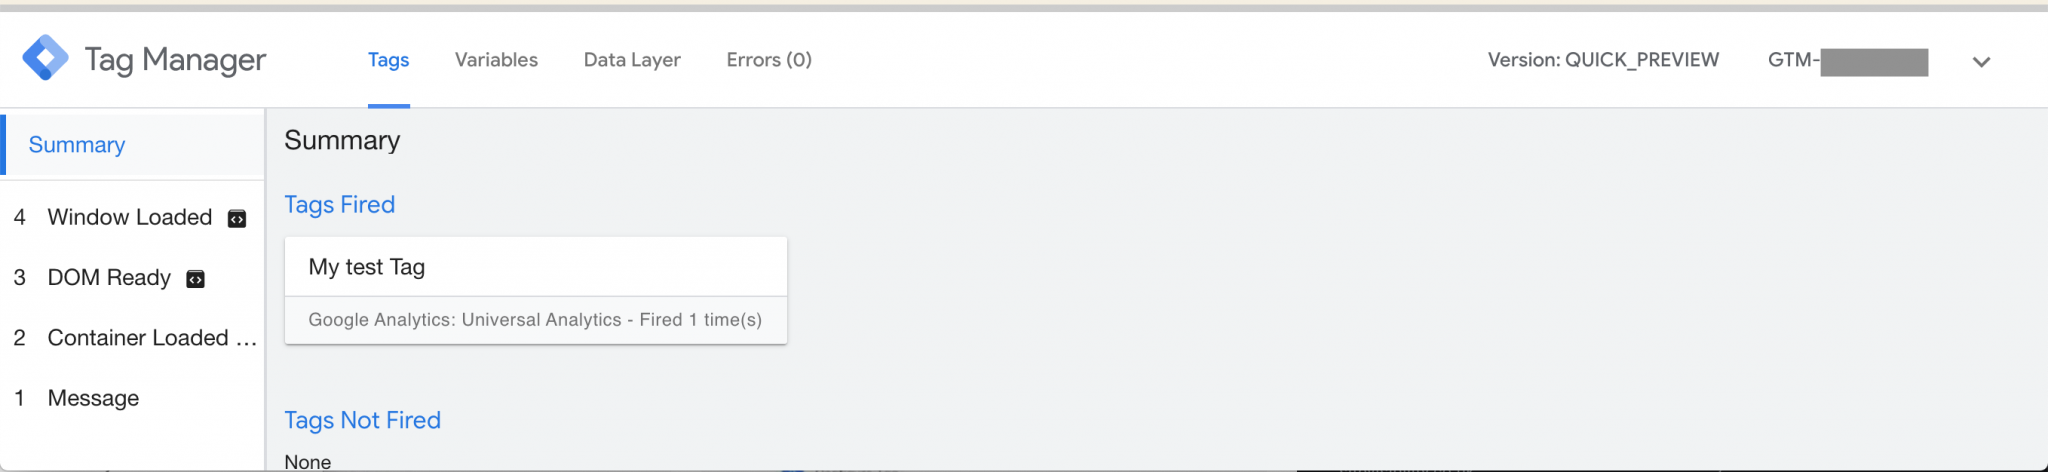
To find out, you can use the Preview button, available on your Workspace.
Google Tag Manager will then enter Preview Mode.

You can also use the Preview option before publishing your container, to make sure that no conflicts or technical issues have arisen.
In the same browser, open or refresh your website’s homepage in a new tab.
You should see the Google Tag Manager console at the bottom of your page. This means that your tag is operational.
Now, you can access data about your website’s page views directly on your Google Analytics Dashboard.
And all this, without having manipulated a single line of code related to Google Analytics!
To test your tags, you can also use the Chrome extension called Tag Assistant or the online website GA Checker.
What about the privacy of your data?
We talked a lot about tags throughout this post, so let’s continue! 😉
Most of our famous tags, when they collect data on your website, do so through cookies, which falls within the scope of the GDPR.
This acronym refers to the General Data Protection Regulation. Came into force in May 2018, the GDPR consists of ensuring that all individuals control and protect the personal data they disseminate when surfing the web.
To learn more about this regulation and to bring your WordPress website into compliance, please visit the complete guide that Eleonor has put together for you on this topic.
In other words, you must obtain the users’ consent to collect personal data.
And that’s not easy at all to put into practice, I might as well tell you.

While Google is committed to ensuring the “privacy” and “safety” of the data it collects in its Privacy Policy, you should also work at it.
For example, the Tag Manager help section tells you how to accept the Data Processing Amendment.
What next? Keep in mind that it is very difficult to be 100% compliant with the regulation. To help you out, this post details how to set up GDPR cookie consent notification with Google Tag Manager.
But I warn you, you’re going to have to get your hands dirty.
Google Tag Manager, for whom?
If Google Tag Manager does indeed allow a “simplified tag management”, it is not in my opinion an “easy to integrate” tool as Google claims.
To fully understand what you are doing without risking to crash your website, it is necessary to have a minimum of technical knowledge.
Google’s documentation, which I mentioned earlier, is a good starting point to understand the basic workings. Even if you have to hang on to understand certain terms.
So you will need some learning to familiarize yourself with the specifics of GTM.
In itself, this tool is not primarily intended for beginners. A good tip: make sure you have a minimum of experience before playing with GTM. Afterwards, anything is possible, even starting from scratch.
The priority target is rather the marketers who have to manage a large number of tags. Thanks to GTM, you no longer need to call on a developer to take care of all that.
If you just have one tag to add to your website, no need to bother with Google Tag Manager: go through the dedicated tool (e.g. Google Analytics).
Conclusion on Google Tag Manager and WordPress
Throughout this post, you’ve read about how to install Google Tag Manager on WordPress, its benefits and how it works.
Do you use it in your daily life as a webmaster? Have you opted for a particular plugin to make it work on your website?
Tell us all about it in the comments.

Receive the next posts for free and access exclusive resources. More than 20,000 people have done it, why not you?
Register


GTM has been the best way for me to implement most of the codes I’ve always been using on my website. Thanks for the guide though.