Need to modify the PHP version of your website? That’s where it happens. Need to create an email address? That’s where it happens too. Need to install an SSL certificate on short notice? Here again. Where? On your WordPress site’s…
With my teeny-tiny measurements – I’m 1 pixel high by 1 pixel wide – I go completely unnoticed.
So, yeah, I’m pretty damn short. But oh, how strong I am. Very, very strong!

I’m not giving you my self-portrait. The weirdo I’m talking about is the Facebook pixel.
If you don’t use it yet, know that this is the tool to install urgently on your website if you advertise on Facebook and/or Instagram, and want to maximize your ROI (Return on Investment).
In this post, I will detail the procedure to follow, step by step. And I’ll tell you all the secrets of this amazing specimen.
Now, here’s the overview.
Overview
- What is the Facebook pixel?
- An analysis tool to help you create better ads
- How to create a Facebook pixel
- How to install the Facebook pixel on WordPress with the Pixel Cat plugin?
- How to install the pixel manually?
- How to know if your pixel works on WordPress?
- How to use your pixel: standard events and custom conversions
- What about GDPR compliance?
- So, pixel or no pixel?
Originally written in March 2020, this article was updated in November 2021.
Find your domain name thanks to our detailed guide and pick a free theme to pamper your WordPress website.
What is the Facebook pixel?
It is an analytics tool that allows you to measure and optimize your Facebook ads, by giving you access to data related to the actions performed by visitors on your website (e.g. button clicks, conversions, page views, purchases etc.).

You automatically get free access to it as soon as you create an ad account on the world’s #1 social network, which is also used by more than two billion people every month.
The Facebook group changed its name at the end of October 2021. It is now called Meta and encompasses several tools: Facebook, Instagram, WhatsApp, Oculus etc.
If we had to roughly compare, let’s say it’s a kind of Google Analytics specific to Facebook.
But let’s take a concrete example to explain its usefulness. Let’s imagine that you have a WooCommerce store on which you sell fans.
The Facebook pixel will be triggered as soon as someone performs an action on your website (e.g. checking out the page of your number 1 sales fan).
You will then be able to send them a targeted ad on their Facebook or Instagram feed, to remind them that your great online store sells super-efficient-refreshing fans (and that it’s time for them to proceed to checkout, if they haven’t already).
You get the main idea: the goal, in this case, is to help you make more sales, and boost your conversions (carrying out a specific action by a visitor, such as downloading a PDF, for example).
Well, that’s all well and good, but you have to ask yourself how does all this stuff work mechanically?
I’ll give you the details right away.
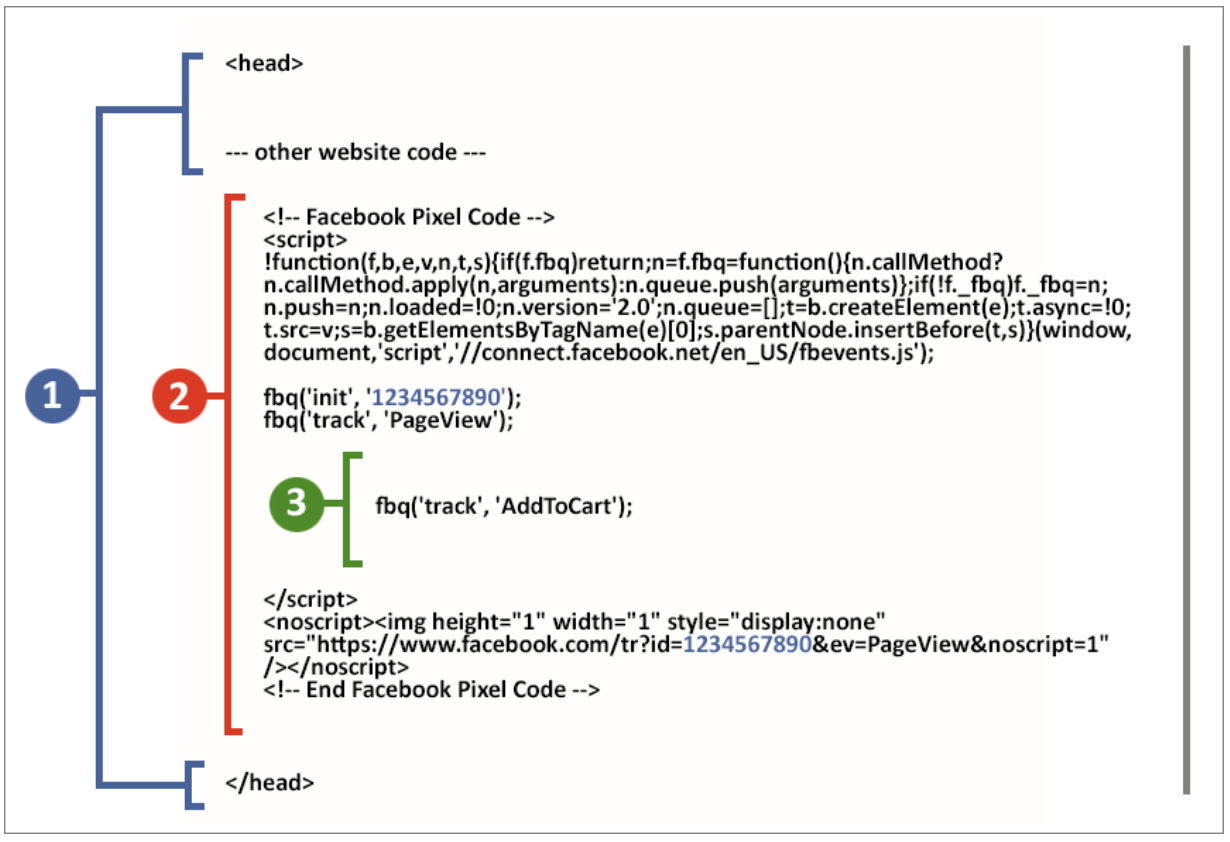
In fact, the Facebook pixel is a piece of JavaScript code containing an image 1 pixel high by 1 pixel wide, hence its name.
Look, it looks like this:
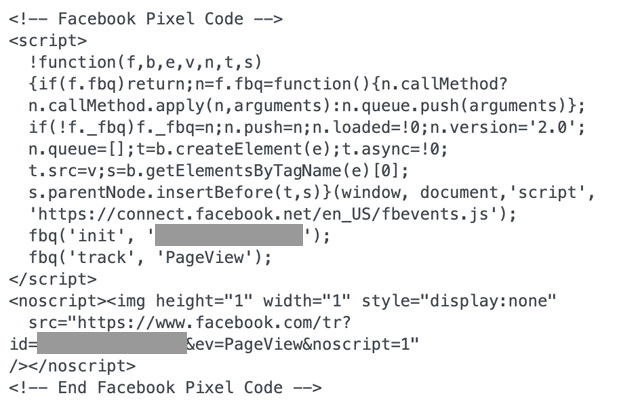
I have provided you with the code corresponding to the said image so that you can understand.
Obviously, this little “snitch”, so to speak, is invisible to the naked eye. You can do the test by pasting the address of the image (which starts with https://www.facebook.com/tr? on the above screenshot) in a new tab of your browser: you won’t see anything, blank page.
For the rest, just below, you’ll need to have your eyes wide open.
An analysis tool to help you create better ads
I hope you have understood how our little spy tool works.
In order to make your mouth water a little bit more, you will immediately discover how it can help you create better ads, and what it can do for you.
To start, a little reminder. As Facebook explains:
Once you’ve set up the Facebook pixel, the pixel will fire when someone takes an action on your website. Examples of actions include adding an item to their shopping basket or making a purchase. The pixel receives these actions, or events, which you can view on your Facebook pixel page in Events Manager.
Source: Business Help Centre About Facebook pixel
Now you’ve got a lot of data on hand to analyze your visitors’ behavior, and optimize your ads, of course.
This will allow you to:
Building similar audiences
Similar audiences, Facebook also calls them lookalike audiences.
Thanks to the data collected by the pixel, you will be able to reach people who have the same profile as your current visitors, and are therefore “likely to be interested in your business”.
This will allow you to target your ads more accurately, and you will also be able to reach an audience that has never been to your website before, broadening your prospect base.

Retargeting
Would you be interested in broadcasting an ad to someone who has already shown an initial interest in your product or service offer?
It is possible by retargeting. In this case, you will target the Internet user who has visited your website, or a particular page, but who has not completed the desired process.
Let’s take the example of our online fan shop. Thanks to retargeting, you will be able to send an ad to the people who have added a fan to their Shopping Cart, but have not paid.
In short, you tell them: “Hey you, remember, you’re almost done shopping! Now, all you have to do is provide your payment information. To do so, get back to my website, right here!”
Tracking your conversions
The Facebook pixel also lets you know what action a visitor has taken on your website after clicking on your ad.
This is called conversion, and it can refer to several things:
- Adding a product in a Shopping Cart.
- Purchasing a product.
- Filling out a form.
- Subscribing to your newsletter etc.
Thanks to the collected data, you will be able to measure your results, calculate your ROI (Return on Investment), and of course correct your modus operandi, if necessary.
For example, if your ad aims to make your visitor fill out a form, but the conversion rate seems low, maybe your form is badly designed and needs to be redesigned.
In short, the Facebook pixel allows you to measure the results of your ads and optimize them by allowing you to reach the “appropriate audience”, as Facebook says.
Who is involved?
Logically, the “priority” users of the Facebook pixel are the people who advertise on… Facebook (but also on Instagram, since this social media is the property of Meta – former Facebook – and its ads can be set from the Facebook Business Manager).
If you haven’t done this yet, but may be planning to do it someday, it may still be worthwhile for you to install this little piece of code.
Facebook will start collecting information about your visitors. And once you’re ready to position yourself in the starting blocks, you’ll have access to all the information you need to get off to a good start.

You now know what our famous pixel can bring you, and if you need it.
But by the way, how to give birth to this famous Facebook pixel? Instructions for use in the next part.
How to create a Facebook pixel
In order to install the Facebook pixel on WordPress, you must first create a Facebook Ad account, if you do not already have one.
You can do this through the Facebook Business Manager Dashboard. This is a free platform to manage your advertising accounts, your Pro Pages etc. The social network explains how to do this on this page.
Next, you can go to the Ads Manager.
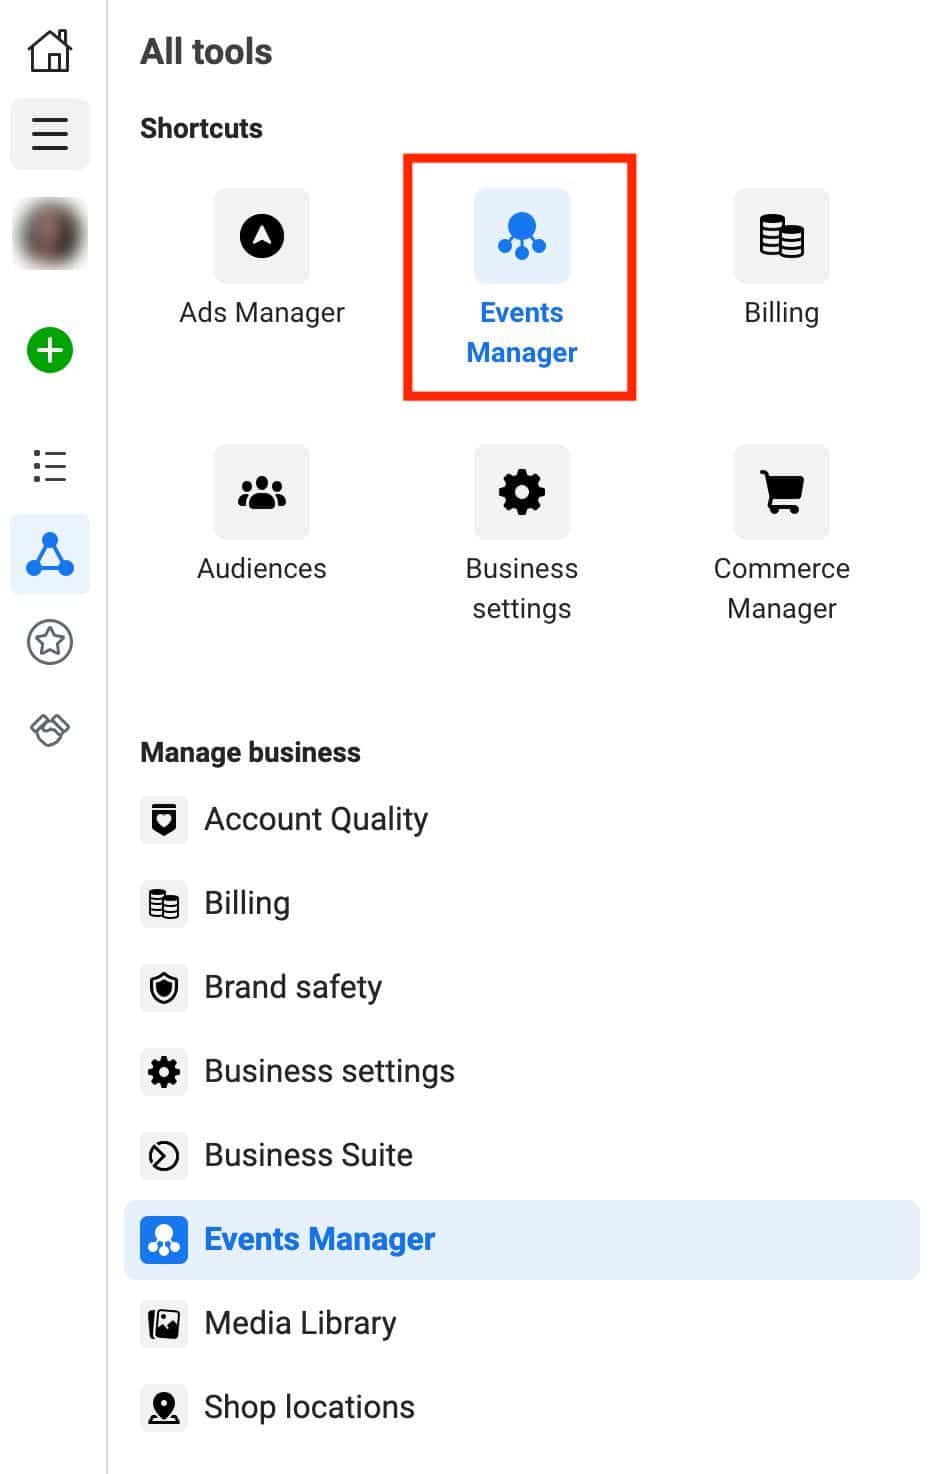
Click on the hamburger menu at the top left of the page, then Events Manager.
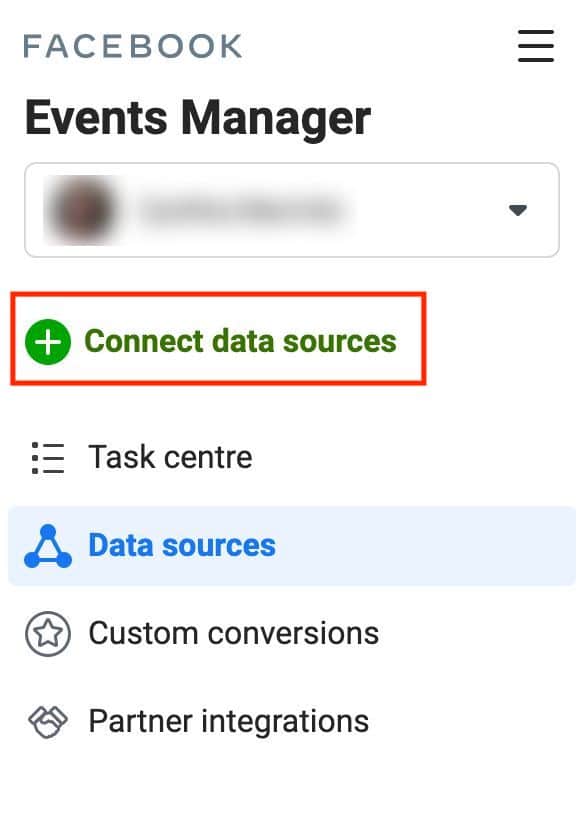
Then, click on the blue + Connect data sources button.
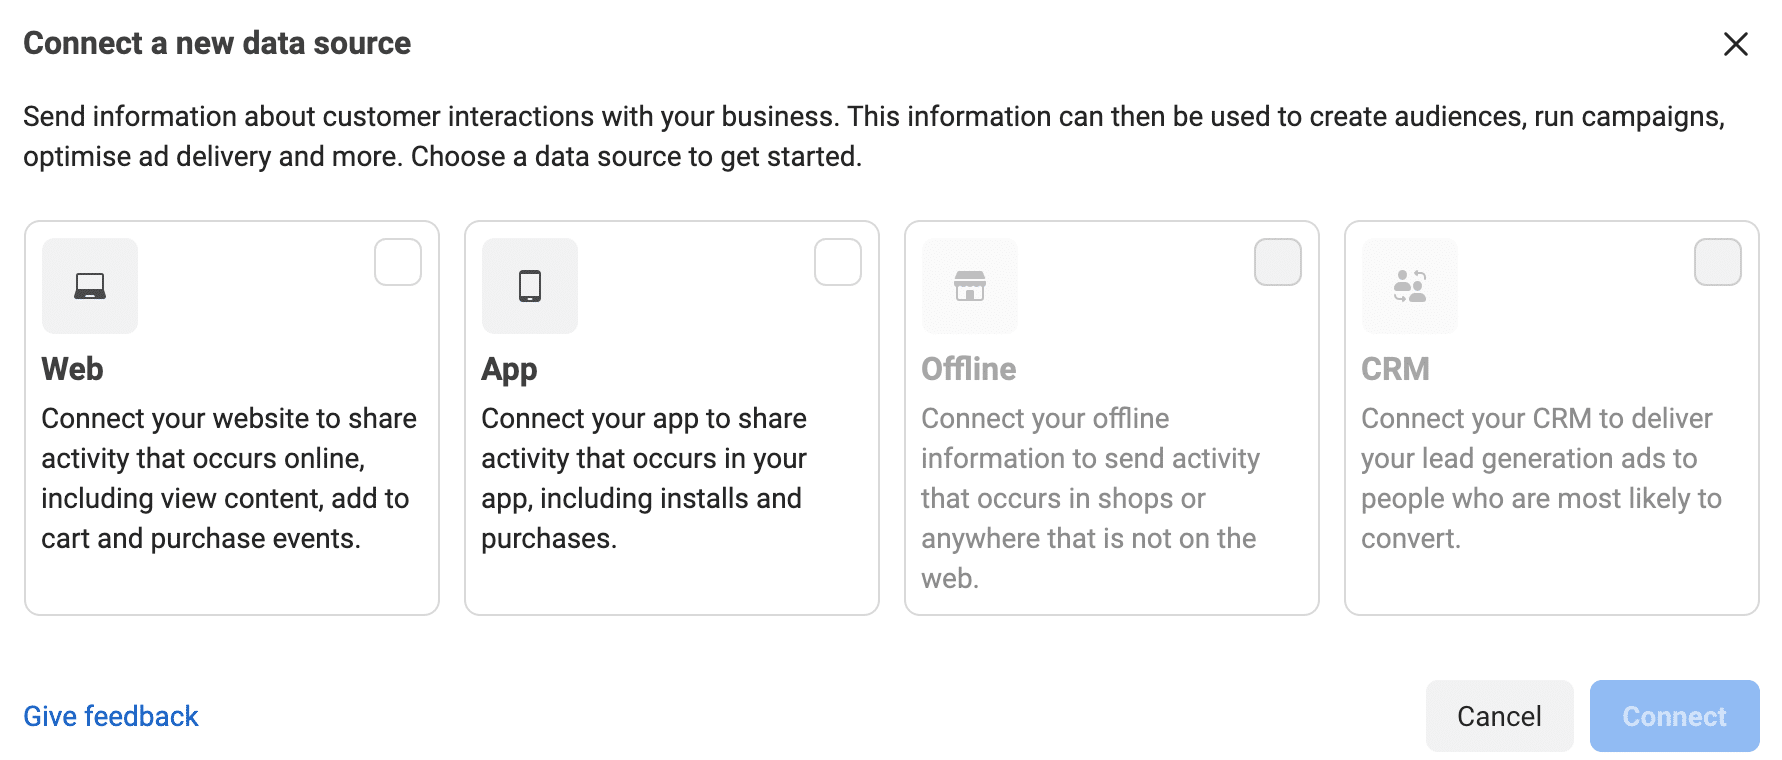
A new window will then open and ask you:
- Your website. This is the option we’re going to choose here, because I’m assuming you want to connect your WordPress site “to share activity that occurs online, including view content, add to cart and purchase events” as Facebook details.
- Your mobile app.
- Offline.
- Your CRM.
Then give your pixel a name and click on the blue “Create Pixel” button.
Finally, finish by entering the URL of your website, then click on the blue “Verify” button.
If an integration with one of Facebook’s partners is detected (Shopify, Squarespace, WordPress), Facebook will notify you. Yay, it works with WordPress!
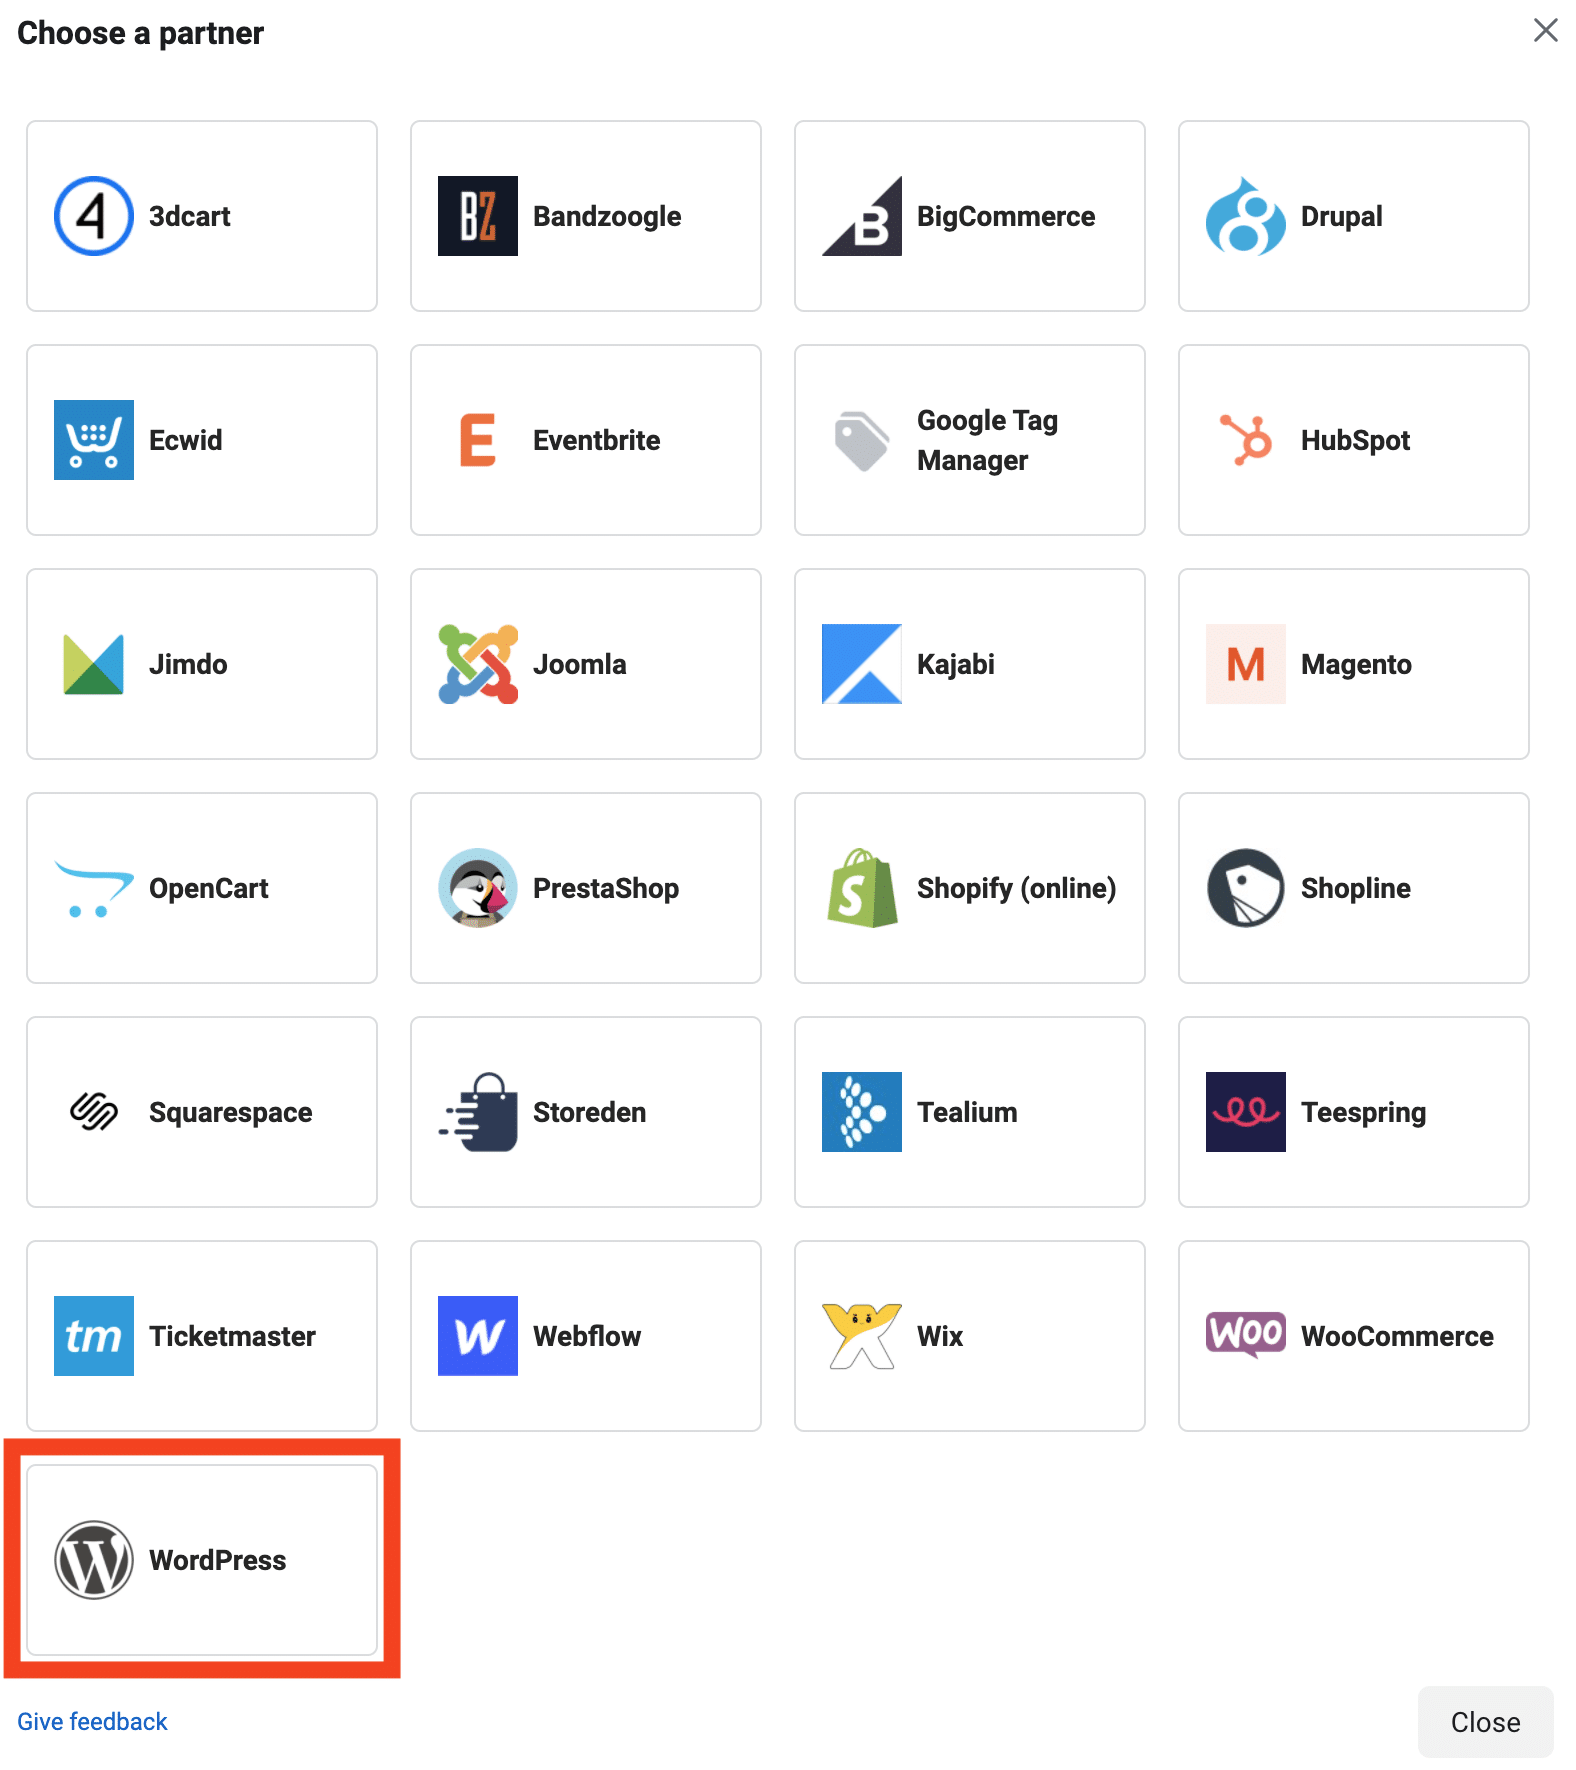
After clicking on “Next”, Facebook offers you to associate your WordPress account, by installing its in-house plugin, called Facebook for WordPress.
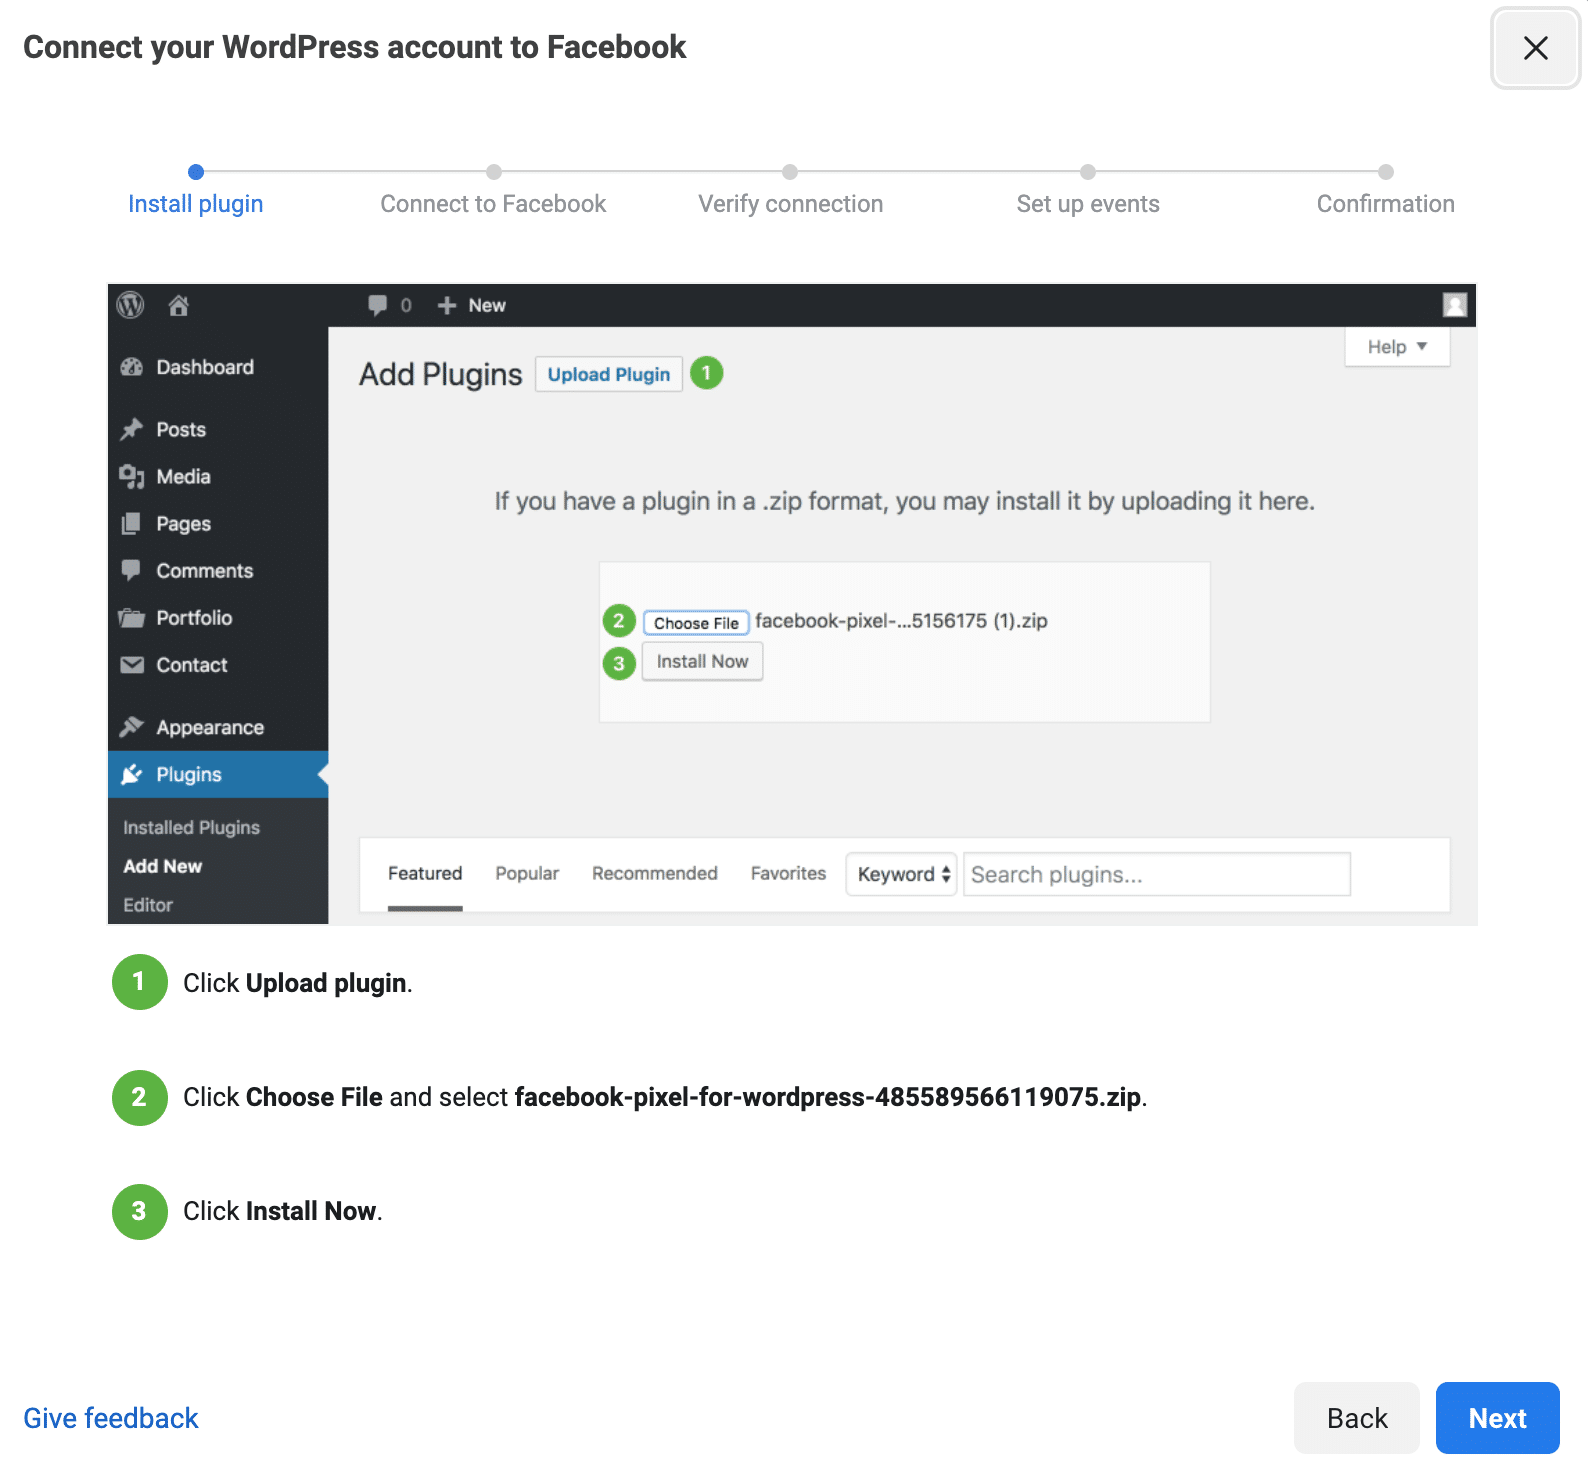
It could be quite suitable but it has two major flaws:
- It has a low rating (3 stars out of 5), which does not really inspire confidence. Several recent user feedbacks – at the time of writing – indicate for example that the plugin broke their site.
- The description of the plugin states, after activating it, that “after an update, the plugin can be deactivated due to a known problem”. We have known more reassuring…
- With it, you can’t do anything from your WordPress dashboard.
So, let’s forget about it. 😉 For the purpose of this tutorial, we’ll instead focus on another more complete free plugin to install the Facebook pixel on WordPress: Pixel Cat.
Get to know it just below.
How to install the Facebook pixel on WordPress with the Pixel Cat plugin?
Originally, this article presented another plugin: Pixel Caffeine. Very practical and easy to use, it is no longer relevant at the time of writing this update. As of October 1, 2021, its developers have indicated that they no longer support the development of new versions or updates.
Although you can probably still activate it on your site when you read this, we advise you not to use it anymore (an outdated plugin may have security holes, for example).
With 50K active installations, Pixel Cat is one of the most famous plugins to install the Facebook pixel on WordPress.
Let’s also note that it is very frequently updated. Even if it is less rated than its main competitor (PixelYourSite), I found its interface more accessible for a beginner (it also allows to create more events).
As you will see, it is also very easy to use.
Pixel Cat will allow you to use some of Pixel’s features directly from your WordPress Dashboard, like creating events.
To install Pixel Cat, go to the administration of your WordPress site, and follow this path: Plugins > Add New.
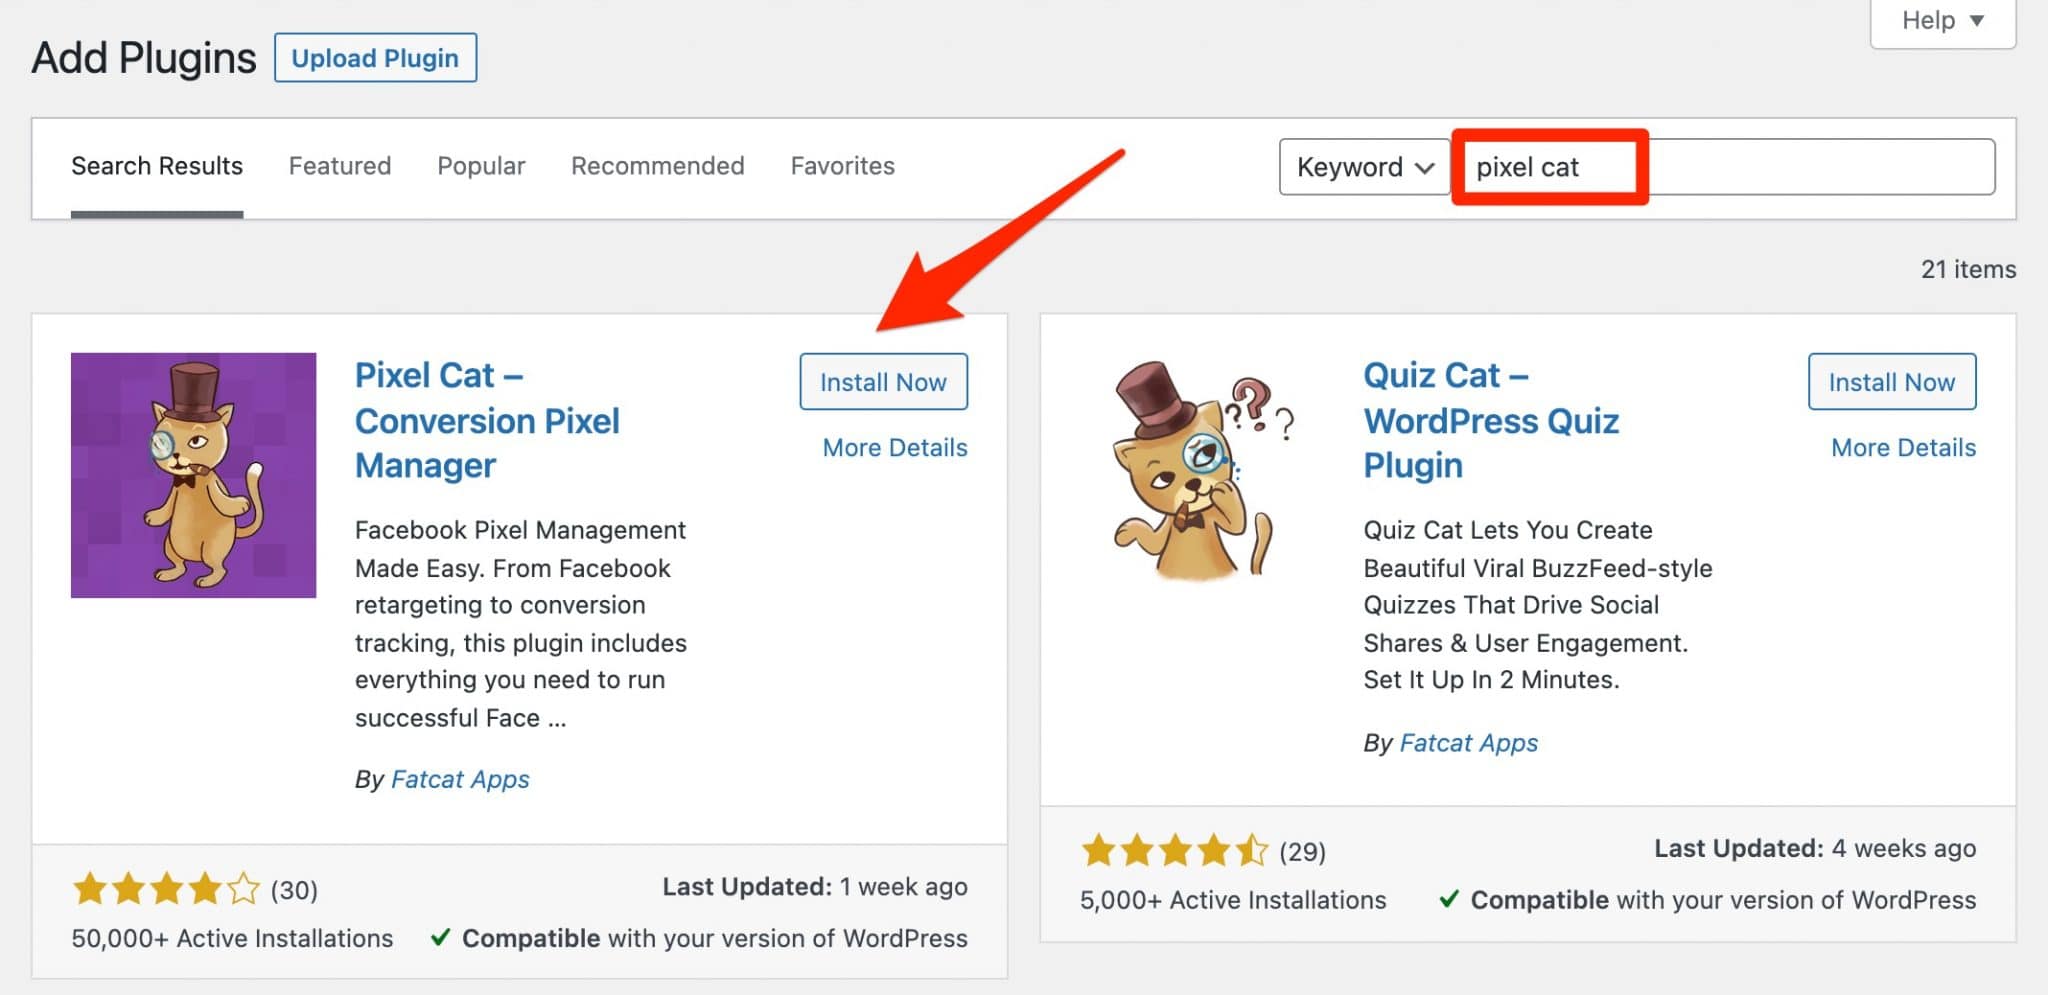
Install and activate the plugin. On its settings page, on the “Main” tab, click on the “Add pixel” button to add the Facebook pixel to your website.
A pop-up window will then be highlighted. All you have to do is enter the ID of your pixel, which you can find in your Event Manager.
Click on the “Add” button:
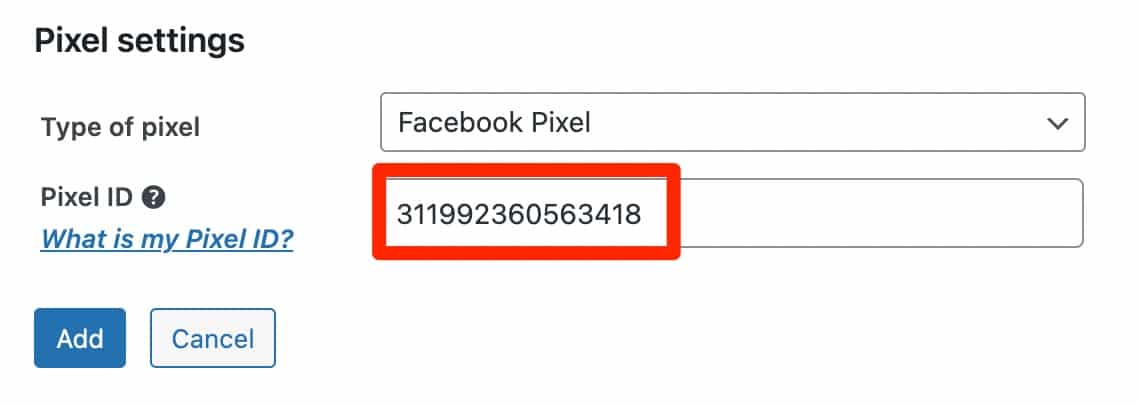
So what else? Well, it’s all good! Congratulations, your Facebook pixel on WordPress is now installed. I’ll show you how to check that it’s working properly in Part 4 of this article.
To set up your ads, I suggest you use the Facebook Ads Manager, which is much more complete than Pixel Cat.
Nevertheless, the latter allows you to make some adjustments while remaining on WordPress, which may suit you.
For example, you can set up events based on certain actions performed by visitors to your site: visiting a page, clicking on a link, hovering over an element.
Pixel Cat also allows you to activate the Facebook pixel on WooCommerce. You will be able to dynamically retarget your visitors with ads on Facebook or Instagram based on what they have viewed on your site (product, category etc.).
Download the Pixel Cat plugin:
Everything is OK with you? I bet you’ve dropped a big “Yes”, so let’s move on!
If you don’t want to install an extra plugin on your website and aren’t afraid to get your hands dirty, you can also install your pixel manually.
That’s the subject of the next part.
How to install the pixel manually?
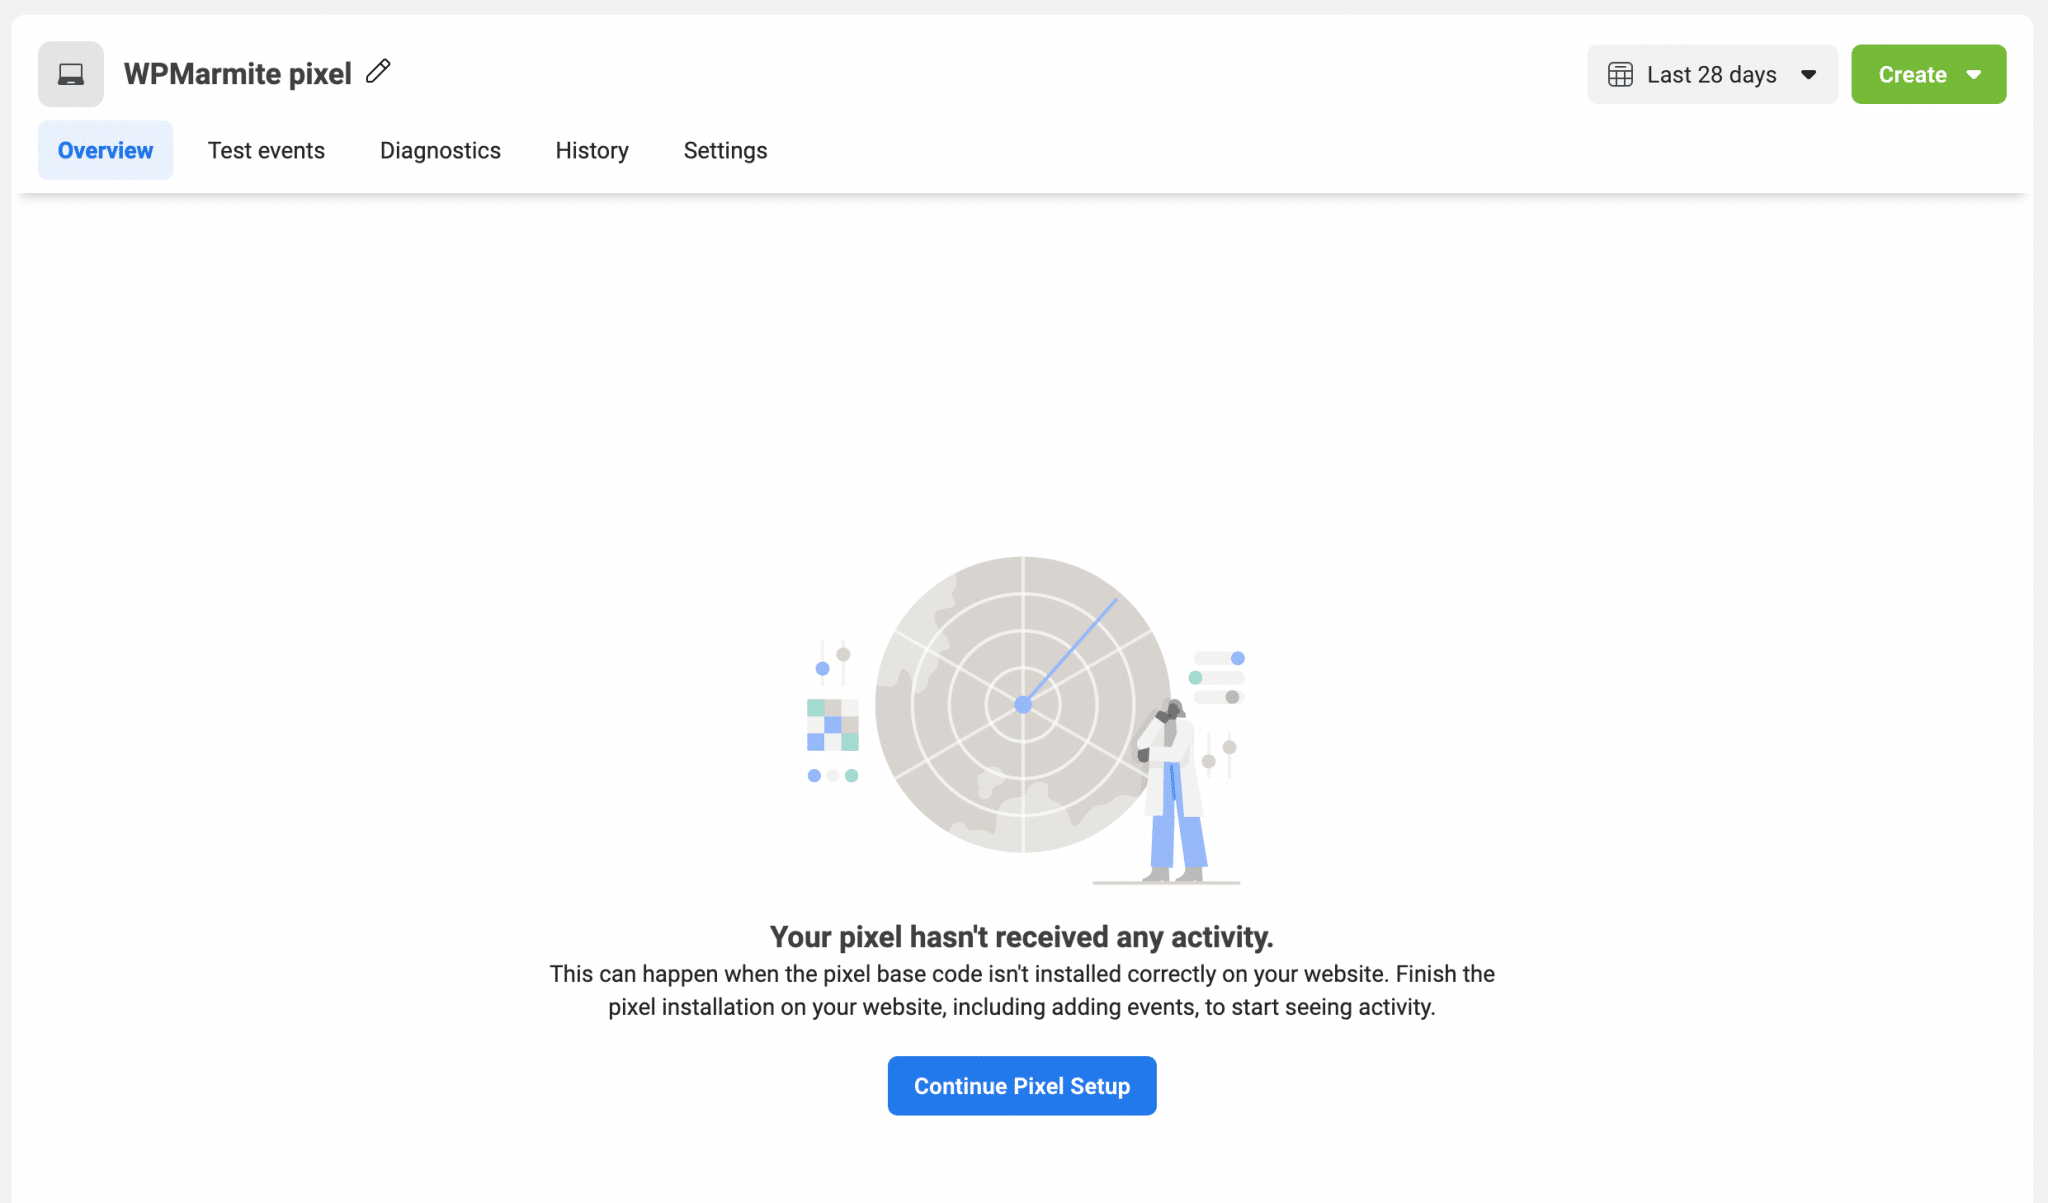
To do this, go back to your Facebook Ads account (in the Events Manager), and click on Continue Pixel Setup.
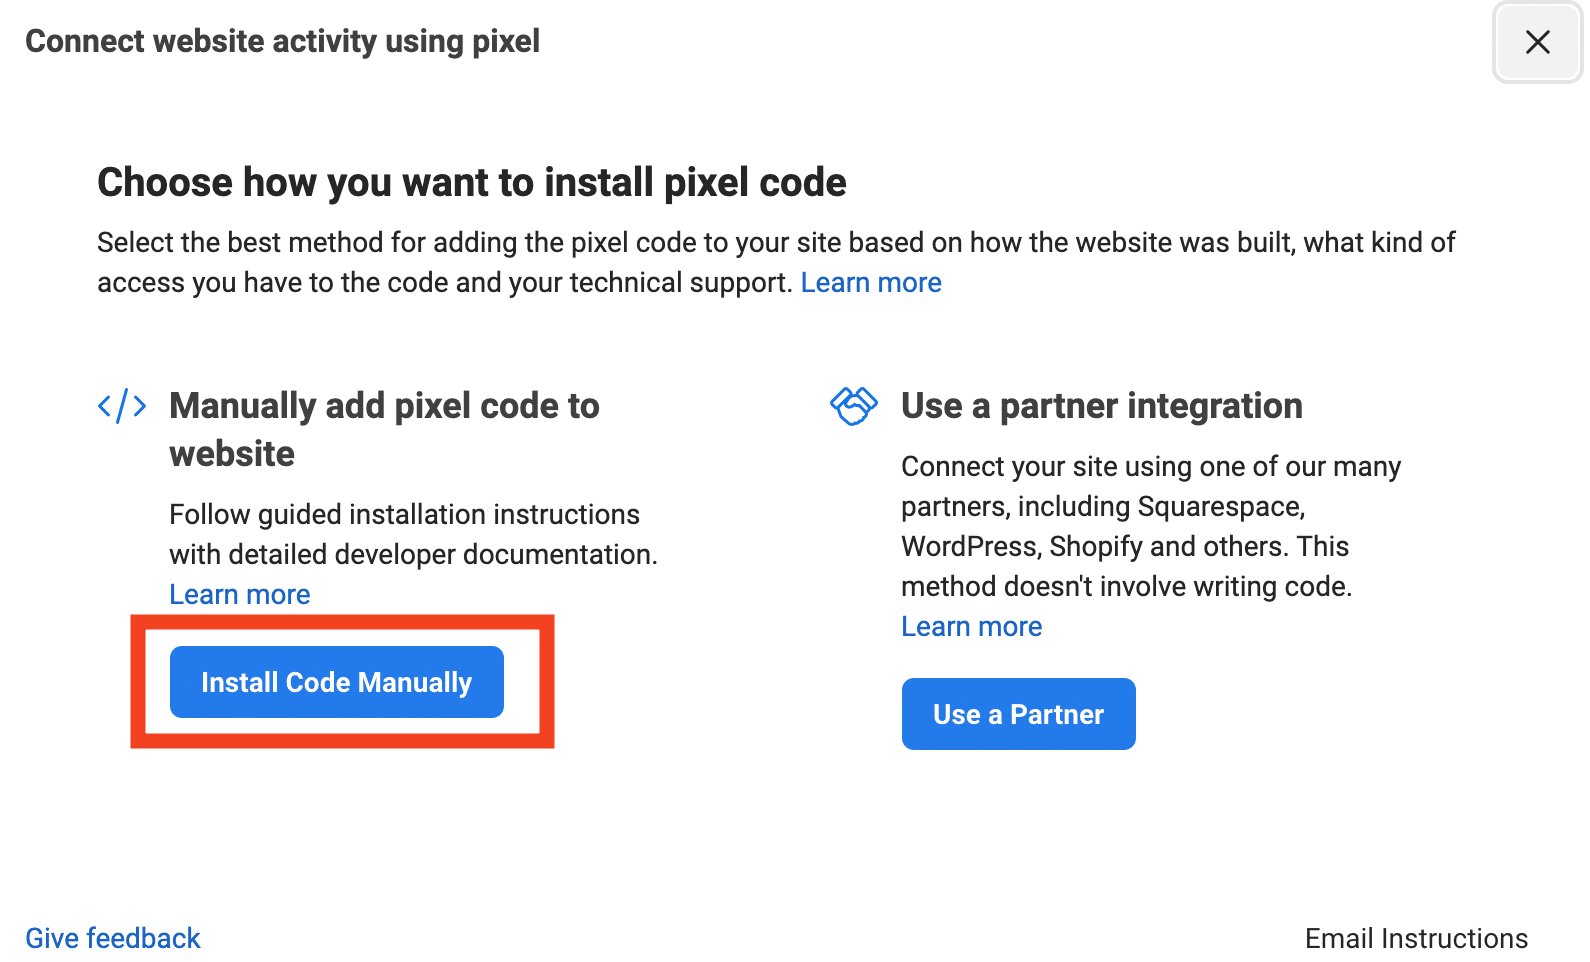
In the next window, choose “Install Code Manually”.
You will then have access to the JavaScript code of your pixel, which you can copy and paste on your WordPress site:
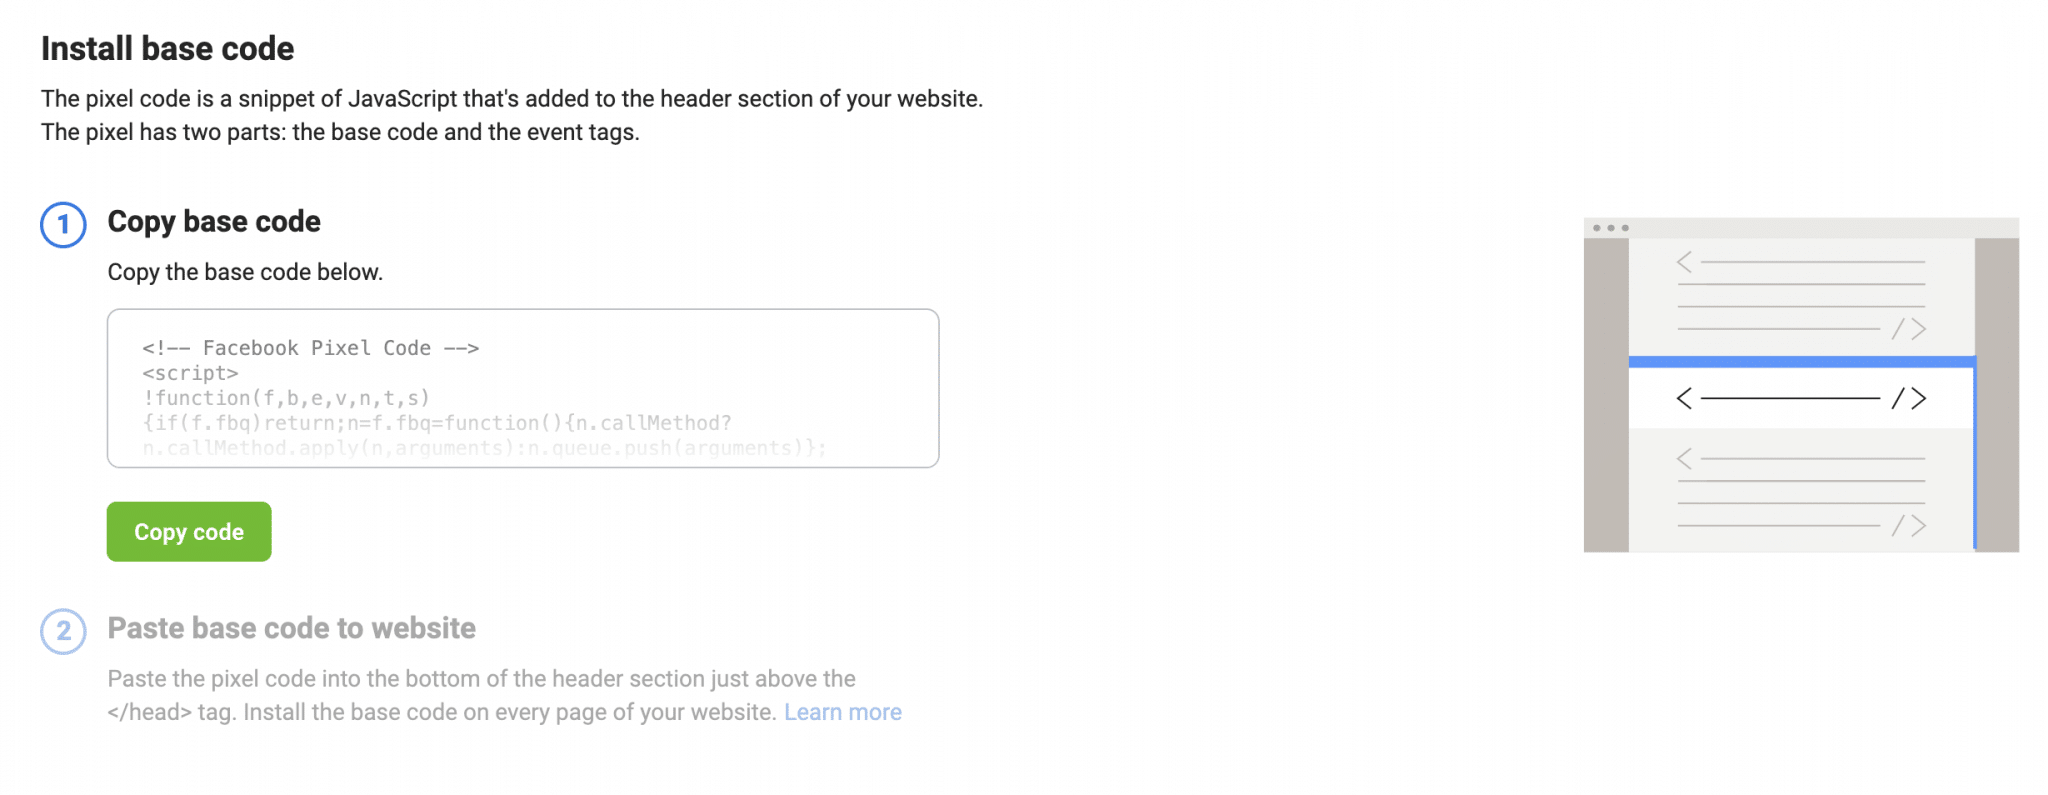
As you can see from the above screenshot, Facebook recommends that you paste the pixel code right above the tag.
However, the most appropriate way to do this is to paste the code snippet into your child theme’s functions.php file.
This little secretive thing is located in your theme folder by following this path: wp-content > themes > name of your theme > functions.php.
If you use a child theme (well done!): copy and paste the functions.php file from your parent theme into your child theme folder.
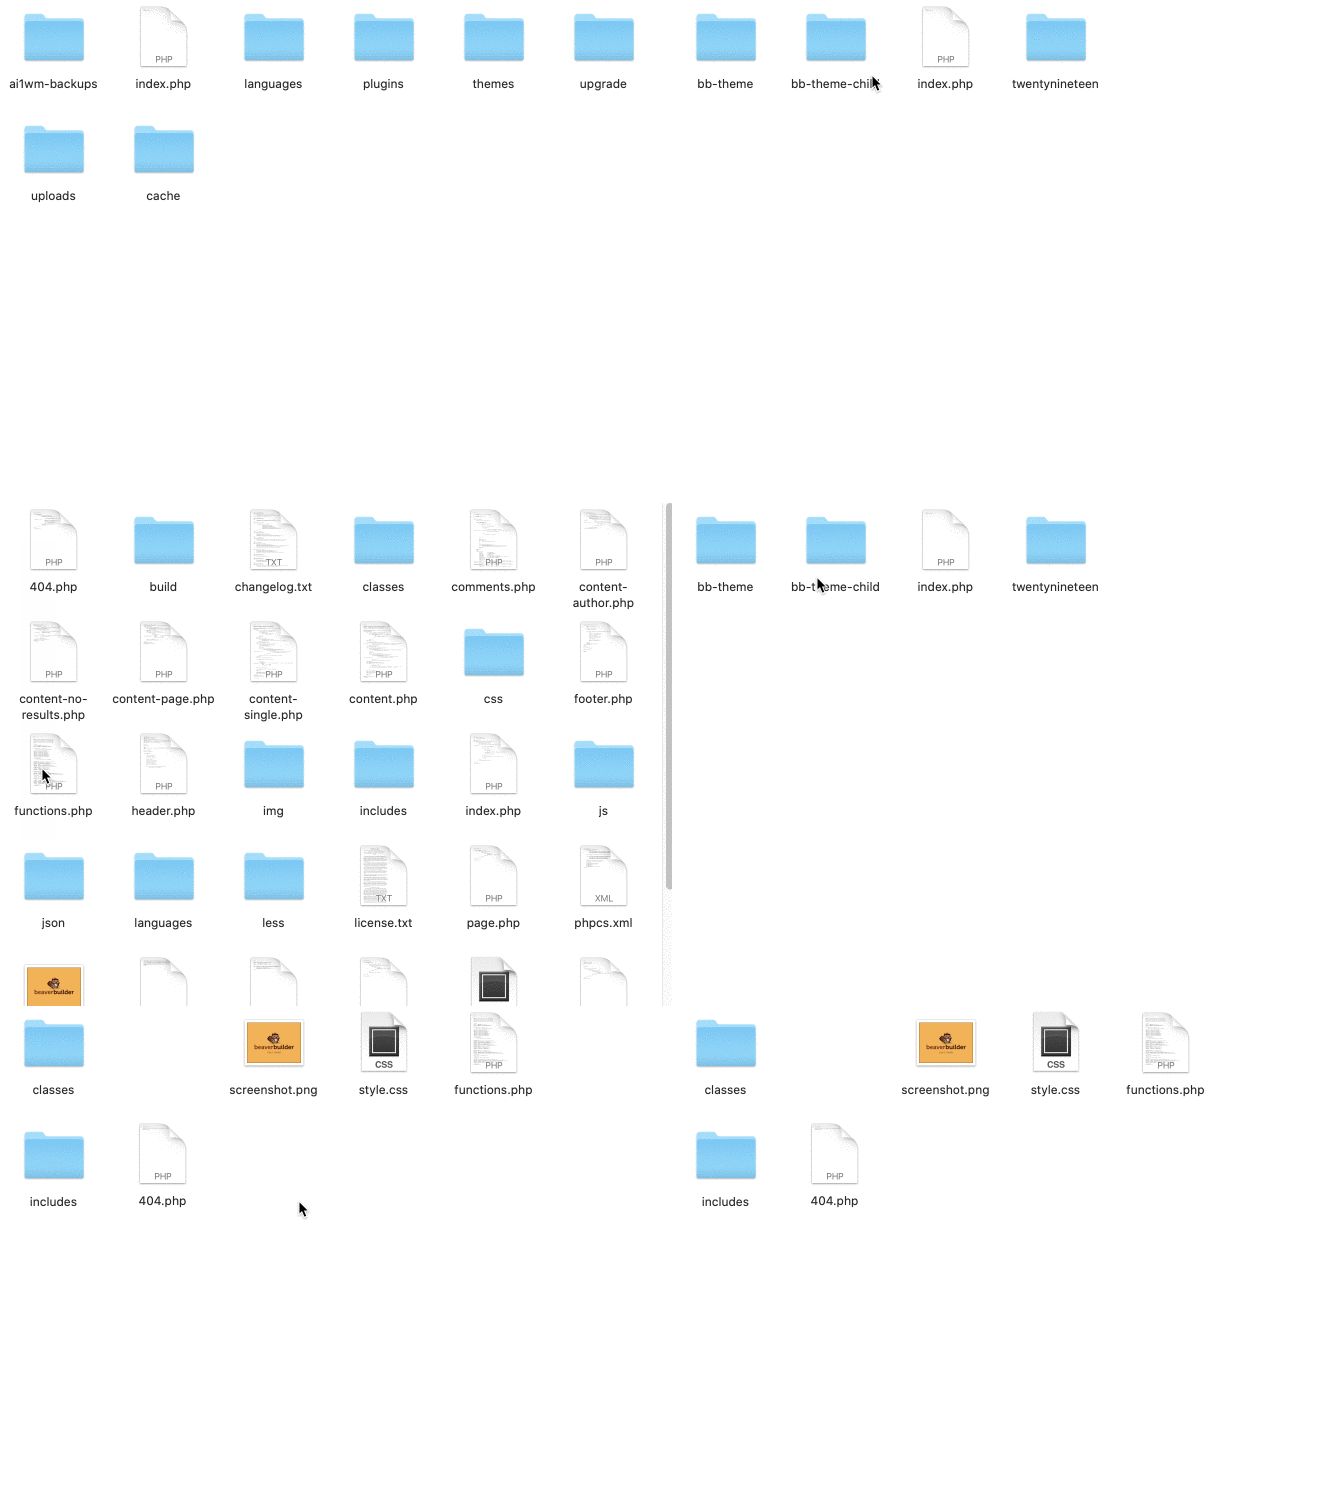
Then open functions.php and add the code below at the end of the file. Remember to paste the Facebook pixel code instead of the text /* Pixel code here */, of course:
add_action('wp_head', 'wpm_add_fbpixel'); function wpm_add_fbpixel(){ ?> /* Pixel code here */ <?php }; Save your file and you can chill, you’re good to go. Phew, that went well!
Last technical check before enjoying your Facebook pixel on WordPress: check that it’s working properly!
How to know if your pixel works on WordPress?
Use the Event Manager
To make sure that all this is working, go back to your Event Manager.
If it is working, you will see graphical activity for the period you selected (e.g., the last 28 days).
If not, you will see the following message: “Your pixel hasn’t received any activity“:
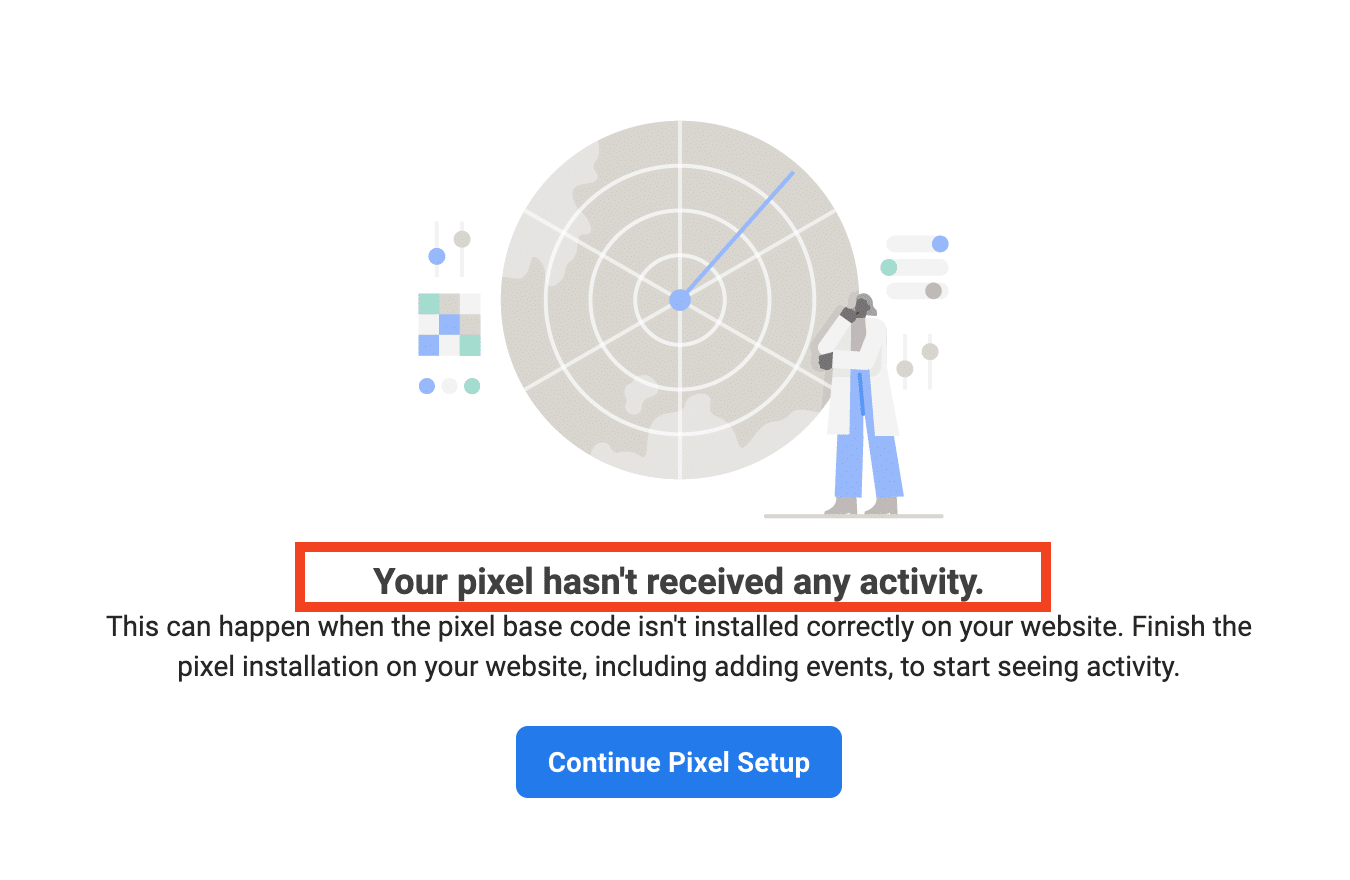
Make sure you set it up correctly by clicking the “Continue Pixel Setup” button.
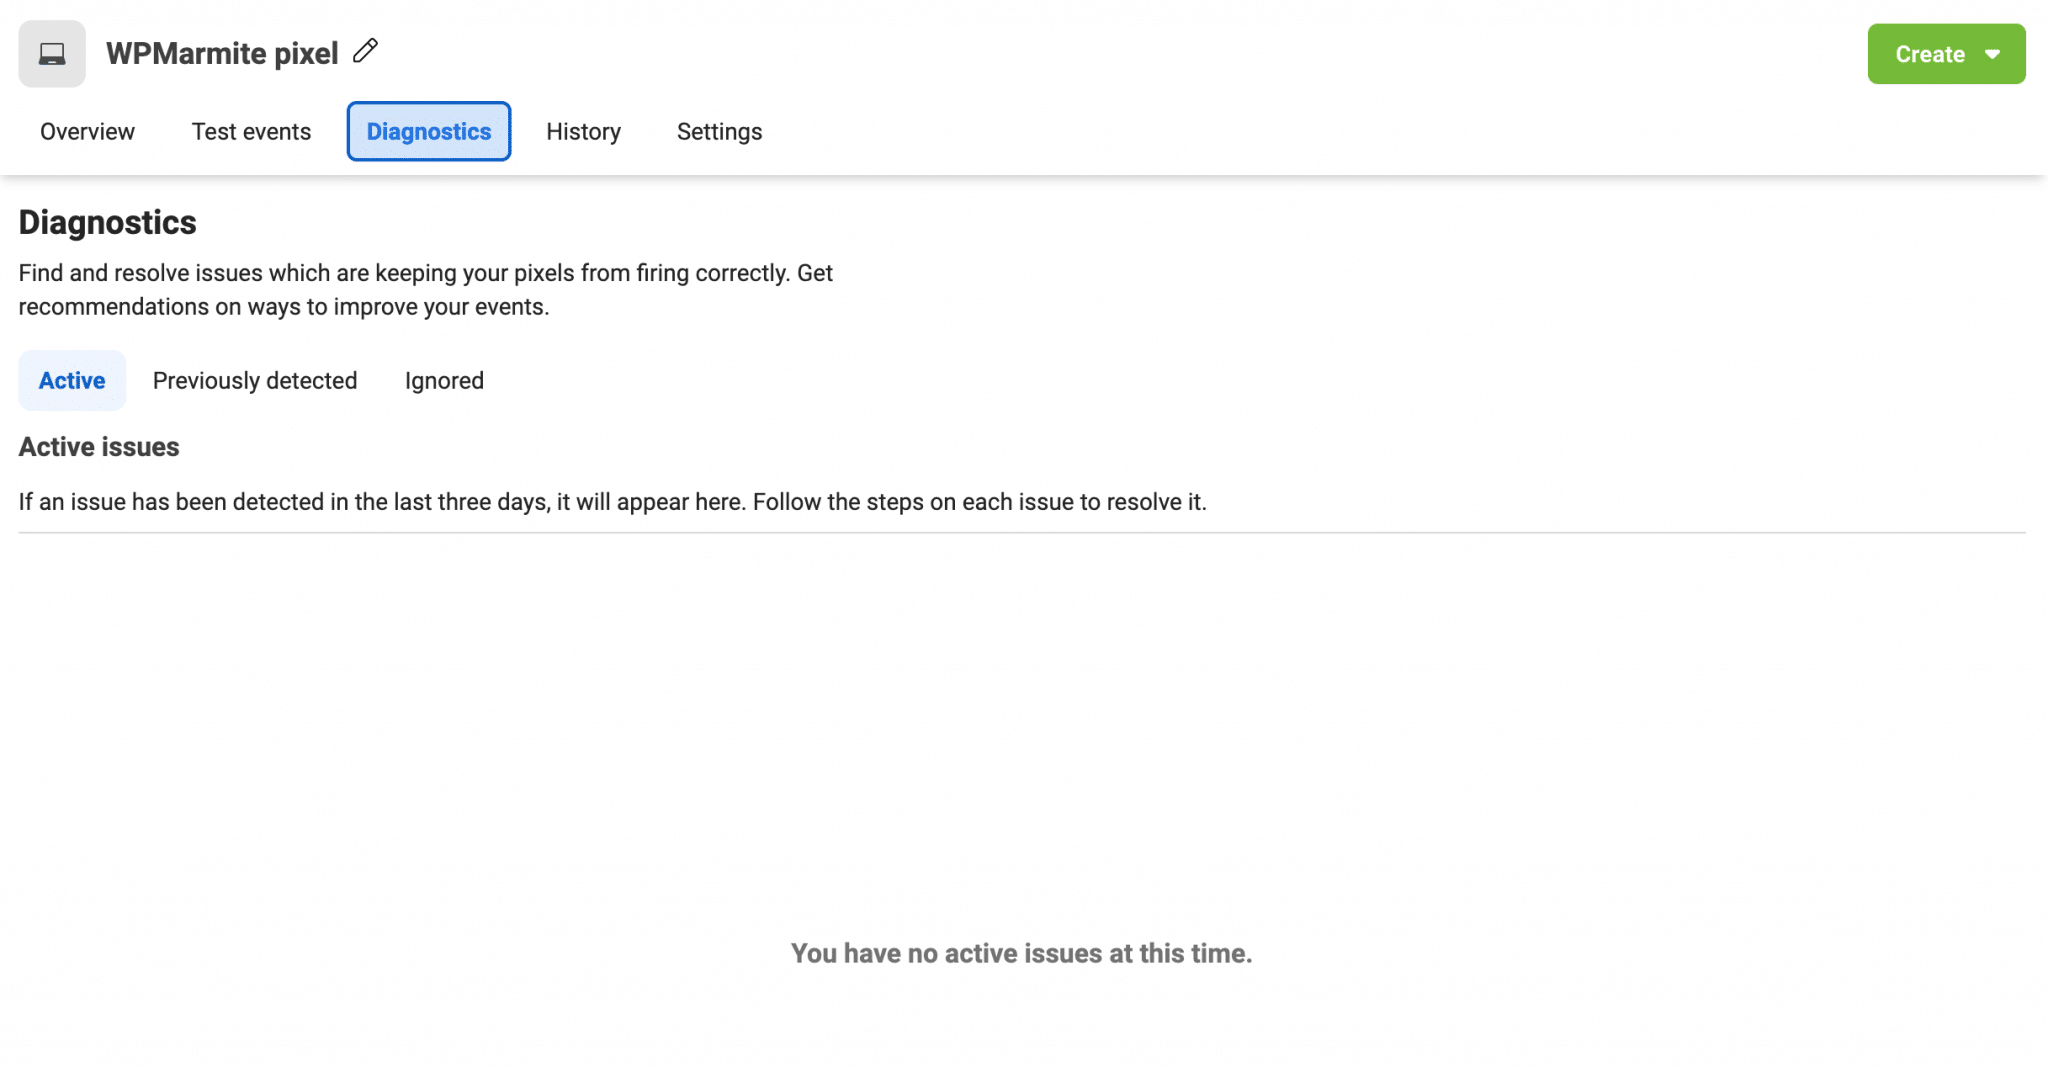
If your pixel was working fine until now and is not responding for some reason, take a look at the “Diagnostics” tab of the Event Manager.
There you will find any problems that have been detected, as well as recommendations for improving your event configuration:
Use the Facebook Pixel Helper extension
Another solution: use the Chrome extension called Facebook Pixel Helper.

You’ll find it by doing a search on your favorite browser, or by going to the Chrome Web Store.
When you add it to Google’s browser, you’ll see it appear in your toolbar.

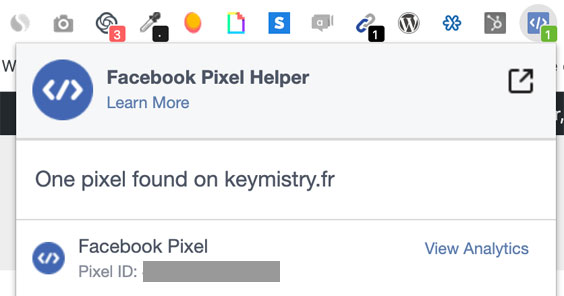
Finish by going to your website and click on the relevant Chrome extension.
If it works, you should get this kind of message:
How to use your pixel: standard events and custom conversions
All the lights are green, your pixel is working? Perfect. Next, you have to ask yourself how to use your pixel and get the most out of it, right?
To guide you as best as possible, we will focus on the idea of an “event”, i.e. an action performed by a visitor on your website, which will trigger the Facebook pixel.
Standard events
As the famous social network explains:
Events are actions that happen on your website. Standard events are predefined by Facebook and can be used to log conversions, optimize for conversions and build audiences.
Source: Business Help Centre Specifications for Facebook Pixel Standard Events
In total, there are 17 of them.

To collect data on a particular event, you will need to install the small piece of code corresponding to the desired action (e.g. add to cart, completed registration etc.) inside the base code of your Facebook pixel, on the page of your choice.
That’s not the purpose of this article, so I won’t give you a detailed tutorial.
However, to help you, I invite you to check out this page which explains how to proceed to use one or more standard events.
If you don’t feel like you can handle the code, Facebook has another solution: custom conversions.
Custom Conversions
According to Facebook, they allow you to “set up standard events without additional code” by using, for example, a URL on your website to find out where a specific action has taken place.
Facebook adds that with custom conversions, “you can filter all purchases to measure just purchases of women’s shoes over USD 40”.
FYI, the social network recommends using custom conversions when you want to:
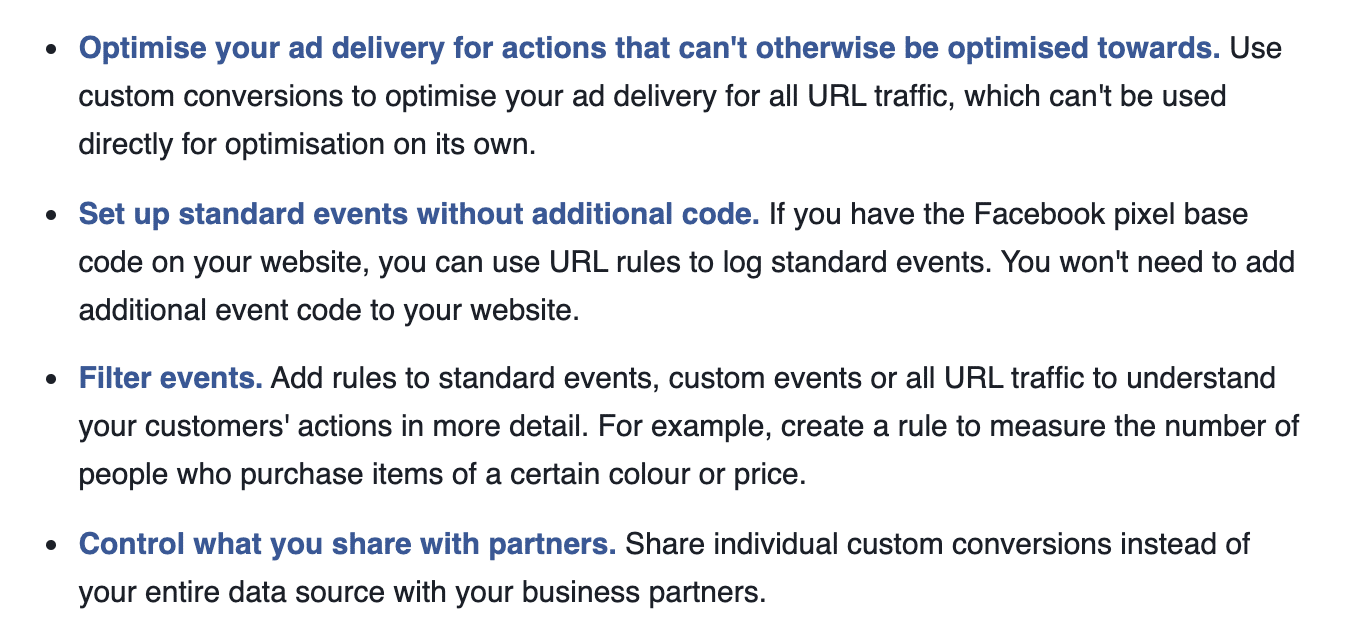
To create a custom conversion, here’s how it works.
What about GDPR compliance?
Among the many questions people have about the Facebook pixel, one that comes up frequently on the table:
Is it GDPR compliant?
That’s quite a tricky question but we’ll try to give you some answers.
The subject being technical, and given that it is not our job, we can only advise you to get in touch with specialists in the field (lawyers, for example).
Let’s start by briefly coming back to what the GDPR is. It is the acronym for the General Data Protection Regulation, a European regulation that came into force in 2018.
Its purpose? To ensure that every individual has control and safety of the personal data they disseminate while browsing the web.
That’s it for the general functioning. Back to Facebook. The company created by Marc Zuckerberg claims that it is GDPR compliant, even though several complaints and lawsuits have been filed against the company in the past.
Then it’s on your side. Or rather on your WordPress website.
In fact, you must “obtain the individual’s prior consent to store and access cookies or other information on their device,” as Facebook says.
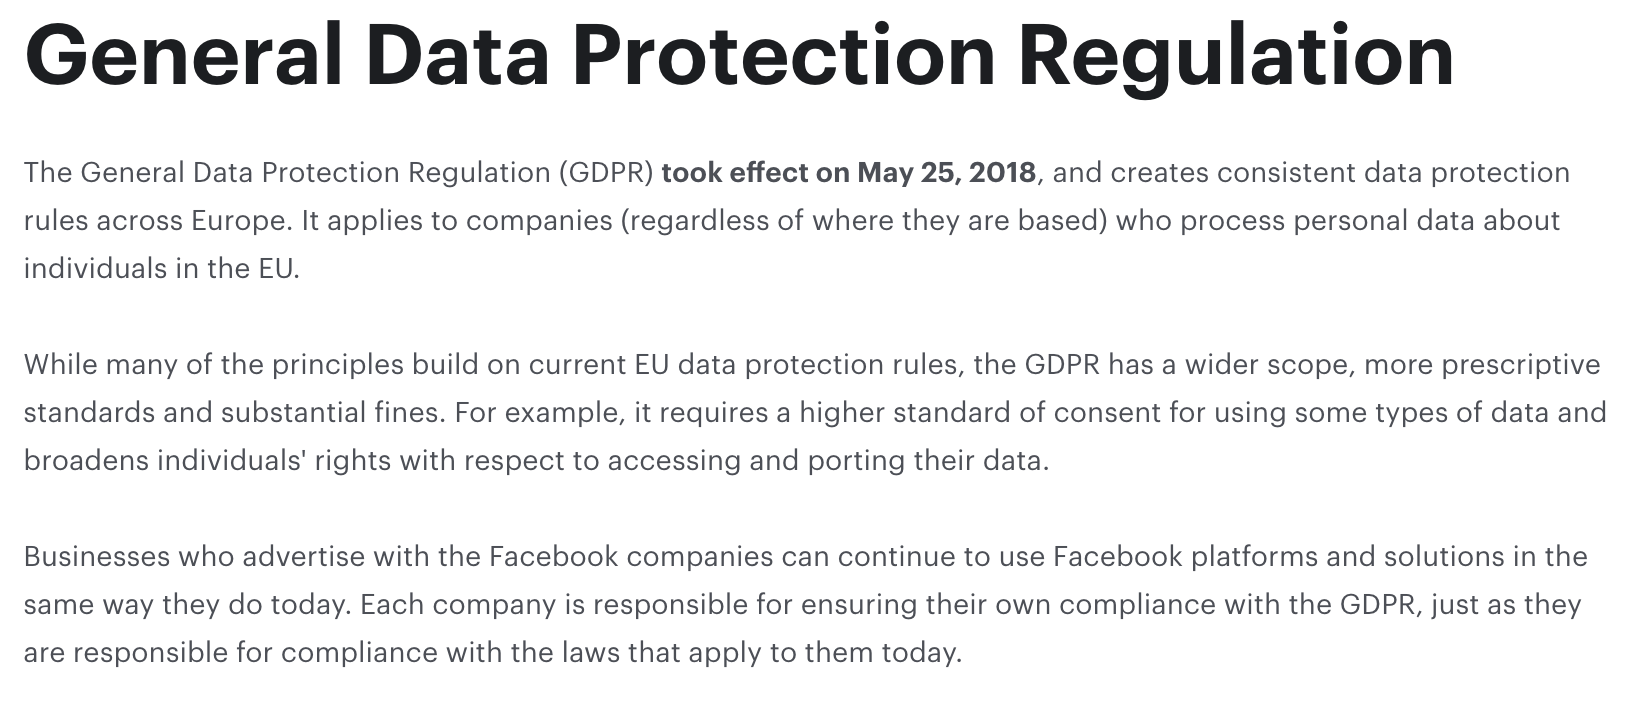
That’s where it gets a little messy, because you hear everything and anything on it.
To get a clearer picture, go to the European Commission website, to which Facebook redirects you when it comes to accessing the specific GDPR regulations for each country.
If you go to the relevant page, you will find useful info. Also, check out all the details you need to know about GDPR compliance.
I advise you to check out the international dimension of data protection page where you’ll find more info to be GDPR compliant.
They will give you a lot of other tips to make the right modifications on your website.
You can take a deep breath again. You’re coming to the end of this post. All we have to do now is summarize everything you’ve learned.
Take a look at our post dedicated to GDPR compliance right here.
So, pixel or no pixel?
Don’t miss it: it’s quick to integrate, and you now know how to add it to your website manually, or using a plugin.
From now on, I’ll leave it up to you. Do you plan to use this little piece of code soon?
Or if you’re already using it, how did you do about it?
Use the comments below to share your feedback and other tips.

Receive the next posts for free and access exclusive resources. More than 20,000 people have done it, why not you?





This tutorial saved my day! Made it soo much easier to install everything connected to the pixel. Thanks a bunch 🙂