Do you know what takes the longest to load on a page? CSS files? No.
JavaScript files? Still no. Alright, I’ll give you a little help to find the answer. It’s the images.
They represent more than 50% of the page loading time. Amazing, isn’t it?
So you’d better reduce their weight, or you’ll end up turning your beautiful WordPress site into an oxcart (personally, I prefer the rocket for my site).

To give them a slimming treatment, without altering them aesthetically, there is a great plugin on WordPress: Imagify. Simple, efficient and functional, it’s really worth a look.
I’ll tell you all about it in this guide, which explains how to configure it and use it like a pro (and many other things).
Overview
Originally written in February 2016, this article was updated in April 2021.
What is Imagify?
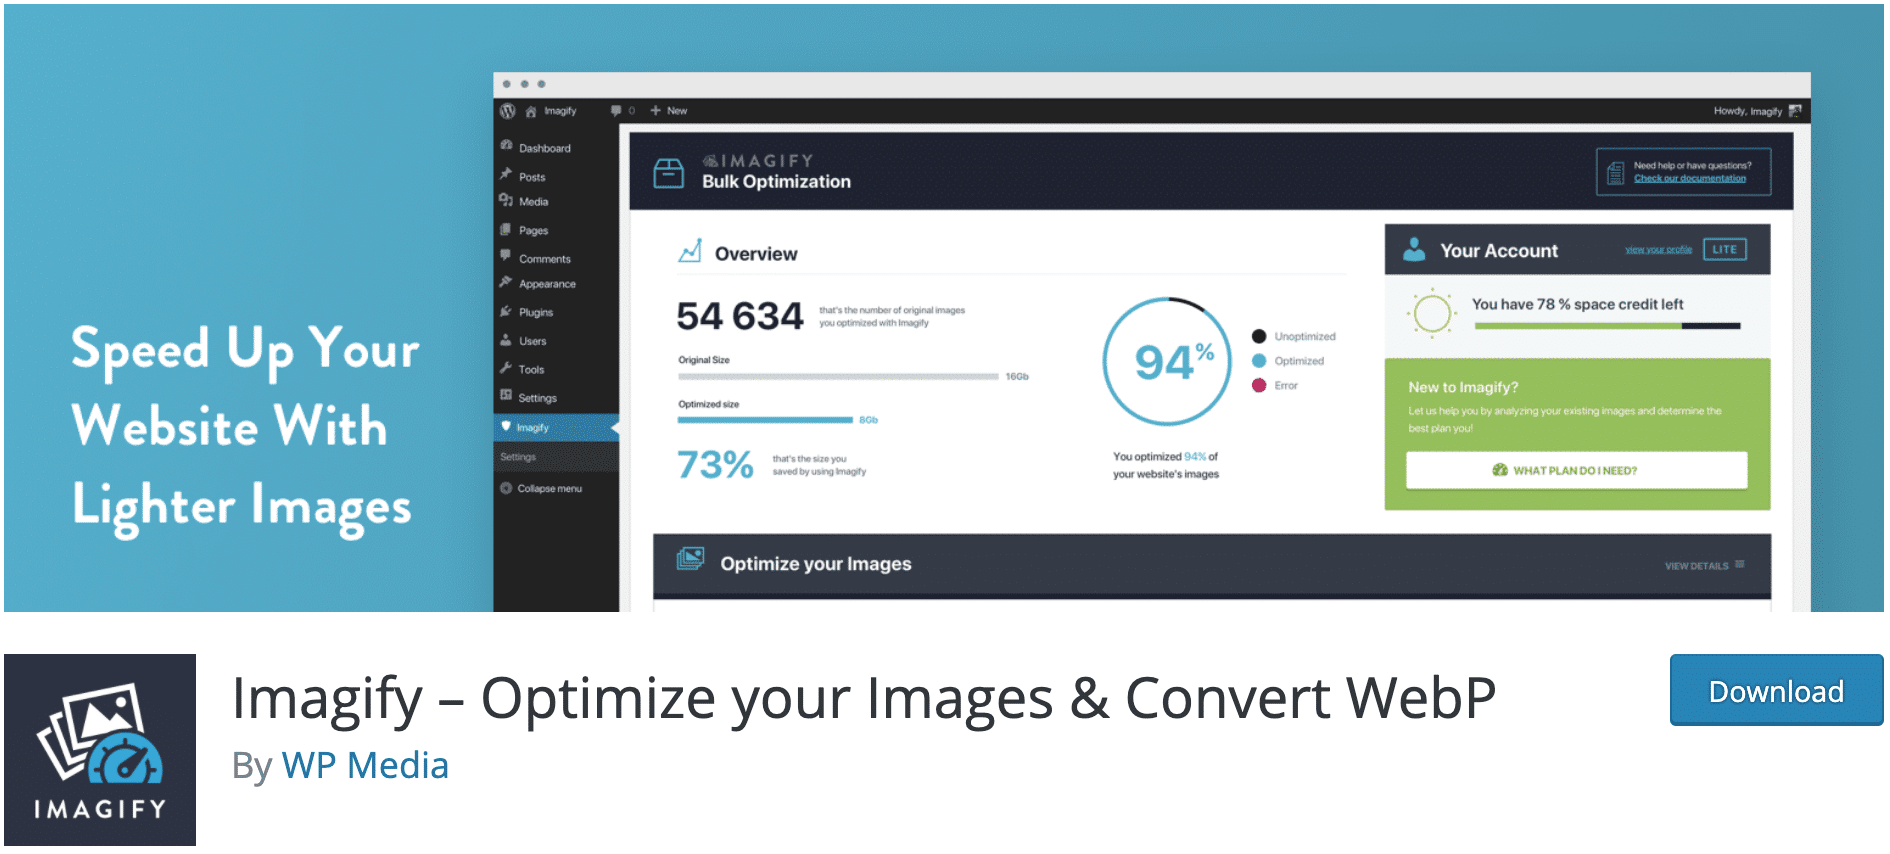
Imagify is a WordPress plugin that allows you to reduce the weight of the images you want to add to your site, as well as those already in your Media Library. All this, without any loss of quality. Thanks to this, you improve the loading time of your site and the user experience of your visitors.
We are talking about a plugin, but not only, to be precise. Imagify can be used in two different ways:
- Directly online, on their dedicated website, as a SaaS (Software as a Service) solution. In this case, you don’t have to install the tool on your site.
- From your WordPress dashboard, after activating the dedicated plugin present on the official directory. For your information, Imagify offers a free version, with which you can optimize 20MB of images per month (about 200 images) on an unlimited number of sites. Two premium licenses allow you to increase this gauge, to take advantage of either 500MB or unlimited use (more info in the pricing section).
Imagify, a tool made in France
With 400,000 active installations at the time of writing, Imagify is one of the most famous plugins in the official directory for compressing images on WordPress.
Among its main competitors, you may know Smush, Optimole or ShortPixel.
Compared to these last three, Imagify is a 100% French solution. Behind it, we find the WP Media team, a startup wanting to “make the web faster, lighter and better”.
We can say that the team cares about their mission, since WP Media is also at the helm of the famous caching plugin WP Rocket (aff), which helps you speed up your site without any effort on your side.
Want to learn how to set up the caching plugin known to be the most powerful by WordPress experts? Check out our complete guide to WP Rocket!
And just to be complete, WP Media also offers a handy plugin, called Lazy Load, to enable lazy load on your site.
Lazy load is a technique that allows you to load certain elements of your page (e.g. images) only when the visitor scrolls through the content.
Optimizing the weight of your images seems secondary at this stage? Just below, you will discover that the use of a tool like Imagify is essential for two major reasons.

Why is it so important to optimize the weight of your images?
A major impact on performance, user experience and conversions.
Images are responsible for more than 50% of the weight of a web page, as I mentioned in the introduction of this article.
You understand the importance of taking care of them, making sure they are not too heavy.
Otherwise, the loading time of your pages may take a nice slap in the face, which can hurt on two levels.
First, for the user experience (UX). This refers to the quality of the experience a visitor has while browsing your website.
If your WordPress site takes a long time to load, there is a good chance that your visitor will go elsewhere (and not come back). By the way, take a look at these stats on the subject, which speak for themselves:
- Nearly one out of two Internet users indicated that the thing that annoys them the most when surfing the web is that a site loads slowly.
- Google, the most used search engine in the world, indicates that the probability of bouncing increases by 32% when the page loading time goes from 1 to 3 seconds.

Optimizing the weight of images will avoid these inconveniences, and will make your site faster. This is also important for your SEO strategy.
The speed of a site is one of the 200 criteria taken into account by Google to rank a page in the results of its search engine (it is not the most important, but it counts a bit), especially for searches made on smartphones.
Moreover, a slow site will make it more difficult for Google’s robots to crawl your pages, which can negatively impact the indexing of your content.
Finally, a site that takes a long time to load due to heavy images can also significantly reduce your conversions (a specific action you want your visitor to perform, such as buying a product).
This is especially glaring for online stores. If you have a WooCommerce shop, pay close attention to the size and weight of your product images! For your information, the conversion rate drops by an average of 4.42% each time your loading time is delayed by one second.
If images play a major role in the loading speed of a site, there are many other optimizations to make to turn your WordPress site into a rocket. Find out which ones in this WPMarmite blog post.
Before talking about Imagify and its settings in detail, let’s focus on three very important elements.
3 good habits to have with your images
Don’t send oversized images
Whether you are a photo enthusiast or not, the files created by a digital camera are very large nowadays.
They can weigh from 4 to 8Mb, sometimes more! It all depends on your settings.
To print them or to edit them on your computer, it’s great.
However, if you want to publish them on the web, it’s more annoying.
Indeed, if a page has to load a dozen 8MB images, your visitors had better be connected to the optical fiber…
The best thing to do is to resize your images before sending them to your site. 2000 pixels wide is more than enough.
Any image editor can do it, but I have to admit that it can be tedious in the long run.
Choose the right file format
You are probably familiar with the three main universal image formats: JPG (or JPEG), PNG and GIF.
Do you know how they differ? It’s a bit technical, but it’s all in the way they are encoded. Basically, how the images are stored in the file.
This difference means that some will be lighter in JPG than in PNG and vice versa.
To help you choose the best format, remember that:
- JPG = photos, images with thousands of colors or shades of gray.
- PNG = diagrams, simple images, logos or images with transparency.
- GIF = animated images. They are often very heavy. To reduce their weight before uploading them to your WordPress site, use the Ezgif tool.
You can learn more about image formats with this infographic and precise details for each format.
Google also offers its own image format, called WebP. It compresses images even more than JPG or PNG, without loss of quality. More info about this in the Imagify settings section.
Compress images before sending them
Before sending images to a site, I always take care to compress them.
For example, after editing an image in Photoshop, I always use File > Save As to find the best compromise between weight and quality:
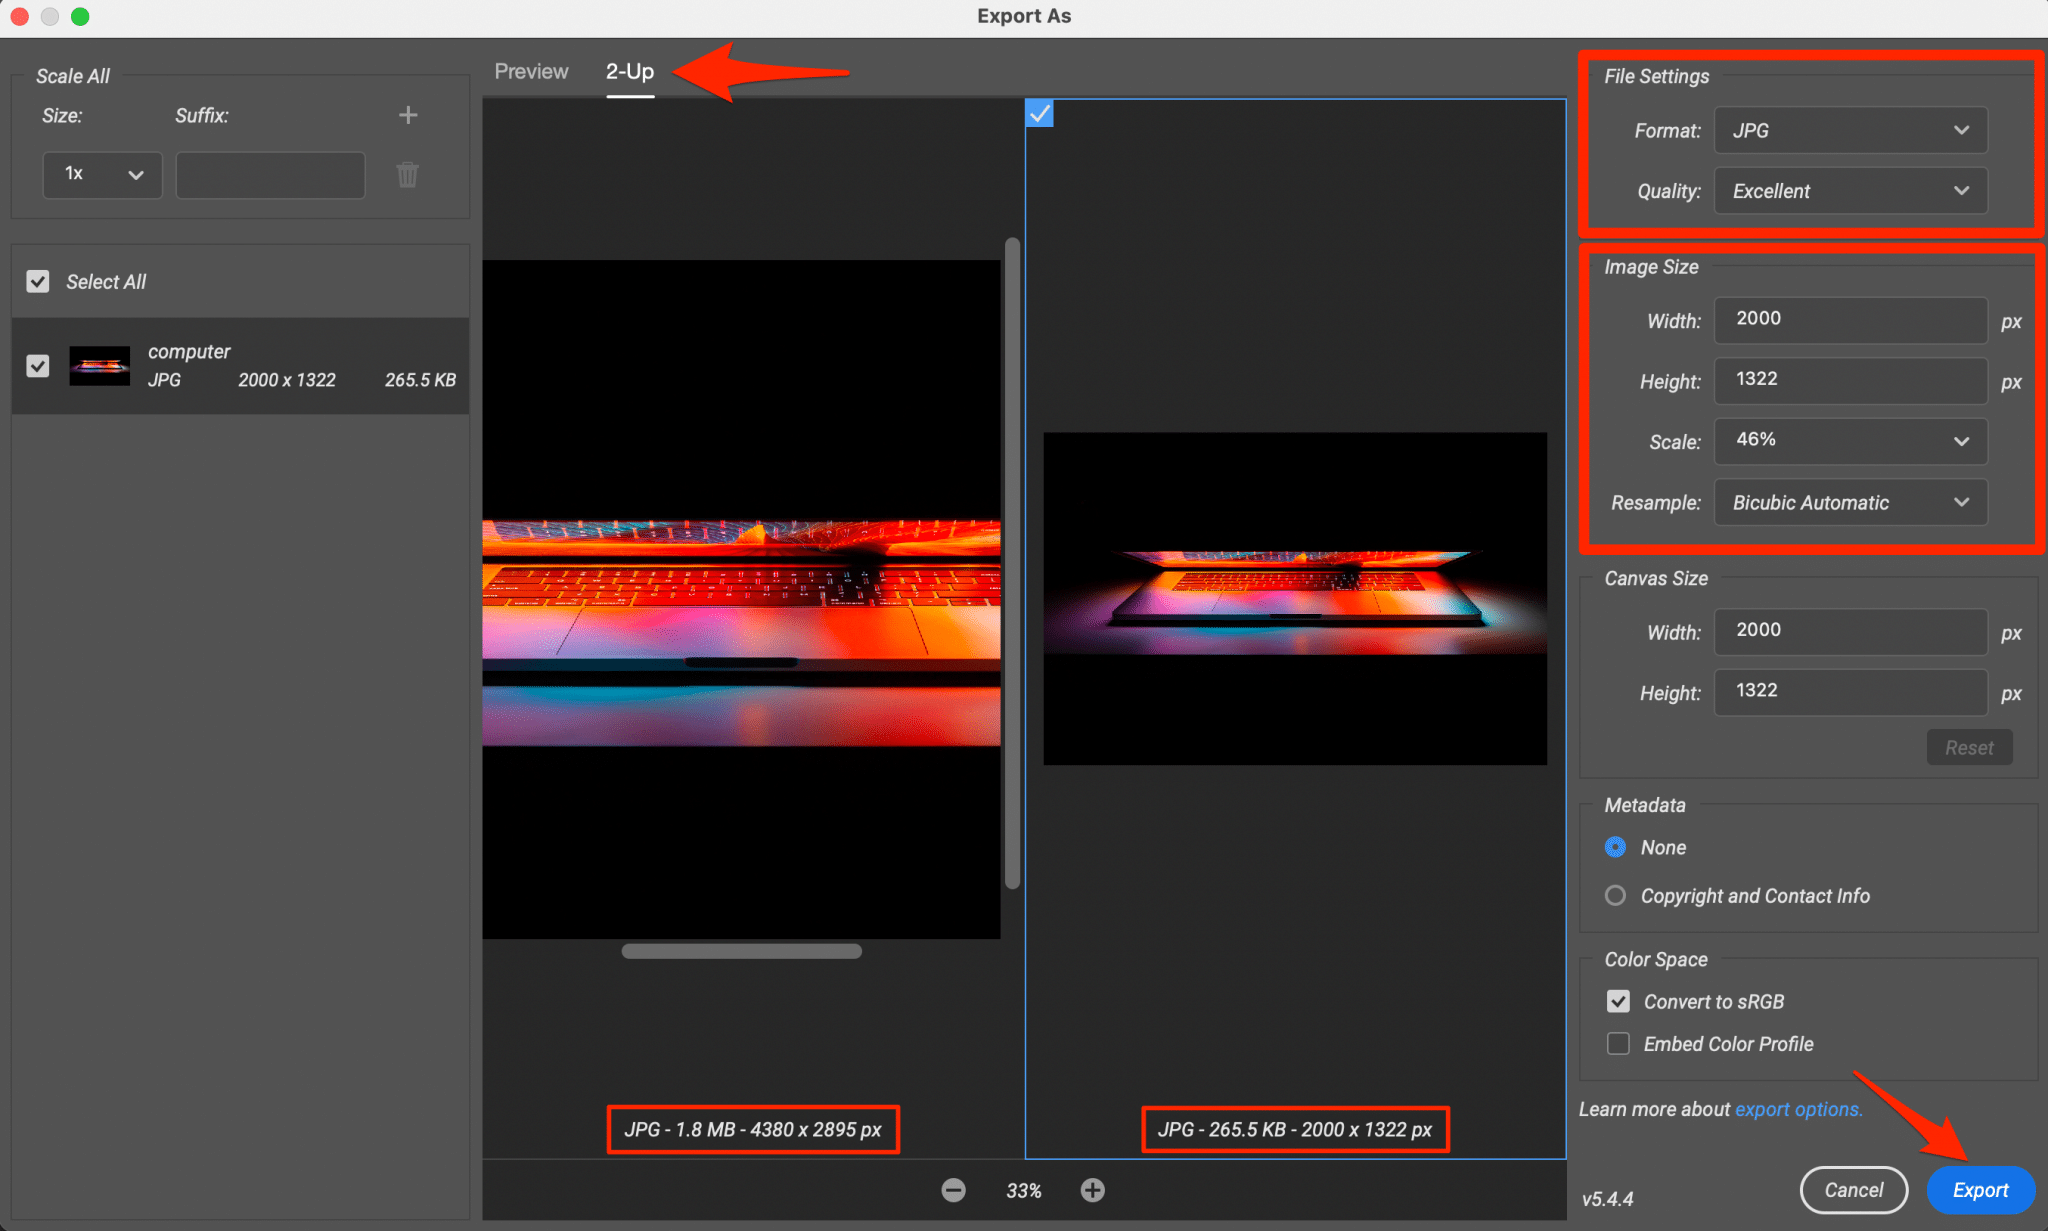
Switch to 2-Up mode and look at the final weight, at the bottom of the screenshot (265.5 Kb against 1.8 Mb). You can play with the formats and settings at the top right (and possibly the size, just below).
Obviously you don’t want to downgrade the quality too much, otherwise the rendering will be horrible.
If you are on a Mac, I recommend the ImageOptim tool to compress more without losing quality.
On the other hand, if you don’t use Photoshop, you should know that there are also several free online tools to help you put your images on a slimming diet, such as:
That’s it for the basic advice. However, you’re going to say that this can be quite restrictive in the long run, especially if you have many images to optimize. And you are right!
Optimizing them one by one can quickly become very, very time-consuming. To go faster, gain in efficiency, and automate the whole process, Imagify is a great ally.
In addition, it will help you optimize the files already in your Media Library. What more could you ask for? Perhaps a brief summary of the benefits of Imagify, for a start.

The little benefits of Imagify on WordPress
If Imagify is so successful with its users, it’s because it combines several very interesting advantages:
- Its interface is intuitive and easy to use.
- If you choose to use the dedicated plugin, rather than the online service, you can optimize all your images from your WordPress dashboard.
- Reducing the weight of your images is quick and easy: everything is done in a few clicks and in an automated way.
- Your images can be resized on the fly (width, height).
- The three universal image formats are supported (JPG, PNG, GIF), with the addition of the PDF format.
- Imagify uses its own servers to optimize your photos, which allows you to consume less bandwidth at your web host, while preserving the loading time of your pages.
- It is possible to restore images after compression, if you have activated the backup option.
To see how all this works, let’s dive into our step by step tutorial.

How to set up and use Imagify on WordPress?
I told you earlier, Imagify is a service. This means that it is not only available as a plugin. So anyone can use it, whether they use WordPress or not.
How to use the online service?
To take advantage of the online tool, you just have to go to Imagify to start immediately. However, I advise you to create a free account to benefit from more features.
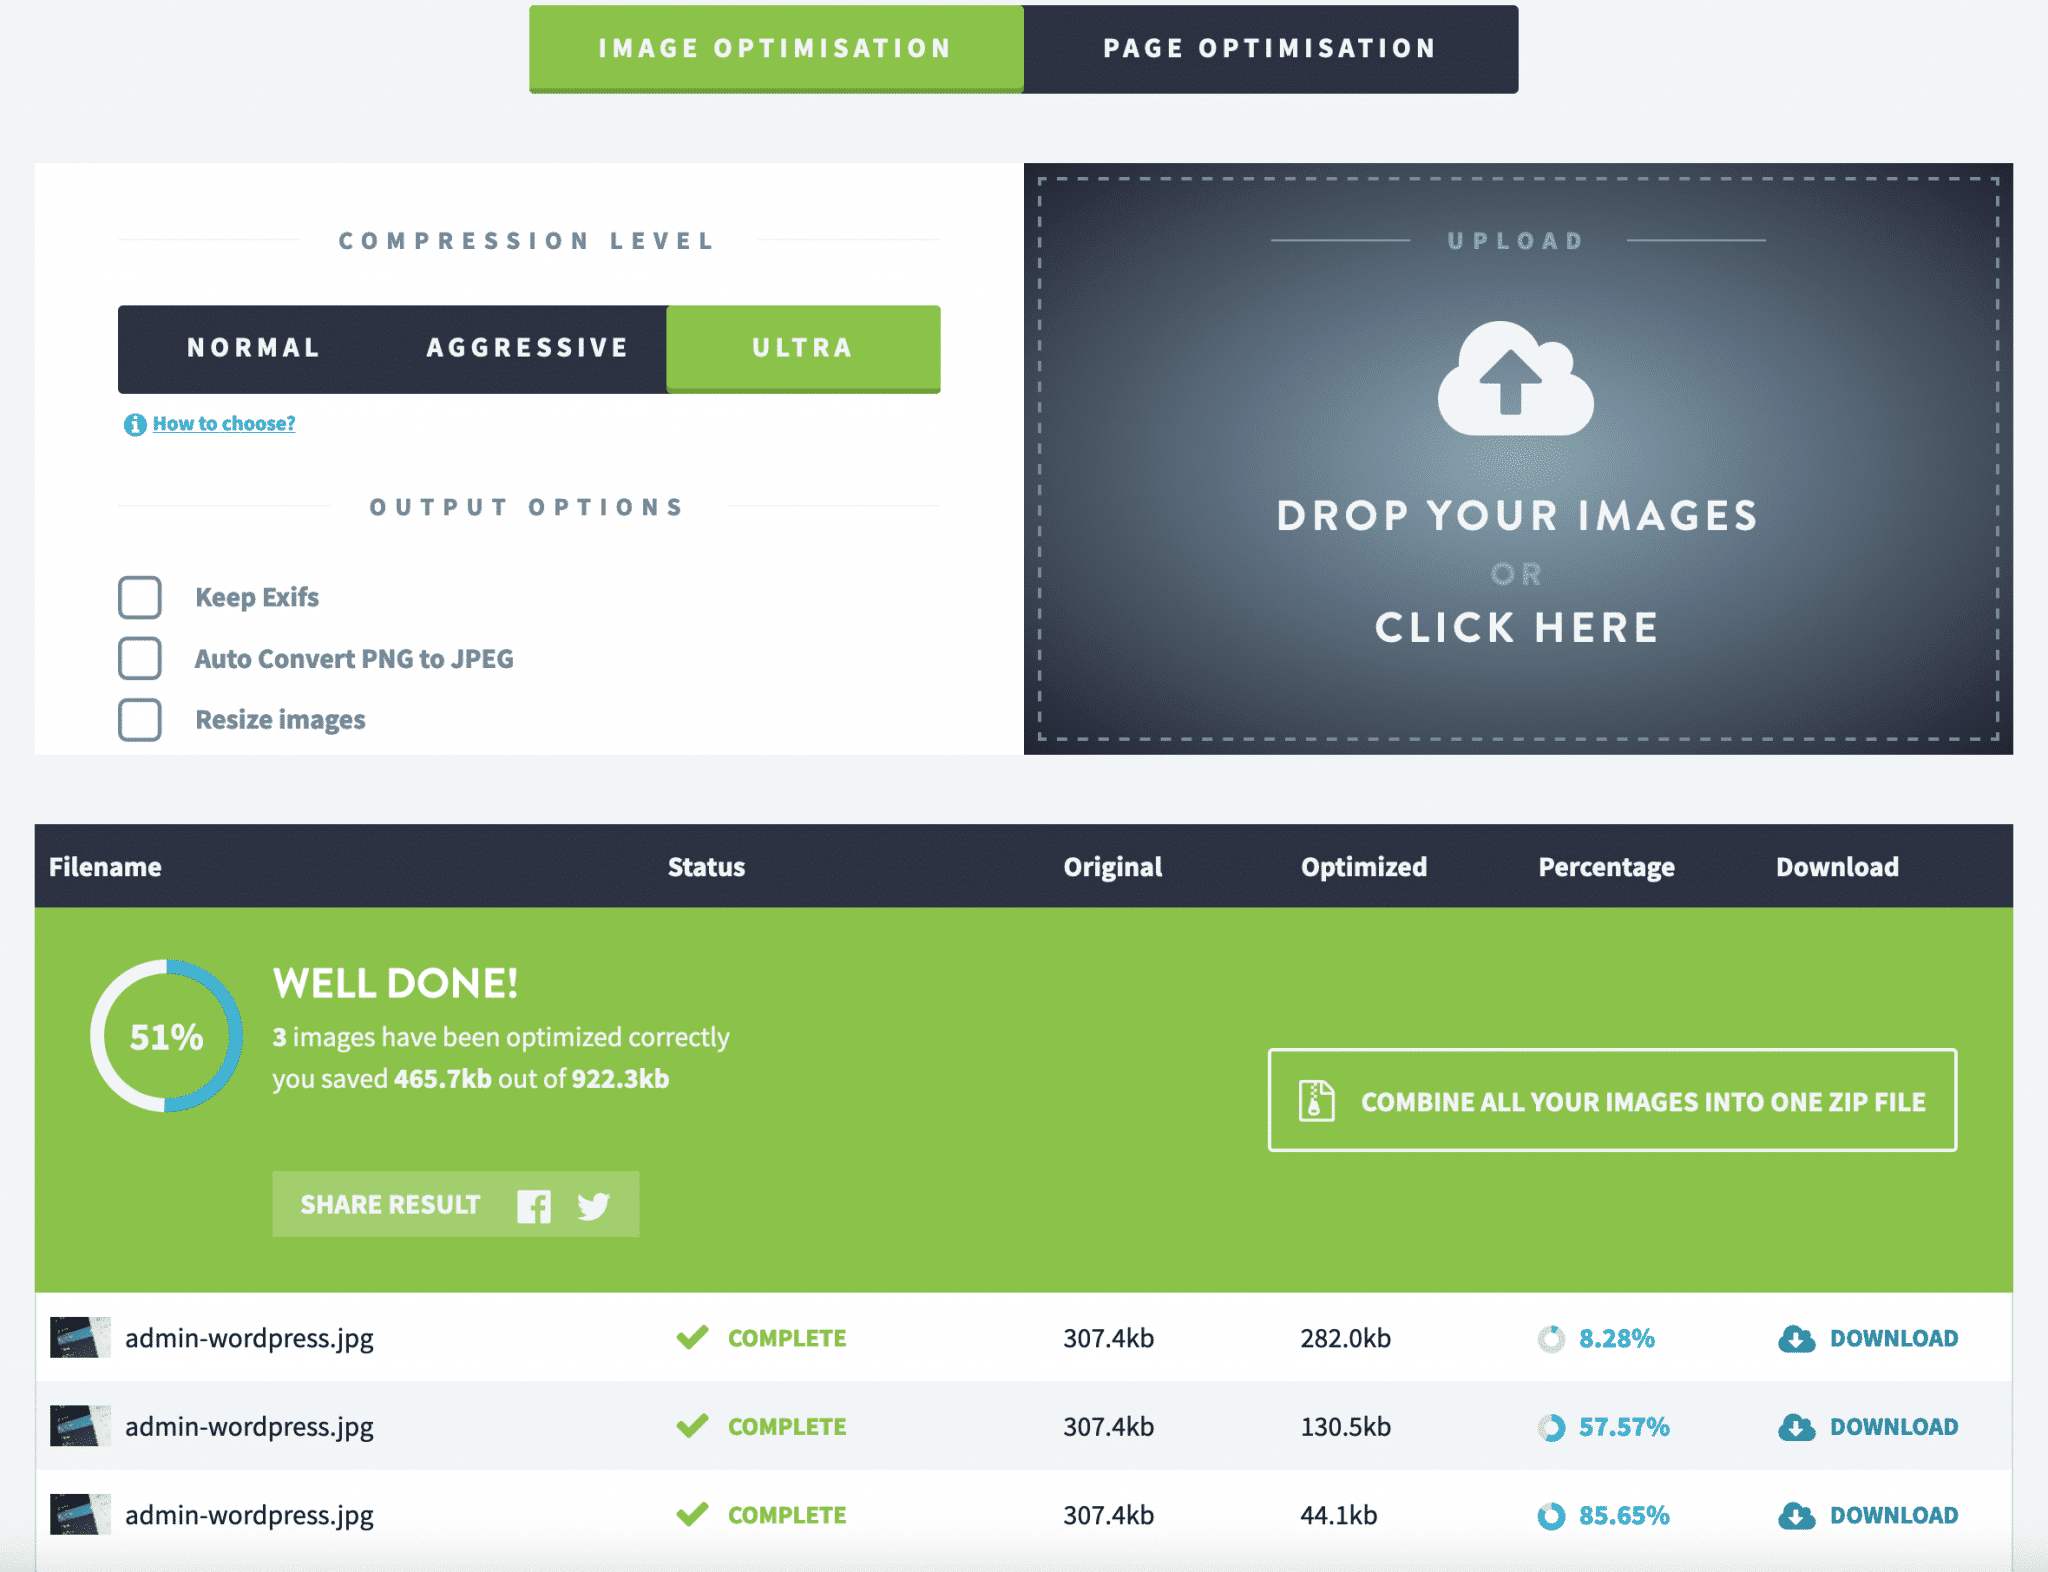
Once on the site, you just have to choose a compression mode (Normal, Aggressive, Ultra), then drag and drop your images in the right area.
For my test, you can see that the compression gain is:
- 8.28% in normal mode
- 57.57% in aggressive mode
- 85.65% in ultra mode
After the optimization, you just have to download them by clicking on the “Download” button, located on the right. You can also get them all in a .zip file by clicking on “Combine all your images into one zip file”.
Note that with a free account, your images will be kept for 24 hours (as opposed to 1 hour without an account).
How to configure the Imagify plugin on WordPress?
If you want the compression of images to be automated, you will have to opt for the plugin.
This way, all the images sent to your site will be compressed on the fly, i.e. as soon as they are uploaded.
This saves a lot of time, because you won’t have to deal with all those annoying tasks we mentioned earlier.
To do this, all you have to do is install Imagify from the official WordPress directory.
With a free account, you’ll get 20MB of compression per month, on an unlimited number of sites. If you blog from time to time, this will be more than enough.
What I like about this plugin is that you are guided step by step (like on WP Rocket):
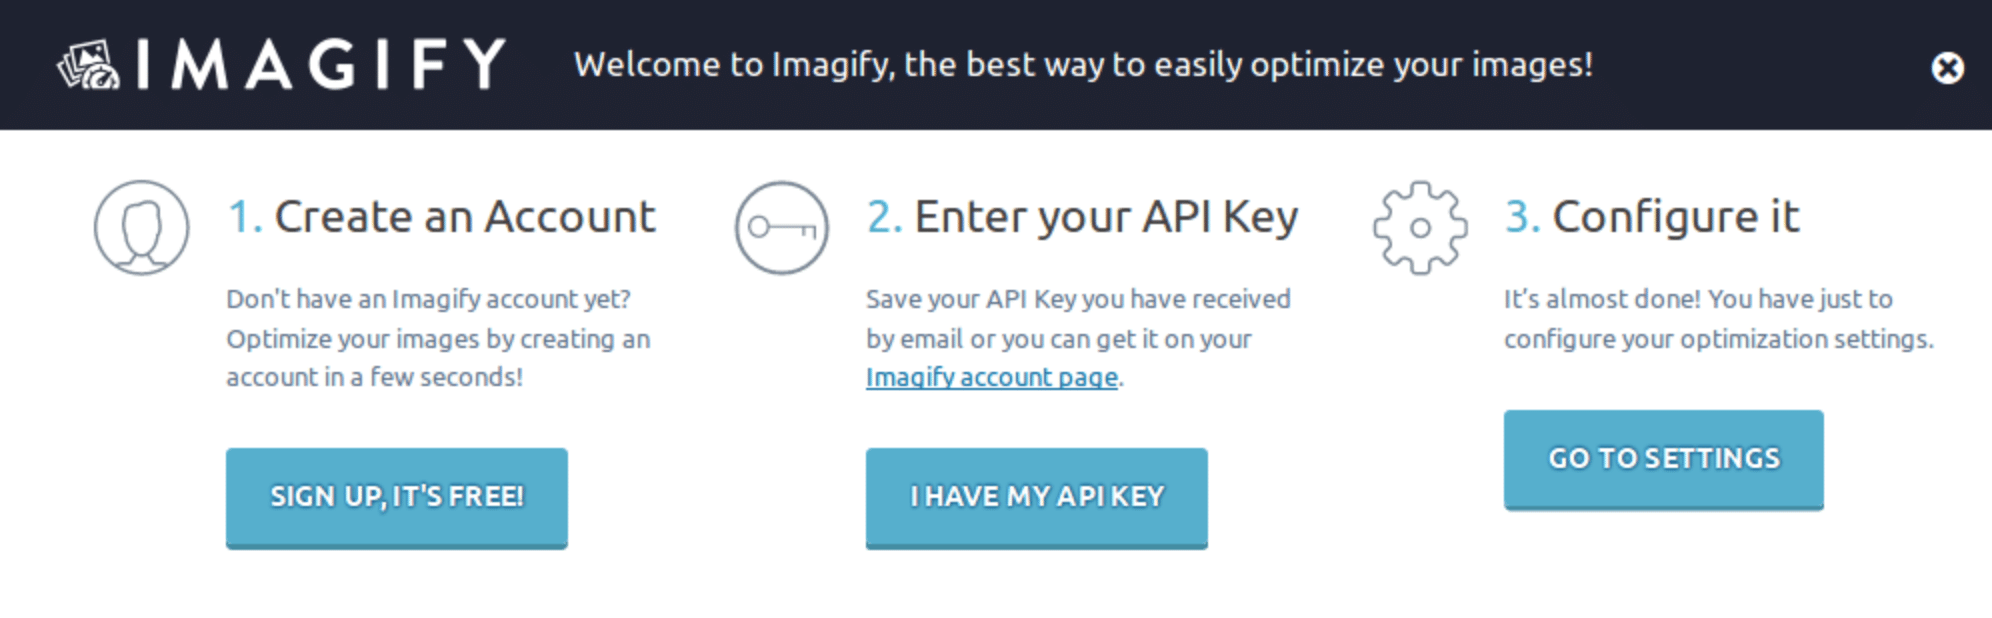
Step 1: Create an Imagify account and enter your API key
If you don’t have an account yet, click on the blue “Sign up, it’s free” button. Enter your email address to receive your API key.
API stands for Application Programming Interface. An API makes data or functionality of an existing application available for other applications to use. Let’s say that this is the key to being able to use Imagify on WordPress.
Now, check your inbox. You’ll find an email from Imagify containing your API key (number 3 on the picture below), and your login details: username and password to be defined later (number 2).
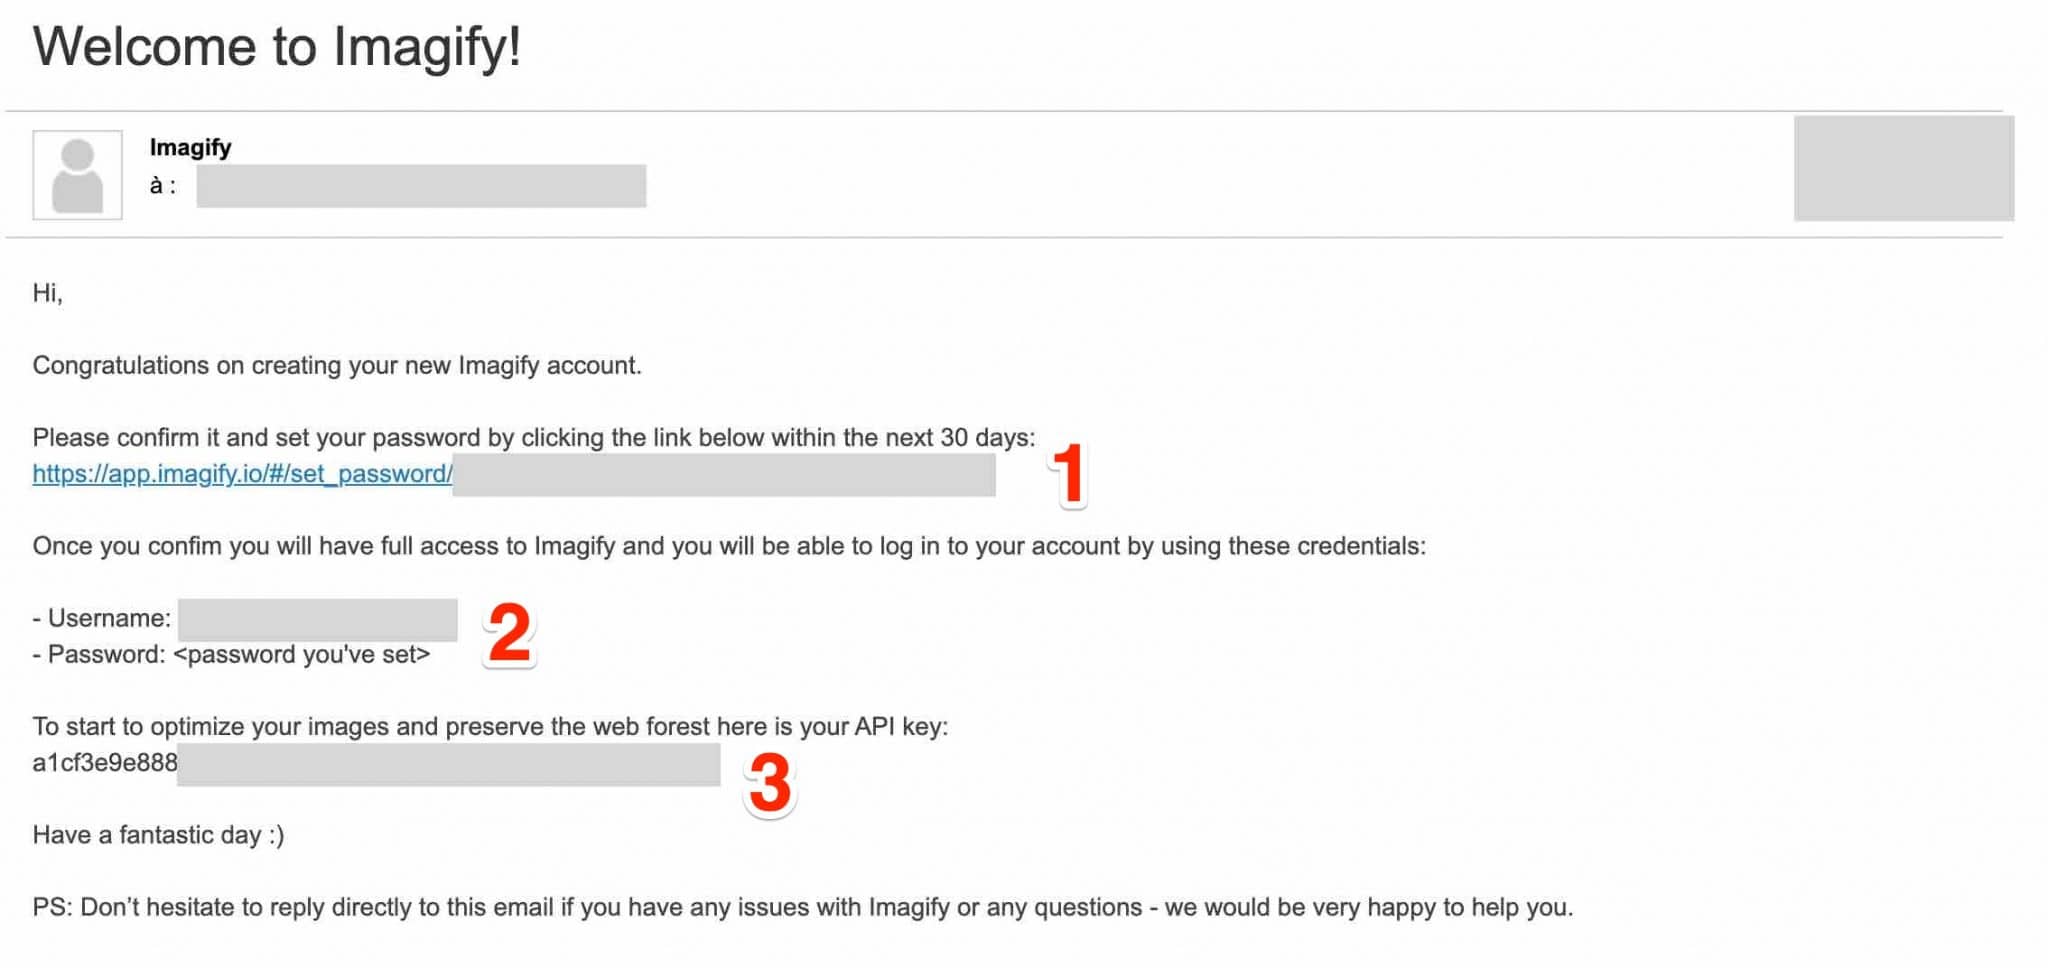
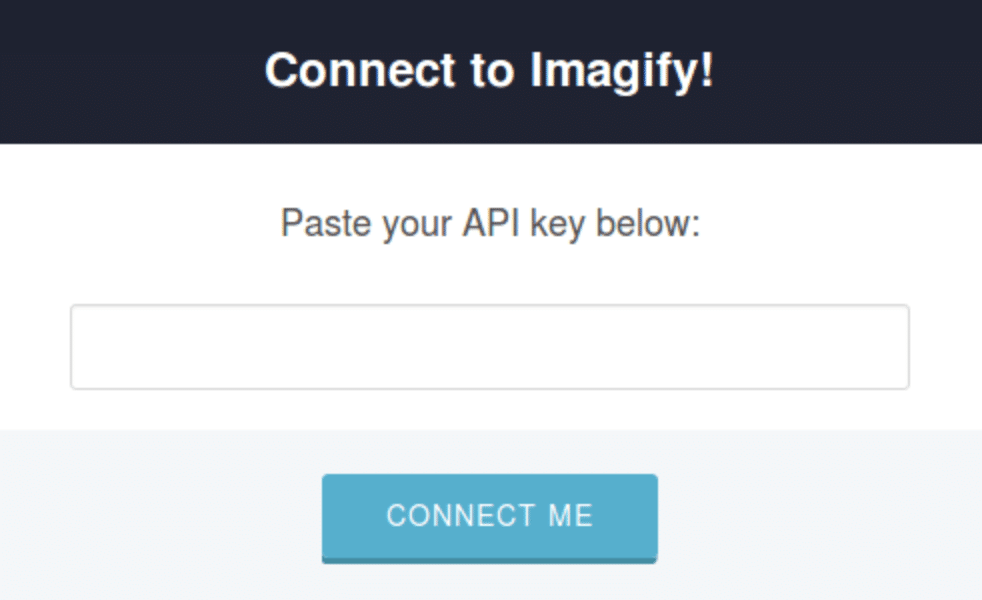
Inside this email, click on the confirmation link provided (number 1). Then, on your WordPress dashboard, click on the “I have my API key” button. Paste the API key from the email:
All good? Then let’s move on to the Imagify settings without delay.
Step 2: Refining your Imagify settings on WordPress
Imagify settings are split into three parts, which we’ll expand on one after the other.
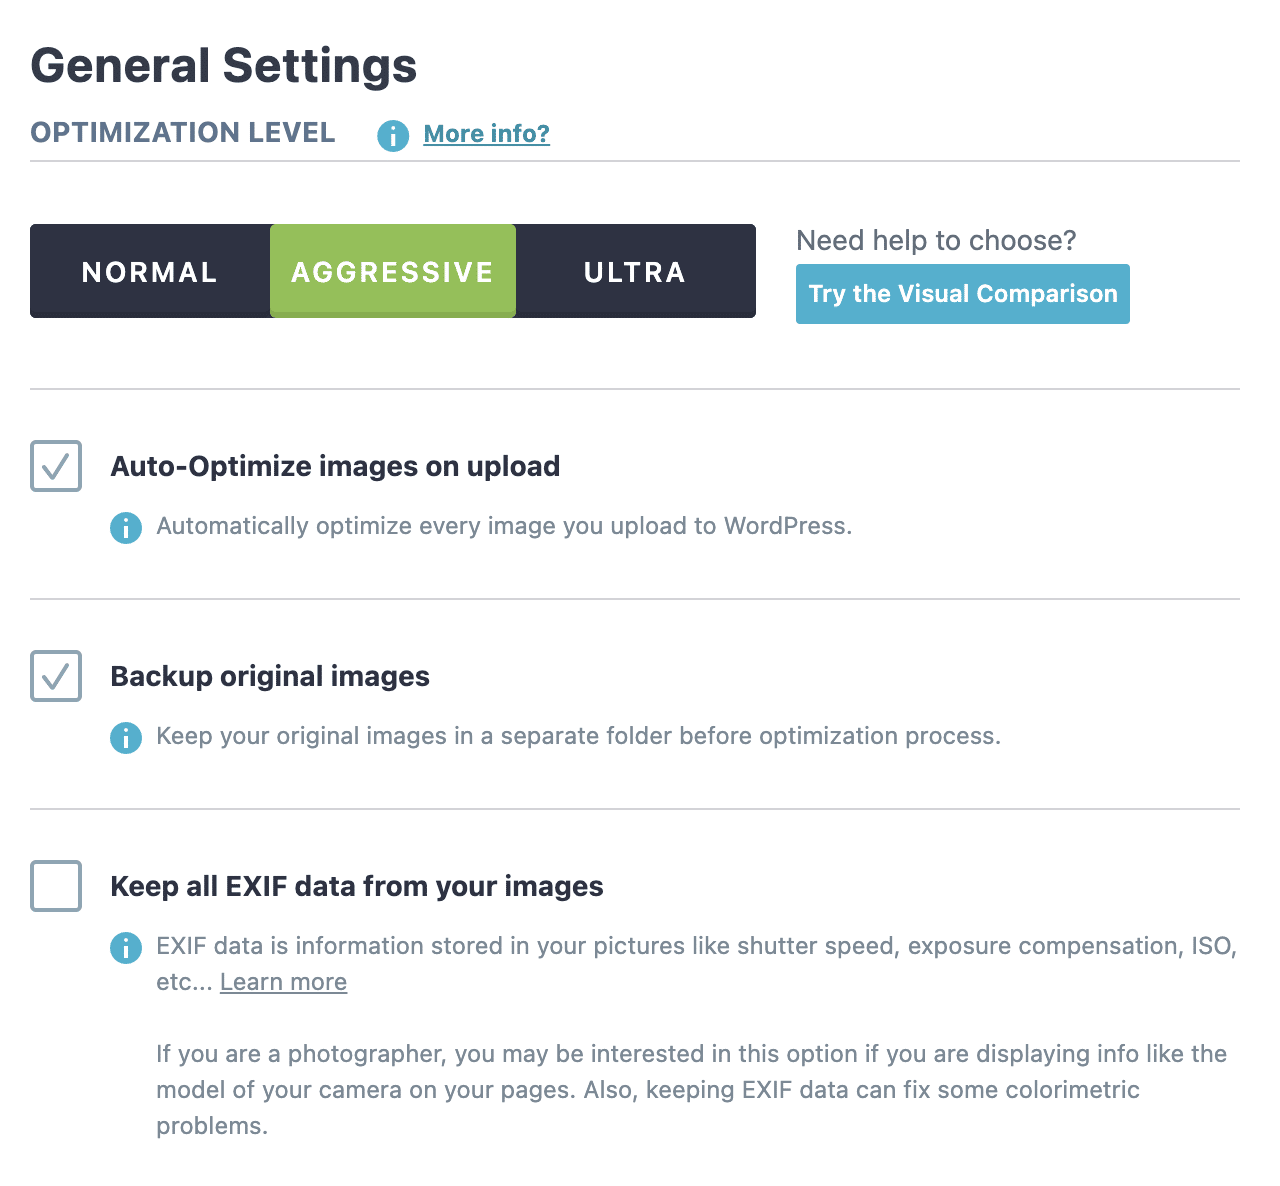
General Imagify Settings on WordPress
In this first menu, you can:
- Choose the compression level (Normal, Aggressive or Ultra). The higher the level of optimization, the stronger the compression will be and the quality of the image will be a little reduced. Do not hesitate to test to see which level will be the most appropriate for you.
- Auto-Optimize images (leave checked).
- Backup original images (also leave checked).
- Keep all EXIF data, i.e. the date of the photo, the camera used and other information (except in exceptional cases, do not check this box).
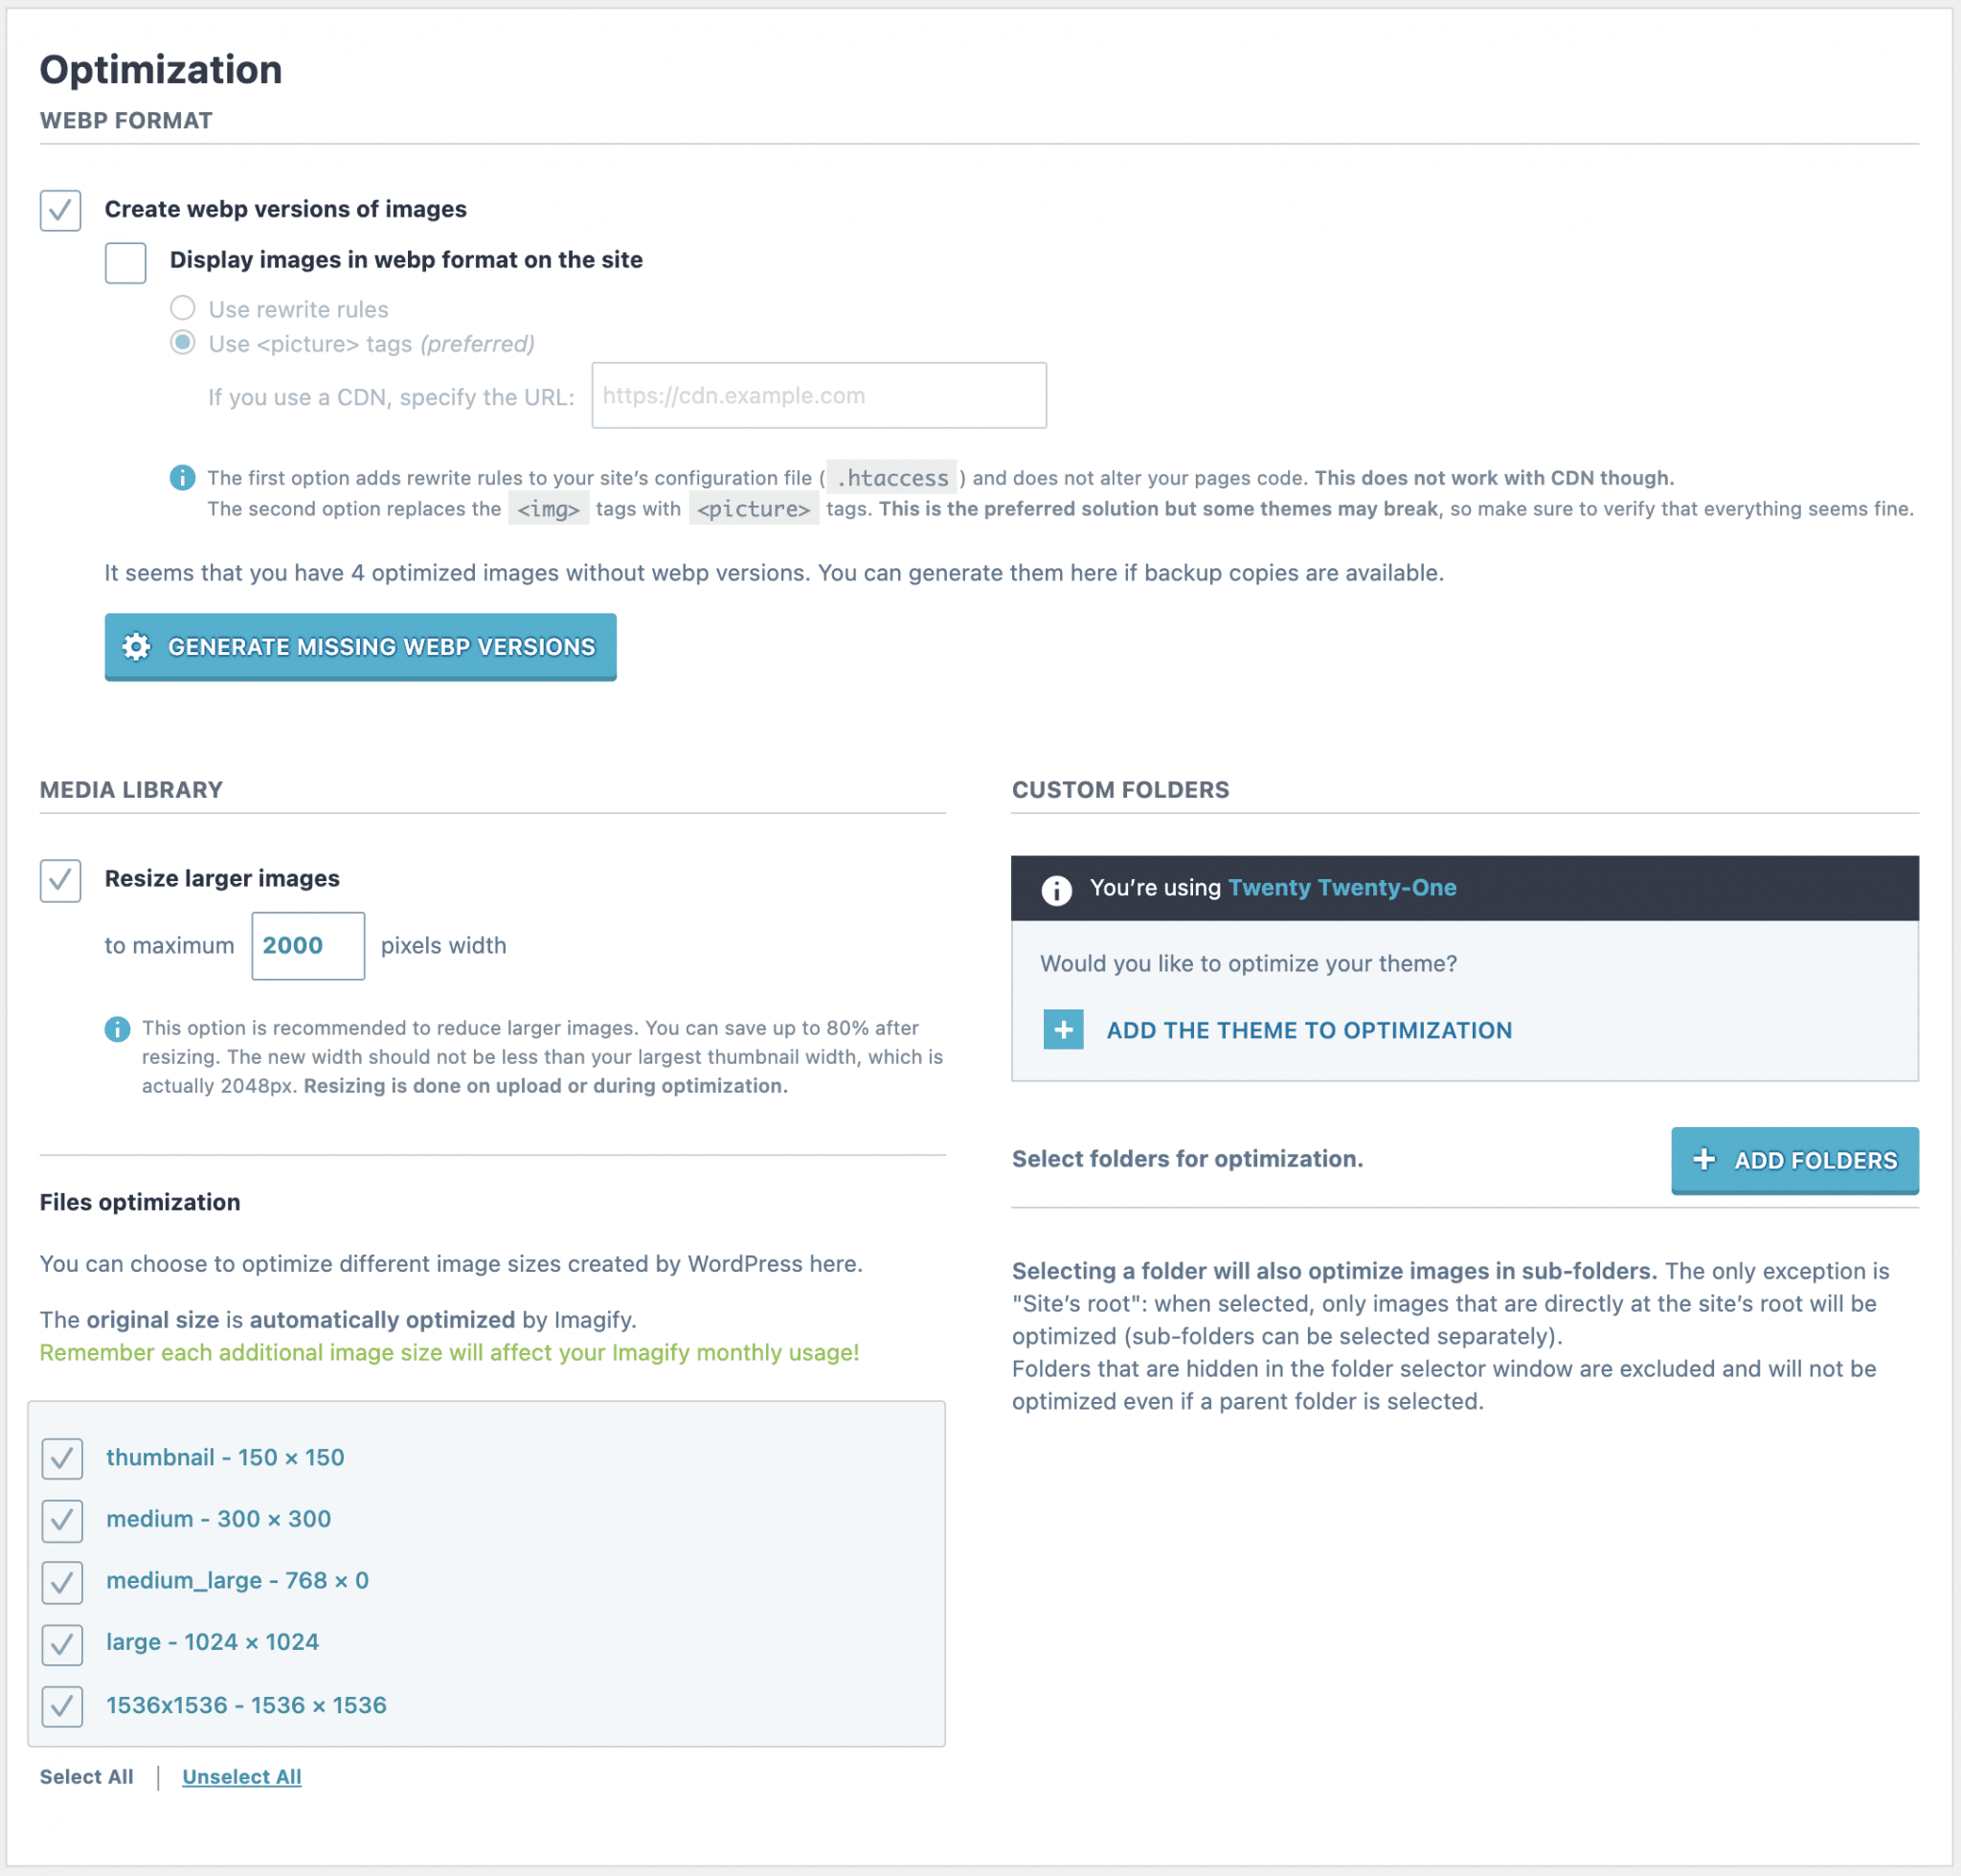
Optimization
The Optimization menu contains 4 major settings:
- WebP format: WebP allows you, I remind you, to compress the images even more than JPG or PNG, without loss of quality. If you have a premium package with Imagify, you can leave the original settings. If you use the free version, you don’t need to create WebP versions of your images, this will avoid wasting your monthly “credit” of images to optimize.
- Media library: Here you can automatically resize images that are too big (2,000 pixels will be fine, but you can put less depending on your site).
- Files optimization: Select thumbnail, medium, medium_large and large, in addition to the sizes you need. Even though this consumes compression credit, WordPress will be able to load these images on small screens.
- Custom folders: You can select certain folders on your site (e.g. wp-content) to optimize all the images in them. Imagify also allows you to optimize the images in your theme, if you wish.
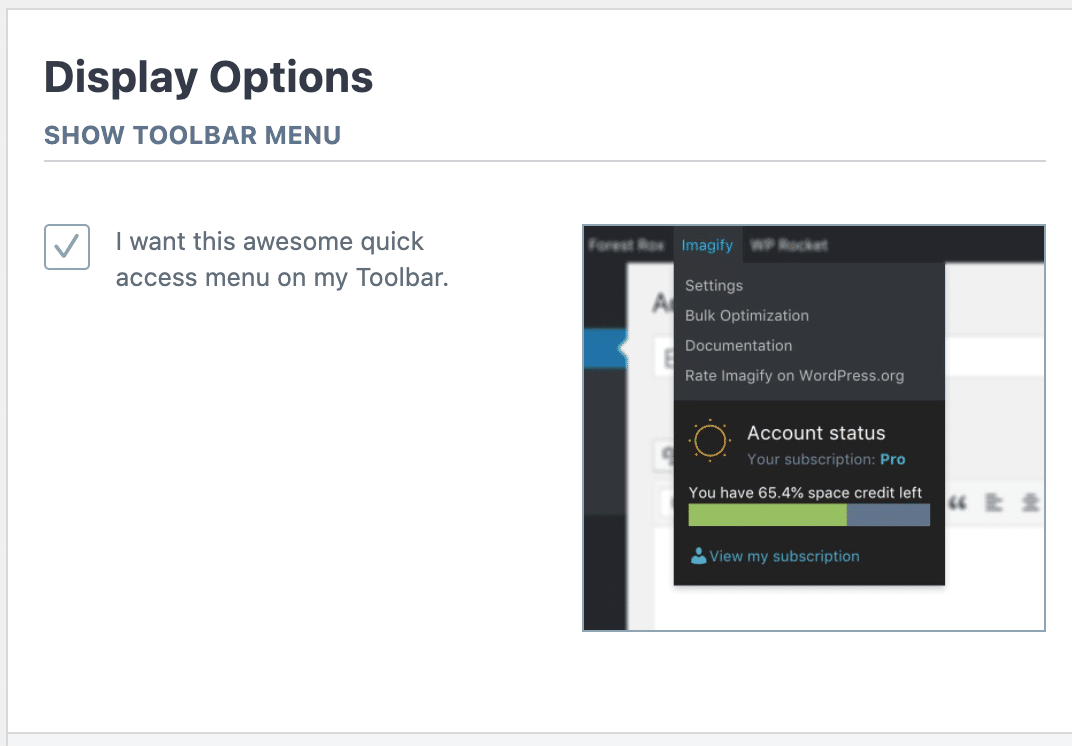
Display Options
Finally, the Display Options menu allows you to choose to show or hide the Imagify settings menu on the toolbar of your WordPress administration interface.
Once you’ve made your fine-tuning, remember to save the changes at the bottom of the page. Now it’s time for the highlight of the show: mass optimization.
Step 3: Optimize your images
Bulk optimization
Imagify’s Bulk Optimization allows you to process all the images on your site. Go to Media > Bulk Optimization to display the following page:
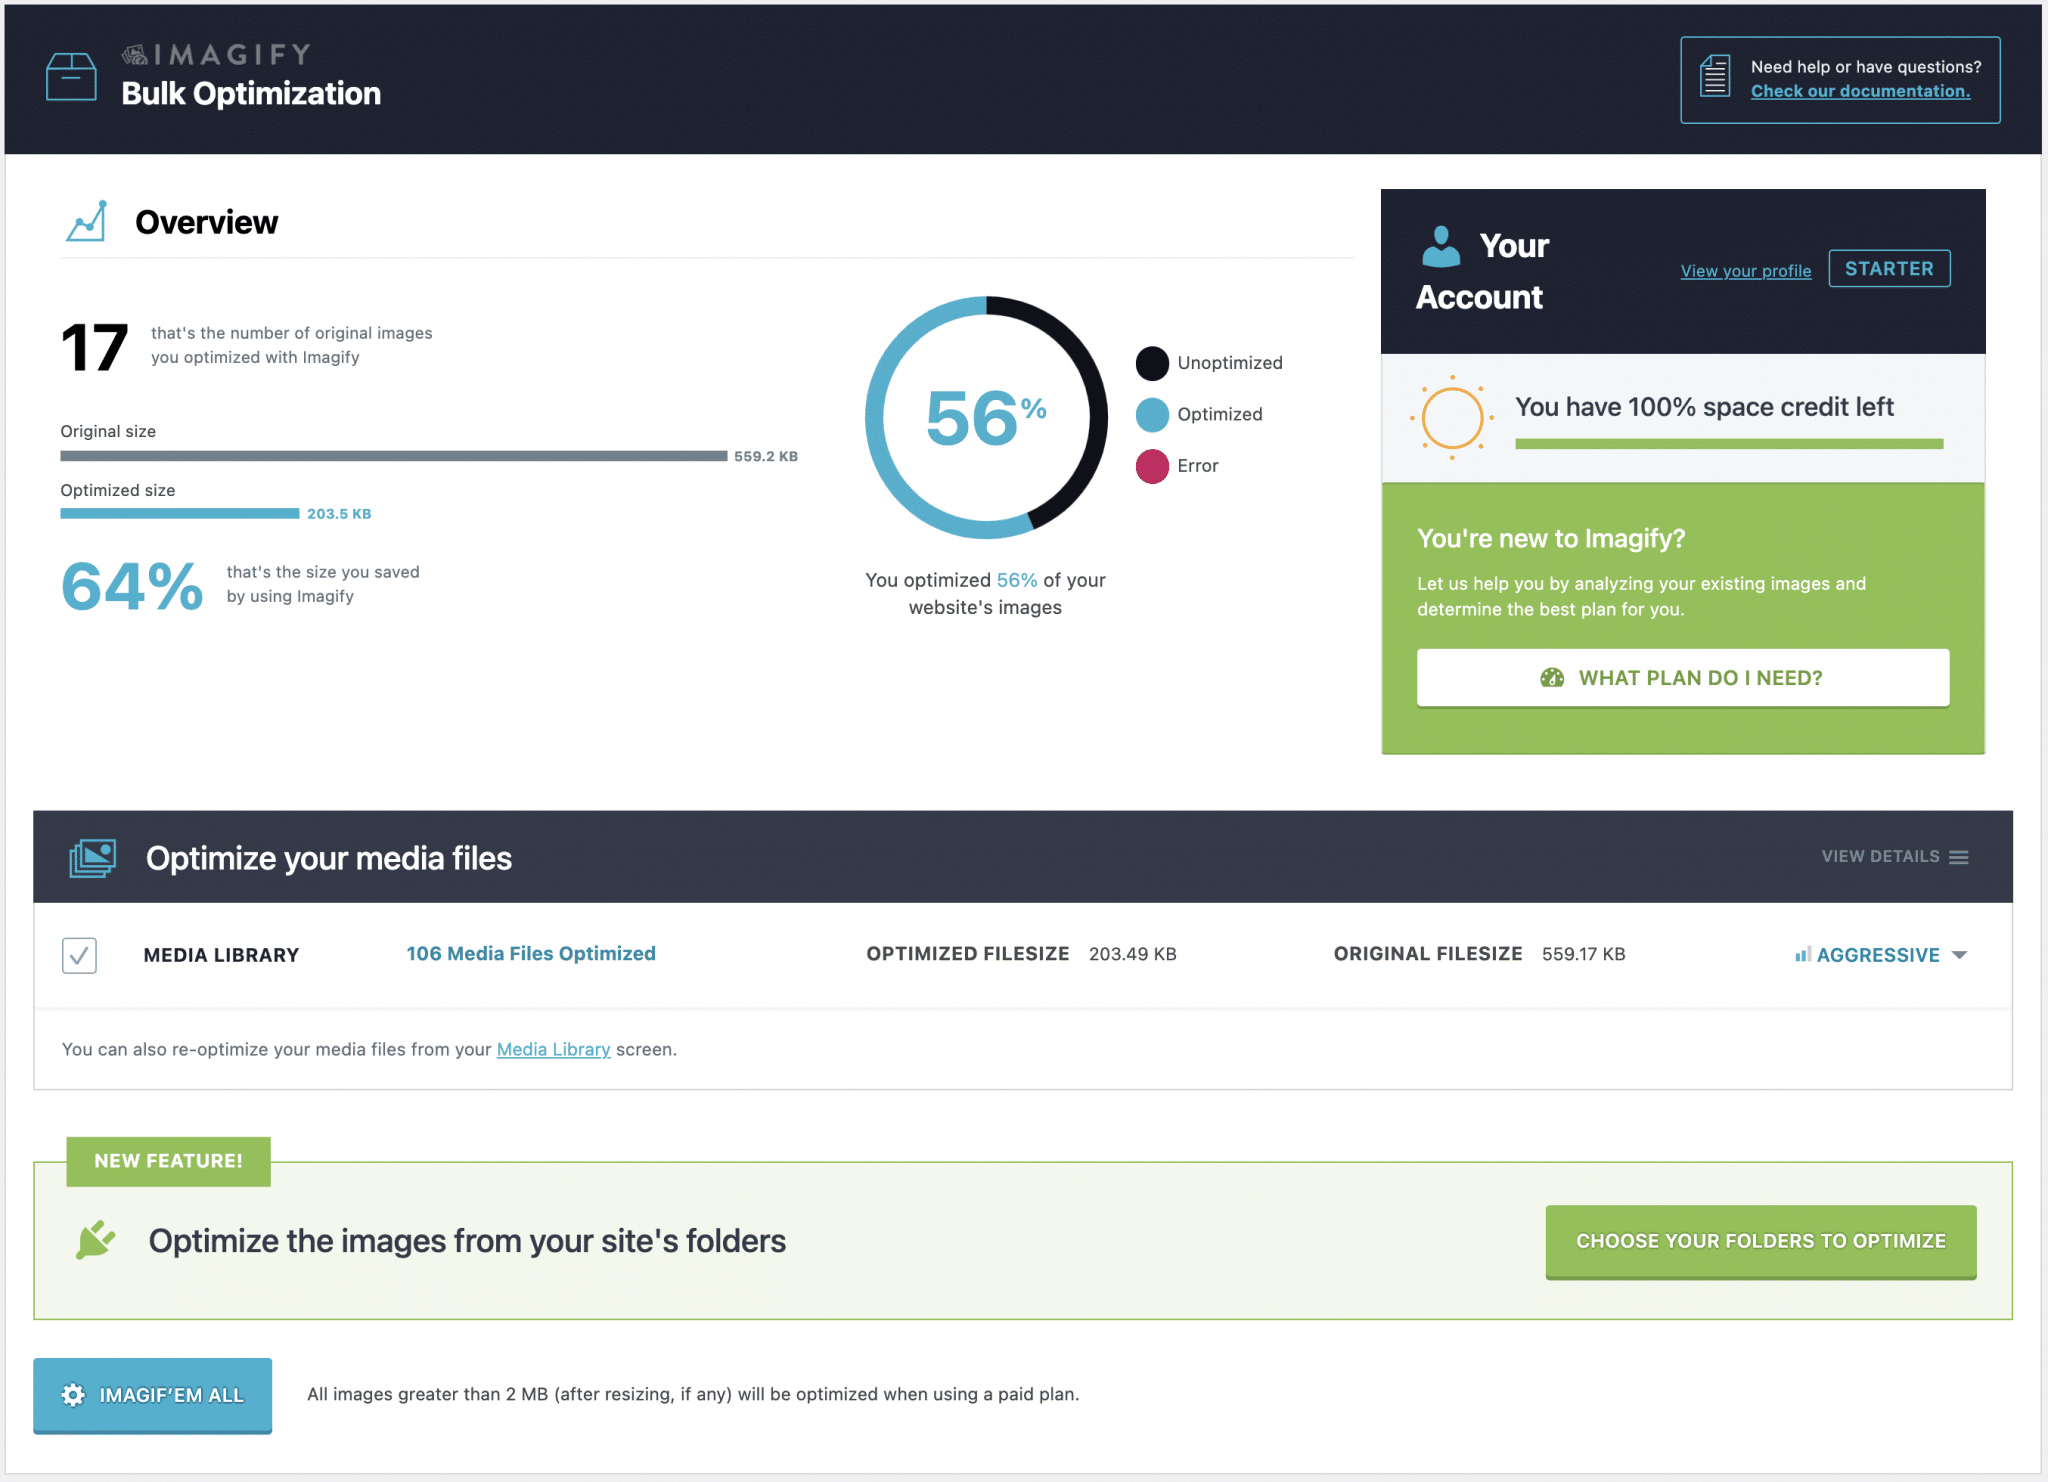
In the case of this test site, we can see that the weight of the images has been divided by almost three quarters!
I think you can get a better result when your files are not optimized before sending.
Regarding the use, once again it is quite simple. Select a compression mode (Normal, Aggressive or Ultra) and click on the blue button “Imagif’em all”.
You can see that “imagify” has even become a verb!
Case-by-case optimization
If you ever want to optimize images on a case-by-case basis, go to the Media Library to find an Imagify column.
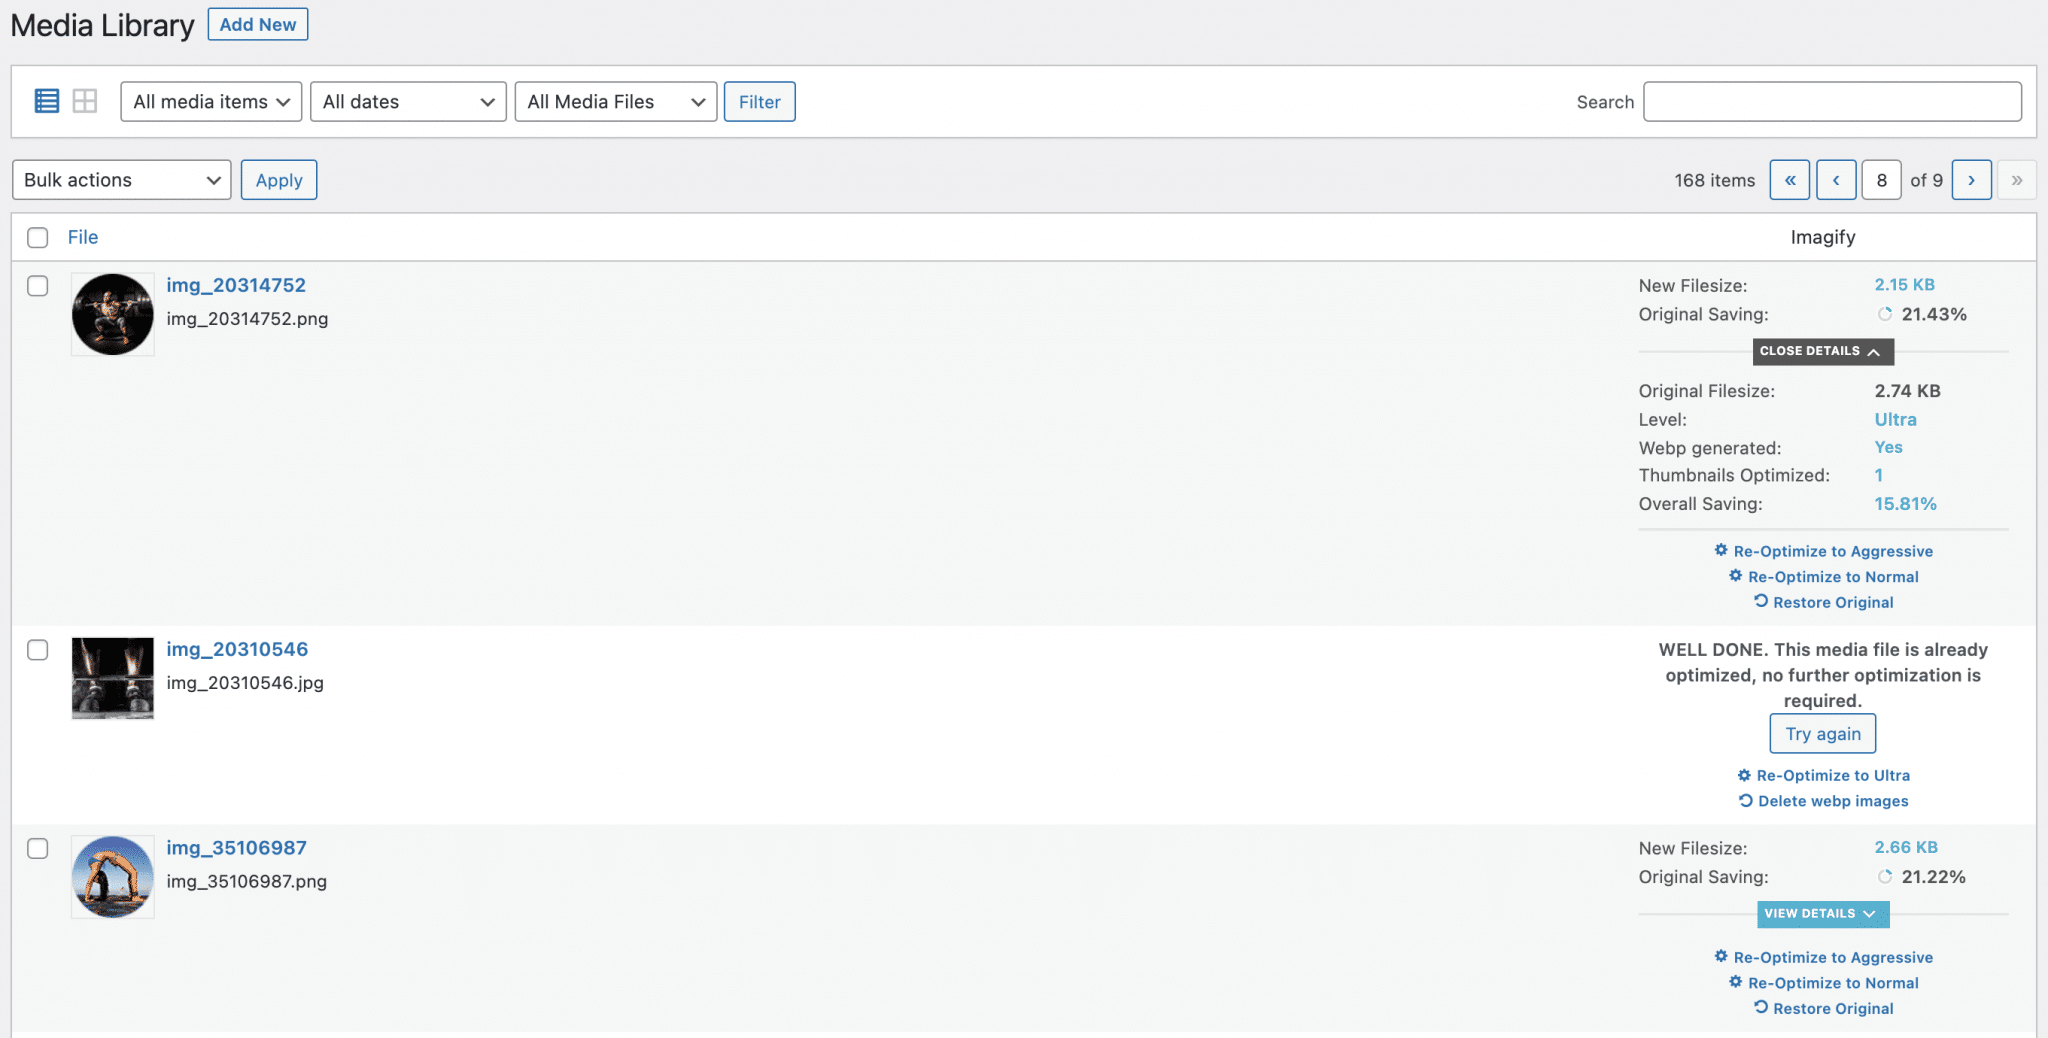
Thanks to it, you will find the compression statistics of each image, you can optimize them in other modes or restore the original image (if you have checked the option in the settings of course).
How much does Imagify cost ?
So far, I’ve told you that 20MB of compression is offered each month.
That’s fine if you run a small blog, but if you need more resources, you’ll have to opt for one of their two paid licenses. Here they are in detail:
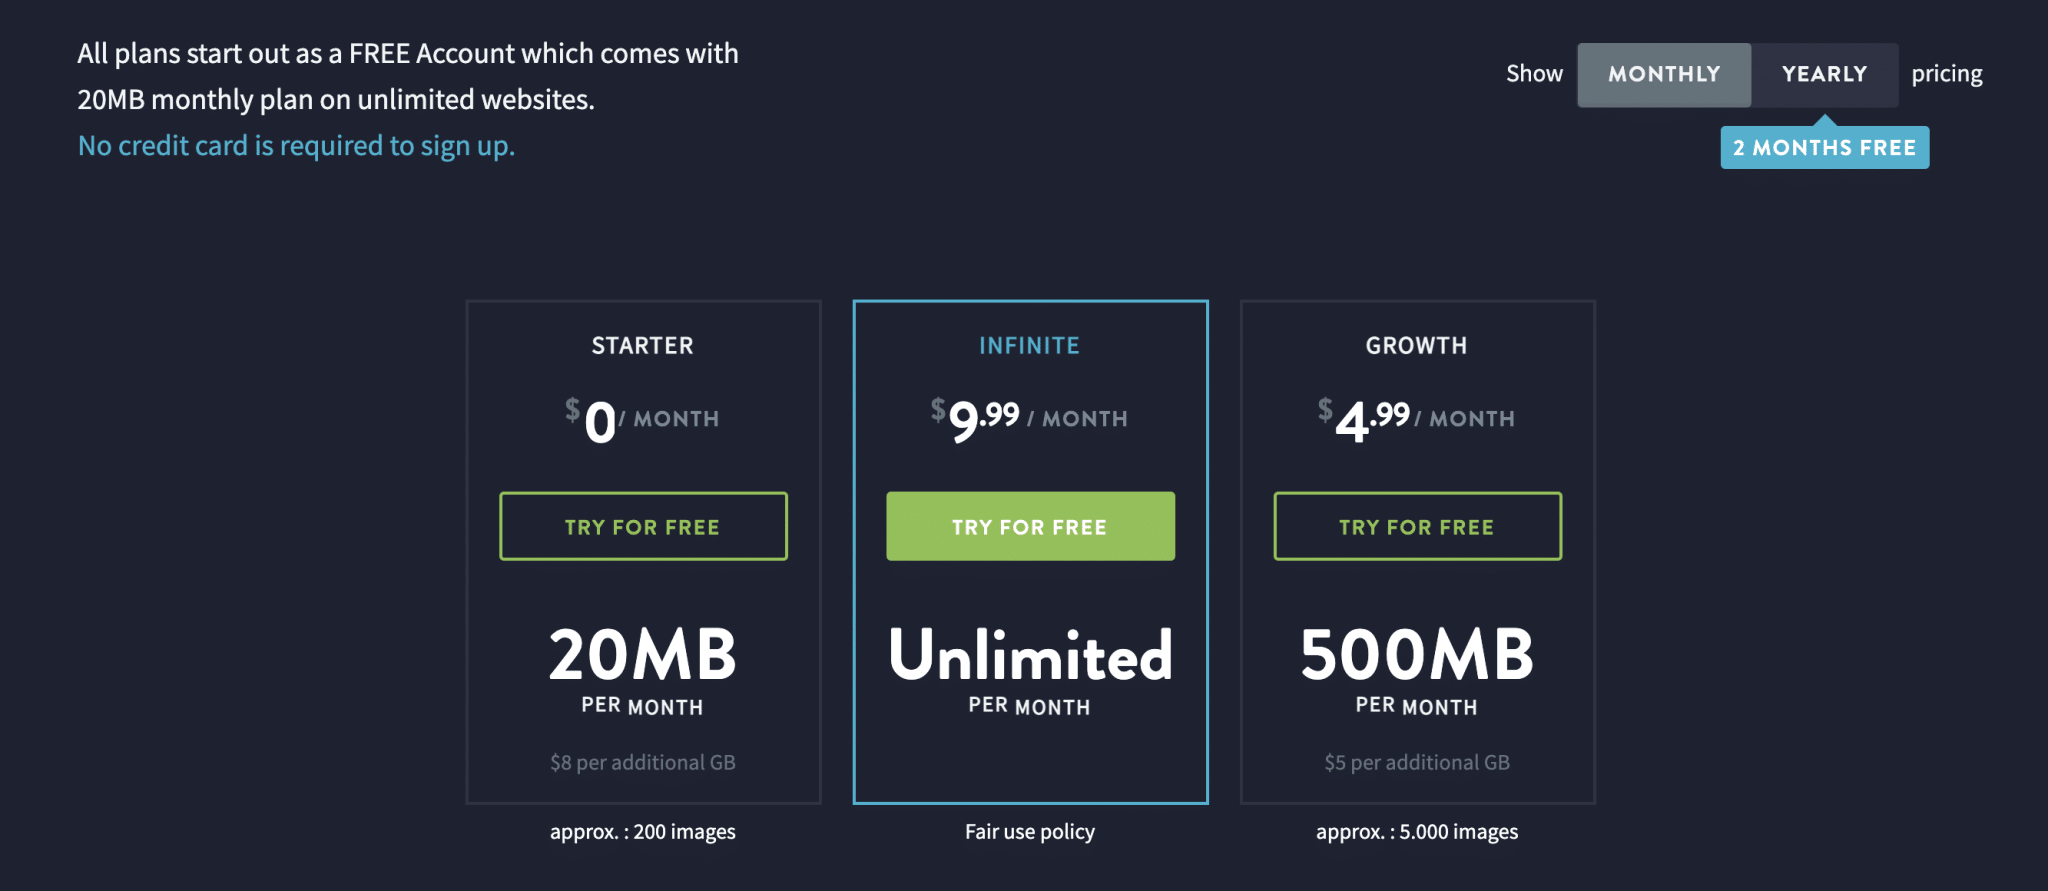
Beyond the price, the difference between the “Growth” ($4.99/month) and “Infinite” ($9.99/month) licenses lies in the total weight of the images you can optimize.
With the “Growth” offer, you are limited to 500MB per month (+ $5 per additional GB), which corresponds to about 5,000 images.
To enjoy unlimited usage, you’ll have to switch to the “Infinite” plan.
As you can see, the subscriptions are initially offered on a monthly basis. However, it is possible to pay annually to get two free months.
Finally, if your needs do not match the proposed offers, you can request a personalized quote to get Imagify on WordPress in premium.
So, how should we picture Imagify?
Imagify is an excellent WordPress plugin to efficiently reduce the weight of your images, without compromising their quality. I recommend it without hesitation, both for its efficiency and for its simplicity of use.
Thanks to it, you can be sure that you won’t have to slow down the loading speed of your site, while taking care of your visitors’ user experience.
Download the plugin Imagify:
As you can see, Imagify is aimed at all WordPress site creators. If you blog once or twice a week, the free offer will suit you fine, as long as you don’t send 5Mb images!
And for $4.99/month, you can already optimize large media libraries (about 5,000 images). For the most voracious among you, there’s the unlimited plan. 😉
Either way, remember: don’t get away from good practices up front. Before uploading your images to WordPress and using Imagify, first consider reducing their size and weight with the tips delivered throughout these lines: Imagify will be all the more efficient.
Have you ever paid attention to image compression on your site? If so, what do you think of Imagify ?

Receive the next posts for free and access exclusive resources. More than 20,000 people have done it, why not you?
Continue reading
Articles posted in WordPress PluginsOur review of B2BKing: A WooCommerce plugin built for B2B commerce
“Hi, I need 200 units of this product with fast shipping please”. As an online store owner, receiving this kind of message puts a smile on your face. Answering it, on the other hand, becomes a lot less fun… Basically,…
GTranslate on WordPress: our full review of this tool for creating a multilingual site
“Hello, how are you?” “What do you think of this computer mouse?” For you, everything is easy to understand in these two sentences. For someone living deep in the Shetland Islands or Yucatán, it’s probably a bit more complicated… If…
Air WP Sync: Test and review of this plugin for integrating Airtable into WordPress
Do you use Airtable and WordPress? Then some of your days probably look something like this. In the morning, you update your Airtable database as soon as something changes. In the afternoon, you copy and paste the same data into…