Sound of a bell…
No, that’s not the sound of the delivery man coming to bring you your latest ecommerce order, but the sound of your neurons rattling as they try to sort out the shipping options on your own WooCommerce store.
Let’s face it, from the time an item is purchased on your store to the time it is received by the customer, there are several considerations to take into account. You need to think about shipping rules (price, size, weight, taxes, etc.), their tracking, and possibly a software solution to optimize your entire shipping process.
With so many parameters to take into account, it’s enough to drive you crazy!

Well, guess what? WPMarmite has prepared a nice little package to help you with your WooCommerce shipping management. Inside, you’ll find tips to use the native features of the famous ecommerce plugin, but also some plugins to increase the powers of your store.
Overview
The shipping parameters to take into account on your ecommerce site
Let’s imagine the journey of a customer (let’s call him Mr. X), on your ecommerce site selling clothes for example.
Let’s suppose that Mr. X lives in the Paris area, and wants to have his purchases delivered to his home. Mr. X goes on your site, finds a sweatshirt and a cap that he adds to his cart. Then, he validates his order, adds his information to the WooCommerce order page. He chooses to have the product delivered to his home and pay on delivery. He then sees that the shipping will cost him €13.
While waiting for his package, Mr. X gets impatient. Fortunately, he can follow his shipment, thanks to a fine tracking system. One day after his order, a deliveryman comes to his house and gives him his package. Mr X is very satisfied, and promises to make his next purchases on your site.
But to achieve this result, a number of elements must be considered, adjusted, set up, managed on your WooCommerce site. Here are some of the most important.
The shipping methods
The shipping methods represent the different ways in which you deliver your products. You can choose to make free shipping, offer a local pickup or flat rate shipping.
Free shipping
Free shipping means that customers do not pay any fees to receive the products they purchase. This can be a great way to encourage your customers to spend more on your store, for example by offering free shipping on purchases over a certain amount.
Local pickup
The local pickup, or “click and collect“, allows customers to come and pick up their packages in a physical store. This shipping method will work very well if you have a warehouse, a point of sale, or if you have a pick-up point.
Flat rate shipping
With this method, you set a shipping rate per item, item quantity or minimum or maximum amount of items purchased.
How far can you go with WooCommerce’s native features?
You should know: WooCommerce is a very powerful tool to manage an online store. In a native way, the plugin offers a wide range of features that can satisfy many needs. Here is how to configure some shipping related options with WooCommerce.
Shipping zones
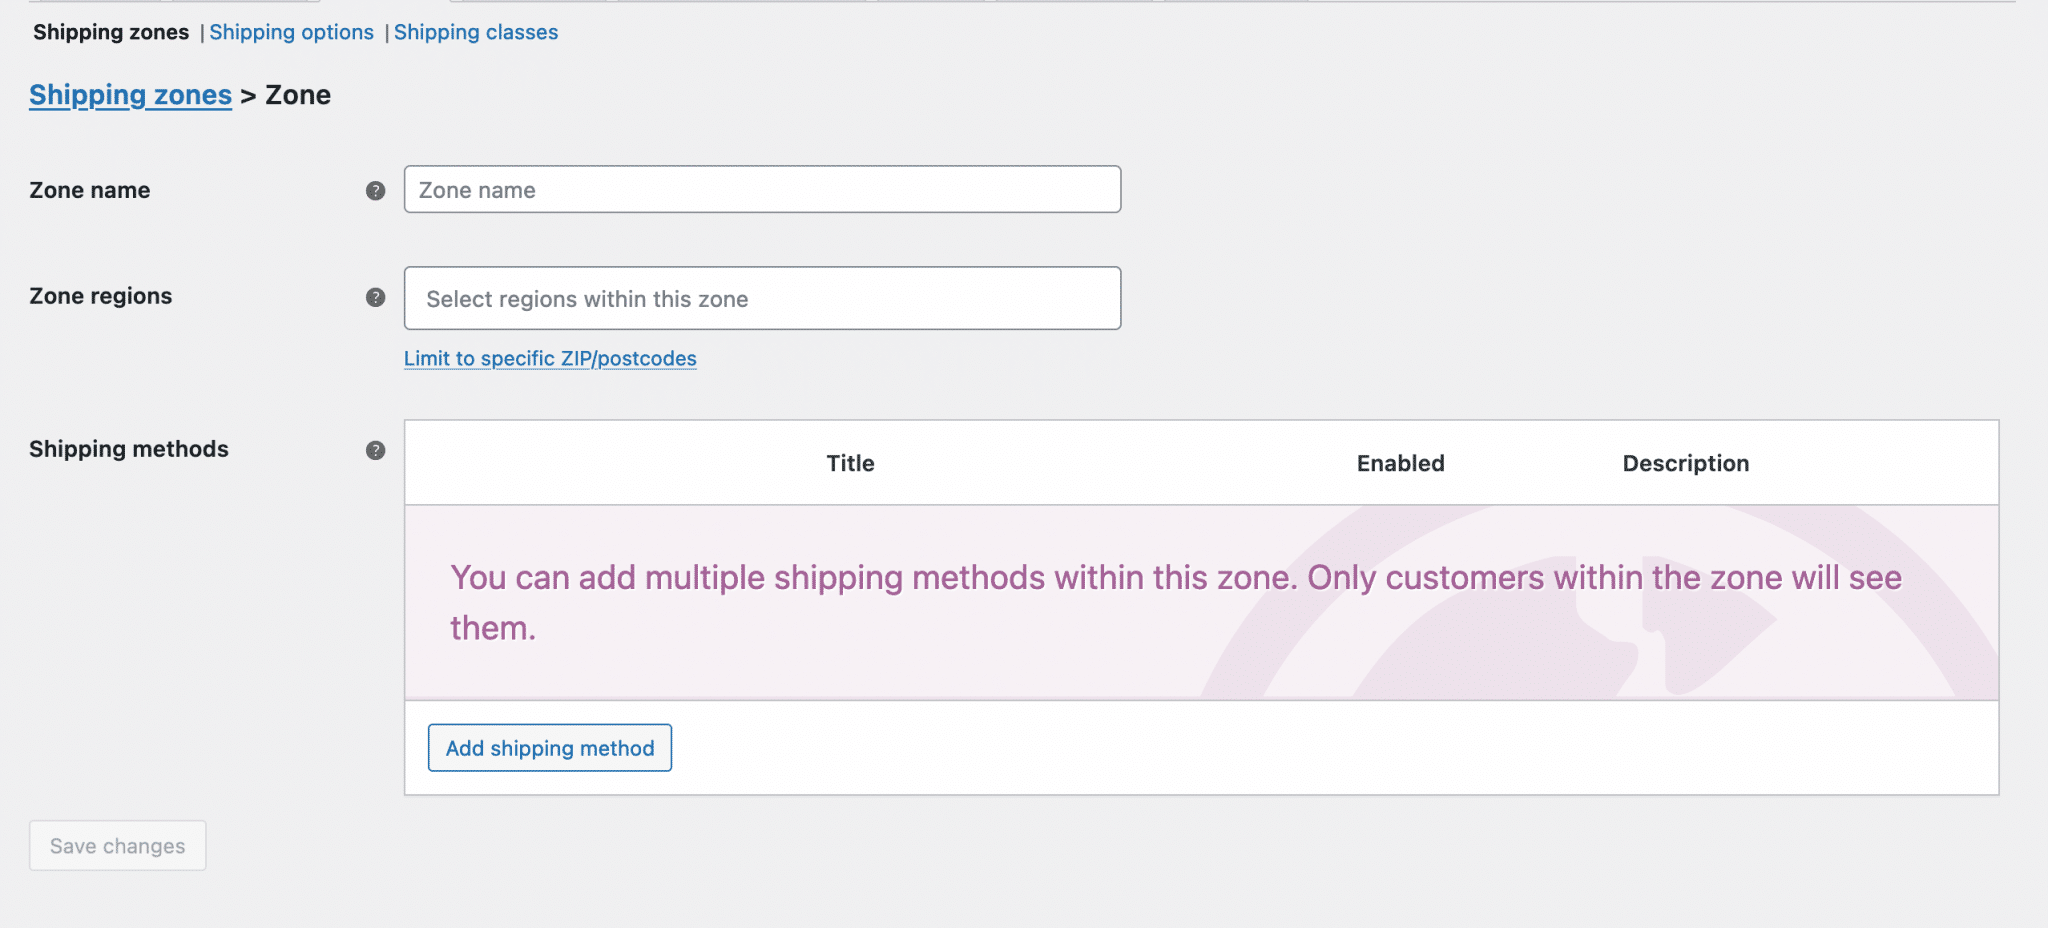
Shipping zones are a key concept in shipping with WooCommerce. Basically, a shipping zone is simply defined geographical areas to which you ship your products.
When you set up these zones on your site, you can add shipping methods to them. For example, if, in addition to your online store, you have a physical store in PARIS 75017, you can add the shipping method PARIS 75017 as local pickup to the shipping zone.
To create a shipping zone, from your WordPress dashboard, go to WooCommerce > Settings. Then click on the Shipping tab. In the window that appears, click on the Add shipping zone button.

In the new window, add the name of the zone, as well as the geographical area in question (city, country or ZIP/postcode). Then click on Add shipping method to select the shipping method you want to apply to this zone.
Shipping classes
Shipping classes allow you to group similar products together and assign one or more shipping methods to them.
To illustrate how these classes work, let’s assume that in addition to sweatshirts, your online store also sells paint cans in fragile containers (why not, after all?). You can create a Fragile shipping class that groups all “paint cans” products.
To do this, from WooCommerce > Settings, click on Shipping Classes. Then click on Add shipping class. A new line will be added in the window. Insert the name of the shipping class, an ID and a description.
Once this is done, the next step is to add the shipping class to your products that will be registered as fragile.
To do this:
- Go to the WordPress dashboard, then to Products.
- Click on Edit, on the product you want to edit.
- Then go to Shipping, then choose at Shipping Class the new shipping class you created.
- Then click Update to save your settings.
Set up Free Shipping
Free shipping is a method that must be added to a shipping zone.
Note that a shipping zone can have several shipping methods.
This is what we will do in our example by adding free shipping to the PARIS 75017 shipping zone.
To add free shipping, from the editing window of a shipping zone, click on Add shipping method. Then choose Free shipping, and click on the Add shipping method button to save. You can then configure in which cases free shipping is available. The available options are:
- ND: Free shipping is available for all orders;
- A valid free shipping promo code: the customer must enter a promo code to enjoy free shipping;
- A minimum order amount : free shipping is available when the order amount reaches a given minimum;
- A minimum order amount OR a promo code: free shipping is available when a promo code is entered by the customer or when a minimum order amount is reached;
- A minimum order amount AND a promo code: free shipping is available when a promo code is entered by the customer and a minimum order amount is reached.
You can also take a look at the Hide Shipping Method For WooCommerce plugin which allows you to hide all other shipping methods if free shipping is available. Very useful for example if during a promotional period you offer free shipping.
Set up local pickup
Local pickup, like free shipping, is also added in the shipping zones. Let’s add a local pickup in the PARIS 75017 area of our previous example.
To do this:
- Go to the editing window of a shipping zone, then click on Add delivery method.
- Then choose Local pickup and click on the Add delivery method button.
- You can then click on Edit to change the shipping method title, the VAT status, and add an optional cost for local pickup.
Easy, right?
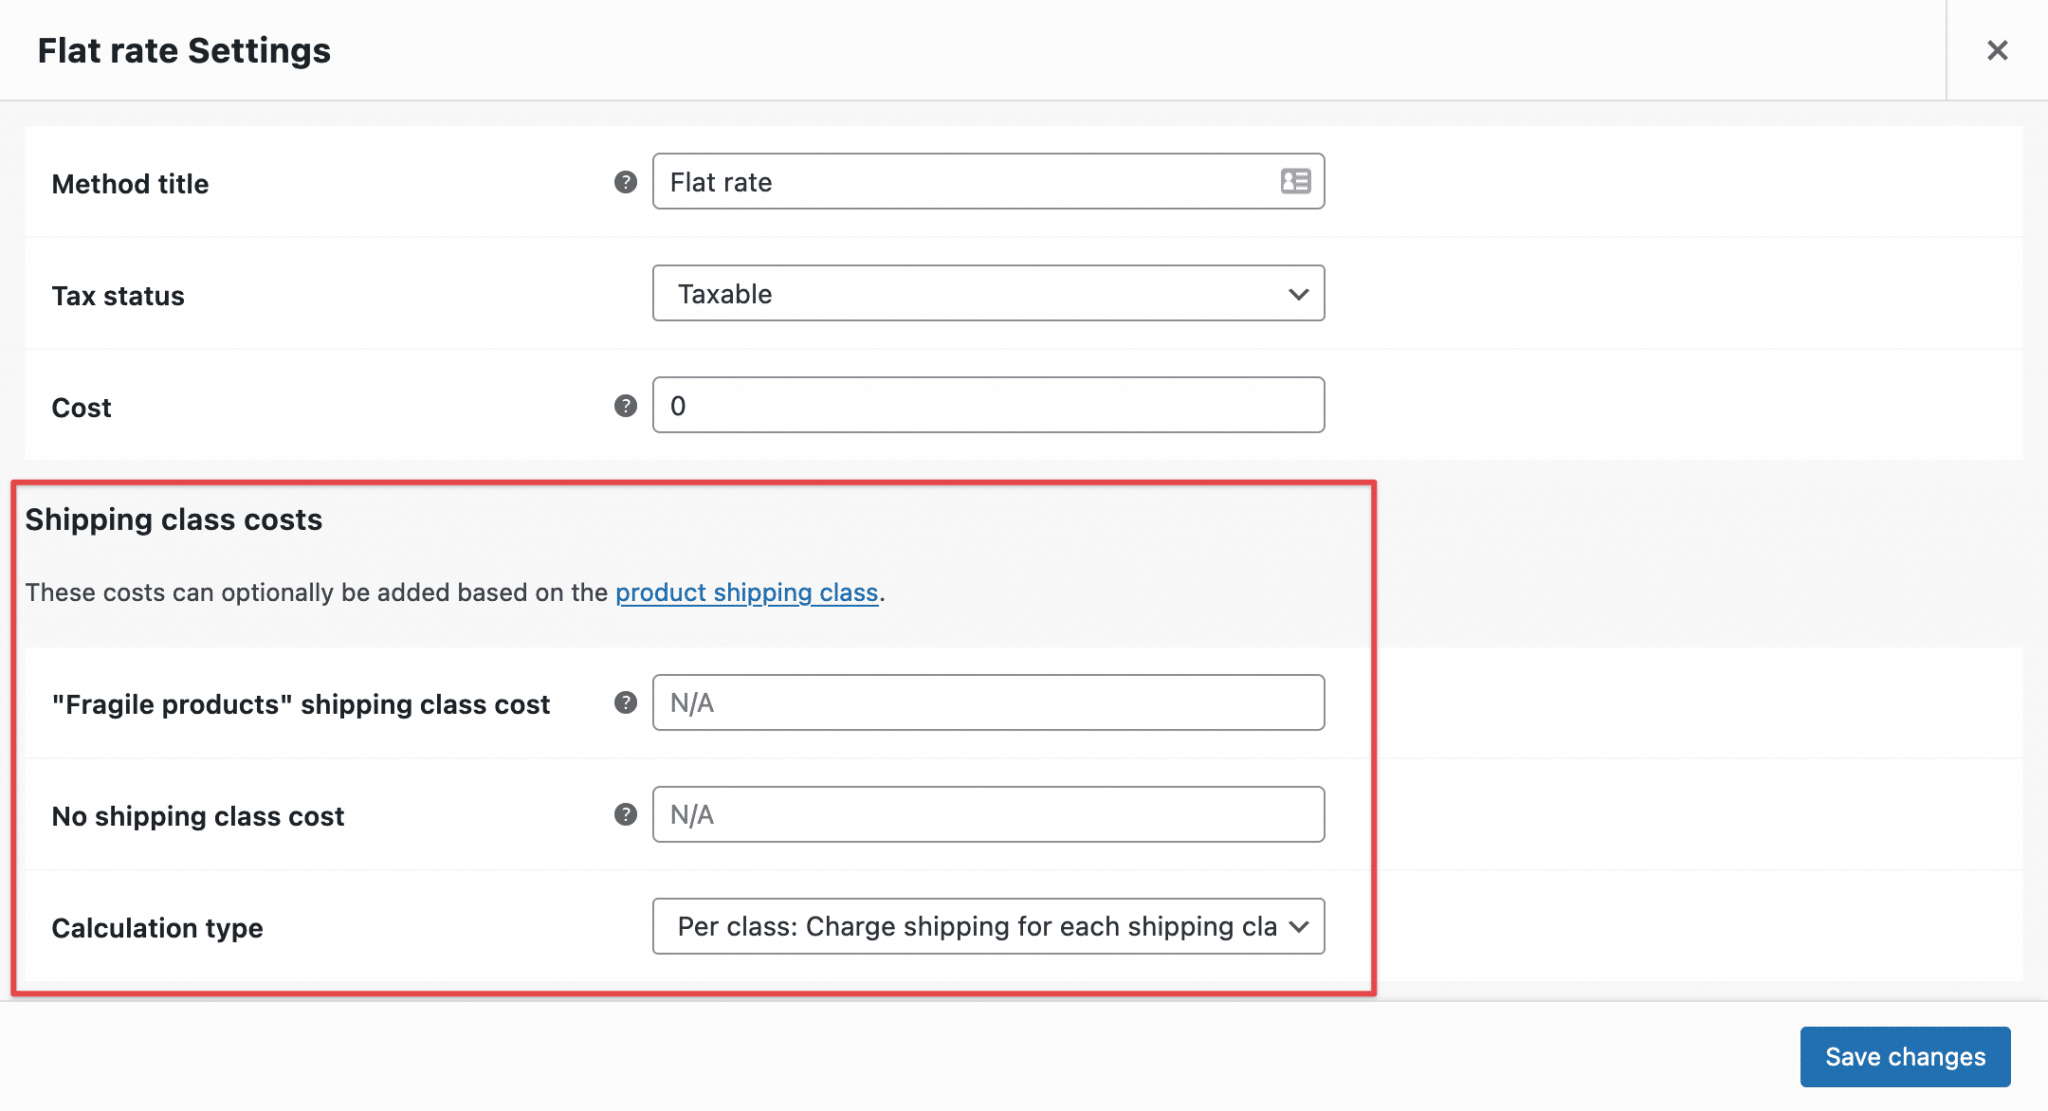
Set up flat rate shipping
With flat rate shipping, you can define how much shipping costs per item, based on the order placed, or based on the shipping class of the products purchased.
To set up this shipping method, the procedure is the same as for the previous ones. From the editing window of a shipping zone, click on Add shipping method. Then choose Flat rate and click on the Add shipping method button.
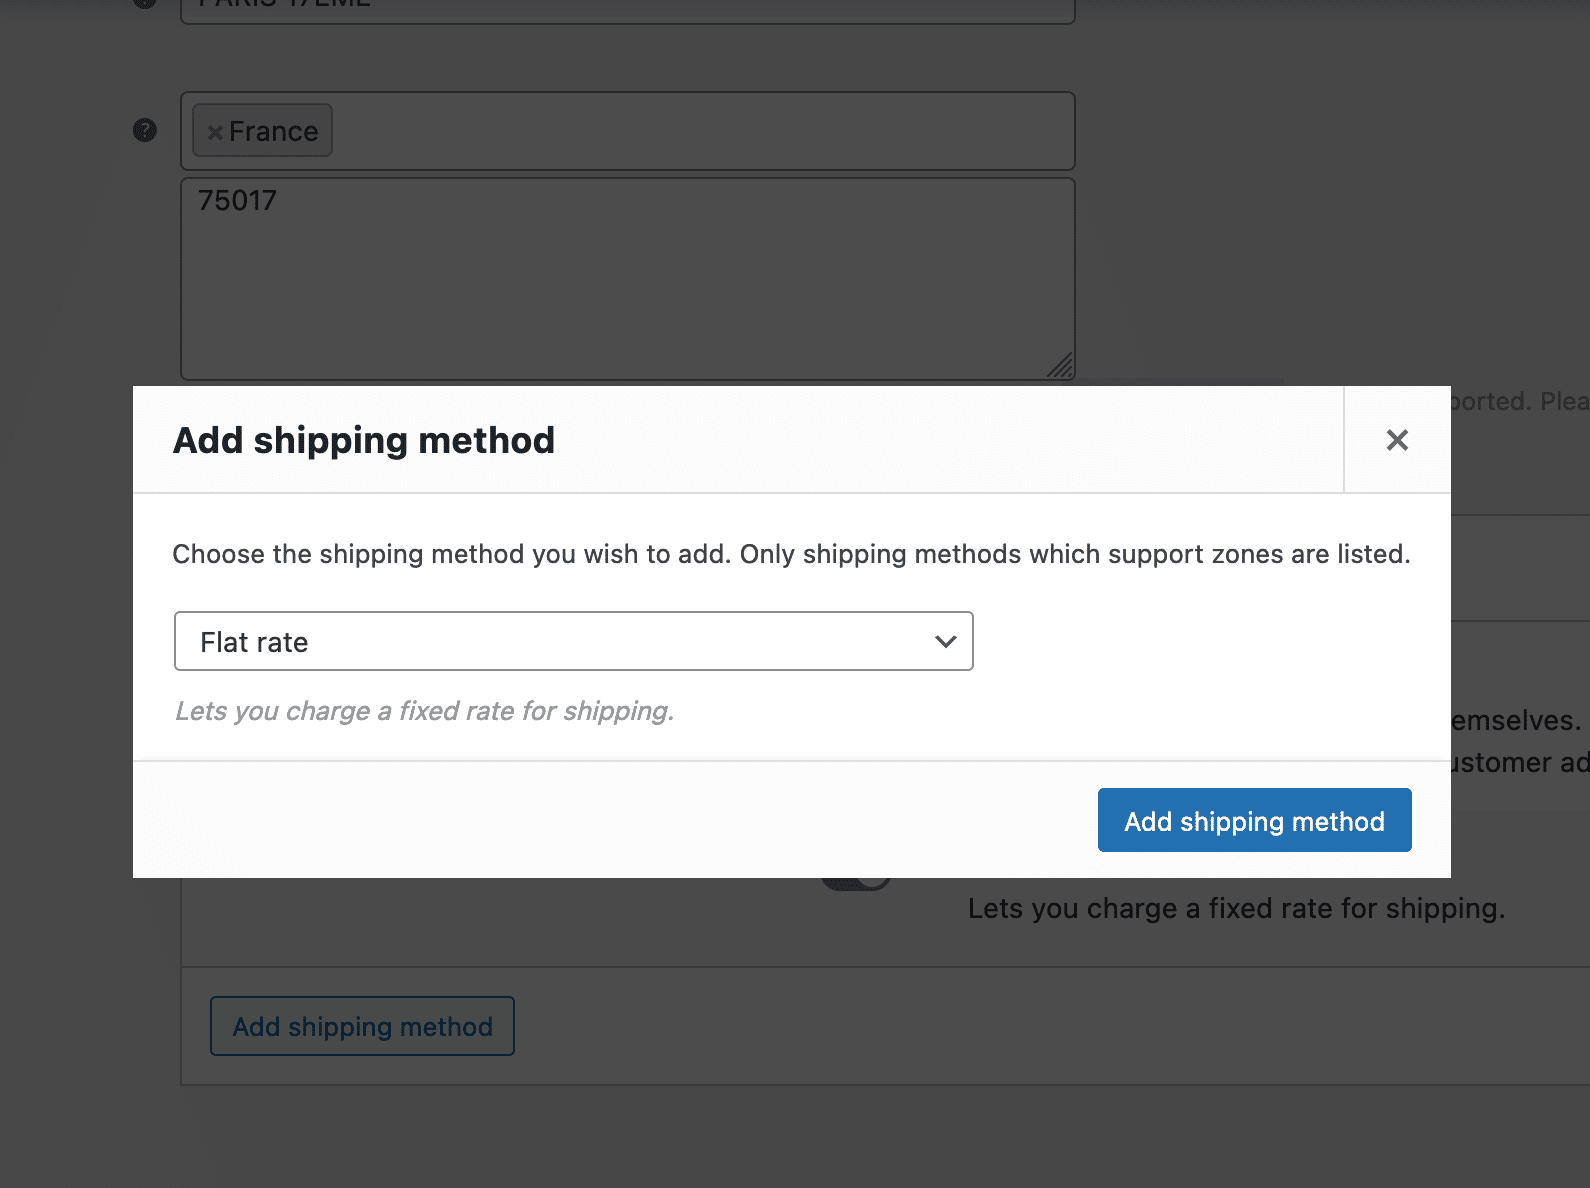
Then click on the Edit button to change the different options of the method. Here again, you can change the title of the method, whether it is taxable or not, and the cost.
It is also possible, in the configuration of the cost, to use advanced calculations with functions such as quantity or additional charges as explained here.
If you had set up a shipping class before, you will see it appear in the flat rate shipping method options.
Want to go further than the native shipping features offered by WooCommerce? Stay here: we’ve got just the thing for you, with the following plugins!

WooCommerce Advanced Shipping: to set up your shipping methods
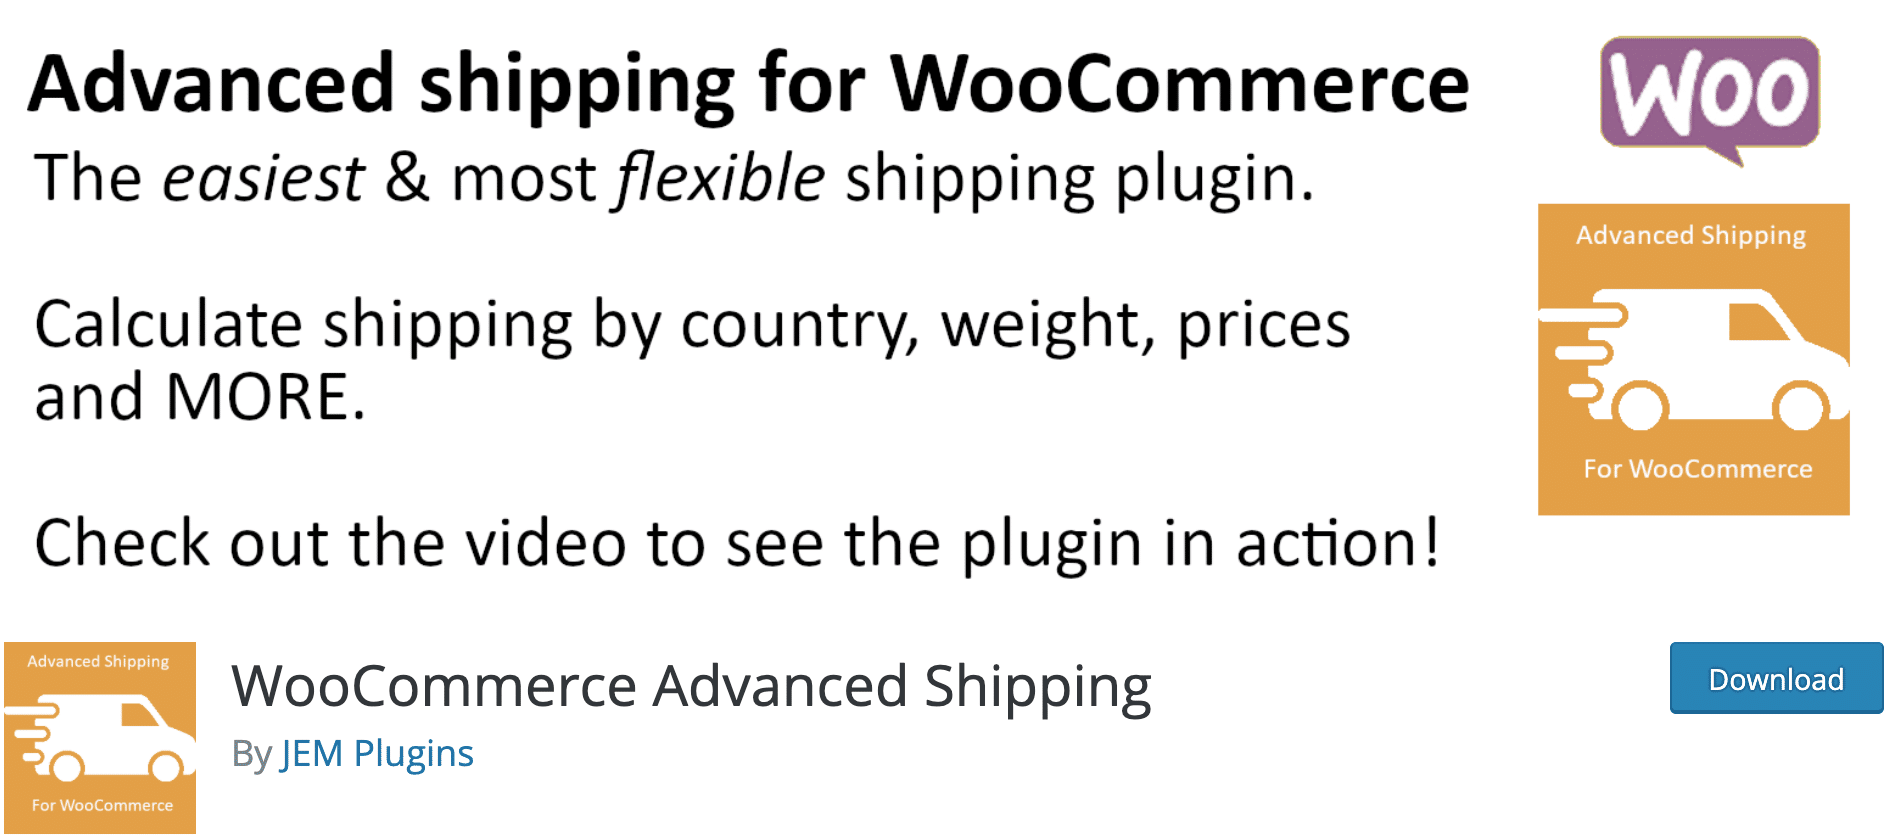
When it comes to creating, combining complex shipping methods, the plugin WooCommerce Advanced Shipping is really a good tool to have on hand. The plugin has over 20,000 active installations on the official WordPress directory. And out of 61 reviews given, there are 56 5-star reviews. Not bad!
The plugin is available in two versions. A free version with the essential options and a premium version that comes in three licenses:
- $79 for one site
- $199 for five sites
- $299 for an unlimited number of sites
These three licenses include one year of support and updates, and a 60-day money back guarantee.
Basically, the plugin allows you to create multiple scenarios, and apply shipping cost rules when certain conditions are met.
To see the plugin in action, the procedure is similar to adding a shipping zone:
- Go to WooCommerce > Settings and then click on the Shipping tab;
- Fill in the name and the geographical area of the zone;
- Choose the shipping method Table Rate then click on Edit.
On the new page, you will discover the different options to create the scenarios. For an online store that sells for example agricultural products, the owner can have the following conditions for shipping costs:
- On any purchase with a weight between 0 and 40 kg, the shipping price is €10.
- If the weight of the purchase is between 41 and 80 kg, the price of the shipping is €30.
- For any purchase weighing more than 80 kg, the price of shipping €60.
In concrete terms, this is what it looks like:
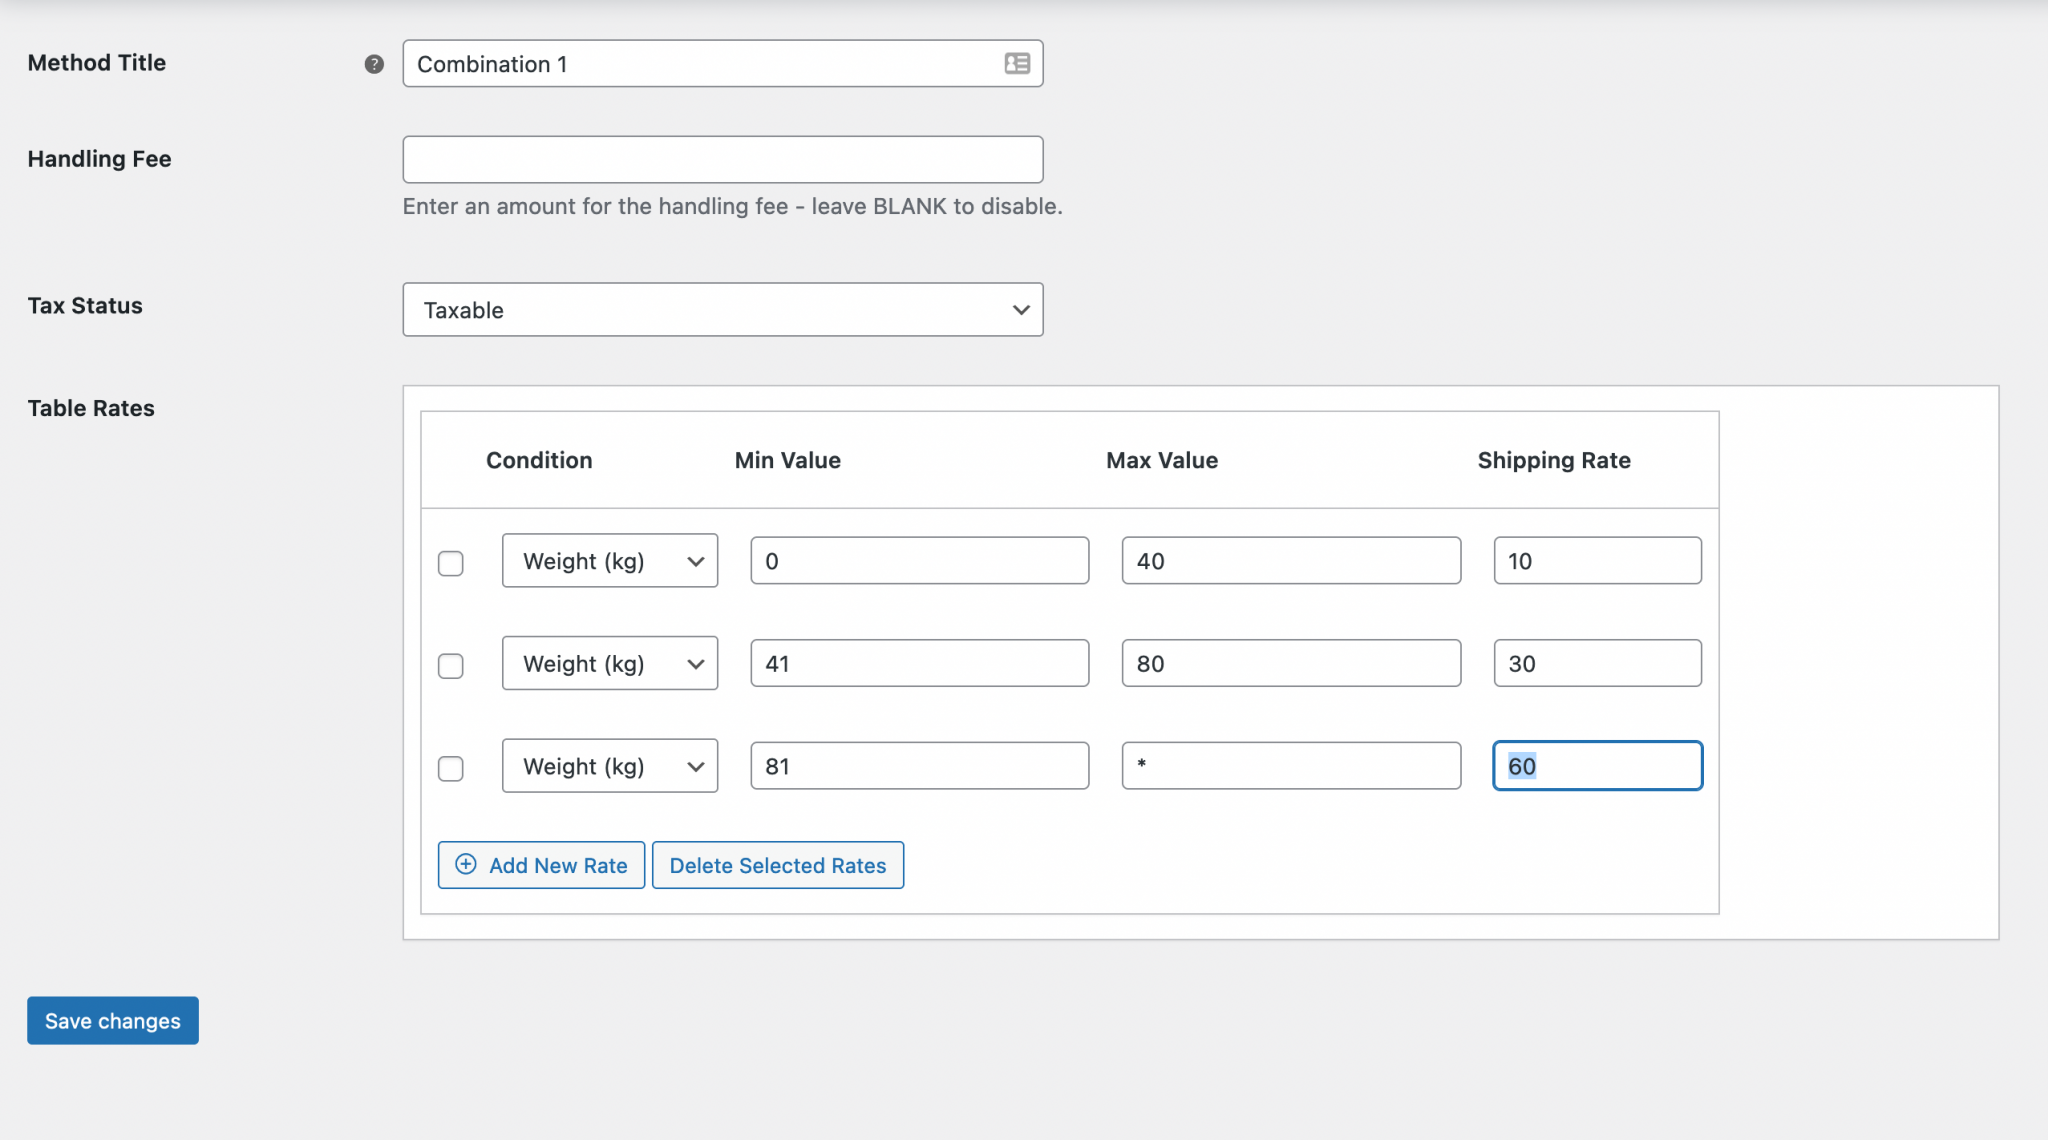
For example, for a product like corn (which is sold in 15 kg bags), when a customer buys 3 products, and enters France as the country, the shipping costs will be calculated using the combination of rules created in the image above.
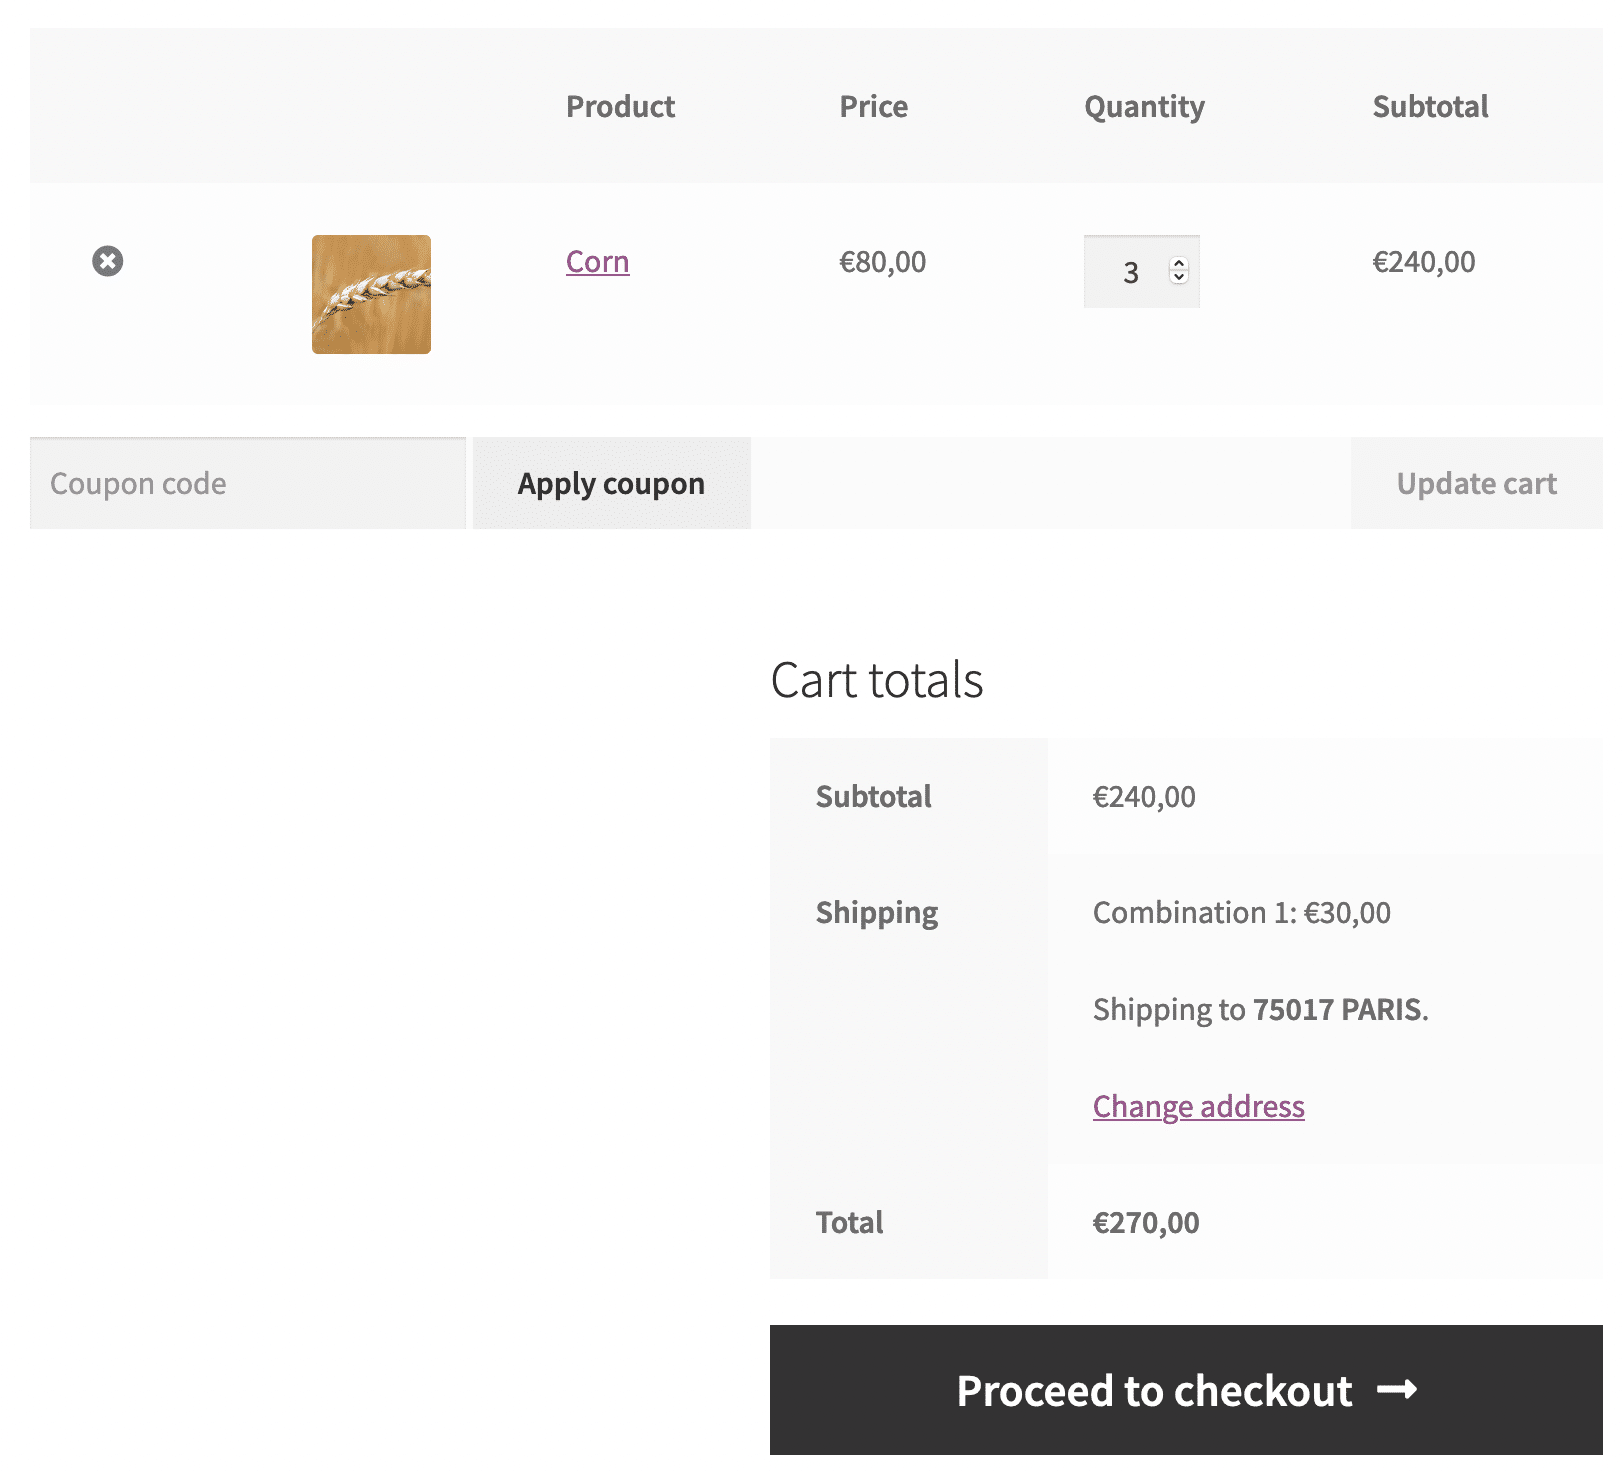
In addition to the weight of the products, the plugin also allows you to create shipping rules based on the prices of the orders. For example, you can create rules such as: “the shipping cost is €40 if the weight of the order is greater than 60 kg and its price greater than €180”.
All these features are available in the free version of the plugin. For more possibilities, the premium version will be able to meet more specific needs.
Download the WooCommerce Advanced Shipping plugin:
Advanced Shipment Tracking for WooCommerce: to manage your shipment tracking
The Advanced Shipment Tracking for WooCommerce plugin allows you to add information related to the tracking of your orders to track them more easily. The plugin is one of the most used for this function. On the official plugin directory, it has more than 40,000 active installations with 218 out of 233 5-star ratings.
The first thing the plugin does when activated is to add a location icon to each item in the order list. This icon is used to add the tracking information for the order.
Once the order information is added and saved, a link appears in the Tracking column, which goes directly to the tracking page of the chosen shipping provider. Note that it is also possible to add the tracking information on the product edit page.
One of the highlights of Advanced Shipment Tracking for WooCommerce is the multitude of options offered by the plugin.
First of all, there are more than 200 shipping providers integrated into it, from DHL to UPS, via the Post Office or AliExpress. To enable and configure these shipping providers as well as other plugin settings, go to WooCommerce > Shipping Tracking. Once there, click on the Shipping Providers tab. There you will find a list of available providers.
So you can enable the suppliers you use the most for your shipping. Only these suppliers will appear in the drop-down list when you want to add tracking information to an order.
The plugin also offers other interesting options like:
- The possibility to bulk import order tracking information using a CSV file;
- The possibility to configure the sending of emails according to the different stages of the shipment (Completed, Partially delivered, Tracking updated);
- An integration with TrackShip to automate shipping tracking when the delivery status changes at shipping providers.
Another must try option is the Email Customizer which allows you to customize the way tracking information appears on emails.
The plugin offers several other features as paid addons.
For example, you can:
- On an order with multiple lines, add tracking information per line of the order;
- Send SMS updates to your customers when their shipping status changes;
- Use the plugin’s functionality with PayPal‘s payment API.
In short: the plugin is a must-have if you want to give your customers the opportunity to track their orders in detail. It’s the perfect way to offer them a great customer experience!
Download Advanced Shipment Tracking for WooCommerce :
WooCommerce shipping: the recap
Shipping is one of the most important aspects when you have an online store.
An efficient and fast shipping system that can be easily tracked means a great customer experience, and therefore as many people likely to come back to your site and recommend you to their friends.
On the other hand, a problematic, slow or untraceable shipping is the guarantee of having unhappy customers, who will leave bad reviews on your site…
Whether it’s the shipping zones, the calculation of shipping fees, or the tracking of deliveries via your different carriers, all these processes must be optimized in order to provide customers with the best possible experience.
So get to grips with WooCommerce’s native features, as well as the plugins discussed in the article, to take your online store to the next level. Time for a better WooCommerce shipping management!

Receive the next posts for free and access exclusive resources. More than 20,000 people have done it, why not you?

Continue reading
Articles posted in WordPress PluginsOur review of B2BKing: A WooCommerce plugin built for B2B commerce
“Hi, I need 200 units of this product with fast shipping please”. As an online store owner, receiving this kind of message puts a smile on your face. Answering it, on the other hand, becomes a lot less fun… Basically,…
GTranslate on WordPress: our full review of this tool for creating a multilingual site
“Hello, how are you?” “What do you think of this computer mouse?” For you, everything is easy to understand in these two sentences. For someone living deep in the Shetland Islands or Yucatán, it’s probably a bit more complicated… If…
Air WP Sync: Test and review of this plugin for integrating Airtable into WordPress
Do you use Airtable and WordPress? Then some of your days probably look something like this. In the morning, you update your Airtable database as soon as something changes. In the afternoon, you copy and paste the same data into…