Content writing, SEO, design modifications, maintenance: your daily life as a webmaster is filled with multiple tasks. Tasks that are more or less important depending on your needs and the type of site to maintain.
You pamper your site. You’re looking at it tenderly. It’s like your baby.

The daily life of a webmaster is also made of radical decisions, which sometimes break your heart a little. Today, you may need to delete your WordPress website, for example.
And while you’re at it, you might as well do it the right way. After reading this post, you’ll know the whole process, thanks to a detailed step-by-step tutorial.
Overview
This tutorial is about the self-hosted solution WordPress.org, used by WPMarmite. It should not be confused with the WordPress.com hosting platform. Do you need clarification? Find out the differences between the two versions in this post. And if you ever want to delete a WordPress.com site, please refer to the official documentation.
Why delete a WordPress website?
Before detailing the process for deleting a WordPress website, let’s stop for a moment to consider the reasons why you might want to take such an action.
Indeed, there is nothing trivial about it. By permanently deleting your WP site, it will disappear completely. You will no longer be able to access your files and its content.
Your visitors will no longer be able to land on your pages when they search for your site on a search engine, or when they enter its URL (web address) in their favorite browser.
By deleting a website, you draw a definitive line on it, as well as on the benefits it can generate:
- You will no longer generate traffic because you will become invisible.
- You will no longer be able to make conversions, which are essential for your business (sales, downloading a white paper, requesting a quote, subscribing to your newsletter, etc.).
We insist: please think carefully before taking action. There are several reasons why you might want to delete a WordPress website. Among them, we can mention the following cases:
- Your WordPress website or blog is abandoned. You want to get rid of it because it does not meet your initial expectations. Its traffic is too low or the sales are not there.
- You don’t have the time to take care of your site (maintenance, content creation), which is no longer strategic for your business. In this case, you choose to delete it permanently.
- Your website does not represent your personal or professional activity anymore, maybe because you have changed direction or you have reoriented your business to another sector of activity.
- You want to start from scratch by launching a new website on a different theme, with a new domain name and another style and brand identity.
- You want to merge your current website/blog with another website.
So, is deleting your WordPress website still on your radar? If so, you should know that WordPress doesn’t have a native option to perform this action in a few clicks, from your dashboard.
To do this, you’ll have to get your hands dirty and delete the different elements one by one, in several strategic places.
Thanks to this, you will make sure that your site will disappear for good from the Internet.
Let me reassure you before we jump into the water: all this is not complicated, even if you are a beginner.
In the next part, discover a detailed step-by-step guide.

How to delete a WordPress website manually in 6 steps
Step 1: Backup the site
The first step is a bit counter-intuitive, but it’s still essential: first of all, back up your site… even if you’re about to delete it.
You can never be too careful. Keeping a safe and sound copy of your files AND your database can help if you want to go back in time and restore your site.
Okay, that’s not in your plans at all today. But who’s to say that you won’t change your mind in a few months?
To back up your site, you have several options. The manual method works perfectly, but it requires a minimum of technical knowledge.
The fastest and easiest option for a novice is to use a plugin. We introduce you to some of them in this post.
Among them, we recommend UpdraftPlus. Easy to use and very complete in its free version, it allows you to automatically schedule your backups while exporting them to a remote storage space (such as Dropbox, Google Drive or AmazonS3).

Step 2: Delete the files from the site
Have you backed up your site? Alright, let’s move on to the next step. Deleting a WordPress website involves deleting the two major components of any WordPress installation:
- The files, which allow the WordPress core to function.
- The database, which contains all the content of your site (posts, pages, plugin settings, comments, revisions etc.).
So let’s start with the files. You have two ways to delete them, which you’ll see in detail below.
Method 1: Delete WordPress website files via cPanel
Let’s start with the least technical and most direct way to delete your files: using the administration interface offered by your host. The most used is called cPanel.
You will find it for example on Bluehost. We are going to use this interface to show you how to proceed.
Note that the cPanel of each host is different. The display and the options offered may vary depending on the provider you use.
To access your cPanel, you need the login details (username + password) provided by your hosting provider when you signed up for their hosting package.
Once connected, in the “Files” section, click on “File Manager”. Click on the root directory of your site, in our case public_html. At home, this name can also be www or htdocs.
Select all the files and directories inside the root folder. Right click and choose “Delete”:

If you have self-installed your WordPress site using an auto-installer like Softaculous, you can also remove it this way. From the Bluehost cPanel, you need to go to Advanced tab > File manager.
Method 2: Delete WordPress files via FTP
Are you more daring and not afraid to get wet? The other alternative for deleting files from a WordPress website is to use an FTP client (File Transfer Protocol).
This is a software that allows you to communicate with your server. With it, you can send files and folders located on your computer to your online hosting server.
For the purpose of this test, I will use Filezilla. It is an open source FTP client that works on any environment (Windows, MacOS, Linux).
If you want to try the competition, use Cyberduck or Transmit.
To connect to an FTP client, the same remark applies as to accessing a cPanel. Access IDs were provided to you when you bought your hosting package, with 4 main infos:
- The connection host
- The port
- The user name
- The password
When you have connected to your FTP, locate the public_html folder and select all its contents. Then, right-click and choose “Delete” to finish:

Step 3: Delete the database
Breathe in, breathe out. Remember: along with the files, the database (db) is the second main element of a WordPress website.
Let’s tackle its removal right away. Here again, our friend cPanel will give us a hand.
Go back to it and locate the “Databases” tab. Click on “MySQL databases”:

Within the current databases, identify the one for your site. To delete it, click on the “Delete” link.

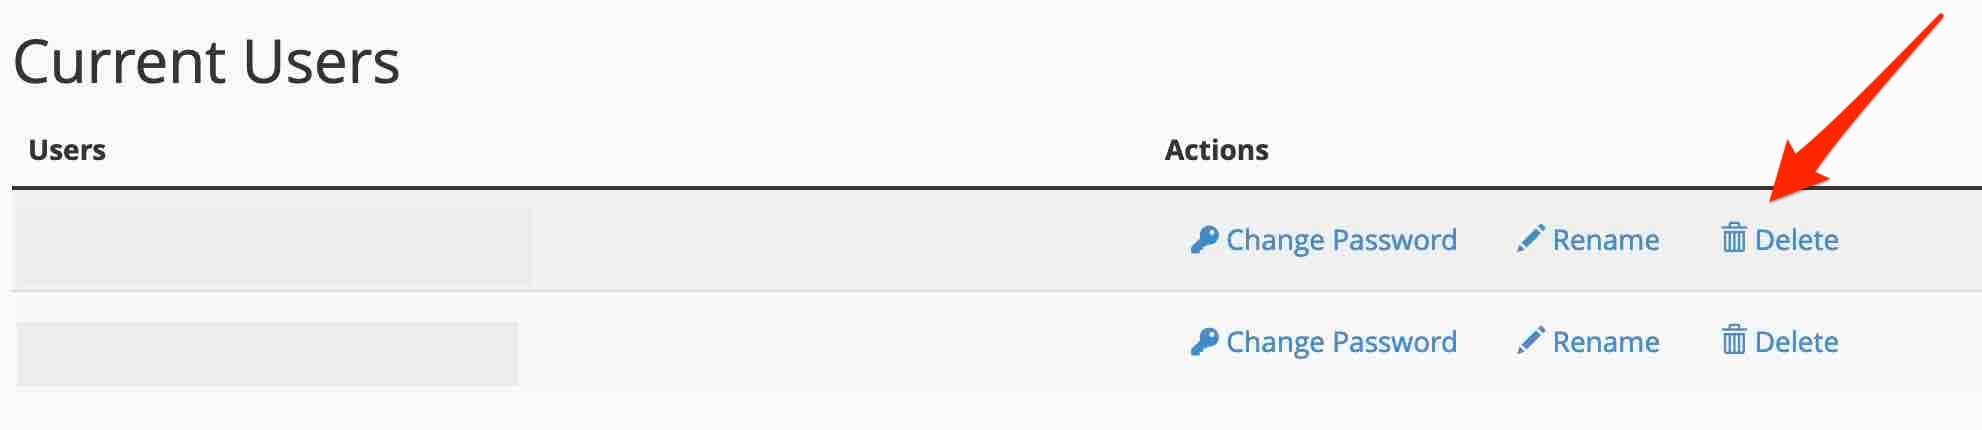
Also remember to delete the users associated to your database. You will find them in the “Current Users” section at the bottom of the same page. Once again, click on “Delete” next to the user of your choice.
No more files, no more database: you now know how to delete a WordPress site with Bluehost. 😉 Keep in mind that the process will be the same with other hosting providers (OVH, Ionos etc.). If they don’t use cPanel, only the interface will change.
You can also delete your database using the phpMyAdmin tool, which allows you to manage the administration of a database. You can access it on cPanel through the menu Databases > phpMyAdmin.

Step 4: Delete the domain name
We remain on cPanel, with its clear and airy interface. I suggest you stay a bit longer to perform an essential operation: delete the domain name associated to your WordPress website (only if you no longer want to use it).
To do this, follow the steps from the Bluehost documentation.
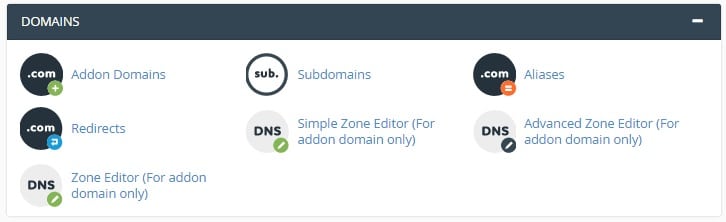
If you’re using another host, go to “Domains” and then “My Domains”. Click on the “Manage” button. On the line with the domain name of your choice, choose “Delete”:
Your domain name will appear in “Addon domains” only if you purchased it from your host. If you bought it from another registrar , you will have to set it up in the hosting DNS so that it appears there.
Well, congratulations! You have successfully taken your WordPress website offline. Its content is no longer accessible on the Internet. However, there’s still a problem.
If you go to a search engine and type in the name of your website, you’ll see that it’s still visible online: its pages are still accessible in the search results. Not exactly what you want, I guess.
However, this is normal: your website has been indexed in the past, and it takes some time for the search engine bots to come back to your pages and see that they no longer feature content.
When you want to permanently delete a WordPress website, you are often in a hurry and don’t want to wait.
The following steps will show you how to speed up the process, in order to erase all traces of your website from search engines.
Step 5: Delete the content visible on Google
Speaking of search engines, we will focus on Google, used by more than 90% of Internet users in the USA.
In its documentation, Google offers two ways to delete a page hosted on your WordPress website.
First scenario: the quick (but temporary) method
To “remove a page hosted on your site from Google’s search results within a day”, Google recommends its URL removal tool. This will temporarily block a web page from appearing in search results, “for about 6 months”.
To do this, you must have access to the Google Search Console (your site must have been added to this tool).
As for the procedure:
- Select the property (your website) on the Google Search Console.
- in the “Temporary removals” tab, click on the “New request” red button.

- In the highlighted window that opens, enter your URL and click on “Next” to complete the procedure.
Second scenario: the permanent method
To permanently block a page in Google’s search results, the search engine recommends implementing one of the 3 following actions:
- Delete or update the content of your WordPress website by deleting it from your hosting server. In principle, you’re all set. To take it a step further, you can also make a request to remove outdated content, but it requires Google’s approval.
- Block the access to the content of your website pages via a password.
- Add a
noindextag to your page, so that it is not indexed by Google.
Google does not recommend blocking access to the pages of your site to its crawlers by adding a directive in your robots.txt file. Indeed, despite this, a page can still be indexed if it is listed on other search engines.
When you remove a page from the Google search engine, you only remove it from… Google. That goes without saying.
Unfortunately, this means that the result may still appear on other competing engines like Bing and Yahoo, to name a few. Also remember to do the necessary actions on them, by checking their documentation.
Don’t forget to remove the links to your website on your various social networks, your Google Business profile, or your email signature.
Step 6: Delete the website archives
Well, you’re well on your way to deleting a WordPress website. You’ve done almost all the work.
However, traces of your website, in the form of screenshots, may exist on the Internet Archive.
The Internet Archive is a non-profit organization that archives content on the web: web pages, books, movies, software, etc.
This gigantic database contains nearly 700 billion cached web pages. To find out if one of yours is listed, enter its URL in the WaybackMachine search box, and see what comes up:

If your WordPress site is listed, contact the Internet Archives by email and ask them to remove the website from their database.
This time, you’re all set: you’ve successfully deleted a WordPress website.
How to delete a WordPress site with a plugin?
In this post, you’ve seen the manual method for deleting a WordPress website.
But after all, on this good old WP directory containing 63,708 plugins, isn’t there a lucky one that allows you to make your WP website disappear in a few clicks?
After examination, I am sad to announce that there is no such plugin. Well, on closer inspection, there is one that might come close to the desired goal. Its name? WP Reset.

It allows you to reset WordPress, restoring the default settings of the database.
With it, you won’t be able to delete a WordPress site entirely, as you would do manually. But you can come close, since WP Reset can delete all your customizations and content (but not your files).
You can use it in some very specific cases, which do not necessarily require to completely delete a site. I am thinking of the following situations for example:
- When you need to do some staging or local tests on your site, and you need to reset the site very quickly, without reinstalling everything.
- Your site has been hacked and requires cleaning and a reset to install its last backup.
So, are you interested in WP Reset? Here it is in detail in this tutorial.

How to unpublish a WordPress site?
If you’re reading this, it’s probably because you have every intention of deleting your WordPress site.
However, in some cases, it is not absolutely necessary to do so, depending on your goals. For example, if you just want to make your site or a page invisible for a while.
In this case, “unpublishing” your site will be enough. Here is how to do it in 3 different situations.
Solution #1: Use a maintenance plugin
You are working on the creation or the redesign of your WordPress site and you don’t want your visitors to see the progress of your project?
Enable a maintenance plugin to let your visitors know that your site will be available on a certain date, for example. With this, you can temporarily close your WordPress site.
There are many maintenance plugins in the WP ecosystem. We introduce you to 10 of them in this complete test. For your information, we found that the most complete one is SeedProd (affiliate link).

Solution #2: Make a page private on the content editor
Sometimes you just need to make a page or a post invisible for a while. This is the case if you want to make some changes to the content or design, for example.
Or if you want to share a content internally, without making it visible to the public.
As for the procedure, it’s very simple. Whether it is for a post or a page, go to the desired content on the content editor.
In the “Post Visibility” option, click on “Public”, then select “Private”:

Solution #3: Ask search engines not to index your site
Finally, let’s review one last option. In the WordPress settings, under Reading Settings > Search engine visibility, you can specify that search engines should not index your site:

I would still be cautious with this option: it’s good to know it exists, but don’t enable it!
When you check it, search engines will no longer index your site: they will no longer sort the URLs of your pages in their database. As a result, they will not be able to display them in the search results.
So your site will no longer be visible on Google and other search engines. And when you uncheck the box, you take the risk that Google will take several weeks or months to index your content again. As you can see, this option should be handled with infinite care.
Final recap
For one reason or another, you may need to delete a WordPress site.
To do so, you have discovered throughout these lines that it is necessary to:
- Remove two key components of any WP site: the files and the database.
- Get rid of the content of your site on Google.
Well, don’t forget that it is possible to reset a WordPress site without having to delete it completely. You can also make it temporarily invisible, either the whole site or a single page or post.
Do you have any feedback on this topic?
Let us know by writing a comment, and let’s continue the discussion. 😉

Receive the next posts for free and access exclusive resources. More than 20,000 people have done it, why not you?
Continue reading
Articles posted in WordPress TutorialsHow to update the PHP version of your WordPress site
What comes to mind when you think of WordPress speed and security? Your favorite plugins, perhaps? You should also think about… PHP! If you’re looking for a site that loads fast, while offering a solid shield against hacker attacks, there’s a…
How to create an effective HubSpot conversion funnel on WordPress (complete guide)
In the drawers of a kitchen, there are often two very useful utensils lying around. The first is the colander. And to illustrate, some WordPress sites unfortunately resemble it. Why? Well, because visitors arrive on the site in question… then…
How to fix the ERR_CONNECTION_REFUSED error: A complete guide
Does your browser display the ERR_CONNECTION_REFUSED message when you try to access a website? This error means that the target server – or your own configuration – is actively rejecting the connection request, leaving you at a dead end. But…