A few days ago, I had an unpleasant experience. I was eager to read a well-sold article on Twitter, so I clicked on the link redirecting me to the relevant website.
And then I waited 3 seconds. 4 seconds. 5 seconds. On the screen: nothing. After 3 compulsive F5 hits to refresh the page: still nothing. So I left the site, a bit grumpy. Reading moment: gone, forget it.

There are several reasons why a web page can be slow to load. Often, this is due to too large images.
The EWWW Image Optimizer plugin is here to help you reduce their weight.
Thanks to it, you’ll be able to improve the loading speed of your WordPress site’s pages, and avoid your visitors (me, for example) to feel frustrated when trying to read your prose.
At the end of this article, you’ll know exactly how to configure this plugin to use it right away like a champ.
Overview
Originally written in October 2019, this article was last updated in April 2022.
What is EWWW Image Optimizer?

EWWW Image Optimizer is a freemium plugin that compresses and optimizes the weight of your images in order to improve the loading speed of your site’s pages. You can decide the compression setting, optimize your images in bulk and resize them. The plugin can be used without any technical knowledge and without the need for coding.
Installed on 1000K+ active installations, EWWW Image Optimizer is one of the most popular plugins in the official directory for optimizing your images, along with Smush (1M+ active installations) and Imagify (1000K+ active installations).
Overall, it is very popular with users, who give it an excellent rating of 4.7/5 stars at the time of writing.
What are the main features of the free version of EWWW Image Optimizer?
In its free version, EWWW Image Optimizer allows you to:
- Compress and optimize the weight of your images without any size limitation. In fact, to be precise, the limit is set at… 150 MB. But I might as well tell you that this is not likely to happen.
- Compress your images on your own server. You don’t need to register or request an API key.
- Process all major image formats: JPG, PNG, GIF, PDF and WebP.
- Optimize all the images already on your site at once, thanks to a mass optimization.
- Optimize the files in the Media Library, but also those in other folders (e.g. your theme images).
- Store your images for free for 30 days.
Why use an image compression plugin?
Just before we move on to setting up the plugin and discovering its options, let’s answer a central question: why use a plugin to compress your images?
There are several good reasons for this:
- Images can represent up to half of the weight of a web page. By optimizing their weight, you ensure that your pages load faster.
- You offer a better user experience to your visitors. A site that is too slow to load is frustrating for the user who will likely go elsewhere if he does not quickly find what he is looking for.
- You take care of your SEO. The loading speed is a criterion taken into account by the Google algorithm to position a page, even if this has little weight compared to major factors such as backlinks or the relevance of your content.
- A site that loads quickly, with optimized images, helps to limit the bounce rate.
Of course, there are editing software to compress your images. I’m thinking of Adobe Photoshop and its “Save for the Web” feature, for example. Or even online tools like TinyPNG, Jpeg.io or Compressor.io.
However, they have three main limitations compared to a plugin:
- These tools are not always free and you may not be comfortable with how they work.
- The degree of compression may not be as effective as with a dedicated WordPress plugin.
- Using a third-party software “forces” you to go back and forth between its interface and your WordPress site. With a plugin, you have all the options directly on your site’s dashboard, which saves a lot of time.
Now, after this appetizer, let’s move on to the main course. Let’s discover in detail how to set up EWWW Image Optimizer.
How to set up EWWW Image Optimizer: tutorial
How to optimize the weight of your images?
On your WordPress administration interface, start by installing and activating EWWW Image Optimizer through the menu plugins > Add Plugins:

Once this operation is done, go to the set up menu of the plugin, in your sidebar on the left, by clicking on Settings > EWWW Image Optimizer.
As you will see, only two steps are required for the plugin to start working.
Step 1: Select your goals
The plugin first asks you to select your goals:
- Check the corresponding box(es) if you want to speed up your site and/or save storage space. For the purpose of this tutorial, I select both options.
- Decide if you want to switch to the Pro package of the plugin or not.
Click on the blue “Next” button when you are done.

Step 2: Confirm your settings
On the next screen, the plugin asks you to validate the settings it recommends for your site.
- Remove metadata. The plugin specifies that this “will remove all metadata: EXIF, comments, color profiles and anything that is not pixel data”.
- Enable Lazy Load on your images. That means that they will only load once they appear on your visitor’s screen, on scroll.
- WebP conversion. WebP is a matrix image format proposed by Google. It compresses images even more than JPG or PNG, without any loss of quality. For your information, WordPress natively supports this format since its version 5.8. The plugin warns you about one major point: converting to WebP format will increase your storage needs.
It recommends the use of Easy IO, a CDN (Content Delivery Network) offered by EWWW Image Optimizer in its Pro version only. - Resize the width and height of your already uploaded images.
- Access documentation and support from your WordPress dashboard.
To start with, you can use the default settings. You will be able to change them later at any time. Click on “Save Settings” to continue:

And that’s it, you’re all set. EWWW Image Optimizer is now configured and ready to work!
The plugin says that new uploads will be optimized automatically. So sit back and relax: the plugin will do everything for you.
What does the EWWW Image Optimizer dashboard offer?
When all your settings are configured, EWWW Image Optimizer redirects you to its dashboard, which can be split into two parts.
At the top of the page, an insert shows you:
- The optimization score of your images (40% in my case). Recommendations are also proposed to improve this score.
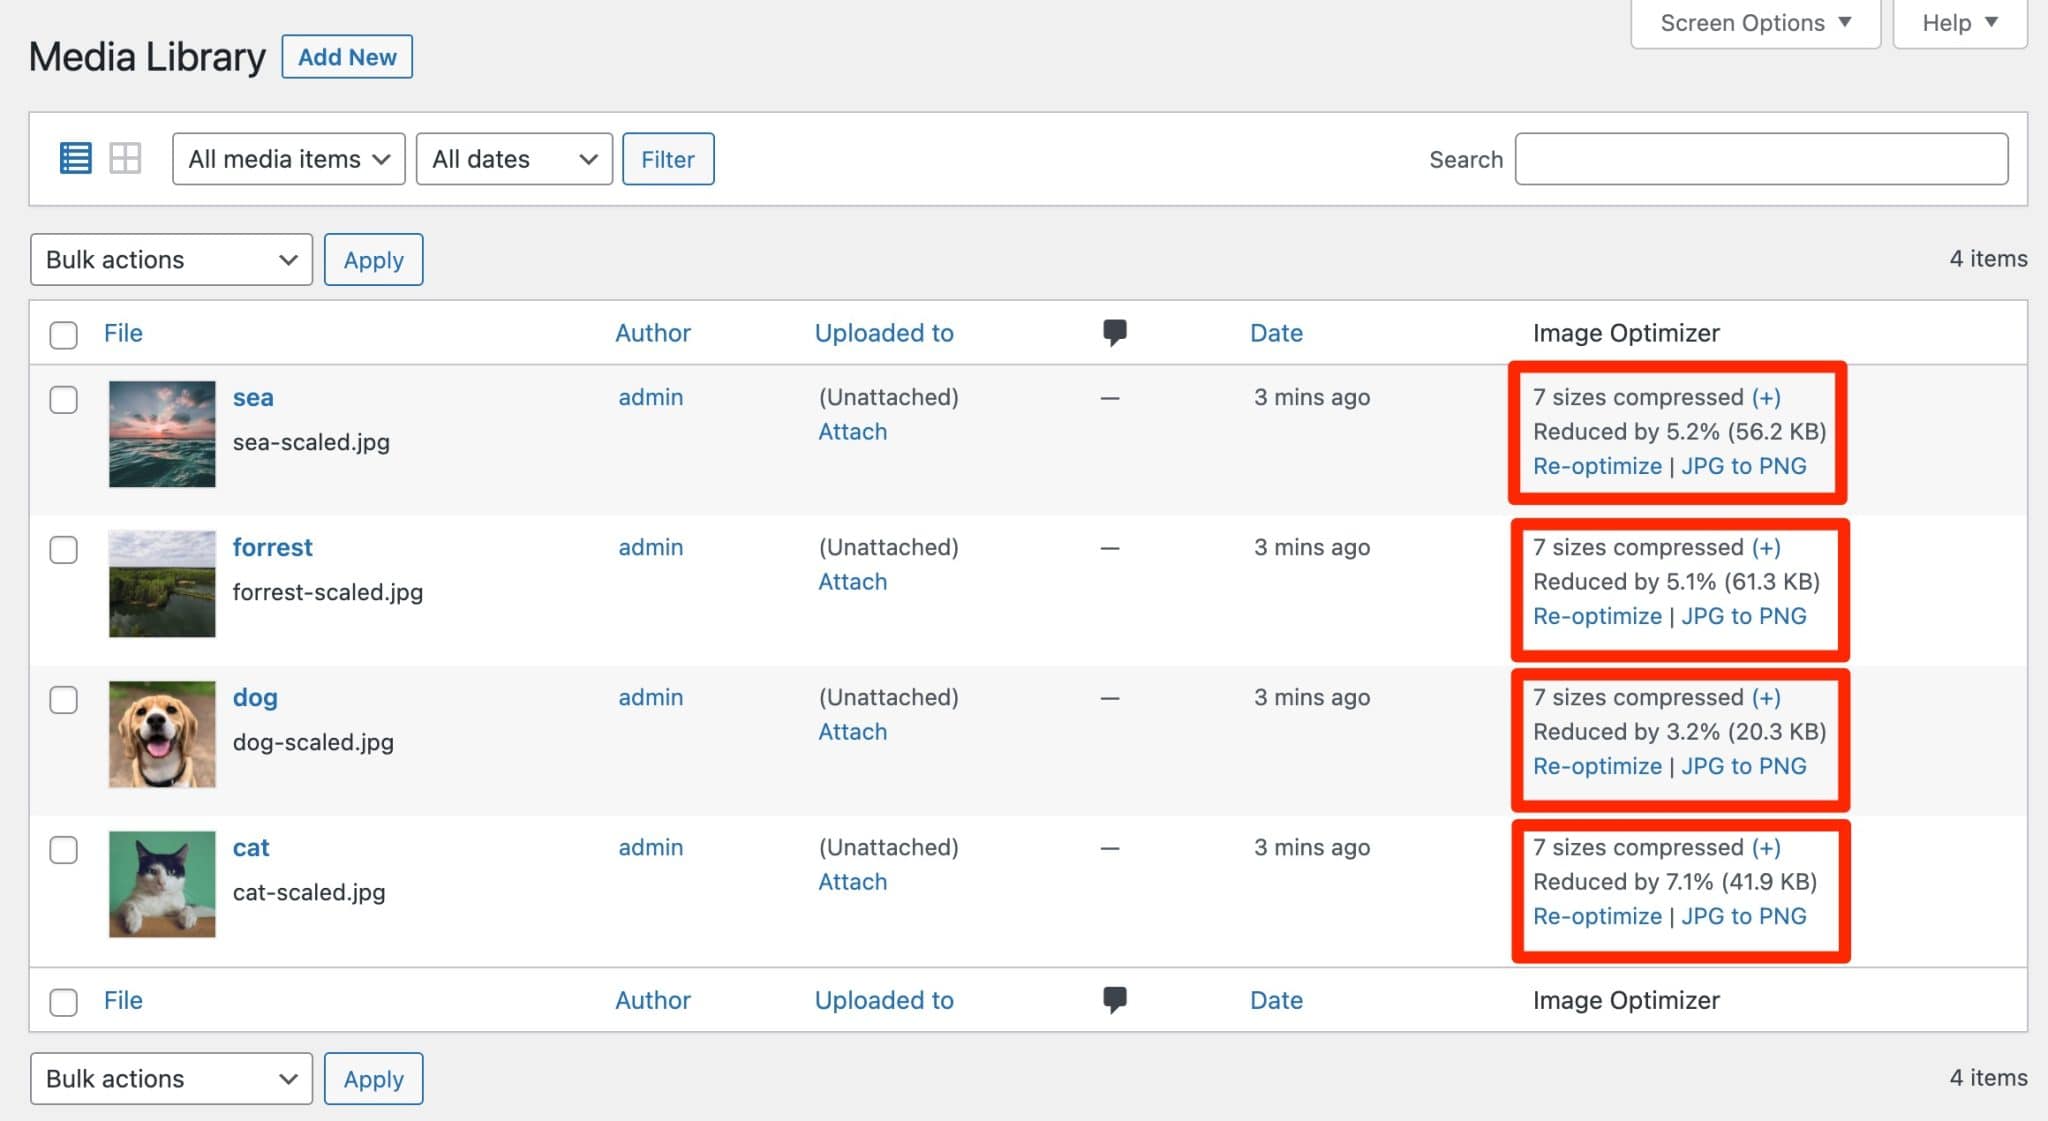
- The local compression savings (248,39 KO). If you go to your Media Library, you have an overview of the optimization for each file. For example, the image of a cat has been reduced by 7.7%, a loss of 56.8 KB.
The rest of the page offers 3 tabs:
- Basic allows you to make adjustments of your choice concerning, for example, delayed loading, resizing of your images, or WebP conversion.
- Support offers options to debug or repair your site. You will find for example a link to the documentation and another one to contact directly the support, even in the free version (!).
- Contribute offers you the possibility to contribute to the improvement of the plugin, for example by allowing the tracking of its use or by translating it.
So, is that all? Well, no, EWWW Image Optimizer also offers another handy option. Discover it in the next part.
How to optimize images in bulk with EWWW Image Optimizer?
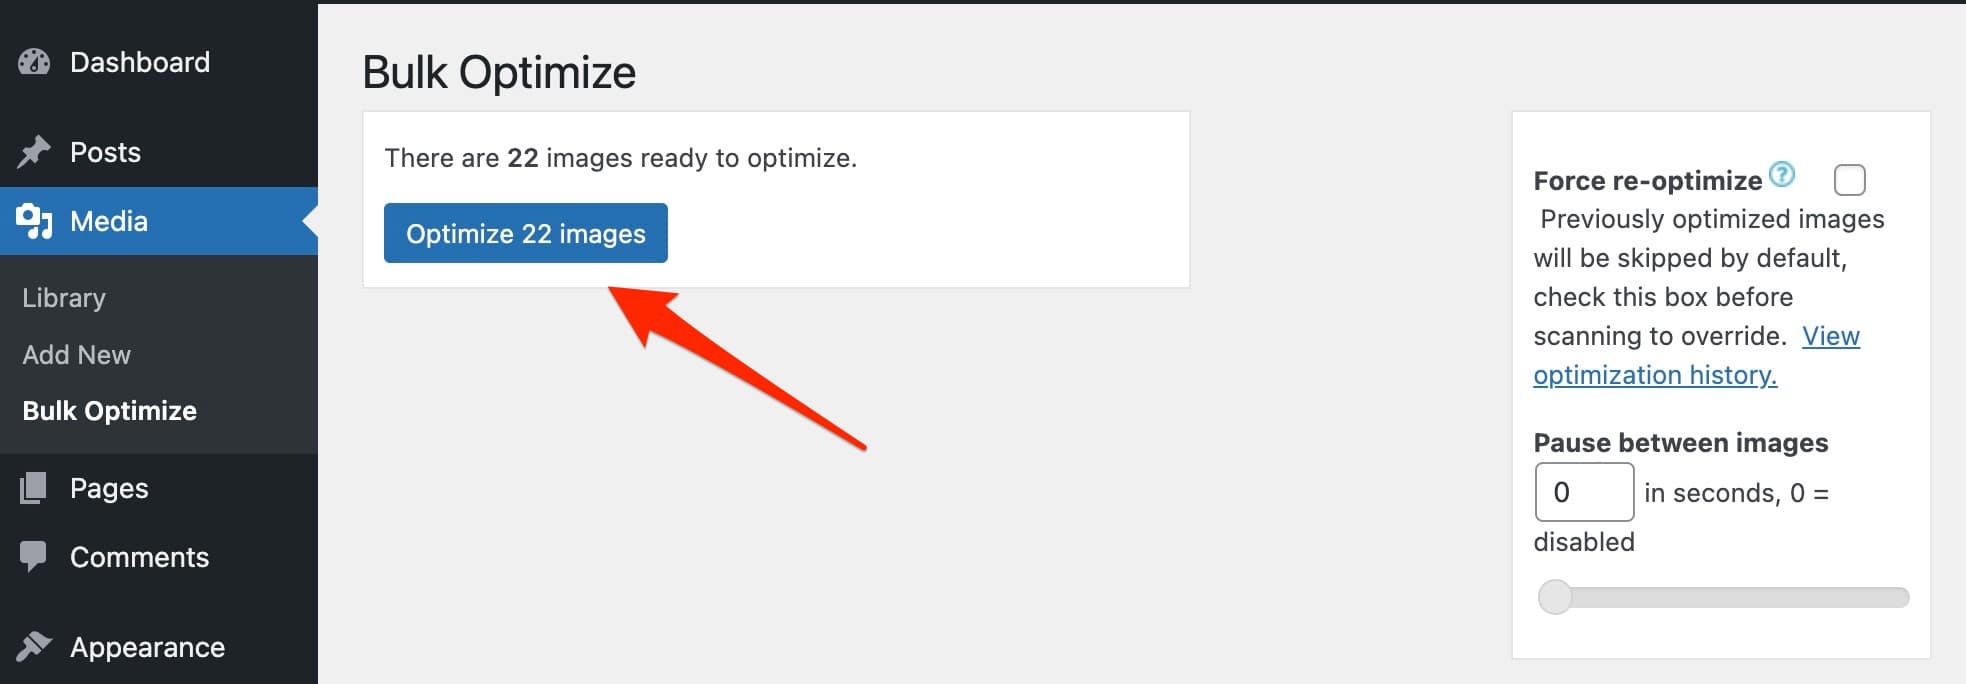
Bulk optimization consists in optimizing the weight of your images in one go, from the same page.
To take advantage of it, go to Media > Bulk Optimize. Click on the “Analyze unoptimized images” button and the plugin will detect the images that deserve to be processed.
FYI, EWWW Image Optimizer will scan the images in your Media Library, but also those in your theme, and “BuddyPress avatars, BuddyPress Activity Plus images, Meta Slider slides, WP Symposium Pro avatars, GD bbPress attachments, Grand Media galleries, and any other user-specified folder”.
Let the plugin run in the background and in a few seconds it’s done.
Now you know how EWWW Image Optimizer works. The free version seems limited? The plugin has a premium offer which is described in the next section.
How much does EWWW Image Optimizer cost?
EWWW Image Optimizer is based on a freemium model. On the one hand, you can enjoy the free plugin, which can be activated from your WordPress dashboard.
It meets the basic need (reducing the weight of your images) and is sufficient to start with.
To go further, Shane Bishop, the American developer of the plugin, offers a premium package composed of 3 plugins:
- Easy Image Optimizer: this is the CDN used in the free plugin to automatically compress your images.
In addition, it also reduces your CSS and JavaScript files to reduce the weight of your pages. - Compress API: thanks to this, the optimization of your images will be even more advanced (more reduction of their weight). You can also store your images on EWWW servers for 30 days.
- SWIS Performance. This plugin is a toolbox that offers caching of your pages, optimization of your Google Fonts or minification of your CSS and JavaScript files.
In total, 3 licenses are offered, for prices ranging from $7/month for a use on 1 site, to $25/month for an unlimited use.
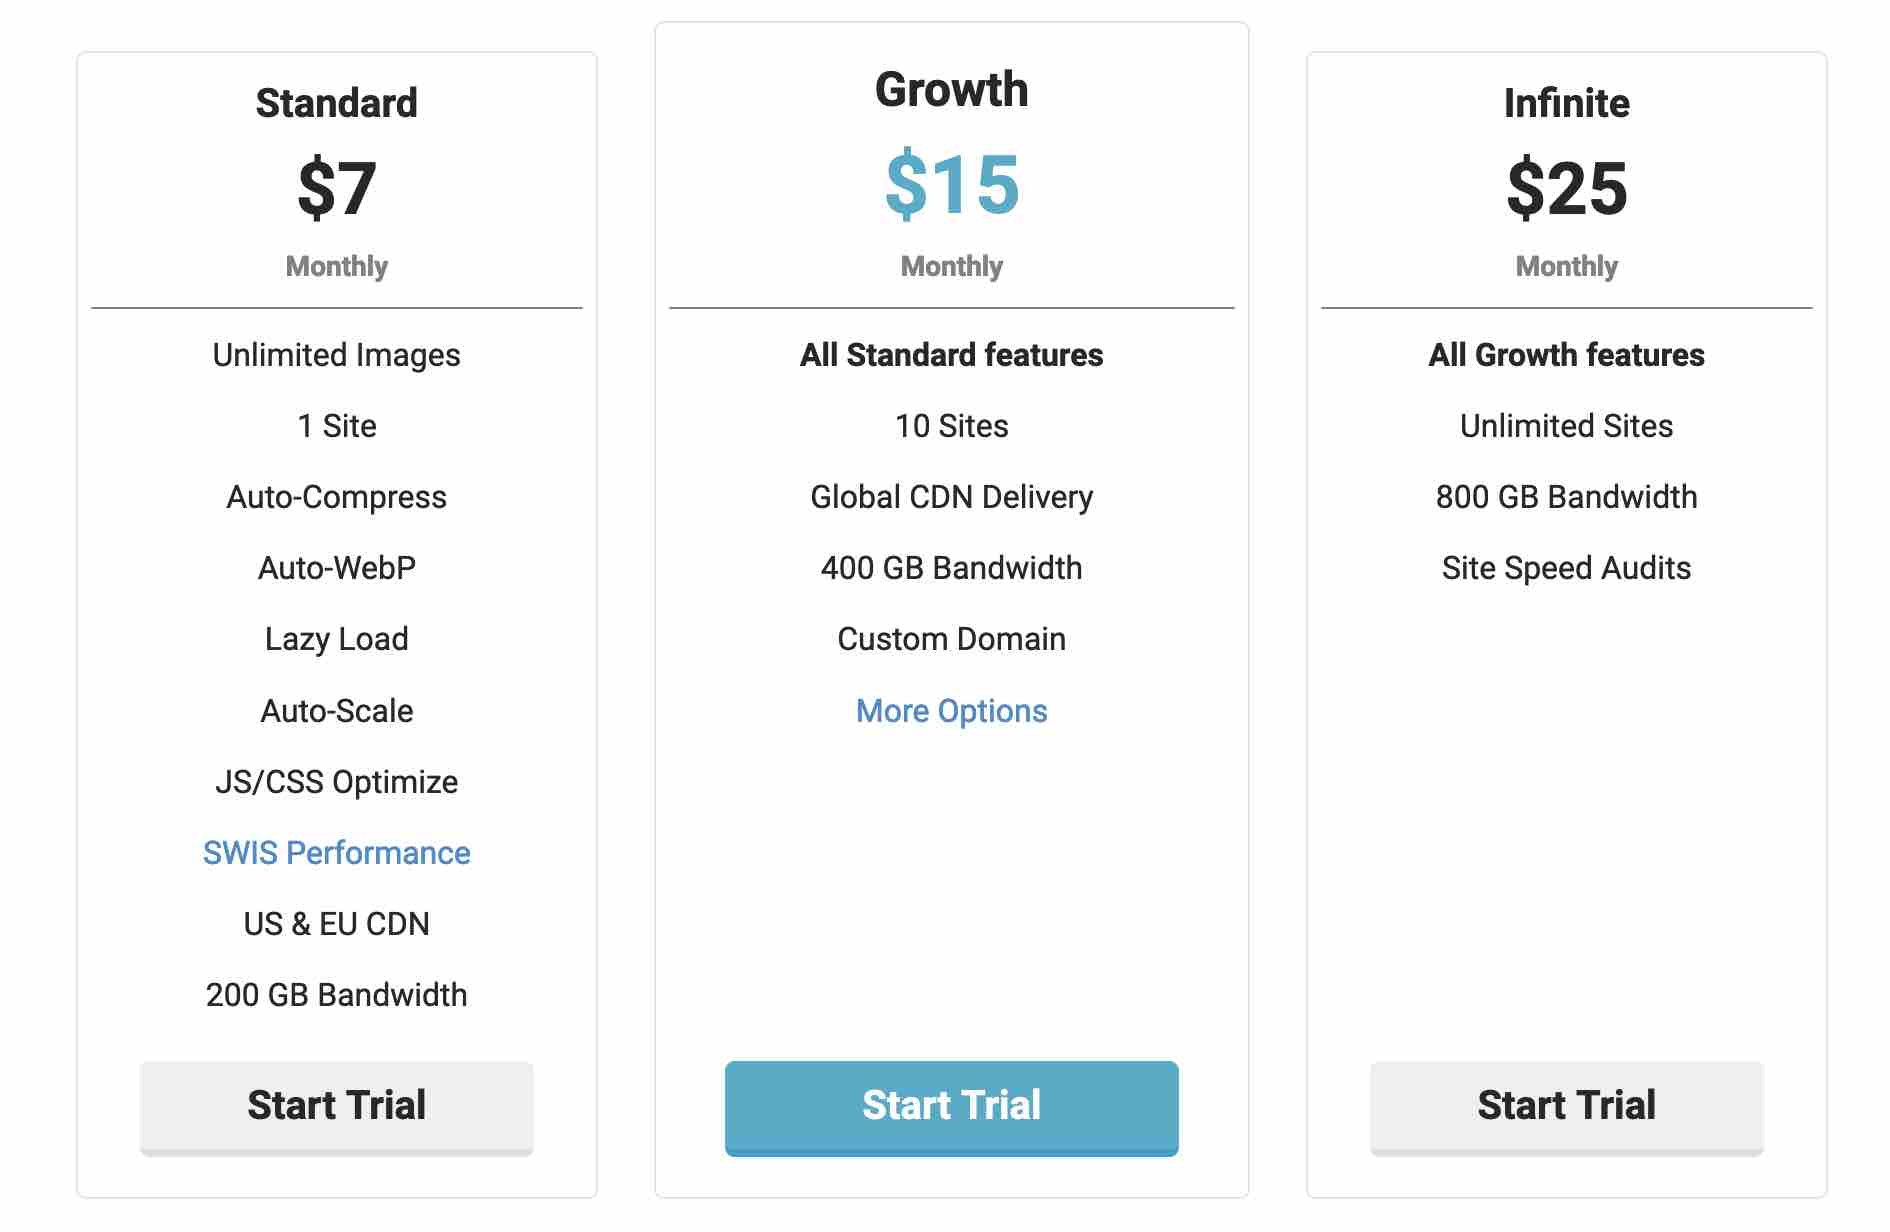
The more expensive the license, the more options and bandwidth you get. Each license offers a free 7-day trial and you’ll get two months free if you pay for a year upfront.
Note that you can also purchase each plugin individually at the following rates: starting at $5/month for Easy Image Optimizer, $3/month for 1,500 image credits for Compress API and starting at $30/year for SWIS Performance.

What other plugins are available to optimize your images?
Since the beginning of this article, I’ve mentioned EWWW Image Optimizer. As efficient as it is, it is not the only one on the market.
I also mentioned Imagify and Smush, but other alternatives exist, such as:
- ShortPixel
- Optimole
- reSmush.it
- Robin image optimizer
- WP Compress
- TinyPNG (that tool I mentioned earlier also offers this plugin)
I don’t know all of them in detail, but I advise you to follow these tips when choosing a plugin to optimize your images:
- Check the maximum size of the files to be optimized and the limitations imposed.
- Take a look at the options offered to find a plugin that really meets your needs. An option for mass optimization, for example, is often welcome.
- Pay attention to the interface: as far as possible, it should be easy to use.
- Check the types of files supported for compressing your images. At least the following classic formats should be included: JPEG, PNG, GIF, PDF, WebP, even SVG.
- Find out which compression formats are used by the plugin in question. The most common plugin formats are lossy and lossless. With lossy compression, the image loses some quality, but the reduction in image size is greater than with lossless compression.
Now, without any transition, let’s draw up an assessment after this test of the EWWW Image Optimizer plugin.
Our final opinion on EWWW Image Optimizer
The advantages of the plugin
- The plugin is very easy to set up and to use. After a few basic settings, everything happens automatically.
- The absence of size limitation (or almost) for the images to optimize.
- Free email support for all users.
- The mass optimization option for your images, very practical to avoid proceeding one by one… and to save a lot of time.
- The possibility to activate the delayed loading of your images even with the free version.

The disadvantages of the plugin
- EWWW uses a lot of memory since it runs on your own server. If you have a lot of images to optimize and a poorly performing hosting offer, it might get stuck.
- The interface is not the most attractive on the market, especially if you compare it to what Imagify offers, for example.
- The lack of clarity in the premium offers. EWWW Image Optimizer first of all promotes its bundled licenses (including the 3 plugins), but you can also get each licence individually. Except that for that, you have to open your eyes.

Who is EWWW Image Optimizer designed for?
EWWW Image Optimizer is suitable for anyone who simply wants to optimize the weight of their images.
Its ease of use makes it a natural choice for people who are new to WordPress.
It is also suitable for people who want to test it without taking any financial risk. Its free version is already interesting to proceed with optimizations.
Download EWWW Image Optimizer:
Personally, I found the plugin efficient and practical, but it is not the most efficient to reduce the weight of your photos (at least in its free version).
Imagify, presented on the WPMarmite blog, had for example achieved a compression gain of up to 85% (compared to a maximum of less than 30% with EWWW Image Optimizer in this test).
On the other hand, its free quota is limited to 20 MB per month, which is a real disadvantage compared to EWWW Image Optimizer.
Finally, if you want to optimize the loading time of your WordPress site, opt for the premium plugin WP Rocket (affiliate link). This very easy-to-use cache plugin – it litteraly works as soon as you activate it – also allows you to optimize your files, your database and even your media.
What do you think about EWWW Image Optimizer? Is it already active on your site? Give us your opinion by leaving a comment.

Receive the next posts for free and access exclusive resources. More than 20,000 people have done it, why not you?

Continue reading
Articles posted in WordPress PluginsOur review of B2BKing: A WooCommerce plugin built for B2B commerce
“Hi, I need 200 units of this product with fast shipping please”. As an online store owner, receiving this kind of message puts a smile on your face. Answering it, on the other hand, becomes a lot less fun… Basically,…
GTranslate on WordPress: our full review of this tool for creating a multilingual site
“Hello, how are you?” “What do you think of this computer mouse?” For you, everything is easy to understand in these two sentences. For someone living deep in the Shetland Islands or Yucatán, it’s probably a bit more complicated… If…
Air WP Sync: Test and review of this plugin for integrating Airtable into WordPress
Do you use Airtable and WordPress? Then some of your days probably look something like this. In the morning, you update your Airtable database as soon as something changes. In the afternoon, you copy and paste the same data into…