How often do you check your email inbox, on a daily basis? Once? Five times? Ten times? A hundred times?
In fact, it doesn’t matter how often. At the end of the day, you’re probably just like everyone else: you open your email inbox once or several times a day.

Chances are, your customers will too. Keeping in touch with your visitors is of utmost importance.
And if you follow me, you’ve got it: sending emails, for example via a newsletter, is still one of the best ways to do this.
I’ll tell you a secret: one of my biggest mistakes was not to offer a newsletter when I launched WPMarmite. I’ve made up for it since then.
To simply collect your visitors’ emails – a prerequisite for sending a newsletter – the Thrive Leads plugin is a great solution.
At the end of this post, you will know all its workings, how to set it up, and its strengths and weaknesses.
Overview
This content is a guest post originally written by Mehdi from the French blog BlogBooster.fr. We don’t use the same tools to work with, but I always find it useful to introduce you to new ways of doing things.
Originally written in June 2017, this article was last updated in June 2022.
What is Thrive Leads?

Thrive Leads is a premium WordPress plugin to collect the email addresses of your website visitors using opt-in forms. Thanks to it, you can increase the number of subscribers to your newsletter, and thus your number of leads, hence its name.
As soon as an email is collected, it is sent to your favorite email marketing service (Mailchimp, ActiveCampaign, SendinBlue, etc.) with which you will have established a gateway, since Thrive Leads does not allow you to send emails (except in exceptional cases that you will discover later).
Flexible and complete, Thrive Leads allows you to design a dozen types of opt-in forms:
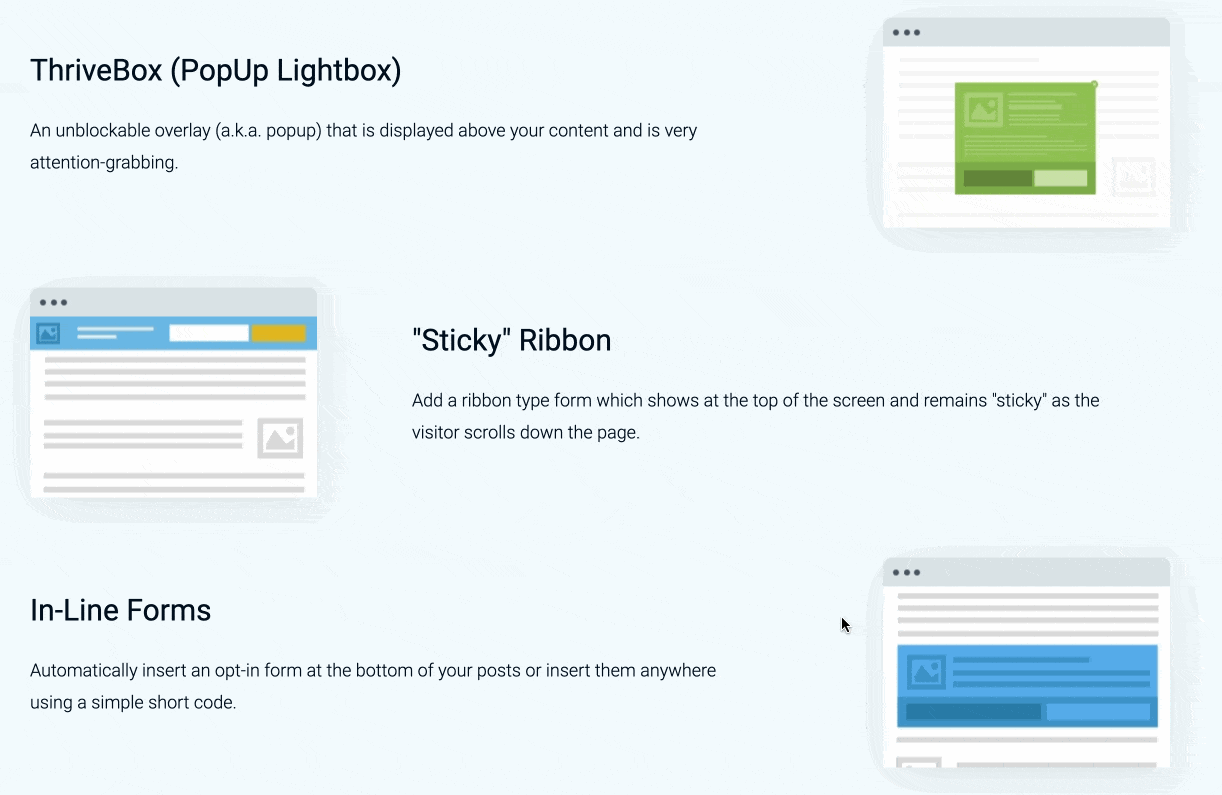
- ThriveBox form (PopUp Lightbox), which is highlighted in a window that opens over your content.
- Sticky ribbon form: this form is always displayed at the top of the screen when your visitor scrolls through the page.
- In-Line form, which can be integrated wherever you want within your content (post or page).
- 2-Step Opt-In form: this form opens in a lightbox after clicking on a call-to-action (CTA) button.
- Slide-In form: this form “slides” onto the screen, from the left or right corner.
- Opt-In widget: to add a form in your sidebar or in a widget area.
- Full screen form (Screen Filler Overlay): this very intrusive form – but which can convert very well – is displayed in full screen when reading.
- Content Lock form. With this form, your content will be displayed only when the visitor has entered his email address.
- Scroll Mat form, which appears from the top of the page and “pushes” the content down.
- Yes/No form, on which the visitor must click on the answer of his choice.
Before we get into the options of Thrive Leads, I wanted to take a moment to talk about the importance of having a list of subscribers. Come on, I’ll take you on board.
Why do you need to have a subscriber list?
Reason #1: To keep your readers coming back
It sounds a little scary, but it’s like this: 75% of your visitors will never come back to your WordPress website or blog.
All that energy spent getting traffic and getting your blog out there. Only to lose almost all of it.
That’s the 1st reason why EVERY site needs to have a subscriber list. Thanks to it, you will make your readers come back to share with them news, posts, tips, special offers. 🙂
Reason #2: To convert your subscribers into customers
Now we come to the 2nd reason. Essential.
When it comes to sales, it seems like it’s binary. 0 or 1. Black or white. Buy or don’t buy. In reality, it’s more complex.
And when you think about it, it’s obvious. Think back to the last time you bought a television.
Before you used your credit card on an ecommerce website, stuff happened.
A lot of stuff:
- You researched whether it was worth buying a curved TV.
- Then you asked about sizes. To see which one would look best in your living room, depending on the distance to your sofa.
- Smart TV or not Smart TV: you asked Google about the difference.
- Etc.
During all these steps, you asked yourself a lot of questions. You hesitated. You asked around.
You were not directly a “hot” customer. You went through different stages, from cold, to warm, to hot. All of this takes time.
If your reader never returns to your website, what does that mean? Well, it means that you will only be able to sell him products or services if, by some miracle, he is hot when he lands on your site.
And also if he trusts strangers (because he doesn’t know you yet, if it’s the 1st time he sees your website). Basically, in this case, it is almost impossible to sell your products and services.
If, on the contrary, you:
- Collect your reader’s email.
- Help him to warm up by sharing information (through your posts).
- Gain his trust because your content is of high quality and responds to the problems he encounters on a daily basis.
By the time he’s warmed up, he’ll probably buy from you. 🙂
So owning a list of subscribers remains MANDATORY to build a profitable online business.
Ok, it’s time to see how to set one up with the help of Thrive Leads. Let’s continue just below.
How to set up Thrive Leads: zoom in on the main features of the plugin
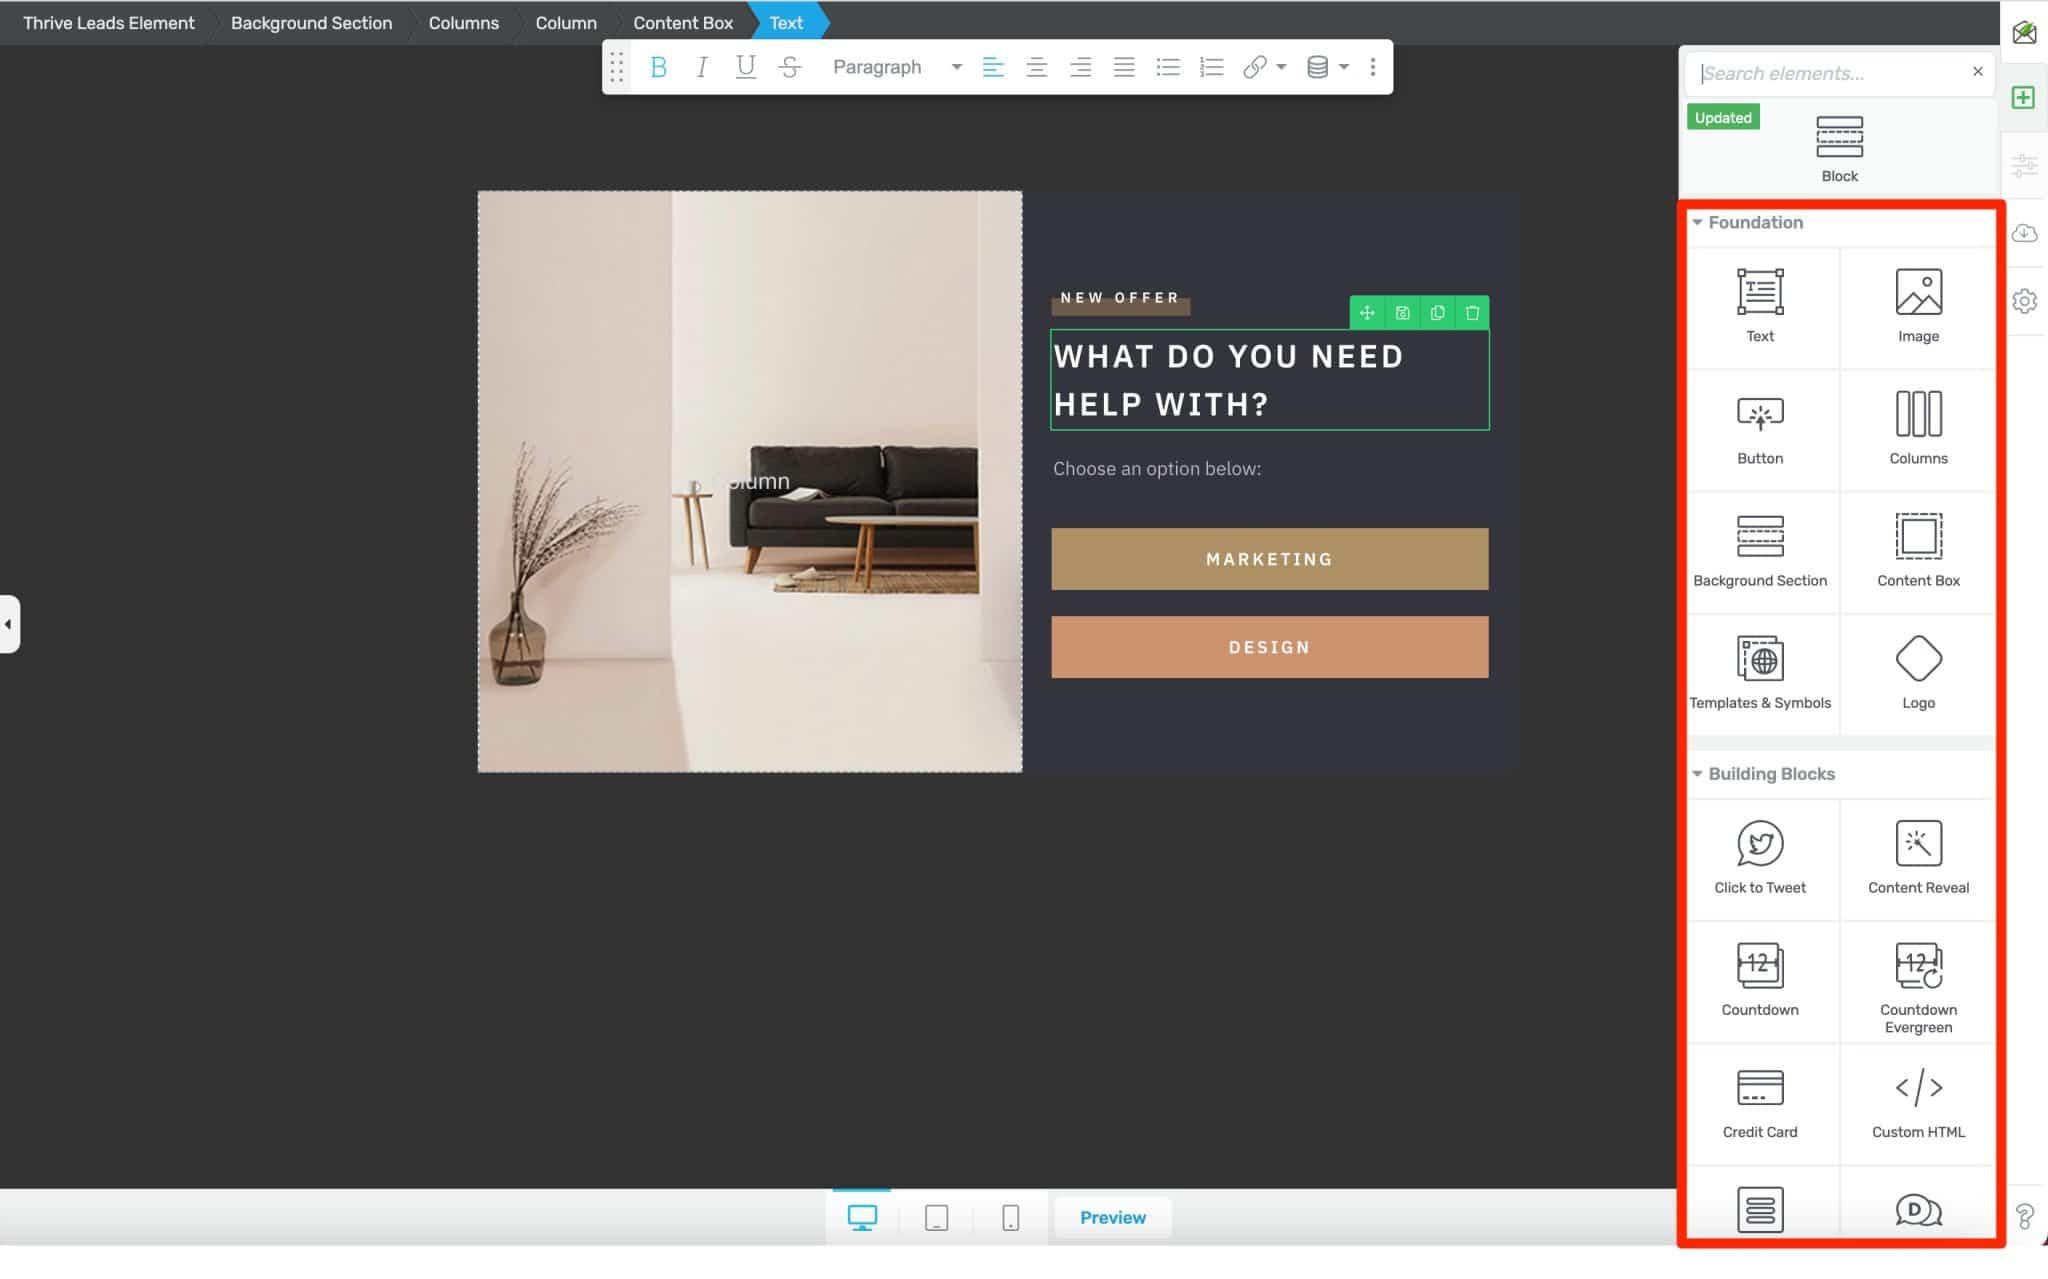
A very complete drag-and-drop visual editor
To begin with, let’s detach one of the first reasons why I introduce you to Thrive Leads: it is very pleasant to use thanks to its drag and drop visual editor.
When you’re on the form editing interface, you can add just about anything you want: text, images, icons, buttons, comments, call-to-action, countdown timer, pricing table, Google Maps, etc
Just like you would with a page builder like Elementor Pro (affiliate link) or Divi Builder (affiliate link), for example:
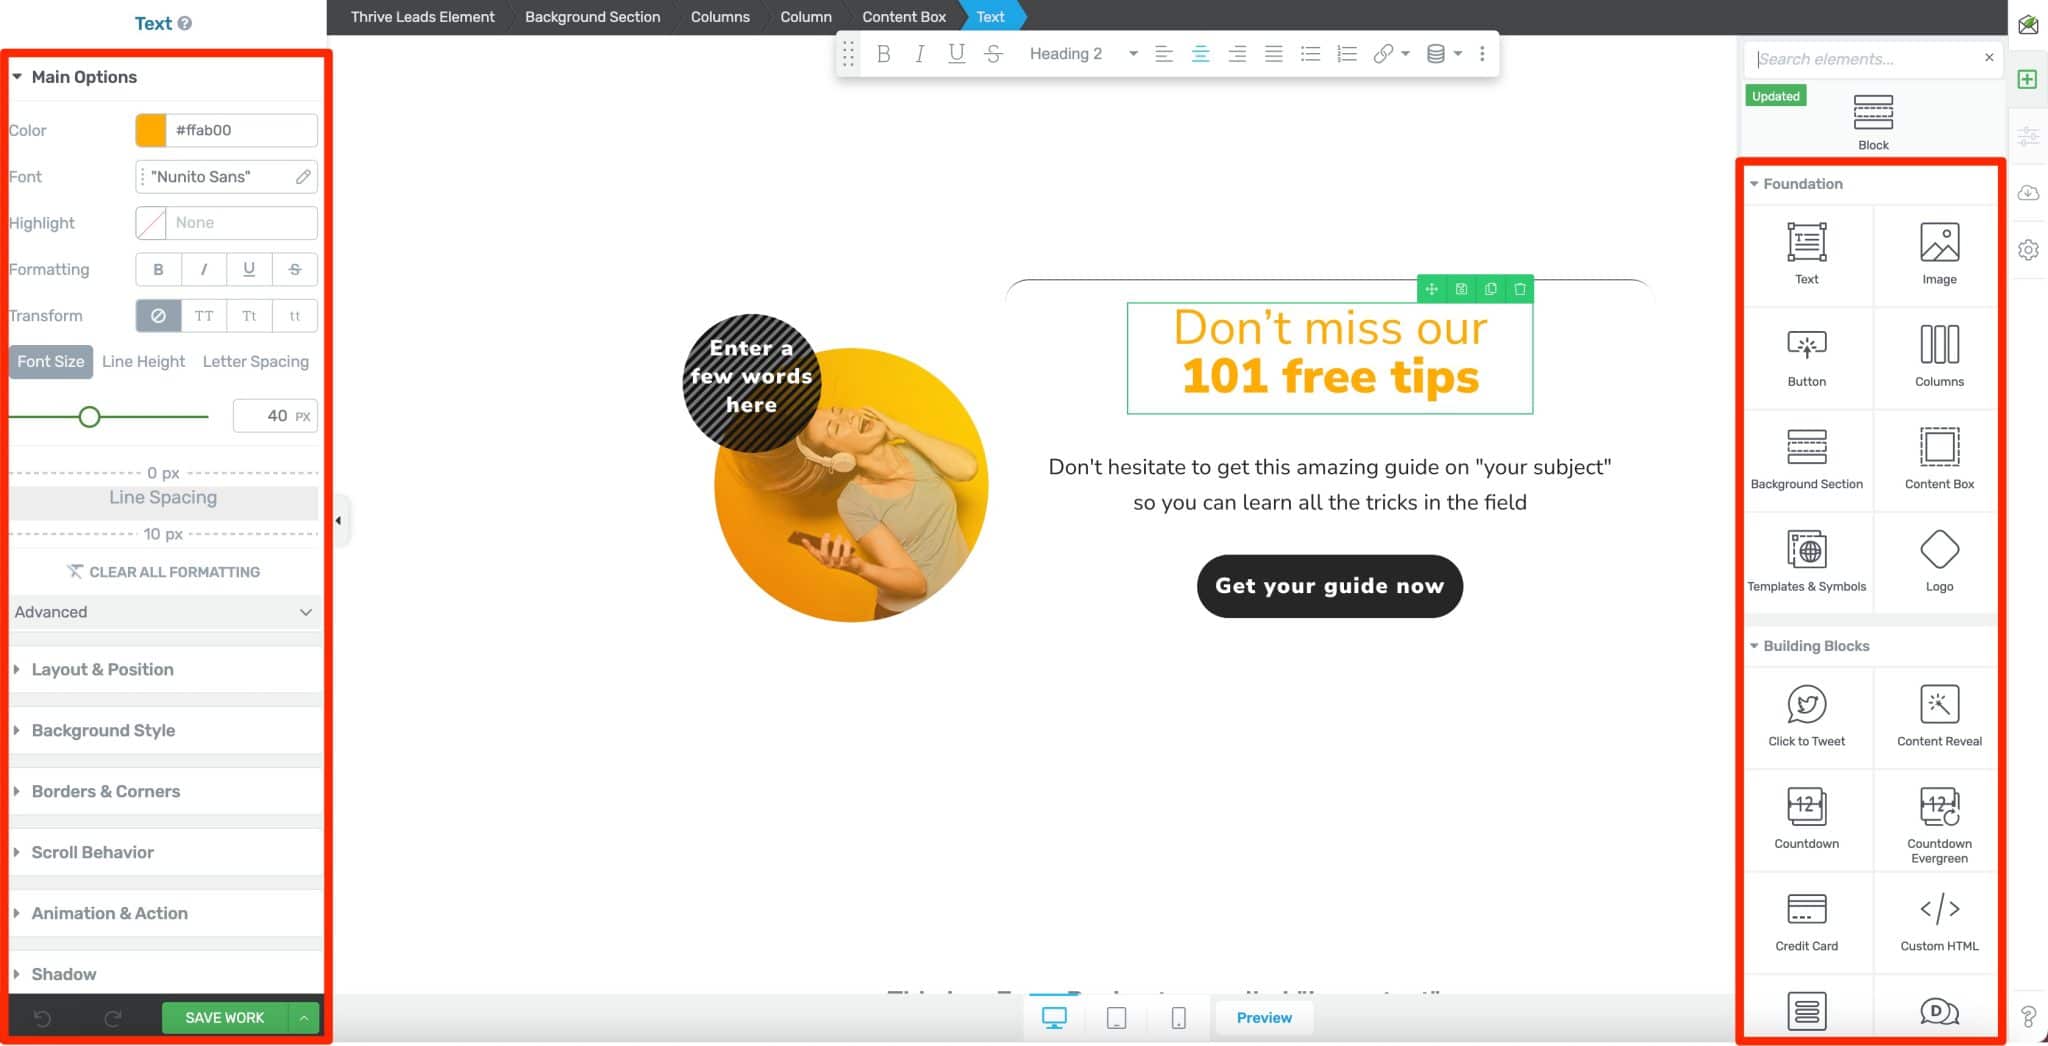
Each element offered by Thrive Leads can be customized in a very fine way with multiple options to control:
- The style: colors, fonts, format, background, borders, shadows, etc.
- Positioning: margins, width, height, alignment, etc.
- Form animation, especially when scrolling.
- Responsive display: you can set the visibility of your forms on any device (computer, tablet, smartphone).
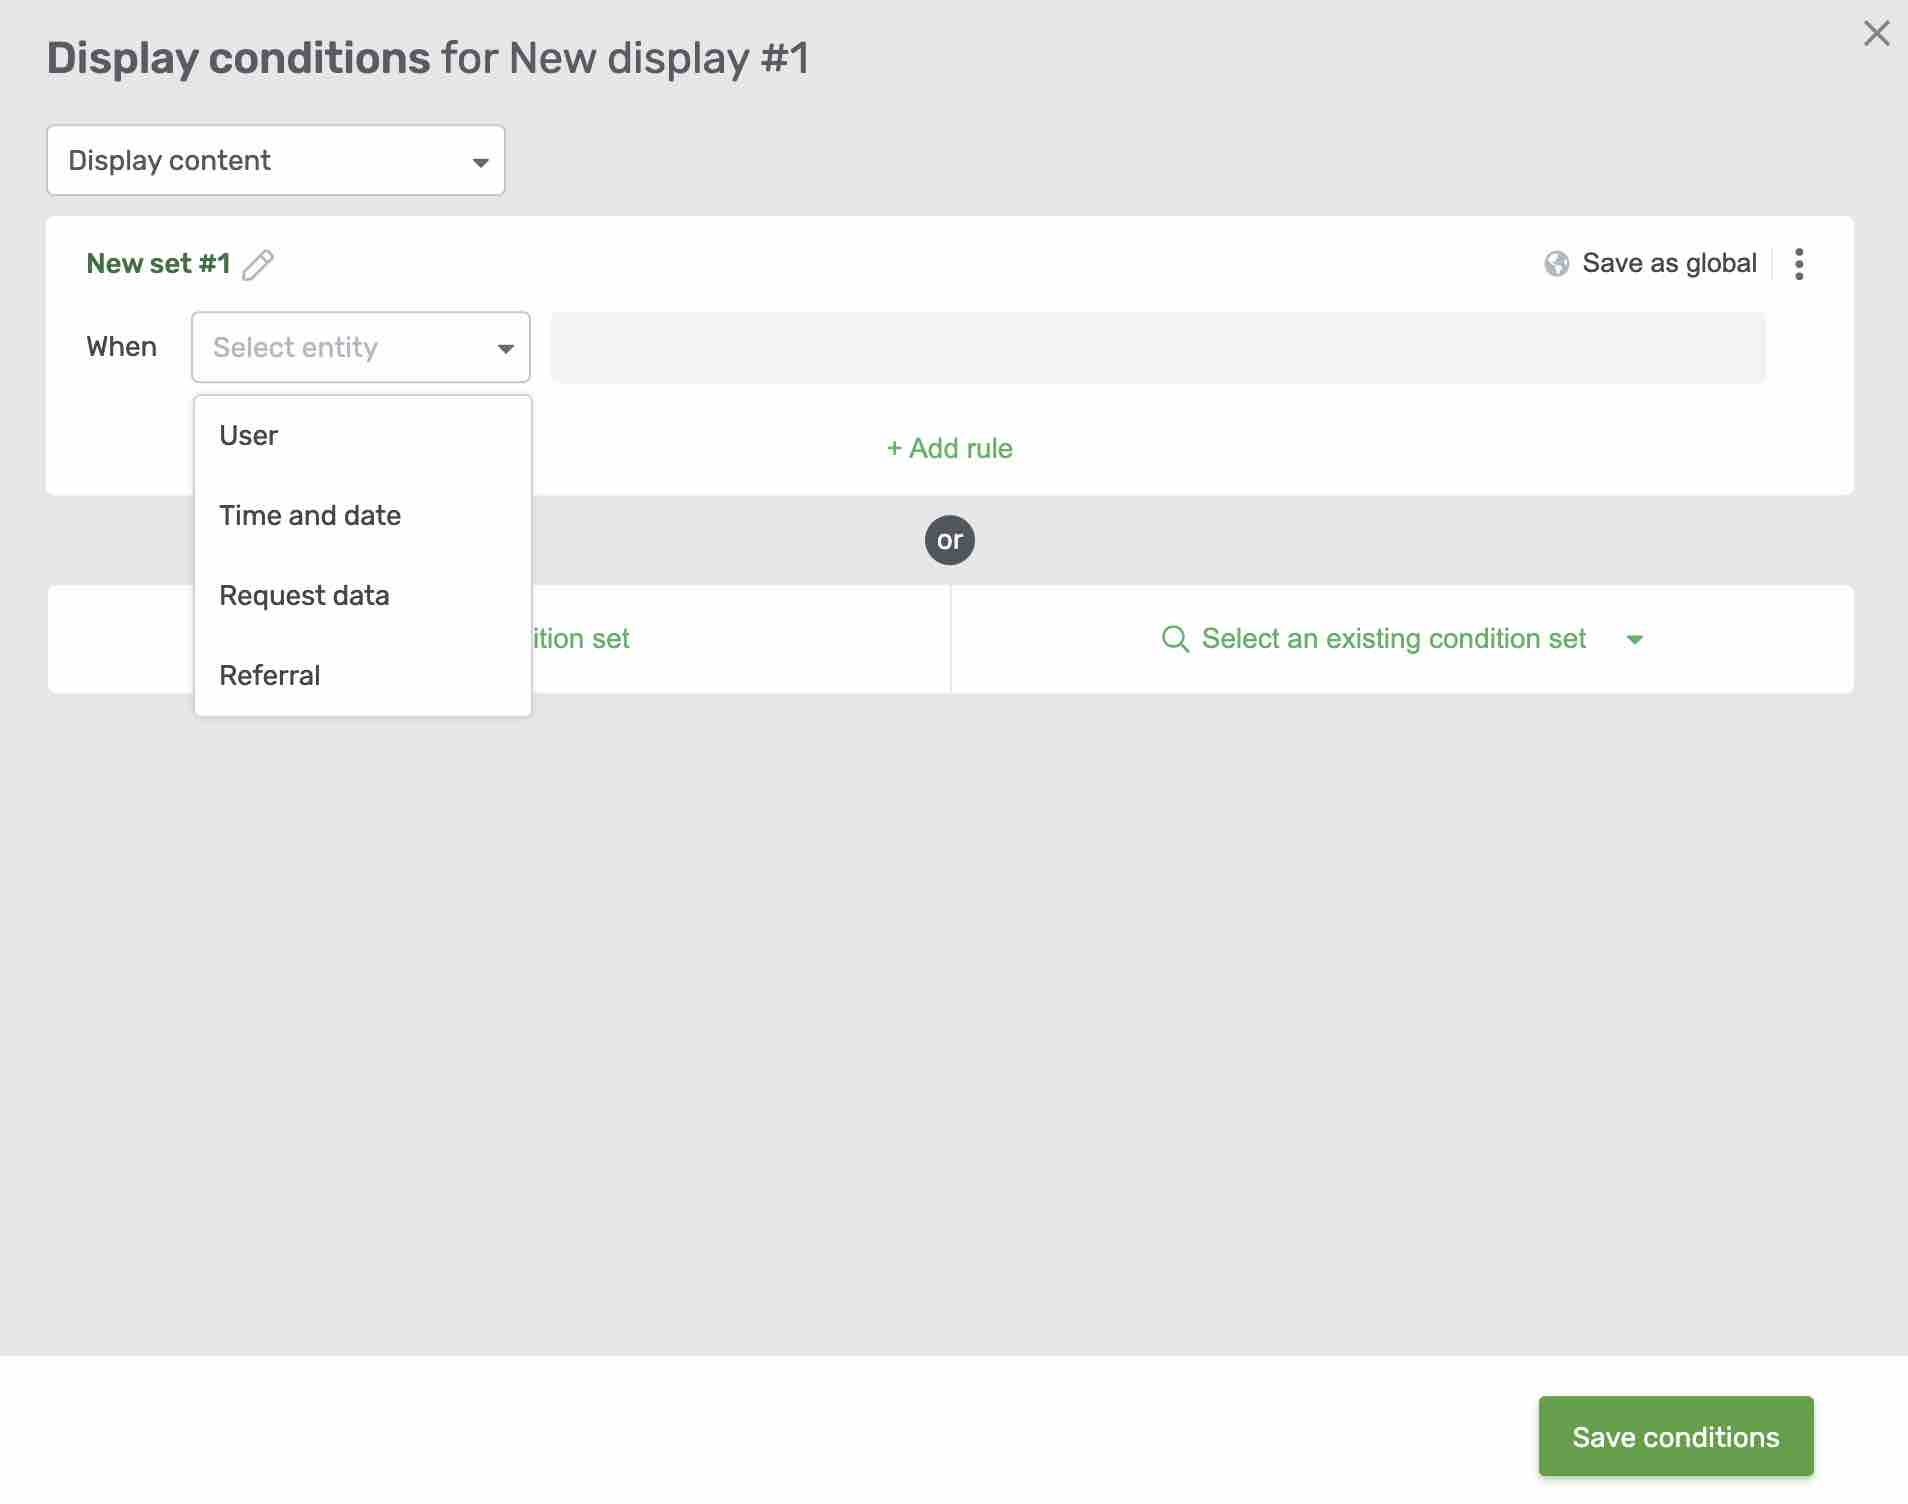
- Conditional display of your forms, according to rules and conditions. This is a very powerful and essential feature. For example, you can choose to show or hide a form based on the day or time, user type, etc.
To make your life easier, Thrive Leads offers nearly 300 ready-to-use form templates, which are generally quite neat in terms of design. Not a bad way to avoid starting from scratch.

On your side, you just have to edit the template of your choice in terms of content , and make it fit your style guide.
All this without leaving your WordPress administration interface, which is not possible with all the opt-in tools, far from it (with OptinMonster for example, you have to create your forms outside of WordPress).
All good so far? Now let’s take a look at the different options you have to create an opt-in form.

Automatic forms (Lead Groups)
When you first land on the Thrive Leads dashboard (in Thrive Dashboard > Thrive Leads on your WordPress admin), the plugin will offer you 3 main options for adding a form:
- Lead Groups
- Lead Shortcodes
- ThriveBoxes
What is a Lead Group?
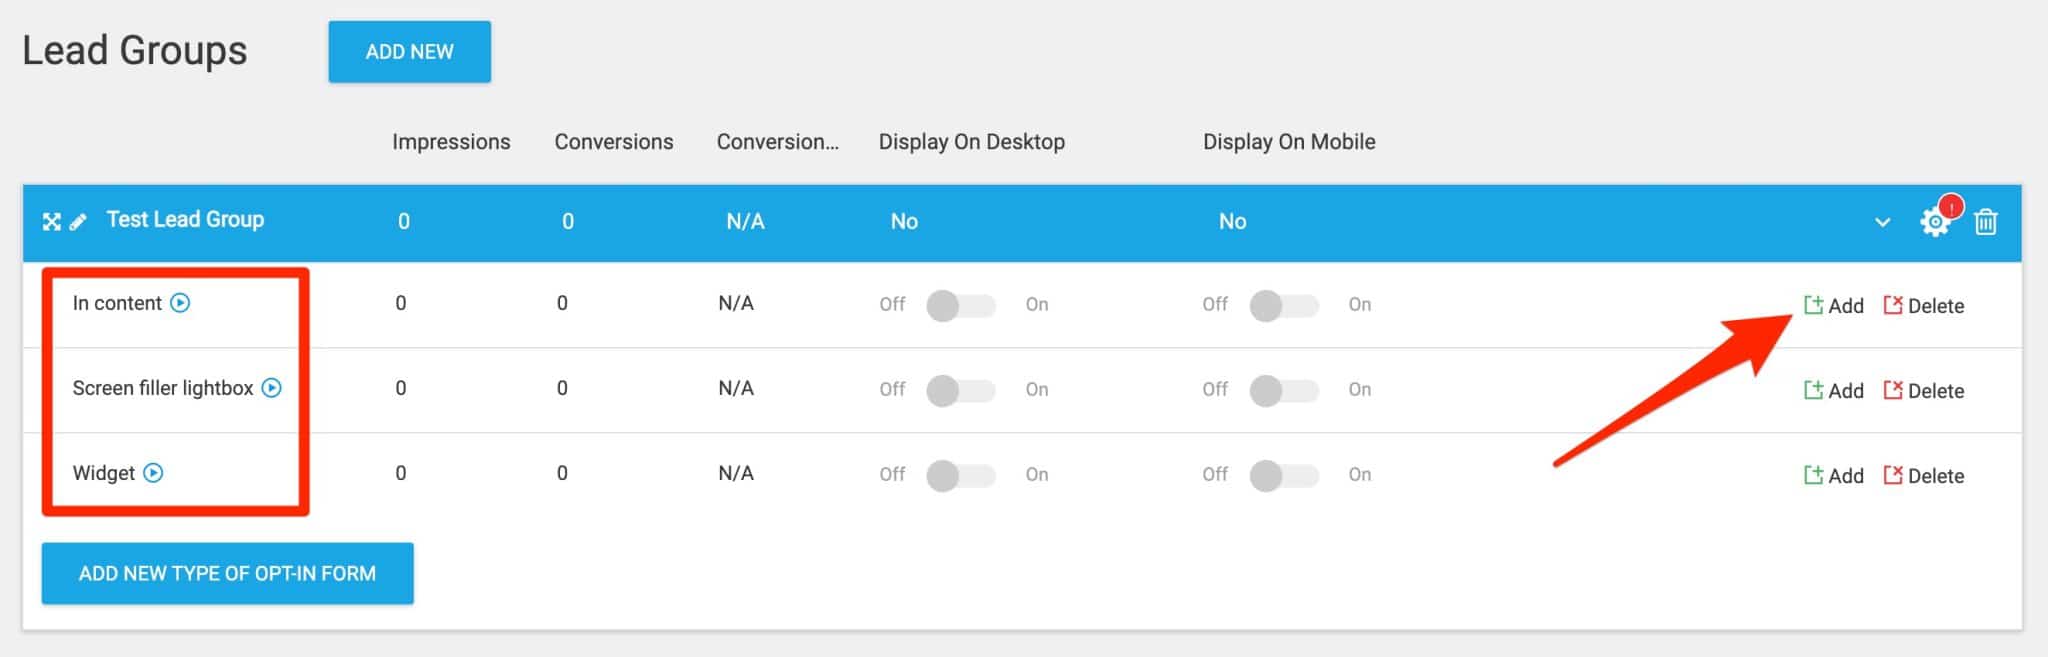
It may look a bit weird on the screen, but it’s not that complicated. I will first explain what you can do with the Lead Groups, which are the first ones to be introduced to you.
A Lead Group consists of several types of forms (e.g. inline, full screen, floating bar) that will be displayed automatically on your website according to specific criteria that you have configured beforehand.
The proposed forms are the following:
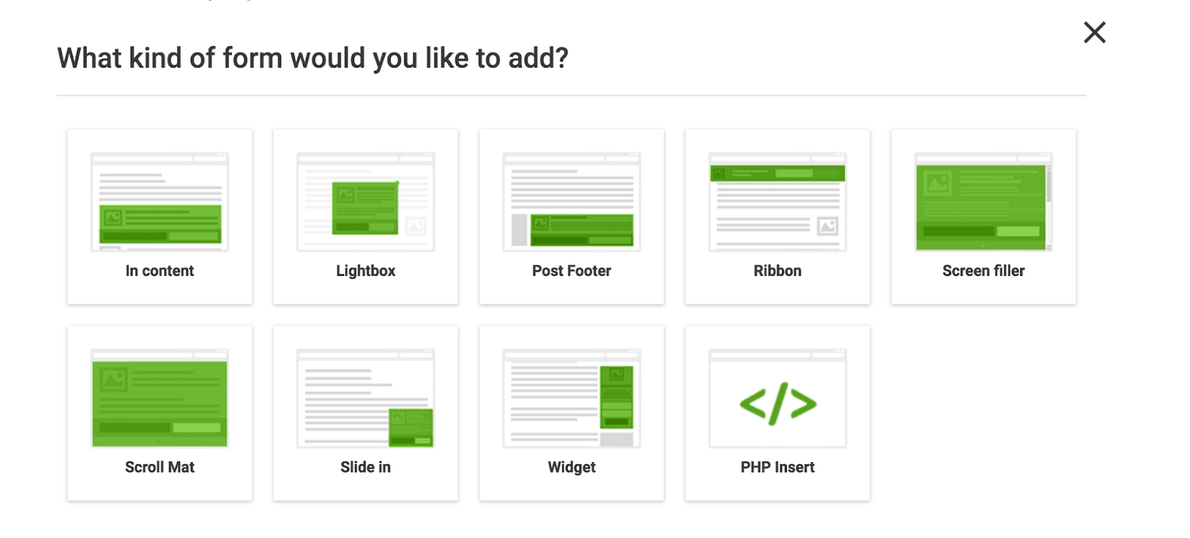
To add them, simply click on the type of form you wish to add to your website. Once you have done so, you can customize them on the Thrive Leads interface by clicking on “Add”:
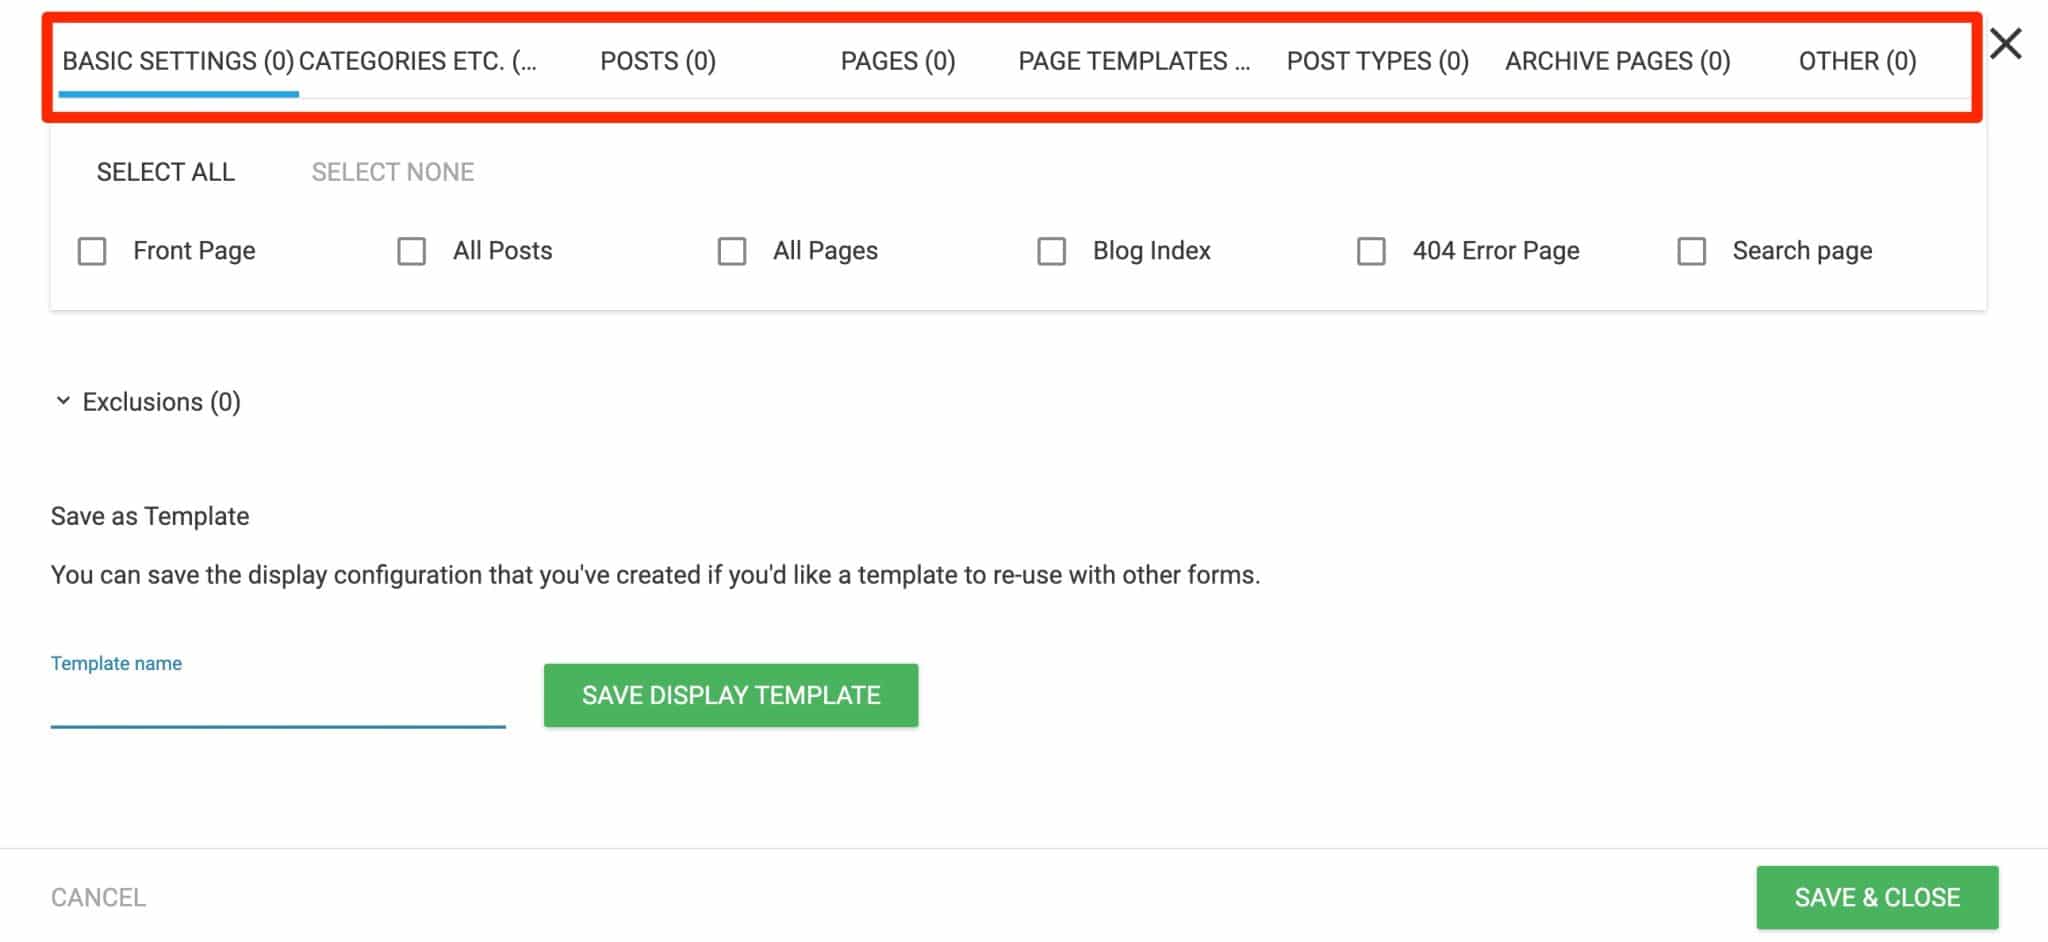
When you’re done, all you have to do is choose exactly where these forms will appear (click on the little cogwheel) on:
- All your pages
- Certain posts in particular
- The posts of a certain category
- Etc.
How to add a pop-up opt-in form?
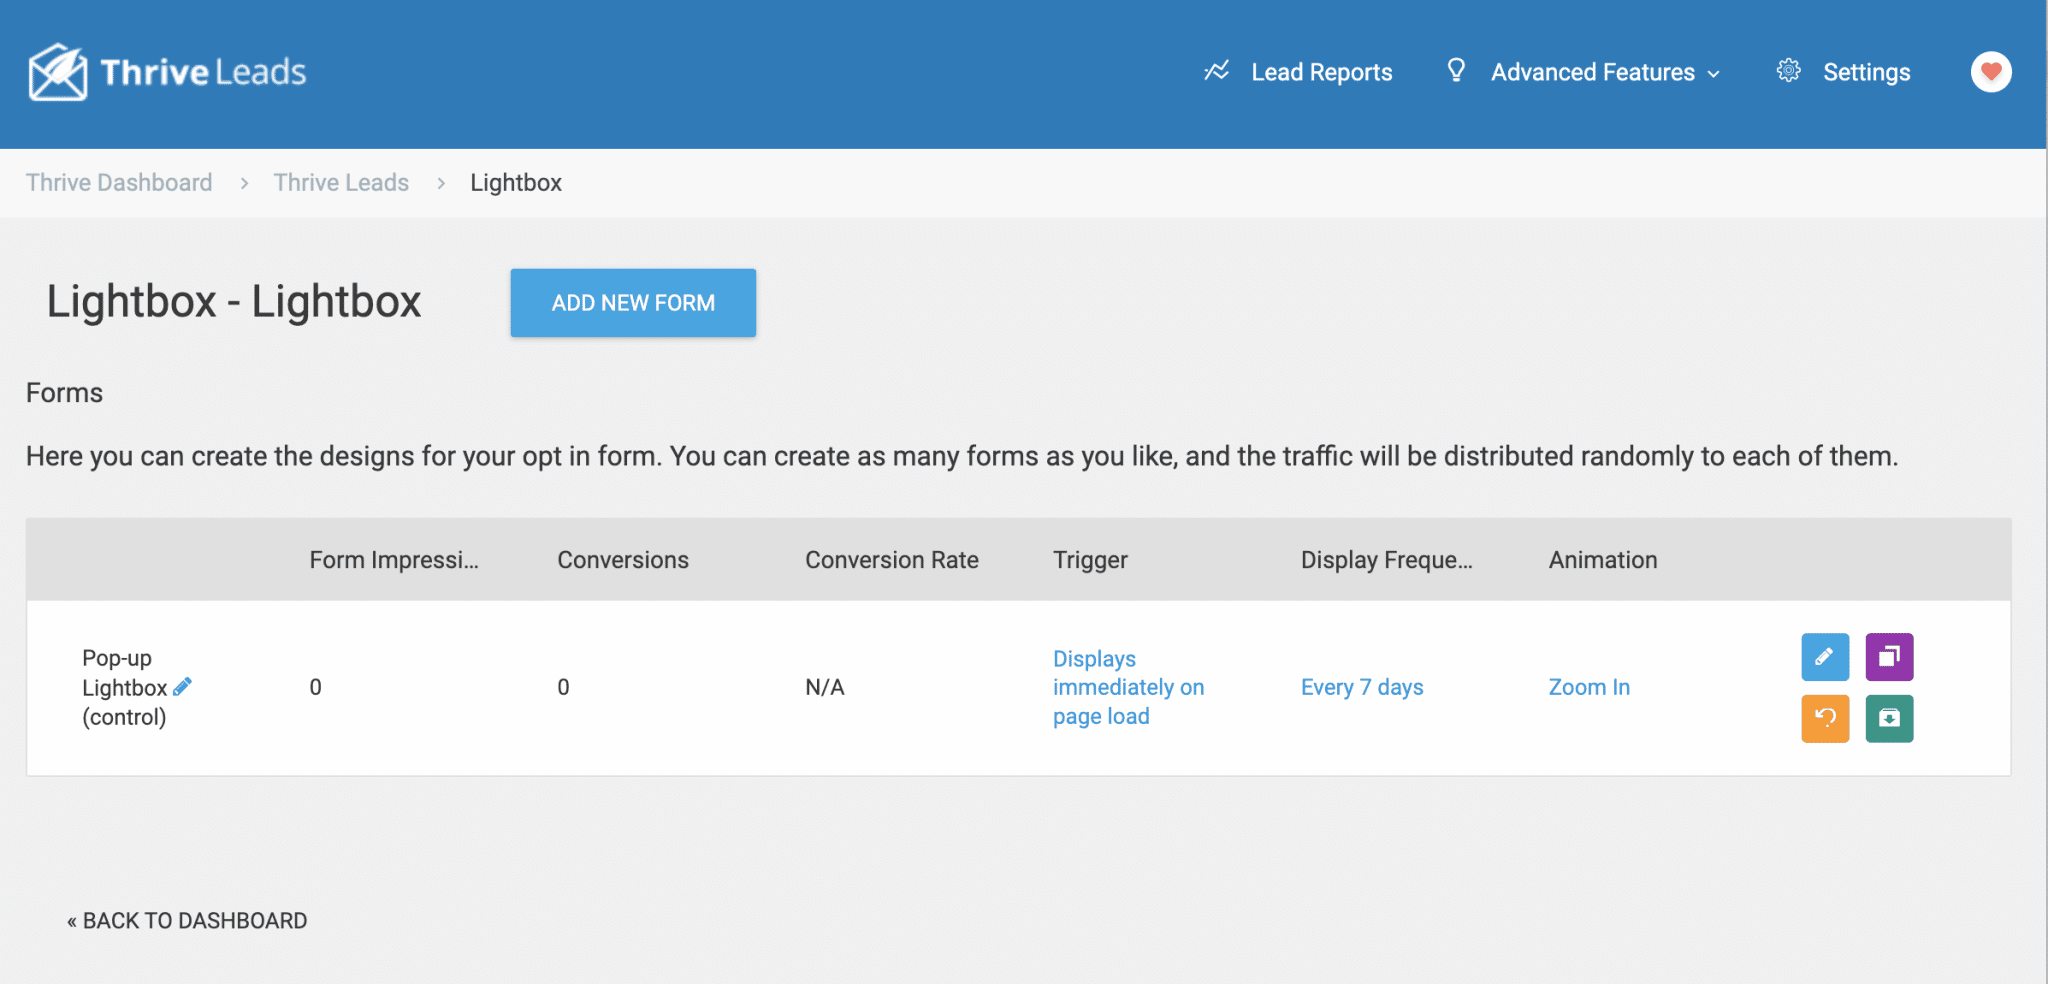
This is how you can set up the famous pop-up window for your opt-in form, for example. To do this, add a pop-up form (called lightbox) to a Lead Group.
That’s it, the pop-up will be displayed each time, according to the display preferences of the Lead Group (on all the posts of the category of your choice, for example).
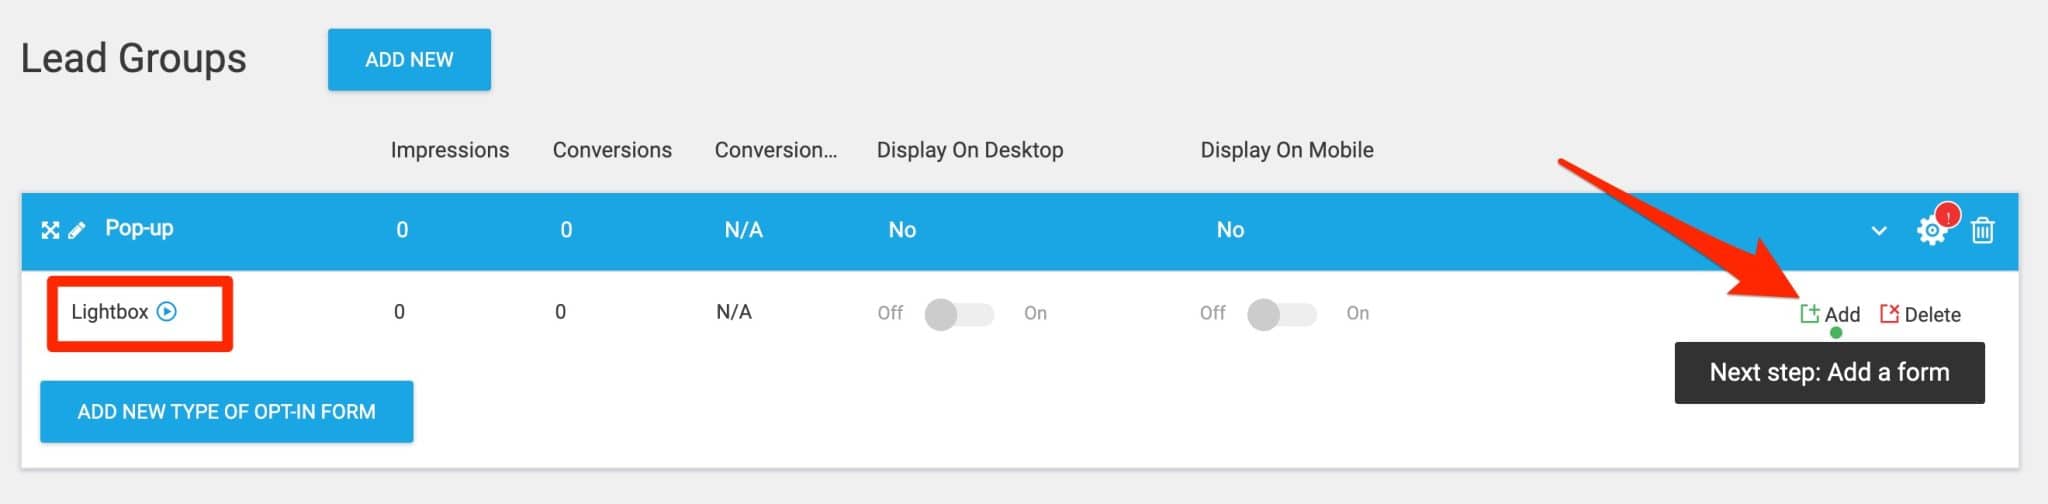
As with the Lead Group, the display options of the pop-up itself are also configurable.
For example, you can choose to display the pop-up:
- After a few seconds.
- When your reader has read half of the article.
- Just before your reader closes the window.
- Every 3 days (useful to avoid bombarding a loyal reader every day).
- Etc.
The choice is impressive.
Finally, you can change the appearance of your pop-up, so that it doesn’t scare your reader away. And better yet, so that it makes them want to give you their email.
Here again, Thrive Leads is really designed for beginners. Or those who are technically challenged. Or the very lazy ones who don‘t want to bother (that’s me).
I’ve already told you, here it is again: you just have to select a form template, adapt the text and that’s it! You have a beautiful form.

Non-automatic forms
In addition to the “Lead Groups”, you can also create forms that you place manually in specific areas on your site.
There are 3 types of “manual” forms:
- Lead Shortcodes
- Thrive Boxes
- Content Lockers
Lead Shortcodes
A Lead Shortcode displays the form of your choice directly in your article or page.
And this, with the field for the visitor to type his email, and the button to validate the form.
To integrate a shortcode form, you just have to create the form. Then copy the shortcode of the form to the area where you want to display the form on your site:
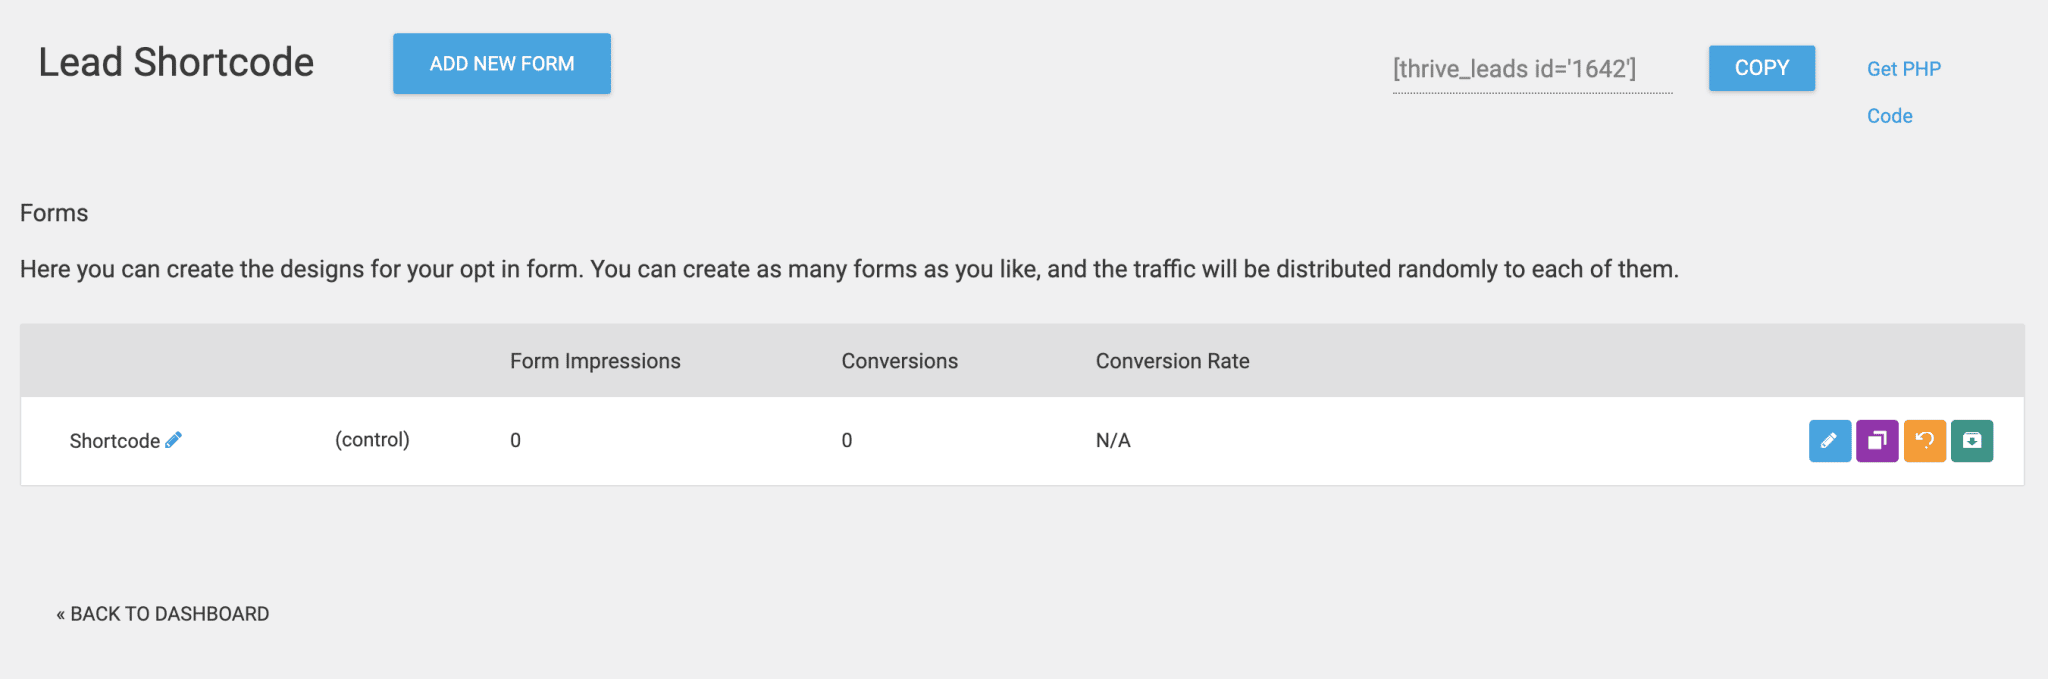
To do this, go to the WordPress content editor, selecting the page or post of your choice.
To conclude, you have two options:
- Either add the Gutenberg “Thrive Leads Shortcode” block and select the lead shortcode you just created (I called it “Shortcode test” in the example below):

- Or add a “Shortcode” block in which you paste the shortcode generated by Thrive Leads. Mine looks like this:
[thrive_leads id='1632'].
Thrive Boxes
Thrives Boxes allow you to display a highlighted form (a pop-up window) when your visitor clicks on a specific area (image, button, piece of text) of the page or article you choose. This pop-up is called a Thrive Box.
For example, in one of my posts, I added a “bonus” to encourage my reader to leave me his email. I then offer him to download my post in PDF version.
And when he clicks on my “BONUS” box in the article, the pop-up appears with the form.
In order to integrate this Thrive Box inside your content, copy and paste the generated shortcode in the desired are.
This time, the code is in 2 parts:
[beginning of code] part to click [end of code]
The “part to click” can be an image, text, whatever you want.
When your reader clicks on it, the Thrive Box (pop-up) is displayed.
Content Lockers
Thrive Leads also offers a special type of form, called a content locker.
You’ve seen this 1,000 times before. You read an article like “The 7 best techniques to improve your Google SEO” and then you know what? Technique #7 is hidden. And obviously, it was the best one...
To access it, you have to… fill in your email, naturally. 🙂

That’s what content locker is all about. Thanks to a 2-part shortcode, you can decide to hide a part of your post very simply. And to reveal it when your reader gives you his email.
Here’s what the content locker shortcode looks like in Thrive Leads:
[start of code] part to hide [end of code]
To get this special shortcode, you need to turn a Lead Shortcode into a Content Locker. Like this:

Smart, right?

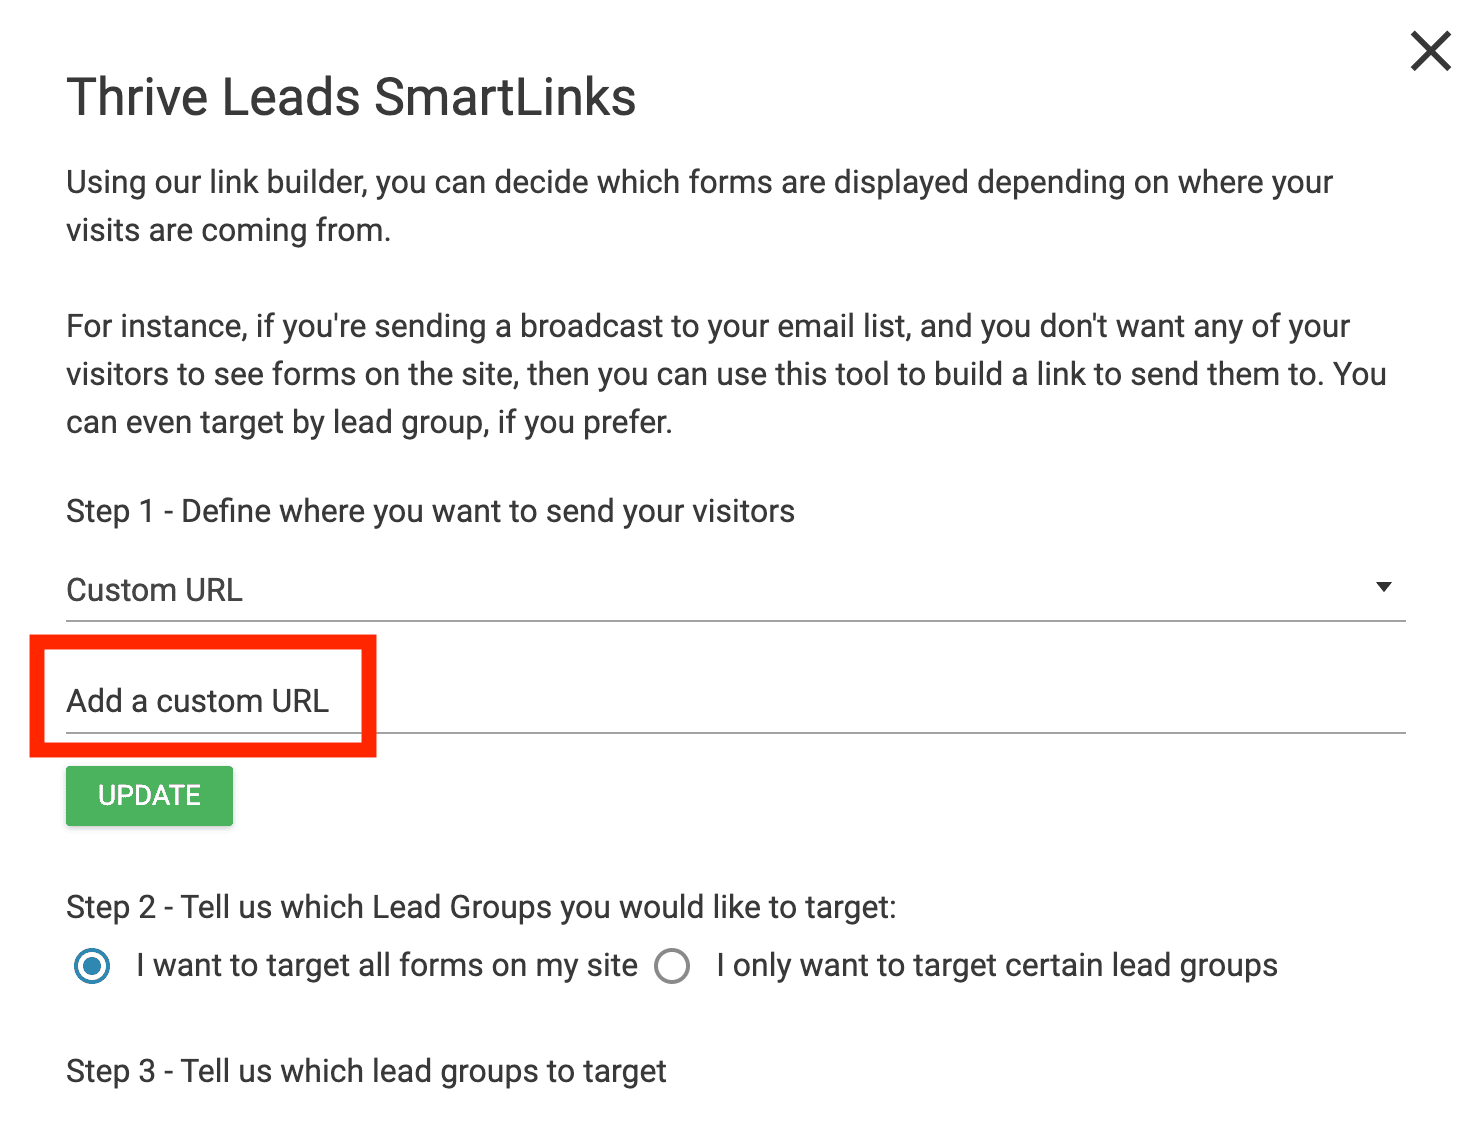
Smart Links
When I discovered this feature, I said to myself: “oh yeah, should have thought of that”.
Thrive Leads allows you to create “magic” links to your site with the Smart Links option.
Thanks to it, you can, for example, hide the display of forms according to the content visited by the visitors.
The Smart Links option works primarily for Lead Groups. You cannot target Thrive Box or Lead Shortcode forms with it.
Let’s take a concrete example to understand. Honestly, isn’t it a pain in the ass when you’re already subscribed to a blog, but you still get the “newsletter” pop-up in your face?
When your favorite blogger sends you his latest article by email for example.
Thrive Leads’ Smart Links option allows you to make any link to your blog “smart”. A link to your latest article, for example, that you are going to send to your newsletter subscribers.
Run the link to your latest article through the Smart Links mill. And that’s it, you’ve got a smart link.
Not everyone who uses this new smart link will see your forms. You can choose exactly which forms to show or not to visitors using a smart link.
Whew, what a relief for your loyal readers already subscribed to your email list.
To set up a smart link, click on the “Advanced Features” drop-down menu at the top of the plugin dashboard:

Then add the URL of the article you want to share in Step 1:
Asset Delivery
Asset Delivery allows you to send an email directly when a reader subscribes to your email list, without going through an automated email scheduled with your email marketing software.
This is a great way to send the download link for a bonus, for example. To access this option, go to “Advanced Features”, just like with Smart Links:

In order to use it, you must first upload the files of your choice (e.g. PDF, ebooks) to your WordPress Media Library.
Then, you must subscribe to a transactional email service. Below are the services that are compatible with Thrive Leads:
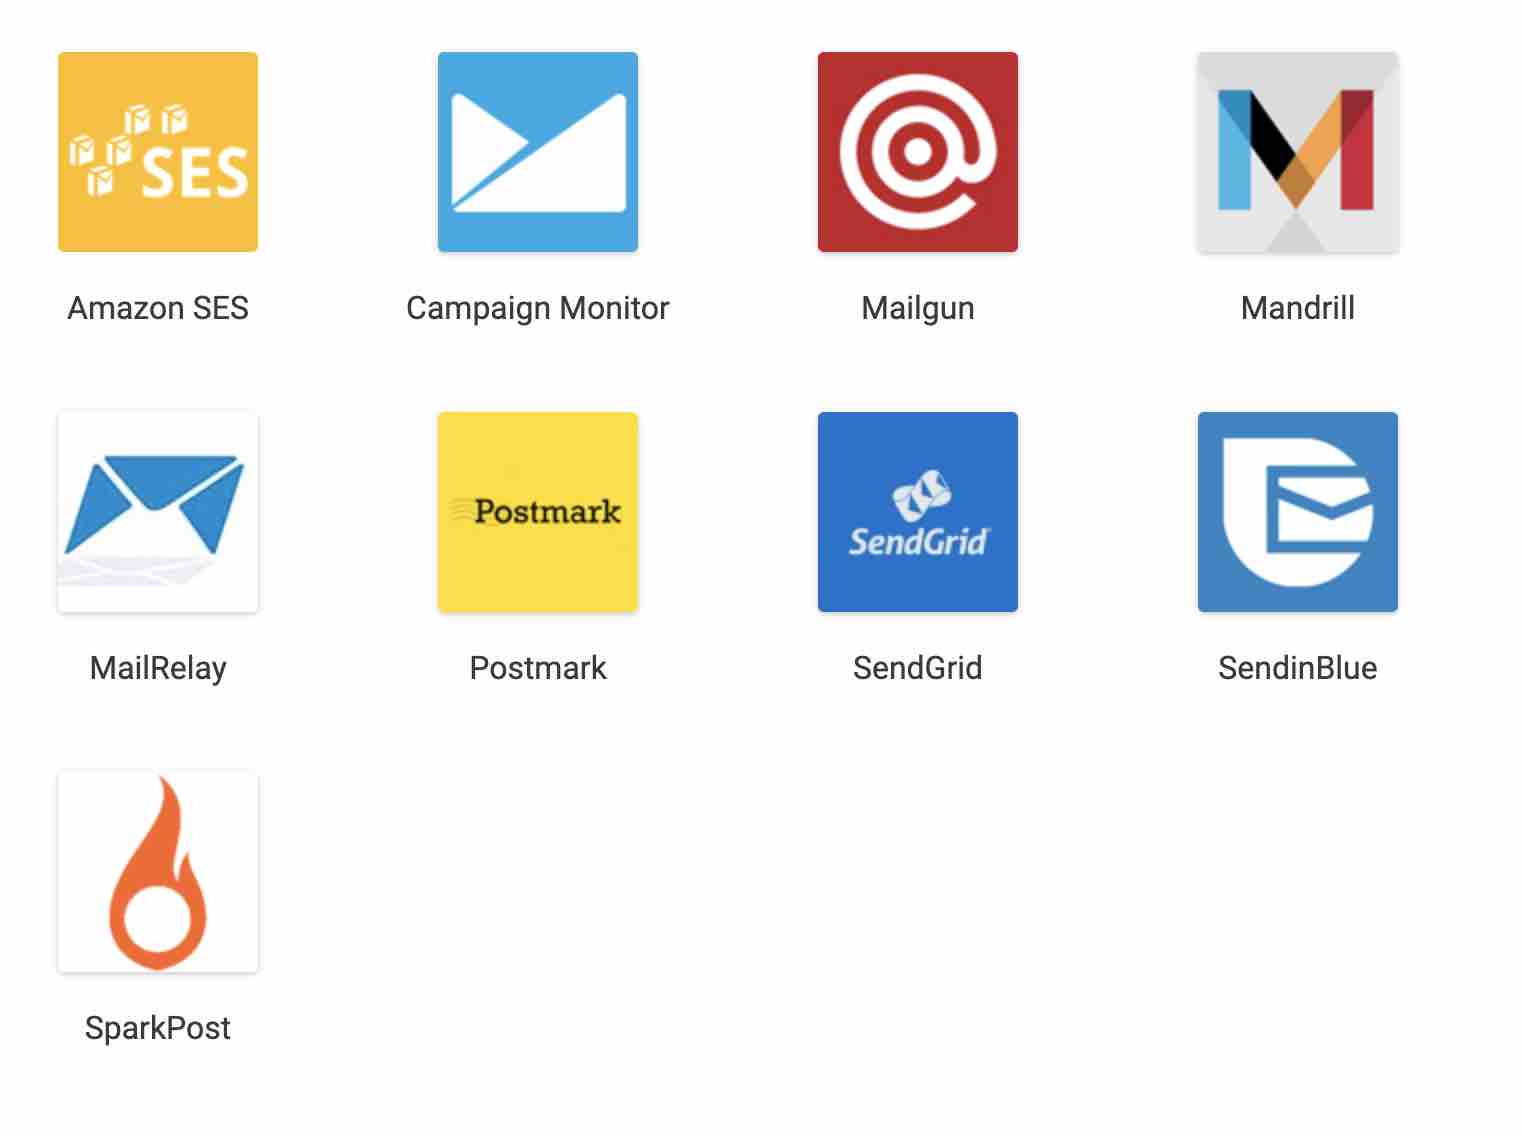
All you’ll need to do is write a default email template and select the URL to download the PDF guide, for example.
The advantage is that you can send a different email for each form. With the link to the right file, depending on which form your reader has registered with. The goal is to manage multiple forms with multiple bonuses, simply.
The other way to do it is to create several lists in your emailing tool, with a different welcome email for each list (with the corresponding bonus link).
But it’s a real pain to manage multiple lists. Because you will have duplicate subscribers, who will be subscribed to several of your lists (because they wanted several of your bonuses…). And these subscribers will receive your duplicate emails if you are not careful.
A/B testing
The final flagship feature of Thrive Leads that I wanted to talk about is A/B testing.
What is an A/B test?
A/B testing consists of displaying two different versions of the same form, to see which one converts more readers:
- 50% of the readers will see the 1st version of the form.
- 50% of the readers will see the 2nd version of the form.
Yes, because sometimes a word or even a color can influence readers. And make a huge difference in the conversion rate.
The conversion rate is the number of readers who convert to subscribers, out of the total number of readers who have seen your form. Example: out of 100 readers, 10 put their email address and validate your form. The conversion rate here is 10/100 = 10%.
Converting at 2% instead of 1% doesn’t sound like much.
But if 1 subscriber earns you an average of $5 (with the sale of your products), that means that at 1,000 subscribers, you earn about $5,000.
But if you had converted at 2%, you would have 2,000 subscribers. And therefore $10,000.
Quite a difference. Do you want to lose $5,000?
Imagine what you’ll lose at 10,000 subscribers to your list…
That’s why A/B Testing is vital to not waste money stupidly.
And because the team at Thrive Leads understands this, they’ve simplified A/B Testing to death. So that anyone can use it simply.
How to use A/B Testing with Thrive Leads?
Let me show you how it works.
Let’s go back to our pop-up from the beginning (the lightbox, the one for the Lead Group that automatically displays).
To create an A/B test, you can for example clone your pop-up. To have two versions (identical for the moment), then modify the new version of the pop-up and finally launch the A/B test.
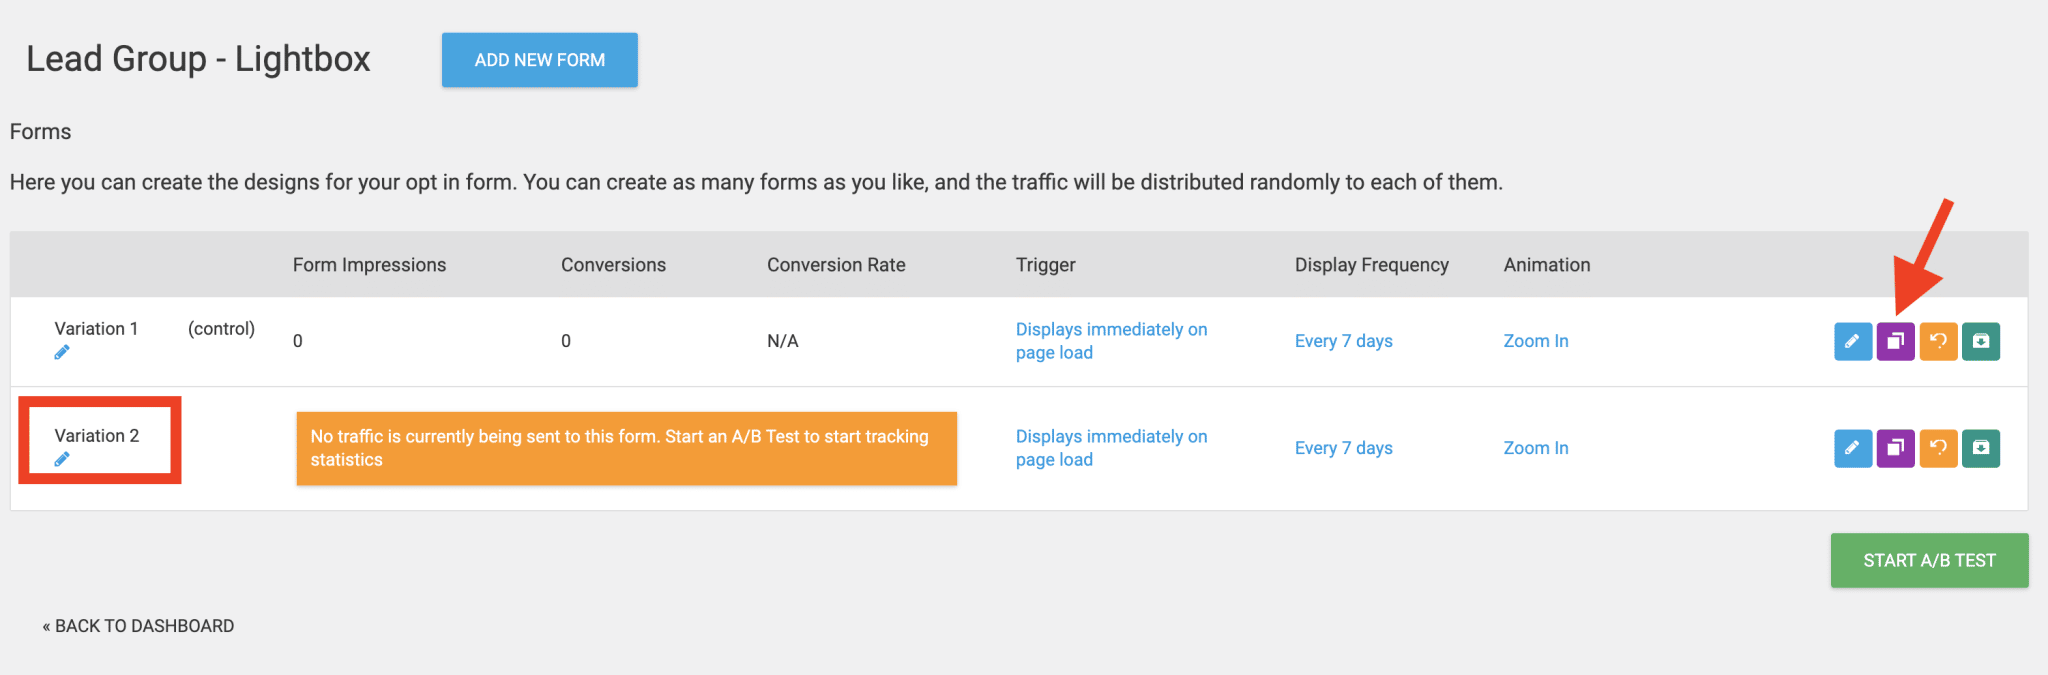
First version of the pop-up
Second version of the pop-up

After running the A/B test, all you have to do is wait until your forms are displayed to enough readers to draw conclusions. And to know which version converts the best readers into subscribers to your email list.
On average, it is said that you need to test on at least 500 people to be able to decide.
That way you can be sure that it’s not a fluke, and that there really is a winner. One form converts better than the other. This is what the A/B test results screen looks like:
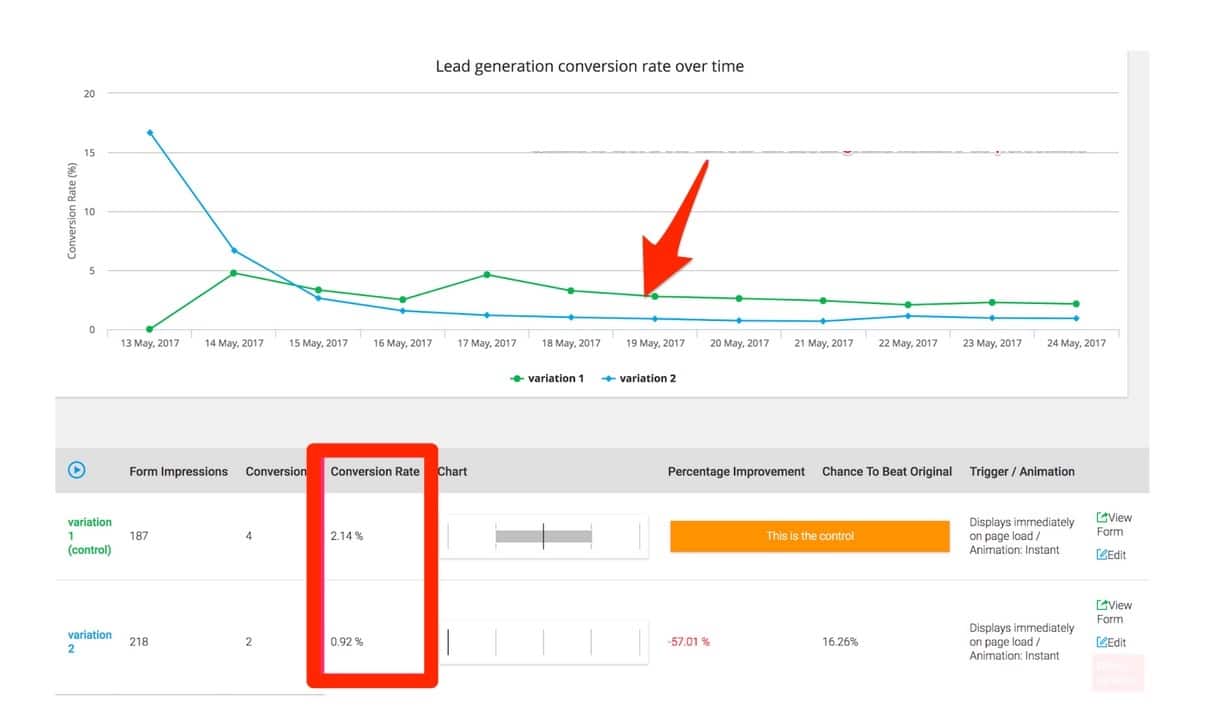
You see very simply which version of your form converts better. All you have to do is choose it and delete the other one. Or run an A/B test again to further improve your conversion rate.
For all your opt-in forms, consider making them GDPR (General Data Protection Regulation) compliant. Thrive Leads provides some tips in its documentation, but I recommend you to read the WPMarmite guide on the subject.
How much does Thrive Leads cost?
Since Thrive Leads is a premium plugin only, you probably want to know how much it costs.
Until the beginning of 2021, Thrive Leads had a “lifetime available” version sold for $67 as a one-time payment, including updates.
This was a real plus and the value for money was just unbeatable. But the creators of the product have changed their tune as of February 1, 2021.
From now on, it’s a little less financially advantageous to get Thrive Leads. To take advantage of it on your WordPress site, you have 2 options:
- Buy the plugin alone, at a price of $97/year. If you do not renew every year, you will no longer benefit from support and updates.
- Get the Thrive Suite for $299/year. It is a suite of 10 tools created by Thrive. It contains Thrive Leads, but also Thrive Theme Builder, Thrive Architect, Thrive Ovation, Thrive Optimize, Thrive Automator, Thrive Comments, Thrive Apprentice, Thrive Quiz Builder and Thrive Ultimatum. These are all tools dedicated to improving conversions on your site.
Financially, it is still very interesting if you intend to use several tools from the Thrive Suite. On the other hand, if you are only interested in Thrive Leads, the bill will be high.

You have reached the end of this test. Let’s conclude with a recap of the advantages and limitations of Thrive Leads.
My final opinion on Thrive Leads
The strengths of Thrive Leads
The main advantages of Thrive Leads are the:
- Ease of creating beautiful custom forms with the drag and drop visual editor.
- Fact that no technical knowledge (in code or in web marketing) is required to design your forms.
- Customization that can be done without leaving the WordPress administration interface.
- Many ready-to-use templates, so you don’t have to start from scratch.
- Affordable price if you want to use several tools of the Thrive Suite.
- Video tutorials produced by the Thrive Leads team.
- Compatibility with the main email marketing platforms (ActiveCampaign, AWeber, Mailchimp, SendinBlue, etc.).
- Options and rules for conditional display of your forms.
- Functionality to set up A/B tests.
The weaknesses of Thrive Leads
Although Thrive Leads managed to seduce me, it still has some limitations:
- Even though editing a form is simple, it still takes a little time to get started with the plugin and understand how to customize it. The titles are not very clear at first (“Lead Group”, “Lead Shortcode” etc.), which does not make things easy. But you don’t really have an excuse on your side, since I explained everything in the article.
- Thrive Leads alone can only be used on a maximum of one site. If you want to install it on several sites, you will have to purchase the Thrive Suite. The investment will then be much more expensive, knowing that the Thrive Suite plugins cannot be activated on more than 5 sites.
Who is Thrive Leads for?
Despite these small flaws, Thrive Leads remains a very good opt-in plugin. However, it is not for everyone. I would recommend it in priority to:
- People who want to harvest email addresses to send newsletters afterwards. Thrive Leads is suitable for all types of users, from beginners to advanced users. However, a slight learning curve is required to familiarize yourself with the specifics of the plugin.
- Marketers who want to optimize the conversion rates of their website forms. If you recognize yourself in this description, you’ll feel like a fish in water: Thrive Leads was designed by marketers for marketers (but not only).
Are you using Thrive Leads? Let’s talk about it in the comments!

Receive the next posts for free and access exclusive resources. More than 20,000 people have done it, why not you?
Continue reading
Articles posted in WordPress PluginsOur review of B2BKing: A WooCommerce plugin built for B2B commerce
“Hi, I need 200 units of this product with fast shipping please”. As an online store owner, receiving this kind of message puts a smile on your face. Answering it, on the other hand, becomes a lot less fun… Basically,…
GTranslate on WordPress: our full review of this tool for creating a multilingual site
“Hello, how are you?” “What do you think of this computer mouse?” For you, everything is easy to understand in these two sentences. For someone living deep in the Shetland Islands or Yucatán, it’s probably a bit more complicated… If…
Air WP Sync: Test and review of this plugin for integrating Airtable into WordPress
Do you use Airtable and WordPress? Then some of your days probably look something like this. In the morning, you update your Airtable database as soon as something changes. In the afternoon, you copy and paste the same data into…