


With more than 620 million downloads at the time of writing, Yoast SEO is one of the 10 most downloaded plugins of all time.
Officially, it’s installed on 5M+ websites in order to optimize their SEO (Search Engine Optimization).
Put another way, this plugin is just a must-have, which leads to a question: can you do without it?


As you might expect, WPMarmite uses it, as well as my personal blog and all my other websites.
Your website’s search engine optimization is something to take very seriously. Even without being an SEO fanatic, having a well optimized site is no small thing.
In this post, we will use this plugin to make your website appreciated by Google, Bing, and all their buddies.
Are you ready?
Roll up your sleeves and let’s get to work!
Overview
This article was last updated in January 2024. By the time you read this article, Yoast’s interface and some of its settings may have evolved, but the advice given throughout these lines remains valid.
Don’t have much time available?
Download the “Power up with Yoast SEO” sheet to get the express configuration and bonus tips.
Prerequisites before starting
Before exploring the interface and settings of Yoast SEO in detail, some useful reminders:
First, make sure that the permalink format (your page’s URLs) on your website is written in full. I see far too many sites with URLs which format is https://wpmarmite.com/?p=11350.
Search engines will find it more difficult to know the content of your pages with URLs containing numbers than with https://wpmarmite.com/en/best-wordpress-plugins/.
I bet you also prefer the second format.
You must admit it’s much easier to remember it that way.
Warning: if you are not installing a new website, changing the permalink structure of your URLs may have a negative impact on your SEO.
If you decide to do it anyway, redirect the old URLs to the new ones.
To learn how to choose your domain name and how to create a WordPress website, take a look at our extensive guides.
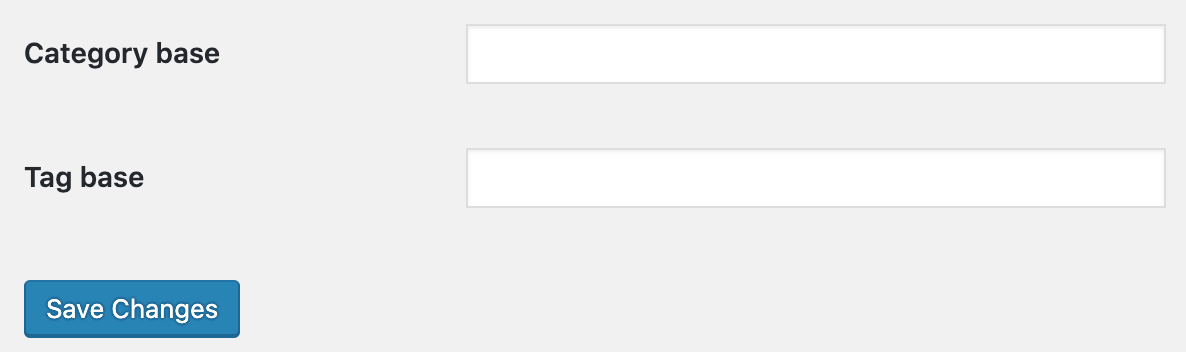
If the URL format is still in the default format on your site, go to Settings > Permalinks and tick the box “Post name” in the Common Settings.

Then, while you are on this page, you can change the category base and the tag base.
For WPMarmite, I chose “cat” for the categories and “topic” for the tags but you can put what you want, as long as it is relatively short and relevant for your visitors.

Again, be careful if you make these changes on an existing website.
Once everything is set up, click “Save Changes.”
We will now be able to get to the heart of the topic.
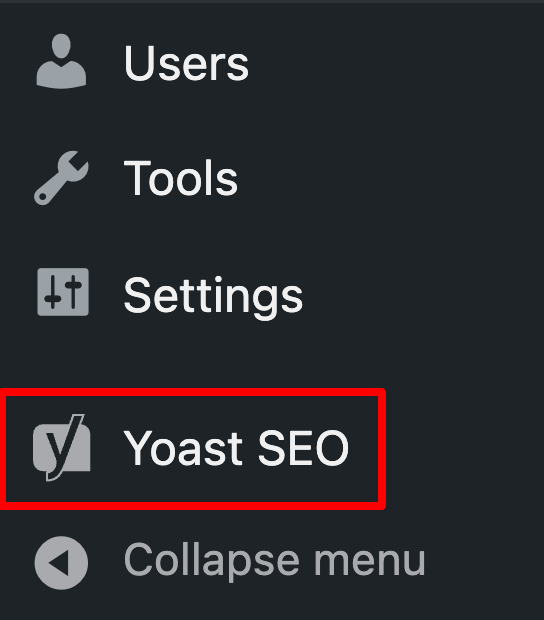
Make sure that Yoast SEO is installed and activated. When it’s done, you should have a “Yoast SEO” menu under “Settings” in the left sidebar.

Also, here is the Yoast website.
How to configure the settings of the free version of Yoast SEO
Let’s take a look at the submenus of the plugin one by one and see what they contain. The first is…
General
Clicking on the “General” submenu is the same as clicking on the plugin’s “Yoast” menu. In both cases, you will be redirected to the same page, called “General – Yoast SEO.”
Dashboard Tab
In this tab you will find a summary of the issues that Yoast SEO has found on your WordPress site, as well as notifications listing configuration tips.

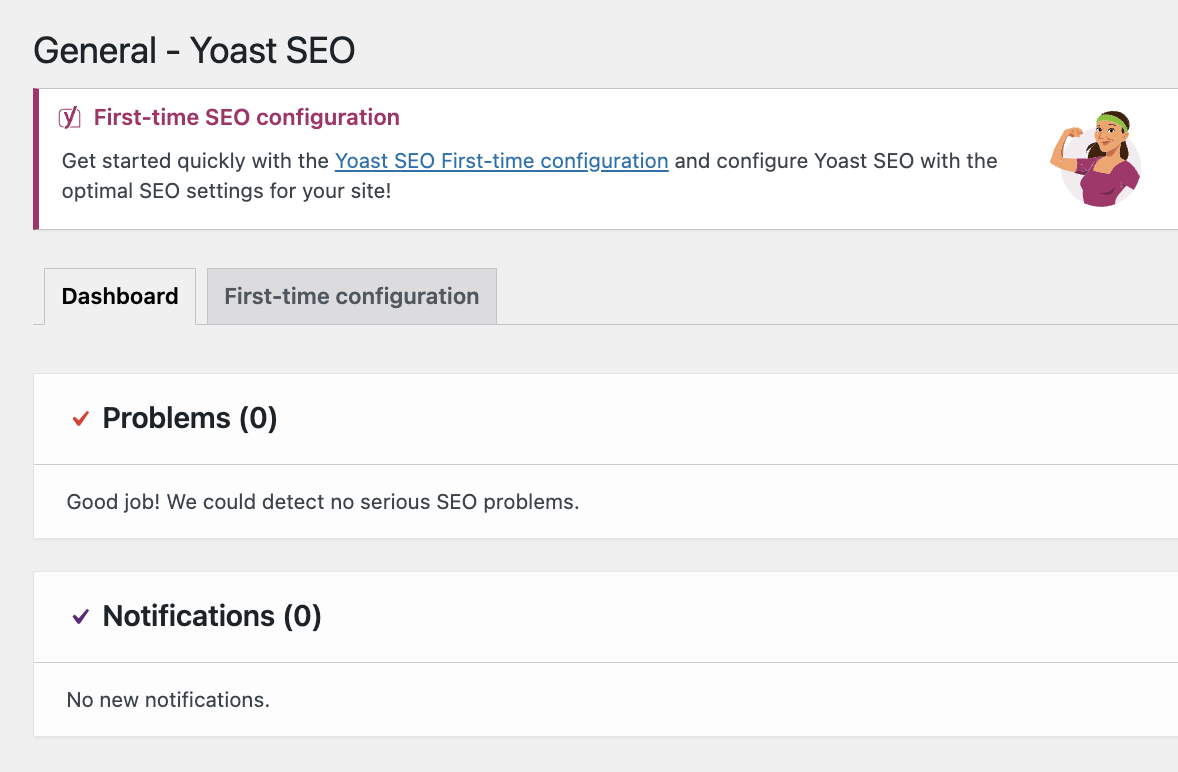
As you can see in the above screenshot, Yoast suggests you follow their first-time SEO configuration guide so that you choose the most optimal settings for your website. If you are a beginner, it can be useful to let it take you by the hand to configure the plugin step by step. The configuration wizard has been simplified as of the update that came out in December 2023. Yoast indicates that the process is now “more intuitive, more straight forward, and more pleasant.” The initial basic parameters are set up more quickly than before, with fewer steps. To use the configuration wizard, click on the tab “First-time configuration” (see screen capture below)
Initial tab configuration

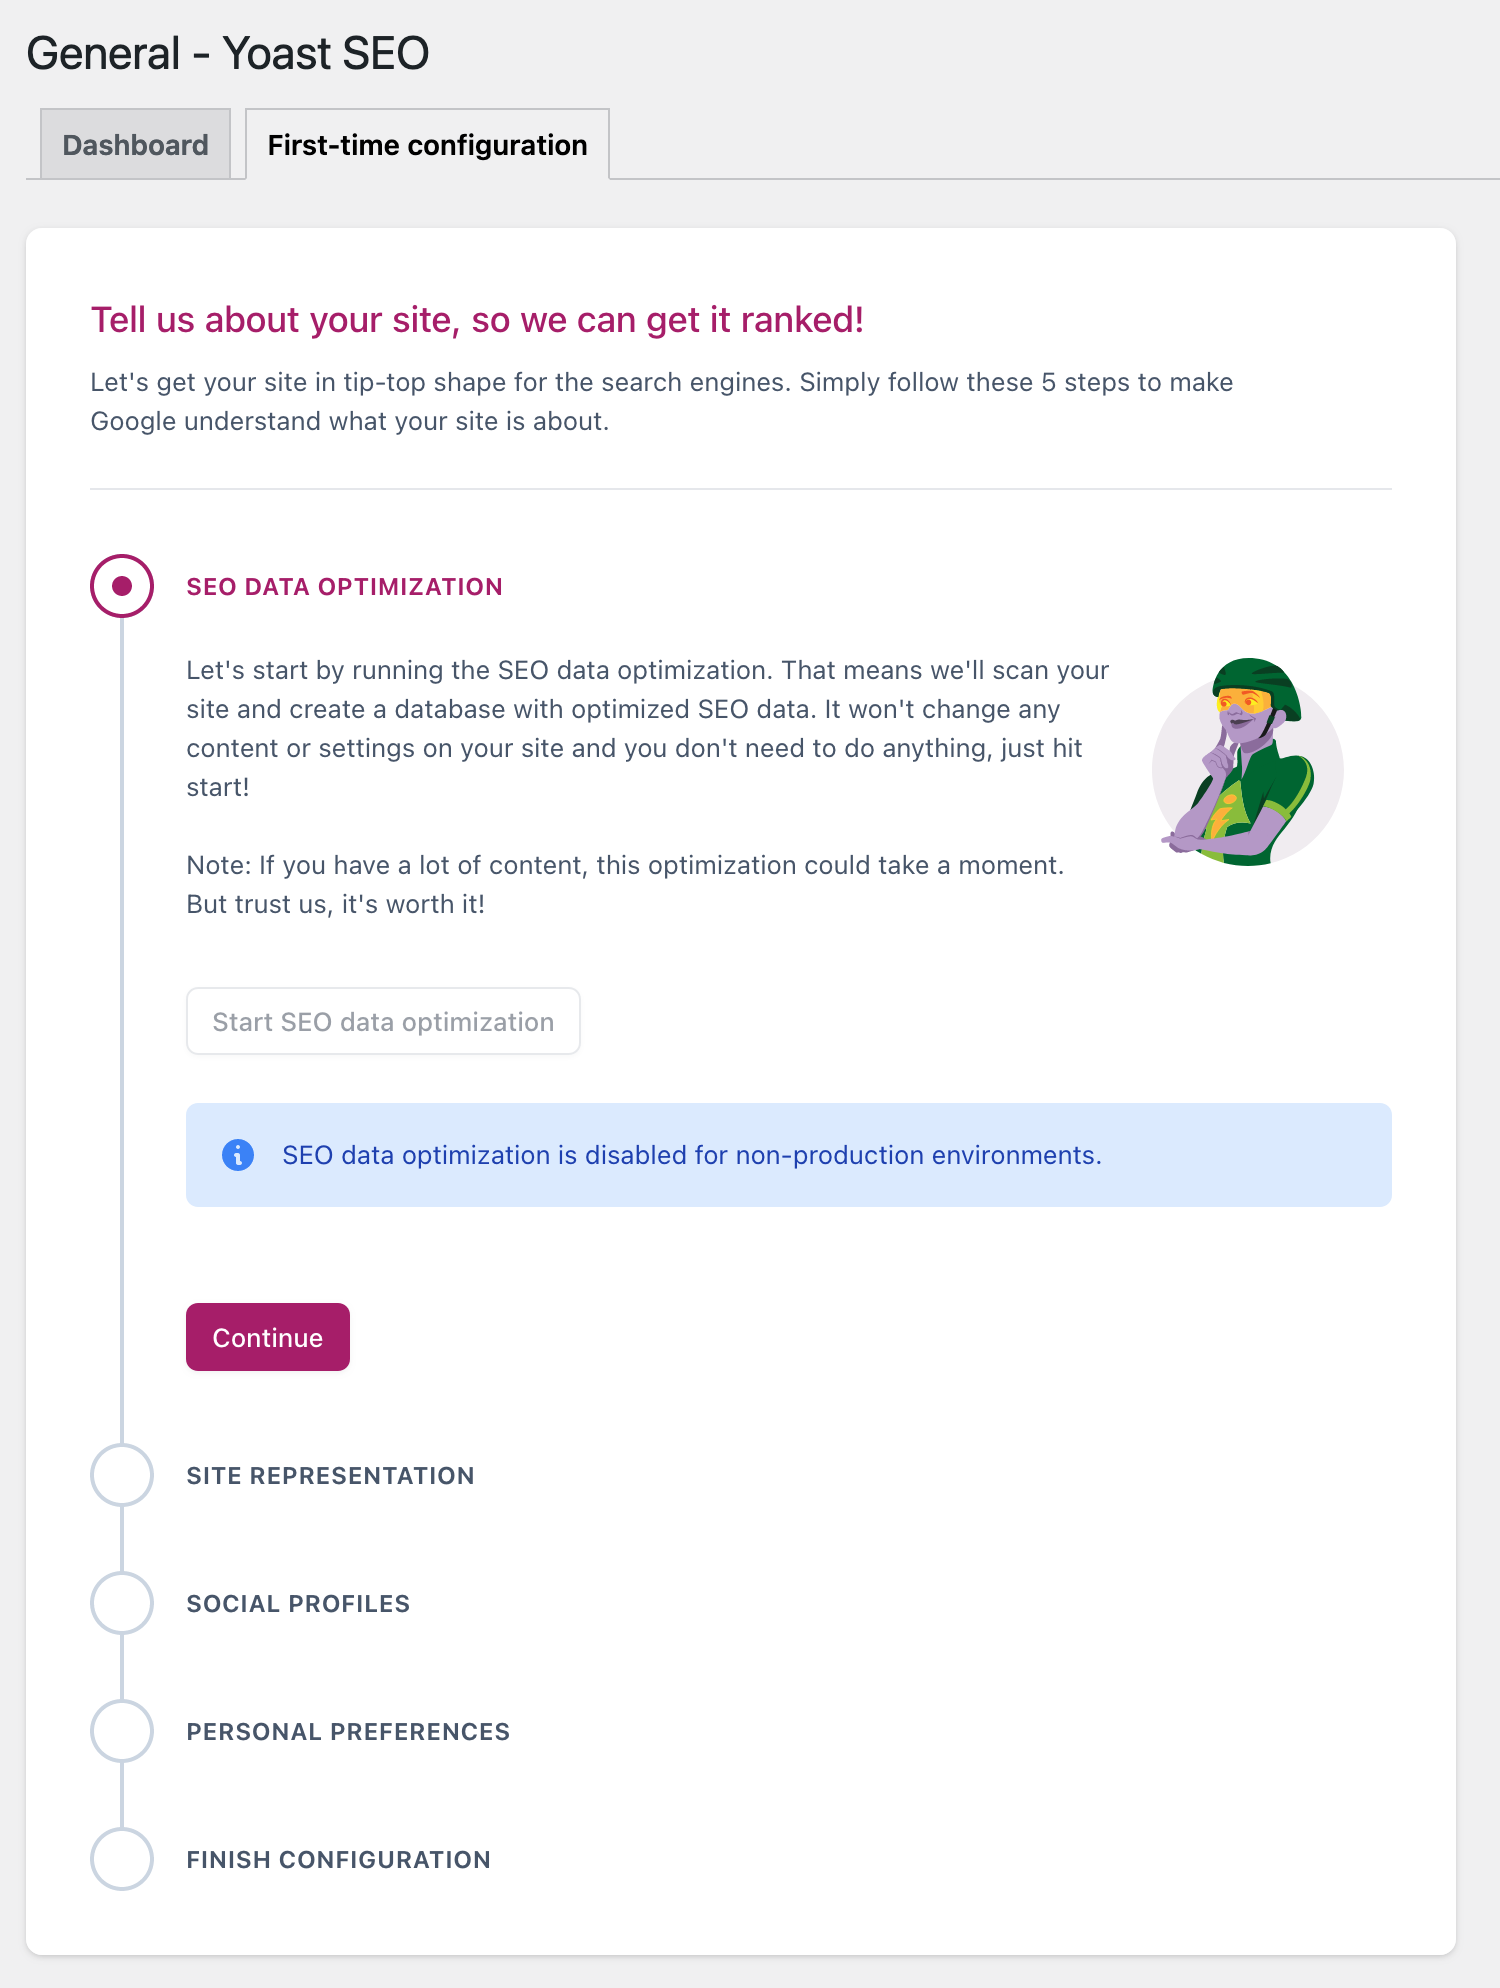
Yoast SEO will ask you questions so that it can automatically choose your settings. All the settings proposed by this wizard will be treated case by case throughout this guide, which is why I will not cover them here, to avoid duplication.
Settings
When you arrive on this page, you will see that it’s composed of four tabs:
- General
- Content types
- Categories and Tags
- Advanced
Let’s look at each one in more detail.
General Tab
Site features
This tab allows you to enable or disable some of the plugin’s features.
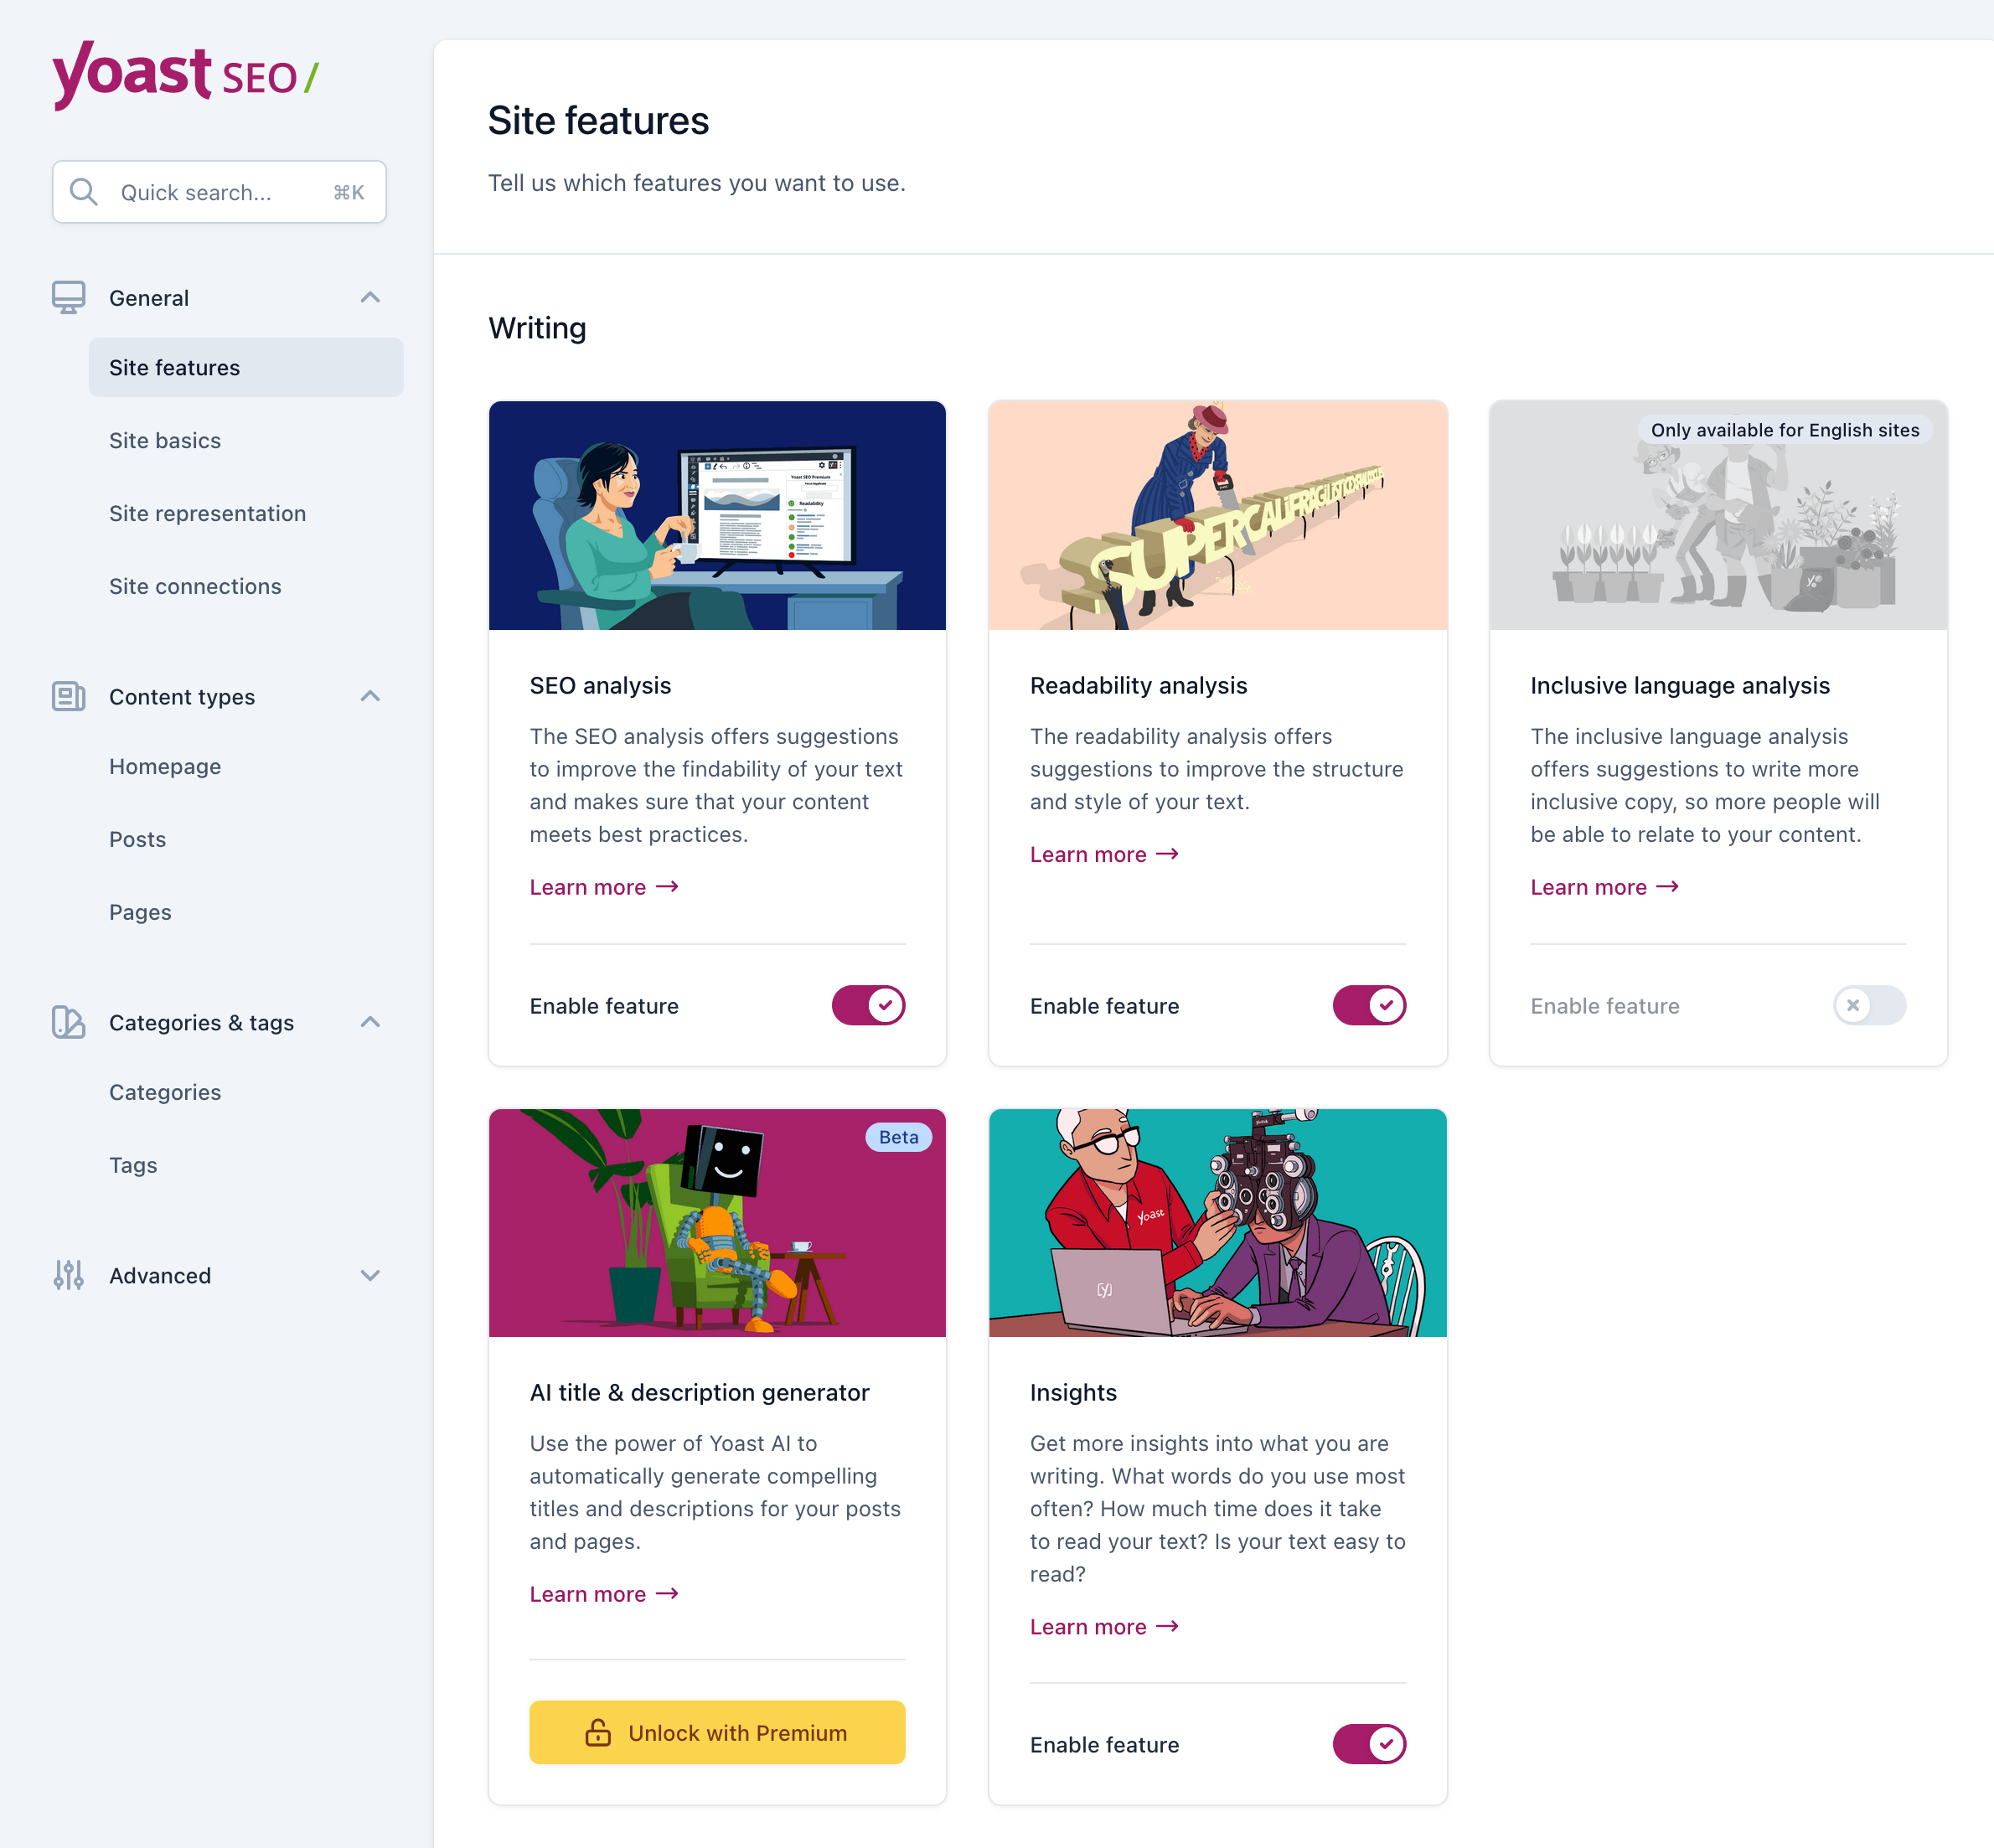
- Writing:
- SEO analysis: Enables/disables the “Focus keyphrase” tab and therefore the “SEO analysis” tab on the Yoast SEO metabox, present when you edit an article or a page. It’s important to keep it enabled to be able to optimize your content.
- Readability analysis: Enables/disables the “Readability” analysis tab displayed in the Yoast SEO options when you write a post, for example. You will find suggestions for improving the structure and style of your text.
- Inclusive language analysis: Enables/disables a tool that gives you suggestions to improve the inclusivity of your text.
- AI title and description generator: Available as a beta version and only with Yoast Premium, this feature allows you to generate title and meta description tags automatically, using artificial intelligence (AI).
- Insights: Enables/disables the option of generating statistics on your content (most frequently used words, read time, etc.)
- Site Structure:
- Cornerstone Content: Enables/disables the option to filter and mark the cornerstone content on your website.
- Text link counter: Enables/disables a tool that tells you the number of internal links in a content, and the number of internal links made to that same content. Leave this setting activated to help you improve the structure of your site.
- Link suggestions (premium): Allows you to get suggestions for links to relevant posts, in order to optimize the internal linkage of your site.
- Admin bar menu: Enables/disables the Yoast menu in the administration bar. It’s up to you to decide if it bothers you but I advise you to keep it.
- Social Sharing
- Open Graph Data: Enables/disables the option to display a preview of your content with images and an extract of the text on Facebook and other social networks when someone shares a link to your site. You can leave this option activated to optimize your site for social media.
- Twitter card data: Allows X (formerly Twitter) to display a preview with images and an extract of text when someone shares a link to your site.
- Enhanced Slack sharing: If your readers use Slack, you will benefit from additional mentions (the author and the estimated reading time) when the URL of a publication is shared on the collaborative communication tool.
- Tools:
- Admin bar menu: When this option is activated, a Yoast icon in the admin bar offers rapid access to third-party tools to analyze pages and allow you to check notifications.
- APIs:
- REST API: Head endpoint: Here we are dealing with a very technical setting related to the WordPress REST API, which allows it to communicate easily with other sites and applications. You can leave the setting activated.
- XML Sitemaps: enables/disables the different sitemaps generated by Yoast SEO.
- IndexNow: When this option is activated, a notification is sent to search engines (Bing, Yandex…) as soon as you publish, update, or delete a publication.
Site basics
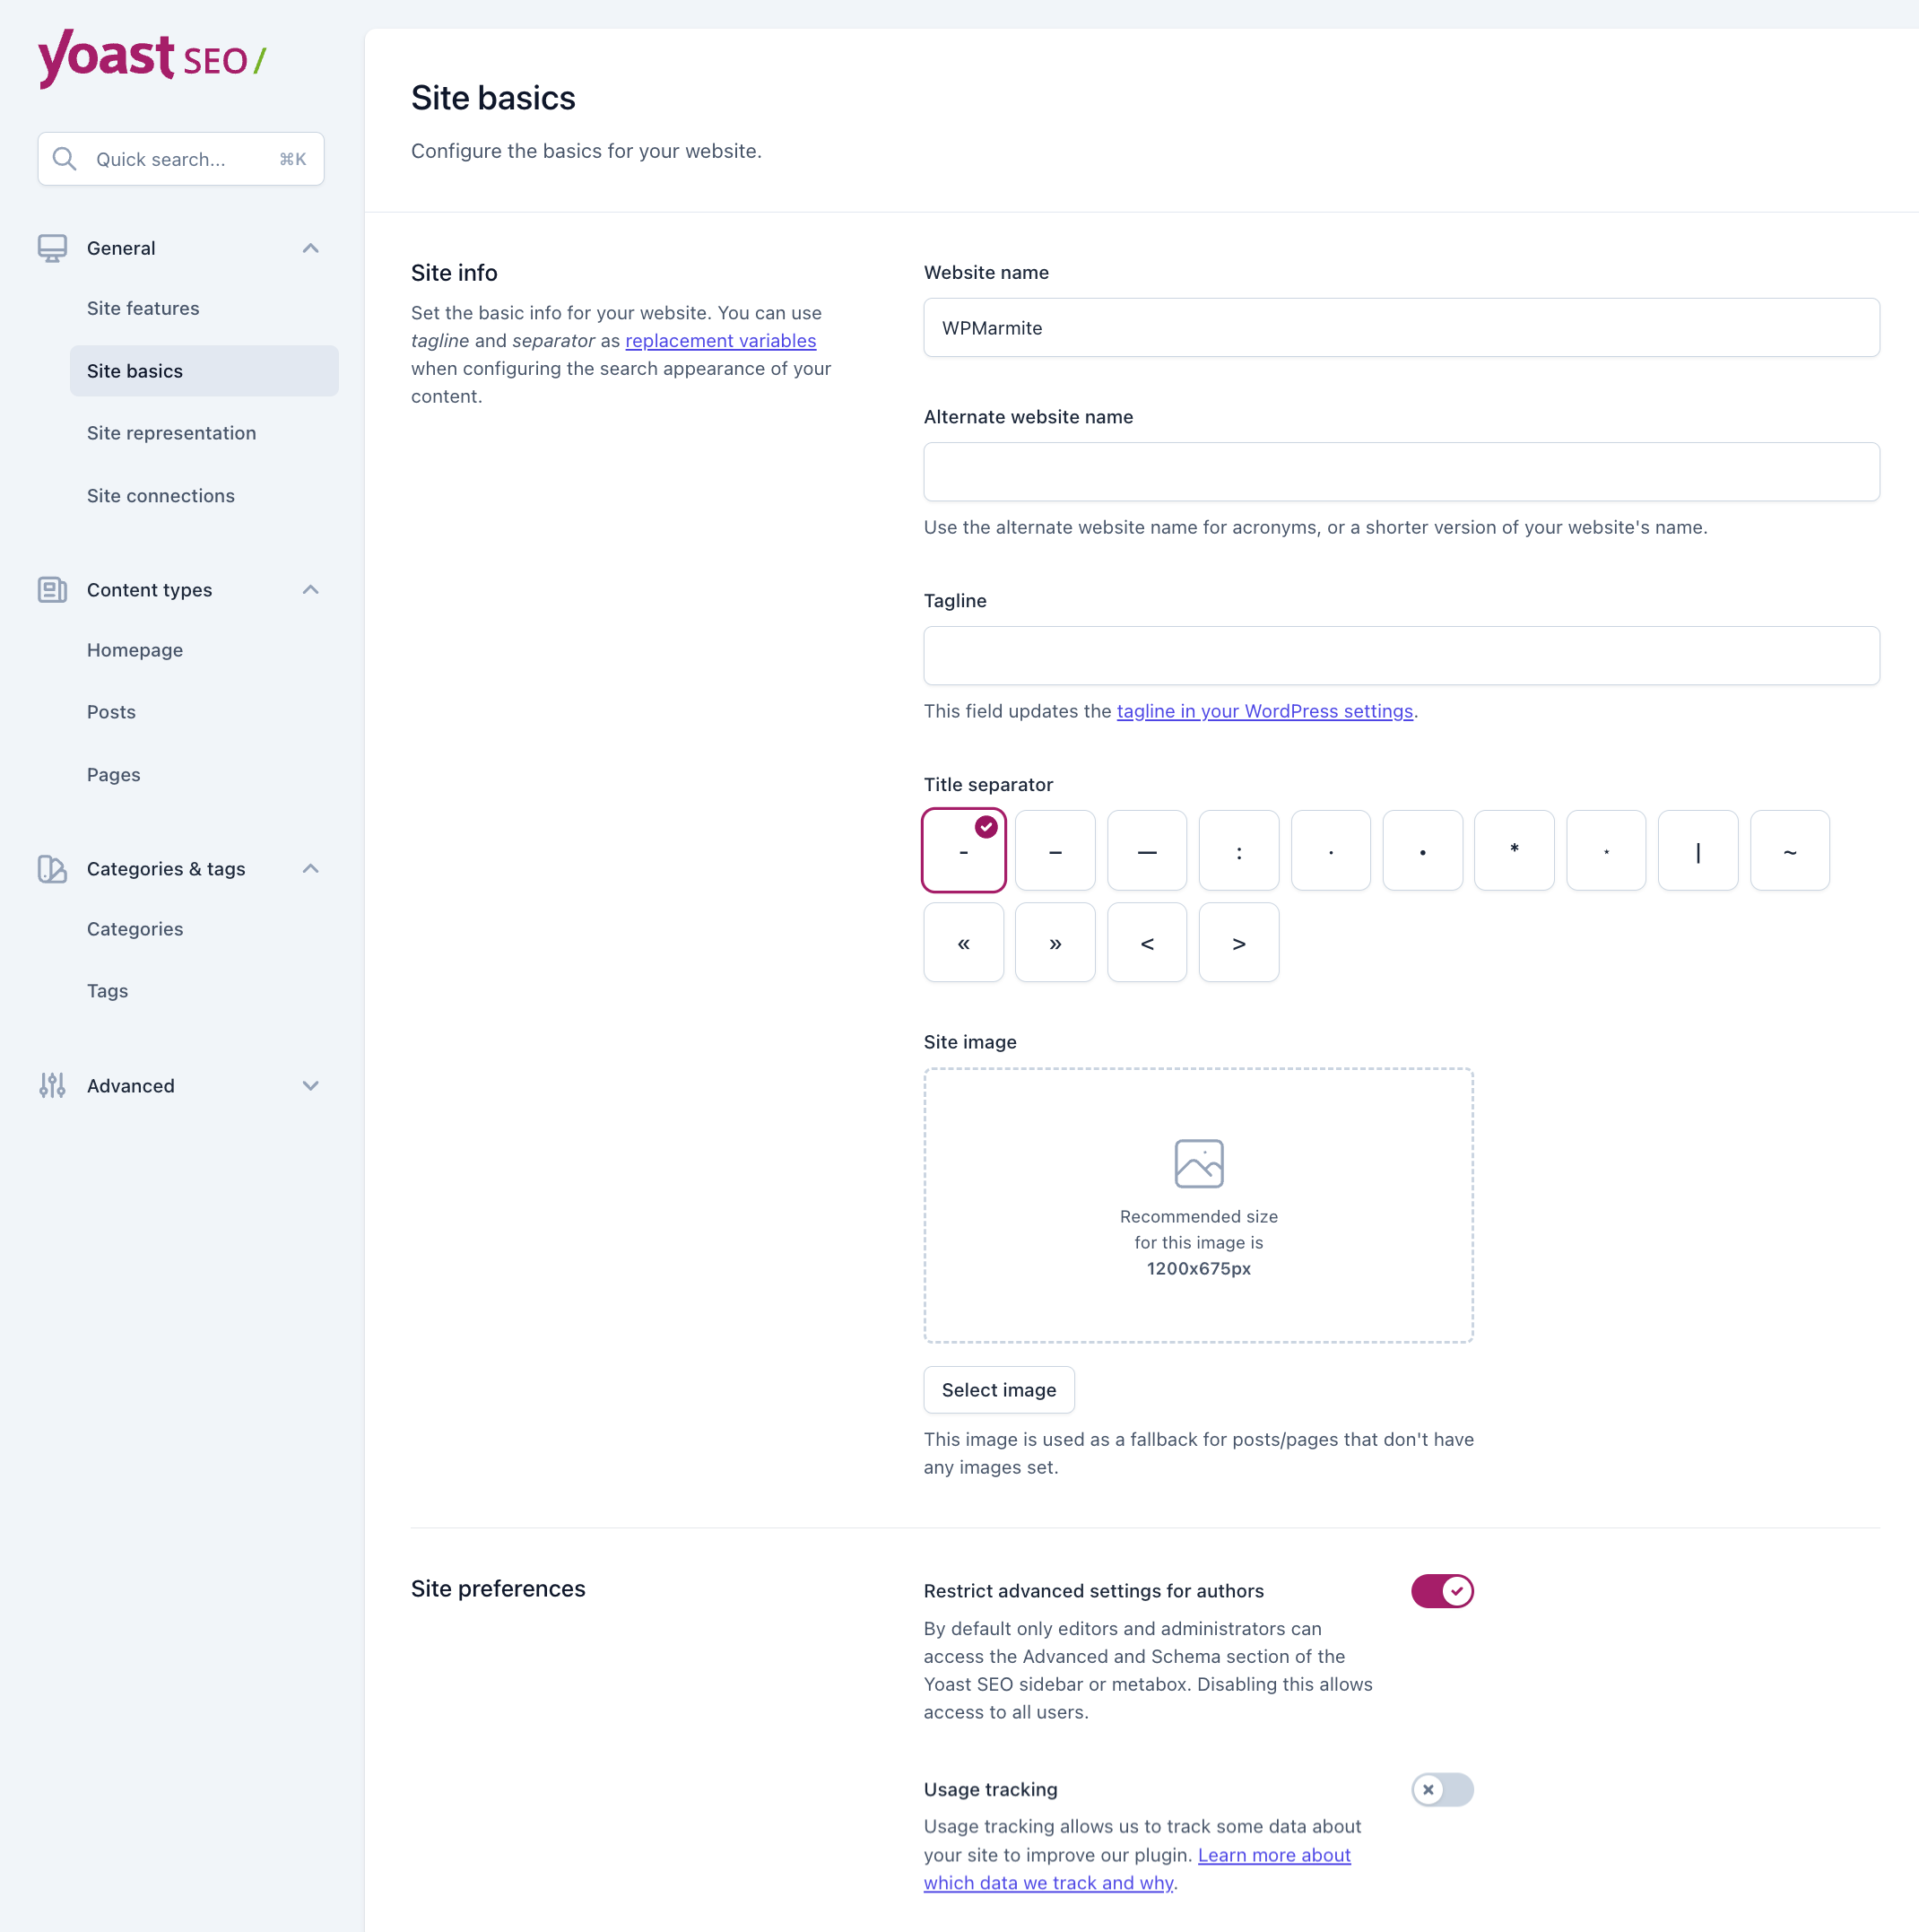
As you can see below, there are multiple options under this tab.
Site info
First, you can define a site name, which will be displayed in search results, and a tagline.
Title separator: Yoast SEO makes it easy to choose the separator — presented as a symbol — to include in the title of your pages.
As indicated in the description, the separator can be included between the title of an article or page and the name of your site.
It’s up to you to see which one suits you best. For WPMarmite, I didn’t complicate my life. I kept the good old dash.
You can then choose an image, which will be displayed if no highlighted image has been defined for your publication.
Site Preferences
Here, a setting allows you to restrict access to the advanced and Schema sections of the Yoast SEO sidebar or meta box to editors and administrators on the site. If many people have access to the administration of your site, you can leave this option enabled.
Next, enabling the “Usage tracking” option sends Yoast SEO data about your site to improve their plugin.
Lastly, with Yoast Premium only, you can select the pages of your site that contain information on your organizational and publishing policies.
Site representation
This tab is very important because it allows you to take advantage of Google’s “Knowledge Graph.” That means that Google will be able to display additional information about you or your brand/company on the right side of its search results.
For example, if you search for information about Matt Mullenweg (the co-creator of WordPress), you’ll see an insert next to the search results:
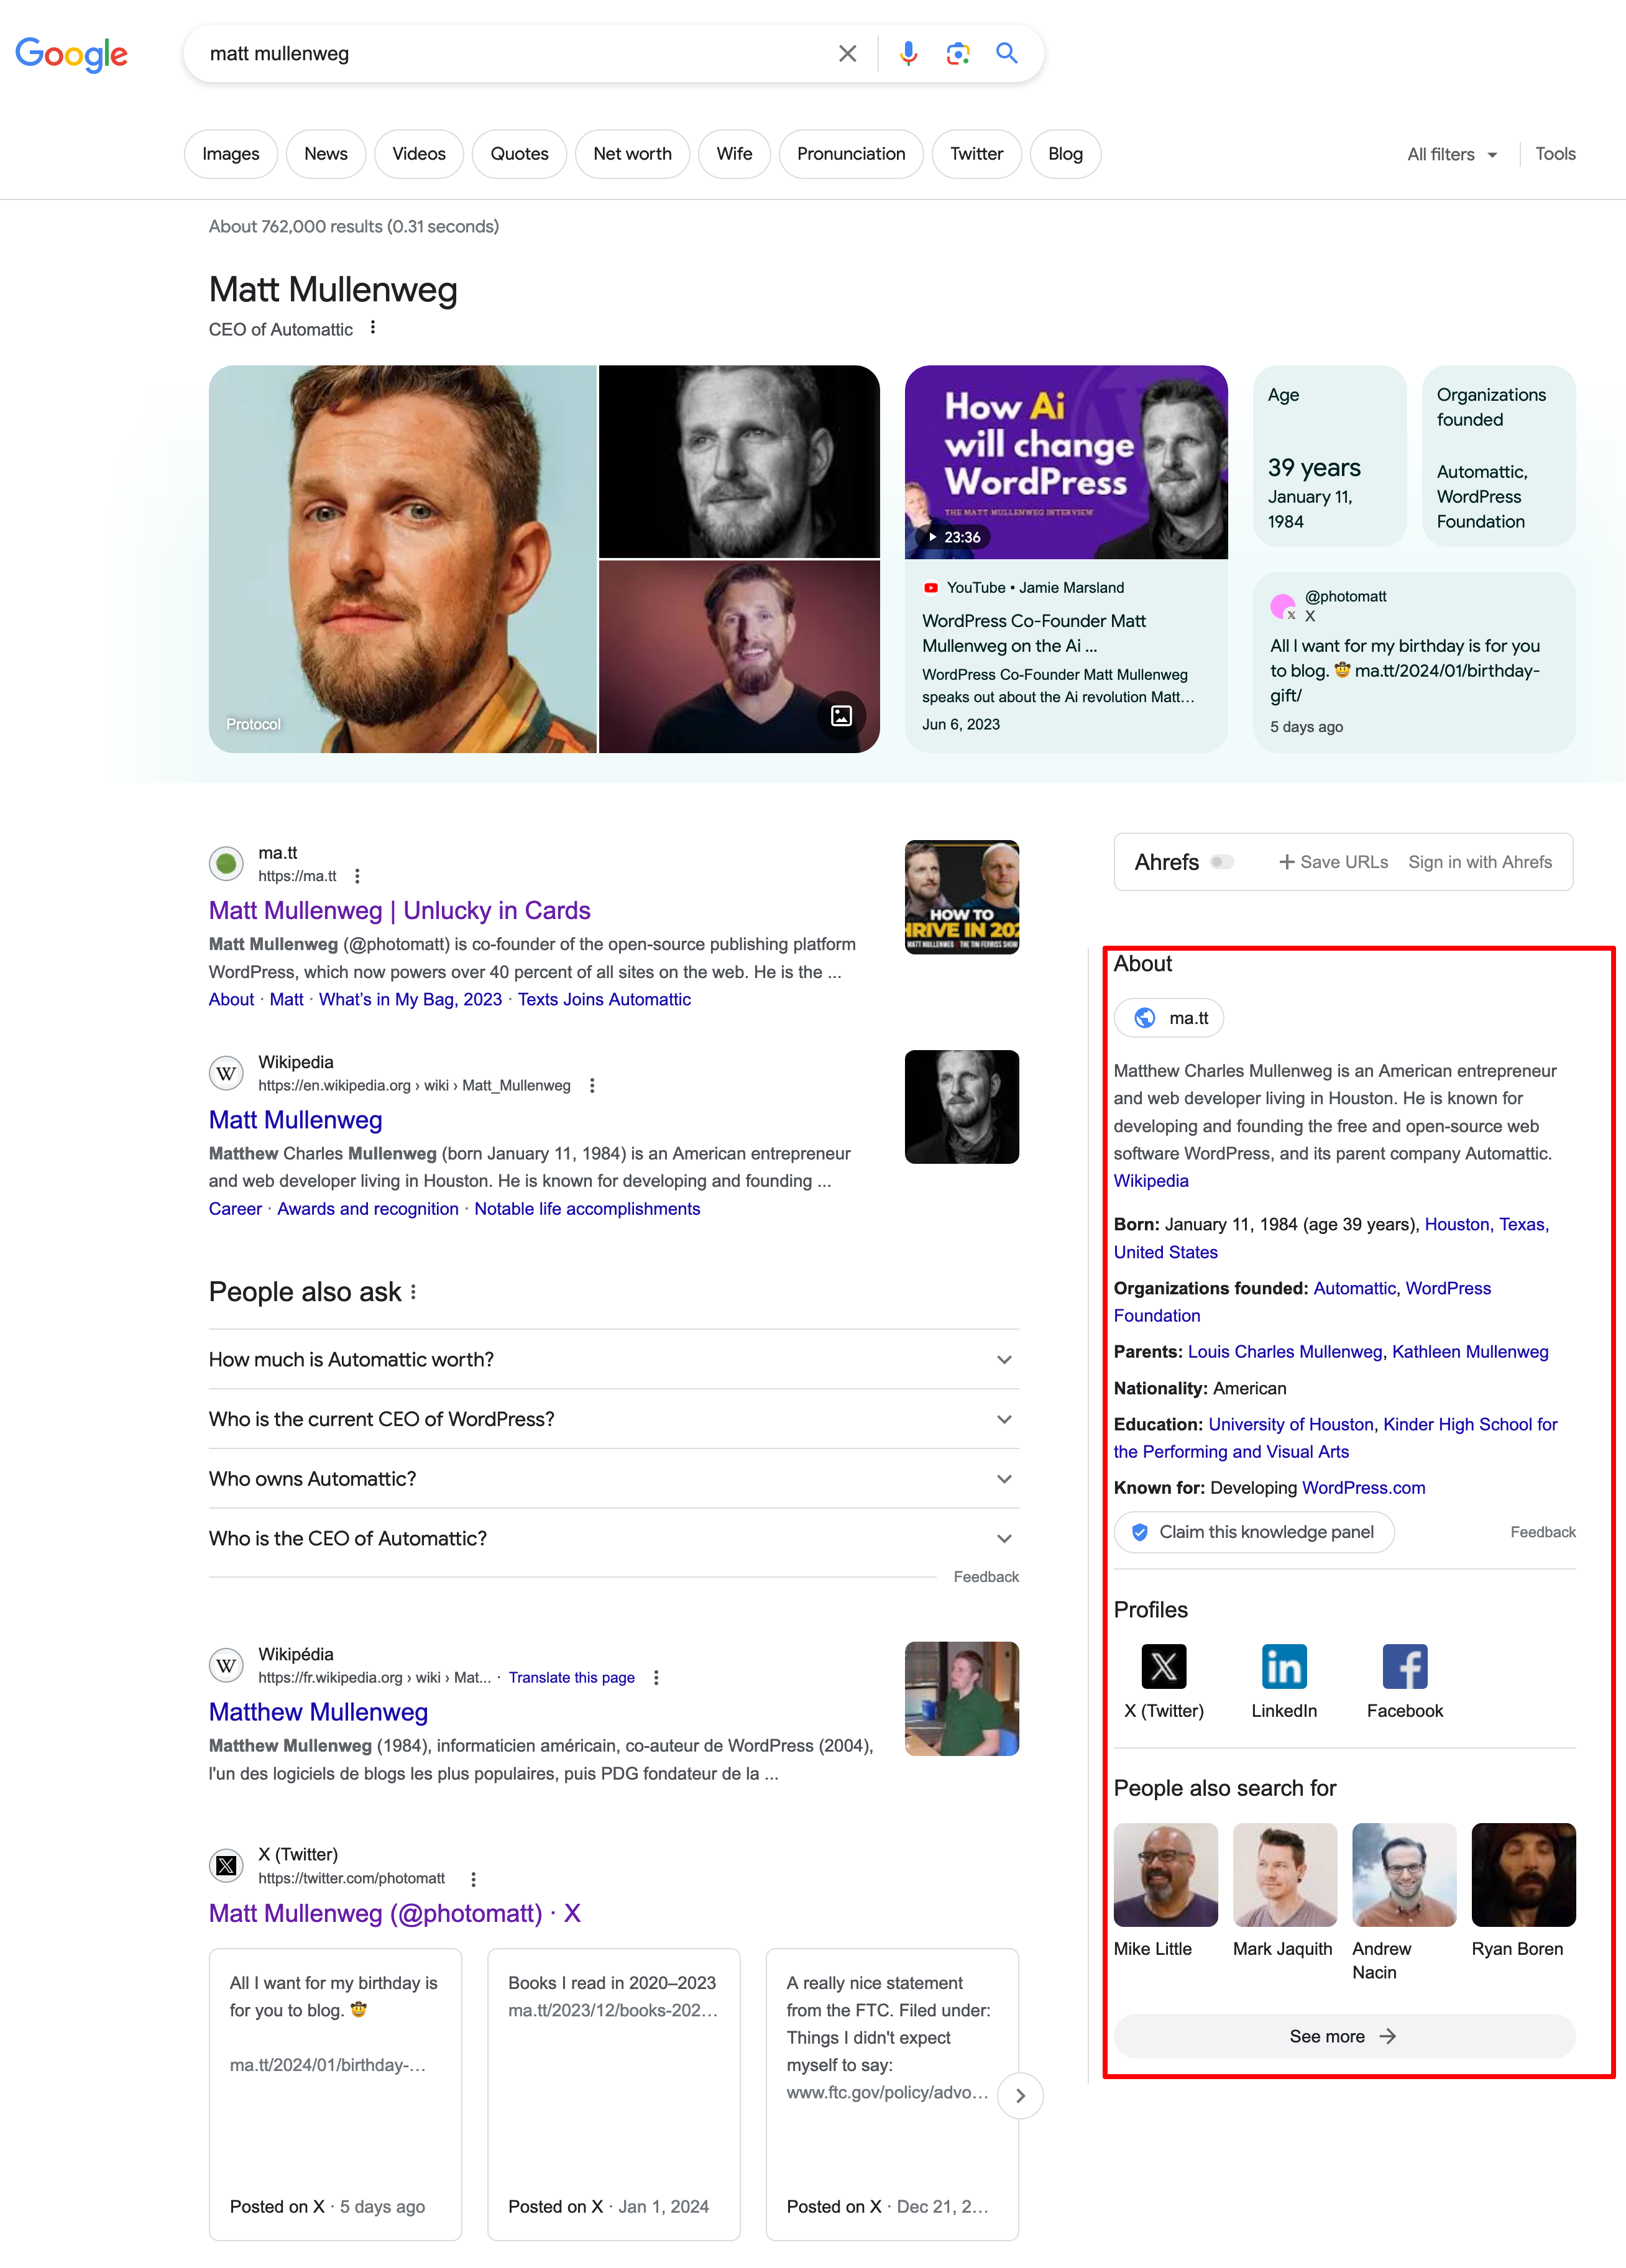
Of course, it’s not guaranteed that Google will systematically highlight the information that you put in this tab, but it gives the search engine a better idea of who you are.
Now let’s move onto the content of the insert. Depending on whether you chose to specify that you are an organization or an actual person, you won’t have the same options:
- Organization: You can define the name of the organization (and an alternative name, such as the short version or an acronym) as well as its logo.
- Person: Yoast will use the information you entered in your WordPress user profile for Google’s search results. Make sure these match your identity. 😉 Just like for an organization, you can also add an avatar or logo. Drop in a picture of yourself, for example.
In the “Other profiles” insert, you can enter links for your social profiles if you think it’s necessary to associate them with your site.
The goal of this tab is to inform Google about your online identity (maybe they use the statistics related to these accounts to determine your popularity and therefore index you better?).
Site Connections
If you want to use the tools that Baidu, Bing, Google, Pinterest, and Yandex offer for webmasters, this tab will help you to verify your site.

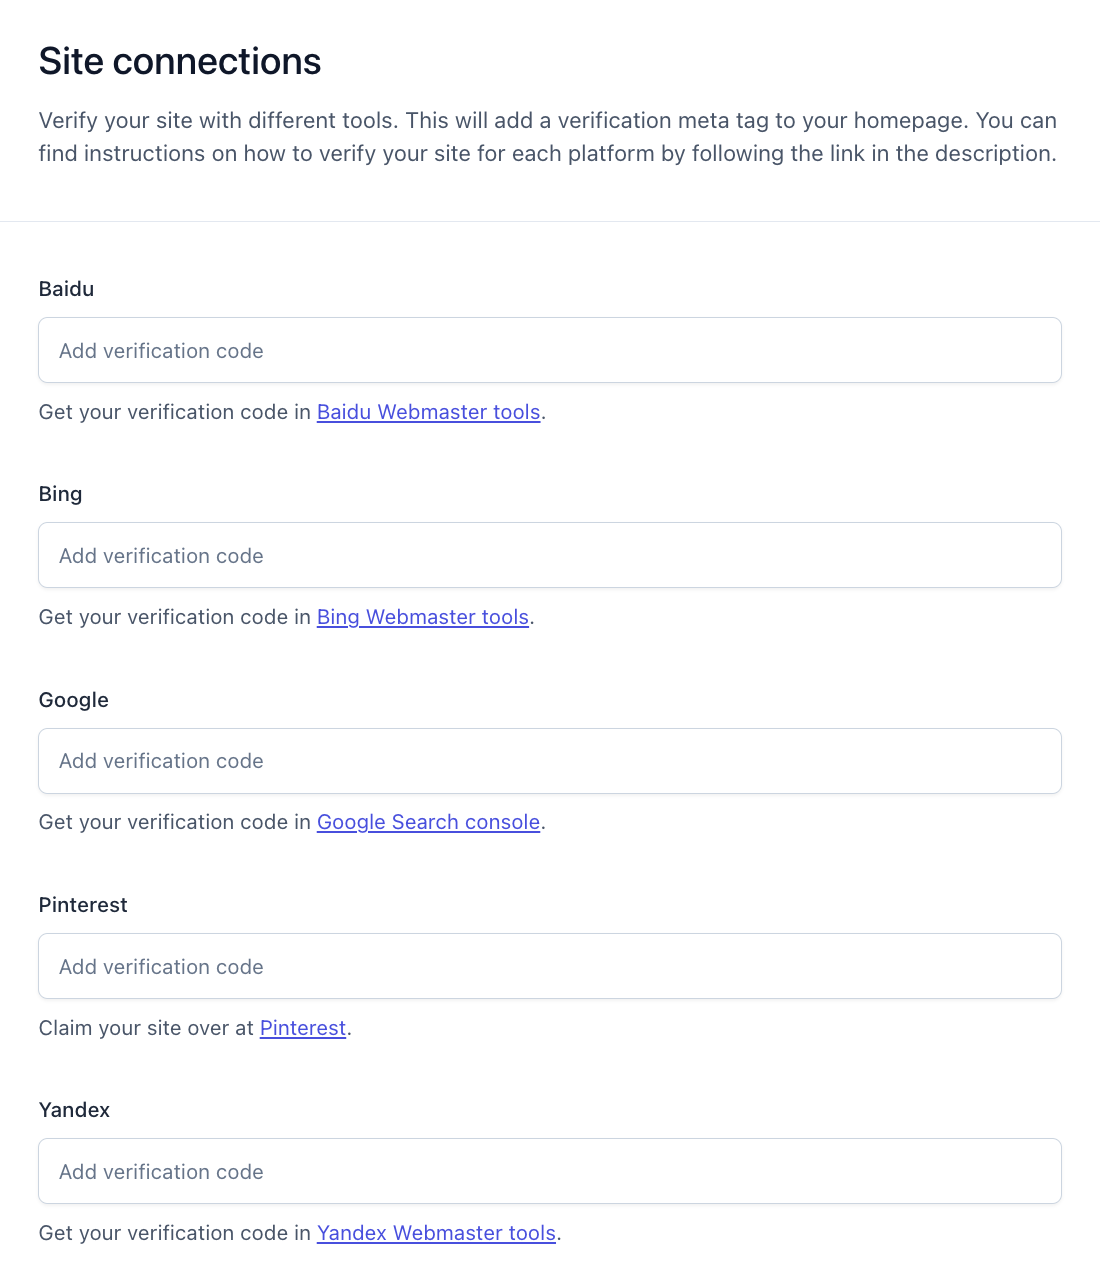
Like it says, fill in the different verification codes for each tool.
Content types tab
Homepage
Homepage: Several things can be displayed in this box, depending on the configuration of your site/blog.
If your home page displays the latest articles, two fields will be displayed to allow you to indicate the title of your site (title tag) and its meta description.
Variables are installed by default, but enter a title and a description that will encourage visitors to visit your site.
On the other hand, if you have defined a page as the home page and another as the blog page, you will have to go to these pages to indicate the associated titles and meta descriptions:

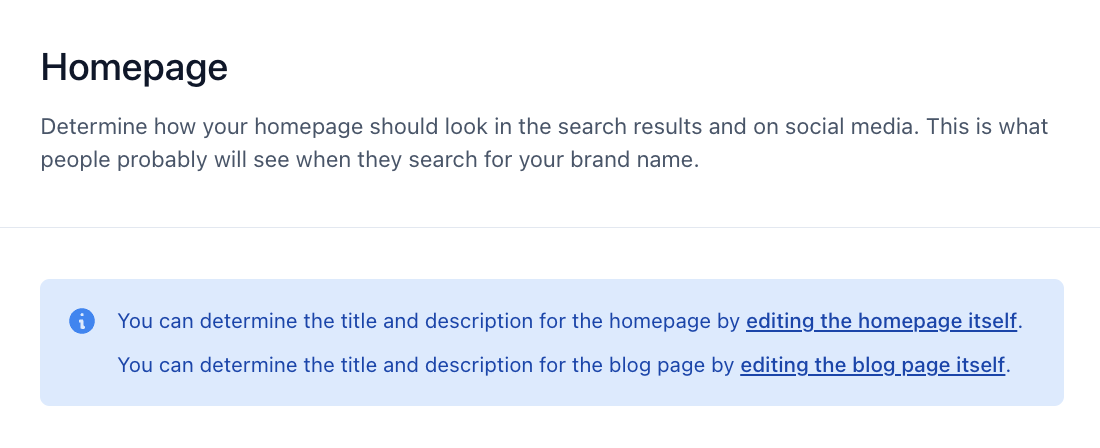
Be sure not to neglect this step, because the information that you will have to provide will describe your homepage to search engines.
For example, this is how Google will display your homepage to searchers:

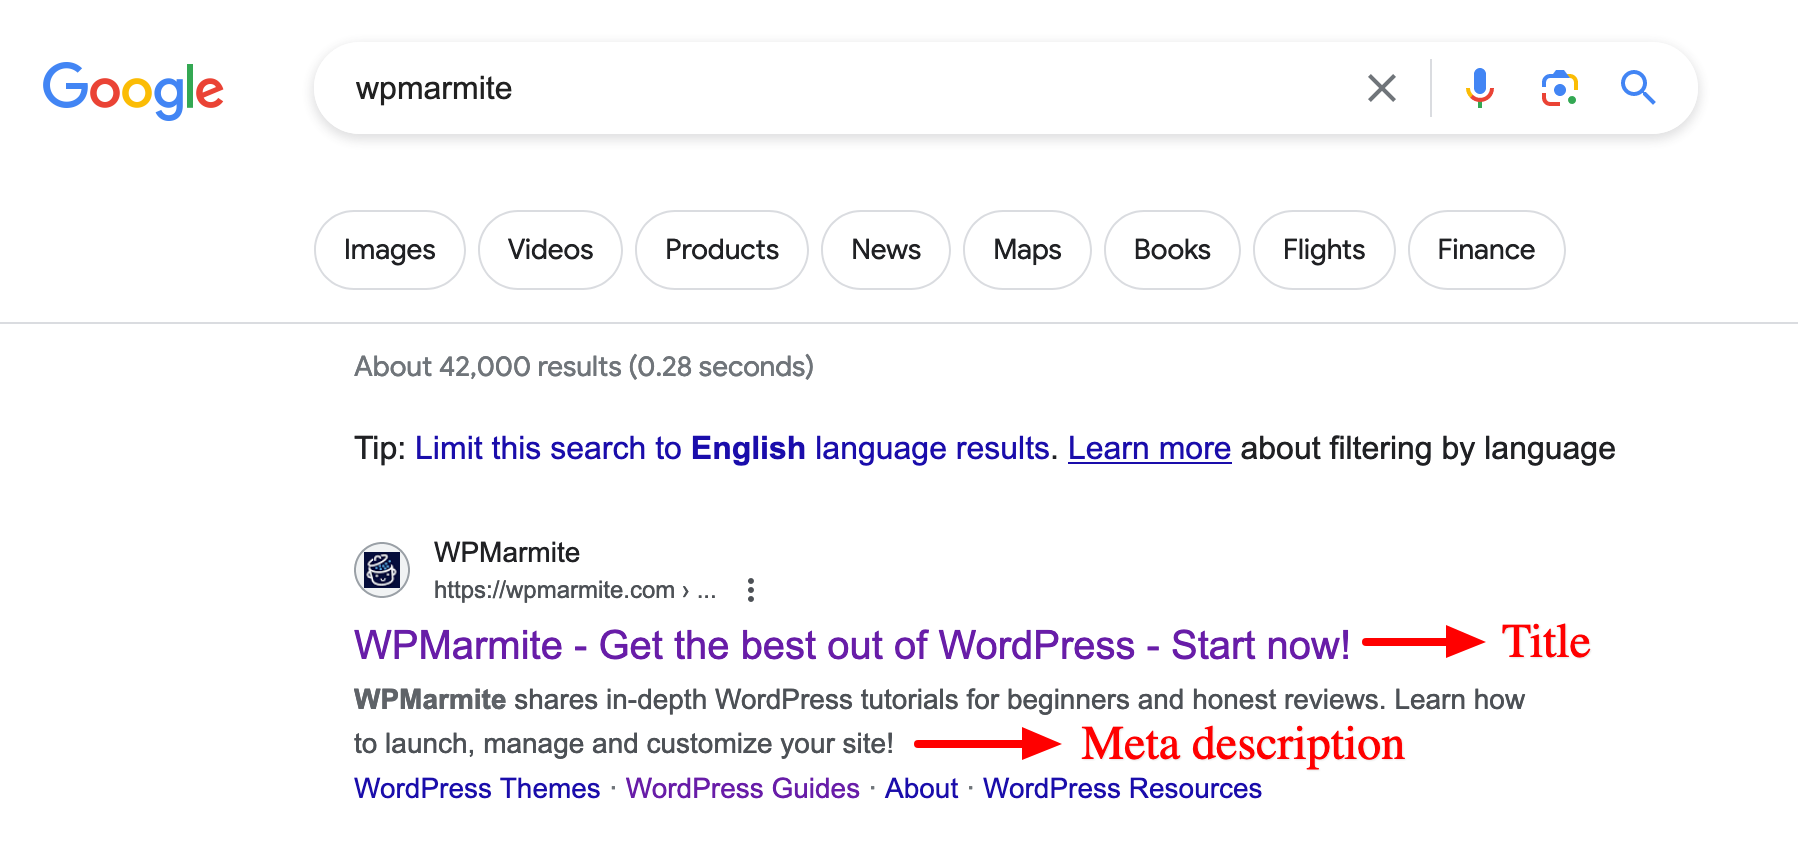
Even though Google doesn’t always use the “Title” tag in its search results (it might reword them), don’t neglect writing them.
An optimized tag can increase your click rate, and thus the traffic on your WordPress site. Especially for the title tag of your homepage, try to describe your website as best as possible to convince people to browse your site. 😉
Links to the Yoast SEO article, and the WordPress Tutorials, Blog, and About pages have been automatically generated by Google. If your site is well organized and gets enough traffic, these links should appear when someone types your site name into Google.


Posts and Pages
Once the homepage is set up, you now have to work on all the other pages of your site, as well as your posts (if you have them).
To do this, Yoast SEO offers to give default values to the different types of content on your website.
This is what will allow you to define“how your pages [and posts] should appear in search results and on social media,” including their description.
In order to adapt to all your content, Yoast SEO uses variables. For example “SEO Title” will match the title tag that Google will display for your publication (post, page, etc.).
Click on “Insert variable” at the top left of the screen to get a list of all available variables.

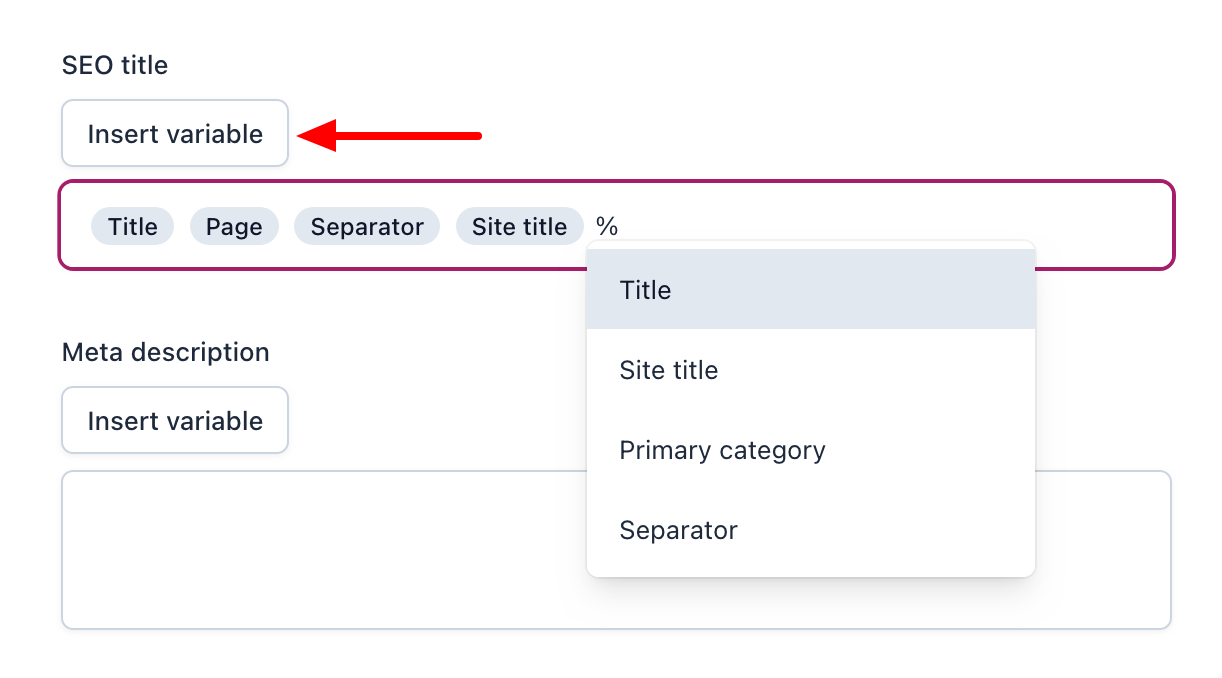
Let’s take a look at the options that are available:
- Show Posts in search results: Select “On” to tell search engines to index your content. This is very important!
- SEO title: For WPMarmite, I simply use the name of the posts/pages for the page title tag (the “Title” variable).
- Meta description: For the text that appears in the search results, I use an excerpt from the post or page. If this excerpt is not defined, it will be generated automatically by the plugin.
- Appearance on social media (premium): This setting allows you to set the default appearance of your content on social networks. Note that you can change the appearance for each publication in the Yoast SEO metabox.
- Schema settings: By default, Yoast automatically describes the content of your publications to search engines using structured data, so that they can better understand the content of your site. To do this, it uses the Schema.org vocabulary, a structured data protocol adopted in 2011 by Google, Bing, and Yahoo.
- Enable SEO controls and assessments: This option is simply used to hide the Yoast SEO insert (called a metabox in WordPress jargon) when you are in edit mode (i.e. writing a post, page, or other type of content). This box allows you to refine the default settings in the options, which is very convenient. Activate this option for posts and pages. On the other hand, there may be content types where this is not useful (if you have slider content, for example).
Taxonomies tab
After working on the types of content and media on our website, let’s move on to taxonomies. Taxonomies are the categories and keywords defined for each type of content.
By default, WordPress offers categories and tags for posts, but you can have others. For example, you could have project categories for a portfolio.

Show Categories in search results: By default, your category pages will be indexed by search engines. However, if you don’t want them to, you can deactivate this option. In that case, the category pages will automatically be ignored and excluded from your XML sitemap. I advise you to leave the option enabled.
SEO title: The page titles should be displayed according to the template you define. Here are the ones I use on WPMarmite, but you are free to modify them:
- Categories: Category – Separator – Site title to display the name of the taxonomy, followed by the separator and the name of your website
- Tags: Tag – Separator – Site title
- Other taxonomies: Term title – Separator – Site title (“Term title” is the name of the taxonomy)
Meta description: This is where you put the description of your taxonomies. I recommend that you use the variable following “Description of the category.”
Make sure you fill in the descriptions of your categories, tags, and other taxonomies to make this work. To do this, edit each of your categories and fill in the description field. Do the same for your tags and other taxonomies.
You can find the list of available variables by clicking on the “Insert variable” button.
Enable SEO controls and assessments: This option just allows you to hide the Yoast SEO metabox while you are in the WordPress content editor.
Show the categories prefix in the slug: By default, WordPress places the category prefix (or the prefix you defined in Settings > Permalinks) in the category URLs. That results in permalinks like: mysite.com/category/plugins-wordpress/.
If you don’t think this prefix needs to be included in the slug (the last part of your URL) and you’d like to take it off, disable this option.
Advanced tab
Search optimization
On this page you’ll find a number of advanced settings that allow you to tell search engines not to crawl certain URLs on your site and to disable certain features and resources that aren’t being used.
For example, it is possible to:
- Remove unwanted metadata and content formats
- Remove resources that WordPress isn’t using
- Block web crawlers (e.g. Google AdsBot)
- Clean up internal search and certain URLs

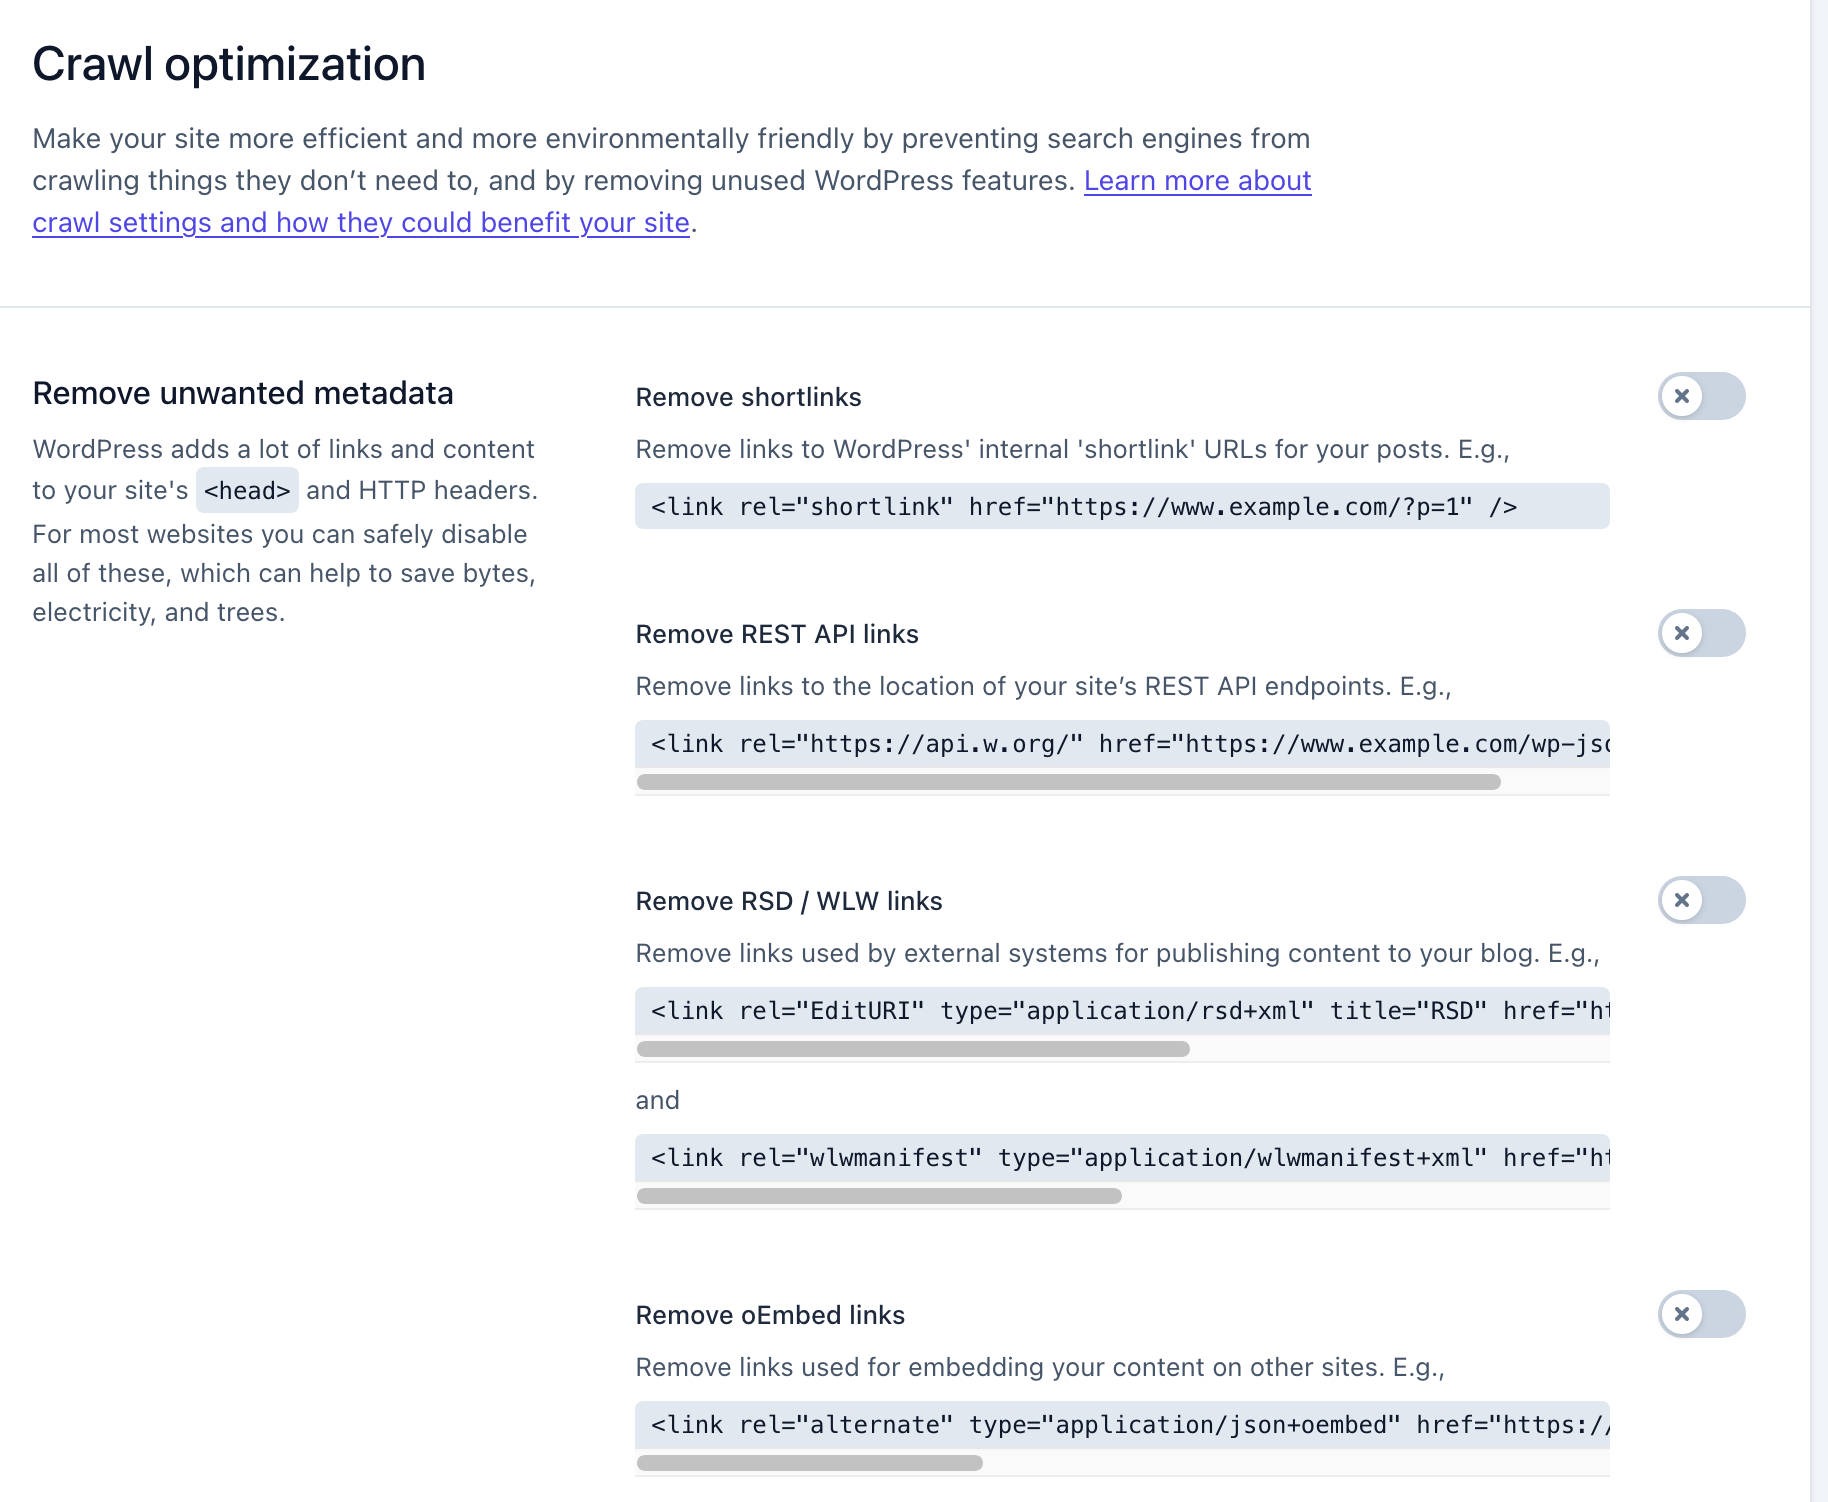
Enabling some of these settings allows you to save crawl budget, i.e. the number of pages of your site that a search engine will crawl in a given time frame.
In fact, some URLs on your site don’t need to be crawled by search engines, which will give search engines more time to crawl the more strategic URLs.
This can also reduce your carbon footprint and improve the loading speed of your pages.
Be careful with these settings. Only activate ones you are sure about. If in doubt, leave the default settings (everything deactivated).
Breadcrumbs tab
In terms of SEO, having an optimized website doesn’t only imply titles and permalinks.
It’s important to have links from other sites. But working on internal links (i.e. between the pages of your website) is a key point too.
To do this, Yoast SEO integrates breadcrumbs to inform your visitors on where they are on your website and to create relevant links to other pages on your site.
It should be noted that not all themes are designed to be compatible with this Yoast SEO feature. If your WordPress theme isn’t compatible, you can get your hands in the code but it requires some knowledge.
If you want to try it, warning: it’s not for everyone.
Are you ready to try it? Insert the following code in a strategic place (for example above your content), preferably in the header.php file of the child theme you will have created for the occasion:
And if you don’t want to get your hands dirty, you can always change your theme. Feel free to take a look at our free theme gallery to get a glimpse of the best ones.
Is everything making sense? Then let’s look at the options under the Breadcrumbs tab:
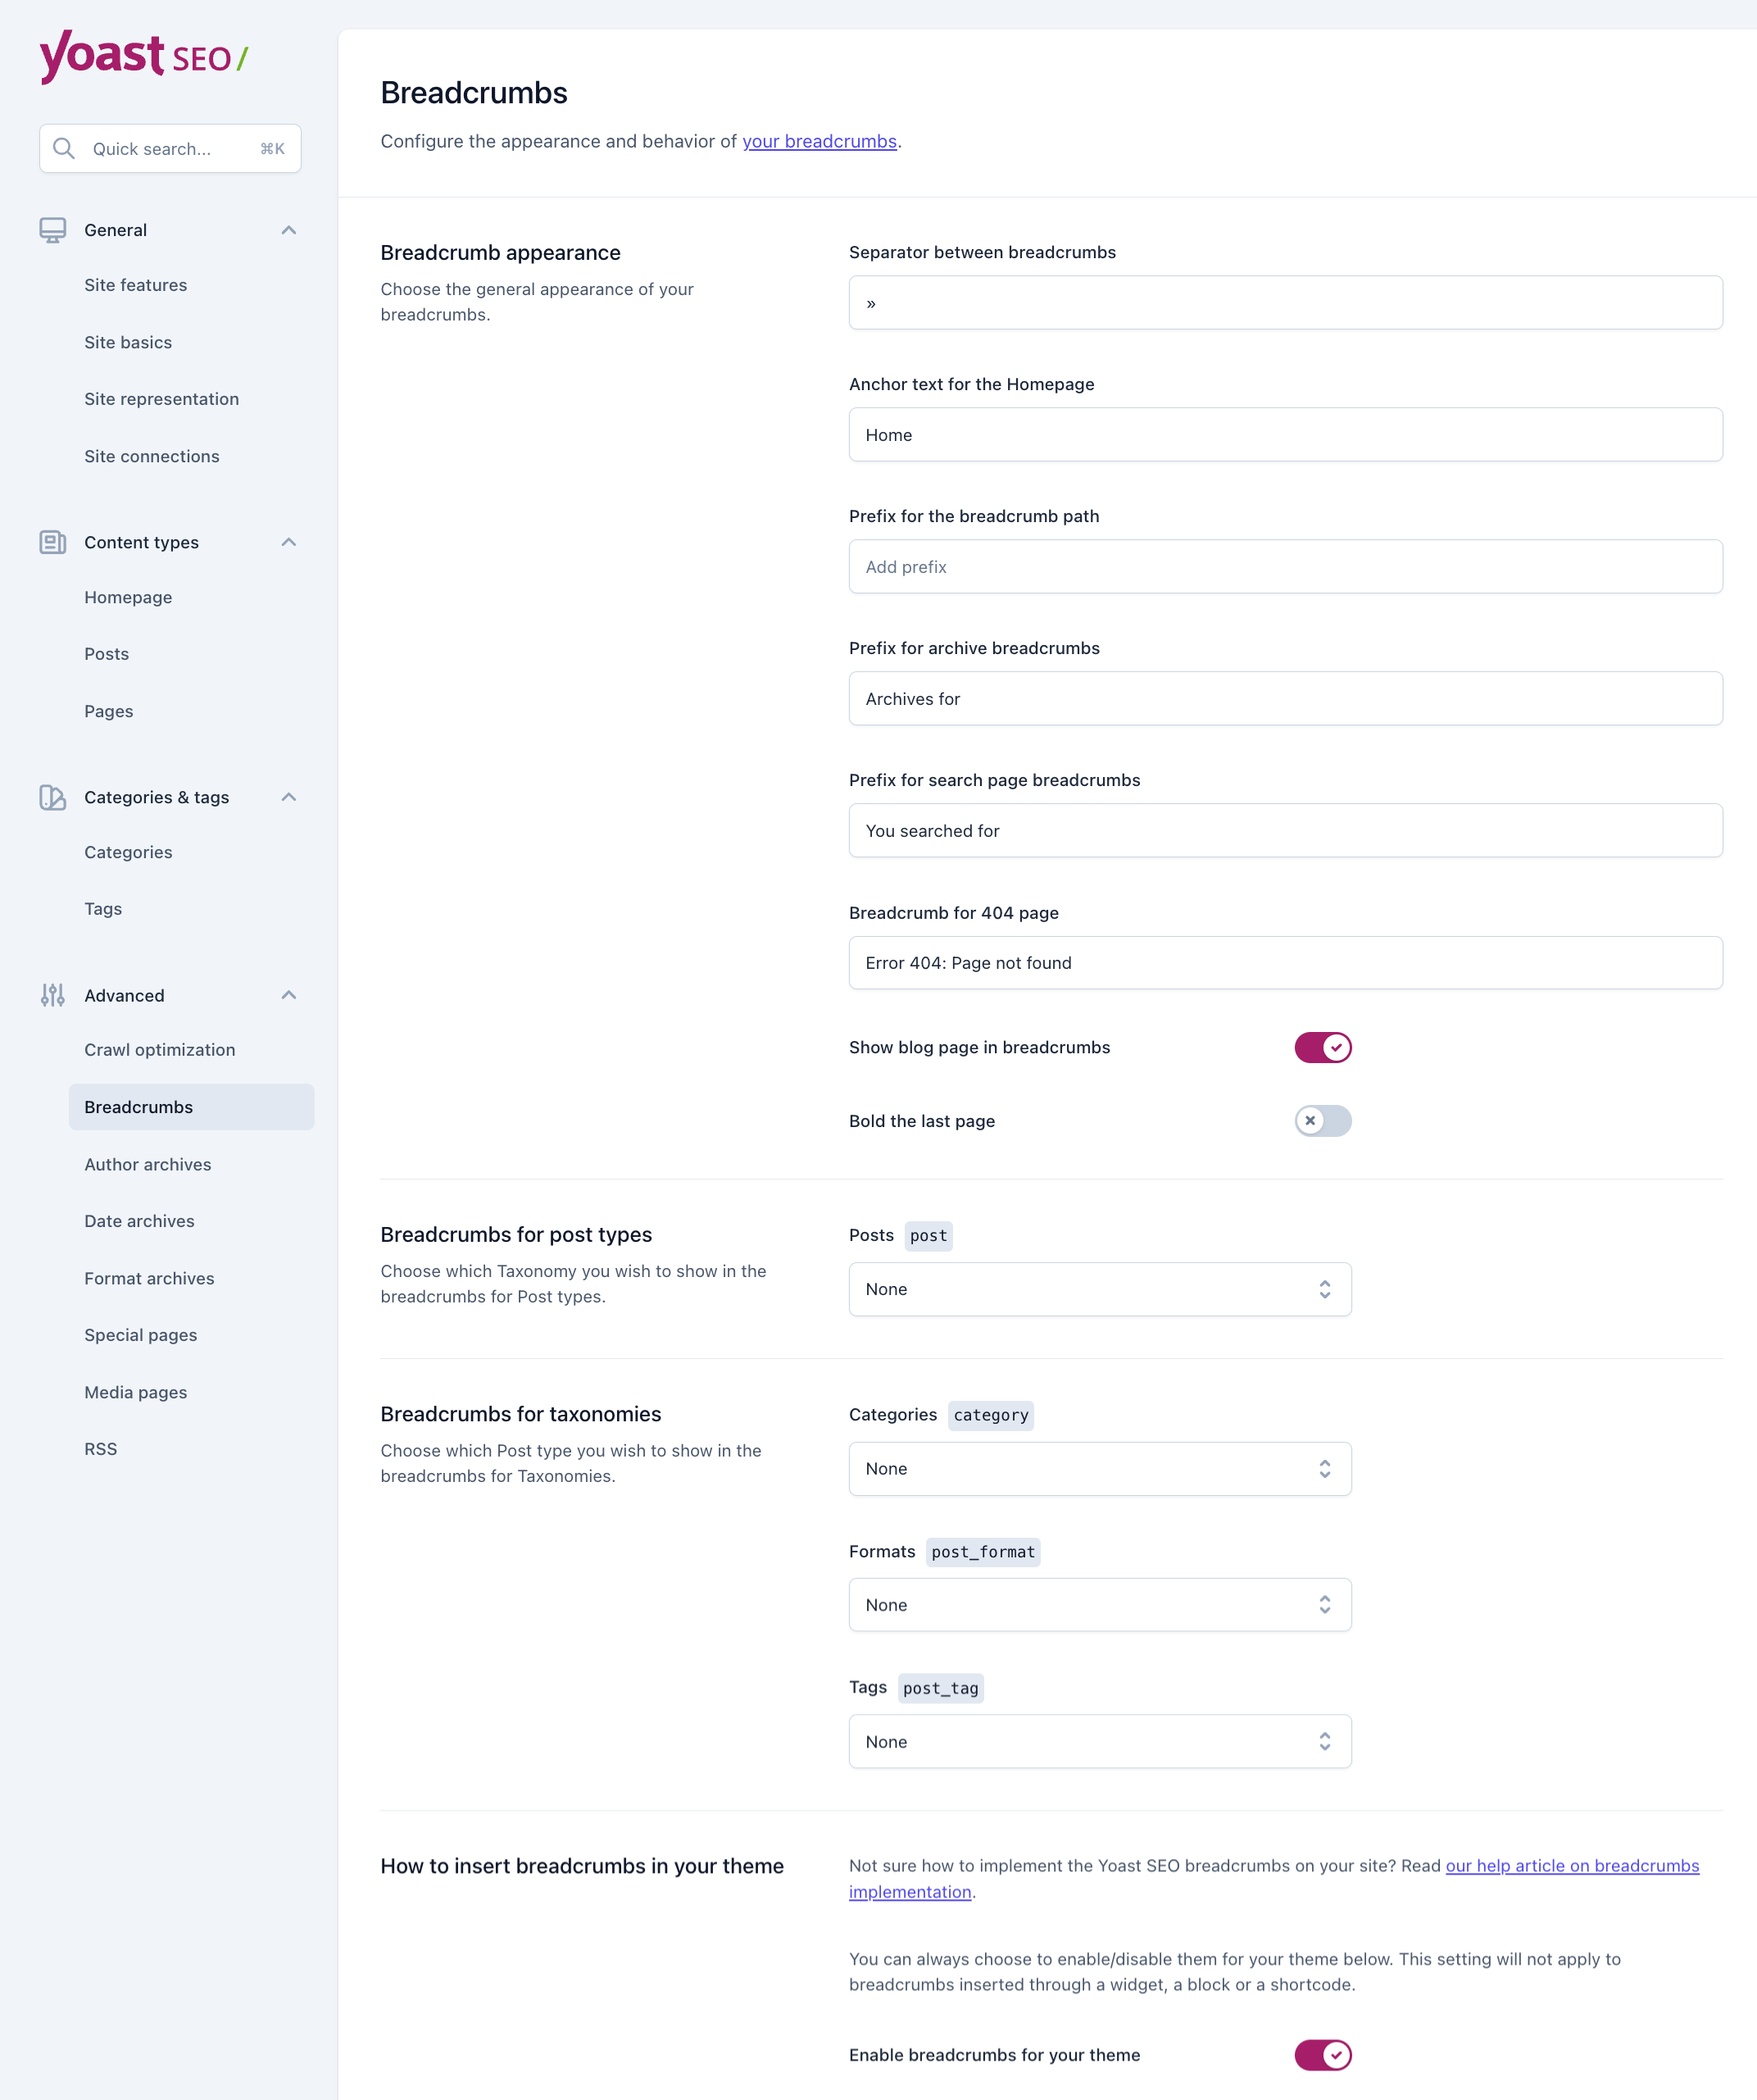
Separator between breadcrumbs: The character you specify will be used as a separator for the different sections of the breadcrumbs. Personally, I often use the character “»” but you can use “-” or “>“.
Anchor text for the Homepage: What should your homepage be named in the breadcrumbs? Home, Homepage, Blog, or something else? The choice is yours.
Prefix for the breadcrumb path: You can put a small text before the breadcrumb path (e.g. a “You are here:” calls out to the visitor, but leaving it blank will make the feed cleaner).
Prefix for Archive breadcrumbs: Same advice as before, except that it’s intended for the archives page.
Prefix for Search Page breadcrumbs: Same advice as before, except that it concerns pages containing search results. WPMarmite simply uses “Search results:”.
Breadcrumb for 404 Page: Enter what the breadcrumbs path should display when visitors land on a page with a 404 error (i.e. a page that doesn’t exist).
Show blog page in breadcrumbs: Disabling this option will make your blog page (f you have a blog page) invisible in the breadcrumbs.
Bold the last page: to highlight the current page a little more, you can put it in bold. This is purely aesthetic.
Breadcrumbs for post types/Breadcrumbs for taxonomies: When a content type has multiple taxonomies, you have the option to choose which one to display in the breadcrumbs.
For instance, for posts, there are categories, tags, and even the format (if your theme takes into account post formats such as video, quote, etc.). You can choose nothing, but for the posts, we recommend you select the categories.
Enable Breadcrumbs for your theme: I think this option speaks for itself. 🙂
Save your changes before clicking on the next tab.
Archives tab
Let’s now move on to the settings of the archive pages, i.e. the pages where your blog posts are listed. Among these pages are the archive pages by author, date, and format. You can set up each page via a dedicated tab:
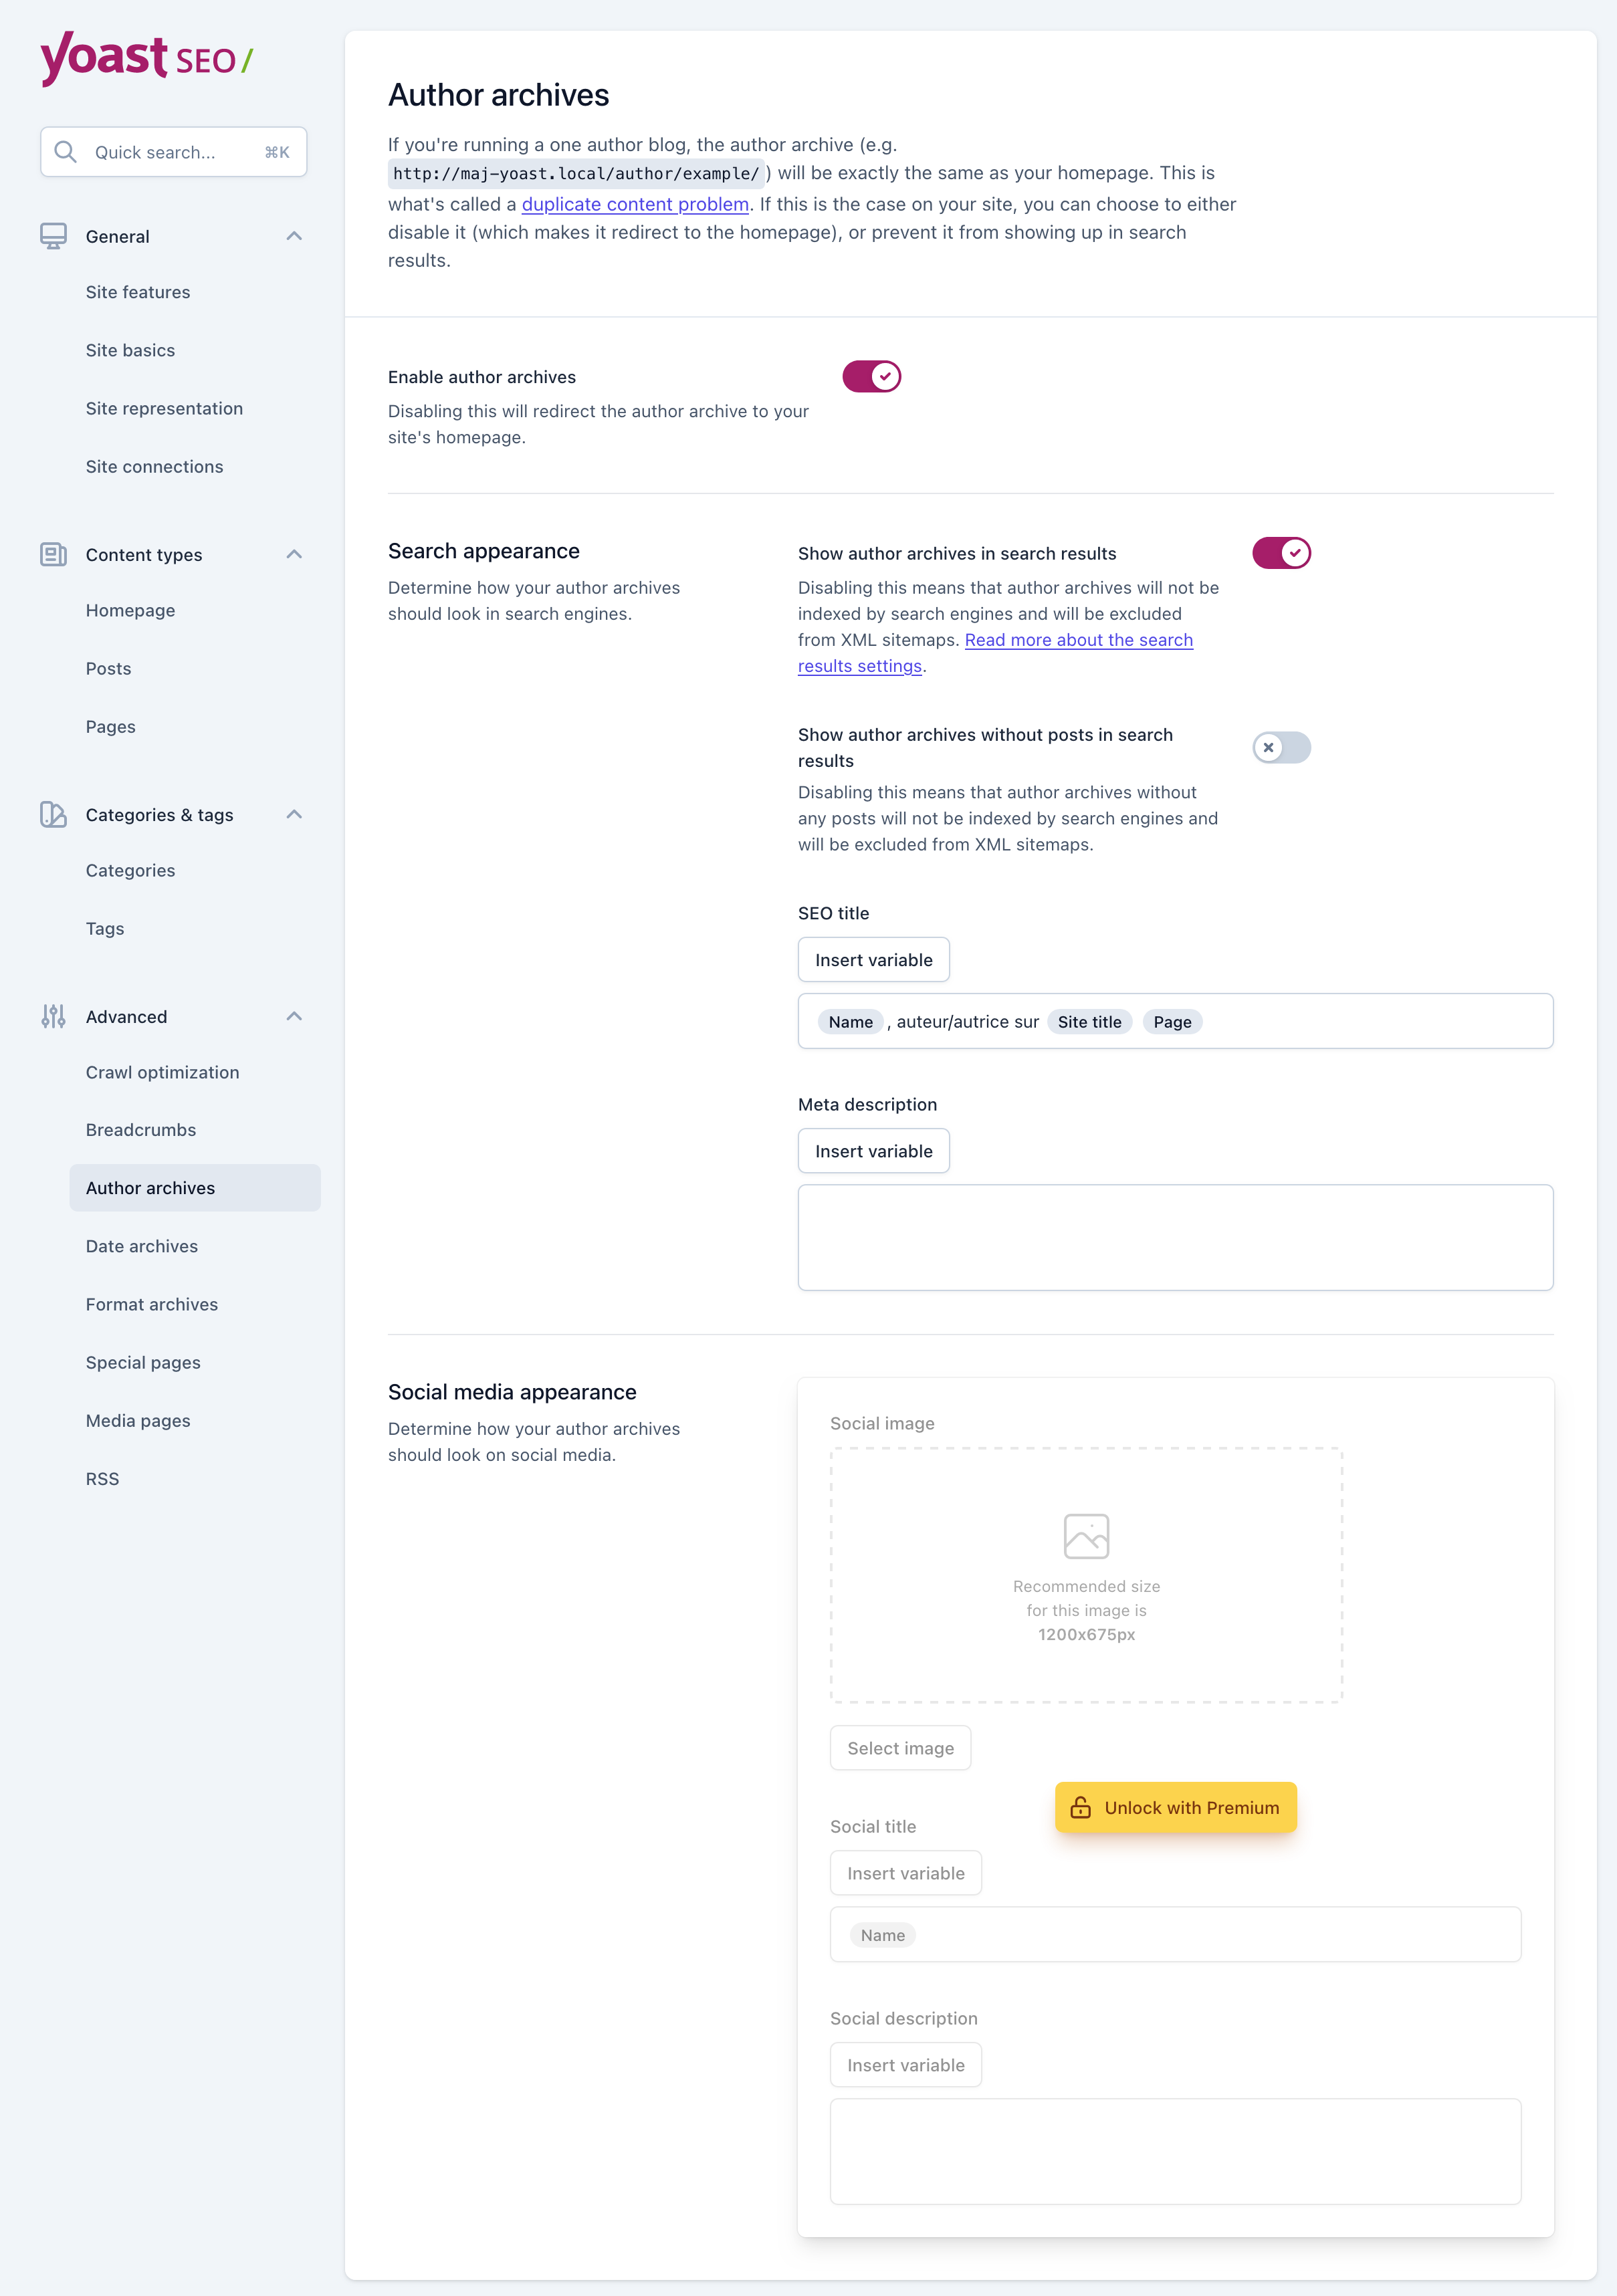
With regards to the Author archives settings, there are two possibilities:
- If you’re the only person writing on your website, you can select “Off” and “Disable author’s archives” because the content of this page would be identical to the one on your blog and could cause a risk of duplicate content (and thus penalize your SEO). In this case, filling in the title and description template would be useless.
- If there are several people writing on your site, the author pages can be useful to your visitors. You can therefore activate them.
In case you want to index them, remember to fill in the title and meta description templates using variables (you will get the list by clicking on “Insert variable”).
Similarly, it’s advisable to disable the Date and Format Archives for most sites, to avoid duplicate content.
Again, if for some reason you want to index these pages, fill in the title and meta description templates using Yoast SEO variables.
Lastly, the Social appearance box (premium option) allows you to set the default appearance for your archive pages on social media.
Special Pages
This tab allows you to choose the titles of internal search pages and 404 pages (when the requested page does not exist).
Here are some suggestions for your site:
- Search Pages: Search for – Search Phrase
- Pages 404: Error 404 – Separator – Site title
If you’re creative and your site doesn’t take itself too seriously, you could put a funny title on your 404 page like I did on WPMarmite (I’ll let you find out by yourself what I chose).
Media pages


It’s very important to leave the “Enable media pages” option on. Without that, you might find yourself with empty pages that don’t have a single image. That’s not interesting to you or your visitors, or to search engines, for that matter.
RSS
Yoast SEO allows you to make changes to the content of your website’s RSS feed. As a reminder, an RSS feed is a way to subscribe to a site to receive future posts through what is called an RSS feed reader (Feedly, for example).
It sometimes happens that the RSS feeds of a site are included without quoting the source, so it would be useful to automatically include a small signature to avoid this small inconvenience (it will even make you gain some links).
Here is what I added at the end of the WPMarmite RSS feed:
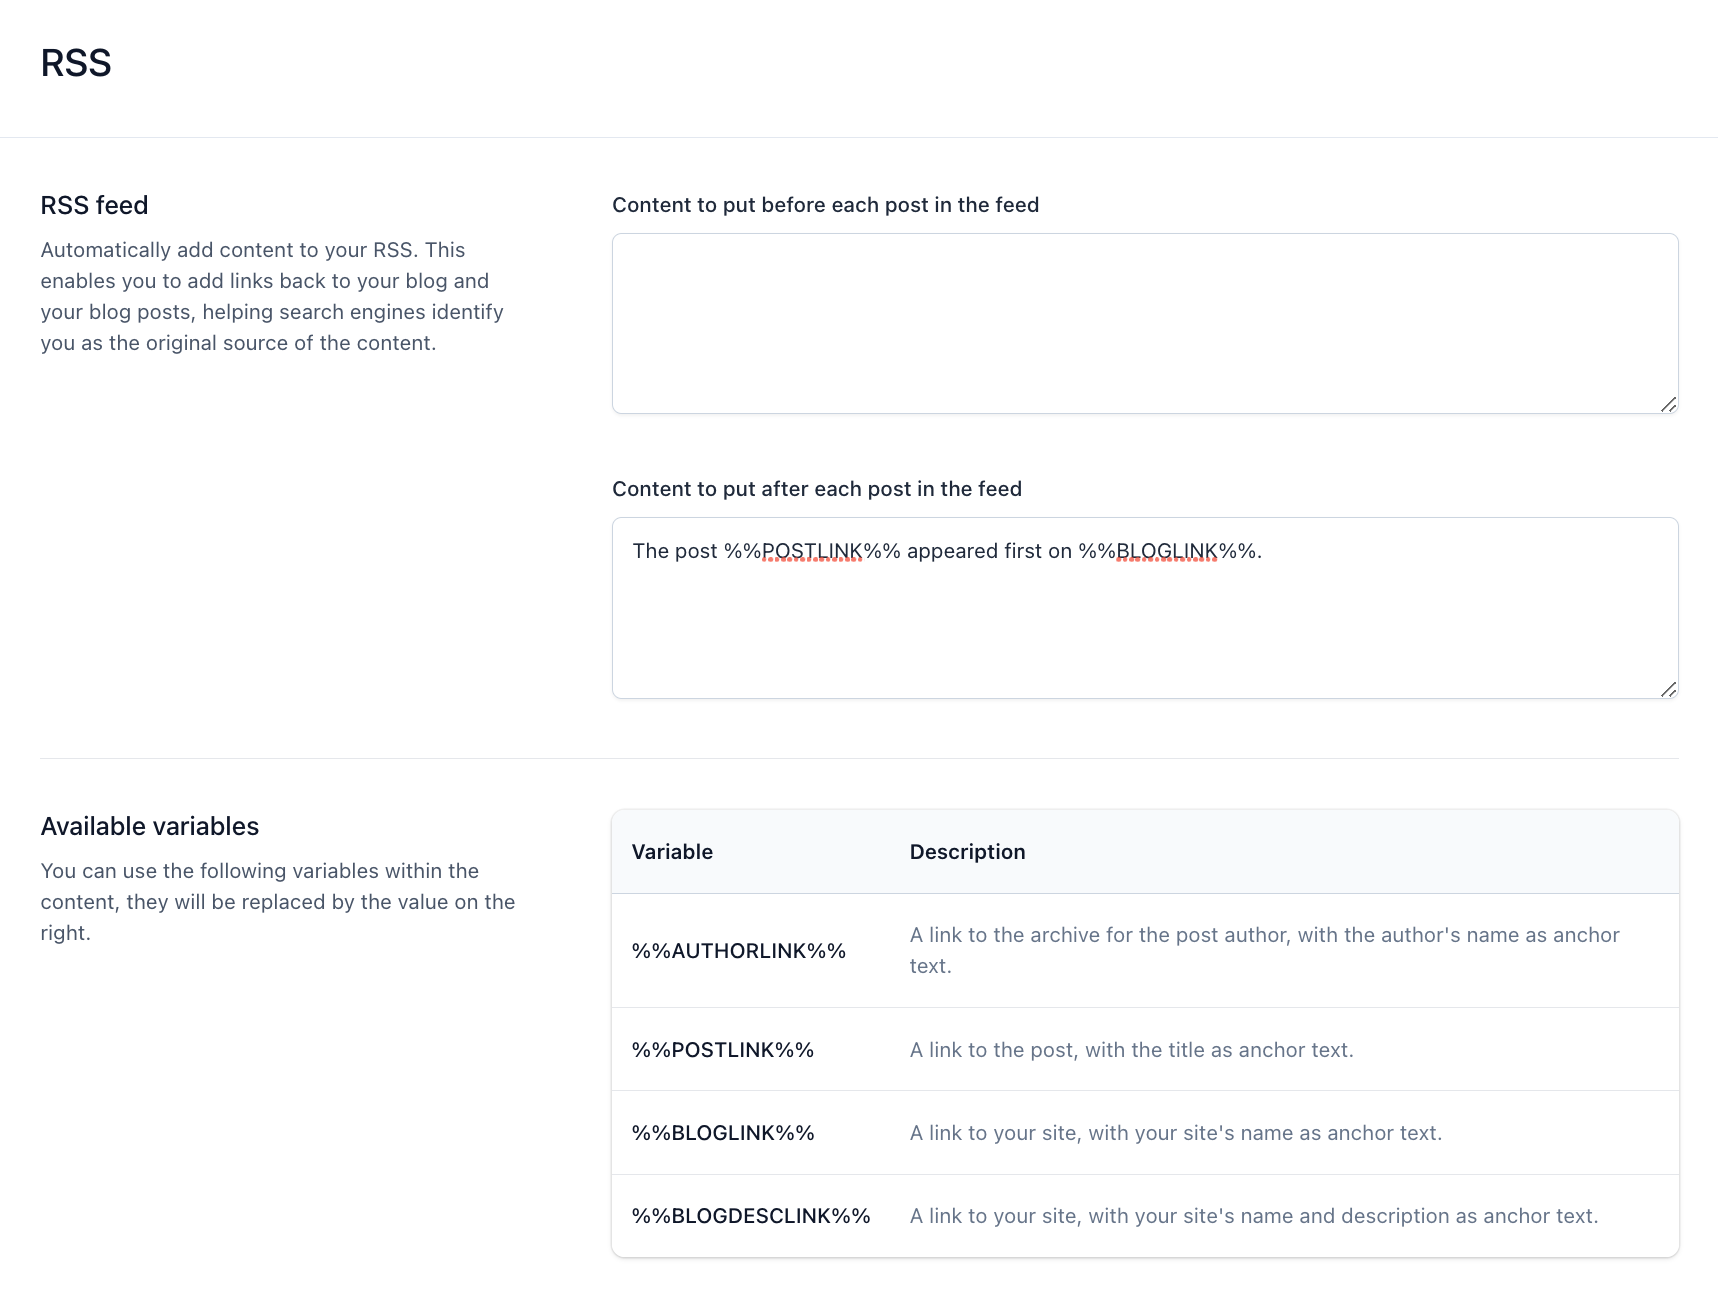
As with page titles, it’s possible to use variables to build the message of your choice. You can place text (and HTML code) before and after the content of your RSS feed, but you don’t have to do both.
In addition, be sure to display only the excerpt of the post in your RSS feed by going to Settings > Reading.
That’s all for the general “Settings” menu. Let’s move on to the next menu of options, dedicated to integrations with Yoast SEO.
Integrations
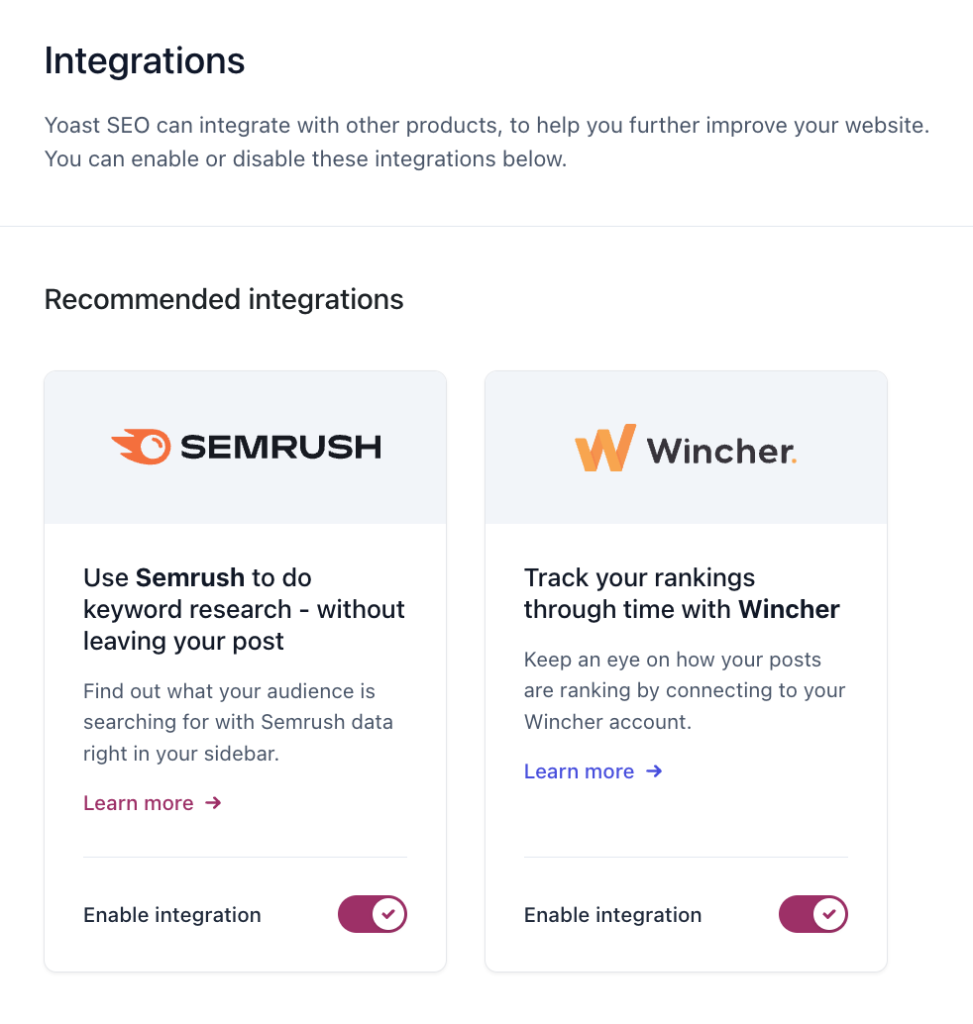
This tab allows you to enable/disable third-party tools that integrate with Yoast SEO.
The plugin offers different categories of integrations:
- Recommended integrations: Yoast suggests that you integrate SEO tools such as Semrush and Wincher (the latter allows you to track the position of your content in search engine results).
- Integrations with the Schema API: To include enriched results in Google through using plugins (the Events Calendar, WP Recipe Maker…) that integrate with Yoast’s Schema API.
- Integrations with plugins: To benefit from the features of certain famous plugins such as Elementor, ACF, Jetpack, Algolia, and WooCommerce.
- Other integrations: To activate integrations with WordProof and Mastodon (with Yoast Premium).
There are specific settings for each tool. For example, the SEO plugin indicates that “integration with Semrush adds suggestions and statistics for the words you choose for the focus keyword.”

Now let’s go to the next menu, which is…
Tools

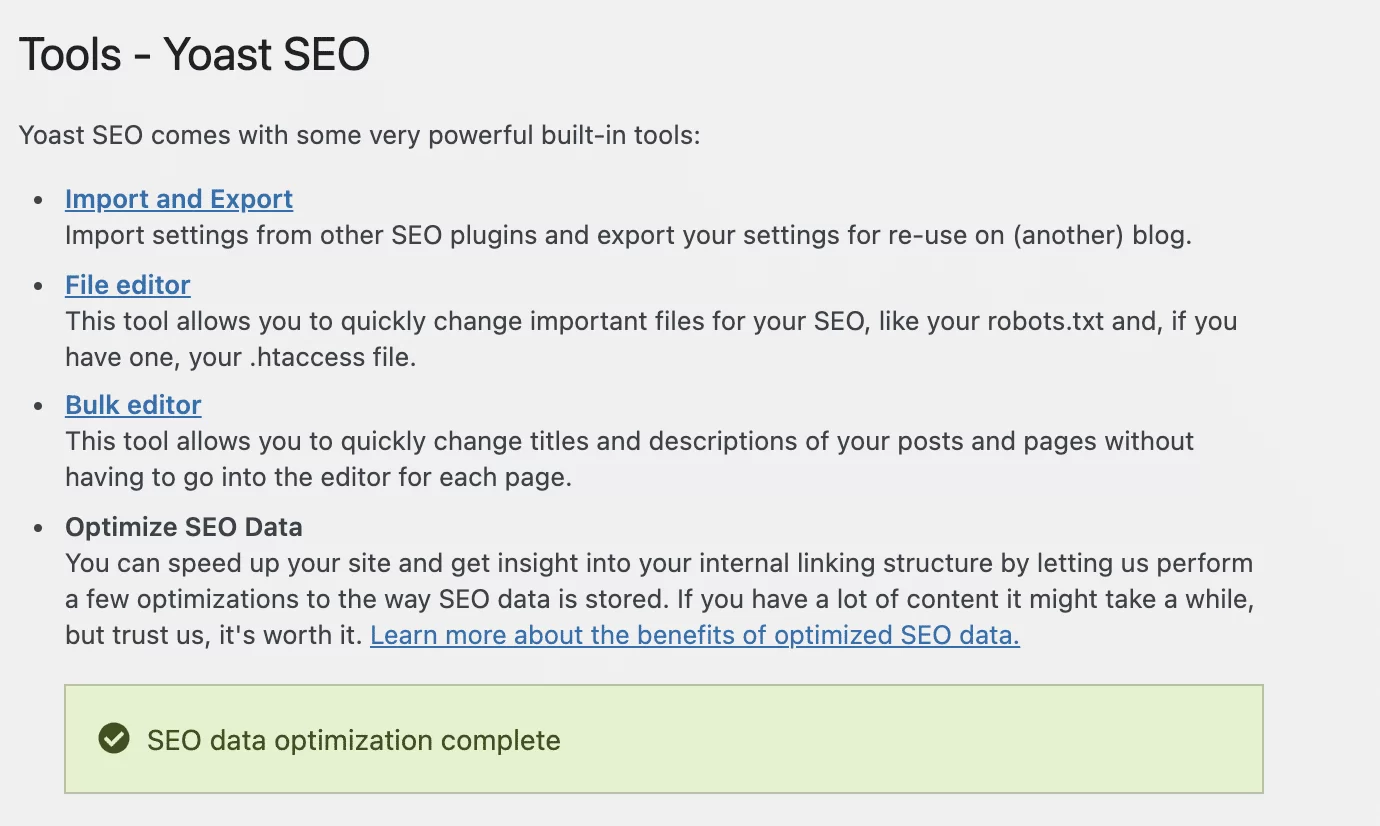
Three built-in tools are currently offered on the free version of our SEO plugin, the first being…
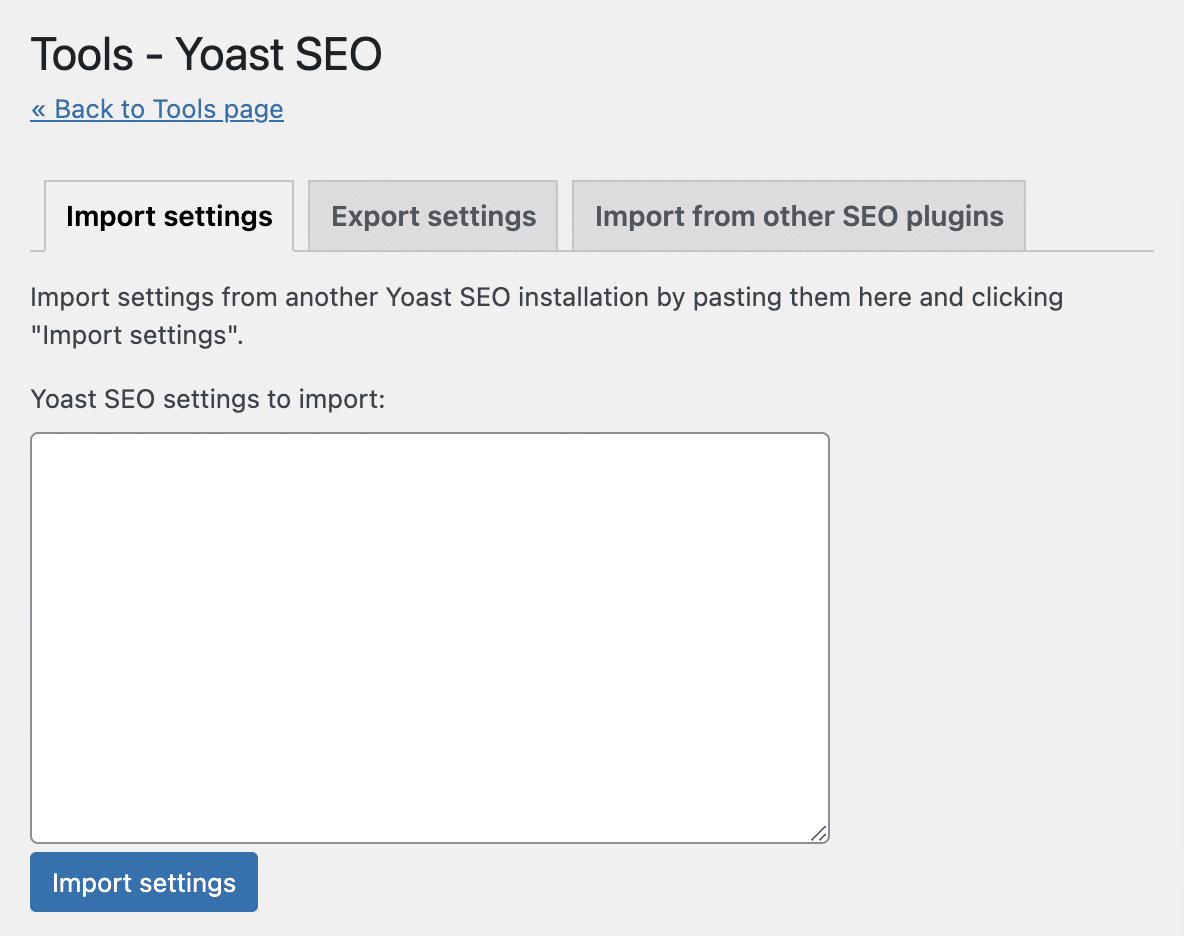
Import and export
This tool will only be useful in two cases:
- You’ve decided to choose the Yoast SEO plugin and you want to use the options defined in your old SEO plugin.
- You want to reuse the configuration of your website for another website or simply back it up.
If you’ve checked one of the two boxes above, you will have three tabs for the settings:
- Import settings: This tab will be useful if you have already exported the settings of Yoast SEO (for example from another site). Nothing too complicated here: you just have to select your file containing the settings to import, and click on the “Import settings” button.
- Export settings: This tab allows you to export the plugin settings for backup purposes, or to avoid redoing the whole configuration on another site. Keep your export file somewhere secure so that you don’t have to search for it when you need it. Ideally, send it to yourself via email or use a service like Dropbox to store it.
- Import from other SEO plugins: If you’ve decided to switch from another SEO plugin to Yoast SEO, you won’t have to redo the entire configuration. Yoast has planned for this, and allows you to import the settings from your previous plugin. Yoast SEO will automatically detect if you are using another plugin (e.g. Rank Math or SEOPress), and offer to import all data automatically if you are.

Let’s now discover the second tool offered by Yoast SEO.
The File editor
This tab enables you to create and edit your robots.txt file if you don’t have one and also to edit your .htaccess file, if it’s already configured on your server.
It’s possible that this file editor is missing on your Yoast SEO interface. This may be the case if a security plugin or a snippet prevents WordPress from editing files.

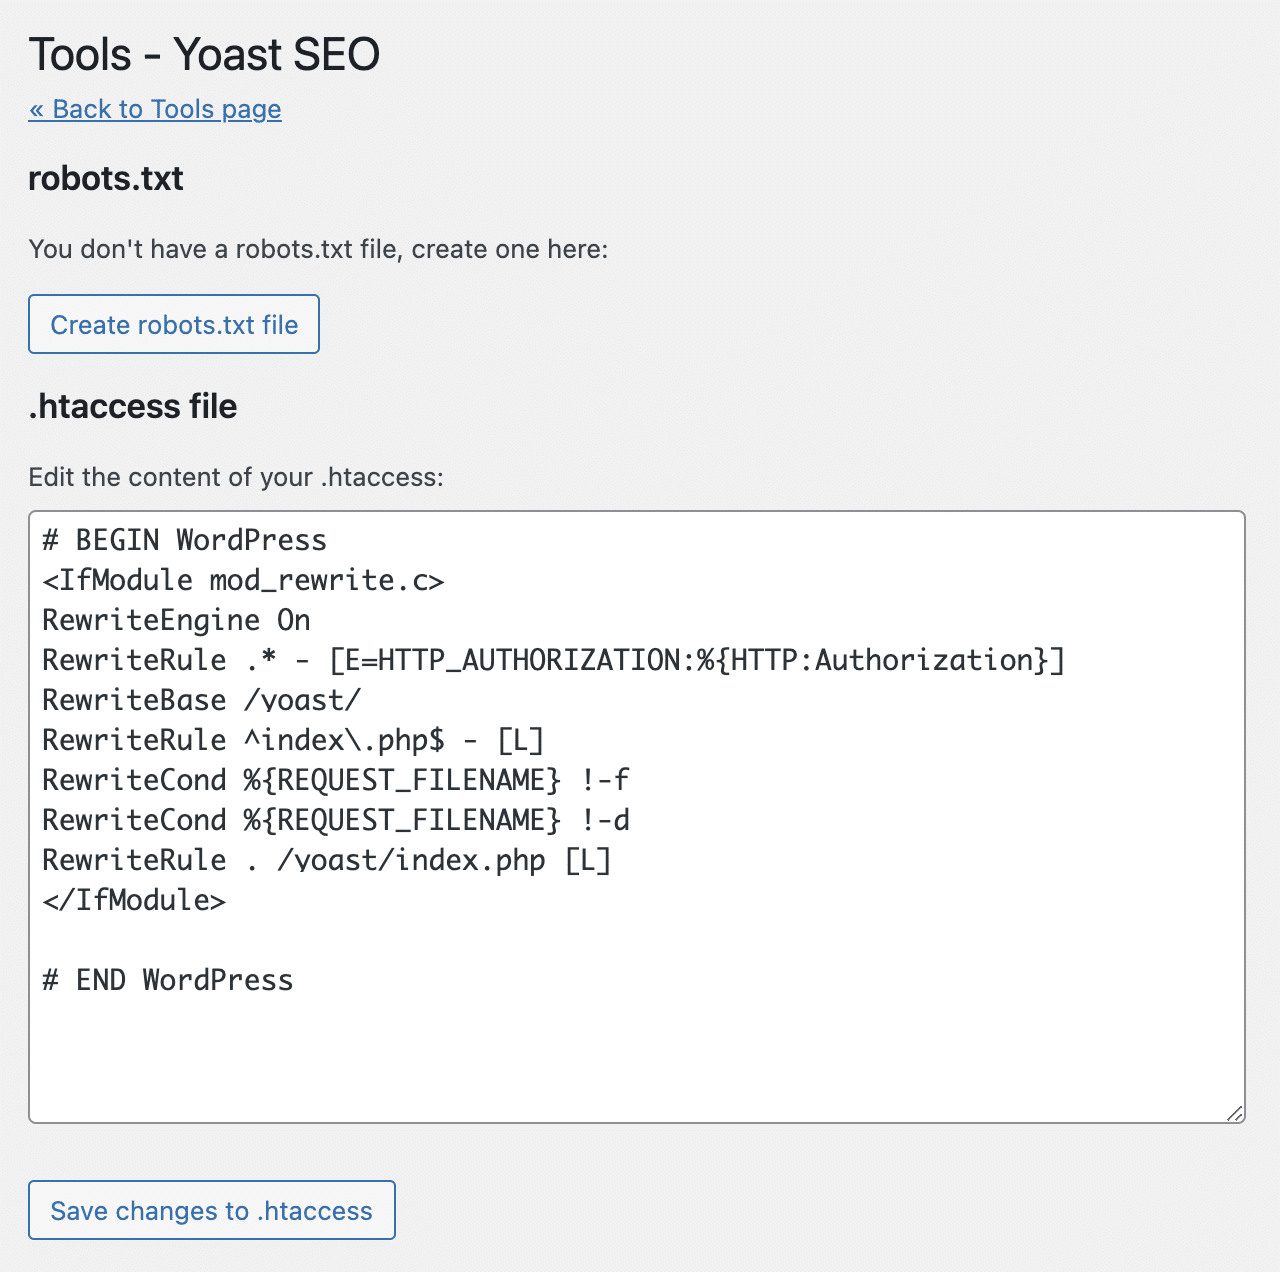
If you want to know more about these two files, you can read our posts about the .htaccess file and Robots.txt: How to optimize this file on a WordPress website.
The Bulk editor
Behind this barbaric name hides a very practical feature. It allows you to define a title, a description and other parameters for each publication.
What’s interesting with this Bulk editor is the possibility to quickly add or modify titles and descriptions of your content.
Here is what it looks like:

Your content is listed in the page, and the columns provide you with different information. Simply enter a new title in the penultimate column and click “Save” to save it.
If you add multiple titles, click “Save All” to save all of them at once.
Does your website have a lot of content? You can filter by item type by clicking on the drop-down menu “Show All Content Types” and by status (All, Published, Drafts, and Trash).
A second editor is available, enabling you to modify your contents’ descriptions in another tab.
This operation is similar to the title editor. See what I explained above to see how to use it.
Optimize SEO Data
This last option allows you to “speed up your site and get insight into your internal linking structure” by letting Yoast SEO “perform a few optimizations to the way SEO data is stored.” This works automatically.
Congratulations, you’ve just completed the setup phase of the free version of Yoast SEO! Now it’s time to optimize your publications.


How to optimize your content with Yoast SEO
Even if the plugin does a lot of things automatically (thanks to what we have seen throughout this post), it’s better to pamper your posts, pages, and other content.
To do this, I invite you to open an article in edit mode, and scroll down the page. Very quickly, you will come across the Yoast SEO meta box. In layman’s terms, this is the box in which you will optimize your content. Remember, we talked about this earlier. 🙂
This meta box contains 4 parts that we will go through in detail (there is also an addon that I use for videos but I won’t talk about it here):
- SEO
- Readability
- Schema
- Social
Psst! Although I already mentioned it above, a quick reminder: you can also access the Yoast SEO optimization features directly in your favorite page builder, Elementor. No need to leave the editing interface to access them: just go to the “Yoast SEO” tab in your page settings. Convenient!
SEO tab
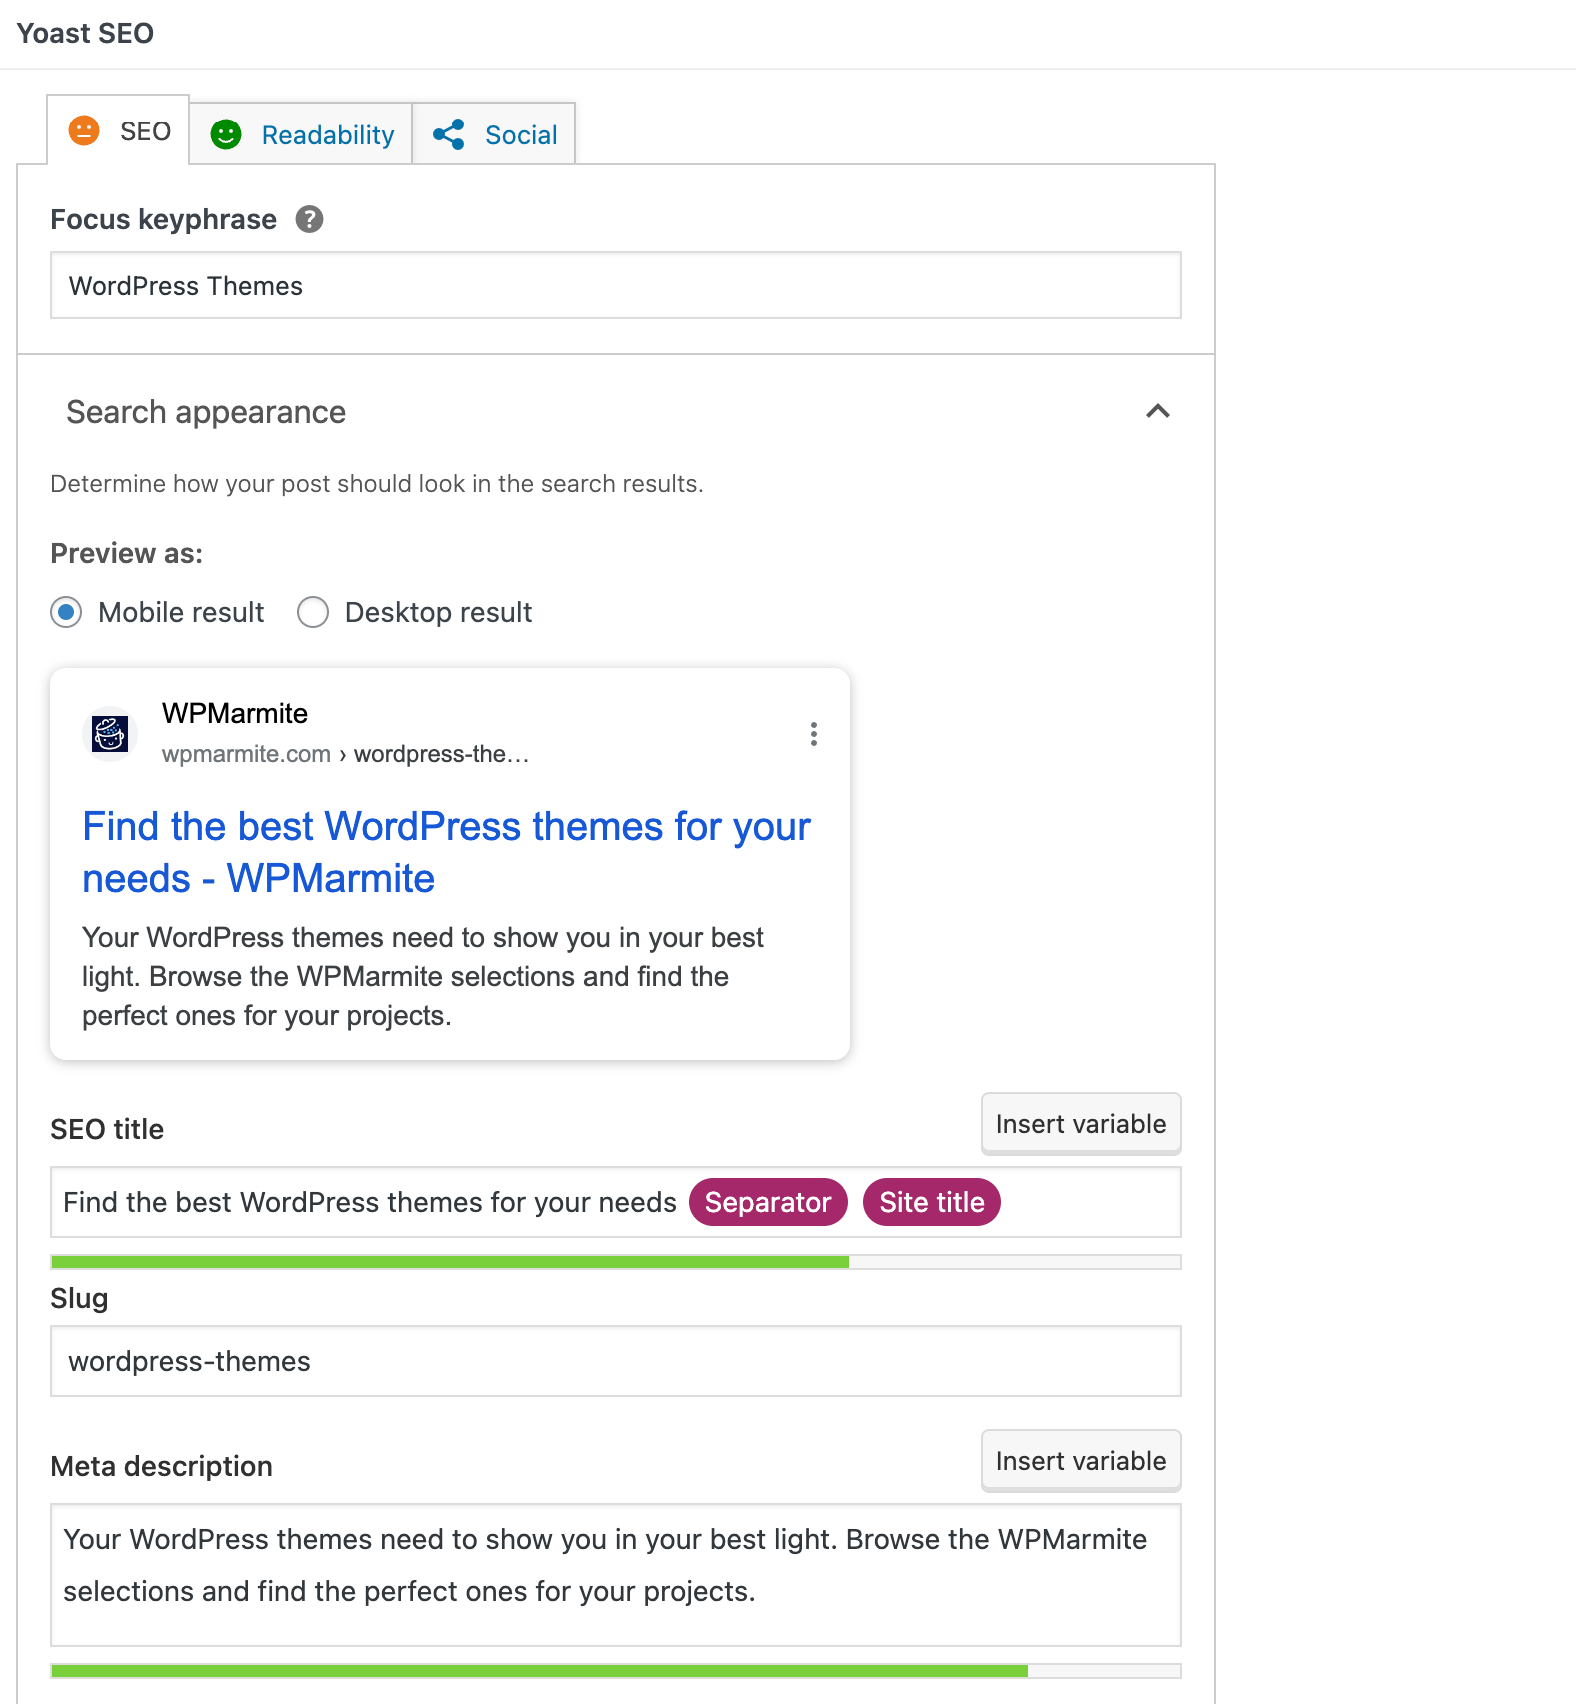
This tab will allow you to optimize your post so that it can try to rank as high as possible on search results pages. As an example, I took the Yoast SEO meta box from this post.
By default, we’re on the SEO tab:

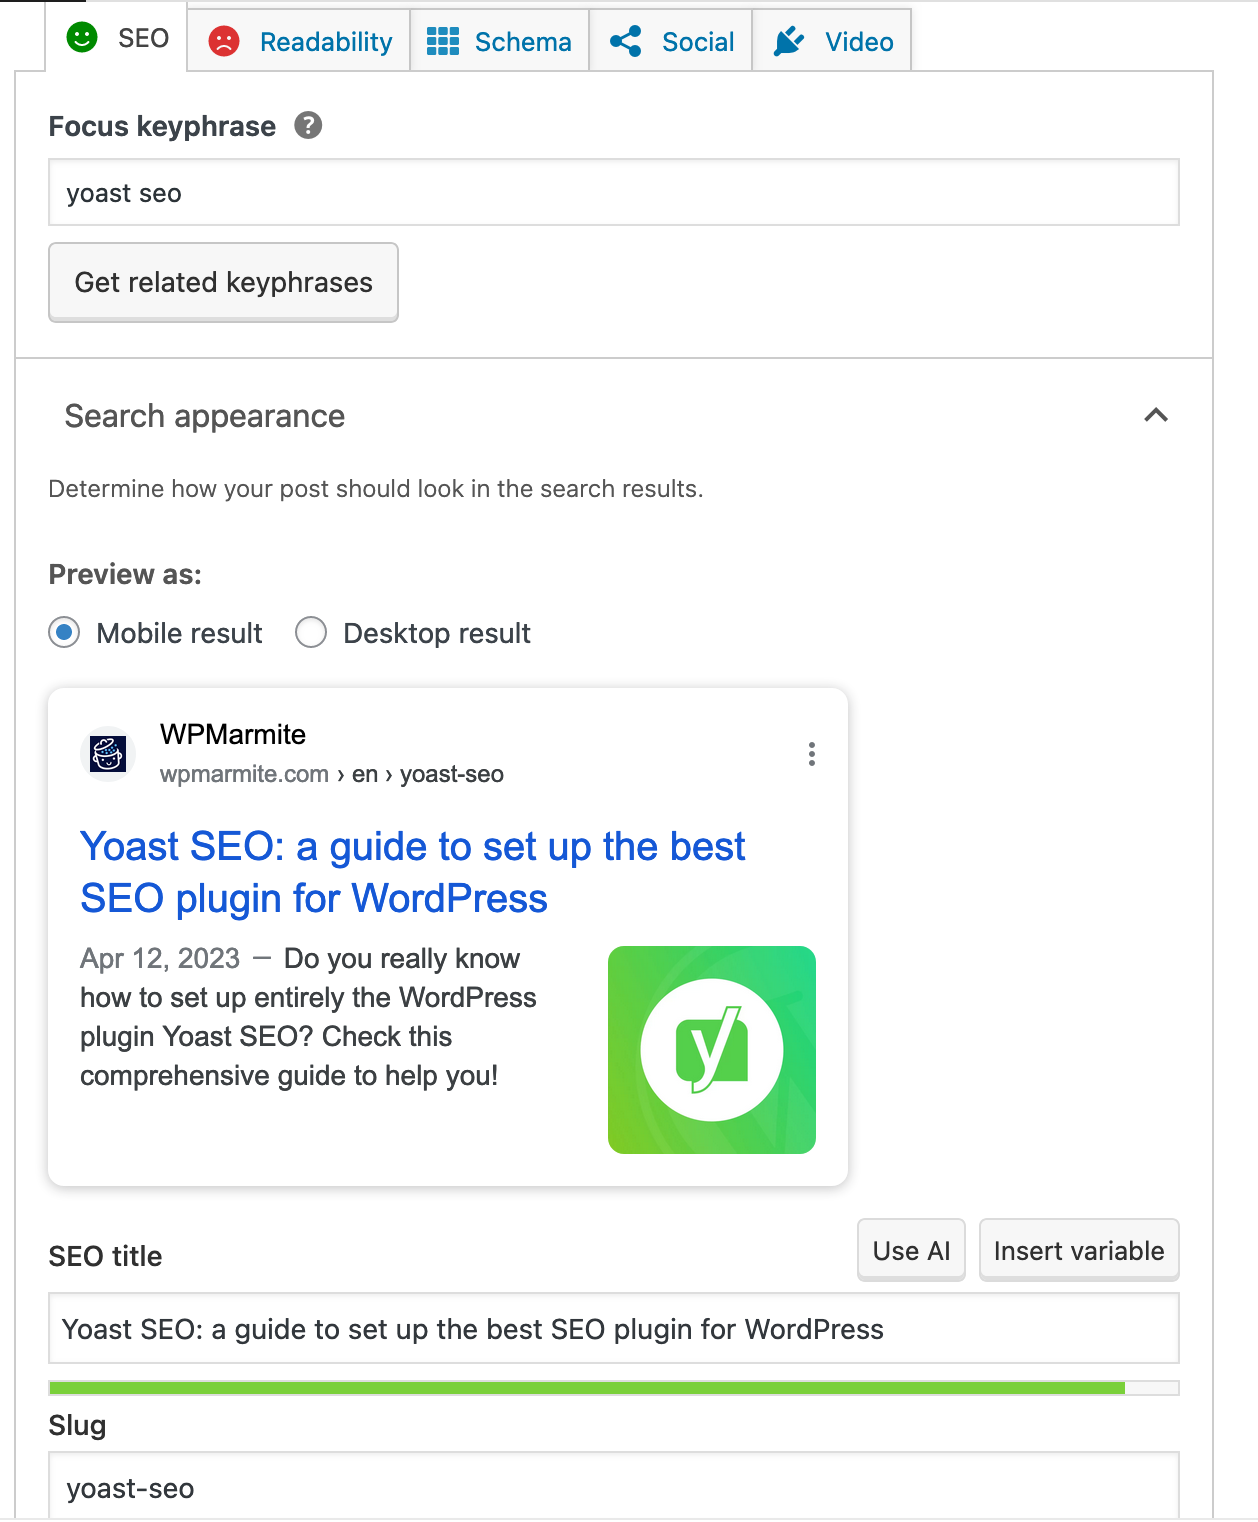
Focus keyphrase: This is the main keyword. Define here the keyword on which you want to rank. Depending on the optimization of your post, you will know what you need to improve with the signals below (under SEO analysis > Analysis results: Problems, Improvements, Good results).
Note that you can also get related keyphrases (click on the corresponding button), provided you have a Semrush account.
Using this tool, you can enrich the lexical range of your content, while trying to position yourself on keywords that are semantically close to your main query.
Search appearance: Gives you a preview of the Google search results of your post on mobile or desktop.
SEO title / Slug / Meta description: Each option has its own area to edit or modify it. You will have a live preview just above (under “Search appearance”).
You might notice the button “Use AI” on the screen capture below. This option allows you to automatically generate title and meta description tags, using artificial intelligence (a Yoast Premium account is required).


SEO analysis
The purpose of this section is to provide you with optimization tips for your publication.

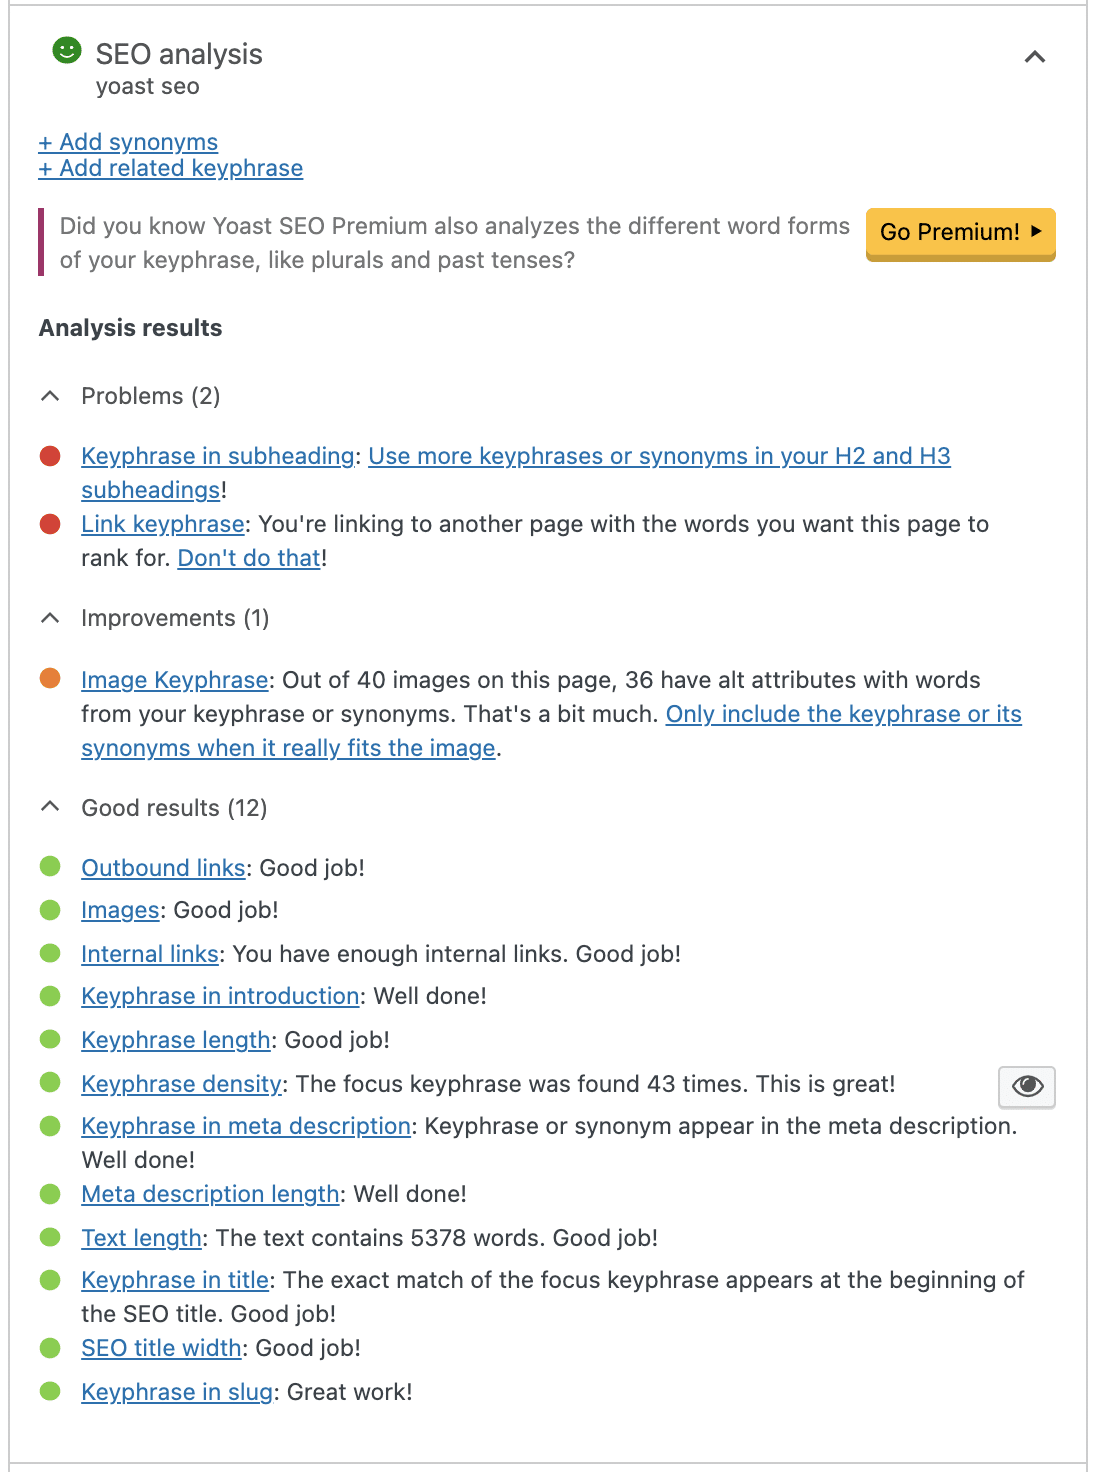
In the case of the screenshot, we can see that not all signals are green. This isn’t mandatory for your publications to rank well in search engines, though, so don’t try to have green lights everywhere!
Clearly, you shouldn’t become obsessed with them, but try to look at them regularly to improve your pages or articles.
The important thing is to write content that is USEFUL to users. Google isn’t going to favor your content just because you repeat a keyword 20 times in an article (on the contrary).
Be careful not to do anything to get in good with the search engines because the backlash can hurt.
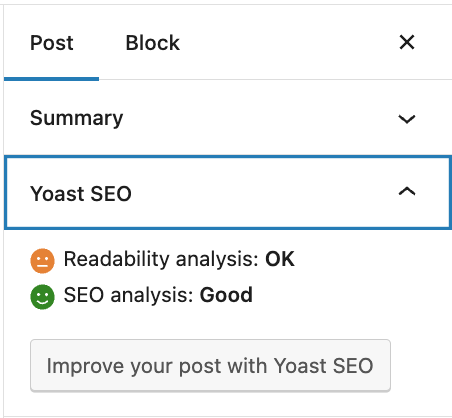
In the end, Yoast SEO calculates an overall score that will be displayed in the sidebar of your article settings, under the section “Yoast SEO,” just below “Status and visibility”:

Premium SEO analysis, + Add a variant, and Internal Link Suggestions sections
Under the “SEO Analysis” section, you have three additional sections offered by Yoast SEO Premium:
- SEO Premium Analysis: To check your text with even more SEO criteria and get an improved analysis of keyphrases.
- +Add a variant: To integrate keyphrases that are related to your main keyphrase.
- Internal Link Suggestions: For automatic suggestions on which content to link to internally.
Track SEO performance
In the next section, you can track the positions of the keyphrases of your publications in the search results.
For this, you have to connect Yoast SEO to the premium tool Wincher.
Cornerstone content
At Yoast, Cornerstone content consists of “the most important and extensive articles on your site.” Technically, this is similar to what is called a “cornerstone page” in marketing jargon.
A cornerstone article or page is optimized around a general, competitive keyword (e.g. wordpress seo) that covers everything important to know about a given topic (e.g. SEO on WordPress).
Aside from that, you have less lengthy and less in-depth content on that general topic (WordPress SEO), content that links back to your cornerstone article.
This allows search engines to understand that the most important article on the topic is your cornerstone content, and somehow increase your chances of ranking better in their results pages.
To help you in this endeavor, Yoast offers you to mark certain content as cornerstone, by enabling or disabling a simple option:

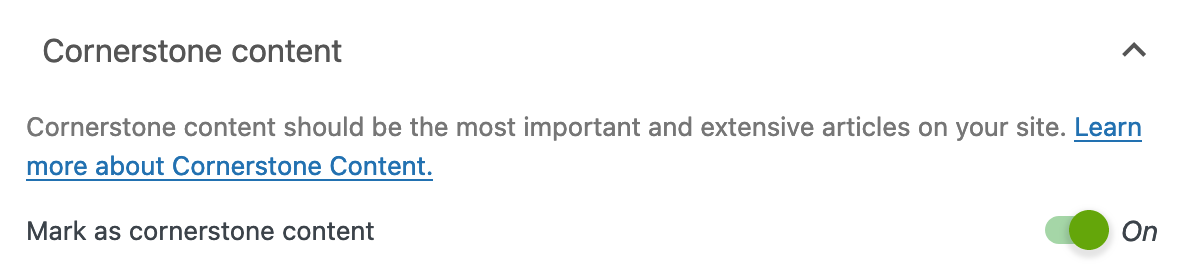
This option is very useful, but it requires a minimum of SEO knowledge to be able to analyze what your cornerstone content is, and to understand if you have been able to design an internal link structure around it.
If you’ve just started a blog with very few posts or you aren’t sure of yourself, don’t activate this option.
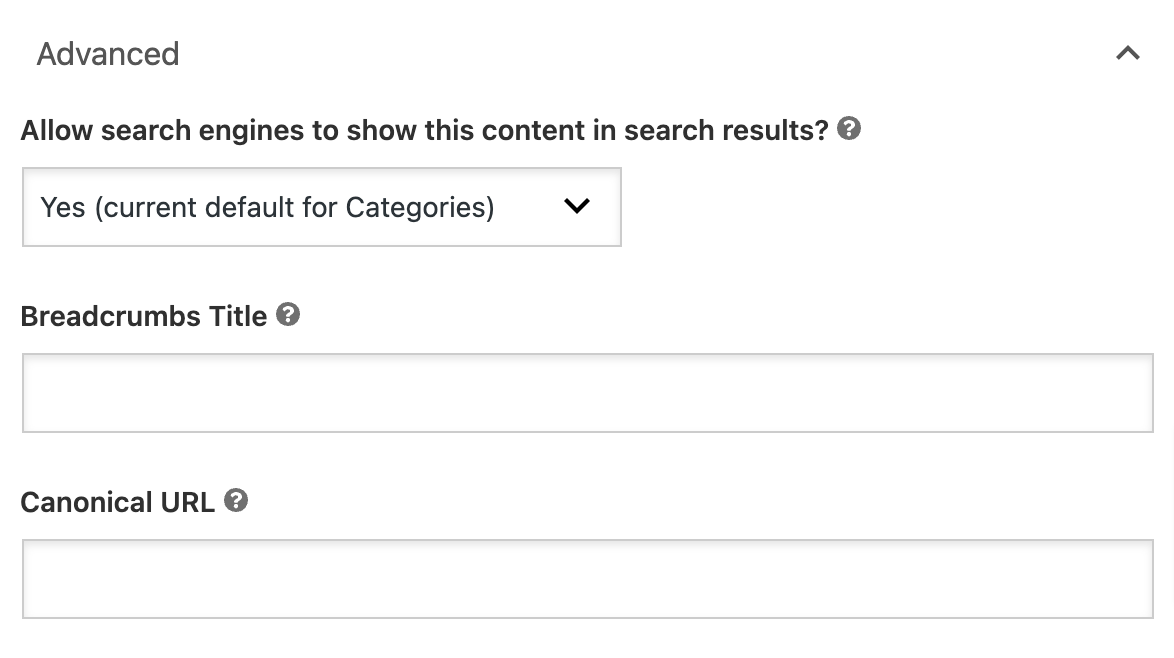
Advanced
Before changing anything in this “Advanced” section, I advise you to understand the role of each of the proposed options. It would be a shame to damage your site after all the work you’ve done.

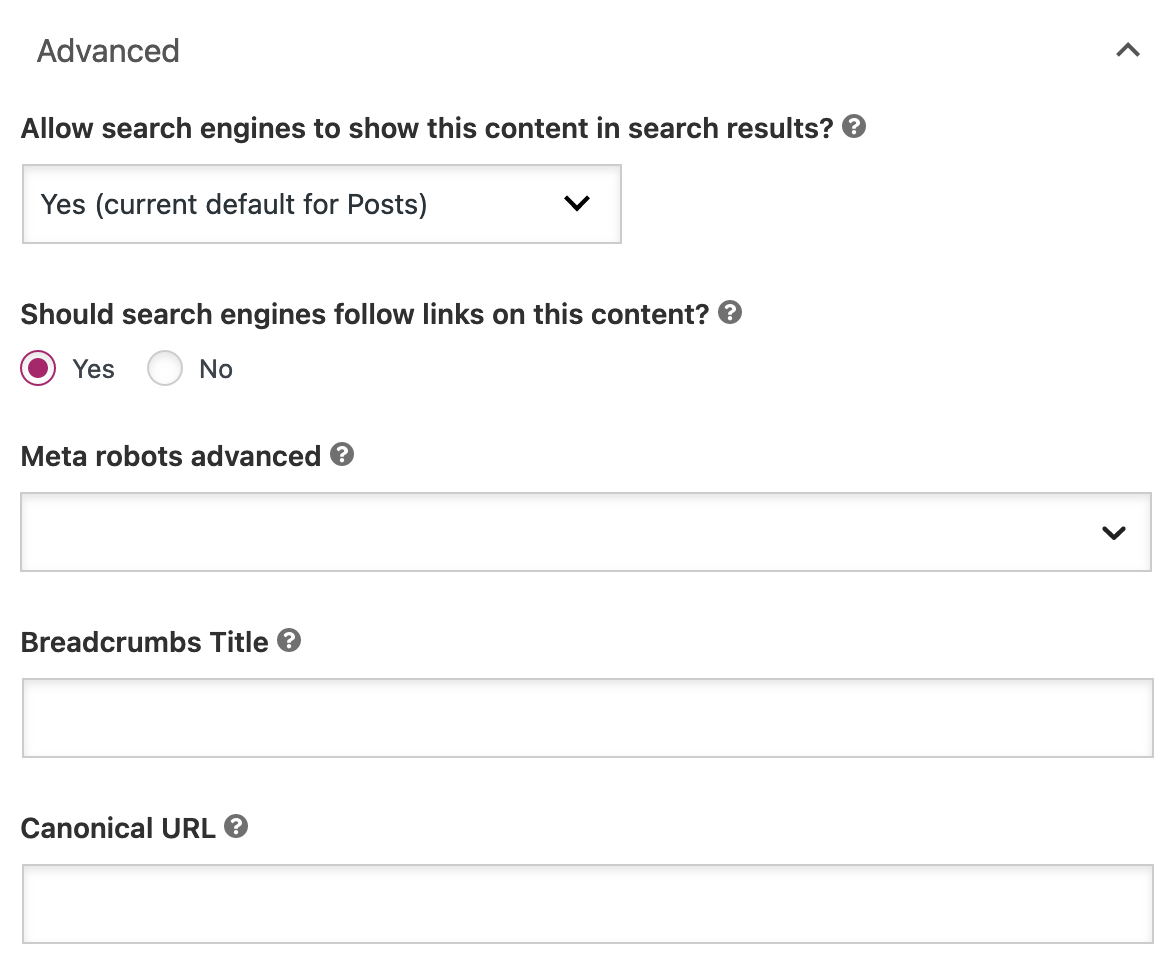
Let’s detail the options you have access to here:
- Allow search engines to show this content in search results: Always leave the default values here, so that your content is always indexed.
- Should search engines follow links on this content: This option allows you to show the internal links between your different contents to search engines. Always leave it on “Yes,” unless you list a large number of websites of little interest to you on one page.
- Meta robots advanced: In most cases, leave the default setting (unless you are sure you do not want to index a category, tag, or other taxonomy).
- Breadcrumbs title: Rename this one if necessary. More info here.
- Canonical URL: A canonical URL is the official URL of a page. This is made to limit the number of duplicate content. Do not fill in this field in order to use the URL generated by WordPress.
Stats
In this section, you can see which words appear most frequently in your content and make sure they fit with your keyphrase (Yoast Premium is required).
Readability tab
The Readability tab gives you real-time writing and layout tips to make your content the best it can be.

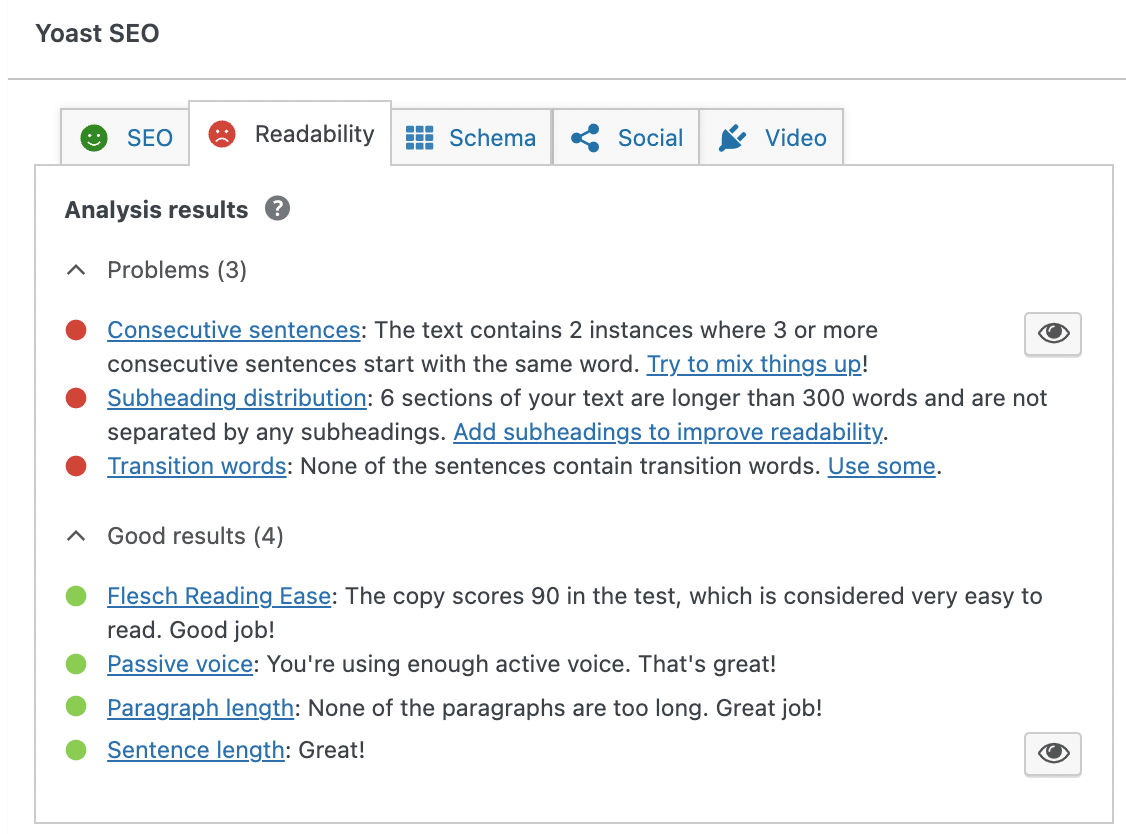
However, don’t always take this into account, as not all the recommended optimizations are necessarily doable.
You’ll get an assortment of recommendations about:
- Use of passive and active voice
- Paragraph length
- The alignment of your text: using left align rather than centered will improve the readability, for example.
- Use of transition words
- Etc.
Schema tab
Having installed Yoast SEO, this plugin automatically provides a number of useful information to Google to enable it to properly identify and understand your website and its content.
However, you may want to provide even more details and that’s where the Schema tab comes in.

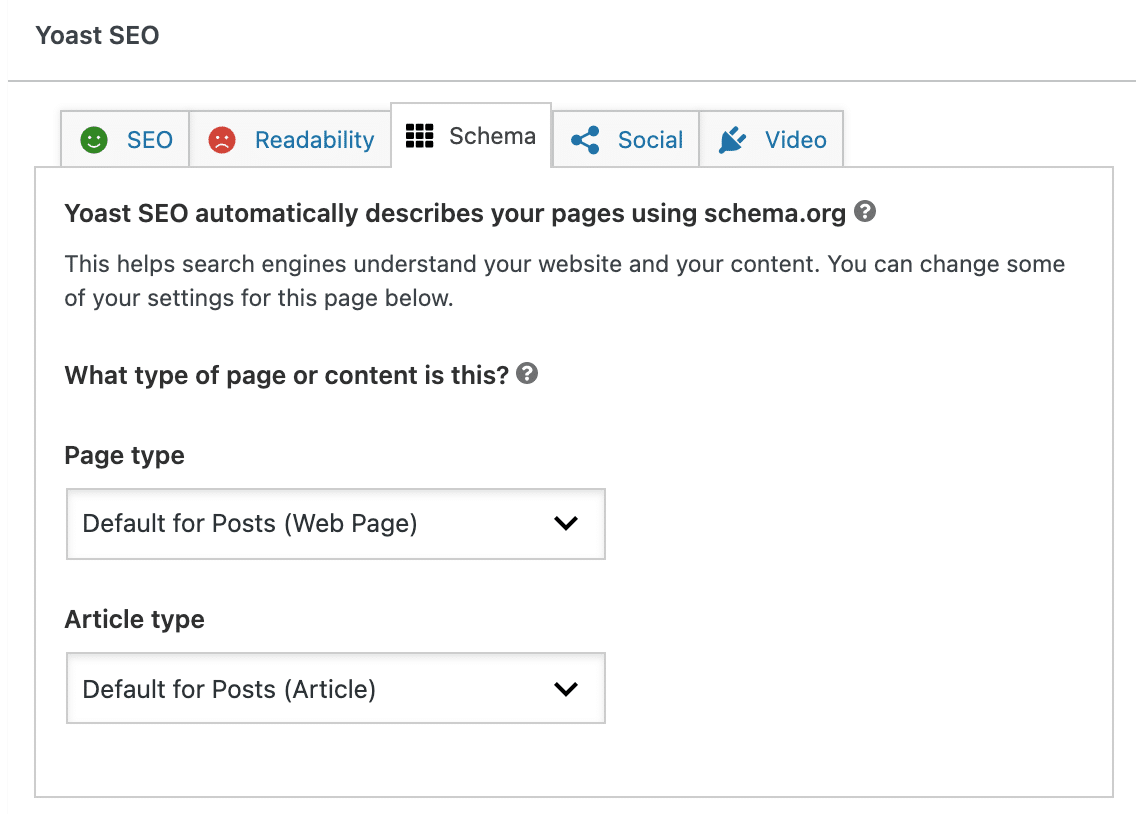
With this option, you decide to give specific information (to Google and any search engine) about the content of your website.
However, these settings will not optimize your posts as well as they could.
This is a first step but if you want Google to retrieve your ratings, prices, or stock, a rich snippets plugin will be necessary.

Social tab
The options in this tab will enable you to go even further in customizing your post for social media (Facebook, X, Instagram, WhatsApp, Threads, LinkedIn, Slack, etc.):

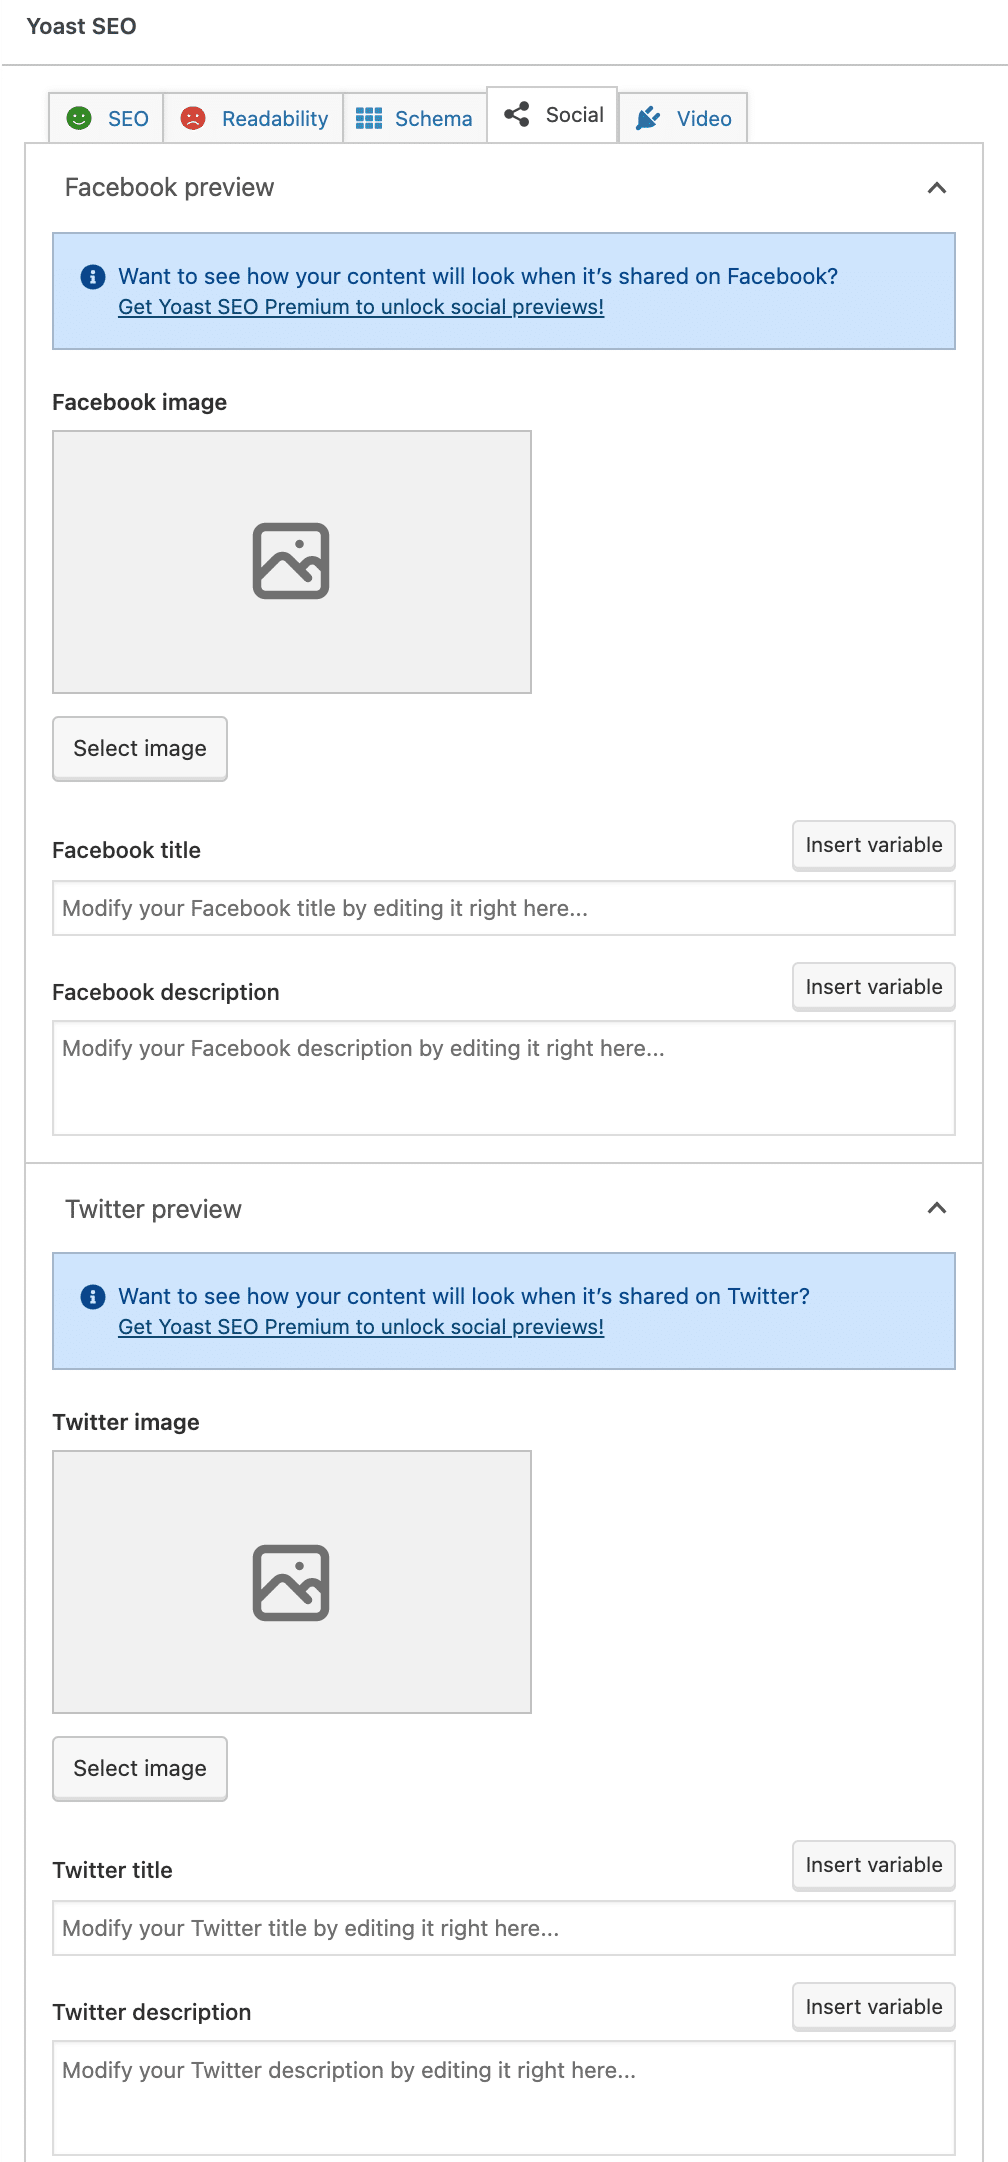
Two sections are available to customize the appearance of your Facebook and X (formerly Twitter) posts. You can define:
- An image representing the post
- A title different from the title defined in the general tab
- A different description from the default meta description
Good luck if you customize everything for each post (this is of course not mandatory, as Yoast will rely on the default settings previously defined in case of no settings)!
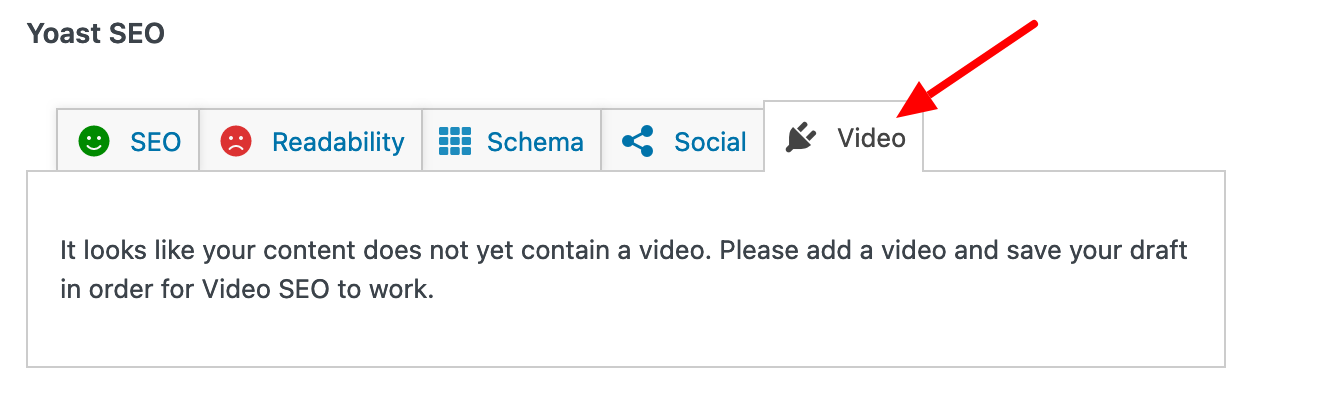
Add-ons tab
This tab allows you to set up some of Yoast’s premium add-ons. For example, WPMarmite uses the Video Addon to optimize the pages that contain some (which is not the case in this post).

Use the meta box for all your content
You now know a little more about how the Yoast SEO meta box works. You will find it under all posts, pages, and other types of content for which you have defined it.
With a good optimization, your content will be ready to rank on search engines. 🙂
Before we say three words about the premium version of Yoast, we still need to review the latest options of the free version of Yoast SEO, just below.
What settings should you use for categories and tags?
If your website uses categories and tags, you can optimize the pages that display them. To do this, go to the edit page of a category or tag.
SEO tab of the category settings

Focus keyphrase: As for your posts, indicate here the keyword for which the category, tag or taxonomy should be ranked.
SEO title / Slug / Meta description: As for posts, define here a title and meta description that will be used instead of the default values specified in the “Content Types” tab of the “SEO Settings” section of the general options of Yoast.
Category Readability tab
Here you will find tips on how to optimize your page. Be careful, not everything is always relevant!
As for the meta-boxes of posts, a “Readability” tab is available to help you optimize everything. As usual, don’t focus solely on this, but give relevant information to your visitors and search engines.
Social media tab of the category settings
At this point, I don’t think it’s useful to explain again what this last tab is for. 😉
Once you have done this work for one category, move on to the next one, until the last one. I hope you don’t have too many!
Then do the same for your tags. And yes, I know this will likely take you quite a long time.
As a general rule, you will only have to write a title and a meta description per term (or even a breadcrumbs title but nothing more). Leave the default settings in other cases.
Advanced Tab
As with traditional posts, it is possible to go further in the configuration of taxonomy pages:

Allow search engines to show this content in search results? Always leave the default values here so that your content is always ranked.
Breadcrumbs title: Rename this taxonomy in the breadcrumb trail if necessary.
Canonical URL: Official URL of the taxonomy page. It’s recommended not to insert anything here.
Congratulations! The optimization of your publications and taxonomies is complete. Before concluding and recapitulating everything you have discovered in this article, I also wanted to quickly show you what Yoast offers in its premium version, so that you have a global vision of the options offered by the SEO plugin.
Yoast SEO Premium: what are the features?
If the free version of Yoast gives you access to a wide range of tools, it is possible to push the optimization even further by getting one of the paid tools of Yoast. And for that, you have several possibilities.
The Yoast SEO Premium plugin


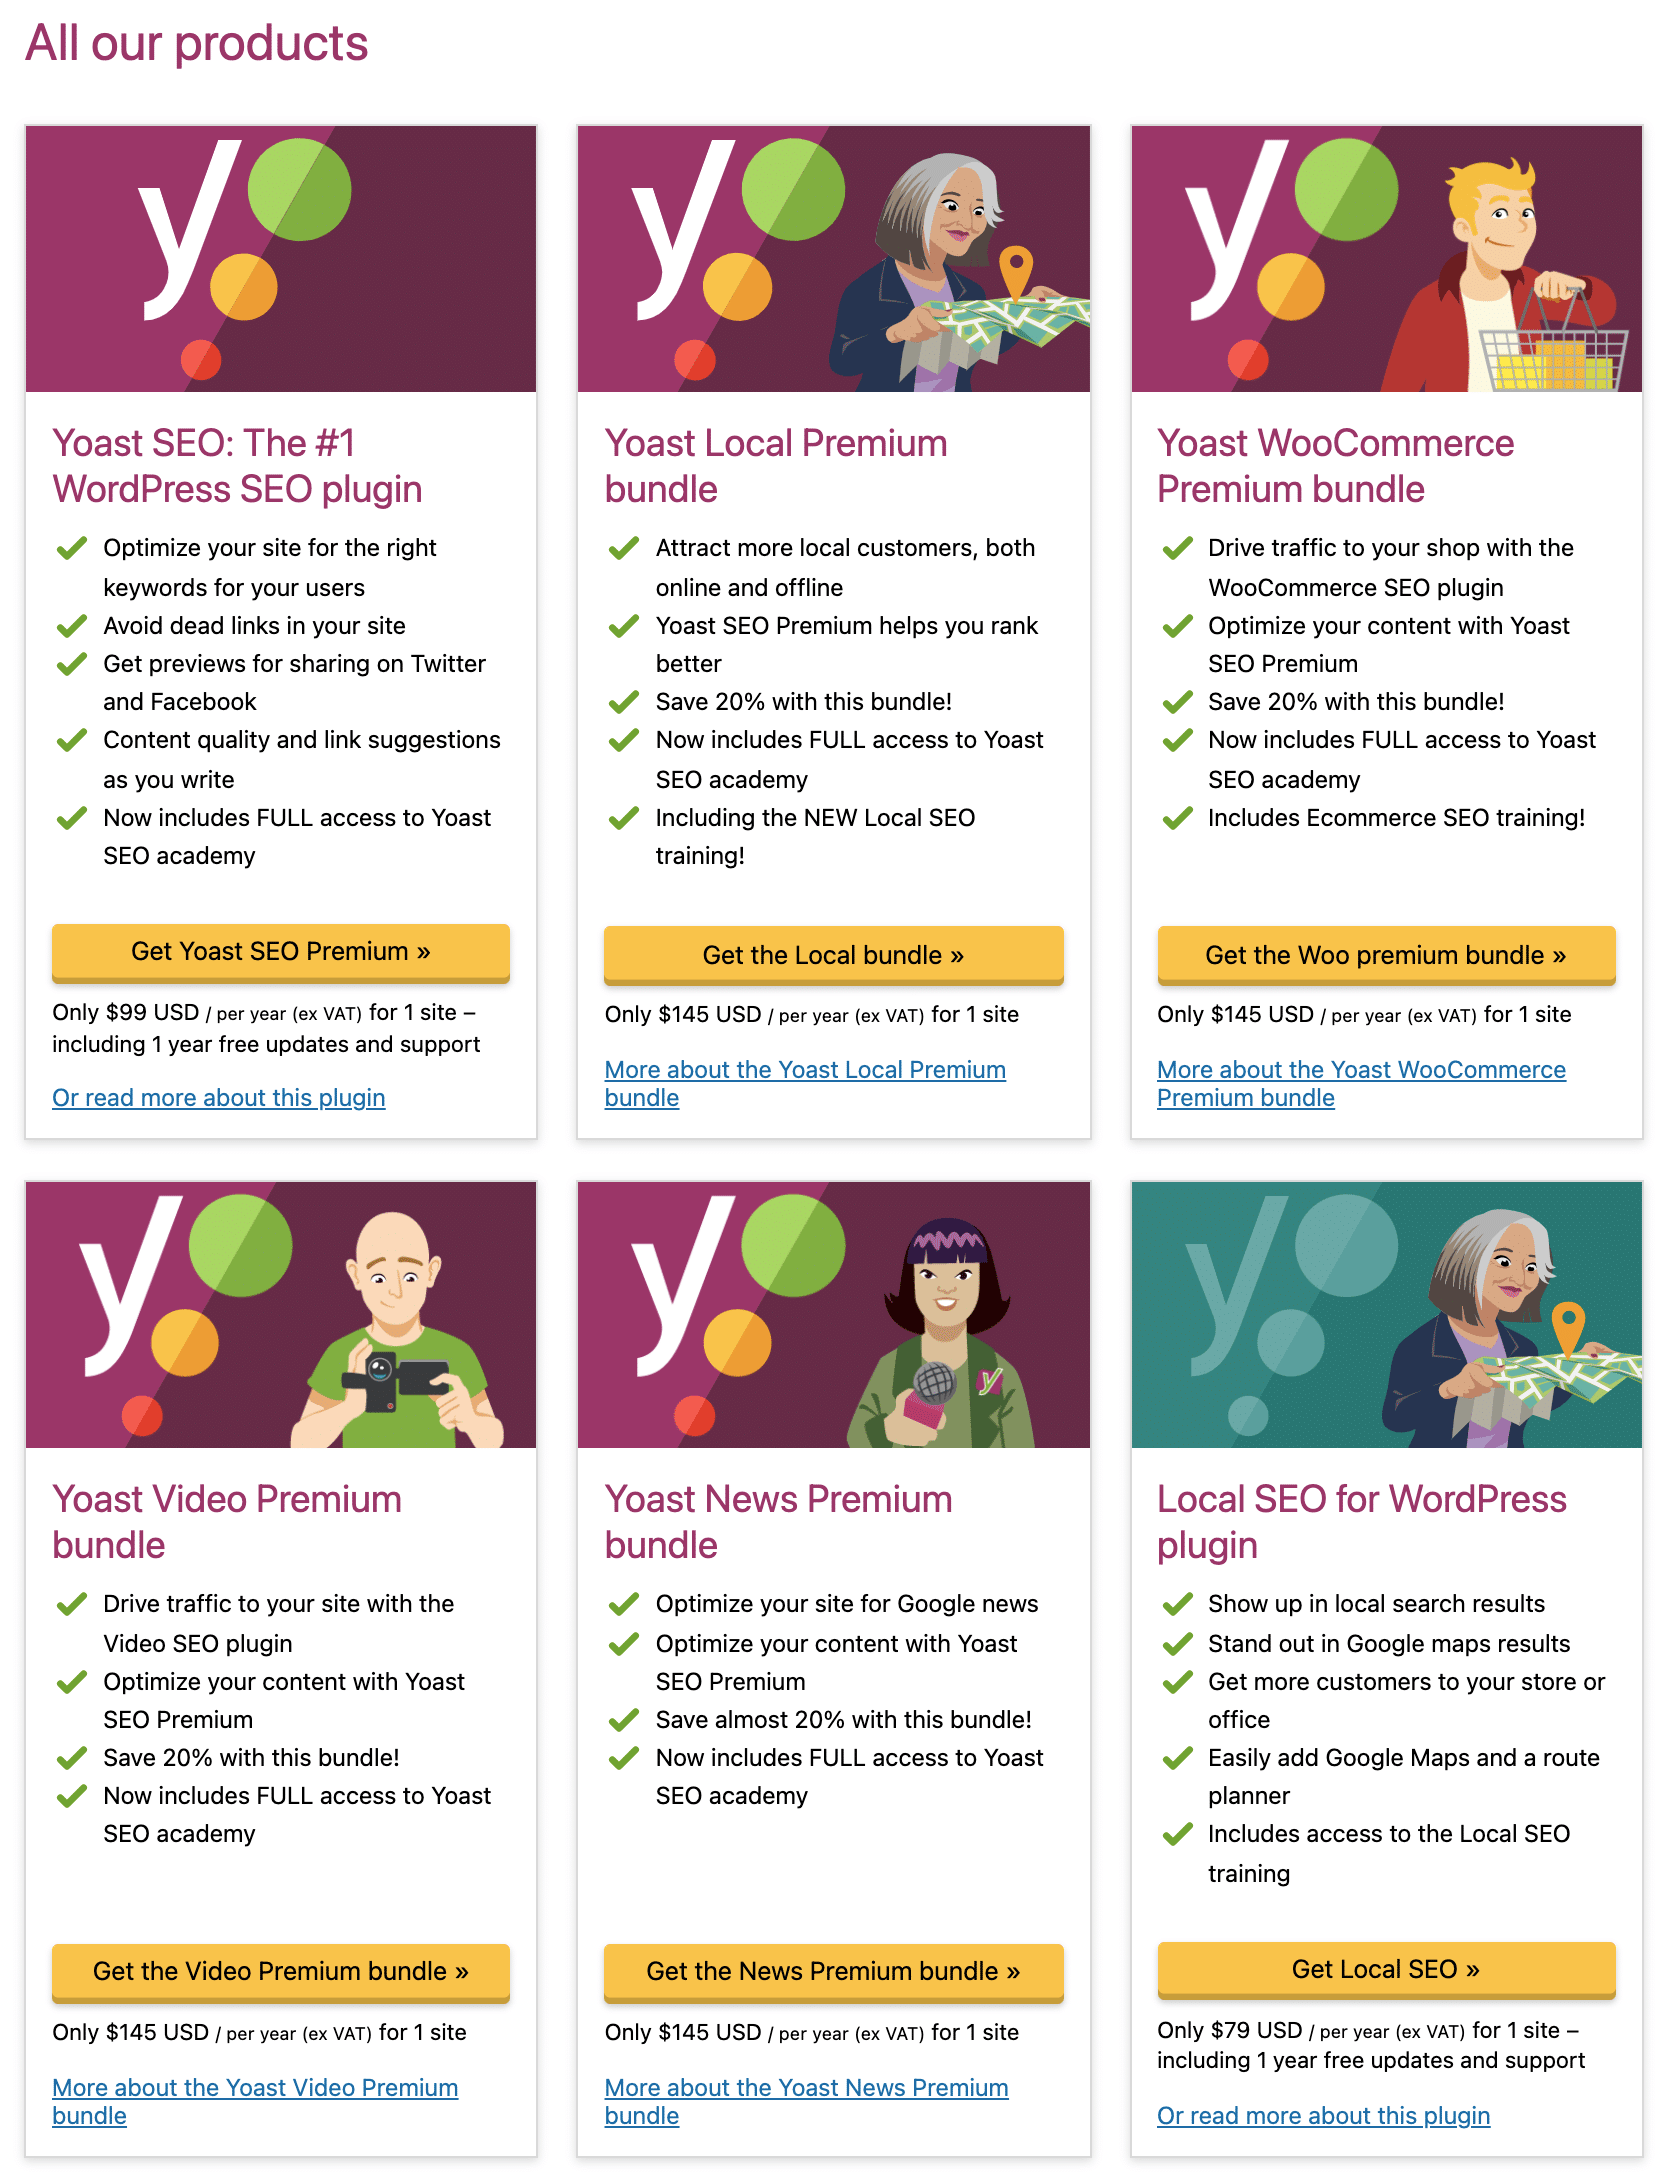
First, you can purchase the Yoast SEO premium plugin, for a fee of $99/year (excl. VAT) (email support and updates included).
Compared to the free version, it gives access to several additional features, such as:
- An automatic redirection manager to avoid dead links and 404 pages.
- A tool to strengthen your internal links (with suggestions, for example), or an orphan content detector (content that has no internal links pointing to it).
- A content analysis tool even more advanced than in the free version.
- The possibility to add variations and synonyms of your main keyword to get close semantic suggestions and integrate them into your content.
- Preview of your publications on Facebook and Twitter.
- The automatic generation of title and meta description tags using artificial intelligence (AI).
- Access to all the Yoast Academy training courses, with a dozen courses related to SEO, and more or less technical (ecommerce SEO, SEO copywriting, local SEO, international SEO, etc.).
As Yoast details, its premium plugin makes certain strategic tasks “easier,” with the aim of saving you time.
That’s it for the first part of the premium SEO plugin’s offer. In addition to this, you can also purchase individual plugins for specific purposes.
Yoast’s 4 targeted premium plugins
Yoast also offers four paid plugins, each sold at $79/year (excl. VAT), for use on 1 site:
- Video SEO: To improve the SEO of your videos on Google.
- Local SEO: To work and optimize your local SEO.
- News SEO: To try to get the first positions on Google News.
- Yoast WooCommerce SEO: To improve the SEO of your e-commerce store and its products.
Moreover, Yoast offers a Bundle for each of these four plugins. If you buy one of them with the Yoast Premium plugin, it will cost you $145/year (excl. VAT).
Finally, the most advantageous offer if you want to buy all the premium products of Yoast is its global offer, called “Plugin subscription” ($229/year excl. VAT).

Our final review of Yoast SEO
This time, it’s over. Yes, yes, I assure you: you have completed your tour of the Yoast SEO plugin. It took a long time, but it was necessary for your article to make it to the Internet.
Yoast is an excellent plugin that I recommend to anyone (from beginner to advanced) who wants to optimize the SEO of their WordPress site. In the vast majority of cases, its free version will be more than enough to perform SEO optimizations on your site.
Download the Yoast SEO plugin:
Throughout this tough guide, you’ve discovered in detail:
- How to configure the plugin settings.
- How to optimize your content with Yoast (posts, pages, categories, and tags).
- What Yoast Premium offers.
Now you are ready to make your content appear in the search engine results pages.
However, I would like to remind you of one important thing: Yoast is not a miracle solution that will help you appear in the first position on the keywords you are targeting.
It is above all a valuable assistance tool that will be a great ally to optimize your content, and will prevent you from making mistakes — provided that you know how to set it up, but with everything I just explained, it should be fine on that side.
To go even further with Yoast (yes, it’s possible) after this great start, I offer you exclusive additional content: “Power up with Yoast SEO.” Inside, you will find:
- A summary of the configuration of the plugin to perform, to start off on the right footing
- A checklist of actions to perform before each publication, with a concrete example (an article optimized around a specific keyword)
- The 8 mistakes not to make in SEO, to avoid mortgaging your chances to be well ranked on the 1st page of search engine results.
Take care, and thanks for reading all the way through. 🙂