You’re approaching the delivery, sitting quietly in front of your computer, ready to sell your new product or service.
You configure a few things on WooCommerce… and then, surprise: you’re faced with a sales funnel worthy of an 80s underground parking lot.

So yes, technically, the funnel will work. That’s clear. However, actually achieving conversions is a different kettle of fish.
Need to optimize all that? That’s where FunnelKit comes in. This plugin makes it easy to create sales funnels, without coding, without being a marketing whiz, and even if you’re starting from scratch.
A tempting offering, don’t you think? Provided you know how to handle the beast. That’s the purpose of this article, which examines this tool in minute detail.
Features, benefits, drawbacks, settings, prices: we’ve got it all covered. We also give you our definitive opinion on FunnelKit, so you know whether you should use it at home.
Ready to go? Let’s get started.
- What is FunnelKit?
- What are the main features of FunnelKit's funnel builder?
- FunnelKit: For whom?
- How to install and configure a sales funnel with FunnelKit
- Introducing FunnelKit Automations and Sliding Cart
- User support and assistance
- FunnelKit prices
- What are the alternatives to FunnelKit?
- Our final review of FunnelKit
Transparency: This article is sponsored. This allows us to remunerate the research and writing work of the WPMarmite blog editors. We remain impartial. If a product isn’t worth it, we’ll say so (or we don’t share about it).
What is FunnelKit?
FunnelKit is an all-in-one freemium plugin that lets you create sales funnels on your WordPress admin interface, with no technical knowledge required, to maximize revenue from your WooCommerce store.
Technically, FunnelKit is a toolbox of three plugins, each with a free and premium version:
- Funnel Builder: Design profitable conversion funnels with ready-to-use templates (landing and registration pages, order pages, upsells, downsells, order bumps, A/B tests, analytics, thank-you pages, etc.).
- Funnel Automations: A marketing automation plugin for creating automated email campaigns (workflows, cart abandonment emails, SMS marketing and email, etc.).
- Sliding Cart: To add a sliding cart to your WooCommerce online store so that your visitors can view and update it without leaving the page they’re browsing.
Formerly known as WooFunnels, FunnelKit is based on the drag-and-drop principle. For the plugin to work, WooCommerce must be active on your site.
Before moving on to the main features of FunnelKit, let’s take a look at a central concept in this article: the famous “sales funnel.”
What is a sales funnel?
What’s a sales funnel? Also known as the sales tunnel, this concept refers to the path followed by a visitor from their first discovery of your site to the final purchase of one of your products or services.
To get an idea of what this looks like, imagine a funnel. Wide at first, narrower as the prospect progresses.
As your visitor progresses through the site, he will pass through several stages:
- At the top of the funnel, he discovers your brand (Awareness). In the jargon, this is what we call a “cold” prospect.
- Then the visitor moves on to your products (Interest) or services, sliding towards the middle of the funnel.
- In the third stage, he studies in detail what you’re offering. He compares and hesitates (Decision).
- And finally, taking action: to buy (Action). Your visitor becomes a customer, having reached the end of the funnel.
These 4 stages are also known in marketing as AIDA (Awareness, Interest, Decision, Action).
At every stage, your role is simple: to help your prospect move forward, without friction, doubt, or unnecessary distraction.

Why use a plugin like FunnelKit?
Now, with our famous funnel, there’s a catch… if you’re using WooCommerce.
The e-commerce plugin does allow you to sell, and it doesn’t prevent you from taking a visitor through all the stages of your sales funnel.
On the other hand, the purchasing process it offers is not really optimized for conversion.
Too many fields, basic design, no upsells or additional sales, and difficulty in guiding the user step by step.
In short, your visitor’s path resembles a supermarket aisle on a Sunday evening rather than a well-oiled commercial machine.
To alleviate this problem, a sales funnel plugin like FunnelKit allows you to guide visitors right through to purchase by:
- Structuring a clear path: Landing page → payment page → upsell → thank-you page.
- Personalizing the checkout phase to make it quicker and more reassuring.
- Adding order bumps, upsells, and downsells to increase the average basket.
- Simplifying the user experience, reducing cart abandonment.
- Measuring your conversions step by step.
What are the main features of FunnelKit’s funnel builder?
For the purposes of this article, we’re going to focus on the heart of the reactor: the Funnel Builder plugin, for creating optimized sales funnels.
A host of options to customize every stage of your funnel
To help your visitors glide through your sales funnel, FunnelKit has some in-store material.
Thanks to FunnelKit, you can customize a number of key elements. With FunnelKit, for example, you can create and personalize:
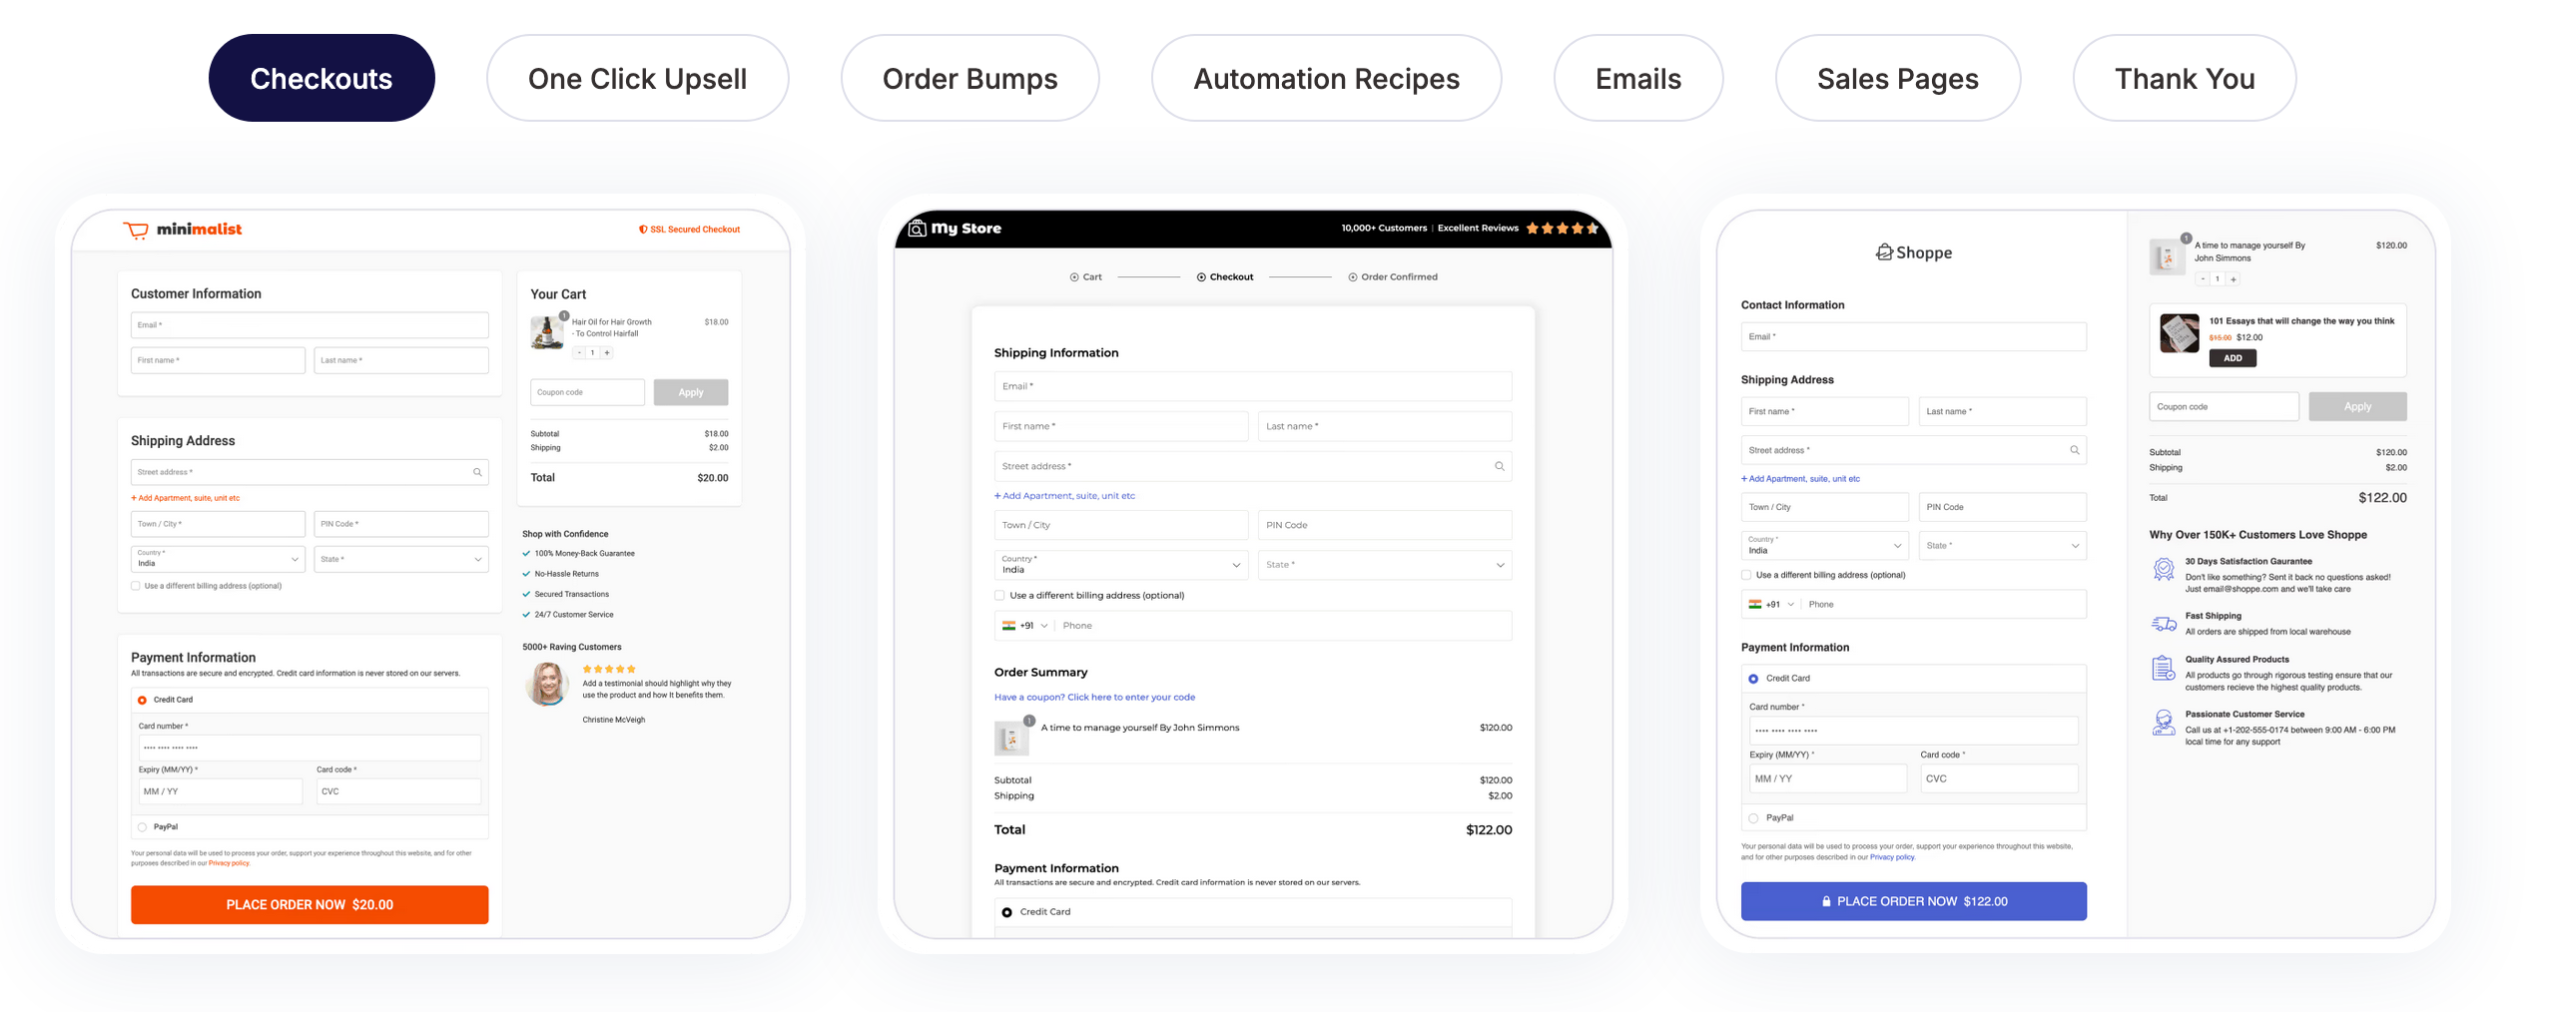
- Landing and registration pages
- Checkout pages with conversion incentives such as trust seals, product guarantees, express checkout options, customer reviews, automatic application of promo codes, etc. Each checkout page can be designed as a single or multi-stage sales funnel.
- Thank-you or order confirmation pages
- Opt-in forms on your landing pages
FunnelKit also lets you edit the validation fields on your order page. If required, you can add new fields (HTML, radio buttons, checkboxes, text), or reorganize sections by dragging and dropping.
And of course, let’s not forget all the options for boosting the average shopping basket (that’s important!). In no particular order, here’s what you can do in just a few clicks:
- Addition of product offers (promotional or not) on the payment page at checkout. We call this an order bump. Customization can go quite far, as you can add conditions such as basket total, basket items, category, and promo code(s) used, to define which additional offer would be proposed.
- You can upsell by offering a more expensive product than the one your visitor is interested in. You can also downsell, with a product that’s less expensive than the one your prospect was initially interested in, but didn’t buy. Here again, you can fine-tune the parameters according to various conditions (item purchased, basket total, etc.).
With the Marketing Automations plugin, you can go even further by setting up automatic emails triggered by abandoned shopping carts (among other things).
Ready-to-use templates compatible with page builders
Suitable for all types of user (from beginner to WordPress expert), FunnelKit was designed with one idea in mind: to simplify the user’s life.
To achieve this, the plugin comes with a hundred ready-to-use templates in different categories, corresponding to each stage of your funnel:
- Checkout pages
- Upsells in one click
- Order bumps
- Thank-you pages
- Emails
- Landing pages
The rendering is professional and the design rather nice (if you like the minimalist look). All templates are responsive (optimal display on computers, smartphones, and tablets) and can be customized according to your wishes (text, design).
Above all, you can modify them with the page builder of your choice. FunnelKit offers templates compatible with the WordPress content editor, but also with Elementor, Divi Builder, Oxygen, and Bricks.
Not using any of the above tools? You can also use shortcodes, which integrate with most page builders.
Easy, intuitive handling
Creating your sales funnel pages with the page builder of your choice is a major advantage. In terms of design, it’s clearly a big plus.
As you’ll see when creating a sales funnel, the plugin is easy to learn and use, making it suitable for beginners.
The drag-and-drop interface is a real plus, and familiarity with the page builder of your choice makes customization even quicker.
In the end, the user experience is fluid, clear, and pleasant. All you have to do is choose a template, then assemble the stages of your funnel like Legos: landing page → payment page → upsell → downsell → thank-you page.
And bam: your funnel takes shape in just a few clicks.
A/B testing and analytical follow-up
Once your funnel is up and running, it’s important to be able to track its progress.
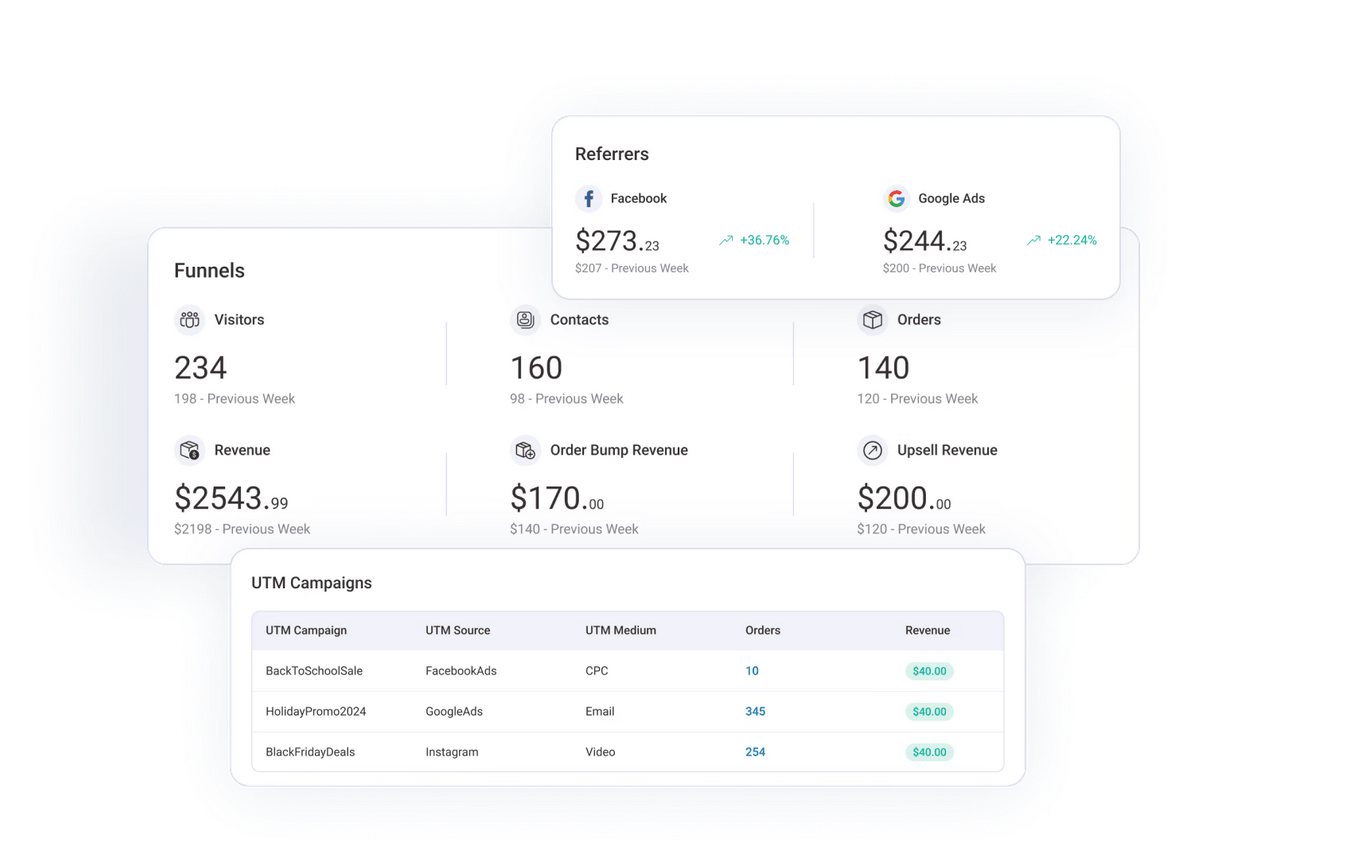
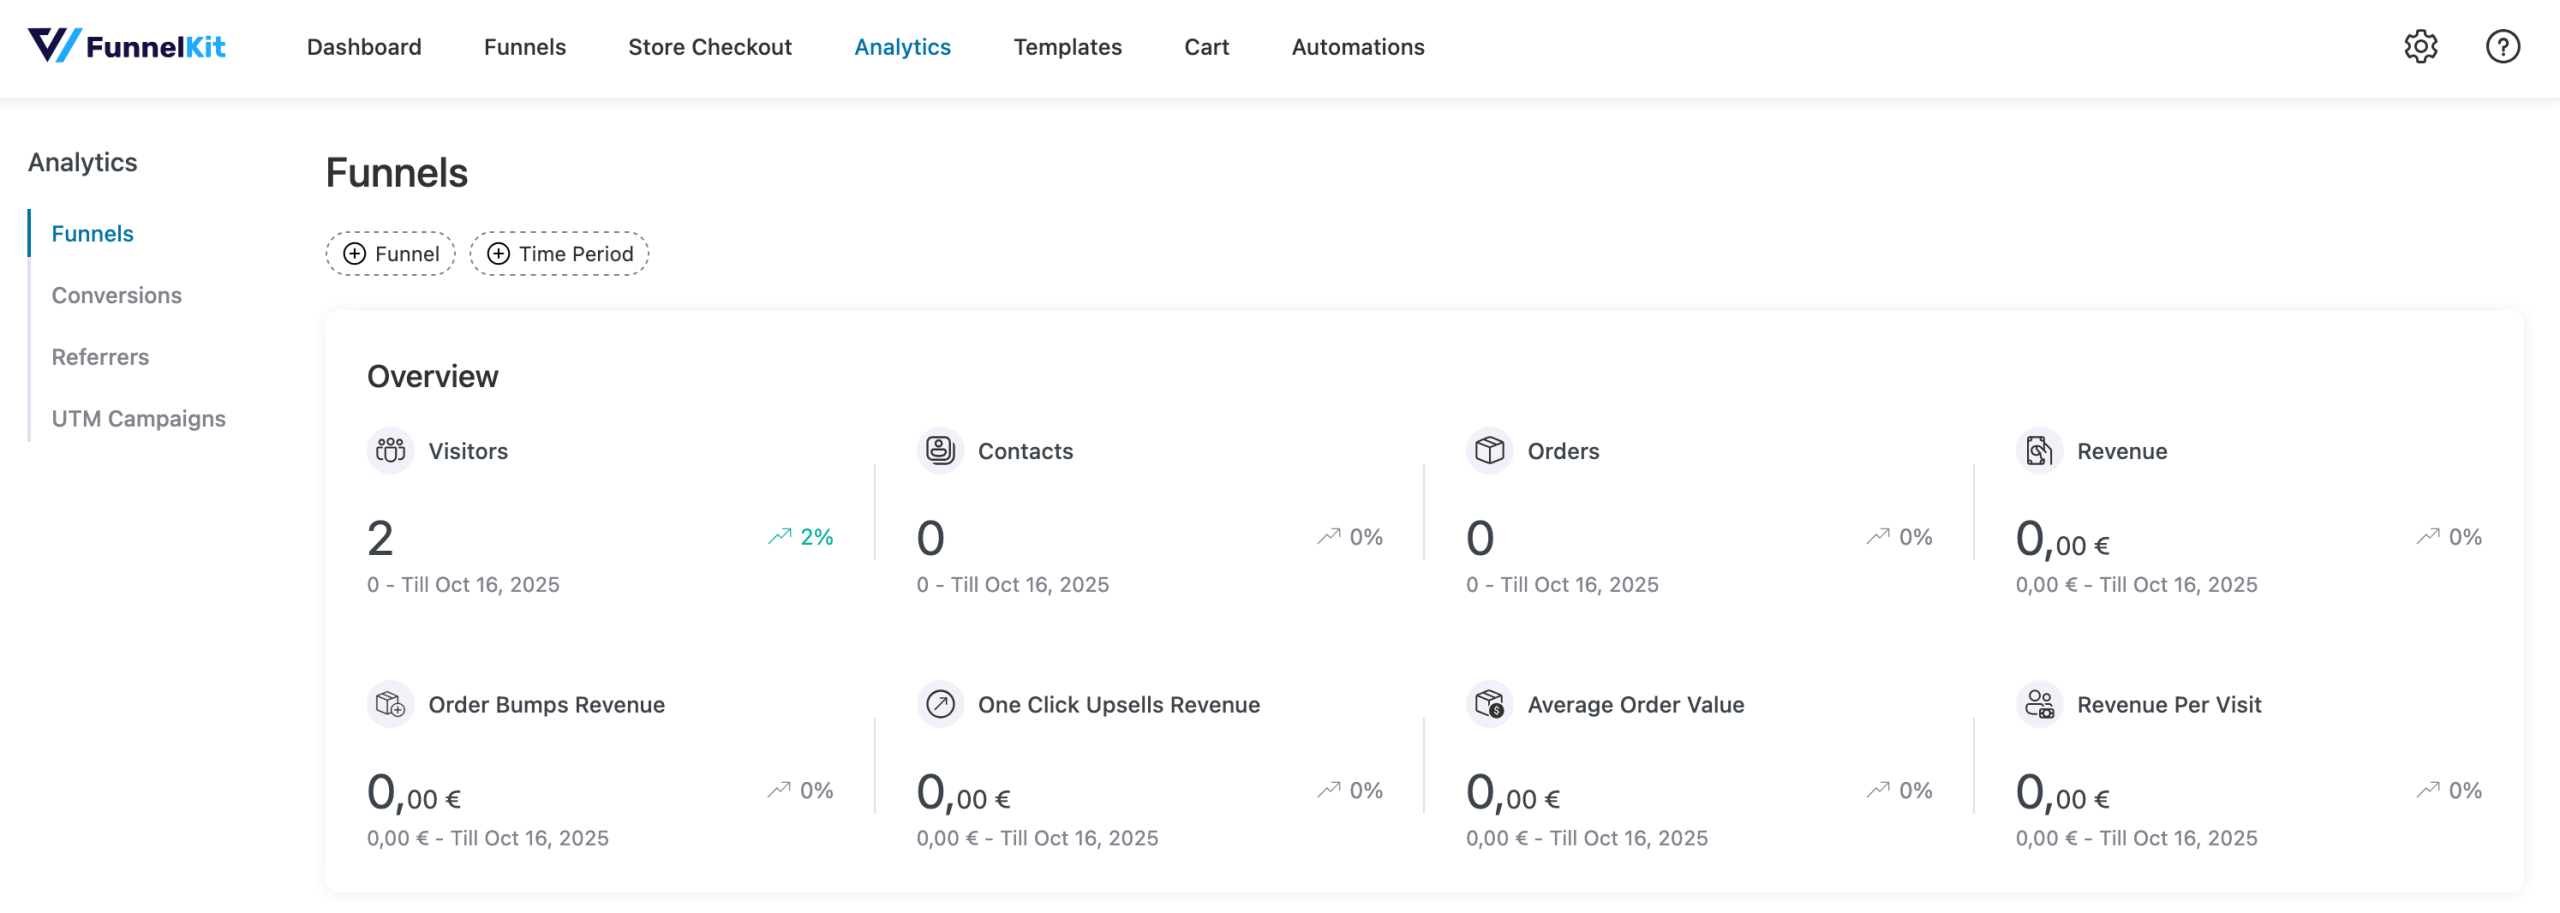
What’s working well? What’s not? FunnelKit gives you access to a performance dashboard directly on your WordPress interface.
You have access to the following data:
- Total number of contacts, orders, and earnings
- Revenue generated per contact
- Best-performing pages and funnels: consult the ranking table to determine effective and ineffective strategies
- Recent activities: display the log to track users’ actions in real time
To push optimization even further and try to improve your conversion rate, you can also carry out A/B tests on any page of the funnel and on the products or services you offer for sale.
FunnelKit: For whom?
A sales funnel, however effective, is not for everyone. In its description on the official directory, FunnelKit claims to appeal to a very wide range of people, even targeting “everyone.”
It’s a marketing tactic, of course. If you’re an occasional blogger, or the webmaster of a showcase site, you won’t need to install this plugin on your WordPress site — that goes without saying.
The prerequisite is to have a WooCommerce store, with the aim of maximizing your conversions. From there, several priority targets emerge, in my opinion:
- Content creators and infopreneurs of all types (regular bloggers with a monetizable audience, coaches, trainers, dropshippers, etc.): If you sell ebooks, video programs, coaching, or training, a high-performance sales funnel can change your business.
- WooCommerce merchants, of course. A well-optimized funnel can increase your average shopping cart, your conversions on the checkout page, and your additional sales.
- Freelancers/agencies: To create funnels for your customers without depending on a third-party platform. And incidentally, to charge a little more for your expertise. 😉
Can you see the light at the end of the funnel? Great. Hold on to your hats, because now it’s time to get practical. In the next section, I’ll show you step by step how to create your first sales funnel with FunnelKit’s Funnel Builder.
How to install and configure a sales funnel with FunnelKit
Step 1: Installing and activating FunnelKit’s Funnel Builder
First, activate the WooCommerce plugin on your administration interface. Remember: it’s required for FunnelKit to work.
Then install the FunnelKit – Funnel Builder for WooCommerce Checkout plugin via the Plugins > Add Plugins menu.
Type “funnel builder” in the search bar, then install and activate the desired plugin:
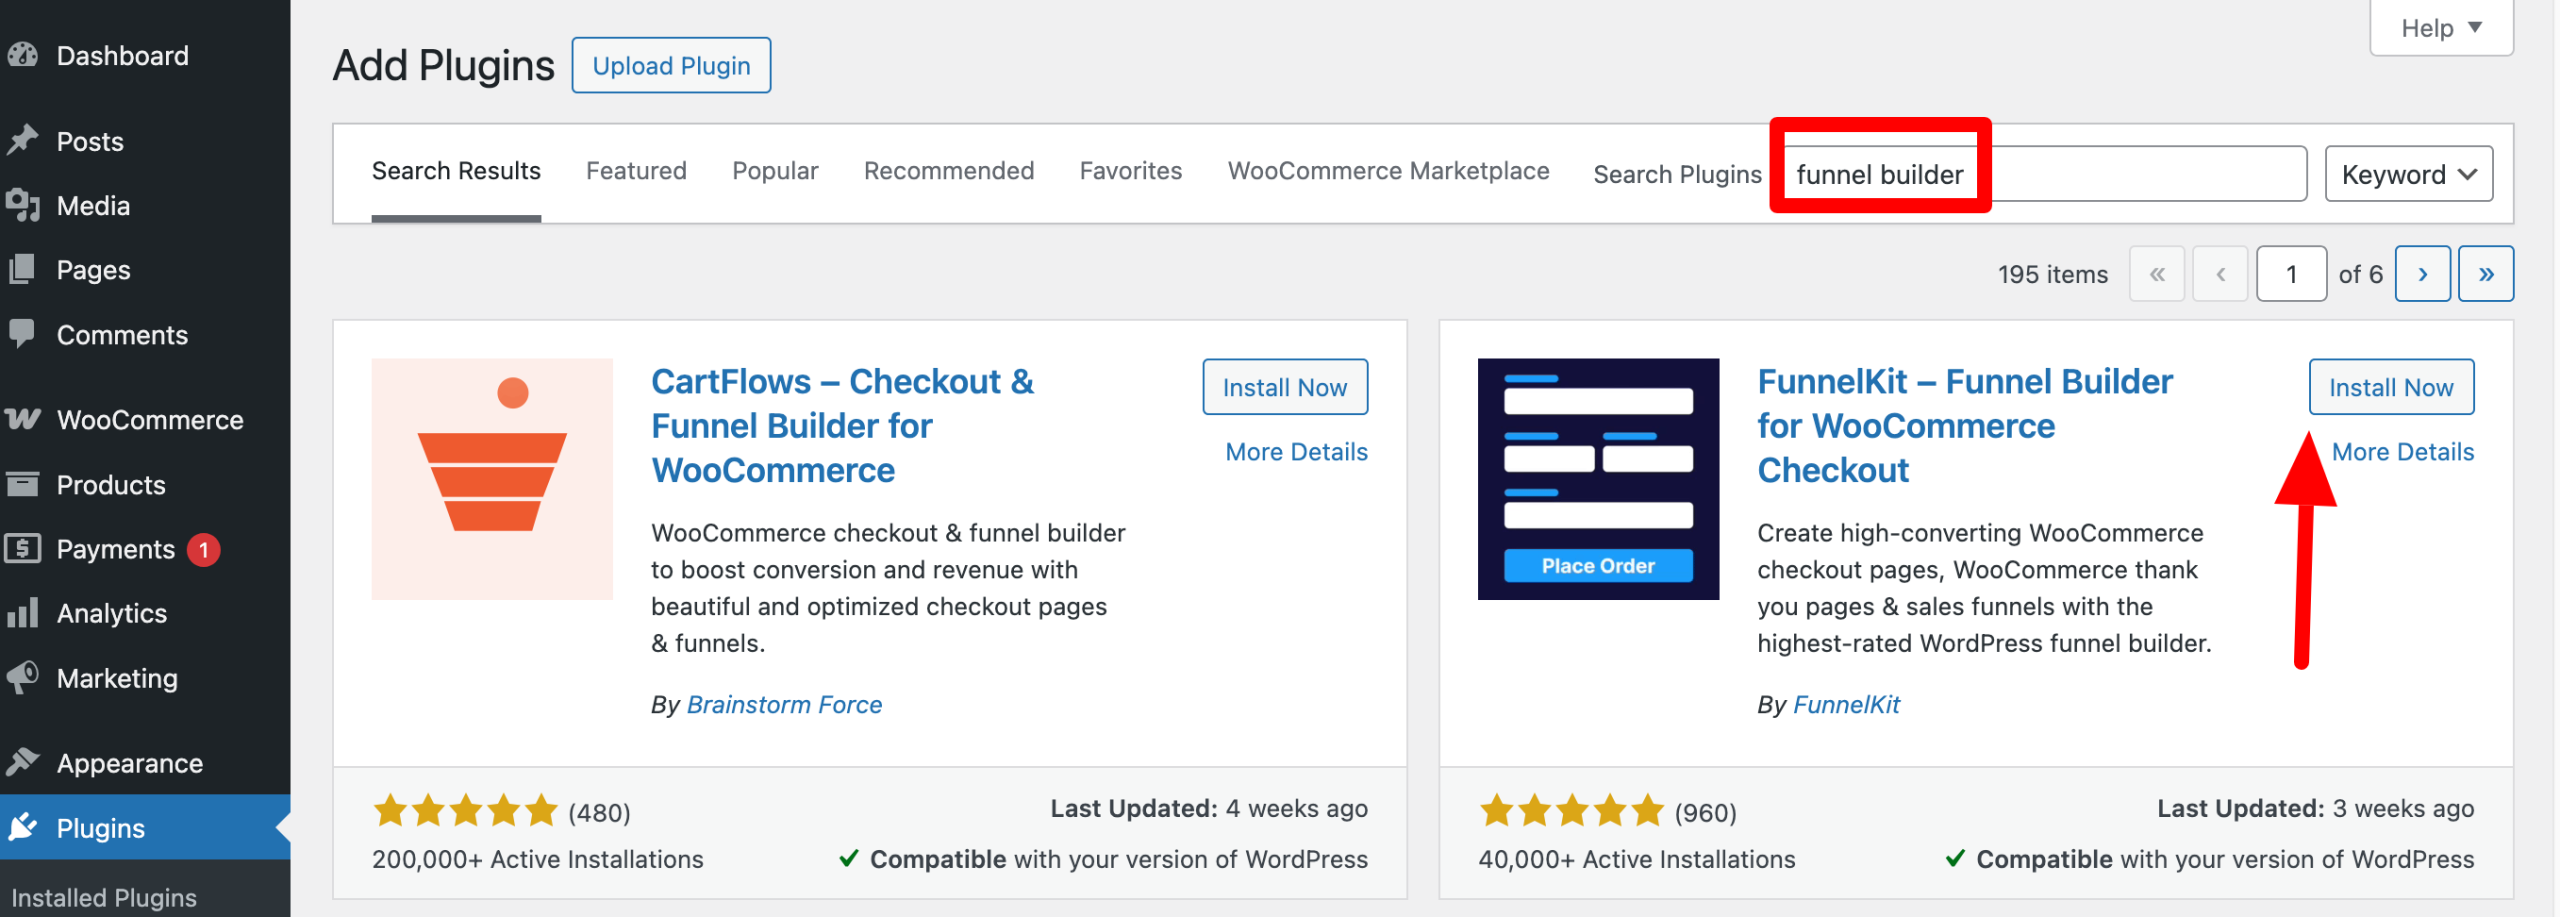
If you have purchased a Pro license, remember to activate it immediately afterwards. To do this, download the plugin in zip format from your FunnelKit customer space, then add it to WordPress. Finish by entering your license key.
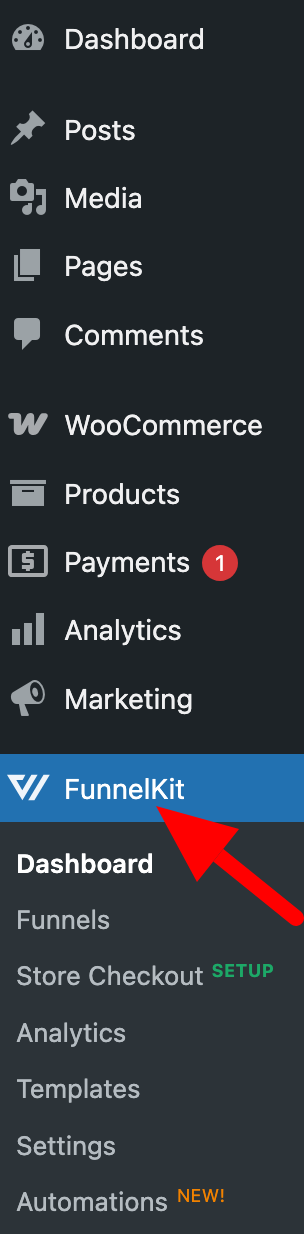
For the purposes of this test, I’ll be using Funnel Builder Pro. If everything has worked correctly for you, you should find yourself with a new “FunnelKit” menu on the sidebar of your administration interface.
From here, you can access the various menus offered by the plugin.
You can create an unlimited number of sales funnels with FunnelKit.
Step 2: Choosing a template and customization
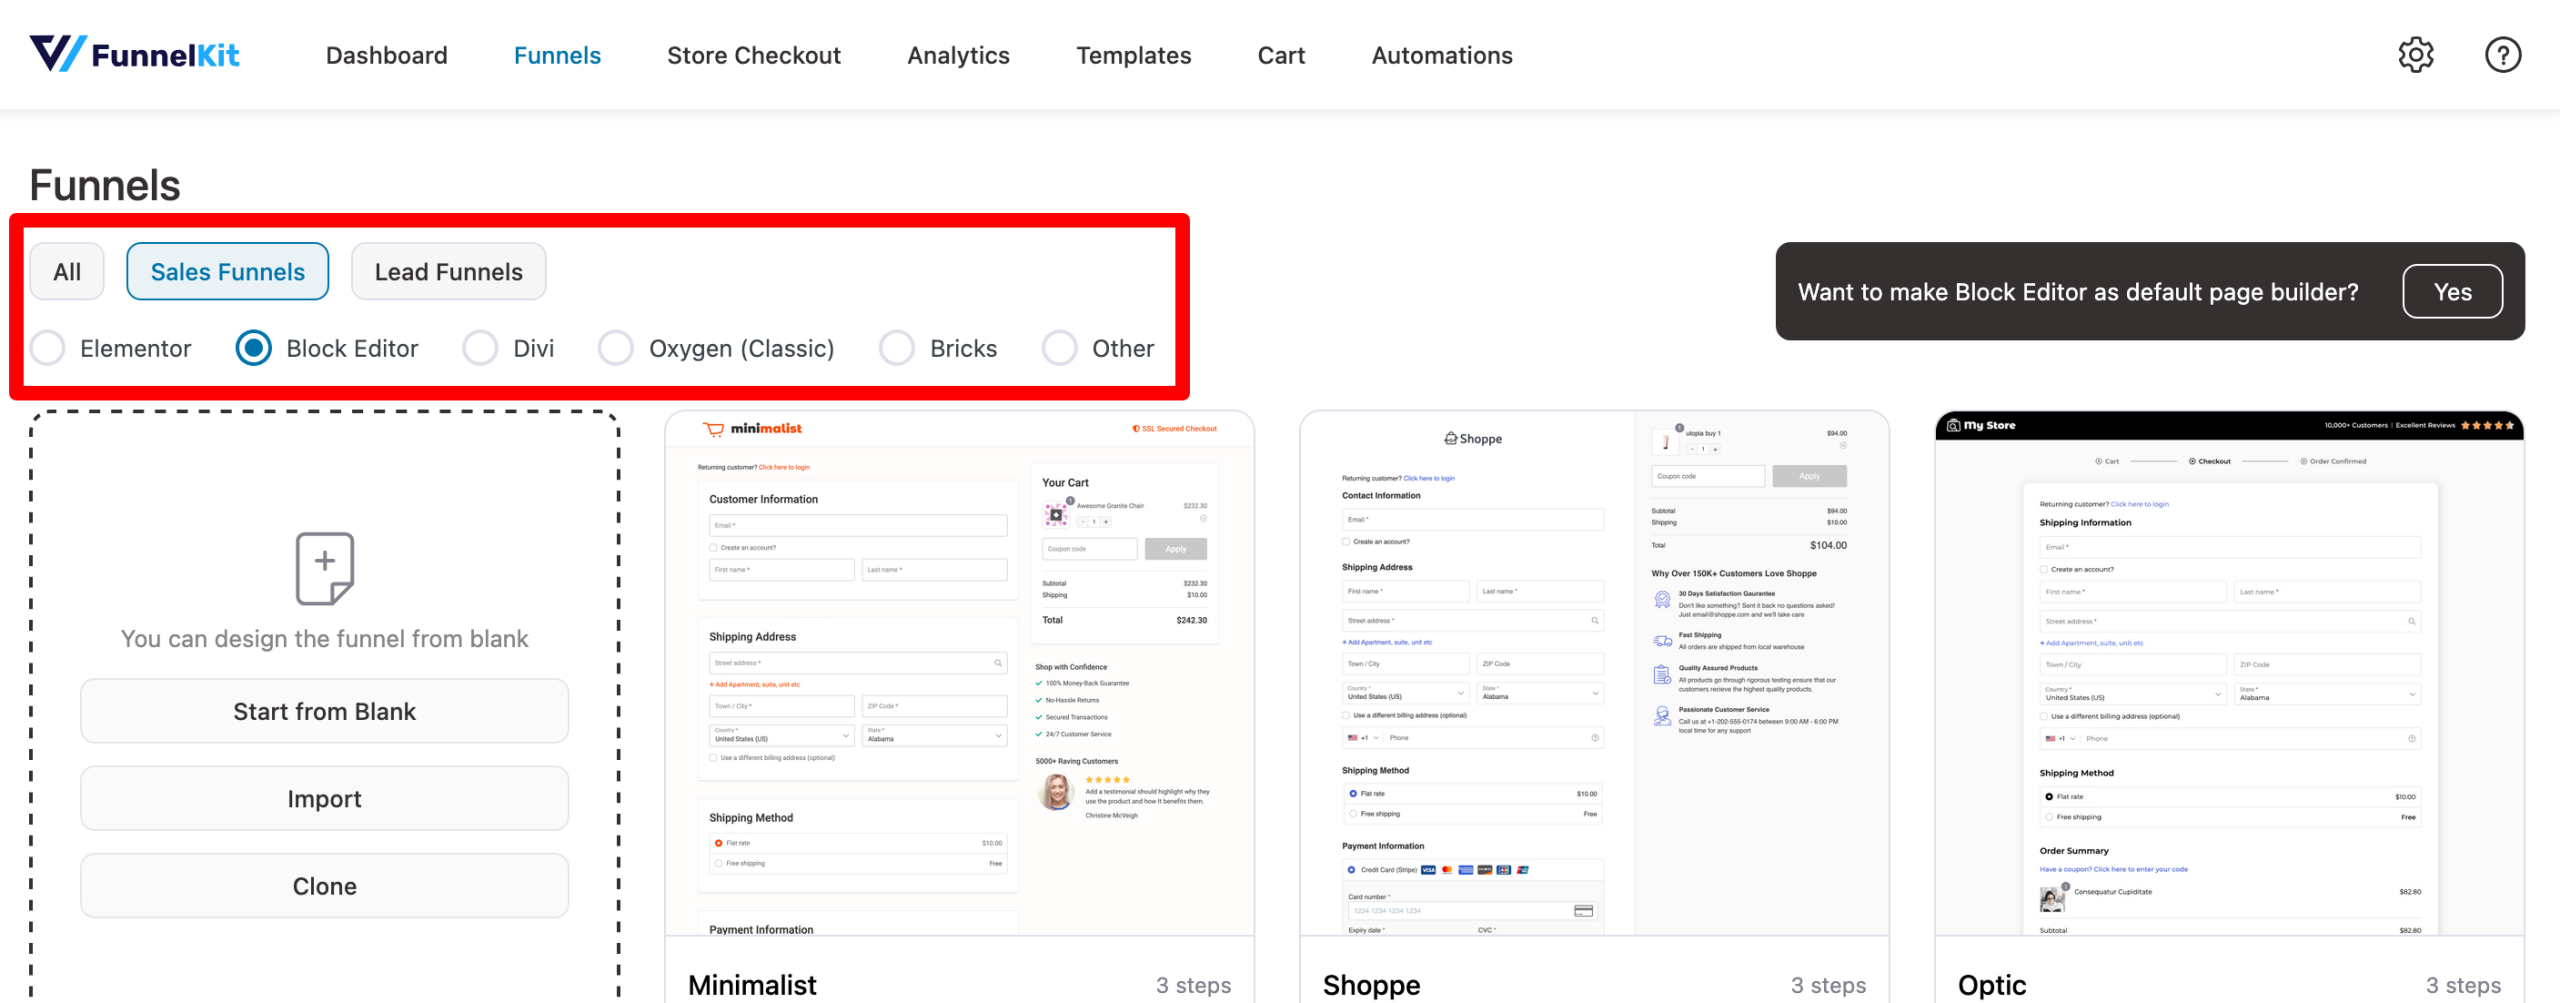
Speaking of menus, let’s start whetting your appetite by heading over to the “Funnels” menu. This is where you’ll start creating your first sales funnel.
At the top of the page, you have two choices to start with:
- Choose the type of funnel you wish to create: Either “Sales Funnels” or “Lead Funnels.” Here, we’ll choose “Sales Funnels.”
- Select your favorite page builder with which to customize the various stages of your funnel. You can choose from Elementor, Block Editor (the native WordPress block editor), Divi, Oxygen, Bricks, or Other (using shortcodes). If you use Elementor, you’ll have a greater choice of templates than with the other options (19 templates offered for Elementor).
When you choose your template, you’ll see several things:
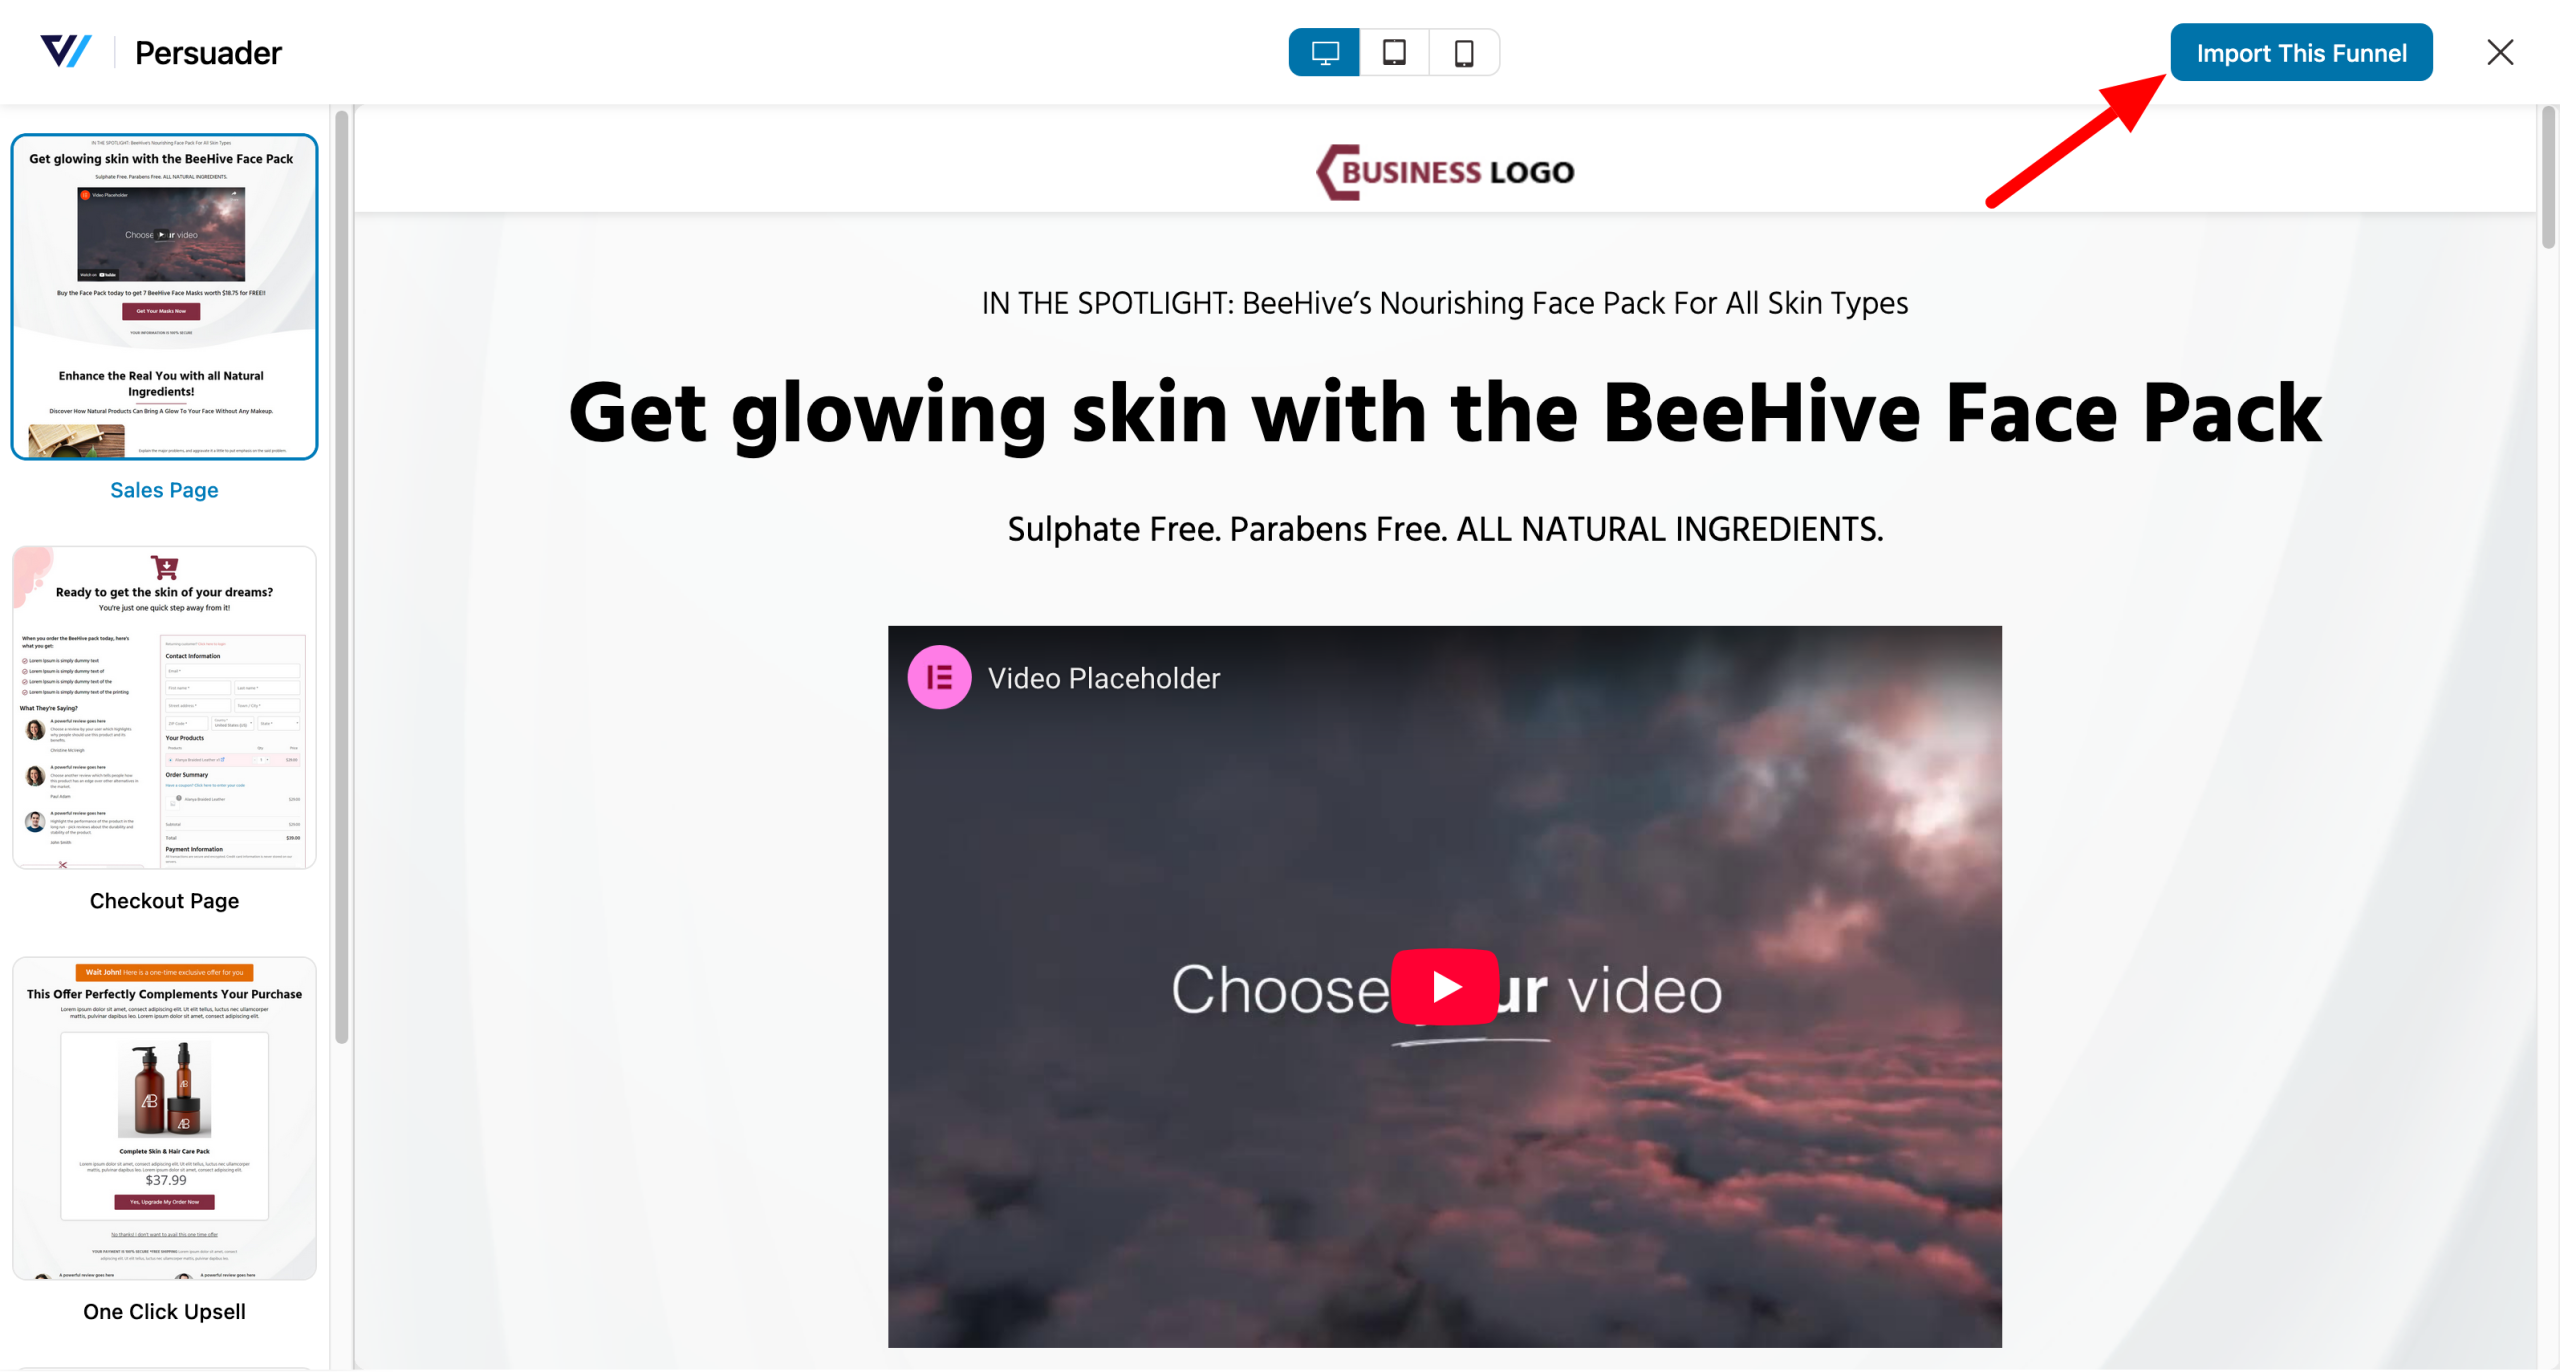
- You can preview the model’s appearance by clicking on the “Preview” button.
- At the bottom of each template, you’ll find a small label, for example “3 steps.” This indicates the number of steps your sales funnel will have. For example, Payment page → Upsell → Thank-you page.
Choose a template according to your needs and the number of steps you wish to configure. However, don’t panic if you go too fast.
The design of each template is customizable, and you can also add/remove steps as you go along. Think of your template as a malleable base so that you don’t have to start from scratch.
Have you made your choice? To select a template, click on the “Preview” button, then on “Import This Funnel”:
Step 3: Customize the design of your sales funnel with FunnelKit
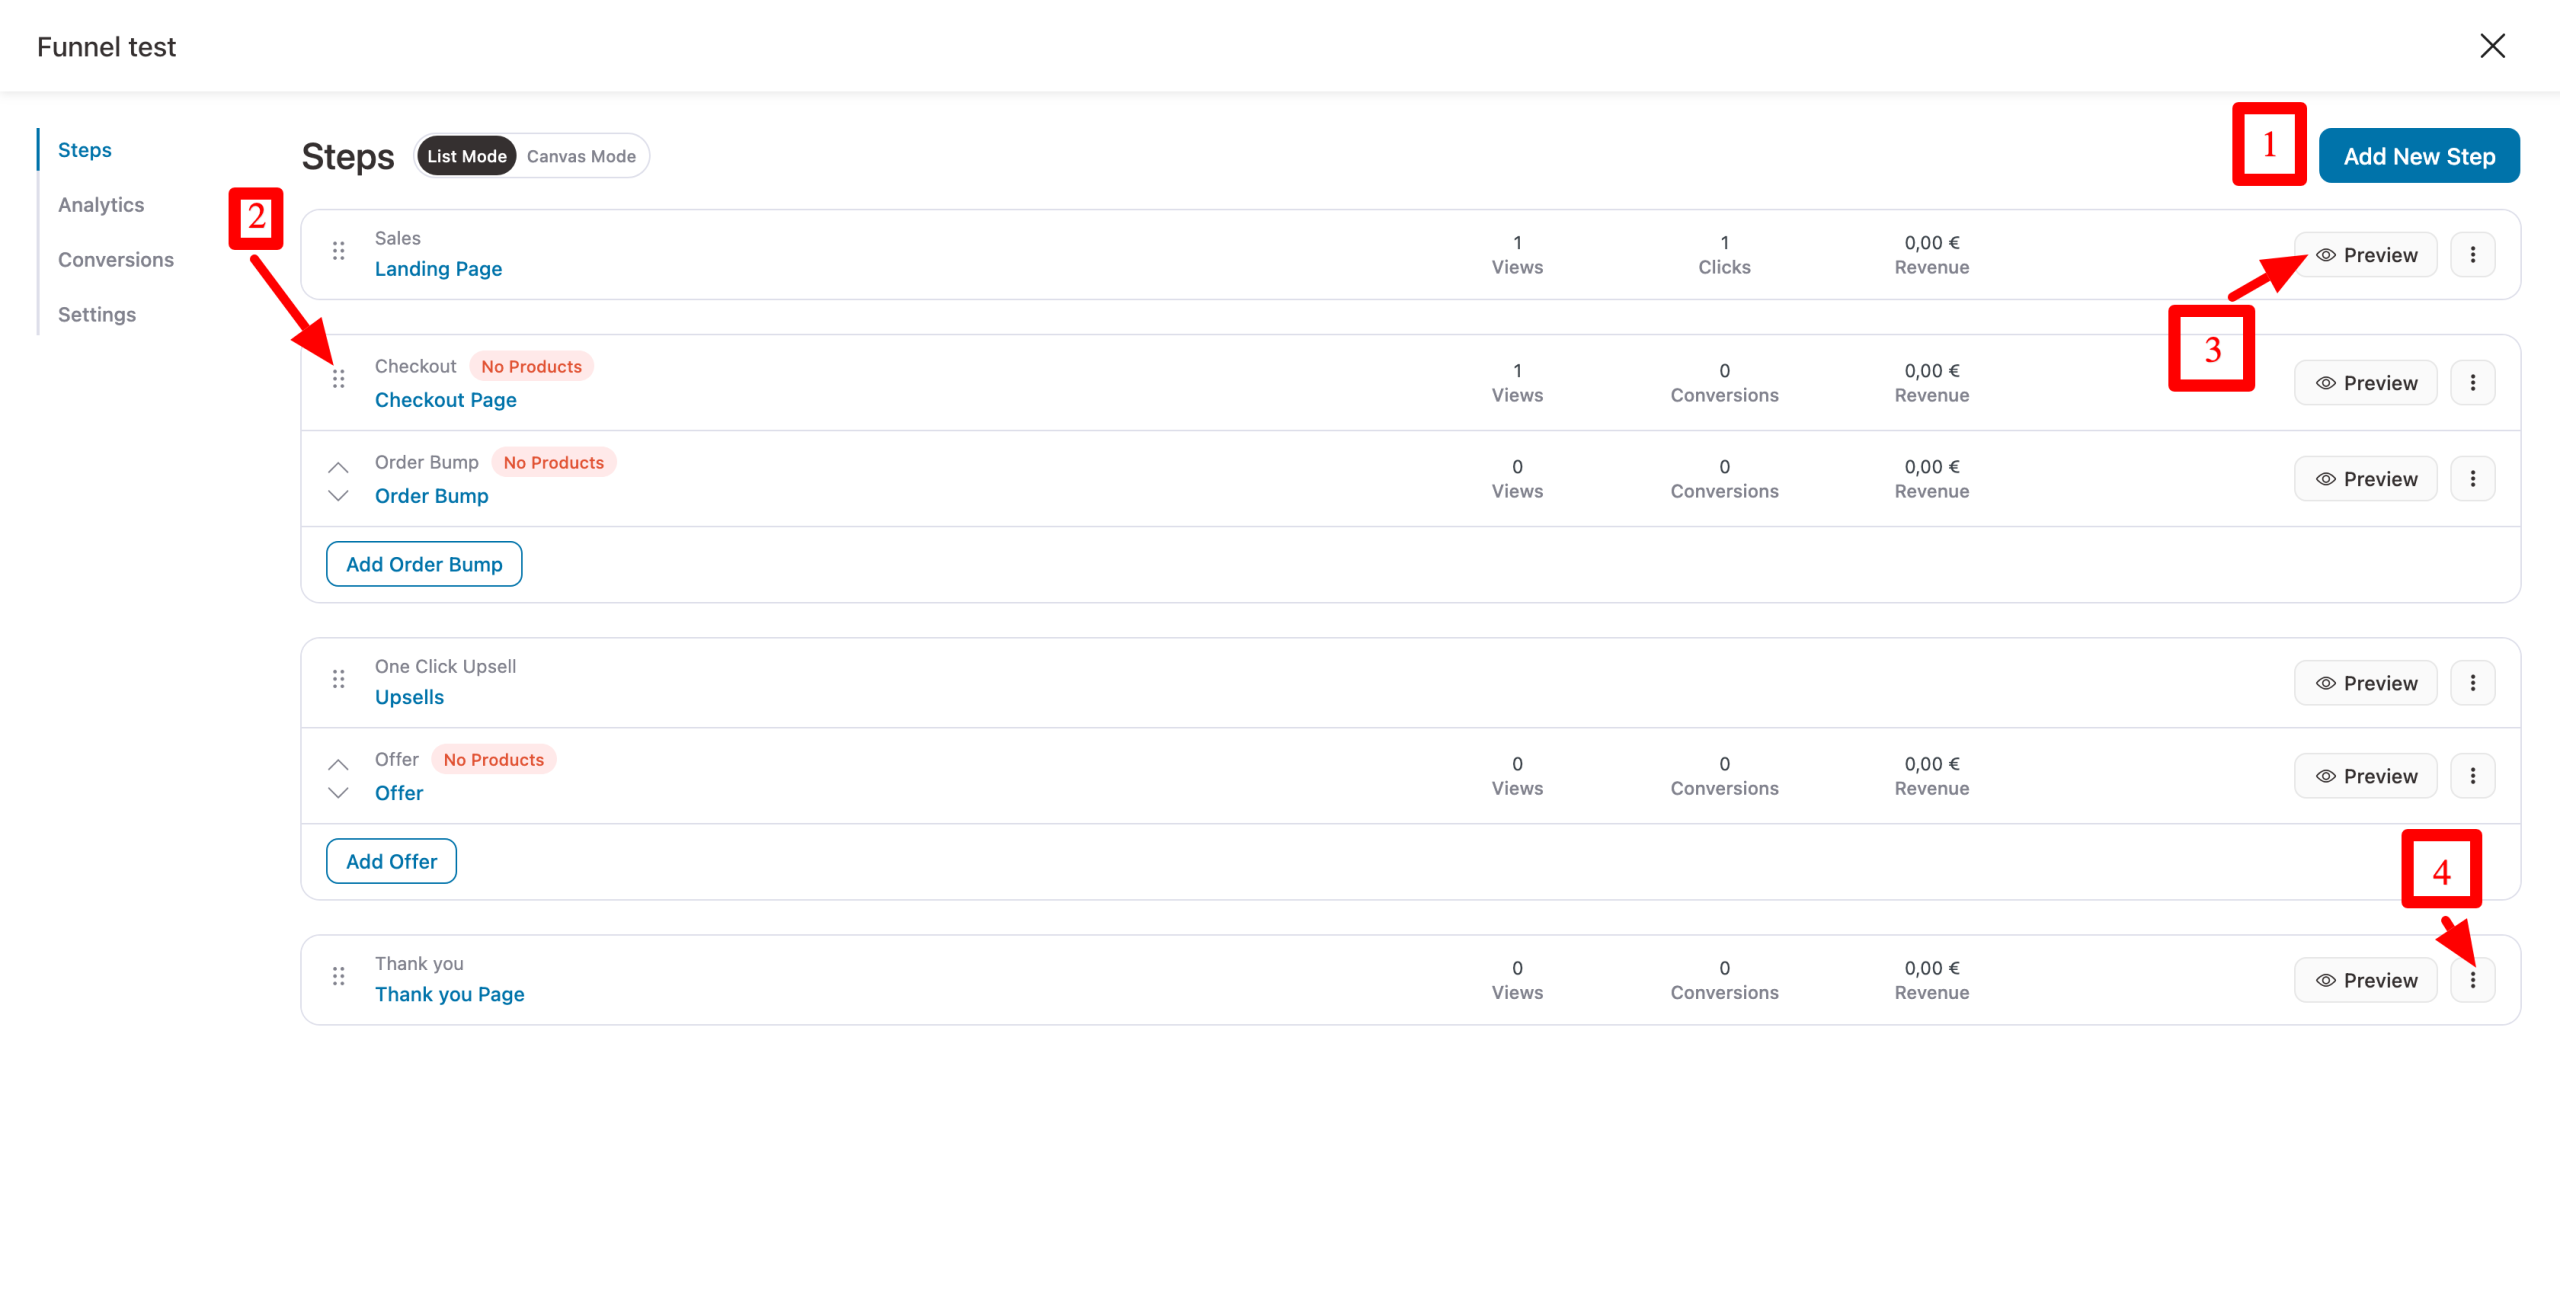
Once your funnel has been imported by the Funnel Builder, you’ll find its various stages on one page.
In the center of the screen, we can see that we currently have four stages in our sales funnel:
- A landing page
- A checkout page
- An upsell
- A thank-you page
Among the main actions on offer, you can, for example:
- Add a new step to your funnel (“Add New Step” button, number 1 on the screenshot).
- Change the order of each step using drag & drop (number 2).
- Preview the visual appearance of each step (number 3).
- Configure each step by clicking on the 3 dots (number 4). Each step can be edited, drafted, duplicated, A/B tested, or deleted (number 4).
To modify the visual appearance of a page, click on the page of your choice, then on the “Edit template” button. Then proceed as usual with the tool of your choice (WordPress Editor, Elementor, Divi Builder, etc.).
Step 4: Add products to your payment page
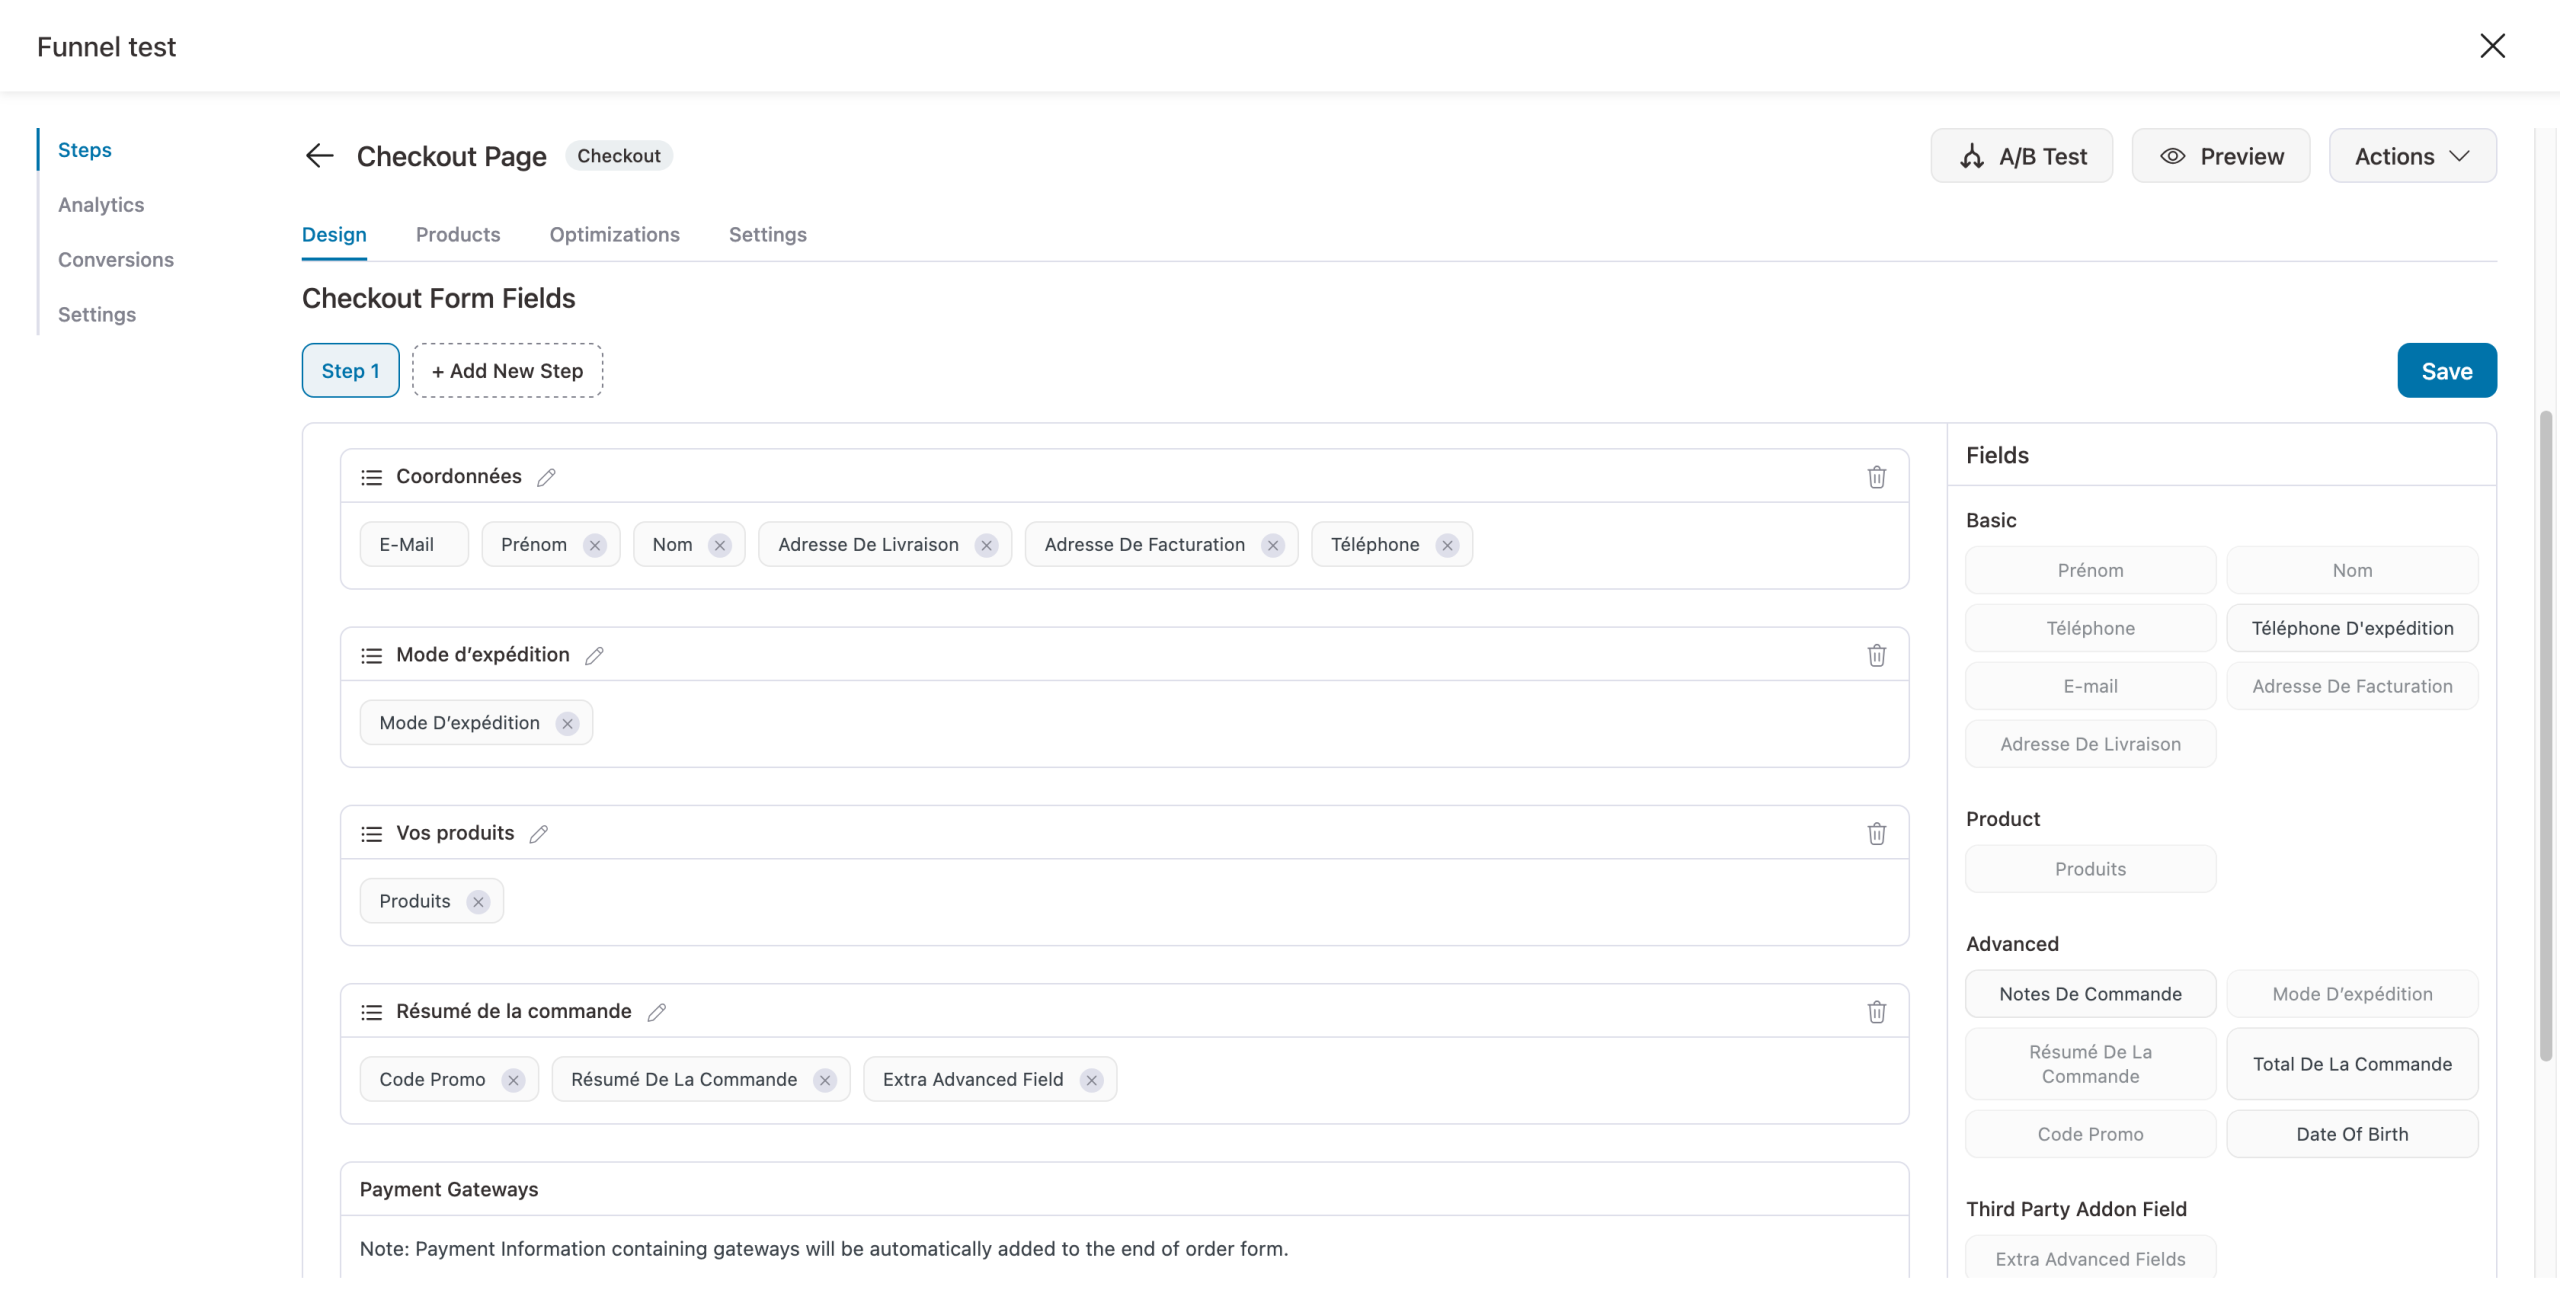
When the design of your pages starts to resemble your expectations, move on to the checkout page. For the moment, it has no products.
For an optimized sales funnel, it’s important to add products that will be automatically added to the shopping cart when a user clicks on a call-to-action (CTA) button on your sales page.
To do this, click on the “Products” tab and add the product(s) of your choice, setting discounts, quantities, and so on.
Don’t forget to configure the checkout form, as this is extremely important. It’s all drag and drop, and you can easily add or remove fields:
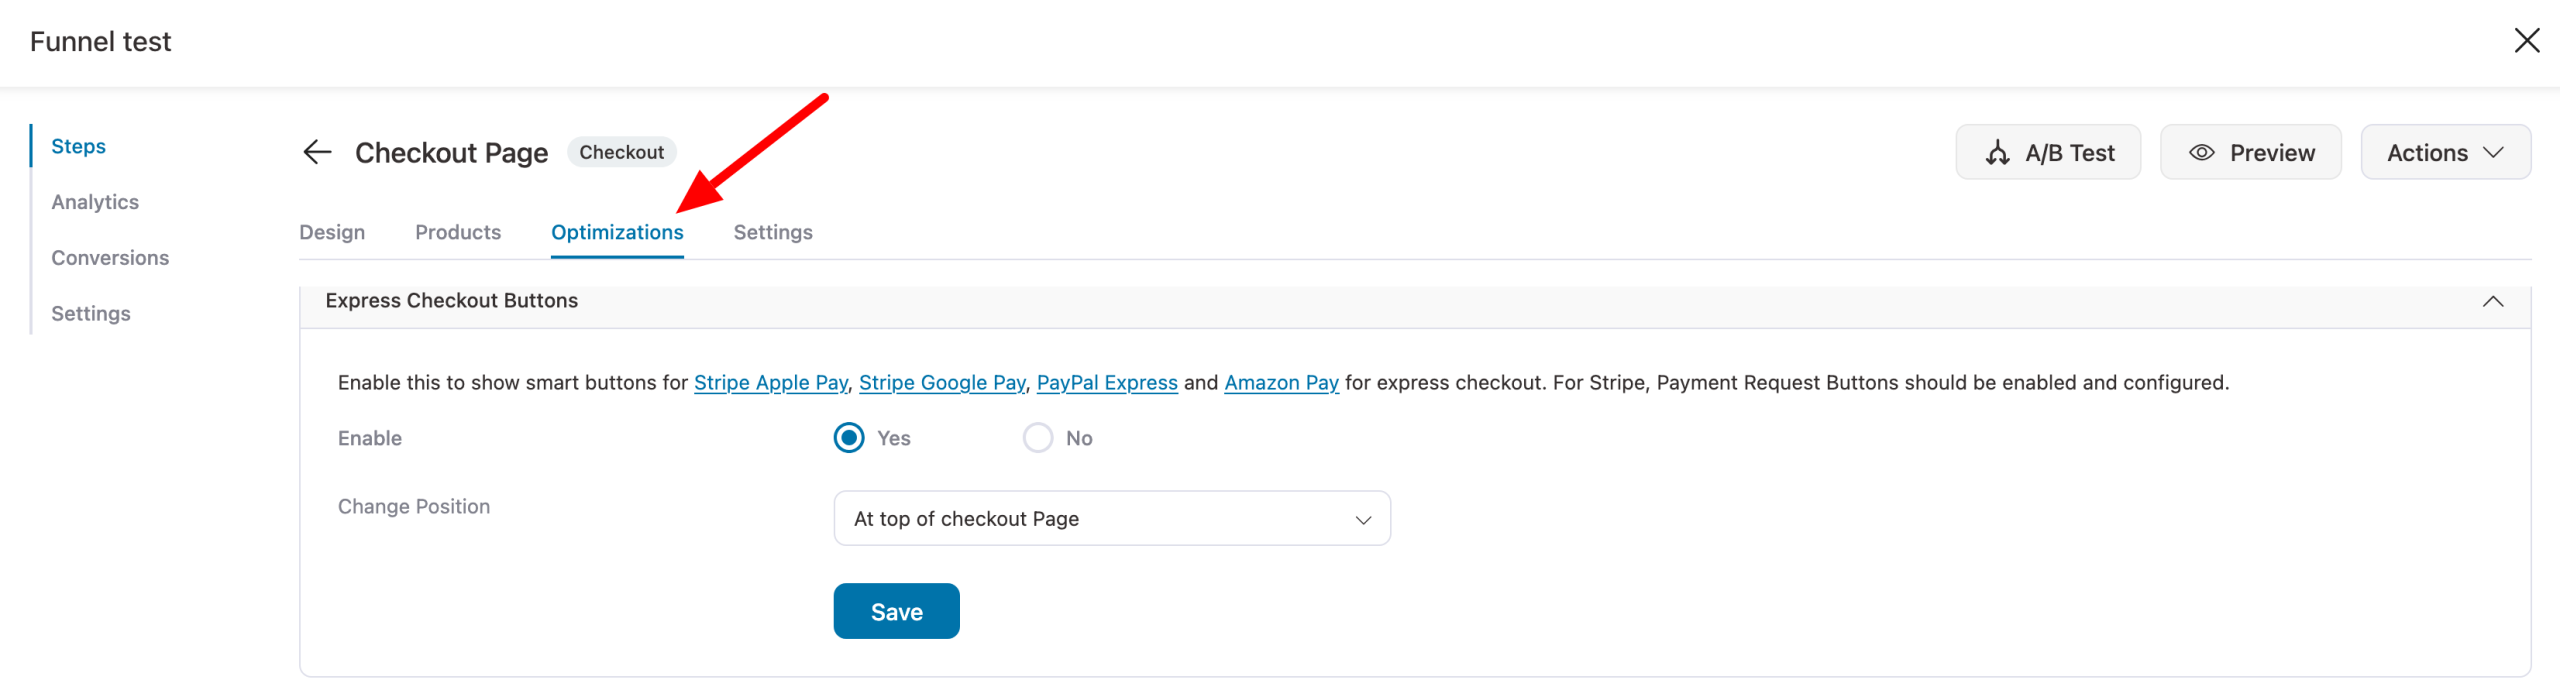
If required, you can also add even more advanced options by going to the “Optimizations” tab. For example, you can add express checkout buttons at different points on the page.
Step 5: Adding an order bump and an upsell
Your FunnelKit funnel is starting to take shape. But you still have some work to do. To optimize it, we recommend adding an order bump and an upsell.
It works on the same principle as the rest. You add one or more products of your choice, then customize the visual appearance (text, design).
Step 6: Testing your funnel
Congratulations! Your sales funnel is now active and ready to bring you new sales.
You can test it by clicking on “Preview.” A word of advice: don’t leave anything to chance. Test everything, really everything, especially clickable buttons, payments, forms, upsells, order bumps, and so on.
All set? It’s time to send some traffic through your funnel. To get your visitors to discover your magnificent funnel, think about optimizing your CTAs (call-to-action buttons). For example, you can add them to your blog posts, your social network banners, etc.
Simply add the URL of your sales page (the landing page, on FunnelKit) to your CTAs, and reap the rewards after a few days/weeks.
Don’t forget to check your stats frequently in the “Analytics” menu, and to make use of the A/B test functionality offered in each sales funnel template.
This way, you can see what’s working best (and what’s getting in the way) and continuously improve your funnel.
Don’t hesitate to visit the plugin’s Settings menu. Here you can set the permalinks of your choice for your various pages (landing pages, thank-you pages, checkout pages, etc.), add custom CSS to your pages, or set the sender name for emails you may send with FunnelKit.
Introducing FunnelKit Automations and Sliding Cart
With Funnel Builder, you’ve got a nice little tool for creating your first customized sales funnels.
Having covered this first big chunk in detail, I’d now like to take a shorter look at the other two plugin solutions offered by FunnelKit:
- FunnelKit Automations (formerly Autonami).
- Sliding Cart.

FunnelKit Automations
FunnelKit Automations lets you create email campaigns (one shot and automated) without leaving your WordPress dashboard.
This is a powerful plugin capable of serving as both a CRM and a marketing automation tool.
It’s packed with features. I’m not going to list them all here, but among other things you can:
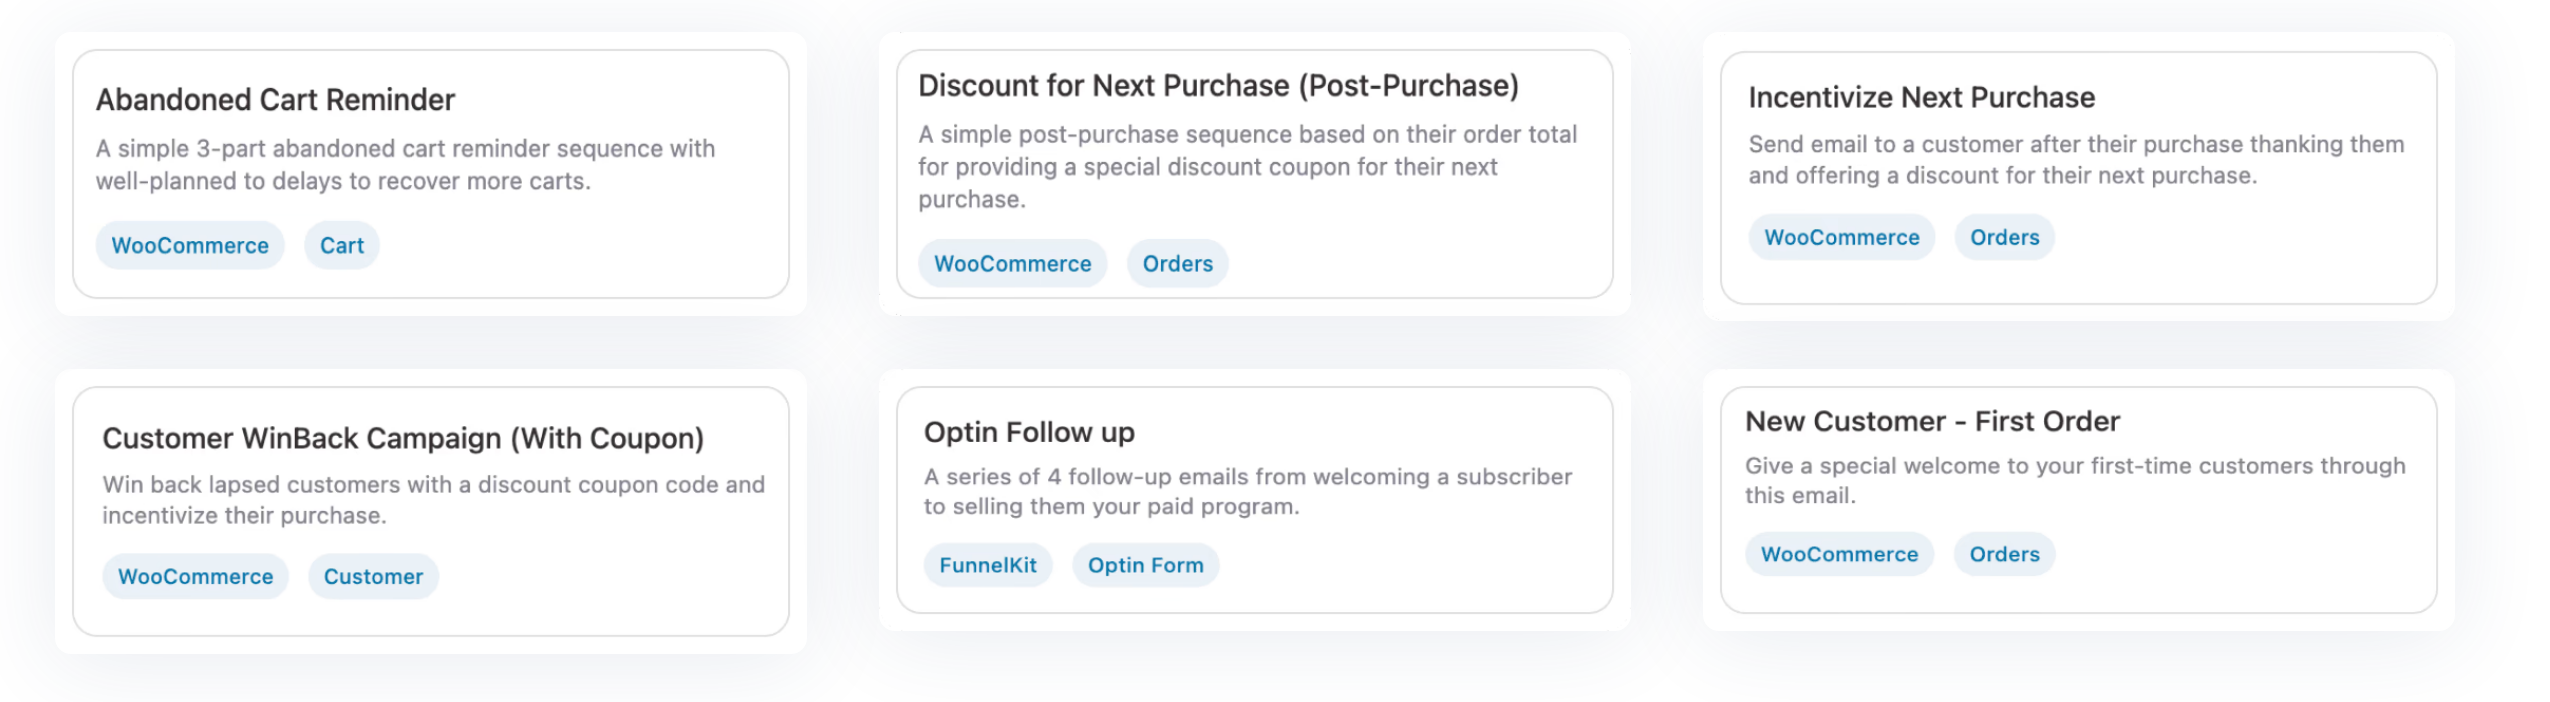
- Send targeted emails in the event of cart abandonment, to offer discount codes, carry out onboarding for new customers, etc. For example: “If customer abandons cart → send email at +30 min.” Ready-to-use templates are available for each.
- Create automated workflows with triggers and conditional logic, all visually and without coding. For example, “If customer joins training → send welcome sequence.”
- Access advanced analytical data (stats on your shopping carts, emails, etc.).
- Send classic emails that you can segment, with an intuitive drag-and-drop email builder.
- Manage all your contact profiles (create labels, lists, custom fields) with access to multiple data for each contact (email open rate, click rate, purchases made, etc.).
- Integrate with over 100 tools, including forms plugins (Gravity Forms, Ninja Forms, Contact Form 7, etc.), email marketing tools (ActiveCampaign, Mailchimp, Kit, etc.), and others (Slack, Zapier, Google Sheets, etc.).
Sliding Cart
Sliding Cart for WooCommerce by FunnelKit (the exact name of the plugin) lets you add a sliding side cart (on the side of your screen, the whole length of the page).
When active, a small icon in the corner of the screen allows your visitor to open (or close) the shopping cart to add items, modify quantities, and even add upsells (Pro version).
This reduces friction for your visitors as they browse your site, and saves them having to go to the checkout page to check what’s included in their shopping cart.
What’s more, with this system, users can quickly access the checkout page, bypassing the conventional WooCommerce shopping cart page altogether.
User support and assistance
Although intuitive and easy to use, FunnelKit can sometimes give you a hard time. If you need help, what options are available to you?
First of all, you can contact the team responsible for supporting the 3 plugins (Funnel Builder, FunnelKit Automations, and Sliding Cart).
Available 24/7, support can be accessed by opening a support ticket, whether you’re using the free or paid version. If you are a Pro license customer, you will have priority support.
If you’d rather try to find the solution to your problem on your own, that’s also possible. For example, you can use:
- Official FunnelKit documentation, with several hundred clear, well-illustrated articles (getting started guides for the 3 plugins, feature articles, FAQ).
- A YouTube channel with over 300 videos, including numerous tutorials. One example? This one, which shows you how to optimize your WooCommerce checkout page to maximize your conversions:
FunnelKit prices
Without transition, we come to the part that sometimes stings a little. Ah, the famous question of price. By the way, how much does FunnelKit cost?
First of all, you can take advantage of the plugin available on the official directory free of charge. It’s a good way of checking out the plugin and testing it, but of course it will soon be limited for your needs.
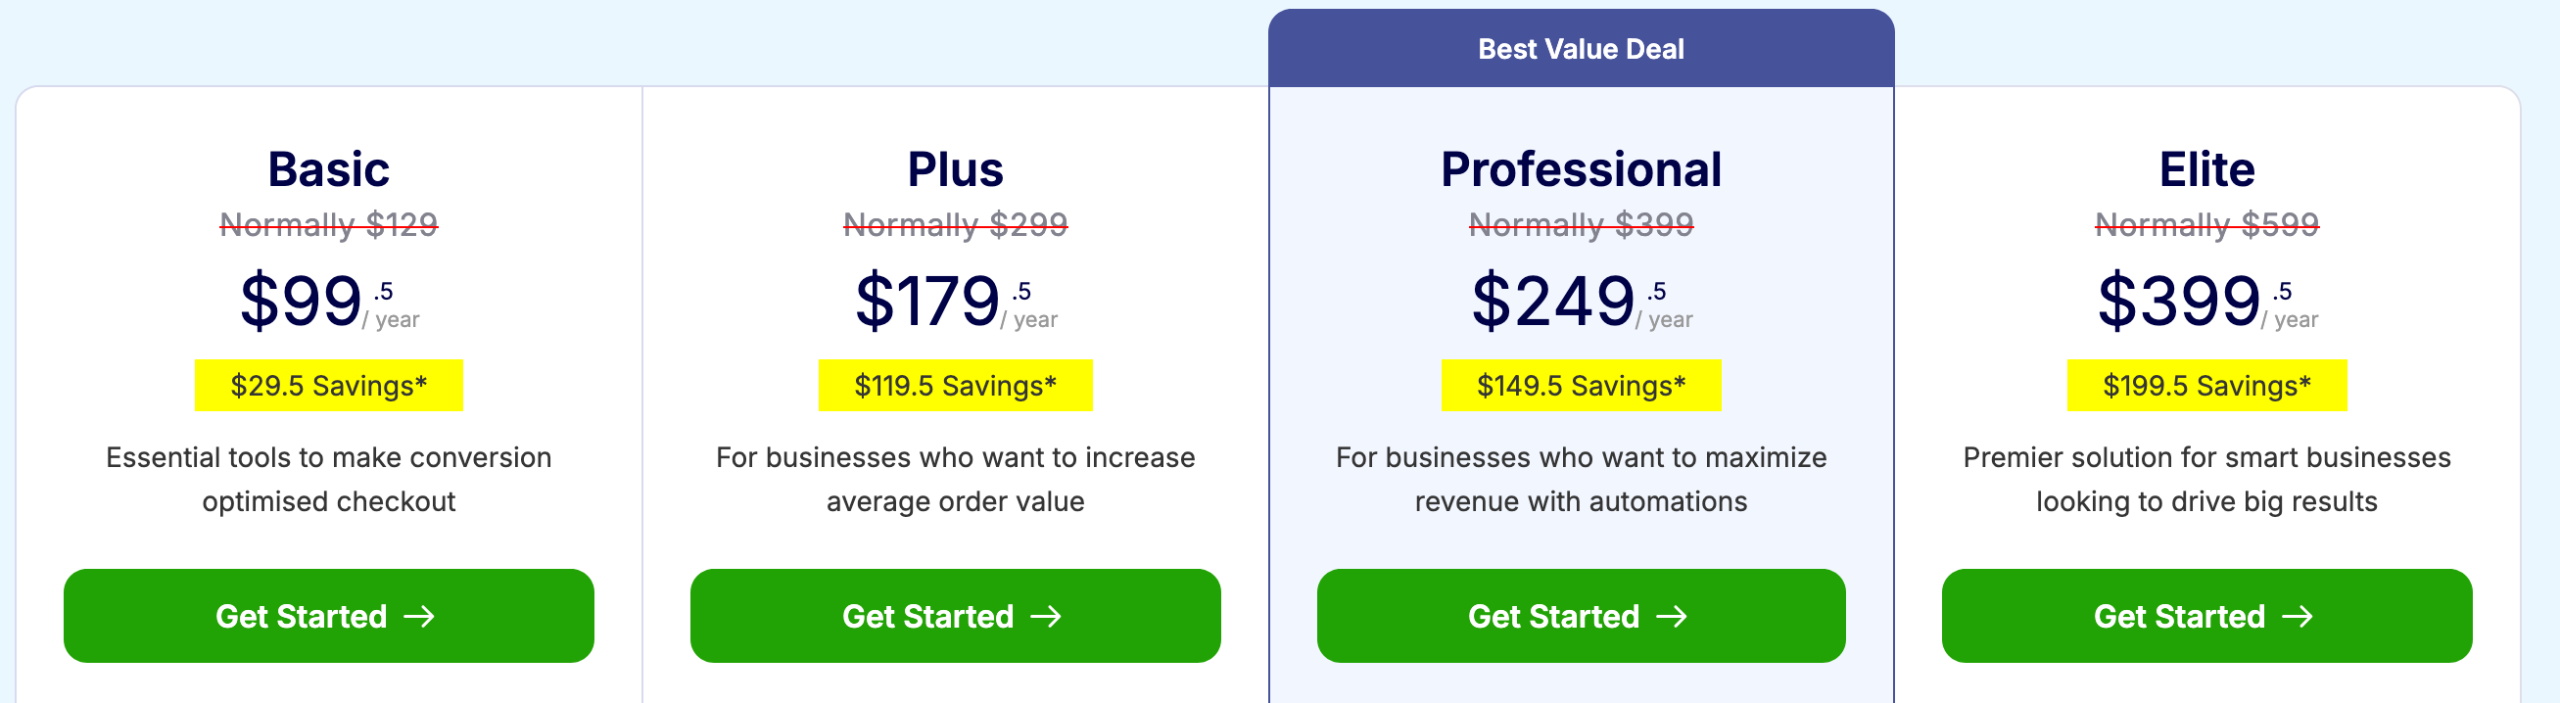
At the premium level, FunnelKit offers 4 price packages (all with a 14-day money-back guarantee):
- Basic: $99.50 for use on up to 1 site
- Plus: $179.50 for use on up to 2 sites
- Professional: $249.50 for use on up to 2 sites
- Elite: $399.50 for use on up to 30 sites
Which plan to choose? Decide according to the number of sites you want to use FunnelKit on, and also your needs.
The Basic plan, for example, is the most limited in terms of functionality. You have no access to A/B testing, analytics, upsells, order bumps, or automation.
In addition, each plan includes the Sliding Carts plugin. However, if you wish to take advantage of the FunnelKit Automations plugin, you’ll need to start with the Professional plan.
Be sure to read all the offer details on the pricing page to check that the options you need are included in your price plan.
You can also purchase the Pro version of the FunnelKit Automations plugin on its own, from $99.50/year for use on up to one site.
Free or Pro version of FunnelKit: Which to choose?
Obviously, switching to a Pro license requires a financial investment that can be significant, depending on the plan chosen.
It’s tempting to wonder whether the free version might not be enough (if you’d like to save some money). Well, once again, it’s a question of needs.
The free version gets you started, with a few free templates but limited options.
To put it simply: Funnel Builder Lite (the free version) won’t be enough if you want to set up additional sales (order bumps, upsells, downsells), configure A/B tests, or take advantage of the most advanced optimizations on your order page.
What are the alternatives to FunnelKit?
In terms of price, FunnelKit may seem a little expensive. It’s an investment, alright.
But honestly, compared to some SaaS platforms, it’s very inexpensive in terms of price (I won’t go into detail about all the options offered by competitors, which are sometimes more advanced in certain respects).
- ClickFunnels costs a minimum of $81/month, or $972/year.
- ThriveCart is priced at $495 (lifetime use, one-off payment). Over time, this can be worthwhile. The downside is that ThriveCart can only be used on one domain per license. So if you want to use it for several customers, it’s likely to be very expensive.
What’s more, compared to these SaaS platforms, FunnelKit lets you retain ownership of your data, since everything runs on your own WordPress installation.
Speaking of which, let’s not forget that FunnelKit has other competitors in the WP ecosystem. Among the best-known is Cartflows, but it’s a little less complete than FunnelKit in terms of automation and advanced checkout.
And let’s not forget WPFunnels, which doesn’t have the functionality to automate your marketing (emails, workflows, etc.).
Our final review of FunnelKit
Alright, we’re getting to the part you’ve been waiting for. The final verdict, with a recap of the plugin’s strengths and limitations for creating sales funnels, as well as WPMarmite’s opinion of FunnelKit.
FunnelKit benefits
- An easy-to-use and easy-to-learn plugin, suitable for beginners. No coding or design skills are required.
- An intuitive, ergonomic interface, with convenient drag-and-drop operation to create your funnels visually.
- Native integration with WordPress, so you can stay in your administration interface while creating your sales funnels.
- Compatibility with the WordPress editor, Elementor, and Divi Builder.
- Numerous integrations, particularly with email marketing tools.
- The ability to add upsells, downsells, and order bumps, conduct A/B tests, and access analytical data.
- Multiple ready-to-use templates for your funnel pages and emails — practical to avoid starting from scratch, and saves you time.
- The all-in-one aspect of the tool, with the possibility of taking advantage of a complete ecosystem with the Sliding Cart and Marketing Automations plugins.
- The availability of a free version, useful to see if the plugin is right for you (and already meet some basic needs).
FunnelKit disadvantages
- There’s no collaborative option that would allow you to share your current funnel with others, for example.
- A short learning curve is required to master the most advanced options (e.g., conditional logic).
- Some functions may be duplicated if you’re already using a large external CRM.
- There are no lifetime licenses.
WPMarmite’s opinion
Tadam, drum roll. It’s time for our final assessment of FunnelKit. In our opinion, it’s one of the best plugins on the market for creating advanced sales funnels on WordPress.
FunnelKit combines simplicity, power, flexibility, native WP integration, and performance.
Above all, it solves a real problem: WooCommerce funnels are often too basic. Does everyone need a good sales funnel? No.
But if you:
- Sell online
- Want to boost your conversions
- Look for centralized, efficient tools
- And want to avoid overly complicated processes
… then yes, FunnelKit deserves a place in your toolbox. To start using it, just click below:

Receive the next posts for free and access exclusive resources. More than 20,000 people have done it, why not you?

Continue reading
Articles posted in WordPress PluginsOur review of B2BKing: A WooCommerce plugin built for B2B commerce
“Hi, I need 200 units of this product with fast shipping please”. As an online store owner, receiving this kind of message puts a smile on your face. Answering it, on the other hand, becomes a lot less fun… Basically,…
GTranslate on WordPress: our full review of this tool for creating a multilingual site
“Hello, how are you?” “What do you think of this computer mouse?” For you, everything is easy to understand in these two sentences. For someone living deep in the Shetland Islands or Yucatán, it’s probably a bit more complicated… If…
Air WP Sync: Test and review of this plugin for integrating Airtable into WordPress
Do you use Airtable and WordPress? Then some of your days probably look something like this. In the morning, you update your Airtable database as soon as something changes. In the afternoon, you copy and paste the same data into…