Today, we are all used to surfing on different types of websites: stores, social networks, newspapers, blogs, forums… For each of these categories of websites, we have the same reflex: to check the menu.
The menu forms an important aspect of the user experience (UX) and today more than ever, you have to keep it at the forefront of your mind when creating websites.
We have already discussed here how to create and manage a WordPress menu. So, it’s time to go further, by focusing now on the ultimate kind of site menu: the dropdown menu, which opens up more options.
Sound good to you? Let’s get started!
What is a dropdown menu?
A dropdown menu allows you to organize and facilitate the navigation of your users, by displaying a reduced number of pages, while giving them the option of visiting additional pages by hovering over the first ones.
A dropdown menu provides real added value in terms of user experience (UX), because it offers an overview of the site’s pages and makes it easy for visitors to access a specific page.
Everything is already arranged on our favorite CMS to make the navigation menu responsive (the display fits screens of different sizes) by default, which makes life easier for creators of WordPress sites.
To create dropdown menus on WordPress, there are different plugins that I have already presented in this article on mega menus, as well as in this guide to plugins you can use to improve your WordPress menu.
But you should be aware that you can do all this by yourself, without adding any plugins.
I can already hear you wondering: “Really? But… how?!”

This is what we will look at in detail now.
How to create a dropdown menu in WordPress
In this tutorial, we will look at three different ways to create a dropdown menu in WordPress:
- Via the Appearance > Customize menu
- Via the Appearance > Menus menu
- Via the Navigation block, with an FSE compatible theme
Using the Customization Tool
When you create your WordPress site, you can choose a default theme or pick one that suits you better from all the free and paid ones out there.
To find the right theme for you, you can check out our themes page.
For this example, I’ll use one of the most popular themes from the official directory: Astra (1M+ active installations).
Create pages of different levels
Start by creating your first level pages, which we will call “parent pages” (Page 1, Page 2, Page 3…), your “children pages” (Page 1-1, Page 1-2, …), and even your “grandchildren pages” (Page 1-1-1, Page 1-1-2, etc., depending on your needs).
Once this is done, all you have to do is display them in the most logical way possible in your dropdown menu.
Adding pages to your menu
So let’s move on to creating a menu that includes all these different levels pages. We will first look at a first method, via Appearance > Customize > Menus.

Be careful here: if you just create a menu by adding all the existing pages, you will get a result that will not meet your expectations, because it will not be a dropdown menu:

On the other hand, by following the logic of the parent, children, and grandchildren pages that you chose when you created the pages, you will get the WordPress dropdown menu that you want.
To do this, start by creating your menu by clicking on “Create a new menu,” give it a name, select the location where you want it to appear, and then click “Next.”
Next, add the desired pages to your menu by clicking on the “Add Items” button. Then, simply drag and drop each child under each parent and each grandchild under each child:

You can also click on the “Reorder” button, and then edit the structure of your dropdown menu using the arrows that appear.
Be careful not to add too many items or different levels to your dropdown menu, as this may make it more difficult for your visitors to navigate.
On the screen, on the visitor’s side, you will have a perfect display, which follows the publication logic of your pages. The visitor of your site will be able to find his way around very easily, thanks to the dropdown menu integrating all the page levels:

If you want to create a dropdown menu not for your pages, but for your posts and categories, you can follow the same steps, using drag and drop.
The classic method
If you prefer the “classic” menu creation option that is present by default on WordPress, you can also use do it that way. You’ll see this method isn’t complicated either.
Create a menu
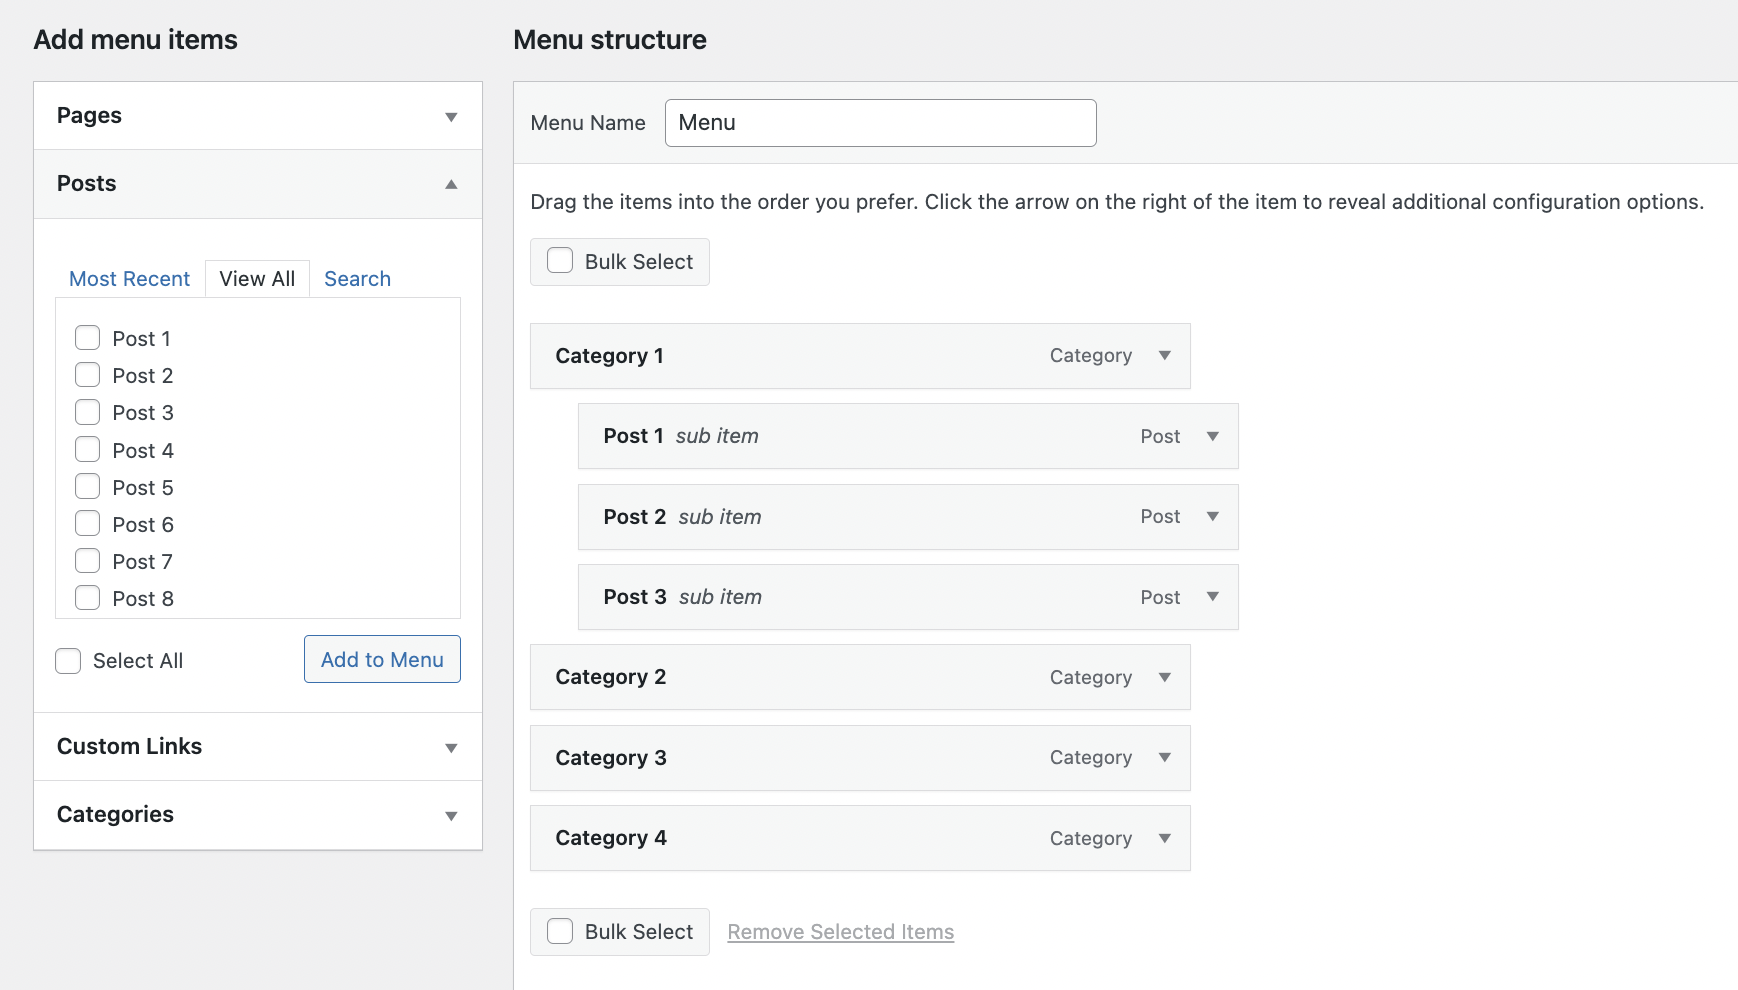
In the WordPress administration, go to Appearance > Menus. You will find yourself on this page:

Then, you will have to follow the following steps.
In the “Menu structure” section:
- Give the menu a name.
- Choose whether to add the so-called top-level pages to the menu immediately or not (here, Pages 1, 2, 3, and 4).
- Choose a location:
- Click on the blue “Save Menu” button at the bottom right of the screen.
Adding menu items
In the “Add Menu Items” section, choose to display either:
- Pages
- Posts
- Categories
- Personalized links (i.e. links that point outside your site or to specific pages of your site, such as the Terms and Conditions for example)
For the pages:
1. Click on “View All,” check the pages you want to add to your dropdown menu, then click on “Add to Menu.”
2. Move the children pages under the parent pages and the grandchildren pages under the children pages using drag and drop, as below.

If you choose to add categories and posts to your dropdown menu, follow the same steps as for the pages:
- First add the categories, then the posts, and click “Add to Menu.”
- Then drag and drop to move the items under the right categories.
Create a dropdown menu with the Navigation block and an FSE theme
With the arrival of the Site Editor (formerly called FSE, for Full Site Editing), the Navigation block has arrived.
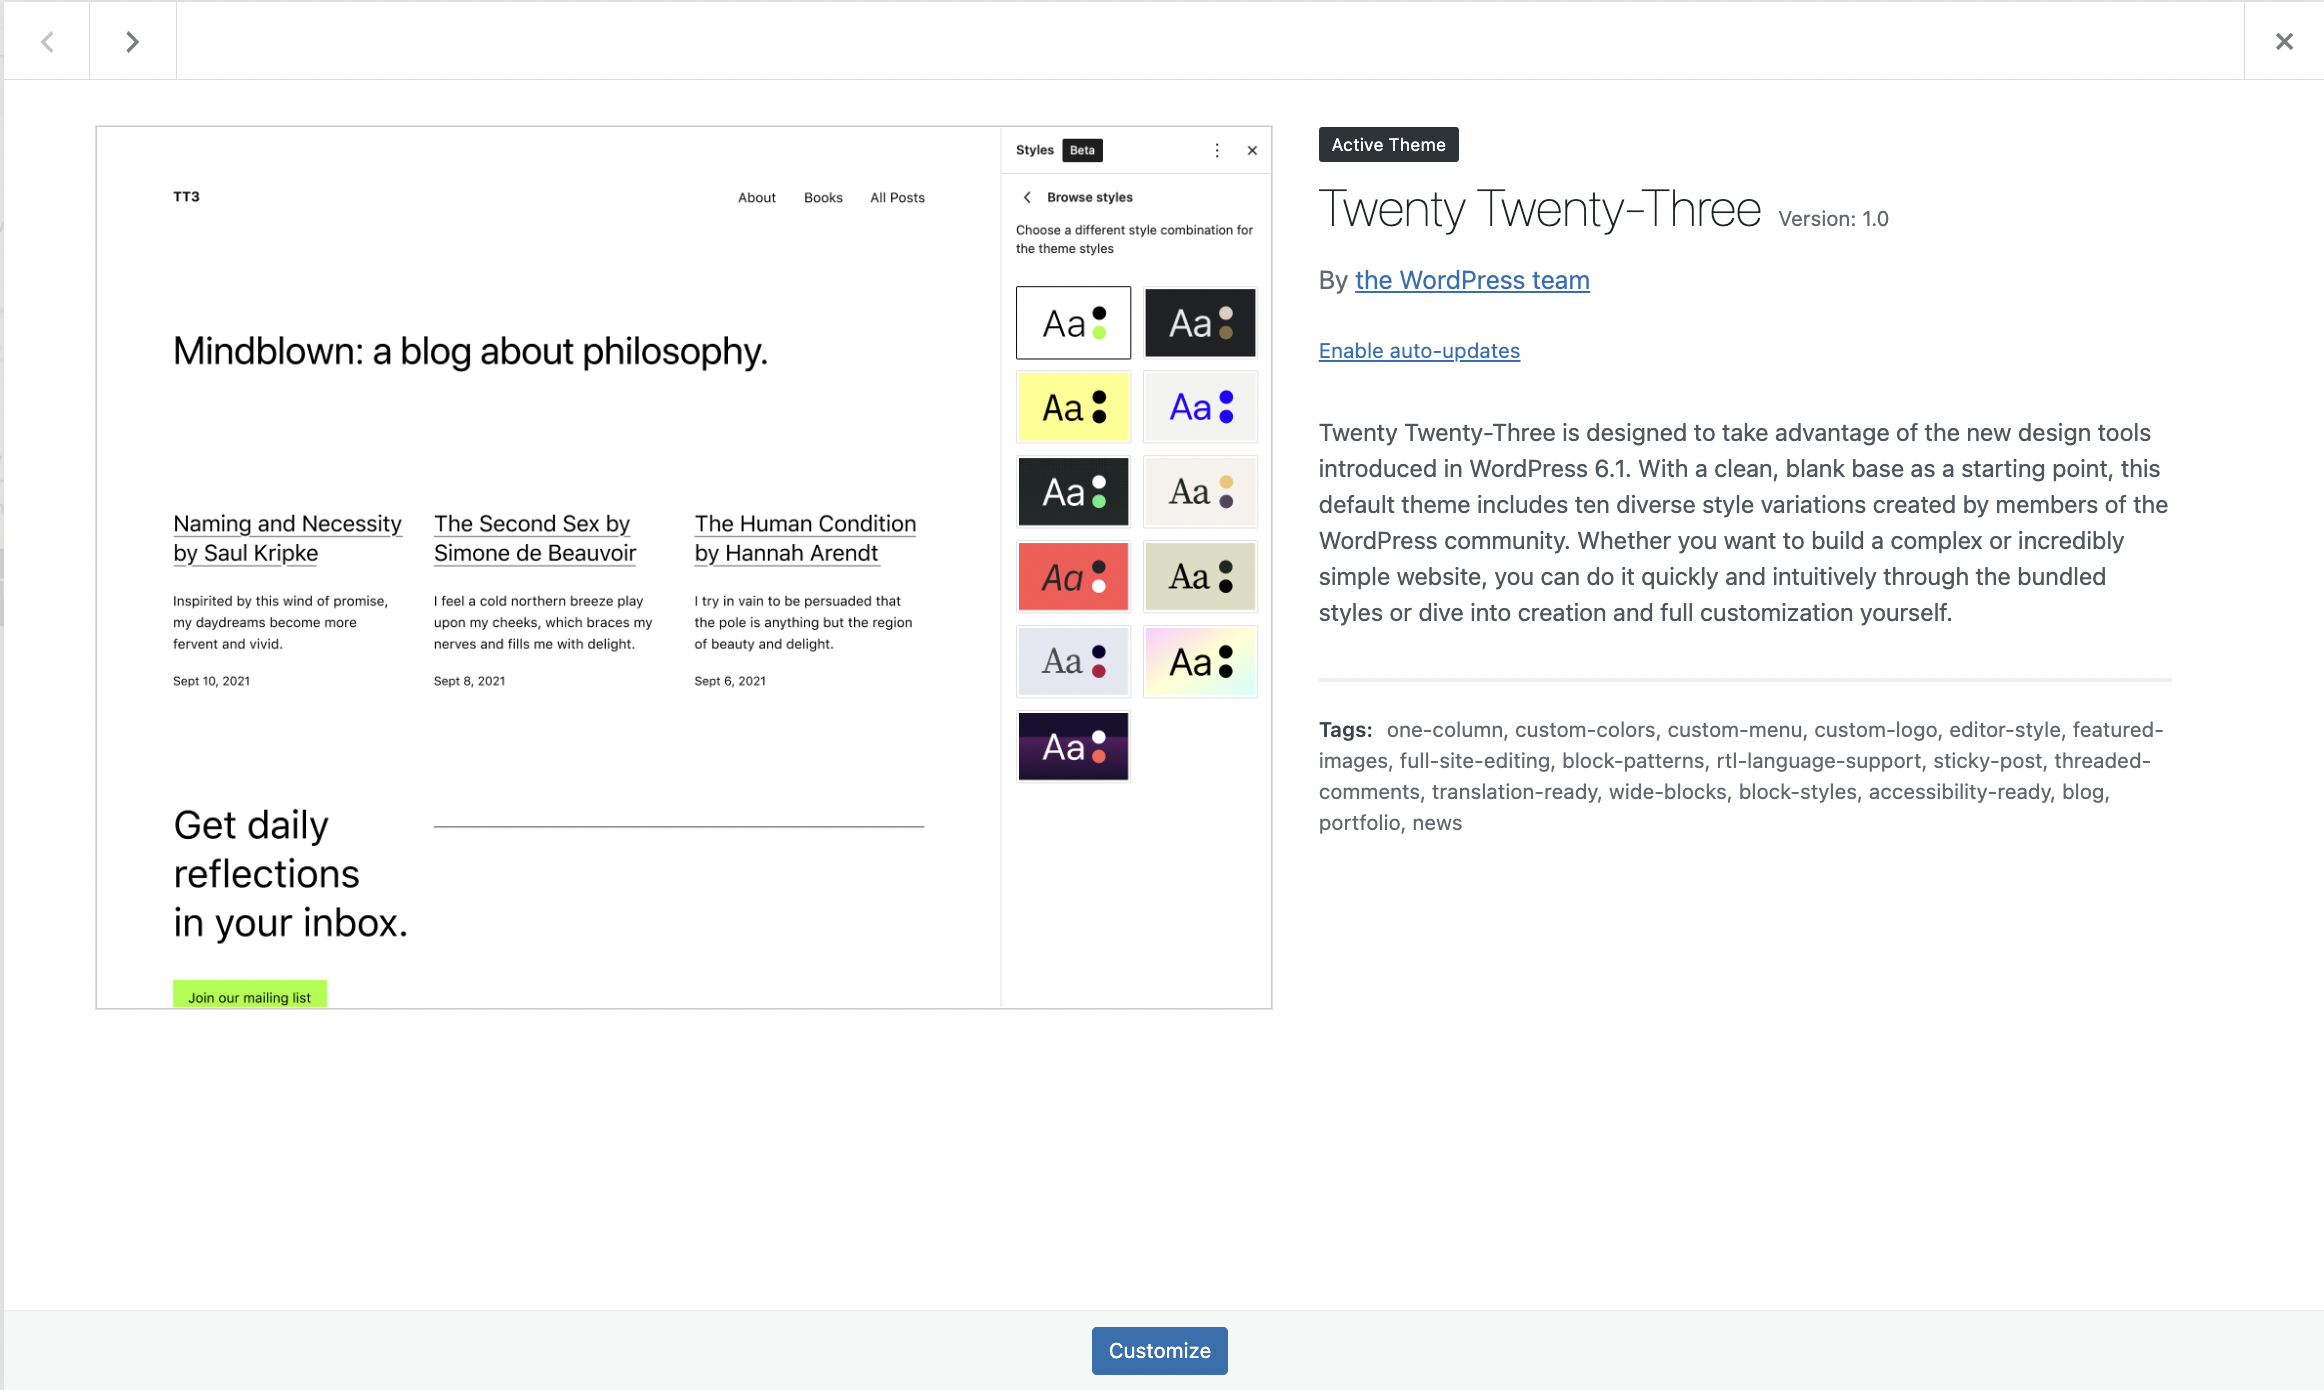
For the purpose of this tutorial, I have chosen a theme that is compatible with Full Site Editing, and that comes free and by default with WordPress version 6.1. It’s called Twenty Twenty-Three:
With an FSE theme like Twenty Twenty-Three, you also have the ability to create a dropdown menu using the Navigation block.
Create a menu with the Navigation block
First, go to the Site Editor, via Appearance > Editor. Then, add the Navigation block where you want to display your beautiful dropdown menu, as you would for any other block.

Everything is in the block’s settings on the right side of your screen:

You have the option to either create a new menu here, which will only be visible on this page for the time being, or to insert the menu you’ve already created, regardless of the technique you use.
The latter will then appear as you have designed it:

Add pages of different levels to your menu
To create a new menu, click on “Create a new menu” in the Navigation block settings. Now you can search for and add the master pages you want to display in your dropdown menu.
To add children and grandchildren pages, simply click on the parent page and then click on “Add submenu.”

Then click on the “+” that appears to add the lower level page. Note that you can add other types of blocks to your menu, such as a logo, social network icons, or a search bar, for example.
You can’t move items in the menu with drag and drop, but you can do so by clicking on the corresponding arrows.
Once you have finished creating your WordPress dropdown menu, you can customize its appearance in the block settings on the right side of the screen (display, colors, typography, spacing, etc.).
It will then be possible to use this menu as you wish and wherever you want on your WordPress site.

Conclusion
Whether you preferred one or the other of these methods, you can see:
- WordPress has several ways to design dropdown menus
- All of them are easy to learn
Since the process is different in each of these three methods, your habits and experience with WordPress will probably lead you to use one or the other.
We are sometimes attached to our habits, so users who have already used the CMS a lot may prefer to use the classic method of menu development. Those who are new to WordPress may be more enthusiastic about using the Navigation block.
In any case, be careful not to include too many elements or too many different levels in your dropdown menu, in order to keep navigation simple for your site visitors.
What about you, do you offer a dropdown menu on your WordPress site? If yes, what method did you use to create it? Tell us all about it in comments. 😉

Receive the next posts for free and access exclusive resources. More than 20,000 people have done it, why not you?

Continue reading
Articles posted in WordPress TutorialsHow to update the PHP version of your WordPress site
What comes to mind when you think of WordPress speed and security? Your favorite plugins, perhaps? You should also think about… PHP! If you’re looking for a site that loads fast, while offering a solid shield against hacker attacks, there’s a…
How to create an effective HubSpot conversion funnel on WordPress (complete guide)
In the drawers of a kitchen, there are often two very useful utensils lying around. The first is the colander. And to illustrate, some WordPress sites unfortunately resemble it. Why? Well, because visitors arrive on the site in question… then…
How to fix the ERR_CONNECTION_REFUSED error: A complete guide
Does your browser display the ERR_CONNECTION_REFUSED message when you try to access a website? This error means that the target server – or your own configuration – is actively rejecting the connection request, leaving you at a dead end. But…