

What comes to mind when you think of WordPress speed and security? Your favorite plugins, perhaps? You should also think about… PHP! If you’re looking for a site that loads fast, while offering a solid shield against hacker attacks, there’s a…
By default, WordPress is highly logical. When you install it, it assigns the prefix _wp to all the tables in your database. WP as in… WordPress, yes.
I mean, it wasn’t going to make the prefix _wix or _shopify. Can you imagine?

Let’s get serious. The problem with this two-letter prefix that goes unnoticed is that it makes your site more vulnerable to hacker attacks, because everyone knows about it!
If you want to strengthen the security of your WordPress installation, you’ll need to change this prefix in your database tables.
At the end of this article, you’ll know why and how to change it, with the help of three practical methods adapted to all types of users, from beginner to advanced.
Let’s get started!
Why should you change the prefix of the database tables on WordPress?
The main reason is related to the security of your site. When you install WordPress on your hosting server, you link it to a database.
This database has 12 tables with a indicative prefix: wp_.
The problem is that this default prefix opens the door to hackers. As it’s very easily identifiable, hackers and malicious bots only have to try to guess the ID of your database to try to perform different types of actions to harm you, such as:
- Adding spam links and comments
- Crashing your site
- Recovering personal data from a form or a purchase (bank details)
Technically, they execute what is called SQL injections in order to retrieve information from your database.
You got it: you’d better protect your database! It’s the most important element of your site, because it contains all its contents:
- Your posts
- Your pages
- The settings of your plugins
- Comments
- Revisions
- Site options
- Etc.
I’ll let you imagine what happens next: if your database gets hacked, you lose everything. Hence the importance of changing the famous table prefix.

Recommendations before changing the prefix of the database
Back up your site
Before diving in, I recommend that you first back up your site (files + database, of course).
There are several ways to do this. You can either opt for:
- A backup plugin like UpdraftPlus. Remember to automate your backups and send them to a third-party storage space.
- A maintenance tool like WP Umbrella (affiliate link) or ManageWP
- A backup service offered by your hosting company. Bluehost (affiliate link), for example, offers complimentary automatic backups, as well as allowing you to run your own backups through the cPanel interface.
Having covered your bases, you will be able to easily restore your site in the event of a problem when changing the prefix of your WordPress database tables.
Use a test site
In order to protect your site from errors or bugs, I advise you not to change the table prefix on a production site (one that is already online).
For more peace of mind, perform your operations on a test site. You can work on:
- A local environment, with the tool Local, for example
- A staging site using a dedicated plugin, such as WP STAGING. You can also create a pre-production site with your host, if it has this option.

If the change of the database prefix goes well, you’ll just have to make the change online, without fear of breaking everything.
Now it’s time to get your hands dirty. Ready to roll up your sleeves?
3 ways to change the prefix of your WordPress database tables
Method 1: Choose a new prefix as soon as you install WordPress
By default, WordPress assigns the prefix wp_ to your database tables when you install the CMS (Content Management System).
However, there’s nothing to stop you from taking the initiative. 😉 You can change the prefix of the database tables as soon as you install your next sites. That way, everything is clear from the start.
Need help installing WordPress? Check out our dedicated tutorial that shows you how to do it step by step.
When you need to link your site to its previously created database, simply enter the prefix of your choice in the box labeled “Table Prefix”:

Here are some tips for creating an effective and hard-to-identify table prefix:
- Don’t use a prefix that starts with
wp_, even if it contains numbers and letters (e.g.wp_ryu7923ecx_) - Avoid prefixes that are too common, such as those beginning with your first name, your pet’s name, love, or 1234
- Put something more complicated, even incomprehensible, in place of
wp_. To do it right, use a combination of numbers and letters (e.g.dgh47yz_) - Use this handy site to generate strong passwords automatically, which you can use as prefixes to modify your database tables.
Method 2: Use a plugin to modify the prefix of your WordPress database tables
Didn’t change the prefix of your tables during installation? Don’t panic, we’ll move on to solution #2 to rectify the situation.
In this situation, the easiest thing for a beginner is to use a plugin.
The most famous (and also well-rated) one in this category in the official directory is called Brozzme DB Prefix & Tools Addons. It will do the job very well.

Don’t forget to backup your database before using the plugin. You never know: in case of a bug or a connection problem, your site could crash.
Here’s how to set it up in two steps.
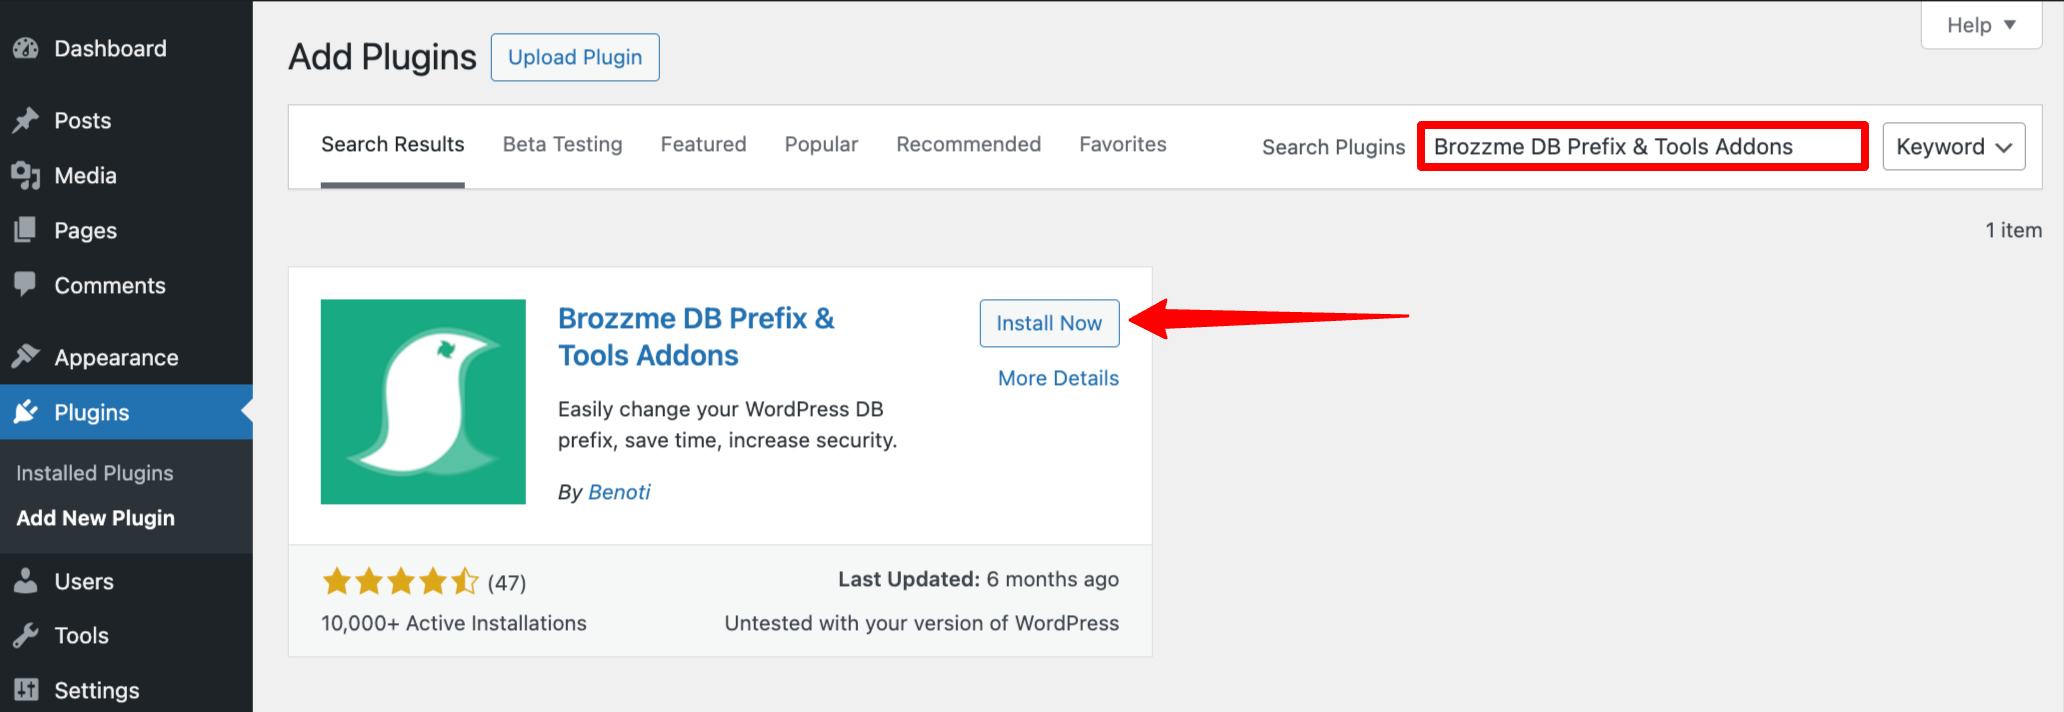
Step 1: Install and activate Brozzme DB Prefix & Tools Addons
On your WordPress admin interface, go to Plugins > Add New. In the search bar, type the name of the plugin. Then install it and activate it:
Step 2: Change the database prefix
Now go to the plugin settings interface, from the Tools > DB Prefix menu.
On the tab called “Change DB Prefix,” enter the prefix of your choice in the “New prefix” box.
The plugin will update your database and the information in your wp-config.php file by itself.

If an error message is displayed, it’s probably because your wp-config.php file is not writable or your database does not have ALTER rights, as indicated by the plugin.
Finish by clicking on the blue “Change DB Prefix” button, and you’re done! To verify that you have correctly changed the prefix of the database tables, navigate to the visible interface of your site (front-end).
Are all the pages displayed correctly? Then you’re all set!

Method 3: Change the prefix of the tables with phpMyAdmin
Do you have a minimum of technical skills and aren’t afraid to get your hands in the code? Or you just don’t want to add an extra plugin to your WordPress site?
In that case, the manual method is surely for you. Let’s find out how to change the prefix of your WordPress database tables using phpMyAdmin.
phpMyAdmin is a web application to manage your database. It’s available on cPanel, an online manager that administers the entire server on many hosting providers.
However, I warn you, this method is riskier than the two previous ones. So as usual, back up your site (files + database) before you start.
Here is the detailed procedure, step by step.
Step 1: Change the prefix of the database tables in the wp-config.php file
To start, add the new prefix of your choice to your wp-config.php file, which contains your site’s basic configurations (and your database credentials).
Speaking of which, where is the wp-config.php file? You’ll find it in the root directory of your site.
In order to identify it, connect to your favorite FTP client. For the purpose of this test, I’ll use FileZilla, which is free.
Now go to the root of your site, which will have a different name depending on your host.
Then, on the line $table_prefix, enter your new prefix (xjh5g7j8_ in the example below):

Step 2 : Change the name of your tables on phpMyAdmin
Now, you have to replace the prefix of all your tables (the famous wp_) by the one you have just entered in your wp-config.php file.
To do this, you will use phpMyAdmin. You will access its interface directly from your cPanel interface (if your host offers this online manager).
When you are connected to cPanel, click on “phpMyAdmin” in the “Databases” section:

Select the database of your choice on the left, and enter the following SQL queries in the SQL tab (replace xxx with the new prefix you chose, i.e. xjh5g7j8_ in my example):
Rename table wp_commentmeta to xxx_commentmeta;
Rename table wp_comments to xxx_comments;
Rename table wp_links to xxx_links;
Rename table wp_options to xxx_options;
Rename table wp_postmeta to xxx_postmeta;
Rename table wp_posts to xxx_posts;
Rename table wp_termmeta to xxx_termmeta;
Rename table wp_terms to xxx_terms;
Rename table wp_term_relationships to xxx_term_relationships;
Rename table wp_term_taxonomy to xxx_term_taxonomy;
Rename table wp_usermeta to xxx_usermeta;
Rename table wp_users to xxx_users;

Some plugins (e.g. Yoast SEO or Imagify) add their own custom tables to your database. Remember to replace them with your new prefix too.
Step 3: Edit the wp_options table
Are you still tracking with me? In the third step, you will modify the table wp_options. This table contains all the options of your site, those contained in the “Settings” menu of your WordPress administration.
Yes, but… by changing the table prefix, you no longer have sufficient rights to access your site’s administration.
To solve this problem, double-click on the table wp_options. In the column option_name, locate the field wp_user_roles.
Double-click on it, and replace it with xxx_user_roles (replace xxx with the new prefix you have chosen, i.e. xjh5g7j8_).

Step 4: Modify the wp_usermeta table
Finally, edit the table wp_usermeta. In the column meta_key, replace all the old prefixes wp_ with the new ones.
For your convenience, you can click on the column meta_key to filter alphabetically:

Step 5: Test your site
In order to verify that the changes have been implemented correctly, navigate through your site’s pages. If everything is displayed correctly, then the change to your database prefix worked.
Are you experiencing problems and can no longer access your site? You probably forgot to modify the prefix of one or more tables. Go back to phpMyAdmin and check.
In case of database connection error, please refer to our dedicated article for solutions.
In summary
In this article, you have learned why and how to change the prefix of the WordPress database tables in three different ways:
- During the initial installation of WordPress
- With the Brozzme DB Prefix & Tools Addons plugin
- Using phpMyAdmin
Whichever method you choose, you’ll have a more secure site. However, don’t stop there.
To further protect your WordPress installation, at the very least consider activating a general-purpose security plugin such as SecuPress, iThemes Security, or Wordfence.
For you, do you have any feedback to share with us after you changed the prefix of WordPress tables? Are you about to do it? Tell me all about it in the comments.

Receive the next posts for free and access exclusive resources. More than 20,000 people have done it, why not you?
Register

Thank you for the plugin recommendation. It worked for me
Awesome! Have fun with your blog 🙂
Thank you for the plugin recommendation. It worked for me