A grayed out field. The impossibility of clicking in this famous field to try to write something. And this message that appears, an outright dismissal: “Logins cannot be changed.”
If you’ve ever tried to change your WordPress login, you’ve probably felt a little frustrated.

That little rascal WordPress doesn’t allow you to do change your username by default, though it’s very easy to change other details — your account password, for example.
However, changing your username is still possible. And the good news is that it’s quick and easy to do.
When you’ve finished reading this article, you will know 3 methods (with and without a plugin) to change your username, if needed.
Why change your WordPress username?
This is not an action that you’ll have to repeat very often. However, changing your WordPress username will sometimes be necessary for several reasons related to:
- Security. If your WordPress username is too simple or obvious (e.g., admin, love, user, baby), you are more likely to have your site hacked, and your content and data stolen. The more complex your login is, the more effectively you will fight against brute force attacks.
- Your brand image. A username that is too offbeat, although humorous (e.g. breadpitt), impacts the image you send to your readers. If you want to come across as a pro, choose a WordPress handle that is representative of your person or your online activity. For example, Alex posts soberly under the username “alex” on the WPMarmite blog. Very simple.
- A mistake when creating it. When setting up your new username, you may have gone too fast and forgotten or added an extra letter due to a typo. This can happen and it can be fixed, as you will see shortly.
- WordPress maintenance. After creating a site for a client and delivering it, you may need to change the login for the site administrator, “transferring” ownership to your client.
- Managing your users. If many users collaborate on your site (e.g. multiple editors) or participate in it (e.g. via a forum), you may sometimes come across usernames with very similar wording. To make everything clearer and more coherent, it can be useful to modify a WordPress username to facilitate user management.
That’s it for the general overview. Now I suggest we get to the action right away. Keep reading to learn several ways to modify your WordPress login, either manually or with the help of a plugin.
To strengthen your site’s security, activate a general-purpose security plugin like iThemes Security or SecuPress. Both have options to limit brute force attacks on your WordPress admin login page, for example.
How to change a username on WordPress: 3 detailed methods
As a precaution, I recommend that you first backup your site (files + database) before taking any action. For this, you can use the free UpdraftPlus plugin, or a tool to maintain your sites like WP Umbrella (affiliate link) or ManageWP. In case of any problem during the manipulations you will perform, you can easily restore your WordPress website.
Method 1: Create a new user and delete the old one on your dashboard
The first method is counter-intuitive but then again, WordPress leaves you no choice. As you read in the introduction, the #1 CMS (Content Management System) on the market doesn’t allow you to directly modify a login.
To get around this problem, the solution is to create a new username, then delete the old one that is causing you problems. 😉
Another point of clarification: I’m going to start by going over this method because it’s the most logical and “natural” of the three options.
With this method, there is no need to install an plugin or to manipulate your database.
Step 1: Add a new user
On your WordPress dashboard, go to the Users > Add New User menu. Enter the information requested on the screen. This includes the following:
- The username: Your new WordPress username
- An email address. Here, you won’t be able to use the same email address as the one already chosen for the user account you want to delete. If you want to, put a backup address temporarily. You will then be able to “recover” the email address of your choice when the other user account is deleted.
- Your first name
- Your last name
- Your website
- The language that will be displayed on the admin for this user
- A password
- The user role. If you want to keep all the same privileges, choose the administrator role.
Finish by clicking on the blue “Add New User” button:

Remember to generate a strong password to reinforce your site’s security. For this, you can use the password generator offered by WordPress. You can also use a free password generator like passwordsgenerator.net or the one offered by Avast.
In any case, never add personal information (date of birth, first name, children’s first name) or real words — present in the dictionary — in your passwords.
Include upper and lower case letters, numbers, and special characters to make your passwords more complex.
On average, it takes less than a second for a hacker to crack the most common passwords (qwerty, football, 123456), according to a study conducted by security specialist NordPass.
As you can see, we now have two administrators on the site:
- thibaut (myself)
- Matt

I’m superfluous, so let’s give all the attention to Matt. After all, he co-created WordPress, not me. 😉
Step 2: Delete the old username
Continue by logging out of your dashboard. Log back in with your new username and password.
Then delete the original user account you want to get rid of (thibaut, in our example). To do this, hover your mouse over the username of your choice and click on the “Delete” link:

Finish by attributing all the content linked to the administrator you just deleted (thibaut) to the new administrator (Matt Mullenweg):

All content related to the old user will now appear under the Matt ID. For example, on the blog posts you wrote, the author will now be Matt.
To “recover” the email address used with your old username, you now only need to enter it in the Accounts > Profile menu.

Method 2: Modifying a WordPress login with a plugin
Now, let’s move on to option number 2 for modifying a username: the use of a dedicated plugin.
Its main advantage? You don’t have to create a new username, unlike the previous method: the modification can be done directly after activation of the plugin (and moreover, you can use the same email).
The disadvantage, if we can call it that, is that you will overload your site (a little) by adding an extra plugin.
Personally, I prefer to avoid this kind of thing and use as few plugins as possible on my site, especially to reduce the risk of incompatibilities between some of them.
Of course, it’s possible to activate the plugin, change your WordPress login, and then remove the plugin once the job is done. It’s up to you to see what suits you best. Do you like the plugin option? Read on.
On the official WordPress plugin directory, there are two main plugins to change your WordPress login:
- Easy Username Updater (10,000+ active installations)
- Username Changer (40,000+ active installations)
Their user reviews are almost identical. However, at the time of writing, Username Changer had not been updated for more than 3 years.
That’s why I prefer to recommend Easy Username Updater, which is updated more regularly. It’s also easy to use, which is another advantage in its favor. Here is how to use it to change your WordPress login.
Step 1: Install and activate the plugin
To get started, go to Plugins > Add New. In the search bar, type Easy Username Updater. Install the plugin, then activate it:

Step 2: Change your WordPress login
Next, go to Accounts > Username Updater to get a list of users on your site. To change the username of any of them, click on “update”:

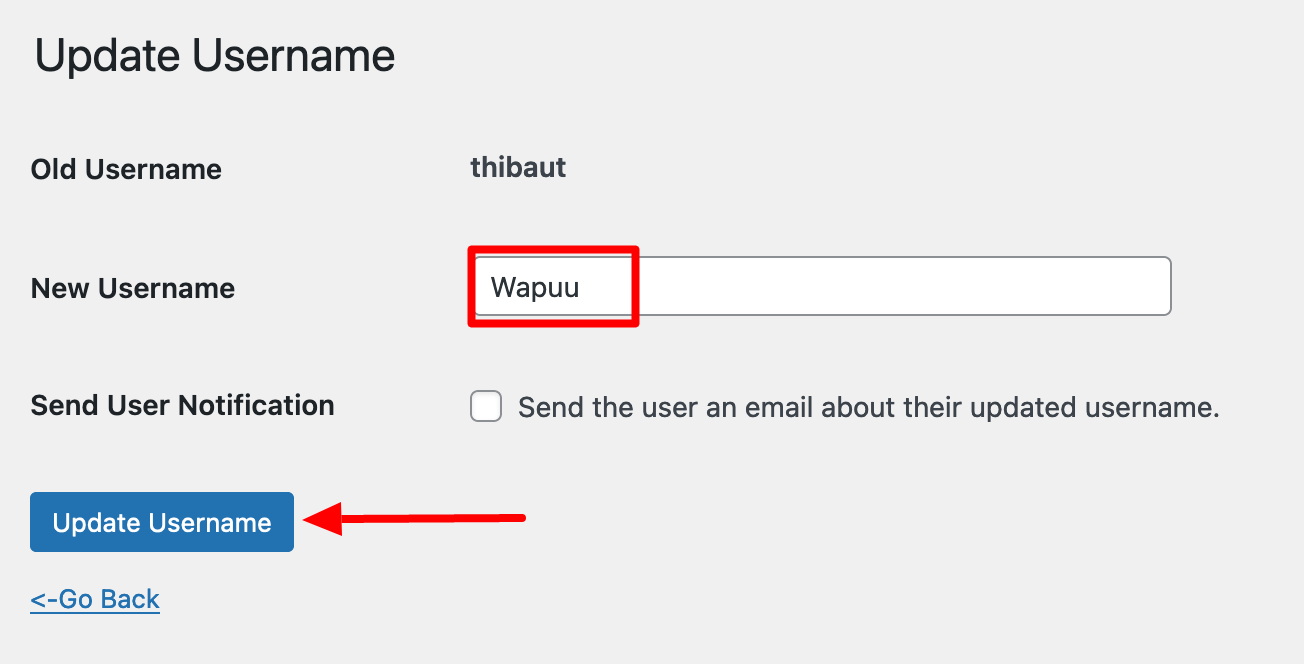
Enter your new username in the field called “New Username.” If you wish to receive an email notification of this change, check the box.
Finish by clicking on the “Update Username” button:
WordPress will automatically log you out. All you have to do is log in again using your new username.
Method 3: Changing a username on WordPress via phpMyAdmin
And finally, let’s go to the third method to change your WordPress username: using phpMyAdmin.
phpMyadmin is a web application used to manage your database. It’s available on the online managers (ex: cPanel) offered by the different hosting companies on the market.
It’s a bit intimidating when you say it like that, but I’ll detail everything point by point so that everything is clear.
However, this method is the most technical of the three. It’s also the most risky, since it involves directly modifying the most important element of your WordPress site: its database.
In other words, the slightest mistake will cause your site to crash. Therefore, I only recommend it to experienced people with a solid technical background. If you’re not sure of yourself, don’t use this method.
However, you can use it if you no longer have access to the administration interface of your site. In this case, only this method will allow you to change your username.
Here is the step-by-step procedure (remember to save your entire site beforehand).
Step 1: Accessing phpMyAdmin
Connect to the interface offered by your web host. For the purpose of this tutorial, I will use cPanel, the administration interface offered by Bluehost (affiliate link), which WPMarmite recommends.
Once on cPanel, click on “phpMyAdmin,” in the “Databases” section.
Step 2: Locate the wp_users table
On the left hand side, select the database of your choice, then double click on the table wp_users, which contains all the users of the site, whatever their role (administrator, subscriber, editor, etc.):

Step 3: Change the WordPress username of your choice
Choose the user name you want to change, then click on “Edit”:

In the “user_login” field, type in your new username. Finish by clicking on “Go”:

And that’s it. When you return to your WordPress dashboard, you will be prompted to log in again using your modified login.
Conclusion
You now have 3 detailed methods to change your WordPress account ID.
Choose the one that best suits your needs and skills. As a reminder, you can perform this operation:
- By hand, directly on your dashboard
- With the Easy Username Updater plugin
- By modifying the wp_users table of your database, on phpMyAdmin
Whichever option you choose, make sure you back up your entire site beforehand, to cover yourself in case of a problem.
What do you do when you need to change your username? Share your experience with WPMarmite readers by posting a comment.

Receive the next posts for free and access exclusive resources. More than 20,000 people have done it, why not you?

Continue reading
Articles posted in WordPress TutorialsHow to update the PHP version of your WordPress site
What comes to mind when you think of WordPress speed and security? Your favorite plugins, perhaps? You should also think about… PHP! If you’re looking for a site that loads fast, while offering a solid shield against hacker attacks, there’s a…
How to create an effective HubSpot conversion funnel on WordPress (complete guide)
In the drawers of a kitchen, there are often two very useful utensils lying around. The first is the colander. And to illustrate, some WordPress sites unfortunately resemble it. Why? Well, because visitors arrive on the site in question… then…
How to fix the ERR_CONNECTION_REFUSED error: A complete guide
Does your browser display the ERR_CONNECTION_REFUSED message when you try to access a website? This error means that the target server – or your own configuration – is actively rejecting the connection request, leaving you at a dead end. But…