

“Hi, I need 200 units of this product with fast shipping please”. As an online store owner, receiving this kind of message puts a smile on your face. Answering it, on the other hand, becomes a lot less fun… Basically,…
I recently introduced WP Grid Builder, one of the newest and most powerful content filtering plugins. Don’t you remember it? It’s probably because you’re not yet subscribed to the WPMarmite newsletter! 😉
Anyway, I don’t blame you, and today, I would like to tell you about its most historical competitor: FacetWP.
For almost 10 years now, FacetWP has reigned supreme over the custom search of many WordPress sites.

It’s hard not to talk about this plugin when talking about dynamic search and filtering on a WordPress website, and we’re going to see how we can implement it on our site to filter our blog posts according to different criteria.
Let’s go!
Overview
In this post, you’ll come across some affiliate links which means that WPMarmite gets a commission if you buy some of the solutions presented through these links. The price won’t change for you, at all, and will help us reward the research and writing work of the blog’s writers.
FacetWP: the mastodon of faceted search
Few competitors, a plugin that is easy to learn and implement on WordPress: everything is done to make our life easier.
As its name suggests, FacetWP allows you to create custom facets to filter any content available on your WordPress website: blog posts, WooCommerce products, custom content types, etc.
These facets can be of different types (we’ll see it right after) and allow the user to finely sort what he is looking for according to the available criteria.
And of course, all this without reloading the page, for a better user experience and speed.
FacetWP is a premium plugin, which does not have a free version.
It is available from $99/year for up to 3 sites, and $249/year for 20 sites and the possibility to filter users.
How to set up a blog post filter system with FacetWP
Now let’s get down to business.
We have a WordPress blog, but to make our visitors’ lives easier, we’re going to add different filters so that they can find what they’re looking for quickly and easily. Because we like to pamper our users.
After downloading and installing FacetWP, let’s go to the settings to find out what it offers.
The parameters are available in the administration in the Settings tab > FacetWP.

We arrive directly in the tab concerning the available facets.
A filter by category is created beforehand to start sorting your content.
We will now create our own.
Setting up facets on FacetWP
Once you have clicked on Add New, you arrive in the interface to set up our facet:

Let’s see FacetWP’s usefulness of each of these fields:
- Label: this will be the name of your facet. Don’t hesitate to put a precise title to find it more easily afterwards. Note the red
Copy shortcodebutton next to it, which will then allow us to insert our facet where we want it on the website. - Facet type: this field defines the type of facets you create. There are 13 different facets:
- Checkboxes
- Dropdown: a dropdown field
- fSelect: a dropdown field allowing you to select several options
- Hierarchy: a field that allows you to prioritize your facet by number of results
- Search: one search field
- Autocomplete: a search bar suggesting terms when you start typing your keyword
- Slider: an interval selector that allows you to define a number interval to sort your content (price, etc…)
- Date range: a range of dates to be defined
- Number range: an interval to be chosen by entering two numbers
- Proximity: a facet that allows you to search for results around a specific location. However, it requires the use of a custom field containing the longitude and latitude previously filled in
- Radio: radio buttons to tick
- Star rating: filtering by number of stars
- Pager: a facet of pagination
- Data Source: the sorting criterion on which the facet will act. It is possible to select all the values defining your content types: posts publication date, WooCommerce price fields, categories, labels, custom fields, etc.
- Value Modifiers: to include or exclude some values from your filters, for example to exclude a product, a category or a post
- Show Ghosts: to show or hide items that don’t return any results
- Behavior: to define whether the selection widens or narrows the displayed results
- Sort By: to define the display order of the elements of our facet (by number, by name, etc)
- Count: to set the maximum number of elements of our facet displayed
- Soft Limit: to display a “See more” button in our facet if many elements are returned
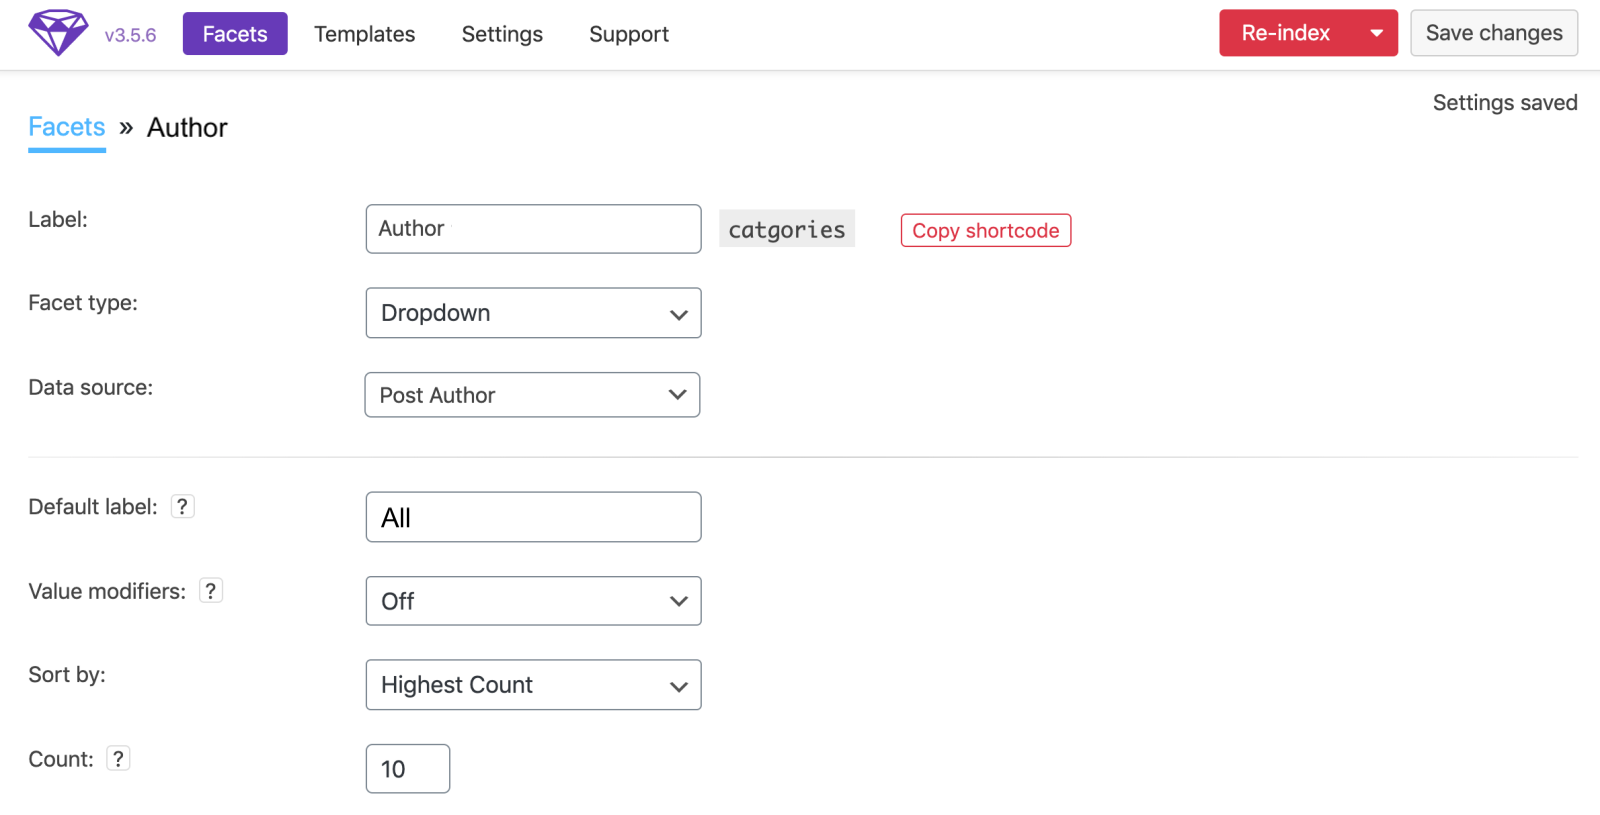
In our case, we will create one facet for our categories, and another to filter by Author.
For Categories, I choose to display checkboxes, and for Authors a dropdown field with the list of the different authors who have published on the website.
Here are the settings for my two facets:
The Category facet:

The Author facet:
Don’t hesitate to modify the options to refine your facets: many possibilities are available and simple to set up.
Create a page template
We now need to set up our page template displaying the types of content to be filtered.
So for us it will be blog posts.
So we go to the Templates tab of FacetWP and this is what we are offered:
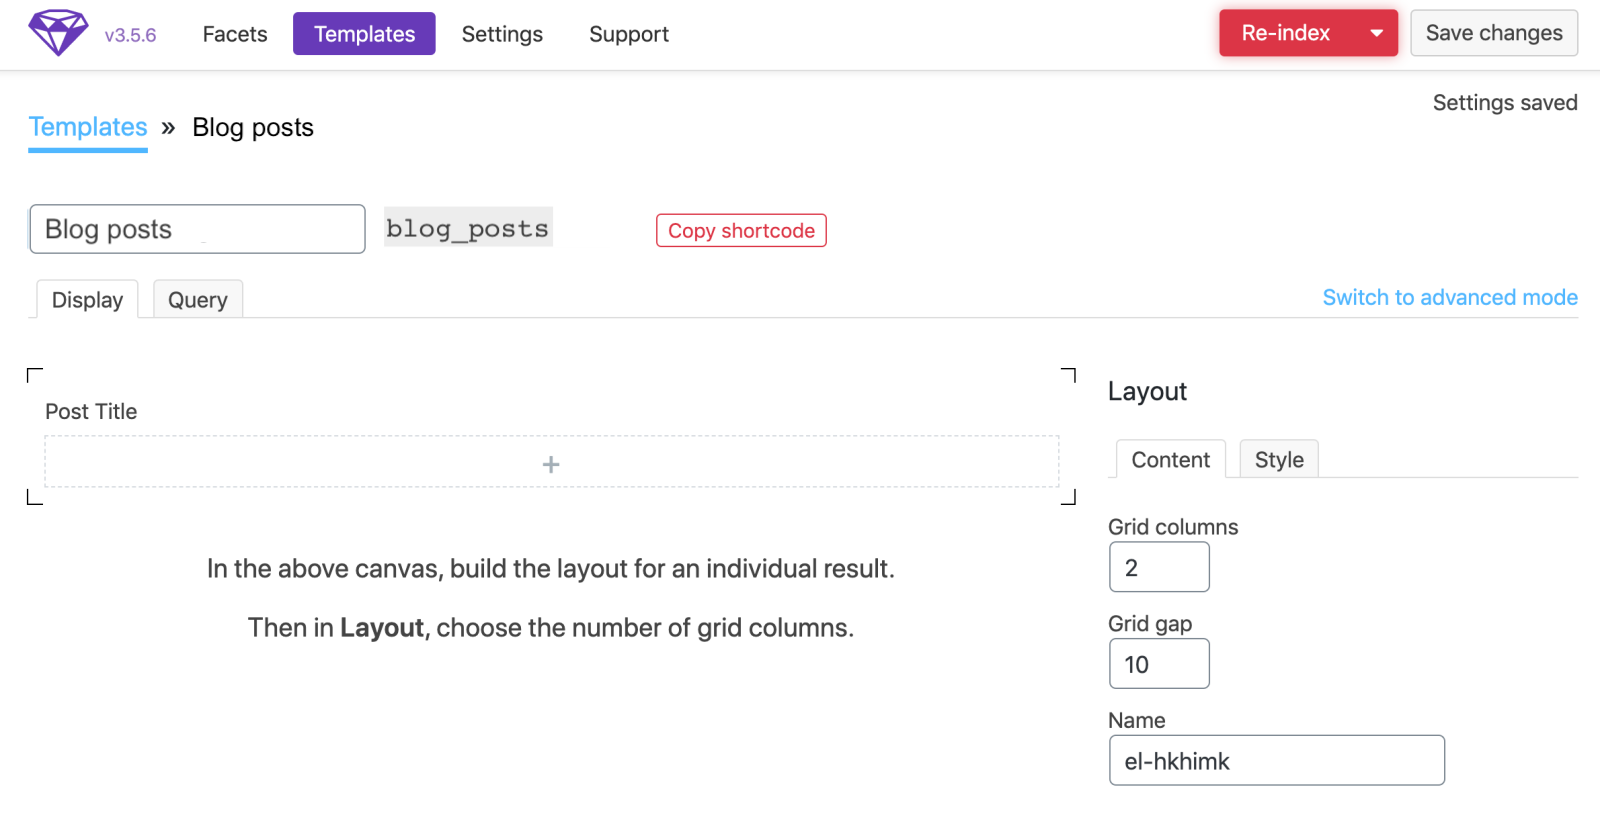
First, let’s give our template a name: Blog Posts. Simple but effective. A short code will then be automatically generated from it.
Then we have different sections:
- The Display tab: enables us to visually set up an element of our grid by selecting the different fields to be displayed.
- The Layout column: enables us to define how these elements will be displayed: the number of items per line, the distance between them and a single CSS class
- The Query tab: enables you to define the query that our template will use to display the different elements: by date, by name, etc
- The Switch to advanced mode link: we won’t talk about it here. This part is only useful if you enter all the code with your bare hands.
Let’s go for the implementation of our template!
Set up your template
FacetWP enables you to visually create (with a rather austere design, I must say) our element to be displayed in the desired way in our template.
To do this, simply display and then style each of the desired items.
By clicking on the +, you will have access to all the fields available for this display.
To name a few, you can for example display:
- The title of the post or product
- The content of the post
- The summary of the post
- The date of publication
- The date of modification
- The author
- The price…

For our template, we will display the following information:
- Picture in the spotlight
- The title of the article
- The summary of the article
- The author
- The date of publication
This is what our template would look like:
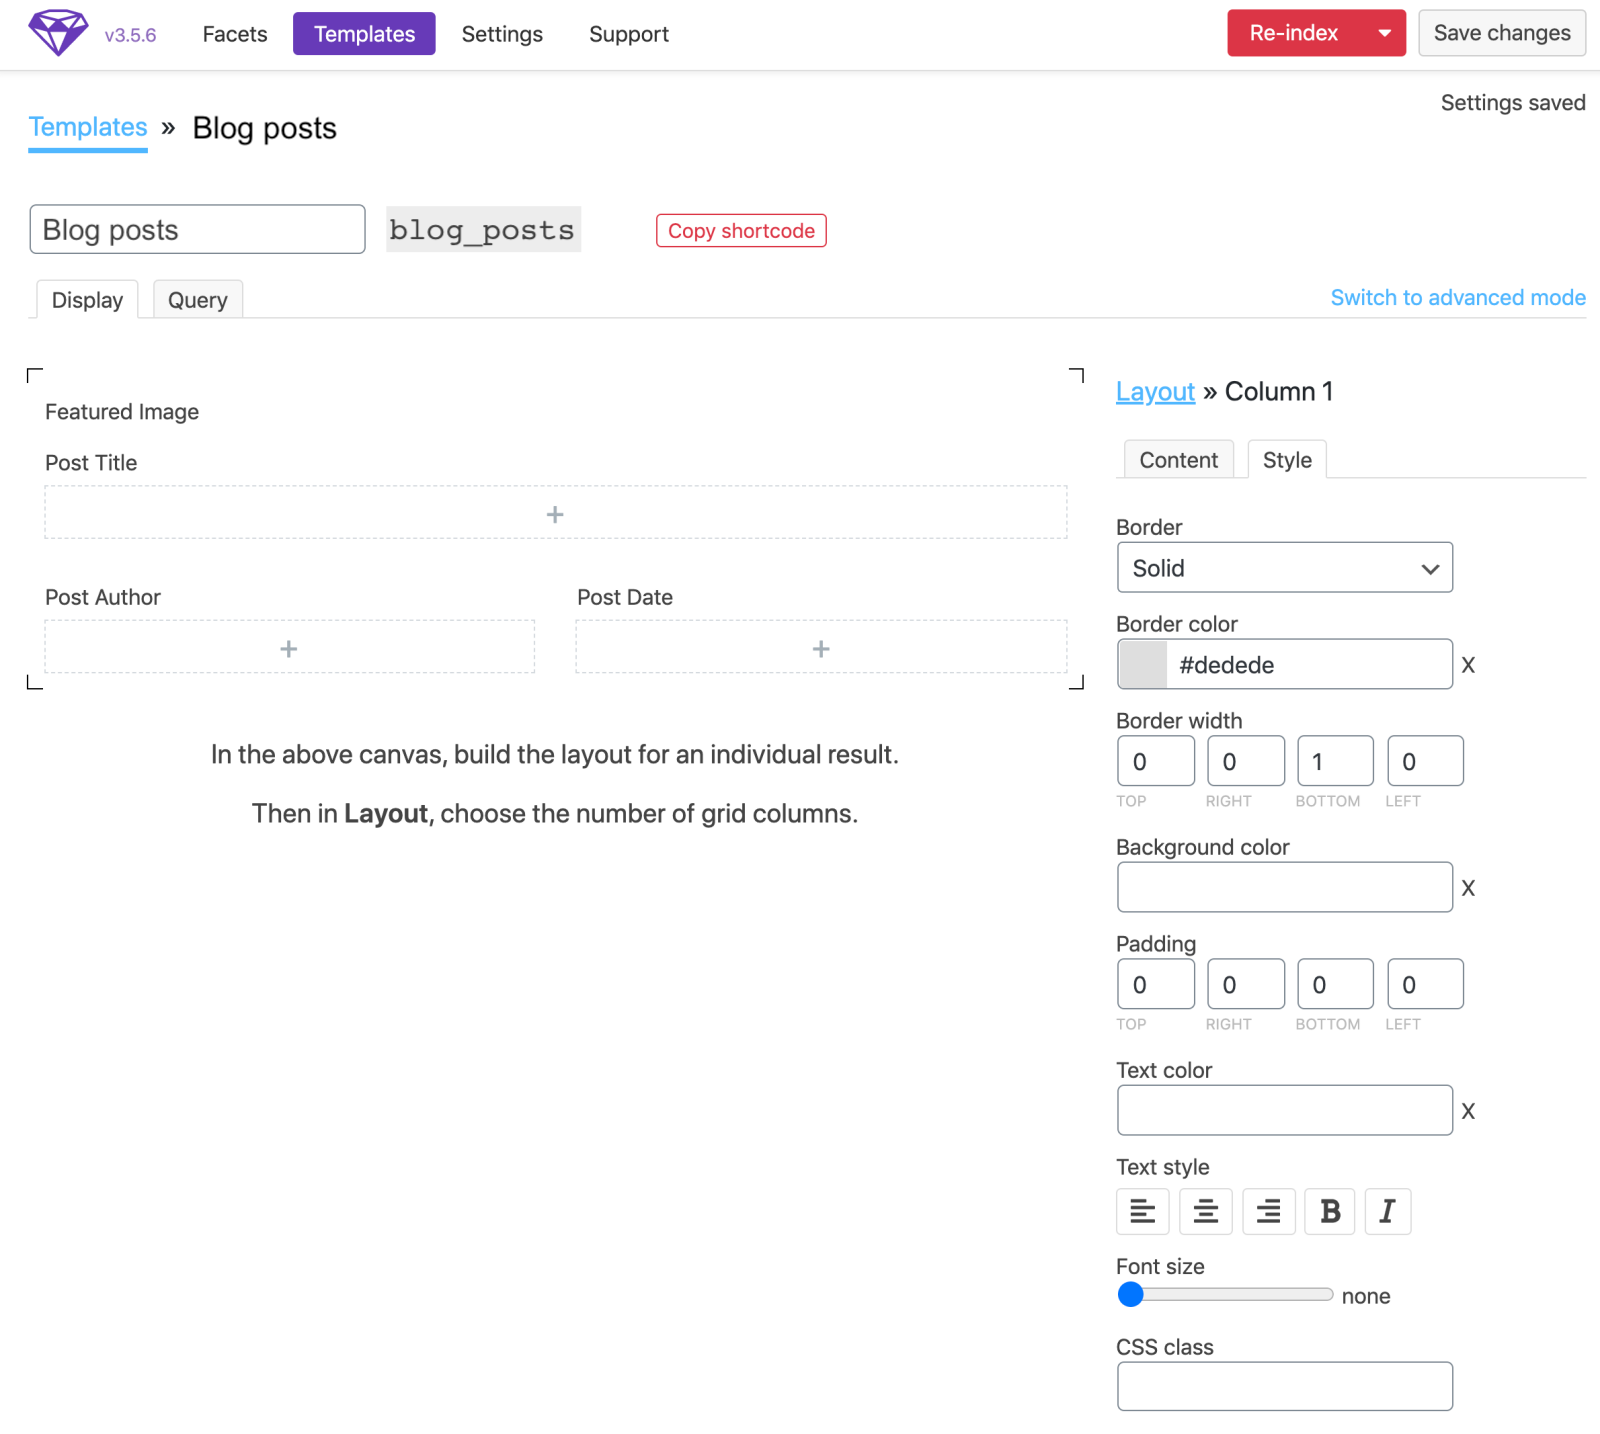
Note that an editing panel is available when you click on an item. It allows you to:
- Change the color
- Add a border
- Define margins
- Set a text size
- Define an alignment
- Add a custom CSS class to then target this element
There are others, depending on the type of field used.
It is also possible to define a multi-column display by clicking on the blue frame and then adding columns:

You are then free to adapt the design of each element so that the design of your template meets your expectations… and those of your visitors, of course!
How to display your template and our facets on a page
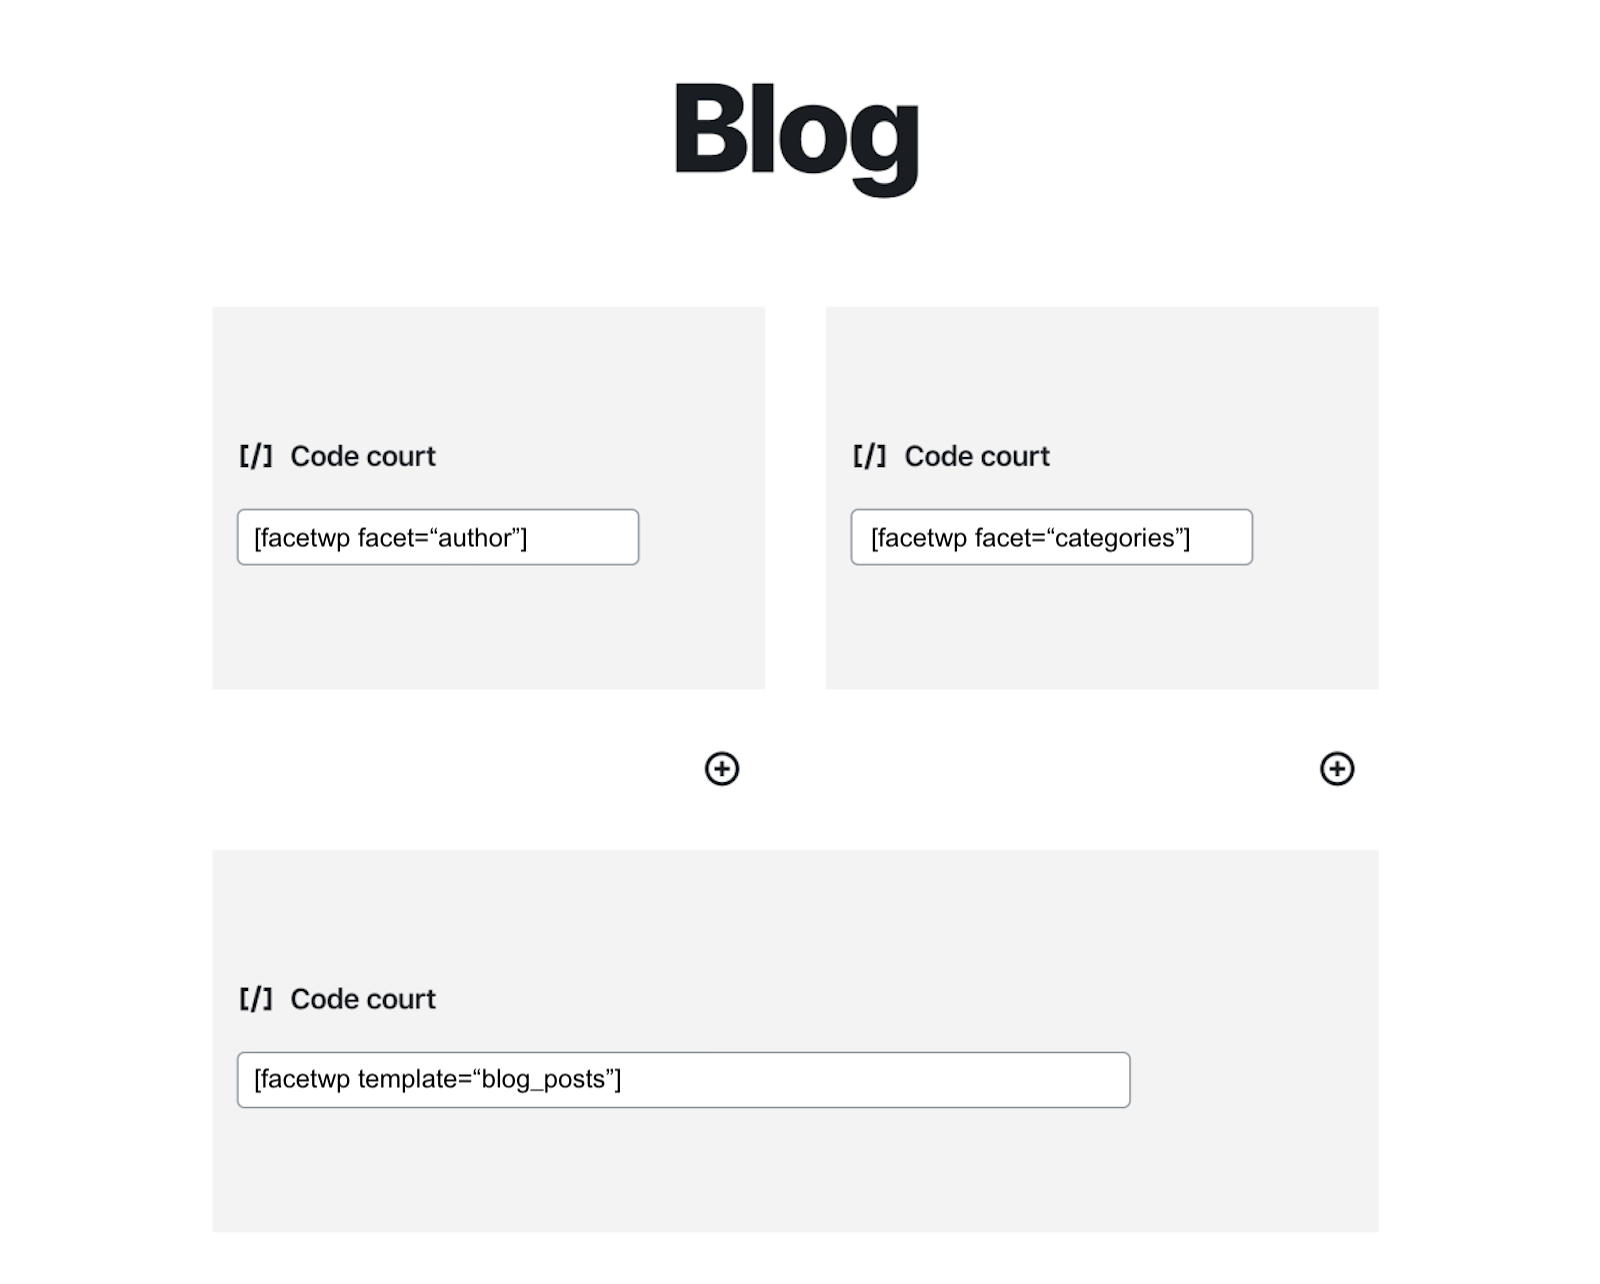
We saw earlier that shortcodes were generated for each of our elements, i.e. facets and templates.
So we just need to get them to insert them wherever we want: a Gutenberg, Elementor, Divi widget or any page builder.
In the case of my template, the short code generated is [facetwp template="blog_posts"].
I insert them in the following way in my page built with Gutenberg:
And here is the rendering on the front of our website:

The design is quite sober and can be improved with a few lines of CSS, especially to shape the facets.

FacetWP addons and their value
FacetWP offers many addons to add features and possibilities in terms of filtering, but also enables to make it compatible with various third-party plugins to use them together.

Among these add-ons, we can find:
- Recipes, which enables to filter contents coming from WP Recipe Maker and Tasty Recipes plugins. Useful if you have a tasty food blog.
- Elementor Integration, which enables you to add FacetWP and facet templates directly via the Elementor posts or products widgets.
- Beaver Builder Integration, same as Elementor, but for the Beaver Builder page builder.
- Flyout, which enables filters to be shown or hidden via a side menu on the mobile phone, useful to improve the user experience.
- Map Facet, to create filterable maps in the style of Airbnb.
- User Post Type, to filter and sort users.
- Caching, to cache FacetWP data to optimize your site performance.
- Conditional Logic, a very useful add-on that allows you to show or hide different facets according to different conditions
- Multilingual, which allows FacetWP to be integrated with the multilingual plugins Polylang and WPML to guarantee perfect translation and display of your content in all languages
- Hierarchy Select, to prioritize your facets if they have different levels of importance
- Pods Integration, to sort your content using the fields from Pods
- Range List, to create facets using value intervals, which can be useful for product prices, for example
- Time Since, to filter your content by relative time intervals such as “Last month”, “Last week”, etc
- Color, to display colors to filter by … colors (obvious). This add-on requires preformatted data for colors: either hexadecimal values or color names
- Alphabetical Listing, which classifies the results of the content grid in alphabetical order
- Relevanssi Integration, which allows you to use the search index of the Relevanssi plugin to filter and sort the results of your content
As you can see, the choice is wide. It’s up to you to pick and choose from what you find interesting to set up a dynamic and personalized search on your WordPress website!
So, what do you think of FacetWP?
FacetWP is an easy-to-use plugin that enables you to improve content filtering on your WordPress website without requiring too much knowledge in terms of code or development.
However, its high price and user interface make it much less attractive than its direct competitor, WPGridBuilder, which price, ease of use and enormous possibilities make it the number one in the industry.
FacetWP can nevertheless be useful for specific projects and for particular needs, in particular through the use of some of its add-ons.
Do you use it on your websites? For what type of content? Tell me all about it!

Receive the next posts for free and access exclusive resources. More than 20,000 people have done it, why not you?
Register


My biggest gripe with wpgridbuilder is the lack of community documentation and/or tutorials. Facetwp has a lot of user generated content that covers the things I need to do. WPgridbuilder allows to create custom filters but I am not experienced enough with code to be able to do that by myself, for example set up a color facet like the one in facetwp.
They have the worst support ever!!! Don’t buy this FacetWP for nothing. Really aweful support. They respond your message 2 in 2 days and lack of knowledge in their responses. Very amateur.
Hi,
Thanks for the well-explained article on Facetwp. I am trying facet on the client’s website but It showing only one category of the product ( while in reality product has multiple categories), do you know how can I fix that?
Any guide would be really helpful.
Hello, do you have reset your index ?