
“Hi, I need 200 units of this product with fast shipping please”. As an online store owner, receiving this kind of message puts a smile on your face. Answering it, on the other hand, becomes a lot less fun… Basically,…
There is one important thing about a website: to be able to find the information you need easily.
Whether it’s for an online store or blog posts, no one likes to spend more than 5 minutes (and that’s already a lot) poking around a site to finally find what they are looking for.
Amazon and WalMart published studies a few years ago explaining that every second of extra loading time was costing them millions of dollars per year.

Well, on our side, we’re not at such figures yet, but let me introduce you to a plugin that may revolutionize your site development, and improve the customer experience.
We’re not going to talk about caching, server, enhancement or optimization. We’re going to focus here on searching and filtering all the data of your site via the WP Grid Builder plugin.
And this is the icing on the cake: you won’t need any code, everything is done visually.
Overview
This post contains affiliate links. This means that WPMarmite will get a commission if you decide to get the plugin. This allows us to pay for the research and writing work of the blog’s writers. Nevertheless, we remain unbiaised. If a product isn’t worth it, we say so (or we don’t talk about it). For more information, see our publishing policy.
Originally written in July 2020, this post was last updated in April 2022.
What is WP Grid Builder?

WP Grid Builder is a premium WordPress plugin that allows you to create filterable grids in real time, without any page reloads, with any type of content (posts, WooCommerce products, portfolio projects, custom post type, etc.). Filters are fully customizable.
You can add as many as you want, on any type of criteria.
It is possible to have classic facets such as the price or color of a product, but also more interesting facets coming from fields added via Advanced Custom Fields, WordPress custom fields, or any other possible data.
WP Grid Builder is versatile and will save valuable time, while offering you the ability to tackle projects that didn’t seem to be within your grasp until now.
Beyond the filterable grids, WP Grid Builder plugin also offers two other very useful features:
- The creation of custom sliders, with any type of data.
- The design of filterable content cards, like AirBnb, to show available properties for rent, for example.
In order for you to understand the usefulness of this plugin (WordPress does not natively allow advanced filtering of your content), WP Grid Builder shows several classic use cases on its official website.
Thanks to this plugin, you will be able to offer filters to your visitors, based on different criteria:
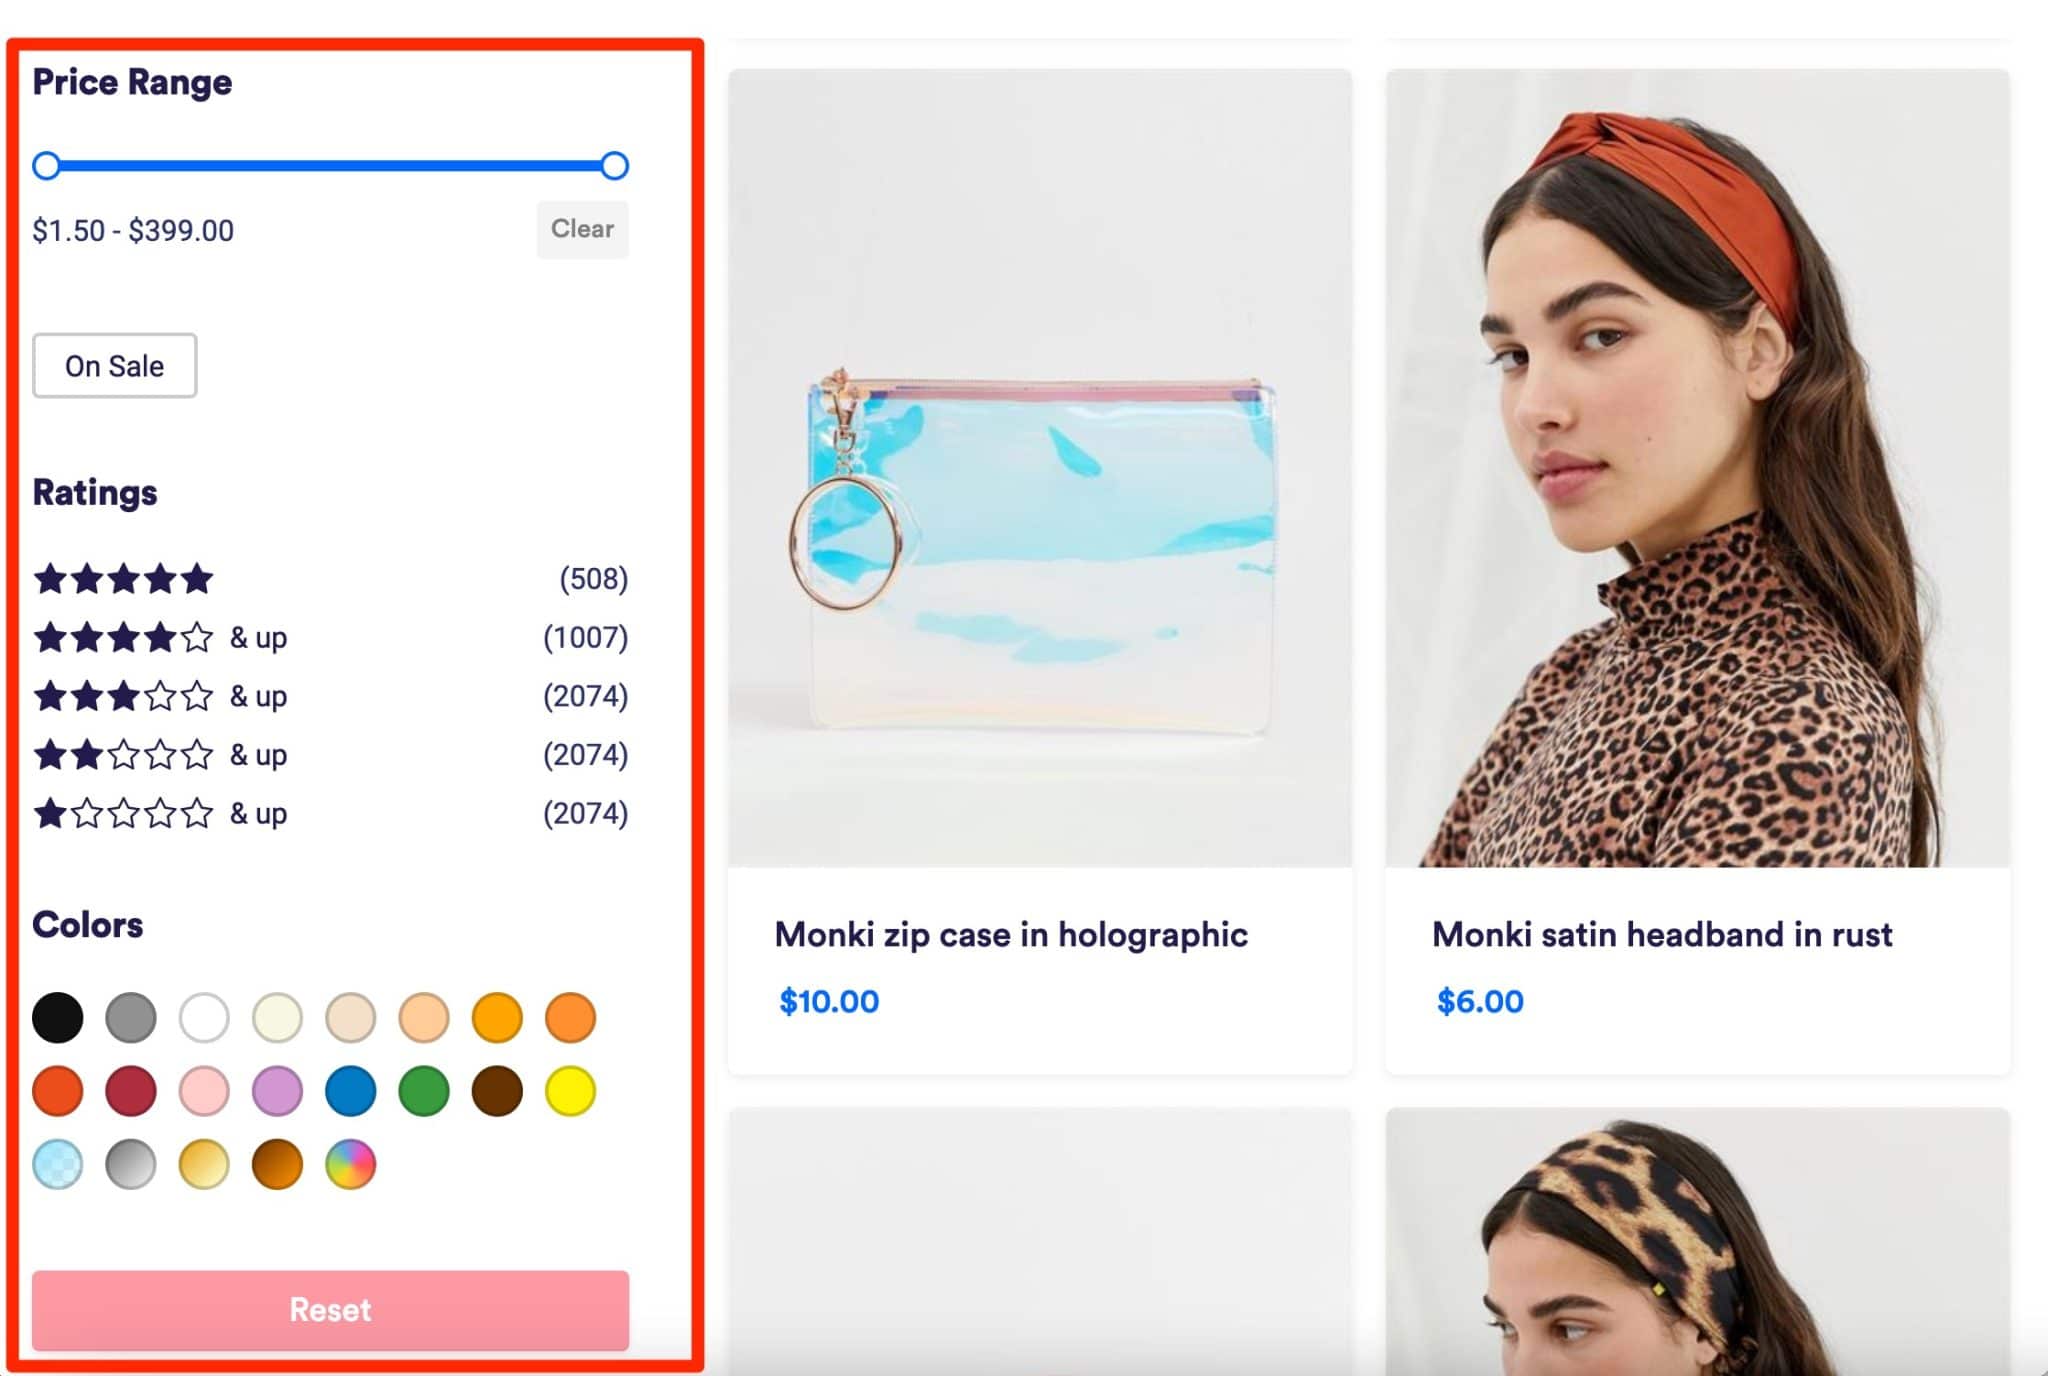
- On an online store, you can for example add the following filters: product types, brands, price range, ratings, colors, etc.
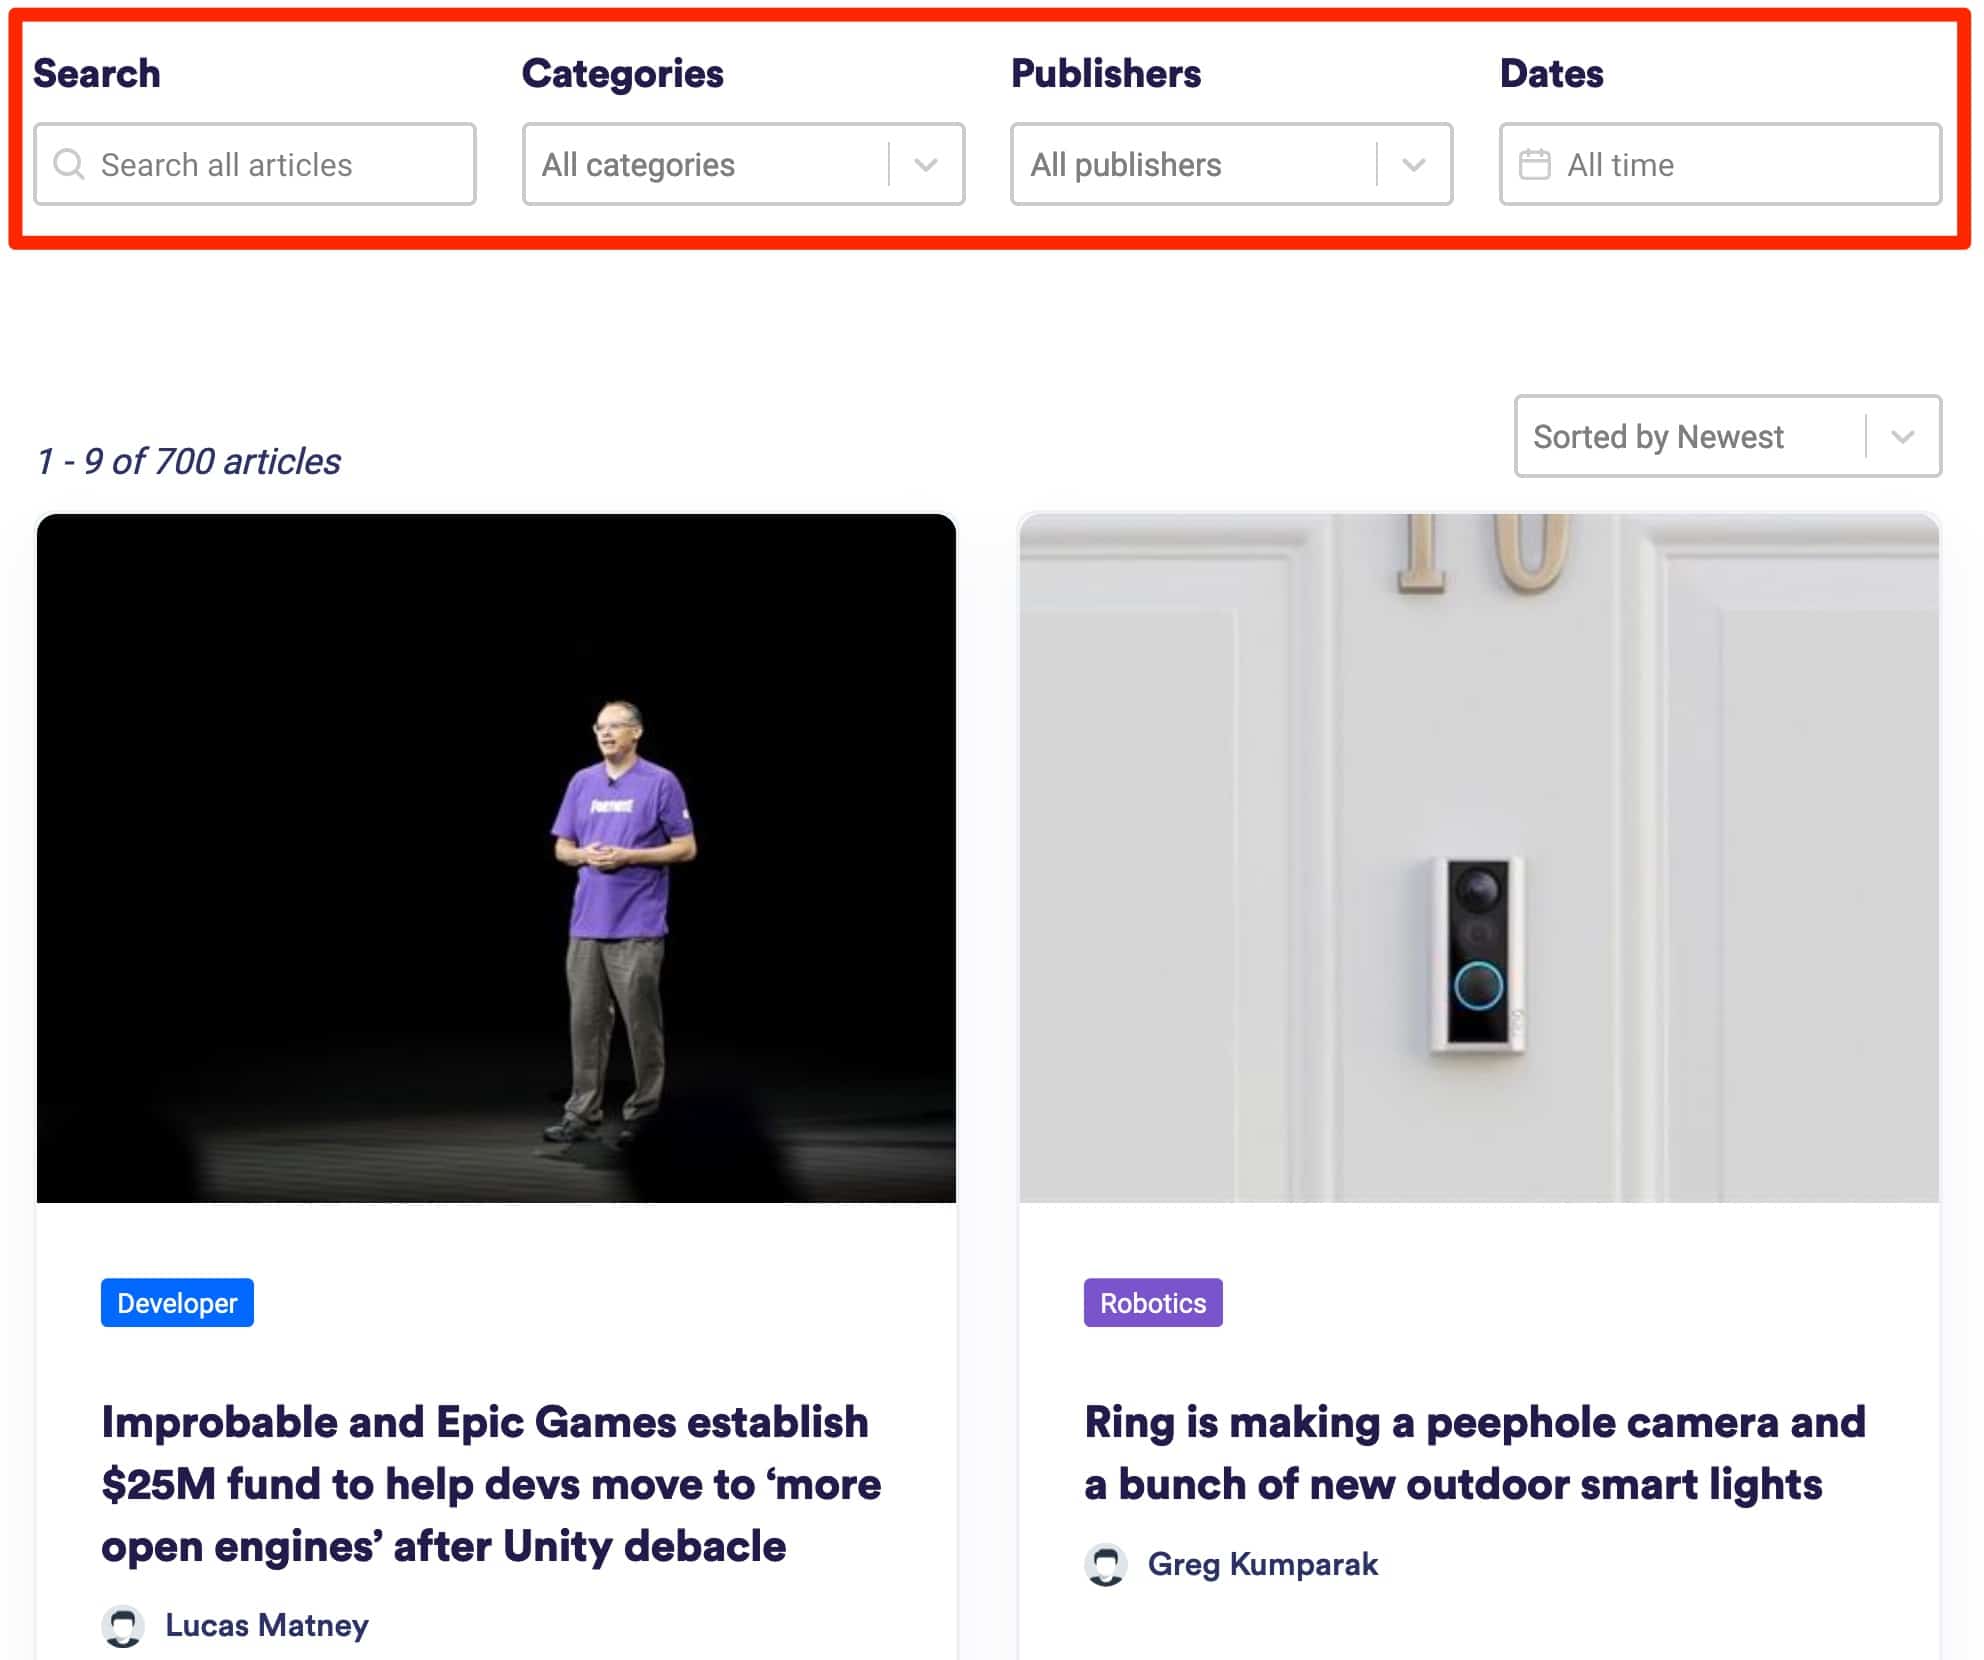
- On a blog page, you can use this to make a faster search for posts by filtering by date, author, category etc.
- On a portfolio page, you can make it possible to search for your images by category type, for example.

To go a little further, take a look at this video presentation created by WP Grid Builder:
Is it clearer for you? Then let’s move on. As you may have noticed in these first few lines, WP Grid Builder’s operation is based largely on a system of filters: the facets.
In order to understand the rest of this test, let’s talk about this technical term in detail in the following section.
What is a WordPress faceted search?
Facets? Nothing to do with the gems or the polished surface of a diamond.
In IT, faceted searches are searches that allow you to filter your content according to different criteria: price, customer ratings, color, brand, etc.
Fast and fluid, this search has different criteria that allow a user to find quickly what they want.
I’m sure you’ve already seen them, for example on travel sites when you define a budget, a date and finally a destination for your next vacation.
You have probably also come across them on ecommerce sites. For example on shoe or clothing stores, when you select sizes, colors, prices and it shows you the matching products.

Using this system on your WordPress site can greatly improve your conversion rate, and the number of visits to your items. Now let’s see how to set this up with WP Grid Builder!
How to set up WP Grid Builder?
Start by installing and enabling the plugin.
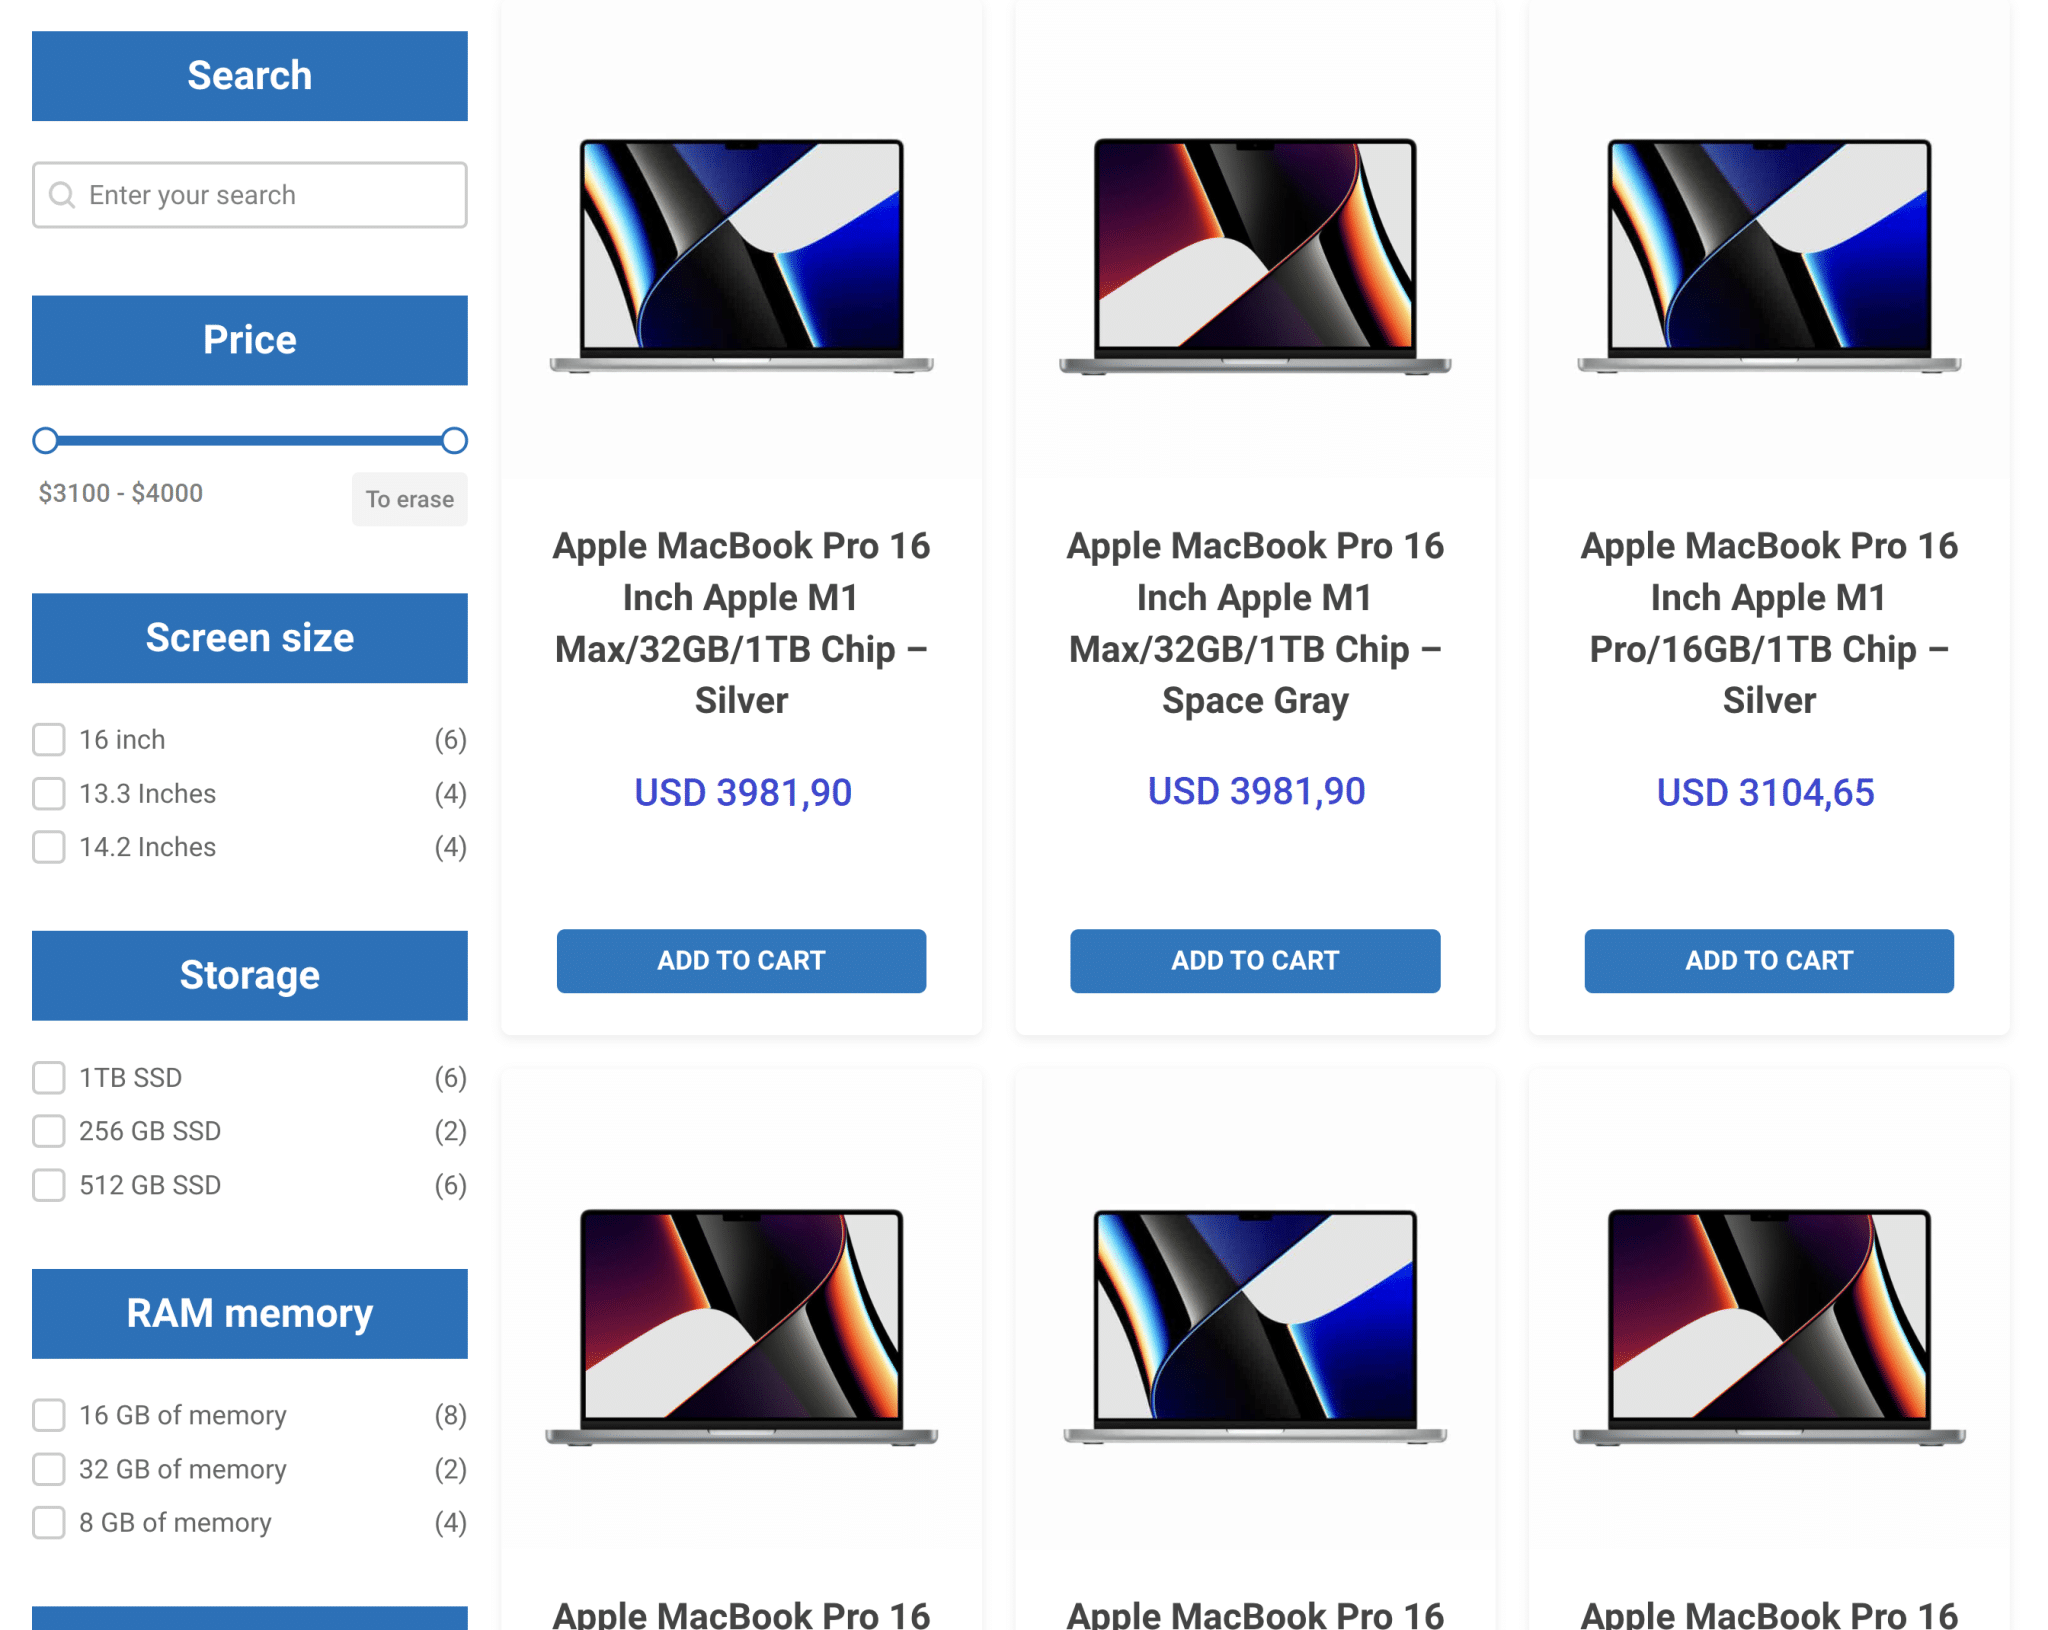
This is how the rest of the process will work. To make it more concrete, I will show you a practical case by designing an online store of Apple products, with specific filters according to the products (RAM memory, color, price, etc.).
Here is the type of filterable grid we will create in this post for our WooCommerce online store:
Before we move on and get into the nitty-gritty, I’ll point out something very important, so you can better understand how WP Grid Builder works.
You should know that the plugin is based on 3 elements:
- The cards
- The facets
- The grids
These terms will be used throughout these lines, but don’t panic: I’ll explain it all to you with screenshots, so you won’t miss anything.
But first, let’s dive into the dashboard of the plugin.
A clear, intuitive and clean dashboard
Once the plugin is enabled on your site, you’ll notice two things in particular:
- A concise menu with links to set up your grids, maps and facets.
But also the possibility to adjust settings and enable modules. It is very easy to find your way around.
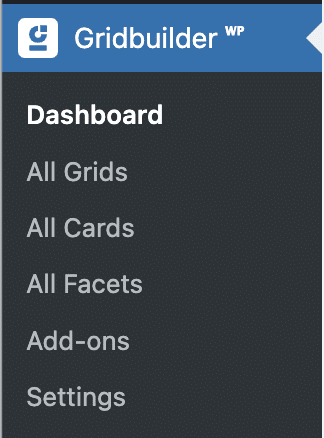
- A clean and colorful user interface. It is very pleasant to navigate through the different menus, with clearly visible call-to-action buttons and space between the different sections. Phew, we can breathe.
How to create a card with WP Grid Builder?
The cards represent the display of each of your contents in the grid. For our concrete example, this corresponds to WooCommerce products.
WPGridBuilder works with more than 20 pre-designed card templates for your blog posts or products, in the “All Cards” menu:

Its cards can be imported and used in a few clicks, but you can totally create your own, or modify an existing template.
Here is an example of the suggested cards to start your first grids:

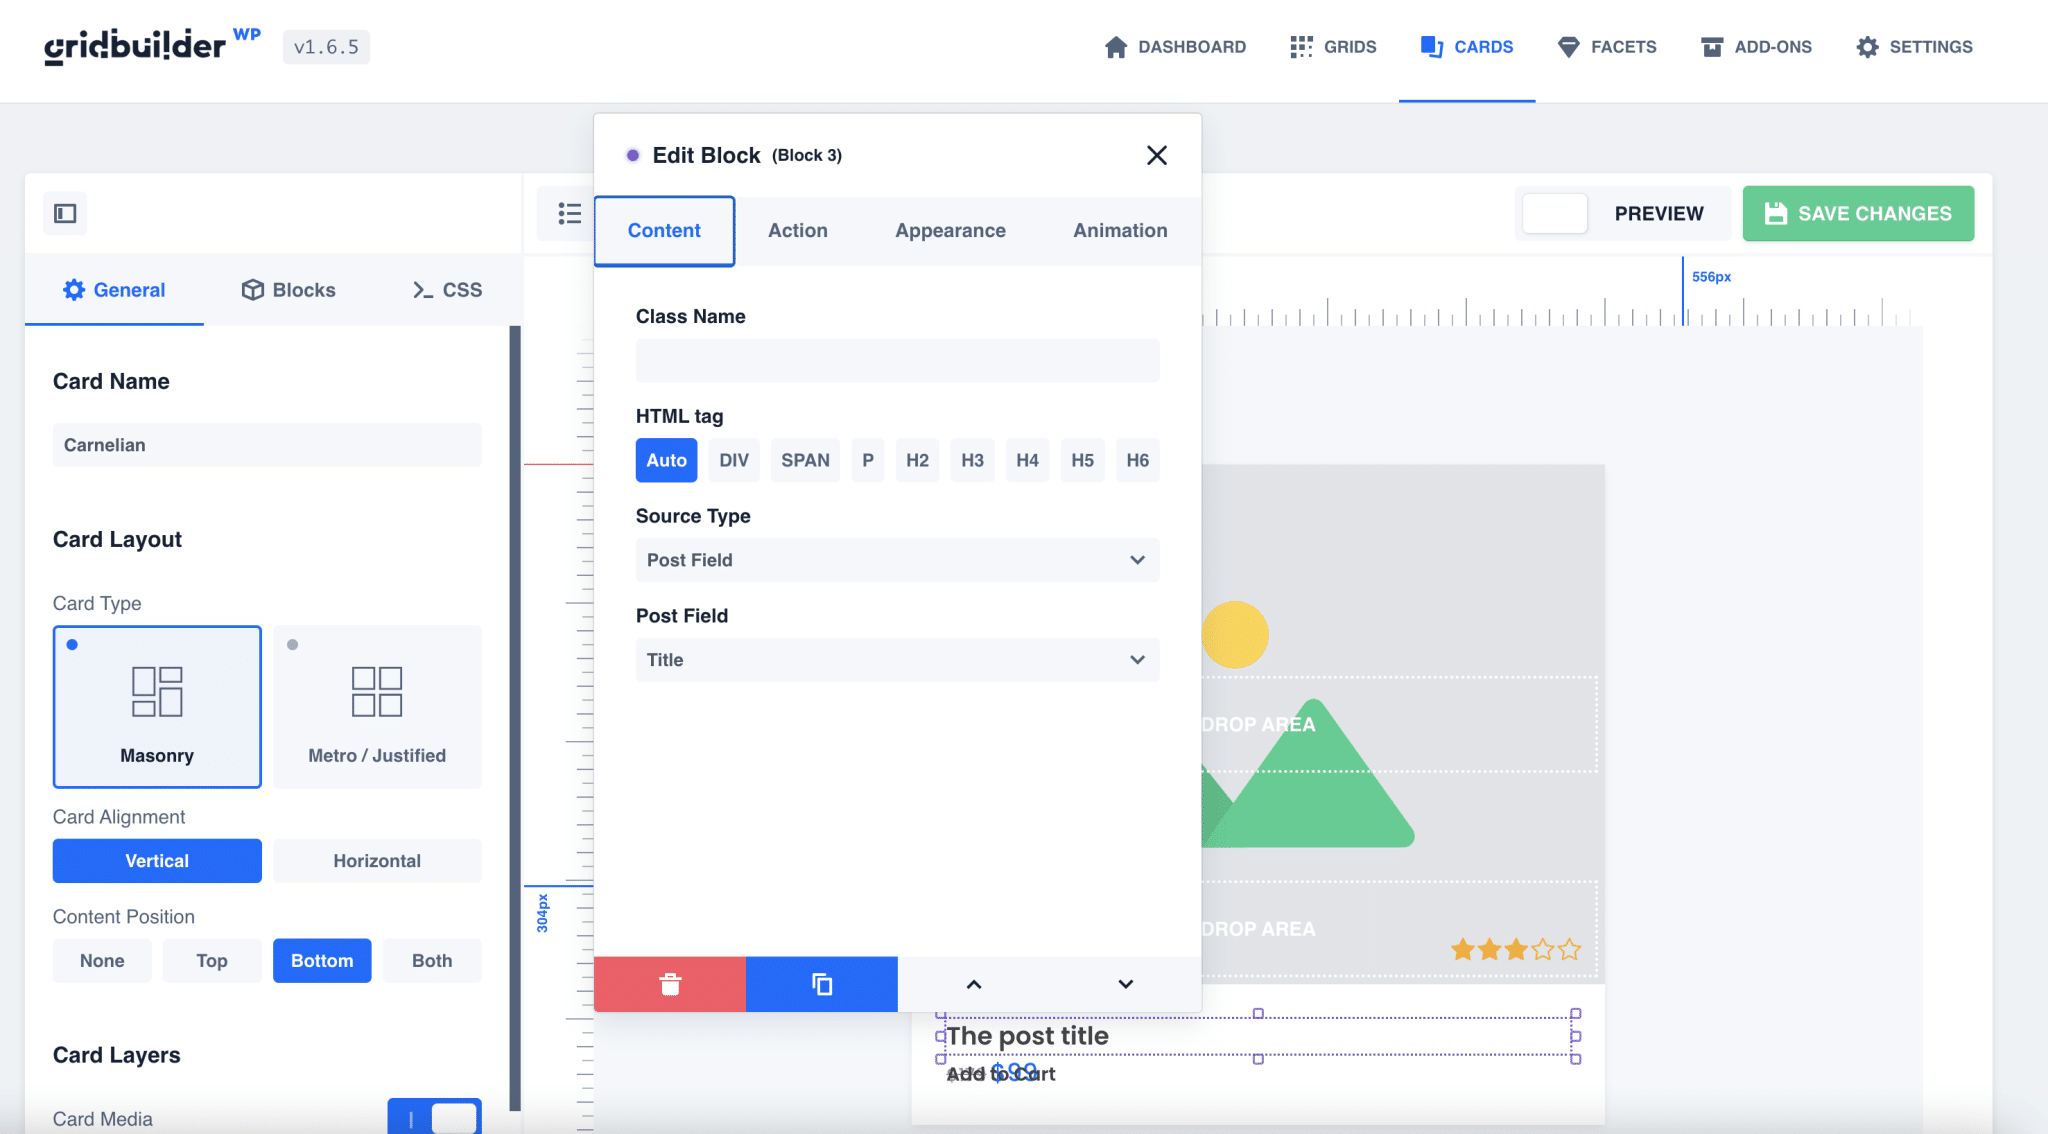
WP Grid Builder embeds an in-house visual builder for editing, allowing you to modify the entire design via drag and drop, using blocks.
There are blocks of all kinds and dedicated to all uses:
- For your posts: titles, metas, content etc.
- For your WooCommerce products: prices, ratings, discounts etc.
- For your WordPress users: name, email, avatar etc.
- For terms and categories.
- To add buttons and icons.
- To integrate custom fields.
In our example, we will start with the card template named “Carnelian”:
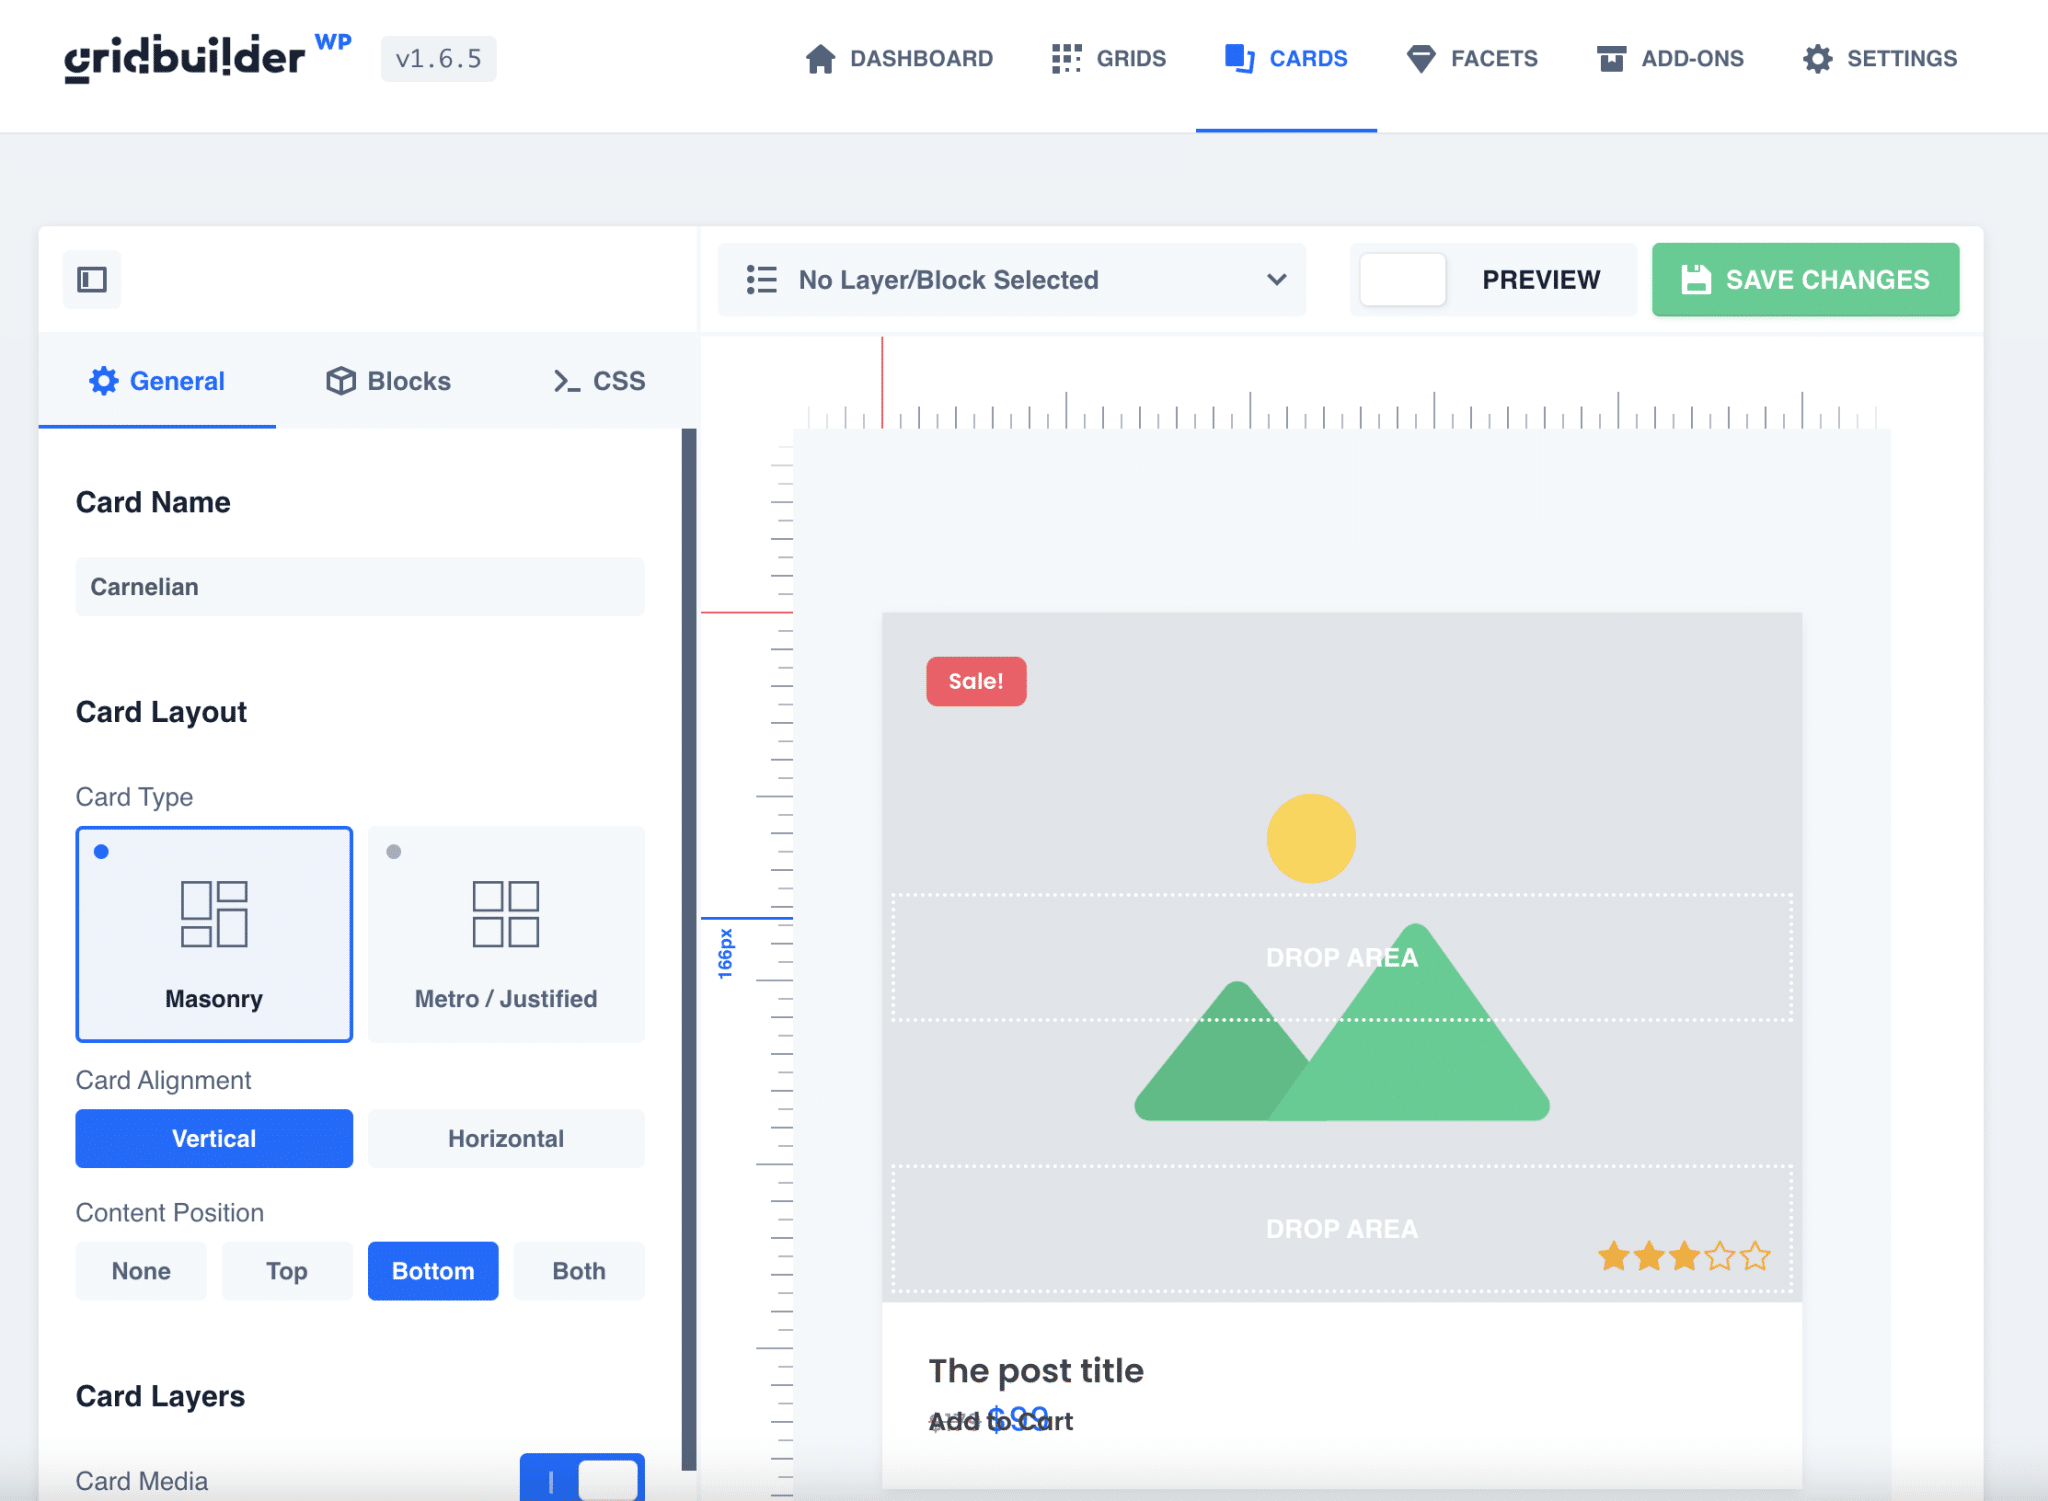
The layout system is quite similar to Gutenberg, or even Elementor.
Each element is customizable and has options to edit color, font, field type, size, background, or add custom CSS.
I edited the layout a bit to get the following result:
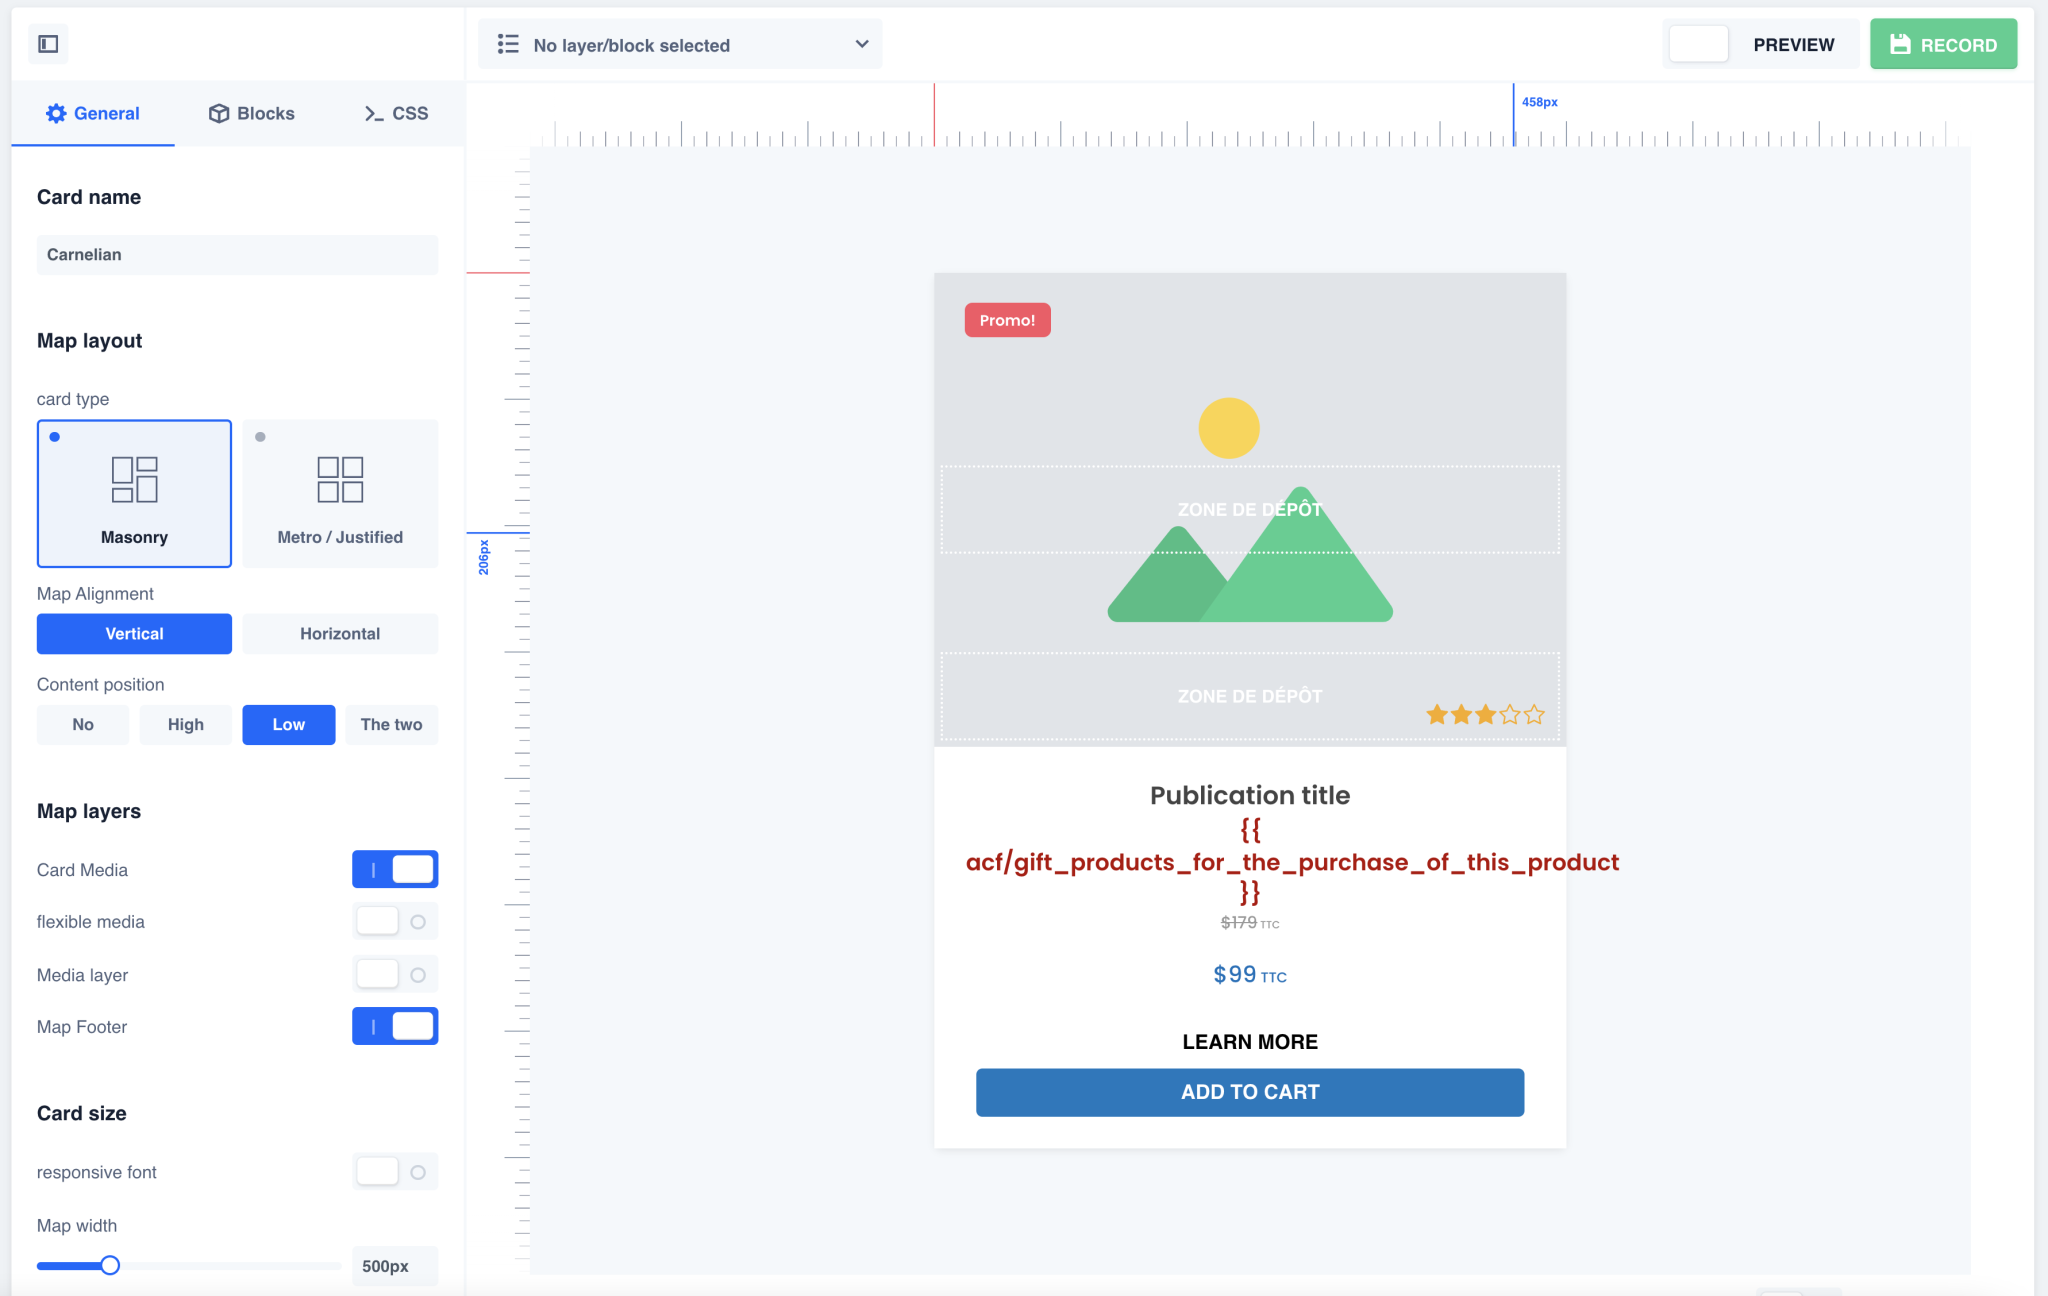
I added an Advanced Custom Field corresponding to an item offered for the purchase of this product, a “Learn More” button linking to the product page, and I modified the typography a bit.
Once our cards are ready and have all the information we need, let’s move on.
How to create a facet?
Here we are now in the most important and interesting part of the setup of our grid: the creation of facets (via the “All Facets” menu).
Facets represent all possible types of filters that you can add to your grid.

As you can see on the above screenshot, they are divided into 5 categories (under “Facet Action”).
Each facet is always attached to a grid (I’ll talk about this in the next part) and you must first select the type of action it will perform on your grid:
- Filter: to filter the content of your grid via buttons, pickers, customer reviews, etc.
- Load: to load more content, with for example the possibility to add an infinite scroll to your grid, or a pagination.
- Sort: to create a drop-down menu of custom choices, such as an alphabetical order.
- Apply: to select filters and redirect to a filtered page.
- Reset: to add a button to reset the visitor’s choices and redisplay the default grid.
Just like the cards, WP Grid Builder offers to import a dozen basic facets to start your project.
I advise you to install all of them, not only because they are useful, but they will also give you an example to create custom ones later.
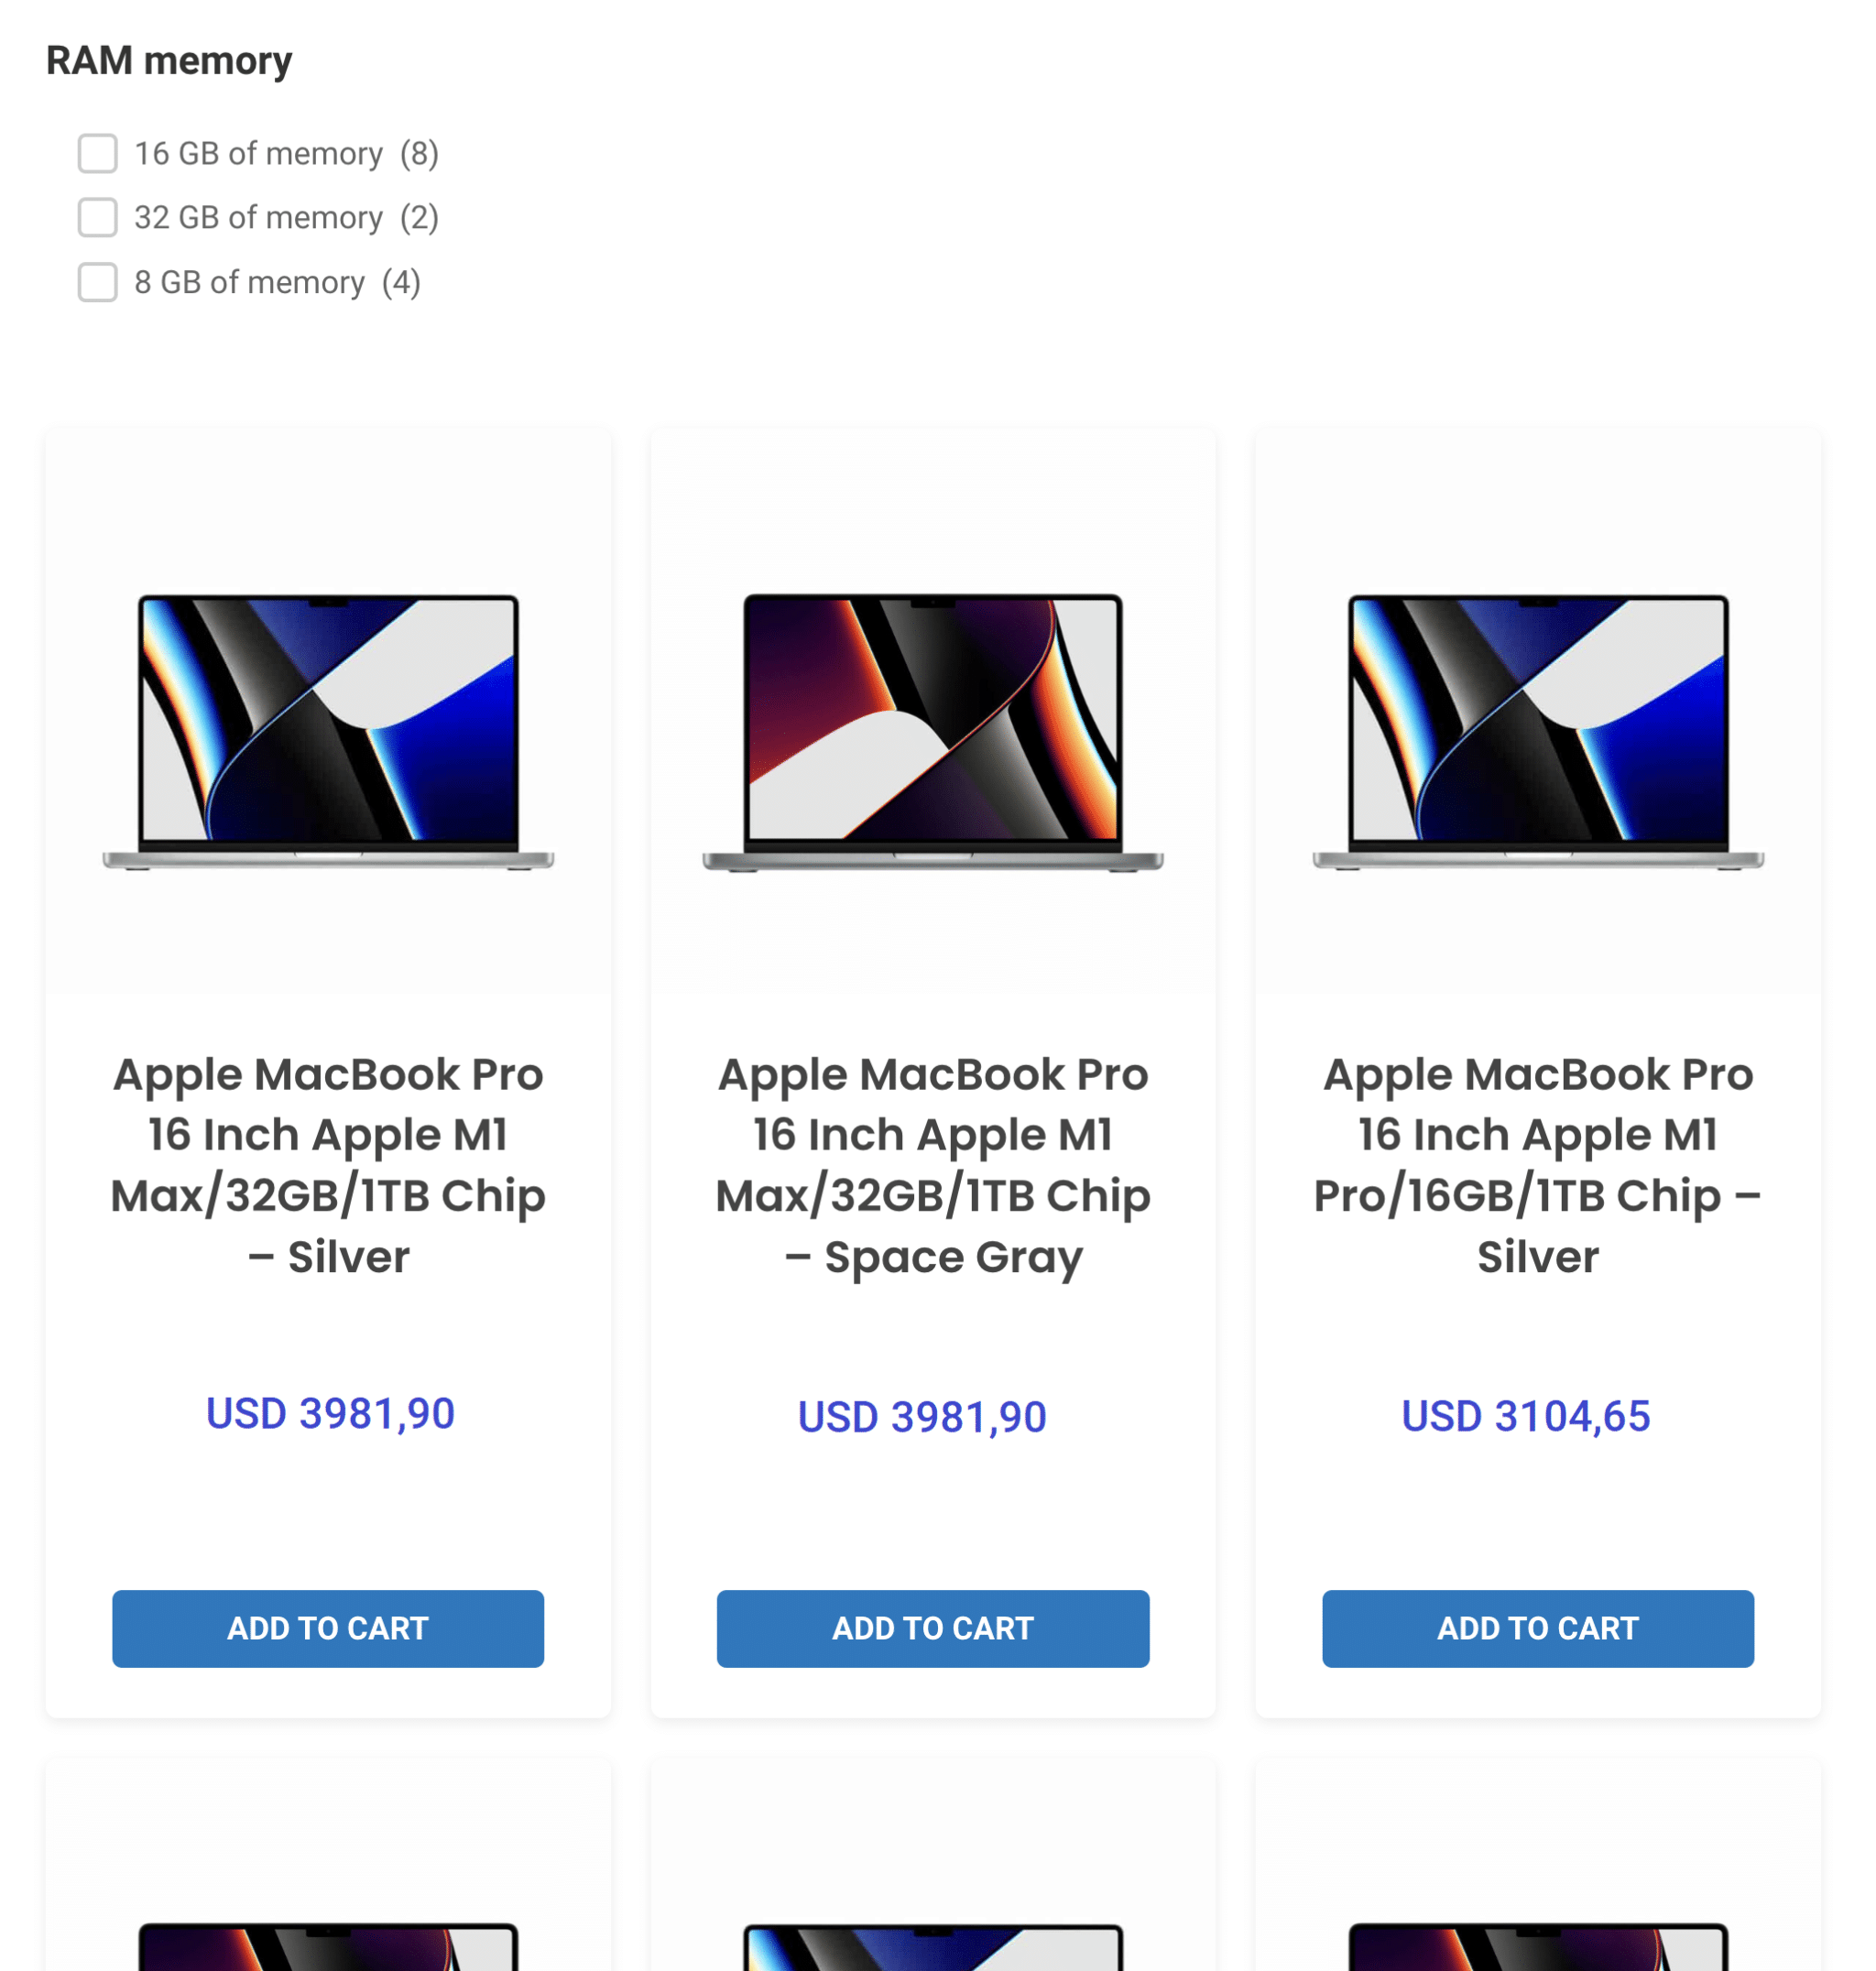
So let’s create our first facet now, to filter our product grid. This facet will sort products according to a custom WooCommerce taxonomy named “Random-access memory” (RAM), previously set up in our products.
So let’s add a “RAM” facet as follows:
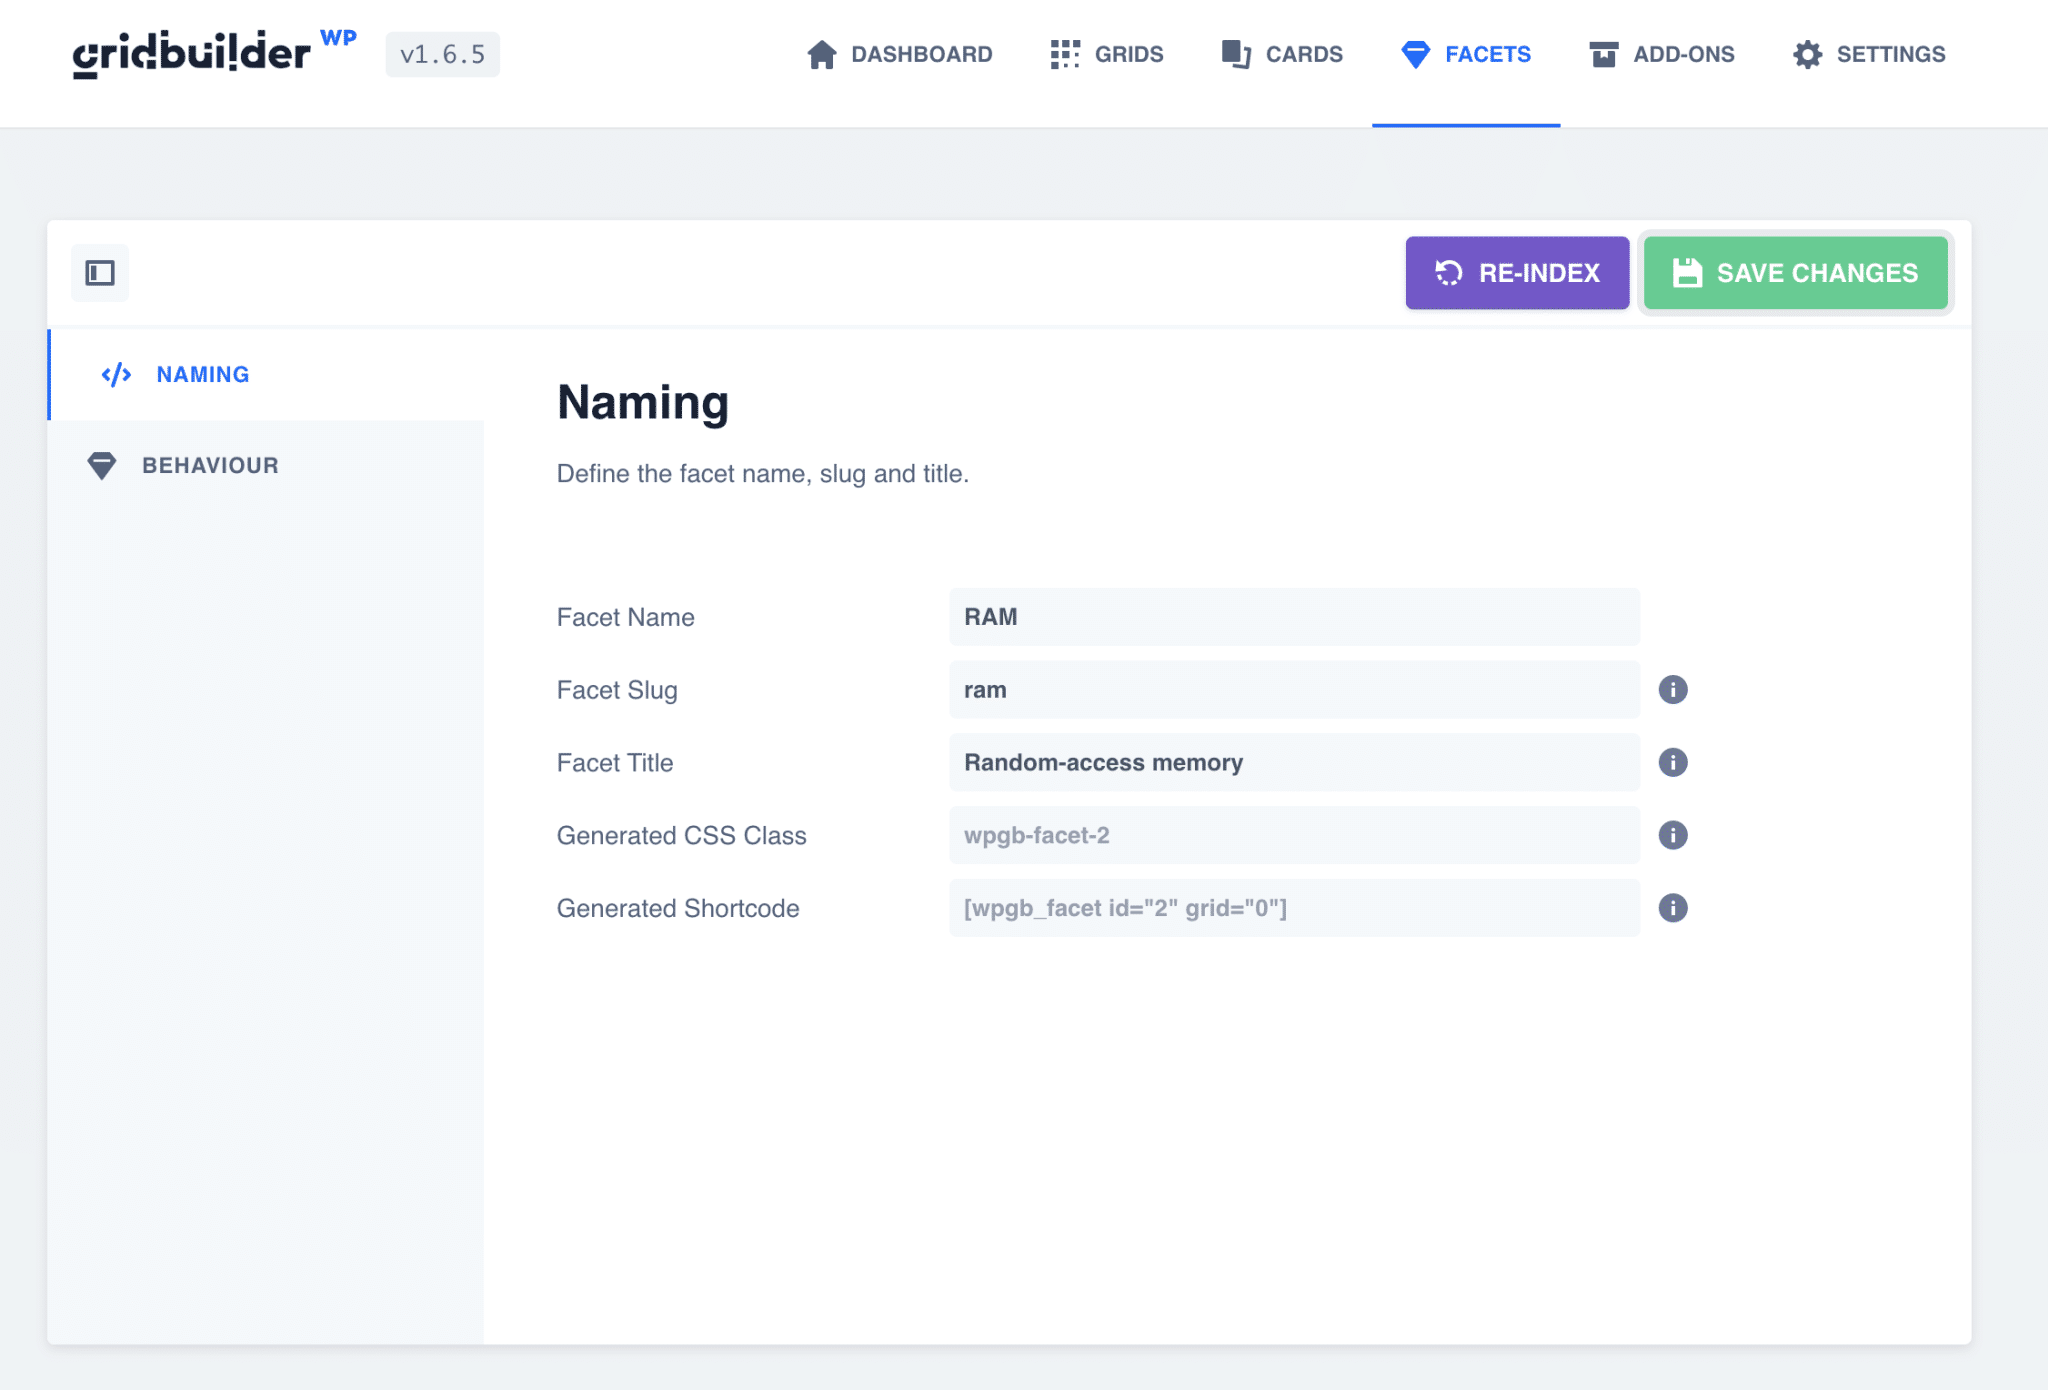
So far, nothing complicated, just name your filter.
Now let’s go to the “Behaviour” tab, which will allow you to define the purpose of your facet:
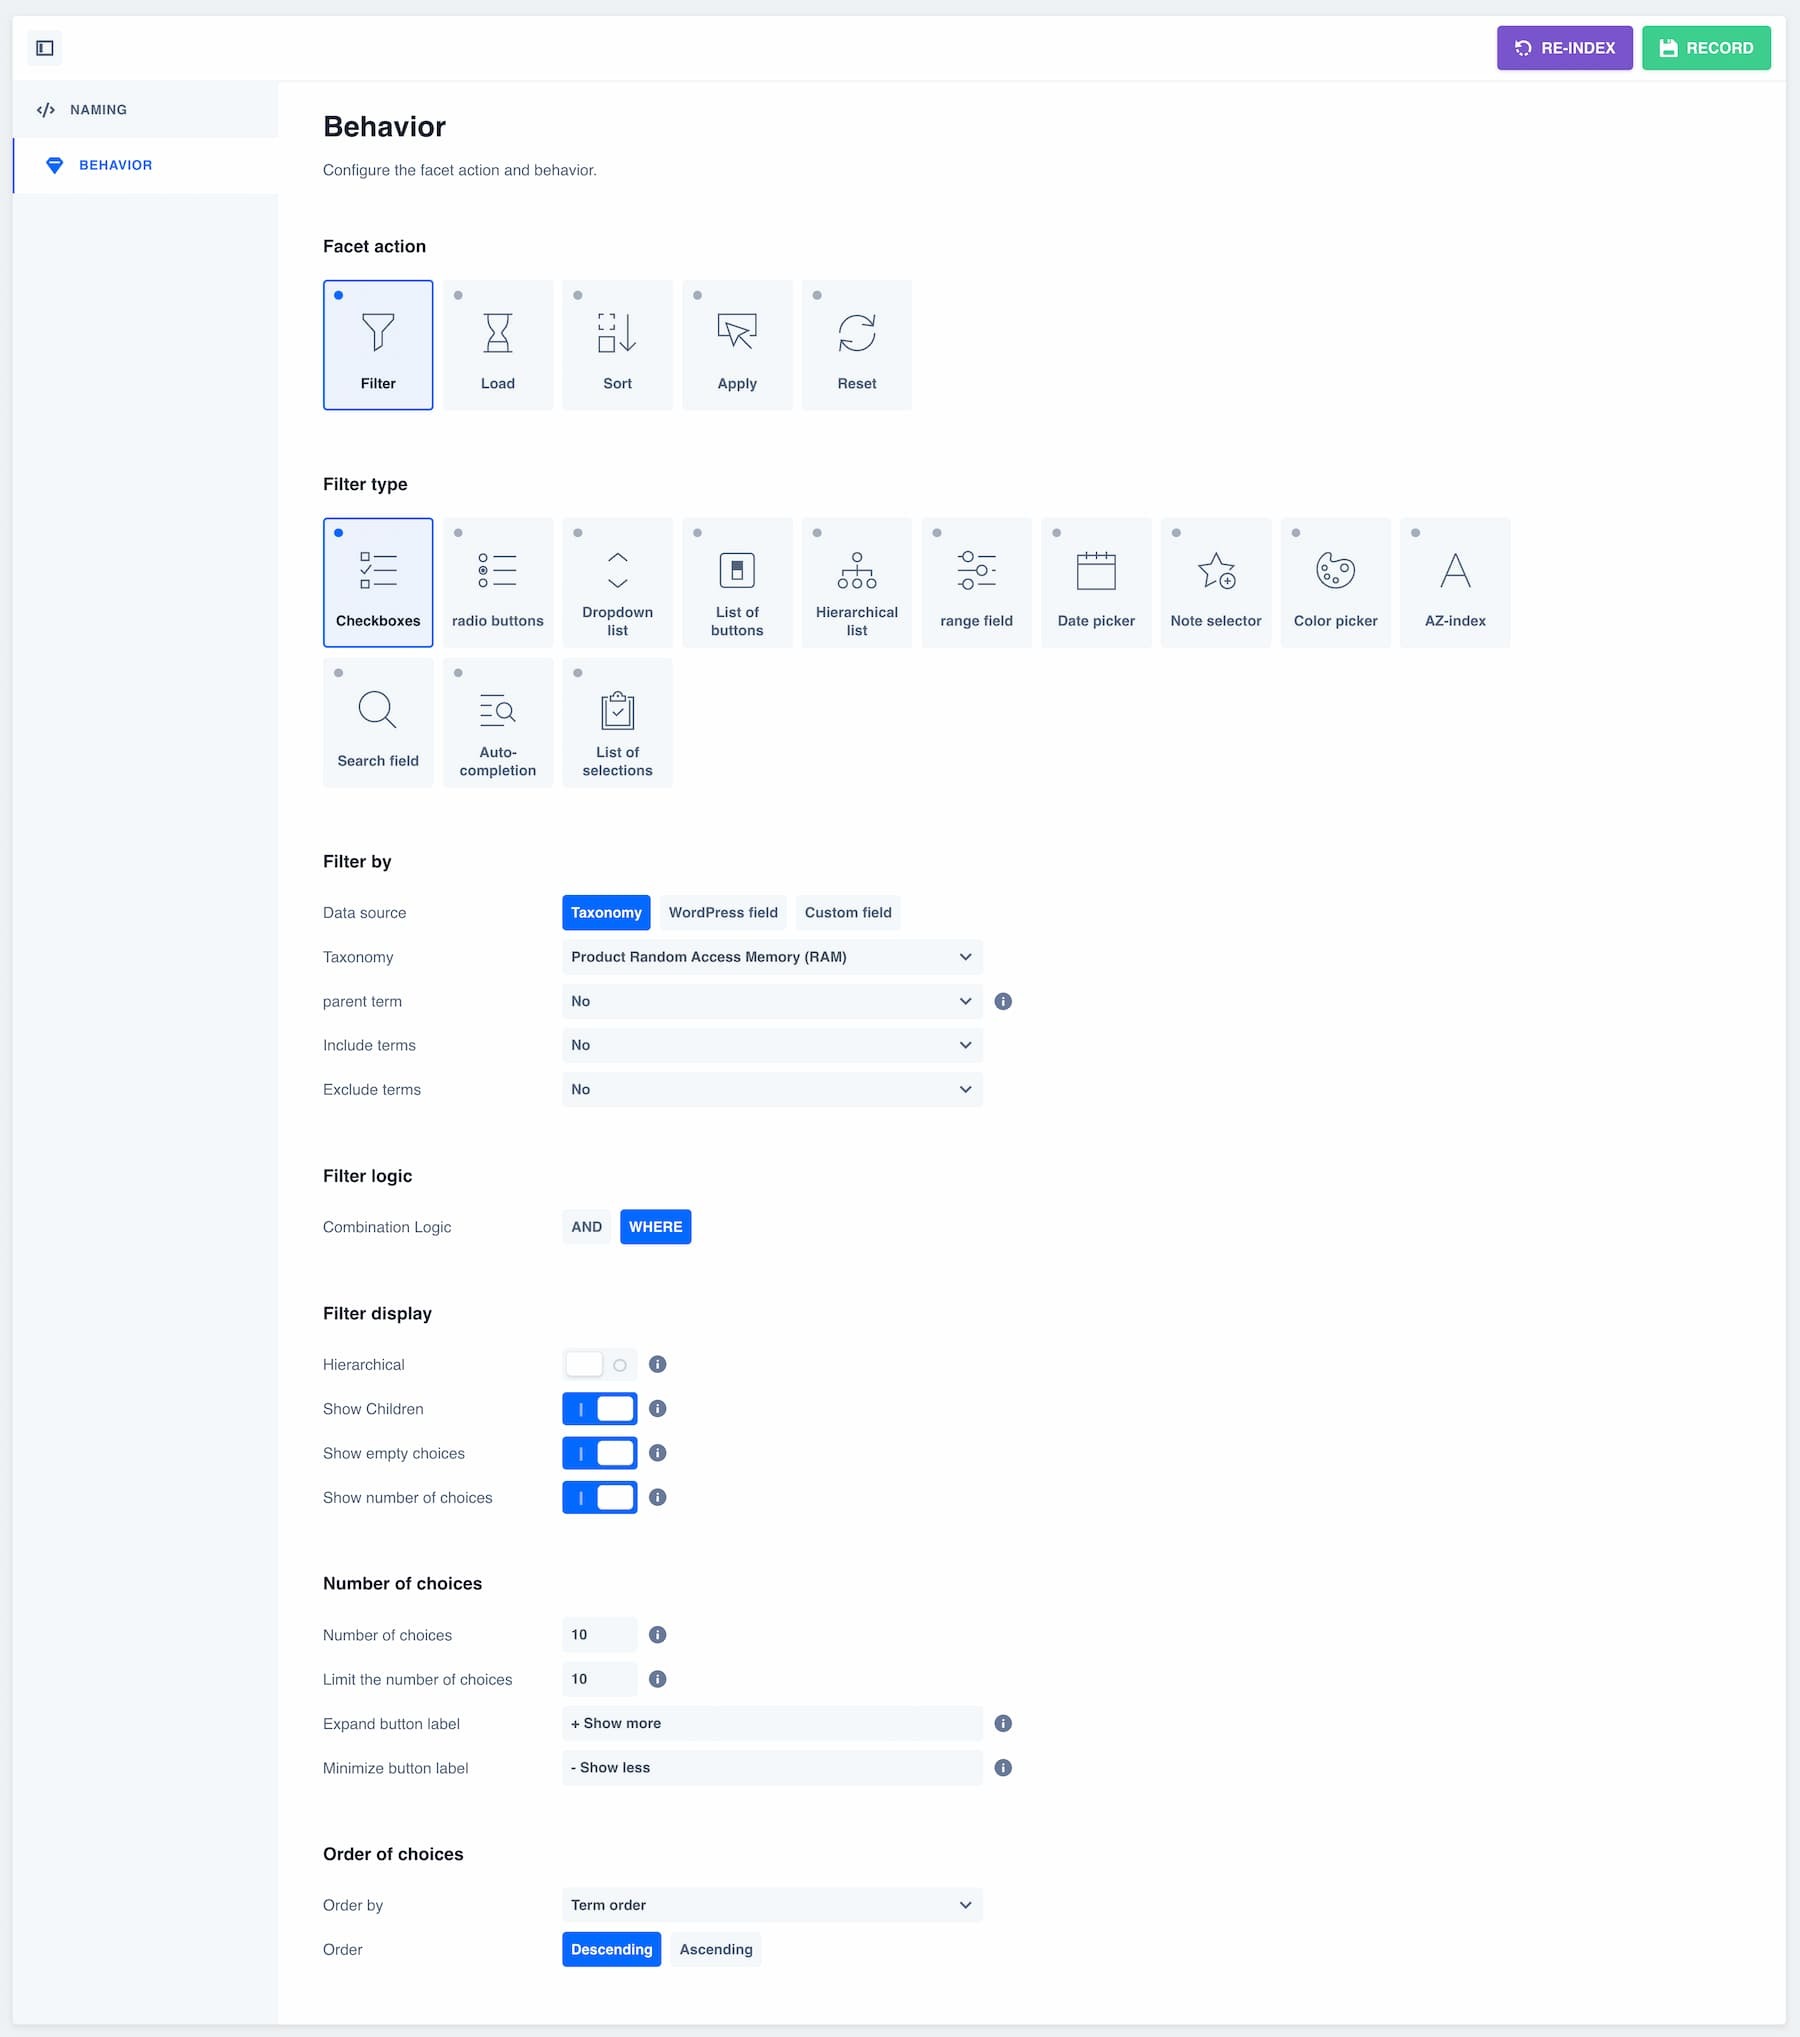
We want to display a filter that allows the visitor to check the different types of RAM to refine their selection. We therefore need the “Checkbox” filter type.
Depending on the filter, you can of course select another one.
Then, we select the type of data to filter. This is the “Random-access memory” taxonomy created earlier via WooCommerce.
The filter logic here is set to the “WHERE” choice, which allows you to check several boxes at once, as opposed to the “AND” choice, which only allows you to define one.
The other options allow you to display or not the sub-categories, the number of products available according to the attribute, or to choose the order of the choices displayed by the filter.
Now you have one more important step: creating your grid.
How to create a grid?
We are now going to build and set up our grid to display exactly the elements we want.
The “Grids” tab includes many options for fine-tuning the display. We will only look at the main ones here, with a precise zoom on each of the ten settings tabs available.
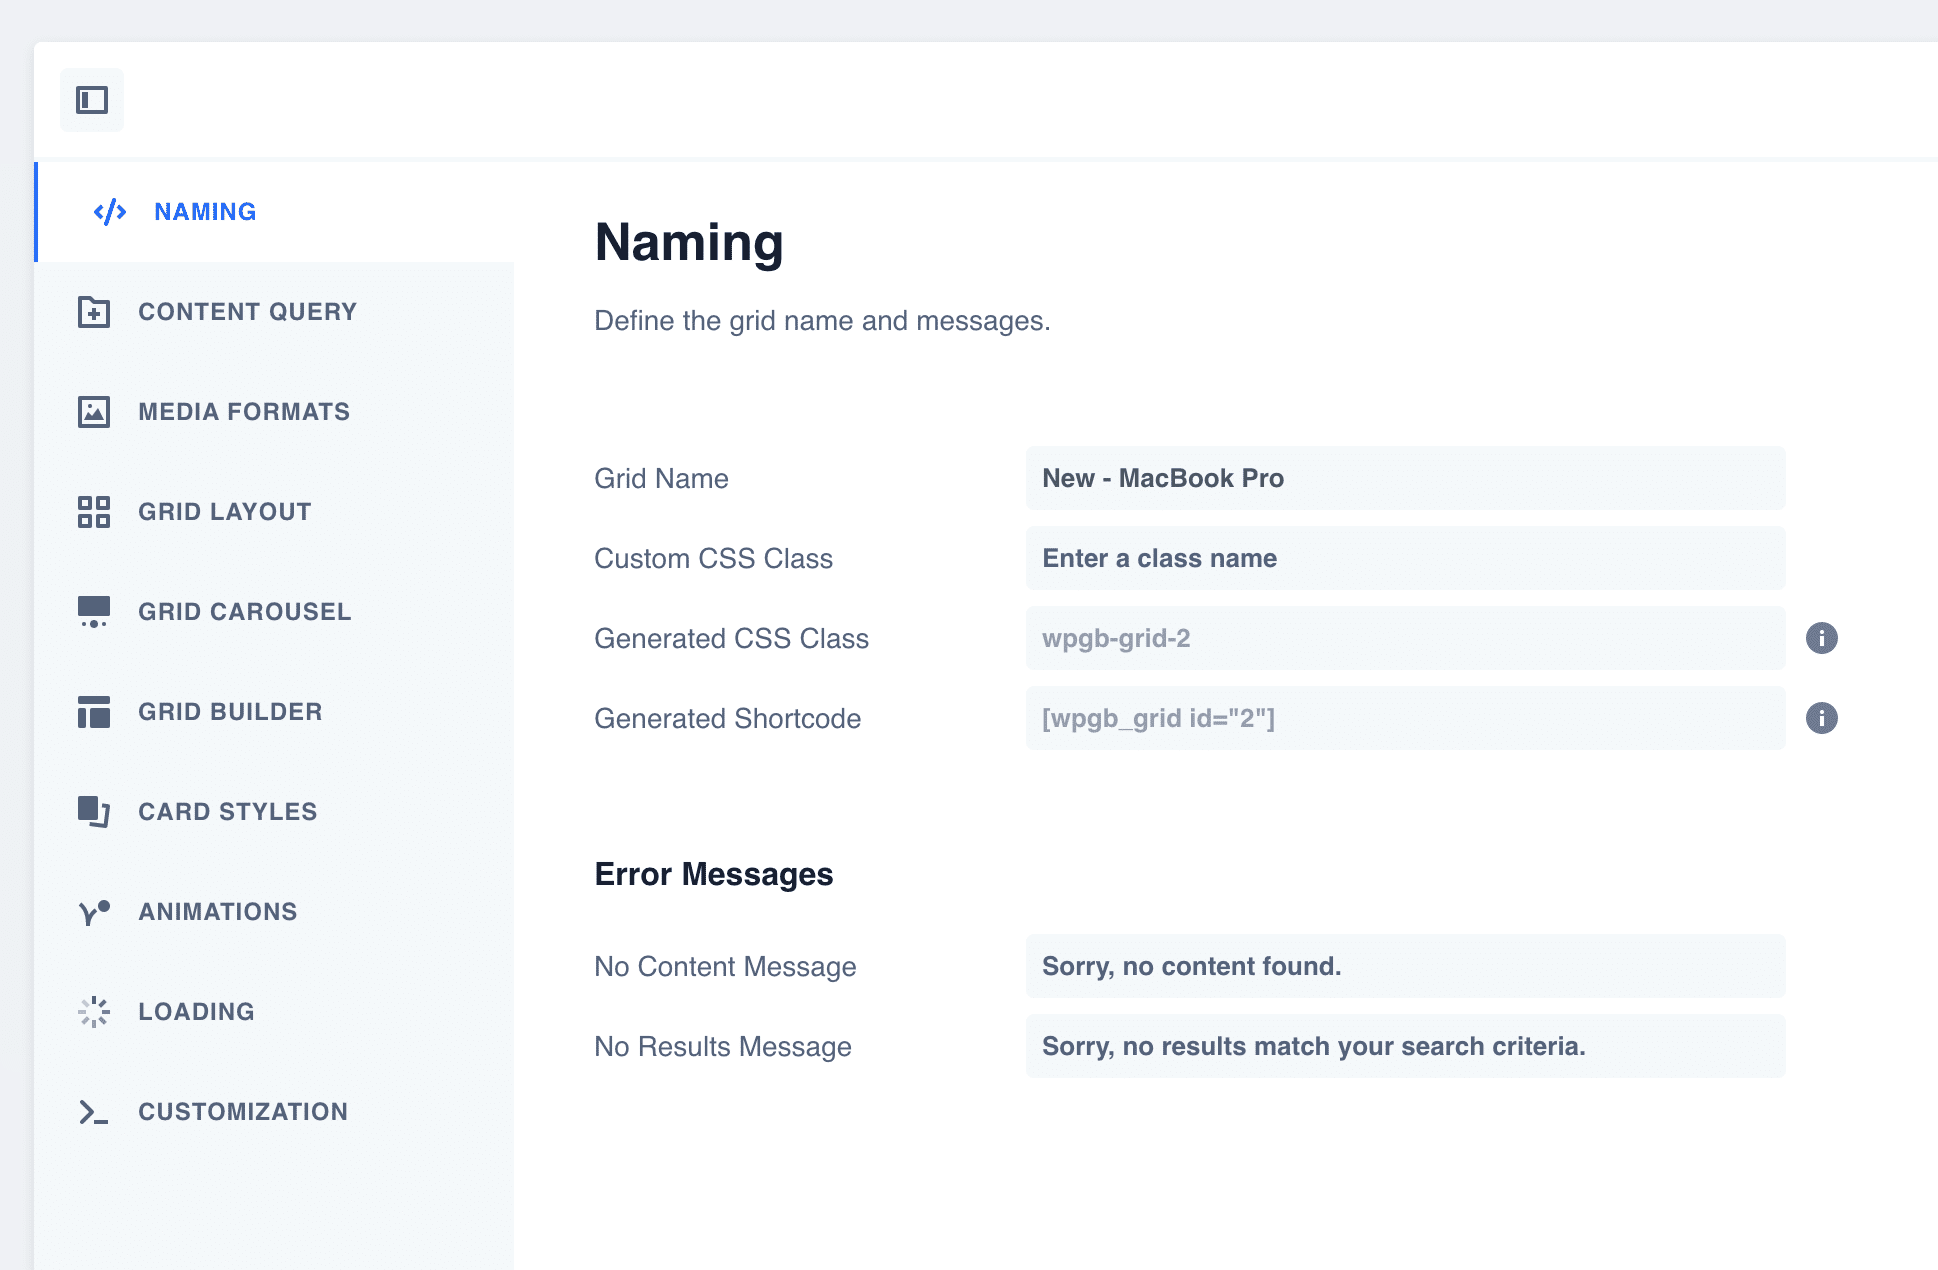
Naming tab
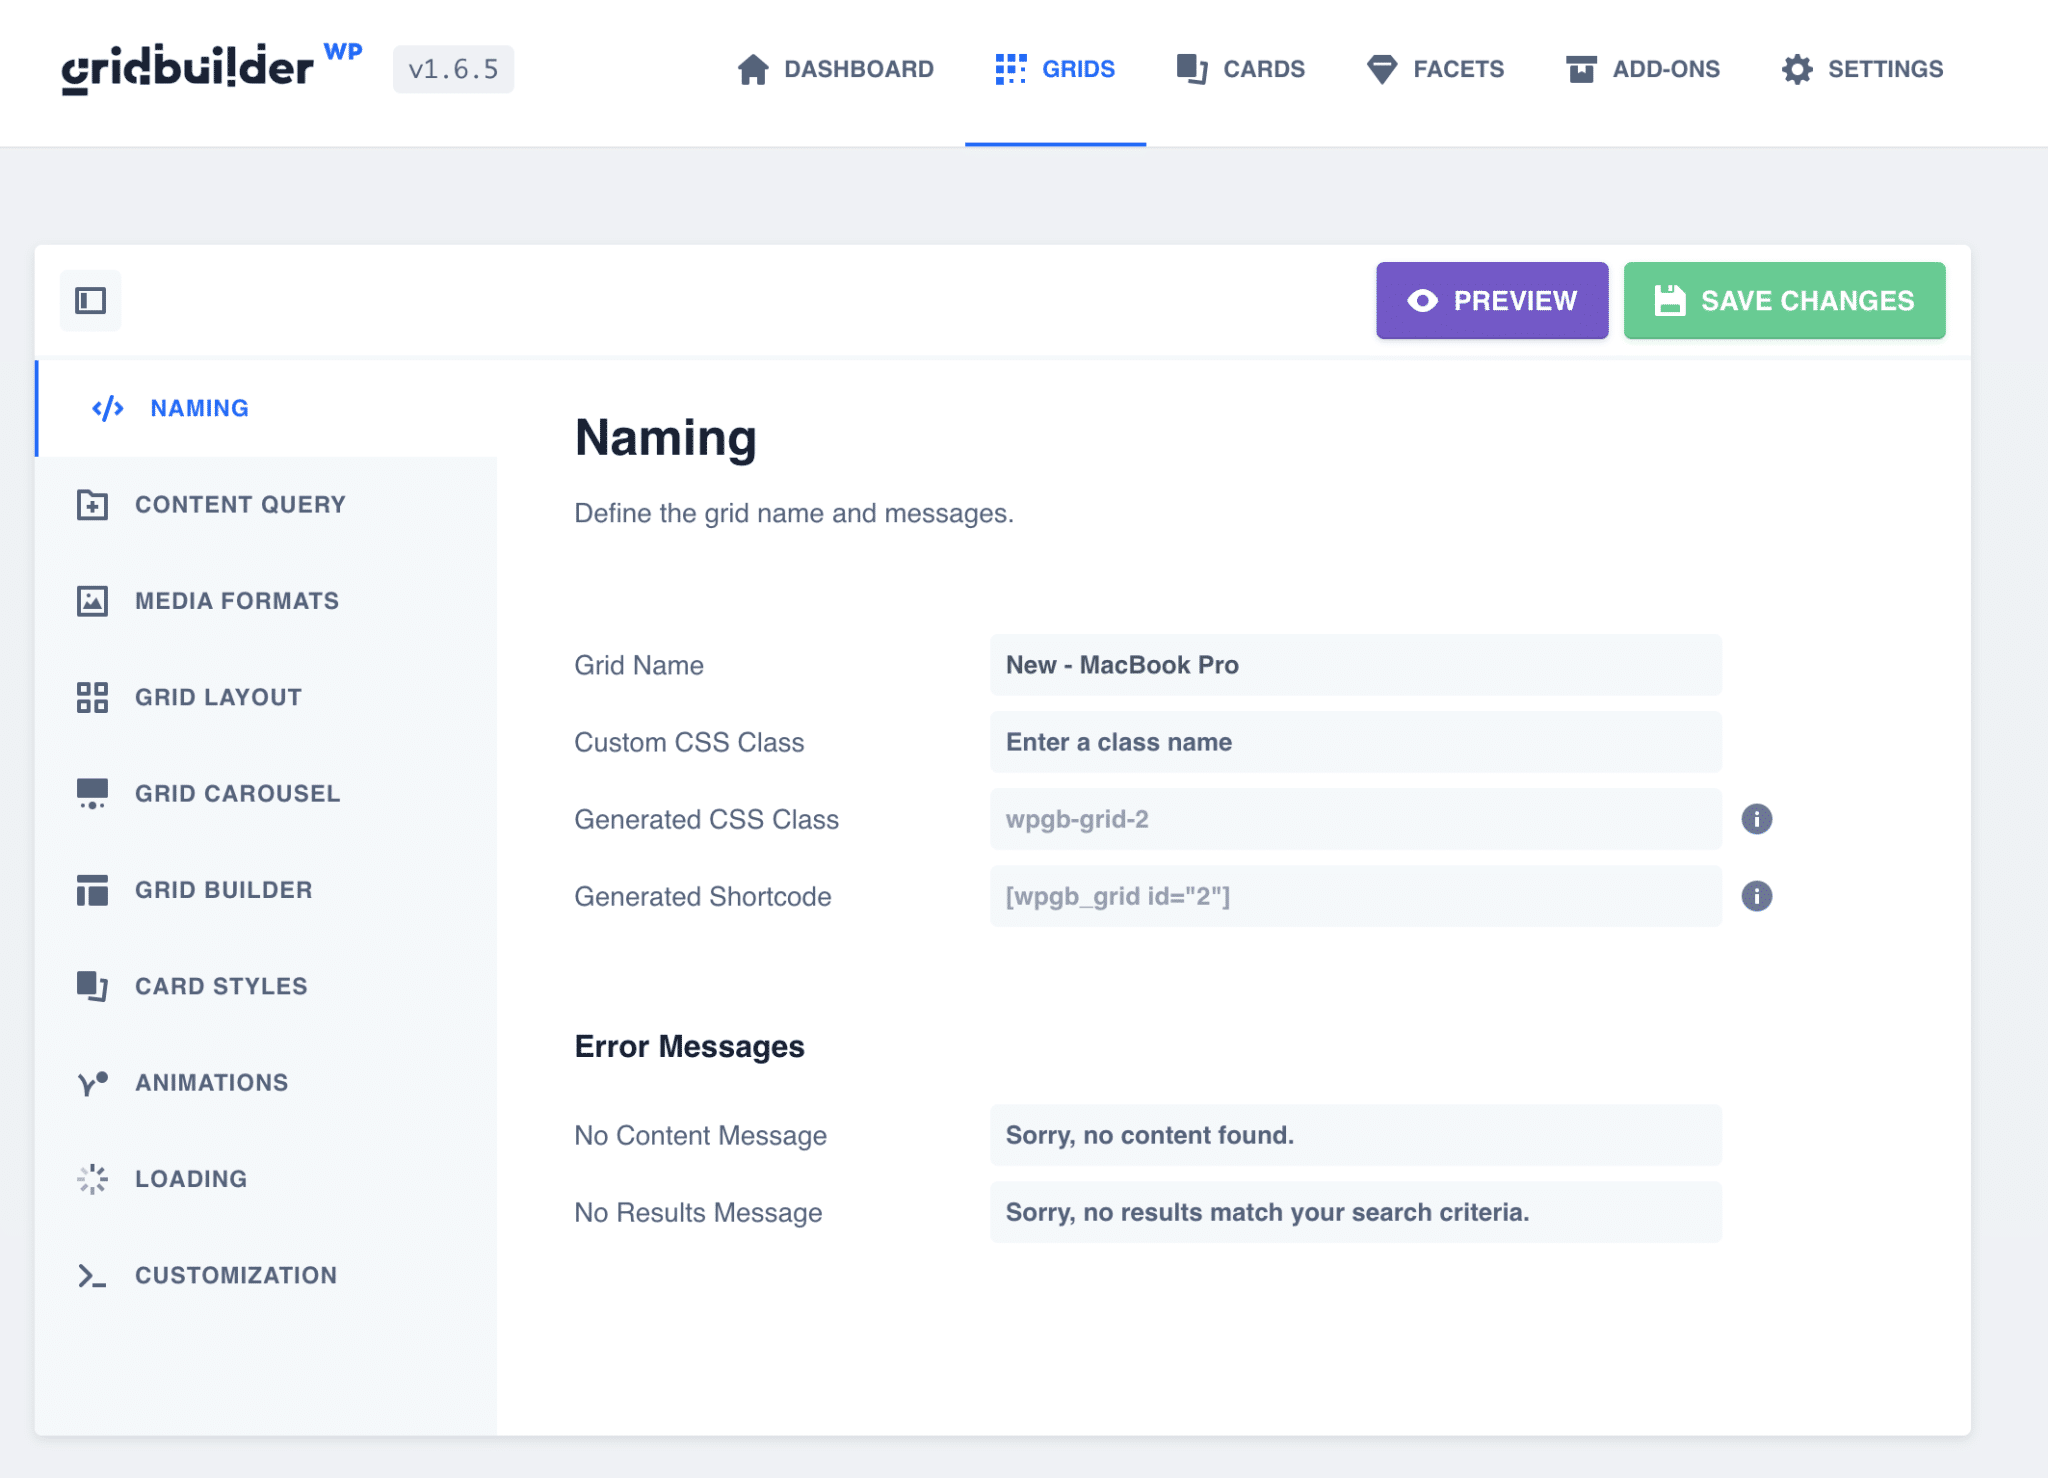
The “Naming” tab allows you to define the name of your grid. This is useful if you create several grids, to define a custom CSS class for it or to retrieve the shortcode to be displayed on your pages.
You can then edit the different error messages if the visitor’s filtering does not return any result.
Content Query tab
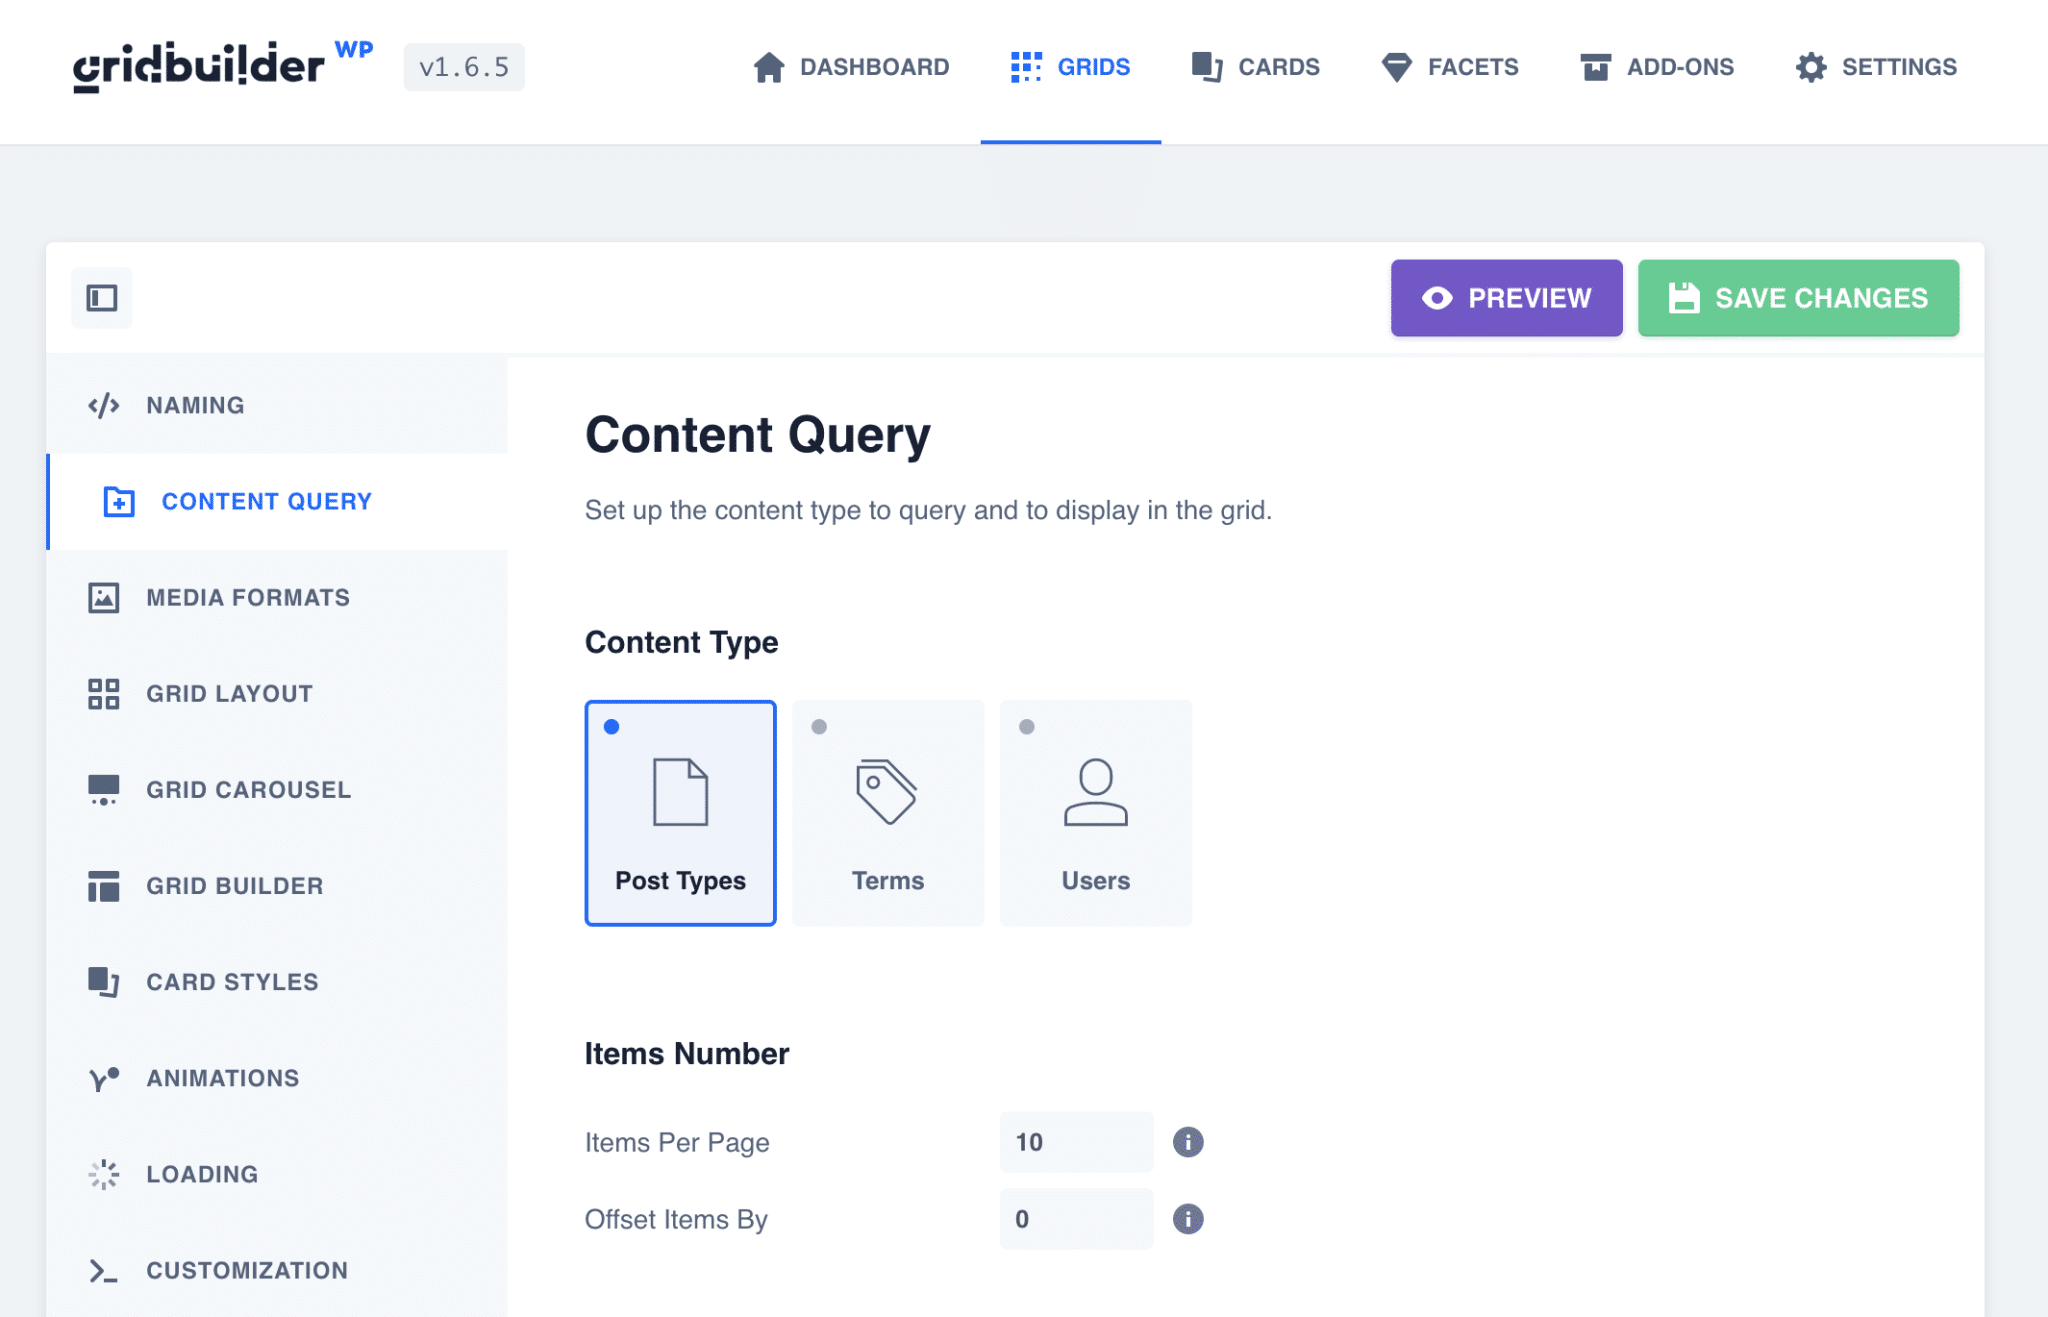
The “Content Query” tab allows you to define precisely what will be displayed in our grid.
We can choose the type of content, taxonomies, and even filter by custom fields.
Here, for example, we have selected the publication type “Products” with the taxonomy term “MacBook Pro”. Our grid will then display only the products of this category.
You can preview the appearance of your grid at any time by clicking on the purple “Preview” button at the top right.
Media Formats Tab
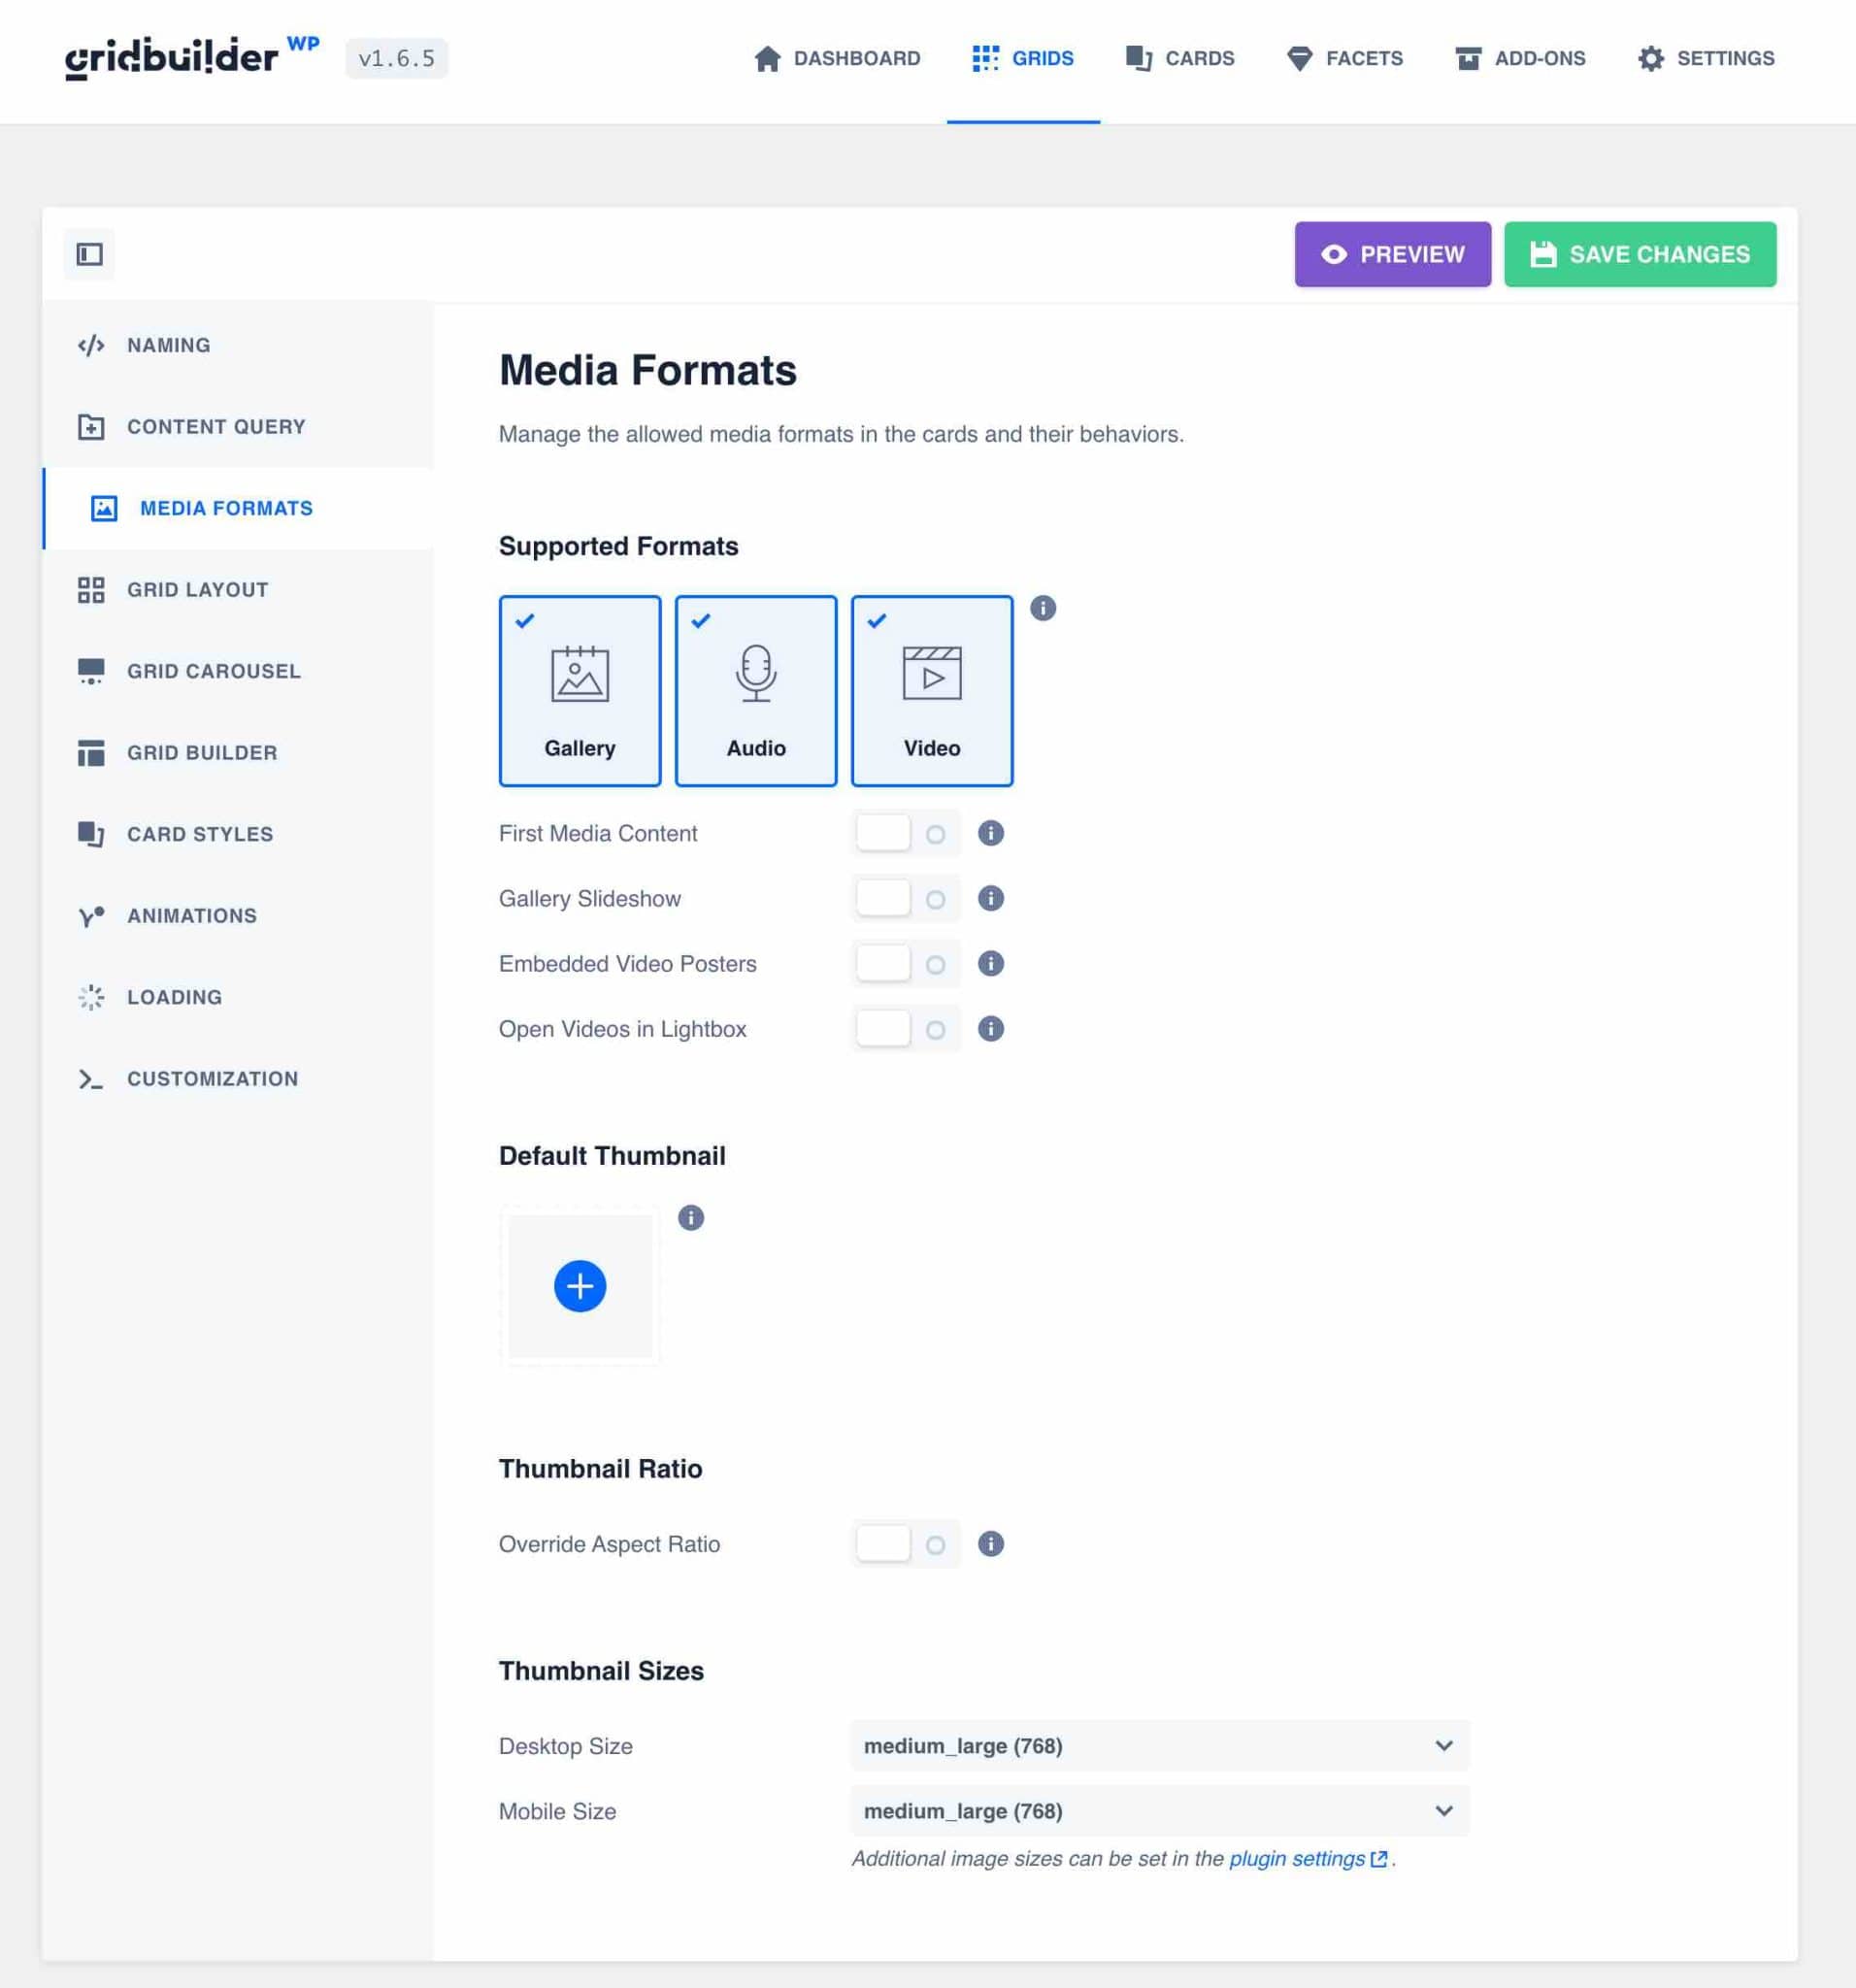
This tab is very useful because it allows you to manage the display of media on the cards.
For example, it allows you to:
- Automatically retrieve the first image of a content if no featured image is defined.
- Manage image galleries as a card image.
- Display the first image of the WooCommerce gallery when hovering over the card.
- Automatically get the featured image from YouTube or Vimeo if you display them on your cards.
- Open videos in a viewer.
It also allows you to define a default image if you do not display any image automatically, or to manage the ratio of your images.
Indeed, the defined image will be automatically displayed in its original format. If all your images do not have the same format, it can affect the design of your grid. To correct this, defining a ratio can be very useful.
In my example, I display the featured images of all my products. Since they all have the same size, I don’t define a particular ratio.
I have chosen to leave all other settings as default, since they work well for this case.
Grid Layout tab
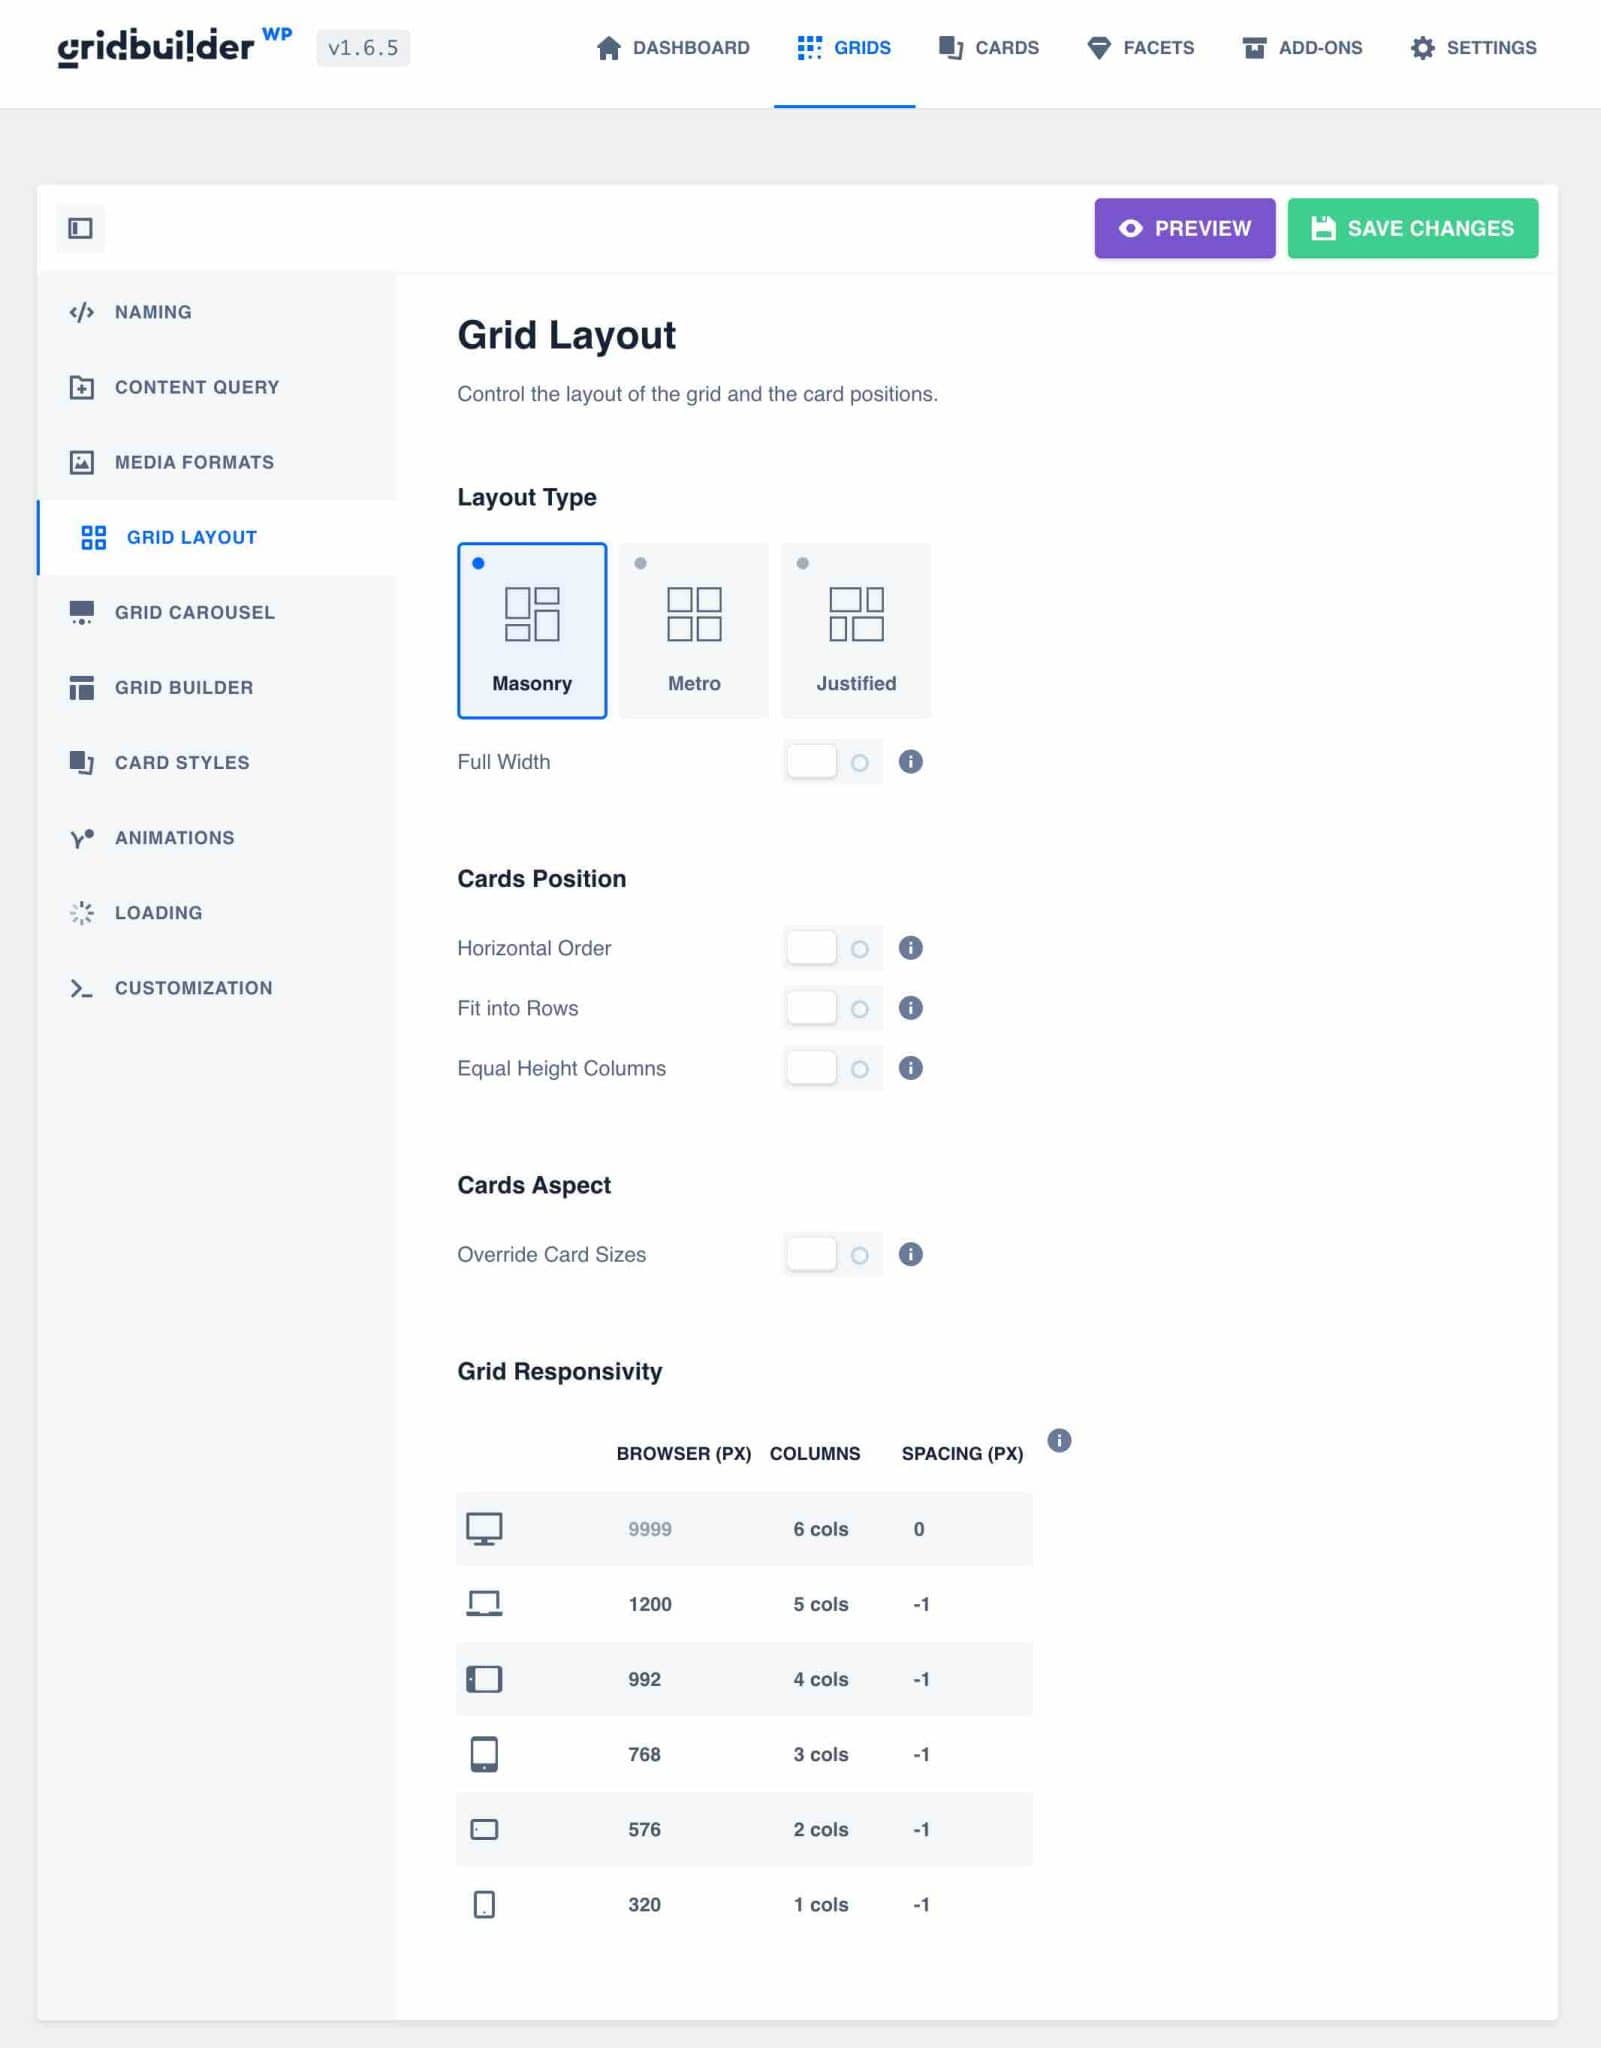
The “Grid Layout” tab allows you to define the display behavior of your grid.
You can choose the type of layout among 3 options:
- Masonry
- Metro
- Justified
These 3 layouts depend on the type of card chosen for your content. I’ll come back to this later.
You can then define your cards order and assign them the same height. This is very useful to keep the design flawless.
Under the “Grid Responsivity” section, you can easily manage the responsive side by defining the number of columns displayed in the grid according to screen sizes, as well as the space between each card.
For our grid here, I chose to focus on displaying a maximum of 3 products per row and a spacing of 20 pixel between them, so that the design remains airy and the information doesn’t overlap too much.
Grid Carousel tab
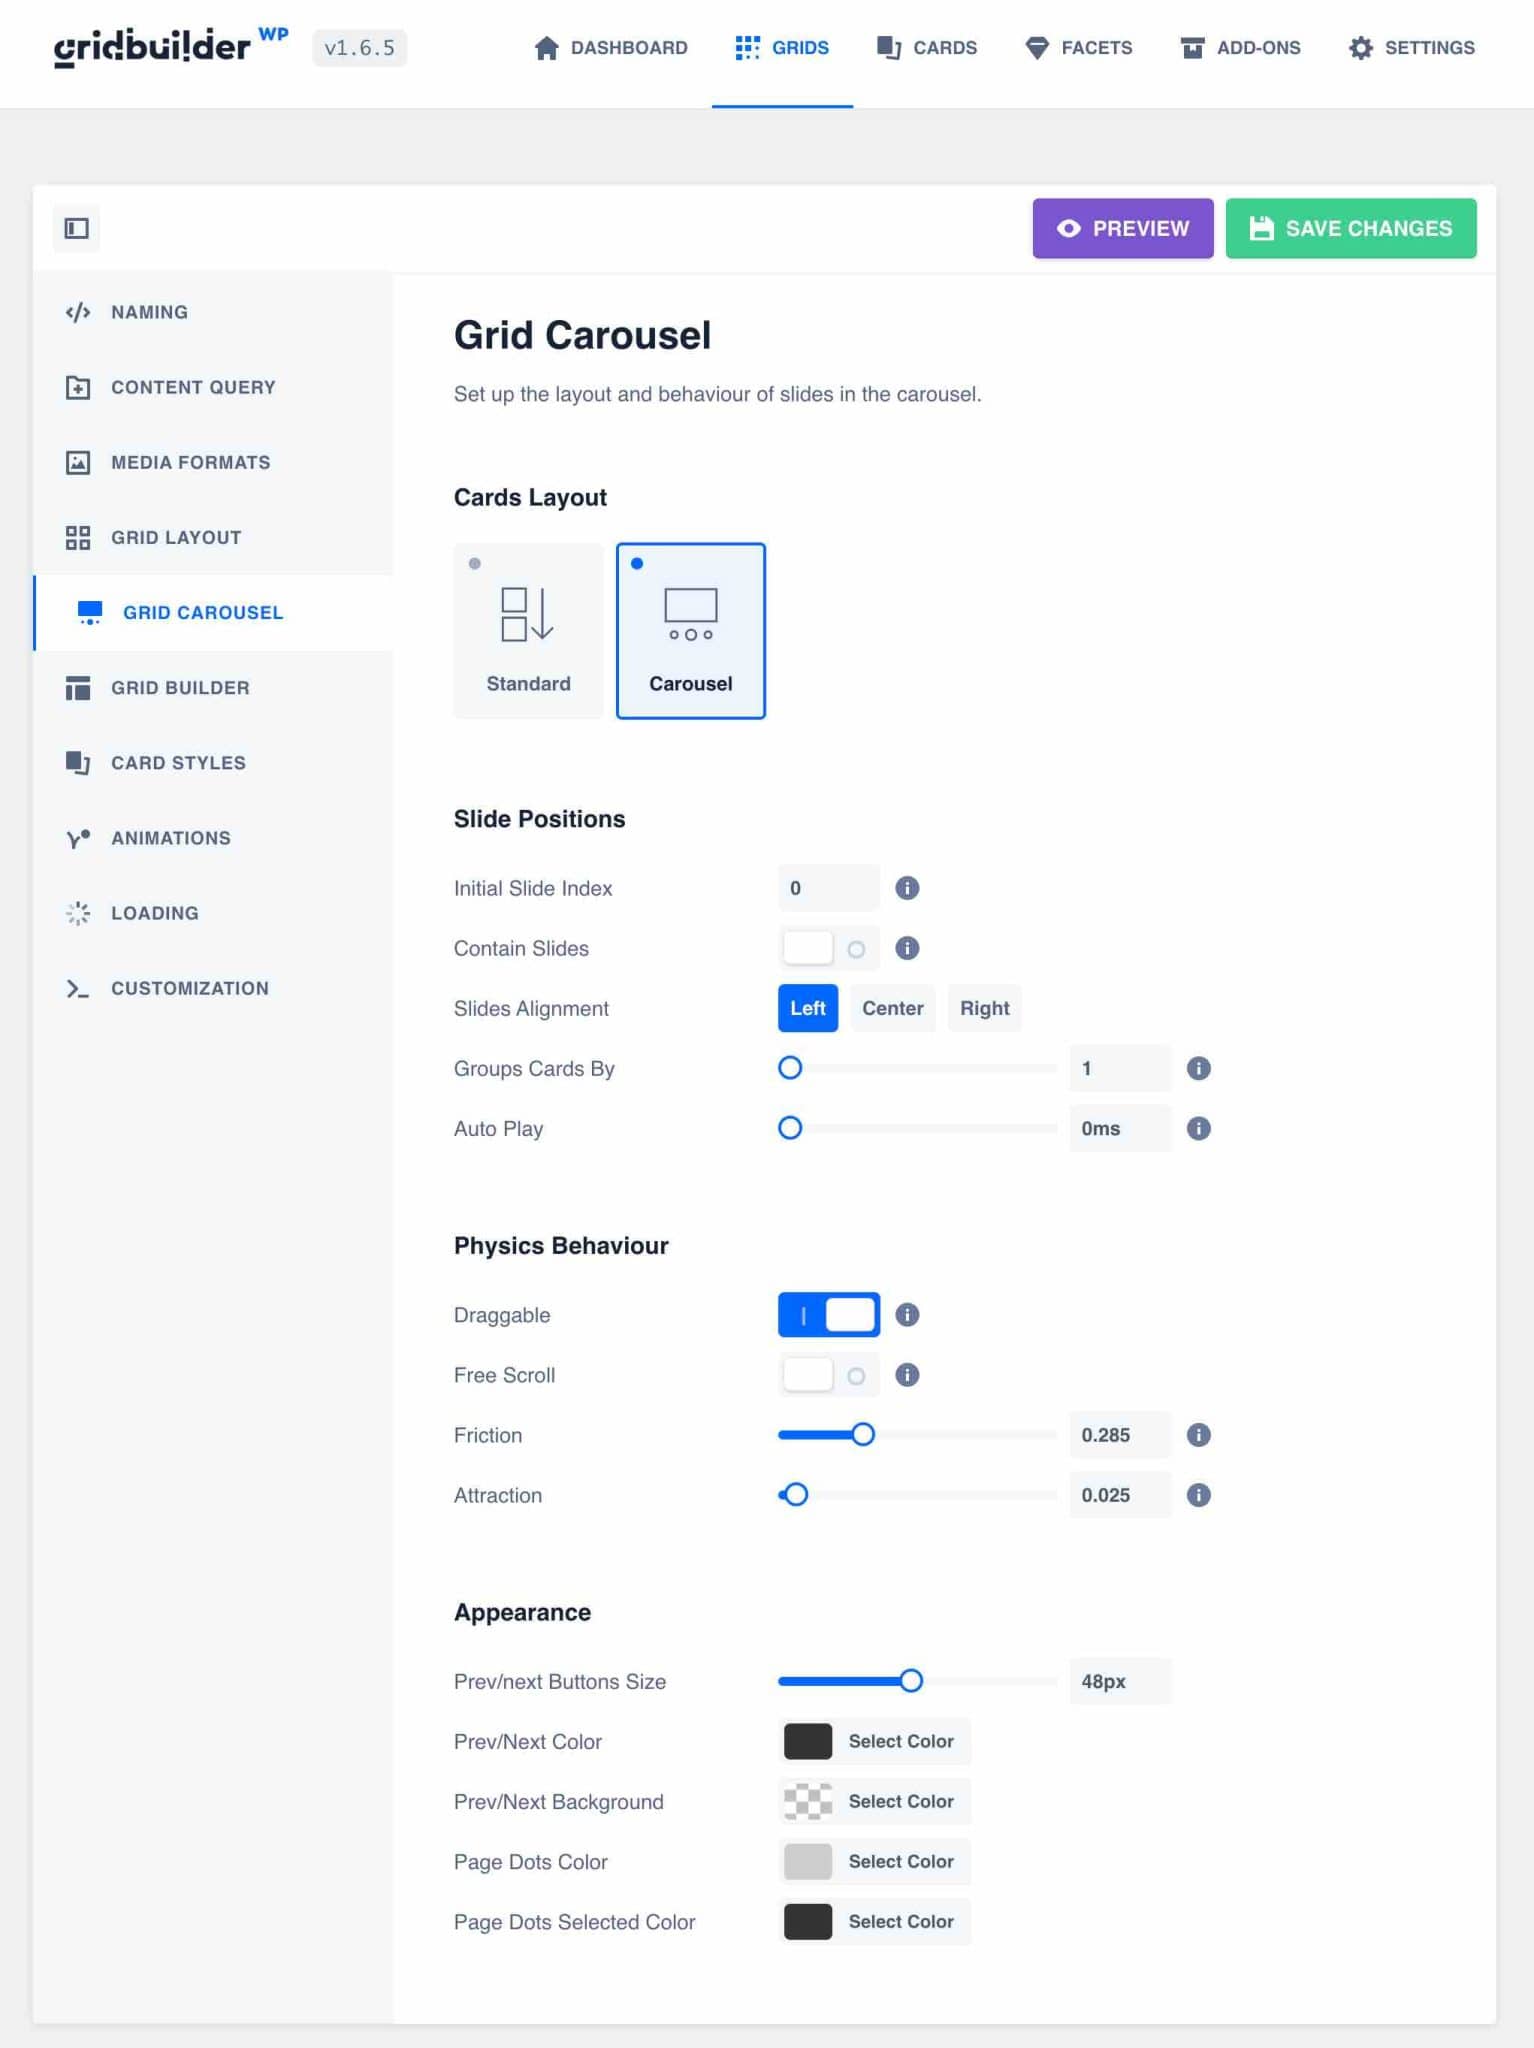
The “Grid Carousel” tab allows you to transform your product grid into a fully customizable carousel in one click.
Simply select the “Carousel” layout, and here we go: you have a product slider.
Different options help you to refine the behavior of your carousel:
- Scrolling speed
- Number of products
- Auto play or not
- Button size
- Position of the slides
This customizable carousel template is simple to operate, and very convenient to avoid installing an additional plugin and display a custom slider with your content.
Here is what we can set up with the default options for example:

Grid Builder tab
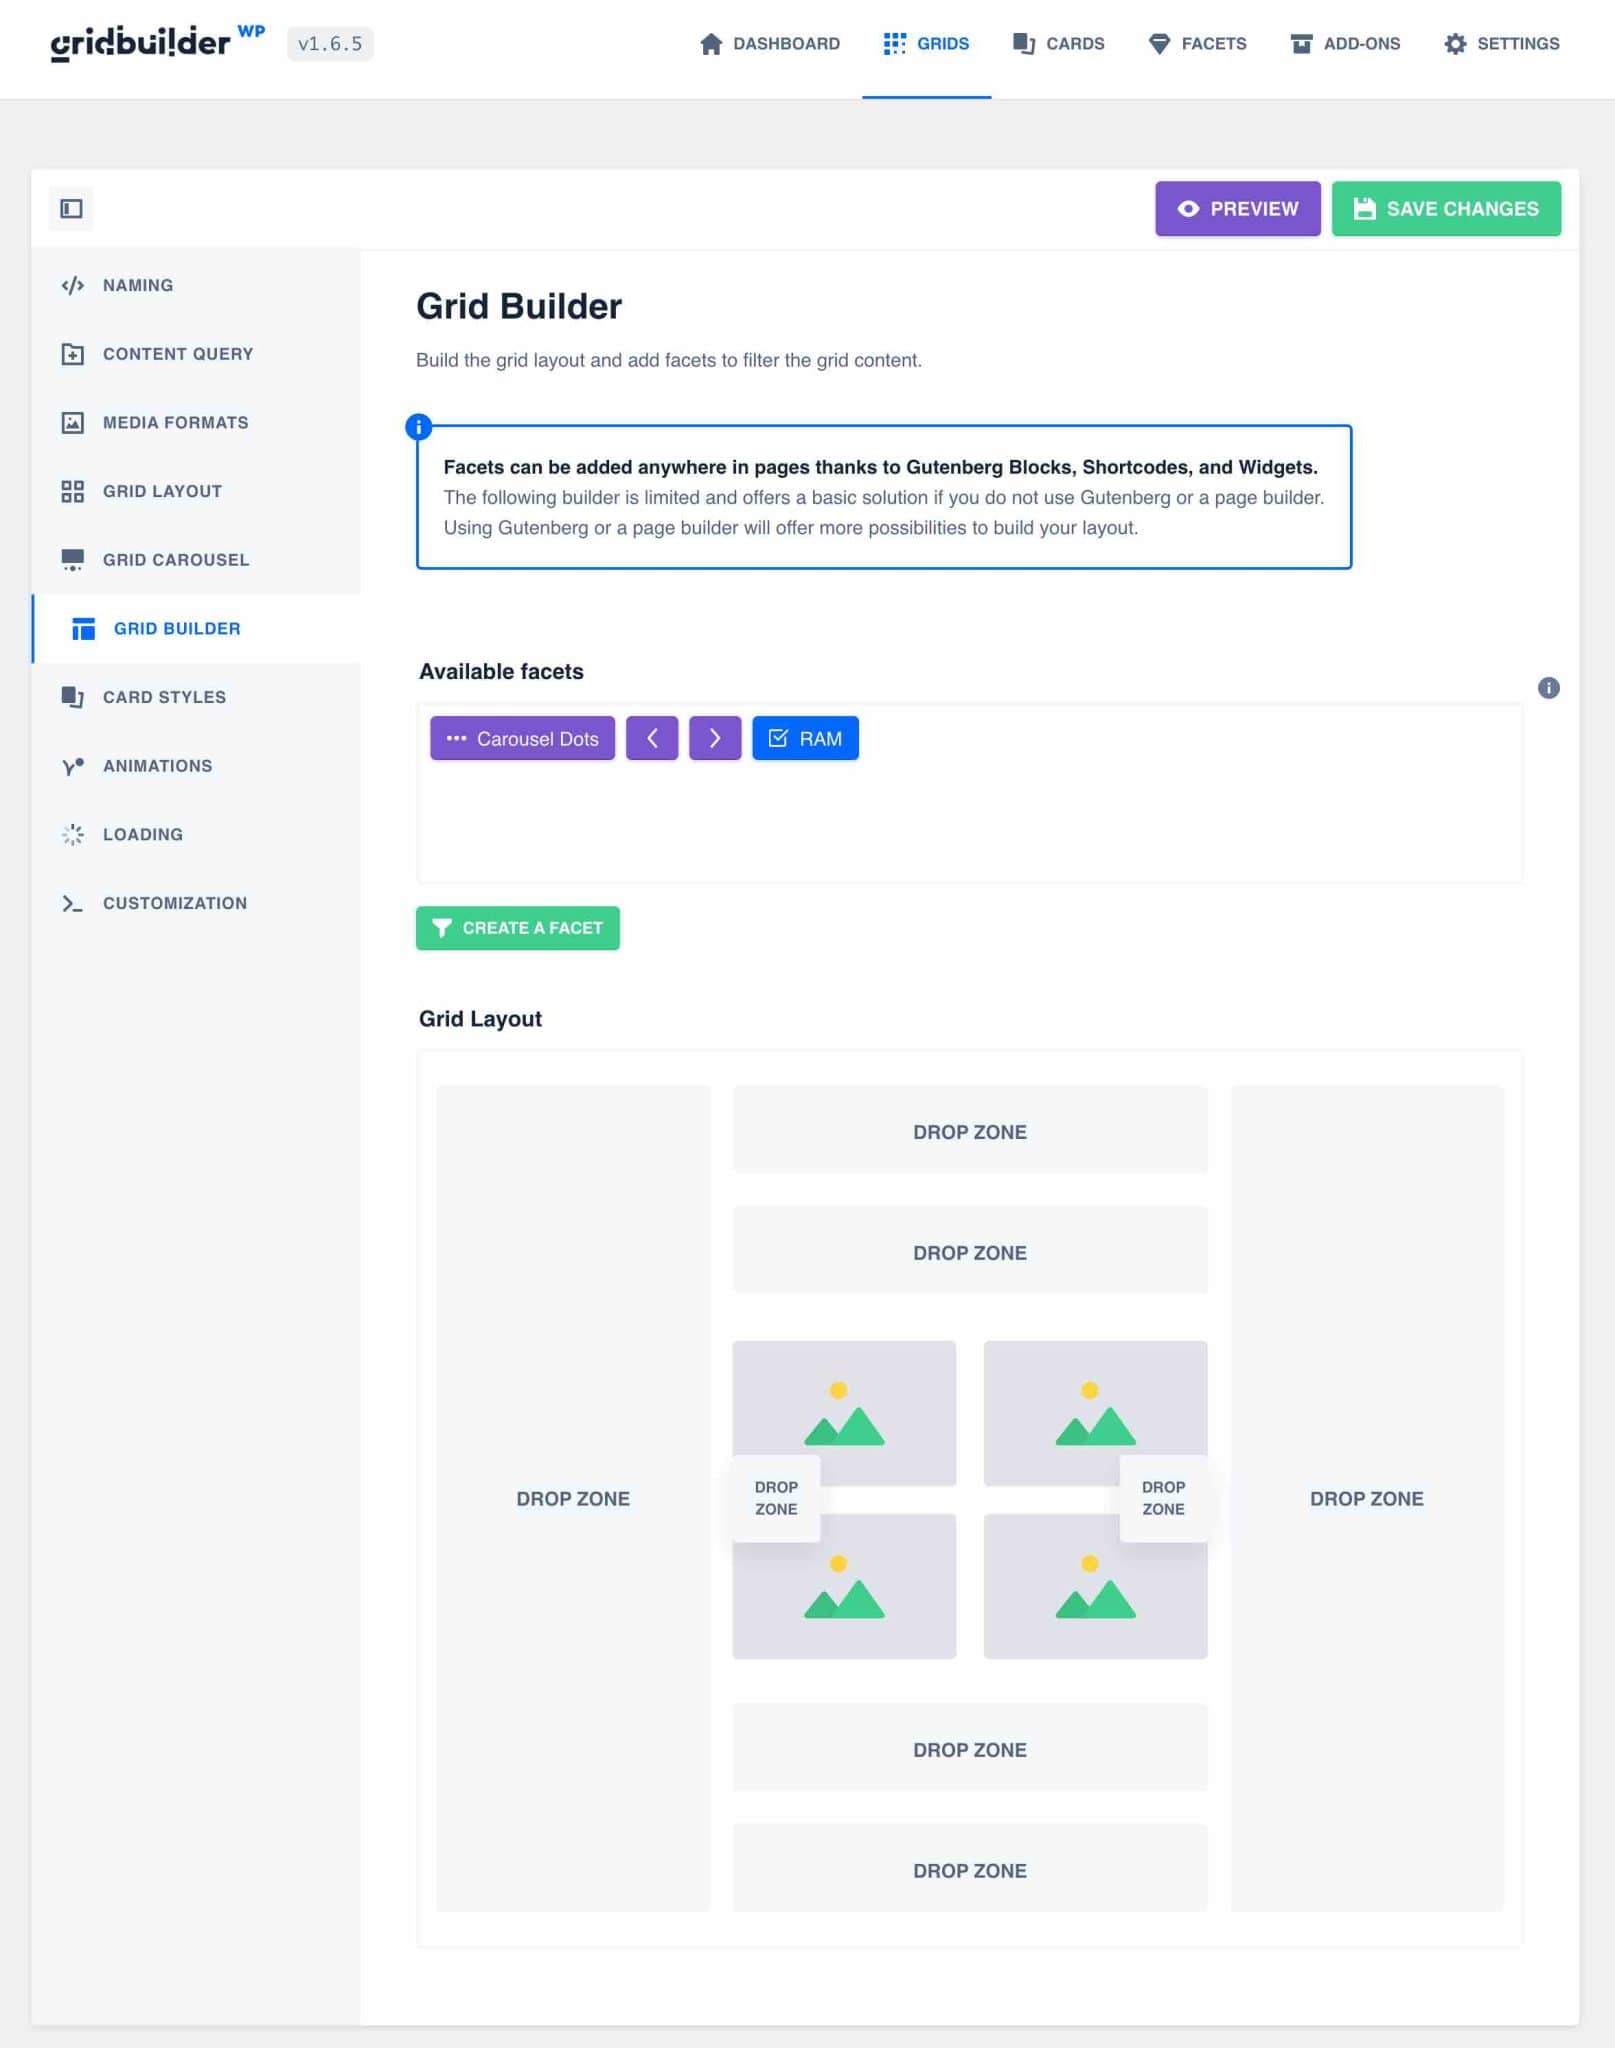
The “Grid Builder” tab allows you to edit all your facets and organize them around your grid.
Simply drag and drop them to the left, right, above or below, in the order you want them to appear on your page.
WP Grid Builder also allows you to display your grid via a shortcode or Gutenberg blocks. I’ll explain it all further in this post.
Card Styles tab
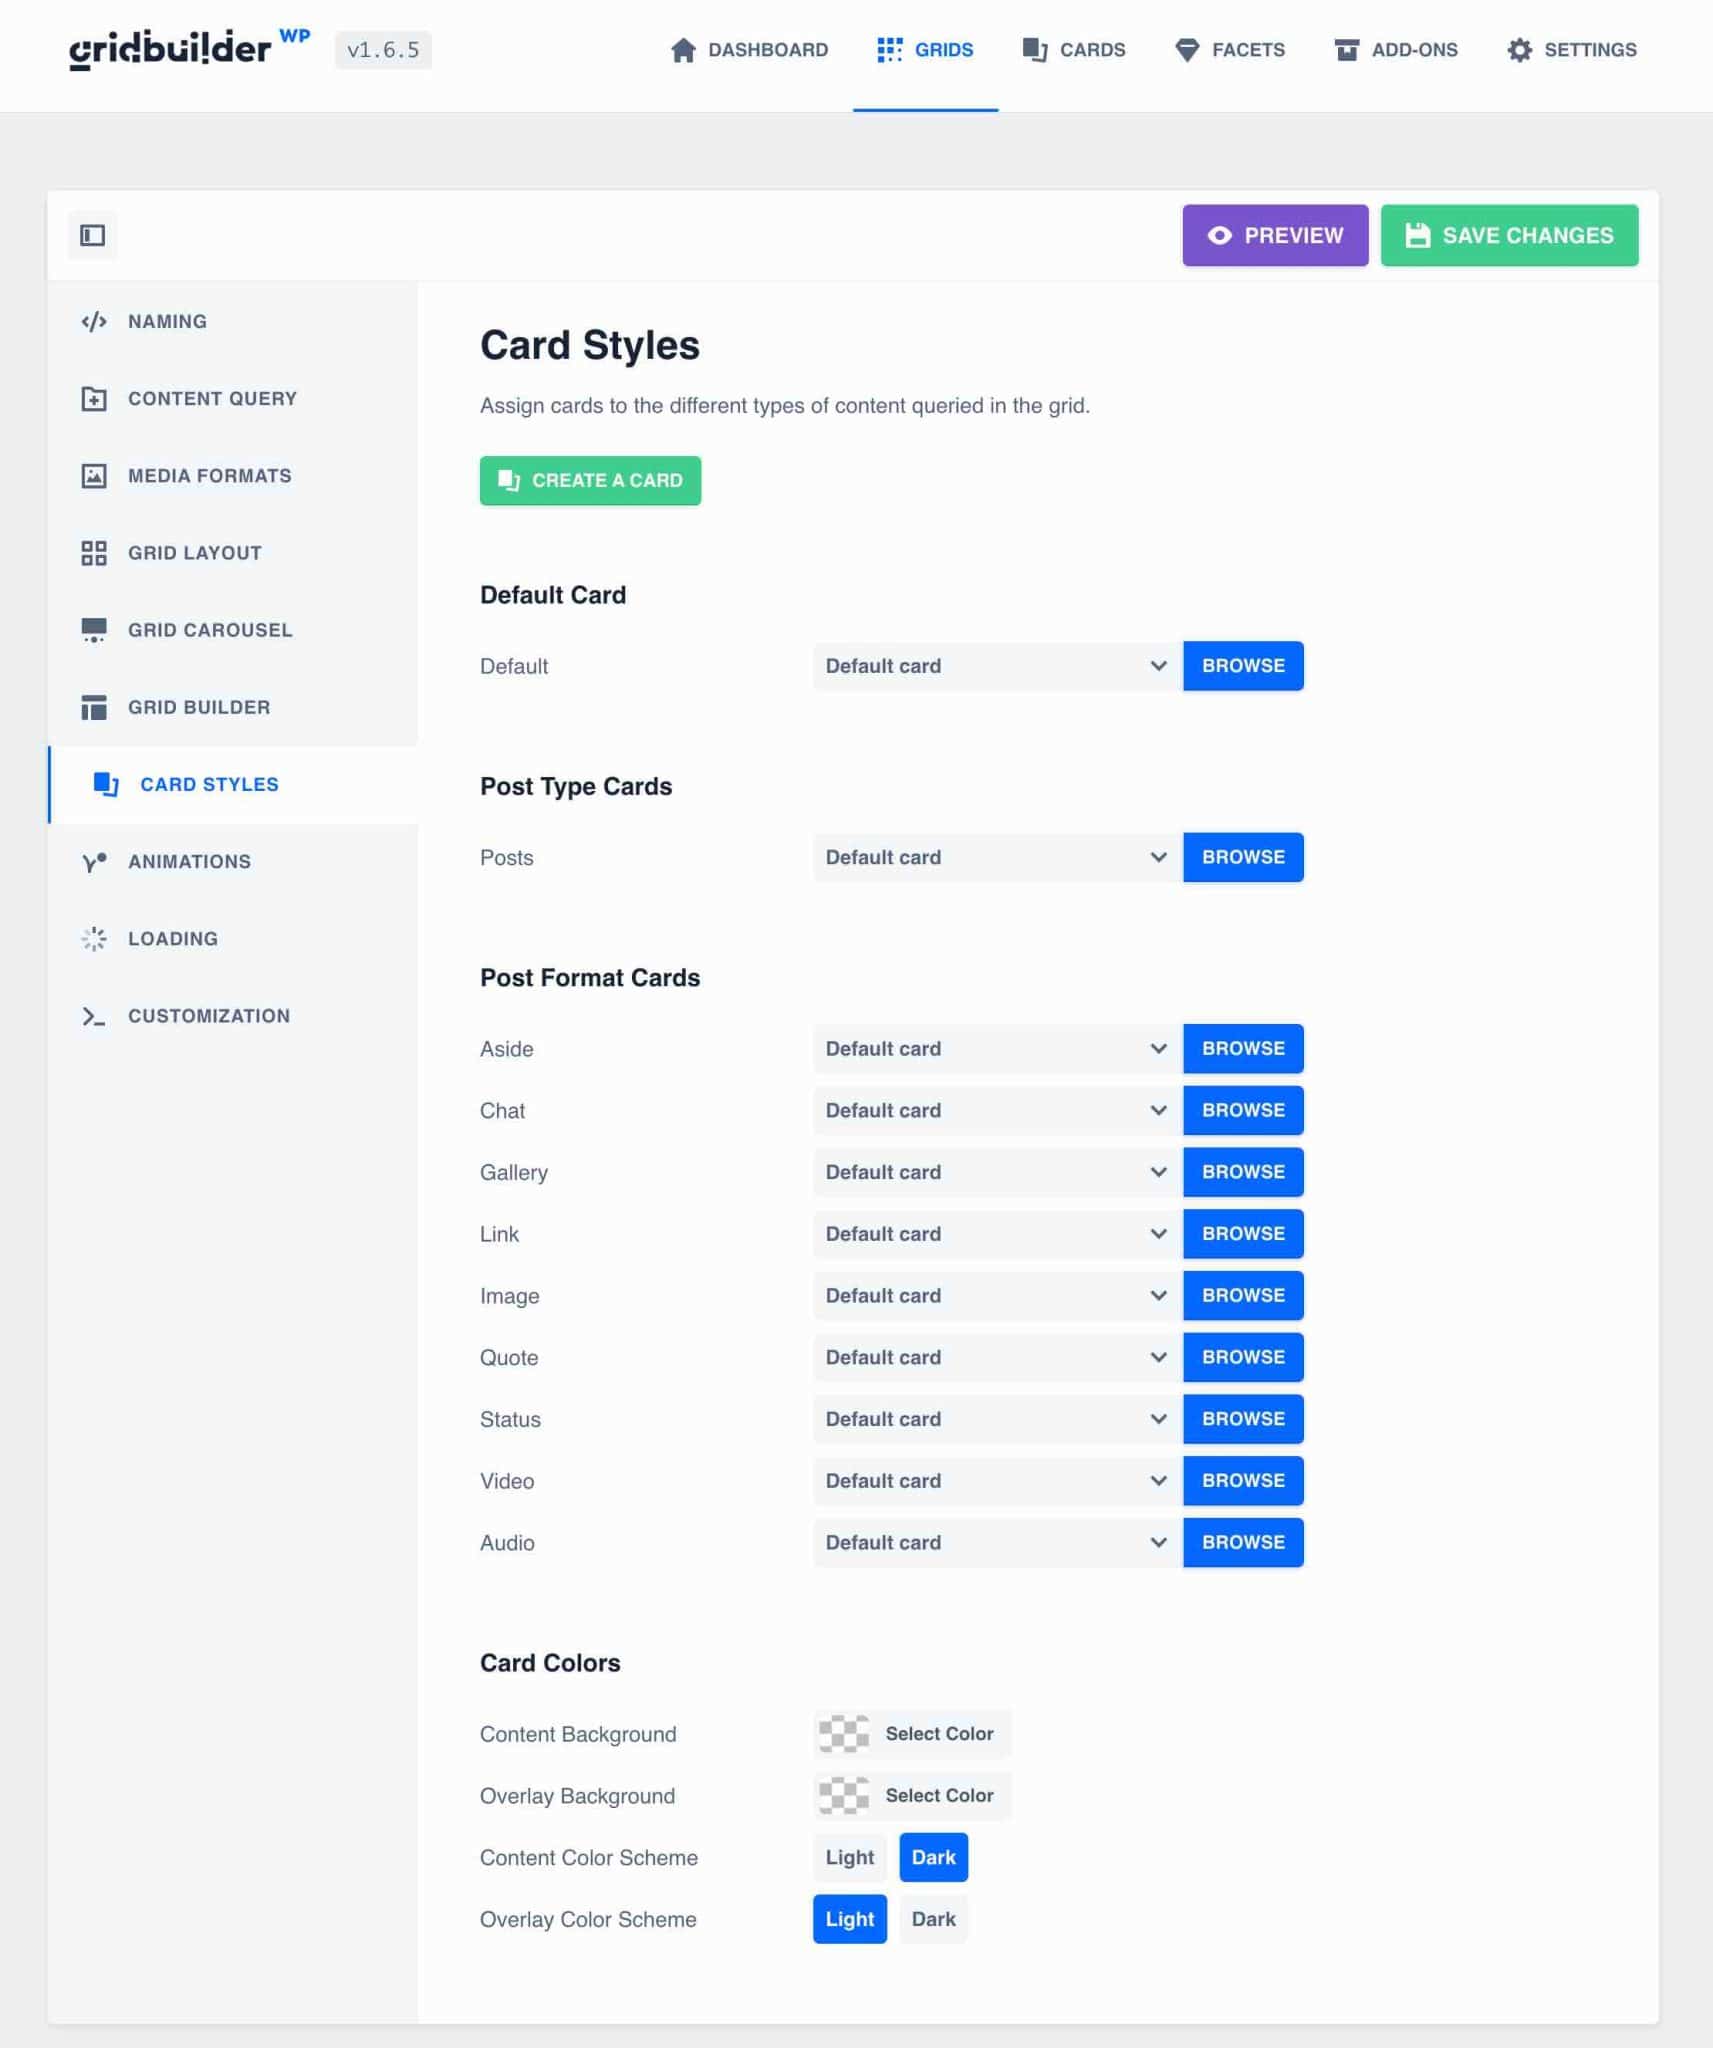
This tab allows you to define which card template will be used depending on the type of content in the grid.
In our case, we have only defined the default card, because we only have one content item, with the “Carnelian” template that we have just defined.
Animations tab
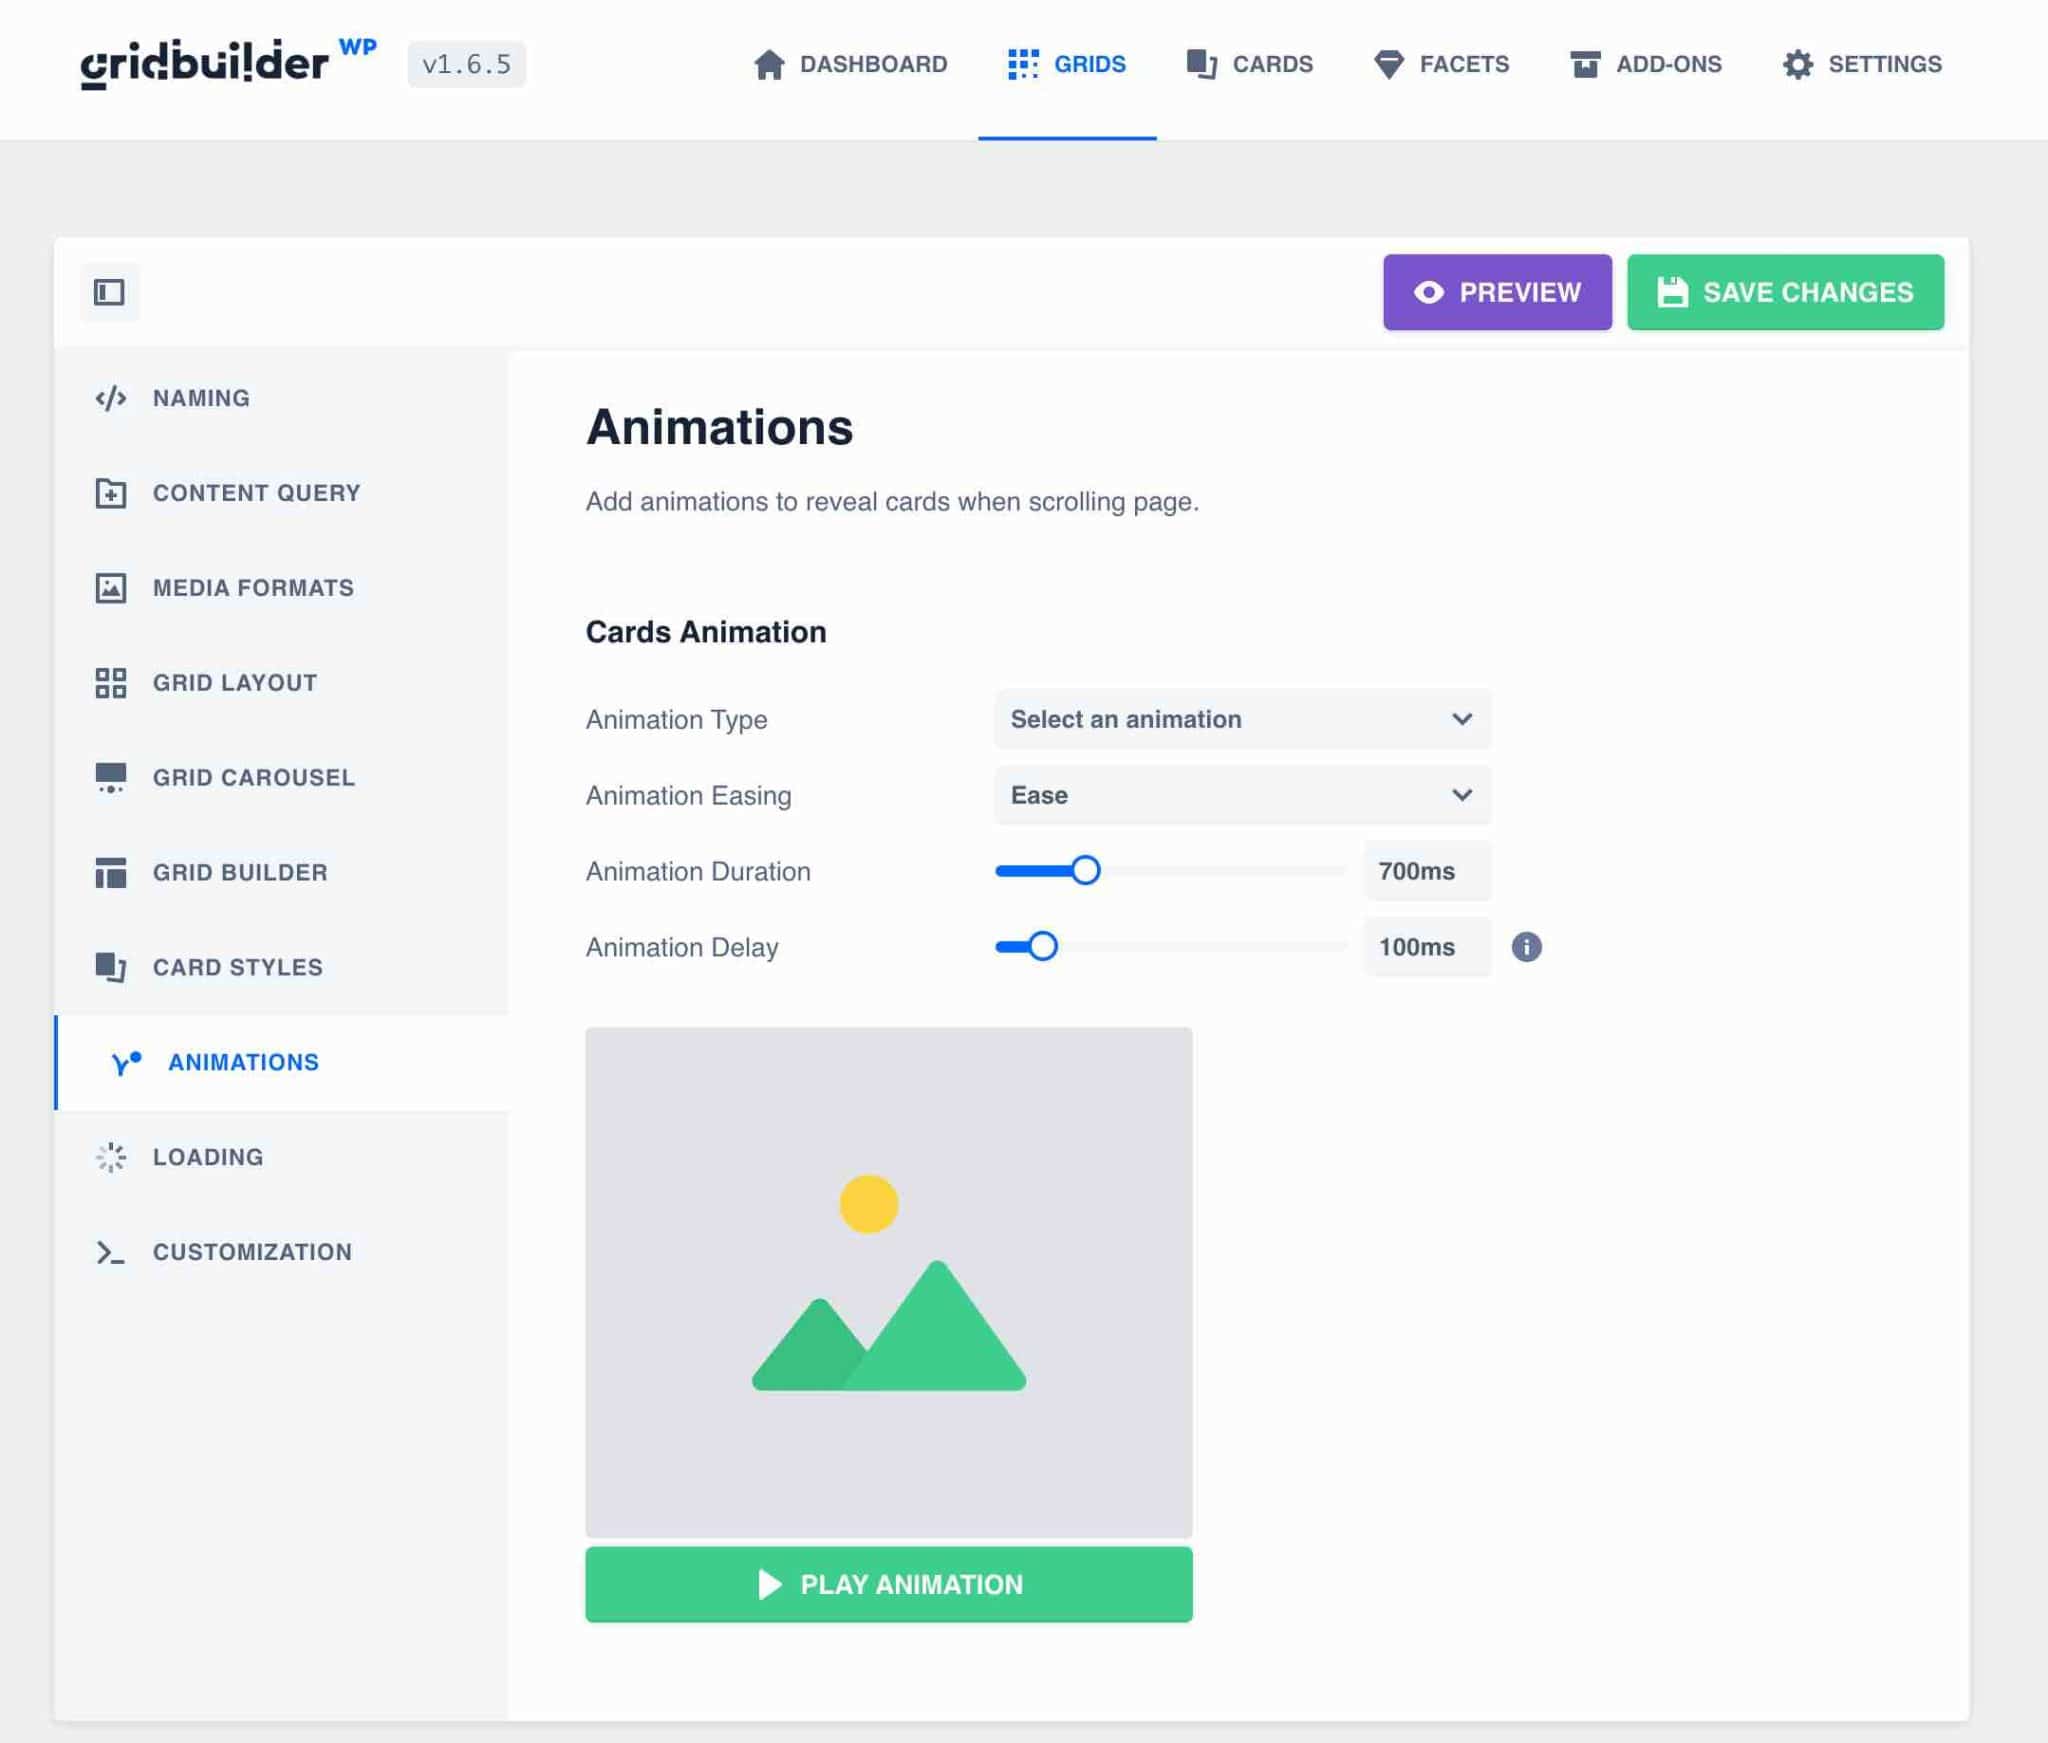
A default animation is set up for the display of your grid cards when you load the page.
You can edit or remove it if you wish, without having to enter a line of code.
Loading tab
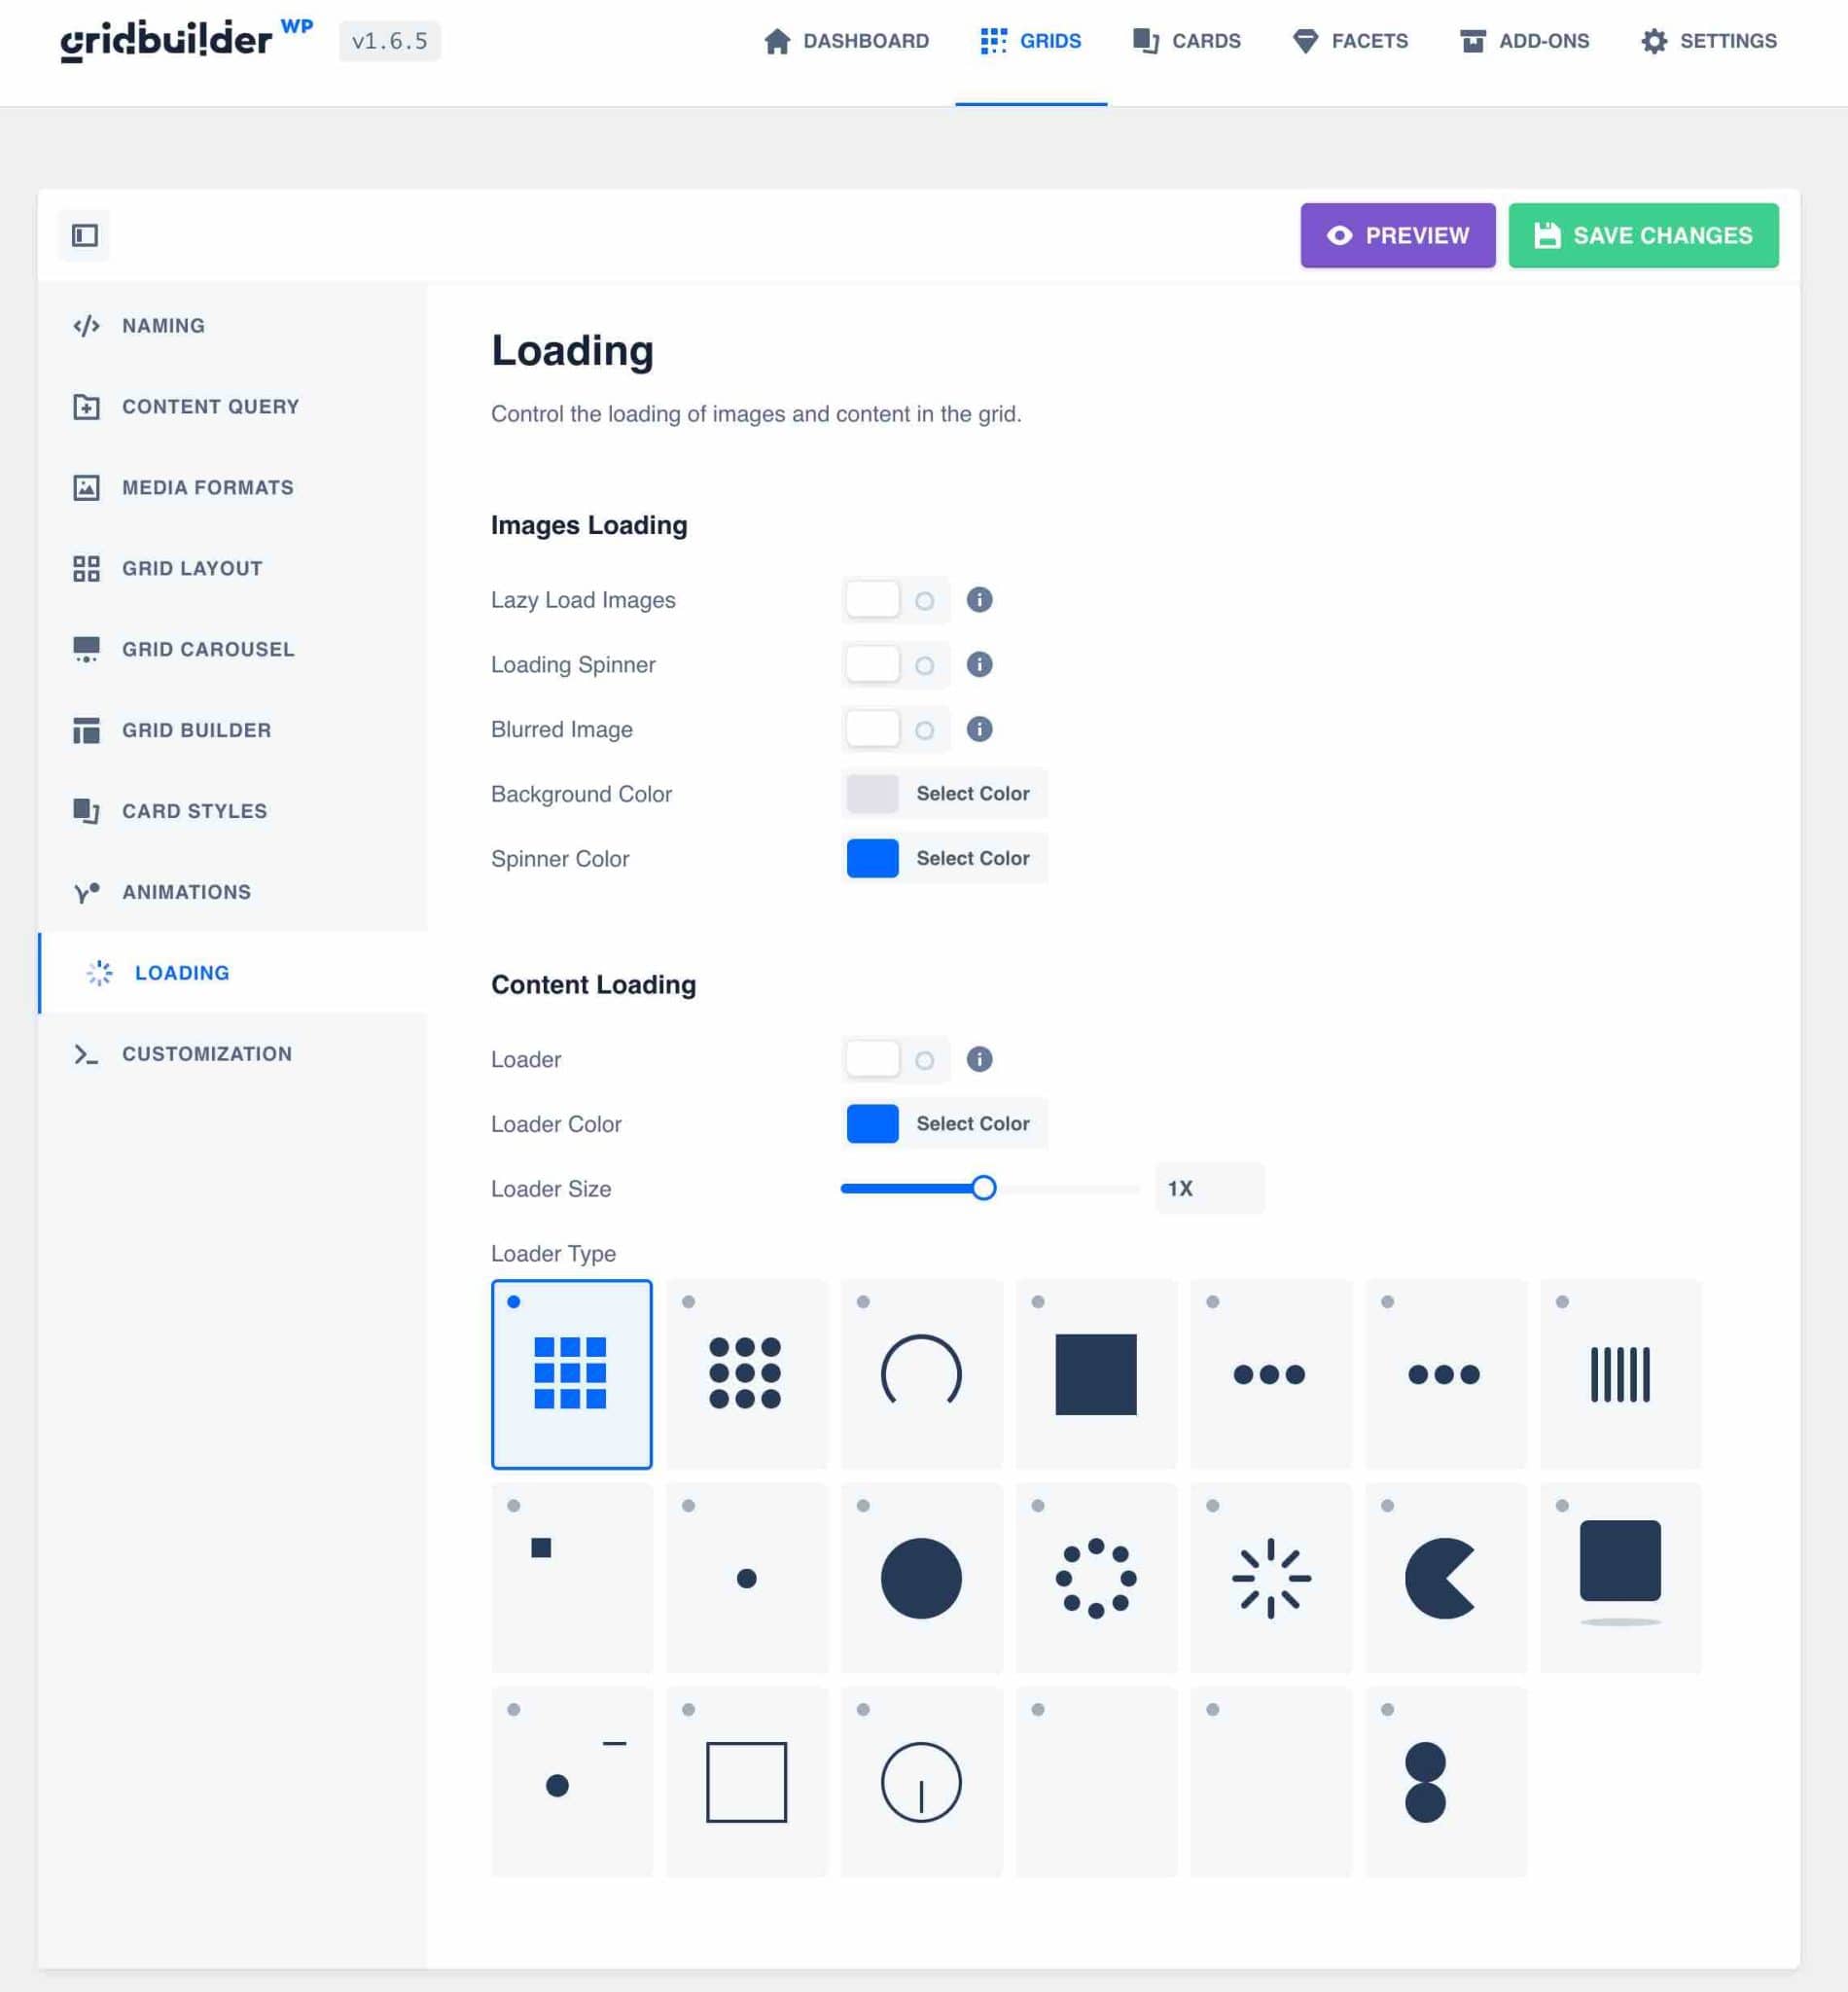
Here you can set a pre-loading animation for your grid to make your visitors wait during the page display.
Note that it is also possible to display blurred images during loading, a bit like Twitter, or to activate the lazy load to load images only when they are visible. This will optimize the performance of your page.
For my part, I only activated the lazy load option to load my grid faster.
Customization tab

The “Customization” tab offers the possibility to add CSS or JavaScript code as needed, directly in the grid settings.
Once this is all set up, we still have to display our grid on our page.

How to display a WP Grid Builder grid on a WordPress site
There are different ways to display your WP Grid Builder grid on your WordPress site.
How to display a WP Grid Builder grid via Gutenberg blocks?
WP Grid Builder includes two Gutenberg blocks that allow you to add grids and facets directly to your pages or posts: a “Facet” block and a “Grid” block.

All you have to do is select “grid” or “facet” in order to view your filterable grid on your page.
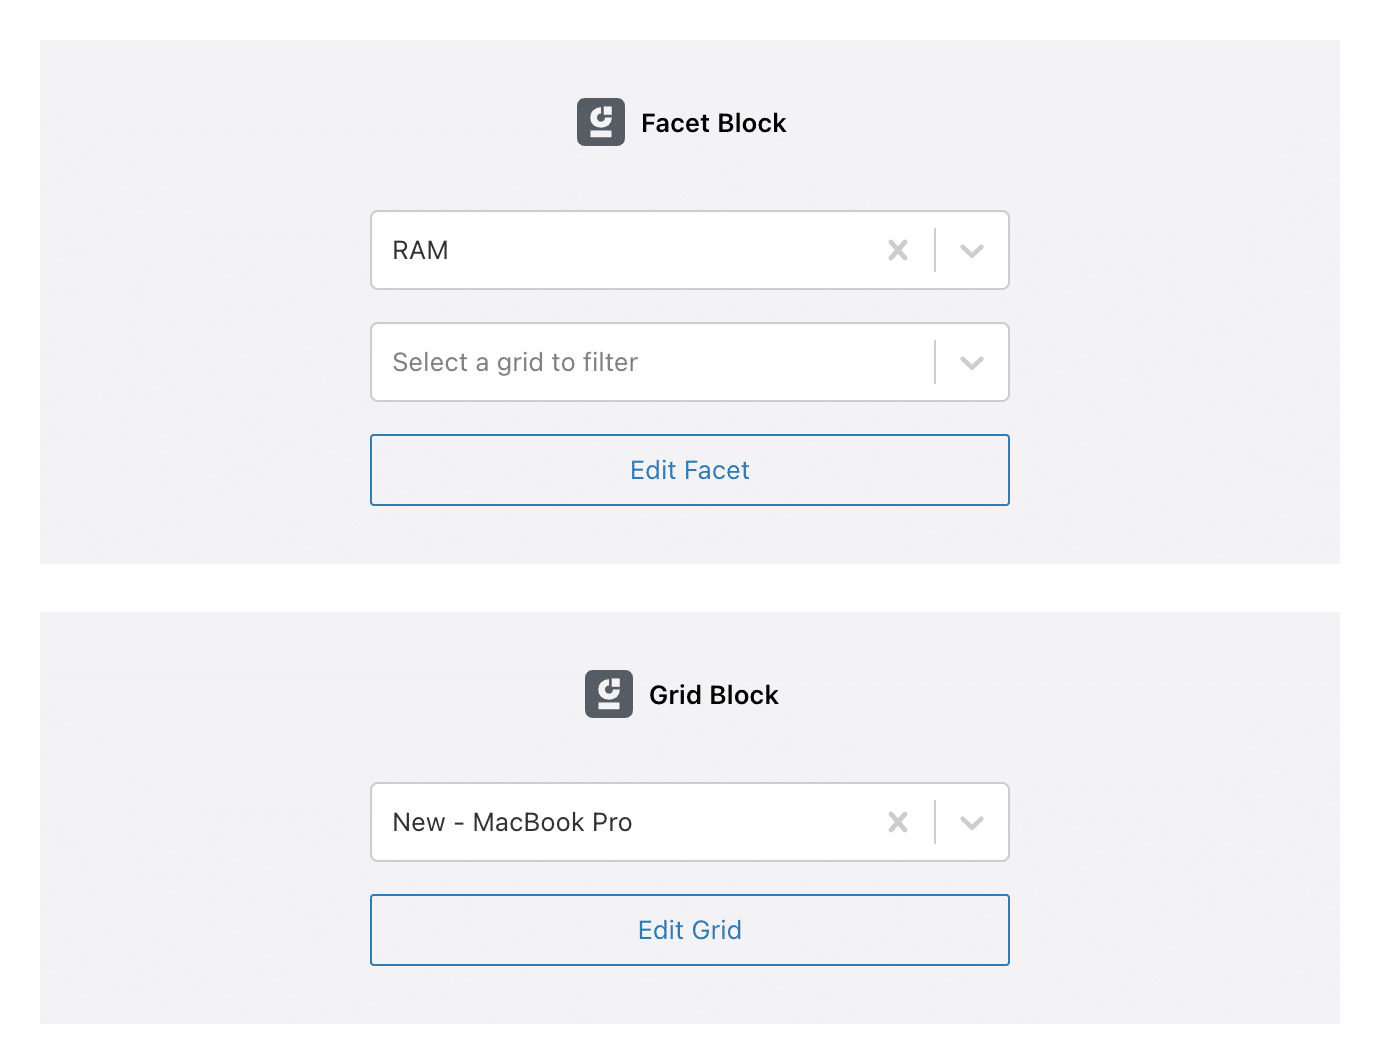
This results in a display of this type:
You can also use these two blocks to integrate your grid in one of the widget areas provided by your theme (e.g. in your sidebar).
How to display a WP Grid Builder grid with a shortcode?
When you create a grid, WP Grid Builder generates an automatic shortcode to display it anywhere on your site.
For example on our grid displaying MacBooks, we can see that the shortcode is [wpgb_grid id="2"].
If you are not comfortable with Gutenberg blocks or you are still using the old WordPress editor (TinyMCE), then you just need to copy and paste the shortcode into your pages, posts or text modules to display your grid.
This is the solution I used in this example. And here is the result:
How to display a “custom” grid via page builders?
If you choose not to integrate the facets when setting up your grid, you can add them later via various shortcodes provided by WP Grid Builder.
We have just seen that each grid has a predefined shortcode. Well, this is also the case for the facets, with one small difference, which we will see.
If we take our “Ram Memory” facet, here is the short code available to display it: [wpgb_facet id="2" grid="0"].
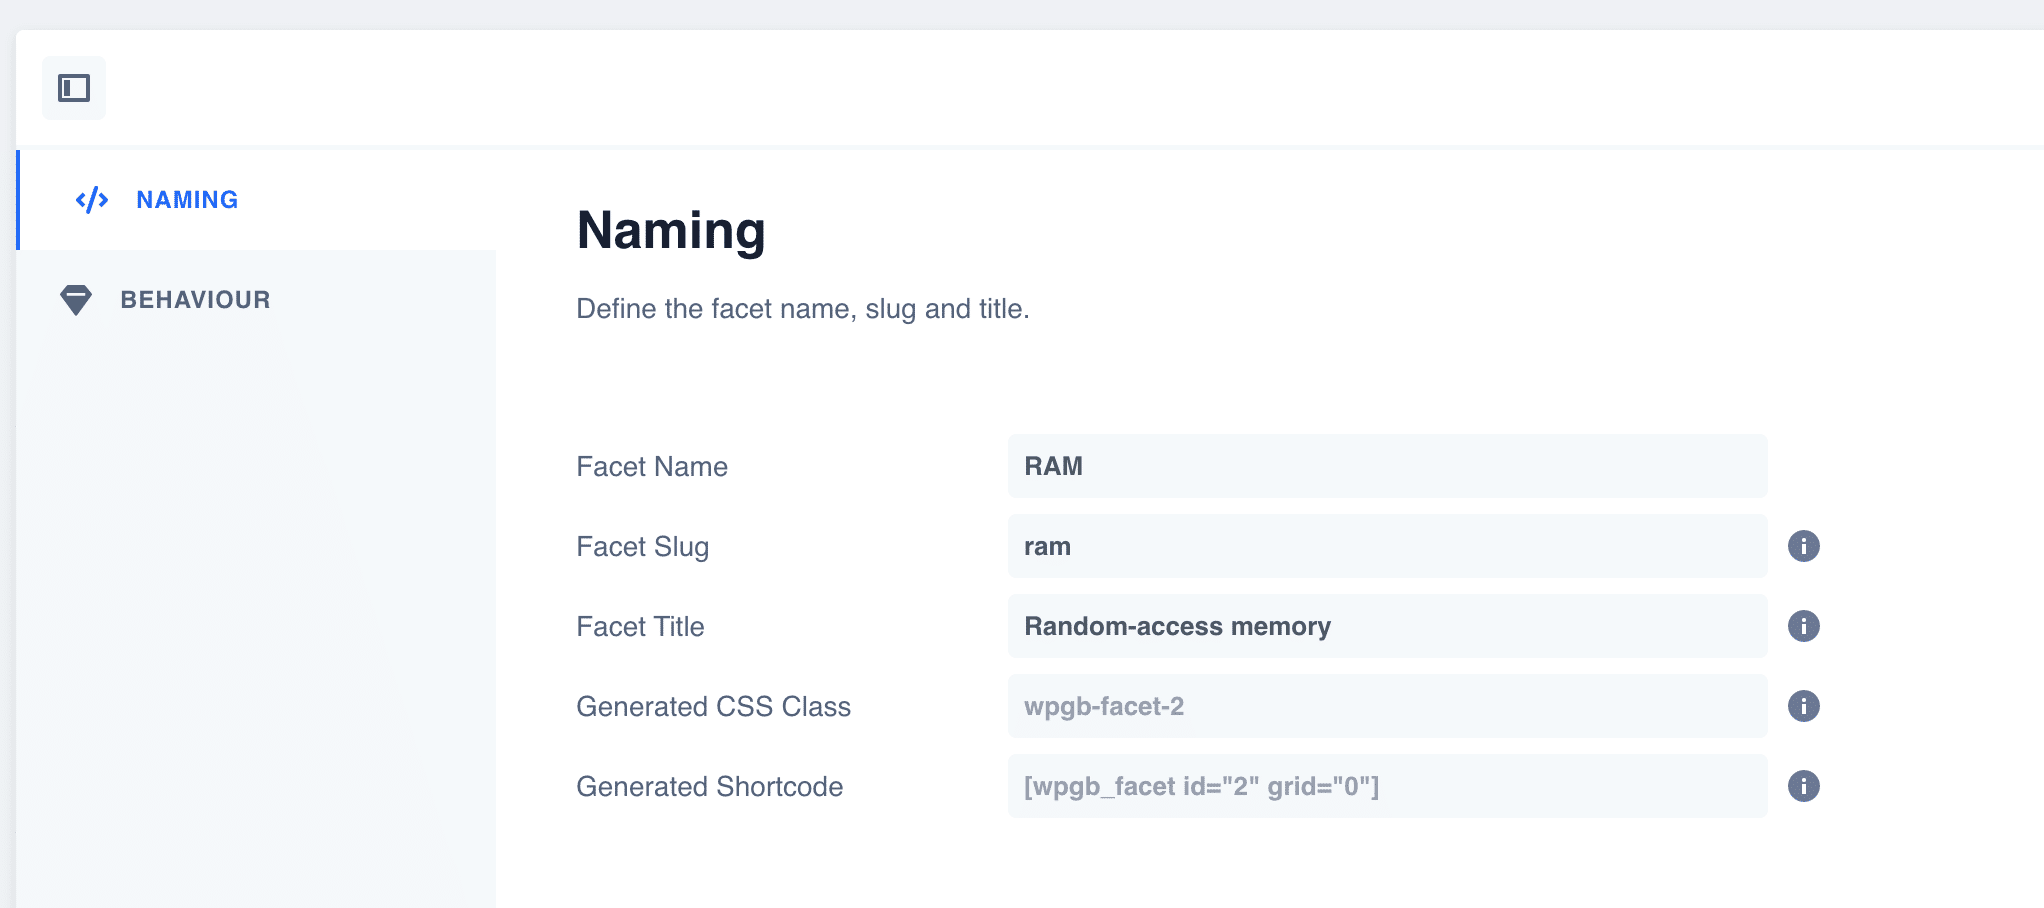
An additional attribute is added: grid="0".
This allows us to attach our facet to a specific grid when we choose to display them separately.
On WP Grid Builder, you can display a grid built without facets at the base, and then add them separately to the page. So you can place them above, below, to the left, to the right, etc.
To link them, you just have to replace the value "0" of the attribute "grid" by the identifier of your grid.
In the case of our grid displaying MacBook Pros, you can see in its shortcode that the id is 2, which would give us [wpgb_facet id="2" grid="2"] to display our facet and link it to our grid.
This last solution will be the most flexible in terms of design and layout, if you need something advanced.
Then, you just have to integrate your shortcode using the interface proposed by the page builder of your choice: Divi Builder, Beaver Builder, Oxygen Builder, Elementor etc.
Speaking of Oxygen Builder and Elementor, you should know that WP Grid Builder even offers a dedicated integration for these two page builders. Find out more about this in the next section.
What are the addons of WP Grid Builder?
Does WP Grid Builder already seem complete?
Although it already perfectly supports the integration of WooCommerce content or Advanced Custom Fields, you should know that it still has some surprises in store for you, since it includes additional addons that might spark your interest.
I’ll show each of them below.
The Map Facet
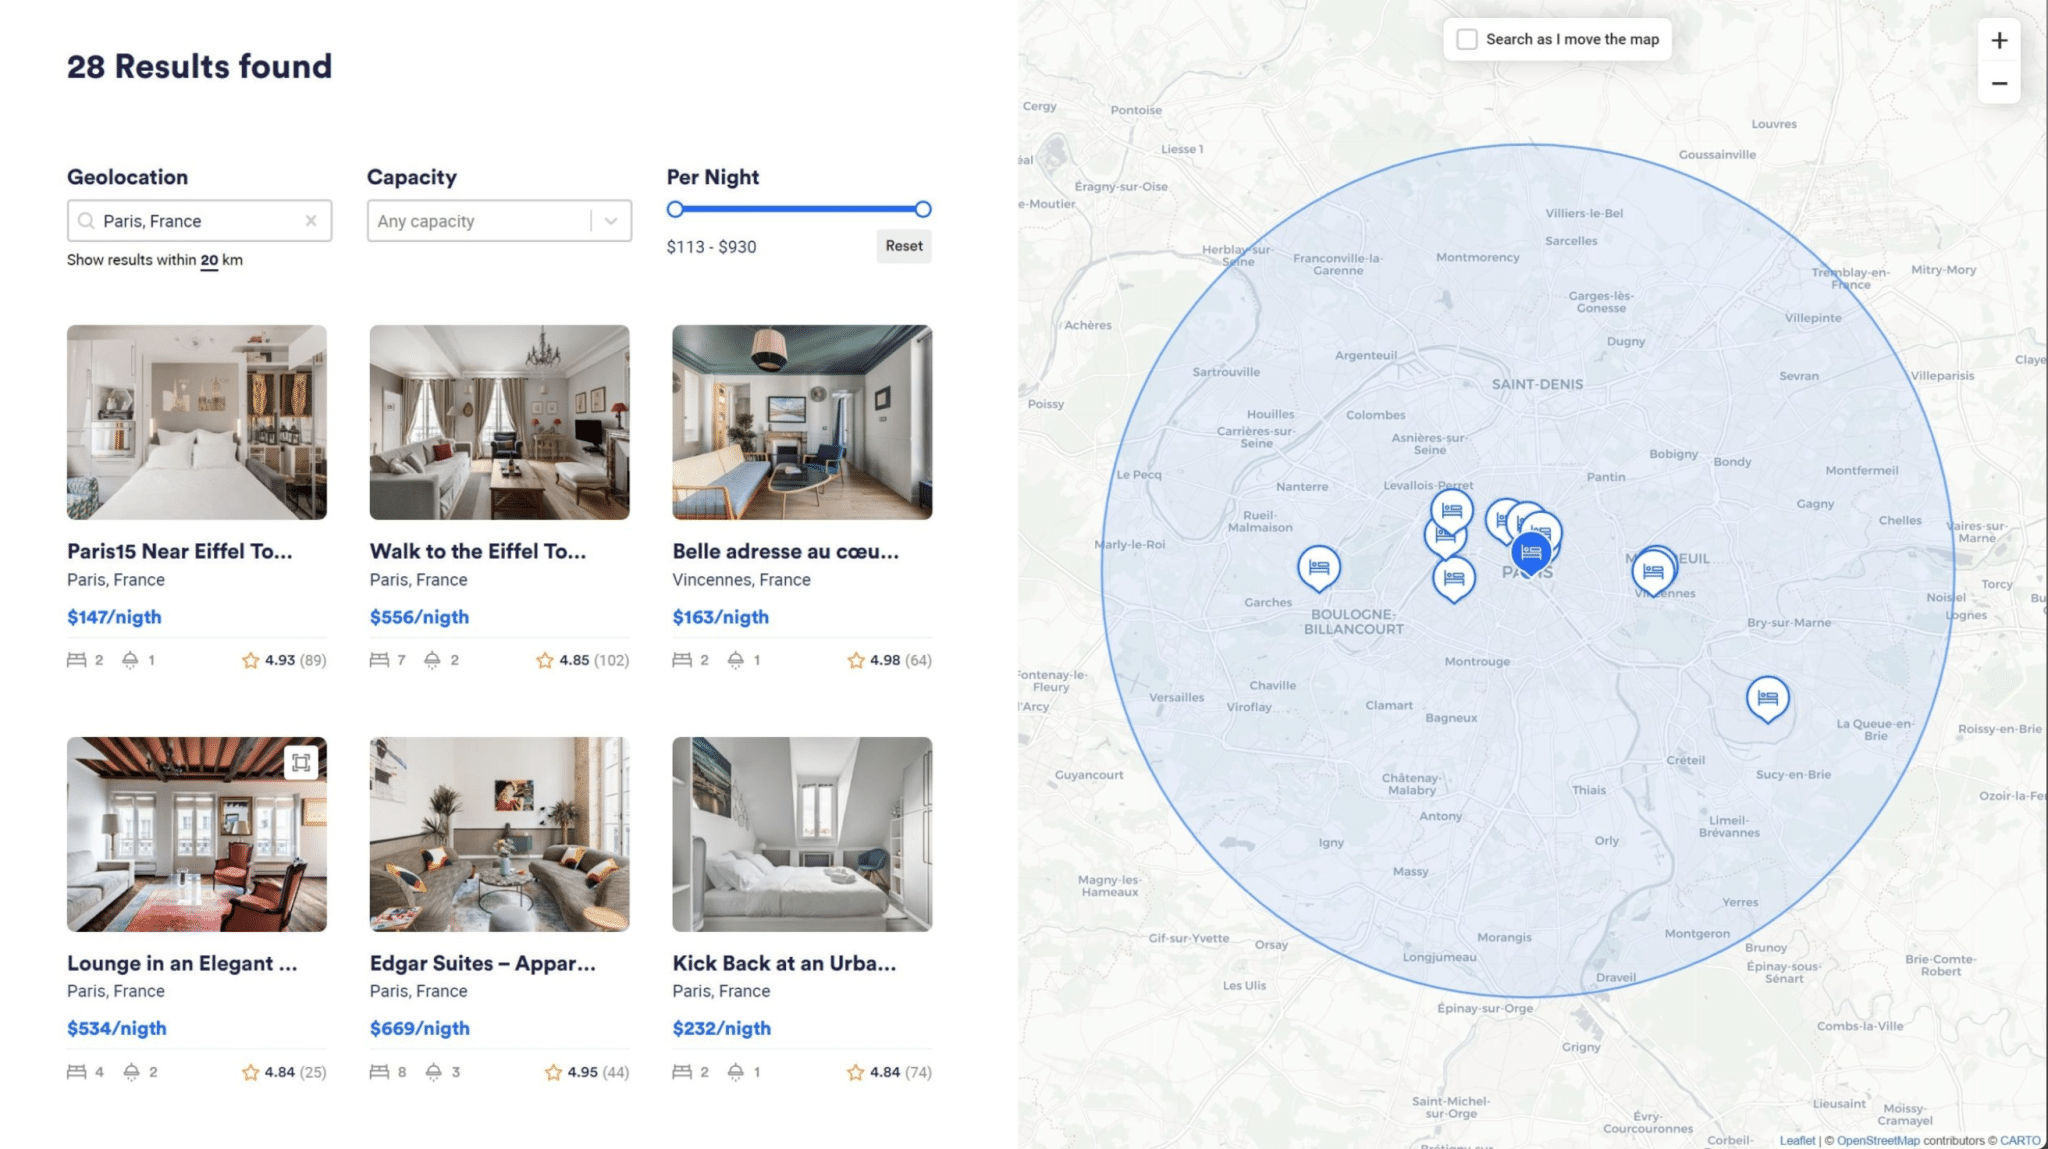
The Map Facet addon includes a new type of facet called “Map”, allowing you to create a filterable map in the style of what you can see on AirBnb.
It integrates the possibility to use Google Maps, Leaflet Map or MapBox, and works by using the latitude and longitude of the different contents.
This can be very useful for some of your projects.
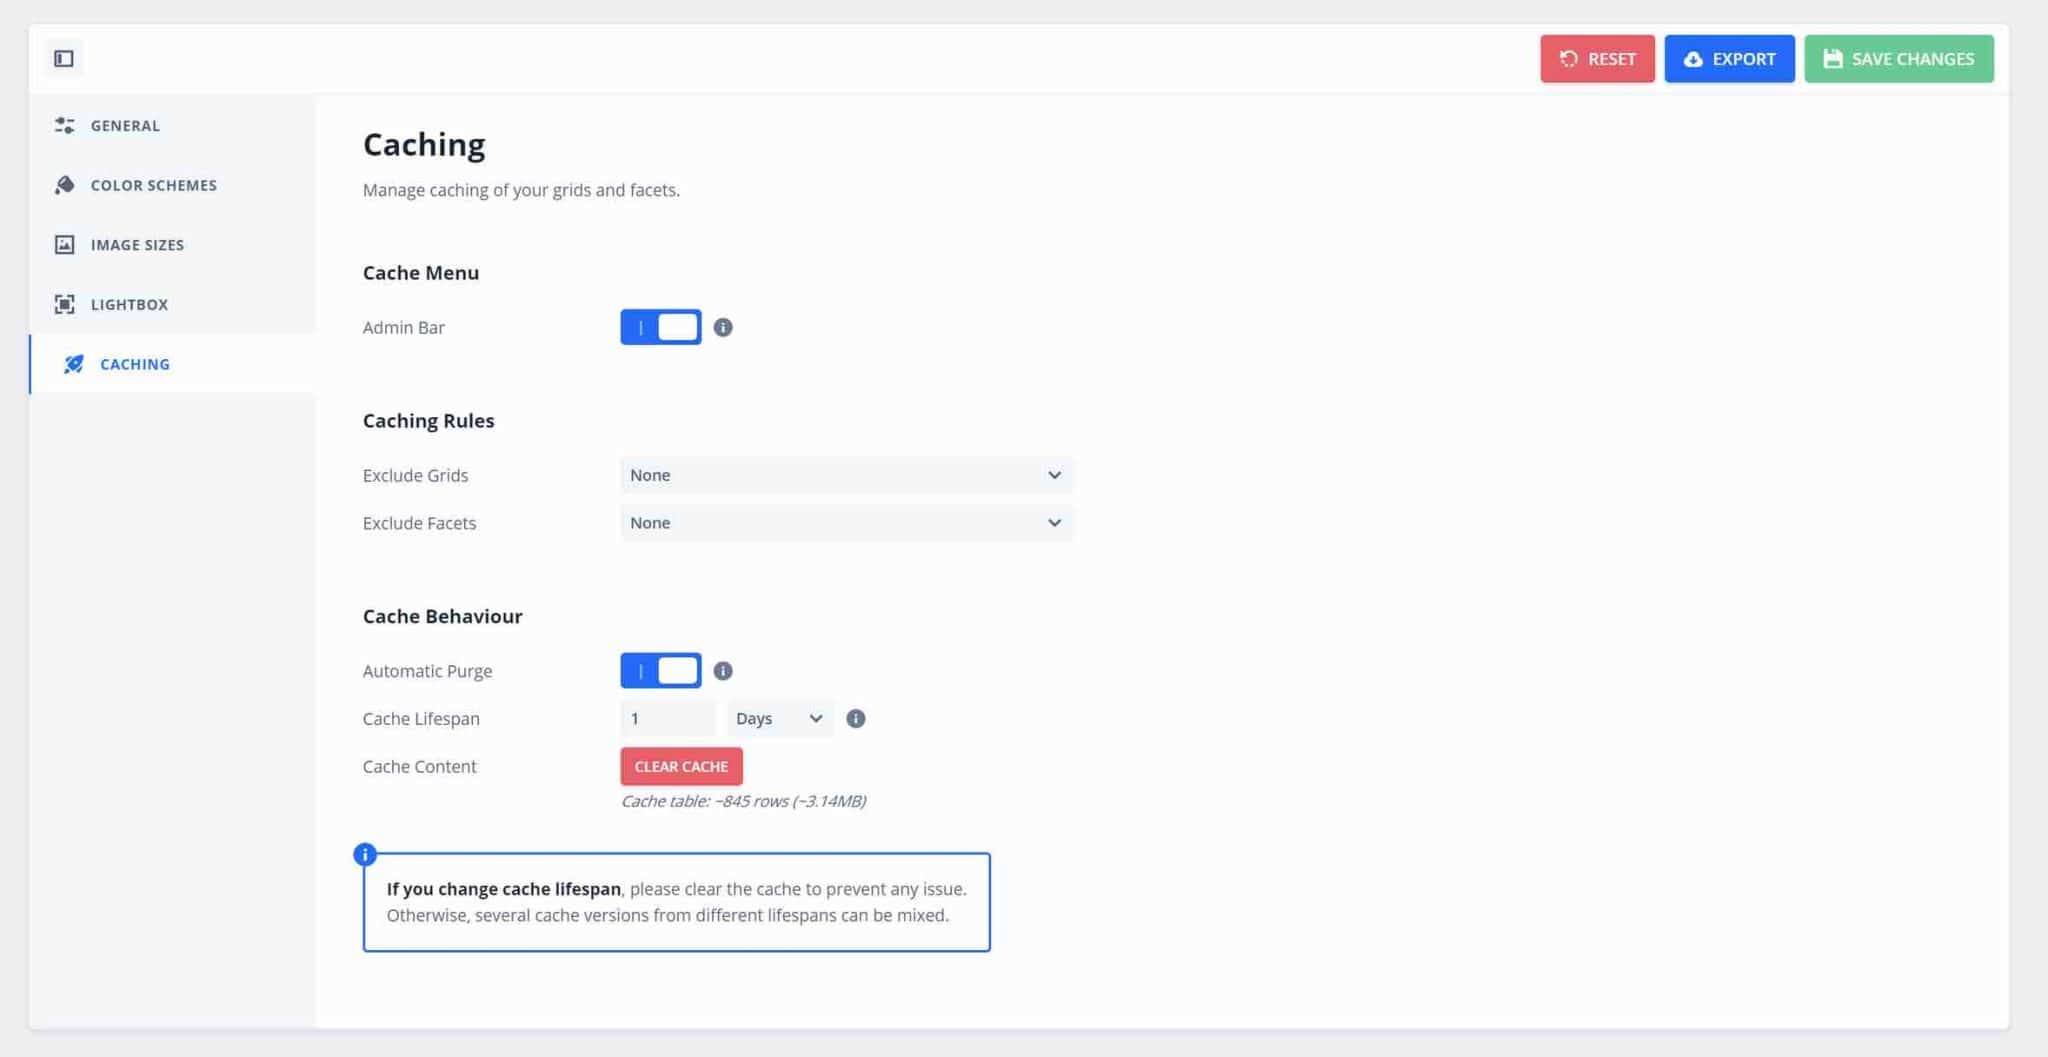
Cache
Caching addon speeds up the loading time when filtering your grids or templates, by caching the content and facets.
To enable caching globally on your site, I recommend the use of the WP Rocket plugin, which is presented in this dedicated tutorial.

LearnDash
This addon dedicated to the LearnDash plugin is useful to create online courses. It adds new blocks in the card creation tab to display different information about your courses, such as your progression.
Multilingual
Multilingual addon improves WP Grid Builder’s compatibility with the Polylang and WPML multilingual plugins and prevents you from duplicating your grids in all languages.
A must-have if your site is available in several languages.
Meta Box
Meta Box addon supports all custom field types generated by the Meta Box plugin and makes it easy to filter content, no matter how complex the field is.
Oxygen
Oxygen addon is dedicated to the page builder of the same name. It adds two new elements to the page builder editing interface, in order to easily add grids and facets and to customize them with Oxygen Builder.
Elementor
Elementor addon, which speaks for itself, works on the same principle as the one proposed for Oxygen Builder.
This time, two new widgets will appear on the Elementor editing interface, which will save you from having to manipulate a short code, as I showed you earlier.
You will also be able to filter some widgets offered by Elementor Pro (affiliate link) (e.g. Posts, Portfolio, WooCommerce Products).
How much does WP Grid Builder cost?
WP Grid Builder is a premium plugin only and offers 3 pricing licenses. Each includes:
- Support and updates for one year.
- All the add-ons I presented in the previous section.
- A discount at the annual renewal, ranging from 20 to 40% depending on the license chosen.

We recommend to base your choice on the number of sites you want to use WP Grid Builder on:
- The Basic license ($49/year) is limited to use on up to one site.
- The Premium license ($99/year) can be enabled on up to 3 sites.
- The Ultimate license ($249/year) can be used on an unlimited number of sites.
Note that a 14-day money-back guarantee is included to allow you to test the plugin without any risk, so to speak.
Finally, you should know that the main premium competitor of WP Grid Builder is called FacetWP. It offers two plans:
- A license for up to 3 sites for $99/year.
- A license for up to 20 sites for $249/year.
Our final review on WP Grid Builder
Throughout these lines, you have discovered:
- How to create and set up a facet.
- How to set up a content map to display your elements.
- How to set up a grid to display the whole on your site.
The next step would be to add many more facets to sort your products even more finely… Now that you know how to add one, there’s no doubt that you’ll be able to handle all cases and needs.
Easy to use, WP Grid Builder will save a lot of your time on the implementation of complex and advanced features.
It is a great plugin which, for me, is the number 1 in the sector. Its ease of use, the quality of its interface and the fact that it can be used without touching a single line of code make it a great ally for any type of profile, including beginners.
Technicians and developers will also find it convenient, thanks to PHP and JavaScript features and hooks.
Finally, its affordable price of $49/year for a site makes it a profitable plugin for any project.
Little bonus: in case of problem, the developer of the plugin can offer his support.
So, do you plan to use this plugin for your future projects?

Receive the next posts for free and access exclusive resources. More than 20,000 people have done it, why not you?
Register


Hi WP Marmite Team,
Nice Tutorial, but WPgridbuilder has very less tutorials & youtube videos to teach beginners like me how to do all the settings.
I would like to ask how you do the fully customizable carousel ? do you have any videos? and what is the URL that the computer demo picture you show in the tutorial? I can’t find the link, do you mind providing me for me to take a look? thank you very much.
Ray
Hello, we don’t have any videos, but the link is : https://www.mcprice.fr/