Adding an admin on WordPress is one of the most common and sensitive operations.
Whether you want to give access to a client, work with a developer, or manage your site with several people, knowing how to add an administrator to WordPress is essential.

The good news is that there are a number of methods for achieving this—some less technical than others—even if you no longer have access to the dashboard.
In this article, you’ll discover all the ways to add an administrator, from the simplest to the most advanced.
You’ll also learn how to avoid common mistakes and secure your site when adding a new user.
Ready? Here we go!
- What is an administrator and why add one?
- How to add an administrator to WordPress from your administration interface
- How to add an administrator to WordPress via phpMyAdmin
- How to add an admin to WordPress via functions.php
- How to add a WordPress admin with a plugin
- Common problems and quick solutions
- How to safely delete an admin user on WordPress
- Conclusion
What is an administrator and why add one?
Before getting down to the nitty-gritty, it’s important to understand why you’re creating an administrator and in what situations it makes sense.
The administrator role on WordPress is the highest. It gives total control over the site and all administration features: themes, plugins, content, managing the dashboard, modifying site settings, adding new user roles, and so on.
A WordPress admin controls what each person with an account can and cannot do (their tasks).
With this power comes great responsibility. Giving admin access is like giving the keys to your house. You have to be extremely careful and discerning.
An example of this? An administrator can even… delete the main administrator.
That’s why it’s so important to choose the right role and only assign it to people you can trust.
In certain situations, adding an administrator to your WordPress site will be essential. For example, if you need to:
- Entrust your site to a service provider (developer, webmaster, agency)
- Work with a partner or a member of your team
- Temporarily transfer access to a maintenance or technical support tool
- Manage multiple sites without sharing your personal account
- Migrate a site to another WordPress hosting or redesign it
Recommendation: Assign the “administrator” role only to your webmaster, or another trusted person who needs access to the entire site. Not only could another administrator harm you, but they could also have their credentials stolen, which would put you at even greater risk.
Overview of other user roles on WordPress
There are several roles on WordPress (each with different levels of permissions). Before assigning the admin role, it’s a good idea to know the alternatives for limiting access to the bare essentials and securing your WordPress site.
In addition to the administrator role, there are also:
- Editors: Can publish and manage publications, including publications by other users
- Authors: Can publish and manage their own messages
- Contributors: Can write and manage their own articles but cannot publish them
- Subscribers: Can only manage their profiles
WordPress even offers a sixth role, the Super Admin, for multisite installations only. This fully empowered user is the only one able to add sites, themes, plugins etc. to the entire network of sites.
How to add an administrator to WordPress from your administration interface
Now it’s time to get your hands dirty. Let’s get down to business with our first method for adding a user to WordPress.
This is the “official” method, the fastest and safest. It requires no technical manipulation.
In detail, proceed as follows, in order:
- Log in to your WordPress administration interface with your username and password.
- Go to Users > Add user.
- Fill in the information required to create a new account (login, first name, last name, email, language, password, etc.). Remember to choose the “Administrator” role.
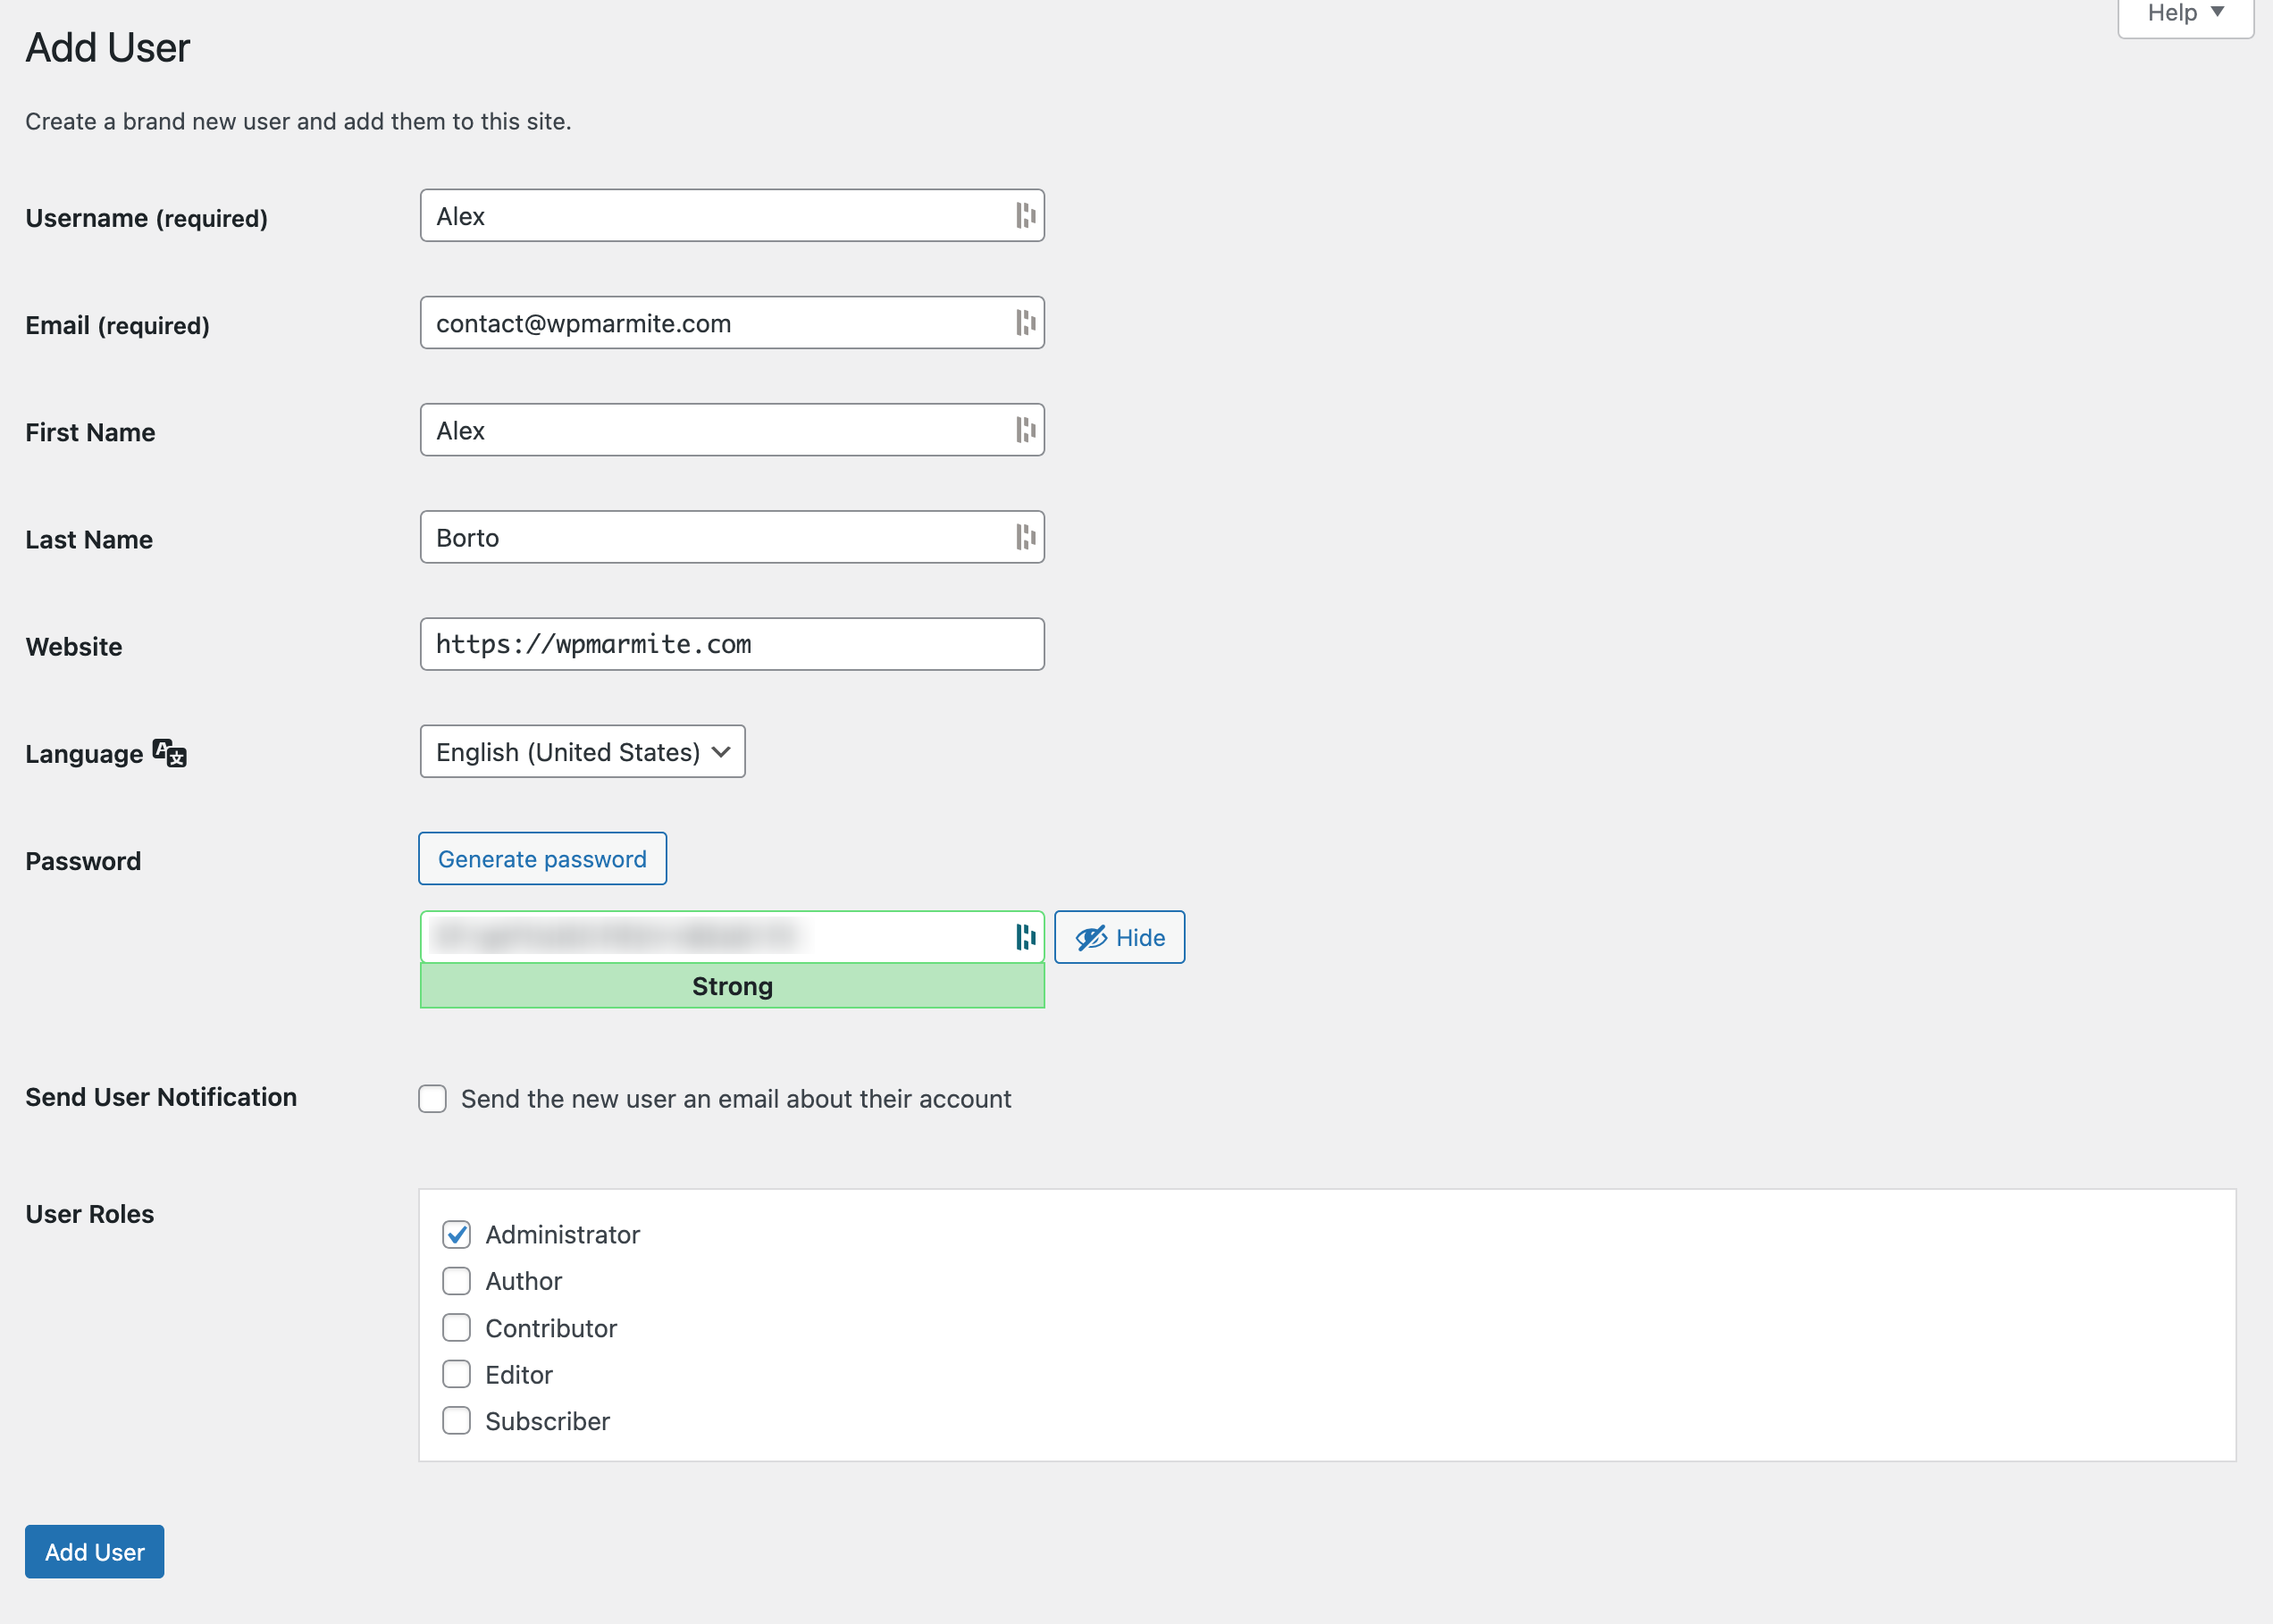
- Finish by clicking on the blue “Add an account” button.
And that’s it: in just a few seconds, you’ve officially added an administrator account to WordPress.
To do things properly, check the following points:
- Make sure the account appears in Users > All Users.
- Check that the email address is correct (otherwise you won’t be able to retrieve the password).
- Check that the newly created admin account can log in correctly.
How to add an administrator to WordPress via phpMyAdmin
The first method is simple, effective, and fast. But in some cases, you won’t be able to rely on it, for example if:
- You no longer have access to your dashboard because you can’t remember your login details
- Your site has been hacked
- A technical problem (bug, plugin conflict, failed update) prevents you from connecting
- Another administrator has deleted your account
- Your site has been migrated and the logins no longer work
To get around this, you can add an administrator to WordPress via phpMyAdmin (a web-based database management application).
Beware, this method is technical and requires good skills. If you’re ever unsure of yourself, call in a more qualified person, or don’t bother at all. The slightest error could cause your site to crash. If you’d like to try your hand at it, make sure you back up your site before any manipulation (files + database).
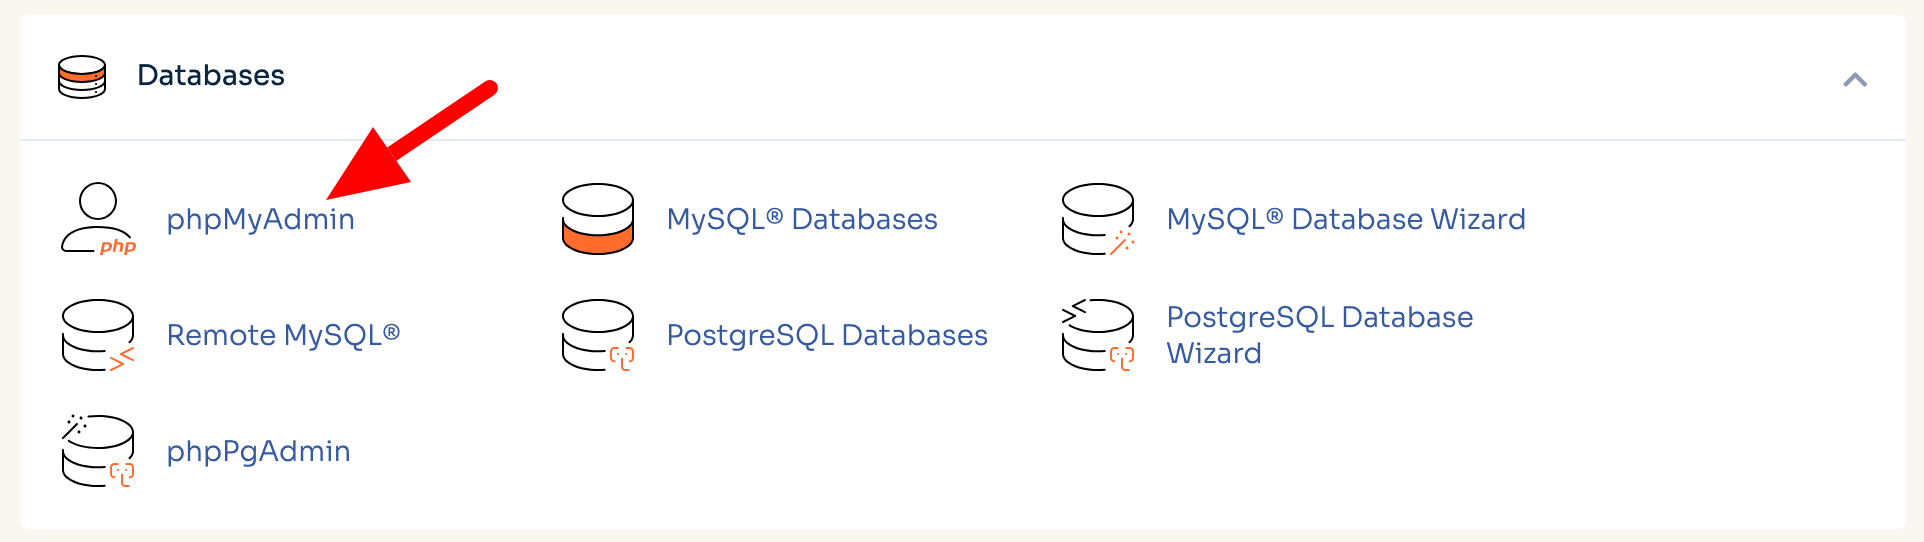
To access phpMyadmin, log on to your hosting provider’s management interface, such as cPanel.
In the “Databases” section, click on the “phpMyAdmin” menu:
Click on your database and search for the wp_users table. Please note: the prefix may be different (e.g. wp78_).
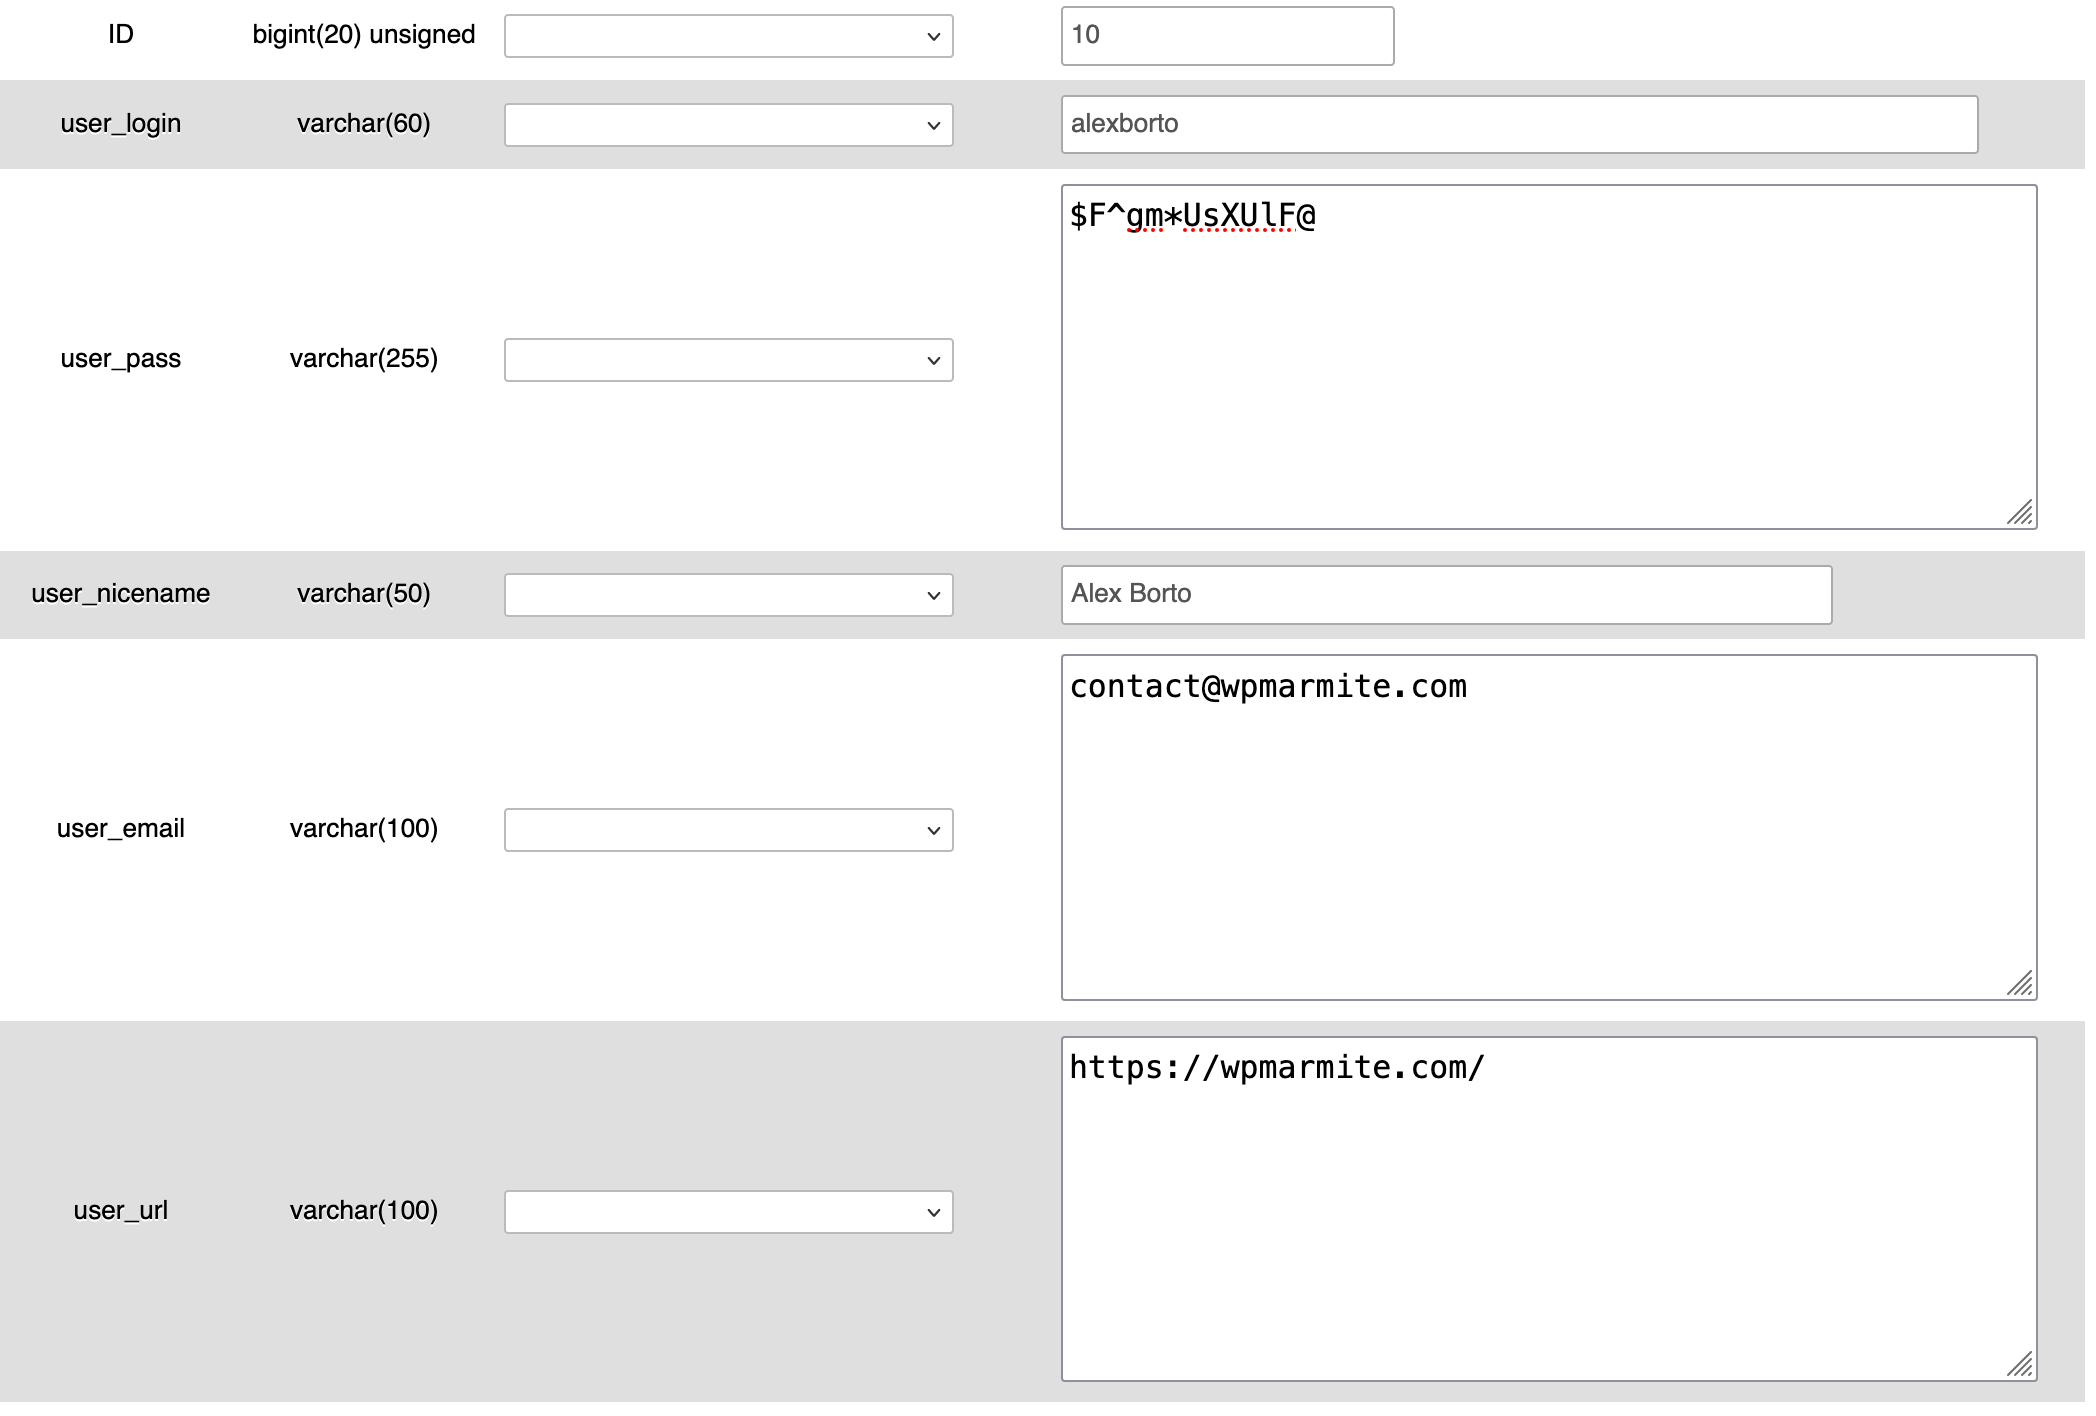
Step 1: Add a user to the wp_users table
At the top of the page, click on “Insert,” then complete the following fields in particular:
| Field | Value |
| ID | A unique number (e.g. 10) |
| user_login | Your login details |
| user_pass | Choose MD5 and enter your password |
| user_nicename | Your legible name |
| user_email | Your email |
| user_status | 0 |
| user_registered | Automatic date |
| user_activation_key | Leave empty |
| user_status | Leave value at 0 |
| display_name | Your public display name |
Finish by clicking on the “Execute” button.
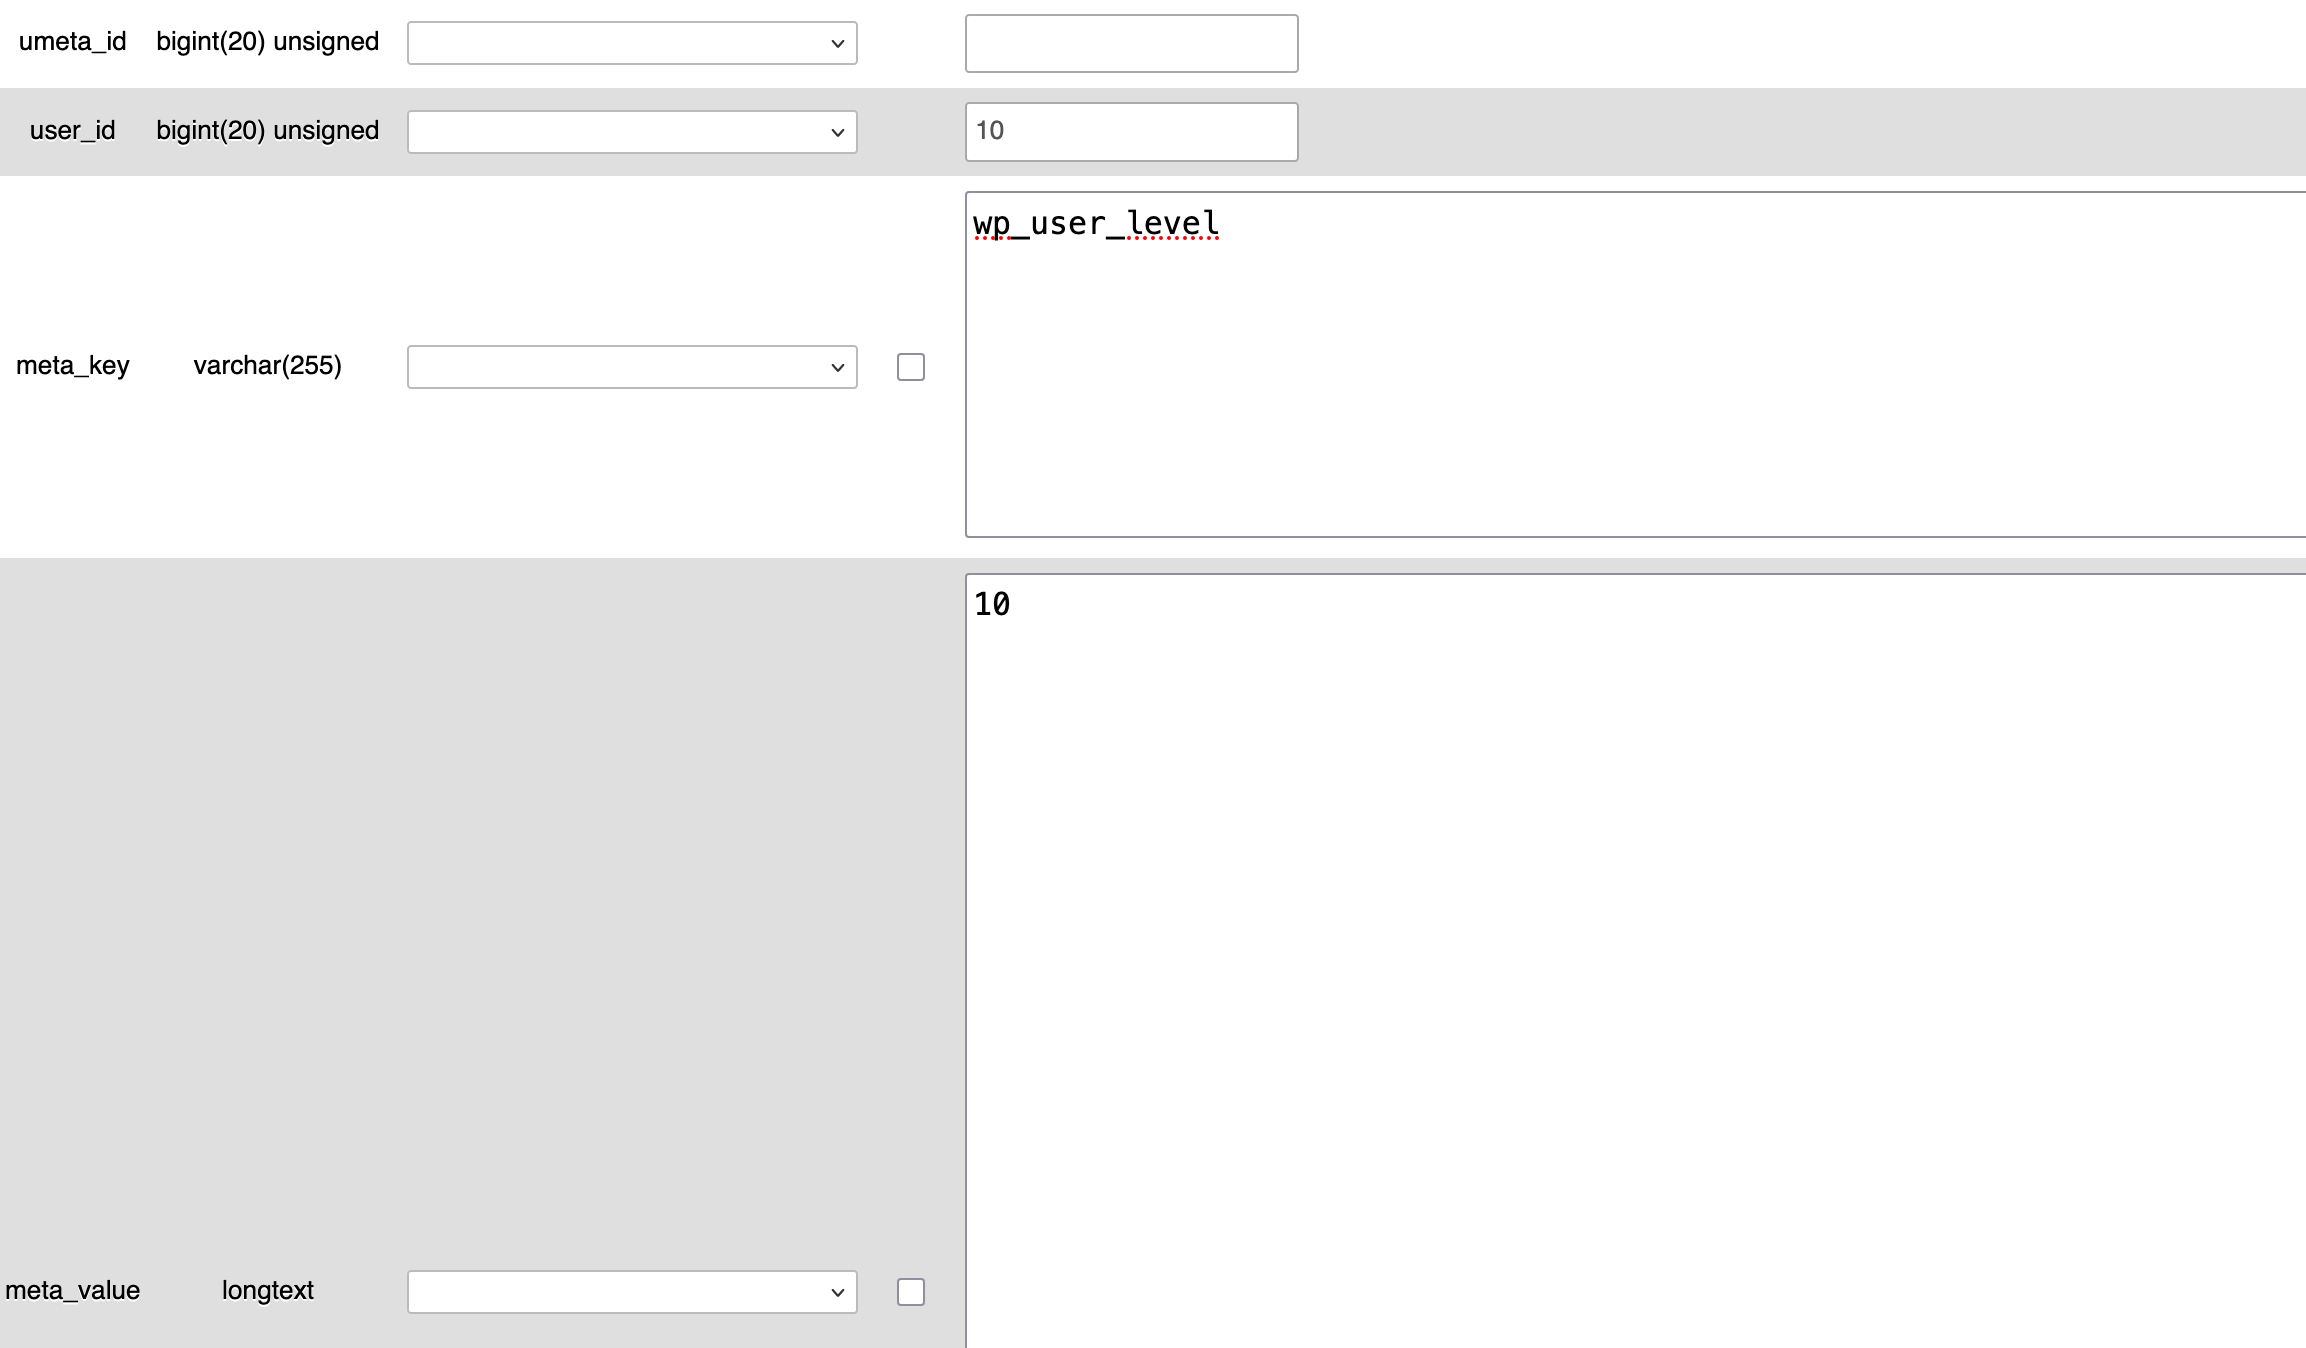
Step 2: Add metadata to the wp_usermeta table
Then enter the wp_usermeta table, and click on “Insert” as before.
Add these entries, each time in the “Value” column:
umeta_id: This field will be filled in automaticallyuser_id: Use the same value as above (e.g. 10)meta_key: wp_capabilities (change thewp_prefix to the one used in your database)meta_value: a:1:{s:13: “administrator”;b:1;}

Scroll a little, and add the following information:
meta_key: wp_user_levelmeta_value: 10
Finish by clicking on “Execute.”
Step 3: Test the connection
Go to your site’s adminsitration interface: https://yoursite.com/wp-login.php.
Log in using the credentials you’ve created. In the Users > All Users menu, click on the newly created admin and update his/her profile by saving at the bottom of the page.

How to add an admin to WordPress via functions.php
Without further ado, let’s move on to another technical method, which should only be used if you are technically proficient and have all the necessary prerequisites (including site backup).
This method is useful if:
- You no longer have access to WordPress OR phpMyAdmin
- Your site crashes, but you can access the files via FTP or your hosting provider
It consists in adding a piece of code to functions.php that automatically creates an administrator.
To do this, connect to your favorite FTP client (FileZilla, Cyberduck, Transmit) or to your hosting’s file manager (such as cPanel).
Locate your active theme’s functions.php file by following this path: wp-content/themes/your-theme/functions.php.
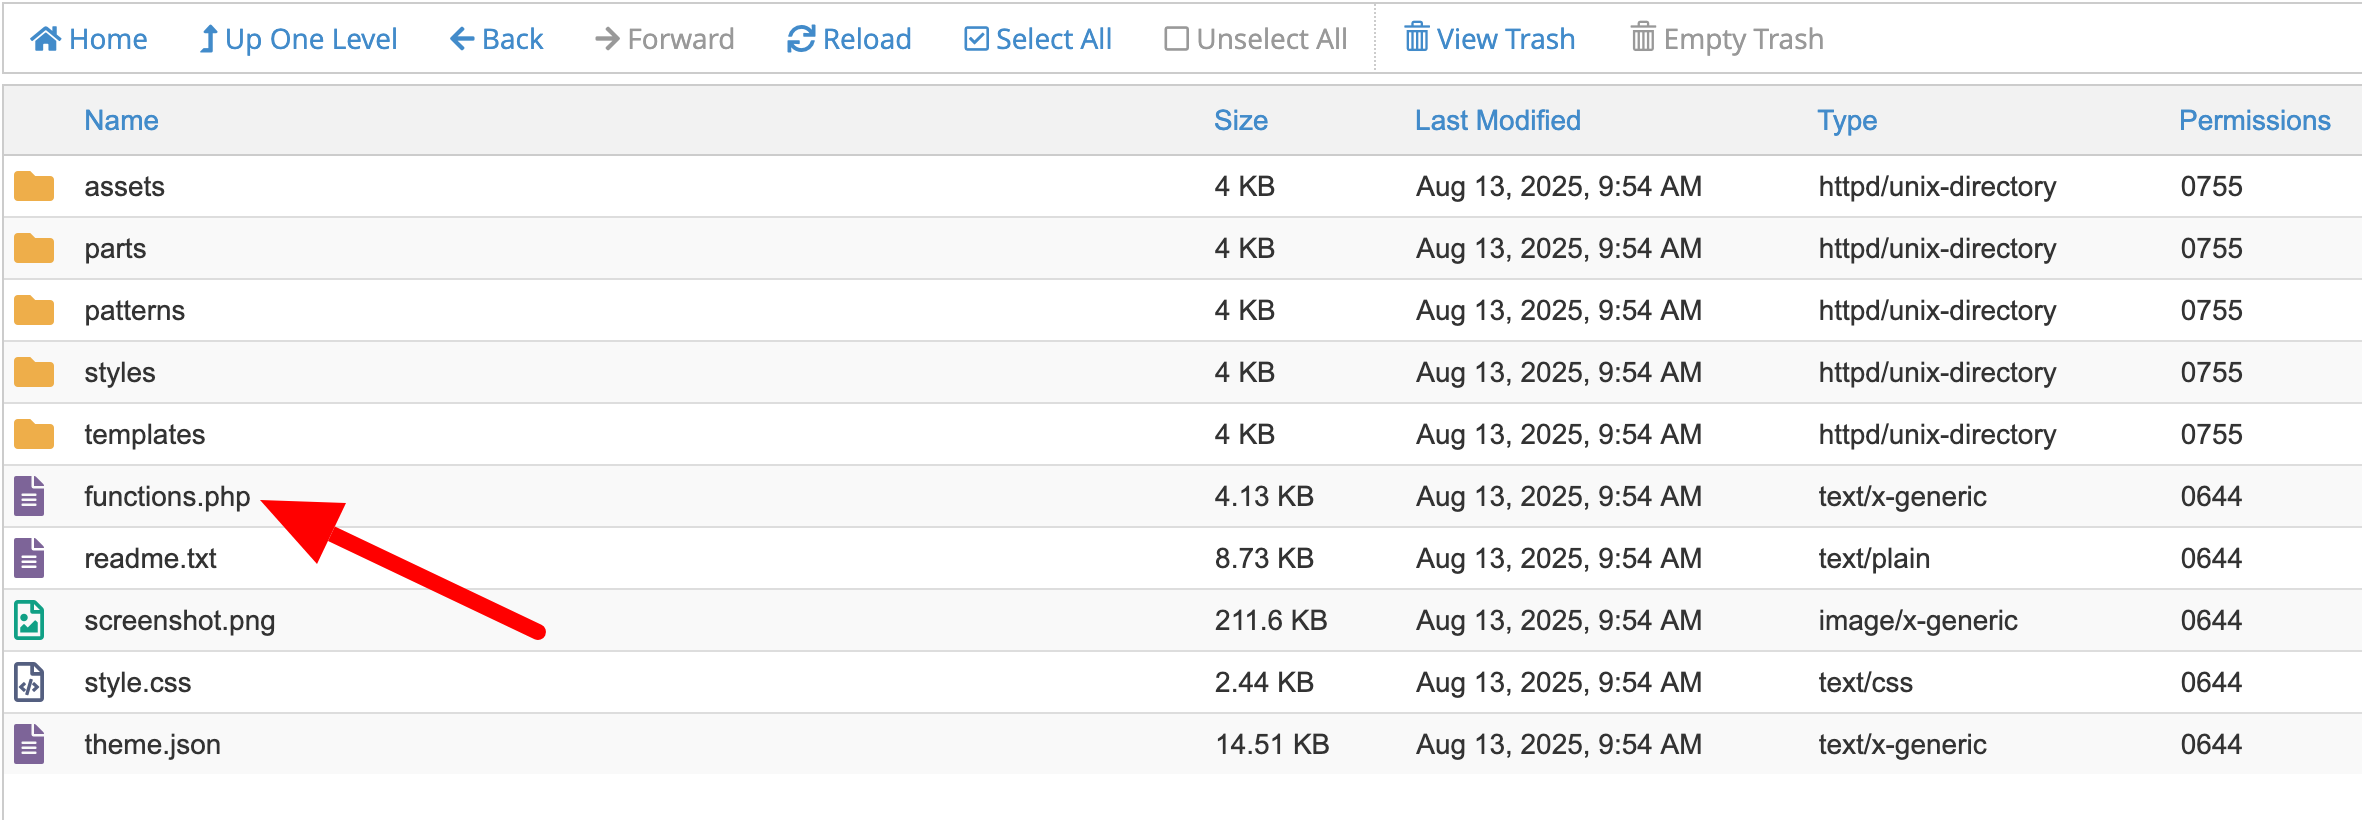
Then add this snippet to the end of the file:
Save the file. Go to your site: the admin account will be created automatically.
Once connected, delete the snippet from the file immediately for security reasons.
How to add a WordPress admin with a plugin
For a simple administrator addition, the use of a plugin is often superfluous or even counter-productive.
As you’ve seen, WordPress’s native functionality does the job perfectly. However, specific needs sometimes arise.
If you’re looking to fine-tune administrator rights or create a hybrid role, on the other hand, plugins like Members or User Role Editor may be of interest.

These plugins let you add roles and permissions and assign them to your user accounts (an admin, for example).
With a dedicated plugin like Members, you can go very far in terms of customizing the permissions granted.
For example, you might want a user to be able to install plugins without touching the themes.
To add a new role and customize it with Members, go to Members > Add New Role and grant it the permissions of your choice by navigating through each submenu:

However, for the pure and simple creation of a standard admin account, stick to the manual methods described above.
Common problems and quick solutions
Sometimes, creating an administrator account doesn’t go as planned. Here are some common problems and how to solve them:
- Role error: If the user logs in but doesn’t see the “Plugins” or “Settings” menus, you’ve probably forgotten to select “Administrator” during creation. Go back to the user’s account and change the role via the drop-down menu.
- The admin’s email cannot be found: Ask the person concerned to check their spam. This is the #1 cause of blockages.
- It’s impossible to log in after creating an admin: Check that the email address is correct. Test the “Forgot password” option on the WordPress admin login page.
- The administrator role doesn’t register: Check the wp_usermeta table and make sure the capabilities are correctly defined.
- The account already exists: Just change the role to administrator.
- The prefix of your WordPress database tables is not _wp: Check this in
wp-config.phpand adapt your manipulations accordingly.
How to safely delete an admin user on WordPress
The departure of an employee or the end of a technical service requires an immediate response.
Leaving an administrator account “dormant” is not at all advisable, especially for security reasons. If this account is no longer needed, delete it as soon as possible.
Before deleting any user, make a backup (via your host, a plugin like UpdraftPlus, or an all-in-one solution like WP Umbrella).
To do this, return to Users > All Users.
When you hover over the person’s name, the “Delete” link appears. Click on it. Note that an additional step is required if this user has published content.

WordPress will ask you what you want to do with the posts and pages linked to this account.
You’ll have the choice of deleting everything or assigning the content to another existing user (yourself, for example). Always choose attribution to avoid losing valuable data.
Conclusion
Knowing how to add an administrator to WordPress is an essential skill for managing your WordPress site on a daily basis.
Whether you are working with a service provider or a team, or need to recover lost access, you now know all the possible methods for creating an admin account:
- The simple method (natively via the WordPress dashboard)
- Technical methods (phpMyAdmin, functions.php), for troubleshooting or advanced users only
- The alternative method (using a plugin)
The important thing is to assign this role with care, and to protect your site with good security practices.

Receive the next posts for free and access exclusive resources. More than 20,000 people have done it, why not you?

Continue reading
Articles posted in WordPress TutorialsHow to update the PHP version of your WordPress site
What comes to mind when you think of WordPress speed and security? Your favorite plugins, perhaps? You should also think about… PHP! If you’re looking for a site that loads fast, while offering a solid shield against hacker attacks, there’s a…
How to create an effective HubSpot conversion funnel on WordPress (complete guide)
In the drawers of a kitchen, there are often two very useful utensils lying around. The first is the colander. And to illustrate, some WordPress sites unfortunately resemble it. Why? Well, because visitors arrive on the site in question… then…
How to fix the ERR_CONNECTION_REFUSED error: A complete guide
Does your browser display the ERR_CONNECTION_REFUSED message when you try to access a website? This error means that the target server – or your own configuration – is actively rejecting the connection request, leaving you at a dead end. But…