I am an interface 100% dedicated to WordPress. I was developed by a hosting company “obsessed with performance” (that’s how they describe themselves).
And thanks to me, you can manage your WordPress site in just a few clicks.
Who am I? MyKinsta, of course!

Well-known to the hosting provider Kinsta’s customers, who praise its intuitiveness and ease of use, this unique dashboard offers multiple advantages.
This page will introduce MyKinsta to you in detail and explain how to use it in a concrete and practical way.
Are you already hosted at Kinsta? We bet you’ll discover a few new tricks.
Are you unfamiliar with this interface? By the time you’ve finished reading, you’ll know everything there is to know about it. Ready to get started? Let’s go!
Transparency: This page is sponsored. Some links to the hosting company Kinsta are affiliate links. If you purchase hosting from them, WPMarmite will receive a commission.
Thanks to affiliation, WPMarmite is able to remunerate the research and writing work of the blog’s editors. However, we remain impartial. If a product isn’t worth it, we’ll say so (or we don’t mention it).
What is MyKinsta?
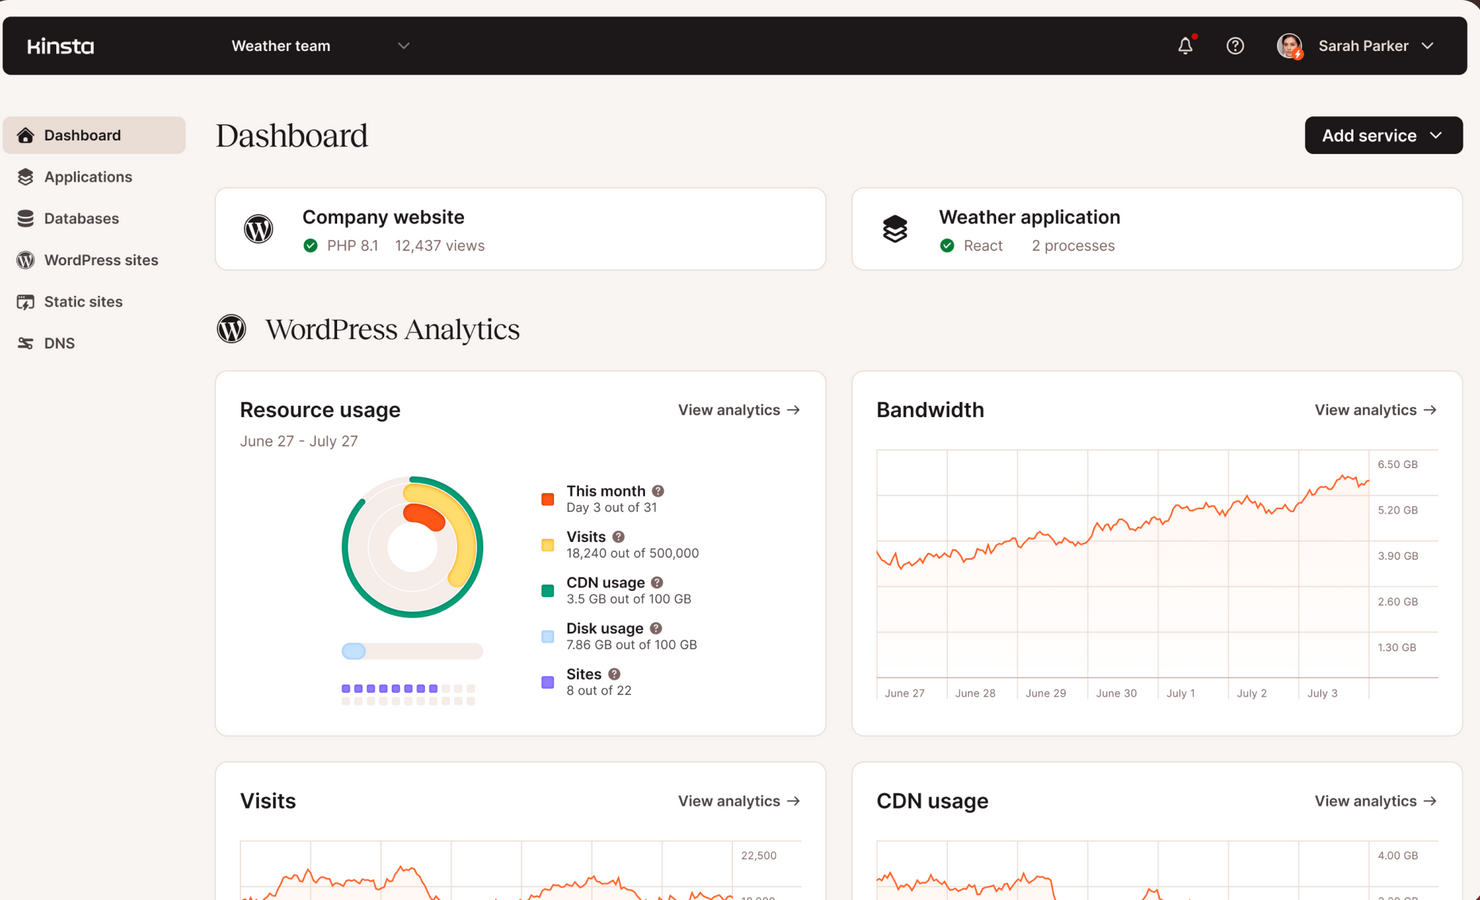
Kinsta dashboard overview
MyKinsta is a personalized dashboard that hosting provider Kinsta offers to its customers. It lets you deploy, host, and manage all your web projects (managed WordPress sites, applications, databases, or web projects with your own Dockerfile) and even static sites (static site hosting is free).
Developed in-house, this intuitive, customizable, and easy-to-use tool enables you to perform multiple actions in just a few clicks, without coding, in a wide range of fields (performance, security, web development, user management, statistics, etc.).
To give you an initial idea of what MyKinsta can do for you, here’s an overview of the tools and functions it offers (non-exhaustive list):
- One-click automated WordPress site design
- Creation and restoration of WordPress backups in a single click
- Update your themes and plugins without having to log into your WordPress administration interface. A backup is even created automatically each time you perform this action from within MyKinsta.
- One-click deployment of staging and development environments, with one-click granular push from one environment to another
- Performance optimization: cache management, modification of PHP version for each site, activation/deactivation of edge caching and CDN, activation of automatic image optimization options
- Activation of WordPress debugging mode with one click
- Add unlimited users to facilitate collaborative working
- Customization of each option and granular control
- Security management: easy activation of password protection (.htpasswd), free SSL certificates, one-click HTTPS, database access via SSH or web interface
- Site availability and monitoring with the Kinsta APM tool
- Access to Kinsta’s open REST API
- PHP performance tool integrated into most Kinsta hosting plans to review and manage your PHP resources
- View detailed statistics for each site
- Creation of server-side redirects
What is Kinsta?

Behind this well-oiled machine is the hosting provider Kinsta. Launched in 2013, Kinsta is a steadily growing company boasting over 120,000 customers at the time of writing, including some very large companies (Unicef, NASA, TripAdvisor).
Kinsta has built its reputation and its range of services around several clearly identifiable pillars that make it unique:
- High-flying performance, which significantly improves the loading speed of your pages. For example, Kinsta’s entire hosting platform is built on Google Cloud, one of the world’s fastest cloud platforms.
- A managed WordPress hosting service dedicated exclusively to the world’s most popular CMS. Kinsta doesn’t offer shared hosting, and takes care of all the technical aspects of hosting for you: server updates, backups, security, speed, and support.
- Free integration with Cloudflare in all their hosting packages. This allows you to benefit from enhanced security (firewall, DDoS protection, etc.) and performance options (edge caching, high-performance CDN, early hints, etc.).
- Customer service available 24/7 all year round, in 10 languages (English, Portuguese, Spanish, Italian, French, German, Japanese, Danish, Dutch, and Swedish), with a very fast average response time (2 to 3 minutes maximum).
- Free, unlimited migrations if you want to switch from another host to Kinsta.
If you’d like to find out more about Kinsta, how it works, and the services it offers, take a look at our full review.
How do I log in to MyKinsta?
To take advantage of the features offered by MyKinsta, you’ll need to sign up for a hosting package for your WordPress site (Kinsta can also provide you with a free demo, if you’d like to try out their dashboard).
For your information, Kinsta’s most affordable WordPress hosting package starts at $35/month or $30/month billed annually (1 WordPress installation, 10GB storage, 35,000 visits).
Once you’ve made your choice, you’ll have a Kinsta customer account with an email address and password.
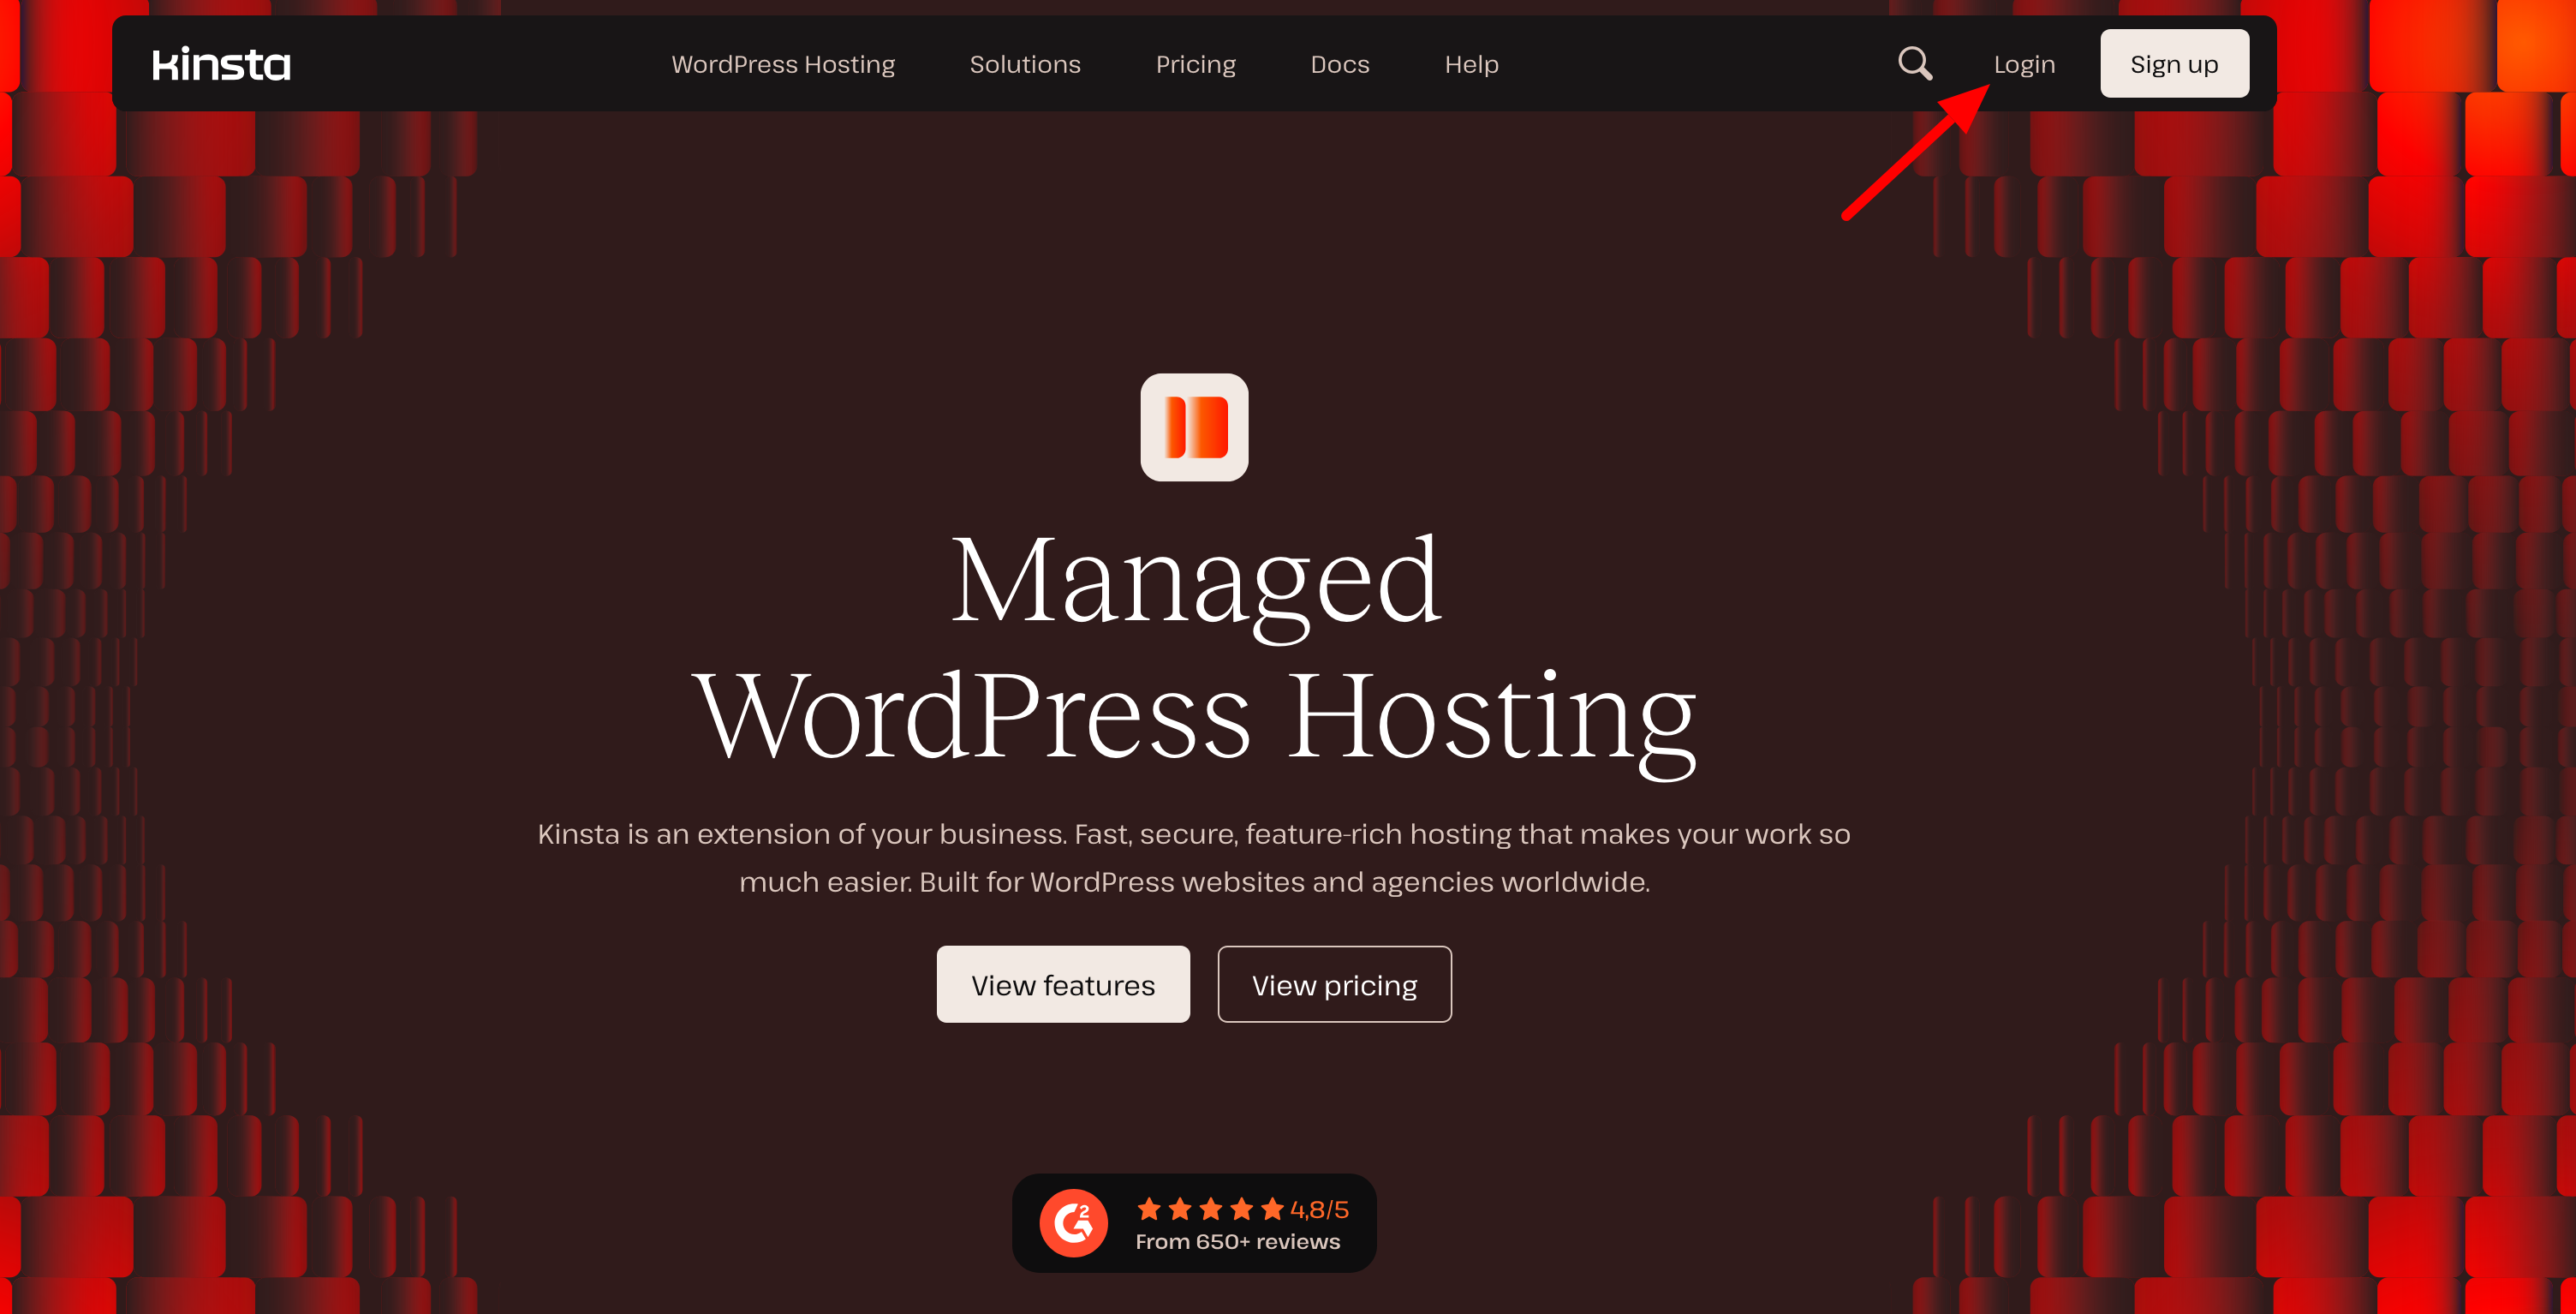
Log in to MyKinsta by clicking on the “Login” button in the top right-hand corner of the official Kinsta home page:
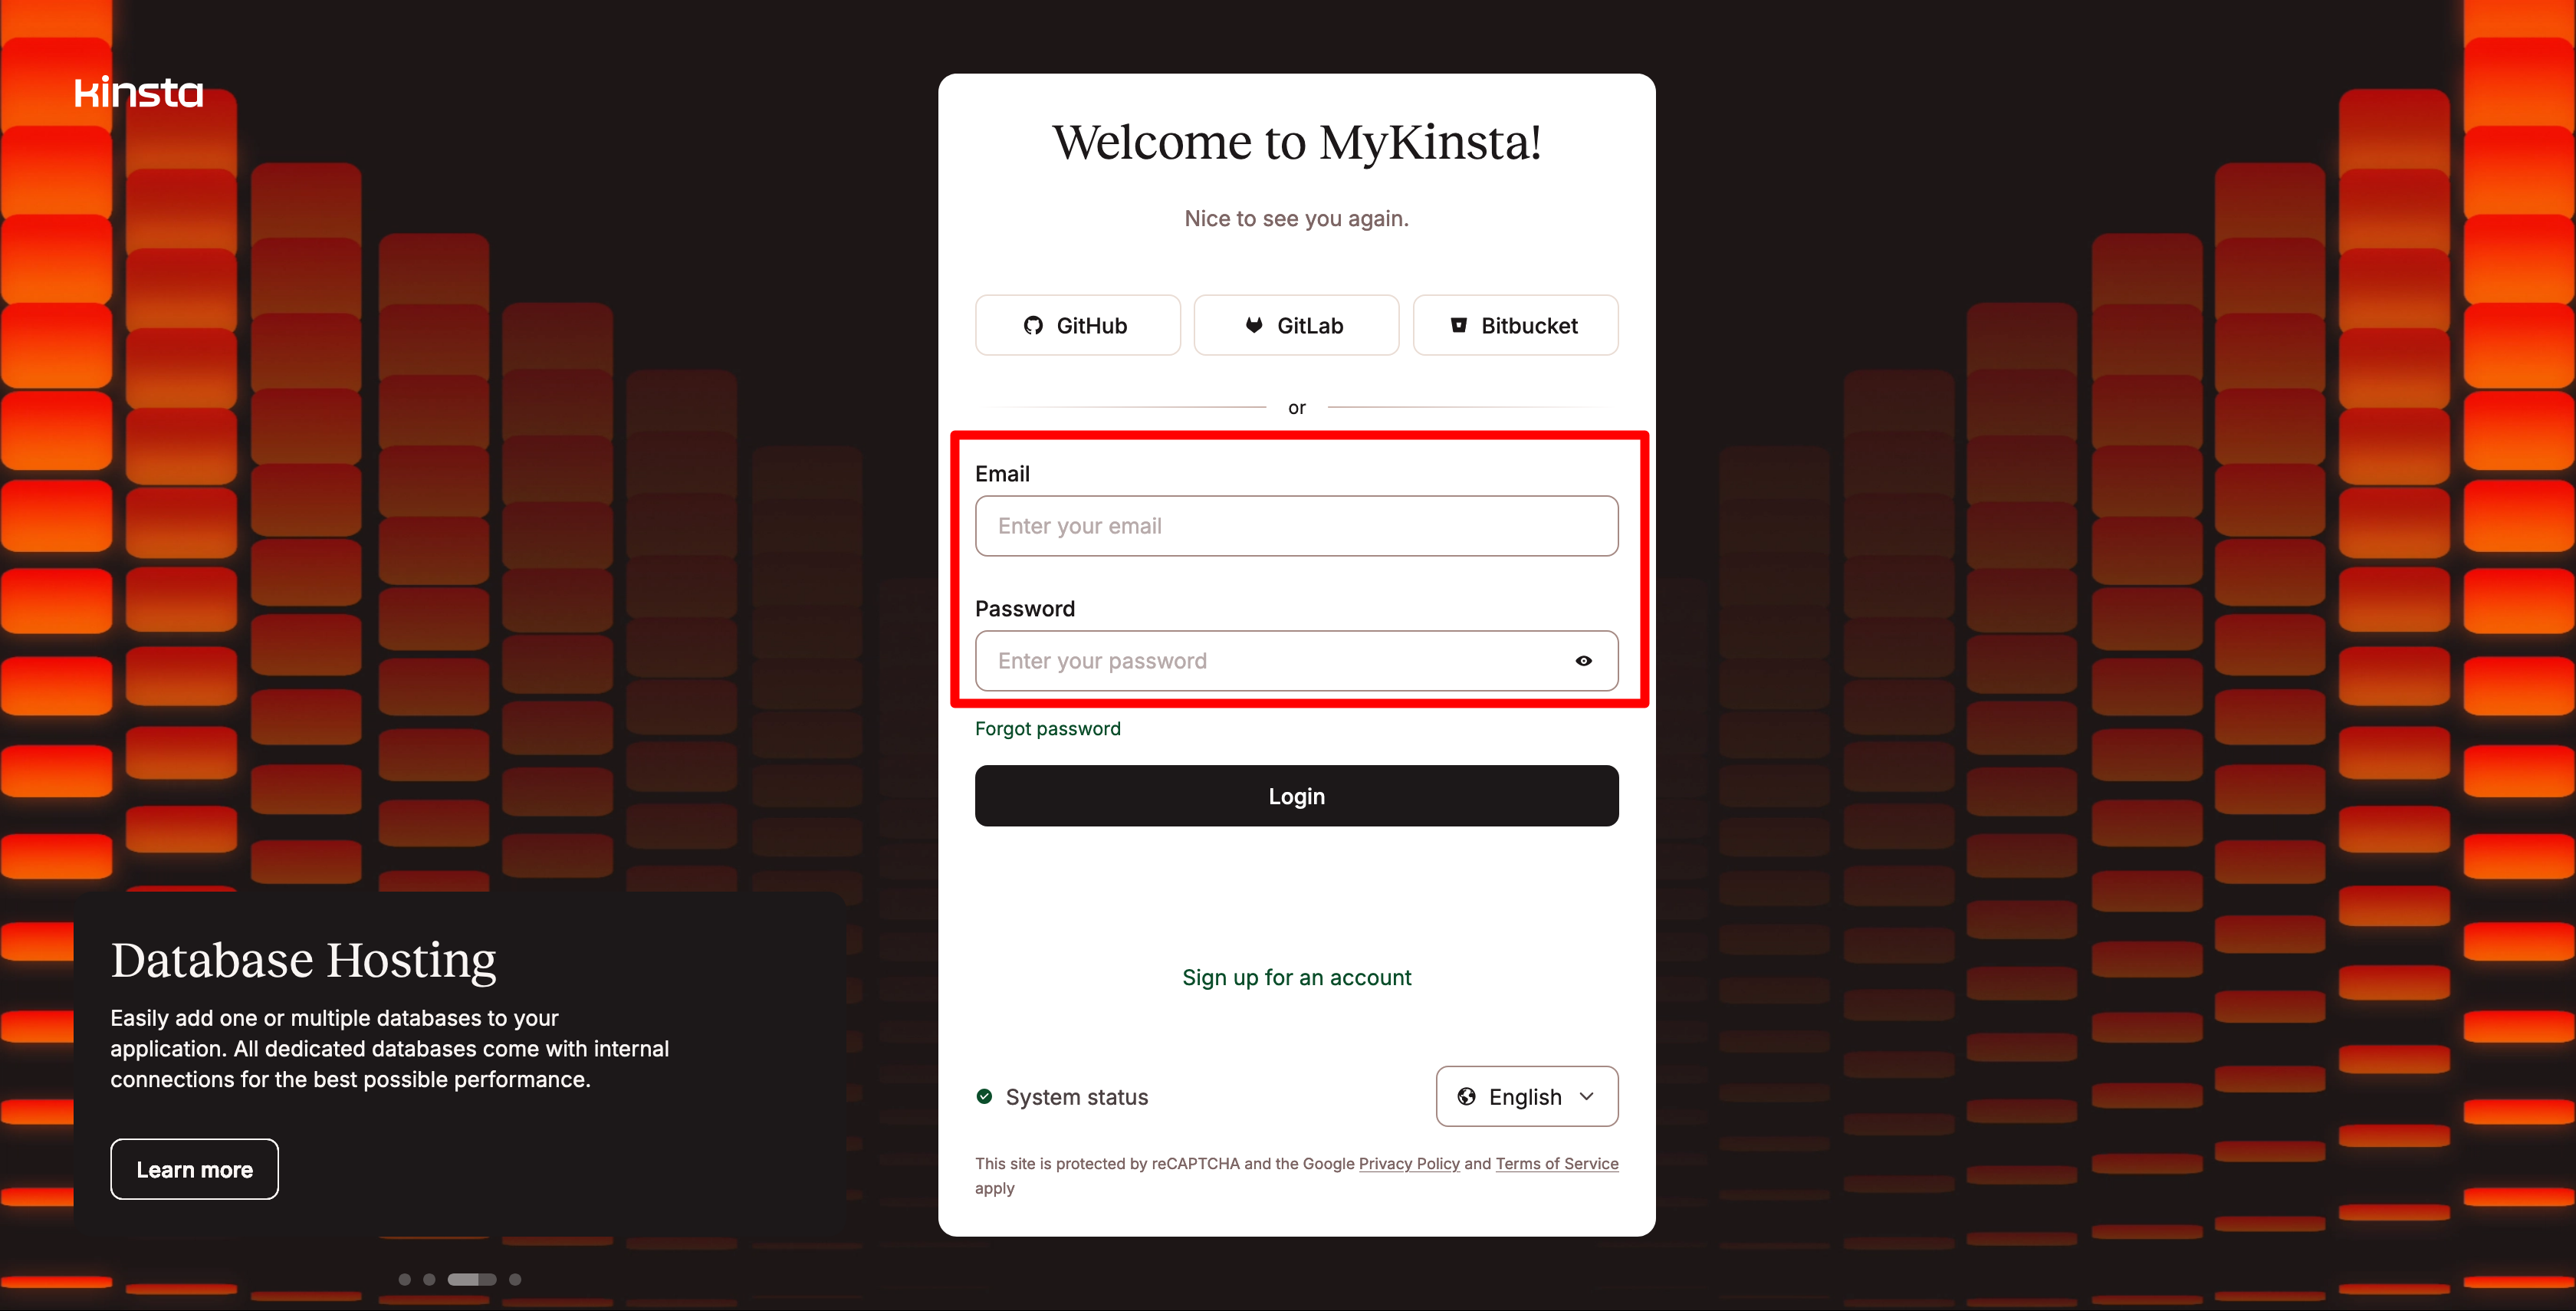
If you prefer, you can also type this URL(https://my.kinsta.com/login) into the web browser of your choice (Chrome, Firefox, Safari, Opera, etc.).
On the page that appears, enter your email address and password in the appropriate fields, then click on the “Login” button:
You’ll immediately find yourself on the MyKinsta interface. For the moment, you don’t yet have access to the options offered by the dashboard.
This is normal, as you must first deploy one of the following:
- A WordPress site
- An application
- A static site
- A database
As you can imagine, we’re primarily interested in WordPress sites. 😉 So we’re going to get into it and show you how it’s done.
But first, let’s take a look at this handy interface.
What does the dashboard interface look like?
The first impression of the MyKinsta dashboard is its clarity. The interface is uncluttered, and the main options are conveniently organized. As a result, it’s easy to find your way around.
Schematically, you can perform actions in 4 different places on the MyKinsta dashboard:
- In the sidebar, which lists the general menus available to you (Dashboard, Applications, Databases, WordPress sites, Static sites, DNS)
- In the center of the screen, where the options available in each menu you enter via the sidebar are displayed
- At the bottom of the interface, with a box featuring various resources redirecting users to Kinsta documentation
- At the top of the screen, where you have access to a quick search bar, for example, as well as user and company settings (invoices, means of payment, users, API keys, etc.).

It’s quick and easy to get the hang of. You can see at a glance how to access all the available features.
It’s also nice not to be swamped by options and sub-menus. You can tell that the team has put in real work on the UX (User Experience) and UI (User Interface).
What’s more, the fact that MyKinsta only offers options dedicated to WordPress — one of the unique things about Kinsta — makes it easier to understand.
That’s right: unlike cPanel, an interface used by many hosting providers, MyKinsta doesn’t offer options for other CMS such as Drupal, Joomla, Magento, Prestashop, and so on.
Here, everything is optimized just for WordPress, which is very convenient.
Without further ado, let’s get to the heart of the matter. Let’s explore how to use MyKinsta, with a detailed presentation of several basic features for managing your WordPress site on a daily basis.
How to use MyKinsta for the daily management of your WordPress site
How do I create a site with MyKinsta?
Let’s start with the basics: deploying your WordPress site on your hosting server.
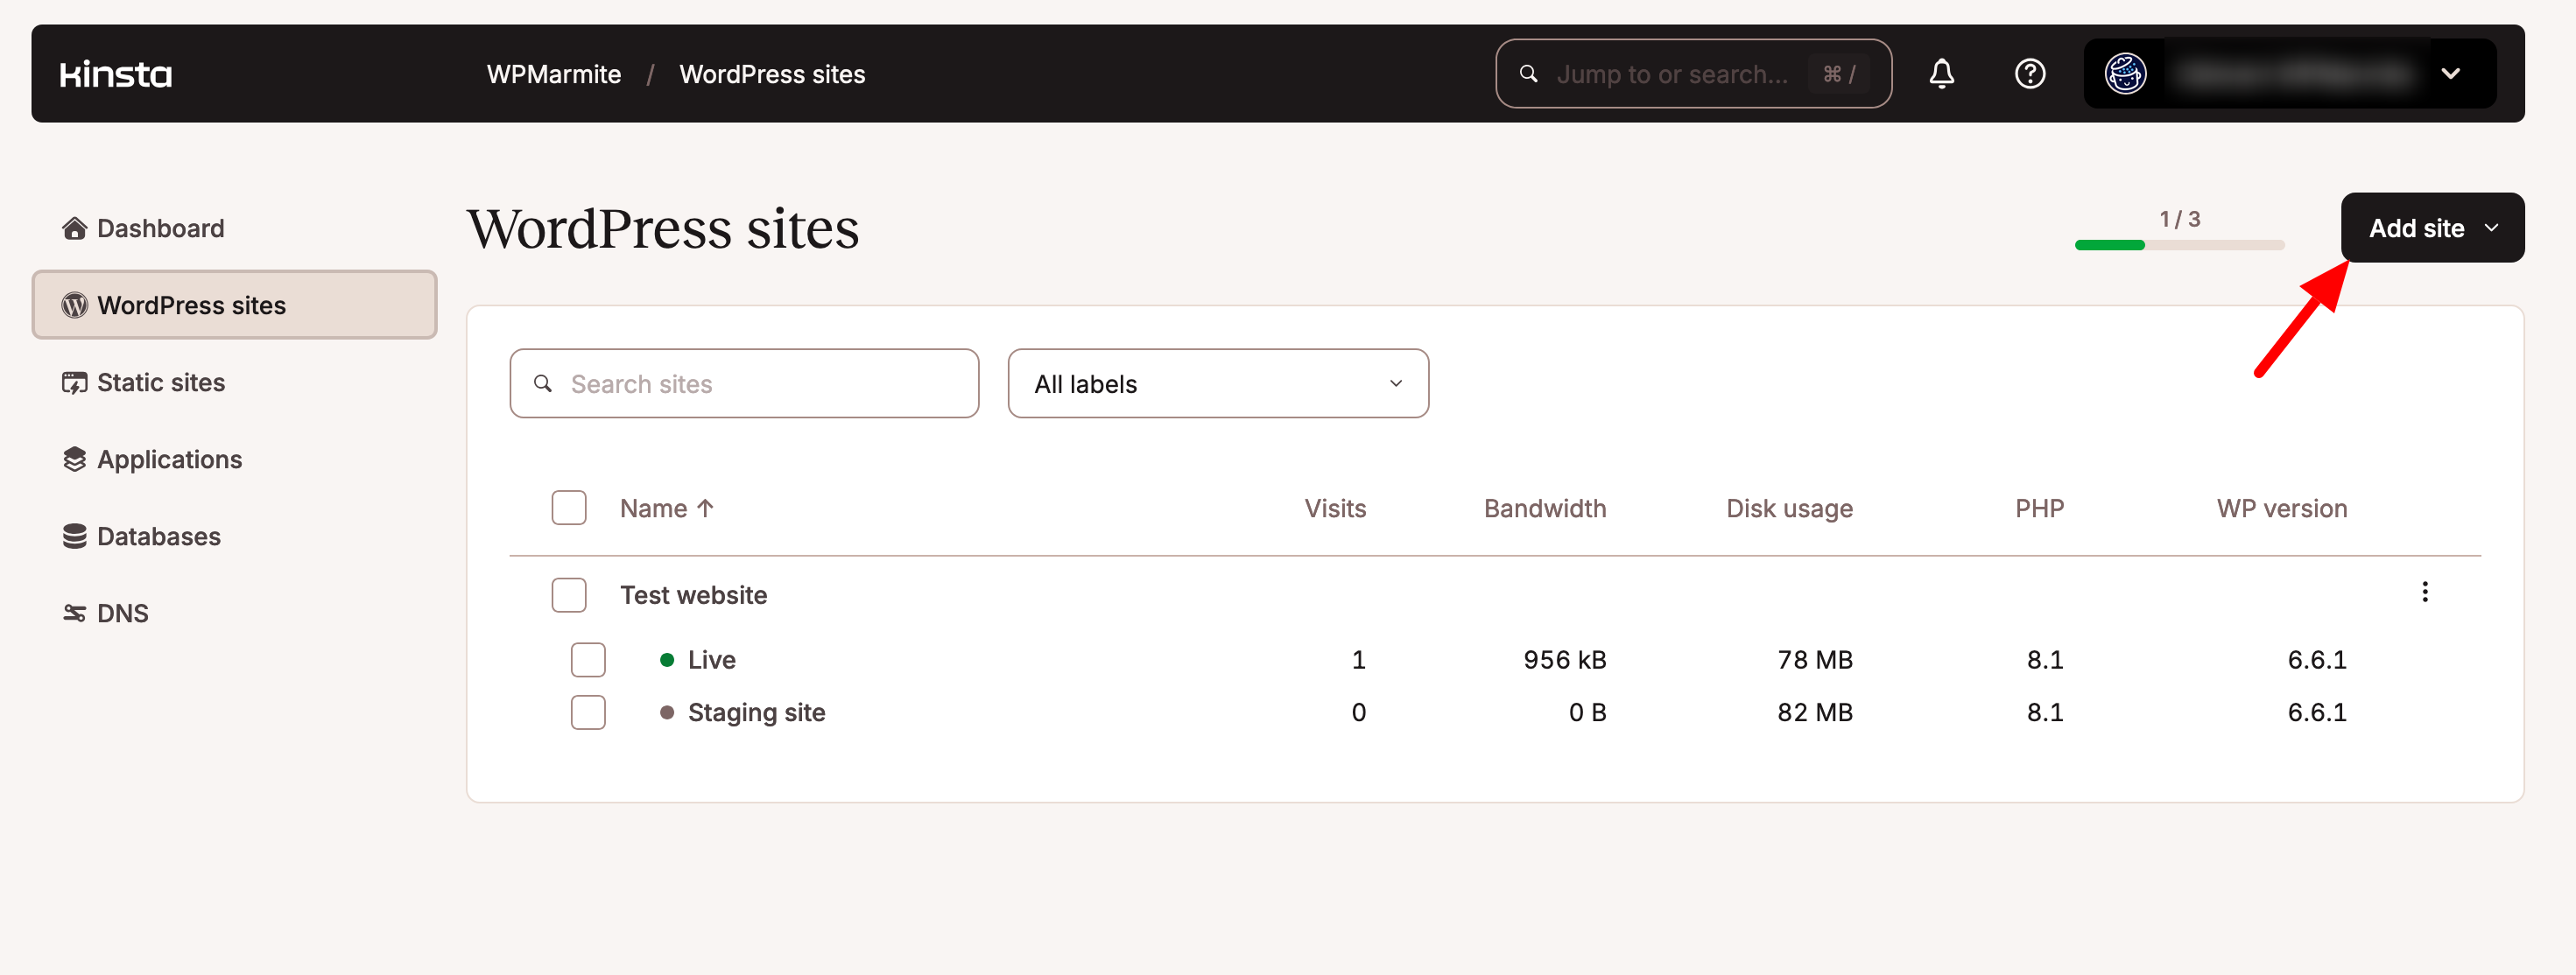
To do this, click on the “WordPress sites” menu, then on the “Add site” button:
Among the options offered next, you can:
- Install WordPress, for a functional, ready-to-use site. This is the option we’re going to focus on here.
- Create an empty environment without WordPress (WP will not be installed).
- Clone an existing environment, to clone a staging or production environment in order to adapt it to your production environment.
Remember to click on the “Continue” button after making your choice:

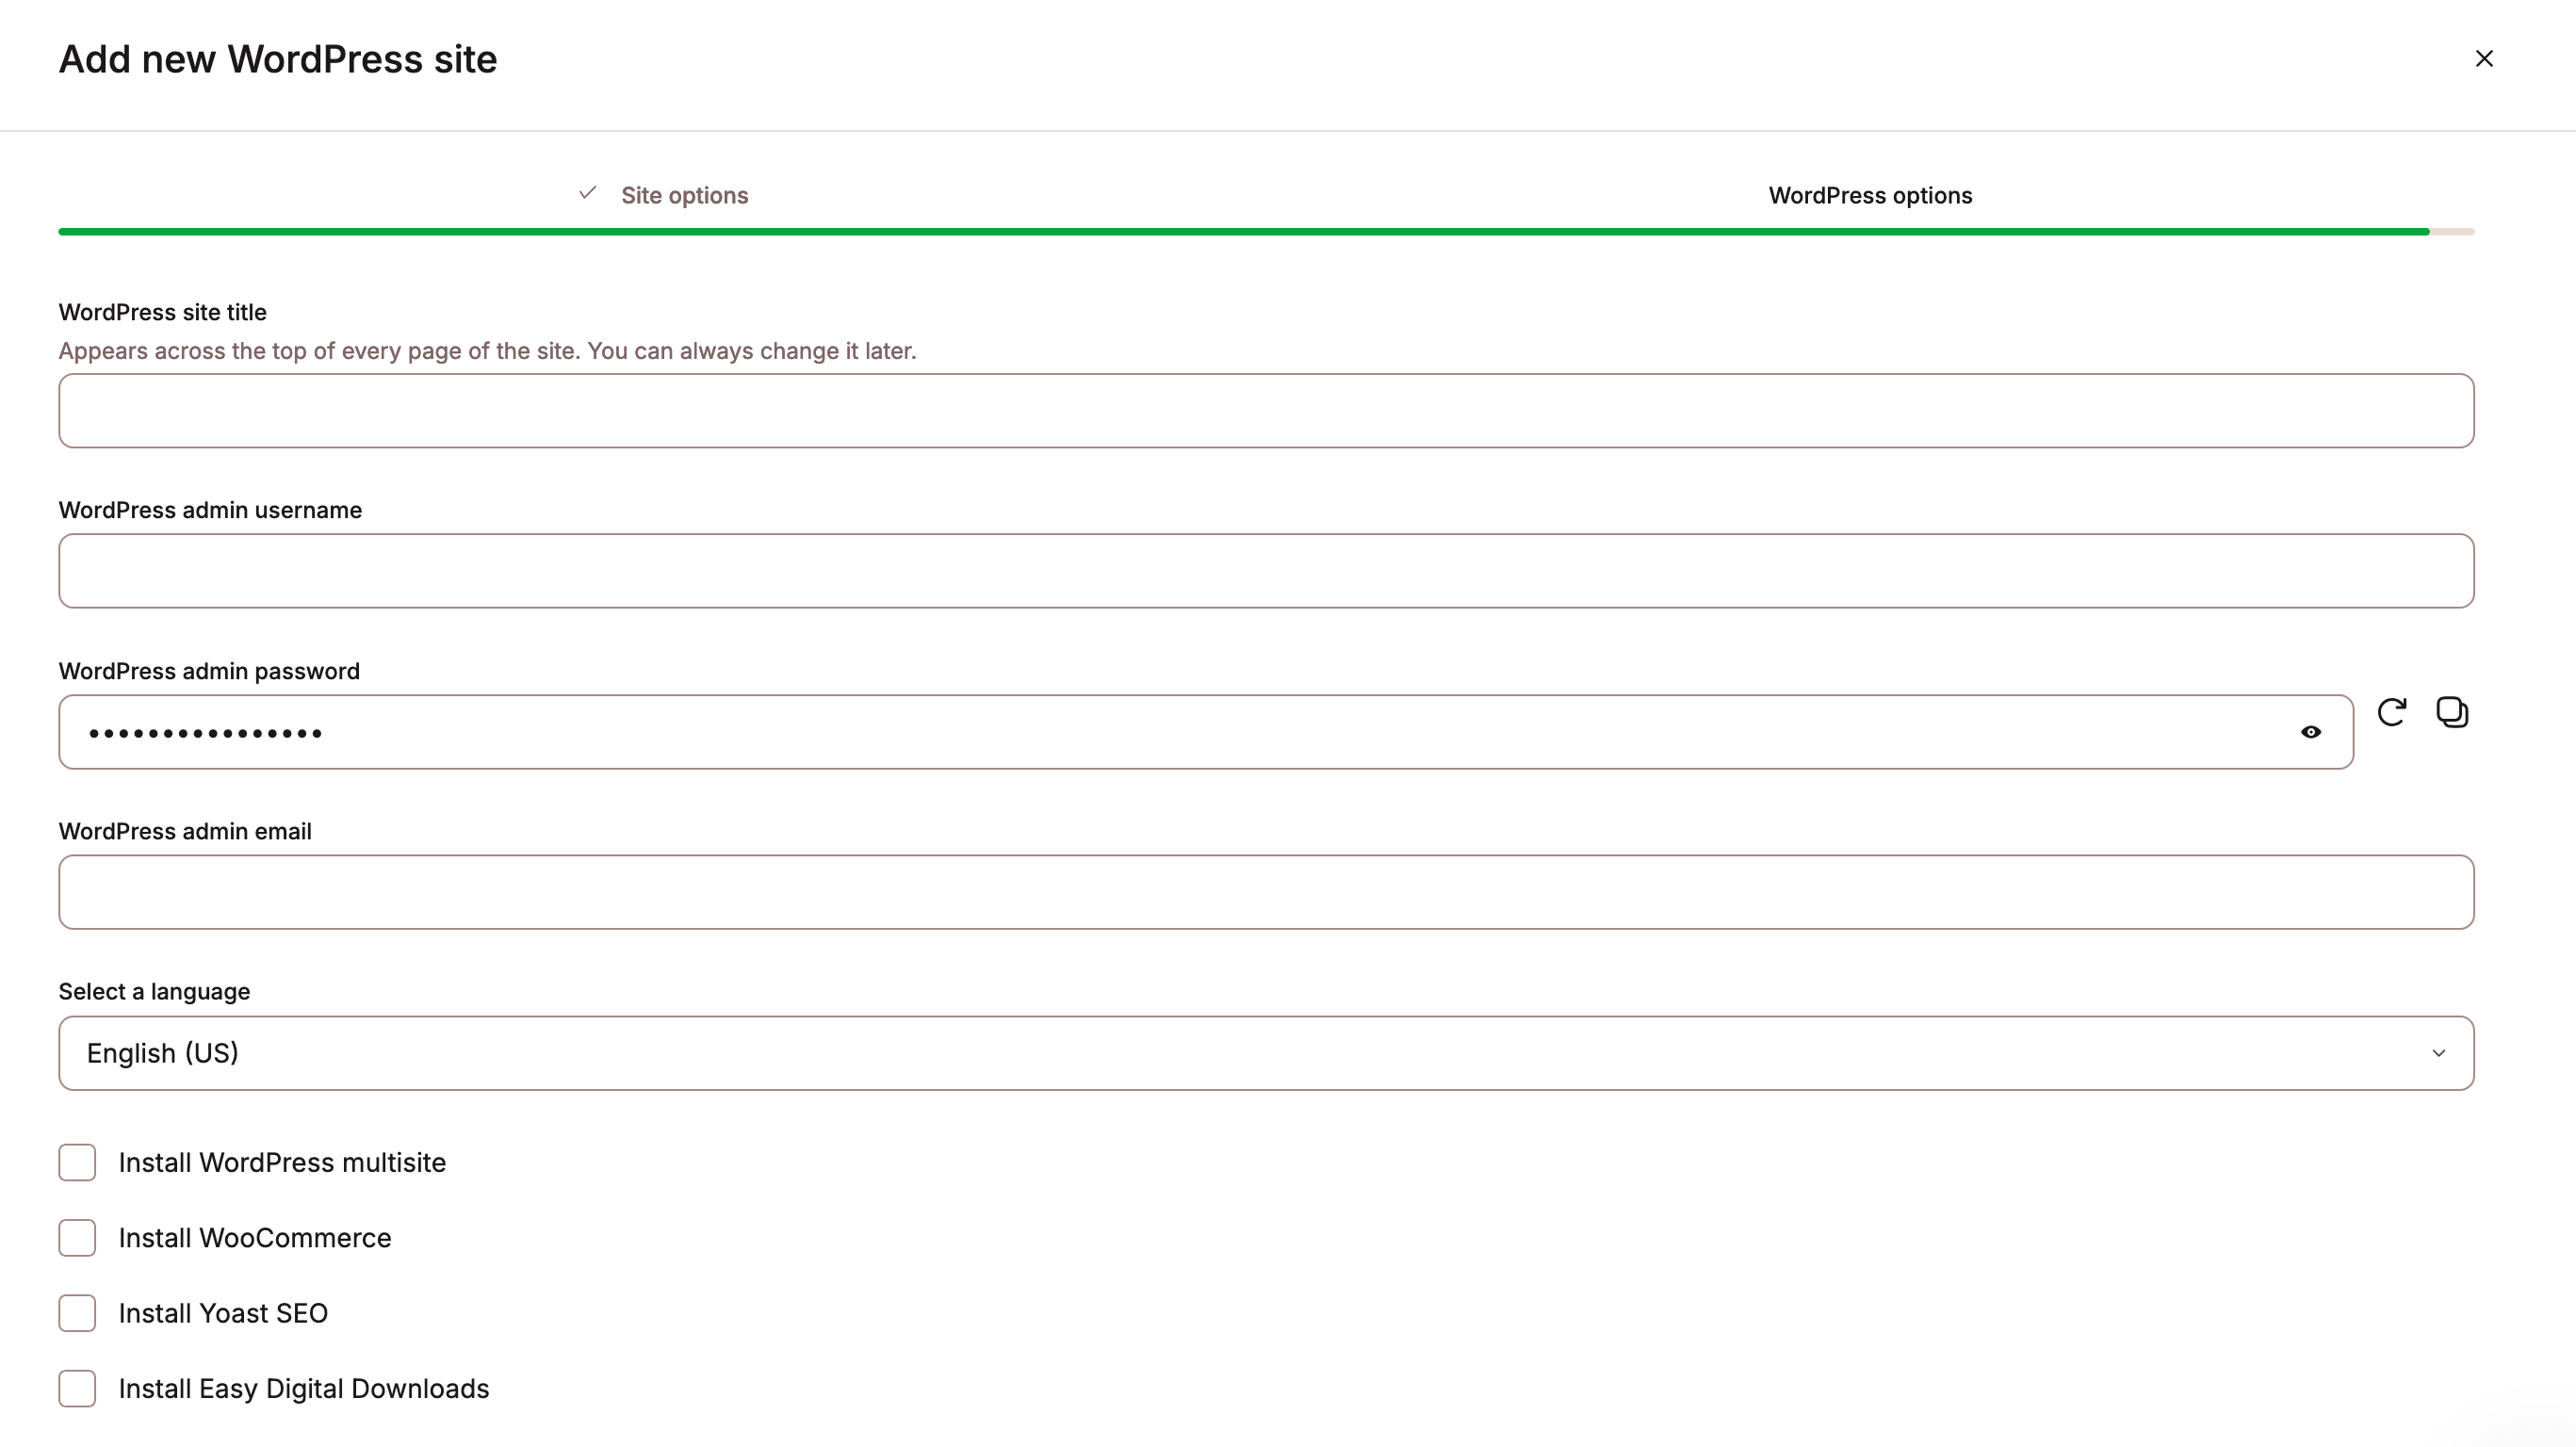
Next, a configuration wizard will guide you and ask you to enter the following information:
- Site name, i.e., the name that will be displayed on your MyKinsta dashboard
- Data center location. Choose the location geographically closest to your visitors, to reduce loading time. Select “Los Angeles,” for example, if it’s relevant to your SEO traffic.
- WordPress site title: the one visible to your visitors in their browser tab (you can change it later)
- Administrator login
- Administrator password
- Administrator’s email address
- Installation language
You can also install certain WordPress plugins, such as Yoast SEO, WooCommerce, or Easy Digital Downloads.
As you can see below, the fields you’ll need to fill in are almost identical to those offered by WordPress when installing a new site. So it should be familiar!
The tool then automatically creates your WordPress site. Once it’s done, your site appears on your dashboard. You can access all its options by clicking on it:
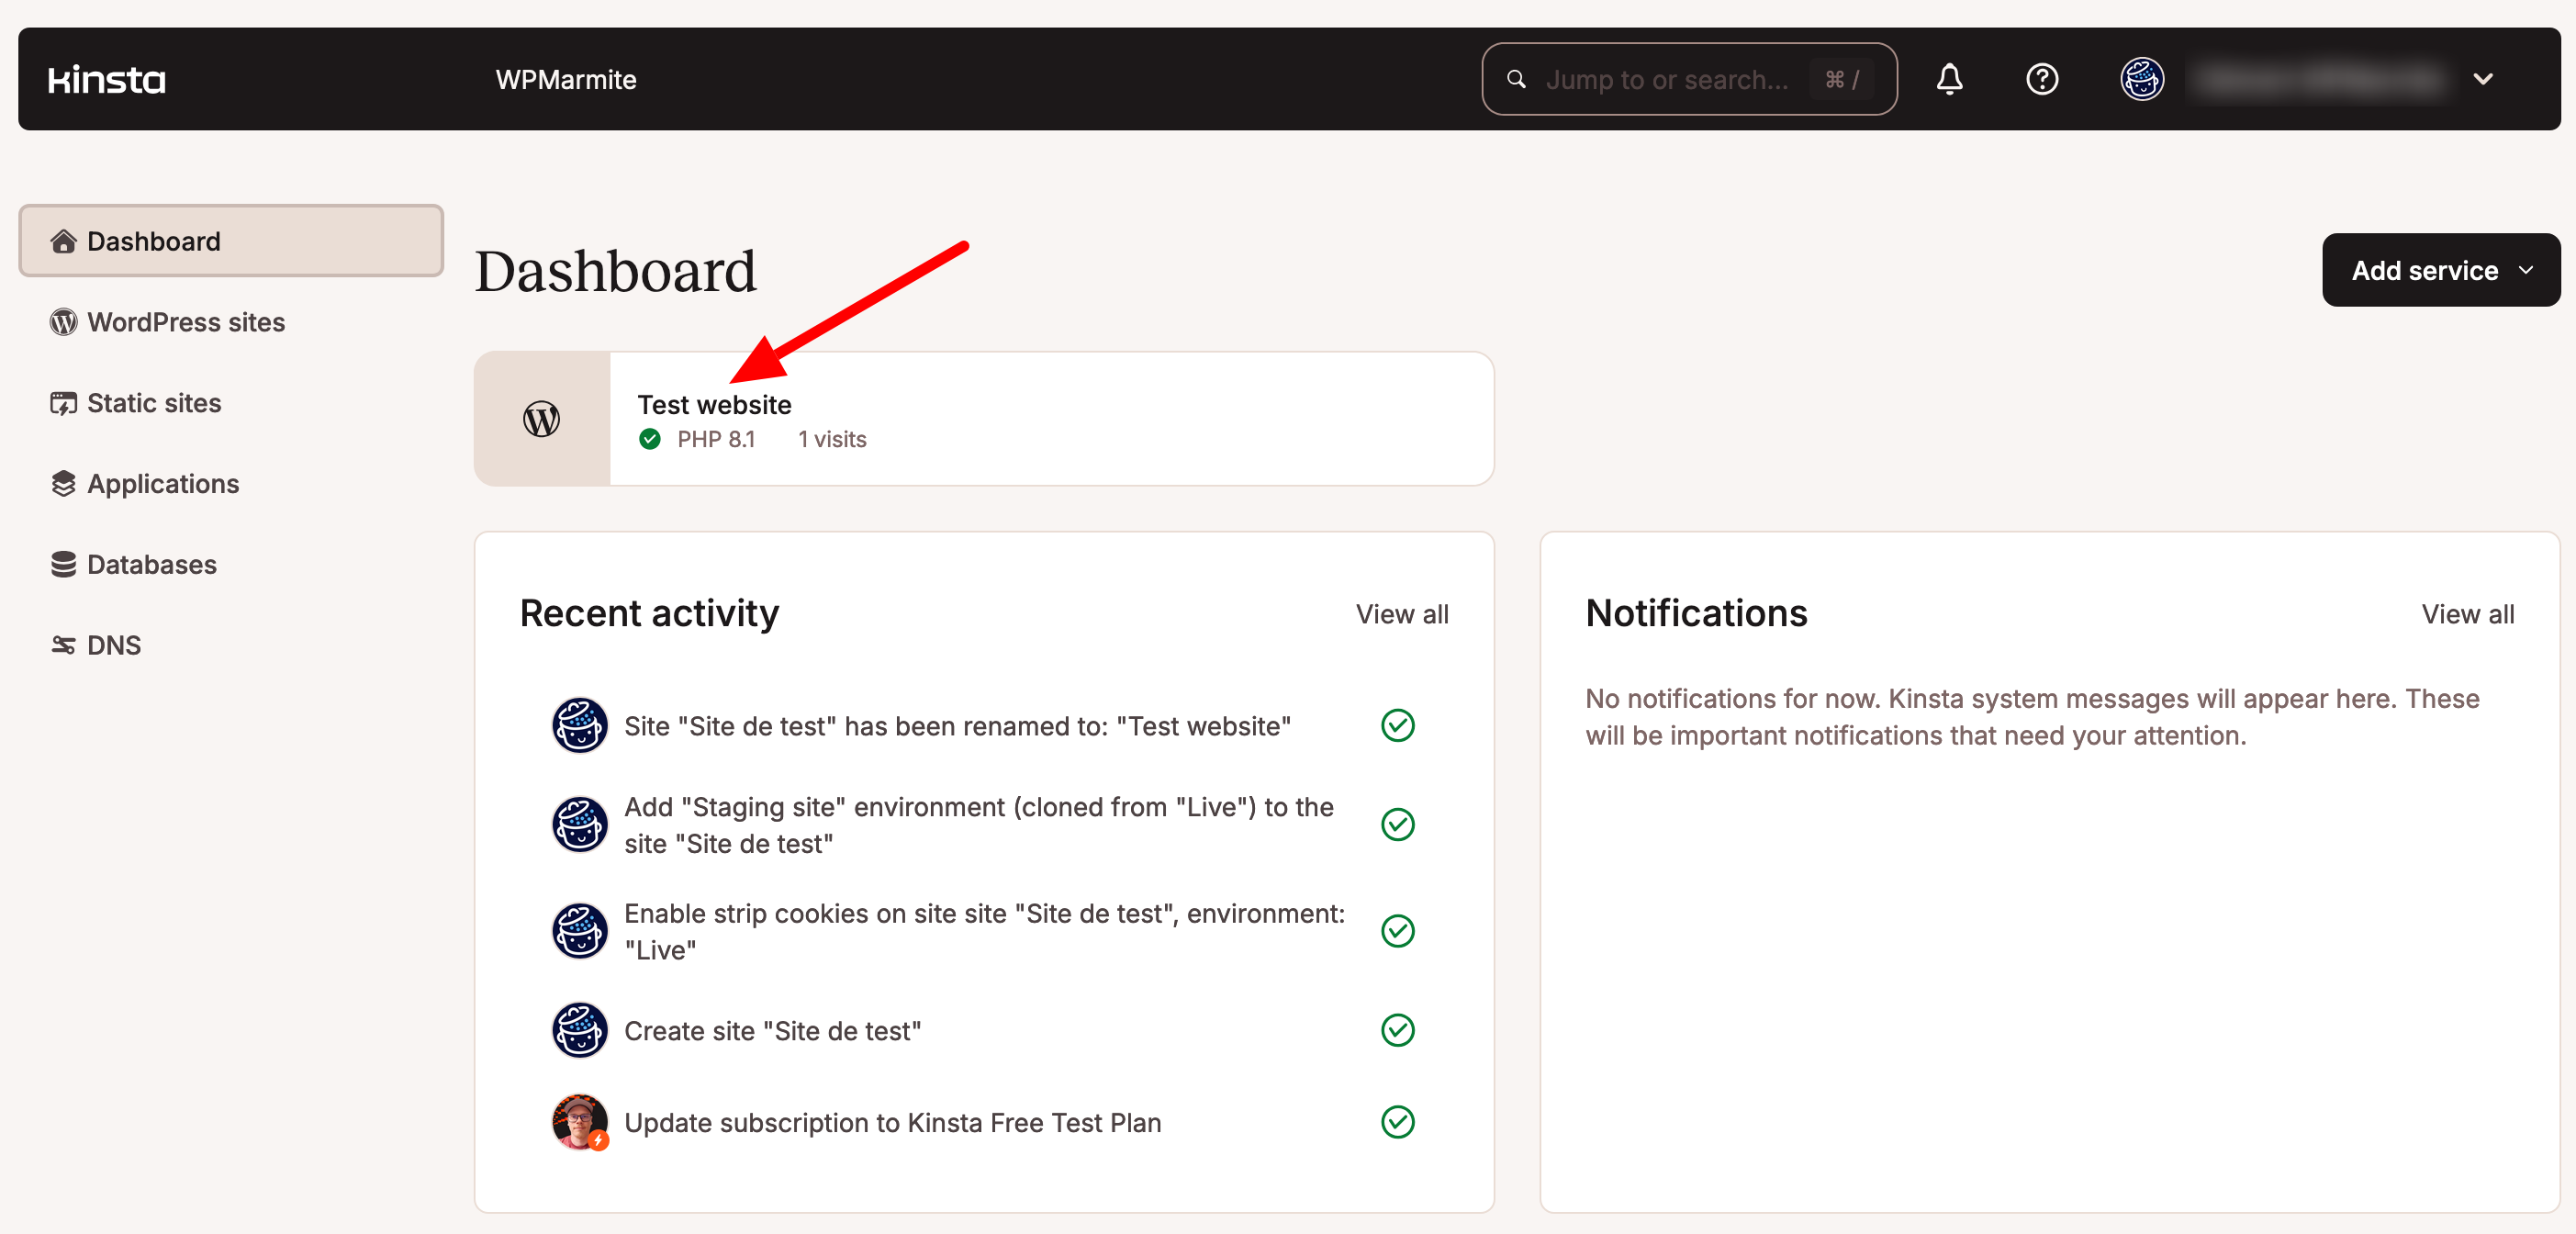
You then have access to the 14 menus in your sidebar (Info, Domains, Backups, Tools, Redirects, etc.).
In each case, the options are self-explanatory. Most of them can be applied with just one or a few clicks, as with WordPress debugging mode:

To access your site’s administration interface, click on the “Open WP admin” button in the “Info” menu:

Then log in with your username and password on the WordPress login page.
Once on your dashboard, you’ll see that Kinsta has installed the latest major version of WordPress. But you’ll also notice a new option called “Kinsta Cache.”
From here, you can make a number of cache management settings.
Once your WP site is installed, you can add your domain name and put your site into production.
How do you update your themes and plugins?
Since you’re on your WordPress admin, you might be thinking about updating your plugins and themes. After all, it’s good security practice.
With MyKinsta, you can take care of this directly from the dashboard interface, without having to connect to WordPress.
Super convenient, isn’t it? To start, go to the “Themes and plugins” menu. You’ll get a detailed overview of the themes and plugins installed and active on your site.
As soon as an update is available, it will appear next to the theme or plugin concerned. All you have to do is click on the corresponding button to start the update:

You can update all themes and plugins to their latest version at the same time.
Note that in the event of a problem, MyKinsta creates a snapshot of your environment just before the update (only available for two hours, though). You can then restore your site with a single click, if required.
As Kinsta is a platform optimized for performance, security, and reliability, its environment is not compatible with certain caching, backup, performance, and security plugins. Find the complete list on this page, and don’t activate the plugins concerned on your Kinsta site, to avoid any risk of incompatibility!
How do you set up a staging environment?
If you’re not sure how a theme or plugin works, or if you want to test it safely, create a staging environment separate from your production (online) site.
Kinsta makes this option available free of charge for every WordPress installation. It’s a great way to run tests and trials, without risking breaking everything on your online site.
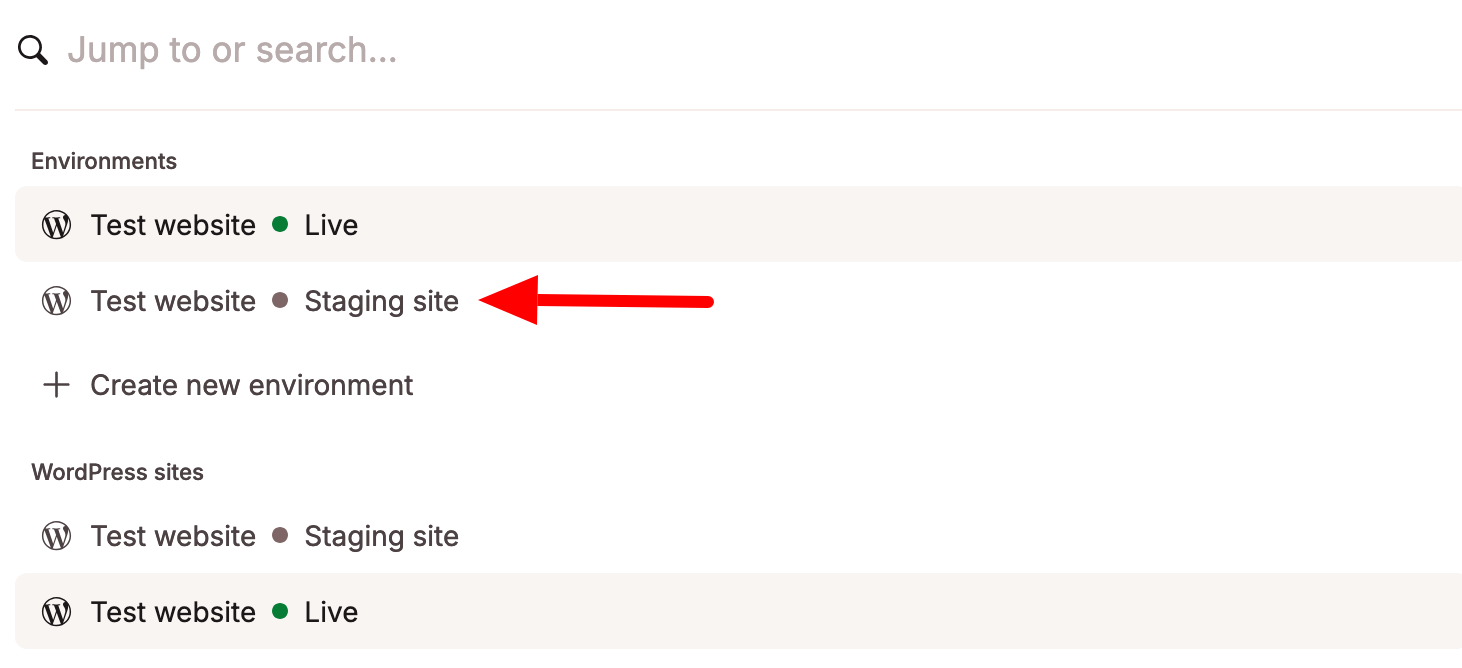
To install a staging environment, first select the site of your choice. Then, in the environment selector, in the top navigation bar, choose “Create new environment”:

Select “Standard environment,” then “Clone an existing environment” (to duplicate your production site to the staging environment). Then give your environment a name, and you’re all set!
From staging to granular production with MyKinsta
The creation process takes a few minutes. When it’s done, find your staging environment in the drop-down menu of the environment selector next to your site name:
You can access the admin of your staging site by clicking on the “Open WordPress administration” link.
One of the great strengths of MyKinsta’s staging environment is its selective push functionality.
In simple terms, this means you can choose what you want to transfer from the staging to the production site: either just the files, just the database, or both.
And you can even choose which database folders and tables you want to push into production.
What performance optimization options are available?
As a self-described “performance-obsessed” web host, Kinsta naturally offers a wide range of options for optimizing loading speed.
Here’s a non-exhaustive overview of what you can do with MyKinsta.
MyKinsta Tools menu
From your dashboard’s “Tools” menu, for example, you can:
- Restart PHP to “resolve some issues that lead to site speed problems,” according to Kinsta
- Change your PHP version
- Preload resources before serving the server response, using the “early hints” feature
In general, if an option seems too technical, or if you’re not sure of the consequences of activating it, don’t touch it! Find out more in Kinsta’s documentation, or contact the hosting company’s customer service department for further details.

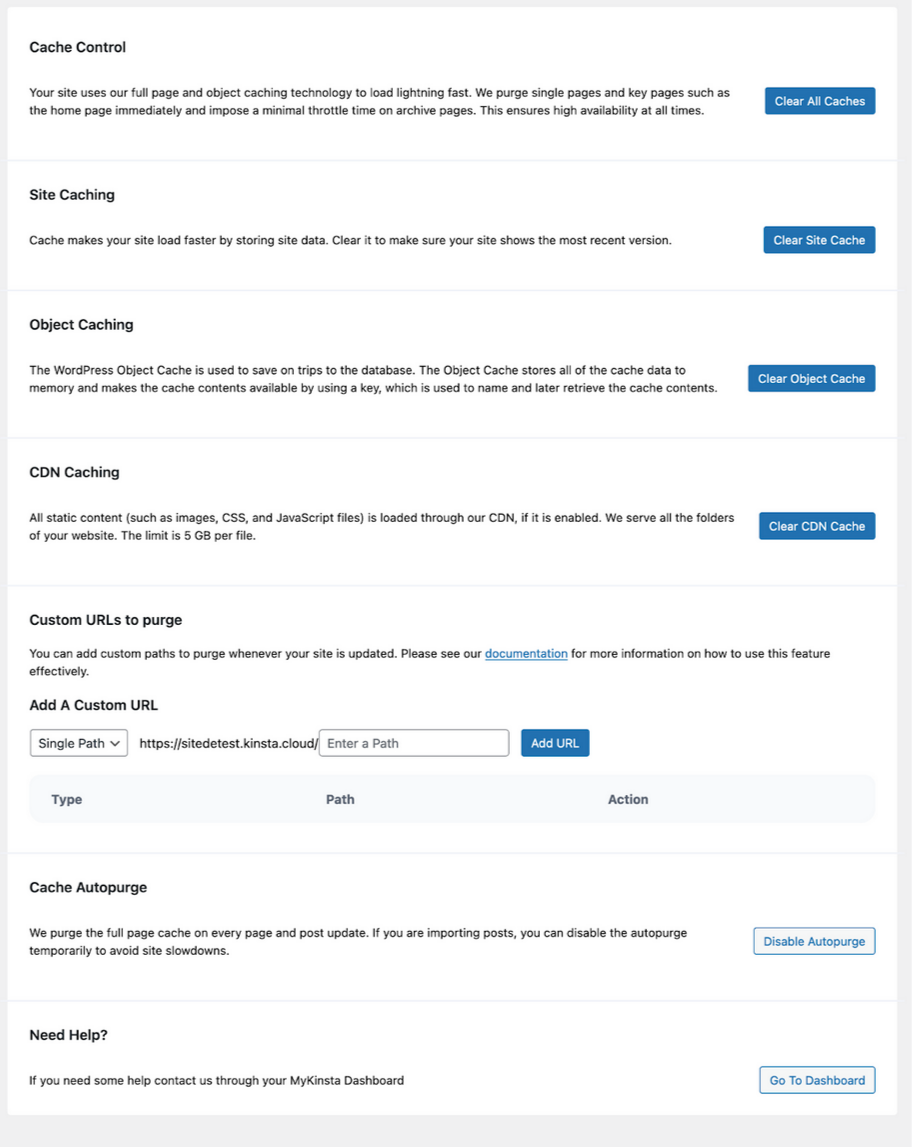
Caching
It’s easy to clear your WordPress site’s cache with MyKinsta. Go to the “Caching” menu, then click on the “Clear Cache” button to make your site load faster:

In addition, remember that you can also clear the cache directly from your WordPress dashboard, including:
- The full-page cache
- Object cache
- CDN cache
- The whole cache
Also note that edge caching, which dynamically generates HTML content for your WordPress site, is activated by default each time a new site is installed.
CDN
Default activation also applies to the premium CDN offered by Kinsta, thanks to its integration with Cloudflare Enterprise (you can deactivate this with a single click, if required).
From the “CDN” tab, you can not only clear the CDN cache if you wish, but also perform other useful optimizations such as:
- Optimization of PNG, GIF, and JPEG images in WebP format (an image format offered by Google that compresses images even further than JPG or PNG, without loss of quality)
- CSS and JavaScript code minification
Site monitoring with APM
As you probably know, a slow site has a negative impact on user experience, SEO, and conversions.
To avoid this kind of inconvenience, hosting provider Kinsta offers you its own performance monitoring tool called APM (Application Performance Monitoring).
Available free of charge on all its plans, Kinsta’s APM tool is able to detect:
- Slower database queries
- Long API calls
- Non-optimized plugin and/or theme code
- Slowest, average, and median requests
- Long external URL requests
As soon as a performance problem is reported to you, you can debug it. To take advantage of APM, activate it in the “APM” menu of your MyKinsta dashboard:

Thanks to this free tool, you don’t have to sign up for a third-party monitoring service.
But be careful! The APM tool is resource-hungry and can slow down your site’s loading speed when activated (for a limited time).
Kinsta recommends that you deactivate it “once you’ve collected enough troubleshooting data.”
How do I back up my site with MyKinsta?
Let’s move on to backups. By default, Kinsta backs up your site daily (files, database, redirects, Nginx configuration, and MyKinsta settings) and keeps the snapshot for 14 days.
You’ll find all your backups in the “Backups” menu, with details of the date and time they were created.
You can easily restore a backup by clicking on the “Restore to” button. Backups can be restored to either the production and/or staging environment:

If you wish, you can also set up backups every 6 hours ($20/month per site) or every hour ($100/month per site), but these services are subject to a charge.
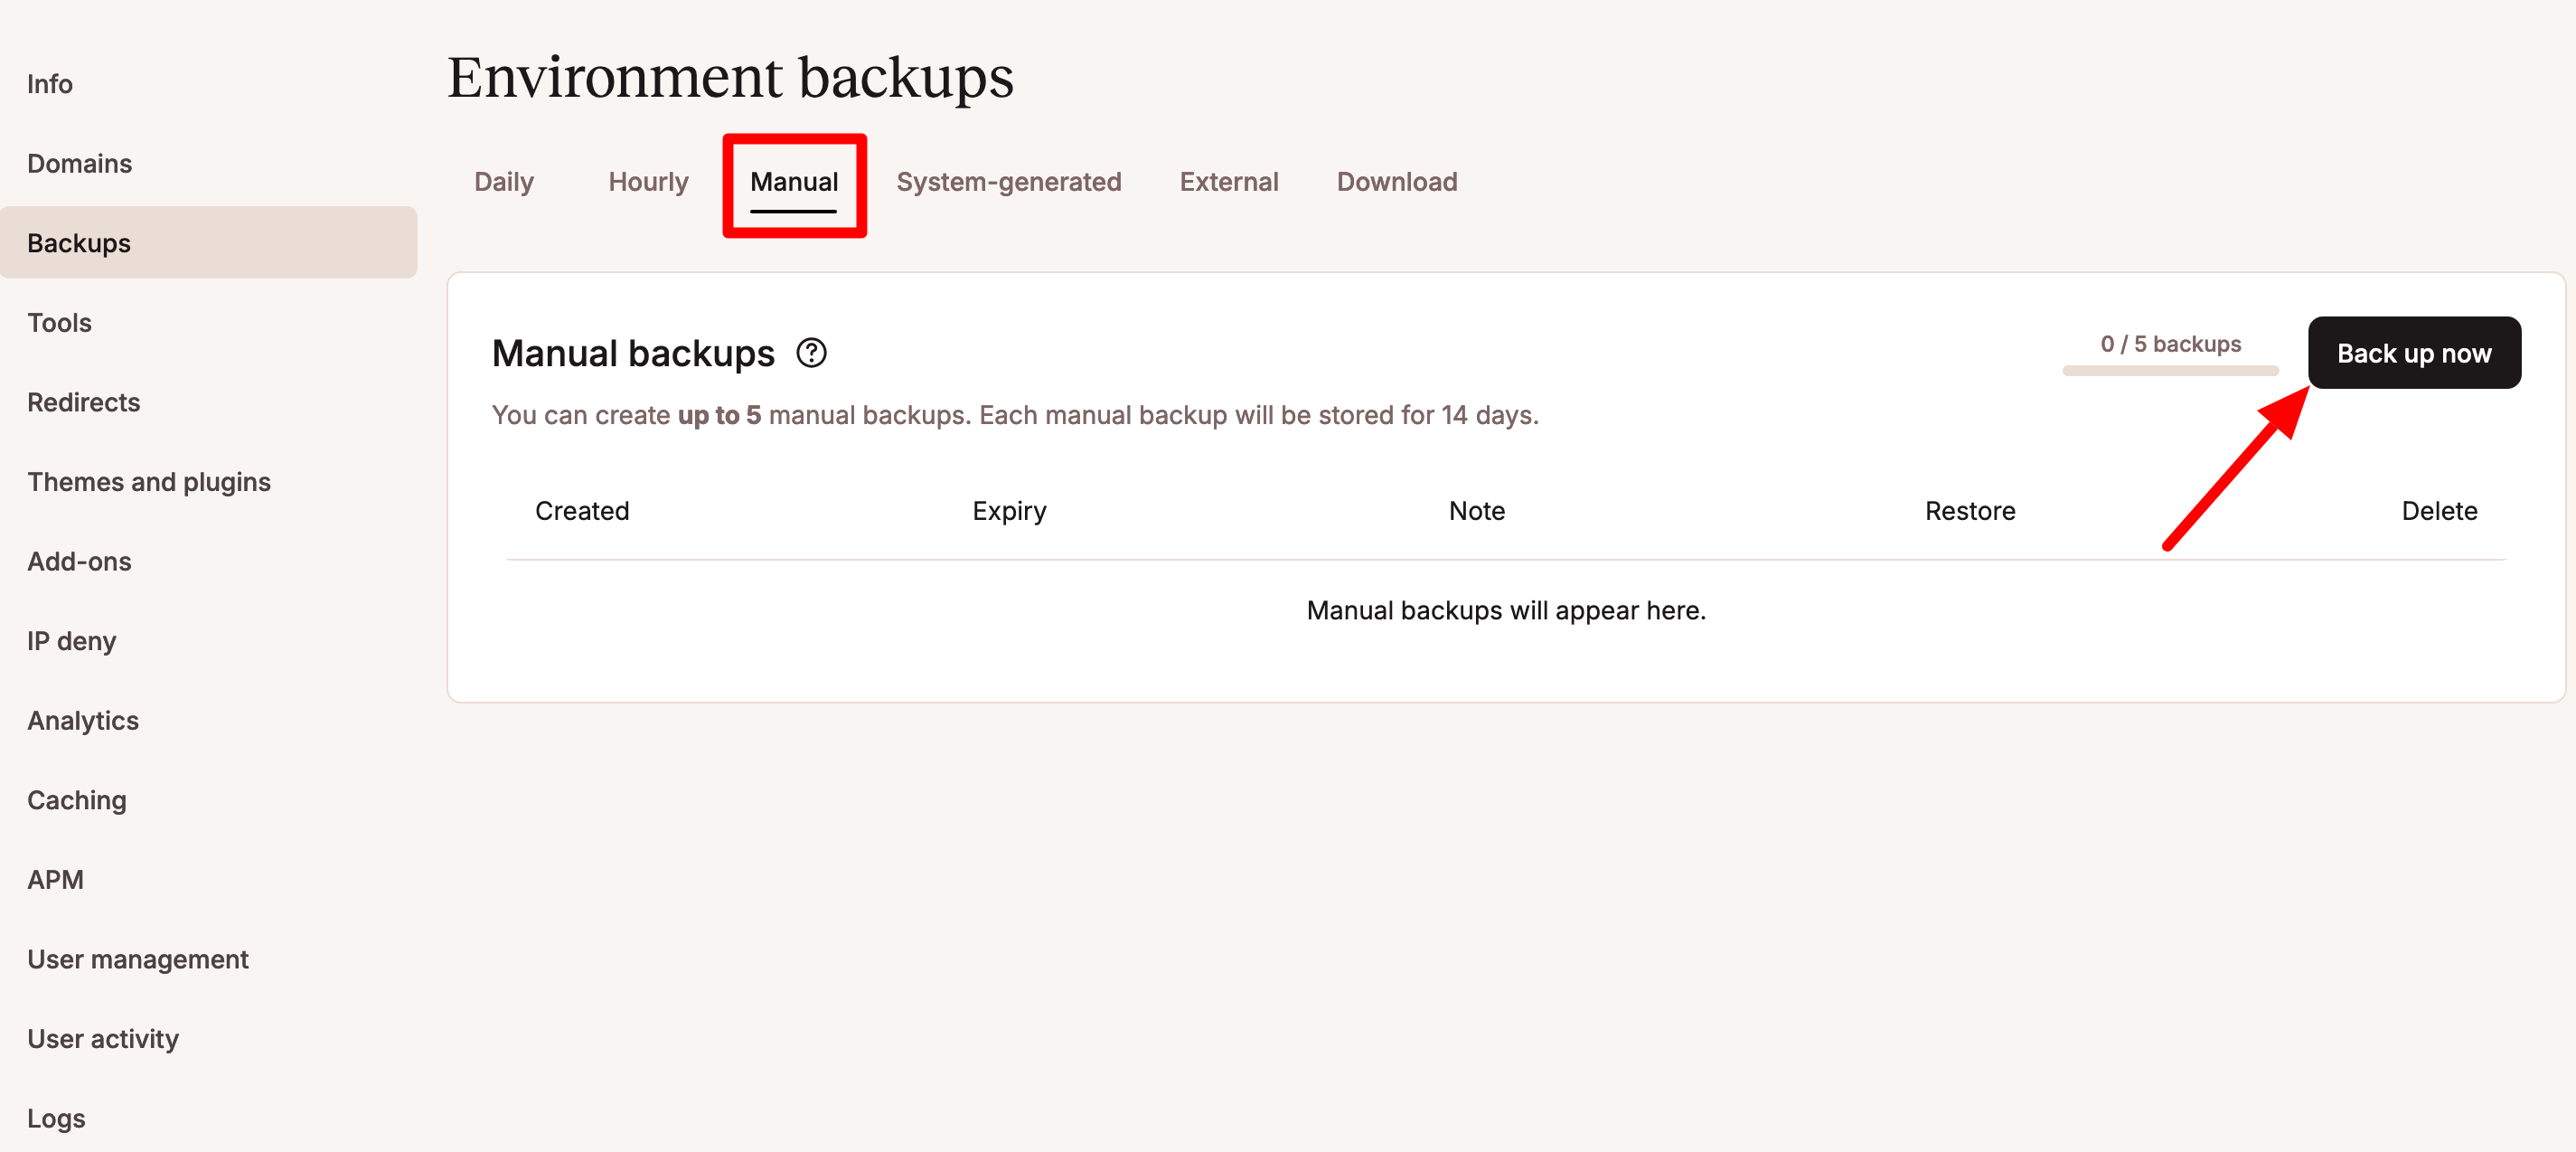
Are you a fan of manual backups? You can create a total of 5 from the “Manual” tab.
Finally, you can download your backup once a week from the “Download” tab.
How do you create and manage your databases?
A good backup contains at least your site files and database, as you’ve just read.
The database is the most important element of your WordPress site, because it contains all the content of your site (posts, pages, plugin settings, comments, revisions, site options, etc.).
You’ll need them to keep your site running. MyKinsta has everything you need to manage your databases. You can:
- Manage your database with the phpMyAdmin tool for running queries, deleting tables, importing data, backing up, exporting or restoring your database, etc. phpMyAdmin is accessible via the “Info” menu:

- Download a backup of your database from the Backups > Download menu.
Domain name management and redirects
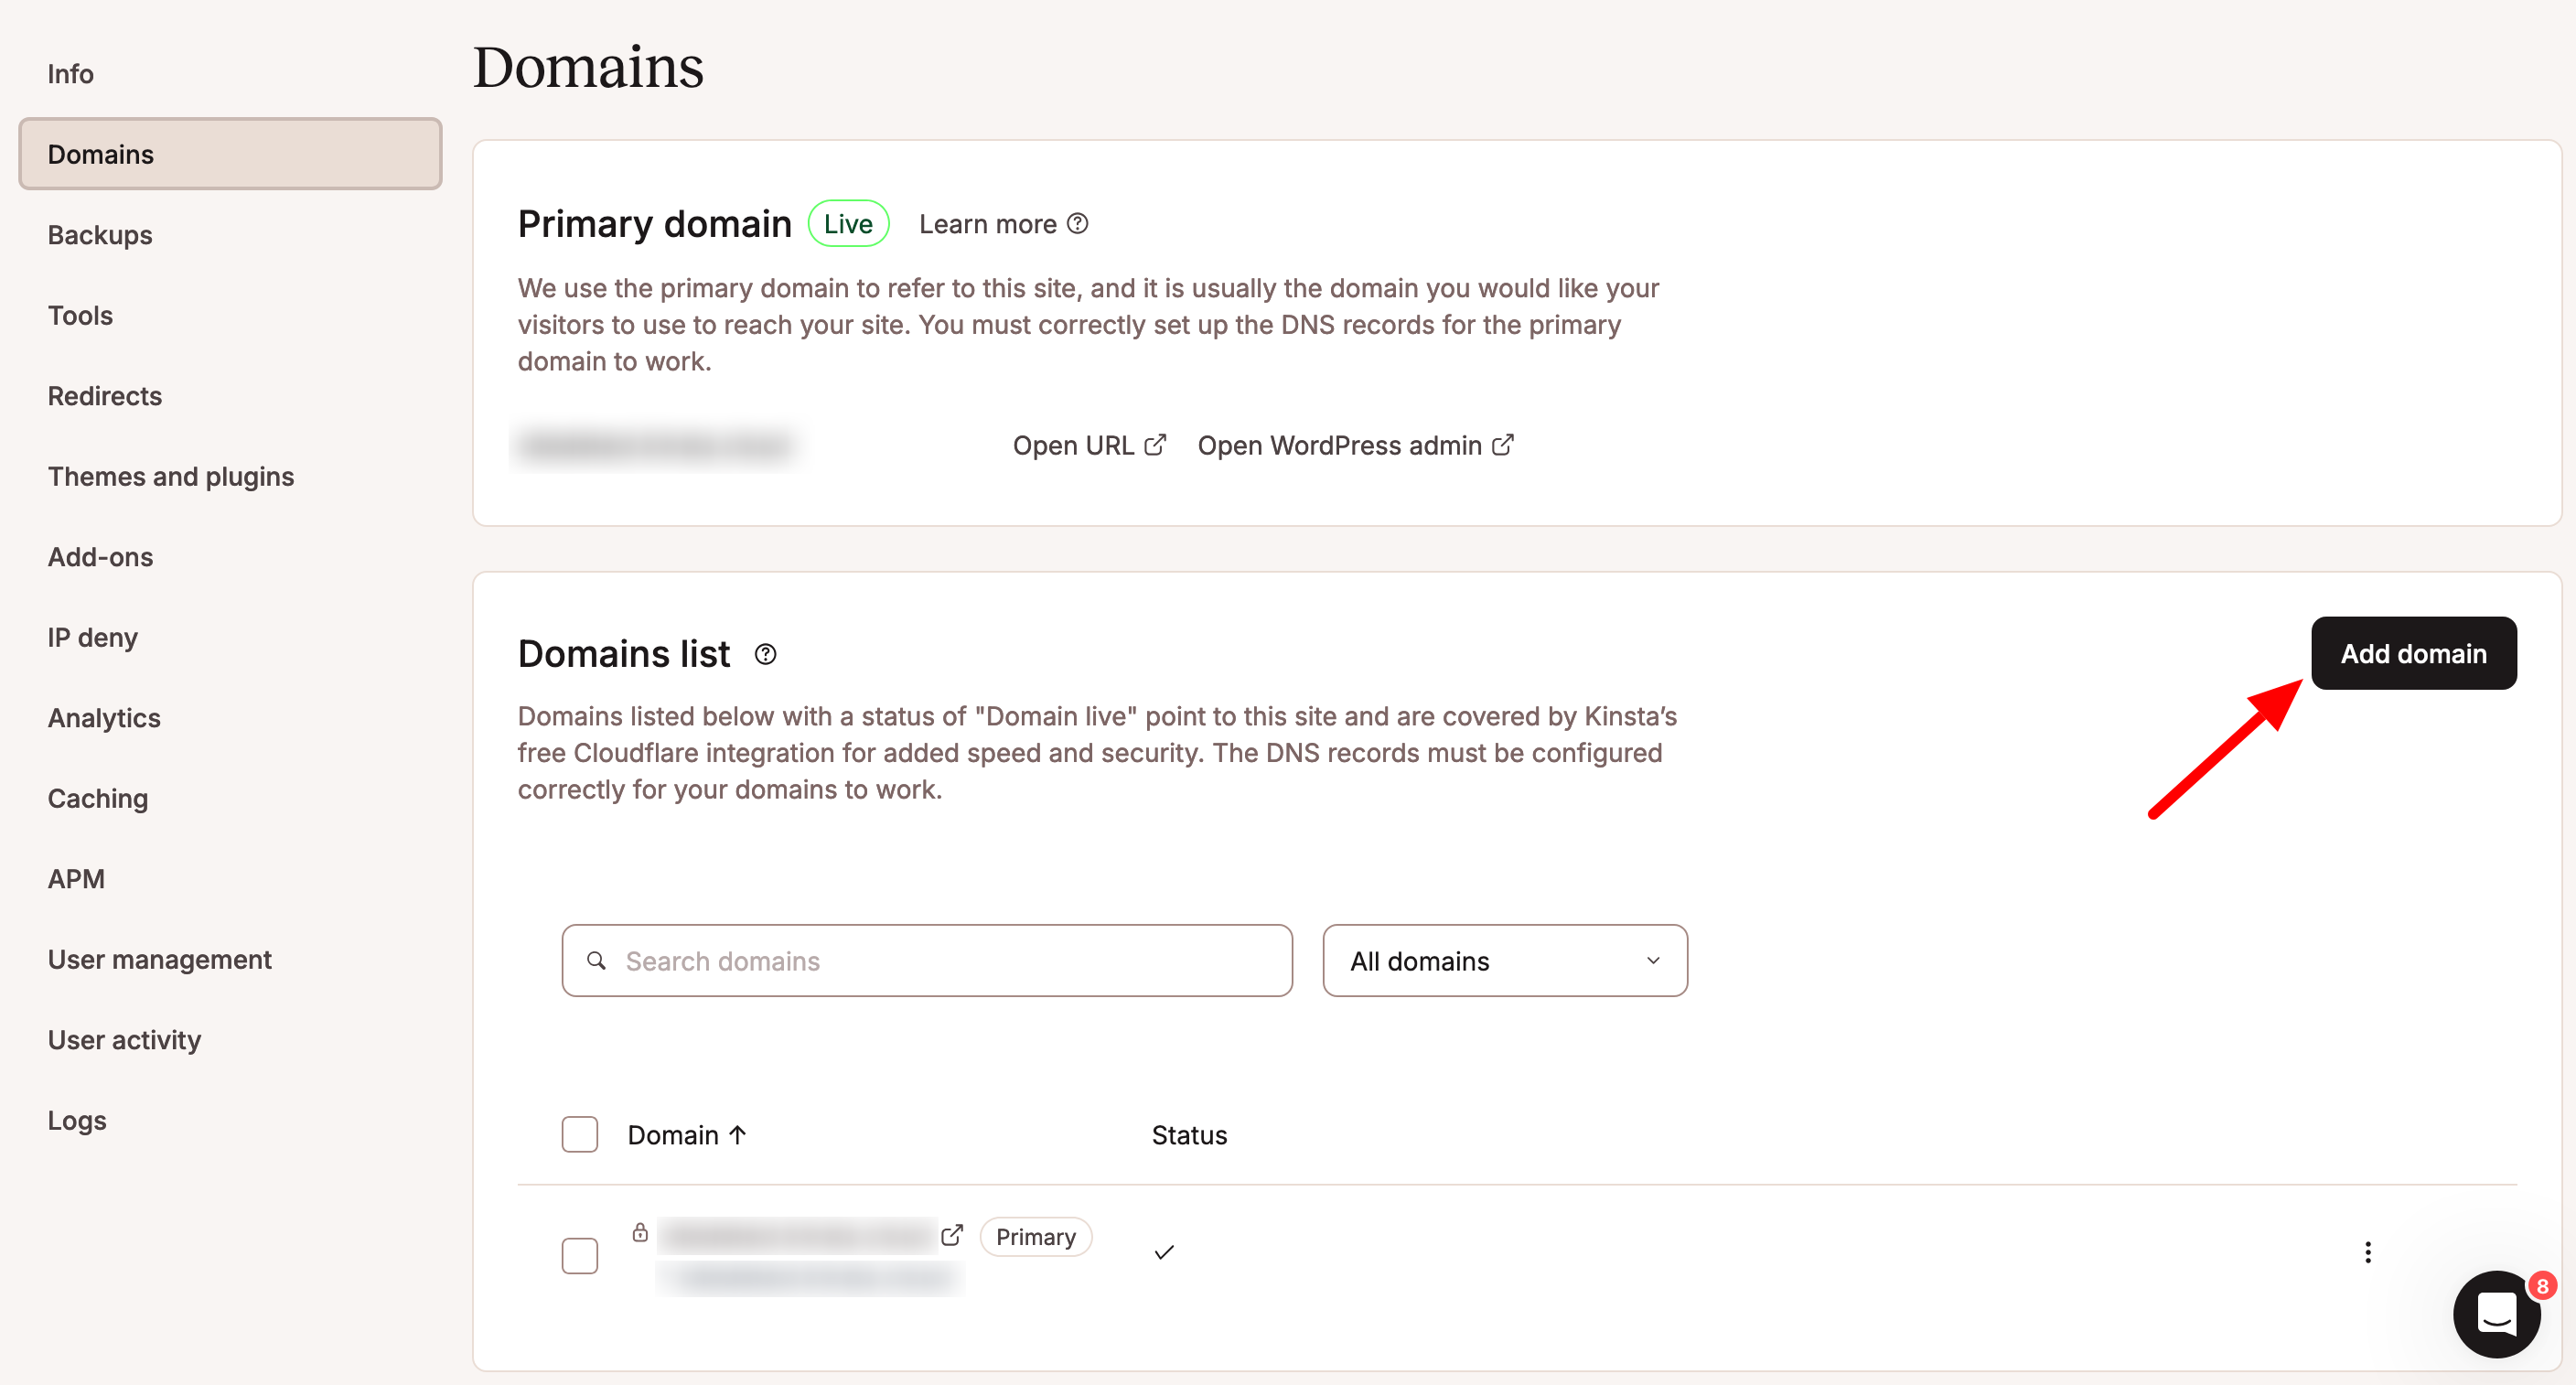
Kinsta doesn’t offer a domain name for purchase with its hosting plans, but it is of course possible to add and configure the domain of your choice, and point the necessary DNS records to their hosting service.
To add a domain or sub-domain, go to Domains > Domains list in MyKinsta.
First, you need to determine whether your domain is connected to an active Cloudflare account or not. Implementation is detailed in this resource.
You can then add redirection rules for each domain, from the “Redirects” menu. This is where you can set up 301 redirects, for example, to prevent your visitors from landing on 404 error pages.
Need to redirect all your HTTP traffic to HTTPS? Use the “Force HTTPS” option in the “Tools” menu.
However, you generally won’t need to do this, as Kinsta has taken care of everything and creates a default redirection.

Finally, thanks to its Cloudflare integration, Kinsta offers free SSL certificates. These certificates are active by default, so you don’t have to do anything on your own.
If required, Kinsta also supports custom SSL certificates.
That’s all there is to this presentation of the major options of the MyKinsta dashboard.
As mentioned above, this post is not intended to be an exhaustive guide to all the options offered by Kinsta’s in-house interface.
You can take advantage of dozens of additional options, such as:
- SSH access
- Support for SFTP connections
- A search and replace tool that doesn’t require installing a plugin, script, or use of the command line
- Two-factor authentication
- htpasswd protection to password-protect your site
- Access to statistics with MyKinsta Analytics: visits, disk space, bandwidth usage, PHP throughput, AJAX usage, etc.
- Develop locally with the free DevKinsta tool, integrated into MyKinsta
To find out more about the range of options available, check out Kinsta’s documentation, as well as the host’s official YouTube channel.
On the latter, you’ll find a playlist of tutorials dedicated to MyKinsta. Although the MyKinsta interface has been redesigned since the publication of most of these videos, the tips are still relevant today and may help you to clarify certain points.
For example, this video shows you how to add a user to your MyKinsta dashboard:
How much does MyKinsta cost?
To benefit from MyKinsta for managed WordPress hosting, you need to subscribe to one of Kinsta’s packages (starting at $30/month per site).
MyKinsta cannot be used free of charge. However, all hosting plans come with a 30-day money-back guarantee. This allows you to test the interface without risk.
You can also test MyKinsta free of charge by requesting a free demo from the hosting company’s sales team.
Finally, if your goal is to host applications or databases, you’ll benefit from a $20 free trial of server resources for one month.
Our final review of MyKinsta
This brings us to the end of our presentation of MyKinsta. As a reminder, you have learned:
- What MyKinsta is
- How it works
- How to perform routine management operations for your WordPress site using this interface
After our test, we’re totally convinced by this intuitive, ergonomic, and, above all, easy-to-use dashboard.
We really appreciated the legibility of the menus, and the fact that many actions can be performed with just a few clicks.
Thanks to its ease of use, MyKinsta is ideal for beginners. It will also appeal to more advanced users. The latter will appreciate the presence of multiple technical options (SSH, GitLab CI/CD, CRON tasks, PHP options, reverse proxy, etc.) to work almost without limits.
If you’re used to working with cPanel, you’ll just need a little time to acclimatize to the MyKinsta interface. But I promise, it won’t take long!