

What comes to mind when you think of WordPress speed and security? Your favorite plugins, perhaps? You should also think about… PHP! If you’re looking for a site that loads fast, while offering a solid shield against hacker attacks, there’s a…
That’s it, it’s decided! You’re ready to take action: you’re going to change the URL of your WordPress site.
This is necessary after changing your domain name or switching to HTTPS, just to name a few reasons.

If you’re wondering how to do this, you’ve come to the right place. At the end of your reading, you will have 5 practical methods (from the simplest to the most technical) to change the URL of your site easily, step by step, even if you’re just starting out with WordPress.
Are you ready? Follow the guide.
Why change the URL of a WordPress site?
What is a URL?
To clarify the subject and lay some groundwork, let’s first go over several concepts, starting with the URL.
This acronym stands for Uniform Resource Locator (Uniform Resource Locator). Simply put, it’s the web address of a content.
For example, the URL of WPMarmite’s Elementor guide is: https://wpmarmite.com/en/wordpress-guides/elementor/
In WordPress jargon, we also refer to permalinks. These correspond to the URL of a content.
Finally, you may also come across the term slug. It should not be confused with the URL or permalink. The slug represents the textual identifier of a publication. It’s the last part of a URL.
For example, in our article on on-page SEO, the URL is: https://wpmarmite.com/en/on-page-seo/
As for the slug, it’s simply on-page-seo.
Note that if you change a slug, you will necessarily change the URL. However, you can change a part of your URL without touching the slug. Are you still following?
Then let’s move on.

4 reasons to change the URL of a WordPress site
Changing the URL of your WordPress site is not a common operation. However, there are several reasons why you might want to do it, including (but not limited to) the following situations:
- A change of domain name, following the redesign of your WordPress site, for example.
- Switching your WordPress site from HTTP to HTTPS. This is essential to secure the connection to your site and improve the user experience.
- Moving your site to another directory (e.g. from
mysite.comtomysite.com/site) or to a sub-domain (e.g. moving a blog frommysite.comtoblog.mysite.com). - A change of environment. For example, if you’ve developed a site locally and wish to migrate it to the online server, you will have to change your URLs. Usually, the migration tools (e.g. Duplicator) do this by themselves, so you don’t have to do it.
So, without further ado, let’s get down to business with a presentation of five ways to change the URL of your WordPress site.
I’ll start with the simplest one, and then I’ll build up to more technical methods as we go along.
How to change the URL of a WordPress site: 5 detailed methods
To be on the safe side, I recommend backing up your site (files + database) before changing the URL of your WordPress site. To do this, use a free plugin like UpdraftPlus. And if you ever want to entrust this task to a professional, use WPSitter. 👇👇👇

Method 1: Change the URL of your WordPress site on the dashboard
Don’t feel like getting your hands dirty? Good thing we’re starting with a method that doesn’t require touching the code.
Everything happens directly on the WordPress administration interface (back office).
The advice given in the following lines for this method (changing the WordPress URL in the general settings) should be applied with the utmost caution. If you’re not sure what you’re doing or have any doubts, don’t do it, or you’ll end up with a broken site.
Step 1: Access the general settings
To get started, head to the Settings > General menu. At the top of the page, you’ll see two fields that interest us:
- WordPress Address (URL). This is the URL that leads to the address of all the files in the WordPress Core.
- Site Address (URL). This is the address of your site, i.e. the one that “you want people to type in their browser to reach your WordPress blog,” the CMS documentation details. This corresponds to your domain name. In principle, keep in mind that the site’s address is the same as the WordPress address, “unless you want your site home page to be different from your WordPress installation directory,” says WordPress.

Step 2: Change the URL of your WordPress site
In a second step, you just have to enter your new URL in the fields “WordPress Address” and “Site Address”:

Finish by clicking on the blue “Save Changes” button. This method has the merit of being simple and fast.
However, it only changes the address of your site in the database.
The addresses of the images and internal links in your content will not be updated… This will cause many display and navigation problems.
This is why you should not limit yourself to updating only the two fields present in the administration. In most cases this will cause problems.
The ideal solution: perform a Search and Replace
To avoid this, the best solution is to perform a direct Search & Replace on all the tables in your database (without first changing the WordPress URL on the dashboard).
To do this, use the Better Search Replace plugin:
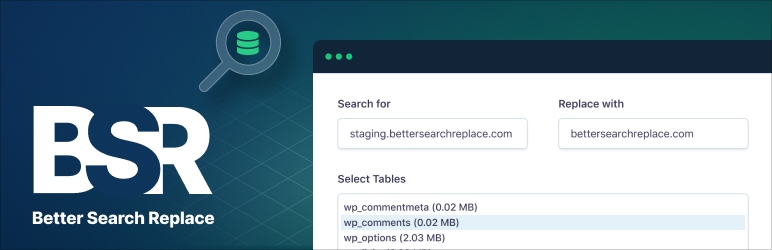
Once it’s activated, go to the Tools > Better Search Replace menu. Then proceed with the following steps:
- In the “Search for” field, enter the URL to be modified (e.g.
https://oldsite.com). - In the “Replace with” field, enter the new URL (e.g.
https://newsite.com). - Select all the tables in your database.
- Leave the default settings in the “Additional settings” box. In principle, only the box “Run as dry run” should be checked.
- Finish by clicking on the “Run Search/Replace” button.

In principle, this should be sufficient. Navigate through your site pages to make sure everything is working properly. If you have problems with the display, try clearing your browser’s cache to see if that solves the problem.
If the “WordPress Address (URL)” and “Site Address (URL)” fields are ever grayed out, or you’ve made a mistake that makes your site inaccessible, you can fix the problem by editing your wp-config.php file. This is the purpose of method #2, covered just below.
Method 2: Change the URL of your WordPress site in the wp-config.php file
The wp-config.php file is one of the major files in the WordPress core. It contains information that allows you to connect to your WordPress database (host, login, and password).
WordPress automatically creates this configuration file at the end of the CMS installation. You will find it in the root directory of your site.
To edit it, connect to the interface of your host (e.g. cPanel) or to an FTP client (File Transfer Protocol client).
For the purpose of this article, I will show you how to do this using the FTP client called FileZilla (free).
Step 1: Connect to FTP
To access your site’s files on Filezilla, connect by entering the following:
- Host
- Username
- Password
- Port

You’ll find them in the email your hosting company sent you when you reserved your hosting space with them.
Step 2: Add two lines of code to wp-config.php
Next, go to the root of your site (the folder that contains all the files on your WordPress site).
This folder may have a different name depending on the hosting company you use.
Double-click on the folder, then locate the wp-config.php file. To open it, right click on it and choose “View/Edit.”
Add the piece of code below, just above the following comment: /* That’s all, stop editing! Happy publishing. */
define( 'WP_HOME', 'https://newurl.com' );
define( 'WP_SITEURL', 'https://newurl.com' );

Of course, replace “newurl.com” by the domain name and extension of your choice. If your site is not in HTTPS, use http at the beginning of the URL.
Finish by saving your file and returning to your WordPress dashboard. Normally, the “WordPress Address” and “Site Address” fields will be grayed out.
As the WordPress documentation states, adding this snippet to the wp-config.php file “is not necessarily the best fix,” because it means you’re “hard-coding the values into the site itself. You won’t be able to edit them on the General settings page anymore when using this method” (unless you remove them from your wp-config.php file).
Another way to change the URL of your WordPress site is to use the functions.php file.
Method 3: Change the WordPress URL in the functions.php file
As its name indicates, the functions.php file contains the functions of your theme.
To modify it, it’s better to use a child theme, or even a plugin like Code Snippets if you want to do it from the WordPress administration.
I don’t recommend this method if you’re a beginner or inexperienced user. It’s more suitable for technicians and people who have a solid foundation with WordPress.
You should use method 1 (via the WordPress settings page) or method 2 (via the PHP constants) first.
If you feel up to it, go back to your favorite FTP client, and access your child theme’s directory (in wp-content > themes).
Open the functions.php file following the same method as for the file wp-config.php.
Then add these two lines of code, just after the initial PHP line (“<?php “):
update_option( 'siteurl', 'https://newurl.com' );
update_option( 'home', 'https://newurl.com' );

As mentioned before, replace ” newurl.com ” with the domain name and extension of your choice. If your site is not HTTPS, use http at the beginning of the URL.
Save the file and refresh your site to make sure the change has been made.
When all is well, finish by deleting the piece of code added to your functions.php file.
Note: This method is actually similar to the first one. The only difference is that the values are updated through the code instead of through the administration.
Method 4: Change the WordPress URL in the database
Let’s continue our discussion of methods with option number 4 for changing the URL of a WordPress site: editing your database.
Here again, the operation is perilous. The slightest syntax or typing error will crash your site.
So make sure you back up your site, and only do this if you feel comfortable with phpMyAdmin.
This is the web application I will use in the following lines. phpMyAdmin is used to manage your database.
You can find this software on the online managers (ex: cPanel or Plesk) offered by the different hosts on the market.
Here is the step by step procedure.
Step 1: Access to phpMyAdmin
Connect to the interface proposed by your host. For the purpose of this tutorial, I will use cPanel, the administration interface offered by SiteGround (affiliate link).
On cPanel, click on “phpMyAdmin” in the “Databases” section:

Step 2: Locate the wp_options table
On the left side, select the database of your choice, then click on the wp_options table, which contains all the options of your site, those that are in the “Settings” menu of your WordPress administration:

If you’ve changed the prefix of your database tables, the table will start with something other than wp_. For example fhj78bd_options.
Step 3: Change the URL of your WordPress site
In the option_name column, locate the rows called “siteurl” (your site’s URL) and “home.”
Then, in the option_value column, double-click on your current domain name in the two lines (“siteurl” and “home”).
Finish by replacing the two old URLs with the new one, then save your changes so that they take effect:

Note: This method is also similar to the first one. This time, we go directly through the database instead of the WordPress administration.
Method 5: Modifying the WordPress URL with WP-CLI
In order to try to be as exhaustive as possible, I’ll finish by presenting you with a final method. Warning: this is the most technical of all.
If you’re not a developer or at least a very good WordPress technician, skip it. In any case, you’ll quickly understand: without a minimum of basic knowledge, what you’re going to read below will be Greek to you.
Method #5 consists in modifying the WordPress URL with the WP-CLI command line interface.
As stated on its official website, “WP-CLI is the command-line interface for WordPress. You can update plugins, configure multisite installations and much more, without using a web browser”.
If you feel up to using WP-CLI (or are used to using it), use the following commands to edit a URL:
wp option update home 'http://example.com'
wp option update siteurl 'http://example.com'
Same note as for the previous methods: replace “example.com” with your domain name.
Throughout these lines, we’ve focused on changing the main WordPress URL (simply put, your domain name). If you ever want to change the URL of the WordPress login page (e.g. yourwebsite.com/wp-login.php or yourwebsite.com/wp-admin), use a dedicated plugin like WPS Hide Login. Some general security plugins (eg: Solid Security, formerly known as iThemes Security) also offer this option.
What to do after a URL change on WordPress
Whatever method you choose, you should have succeeded in changing the URL of your WordPress site.
However, make sure that the URLs (images and links) in your content have been updated with search and replace (as we saw in method #1).
Then, there is one more technical detail to take care of in order to do things the right way.
Even though your main URL has been changed, some visitors will still want to access your site via the old URL.
In this case, they will land on a 404 error page, which is not a good look. This is bad for the user experience, but also for the search engines, which don’t like it.
It’s therefore important that you set up a 301 redirect from the old URL to the new one.
To do this, you can either:
- Use the interface offered by your host. cPanel, for example, allows you to perform redirections.
- Make a redirection in an
.htaccessfile. We explain all about this in our dedicated article.

Conclusion
You have just learned 5 methods to change the URL of a WordPress site. To summarize, you now know how to do this operation:
- From the WordPress administration interface
- In the
wp-config.phpfile - In the
functions.phpfile - With phpMyAdmin
- In command line with WP-CLI
Ideally, you should use a search and replace to have everything updated automatically. This will save you unnecessary worries.
Always remember to back up your site before taking action and don’t forget to redirect your old domain name to the new one afterwards. This is essential in order to not penalize your SEO actions.
Do you have any feedback to share with WPMarmite readers after changing your URL? Or do you have any tips or best practices to suggest? Tell us all about it in the comments area.

Receive the next posts for free and access exclusive resources. More than 20,000 people have done it, why not you?
Register

BSR
dry run: only for testing. no change in the database so it wont be change the urls.
“if checked, no changes will be made to the database allowing you to check the results beforehand”